1
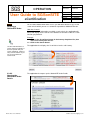
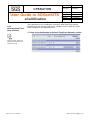
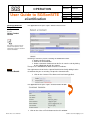
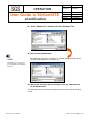
OPERATION
User Guide to SGSonSITE
eCertification
Type:
Document
Reference:
P-OPS.08
Issue n°:
Issue date:
Author:
Approver:
Page n°:
3
07.06.2012
Eleonor Tolete
L. REFRAN
1 of 45
SGSonSITE User Guide
eCertificate
Version 3.0
Back Office User’s Manual
eCertificate
E.Tolete
OPERATION
User Guide to SGSonSITE
eCertification
Type:
Document
Reference:
P-OPS.08
Issue n°:
Issue date:
Author:
Approver:
Page n°:
3
29.05.2012
E. TOLETE
L. REFRAN
2 of 47
What is SGSonSITE?
SGSonSITE provides a platform for issuing electronic certificates and reports (eCertificates and
eReports, or collectively, eDocuments), which are then accessible, downloadable, and printable by
authorized clients. The eDocument platform provides more efficient and economical distribution of
documents and expedites the trade transaction. It serves as a repository of both eReports and
eCertificates that can be accessed by clients quickly and securely.
SGSonSITE is widely used by most, if not all, in SGS Business Lines and is accessible at the
following URL: http://www.sgs.com/en/Our-Company/Online-Services.aspx
Using this User’s
Guide
This user’s guide includes task related information to help you use
SGSonSITE as easy as possible.
1.1
Tips, Notes and
Cautions
This manual uses tips, notes and cautions shown in the left margin and is
easy to recognize.
Information to make
the task easier
Important information
about the current topic
Warns you of potential problems
or concerns
1.2
Screen
Captures
This guide includes the actual screen shots of all the pages of SGSonSITE.
The intention is to help you familiarize with all the pages just like navigating
the web site.
1.3
Moving through
SGSonSITE
Moving through the SGSonSITE is like moving through any other Windows
program. You can use your mouse to point and click or you can use the Tab
key to move from field to field.
Moving from field to field using the Tab Key is only possible if you are using an
Internet Explorer Browser
1.4
Contacting
Back office User’s Manual
If you need help and this User Guide has not provided an answer to your
query, you may contact the SGSonSITE Support Team:
email: [email protected]
OPERATION
User Guide to SGSonSITE
eCertification
Type:
Document
Reference:
P-OPS.08
Issue n°:
Issue date:
Author:
Approver:
Page n°:
3
29.05.2012
E. TOLETE
L. REFRAN
3 of 47
SGSonSITE
Support Team
Email:
Phone:
Email:
Customer Care Representatives
[email protected]
(632) 755 7417
24/7 service from Monday to Sunday
Project Manager
[email protected]
Business Analyst
[email protected]
Back office User’s Manual
Phone:
(63 2) 755.7428 / +63 9175587031
Web:
www.sgsonsite.sgs.com
email: [email protected]
OPERATION
User Guide to SGSonSITE
eCertification
Type:
Document
Reference:
P-OPS.08
Issue n°:
Issue date:
Author:
Approver:
Page n°:
3
29.05.2012
E. TOLETE
L. REFRAN
4 of 47
Introducing eCertificates
2.1
Background
Agri has developed a solution, eCertificate or e-Cert that allows recipients of
an electronic version of Agri’s final reports (Certificates) to verify via the Web
that the eCertificate has indeed been issued by SGS and that it is identical to
the report originally issued by SGS.
For various reasons, notably of security, performance and homogeneity, Agri
has decided to try and leverage SGSonSITE, the Web Front-Office system of
SGS, for its eCertificate solution. After investigation of various options, it was
decided that migrating the eCertificate solution from its current technology to
SGSonSITE’s was the best option. This migration has recently become quite
critical for Agri. Although these authentication capabilities are especially
important in the case of Agri where the eCertificate is used by banks to
release funds, the authentication of eReports is of interest to all SGS sectors.
Originally for Agri, SGSonSITE is now widely used across business sectors
for both eCertificates and ereports.
The current structure of SGS, consisting of 10 business segments operating across
10 geographical regions, was formed in 2001. From our beginnings in 1878 as a
grain inspection house, we have steadily grown into our role as the industry leader.
We have done this through continual improvement and innovation and through
supporting our customers’ operations by reducing risk and improving productivity.
2.2
eCertification
Process
Back office User’s Manual
eCertification through Workflow. This is the type of eCertification
where eCertificates will be created by SGS using templates in the
application. After the approval (if necessary), the approved certificates
then will be sent to the External Parties. This process of eCertification is
used by AGRI, COTTON, CTS, SSC, OGC, Industrial and MINERALS
Business Lines.
email: [email protected]
OPERATION
User Guide to SGSonSITE
eCertification
2.3
Role
Description
Type:
Document
Reference:
P-OPS.08
Issue n°:
Issue date:
Author:
Approver:
Page n°:
3
29.05.2012
E. TOLETE
L. REFRAN
5 of 47
Roles are assigned to SGS staff, users or clients who are directly or
indirectly involved in the eCertification process.
The table below shows Roles Description:
Back office User’s Manual
Creator
A SGS User who creates or amends the draft
Certificate.
Final Approver
An approver who approves or amends the
Certificate. Users having this role are the only
ones that can Cancel an eCertificates.
Principal
An external party contact that is notified once
an eReport has been eCertified.
Third Party Contact
An external party contact that is notified once
an eReport/eCertificate has been eCertified.
Draft Third Party
Contact
An external party contact that is indirectly
involved in the draft certificate revision cycles.
Final Third Party
Contact
An external party contact that is notified once
an eReport/eCertificate has been eCertified.
email: [email protected]
OPERATION
User Guide to SGSonSITE
eCertification
Type:
Document
Reference:
P-OPS.08
Issue n°:
Issue date:
Author:
Approver:
Page n°:
3
29.05.2012
E. TOLETE
L. REFRAN
6 of 47
eCertification
eCertification is now used by Agri, Minerals, CTS, IND, SSC, COTTON
and OGC Sectors. This is when the Sector’s Final Reports (Certificates)
are created on SGSonSITE ePlatform to become an eCertificate. This
eCertificate will be sent to the external party contacts and allows them to
eAuthenticate it at the ePlatform at anytime.
3.1
Access
Rights
Individual roles with different access rights are assigned to an SGS User
that is involved in the eCertification process. eCertification through
workflow will require 2 different users (below) in order to complete the
process.
1 user having the Creator Role
1 user having the Approver role
This is in compliance with the requirements of Internal Audit that there
should be a Creator and an Approver function only.
Users who have the Approver role can still create the eCertificates.
HOWEVER they need to request another Approver to approve their Draft
eCertificates to Final as an Approver. (as per SGSonSITE version 3.1)
3.1.1
SGS Creator creates
Draft eCertificate
If the creation of the eCertificate is initiated by the SGS Creator, the
created draft eCertificate would need an approval from Final Approver,
before the eCertificate becomes a final approved eCertificate.
There are two (2) possible scenarios to process an eCertificate.
3.1.1.1
eCertificate requires
approval from the
Approver
Activity
Status
1.1 SGS Creator creates draft eCertificate.
Draft Created
1.2 Creator requests Final approval for
Draft Created
1.3 Approver approves eCertificate
1.4 Approver then sends the eCertificate
Final Approval Requested
Final Approved
Final Sent
In this scenario a Creator and an
assigned Approver processes the
eCertificate
Back office User’s Manual
email: [email protected]
OPERATION
User Guide to SGSonSITE
eCertification
3.1.1.2
Two Approvers process
the eCertificate
Type:
Document
Reference:
P-OPS.08
Issue n°:
Issue date:
Author:
Approver:
Page n°:
Activity
Status
2.1 Approver A creates draft
eCertificate
2.2 Approver A requests final approval
for the Draft created from Approver B
Draft Created
Final Approval Requested
2.3 Approver B approves the
eCertificate
In this scenario two Approvers
(Approver A and B) processes
the eCertificate. One acting as
the creator and the other as an
approver and vice versa.
3
29.05.2012
E. TOLETE
L. REFRAN
7 of 47
2.4 Approver B then finalizes the Draft
to Final eCertificate
Final Approved
Final Sent.
* If Approver B creates the eCertificate, Approver A can approve and finalize the
eCertificate to Final.
3.2
Getting Started
SGSonSITE uses 2 URL for all Business Sectors,
https://sgsonsite.sgs.net/en/brochureware/sgsonsite.nsf/pages/main.jsp
(INTERNAL LINK)
https://sgsonsite.sgs.com/en/brochureware/sgsonsite.nsf/pages/main.jsp
(EXTERNAL LINK FOR SGS Users only)
3.2.1
Starting it…
Right!
Back office User’s Manual
1. From your PC’s desktop double click on the Internet Browser
Icon.
email: [email protected]
OPERATION
User Guide to SGSonSITE
eCertification
Type:
Document
Reference:
P-OPS.08
Issue n°:
Issue date:
Author:
Approver:
Page n°:
3
29.05.2012
E. TOLETE
L. REFRAN
8 of 47
2. Type the URL in the address bar.
3. Then choose the Business Sector
The application then
displays the
SGSonSITE Back
Office Log-In Page.
User name and
password fields
Back office User’s Manual
email: [email protected]
OPERATION
User Guide to SGSonSITE
eCertification
3.2.2
Logging-In
Type:
Document
Reference:
P-OPS.08
Issue n°:
Issue date:
Author:
Approver:
Page n°:
3
29.05.2012
E. TOLETE
L. REFRAN
9 of 47
4. Type in your User Name and Password in their appropriate
fields.
5. Click on the Login button.
6. The application then will take you to the SGSonSITE Back Office
Staff Entry Point Page.
The Back Office
Staff Entry Point Page
Sample Home Page Display:
All SGS Users have the
same entry point page.
Although some of the
functionality may not be
available to some users
because of Access Rights.
Back office User’s Manual
email: [email protected]
OPERATION
User Guide to SGSonSITE
eCertification
3.3
Creating a
Draft Certificate
Document
Reference:
P-OPS.08
Issue n°:
Issue date:
Author:
Approver:
Page n°:
3
29.05.2012
E. TOLETE
L. REFRAN
10 of 47
In order to create a draft certificate, the following attributes must be specified
(mandatory information).
Creating a Draft
Certificate
Type:
The Office for the Draft Template should be equal to the Office for the Final
Template: selecting the SGS Location for the Draft/Final Template means
selecting the template to be used when merging the different information
related to the draft eCertificate. Each SGS Location that can be selected at
this stage has a unique Draft/Final Template and must be visible to the
Creator using SGSonSITE’s visibility rules.
The Issue Date
The Principal Contact
The eFindings: this is the document that contains the findings of the
certificate.
Associated to the Draft eCertificate there is another set of information that the
Creator may provide:
The References: the local document number, the sales file number, the
execution file number, the SGSonSITE order number, the customer
reference, other references (eg. vessel)
The Draft Third Party Contacts
Draft Notification with attachment flag.
The Final Third Party Contacts
Final Notification with attachment flag
If you think that you have all the mandatory information for the eCertificate, then
you are now ready to create your Draft eCertificate.
3.3.1
Accessing the
Create Draft Screen
Back office User’s Manual
7. From the back office entry page, the CREATOR will click on the
eCertification through Workflow hyperlink.
email: [email protected]
OPERATION
User Guide to SGSonSITE
eCertification
Type:
Document
Reference:
P-OPS.08
Issue n°:
Issue date:
Author:
Approver:
Page n°:
3
29.05.2012
E. TOLETE
L. REFRAN
11 of 47
(The application then
opens up the Create
Draft Screen.)
Back office User’s Manual
email: [email protected]
OPERATION
User Guide to SGSonSITE
eCertification
Type:
Document
Reference:
P-OPS.08
Issue n°:
Issue date:
Author:
Approver:
Page n°:
3
29.05.2012
E. TOLETE
L. REFRAN
12 of 47
8. Select the Office for Draft Template by clicking on the arrow down
button in the Office for Draft Template drop down list. Then select
the Office from the list.
If the Office for Draft and Final
Template that you needed are not
available on the list, ask the
administrator to upgrade your
office visibility rights.
9. Consequently the Office for Final Template will adjust accordingly
to match the Office for Draft Template.
10. Specify the Issue Date by selecting the day, month and the year
from the Issue Date drop down list boxes.
3.3.2
Linking the
eCertificate to a
SGSonSITE Order
If the eCertificate needs to be linked to an SGSonSITE Order:
11. Click on the Select button beside the SGSonSITE order field.
This function will automatically
fill in the Principal Contact
Information.
The application then opens up the Select SGSonSITE Order screen.
THIS FUNCTIONALITY
IS OPTIONAL
This screen is used to look for a
SGSonSITE Order that we want to
LINK to the eCertificate. However,
only one Order can be selected.
Back office User’s Manual
email: [email protected]
OPERATION
User Guide to SGSonSITE
eCertification
3.3.2.1
Selecting a
SGSonSITE Order
Type:
Document
Reference:
P-OPS.08
Issue n°:
Issue date:
Author:
Approver:
Page n°:
3
29.05.2012
E. TOLETE
L. REFRAN
13 of 47
On the Select SGSonSITE Order screen, you will notice that there are several
search criteria which you can use to look for a particulate SGSonSITE order.
How does it work?
By supplying single information or multiple search criteria, the application will
locate and display all the records in the database that matches with the search
criterion you provided.
Example:
1.1 Click on the Arrow Down button in the Country drop down list, then
select one country from the list.
1.2 Click on the Search button.
Use the Order Number as a
search criteria if available, to
be more specific with your
search. Otherwise, supply as
many search criterion as you
can to narrow down the
search result.
3.3.2.2
Opening the
SGSonSITE Order
Details
Back office User’s Manual
The application then displays the list of Orders for the said Country.
The application then opens up the SGSonSITE Order Details
email: [email protected]
OPERATION
User Guide to SGSonSITE
eCertification
Type:
Document
Reference:
P-OPS.08
Issue n°:
Issue date:
Author:
Approver:
Page n°:
3
29.05.2012
E. TOLETE
L. REFRAN
14 of 47
2.1 Close the SGSonSITE Order Details window by clicking on the close
button. The application then goes back to the Select SGSonSITE Order
screen.
2.2 Close the SGSonSITE Order Details window by clicking on the close
button. The application then goes back to the Select SGSonSITE Order
screen.
3.3.2.3.
Selecting
SGSonSITE Order
12. Position the mouse pointer on the radio button beside the
SGSonSITE Order where you want to link the eCertificate, click on
the left mouse button once to select the order.
13. Click on the Add button.
The application then closes the Select SGSonSITE Order screen and returns to
the Create Draft screen.
Enter the following information if available:
14. Customer Name
15. Other Reference (e.g. Vessel)
Notice that the Principal Contact
information is now filled with the
Contact information from the
SGSonSITE Order you selected.
Back office User’s Manual
16. Local Document Number
email: [email protected]
OPERATION
User Guide to SGSonSITE
eCertification
3.3.3
Selecting Draft Third
Party Contacts
Type:
Document
Reference:
P-OPS.08
Issue n°:
Issue date:
Author:
Approver:
Page n°:
3
29.05.2012
E. TOLETE
L. REFRAN
15 of 47
You might want to send a notification email to the Draft Third Party Contacts
informing them that a Draft eCertificate is available and even attach the actual
Draft eCertificate in the notification email.
17. Click on the Add button in the Draft Third Party Contacts section.
Same procedure applies if the
Principal Contact needs to be
selected manually.
Back office User’s Manual
email: [email protected]
OPERATION
User Guide to SGSonSITE
eCertification
Selecting External
Party Contacts
Type:
Document
Reference:
P-OPS.08
Issue n°:
Issue date:
Author:
Approver:
Page n°:
3
29.05.2012
E. TOLETE
L. REFRAN
16 of 47
The application then opens up the Select Contact screen.
3.3.3.1
Select Contact
Screen
This screen is used to look for
Contact of Companies and to
select them in order to add them
into the eCertificate.
Selecting a Contact is just like selecting an SGSonSITE Order.
Supply a Search Criteria
Click on the Search button
Select a Contact or Contacts from the list of search results by ticking
on the radio button beside the Contact
Then press the Add button to add them to the eCertificate.
3.3.3.2
Contact Details
You might want to view first the Contact Details before finally adding it to the
eCertificate that you are creating. To open the Contact details;
Click on the Contact’s First Name and Last Name hyperlink.
The application then opens up the Contact Details window.
Click on the Close or Finish button to close this window.
Back office User’s Manual
email: [email protected]
OPERATION
User Guide to SGSonSITE
eCertification
3.3.3.3
Company Details
Type:
Document
Reference:
P-OPS.08
Issue n°:
Issue date:
Author:
Approver:
Page n°:
3
29.05.2012
E. TOLETE
L. REFRAN
17 of 47
You might also want to view first the Company Details of the Contact before finally
adding it to the eCertificate that you are creating. To open the Company details;
Click on the Company Name hyperlink.
To avoid confusion, do not forget
to close all the window that pops
up every time you are viewing the
other details.
The application then opens up the Company Details screen.
Close the Company Details screen.
What if the External Party Contacts for the eCertificate you are creating are not yet
stored in the database?
Click on the Create Company button.
NOTE: you can only create a Company when your role allows you to otherwise,
please contact [email protected] for information
The application opens up the Create Company screen.
Create the company on this window including the contacts (see section __ to
create a company)
Close this window to return to the Select Contact screen.
Then select Contact.
Back office User’s Manual
email: [email protected]
OPERATION
User Guide to SGSonSITE
eCertification
3.3.3.4
Selecting External
Party Contacts…
Type:
Document
Reference:
P-OPS.08
Issue n°:
Issue date:
Author:
Approver:
Page n°:
3
29.05.2012
E. TOLETE
L. REFRAN
18 of 47
18. From the List of Search Results in the Select Contact screen,
select the Contact or Contacts then press the Add button.
The application then closes the Select Contact screen and returns to the
Create Draft Screen. The selected contact/s is already added in the form.
You can always delete the
Contacts by pressing the delete
button beside the Contact Name
19. Select the YES radio button in the Notification with Attachment
Section (draft) if you want to attach the Draft eCertificate in the
Notification email to be sent to the Draft External Party
Contact/s. Otherwise, select No.
You might also want to send a notification email to the Final Third Party
Contacts informing them that the Final eCertificate is available and even
attach the actual eCertificate in the notification email. To do this;
Click on the Copy from Draft
button if the Draft Third Party
Contact is the SAME as the Final
Third Party Contact or Contacts.
20. Click on the Add button in the Final Third Party Contact Section
then same procedure applies like adding a Draft Third Party
Contact.
*You may use the Downloadable eFinding template
*The eCertificate Best Practices guide may also be downloaded from the
system
3.3.4
Upload eFindings
Screen
21. Click on the Upload button in the eFindings section.
The application then opens up the Upload eFindings screen
This screen is used to
upload eFindings and to
attach it to the eCertificate
Click on “Browse”.
Back office User’s Manual
email: [email protected]
OPERATION
User Guide to SGSonSITE
eCertification
Type:
Document
Reference:
P-OPS.08
Issue n°:
Issue date:
Author:
Approver:
Page n°:
3
29.05.2012
E. TOLETE
L. REFRAN
19 of 47
22. At the “Choose File” window, enter the eFindings Title.
23. Click on the Upload button
The application then opens up a Browser window asking you to specify the
file name and location of the eFindings file.
Only MS Word type of document
can be uploaded as eFindings as
of now using Word 97- 2003 Word
Document.
24. Specify the file name and the location of the file, and then click
on the Open button.
The application closes the Browser window and returns to the Upload eFindings
screen.
Back office User’s Manual
email: [email protected]
OPERATION
User Guide to SGSonSITE
eCertification
Type:
Document
Reference:
P-OPS.08
Issue n°:
Issue date:
Author:
Approver:
Page n°:
3
29.05.2012
E. TOLETE
L. REFRAN
20 of 47
25. Click on the Submit button.
The application then closes the Upload eFindings screen and returns to the
Create Draft screen.
Clicking on the Submit button
means Creating and Storing the
Draft eCertificate to the ePlatform.
Review the information in the Created Draft…… then from the Create Draft
screen…..
26. Click on the Submit button.
CONGRATULATIONS!
You have just created a Draft eCertificate!
Back office User’s Manual
email: [email protected]
OPERATION
User Guide to SGSonSITE
eCertification
3.4
eCertificate Details
Screen
Back office User’s Manual
Type:
Document
Reference:
P-OPS.08
Issue n°:
Issue date:
Author:
Approver:
Page n°:
3
29.05.2012
E. TOLETE
L. REFRAN
21 of 47
The application then closes the Create Draft screen and opens up the
eCertificate Details screen.
*This is a sample eCertificate Details page screen
email: [email protected]
OPERATION
User Guide to SGSonSITE
eCertification
Type:
Document
Reference:
P-OPS.08
Issue n°:
Issue date:
Author:
Approver:
Page n°:
3
29.05.2012
E. TOLETE
L. REFRAN
22 of 47
Click on this button if you want to Create a New
Draft. The application will close this details
screen and opens up a blank Create Draft form.
What Now?
Click on this button if you want to open a
window to create a new eCertificate and pre-fill
the information with the one of the current
eCertificate.
Click on this button if you want to modify the
details of the Created Draft eCertificate.
……or
NO! I don’t want to do anything but to finalize this Draft Created eCertificate!
See next page to continue working with your Draft Created eCertificate.
Back office User’s Manual
email: [email protected]
OPERATION
User Guide to SGSonSITE
eCertification
3.5
Requesting
Approvals
Type:
Document
Reference:
P-OPS.08
Issue n°:
Issue date:
Author:
Approver:
Page n°:
3
29.05.2012
E. TOLETE
L. REFRAN
23 of 47
As discussed in the earlier section of this manual (page 8), there
possible scenarios that might take place in order to Finalize
eCertificate. Let’s assume that the User who initiated the creation of
Draft eCertificate is a Creator and the created draft would require
approval from an Approver.
are
an
this
the
Thus, the following actors will be involved:
Back office User’s Manual
Creator
The one who Created the Draft.
Approver
The one who will approve the Draft
eCertificate and process this to
Final eCertificate.
email: [email protected]
OPERATION
User Guide to SGSonSITE
eCertification
3.6
Requesting an
Approval
Type:
Document
Reference:
P-OPS.08
Issue n°:
Issue date:
Author:
Approver:
Page n°:
3
29.05.2012
E. TOLETE
L. REFRAN
24 of 47
1. Click on the Request Final Approval button.
The application then opens up
the Request Final Approval screen.
Requesting for a Final Approval is
only possible if the status of your
eCertificate is Draft Created or
Draft Amended.
2. Select the an Approver from the dropdown list.
What if the supposed Approver is not included in the list?
2.1 Click on the Other button. The application then opens the Select
Approver screen.
2.2 Enter the Approver Name or select the Office from the dropdown list then
click on the Search button.
2.3 From the list of search results, Select the approver by ticking on the radio
button beside the Approver name then click on the Select button. The
application then closes the Select Approver screen and returns to the
Final Approval Request screen.
Back office User’s Manual
email: [email protected]
OPERATION
User Guide to SGSonSITE
eCertification
Type:
Document
Reference:
P-OPS.08
Issue n°:
Issue date:
Author:
Approver:
Page n°:
3
29.05.2012
E. TOLETE
L. REFRAN
25 of 47
Requesting an Approval
3. You may also enter some Comments in the Comment field.
4. Click on the Submit button.
5. Click on the Finish button, and then close the browser.
Clicking on the Submit
button means sending the
Final Approval Request to
the selected Approver.
Back office User’s Manual
The status of your eCertificate now becomes Final Approval
Requested.
email: [email protected]
OPERATION
User Guide to SGSonSITE
eCertification
Type:
Document
Reference:
P-OPS.08
Issue n°:
Issue date:
Author:
Approver:
Page n°:
3
29.05.2012
E. TOLETE
L. REFRAN
26 of 47
* Notice that some
buttons disappeared from
the Creator’s view.
The things you CAN
do during Draft
Created or Draft
Amended status will
NO LONGER be
present after clicking
the Request Final
Approval Button:
• Send Draft
• Cancel
eCertificate
Back office User’s Manual
email: [email protected]
OPERATION
User Guide to SGSonSITE
eCertification
Type:
Document
Reference:
P-OPS.08
Issue n°:
Issue date:
Author:
Approver:
Page n°:
3
29.05.2012
E. TOLETE
L. REFRAN
27 of 47
After submitting your Final Approval Request, the application will send a notification
So… email to the Approver whom you specified. Wait for the notification email that will be
What’s next? sent to your mailbox once the Approver approves or disapproves your Created Draft
eCertificate.
-MOREOVER , SEE NEXT PAGE PLEASE-
Back office User’s Manual
email: [email protected]
OPERATION
User Guide to SGSonSITE
eCertification
Type:
Document
Reference:
P-OPS.08
Issue n°:
Issue date:
Author:
Approver:
Page n°:
3
29.05.2012
E. TOLETE
L. REFRAN
28 of 47
Click on your eCertificate number hyperlink to open up the details.
The application then opens up the eCertificate Details screen. This screen is
the same screen that opens up after submitting your Created Draft eCertificate
(see page 23).
Notice that the Status of your eCertificate has changed. The eCertificate
status’ now may be:
Final Approved or
Final Rejected
The QuickSearch
Functionality
Of course, depending on the result of the investigation of your Approver.
The Quick Search functionality for “eCertificate Reference” is another efficient
way to search/list an eCertificate. This is found on My SGSonSITE Staff
Homepage. User can be able to search an eCertificate number by entering
any of the details found on the “References” (eCertificate Detail Page).
This functionality is
only available in SGS
Agricultural Services
Backoffice.
Back office User’s Manual
email: [email protected]
1. Enter a data on the e eCertificate Reference field. Click on the
Search button.
OPERATION
User Guide to SGSonSITE
eCertification
Type:
Document
Reference:
P-OPS.08
Issue n°:
Issue date:
Author:
Approver:
Page n°:
3
29.05.2012
E. TOLETE
L. REFRAN
29 of 47
The application then opens up the List/Search eCertificate screen showing a
list of eCertificates that matches the data you entered on the eCertificate
Reference. This is the same screen that opens up after searching your
Created Draft eCertificate (see page 25).
Or the traditional way…
Back office User’s Manual
1. On your Homepage, please look for the link Search eCertificate under the
Search and Create box.
email: [email protected]
OPERATION
User Guide to SGSonSITE
eCertification
Type:
Document
Reference:
P-OPS.08
Issue n°:
Issue date:
Author:
Approver:
Page n°:
3
29.05.2012
E. TOLETE
L. REFRAN
30 of 47
2. You will then see the List Search eCertificates Page. Here, you may use
different fields to search for your eCertificate. The most commonly used fields
are the eCertificate Number field, eCertificate Status, and…
…the My eCertificates button. (This button will automatically display
all eCertificates waiting for your action)
Note: When searching, make sure the range of the Date created start and
end is correct.
Back office User’s Manual
email: [email protected]
OPERATION
User Guide to SGSonSITE
eCertification
3.7
Amending an
eCertificate
Type:
Document
Reference:
P-OPS.08
Issue n°:
Issue date:
Author:
Approver:
Page n°:
3
29.05.2012
E. TOLETE
L. REFRAN
31 of 47
1. Click on the Amend button.
The application then opens up the Amend eCertificate Screen. Notice that
almost all of the fields are editable except for the eCertificate Number and the
eCertificate Status.
If the Uploaded eFindings file needs to be amended.
1.1 Click on the Download eFindings link.
1.2 The application will open up a window asking you to specify the file
name and the location where you want to save the eFindings. Specify
the file name and the location then click on the Submit button. The
application then saves the eFindings file in the specified location.
1.3 Open and modify the downloaded eFindings file. Save and close the
file.
Do not forget to SAVE the
modications you made in the
downloaded eFindings file and do
not forget to UPLOAD it back to
the eCertificate. Otherwise, the old
eFindings file will be retained in
the system.
1.4 Click on the Upload button in the eFindings section.
1.5 The application then opens up the Upload eFindings screen. Specify
the file name and the location of the file to be uploaded.
1.6 Click on the Submit button.
2. Modify whatever needs to be modified.
3. Click on the Submit button.
`The application then closes the Amend eCertificate screen then returns to the
eCertificate Details screen. Notice that the status of the eCertificate becomes
DRAFT AMENDED.
4. Send a Final Approval Request.
Back office User’s Manual
email: [email protected]
OPERATION
User Guide to SGSonSITE
eCertification
3.8
Creating a
Draft eCertificate by
Batch
Type:
Document
Reference:
P-OPS.08
Issue n°:
Issue date:
Author:
Approver:
Page n°:
3
29.05.2012
E. TOLETE
L. REFRAN
32 of 47
In the previous section, what we did is we created a single Draft
eCertificate for a Customer. In some instances, you may want to create
multiple eCertificates for a single customer in one shot. Actually, the
application will allow you to do this but you must be certain that all the
information in the eCertificates will have the same information except for
the eFindings Title and the eFindings itself.
What does it mean?
Take a look at the example below, you will notice that in this Confirmation
Page we created multiple eCertificates for this Customer. This would mean
that ALL of the created eCertificates will be sent to the indicated Principal
Contact, to the Draft Third Party Contacts with the Draft eCertificate
attached and to the Final Third Party Contacts with the Final eCertificate
attached. And of course all the eCertificates will have all the other
information as indicated in the form including the SGS Office templates to
be used.
Therefore, do not include the eCertificate in your batch creation that may
have a different information or condition from the rest.
Back office User’s Manual
email: [email protected]
OPERATION
User Guide to SGSonSITE
eCertification
Creating a Draft
eCertificate by Batch
Type:
Document
Reference:
P-OPS.08
Issue n°:
Issue date:
Author:
Approver:
Page n°:
3
29.05.2012
E. TOLETE
L. REFRAN
33 of 47
1. From the SGSonSITE Back Office Entry Page, click on the
eCertification through Workflow hyperlink.
The application then opens up the Create Draft screen.
2. Enter all the information in the form, select the Draft and Final
Offices, External Party Contacts etc…
3. Click on the Upload button in the eFindings section.
The application then opens up the Upload eFindings window.
4. Enter the eFindings Title then click on the Upload button.
The application then opens up the Browser window.
5. Specify the file name and the location of the eFindings to be
uploaded, and then click on the Add button.
The application then closes the Browser window and returns to the Upload
eFindings window.
6. Click on the Add button to upload the eFindings file.
The application then closes the Upload eFindings window and returns to the
Create Draft screen.
Notice that the uploaded
eFindings file is added in the
eCertificate form.
Now, repeat steps 3 to 6 until you uploaded all your eFindings that needs to
be eCertified.
After uploading all the eFindings to be eCertified,
7. Click on the Submit button.
The application then displays the Batch Draft Confirmation Page.
In this example, you will notice that
all the eFindings that needs to be
eCertified have their own unique
eCertificate number. All of these
Draft eCertificates will have the
same information except for the
eFindings Title and the eFindings
itself. All of these eCertificates will
have a status of Draft Created.
Back office User’s Manual
email: [email protected]
OPERATION
User Guide to SGSonSITE
eCertification
3.9
Requesting Approval
by Batch
Type:
Document
Reference:
P-OPS.08
Issue n°:
Issue date:
Author:
Approver:
Page n°:
3
29.05.2012
E. TOLETE
L. REFRAN
34 of 47
Again, in some instances, you may want to Request a Final Approval for
all your Draft Created eCertificates or Draft Amended eCertificates to a
single Approver in one shot. You can also do this, but then again, all the
information must be the same including the eCertificate’s statuses.
The following are the conditions that must be satisfied in order for you to
be allowed by the application to Request a Draft of Final Approval by
Batch:
All the information of the selected eCertificates are the same,
except for the eFindings title and the eFindings itself.
All the selected eCertificates should have the same status.
Let’s proceed… 1. From the Back Office Entry Point Page, click on the List/Search
eCertificate hyperlink.
The application then opens up the
List/Search eCertificate screen.
.
Back office User’s Manual
email: [email protected]
OPERATION
User Guide to SGSonSITE
eCertification
Requesting Approval
by Batch
Type:
Document
Reference:
P-OPS.08
Issue n°:
Issue date:
Author:
Approver:
Page n°:
3
29.05.2012
E. TOLETE
L. REFRAN
35 of 47
2. Click on the My eCertificates button.
The application then lists down all the eCertificates you have created.
The My eCertificate function will
also list you down all the
eCertificates, regardless of status,
in which you are involved with.
Back office User’s Manual
email: [email protected]
OPERATION
User Guide to SGSonSITE
eCertification
Type:
Document
Reference:
P-OPS.08
Issue n°:
Issue date:
Author:
Approver:
Page n°:
3
29.05.2012
E. TOLETE
L. REFRAN
36 of 47
3. From this list, select all the eCertificates that should be approved by
batch, by ticking on the radio button beside the eCertificate number.
If you are certain that all of the eCertificates that you selected satisfies the
application’s conditions and you are certain that the request for approval for all
the eCertificates you selected will be sent to a single approver, then,
depending on what kind of approval you are requesting.
4. Click on the Request Final Approval by Batch
The application then opens up the Request for Final Approval window.
5. Identify the Approver.
6. Click on the Submit button.
The application then displays the Request Confirmation by Batch window. Then
sends a Request for Approval notification email to the specified Approver.
The status of all the selected eCertificates becomes Final Approval
Requested.
Back office User’s Manual
email: [email protected]
OPERATION
User Guide to SGSonSITE
eCertification
Type:
Document
Reference:
P-OPS.08
Issue n°:
Issue date:
Author:
Approver:
Page n°:
3
29.05.2012
E. TOLETE
L. REFRAN
37 of 47
The application will also allow you to send eCertificates to External Parties
3.10
Sending eCertificates by Batch.
by Batch
The following are the conditions that must be satisfied in order for you to
be allowed by the application to send the eCertificates to the External
Parties by Batch.
All the information of the selected eCertificates is the same, except for
the eFindings title and the eFindings itself.
Sending eCertificates with
Amended, Requested, Rejected or
Cancelled status is not allowed by
the application.
Let’s proceed…
All the selected eCertificates should have the same status.
If sending Final eCertificates by Batch, the status of all the
eCertificates should be All Final Approved or All Final Sent.
1. From the Back Office Entry Point Page, click on the List/Search
eCertificate hyperlink.
The application then opens up the List/Search eCertificate screen.
2. Click on the My eCertificates button.
Back office User’s Manual
email: [email protected]
OPERATION
User Guide to SGSonSITE
eCertification
Type:
Document
Reference:
P-OPS.08
Issue n°:
Issue date:
Author:
Approver:
Page n°:
3
29.05.2012
E. TOLETE
L. REFRAN
38 of 47
The application then lists down all the eCertificates which you have
created.
3. From this list, select all the eCertificates that you want to send by
batch, by ticking on the radio button beside the eCertificate
number.
If you are certain that all of the eCertificates that you selected satisfies the
application’s conditions, then…
4. Click on the Send Final eCertificate by Batch button.
The application then displays the Send Final by Batch Confirmation Page.
All the selected eCertificates are sent to the External Party Contacts.
The status of all the selected eCertificates becomes Final Sent.
Back office User’s Manual
email: [email protected]
OPERATION
User Guide to SGSonSITE
eCertification
3.11
Process a Final
Approval Requested
eCertificate one at a
time.
You may view the Draft
eCertificate by clicking on the
View eCertificate button.
2.
You may also amend the
eCertificate by yourself
before approving the
eCertificate9. (see section 3.7
for amending eCertificate).
Document
Reference:
P-OPS.08
Issue n°:
Issue date:
Author:
Approver:
Page n°:
3
29.05.2012
E. TOLETE
L. REFRAN
39 of 47
From the list of search results;
1.1 Click on the eCertificate Number hyperlink of the eCertificate that
you want to process.
The application then opens up
1.
Type:
the eCertificate Details screen.
1.2 Click on the Process Final button.
The application then opens up the Process Final window.
Clicking the Process
Final will both Approve
the Draft and Finalize
the Draft eCertificate.
Back office User’s Manual
email: [email protected]
OPERATION
User Guide to SGSonSITE
eCertification
Type:
Document
Reference:
P-OPS.08
Issue n°:
Issue date:
Author:
Approver:
Page n°:
3
29.05.2012
E. TOLETE
L. REFRAN
40 of 47
6. Upon clicking the Process Final button, the Approver will then see
the Final Approval page:
Here, the Approver can
Reject or Approve the
Draft eCertificate.
Working with Final
Approval Requested
eCertificates
There are two possible way to process a Final Approval Requested
eCertificate:
You may process the approval one at a time.
You may process the approval at one time.
Back office User’s Manual
email: [email protected]
OPERATION
User Guide to SGSonSITE
eCertification
Process Final Approval
eCertificate one at a
time.
Type:
Document
Reference:
P-OPS.08
Issue n°:
Issue date:
Author:
Approver:
Page n°:
3
29.05.2012
E. TOLETE
L. REFRAN
41 of 47
7. Select either Approve or Disapprove the eCertificate, by ticking on the
radio button beside the result.
8. Enter your Comments in the comment field.
9. Press the Submit button.
The application then closes the Process Final window and returns to the
eCertificate Details Screen.
Three (3) possible statuses of the eCertificate after this process:
If the Approver rejects the eCertificate, the status becomes Final
Rejected.
Back office User’s Manual
If the Approver approves the eCertificate, the status becomes Final
Approved. A Final Approved notification email is sent to the Creator of
the eCertificate.
Final Sent for final sending the Final Approved Certificates
email: [email protected]
OPERATION
User Guide to SGSonSITE
eCertification
3.12
Processing the
Final Approval
by Batch
Type:
Document
Reference:
P-OPS.08
Issue n°:
Issue date:
Author:
Approver:
Page n°:
3
29.05.2012
E. TOLETE
L. REFRAN
42 of 47
You may also process the Final Approval by batch.
The application will allow you to do this if the following conditions are
satisfied:
The status of ALL the eCertificates are Final Approval Requested.
All the information in the eCertificates are the same. Of course, except
the eFindings Title and the eFindings itself.
Let’s proceed…
1.1 From the Back Office Entry Point Page, click on the List/Search
eCertificate hyperlink.
The application then opens up the
List/Search eCertificate screen.
1.2 Click on the My eCertificates button.
Back office User’s Manual
email: [email protected]
OPERATION
User Guide to SGSonSITE
eCertification
Processing Final
Approval by Batch
Type:
Document
Reference:
P-OPS.08
Issue n°:
Issue date:
Author:
Approver:
Page n°:
3
29.05.2012
E. TOLETE
L. REFRAN
43 of 47
The application then lists down all the eCertificates in which you are involved with.
1.3 From this list, select all the eCertificates that you want to
Approve or Disapprove by batch, by ticking on the radio button
beside the eCertificate number.
If you are certain that all of the eCertificates that you selected satisfies the
application’s conditions, then…
1.4 Click on the Process Final by Batch button.
The application then opens up the Process Final window.
1.5 Select either Approve or Disapprove the eCertificate, by ticking
on the radio button beside the result.
1.6 Enter your Comments in the comment field.
1.7 Press the Submit button.
The application then closes the Process Final window and returns to the
List/Search eCertificate screen.
-End-
Back office User’s Manual
email: [email protected]


![取扱説明書 [F-03B] - Altehandys.de](http://vs1.manualzilla.com/store/data/006538124_2-9b53d14369fe3af8b4369d863b7cba7c-150x150.png)