1
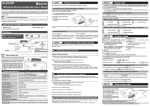
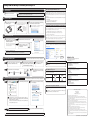
How to insert memory cards into the corresponding card slots Ensure the memory card is oriented correctly, and insert it straight into the correct memory card slot. • For the latest information on supported media, visit the official ELECOM website. http://www.elecom.co.jp/global/download/compatibility.html • This product is designed to continue supporting the latest media via firmware updates. Slot USB 2.0 Multi Type Card Reader MR-K009 series User's manual Forward 1 SD Memory Card SDHC Memory Card Slot Multimedia Card Reduced Size Multimedia Card RSMMC 2 Memory Stick Micro (M2) Usage Precautions Thank you for purchasing the MR-K009 Series USB 2.0 card reader. This user’s manual explains how to set up the product. Please thoroughly read this user’s manual before use, to ensure proper setup of the product. Safety Precautions • Always observe the cautions issued by PC and peripheral device manufacturers when connecting and disconnecting this product. • Do not attempt to disassemble, modify or repair this product by yourself. Doing so may cause a fire, electric shock, or product damage and may void the warranty. • Do not use this product or any PC to which this product is connected in areas where water is used or in very humid environments. Doing so may cause a fire, electric shock, or product damage. • When connecting and disconnecting this product, always touch a metal object (such as a steel desk or a metal door handle) to discharge static electricity before touching this product. Static electricity may damage this product. • If you suspect something is wrong with the product, discontinue use immediately. Specifications • OS .................................. Windows® 7(up to SP1), Windows Vista® (up to SP2), Windows® XP (SP1 to SP3), Windows® 2000 (SP4) Mac OS® X (10.2 to 10.6) In the above OSs, the drivers provided with the OSs can be used. • Interface.........................USB • Operating temperature ..0 to 40°C • Operating humidity ........0 to 80% • Dimensions ................... 38.5 (W) x 35.0 (D) x 12.0 (H) mm (Not including protruding parts) • Cable length ..................1.7 cm • Included items ............... Manual x1 • If the PC is started when a memory card is inserted in this product, a disk scan may be performed automatically, even if the PC had no previous abnormal termination errors. • If the PC is started when a memory card is inserted in this product, even if the device has been connected before, the "Found New Hardware" message may be displayed. • It may take a minute or so for this product to be recognised by the PC after it has been connected. Wait until you can operate the computer. • Certain types of media, including older media and media that uses special formats, may not be compatible with this product. • Before using media with digital cameras, mobile phones, or other devices, format it with the device that you use. It may not always be possible to use media that has been formatted using a PC. In such cases, media can be used by first formatting it on the device with which it is to be used. • This product does not support copyright protection. • Please follow the removal of this product, to the procedure "5 Disconnect the card reader from the PC ". There is a possibility the file disappearing. • ELECOM Co., Ltd. shall bear no responsibility whatsoever for any data loss or damage resulting from the use of this product. • Always insert and remove media from this product with the correct orientation and alignment. • This product does not support standby or sleep modes. • This product does not support modem cards or similar I/O cards. • Do not use this product in humid or dusty environments. • Do not subject this product to strong shocks. • To clean the product, wipe it with a soft, dry cloth. Do not use benzene, paint thinner, alcohol or similar liquids. Face the terminal end downwards Face the terminal end downwards Face the terminal end downwards miniSD memory cards can be written to or read with the use of a conversion adapter. MMCmicro can be written to or read with the use of a conversion adapter. SDXC Cards ® ® Can be written to or read directly in Windows 7 and Windows Vista (SP1 or above) ® ® For Windows Vista , update to SP1 or above, and for Windows XP, update to SP2 or above. ® Windows 2000 do not support exFAT as of Februrary 2011. ® Supports exFAT format for MAC OS X 10.6.5 and later. Slot Only insert one media card at a time. Media may not be recognised if multiple cards are inserted at the same time. 3 microSD Memory Card microSDHC Memory Card Slot 4 Memory Stick Memory Stick PRO Memory Stick Duo Memory Stick PRO Duo LED The LED of this product will flash when writing to or reading a memory card. Part names and information on the memory card slot and USB port Slot Align card with centre upper edge of slot Face the terminal end upwards Do not remove a memory card from the slot while the PC is writing to or reading from it. Do not disconnect this product from the PC while it is writing to or reading from a memory card. Doing so may cause product damage and result in file damage or loss. Face the terminal end downwards 2 USB cable Slot 1 Slot 3 Slot 4 See the reverse side of the manual for information on connecting to/removing from the PC. -1- Face the terminal end downwards Reading from and writing to a memory card using a PC 1 Activate the PC 1 ® When using this product with Windows 2000 ® Windows 2000 Service Pack 4 or later is required to use this product. Perform the following steps to confirm your version. If using Service Pack 3 or earlier, use ® Windows Update to update it to the latest version of Windows 2000. For information on performing the update, refer to your PC manual or consult the manufacturer of your PC. If the PC is started with this product connected, the product may not be recognized. If this problem occurs, remove and reconnect the product. The power of PC is turned on. 2 Connect to the PC 1 2 Pull out the USB connector from the product. USB connector 3 Connect the USB connecter to the PC USB port. The product will be automatically recognised by the PC. * Confirm the proper up/down orientation of the connector when you connect it. USB connector 3 1. Right-click the My Computer icon on your desktop, and then click “Properties” from the menu. The system properties window is displayed. ® 2. Confirm your version of Windows 2000. The card reader is automatically recognised and the connection procedure is complete. ® If the Windows installed on your computer does not support USB 2.0 When using Windows ®, an “installation complete” notification will appear in the taskbar. When performing step 2 of “2. Connect to the PC”, the following taskbar message or system notification will appear when you connect the USB connector to the PC USB port. • When using Windows® XP Service Pack 1 or earlier "HI-SPEED USB Device Plugged into non-HI-SPEED USB Hub" • When using Windows Vista® or Windows® XP Service Pack 2 or later "This Device Can Perform Faster" Insert a memory card 1 Inser t a memor y card in the appropriate slot with the correct orientation and alignment. Refer to “How to insert memory cards into the corresponding card slots” (on the front side) for details Windows® 2 Macintosh® 2 If an Auto Play dialog box appears, select the action that you want Windows to perform. The inserted memory card can be accessed. 4 Remove the memory card 1 Macintosh® 1 ® * If the card is empty, it is opened directly as a removable disk. ELECOM CO., LTD. Do not remove a memory card while the PC is writing to or reading from it. 2 Open “My Computer” (“Computer” in Windows 7 and Windows Vista). 2 ) becomes an Eject ( 3 Right-click the removable disk that the memory card was assigned to, and on the context menu that appears, click [Eject]. Drag the drive icon to the Trash (Eject). The Trash icon( ® About Windows drive letters In Windows , a single drive letter will be assigned to the 4 memory card slots (the letter shown in parenthesis is an example that assumes that the last assigned drive letter is E). A drive icon appears on the desktop and you can access the memory card. Only insert one media card at a time. Media may not be recognised if multiple cards are inserted at the same time. Windows® This message is to inform you that even though this product is a USB 2.0-compatible device, the port that it is connected to does not support USB 2.0. In this case, this product will operate at USB 1.1 speed, not that of USB 2.0. ) icon. More than 1 memory card slot cannot be used at the same time. Remove the memor y card from the slot. ® In Windows 7, the drive icon will appear once a memory card is inserted into a slot. Check that the drive icon has disappeared and remove the memory card from the slot. ® About Macintosh drive icons ® When using a Macintosh , a different drive icon will appear depending on which memory slot you insert a card into. Slot 5 Disconnect the card reader from the PC Windows ® 1 Click the , , , or icon in the Taskbar or the Notification Area. 2 Do not disconnect the card reader while the PC is writing to or reading from it. 3 Click the message that appears. Drive icon The “Safe to Remove Hardware” notification is displayed. ® If the PC does not recognise the card reader, disconnect it from the PC and try connecting it again. ® In Windows 7, even if this product is recognised, the drive will not be displayed until a memory card has been inserted. ® • Windows 7, Windows XP Proceed to Step * If removing a memory card ® using Windows 7, proceed to step . ® ® • Windows Vista 7, Windows 2000 Click , and proceed to Step 4 USB 2.0 Multi Type Card Reader MR-K009 series User’s manual 1st edition, January 10, 2012 • This manual is copyright of ELECOM Co., Ltd. • Unauthorised copying and/or reproducing of all or part of this manual is prohibited. • The specifications and appearance of this product may be changed without prior notice for product improvement purposes. • ELECOM Co., Ltd. shall bear no responsibility for any and all affects resulting from the use of this product regardless of the above reasons. • Export or service transaction permission under the Foreign Exchange and Foreign Trade Control Law is required in order to export this product or parts of this product that constitute strategic materials or services. • The SD logo, SDHC logo, SDXC logo, microSD logo, and microSDHC logo are trademarks of SD-3C, LLC. • Multimediacard is trademark of Infineon Technologies AG . • Memory Stick, Memory Stick PRO, Memory Stick Duo, Memory Stick PRO Duo, and Memory Stick Micro are trademarks of Sony Corporation. • Windows and the Windows logo are trademarks of the Microsoft group of companies. • Mac and the Mac logo are trademarks of Apple Inc., registered in the United States and other countries. • Company names, product names, and other names in this manual are generally trademarks or registered trademarks. • If using a USB device or PC card besides this product, both names will be displayed. In this case, click the message that appears for this product (indicating a USB mass storage device or USB disc). • If a memory card is inserted into the memory card slot when using Windows ® 7, click “Eject Mass Storage Device”. Remove all memory cards from the card reader slots. or 宜麗客 (上海) 貿易有限公司 上海市徐匯区肇嘉浜路1065甲号飛雕国際大厦704 号 電話 : 86-21-33680011 FAX : 86-21-64271706 URL : http://www.elecom-china.com/ ELECOM Korea Co., Ltd. 5F Suam Bldg. 1358-17, Seocho2-dong, Seocho-gu, Seoul 137-862, Korea TEL : 1588-9514 FAX : (02)3472-5533 URL : www.elecom.co.kr ELECOM Singapore Pte. Ltd 33 UBI AVENUE 3 # 03-56. VERTEX SINGAPORE (408868) TEL : (65)-6347-7747 FAX : (65)-6753-1791 ELECOM India Pvt. Ltd. 408-Deepali Building, 92- Nehru Place, New Delhi-110 019, India TEL: 011-40574543 e-mail: [email protected] URL: http://www.elecom-india.com/ If the PC does not recognise the card reader * If the icon is displayed in the ® Notification Area in Windows 7, click it and then click the USB icon ( ) that appears. Macintosh® or 1-1 Fushimi-machi 4-Chome Chuoku, Osaka Japan 541-8765 URL: http://www.elecom.co.jp/global/ [email protected] Disconnect the card reader from the USB port. Always disconnect the card reader from the PC before turning off the PC. -2- ©2012 ELECOM Co., Ltd. All Rights Reserved.
![[PDF:0.6MB]](http://vs1.manualzilla.com/store/data/005664304_1-5124c75bfbffa9dc3657cce05bb0013f-150x150.png)
![[PDF:5.2MB]](http://vs1.manualzilla.com/store/data/005774868_1-669613f95b0b272316743db6cc4e3a79-150x150.png)
![[PDF:4.2MB]](http://vs1.manualzilla.com/store/data/005828831_1-fe8cebe621cde38b99682d8c012568df-150x150.png)
![[PDF:2.3MB]](http://vs1.manualzilla.com/store/data/005863819_1-750fe9ca9e57c8585ad33444df000a24-150x150.png)
![[PDF:1.8MB]](http://vs1.manualzilla.com/store/data/005708629_1-c6bdf3b3035e2fb2adedb53e84bf3717-150x150.png)
![[PDF:3.6MB]](http://vs1.manualzilla.com/store/data/005700359_1-411bc916f99a59f282120c6ff0bb3aea-150x150.png)
![[PDF:2.7MB]](http://vs1.manualzilla.com/store/data/005963125_1-91cfac1a44081edc30bde50a800df143-150x150.png)