1
BU/RB MIMO Quick Installation Guide
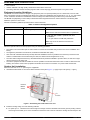
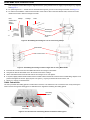
pole and tighten on both sides using the supplied washers, spring washers and nuts. Apply torque of 80 [Lib*In] = 9 [N*m].
See Figure 2.
»
»
For poles larger than 4” - Thread the four metal bands through the grooves on the carriage and fasten. See Figure 3.
For wall mount installation - Mark the exact location of the holes to drill on the wall. Drill the holes, and use four metal
dowels and screws to affix the carriage to the wall.
Nuts,
washers and
spring
washers
Clamps
Carriage
Rods
Tilt fastening
screws(x2)
Tilt Control
screw
Figure 2: Assembling the Carriage on 1.5"-4" Poles Using Clamps
Metal bands
Tilt Control screw
Figure 3: Assembling the Carriage on Poles Larger than 4" Using Metal Bands
3
4
5
6
7
Insert the Tilt Control screws into the middle-side hole of the carriage on both sides.
Hang the unit with the tilt bracket on the Tilt-control screws of the carriage.
Attach and fasten all the screws at both sides of the carriage. Do not over tighten.
If required, slightly release the tilt bracket screws to enable rotation and the Tilt Control screws to enable tilting; adjust the unit
position and tighten the screws. Apply torques of 45 [Lib*In.] = 5 [N*m] to the M6 Tilt-control screws, and
80 [Lib*In] = 9 [N*m] to the M8 screws.
Cable Connection
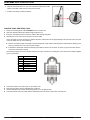
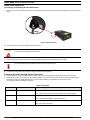
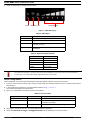
The unit is provided with sealing glands on all the cable connectors. The cables are to be connected to the unit by inserting the
cable connector through the sealing gland. A dedicated tool is supplied for fastening the sealing glands.
Grounding
Terminal
USB/RS-232
For Debug
PoE In
PoE Out
Figure 4: Unit Connections with Sealing Glands and Gland Fastening Tool
P/N 215998
-3-
March 2012