1
TMS Web Operator Confirmation User Manual Updated 11-19-08 This document is the property of Transwestern Pipeline Company, LLC and all information contained within is CONFIDENTIAL and PROPRIETARY. No part of this document may be copied or reproduced without the written permission of Transwestern Pipeline Company, LLC. TMS Web Operator Confirmation User Manual Print Date 9/20/10 10:10:10 AM Contents Click the red page number to the right of the paragraph heading to navigate to that section. ICONS AND CONVENTIONS USED IN THIS MANUAL ..................... 5 ASSUMPTIONS...................................................................... 6 INTRODUCTION ..................................................................... 7 TMS SYSTEM ...................................................................... 8 CONFIRMATION .................................................................... 9 Confirmation Maintenance ....................................................... 10 GETTING STARTED .................................................................................11 SUBMIT A SINGLE CONFIRMATION .............................................................13 SUBMIT ALL CONFIRMATIONS ...................................................................15 Change Confirmation Quantity ......................................................16 Delete a Line Item .........................................................................17 View Location Contract Totals by Cycle ........................................18 PRE-CONFIRM QUANTITIES PRIOR TO THE SERVICE REQUESTER NOMINATING ..21 CONFIRMATION MAINTENANCE SCREEN FIELD HELP ....................................23 NOMINATE OPERATOR MAKEUP QUANTITIES ..............................................26 OPEN AN EXISTING OBA/DPOA NOMINATION .............................................27 Create a New Nomination Using the Add Button............................27 Create a New Nomination by Entering New Data in All the Nomination Data Fields ..............................................................................................................28 Create a New Nomination Using an Existing Nomination as a Template30 Update an Existing Nomination Using the Replace Button......................30 COPY A CONTRACT’S OBA/DPOA NOMINATION(S)......................................31 OPEN/COPY NOMINATION SCREEN FIELD HELP ...........................................33 Options .........................................................................................34 DRN and Point Number Mode ........................................................34 NOMINATION MAINTENANCE SCREEN FIELD HELP........................................36 h:\personal\webforms\manuals\operatorconfirmations111908b.doc Page ii Print Date 9/20/10 10:10:10 AM TMS Web Operator Confirmation User Manual Confirmation Summary ............................................................. 38 VIEW CONFIRMATION SUMMARY................................................................38 CONFIRMATION SUMMARY SCREEN FIELD HELP...........................................42 EDI Confirmation Response View Screen ................................ 43 EDI CONFIRMATION RESPONSE VIEW SCREEN FIELD HELP ...........................44 Operator Choice Selection ....................................................... 45 ACTIVE CONFIRMATION LOCATION ............................................................45 PASSIVE CONFIRMATION LOCATION ..........................................................45 Confirmations By Exception ..................................................... 46 View Operator Makeup Nominations........................................ 46 SCHEDULING...................................................................... 47 Scheduling Quantities By Location .......................................... 47 VIEW SCHEDULED QUANTITIES BY LOCATION ..............................................48 BATCH SCHEDULE STATUS ......................................................................49 REPORTING ....................................................................... 51 View and Print Scheduled Quantities Report........................... 51 TMS GENERIC SCREEN FUNCTIONS ...................................... 55 System Tool Bar Icons.............................................................. 55 Search Facility Option .............................................................. 56 SEARCH AND LOCATION SEARCH OPTIONS .................................................57 Name Begins With.........................................................................58 Name Contains .............................................................................58 Svc Req K .....................................................................................59 Loc Prop .......................................................................................59 Location .......................................................................................59 RECEIPT/DELIVERY LOCATIONS VALID FOR CONTRACT .................................61 h:\personal\webforms\manuals\operatorconfirmations111908b.doc Page iii Print Date 9/20/10 10:10:10 AM TMS Web Operator Confirmation User Manual LOCATION DETAIL INFORMATION DISPLAY ..................................................62 Sort............................................................................................ 63 DATA SORTS .........................................................................................63 COLUMN SORTS .....................................................................................65 Print........................................................................................... 65 Export........................................................................................ 66 Cancel ....................................................................................... 67 h:\personal\webforms\manuals\operatorconfirmations111908b.doc Page iv Print Date 9/20/10 10:10:10 AM TMS Web Operator Confirmation User Manual Icons and Conventions Used in this Manual NOTE: A note is used to draw your special attention. GOOD IDEA: A good idea is a strong recommendation. REMEMBER: A reminder. Menu Names Menu names display like this. Field Names Field names display in Italics. SCREEN NAMES SCREEN titles display like this. DIALOG BOX NAMES DIALOG BOX titles display like this. Select Multiple Options Select File|New from the main menu. Drop-down box Buttons arrow Click on arrow and selection list displays. Buttons are displayed graphically. H:\PERSONAL\WebForms\Manuals\OperatorConfirmations111908b.doc 5 Print Date 9/20/10 10:10:10 AM TMS Web Operator Confirmation User Manual Assumptions It is assumed that you already have the proper security set up for your ID to perform the operations described in this manual. It is assumed that you know how to access the Throughput Management System (TMS). The new TMS Web screens are set to use the NAESB EDM standards defined for your desktop resolution. The standard suggested is 1024 X 768 setting which will allow you to view TMS Web as designed. Please adjust accordingly: H:\PERSONAL\WebForms\Manuals\OperatorConfirmations111908b.doc 6 TMS Web Operator Confirmation User Manual Introduction The TMS systems were used originally by multiple companies which are no longer associated with Transwestern Pipeline Company. TMW Web required modifications to some of the screens in order to meet the needs of these multiple companies. As a result, you may see some additional fields that were not in the previous version of TMS and may not be applicable today. You may also see references to other pipelines that are no longer associated with Transwestern Pipeline All screens in the TMS system have the same basic layout: the Form area where you enter data and the Matrix area where you view data. The column headings at the top of the Matrix area reflect the field titles in the Form area. Figure 1. TMS Screen Layout H:\PERSONAL\WebForms\Manuals\OperatorConfirmations111908b.doc 7 TMS Web Operator Confirmation User Manual TMS System The TMS system is used to perform the following tasks: Enter and view operator nominations Enter and view operator confirmations View operator and shipper scheduled quantities The steps for entering and viewing nominations and shipper-scheduled quantities are covered in detail in the Nominations User Manual. T Thhiiss TMS Operator Confirmation manual covers only the menu options and screen functions shown below. Confirmation (Page 9) Scheduling (Page 47) Reporting (Page 51) Exit (Page 54) TMS Generic Screen Functions (Page 55) Search Facility Screens (Page 56) You access the TMS system via the Hot Tap customer activity TMS website (Figure 2). Figure 2. TMS Web Main Menu H:\PERSONAL\WebForms\Manuals\OperatorConfirmations111908b.doc 8 TMS Web Operator Confirmation User Manual Confirmation The purpose of the confirmation process is to provide operators the ability to confirm gas flows between interconnecting parties based on the nominations submitted by service requesters for Florida Gas Transmission Company (FGT), and Transwestern Pipeline Company (TW). Following are the confirmation processes documented in this manual. Confirmation Maintenance (Page 10) Confirmation Summary (Page 38) Operator Choice Selection (Page 45) Confirmation By Exception (Page46) Operator Makeup Nominations (Page 46) H:\PERSONAL\WebForms\Manuals\OperatorConfirmations111908b.doc 9 TMS Web Operator Confirmation User Manual Confirmation Maintenance The purpose of the Confirmation Maintenance screen (Figure 3. Confirmation Maintenance Screen) is to confirm gas flows between interconnecting parties and request makeup nominations to and from the pipeline. Specifically, the Confirmation Maintenance screen allows you to perform the following functions: confirm a single nomination, confirm all nominations, pre-confirm quantities prior to the service requester nominating, and nominate operator makeup quantities. Before you can perform any of these individual functions, however, you must first provide the system basic information to access the data that you want to manipulate. The Getting Started section beginning on Page 11 explains the generic preliminary steps that you must perform. Figure 3. Confirmation Maintenance Screen H:\PERSONAL\WebForms\Manuals\OperatorConfirmations111908b.doc 10 TMS Web Operator Confirmation User Manual Getting Started Confirmation Maintenance operations differ slightly among the pipelines. By default FGT displays the Loc number while TW display the Loc Prop number. The DRN is the NAESB defined method for identifying location. To perform each Confirmation Maintenance operation, you must first open the Confirmation Maintenance screen and access the desired pipeline and location(s) or contract. The process for accessing the pipelines and location(s) is exactly the same for each Confirmation Maintenance function; thus, it will be explained here once and then referenced at the beginning of each section, rather than repeating the same information for each confirmation function. 1. Select Confirmation|Confirmation Maintenance from the TMS Main Menu. The Confirmation Maintenance screen opens (Figure 3. Confirmation Maintenance Screen). The Conf Pty field populates based on your logon ID. 2. The Conf Req field defaults to the pipeline for which you have TMS security rights: Florida Gas Transmission Company or Transwestern Pipeline Company. NOTE: The fields available to you will depend upon the company you select. Transwestern and FGT have an Operator Balancing Agreement (OBA) number. FGT also has a Delivery Point Operator Agreement (DPOA) number. The instructions below generically explain how to populate all fields. 3. Type the gas date for the transactions you want to confirm in the Gas Date field using the mmddyy format and tab. 4. Click the down arrow in the Cycle field and select the appropriate cycle (Figure 4). The system defaults to the current cycle you are in. Figure 4. Cycles H:\PERSONAL\WebForms\Manuals\OperatorConfirmations111908b.doc 11 TMS Web Operator Confirmation User Manual NOTE: Only nominations effective for the specific cycle that you select will display. To see nominations effective for that 24-hour period, select Final AM cycle. 5. Click the down arrow in the desired field (Loc or OBA/DPOA) to make a selection from the drop-down list that appears. Loc Displays the nominations to be confirmed at a location(s). OBA/DPOA Displays all locations with nominations for your OBA/DPOA. FGT displays OBA/DPOA and TW displays OBA. Following are the data that will be retrieved based on your Location Proprietary Code or OBA/DPOA specifications. Selection Result Select a specific OBA/DPOA contract The application retrieves all locations associated with it. Select a specific location The application will only retrieve the nomination line items for the selected location. Allow the field to default to the All. All locations tied to your ID name for that gas date will appear in the Matrix area. In other words, do not select a specific Loc number or OBA/DPOA contract number from the drop-down list. 6. If you want to narrow your search to a specific confirmation status type, click the down arrow to select a filter other than all, which is the default (Figure 5). A description of the functions of each filter follows Figure 5. Figure 5. Filter Field Filter All Filters the data to display only a specified type of information as defined in the bullets below. Displays all confirmation-type quantities for a specific gas date and cycle (confirmed, pre-confirmed, and unconfirmed). H:\PERSONAL\WebForms\Manuals\OperatorConfirmations111908b.doc 12 TMS Web Operator Confirmation User Manual Unconfirmed Displays only those nominations that are unconfirmed for that gas date and cycle. Confirmed Displays only confirmed nominations for that gas date and cycle. Pre-Confirmed Displays only those confirmations that have been entered by the operator for that gas date and cycle. Now that you have specified the generic criteria up through filtering the data, you are ready to perform detailed confirmation processes shown below: Submit a Single Confirmation (Page 13) Submit All Confirmations (Page 15) Pre-confirm Quantities Prior to the Service Requester Nominating (Page 20) Nominate Operator Makeup Quantities (Page 26) NOTE: See the Confirmation Maintenance Screen Field Help section on Page23 for detailed definitions of each of the fields and column headings on the Confirmation Maintenance screen. Submit a Single Confirmation After retrieving confirmation data from the Confirmation Maintenance screen, you can submit confirmations by line item. The instructions below explain how to accomplish this. 1. Open the Confirmation Maintenance screen. NOTE: 2. 3. See the Getting Started section beginning on Page 11 for instructions on opening the Confirmation Maintenance screen and selecting pipelines and location(s). Then follow the instructions below for confirming a single nomination. Click Retrieve Icon. If nominations exist, they will be displayed at the following levels: Svc Req K Up/Dn K Up/Dn ID Click once on the nomination line item that you want to confirm. The fields in the Form area of the screen populate with the related data (Figure 6). H:\PERSONAL\WebForms\Manuals\OperatorConfirmations111908b.doc 13 TMS Web Operator Confirmation User Manual Figure 6. Service Requester Line Selected 4. Type the quantity you want to submit in the Conf Qty field then tab. 5. Type the confirmation end date for that nomination line item in the End Date field then tab. H:\PERSONAL\WebForms\Manuals\OperatorConfirmations111908b.doc 14 TMS Web Operator Confirmation User Manual 6. If necessary, click the down arrow in the optional RR field and select the appropriate reduction reason code. The reduction reason code displayed will be the reduction code selected by the operator and not the scheduling reduction reason code. 7. Click Submit Icon. The confirmation updates successfully for the nomination line item selected. You will immediately see the changed confirmation quantity in the line item. 8. Repeat this process to confirm line by line. NOTE: If you have passed the deadline for the cycle that you retrieved, the Submit button will be disabled and you must re-retrieve the confirmation data for the next cycle (select appropriate cycle from the Cycle drop-down box) and then confirm. Submit All Confirmations The instructions below explain how to simultaneously confirm all nominations (i.e., all line items) that have not previously been confirmed or do not have a zero quantity and are currently displayed in the Matrix area of the screen. 1. Open the Confirmation Maintenance screen. NOTE: 2. 3. See the Getting Started section beginning on Page 11 for instructions on opening the Confirmation Maintenance screen and selecting pipelines and location(s). Then follow the instructions below for confirming all nominations. Click Retrieve Icon. If nominations exist, they will be displayed at the following levels: Svc Req K Up/Dn K Up/Dn ID Click Submit All Icon. The Confirm All Options dialog box appears (Figure 7). H:\PERSONAL\WebForms\Manuals\OperatorConfirmations111908b.doc 15 TMS Web Operator Confirmation User Manual Figure 7. Confirm All Options 4. Click the down arrow of either Nominated Quantity or Scheduled Quantity depending on how you want to confirm the nomination. Scheduled Quantity is the amount of gas scheduled by the pipeline after balancing. Nominated Quantity is the amount of gas requested by the shipper. 5. Type the date through which you want the volume to be confirmed in the End Date field and tab. 6. . Click All unconfirmed nominations for the selected location and cycle are confirmed. At this point, if desired, you can either change or delete the existing confirmations, as long as the confirmation deadline for that cycle has not passed. See Change a Line Item on Page 16 and Delete a Line Item on Page 17 for instructions. NOTE: If only a few changes are necessary, make those confirmation changes to the single lines first, and then press the Submit All button to confirm the remainder of the nomination line items. This action will not override the manually confirmed nominations. Change Confirmation Quantity After retrieving confirmation data from the Confirmation Maintenance screen, you can change a confirmed quantity for the following types: All, Confirmed, or Pre-confirmed. 1. Open the Confirmation Maintenance screen. NOTE: See the Getting Started section beginning on Page 11 for instructions on opening the Confirmation Maintenance screen and selecting pipelines and location(s). Then follow the instructions below for changing a line item. H:\PERSONAL\WebForms\Manuals\OperatorConfirmations111908b.doc 16 TMS Web Operator Confirmation User Manual 2. Click Retrieve Icon. If nominations exist, they will be displayed at the following levels by DRN or location: Svc Req K Up/Dn K Up/Dn ID 3. Click once on the line item for which you want to change the confirmed quantities. The Form area of the screen populates with data related to the highlighted line item. You will make data changes in these fields and tab. 4. Type the new quantity you want to confirm in the Conf Qty field then tab. NOTE: If you have passed the deadline for the cycle that you are changing, the Confirm button will be disabled and you must re-retrieve and confirm for the next cycle. 5. Type the confirmation end date for that nomination in the End Date field then tab. For Intraday confirmations, the end date will default to the same date as the begin date, since Intradays are only one day. 6. If necessary, click the down arrow in the optional RR field and select the appropriate reason code. 7. Click Submit to save your changes. 8. Repeat this process to change confirmed quantities line by line. 9. Click Cancel to return to the confirmation open box to enter a new confirmation point, cycle or gas date. Delete a Line Item After retrieving confirmation data from the Confirmation Maintenance screen, you can delete a quantity for either of the following types: Confirmed, All, or Pre-confirmed. 1. Open the Confirmation Maintenance screen. NOTE: 2. See the Getting Started section beginning on Page 11 for instructions on opening the Confirmation Maintenance screen and selecting pipelines and location(s). Then follow the instructions below for deleting a line item. Click Retrieve Icon. If nominations exist, they will be displayed at the following levels: Svc Req K H:\PERSONAL\WebForms\Manuals\OperatorConfirmations111908b.doc 17 TMS Web Operator Confirmation User Manual Up/Dn K Up/Dn ID 3. Highlight the desired line item for which you want to delete the confirmation. The fields in the Form area of the screen populate with the related data. 4. Click Delete Icon. The confirmed quantity will be deleted and will no longer display in the confirmation column. NOTE: You can only delete those confirmations that have not been processed for the cycle selected. View Location Contract Totals by Cycle Following are instructions for viewing selected location contract totals by cycle on the Confirmation Maintenance screen (All, Unconfirmed, Confirmed, and Pre-confirmed). 1. Open the Confirmation Maintenance screen. NOTE: 2. See the Getting Started section beginning on Page 11 for instructions on opening the Confirmation Maintenance screen and selecting pipelines and location(s). Then follow the instructions below for viewing location contract totals. Select gas day, cycle, location or OBA/DPOA and then click Retrieve Icon. If nominations exist, they will be displayed at the following levels: Svc Req K Up/Dn K Up/Dn ID 3. Highlight the desired location line item for which you want to view totals. The fields in the Form area of the screen populate with the related data. 4. Click Loc Tot Icon. The Location Total screen appears. (See the example in Figure 8.) It displays nomination, confirmation, and scheduled totals for the location and confirmation filter you selected. H:\PERSONAL\WebForms\Manuals\OperatorConfirmations111908b.doc 18 TMS Web Operator Confirmation User Manual Figure 8. Location TotalScreen 5. Click the Svc Req K radio button to view totals by service requester contract for nominations, confirmations, and scheduled quantities, or Click the UP/DN K radio button to view a sum of all line items at the upstream/downstream contract level only. 6. Click the X in the upper right-hand corner to close the Location Total screen (Figure 8). You are returned to the Confirmation Maintenance screen where you can perform other operations or view other location totals. NOTE: The Location Total-Confirmed Only and the Confirmation Maintenance screens can be open simultaneously; thus allowing you to toggle back and forth between them. H:\PERSONAL\WebForms\Manuals\OperatorConfirmations111908b.doc 19 TMS Web Operator Confirmation User Manual 7. Click Print Icon to print the totals screen. 8. Click Export Icon to save this screen to a file on your PC. H:\PERSONAL\WebForms\Manuals\OperatorConfirmations111908b.doc 20 TMS Web Operator Confirmation User Manual Pre-confirm Quantities Prior to the Service Requester Nominating The Precnf icon is used only when the service requester has not nominated her/his quantities and the operator wants to confirm the service requester’s nominated quantities ahead of time. You must know the service requester contract number and its upstream/downstream contract information along with the service requester's ID code prior to entering your confirmation. If this information does not match up with the service requester’s nomination, the quantities will not be scheduled. The instructions below explain how to enter a pre-confirmed quantity. 1. Select Confirmation|Confirmation Maintenance from the TMS Main Menu. The Confirmation Maintenance screen opens. 2. Click the down arrow in the Conf Req field and select Florida Gas Transmission Company, or Transwestern Pipeline Company. 3. Type the gas date for the transaction that you want to pre-confirm in the Gas Date field using the mmddyy format then tab. 4. Select the correct cycle for the pre-confirmation request. 5. Select the Loc or point to pre-confirm from the drop down list of point locations. 6. Click Precnf Icon on the confirmation. The pre-confirmation (figure 9) maintenance screen opens (figure 9). Figure 9. Pre-Confirmation Maintenance Screen H:\PERSONAL\WebForms\Manuals\OperatorConfirmations111908b.doc 21 TMS Web Operator Confirmation User Manual NOTE: If you decide that you need to change the gas date of the pre-confirmation, click the box on the screen and return to. the Confirmation Maintenance screen. Then enter the correct gas date on this screen and click on the Precnf icon. 7. Type the service requester transport contract number in the Svc Req K field. This number must match the service requester’s nomination in order for the gas to be scheduled. The SVC Req. ID will populate when the SVC Req. K is entered. 8. Select from the drop down list of up (receipt) K or down (delivery K) role and tab to the K data field. 9. Type the service requester’s upstream / downstream contract number in the K field then tab. This number must match the service requester’s nomination in order for the gas to be scheduled. 10. Type the Up / Down ID code in the ID Code field then tab. Currently this is the DUNS # for the upstream / downstream contract. 11. Type the confirmed quantity in the Confirmed Quantity field then tab. 12. Type the end date of the pre-confirmation in the End Date field and tab. 13. Click Apply to accept the transaction. You are returned to the Confirmation Maintenance screen where the new line appears in the Matrix area. H:\PERSONAL\WebForms\Manuals\OperatorConfirmations111908b.doc 22 TMS Web Operator Confirmation User Manual Confirmation Maintenance Screen Field Help Field Name Definition The functions used to save your confirmation line item to the database. Simultaneously confirms all nominations (i.e., all line items) that have not previously been confirmed or do not have a zero quantity and are currently displayed in the Matrix area of the screen. Allows the operator to nominate imbalance makeup gas on their OBA/DPOA/location. (TW will confirm and schedule the makeup.) Beg Date Conf Pty The gas date associated with the start of the confirmation. System-generated confirmation date time stamp for transactions. Occurs at time of input or confirm. The confirming party’s name and DUNS number. Conf Qty The quantity confirmed by the operator. Conf Req The name of the pipeline: Florida Gas Transmission, or Transwestern. Conf Track ID The system-generated tracking number assigned to each confirmation EDI transaction line item. The EDI trading partner may also generate this number. Conf Date Time (Tracking Num) Cycle End Date Filter The confirmation cycle associated with the confirmation. It is system-generated at the time of save. The valid cycles follow: Timely Evening Intraday 1 Intraday 2 Final AM The end date associated with the confirmation end date entered by the operator. Filters the data to display only a specified type of information as defined in the bullets below. AllDisplays all confirmation-type quantities for a specific gas date and cycle (confirmed, pre-confirmed, and unconfirmed). UnconfirmedDisplays only those nominations that are in an unconfirmed status for that gas date and cycle. ConfirmedDisplays only confirmed nominations for that gas date and cycle. H:\PERSONAL\WebForms\Manuals\OperatorConfirmations111908b.doc 23 TMS Web Operator Confirmation User Manual Field Name Definition Pre-ConfirmedDisplays only those confirmations that have been entered by the operator for that gas date and cycle. Gas Date The start date of the confirmation. K Flow Flow Indicator. Identifies the role (Receipt or Delivery) in which the location has been nominated on by the service requester. Loc (Name) (DRN) Represents the name of the pipeline point for which the operator is responsible. The location where the quantity will be scheduled. Loc Prop (POI) Location Proprietary Code or POI number assigned by the pipeline for a specific location. Nom Date Time System-generated nomination date time stamp for transactions. Occurs at time of input or save. Nom Qty The quantity nominated by the service requester. OBA/DPOA Operational Balancing Agreement/Delivery Point Operator Agreement contract number. Oper Choice Operator Choice. Enables the operator or agent/designee to specify whether to take an active or passive role at a location level in the confirmation process. RR A reduction reason code identifying the reason why the nominated quantity has been reduced by the operator during the confirmation process. (Reduction Reason) Sched Qty The quantity scheduled by the pipeline after balancing, allocation, and confirmation. Service Req (Name) The party (service requester or the service requester’s agent/designee) requesting the service. Source Identifies where the confirmation quantity originated from; for example, EDI, Prev Schd. Svc Rep The Pipeline Market Service Representative assigned to the service requester contract. They schedule gas on the pipeline. Svc Req ID The DUNS Number for the service requester associated with the service requester contract. Svc Req K Service Requester’s transportation contract number used to nominate to the pipeline. TT Code assigned to the nomination identifying makeup transactions. Code 04 is imbalance from the pipe, 03 is imbalance to the pipe. (Transaction Type) H:\PERSONAL\WebForms\Manuals\OperatorConfirmations111908b.doc 24 TMS Web Operator Confirmation User Manual Field Name Definition UP/DN ID The DUNS Number of the party supplying or receiving gas quantities to or from the service requester. UP/DN K Alphanumeric contract identifier of the party who is supplying or receiving the gas quantities to or from the service requester. H:\PERSONAL\WebForms\Manuals\OperatorConfirmations111908b.doc 25 TMS Web Operator Confirmation User Manual Nominate Operator Makeup Quantities Nominate Operator Makeup Quantities is a function of the Nomination Maintenance screen. This function is used to nominate imbalance makeup gas on your OBA/DPOA. (FGT, and TW will confirm and schedule the makeup.) The instructions below explain how to facilitate the request for makeup. Be aware that when nominating operator makeup quantities, you access the Nomination Maintenance screen via the Confirmation Maintenance screen. NOTE: You can also access the nominations that you want to makeup by opening the Nomination Maintenance screen directly from the TMS Main Menu. 1. Select Confirmation|Confirmation Maintenance from the TMS Main Menu. The Confirmation Maintenance screen opens. 2. Click the down arrow in the Conf Req field and select Florida Gas Transmission Company, or Transwestern Pipeline Company. The options on the screen will vary slightly from company to company. 3. Type the starting gas date for the imbalance nomination transaction in the Gas Date field using the mmddyy format and tab. 4. Click Mkup Icon on the Confirmation Maintenance screen. The Open/Copy Nomination screen appears (Figure 10). The purpose of the Open/Copy Nomination screen is twofold: Open an existing OBA/DPOA nomination (Page 27) Copy a contract’s OBA/DPOA nomination(s) (Page 31) Figure 10. Open/Copy Nomination Screen H:\PERSONAL\WebForms\Manuals\OperatorConfirmations111908b.doc 26 TMS Web Operator Confirmation User Manual Open an Existing OBA/DPOA Nomination The purpose of opening an existing nomination is to view, replace, or update it, or use it as a template to create a new nomination for a specified contract and date. To open an existing nomination(s) or create a new nomination for a particular gas date, you must specify the contract to which this nomination belongs. The instructions below explain how to open a contract and access an existing nomination for a particular gas date. 1. Click the down arrow in the TSP field on the Open/Copy Nomination screen and select Florida Gas Transmission Company, or Transwestern Pipeline Company (Figure ). 2. Type an OBA/DPOA contract number in the Svc Req K field then tab. 3. Type the starting gas date for the imbalance nomination transaction using the mmddyy format in the Gas Date field, or use the calendar or next, previous arrows to find the correct gas date then tab. 4. Click Retrieve. The Nomination Maintenance screen opens and is populated with the pre-existing nominations for the contract and gas date you selected (if a nomination exists). Create a New Nomination Using the Add Button An operator can request one of two types of imbalance nomination transactions: Receipt Delivery One-sided nonpathed is for operator makeup to the pipe. One-sided nonpathed is for operator makeup from the pipe. Receipt Delivery New nominations are created by either Entering New Data in All the Nomination Data Fields (Page 28), or Using an Existing Nomination as a Template (Page 30). H:\PERSONAL\WebForms\Manuals\OperatorConfirmations111908b.doc 27 TMS Web Operator Confirmation User Manual Create a New Nomination by Entering New Data in All the Nomination Data Fields 1. On the Nomination Maintenance screen, ensure that no nomination path is selected or highlighted in the Matrix area. If one is selected, click on it to deselect it. 2. Click the desired nomination type icon; , or . The appropriate fields for the nomination type selected display. 3. Type the desired begin and end dates for the imbalance nomination in the Beg and End fields and tab. The begin date defaults to the begin date entered on the Open/Copy Nomination screen. The end date defaults to the end of that month. The TT field defaults to 04 if you specified a receipt transaction, which is makeup to the pipe. The TT field defaults to 03 if you specified a delivery transaction, which is makeup from the pipe. All other fields are either blank or contain a zero. 4. Enter the appropriate data for the nomination type you selected. The instructions below explain how to populate each field (starting with the Receipt fields). NOTE: See the Nomination Maintenance Screen Field Help section on Page 36 for detailed definitions of each of the fields and column headings on the Nomination Maintenance screen. Receipt Makeup Fields Follow steps 1 through 8 below to request makeup nominations to the pipeline. 1. Type the receipt location in the Receipt Loc Prop field and tabor click in the Loc Prop field to invoke the Point Search function. (See the Search Facility Option section beginning on Page 56 for instructions on performing a search.) 2. Type the upstream contract number in the Receipt Up K field then tab. 3. Type the DUNS number for the upstream contract number in the Receipt Up ID field then tab. 4. Type the receipt quantity in the Receipt Quantity field then tab. 5. Type the receipt rank in the Receipt Rank field then tab NOTE: If you leave the Receipt Rank field blank, the system will automatically assign a rank of 500. H:\PERSONAL\WebForms\Manuals\OperatorConfirmations111908b.doc 28 TMS Web Operator Confirmation User Manual 6. Type the package ID in the Package ID field if applicable to your business requirements then tab. This is an optional field. 7. Click to create the receipt nomination. It will display in the Matrix area. Follow steps 1 through 8 in the Delivery Makeup Fields section below to request makeup deliveries to the pipeline. NOTE: When you use the button, the system checks for duplicates for the date range you entered. It compares the new nomination with the existing nominations. If a duplicate nomination exists, an error message displays. If you use the button to add new nominations prior to the Nomination Cycle deadline and then save after the deadline, the system displays an error message stating that the deadline has passed. You must re-retrieve the data and make changes again for the next nomination timeline cycle. 8. Click Submit to save the makeup nomination request. A dialog box will notify you that the update was successful. Delivery Makeup Fields 1. Type the delivery location in the Delivery Loc Prop field then tab or click in the Loc Prop field to invoke the Location Search function. (See the Search Facility Screens section beginning on Page 56.) 2. Type the downstream contract number in the Delivery Dn K field then tab. 3. Type the DUNS number for the downstream contract in the Delivery Dn ID field then tab. 4. Type the delivery quantity in the Delivery Quantity field then tab. 5. Type the delivery rank in the Delivery Rank field then tab. NOTE: If you leave the Delivery Rank field blank, the system will automatically assign a rank of 500. 6. Type the package ID in the Package ID field if applicable to your business requirements then tab. This is an optional field. 7. Click to create either the delivery nomination. The new nomination is added to the Matrix area if it passes the system validation edits, such as duplicate paths, valid locations, and valid dates. H:\PERSONAL\WebForms\Manuals\OperatorConfirmations111908b.doc 29 TMS Web Operator Confirmation User Manual 8. Click Submit to save the makeup nomination request. A dialog box will notify you that the update was successful. NOTE: See the Nomination Maintenance Screen Field Help section on Page 36 for detailed definitions of each of the fields and column headings on the Nomination Maintenance screen. Create a New Nomination Using an Existing Nomination as a Template To save time, you can use an existing nomination as a template for creating a new nomination. Once you have existing nomination data, you can modify it as needed for your new nomination. The existing nomination that you used as a template is not changed. The instructions below explain how to accomplish this task. 1. Click either 2. Click on the nomination line item in the Matrix area of the Nomination Maintenance screen that you want to use as a template to highlight it. The data from that nomination populates the Form area. 3. Change the data in any of the fields as needed then tab to activate the change. NOTE: or to specify the nomination type. The begin date of the new nomination you are creating from the template must be the current gas date or a later date. The system will not create a new nomination if the begin date is earlier than the current date. If the begin date is the same as the current gas date or equal to the upcoming gas date, and the deadline time has passed for the upcoming gas date, you must make the new nomination effective for one day only. 4. Click after you have changed all the desired fields. The new nomination is added to the Matrix area if it passes the system validation edits, such as duplicate paths, valid locations, and valid dates. 5. Click Submit to save the makeup nomination request. A dialog box will notify you that the update was successful. Update an Existing Nomination Using the Replace Button button is to allow you to replace a nomination line item for a The purpose of the specific date range with a new nomination once gas has been scheduled for that day. The system H:\PERSONAL\WebForms\Manuals\OperatorConfirmations111908b.doc 30 TMS Web Operator Confirmation User Manual may split the existing nomination into different date ranges depending on the start and end dates of the original nomination when compared to the date ranges of the new nomination. The new nomination’s begin/end date must fall within the original dates. Following are instructions for replacing a nomination. or to specify the nomination type. 1. Click either 2. Click once on the existing nomination line item on the Nomination Maintenance screen that you want to replace. The data from that nomination appears in the data entry area. 3. Update any data field item including dates, locations, quantities, receipt and delivery contracts, ID codes, transaction type, or package ID and tab off the data field to activate the change. 4. Click the Matrix area. 5. Click Submit to save the makeup nomination request. A dialog box will notify you that the update was successful. NOTE: button to update that existing nomination with these changes in the The system checks for duplicate lines and displays an error message if a nomination already exists for the new date range. If no duplicate exists, the system inserts the new nomination within the original nomination’s start and end dates and splits the original nomination if necessary. If you use the button to update a nomination prior to the nomination deadline and save after the deadline, the system will display an error message stating that the deadline has passed. You must then re-retrieve the data and make changes again for the next nomination cycle. If you use the button after the timely deadline, and the original nomination has already been scheduled, the system inserts (replaces) the new nomination within the original nomination. The system splits the original nomination, if necessary, and creates an Intraday nomination from the original nomination. The original nomination is given a quantity of zero. Copy a Contract’s OBA/DPOA Nomination(s) The purpose of the copy function is to save you time when entering new nominations for a particular contract. Rather than having to re-key data that will remain constant over the course H:\PERSONAL\WebForms\Manuals\OperatorConfirmations111908b.doc 31 TMS Web Operator Confirmation User Manual of the contract, you can copy a contract’s nominations for a specified date range. The instructions below explain how to copy a contract’s nominations for a specified date. Click Retrieve on the Nomination Maintenance screen. The Open/Copy Nomination screen appears. NOTE: See the Open/Copy Nomination Screen Field Help section on Page 33 for detailed definitions of each of the fields and column headings on the Open/Copy Nomination screen. Figure 10. Open/Copy Nomination Screen 1. Click the down arrow in the TSP field and select Florida Gas Transmission Company, or Transwestern Pipeline Company. 2. Tab to the Svc Req. K field and type the appropriate Service Requester Contract Number. 3. Click the box to the left of Copy Nomination so that a check mark appears there. 4. Type the date of the specific nomination(s) that you want to copy in the From Date field or use the calendar or next and previous arrows to find the date then tab. 5. Type the start and end date that you want to copy the nomination to in the To Start and End fields or use the calendar or next and previous arrows to find the date then tab. 6. Click Copy Icon if you do not want to accept the transaction, or 7. Click Cancel to cancel the transaction. The Nomination Maintenance screen opens and is populated with the pre-existing nominations for the contract and gas date you selected. 8. Enter any changes to specific nomination line items and tab or add new nomination line items and tab. 9. Click Submit on the Nomination Maintenance screen to save your change. H:\PERSONAL\WebForms\Manuals\OperatorConfirmations111908b.doc 32 TMS Web Operator Confirmation User Manual Open/Copy Nomination Screen Field Help Field Name Definition Copy Nomination A check box you use to specify that you want to make a copy of an existing nomination. To End The date you want the nomination copy to end. From Date The specific date of the nomination that you want to copy. Gas Day The start date of the nomination. Nominator The DUNS number assigned to the service requester nominating. Svc Req K The number assigned to a particular contract. To Start The date you want the nomination copy to start. TSP The name of the pipeline: Florida Gas Transmission Company, or Transwestern. H:\PERSONAL\WebForms\Manuals\OperatorConfirmations111908b.doc 33 TMS Web Operator Confirmation User Manual Options DRN and Point Number Mode Confirmation Maintenance operations differ slightly among the pipelines. By default FGT displays the Data Reference Number (DRN) location while TW displays the Loc Prop number. The DRN is the NAESB-defined method for identifying location. As shown in 11 and 12 either the button title or the field name changes depending upon which mode you select. Figure 11. Confirmation Maintenance View DRN and Point Modes (FGT, and TW) Figure 12. Confirmation Maintenance View POI and Point Modes (TW and FGT) H:\PERSONAL\WebForms\Manuals\OperatorConfirmations111908b.doc 34 TMS Web Operator Confirmation User Manual Figure 13. Options Menu Item and Subfunctions Function Display Numbers Hot Keys None By DRN Notes DRNData Reference Number. A NAESB-defined generic location number. The DRN Mode enables the user to view and input information via the DRN code values. Selecting DRN Mode from the menu invokes the button. Display Numbers None By Loc Prop (POI) - LOC Loc PropPipeline Proprietary Location Number. The Loc Prop mode enables you to view and input information via the POI code values. FGT does not use proprietary location numbers. Selecting Loc Prop from the menu invokes the Loc button. Display Names Name Icon None The Display Names mode enables you to view the names tied to the DRN and Loc numbers of the line items in the matrix area. In other words, when in DRN or Loc mode you view the DRN number under the Rec Loc and Del Loc fields and in Loc Prop mode you view POI number under the Rec Loc and Del Loc fields. Under the Display Names mode you view the names associated with these numbers. While in Display Names mode when you highlight a line item in the Matrix area you can still view the associated DRN and Loc Prop numbers for that line item in the Form area. H:\PERSONAL\WebForms\Manuals\OperatorConfirmations111908b.doc 35 TMS Web Operator Confirmation User Manual Nomination Maintenance Screen Field Help Field Name Definition Begin/End Dates The start and end dates are entered for every nomination on the contract and can be adjusted separately for each nomination. The start date is the date the gas will begin flowing. The end date is the date the gas will stop flowing. The end date defaults to the corresponding end of the month. The service requester’s end date can be up to the termination date of the contract. Svc Req K Identifies the upstream/downstream contract at the respective receipt/delivery location. The Service Requester contract number is required for all storage, Park N Ride, and pool locations. The system will validate the Service Requester contract entered and display the correct DUNS number in the ID Code field after you leave this field. A Non-Service Requester Contract number is required at all physical locations. This field can be an alphanumeric field. The DUNS number must be manually entered in the ID Code field when entering a Non-Service Requester contract. The nomination cycle associated with the nomination. It is systemgenerated at the time of save. The valid cycles follow: Timely Evening Intraday 1 Intraday 2 Final AM The downstream contract party’s Duns #. It is populated automatically when a Service Requester contract number is entered in the Delivery Contract field. The system will validate the DUNS number. Represents the receipt/delivery location for your nomination on your contract. Cycle Dn ID Loc Package ID An optional field that may be used to describe the nomination at a lower level. Quantity The amount of gas that the service requester will receive from or deliver to the market. Rank The receipt/delivery priority (1 to 999) assigned by the service requester to identify the order of which gas should be scheduled by the pipeline. The higher the rank number, the greater the risk of being cut. For example, gas H:\PERSONAL\WebForms\Manuals\OperatorConfirmations111908b.doc 36 TMS Web Operator Confirmation User Manual Field Name Definition assigned a rank of 99 will be cut before gas assigned a rank of 1. If no rank is entered, the system will default to 500. Receipt Time The nomination timestamp for transactions. It is system generated at the time of input and save. Source ID The way in which the nominated transactions were entered (in other words, on-line or EDI). The source ID is system generated. Nom Trk ID The number used to track the nomination line item to the quick response and scheduled quantities. Applies only to nominations sent via EDI. The nomination originator creates the tracking number. TT Identifies the transaction type of the nomination. Up ID The upstream contract party's Duns #. Dn K Identifies the downstream contract at the delivery location. Up K Identifies the upstream contract at the receipt location. H:\PERSONAL\WebForms\Manuals\OperatorConfirmations111908b.doc 37 TMS Web Operator Confirmation User Manual Confirmation Summary The purpose of the Confirmation Summary screen is to provide operators a view of their daily and monthly scheduled gas quantities at their locations. They can view these gas quantities by location, DUNS Identification, or operational balancing agreement/delivery point operator agreement. Loc or Loc Prop Provides a summary for the location number specified for the date range selected. ID Provides a summary of all locations assigned to a particular ID or Legal Entity for a specified date range. Note that FGT use the DUNS number in place of Legal Entity. OBA/DPOA Provides a summary of any quantities scheduled for the locations on an OBA/DPOA contract. Figure 13. Confirmation Summary Screen See the Confirmation Summary Screen Field Help section on Page 42 for detailed definitions of each of the fields and column headings on the Confirmation Summary screen. The instructions below explain how to view Confirmation Summary. View Confirmation Summary 1. Select Confirmation|Confirmation Summary from the TMS Main Menu. The Confirmation Summary screen opens. 2. Click the down arrow in the TSP field and select Florida Gas Transmission Company, or Transwestern Pipeline Company. H:\PERSONAL\WebForms\Manuals\OperatorConfirmations111908b.doc 38 TMS Web Operator Confirmation User Manual 3. Click the down arrow and select the desired Loc, ID, or OBA/DPOA number (mandatory). Loc or Loc Prop Displays only the specified location. ID Displays all locations that are operated by the specified ID. OBA/DPOA Displays all locations on your OBA/DPOA contract. 4. Confirmations are effective over a date range. Type the begin date of the desired date range in the Beg Date field then tab, or use calendar or next, previous arrows. Type the end date of the desired date range in the End Date field then tab, or use calendar next, previous arrows. 5. Click Retrieve. The Confirmation Summary screen displays the nominated, confirmed, scheduled, makeup, and measured quantities with a variance and percentage calculation of scheduled vs. measured (Figure 14). Actual measured quantities have approximately a two-day lag time. The variance calculation uses the estimated quantity if the actual quantity is blank. Total quantities at the bottom of the screen for the Loc, ID, or OBA/DPOA number are summed over the specified date range. For example, if you select by OBA/DPOA contract, you will see the total quantities for all locations on the contract (Figure ). H:\PERSONAL\WebForms\Manuals\OperatorConfirmations111908b.doc 39 TMS Web Operator Confirmation User Manual Figure 14. Confirmation Summary Screen 6. Highlight a single location on the Confirmation Summary screen (Figure 14). 7. Click Detail to access the daily quantity information for the date range that you selected. A new Confirmation Summary screen overlays the one discussed in Step 6 above and displays the daily detail. H:\PERSONAL\WebForms\Manuals\OperatorConfirmations111908b.doc 40 TMS Web Operator Confirmation User Manual 8. Click Cancel. You are returned to the original Confirmation Summary screen where you can select another Loc, ID, or OBA/DPOA number to view. H:\PERSONAL\WebForms\Manuals\OperatorConfirmations111908b.doc 41 TMS Web Operator Confirmation User Manual Confirmation Summary Screen Field Help Field Name Definition Actual Total physical flow at the location from measurement. Btu British Thermal Unit. Conf Makeup Total quantity confirmed by the pipeline at the location. Conf Qty Total quantity confirmed by the operator at the location. Gas Date The date the gas is scheduled to flow. Nom Qty Total quantity nominated by service requesters at the location. Sched Qty Total quantity scheduled by the pipeline at the location. Estimated Total estimated physical flow at the location from measurement in Dth. Loc The location where the quantity will be scheduled. Nom Makeup Total quantity nominated for makeup at the location. Pct The percent variance calculated between current scheduled and actual. Sched Makeup The total quantity scheduled as makeup by the pipeline at the location. Var Calculated quantity difference between current scheduled and measured or actual flows. ID Operator DUNS number. OBA Operator Balancing Agreement DPOA Delivery Point Operator Agreement. Sched Total Total quantity scheduled between sched qty., and sched makeup. H:\PERSONAL\WebForms\Manuals\OperatorConfirmations111908b.doc 42 TMS Web Operator Confirmation User Manual EDI Confirmation Response View Screen The purpose of the EDI Confirmation Response View screen is to provide on-line capability for viewing reduction reason messages, error/warning messages, and the status of the EDI files sent via the Internet. Three status codes are used. AE One or more quantities were not confirmed. Remainder of batch accepted. AK All quantities confirmed. Conditions exist that create one or more warnings. AT All quantities confirmed as requested. Following are instructions for using the EDI Confirmation Response View screen. 1. Select Confirmation|EDI Quick Response on the TMS Main Menu. The EDI Confirmation Response View screen opens (Figure15). The TSP field defaults to the pipeline for which you have TMS security rights: Florida Gas Transmission Company, or Transwestern Pipeline Company. Figure 15. EDI Confirmation Response View Screen 2. Click the down arrow in the Trading Partner field and select a specific trading partner from ll to invoke all trading the drop-down menu that appears or, allow the field to default to aall partners. H:\PERSONAL\WebForms\Manuals\OperatorConfirmations111908b.doc 43 TMS Web Operator Confirmation User Manual 3. Click in the Submit Date field and type the desired date in mmddyy format or use the ield ddefaults efaults tto o tthe he ccurrent urrent he SSuubmi bmitt D attee ffield Da calendar or next, previous date arrows. TThe ccalendar alendar dday. ay. 4. Click Retrieve. The menu lists the status of confirmations submitted via EDI. 5. Click on the confirmation response line for which you want to view the warning or error messages. Messages display in the area positioned below the Matrix area. The information available on this screen is systematically sent back to the service requester or agent in an EDI transmission. 6. Click Cancel to close the EDI Confirmation Response View screen. 7. Click Print to print this screen. 8. Click Export to down load into a file on your PC. EDI Confirmation Response View Screen Field Help Field Name Definition Beg/End Date The nomination beginning and ending date range. Location (Loc Prop) Represents the receipt/delivery location for your nomination on your contract. Conf Rsp Status Transaction status codes. Quick Rsp Status AE One or more quantities were not confirmed. Remainder of batch accepted. AK All quantities confirmed. Conditions exist that create one or more warnings. AT All quantities confirmed as requested. Loc Prop (Location) Represents the proprietary receipt and/or delivery location. Submit Date The date the EDI confirmations were submitted. Tracking Number The tracking number is created and submitted by the sender of the Request for Confirmation. The tracking number is sent back in the EDI confirmation response and confirmation response quick response to help the operator locate the quantity(s) reduced, warning(s) or error(s) in their confirmation file. Trading Partner The name of the operator or agent submitting the EDI confirmations. Trading Partner (TP) The DUNS Number of the operator or agent submitting the H:\PERSONAL\WebForms\Manuals\OperatorConfirmations111908b.doc 44 TMS Web Operator Confirmation User Manual Field Name Definition DUNS EDI confirmations. TSP Transportation Service Provider. The pipeline providing the service. For EDI transactions, this is the pipeline DUNS number. (Transportation Service Provider) Reduction Reason Code This code is the EDI reduction reason code. It is generated as a result of TMS processing the operator or agent submitted EDI confirmation file. Reduction Reason Message The reduction reason message is the text definition of the EDI reduction reason code. Operator Choice Selection The Operator Choice Selection option allows you or your agent/designee to take an Active or Passive role at a location level in the confirmation process. The Operator Choice Selection option default is Active for all your locations. If you choose to change the status of a location, please contact your market service representative to acquire the Request for Operator Choice form. You may terminate or change this option on a monthly basis by providing written notice to your Market Service Representative two business days prior to the beginning of the month. For Timely nomination, if no confirmation is received from you, the confirmed quantity defaults to the previous day’s Timely scheduled quantity. For Intraday nominations, if no Intraday confirmation is received from you, the confirmed quantity defaults to the previous cycle’s scheduled quantity. The active/passive roles may override these defaults. Active Confirmation Location An Active operator will be required to provide a confirmation quantity for all Active confirmation locations during all cycles including Timely and all other Intraday confirmation cycles. If you are confirming for a range of days at an active location, the confirmation quantity will be used during the Timely confirmation for each day within that range. Passive Confirmation Location A Passive operator will be required to provide a confirmation quantity for all passive confirmation locations during the Timely confirmation cycle. TMS will then copy the Timely confirmation quantity to each confirmation Intraday cycle. H:\PERSONAL\WebForms\Manuals\OperatorConfirmations111908b.doc 45 TMS Web Operator Confirmation User Manual If you are confirming for a range of days at a passive location, the confirmation quantity will be used during the Timely confirmation for each day within that range. Then TMS will copy the Timely confirmation quantity to each confirmation cycle for all Intraday cycles for those dates. The operator will also have the option of overriding the passive confirmation by inputting a different quantity. If the operator manually overrides the confirmation on a passive confirmation location, that override will remain in effect for all Intraday cycles for that specific gas date. Confirmations By Exception TW will automatically confirm ALL NOMINATIONS for the operator’s or the agent’s specified location(s). All confirmed quantities will equal nominated quantities for all cycles. Operators will be able to change any confirmation that is automatically confirmed by TW during any cycle. Any manual change made by the operator will remain in place for the entire gas day. NOTE: Confirmations spanning multiple days will be used only during the Timely cycle for each of those days. If the operator is an active operator at a location, he must still come in and confirm during each cycle. The Intraday confirmations pertain only to Intraday nominations and they do not copy over to the next gas date. View Operator Makeup Nominations The purpose of viewing request for makeup nominations on the Confirmation Maintenance screen is to verify that the pipeline has accepted your request(s) for makeup and scheduled appropriately. An operator or shipper can nominate makeup nominations on the pipeline. However, operators cannot confirm makeup nominations. Only internal pipeline service representatives can confirm them. These transaction types are identified by 04 or 03 transaction type codes. If a confirmed quantity appears in the Conf column, this means the pipeline has processed your request for makeup and will schedule the gas during that cycle. If no quantity appears in the Conf column, the pipeline will not schedule your request. H:\PERSONAL\WebForms\Manuals\OperatorConfirmations111908b.doc 46 TMS Web Operator Confirmation User Manual Scheduling Scheduling is the process of determining the amount of gas to flow through the pipeline on a particular gas date. This scheduled amount of gas is based on nominations submitted by service requesters. Service requesters (the receipt and delivery links in the gas flow chain) may nominate conflicting gas quantities; for example, a service requester may nominate to deliver more gas than another service requester has nominated to receive from that service requester. These discrepancies are rectified during the Scheduling process. Scheduling is comprised of three major steps: Balancing, Allocation, and Confirmation. The amount of gas scheduled may differ from the nomination amount due to any of these three steps. Balancing During balancing, the pipeline ensures that all nominations across the pipeline (buys vs. sells) are matched. If the nominations do not match, then the pipeline will reduce the nominations using service requester ranks to ensure balancing. Allocation The allocation process looks at any points or areas on the pipeline that have been nominated over capacity. The pipeline will reduce the service requester nominations down to the point/area capacity based on tariff capacity rules. Confirmation The purpose of Confirmation is to confirm gas flows between interconnecting parties and request makeup nominations to and from the pipeline. The Scheduling system uses the Lesser of Rule when processing Confirmation requests. The Lesser of Rule means that if the amount of gas confirmed at a location conflicts with the amount of gas scheduled for that location, whichever is the smaller amount will end up being the amount scheduled for that location. This section explains how to view the scheduling process on each pipeline and how to view scheduling quantities for all locations that the operator confirms. Following are the screens discussed in this section: Scheduling Quantities by Location (47) Batch Schedule Status Scheduling Quantities By Location The purpose of this screen is to provide the operator with a summary of their operator scheduled quantities by location. Following are instructions for viewing the Scheduling by Location screen. H:\PERSONAL\WebForms\Manuals\OperatorConfirmations111908b.doc 47 TMS Web Operator Confirmation User Manual View Scheduled Quantities by Location 1. Select Scheduling|Scheduled Quantities by…|by Location. The Location Quantity Summary List screen appears. Figure 16. Location Quantity Summary List Screen 2. Click the down arrow in the TSP field and select Florida Gas Transmission Company, or Transwestern Pipeline Company. 3. Tab to the Loc Prop field and type the appropriate location number. 4. Type the start and end dates in the Beg/End Date fields and tab or use calendar or next, previous arrows. 5. Click Retrieve. The Matrix area of the Location Quantity Summary List screen populates with the nominated and scheduled totals by day. 6. Highlight a specific gas date in the Matrix area. 7. Click Detail. The Location Qty Detail List screen appears (Figure 16). It displays a detailed list of the service requesters who nominated at the selected location for that gas date. The service requester name and contract number will appear along with the quantities that the pipeline scheduled for each service requester’s contract. H:\PERSONAL\WebForms\Manuals\OperatorConfirmations111908b.doc 48 TMS Web Operator Confirmation User Manual Figure 17. Location Qty Detail List Screen 8. Click (X) to exit the Location Qty Detail List screen. You are returned to the Location Quantity Summary List screen. 9. Highlight another gas date to view the detail quantity list, or 10. Click Print to print the screen. 11. Click Export to save the screen in a file or your PC. 12. Click Cancel to clear the Scheduling By Location Screen data Request. Batch Schedule Status The purpose of the Batch Schedule Status screen is to provide the customer a view of the processing cycles for a given gas date. This screen displays three successive gas dates (current, prior, and next day). The cycles identify which process is completed or currently processing. Once a cycle has completed processing, the scheduled quantities are available to view through either the Scheduled Quantities by Location or the Confirmation Maintenance screen. 1. Select Scheduling|Batch Schedule Status from the TMS Main Menu. The Batch Schedule Status screen opens (Figure 17). H:\PERSONAL\WebForms\Manuals\OperatorConfirmations111908b.doc 49 TMS Web Operator Confirmation User Manual Figure 18. Batch Schedule Status Screen 2. Click the down arrow in the TSP field on the Batch Schedule Status screen and select Florida Gas Transmission Company, or Transwestern Pipeline Company. 3. Type the gas date in the Date field and tab or use the calendar or next, previous arrows. 4. Click Retrieve. The data will be displayed when the balancing and/or the confirmation and scheduling processes are completed for the three daily cycles (current, prior, and next day). 5. Click Cancel to exit this screen. You are returned to the TMS Main Menu screen. 6. Click Print to print the screen. H:\PERSONAL\WebForms\Manuals\OperatorConfirmations111908b.doc 50 TMS Web Operator Confirmation User Manual Reporting The reporting feature allows you to view on-line or print hard copies of an operator scheduled quantities report. How to view, print, and export the Scheduled Quantities Report is discussed below. View and Print Scheduled Quantities Report 1. Select Reporting|Reports|Scheduled Quantities Report from the TMS Main Menu. The Scheduled Quantities Reports screen opens (Figure 19). Figure 19. Scheduled Quantities Reports Screen 2. Click the down arrow in the TSP field and select Florida Gas Transmission Company, or Transwestern Pipeline Company. 3. Click the down arrow on Scheduled Quantities for Operator and select operator. 4. Type the gas date in the gas date field and tab or use the calendar or next, previous arrows. 5. Click the down arrow on the sort field and select the sort option. 6. Click the down arrow on Location, ID, or contract number and type the appropriate number in the field selected. NOTE: Operators can only see the locations that are tied to their ID. H:\PERSONAL\WebForms\Manuals\OperatorConfirmations111908b.doc 51 TMS Web Operator Confirmation User Manual 7. Click Submit view the selected operator data. The Operator Confirmation Report opens (Figure20). The nominated and scheduled quantity information for the receipts and deliveries that you operate will display along with the month-to-date quantities. Figure 20. Operator Confirmation Report 8. Click on the scroll bar to scroll through the pages of the report. 9. Click Print to print the report. The print option box opens. 10. Click properties on the print option and select Landscape Orientation. Then click advance to select paper size legal in the drop down list and click Ok twice to activate the print. 11. Click in the upper left corner of the page on the “click here to save the following report to Excel” data field to export the report to your PC. 12. To close the view screen: a. Click the button in the top right corner of the screen. You are returned to the Scheduled Quantities Reports screen. H:\PERSONAL\WebForms\Manuals\OperatorConfirmations111908b.doc 52 TMS Web Operator Confirmation User Manual b. Click on the Scheduled Quantities report. You are returned to the TMS Main Menu screen. H:\PERSONAL\WebForms\Manuals\OperatorConfirmations111908b.doc 53 TMS Web Operator Confirmation User Manual NOTE: The Scheduled Quantities Reports screen will be available to view and print throughout the day. For Timely Scheduled Quantities, this screen will be available to view and print on-line at 4:30 p.m. CCT one day prior to gas flow and after each Intraday cycle. Please keep in mind that the quantity shown is based on the scheduled quantities in place at the time you retrieve the report and is subject to change as each batch process is completed or as Intraday nominations are scheduled. NOTE: Reports will be available on-line for the prior six months. H:\PERSONAL\WebForms\Manuals\OperatorConfirmations111908b.doc 54 TMS Web Operator Confirmation User Manual TMS Generic Screen Functions Following are detailed descriptions of the basic screen functions that are generic to the TMS program. The other sections of this manual reference these functions. System Tool Bar Icons (55) Search Facility Option (56) Sort (63) Print (65) Export (66) Each of the above-mentioned functions is explained in detail below. System Tool Bar Icons The following tool bar icons are used generically throughout the TMS program. Icon Notes Saves all current updates to the database if all validation criteria are met. If an error message appears, changes will not be saved. All error messages must be adjusted and corrected before the nomination can be saved. Retrieves pre-existing data for the gas date selected. Retrieves pre-existing data for the gas date selected. Re-retrieves the contract you already have open. Deletes selected information at a line item level. Only paths that have not been scheduled can be deleted. Path rate information can be viewed for the nomination path detail line that you have highlighted in the Matrix area. This rate is based on the information available at the time of nomination and is subject to change. Receipt Total. Sums all applied receipt location totals in location number order for the gas date of the path highlighted in the Matrix area. Displays location number, location name, and total POI quantity. Delivery Total. Sums all applied delivery location totals in POI number order. Displays location number, location name, and total POI quantity. H:\PERSONAL\WebForms\Manuals\OperatorConfirmations111908b.doc 55 TMS Web Operator Confirmation User Manual Sorts all applied data fields available in the Selection View screen (ascending or descending order) based on the selection criteria the user selects. Prints the entire nomination detail for the contract that you have open regardless if all paths have been saved. Exports data on the screen that you have open to a Tab delimited file. You can then customize the data into your own file as needed. Identifies the type of transaction that you are going to enter in the data fields. For transportation contracts, the system defaults to a path transaction that requires both receipt and delivery information to be entered in the data field. Identifies only the receipt side of the data fields. Use this for receipt makeup only transactions on a contract, such as pooling, makeup, or Park N Ride. When you select the Rcpt Icon, the system removes the delivery input data fields and defaults the Transaction Type to code 03 which is imbalance payback to the pipe. Identifies only the delivery side of the data fields. Use this for delivery makeup only transactions on a contract, such as pooling, makeup, or Park N Ride. When you select the Delv icon, the system removes the receipt input data fields and defaults the Transaction Type to code 04 which is imbalance payback from the pip333e. Closes the Nomination Maintenance screen and returns you to the main menu. Search Facility Option Four basic search options are available to you in the TMS system: Search (Contract and Point) Location Search Location Detail Information Receipt Locations Valid for Contract The type of search you can perform depends upon the field from which you invoke the search option. For example the Svc Req K field invokes the Search option. The *Loc Prop field invokes the Location Search, Location Detail Information, and Receipt Locations Valid for Contract options. H:\PERSONAL\WebForms\Manuals\OperatorConfirmations111908b.doc 56 TMS Web Operator Confirmation User Manual T maannuuaall Thhee sseeaarrcchh ssccrreeeennss m maayy vvaarryy sslliigghhttllyy aaccrroossss tthhee ppiippeelliinneess;; tthhuuss,, tthhiiss m sshhoow wss ssccrreeeenn sshhoottss ffoorr eeaacchh ppiippeelliinnee.. NOTE: Once you have performed a search and have retrieved a list of data, you can sort that data in various ways. See the Sort section beginning on Page 63 for detailed instructions. Search and Location Search Options The Search and Location Search menu options work similarly; thus, both operations are explained in this section. 1. Click in either a location type field , 2. or a contract type field on the screen you are currently viewing. The related Lookup Facility screen appears (Figure through Figure21). Figure 21. Contract Search ScreenFGT & TW H:\PERSONAL\WebForms\Manuals\OperatorConfirmations111908b.doc 57 TMS Web Operator Confirmation User Manual Figure 22. Location Search ScreenFGT, and TW 3. Click the radio button to the left of the desired search method so that it turns black (Figure through Figure 22. Follow the individualized instructions below for each of the search scenarios. Name Begins With Name Begins With searches on company name. a. Type the first letter or the first few letters that you know of the contract name in the Name Begins With field. b. Click Find. The display area populates with all contracts available to your logon ID beginning with the letter(s) you typed. c. Click the select box on the contract in the scroll list that you want to retrieve. You are returned to the screen from where you initiated the search. Its fields are now populated with related data. d. You are now ready to perform operations on the contract you invoked. Name Contains Name Contains searches on company name. a. Type any portion of the contract name that you know in the Name Contains field. H:\PERSONAL\WebForms\Manuals\OperatorConfirmations111908b.doc 58 TMS Web Operator Confirmation User Manual b. Click Find. The display area populates with all contracts available to your logon ID that contains the letter(s) you typed. c. Click the select box on the contract in the scroll list that you want to retrieve. You are returned to the screen from where you initiated the search. Its fields are now populated with related data. d. You are now ready to perform operations on the contract you invoked. Svc Req K Svc Req K searches on contract number. a. Type a range of contract numbers on which you want to perform a search in the Number field. b. Click Find. The display area populates with all contracts available to your logon ID within the range of contract numbers you typed. c. Click the select box on the contract in the scroll list that you want to retrieve. You are returned to the screen from where you initiated the search. Its fields are now populated with related data. d. You are now ready to perform operations on the contract you invoked. Loc Prop Loc Prop searches on location numbers. a. Type a range of Location numbers on which you want to perform a search in the Loc Prop field. b. Click Find. The display area populates with all contracts available to your logon ID within the range of location numbers you typed. c. Click the select box on the contract in the scroll list that you want to retrieve. You are returned to the screen from where you initiated the search. Its fields are now populated with related data. d. You are now ready to perform operations on the contract you invoked. Location Location searches on DRN numbers. H:\PERSONAL\WebForms\Manuals\OperatorConfirmations111908b.doc 59 TMS Web Operator Confirmation User Manual e. Type a range of DRN numbers on which you want to perform a search in the Location Number field. f. Click Find. The display area populates with all contracts available to your logon ID within the range of DRN numbers you typed. g. Click the select box on the contract in the scroll list that you want to retrieve. You are returned to the screen from where you initiated the search. Its fields are now populated with related data. h. You are now ready to perform operations on the contract you invoked. H:\PERSONAL\WebForms\Manuals\OperatorConfirmations111908b.doc 60 TMS Web Operator Confirmation User Manual Receipt/Delivery Locations Valid for Contract The Receipt|Delivery Locations Valid for Contract search screens (Figure 19 & 20) can only be invoked from the Nomination Maintenance screen. It displays only those locations that are valid for the contract you have invoked when nominating operator imbalance gas. The instructions below explain how to use the Receipt|Delivery Locations Valid for Contract search screens. Figure 19 & 20. Receipt and Delivery Locations Valid for a Contract 1. On the Nomination Maintenance screen click in either the Location field or the Loc Prop field (depending upon your pipeline view). The Receipt|Delivery Locations Valid For Contract screen appears and displays all valid locations for your contract (Figure 19 & 20). 2. Click on the select box for the desired location in the Matrix area of the screen. The screen from which you initiated the search will populate with the selected point. H:\PERSONAL\WebForms\Manuals\OperatorConfirmations111908b.doc 61 TMS Web Operator Confirmation User Manual Location Detail Information Display The Location Detail Information Display search screen can only be invoked from the receipt / delivery locations valid for contract screen. It displays specific information related to the point that you select in the Location matrix area of the screen. (Figure 19 & 20) Figure 21. Loc. Detail Info. DisplayFGT and TW 1. Enter a location number in either the Location field or the Loc Prop field (depending upon your pipeline view). 2. Click on the detail box for the desired location in the matrix area of the screen. 3. The Location Detail Information Display screen appears. It displays information related to the location you selected (Figure21). 4. If you want to view the details of another location, click on the detail box for the desired location. 5. Click Cancel to close the Location Detail Lookup Search Information Display screen. H:\PERSONAL\WebForms\Manuals\OperatorConfirmations111908b.doc 62 TMS Web Operator Confirmation User Manual Sort Sorts are performed in basically the same manner on all screens. The various sort options are explained below. Data Sorts 1. Click Multi Sort Icon. The Sort Criteria View screen appears (Figure 23). NOTE: You can also invoke the sort option by clicking in the Matrix area of the screen. H:\PERSONAL\WebForms\Manuals\OperatorConfirmations111908b.doc 63 TMS Web Operator Confirmation User Manual Figure 23. Sort Criteria View 2. Select the order of rank in the rank column beginning with the number 1 in the first column you wish to sort. Continue with the additional field sorting by sequentially numbering the column field names you wish to sort (2, 3, 4…) 3. Click either Ascending or Descending depending on the direction that you want to sort. 4. If you change your mind and do not want to sort on one of the variables you have selected, Click reset to clear the sort or change the rank column to the new rank number. 5. Click Submit to activate the sort function on the active screen. H:\PERSONAL\WebForms\Manuals\OperatorConfirmations111908b.doc 64 TMS Web Operator Confirmation User Manual 6. Click Cancel to close the multi Sort screen. Column Sorts You can perform a sort on a specific data column. The explanation follows. 1. Click on a column header. For example, toggle. . The sort option on these columns is a 2. Click once and it sorts in ascending direction 3. Click again and the system toggles to sort in the descending direction . . Print 1. Click Print. The print option box appears. 2. Select the Printer you wish to print to. 3. Click on Lay Out Option. 4. Select Landscape. 5. Click Advanced Option if your wish to change the paper size from letter to legal and click Ok. 6. Click Print Option to print. H:\PERSONAL\WebForms\Manuals\OperatorConfirmations111908b.doc 65 TMS Web Operator Confirmation User Manual Export You can export a file from any TMS screen that has the Export icon; for example, the Scheduled Quantity By Cycle screen (Figure 24). Figure 24. Scheduling Maintenance Screen 1. Retrieve the contract that you want to export. 2. Click Export. The Screen Data displays in a file format layout. 3. Click file, save as. The name file to be exported appears (figure 25) H:\PERSONAL\WebForms\Manuals\OperatorConfirmations111908b.doc 66 TMS Web Operator Confirmation User Manual Figure 25. Name File to be Exported Screen 4. Click in the File name field and change the file name if necessary and add the extension for the file type you want to use. For example, .xls for an Excel file. Select the Directory file on your PC. 5. The Files of type field is not active. Select the type of file. 6. Click Save. All data related to the selected contract is exported to the specified directory. NOTE: To ensure that you have access to your exported files after disconnecting, you must download them to your local PC. Cancel Click to exit or clear the screen. H:\PERSONAL\WebForms\Manuals\OperatorConfirmations111908b.doc 67


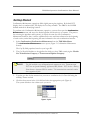


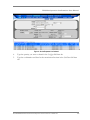

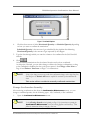
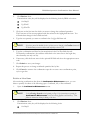

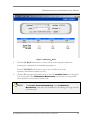

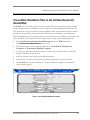
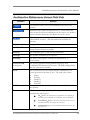


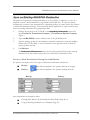
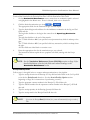

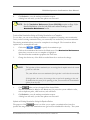
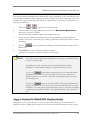
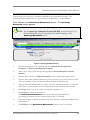

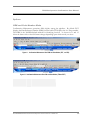
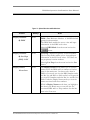
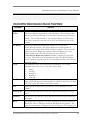

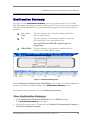


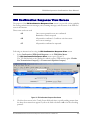


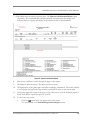


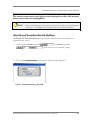
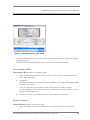

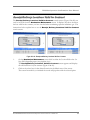


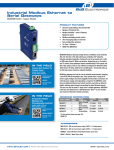


![EnergyAccessOnline User Manual[1]](http://vs1.manualzilla.com/store/data/005906408_1-e15b8e64694c6ea91dc3f2c3109f09fc-150x150.png)