1
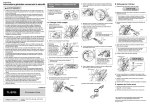
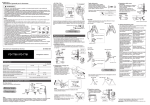
AEC7720U
AEC7720UW
User’s Manual
Ver : 1.01
Copyright
©
2000ACARD Technology Corp.
-1-
INDEX
Chapter 0 About the SCSIDE ......................................................3
Chapter 1 Introduction.................................................................5
1.1 Overview ........................................................................5
1.2 Feature..........................................................................5
1.3 Specification ..................................................................6
Chapter 2 Hardware Installation ...................................................9
2.1 Installing host adapter.....................................................9
2.2 IDE to SCSI Transfer Card Notice :................................. 10
2.3 AEC7720U/UW installation............................................ 11
Chapter 3 Troubleshooting......................................................... 15
3.1 Basic troubleshooting ................................................... 15
3.2 Advanced Troubleshooting............................................. 16
Technical Support Form .............................................................. 27
-2-
Chapter 0
About the SCSIDE
Before you use the AEC7720U/AEC7720UW
SCSIDE® is a revolutionary invention developed by ACARD
Technology Ltd. It not only offers the unprecedented functionality of
converting IDE data flow into SCSI bus, but also minimize the
converting overhead. This technology has opened up a numbers of
possibilities of SCSI applications to use less expensive IDE device.
The following examples are just a short list of the SCSIDE®
application.
1.
2.
3.
4.
5.
Convert IDE hard drive into an external SCSI hard drive for data
backup in notebook and desktop PCs.
Convert IDE 50X CD-ROM into a 50X Ultra SCSI CD-ROM. Which
is brand new in the world.
Convert your favorite IDE DVD-ROM into a Ultra SCSI DVD-ROM.
Create a DVD-ROM Server by daisy chain Multiple SCSIDE®
DVD-ROM.
Convert 5400rpm or 7200rpm DMA33/66 HD into UW-SCSI HD for
PC Workstation, PC Server, even for Unix Workstation and
Server.
The basic architecture of SCSIDE® is a highly integrated multi CPUs
“System On a Chip” design. This SOC design utilizes ACARD
Technology’s many years expertise in IDE, SCSI and RISC CPU chip
design. As illustrated in the following diagram, this SOC has multiple
CPUs, its own ROM and RAM, DMA controllers and external ROM
interface for flash-ROM firmware update. ACARD Technology has also
polished the firmware design to make the IDE to SCSI conversion a
truly “plug and play” experience. The firmware has been test with
almost all brands of IDE DMA33/66 HD, ATAPI CD-ROM, DVD-ROM.
No matter what type of IDE device you have, ATA hard drive, CD-ROM,
(CD-RW with limited support ; see2.2) or DVD-ROM, you can easily
plug it on and ready to enjoy your SCSI adventure.
Because of this intelligent firmware design, you don’t have to install
driver to on you OS to use SCSIDE® series of products. To the OS, it
acts like a SCSI device, just plug and play.
-3-
The Design Objectives of SCSIDE®:
The primary goals for ACARD’s SCSIDE® technology has three folds:
1. Bring down the cost of using SCSI technology by less expensive
device.
2. Create some application the people want but currently not
available (50X SCSI CD-ROM, high speed SCSI DVD-ROM).
3. Transparent plug and play, no software driver needed (to installed)
when converting IDE device into SCSI device.
Welcome, our new SCSIDE members and enjoy it.
-4-
Chapter 1
Introduction
1.1 Overview
The AEC7720U/UW Ultra/Wide SCSI-IDE bridge is dedicate as
general-purpose bridge of SCSI (Small Computer System Interface) to
IDE(Integrated Device Electronics) interface. With ACARD
micro-controller core built-in, it provides more flexibility and stability
for highly exploring application.
AEC7720U/UW supports IDE devices such as hard disk drive,
CD-ROM, CD-R, (CD-RW with limited support ; see 2.2)DVD-ROM,
etc. which can be easily attached to SCSI bus.
1.2 Feature
l
l
l
l
l
On-chip high speed ACARD RISC micro-controller,
SCSI controller, IDE controller and interfaces.
SCSI host interface synchronous transfer rate up to 20 MB/sec
(AEC7720U) Ultra SCSI or 40MB/sec (AEC7720UW) for Ultra
wide SCSI transfer.
Full SCSI target features support.
Programmable IDE access modes, including
PIO mode 0,1,2,3,4
Multiword DMA mode 0,1,2
Ultra DMA mode 0,1,2(with transfer rate up to 33.3 Mbytes/s)
Onboard flash ROM for easy firmware upgrade.
-5-
1.3 Specification
1.3.1 Packing List
Please check the following packing list.
l
AEC7720U/UW bridge adapter
4 pin Y splitter power cable (option)
l
1.3.2 Parts specification
1.
AEC7720U/UW
Environment - Temperature
Operating 0 °C to 70 °C
Storage -20 °C to 85 °C
Humidity
Dimensions
-
15% to 90%
-7720U
- Length: 8.8cm
- Width : 3.8cm
- Height: 2.5cm
AEC7720U Cable
cable
AEC7720UWCable
cable
7720UW
12 cm
3.8 cm
2.5 cm
- 50 pins female to 50 pins female round
- 68 pins male to 68 pins male round
-6-
AEC7720U Bridge Adapter
n
CN1 - 40 pins female IDC IDE port
n
CN2 - 50 pins SCSI connector
n
CN3 - 4 pins power connector
n
JP1 - SCSI ID Switch connector
n
JP2 - Terminator
n
JP3 - Activity LED
n
JP4 – Terminator power supply switch, default is ON.
JP2
JP1
Terminator Connector
SCSI ID Swith Connector
CN2
SCSI Connector
CN3
Power connector
JP4 Terminator
CN1
IDE Port
Power supply
JP3 Active LED
SCSI Adapter (Option)
Please refer to SCSI adapter User’s manual
-7-
AEC7720UW Bridge Adapter
n
CN1 - SCSI ID Switch connector & Activity LED
n
CN2 - 68 pins SCSI connector
n
CN3 – Terminator power supply switch, deault is ON.
n
CN4 - Terminator
n
CN5 - 4 pins power connector
n
CN7 - 40 pins female IDC IDE port
CN1
CN1
SCSI ID Swith
Active LED
CN2
CN3 CN4
SCSI Connector
Terminator
And
terminator
Power
supply
CN5
Power
CN7 IDE Port
SCSI Adapter (Option)
Please refer to SCSI adapter User’s manual
-8-
connector
Chapter 2
Hardware Installation
The hardware installation may include two parts, the first part is a
simple SCSI host adapter installation, you use the AEC6712U/TU/UW
card (option) that come with the system. The second part is the
AEC7720U/UW installation, which is also straight forward, only take
about five minutes to complete. Please follow the following instruction.
Before you install an IDE device into the AEC7720U/UW, please
adjust the jumper setting.
You are about to connect an IDE hard drive on AEC7720U/UW,
please note that if you have a old disk which already have a
version of OS installed, we recommend that you re-partition
and re-install the OS after the hardware installation. It might
work even without re-install the OS at the beginning (for DOS
and Windows), but the way SCSI card commands are different
than the ON-Board IDE controller, it will create reading/writing
error, so we recommend that after hardware installation just
treat the IDE hard disk as the new disk.
2.1 Installing host adapter
For installing the host SCSI adapter, please refer to the
AEC6712U/TU/UW adapter manual comes together with
AEC7720U/UW kit or your original adapter supplier. Then, configure
your AEC6712U/TU/UW software driver using the supplied CD-ROM
disc.
Note: If you only have one CD-ROM or DVD-ROM and want to install
the CD-ROM, DVD-ROM into the AEC7720U/UW and you are
installing AEC 6712U/TU/UW SCSI card first time, your computer
might not recognize anyAEC7720U/UW because the software driver is
not installed. Before the SCSI card can recognize the SCSI device,
the software drive need to be installed. However, if the software driver
is in the CD disc, you may have to download the driver(s) into floppy
disc for ease of installation or download from our WEB site :
http://www.acard.com
-9-
2.2 AEC7720U/UW Bridge Notice :
2.2.1 Compatibility list of AEC7720U/UW
AEC7720U/UW were designed specifically for DMA Harddisk and
DMA CD-ROM , we have fully tested all kind of Harddisk available In
our lab , the compatibility with different SCSI card even Mac and Sun
workstation is very high. The support to most current model of
CD-ROM is also very good.
1.The AEC7720U/UW support all DMA33/66 Harddisk include :
IBM HDD
MAXTOR HDD
QUANTUM HDD
SEAGATE HDD
WESTERNDIGITAL HDD
2. Due to many generation and different speed of CD-ROM available
on the recent market .We tested and support the following models.
CD-ROM support been tested :
AFREEY 50X, 56X
ASUS 40X, 50X
AOPEN 48X
TEAC 40X
2.2.2 Special recommendation of using ACARD AEC7720U/UW
bridge With CD-RW
We have expanded the support to limited model of CD-RW (Ricoh
brand). To use AEC7720U/UW with CD-RW, there are special
recommendation to get to best CD-Recording result.
1.CD-RW model supported :
Due to different command set from different CD-RW vendor
especially the difference between IDE and SCSI model , we have
tested and picked the highest compatible CD-RW between IDE and
SCSI which is the following
Ricoh : 7060A, 7080A, 9060A
2.SCSI card supported :
- 10 -
Unlike the IDE HD and IDE CD-ROM which work with
AEC7720U/UW with high compability to all SCSI card , IDE
CD-RW with be recognized as IDE CD-RW by most CD recording
software even converted into SCSI function by AEC7720U/UW. As
a result the CD recording software will send out 12 byte IDE
command which need special SCSI cards that can handle this
properly are :
ACARD AEC 6712U
AEC6712TU
AEC6712UW
3. CD Recording software supported :
For IDE CD-RW converted to SCSI function to work properly not only
the AEC series SCSI cards must be used, but also the software
combination. At this stage only two software will work properly :
®
Adaptec EasyCD-creator
ACARD DupeBoy
2.3
AEC7720U/UW installation
2.3.1 3.5” drive or 5.25 drive
Since most of hard drives have size of 3.5” and CD-ROM / CD-R/W
have size of 5.25” ,AEC7720U/UW was designed for both 3.5’ and
5.25” size of device without any additional mounting kit. If you have a
3.5” of device, please mount it by following figure first. Then, install it
as the figure shown below.
2.3.2 Power Connection
Internal Power Connection
There are two different sizes of internal power connectors for device
and AEC 7720U/UW circuit board. Most of IDE devices use the
connector of bigger size, and the AEC7720U/UW board uses the
connector smaller size of. Please see the figures below for the way of
connection.
- 11 -
2.3.3 Cable Connection
Before you connect AEC7720U/UW board to your device, recognize
the different interface connectors of SCSI and IDE on the board. The
longer connector (AEC7200U CN2 ; see Page 8 / AEC7720UW
CN2 ;see Page 9) on circuit board, which has 50 pins/68 pins, is the
SCSI connector. The shorter one (AEC7720U CN1 ; see Page 8 /
AEC7720UW CN7 ; see Page 9 ) on opposite side with 40 pins is the
IDE connector. Inside the cabinet, there is only one SCSI ribbon cable
connection unused. Please note this connector will be connected to
AEC7720U/UW.
Step 1. Find out pin 1 of 40-pin IDE connector on AEC7720U/UW
board.
Step 2. Find out pin 1 of connector on your IDE device.
Step 3. Connect these two connectors aligning with pin 1 to pin 1.
Step 4. Find out pin 1 of 50-pin SCSI connector on AEC7720U/UW
board.
Step 5. Find out a color line of the internal SCSI ribbon cable
indicating pin 1 of connector.
Step 6. Connect the internal SCSI cable toAEC6712U/TU/UW aligning
with pin-1 to pin-1.
Step7. Connect 4-pin power cable to AEC7720U CN3,;see Page 8
AEC7720UW CN5 ; see Page 9 .
- 12 -
2.3.4 Configuring your AEC7720U/UW
Jumper Setting Power
Connection
There are three configurations have to be set upon AEC7720U/UW,
terminator enable / disable, terminator power on / off, and SCSI ID
number setup. Terminator power and SCSI ID number setup are
combined together as a module, which you can find
OFF
ON
behind the back of enclosure. And, you can see
terminator by just enable / disable jumper JP2 / JP4.
Please follow the instruction below and decide your
suitable jumper setting.
1
Terminator Enable / Disable. Generally, when
your device is at the end of the SCSI bus cable
or there is only one device on this cable, you
should set the terminator as enable. The default value is enable.
AEC7720U
JP2
AEC7720UW JP4
2
SCSI ID Number. For every unique device on one SCSI adapter
card, there is a unique ID number indicating that device. Follow
the instruction attached on enclosure to set an ID number until
your IDE device get a unique number.
AEC7720U
1 èON-SCSI ID 4
2 èON-SCSI ID 2
3 èON-SCSI ID 1
left
right
Default :All Off
- 13 -
1 2 3
AEC7720UW
1 ? ON-SCSI ID 1
2 ? ON-SCSI ID 2
3 ? ON-SCSI ID 4
4 ? ON-SCSI ID 8
5? LED
left
right
1 2 3 4 5
Default: All Off
3
Terminator Power. Default setting is on. However, you can turn
it on or off depends on different applications.
- 14 -
Chapter 3
Troubleshooting
3.1 Basic troubleshooting
If you install your AEC7720U/UW and it doesn’t function properly,
follow the basic troubleshooting below.
1.
Check host adapter.
Verify the adapter card is seated in its slot on the motherboard.
2. Check all connectors and cables.
Check bridge power connector, internal SCSI connector, internal IDE
connector, device power connector, and ribbon cable are connected
well. Ribbon cables are easily damaged because of un-proper fold.
You can try a new cable known to be good. Make sure no connector
pins are bent. Verify pin 1 on the interface cable is aligned with pin 1
on the drive and host adapter.
3. Verify the jumper setting.
Start over the section Configuring your AEC7720U/UW (Jumper
Setting and power connection) to check if the jumper setting is
correct.
4. SCSI ID conflict.
If you have multiple SCSI devices, please make sure that ID of the
SCSI device do not duplicate. To reduce the chance the ID switch
malfunction, it is recommended to test it individually.
5. Poor external cable problems.
This may happen if you daisy chained many SCSI device and some of
the external cables are not the high density 50 pins (or 68pins
UW-SCSI) cables. The 25pin to 50 pins SCSI cable has weak
grounding, so if you daisy chained more SCSI device to MAC through
the 25/50 pins SCSI cable and having intermittent failure, it is
recommended that you change this cable with another better quality
one.
- 15 -
3.2
Advanced Troubleshooting
Let’s use an example of installing a IBM DTTA-351010 hard drive into
AEC7720U/UW to show a proper way of software troubleshooting
(configuration). Assume that we set an SCSI ID number “0” to
AEC7720U/UW.
3.2.1 For Windows 95 System
1. Verify the SCSI host adapter.
Check the device name shown on the list of devices to see if the
device name of SCSI adapter is exact the one you have installed with
AEC7720U/UW.
The method of entering “Device Manger” is shown below.
Step 1. Enter “My Computer”.
- 16 -
Step 2. Double click on “Control Panel”.
Step 3. Double click on “System” Enter “Device Manager”. Click
once on “SCSI controllers” to check whether you installed your
ACARD AEC6712U/TU/UWS adapter properly.
- 17 -
2. Verify your IDE device.
If you can find your IDE device name which you install with
AEC7720U/UW on “Device Manger”, then you have installed your
AEC7720U/UW successfully. If you can’t find your device name but
find a yellow question mark “?” on head of device named SCSI-IDE
Bridge-No Device, check the internal IDE connector of
AEC7720U/UW. It could be caused by unsuitable connection or
malfunction IDE device. Follow the instruction below to see how to
check your IDE device.
Step 1. Click on “Disk drives” to show your hard disk drives and
floppy disk drives.
- 18 -
Step 2. Click on “Properties” . Then, choose “Setting “ see if the
“Target ID” is right number and the “INT 13 UNIT” is enable.
- 19 -
3.2.2. For Windows 98 System
1.
Verify the SCSI host adapter.
Check the device name shown on the list of devices to see if the
device name of SCSI adapter is exact the one you have installed with
AEC7720U/UW. The method of entering “Device Manger” is shown
below.
Step 1. Open “My Computer” window.
- 20 -
Step 2. Double click on “Control Panel”.
Step 3. Double click on “System”. Enter “Device Manger”. Click
once on “SCSI controllers” to check whether you installed your
ACARD AEC6712U/TUUW SCSI adapter properly.
- 21 -
2.
Verify your IDE device.
If you can find your IDE device name which you installed with
AEC7720U/UW on “Device Manger”, then you have installed your
AEC7720U/UW successfully. If you can’t find your device name but
find a yellow question mark on head of device named SCSI-IDE
Bridge-No Device, check the internal IDE connector of
AEC7720U/UW. It could be caused by unsuitable connection or
malfunction IDE device. Follow the instruction below to see how to
check your IDE device.
Step 1. Click on “Disk drives” to show your hard disk drives and
floppy disk drives.
- 22 -
Step 2. Click on “Properties” , Then, choose “General” to check
the “Device Status” to see if the device is working properly.
- 23 -
Step 3 Double click on “System” Enter “Device Manager”.Click once
on “SCSI controllers” to check whether you have intalled your
ACARD AEC6712U/TU/UW adapter properly.
- 24 -
3.2.3. For Windows NT System
1.
Verify the SCSI host adapter.
Check the device name shown on the list of devices to see if the
device name of SCSI adapter is exact the one you have installed with
AEC7720U/UW. The method is shown below.
Step 1. Double click on “My computer”. Then enter the “Control
Panel”.
Step 2. Double Click on “SCSI Adapter”.
- 25 -
Step 3. Enter “Devices” to check if the SCSI Controller is correct.
2. Verify your IDE device.
Click on “ACARD 671x PCI SCSI Controller” to check the device you
connect to AEC7720U/UW. If you can find your IDE device model
name which you install with AEC7720U/UW on “Device Manger”,
then you have installed your AEC7720U/UW successfully. If you
cannot find your device name but find a yellow question mark “?” on
head of device named SCSI-IDE Bridge-No Device, check the internal
IDE connector of AEC7720U/UW. It could be caused by unsuitable
connection or malfunction IDE device.
- 26 -
Appendix 1
Technical Support Form
Email: [email protected]
http://www.acard.com
Model : AEC7720U/UW
System Configuration
Main Board vender
BIOS version
SCSI adapter
Chipset
Memory
Display card
Other I/O card
OS version
Hard Disk Configuration
Hard Disk Model / type
Capacity
Firmware version
IDE Device Connect
CD-ROM model
CD-R model
MO or Removable HDD
Others
Problem Description
- 27 -
F/W version: