1
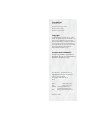
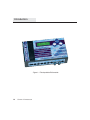
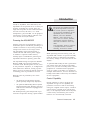
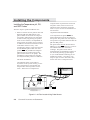
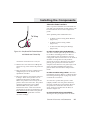
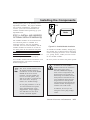
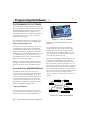
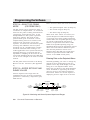
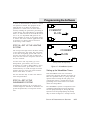
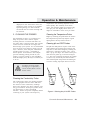
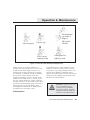
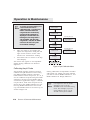
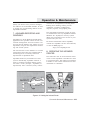
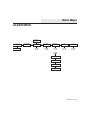
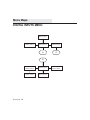
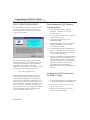
Installing the Components
Wall Mount
Power Supply
☎
Telephone
Line
Modem/ Serial
Port
Modem
Figure 2.16 • Connecting a Modem
set to
work properly with your AquaNode unit.
If you do not have an Aquadyne
modem, you will need to configure the
serial port settings on the modem.
Normally, this will require that your
settings support the port settings of
your AquaNode (baud rate of 19,200
and data format of 81N). If you are
using AquaWeb, you will also need to
configure the modem to auto-answer.
The Aquadyne modems default settings
on the dip-switch (at the back of the
modem) are “DUDUUUDD” for switch
positions 1-8 respectively. Verify that
the dip-switch settings are in the
correct positions.
2.
Power up the Modem—Aquadyne
modems are powered by a small wallmount transformer, as shown in Figure
2.16. Plug the end of the cable from the
power transformer into the front of the
modem. Then plug the modem wall
transformer into a wall receptacle or,
preferably, into a surge suppressor
powerstrip.
If you have an Aquadyne modem, the
serial port configurations are already
!
CAUTION
There could be problems in
modem operation and pager
functionality if the telephone
line is shared. For proper
operation, the modem will
required a dedicated telephone line.
A small power switch is located on the
back of the modem. Set the power
switch on the modem to the ON
position. When the modem has power,
several red lights should be
illuminated on the front of the device.
3.
Connect the Modem and Phone—The
modem is supplied with a 6-foot
telephone cable to connect the modem
to the telephone company (telco) phone
line. Plug the phone cable into the
back of the modem in the jack labeled
LINE. (DO NOT plug the cable into the
jack labeled PHONE.) Connect the
other end of the phone line to the
closest telco live telephone jack.
CHAPTER 2: INSTALLING
THE
COMPONENTS
2-21