1
-PWFPGMJGFCFHJOTXJUI3DPN
REV. 3.2
DIGITAL EGG INCUBATOR
USER'S MANUAL
MARU MAX (190 / 380 / 1000)
$SBEMF5ZQF
Contents
<ckhcigYFWcaA5FIA5L%-$#',$#%$$$
%"Introduction
%Rcom MARU Introduction
7##;
&GUZYhmdfYWUih]cbg
'Identification of Parts
Introduction
(Basic components
)Name & Function of Operation Parts
*Easy Function Operation
&"Before use
%What is an Incubation Room?
<
Before use
How to Install Incubation /
& How to assemble the rotary wheel [Options]
'"Incubation
%Preparation for Incubation#How to Start Incubation
43##46
&Egg Turning#Humidification#How to Terminate Incubation
(3)
Incubation
Humidity & Air Maintenance during Incubation /
Maintenance after Hatching / Dew Condensation
("Function Settings
%Return to Factory Setting
47##4:
&Temperature / Humidity Setting
Function Settings
How to preserve the humidification-unit part /
' How to Set Abnormal High & Low Temp. Alarm
(How to change Centigrade & Fahrenheit
)Egg Turning Interval Setting
)"How to Clean
%Disassembling and Cleaning the Incubator
4;##4<
How to Clean
*"Product Information
%How to Replace Fuse#Servicing / Frequently Asked Questions (FAQ)
53##56
&Troubleshooting
Product Information
'Specification
The result of Hatching and Brooding can be changed by a large numbers of factors. Autoelex Co., Ltd.
& our distributors will not take any responsibility for ‘Loss of eggs or pet/animal lives’ under any
circumstances such as ‘Hatching/Brooding failures’, ‘User’s carelessness’, ‘Personal (un-certificated)
conversion / alteration’, ‘Arbitrary using out of the machine’s purpose’, ‘Electric power failure’, or
‘Malfunctioning’. Please be sure that the machine works without any problem before placing Eggs or
Pets(Animals). Also, we strongly recommend you to read the User’s Manual carefully to minimize of
any failure.
Mark Explanation
Caution : Caution mark against a fault that can cause damage, trouble, or failure of incubation.
Tip :
Prohibited
It is necessary to keep.
Do not disassemble.
Remove the power cord from outlet.
Do not touch.
Ground Connection for preventing electric shock.
References or useful suggestions in using Rcom product
Warning of actions which may be dangerous or cause damage to the incubator.
%*(*5"-*/$6#"503
6
1. Introduction
(1) Rcom MARU Introduction
Rcom MARU
First of all, sincerely thank you for all purchasing Rcom MARU incubators.
It has been designed to analyze airflow from computer simulation in order to keep optimal environment inside of
incubator and applied high digital technology to control automatic hatching system.
However, to acquire top-notch hatching result, user’s knowledge of the machine and manage the incubator are also
important. Certainly, we provide optimal hatching environment but need to be managed temperature and humidity
carefully depends on egg species, environment, and capacity. moreover, Rcom MARU has been designed already to
provide the best optimal hatching environment, therefore, before using the incubator, we strongly recommend you that
please read the manual carefully.
Features
[Main Function] MAX 190 / 380 / 1000
* Intergarted simplify control pannel(superior maintenance)
* Automatic temperature & humidity control and set function
* Automatic egg turning & turning interval set function (1h, 2h, 3h)
* FND display for easy recognition of incubation state
* Artificial intelligence electronic control system applied from Rcom utmost technology
* High reliability temperature and humidity sensor applied produced by Sensirion, Swiss
(ver. 3rd Generation of sensirion, Swiss)
* Transparent double insulated view window
* Sliding Air-vent able to control the air in the chamber
* Minimized temperature variation applied from Rcom optimum air flow technology
* Water heating system for evaporation eliminating bacteria
* Water level sensing & warning system
* Superb high density foam board for maintaining stable temperature & maximizing energy efficiency
* The safety device of the humidification-unit is attached on the Thermostat
[Useful Function] MAX 190 / 380 / 1000
* Degree C / degree F interchangeable
* Hatching chamber equipped
* Egg turning stop on opening window
* Inbuilt humidifying system
* Warning & display function of abnormal temperature caused by ambient temperature fluctuation
* Incubation data memory and alarm function in case of blackout
* Equipped Water nipple in front for handy water supply
* Auto horizontal egg turner stop function & manual egg turner positioning function
* Each egg turner operation available selectively (Model No.: MX-1000C)
* Adjustable universal egg tray able to placing different eggs according to the species (sold separately)
* Top cover can be opened for easy cleaning and maintenance after hatching
[OPTION] MAX 190 / 380 / 1000
* Universal egg basket, ABS Divider
7
%*(*5"-*/$6#"503
1. Introduction
Electrical hazards
Do not use a damaged power Do not pull the cord when
cord or loose outlet.
taking out the power cord, and
▶ Risk of electric shock or fire. keep wet hands away from
connecting plug.
Setting Cautions
(2) Safety Precautions
Be careful the details below when you use.
Never pull the plug out of the
outlet during the incubation
period.
Do not install under the direct
sunlight.
Do not install in moist or
humid environment.
▶ Risk of fire or interference
with the incubation process.
▶ Risk of fire or electric shock.
Do not cover the ventilating
opening.
Install away from heat
sources.
▶ Inner temperature can rise,
interrupting incubation.
▶ Risk of damage to the
incubator case and
interference with the
incubation process.
Ensure that the incubator is
installed on a stable surface
away from edges.
Cleaning Cautions
Clean the incubator by a soft
cloth with a neutral detergent.
Brush away dust on the plug
with a dry cloth.
▶ Risk of electric shock or fire.
▶ Risk of fire or electrical
overload.
Be careful the details below when you use.
Do not install in dusty or dirty
environment.
▶ Risk of electric shock or fire.
Do not insert multiple
connecting plugs in an outlet.
▶ Incubation will be interrupted.
▶ Risk of damage or fire within
the incubator.
Do not disassemble or modify Please ensure that no small
the incubator in any way.
objects get into
the holes on the incubator.
▶ Risk if electric shock or fire.
Do not twist or crush electric
cord.
▶ Risk of damage to incubator
and eggs and user from
accidental knocks or drops.
If the incubator sounds
strange or emits smoke
contact your service center.
Do not install in excessively
cold or hot conditions,
cigarette smoke, etc.
Do not use any other
non-standard parts except
those provided.
▶ Risk of interference with
the incubation process.
▶ Risk of damage or hatching
failure.
If the incubator requires repair
disconnect from the power
supply and please contact to
your service center.
Children should be supervised
to ensure that they do not play
with the appliance.
Clean the incubator
thoroughly before storing.
Do not place water container
on the incubator
▶ Risk of knocking the incubator
or accidental interference with
the controls.
▶ Risk of electric shock or fire.
Be sure to disconnect the electric cord
from the outlet before cleaning.
Do not use chemicals like wax, For special cleaning of inner
benzene, alcohol, thinner,
part per year, contact to the
aromatic, or lubricant, etc.
service center.
▶ If you don't clean the inside of
incubator for a long time, dust
can cause some trouble or a fire.
%*(*5"-*/$6#"503
8
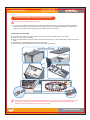
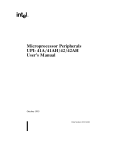
(3) Identification of Parts /
(4) Basic Components
1. Introduction
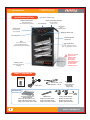
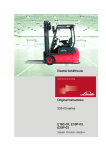
Identification of Parts
* MX-380C model image
Power Connecting (the rear)
Digital Control Center
See description of
the function and operation.
Air vent (Top)
For connecting
power cord.
Temperature
and
humidity sensor
Air inlet vent
For inlet of air
from outside
Nipple for water hose
Air vent (Front)
Insulation Board
(or Pannel)
Door
For a clear view of
the incubation process.
( Duplicated Viewing Window )
Egg Tray(Cradle)
190, 380 : 3-stage(one column)
1000 : 4-stage(double columns)
(sold separately)
Hatchery room
Temporary space for
hatchery
Please do not use
regular water,
mineral water,
or tap water.
We strongly
recommend to use
“Distilled Water”
to protect the
humidifying unit.
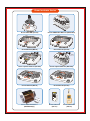
Basic Components
ࡣଭੰࠝۗԧ౿ఢÎੵ಼Ï
REV. 3
DIGITAL EGG INCUBATOR
USER'S MANUAL
MARU CT Series (190 / 380 / 1000)
ଵࢱ෴݅
Manual
Power Cord
## Silicon Tube : 1.5m
+diameter#=#剁7-9,##
Easy function
operation
* Can be attached
anywhere for
easy viewing
Sold Separately
+5HD,
Universal Egg Basket /
Basket support
MARU 190 Series 5EA / 4EA
MARU 380 Series 10EA / 8EA
MARU 1000 Series 24EA / 16EA
9
ABS Divider
MARU 190 Series 30EA
MARU 380 Series 60EA
MARU 1000 Series 160EA
+5HD,
Slhfh#=#5;HD
###+49HD,
Rotary wheel, Bracket
MARU 190 Series 4EA
MARU 380 Series 4EA
MARU 1000 Series 4EA
%*(*5"-*/$6#"503
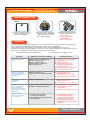
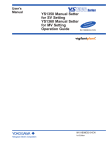
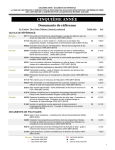
(5) Name & Function of
Operation Parts
1. Introduction
Name & Function of Operation Parts
Rcom MARU MAX 190 / 380
②
①
③
⑪⑫
④
⑬
Rcom MARU MAX 1000
⑭
⑮
举 Heater Operation Lamp : Light on when working
久 Egg-Turning Button : Egg-turning plate level
丿 Temp. Display : Current Temperature Display
(Setting egg-turning ON/OFF)
Pumping
Button
:
Starting
pumping motor for humidity
乆
乀 Humidity Display : Current Humidity Display
乇 Safety Function Button : With other buttons together
乁 Pumping System Operation Lamp : Light on when
working
乂 Up Button : Setting Temp. & Humidity UP /
Calibrated Temp. & humidity UP
(Manual egg-turning button)
乃 Down Button : Setting Temp. & Humidity DOWN /
Calibrated Temp. & humidity DOWN
(Manual egg-turning button)
乄 Menu Selecting Button : Setting Value save
Egg Turning Melody ON / OFF
%*(*5"-*/$6#"503
(Setting value check)
么 Power Failure Alarm Function : Blink with power failure
(to remove, press SET button)
义 Egg-Turning Lamp : Turn on with automatic egg-turning mode.
(Blink when working)
乊 Water Supplement Lamp : Blink with water shortage
Turning on L Lamp : The light on while the left-side
cradle working
Turning on R Lamp : The light on while the right-side
cradle working
:
1. Introduction
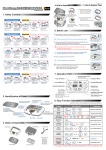
(6) Easy Function Operation
* put some water after take off label from the back and attach
to the window.
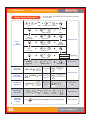
Easy Function Operation
tEP
Start
Temp.
or
Default : 37.5¶C ( <<18#℉ )
or
rH
Default : RH 45%
HI
or
Abnormal
High Temp. Alarm
Default : 2¶C
Humi.
PD[#4<3#2#6;3#2#4333
How to
Set
the Function
C.F
or
LO
Default : -3¶C
Abnormal
Low Temp. Alarm
or
Default : ¶C
Cels. / Fahr.
wuq#+PD[#4<3#2#6;3,
or
wuq4+O,#+PD[#4333,
Egg-Turning
Default : 1hour
Turning Off
Humidification
trn2(R)
or
Egg-Turning
Default : 1hour
UK#4<(
00
Display during
no working
Pumping Motor
Test
PD[#4333#RQO\
MAX 1000 Finish
Working when
incubator water is
empty
SXPS
once
PD[#4<3#2#6;3#2#4333
Initialization
(Factory Setting)
Forced manual
Egg-Turning
#SRZHU#LQ
uVw
Krz#wr#vhw
wkh#wxuqlqj
vrxqg
;
wxuq
Alignment
KROG
Horizon egg-turning
will be done
in terms of the setting
3sec.
Manual
egg-turning
will be done
in terms of
the setting
ru
Once
Egg Turning
ON / OFF
Cradle Horizon
Default
Turning
both sides
Egg Turning
VHW
ON / OFF
KROG
Twice
3Times
PD[#4<3#2#6;3
RQO\
wxuq
4Times
turn
turn
turn
turn
Turning
OFF
Turning
on the left side
Turning
on the right side
Turning
both sides
(Repeat)
VHW
KROG
PD[#4333#RQO\
Sxvk##################exwwrq#pruh#wkdq#8#vhfrqgv#+Edvlf#vhw0xs#=#Wxuqlqj#vrxqg/#RQ,
PD[#4<3#2#6;3#2#4333
%*(*5"-*/$6#"503
(1) What is an incubation room? /
(2) How to Install Incubator
2. Before Use
What is an Incubation Room?
The Incubation Room is a confined space for setting and operating an incubator.
Because the incubation room environment has a considerable effect on hatch rate, it's recommended to control
the environment for setting up an incubator; there should be little noise and vibration around and temperature
ranging 28℃Û)ZLWKVPDOOYDULDWLRQLQWHPSHUDWXUH
Especially, if there are frequent occasions when the temperature drops suddenly at night, compared with daytime,
be sure to check from time to time and pay attention so that the incubator is not directly exposed to sunlight
during daytime.
If you set high temperature, condensation will occur and may causes licking water from the
incubator and it is not a technical problem. You need to keep temperature between 28℃ (82.4℉).
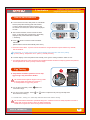
How to Install Incubator
▶ Please set the incubator flatways on the strong and 50[cm] or above tallish table.
▶ In case of the level surface is indentation, it might occur a gap because of door is not completely closed.
▶ Connect silicon tube to the nipple of incubator, and the other side of silicon tube should be put in the water
container.
Do not place water container on the incubator. It might overflow from the humidity unit.
K5H9F=B
)$Wa
If you use Mineral water or Tap water for
humidification, the humidity unit can be
broken easily because of water scales.
We strongly recommend you to use only
“DISTILLED WATER” for your machine, and
Autoelex Co.,Ltd & our distributors do not
indemnify for warranty service not only if you
have any problem with using mineral water,
regular water, tab water and the like but also
if you had improper management or handling for
your machine. In this case, Autoelex Co.,Ltd. & our
distributors will charge for your after service.
If the egg basket lean to the front side,
they can be wedged by cradle frames.
How to assemble the rotary wheel [Options]
Sold Separately
Bracket x 4
▶ the front :
brake-type wheel
x2
▶ the rear :
brake free-type wheel
x2
lay down cautiously the machine :
bracket-wheel-screw in seguence
Ú for the front 2wheels, assemble brake-type wheel
ⓑ for the rear 2wheels, assemble brake free-type wheel
Once the assembly done, put up the assembled incubator with care
when in lay down or put up incubator, be careful not to be damaged.
%*(*5"-*/$6#"503
<
3. Incubation
(1) Preparation for Incubation /
How to Start Incubation
Preparation for Incubation
▶ When the power cord is plugged into power after the power cord is connected to power connecting in the rear,
the digits on the temperature and humidity FND appear and temperature and humidity is moderately getting
increased. Even though you can smell bad, it is normal.
Do not connect power supply before the incubator is assembled completely. Risk of electric shock.
▶ Please check and refill water every 2 days during incubation.
(If the water tank is small, please check everyday.)
In case you use the incubator without adding humidification water or intend to incubate eggs at low
humidity under RH 20%, you must stop its humidification function. please turn off the humidity unit if the
unit is empty water otherwise, humidity unit will be broke or you may not no longer use the unit.
(When using this function, the alarm for sensing water drop will go out.)
[See the description of humidification function OFF on Page 12]
※ How to turn off Humidification Function : Set humidity under RH 20%.
If you use Mineral water or Tap water for humidification, the humidity unit can be broken easily
because of water scales. We strongly recommend you to use only “DISTILLED WATER” for your
machine, and Autoelex Co.,Ltd & our distributors do not indemnify for warranty service not only
if you have any problem with using mineral water, regular water, tab water and the like but also if you
had improper management or handling for your machine. In this case, Autoelex Co.,Ltd. & our
distributors will charge for your after service.
▶ place eggs adjusting dividers in terms of the egg size.
Be sure to fit eggs to space made by two dividers.
UP
It is recommended to place eggs with
sharp end side down.
▶ Perform the horizontal alignment by pressing
button for 3 seconds. In case the horizontal alignment is
not completed successfully, you can adjust manually by pressing + , - button.
(Do not open the door while the alignment is working.)
▶ Before placing an egg basket in the incubator, be sure to power off the incubator or to turn off the egg turning.
▶ Before placing eggs in the incubator, it is recommended to turn on and
stabilize the temperature of incubator for a few hours.
Be sure to close the door completely; if not, the temperature and
humidity will fail to go up.
please check if the machine’s floor is wet or not, otherwise you
may not reach the normal temperature.
The egg to incubate must be a fertilized egg.
Please make it balanced when puting eggs on the egg basket.
43
%*(*5"-*/$6#"503
3. Incubation
(1) Preparation for Incubation / How to Start Incubation
(2) Egg Turning / Humidification / How to Terminate Incubation
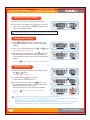
How to start incubation
▶ For the first two seconds, after power on, FND blinks
and the pump starts working (until water is filled:
In case of water shortage it works for 2min.) and
for another one second, the version will be displayed
on FND.
▶ After version indication, buzzer sounds for about
15sec. At the same time, present temp. & humidity
displayed and power failure alarm indication
ⓐ is blinking.
▶ Press
button to remove buzzer and alarm
indication.
(Buzzer will be removed automatically after 15sec.)
※ Notice of Power Failure : If power is turned off and then on again because of power failure or by mistake,
first dot will blink.
Quick Start : If you just connect power, it automatically starts incubation with factory setting.
[Factory setting : Temperature 37.5℃ (99.5℉), Humidity RH 45%]
▶ Incubator display current temperature and humidity, and it goes to setting conditions within an hour.
※ The artificial intelligence system memorizes and classifies ambient conditions for keeping optimum temperature,
and temperature can move up slowly at the first stage.
Egg Turning
▶ 3days before incubation, please be sure to stop
egg turning in tray and remove divider.
Be careful! Chicks might be caught in turning cradle.
If the egg basket are located out of frames ⓐ,
it cause problem for egg turning device.
▶ How to align horizontally : Press
3 seconds to align.
▶ How to turn trays manually : Press
the incubator is working.
button for
or
button to adjust the tray-turning manually while
※ For MAX 1000 , Turning on L and R lamp indicates which side cradle is turning.
Be recommended to hatched in special hatching room. chickens in hatch are easily exposed to the risk of
failing down or being caught in crevice to death occasionally
Please don’t forget to turn off the turning function at this time.
%*(*5"-*/$6#"503
44
3. Incubation
(1) Preparation for Incubation / How to Start Incubation
(2) Egg Turning / Humidification / How to Terminate Incubation
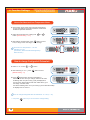
How to Set Egg Turning ON/OFF
▶ MAX 190 / MAX 380 : Press
button to change setting while pressing
[Default : Turning on-Turning ON Lamp on] Turning off - Turning ON Lamp off
button.
▶ MAX 1000 : Turning Lamp L and R indicates which side cradle is turning.
[Default : Both side turning - Turning Lamp L and R on]
[Default]
▶ MAX 1000
Both side
turning ON
G9H
once
twice
3 times
4 times
turn
turn
turn
turn
Left-side
cradle Turning
ON
Right-side
cradle Turning
ON
Both side
Turning
ON
HOLD
Turning OFF
Repeat
Recommend to hatch in special hatching room. chickens after hatch are easily exposed to the risk of failing
down or being caught in crevice to death occasionally Please don’t forget to turn off the turning function
at this time.
'II6WTPKPI/GNQF[101((
▶ Please press
button over 5 seconds
to turn ON or OFF egg Turning Melody.
Humidification
▶ All kinds of bird need over RH 65% humidity during the period prior to hatching.
▶ How to turn humidification off : When you don't need the humidification function with your working incubator,
you can turn off by setting RH 19% in the humidity setting mode.
The mark " -- " appears on FND and the humidity function stops.
▶ Indication of water shortage : When the sensor detects low water level, water empty lamp is turned on.
Lasting water shortage causes turning water empty lamp on, blinking of humidity
working lamp and alarm ringing.
▶ How to test a pumping motor : Press
button while your incubator is working and then the pump motor
starts working.
In case of water shortage, it works. When the inside of the incubator is filled with water,
the pump motor works for 0.5 second.(Check motor working sound)
please turn off the humidity unit if the unit is empty water otherwise, humidity unit will be broke or you
may not no longer use the unit. so please turn off the humidity unit.
If you use Mineral water or Tap water for humidification, the humidity unit can be broken easily
because of water scales. We strongly recommend you to use only “DISTILLED WATER” for your
machine, and Autoelex Co.,Ltd & our distributors do not indemnify for warranty service not only
if you have any problem with using mineral water, regular water, tab water and the like but also if you
had improper management or handling for your machine. In this case, Autoelex Co.,Ltd. & our
distributors will charge for your after service.
Incubation Termination
No power switch for the incubator.
▶ The power cord should be unplugged to turn the incubator off after hatching.
▶ Rcom MARU MAX 190 / 380 / 1000 do not need to be initialized after hatching. When you need the same
condition as the previous set, all you need to do is to plug in your incubator.
45
%*(*5"-*/$6#"503
3. Incubation
(3) Humidity & Air Maintenance during Incubation /
Maintenance after Hatching / Dew Condensation
Humidity & Air Maintenance During Incubatiron
▶ When hatching, humidity should be relatively high to prevent the thin membrane from drying out or hardening
before hatching.
▶ When hatching, it's recommended not to open the door often.This is because if you open the door often
humidity will be rapidly decreased and it will take a long time to regain the proper humidity.
Incubator internal temperature is 37℃ (99.5℉) or more, and hatching room temperature is below
28℃, in that case, RH70% humidity is may not be able. The difference of ±5% humidity value may
occur from the humidity sensors difference, and there are no problems at hatching
▶ It's very important to maintain humidity higher 1~2 days before hatching than the early and middle incubation
periods. Humidity requirements during incubation are RH 45~55% for waterfowl, RH 40~45% for poultry and
RH 35~45% for parrot, in general. One day before hatching, all kinds of birds need about RH 65% humidity
and sometimes need higher than that.
However, in areas of high ambient humidity, lower levels of humidity may be needed during incubation.
▶ Air Controlling Lever : Outer fresh air can be flowed into incubator inside without affecting insulation.
When eggs start hatching, open air controlling lever either fully or half-open.
▶ It is normal that wa ter might leak in case of high humidity.
▶ If the temperature where incubator installed is high, it will effects to incubator’ setting temperature.
In this case, you are able to adjust temperature by Air ventilation on the top of machine.
You can adjust
Air Ventilation
1/4 open
1/2 open
close
wide open
If you set high temperature, condensation will occur and may causes licking water from the incubator and
it is not a technical problem. You need to keep temperature between 28°C (82.4°F).
Especially during at night, temperature drops dramatically from time to time in winter season so maintain
inner and outer temperature is important to prevent condensation.
Maintenance after Hatching
▶ It is necessary to use a brooder for baby chicken or bird since they are too week against cold or cool environment.
If you try egg-hatching in your incubator, there would be lots of germs, feathers, which causes of low egg hatching
possibility for your next hatching. Also, they can make your incubator broken or faulty.
We strongly recommend you to use independent Hatcher or Brooder for egg-hatching.
If you have any faulty or broken because of not using independent Hatcher or Brooder, we do not serve you the
free warranty service. In other words, you have to pay for the service charge.
To make a simple Hatcher or Brooder, please refer to the our web-site (www.Rcom.co.kr).
Please do not try to egg-hatching in the incubator. It makes your incubator broken or faulty, and we do not
give you free warranty service. (Please move all the eggs 1~3 days before hatching into Hatcher or Brooder.)
Hatcher : The machine for egg-hatching. Operate it 1~3 days before egg-hatching. (Rcom MARU H&B)
Brooder : The machine makes baby chickens or birds warm up against cold or cool environment. You can
set up proper temperature and humidity. (Rcom MARU H&B / Rcom Brooder Series)
▶ As there is some difference in chick feed for each kind of bird, so it's desirable to obtain useful information
about the chicks before hatching.
Dew Condensation
▶ Dew condensation is natural phenomenon which can be occurred when incubator
inner temperature is big different from outer temperature.
So, water can leak from the incubator during humidification, which is normal.
Appropriate Incubator internal temperature is between 28℃ (82.4℉).
%*(*5"-*/$6#"503
46
4. Function Settings
(1) Return to Factory Setting /
(2) Temperature / Humidity Setting
Return to Factory Setting
▶ This function is for return incubator to factory setting.
▶ Unplug power cord. Replug during
button is pressed.
Then, "rSt AL" will indicated in display, and H&B returns to
factory setting.(Default setting)
Calibrated temperature and humidity will also return to factory setting.
Temperature Setting
▶ Press
and
button at the same time then “ tEP ”
will be indicated for about 0.5sec. and then temp display
will blink.
▶ Then, you can adjust temperature with
[Default setting: 37.5℃ (99.5℉)]
and
button.
▶ After setting required temperature, press
button once
then setting will be stored. Next, “rH” will be indicated in
humidity display for about 0.5sec. and then humidity display
will blink.
※ Just press
button if you do not need to change setting.
Humidity Setting
▶ When humidity display is blinking, adjust humidity setting
with
or
button.
[Default setting : RH 45%]
▶ If you keep pushing
button under 19,
humidity device is off and it shows as ⓐ
▶ After setting required humidity, press
button once
then setting will be stored. Next, “HI”(abnormal high temp.
alarm) will be indicated for about 0.5sec.
and then abnormal temp. alarm setting value will blink.
※ Just press
setting.
button if you do not need to change
Temperature and humidity is optimized when Rcom products are released.
We do no recommend customers to recalibrate by their own. If you need to recalibrate, please visit our
ZHEVLWHZZZUFRPFRNUĺ'RZQORDGĺ0DQXDORUDVNSXUFKDVHSODFH
Because of low price thermometers and hygrometers are not accurate, e recommend you to use special
calibrated thermo-hydrometer. (Poultry only thermo-hydrometer: check Rcom website: DigilogⅡ)
47
%*(*5"-*/$6#"503
4. Function Settings
(3) How to preserve the humidification-unit part /
How to Set Abnormal High & Low Temp. Alarm
How to preserve the humidification-unit part
▶ To maintain the temperature to be level as normal in humidification-unit, the manual type thermostat is applied
to the area shown in picture. just push the knob shown in picture, unless the water get to be heated in spite of
staring the humidification function.
▶ When the humidity unit is not working even if you keep pressing the thermostat knob to downward or it keeps
turned off automatically, please contact our customer service.
warning : when you touch the thermostat swithch, please make sure the power cord is plugged out.
C::
CB
Manual thermostat
Press : ON
Water
How to Set Abnormal High Temperature Alarm
▶ Adjust abnormal high temperature value with
or
button. [Default setting : 2°C]
▶ After setting required value, press
button to save.
Then, it will go to the next stage, abnormal low temp.
setting with display "LO"(abnormal low temp. alarm) for
about 0.5 sec.
Abnormal High temperature:This function gives
notice when incubator temperature is higher
than setting temperature because of abnormal
ambient temperature increase.
When room temperature is higher than incubator
temperature, this function works with buzzer.
Here, "HI" and temp. gap are displayed alternatively.
Press OK button to remove buzzer.
%*(*5"-*/$6#"503
48
4. Function Settings
(3) How to preserve the humidification-unit part /
How to Set Abnormal High & Low Temp. Alarm
(4) How to change Centigrade & Fahrenheit
How to Set Abnormal Low Temperature Alarm
▶ This function gives notice when incubator temperature
is lower than setting temperature because of abnormal
ambient temperature decrease.
▶ Adjust abnormal low temp. setting with
button. [Default setting : -3°C]
or
▶ After setting required value, press
button to save.
Then, it will go to the next stage,°C & °F change.
Abnormal Low Temperature: " LO" will
indicated on LCD.
(The others, same with abnormal high temp.
alarm function.)
How to change Centigrade & Fahrenheit
▶ Select °C or °F with
or
▶ After selecting °C or °F , press
[Default setting : °C]
button.
button to save.
▶ Press
button after choosing Centigrade or
Fahrenheit to save what you change, and then set value
is blinking after "Trn"(set turning cycle) is displayed for
0.5 second on temp FND for MAX 190 / MAX 380 to go to
next stage. For MAX 1000,
set value is blinking after "Trn1" (set turning cycle for left-side cradle)
is displayed for 0.5 second.
How to change Centigrade value to Fahrenheit °C = 5/9 (°F - 32)
※ Just press
49
button if you do not need to change setting.
%*(*5"-*/$6#"503
(5) Egg Turning
Interval Setting
4. Function Settings
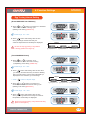
Egg Turning Interval Setting
[ Rcom MARU MAX 190 / MAX 380 ]
▶ Press
or
button to increase or to decrease
value in the set mode of turning cycle
(blinking of set value). [Default:1hr]
control range : 1hr ~ 3hrs
▶ Press
button after setting value to save
what you change and then the newly set
values of temperature and humidity are displayed.
Be sure to stop egg turning 3 days before
hatching. [Refer to the Page 12]
FYdYUh
Once (Lamp ON)
Egg turning Interval : 2 hours
Twice (Lamp ON)
Egg turning Interval : 3 hours
3Times (Lamp ON)
Egg turning Interval : an hour
[ Rcom MARU MAX 1000 ]
▶ Press
or
to increase 1hr or
to decrease 1hr in the set mode of turning
cycle(blinking of set value). [Default:1hr]
control range : 1hr ~ 3hrs
▶ Press
button after setting value to save what
you change, and then the newly set value is blinking
after 'Trn2'(set turning cycle for right-side cladle ) is
displayed for 0.5 second to go to next stage.
※ Press
FYdYUh
button to skip this stage.
▶ Press
or
button to increase or to
decrease value in the set mode of turning cycle.
(blinking of set value) [Default:1hr]
Once (Lamp ON)
Egg turning Interval : 2 hours
Twice (Lamp ON)
Egg turning Interval : 3 hours
3Times (Lamp ON)
Egg turning Interval : an hour
control range : 1hr ~ 3hrs
▶ Press
button after setting value to save
what you change and then the newly set values of
temperature and humidity are displayed.
Be sure to stop egg turning 3 days before hatching.
[Refer to the Page 12]
%*(*5"-*/$6#"503
4:
(1) Disassembling and
Cleaning the Incubator
5. How to Clean
Disassembling and Cleaning the Incubator
Be sure to remove power before cleaning.
▶ If you turn off incubator and then let the incubator with door closed after high humidity incubation, moisture
inside of the incubator evaporates and sticks to electric device. This could cause problem, and be sure to
open door of incubator and completely remove moisture inside of incubator.
[ Cleaning of Control Part]
▶ Loosen screws on the top of the incubator as the below pictures, and lift up the cover to open.
▶ Remove water inside of incubator.
▶ Open the maintenance cover and remove all dust and foreign thing on the humidification unit and the fan with
brush.
▶ After cleaning, reassemble the maintenance cover again.
▶ Please clean up the humidification unit and the fans after egg hatching.
Rcom MARU 190 / 380 / 1000
O\ia]X]Z]WUh]cb!ib]hdUfhQ
Heater
When scratched or hit by something, humidification heater ⓐ can be damaged. when open the top cover,
be sure to pull electric cord out and get rid of water dirt, Please be sure to remove the harden dirty
substance on the heater surface when cleaning after hatch.
4;
%*(*5"-*/$6#"503
5. How to Clean
(1) Disassembling and
Cleaning the Incubator
C::
CB
▶ ⓑ Thermostat S/W knob : when over heated in humidification area, automatically functioned “OFF”.
However, humidification area goes back to normal function when pressed down after getting rid of the cause
of abnormal high temperature. Please make sure to notnly “ON” signal show the humidity heater in operation.
▶ ⓒ Temperature and humidity sensor : lie in upper part inside incubator. occasionally. fur, dirt or water disturb
the accurate measurement of temperature&humidity. Please clean up furs or dirts with soft brush.
▶ Please make them assembled by the reverse procedure.
[Cleaning of Incubator Inside]
▶ After hatching, remove egg basket and divider inside of incubator, and clean the inside with vacuum cleaner.
Tiny dust should be removed with brush again.
After several hatching, dust or bird feathers can stick to the incubator inside which maybe cause malfunction.
So, you should to clean the incubator carefully after every time of hatching.
[The life span of the evaporating heater can be reduced when used without cleaning.]
When the condition of dirty substance cleaning, it can create fan-noise or further fan-stop
▶ Clean the egg basket and dividers with water and an antiseptic solution, and then dry naturally or operate
incubator temporary to dry them.
Be careful not the moisture gets into the power connecting part on the backside of incubator.
Do not clean the incubator with benzene or thinner. Risk of transformation or decolorization.
%*(*5"-*/$6#"503
4<
6. Product Information
(1) How to Replace Fuse / Servicing /
Frequently Asked Questions (FAQ)
How to Replace Fuse
BACK
PUSH
▶ Fuse is located at the top of
power connection part on
back side of incubator.
▶ When the fuse is damaged,
remove the fuse at the inside
below of power connection
part, with screwdriver.
▶ Replace A(Used Fuse) fuse
with B(Spare Fuse) fuse.
For AC 100V use :
250V 5.0A Ø5*20mm
For AC 230V use :
250V 3.0A Ø5*20mm
Servicing
All our Rcom digital products of Autoelex Co., Ltd. are made by precision systems under strict quality control.
But occasionally some defective products are found on the way of their distribution.
If any problem occurs, then please contact Autoelex service center or distributorsin your country.
We will do our best to solve the problems, if any, for you. This product is designed in modular mode, so for its
repair, if any, a qualified person can replace the part concerned with ease.
* Complaint Department : 82-55-337-2560
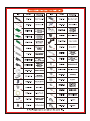
Troubles
53
*E-mail Receipt : [email protected]
Expected Causes (Possibility)
Countermeasures
In case hatching rate
is low
▶When the egg is an unfertilized egg.
▶Getting infected by germs
▶Wrong incubation setting
▶Health condition of mother bird
▶Improper egg turning
ઔInspect the egg to check possibility
of egg surviving.
ઔDisinfect the incubator.
ઔCheck all settings of incubator.
Especially, check them focusing
on the temperature.
ઔReview care of health of mother bird.
ઔCheck if egg turning is normal.
When a chick hatches
out earlier than expected
or a deformed chick
hatches out
▶Setting temperature high
▶Egg turning was not operating normally
ઔLower temp. setting of the
incubator about 0.5(1એ)
ex) 37.5℃ (99.5℉) → 37.0℃ (98.6℉)
ઔCheck if egg turning function is OFF
When a chick hatches
out later than
expected
▶Setting temperature low
ઔRaise temp. setting of the
incubator about 0.5(1એ)
ઔex) 37.0℃ (98.6℉) → 37.5℃ (99.5℉)
When hatching dates
are so different from
each egg (When all
chicks don't hatch out at
the same time but over a
long period)
▶ Eggs stored for different lengths of time
▶ Diffferent incubation temperatures
ઔMinimize the time to store egg properly.
ઔCheck Temperature difference
in the incubator.
(sunlight, temp of incubation room, etc.)
When intending to
hatching various eggs
at the same time
▶ Incubation days are different,
so hatching rate falls down.
▶ Eggs might be contaminated by chicks
that hatched first.
ઔMark hatching date on eggs and
move them to other incubator
(brooder) just on the marked date.
ઔIn case of putting in many eggs
at the same time, it's convenient
to prepare a spare incubator available
as a brooder
%*(*5"-*/$6#"503
6. Product Information
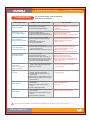
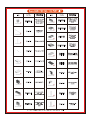
Troubleshooting
CIRCUMSTANCE
(2) Troubleshooting
For more detail, please check our website at
www.Rcom.co.kr diagnosis
ITEMS TO BE CONFIRMED
SOLUTIONS
No signs of power
to the incubator.
ઔCheck electric cord is properly connected.
ઔCheck if there is a power outage.
ઔCheck whether the plug is damaged.
ઔConnect the cord again.
ઔCheck the main socket with any other electric
appliances.
ઔTry to insert to another outlet.
Temperature will
not go high enough.
ઔCheck your setting temperature.
ઔInitialize the incubator. [Refer to the page 14]
ઔplease check the bottom of machine is wet or not.
ઔSet the temperature as required.
ઔplease remove moisture.
ઔPlease put the water tank on the floor and use.
ઔCheck if room temperature is too high
Alarm sounds with
ઔCheck if incubator is exposed to the direct
"HI" indication
rays of sun
(abnormal high temp.)
ઔIn case of lowering temperature.
ઔCheck water for humidity.
ઔAdjust room temperature 28℃ (82.4℉)
ઔInstall incubator without the direct rays of sun
ઔReturn incubator to factory setting
[Refer to page 14]
Alarm sounds with
"LO" indication
(abnormal low temp.)
ઔCheck if room temperature is too low
ઔCheck if incubator heater(temperature controllingsystem) is normally working
ઔplease check the bottom of machine is wet or not.
ઔAdjust room temperature 28℃ (82.4℉)
ઔPlace thermometer inside of incubator and
check if setting temperature is correct
ઔplease remove moisture.
ઔPlease put the water tank on the floor and use.
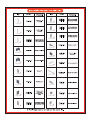
Humidity will not
go high enough.
ઔCheck your setting humidity.
ઔClose the door again after checking.
ઔInitialize the incubator. [Refer to the page 14]
ઔCheck if pumping is working. [Refer to the page 12]
ઔYou need to confirm that if the thermostat S/W
knob is side up in the humidity unit section.
ઔSupply water.
ઔCheck if silicon tube is blocked
ઔSet the humidity again as required.
ઔClean the humidification unit.[Refer to page 18~19]
ઔPress Thermostat knb of S/W in humidification-unit
[Refer to page 18~19]
The machine makes
some noise.
ઔCheck if there is any hatching debris such as
feather or eggs-shell in the incubator FAN.
ઔA little noisy is not faulty.
ઔRemove power and then open maintenance
cover to clean the FAN for air circulation.
[Refer to page 19]
Egg-Turning fails
to work.
ઔCheck that the Egg-turning stoppage is not
activated. (Egg-turning lamp lighting)
ઔCheck that there are no foreign items on the
egg turning tray.
ઔCheck if egg turning plate is assembled correctly.
ઔPlease confirm if any divider are not stuck in the
middle of machine
ઔIf you need to turn the eggs, you can manually
re-start egg-turning.
Dew foams in
the incubator.
ઔCheck the incubator is not placed too cold
circumstances.
ઔWhen you turn OFF incubator and then
turn on.
ઔIn case of setting high humidity
ઔAdjust room temperature between 28℃ (82.4℉)
ઔDew condensation is normal.
ઔIt is normal.
Water leaks from
the machine.
ઔCheck if you did not place the water container
on the incubator.
ઔCheck that the incubator placed on inclined
surface.
ઔCheck if it is Dew condensation
ઔPlace water container on the bottom.
ઔ Place incubator under a level surface.
- A little noisy occurs from the
inside of circulation fan.
Be sure that the incubator works without any problem before placing eggs in the incubator.
%*(*5"-*/$6#"503
54
6. Product Information
1-1 Name : Rcom MARU 190 / 380 / 1000 (Cradle Type)
1-2 Model : MAX CT Series
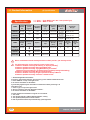
Specification
NAME
(3) Specification
CT Series Capacities
[Chick
Model
egg size]
No.
Egg Turning
Method
Egg turning Egg turning
angle
Interval
>Û@
[min]
Egg Turning
ON/OFF per
floors
Functional
Ranger
4EQO/#47
/#:
MX-190C
168
Cradle
ÛÛ
0,60,120,180
1rows
egg Turning
ON, OFF
temperature: 20~42℃a℉
KXPLGLW\a
4EQO/#47
/#:
MX-380C
336
Cradle
ÛÛ
0,60,120,180
1rows
egg Turning
ON, OFF
temperature: 20~42℃a℉
KXPLGLW\a
4EQO/#47
/#:
MX-1000C
840
Cradle
ÛÛ
0,60,120,180
1rows egg Turning
ON, OFF
2rows egg Turning
ON, OFF
temperature: 20~42℃a℉
KXPLGLW\a
NAME
CT Series Humidification
Model
Device
No.
Option
The number of Dimensions
(W*L*H)
Trays
[mm]
Weight
[Kg]
Maximum
electric power
[W]
Average
electric power
[W]
4EQO/#47
/#:
MX-190C
Egg basket
ABS divider
3IORRUVURZ
440
4EQO/#47
/#:
MX-380C
Egg basket
ABS divider
3IORRUVURZ
30
440
4EQO/#47
/#:
MX-1000C
Egg basket
ABS divider
4IORRUVURZ
440
We are not allowed to extend warranty therefore we ONLY provide 1 year warranty service.
You will be asking for service charge if you are in below cases.
1. Broken or Problem caused by ‘No cleaning’ or ‘Improper handling’
2. Broken or problem caused by ‘Not using distilled water’
3. Broken or problem caused by ‘Trying Bird hatching in incubator’
(Please don’t try bird hatching in incubator. Please use Hatcher during bird hatching.)
4. Broken or problem caused by ‘Wrong controling(Using)’
5. Broken or Problem caused by using the machine out of User’s Manual.
6. Broken or problem caused by ‘Customer’s mistake or fault’
※ Product Registration Procedures
If you are a new member of Rcom, you need to log in our website at www.Rcom.co.kr
1. Click “SIGN UP” on top of the right corner.
2. Fill out the information on the blanks.
If you already registered your information on the Rcom website, please log in to
www.Rcom.co.kr.
1. Click “Login” on top of the right corner.
2. Select “Customer” and click “Register Products”.
3. Fill out the information on the blanks.
You will need below information to register on our website.
1. Your name
2. Your (home/company) address & Email address, country
3. Your product(model) name & Serial number
4. Date of purchase & Name of purchased shop you bought from
55
%*(*5"-*/$6#"503
Rcom Incubator Series
PUM
P
POW
ER
Rcom PRO MINI (PX-03)
INL
POW
ER
ET
Rcom KINGSURO MAX 20 (MX-SURO)
F
F
K5H9
K5H9
Rcom MAX 20 (MX-20)
Rcom PRO 20 (PX-20)
PUM
P
POW
ER
POW
ER
INL
ET
F
K5H9
Rcom reptiles PRO 90 (PX-R90)
Rcom reptiles MAX 60 (MX-R60)
WATE
R
WATE
R
PULL OPEN
Rcom MAX 50 (MX-50)
Rcom BROODER&ICU
(MX-BS500(N))
PULL OP
EN
Rcom PRO 50 (PX-50)
Rcom DIGILOG
(PX-V1)
Rcom DIGILOG2
(PX-V2)
3DPNJTEFTJHOFEGPSVTFSTFBTZBOEDPOWFOJFOUVTF
*UDBOCFDIBOHFEXJUIPVUOPUJDFGPSJNQSPWFNFOUJOQFSGPSNBODF
EFTJHOUSFBUNFOUBOETPGUXBSFFUD
www.Rcom.co.kr
SELLER
MANUFACTURER
ú)FBE0GGJDF%FPLBN+VDIPO(JNIBF
,03&"
%JSFDUUPTBMFTUFBN
ú5&_0GGJDF
ú'"9
3DPN!3DPNDPLS
ú&."*-
3DPNJTUIF#FTU%FTJHOXJUI)JHI2VBMJUZ7BMVFBOE1FSGPSNBODF