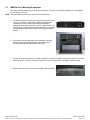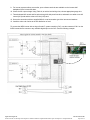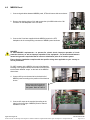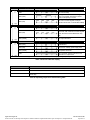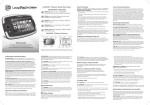
1
INEX Inverter System
User Manual
014-114-B2
This page intentionally left blank.
Argus Technologies Ltd.
Burnaby, British Columbia. Telephone: 604 436 5900 Fax: 604 436 1233
Argus Technologies reserves the right to make changes to the products and information contained in this document without notice.
Copyright 2008 Argus Technologies Ltd. Argus® is a registered trademark of Argus Technologies Ltd. All Rights Reserved.
Printed in Canada.
Visit www.argus.ca
INEX Inverter System
User Manual
014-114-B2
Applies to inverter modules 014-114-10, 014-115-10, 014-116-10, and 014-117-10.
The following documents and drawings are included in this manual to provide the necessary information required for
installation, operation and fault diagnosis of the unit:
• Specifications:
014-114-B1
• Installation and Operation Instructions:
014-114-C0
• Factory Service Information:
048-527-10
Argus Technologies Ltd.
014-114-B2 Rev D WC
Printed in Canada. © 2008 Argus Technologies Ltd. ARGUS and INEX are registered trademarks of Argus Technologies Ltd. All Rights Reserved.
Specifications for INEX Inverter System
Inverter Module Input
Nominal Voltage:
48Vdc
Operating Range:
40.5 to 58Vdc within rated limits
Under Voltage Warning Threshold:
45Vdc
Under Voltage Threshold:
40Vdc
Over Voltage Warning Threshold:
58Vdc
Over Voltage Threshold:
60Vdc
Isolation AC-DC:
Reinforced isolation (Pri-Sec) 4242Vdc/1min
Inrush current:
<2*Irated
Isolation DC-enclosure:
707Vdc (varistors and filter capacitor removed)/1min
Input Protection:
Reverse polarity protection
Psophometric Noise Voltage:
≤1.0mV ITU-T O.41 (16.66 to 6000Hz)
Reflected Psophometric Noise Current: <1% according to YD/T 777-2006
Reflected Relative Band Width Current Noise: <10% (0-2MHz) according to YD/T 777-2006
Wide Band Noise:
<1.0mV (psophometric, 25Hz to 5kHz)
<20mVrms (25Hz to 20kHz)
Peak to Peak Noise:
<150mV up to 100MHz
Inverter Module Output
Power Capacity:
1000VA/800W,
1500VA/1200W
Waveform:
Pure sine wave
Power Factor:
0.8
Nominal Output Voltage:
110/115/120Vac or 208/220/230/240Vac
Voltage Regulation:
Max ±2%
Output Frequency:
50/60Hz
Frequency Variation:
Max ±0.5%
Frequency Setting:
Manually, field-selectable
Crest Factor:
3:1
T.H.D. (Current):
<3% for linear load, <5% for non-linear load
Capacitive/Inductive Load:
-0.8 to +0.8 without exceeding permissible distortion for resistive load
Efficiency:
Min 88% at rated load for 48Vdc system
Argus Technologies Ltd.
014-114-B1 Rev D WC
Printed in Canada. © 2008 Argus Technologies Ltd. ARGUS and INEX are registered trademarks of Argus Technologies Ltd. All Rights Reserved.
Page 1 of 4
Specifications for INEX Inverter System Continued
Current Limitation:
Electronic current limitation at overloads and short circuits
Isolation AC-enclosure:
Basic isolation (Pri-Gnd) 2121Vdc/1min
Surge Protection:
EN61000-4-5, Telcordia GR-1089 CORE, ANSI/IEEE C62.41, STD 5871980
Dynamic Response:
Better than ±10% according to IEC 62040-3 Class 1
Over Load Protection:
1.5*Inom >20s
1.25*Inom temperature controlled
Inom = 1000VA/output voltage
Short circuit current = 16A for INV-4810EA and 30A for INV-4810A
Load Sharing:
<5%
Inverter Protection
Over Load:
When load exceeds 150% of power capacity, inverter will shut down after
20 seconds, and diagnose as overload fault with red LED lit.
When load is 105~150%, inverter continuously delivers output power
with a yellow LED lit for warning.
Output Voltage Fault Detection:
When the output RMS (root mean square) voltage is out of operating
voltage range, the inverter unit will diagnose as output voltage high or
low fault.
Inverter Output Short Circuit:
When output RMS voltage is below 40VAC and output RMS current is
over 2A, the system will diagnose as inverter output short circuit fault
with red LED on.
Input Voltage Detection:
When the DC input voltage is out of operating voltage range, the inverter
system will shut down and release visual and audio alarms.
Over Temperature:
When inverter internal temperature rises over 100°C (212°F), the system
will diagnose as over temperature fault with red LED flicker.
Maximum Number of INEX Inverter Modules for Parallel Connection
Model
INV-4810A
(1000VA/120Vac)
INV-4810EA
(1000VA/240Vac)
INV-4815A
(1500VA/120Vac)
INV-4815EA
(1500VA/240Vac)
Note: Static transfer switch (STS)
With STS-050A
6
12
4
8
Without STS-050A
12
12
8
12
INEX Controller Module
DC Nominal Voltage:
48Vdc
DC Voltage Range:
30 to 70Vdc
Over Current Protection:
2A fuse
LCD Display:
3” backlit LCD screen with 4 lines by 16 characters
LED Indicators:
Green/normal, yellow/warning, and red/fault
Argus Technologies Ltd.
014-114-B1 Rev D WC
Printed in Canada. © 2008 Argus Technologies Ltd. ARGUS and INEX are registered trademarks of Argus Technologies Ltd. All Rights Reserved.
Page 2 of 4
Specifications for INEX Inverter System Continued
Function Keys:
Esc
PgUp
PgDn
Enter
for cancellation
for cursor up movement
for cursor down movement
for selection of comment validation
Buzzer:
Audio alarm when inverter, STS, or controller module operates
abnormally. Esc key cancels audible alarm.
System Parameters:
BaudRate – setting controller com port baud rate
Keypad tones – setting keypad tones
Time & Date – setting current time and date
Setting Password – setting system password
Brightness – setting LCD brightness
Default – change current system parameters to default values
Bat Calib – calibration battery voltage
INEX Static Transfer Switch Module
AC Input Voltage Range:
89 to 138Vac for 110/115/120Vac system
176 to 276Vac for 208/220/230/240Vac system
Over Voltage Threshold:
Adjustable between
117 and 127Vac for 110Vac system, default is 121Vac
122 and 132Vac for 115Vac system, default is 127Vac
127 and 138Vac for 120Vac system, default is 132Vac
220 and 240Vac for 208Vac system, default is 229Vac
233 and 252Vac for 220Vac system, default is 242Vac
244 and 264Vac for 230Vac system, default is 253Vac
254 and 276Vac for 240Vac system, default is 264Vac
Under Voltage Threshold:
Adjustable between
89 and 105Vac for 110Vac system, default is 99Vac
93 and 110Vac for 115Vac system, default is 104Vac
100 and 114Vac for 120Vac system, default is 108Vac
176 and 198Vac for 208Vac system, default is 187Vac
176 and 209Vac for 220Vac system, default is 198Vac
185 and 218.5Vac for 230Vac system, default is 207Vac
193 and 228Vac for 240Vac system, default is 216Vac
Redundant Power Supply Design:
Startup power-on by priority source or alternative
Nominal Output Voltage:
Same as utility voltage or inverter output
Permissible Frequency Area:
Max. ±2.5% (inverter synchronization)
Transfer Time:
Typical 1/4 cycle
Rated Power:
50A
Operation Methods:
Inverter priority/Mains priority (On-line/Off-line)
Argus Technologies Ltd.
014-114-B1 Rev D WC
Printed in Canada. © 2008 Argus Technologies Ltd. ARGUS and INEX are registered trademarks of Argus Technologies Ltd. All Rights Reserved.
Page 3 of 4
Specifications for INEX Inverter System Continued
Mechanical
Inverter Module:
Dimensions: 43.8mm H x 215mm W x 270mm D
[1.7" H x 8.5" W x 10.6" D]
Weight:
2.5 kg (5.5 lb.)
STS Module:
Dimensions: 43.8mm H x 215mm W x 270mm D
[1.7" H x 8.5" W x 10.6" D]
Weight:
2.1 kg (4.6 lb.)
Controller Module:
Dimensions: 43.8mm H x 87.9mm W x 277mm D
[1.7" H x 3.4" W x 10.8" D]
Weight:
0.5 kg (1.1 lb.)
Interface Module:
Dimensions: 43.8mm H x 129.5mm W x 79.7mm D
[1.7" H x 5.1" W x 3.1" D]
Weight:
0.25 kg (0.55 lb.)
Inverter Shelf:
Dimensions: 43.8mm H x 440mm W x 329.5mm D
[1.7" H x 17.3" W x 13" D]
Weight:
2.7 kg (6 lb.)
Controller/Interface/STS Shelf:
Dimensions: 43.8mm H x 440mm W x 329.5mm D
[1.7" H x 17.3" W x 13" D]
Weight:
2.7 kg (6 lb.)
MBSDU Panel:
Dimensions: 88mm H x 483mm W x 329.5mm D
[3.5" H x 19" W x 13" D]
Weight:
7.0 kg (15.4 lb.)
Environmental
Operating Temperature:
-20 to +70°C (-4 to +158°F)
-5 to +50°C (23 to +122°F) with full performance
Storage Temperature:
-40 to +85°C (-40 to +185°F)
Humidity:
0 to 90% non-condensing
Heat Dissipation:
Forced air cooling for inverter and STS modules
Operating Altitude:
1500m (4922 feet)
Audible Noise:
55dB ETS 300 753 Class 3.1
Standards
Inverter Module:
EN 60950-1, UL-60950-1, IEC 60950-1, CSA C22.2 No. 60950-1
STS Module:
EN62040-1-1, IEC 62310-1, CSA C22.2 No. 107.3, ANSI/UL 1778
Controller Module:
EN 60950-1
Marking:
cULus, CE, RoHS, C-Tick
The above information is valid at the time of publication. Consult factory for up-to-date ordering information. Specifications are subject to change without notice.
Argus Technologies Ltd.
014-114-B1 Rev D WC
Printed in Canada. © 2008 Argus Technologies Ltd. ARGUS and INEX are registered trademarks of Argus Technologies Ltd. All Rights Reserved.
Page 4 of 4
IMPORTANT SAFETY INSTRUCTIONS
SAVE THESE INSTRUCTIONS
1. Please read this manual prior to use to become familiar with the product’s numerous features and operating
procedures. To obtain a maximum degree of safety, follow the sequences as outlined.
2. This manual provides warnings and special notes for the user:
a. Points that are vital to the proper operation of the product or the safety of the operator are
indicated by the heading: WARNING.
b. A notation that is in Bold or Italic typeface covers points that are important to the
performance or ease of use of the product.
3. Before using the product, read all instructions and cautionary markings on the product and any equipment
connected to the product.
4. Do not expose the product to rain or snow; install only in a clean, dry environment.
5. CAUTION – Unless otherwise noted, use of an attachment not recommended or sold by the product
manufacturer may result in a risk of fire, electric shock, or injury to persons.
6. CAUTION – Do not operate the product if it has received a sharp blow, it has been dropped, or otherwise
damaged in any way – return it to a qualified service center for repair.
7. CAUTION – Do not disassemble the product – call our qualified service centers for servicing. Incorrect
reassembling may result in a risk of electrical shock or fire.
8. WARNING – The input and output voltages of the product are hazardous. Extreme caution should be
maintained when servicing or touching conductive components connected to the product.
TABLE OF CONTENTS
1
INTRODUCTION ............................................................................................................................................................. 1
TU
UT
TU
UT
1.1
1.2
1.3
2
Scope of the Manual ..................................................................................................................................... 1
Product Overview .......................................................................................................................................... 1
Model and Part Numbers .............................................................................................................................. 2
TU
UT
TU
TU
UT
TU
TU
UT
UT
UT
TU
UT
2.1
2.2
3
Packing Materials .......................................................................................................................................... 3
Check for Damage ........................................................................................................................................ 3
TU
UT
TU
TU
UT
TU
UT
UT
SHELF INSTALLATION ................................................................................................................................................... 4
TU
UT
TU
UT
3.1
3.2
3.3
4
Inverter Shelf Preparation/Mounting ............................................................................................................. 4
Controller/Interface/STS Shelf Mounting/Preparation................................................................................... 6
MBSDU Panel Mounting/Preparation ........................................................................................................... 7
TU
UT
TU
TU
UT
TU
TU
UT
UT
UT
TU
UT
WIRING AND CONNECTIONS .......................................................................................................................................... 8
TU
UT
TU
UT
4.1
4.2
4.3
4.4
4.5
4.6
4.7
4.8
5
Safety Precautions ........................................................................................................................................ 8
Tools Required .............................................................................................................................................. 8
Wire Selection ............................................................................................................................................... 8
Single Inverter Shelf System ......................................................................................................................... 9
Multi-Inverter Shelf System ......................................................................................................................... 11
STS/Controller Shelf ................................................................................................................................... 14
Controller/Interface Shelf ............................................................................................................................ 15
MBSDU Panel ............................................................................................................................................. 17
TU
UT
TU
TU
UT
TU
TU
UT
TU
UT
TU
UT
TU
UT
TU
UT
TU
UT
UT
UT
TU
UT
TU
UT
TU
UT
TU
UT
TU
UT
TU
UT
MODULE INSTALLATION AND REMOVAL ....................................................................................................................... 20
TU
UT
TU
UT
5.1
5.2
5.3
6
Installation and Removal of STS and Inverter Modules.............................................................................. 20
Controller Module Implementation .............................................................................................................. 21
Interface Module Implementation ................................................................................................................ 22
TU
UT
TU
TU
UT
TU
TU
UT
UT
UT
TU
UT
OPERATION ................................................................................................................................................................ 23
TU
UT
TU
UT
6.1
6.2
6.3
6.4
7
Pre-Operation Check .................................................................................................................................. 23
Status Monitoring ........................................................................................................................................ 23
Parameter Setting ....................................................................................................................................... 25
Module Parameter Settings ........................................................................................................................ 26
TU
UT
TU
TU
UT
TU
TU
UT
TU
UT
UT
UT
TU
UT
TU
UT
DEFAULT VALUES ...................................................................................................................................................... 29
TU
TU
UT
TU
8
UT
UT
MAINTENANCE ........................................................................................................................................................... 31
TU
UT
8.1
8.2
8.3
9
UT
TU
INSPECTION.................................................................................................................................................................. 3
TU
TU
UT
Inverter Fan Replacement .......................................................................................................................... 31
STS Fan Replacement ................................................................................................................................ 32
Replacement Parts...................................................................................................................................... 32
TU
UT
TU
TU
UT
TU
TU
UT
UT
UT
TU
UT
TROUBLESHOOTING.................................................................................................................................................... 33
UT
TU
UT
10 ARGUS CONVENTIONS ................................................................................................................................................ 37
TU
UT
TU
UT
10.1
10.2
UT
TU
TU
UT
TU
Numbering System...................................................................................................................................... 37
Acronyms and Definitions ........................................................................................................................... 37
TU
UT
UT
11 OUTLINE DRAWINGS ................................................................................................................................................... 38
TU
UT
TU
UT
11.1
11.2
11.3
UT
TU
TU
UT
TU
TU
UT
Mechanical Dimensions of INEX Inverter Module ...................................................................................... 38
Mechanical Dimensions of INEX STS Module ............................................................................................ 39
Mechanical Dimensions of INEX Controller Module ................................................................................... 40
TU
UT
UT
TU
UT
i
11.4
11.5
11.6
11.7
UT
TU
TU
UT
TU
TU
UT
TU
UT
Mechanical Dimensions of INEX Interface Module ..................................................................................... 41
Mechanical Dimensions of INEX Inverter Shelf .......................................................................................... 41
Mechanical Dimensions of INEX Controller/Interface/STS Shelf ............................................................... 42
Mechanical Dimensions of INEX MBSDU Shelf ......................................................................................... 43
TU
UT
UT
TU
UT
TU
UT
ii
1
Introduction
1.1
Scope of the Manual
This instruction manual explains the installation, interconnection, and operation of Argus Technologies’ INEX
Inverter System.
1.2
Product Overview
INEX inverter series is an integrated telecommunication AC power system, including inverter, static switch, LCD
controller, and interface modules. With versatile “building block” design and N+1 redundant configuration, INEX
inverter system facilitates complex telecommunication and industrial power demands.
INEX series DC to AC inverter module is available for 1000VA (800W) or 1500VA (1200W) to convert -48Vdc
input to 120Vac or 230Vac output at 50Hz or 60Hz. The inverter module is “hot swappable” meaning it can be
inserted or removed from the shelf without cutting power to or from the system.
A universal 19” shelf is designed to parallel connect and synchronize all INEX inverter models. With this shelf,
INEX series employs N+1 redundant configuration to output power maximum of 12kVA for 120Vac models and
18kVA for 230Vac models, and to operate in N+1 redundant mode for optimization. INEX “all master” dynamic
mechanisms automatically share and re-organize critical loads to further prevent interruption if one or more
inverter modules fail.
INEX selective static transfer switch (STS) provides automatic instantaneous load transfer, which further secures
uninterrupted operation of sensitive electronic equipment.
The INEX system controller, equipped with a DSP microprocessor, gives real-time system status through
comprehensive LCD/LED indication, and allows program settings through the display panel. A communication
interface module provides local or remote control and monitoring of the system.
INEX Inverter system only
INEX Inverter system with
control/metering
Illustrations only and may not match your installation.
Argus Technologies Ltd.
014-114-C0 Rev D WC
Printed in Canada. © 2008 Argus Technologies Ltd. ARGUS and INEX are registered trademarks of Argus Technologies Ltd. All Rights Reserved.
Page 1 of 43
INEX Inverter system with STS and
control/metering
INEX Inverter system with STS,
control/metering, and MBS/distribution
Illustrations only and may not match your installation.
INEX Inverter System features include:
•
•
•
•
•
•
•
•
1.2.1
Pure sine wave output with low distortion
Versatile module design allows a variety of configurations for different power needs
Easily expands capacity up to 18kVA with N+1 redundancy
“All master” dynamic mechanism eliminates single-point failure to optimize reliability
Hot-pluggable connection allows module addition or removal without cutting power
Ultimate high power density reducing space demand
High efficiency (> 88%)
Comprehensive LCD/LED display provides system status, and user-friendly panel eases program settings.
WinPower Software
WinPower is a power management software specifically designed to monitor and control the INEX inverter system
via a personal computer. It is available to download via the Argus website (www.argusdcpower.com).
To remotely monitor and control INEX inverters, connect the USB cable (A-B type) to the port on the front panel of
the interface module. Then follow instructions stated in the WinPower manual to properly install the software to a
personal computer physically connected to the INEX inverter system.
1.3
Model and Part Numbers
This product is available to order under the following part numbers:
Model Number
INV-4810A
INV-4810EA
INV-4815A
INV-4815EA
MC-1000A
STS-050A
MBSDU-50-2U-19A
MBSDU-50-2U-19-UA
MBSDU-50-2U-19A
INVSS-2EA-1U-19A
STSSS-I-1EA-1U-19A
MC-BLANK
IFC-BLANK
INV-BLANK
U
S
S
Description
Part Number
1000VA/800W inverter module (I/P: 48Vdc, O/P: 120Vac, 60Hz)......................014-114-10
1000VA/800W inverter module (I/P: 48Vdc, O/P: 230Vac, 50Hz)......................014-115-10
1500VA/1200W inverter module (I/P: 48Vdc, O/P: 120Vac, 60Hz)....................014-116-10
1500VA/1200W inverter module (I/P: 48Vdc, O/P: 230Vac, 50Hz)....................014-117-10
Controller module................................................................................................018-593-10
50A static transfer switch module .......................................................................019-050-10
Discontinued, see 020-424-10 ............................................................................020-417-10
MBS+DU panel (maintenance bypass switch and NEMA AC distribution) ........020-422-10
MBS+DU panel (maintenance bypass switch and IEC AC distribution).............020-424-10
Inverter shelf .......................................................................................................030-419-10
Controller/STS shelf (includes interface module IFC-1000NSA)........................030-420-10
Controller blank plate ..........................................................................................614-616-10
Interface blank plate............................................................................................614-617-10
Inverter/STS blank plate .....................................................................................614-618-10
S
S
The above information is valid at the time of publication. Consult factory for up-to-date ordering information.
Argus Technologies Ltd.
014-114-C0 Rev D WC
Printed in Canada. © 2008 Argus Technologies Ltd. ARGUS and INEX are registered trademarks of Argus Technologies Ltd. All Rights Reserved.
Page 2 of 43
2
Inspection
2.1
Packing Materials
All Argus products are shipped in rugged, double walled boxes and suspended via solid inserts to minimize shock
that may occur during transportation. Packaging assemblies and methods are tested to International Safe Transit
Association standards.
Power systems are also packaged with Cortex. This plastic wrap contains a corrosive-inhibitor that protects the
product from corrosion for up to two years.
2.1.1
Returns for Service
Save the original shipping container. If the product needs to be returned for service, it should be packaged in its
original shipping container. If the original container is unavailable, make sure the product is packed with at least
three inches of shock-absorbing material to prevent shipping damage.
NOTE: Argus Technologies is not responsible for damage caused by the improper packaging of returned products.
2.2
Check for Damage
Prior to unpacking the product, note any damage to the shipping container. Unpack the product and inspect the
exterior for damage. If any damage is observed contact the carrier immediately.
Continue the inspection for any internal damage. In the unlikely event of internal damage, please inform the
carrier and contact Argus Technologies for advice on the impact of any damage.
Verify that you have all the necessary parts per your order for proper assembly.
Argus Technologies Ltd.
014-114-C0 Rev D WC
Printed in Canada. © 2008 Argus Technologies Ltd. ARGUS and INEX are registered trademarks of Argus Technologies Ltd. All Rights Reserved.
Page 3 of 43
3
Shelf Installation
This chapter is provided for qualified personnel to install the product.
3.1
Inverter Shelf Preparation/Mounting
The inverter shelf has been designed for flush or mid-mounting in a 19” relay rack. Mounting brackets are also
supplied for mounting in a 23” rack.
NOTE: The shelf shall be mounted in a clean and dry environment. Allow at least 1.75” of free space in front of the unit
for unrestricted cooling airflow.
1. There are four holes right above three deck connectors of each inverter slot. Based on inverter model, insert
the supplied nylon guide pin to the corresponding hole:
•
•
•
•
Position A for INV-4815A (as shown below)
Position B for INV-4815EA
Position C for INV-4810A
Position D for INV-4810EA
Nylon guide pins shown in Position A
D
D
C
B
C
B
CAUTION
System will fail to operate normally when inverter modules of different specifications are inserted
into inverter shelves. Use supplied nylon guide pins for securing only inverter modules of the
same specifications.
Argus Technologies Ltd.
014-114-C0 Rev D WC
Printed in Canada. © 2008 Argus Technologies Ltd. ARGUS and INEX are registered trademarks of Argus Technologies Ltd. All Rights Reserved.
Page 4 of 43
2. The shelf should be mounted to the rack using at least two
#12 – 24 x 1/2” screws in each bracket. Philips-type screws
and screwdriver should be used to eliminate the possibility of
slippage and scratching of the unit’s exterior. Washers (such
as internal tooth) or special screws that are designed to cut
through the painted surface should be used to ensure a good
chassis ground.
3. Put the inverter shelf into the equipment rack horizontally,
and align holes of mounting brackets and rack.
4. Each inverter shelf holds maximum two inverter modules.
Repeat the steps above to install the inverter shelves as
required.
5. All input and output connections are made through the knockouts, located in the top
and the bottom of the shelf rear cover, as well as both side panels.
Remove the rear cover to access the inverter shelf backplane and connectors.
6. Knockouts on top and bottom are for shelf inter-connections and supplementary wire
routing. To remove knockout, snip tabs, move plate up and down until tabs in back
snap apart.
Argus Technologies Ltd.
014-114-C0 Rev D WC
Printed in Canada. © 2008 Argus Technologies Ltd. ARGUS and INEX are registered trademarks of Argus Technologies Ltd. All Rights Reserved.
Page 5 of 43
3.2
Controller/Interface/STS Shelf Mounting/Preparation
The shelf has been designed for flush or mid-mounting in a 19” relay rack. Mounting brackets are also supplied
for mounting in a 23” rack.
NOTE: The shelf shall be mounted in a clean and dry environment. Allow at least 1.75” of free space in front of the unit
for unrestricted cooling airflow.
1. The shelf should be mounted to the rack using at least two #12
– 24 x 1/2” screws in each bracket. Philips-type screws and
screwdriver should be used to eliminate the possibility of
slippage and scratching of the unit’s exterior. Washers (such as
internal tooth) or special screws that are designed to cut
through the painted surface should be used to ensure a good
chassis ground.
2. Put the shelf into the equipment rack horizontally, and align
holes of mounting brackets and rack.
NOTE: Each INEX controller module or interface module allows maximum
control of 12 inverter units cascaded. It is recommended to have the
controller/interface/STS shelf installed on top of stacked inverter
shelves to ease inter-connections; however, it may be installed
below the inverter shelves if the MBSDU panel is not required.
All input and output connections are made through the knockouts, located in the top and the bottom of each of the
two rear covers, as well as both side panels. The cover on the right is for the controller/interface section, and the
cover on the left is for the STS section.
3. Remove the rear cover(s) to access the shelf backplane and
connectors.
4. Knockouts on top and bottom are for shelf inter-connections. To
remove knockout, snip tabs, move plate up and down until tabs
in back snap apart.
Argus Technologies Ltd.
014-114-C0 Rev D WC
Printed in Canada. © 2008 Argus Technologies Ltd. ARGUS and INEX are registered trademarks of Argus Technologies Ltd. All Rights Reserved.
Page 6 of 43
3.3
MBSDU Panel Mounting/Preparation
The panel has been designed for flush or mid-mounting in a 19” relay rack. Mounting brackets are also supplied
for mounting in a 23” rack.
NOTE: The panel shall be mounted in a clean and dry environment.
1. The panel should be mounted to the rack using at least two #12
– 24 x 1/2” screws in each bracket. Philips-type screws and
screwdriver should be used to eliminate the possibility of
slippage and scratching of the unit’s exterior. Washers (such as
internal tooth) or special screws that are designed to cut through
the painted surface should be used to ensure a good chassis
ground.
2. Put the panel into the equipment rack horizontally, and align
holes of mounting brackets and rack. The panel must be
mounted above the controller/interface/STS shelf.
3. All input and output connections are made through the knockouts, located in the bottom of the rear cover and
both side panels. To remove knockout, snip tabs, move plate up and down until tabs in back snap apart.
4. Remove the rear cover to access the backplane and connectors.
Argus Technologies Ltd.
014-114-C0 Rev D WC
Printed in Canada. © 2008 Argus Technologies Ltd. ARGUS and INEX are registered trademarks of Argus Technologies Ltd. All Rights Reserved.
Page 7 of 43
4
Wiring and Connections
This chapter provides notes on cable sizing and cabling details with respect to the Argus INEX 1000/1500 Inverter
System.
4.1
Safety Precautions
WARNING
Ensure all power sources are OFF during wiring. Disconnect battery cables from battery.
Before working with any battery or power system/distribution center, follow these precautions:
•
•
Remove all metallic jewelry; e.g., watches, rings, metal rimmed glasses, necklaces.
Wear safety glasses with side shields (and prescription lenses if necessary) at all times during installation.
The installer should follow all applicable local rules and regulations for electrical and battery installations; e.g.,
CSA, UL, CEC, NEC, OSHA, and local fire codes.
Use OSHA approved insulated hand tools.
4.2
Tools Required
Various tools are essential for product installation. Use this list as a guide:
•
•
•
•
•
•
•
4.3
Slot head screwdrivers (blade sizes: 1/4”, 1/8”, 1/16”)
Philips head screwdriver, #2 (tip size 3/16”)
Digital voltmeter equipped with test leads
Adjustable 48Vdc load (optional)
Cutters and wire strippers
Crimping tool (optional for large gauge wire)
Anti-static wrist strap.
Wire Selection
The INEX inverter modules are designed to operate in parallel for higher output current. Two modules are
automatically connected in parallel in each shelf. Two or more inverter shelves can be further connected in
parallel for additional output power; this is done by connecting inputs (BAT-, BAT+) in parallel, and outputs (Line,
Neutral, Ground) in parallel. When paralleled, there is no master unit and each unit adjusts its own power level for
best power sharing. Please refer to the following wiring instructions for your needs.
When selecting wiring, consider the following factors:
•
•
•
Current carrying capacity of the wire
Maximum wire length needed
Maximum ambient temperature.
Argus Technologies Ltd.
014-114-C0 Rev D WC
Printed in Canada. © 2008 Argus Technologies Ltd. ARGUS and INEX are registered trademarks of Argus Technologies Ltd. All Rights Reserved.
Page 8 of 43
NOTE: Use the following table as a guide only. Ensure that the installation complies with the specific wiring rules
applicable to your country or area of jurisdiction.
Shelf number of
2 x 1000VA
inverter
cascaded
#1
#2
#3
#4
#5
#6
Shelf number of
2 x 1500VA
inverter
cascaded
#1
#2
#3
#4
#5
#6
Input Current
Maximum
@ 40Vdc
45.5A
91.0A
Input Current
Maximum
@ 40Vdc
68.2A
136.4A
110Vac Output
Current Max.
230Vac Output
Current Max.
18.2A
36.4A
54.5A
72.7A
90.9A
109.1A
8.7A
17.4A
26.1A
34.8A
43.5A
52.2A
110Vac Output
Current Max.
230Vac Output
Current Max.
27.3A
54.5A
81.8A
109.1A
136.4A
163.6A
13.0A
26.1A
39.1A
52.2A
65.2A
78.3A
Minimum Size
of DC Input
Wire Max.
Min. Size of
110Vac Output
Wire Max.
Min. Size of
230Vac Output
Wire Max.
#8 AWG
#4 AWG
#14 AWG
#10 AWG
#8 AWG
#6 AWG
#4 AWG
#3 AWG
#16 AWG
#14 AWG
#10 AWG
#10 AWG
#8 AWG
#8 AWG
Minimum Size
of DC Input
Wire Max.
Min. Size of
110Vac Output
Wire Max.
Min. Size of
230Vac Output
Wire Max.
#6 AWG
#2 AWG
#12 AWG
#8 AWG
#6 AWG
#3 AWG
#2 AWG
#2 AWG
#16 AWG
#12 AWG
#10 AWG
#8 AWG
#6 AWG
#6 AWG
Table A–Recommended wire size versus current
Remarks: 1. Total Power Rating (VA, W) = No. of shelf × Inverter module power rating (VA, W) * 2
2. I/P current = Total power rating (W) ÷ 0.88 ÷ 40
3. O/P current = Total power rating (VA) ÷ AC voltage
4.4
Single Inverter Shelf System
1. In the inverter shelf package, you will find a jumper.
When only ONE inverter shelf is applied in the system, insert
the jumper to pins 1 and 2 of connector JP2:
2. Negative (BAT-) and positive (BAT+) DC input terminal studs are located in the left side of backplane. In
consideration of the power rating and distance from the battery, choose appropriate gauge wire using Table A
as well as local wiring rules.
NOTE: For inverter systems without a controller, open collector terminals are available on the inverter shelf backplane for
the inverter fail alarm. See details under point 9 of Section 4.5.
Argus Technologies Ltd.
014-114-C0 Rev D WC
Printed in Canada. © 2008 Argus Technologies Ltd. ARGUS and INEX are registered trademarks of Argus Technologies Ltd. All Rights Reserved.
Page 9 of 43
3. Thread battery cables through left-side panel knockout; put the hole lug at one end of each battery cable to
DC input stud.
4. Secure the connection with two supplied M5x12 cross hexwasher type nickel screws and washers as shown:
CAUTION
Reverse polarity connections would damage the unit and is not cover by the warranty. Ensure
correct polarity (positive to positive, negative to negative) before completing connections
between battery and INEX inverter unit.
5. Install the other end of battery cables to battery or 48Vdc source.
WARNING
DC source voltage should be between 45V and 58V.
6. The three studs in the center of the backplane are AC output terminals. AC neutral, ground and line are
marked as UC3, UC4 and UC5, respectively. Check the AC output voltage. Using Table A, as well as local
wiring rules, choose appropriate gauge wire.
7. Thread AC neutral and line wires through left-side panel knock-out, put the hole lug at one end of each wire to
AC neutral and AC line studs.
8. Secure the connection with two supplied M5x12 cross hex-washer type nickel screws and washers as shown.
9. Install the other end of wires to the AC distribution or load.
10. AC Ground stud (UC4) is mainly for inter-connection with extra
shelves. To do system grounding, cover up the backplane with
the rear cover first, and screw the ground wire on the rear cover
with the supplied cross hex-washer type nickel screw as shown:
DANGER
To meet CEC/NEC requirements – to prevent fire, electric shock, improper operation of circuit
protection devices, as well as improper operation of the equipment – an electrical bond between
neutral and ground is required at the AC source or distribution point of an inverter system.
Ensure that the installation complies with the specific wiring rules applicable to your country or
area of jurisdiction.
Argus Technologies Ltd.
014-114-C0 Rev D WC
Printed in Canada. © 2008 Argus Technologies Ltd. ARGUS and INEX are registered trademarks of Argus Technologies Ltd. All Rights Reserved.
Page 10 of 43
4.5
Multi-Inverter Shelf System
CN20 and CN21 at the inverter shelf backplane are inter-parallel connectors for inverter synchronization. The
upper port is used to connect the inverter shelf above, and the lower port is used to connect the inverter shelf
below.
1. Use the flat communication cables provided to connect all
available inverter shelves:
2. Use the supplied bus bars for connecting the DC negative input (BAT-) studs of all available shelves together
with M5x12 cross hex-washer type nickel screws and washers. See Table A.
3. Similarly, connect DC positive input (BAT+) studs of all shelves together.
4. Do the same for AC neutral (UC3), AC ground (UC4) and AC line (UC5) studs individually:
NOTE: Spacers supplied are required on the last (bottom) shelf for AC bars.
CAUTION
Ensure that no jumper is inserted into JP2 connector of all connected inverter shelves.
5. Choose appropriate gauge wire with consideration for the total input current of the whole inverter system,
distance from the battery, and local wiring rules.
6. Thread two battery cables through left-side panel knockout, and attach one battery cable to one DC negative
input stud (BAT-) and the other to one DC positive input stud (BAT+).
CAUTION
Reverse polarity connections would damage the unit and is not cover by the warranty. Ensure
correct polarity (positive to positive, negative to negative) before completing connections
between battery and INEX inverter unit.
7. Secure the connection with two supplied cross hex-washer type nickel screws and washers as shown.
8. Install the battery cables to battery or 48Vdc source.
WARNING
DC source voltage should be between 45V and 58V.
Argus Technologies Ltd.
014-114-C0 Rev D WC
Printed in Canada. © 2008 Argus Technologies Ltd. ARGUS and INEX are registered trademarks of Argus Technologies Ltd. All Rights Reserved.
Page 11 of 43
9. For inverter systems without a controller, open collector terminals are available on the inverter shelf
backplane for the inverter fail alarm.
10. Check the AC output voltage. Using Table A, as well as local wiring rules, choose appropriate gauge wire.
11. Thread selected AC neutral and line wires through left-side panel knockout, and attach one cable to one AC
neutral (UC3) stud and the other to AC line (UC5) stud.
12. Secure the connection with two supplied M5x12 cross hex-washer type nickel screws and washers.
13. Install the other end of wires to the AC distribution or load.
To connect the INEX inverter with an Argus Cordex™ system controller (CXC), use the contacts of CN11 on the
INEX inverter shelf to connect to any available digital input on the CXC. See the following example:
Argus Technologies Ltd.
014-114-C0 Rev D WC
Printed in Canada. © 2008 Argus Technologies Ltd. ARGUS and INEX are registered trademarks of Argus Technologies Ltd. All Rights Reserved.
Page 12 of 43
14. To do system grounding, cover up the backplane with the
rear cover first, and screw the ground wire on the rear cover
with the supplied cross hex-washer type nickel screw as
shown:
NOTE: INEX inverter modules allow maximum 12 units cascaded for expanding power capacity. The input current of
entire inverter system would exceed the current limit of available wires. When the total input current is over the
cable current limit, split DC connection to multiple groups by removing inter-connected BAT+ & BAT- bus bars
between groups, and choose suitable wire size for each group. Input DC feeder breaker configured one per shelf
or optionally input breaker per two shelves maximum.
4.5.1
CASE STUDY – An inverter system with eight INV-4810A inverter modules (8kVA)
The total input current, 151.5A @ 48Vdc, can be halved by removing DC positive (BAT+) and DC negative (BAT-)
bus bars connected between shelves 2 and 3. DC connection is split into two groups (4kVA and 4kVA). After
selecting suitable wire for minimum transmission current of 75.8A, two pairs of battery cable are separately
connected to DC positive and negative studs of both groups as shown:
Argus Technologies Ltd.
014-114-C0 Rev D WC
Printed in Canada. © 2008 Argus Technologies Ltd. ARGUS and INEX are registered trademarks of Argus Technologies Ltd. All Rights Reserved.
Page 13 of 43
4.6
STS/Controller Shelf
WARNING
Ensure all power sources are OFF during wiring. Disconnect battery cables from battery.
1. Follow wiring instructions to suit your installation.
CN1: Use shorting plug
for pins 1 to 4 when
MBS is not installed
CN2: SYNC port on the
controller/interface shelf
backplane
2. Locate the CN2 connector on the backplane of the STS shelf
and the CN7 connector on the backplane of the inverter
shelf. Connect these two connectors with the attached STS
signal cable as shown:
CN7: SYNC port on the
inverter shelf
backplane
3. Connect AC bus connectors of STS shelf to the AC bus of
the top level inverter shelf.
4. Then connect the AC bus connectors between inverter
shelves.
NOTE: Spacers supplied are required on the last (bottom) shelf for AC
bars.
5. Route both DC input wires through the wire hole on the left
side of the inverter shelf. Use the cross-pan type nickel
screws in accessory kit for fixing both DC input wires.
CAUTION
To connect AC output wires onto the system,
only one AC line and AC neutral are necessary to
be connected either from STS shelf or inverter
shelf.
6. For inverter shelf only or without STS module:
Connect AC LINE to the UC4 (AC-L OUT) connector of STS
shelf.
Connect AC NEUTRAL LINE onto UC3 (AC-N) connector of
STS shelf.
This page Next page
7. With STS module:
Connect AC LINE IN to UC5 and AC LINE OUT to UC4 of STS shelf. Connect AC NEUTRAL IN/OUT to UC3.
Argus Technologies Ltd.
014-114-C0 Rev D WC
Printed in Canada. © 2008 Argus Technologies Ltd. ARGUS and INEX are registered trademarks of Argus Technologies Ltd. All Rights Reserved.
Page 14 of 43
4.7
Controller/Interface Shelf
WARNING
Ensure all power sources are OFF during wiring. Disconnect battery cables from battery.
1. INEX controller and interface modules are powered from inverters. Securely plug one end of the supplied 3pin power cable to CN12 power jack on the controller/interface/STS shelf backplane, and the other end to
CN9 power jack on the inverter shelf backplane:
CN12: Power connector
of controller
CN9: Power connector
to controller
2. CN3 connector on the controller/interface shelf backplane, and CN8 connector on the inverter shelf backplane
are for data transferring between controller/interface modules and inverters. Use the supplied signal cable to
link the two connectors together as shown:
CN3: CAN COM port on
the controller/interface
shelf backplane
CN7 to CN11 relay alarm
contacts (1A rated)
[see below]
CN8: CAN COM port on
the inverter shelf
backplane
Argus Technologies Ltd.
014-114-C0 Rev D WC
Printed in Canada. © 2008 Argus Technologies Ltd. ARGUS and INEX are registered trademarks of Argus Technologies Ltd. All Rights Reserved.
Page 15 of 43
3. Use #30 to 16AWG to connect dry contact terminal CN7 to CN11:
NOTE: To set the alarm mode of dry contact, refer to the next chapter.
4. Replace rear cover(s) once all connections have been
completed.
Argus Technologies Ltd.
014-114-C0 Rev D WC
Printed in Canada. © 2008 Argus Technologies Ltd. ARGUS and INEX are registered trademarks of Argus Technologies Ltd. All Rights Reserved.
Page 16 of 43
4.8
MBSDU Panel
1. Connect signal cables between MBSDU panel, STS and inverter shelves as shown:
2. Remove the shorting plug on CN1 and connect the 4-pin MBS cable to the CN1
connector on the backplane of the STS shelf.
#4 (AC I/P)
#1, #1, #2
3. Connect the 5 bus bars supplied with the MBSDU panel to the STS
backplane via the corresponding connectors of MBSDU panel as shown:
#3 (STS O/P)
DANGER
To meet CEC/NEC requirements – to prevent fire, electric shock, improper operation of circuit
protection devices, as well as improper operation of the equipment – an electrical bond between
neutral and ground is required at the AC source or distribution point of an inverter system.
Ensure that the installation complies with the specific wiring rules applicable to your country or
area of jurisdiction.
For INEX systems with a MBSDU, this can be facilitated by
installing a wire jumper between Neutral and Ground on the
terminal block labelled “output” on the back of the MBSDU
shown here:
4. Connect AC input to the terminal on the back left of
MBSDU panel according to the position of the labels as
shown.
Wire jumper should be sized
for the maximum capacity of
the system. Refer to Table A.
5. Connect AC output to the terminal (according to the
label) on the back right of MBSDU panel to external
distribution or load.
Argus Technologies Ltd.
014-114-C0 Rev D WC
Printed in Canada. © 2008 Argus Technologies Ltd. ARGUS and INEX are registered trademarks of Argus Technologies Ltd. All Rights Reserved.
Page 17 of 43
6. Replace rear cover(s) once all connections have been
completed.
7. Screw the system ground wire on the rear cover with the
supplied cross hex-washer type nickel screw.
CAUTION
STS is not hot swap without MBS.
When installing STS module with MBS it is not necessary to turn off the system. However, the
incorrect install/removal action will damage the STS module frame because of the safety lock of
the MBS.
Proceed as follows: put switch at MBP or IBP position (Determined by mains and inverter output
status) as shown:
MBP position:
4.8.1
IBP position:
Position Status of MBS
The operation mode of STS is closely associated with the position of MBS. The MBS has two main connectors
and three assistant connectors. The signals generated by three assistant connectors are passed to DSP for
position status detection. There are five valid positions:
1.
2.
3.
4.
5.
MBP – mains bypass
MSS – mains static switch (for mains maintenance)
NORM – normal operation
ISS – inverter static switch (for inverter maintenance)
IBP – inverter bypass
U
U
U
U
U
U
U
U
U
U
U
U
U
U
U
U
U
U
U
U
U
U
U
U
U
U
STS will continuously detect the position of MBS in order to decide the transferring action between different
modes.
When the STS is powered on, it will judge whether the present position of MBS is valid. If the status is invalid,
STS will consider MBS not well connected, and it will not enter any types of operation mode until the detection
signal becomes normal.
If MBS is changed when STS runs at one of the five valid positions, and this change happens between two
adjacent positions, the STS will transfer to different mode based on current status. Otherwise, the STS will not
take any action.
For example, if MBS is set at P3, STS will take action when MBS is turned to P2 or P4.
Argus Technologies Ltd.
014-114-C0 Rev D WC
Printed in Canada. © 2008 Argus Technologies Ltd. ARGUS and INEX are registered trademarks of Argus Technologies Ltd. All Rights Reserved.
Page 18 of 43
NOTE: Be sure not to change MBS position immediately when STS is inserted into the rack, wait at least five seconds if
you want to change it. When you change its position you must confirm that you keep MBS at one position more
than one second in order for MCU of STS has enough time to detect MBS position via MBS auxiliary contacts
(CN1).
Argus Technologies Ltd.
014-114-C0 Rev D WC
Printed in Canada. © 2008 Argus Technologies Ltd. ARGUS and INEX are registered trademarks of Argus Technologies Ltd. All Rights Reserved.
Page 19 of 43
5
Module Installation and Removal
5.1
Installation and Removal of STS and Inverter Modules
1. Install the inverter or STS module by sliding it into a pre-wired rack mount shelf until the faceplate is flush with
the mounting ears.
2. In order to prevent the inverter or STS module removal, turn the lock bolt counter-clockwise to LOCK position.
CAUTION
Parallel connection of inverter modules with different specifications would lead to serious
damage, and is not covered by the warranty. Use supplied nylon guide pins for securing only
inverter modules of the same specifications.
Inverter shelf holds only inverter modules; STS module will not fit in an inverter shelf.
3. Each inverter shelf holds maximum two inverter modules. Repeat previous steps to insert inverter module to
inverter shelf as required.
4. Inverter or STS module can be removed by pulling on the handle after turning the lock bolt to the UNLOCK
position. CAUTION: STS is not hot swap without MBS.
5. You can cover the excess cavity with an optional blank plate as follows:
The optional cover plate comes into two pieces: orthogonal silver metal piece and black coated cover plate.
6. After screwing the inner silver metal piece to the shelf bottom plate, use bolts on both sides to attach the
black metal cover to the inner silver piece.
Argus Technologies Ltd.
014-114-C0 Rev D WC
Printed in Canada. © 2008 Argus Technologies Ltd. ARGUS and INEX are registered trademarks of Argus Technologies Ltd. All Rights Reserved.
Page 20 of 43
7. If controller module and/or interface module is not required, you can cover the excess cavity of
controller/interface/STS shelf with optional blank plates. The optional blank plate comes into two pieces.
8. After screwing the inner silver metal piece to the shelf bottom plate, use bolts on both sides to attach the
black metal blank plate to the inner silver piece.
5.2
Controller Module Implementation
1. To install the controller module, slide it into the 2U-wide controller slot of the pre-wired
controller/interface/STS shelf until the faceplate is flush with the mounting ears. With the power on, the green
LED of the controller unit will light if everything functions correctly.
2. If an interface module is available, simply insert the interface module into the 3U-wide interface slot of the prewired controller/interface/STS shelf until the faceplate is flush with the mounting ears.
Argus Technologies Ltd.
014-114-C0 Rev D WC
Printed in Canada. © 2008 Argus Technologies Ltd. ARGUS and INEX are registered trademarks of Argus Technologies Ltd. All Rights Reserved.
Page 21 of 43
5.3
Interface Module Implementation
NOTE: IFC is pre-installed on the 030-420-10 shelf.
1. To install interface module, the rear cover must be removed.
2. Plug one end of the supplied flat cable to CN1 connector, and route the other end through the hole on the
controller/interface/STS shelf backplane as shown.
3. Cover up the controller/interface shelf backplane with the rear cover.
4. Pull the other end of flat cable to the front of INEX inverter system, and plug the cable to the cable socket on
the interface module PCB shown below:
Argus Technologies Ltd.
014-114-C0 Rev D WC
Printed in Canada. © 2008 Argus Technologies Ltd. ARGUS and INEX are registered trademarks of Argus Technologies Ltd. All Rights Reserved.
Page 22 of 43
6
Operation
6.1
Pre-Operation Check
6.1.1
Inverter Operation Check
•
•
•
•
•
•
Check the DC input polarity.
Ensure the input voltage is in the standard range.
Check wiring size based on local codes and the wiring table.
Ensure the rear cover is securely installed for safety; preventing electrical shock.
Ensure the ground wiring is properly connected on rear cover for safety; preventing electrical shock.
Ensure the inverter module has been locked. The lock bolt should be in the lock position.
At power on, the inverter/STS unit enters into a self-diagnostic mode with POWER ON and WARNING LED
indicators blinking simultaneously. If everything functions correctly, the ON indicator will remain solid green, and
the power will be delivered to the AC output terminals.
6.1.2
STS Operation Check
•
•
•
6.1.3
Controller/Interface Operation Check
•
•
•
6.1.4
Ensure the controller module is securely installed.
Ensure the rear cover of controller/interface/STS shelf is securely installed.
Ensure the interface module is securely installed and the wiring is properly connected.
MBS Operation Check
•
•
6.2
If installed, ensure the MBS is at “Normal” position.
Ensure the rear cover is securely installed for safety; preventing electrical shock.
Ensure the STS module has been locked. The lock bolt should be in the lock position.
The breakers are at ON position.
The rear cover of MBS is securely installed.
Status Monitoring
When the controller module is properly installed with power on, the LCD screen will light by displaying “Waiting”
for self-diagnosis. Within a few seconds, STATUS and SETTING options will then show on the screen.
STATUS is classified into four sections: MODULE, CONTROLLER, BATTERY, and ALARM.
Argus Technologies Ltd.
014-114-C0 Rev D WC
Printed in Canada. © 2008 Argus Technologies Ltd. ARGUS and INEX are registered trademarks of Argus Technologies Ltd. All Rights Reserved.
Page 23 of 43
Heading
Address
Serial No
OPV
OPI
OPF
OPP
IPV
Power Used
Heatsink
Ambient Temp.
Run time
Power Limited
HW Rev
SW Rev
Value
Inverter module location
Serial number of the selected inverter module
Output voltage of the selected inverter module in Volts (V)
Output current of the selected inverter module in Ampere (A)
Output frequency of the selected inverter module in Hertz (Hz)
Power capacity of the selected inverter module in Volt-Amperes (VA)
DC input voltage of the inverter system in Volts (V)
Load level in percentage (%)
Inverter system temperature in Celsius (ºC)
Inverter ambient temperature in Celsius (ºC)
Inverter running time in hour (H)
Power limited in percentage (%)
Hardware version of the selected inverter module
Software version of the selected inverter module
Table B–LCD display of inverter status
Heading
Address
Serial No
OPV
OPI
OPF
OPP
Mains AC Vol
Main AC Freq
INV AC Volt
INV AC Freq
MBS Position
Running Mode
Default Volt
Default Freq
Power Used
Temperature
Run Time
Priority Mode
HW Rev
SW Rev
Value
STS module location
Serial number of installed STS module
Output voltage of STS module
No display
Output frequency of STS module
No display
Voltage of AC connected to STS module
Frequency of AC connected to STS module
Voltage of Inverter AC connected to STS module
Frequency of Inverter AC connected to STS module
Current MBS position (IBP /ISS/Normal/MSS/MBP)
STS current running mode (Inverter/mains/standby/power on)
STS default output voltage (V)
STS default output frequency (Hz)
Load level in percentage (%)
STS temperature in Celsius (ºC)
STS running time in hour (H)
Operation mode of STS module;
ON = output from inverter, OFF = output from AC
STS, the default is ON
Hardware version of STS module
Software version of STS module
Table C–LCD display of STS status
Heading
Hardware Version
Firmware Version
Input Voltage
Temperature
Value
Hardware version of controller module
Software version of controller module
DC input voltage of controller module in Volts (V)
Controller temperature in Celsius (ºC)
Table D–LCD display of controller status
Argus Technologies Ltd.
014-114-C0 Rev D WC
Printed in Canada. © 2008 Argus Technologies Ltd. ARGUS and INEX are registered trademarks of Argus Technologies Ltd. All Rights Reserved.
Page 24 of 43
Main menu->Alarm->Active Alarm
Item
Specification
Inverter
Serial number, Alarm name, Event time
STS
Serial number, Alarm name, Event time
SMR
(N/A)
Serial number, Alarm name, Event time
Remark
For example:
1. Inv xxxxxxxxx
Fan Fault
yyyy-mm-dd
hh:mm:ss
▼
Table E–LCD display of alarm log
6.3
Parameter Setting
INEX inverter system allows some parameters to be adjusted through the controller module.
1. Use PgDn
key and Enter
key to select SETTING.
2. A four-digit numeric password is required. Use PgUp
number.
key to increase number, and PgDn
key to decrease
For example, press PgUp key once for 1, twice for 2,
three times for 3, and so on.
3. Press Enter
to validate each digit of the
password once the desired number is selected.
The default password is 1234.
No setting modification can be executed if a wrong password is
entered.
SETTING section is divided into two categories: MODULE and SYSTEM.
Parameters of modules can be modified or adjusted under MODULE while system-related setups can be done
under SYSTEM. The following sections refer to detailed setup procedures.
NOTE: To activate system level changes, cycle the system power off then on again.
6.3.1
Password Setting
A new password can be set in SYSTEM option under SETTING.
1. Press Enter
key to enter SETTING PASSWORD menu for resetting the
password.
2. Use PgUp key and PgDn key to select a number.
3. Press Enter
to validate each digit of the password once the desired number is
selected.
4. After the new four-digit password is input, the system will prompt the user to re-enter
the new password as confirmation. Input the new password again.
Once the password is successfully changed, DONE will appear on the screen.
Argus Technologies Ltd.
014-114-C0 Rev D WC
Printed in Canada. © 2008 Argus Technologies Ltd. ARGUS and INEX are registered trademarks of Argus Technologies Ltd. All Rights Reserved.
Page 25 of 43
6.3.2
Inverter System Parameter Settings
Parameter
BaudRate: Baud rate of COM port
RS422 Addr: RS422 address
Keypad tones: activation or de-activation
of audio alarm
Time&Date: Time and Date displayed on
LCD
Language
Brightness: LCD brightness
Default: Reset Default value
Dry Connect: Dry contact setting
Bat Calib: battery voltage calibration
Specification
Selectable at 1) 2400bps, 2) 4800bps and 3) 9600bps
RS422 communication protocol
Selectable at 1) Enable and 2) Disable
Time: hh:mm:ss
Date: yyyy-mm-dd
English
From 00~63 for adjusting LCD display contrast
Press “Enter” for resetting the default value and “ESC” cancel the setting
Reset to Default Value (refer to Appendix A)
Refer to Module Parameter Settings section: Dry Contact Setting
xx.xxV
For regulating the battery voltage value of LCD display of controller after
operating for long period of time.
The adjustable range is from 20.01V to 69.99V
Table F–System parameter settings
6.4
Module Parameter Settings
Parameter
Output volt:
Inverter output voltage
Output Freq:
Inverter output frequency
OPV HL:
High loss of inverter output voltage
OPV LL:
Low loss of inverter output voltage
IPV LVSD:
Cut-off voltage of inverter input
Power Limited:
Inverter output power capacity
Fan Speed:
Fan speed level of inverter module
Inverter On/off:
Setting all/single inverter turn on or off
Setting Option
For INV-4810EA/INV-4815EA, selectable at:
1) 208Vac 2) 220Vac 3) 230Vac 4) 240Vac
For INV-4810A/INV-4815A, selectable at:
1) 110Vac 2) 115Vac 3) 120Vac
Selectable at 1) 50Hz and 2) 60Hz
For Output volt = 208V, adjustable between 220V and 240V
For Output volt = 220V, adjustable between 233V and 252V
For Output volt = 230V, adjustable between 244V and 264V
For Output volt = 240V, adjustable between 254V and 276V
For Output volt = 110V, adjustable between 117V and 127V
For Output volt = 115V, adjustable between 122V and 132V
For Output volt = 120V, adjustable between 127V and 138V
For Output volt = 208V, adjustable between 1760V and 198V
For Output volt = 220V, adjustable between 176V and 209V
For Output volt = 230V, adjustable between 185V and 218V
For Output volt = 240V, adjustable between 193V and 228V
For Output volt = 110V, adjustable between 89V and 105V
For Output volt = 115V, adjustable between 93V and 110V
For Output volt = 120V, adjustable between 100V and 114V
Adjustable between 36V and 46V
Adjustable between 50% and 100%
Selectable at 1) Normal and 2) Full
1. All ->On/Off
2. Single
Serial No:
xxxxxxxxxx
On
⊙
○
Off
ON
OFF
Single
I nv: X ↕
Serial No:
xxxxxxxxx
Enter
⊙ ON
○ OFF
Table G–Inverter parameter settings
Argus Technologies Ltd.
014-114-C0 Rev D WC
Printed in Canada. © 2008 Argus Technologies Ltd. ARGUS and INEX are registered trademarks of Argus Technologies Ltd. All Rights Reserved.
Page 26 of 43
Parameter
AC HL: High loss of alternative AC input
AC LL: Low loss of alternative AC input
Inv HL: High loss of inverter AC input
Inv LL: Low loss of inverter AC input
Priority
Setting Option
xxxV
xxxV
xxxV
xxxV
Selectable at 1) On line and 2) Off line
Table H–STS parameter settings
6.4.1
Fan Speed Control
Output current and NTC temperature decide the fan speed. The NTC temperature has the influential priority.
When the temperature is above 70ºC, the fan will work in full speed. However, when the temperature is less than
60ºC, the fan works according to the different load current. The fan has four levels of speed, the following tables
show the relation between fan speed and load current:
Load
Load > 75%
75% ≥ Load > 50%
50% ≥ Load > 25%
25% ≥ Load
Detect Back
<=70%
<=45%
<=20%
Speed
Speed1
Speed2
Speed3
Speed4
Duty
100%
2/3
1/3
0
Table I–One fan, rotate speed1
Load
Load > 75%
75% ≥ Load > 50%
50% ≥ Load > 25%
25% ≥ Load
Detect Back
<=70%
<=45%
<=20%
Speed
Speed1
Speed2
Speed3
Speed4
Duty
2/3
1/3
1/4
0
Table J–Two fans, rotate speed2
Relation between fan speed and load current:
Argus Technologies Ltd.
014-114-C0 Rev D WC
Printed in Canada. © 2008 Argus Technologies Ltd. ARGUS and INEX are registered trademarks of Argus Technologies Ltd. All Rights Reserved.
Page 27 of 43
6.4.2
Alarm Settings
6.4.2.1
Clear Alarm History
In CLEAR menu, press Enter
6.4.2.2
for clearing all the alarm history.
Dry Contact Alarm Configuration A
Settings
Module
►System
Æ
Baud Rate
RS422 Addr
Keypad tones
Time&Date
Language
Password
Brightness
Default
► Dry connect
Bat Calib
1
Æ
DryCont: X↕
Alarm Type:XXX
Alarm No: X
xxxxxxxxxxx
2
⊙INV
Æ
2
t
:
1
m
T
y
p
e
:
m
N O :
0
2
e
l
o
y
C o
A l
a
r
A l
a
r
I
N v
o
n
v
r
Æ
3
1. From the SETTING menu, select SYSTEM.
2. Then select DRY CONNECT to choose number. Use PgUp
to make selection.
DRYCONT. Press Enter
D r
Alarm Type: INV
Alarm No: 1↕
Inverter fault
○STS
○Cont
○Smr
key and PgDn
I
N V
a
d
4
key to change
3. To determine ALARM TYPE, select which module alarm group to assign to the dry contact.
Press Enter
to make selection.
4. To select the alarm fault mode of the alarm type, enter ALARM NO. Press Enter
to make
selection.
5. Press ESC to exit menu.
6.4.2.3
Dry Contact Alarm Configuration B
The alarm mode is programmed as follows:
No.
01
02
03
04
05
06
07
08
09
10
11
12
13
Static Transfer Switch
Inverter unavailable
Main unavailable
Output overload
Output short circuit
K1 relay open
STS SCR1 short
STS SCR2 short
Inverter bypass mode
Over temperature
MBS position abnormal
STS fan lock
STS fault mode
STS Eeprom fault
No.
01
02
03
04
05
06
Inverter
Inverter fault
Inverter over load
Inverter fan fault
Power limit
DC input abnormal
Inverter low volt off
No.
01
02
03
04
05
Controller
DC input low
Controller temperature high
Controller EPROM fault
DC input over
CAN bus off
Table K–Dry contact alarms
Argus Technologies Ltd.
014-114-C0 Rev D WC
Printed in Canada. © 2008 Argus Technologies Ltd. ARGUS and INEX are registered trademarks of Argus Technologies Ltd. All Rights Reserved.
Page 28 of 43
7
Default Values
Setting
STS priority
Mains high loss volt
Mains low loss volt
Inverter input high loss volt for STS
Inverter input low loss volt for STS
Inverter output high loss volt
Inverter output low loss volt
Inverter shutdown due to low input volt
Inverter shutdown due to high input volt
Inverter output volt
Inverter output volt frequency
Inverter output power limit
Default Value
On-line
138V
100V
138V
100V
138V
100V
40V
60V
120V
60Hz
100%
Table L–120Vac system factory defaults
Setting
STS priority
Mains high loss volt
Mains low loss volt
Inverter input high loss volt for STS
Inverter input low loss volt for STS
Inverter output high loss volt
Inverter output low loss volt
Inverter shutdown due to low input volt
Inverter shutdown due to high input volt
Inverter output volt
Inverter output volt frequency
Default Value
On-line
264V
185V
264V
185V
264V
185V
40V
60V
230V
50Hz
Table M–230Vac system factory defaults
Setting
RS-232, RS-422, RS-485 communication baud rate
RS-422 address
Button tone
LCD brightness value
Language
Password
Dry contact 1
Dry contact 2
Dry contact 3
Dry contact 4
Dry contact 5
Default Value
2400bps
9999
On
45
English
1234
Inverter overload
Inverter unavailable
Inverter fan fault
STS fan fault
Inverter power limit
Table N–System parameter factory defaults
Argus Technologies Ltd.
014-114-C0 Rev D WC
Printed in Canada. © 2008 Argus Technologies Ltd. ARGUS and INEX are registered trademarks of Argus Technologies Ltd. All Rights Reserved.
Page 29 of 43
Alarm Type
Inverter
STS
Controller
Alarm Name
Inverter fault
Inv over load
Inv fan fault
Inv low volt off
Inv Bus High
Inv Bus Low
Inv BusSoft fail
Inv Output short
Inv OPV Low
Inv OPV High
Inv Temp High
NegPow Protect
SynPulse fault
Inv EPO
SoftStart fail
Eeprom fail
Inv Temp High
Inv unavailable
Main unavailable
Output overload
OP Short circuit
K1 Relay open
STS SCR1 short
STS SCR2 short
INV Bypass Mode
Over temperature
MBS Abnormal
STS Fan Lock
STS fault mode
STS Eeprom Fault
SPS Power Fail
OutPut Abnormal
Inv lost
STS lost
DC input low
Cont temp high
Cont eeprom fail
DC input Over
CAN Bus Off
Level
Major
Observe
Major
Major
Critical
Critical
Critical
Critical
Critical
Critical
Critical
Critical
Critical
Critical
Critical
Major
Critical
Major
Major
Major
Critical
Major
Critical
Critical
Critical
Major
Critical
Major
Critical
Major
Critical
Critical
Critical
Critical
Critical
Critical
Major
Critical
Critical
Remark
Inverter fault
Inverter Over-loading
Inverter Fan fault
Inverter shut down due to low input voltage
Bus voltage over the maximal level
Bus voltage under the minimal level
Bus Soft Start Fail
Inverter Output Short
Inverter output voltage low
Inverter output voltage high
Inverter Temperature High
Inverter negative power protection
Sync Pulse Fault
EPO
Inverter soft start fail
Inverter EEPROM fault
Inverter temperature high
Inverter unavailable
Mains unavailable
Output over load
Output short circuit
Back-feed relay open
SCR1 short circuit
SCR2 short circuit
Inverter bypass mode
STS temperature high
MBS in abnormal position
STS fan fault
STS running in fault mode
EEPROM fault
Control power fail
STS output normal
Inverter lost
STS lost
Bat Volt Low
Controller temperature High
Controller EEPROM fault
Bat voltage high
Controller CAN bus off
Table O–Alarm code factory defaults
Argus Technologies Ltd.
014-114-C0 Rev D WC
Printed in Canada. © 2008 Argus Technologies Ltd. ARGUS and INEX are registered trademarks of Argus Technologies Ltd. All Rights Reserved.
Page 30 of 43
8
Maintenance
Although very little maintenance is required with INEX systems, routine checks and adjustments by qualified
service personnel are recommended to ensure optimum system performance.
The following table lists the maintenance procedures for this system. These procedures should be performed at
least twice a year.
WARNING: HIGH VOLTAGE AND SHOCK HAZARD.
Use extreme care when working inside the shelf while the system is energized.
Do not make contact with live components or parts.
Circuit cards, including RAM chips, can be damaged by static electricity. Always wear a grounded
wrist strap when handling or installing circuit cards.
Procedure
Clean ventilation openings
Inspect all system connections (re-torque as necessary)
Verify alarm/control settings
Verify alarm relay operation
Date Completed
Table P–Sample maintenance log
8.1
Inverter Fan Replacement
1. Unlock the inverter and slide the module 10 cm (4”) out of the shelf. Wait two minutes for module capacitors
to discharge.
2. Remove the six (6) screws that secure the front cover to the module.
3. Gently slide the front cover (with the fans) out of the module case.
4. Disconnect the fan power connectors (one per fan).
5. Note the direction of airflow and remove the fans from the assembly.
6. Install the replacement fans following the preceding steps in reverse order.
Fan power connectors
Screw hole (6 places)
for front panel
Fan screw (2 per fan)
Front cover w/fans
Argus Technologies Ltd.
014-114-C0 Rev D WC
Printed in Canada. © 2008 Argus Technologies Ltd. ARGUS and INEX are registered trademarks of Argus Technologies Ltd. All Rights Reserved.
Page 31 of 43
8.2
STS Fan Replacement
1. Unlock the STS and slide the module 10 cm (4”) out of the shelf. Wait two minutes for module capacitors to
discharge.
2. Remove the six (6) screws that secure the front cover to the module.
3. Gently slide the front cover (with the fans) out of the module case.
4. Disconnect the fan power connectors (one per fan).
5. Note the direction of airflow and remove the fans from the assembly.
6. Install the replacement fans following the preceding steps in reverse order.
Screw hole (6 places)
for front panel
Fan power connector
(2 places)
Fan screw (2 per fan)
8.3
Front cover w/fans
Replacement Parts
The INEX Inverter System offers a complete spare parts kit for each model number. Spare parts kits include the
power modules. Parts (those included in the spare parts kit) can be ordered individually or as a complete parts kit.
To order an individual part, give the full description along with the complete model and part number.
Model Number
INV-4810A
INV-4810EA
INV-4815A
INV-4815EA
MC-1000A
STS-050A
Fan
Cover
Cover
Cover
U
Description
Part Number
1000VA/800W inverter module (I/P: 48Vdc, O/P: 120Vac, 50/60Hz).................014-114-10
1000VA/800W inverter module (I/P: 48Vdc, O/P: 230Vac, 50/60Hz).................014-115-10
1500VA/1200W inverter module (I/P: 48Vdc, O/P: 120Vac, 50/60Hz)...............014-116-10
1500VA/1200W inverter module (I/P: 48Vdc, O/P: 230Vac, 50/60Hz)...............014-117-10
Controller module................................................................................................018-593-10
50A static transfer switch module .......................................................................019-050-10
INEX inverter/STS module fan............................................................................500-419-10
INEX inverter shelf rear cover.............................................................................614-844-10
INEX STS shelf rear cover, large........................................................................614-845-10
INEX STS shelf rear cover, small .......................................................................614-846-10
The above information is valid at the time of publication. Consult factory for up-to-date ordering information.
Argus Technologies Ltd.
014-114-C0 Rev D WC
Printed in Canada. © 2008 Argus Technologies Ltd. ARGUS and INEX are registered trademarks of Argus Technologies Ltd. All Rights Reserved.
Page 32 of 43
9
Troubleshooting
If the system fails to operate properly after having the installation and setup of the system thoroughly reexamined, use the following troubleshooting table to determine the probable cause(s) and solution(s) to resolve
error conditions. For unlisted error conditions, please contact your local dealer for technical assistance.
Error Condition
Possible Cause
Improper position of nylon guide pin.
Inverter module cannot
be properly inserted.
No AC output
and all LEDs off.
Insertion of non-inverter module.
Lack of input power.
Mismatch of inverter modules.
No AC output.
Both green and yellow
LEDs flicker.
No AC output.
Both yellow and red
LEDs are on.
Inverter self-diagnosis.
Load exceeds 125%.
1. Input wiring is connected in reverse (i.e.
reverse polarity).
2. Output voltage is out of operating range.
No AC output.
Red LED is on.
3. Inverter output is shorted.
4. Negative Power Protection.
1. Inverter fails to soft start.
Red LED blinks fast.
AC output exists with
yellow LED flickering.
AC output exists and
yellow LED is on.
Recommendation
Refer to Section 3.1 to insert the nylon guide pin
to correct position.
Check if the inserted module is not inverter
module. Inverter shelf holds only inverter
modules.
Ensure input cables are all firmly connected to
power source.
Check if power source is not yet switched on, or
is low in power.
Ensure inserted inverter modules have the same
specifications.
Inverter self-diagnosis takes a few seconds.
LED turns to a solid green light after the
completion of self-diagnosis.
Ensure the load is no higher than 100% of the
total power rating. Reduce as required.
Ensure input cables are connected to correct
polarity (positive to positive, negative to
negative).
Adjust voltage to ensure that the connected
device is within the inverter output voltage range.
Turn off the input power source to remove all
short circuits.
For multi-shelf system, any jumper insertion on
JP2 connector would obstruct parallel
connections. Remove jumper from JP2
connector.
For single-shelf system, jumper on JP2
connector pools two inverter modules. Ensure
there is a jumper on JP2 connector.
Reboot the inverter system by switching off and
on the input power source.
2. Inverter temperature rises beyond the
temperature limit.
Leave inverter idle to cool down for few minutes.
Input voltage is out of operating range.
Ensure input voltage is between 45 to 58Vdc.
Load is over 100% but below 125%.
Inverter continuously
Failure of EEPROM.
delivers power, but with
red LED flickering
Fans failure.
slowly.
Ensure the load is no higher than 100% of the
total power rating. Reduce as required.
Reboot the inverter system by switching off and
on the input power source.
Check if the fans are locked or fail to work.
If fan is locked, remove the obstruction;
if fan fails to work, replace the fan.
Table Q–Troubleshooting for inverter module
Argus Technologies Ltd.
014-114-C0 Rev D WC
Printed in Canada. © 2008 Argus Technologies Ltd. ARGUS and INEX are registered trademarks of Argus Technologies Ltd. All Rights Reserved.
Page 33 of 43
Inverter Module LED Display Status
Green LED
Priority
Priority
Priority
LED Signal
Status
Solid
Inverter work normally
Blink (slow)
Inverter is being inquired
Blink (intermittent (slow))
One of the status as follows:
1) Power On.
Details refer to note.
2) Shut down remotely.
Yellow LED
LED Signal
Status
Blink (intermittent (slow))
Power On
Details refer to note.
Solid
Over Load
(Load percent > 100%)
Blink (fast)
DC input abnormal
(Vin<=45V or Vin>=58V)
Blink (intermittent (fast))
Inverter shut down due to super low/super
high input
(Vin<=VLVSD or Vin>=VHVSD)
Red LED
LED Signal
Status
Blink (slow)
One of the alarms as follows:
1) EEPROM Fault.
The inverter cannot work in parallel
mode system, however, it can work
in single mode system.
2) Inverter Fan Fault.
Fan fails in operation.
Blink (fast)
One of the alarms as follows:
1) Internal DC Bus Over/Under/
Unbalance/soft start fail.
The inverter will shut down. It
cannot restart automatically.
2) Temperature High.
The inverter will shut down. It
cannot restart automatically.
Solid
One of the alarms as follows:
1) Input reverse polarity.
The DC input voltage polarity is
reverse.
2) Inverter output Short circuit.
When short circuit happens,
inverter will shut down. Manual
restart is required.
3) Abnormal output voltage.
The inverter will shut down when
output voltage is out of operating
voltage range. It cannot restart
automatically.
4) Negative Power Protection.
The inverter will shut down. It
cannot restart automatically.
5) Overload fault.
When the time of overload
protection exceeds the defined
time, the inverter will shut down.
Then inverter should be manually
restarted.
Table R–Inverter LED indicator display
Argus Technologies Ltd.
014-114-C0 Rev D WC
Printed in Canada. © 2008 Argus Technologies Ltd. ARGUS and INEX are registered trademarks of Argus Technologies Ltd. All Rights Reserved.
Page 34 of 43
Error Condition
No AC output and all
LEDs off.
Priority is On line, STS
AC output is normal but
with yellow LED on
Priority is On line, STS
AC output is normal but
with green LED flash 1
time/s
Priority is On line, STS
AC output is normal but
with green LED flash 1
time/s, and yellow LED
on
No AC output, yellow
LED is on
Priority is off line, AC is
normal from Mains, but
yellow LED is on
Priority is off line, AC is
normal, but green LED
flash 1 time/s
No AC output, yellow
LED flash 2 times/s
AC output is normal,
green LED is on or flash
1 time / second, yellow
LED flash 2 times/s
AC output is normal,
green LED is on, red LED
flash 1 time/s
AC output is normal,
green LED is on, red LED
flash 1 time/s
AC output is normal,
green LED is on, red LED
flash 1 time/s
AC output is normal,
green LED is on, red LED
flash 2 times/s
AC output is normal,
green LED is on, red LED
flash 2 times/s
AC output is normal,
green LED is on, red LED
flash 5 time/s
AC output is off, red LED
on, other LEDs off
Possible Cause
Recommendation
Lack of input power
Ensure input cables and bus bars are all firmly
connected to power source.
Check if inverter output or mains AC are not yet
switched on, or are low in power.
STS AC input source is from inverter. The inverter is
Check AC mains connection and status.
in normal status, but the utility line is in abnormal
status.
STS AC input source is from utility, the inverter is in
normal status. Maybe the current load is out of
Please refer to inverter troubleshooting guide.
capability of inverter, or the inverter is just from
abnormal status back to normal.
STS AC input source is from utility, and inverter is in
Please refer to inverter troubleshooting guide.
abnormal status.
Both inverter and utility AC source are in abnormal
status.
Check AC mains and inverter output.
STS AC input source is from utility, and inverter is in
Please refer to inverter troubleshooting guide.
abnormal status.
STS AC input source is from inverter, utility is just
from abnormal status back to normal.
Check AC mains connection and status.
The relay of utility power side is broken and cannot
form close circuit.
Turn MBS to mains or inverter bypass mode,
maintain the STS module
The relay of utility power side is broken and cannot
form close circuit.
Turn MBS to mains or inverter bypass mode,
maintain the STS module.
Fan fails
Turn MBS to mains or inverter bypass mode,
maintain the STS fan.
EEPROM FAULT
EEPROM can’t write or read data correctly.
This will not influence the STS AC output. The alert
will be off automatically after 10s.
CAN communication error
Check the connection of CAN signal cables.
SCR short fault
Turn MBS to mains or inverter bypass mode,
maintain the STS.
Auxiliary Power Supply fault
Turn MBS to mains or inverter bypass mode,
maintain the STS.
MBS provides 3 sets of signals to STS for detecting
Ensure the MBS and STS signal cables are
MBS position. When the connection is off or not at
connected.
valid position, this alert appears.
Turn MBS to mains or inverter bypass mode,
STS fault mode
maintain the STS.
Turn MBS to mains or inverter bypass mode,
AC output is off, red LED
maintain the STS.
Over temperature
on, other LEDs off
Check if the environmental temperature is higher or
if there is anything blocking the vent.
Decrease or remove the loads, then shut down or
AC output is off, red LED
Over load
remove the STS module. Then reconnect and
on, other LEDs off
restart.
Decrease or remove the loads, then shut down or
AC output is off, red LED
Output short
remove the STS module. Then reconnect and
on, other LEDs off
restart.
AC output is normal,
STS internal temperature is too high. Check if
Inverter bypass mode
green and yellow LEDs
anything is blocking the vent or if module has been
flash 2 times/s
working overload for a long time.
Table S–Troubleshooting for STS module
Argus Technologies Ltd.
014-114-C0 Rev D WC
Printed in Canada. © 2008 Argus Technologies Ltd. ARGUS and INEX are registered trademarks of Argus Technologies Ltd. All Rights Reserved.
Page 35 of 43
Inverter Module LED Display Status
Green LED
Priority
Priority
Priority
LED Signal
Status
Solid
STS work Normally
Blink (slow)
Running mode not accord with setting
priority, for example, STS work in off-line
mode, but the priority is on-line
Blink (fast)
STS work in Inverter bypass mode (the
internal mode of STS, not mean IBP of MBS)
Yellow LED
LED Signal
Status
Solid
Mains or Inverter abnormal
Blink (fast)
If the status of green LED is the same as
yellow LED, then it stands for Inverter bypass
mode, otherwise it means Back-feed relay
open
Blink (fastest)
STS Output abnormal
Red LED
LED Signal
Status
Blink (slow)
Fan lock or CAN communication fail or
EEPROM fault
Blink (fast)
SCR short or auxiliary power supply fault
Blink (fastest)
MBS position abnormal
Solid
STS Fault mode, maybe overload or over
temperature or output short
NOTE: If more than one warning exists at the same time, then the LED will display the highest priority.
Table T–STS LED indicator display
Alarm Priority
LED Indicator Status
Observe
Green: On
Yellow: On
Red: off.
Major
Green: On
Yellow: off
Red: On
Critical
Green: On
Buzzer chirp
Yellow: off
Red: On
Table U–Operating sequence troubleshooting table
Argus Technologies Ltd.
014-114-C0 Rev D WC
Printed in Canada. © 2008 Argus Technologies Ltd. ARGUS and INEX are registered trademarks of Argus Technologies Ltd. All Rights Reserved.
Page 36 of 43
10
Argus Conventions
10.1
Numbering System
Argus Technologies uses an eight-digit drawing number system, which is broken into three blocks. The first three
digits describe the category of the product; e.g., rectifier or fuse panel. The next three digits indicate the sequence
in which the product number was allocated in a particular category. The last two digits indicate the type of
drawing, for example:
“-05”
“-08”
“-20”
Schematic
Customer Connections
Main Assembly
Argus uses an eight-digit part numbering system for all components and sub assemblies. Each part is covered by
its own unique number. Due to the quantity, categories will not be listed within this manual.
10.2
Acronyms and Definitions
AC
ANSI
AWG
BTU
CAN
CEC
CSA
DC
EIA
EMC
EMI
ERM
ESD
FCC
HVSD
IEC
IEEE
LED
LVD
MTBF
NC
NEC
NO
OSHA
OVP
RAM
RU
THD
UL
Alternating current
American National Standards Institute
American Wire Gauge
British thermal unit
Controller area network
Canadian Electrical Code
Canadian Standards Association
Direct current
Electronic Industries Alliance
Electromagnetic compatibility
Electromagnetic interference
Electromagnetic Compatibility and Radio Spectrum Matters
Electrostatic Discharge
Federal Communications Commission (for the USA)
High voltage shutdown
International Electrotechnical Commission
Institute of Electrical and Electronics Engineers
Light emitting diode
Low voltage disconnect
Mean time between failures
Normally closed
National Electrical Code (for the USA)
Normally open
Occupational Safety & Health Administration
Over voltage protection
Random access memory
Rack unit (1.75”)
Total harmonic distortion
Underwriters Laboratories
U
U
U
U
U
U
U
U
U
U
U
U
U
U
U
U
U
U
U
U
Argus Technologies Ltd.
014-114-C0 Rev D WC
Printed in Canada. © 2008 Argus Technologies Ltd. ARGUS and INEX are registered trademarks of Argus Technologies Ltd. All Rights Reserved.
Page 37 of 43
11
Outline Drawings
11.1
Mechanical Dimensions of INEX Inverter Module
Power On LED
Lock bolt
Warning LED
Fault LED
Argus Technologies Ltd.
014-114-C0 Rev D WC
Printed in Canada. © 2008 Argus Technologies Ltd. ARGUS and INEX are registered trademarks of Argus Technologies Ltd. All Rights Reserved.
Page 38 of 43
11.2
Mechanical Dimensions of INEX STS Module
Power On LED
Lock bolt
Warning LED
Fault LED
Argus Technologies Ltd.
014-114-C0 Rev D WC
Printed in Canada. © 2008 Argus Technologies Ltd. ARGUS and INEX are registered trademarks of Argus Technologies Ltd. All Rights Reserved.
Page 39 of 43
11.3
Mechanical Dimensions of INEX Controller Module
Power On LED
Warning LED
Function keys
Fault LED
LCD screen
Argus Technologies Ltd.
014-114-C0 Rev D WC
Printed in Canada. © 2008 Argus Technologies Ltd. ARGUS and INEX are registered trademarks of Argus Technologies Ltd. All Rights Reserved.
Page 40 of 43
11.4
Mechanical Dimensions of INEX Interface Module
RS-485 port
RS-232 port
USB port
11.5
Mechanical Dimensions of INEX Inverter Shelf
BAT DC cathode
CN11: Inverter fail open
collector terminals
BAT +
DC anode
UC3: AC neutral
UC4: AC ground
UC5: AC line
CN7: COM/SYNC port
with STS module
CN9: Power
connector to
controller
CN20/CN21:
Inter-parallel
connectors
JP2: Mode selector
CN8: CAN COM port
with controller module
Argus Technologies Ltd.
014-114-C0 Rev D WC
Printed in Canada. © 2008 Argus Technologies Ltd. ARGUS and INEX are registered trademarks of Argus Technologies Ltd. All Rights Reserved.
Page 41 of 43
11.6
Mechanical Dimensions of INEX Controller/Interface/STS Shelf
UC5: AC input
UC4: AC output
CN2: Signal port
between STS & inverter
UC3: AC neutral
UC2: AC ground
UC1: AC line
CN12: Power connector
of controller
CN3: CAN bus interface
CN4 (future option)
CN7-11: relay contacts
Controller
slot
CN13: RS-232 port
CN1: Signal port between
interface module & shelf
CN1: Signal port
between STS & MBS
STS
slot
CN2, CN6:
(future option)
Interface
slot
Argus Technologies Ltd.
014-114-C0 Rev D WC
Printed in Canada. © 2008 Argus Technologies Ltd. ARGUS and INEX are registered trademarks of Argus Technologies Ltd. All Rights Reserved.
Page 42 of 43
11.7
Mechanical Dimensions of INEX MBSDU Shelf
Power distribution breakers
Main switch
Maintenance bypass switch
(MBS)
FRONT VIEW
Illustration only and may not match your model.
AC input
terminal block
AC-L input
AC output
terminal block
STS-L output
AC output NEMA receptacles 020-422-10
AC output IEC receptacles 020-424-10
REAR VIEW
Signal cable connected
to STS shelf CN1
AC-L
GND
AC-N
Argus Technologies Ltd.
014-114-C0 Rev D WC
Printed in Canada. © 2008 Argus Technologies Ltd. ARGUS and INEX are registered trademarks of Argus Technologies Ltd. All Rights Reserved.
Page 43 of 43
FACTORY SERVICE INFORMATION
Technical Support
Technical support staff are available for answering general questions related to installation, operation
and maintenance of Argus products. In Canada and the USA, call Argus toll free 7:30 am to 5:00 pm
Pacific Standard Time at:
+1-888 GO ARGUS
(+1-888-462-7487)
For emergencies, call +1-888-GO-ARGUS 24 hours a day, seven days a week.
Customers outside Canada and the USA, call +1-604-436-5547 for technical support.
Training
Argus offers various levels of product and technical training. These workshops provide a mix of
theory and hands on application for qualified customers. Please consult your sales representative for
course schedules, locations and costs, or visit our website at www.argusdcpower.com.
Factory Repair and Servicing
All service, beyond initial adjustments, should be carried out by qualified factory service personnel.
For these procedures, please contact Argus Technologies at the locations listed to the right.
Product Returns
Before returning any product for service, please obtain a Return Material Authorization (RMA) number
from an Argus factory service representative. The representative will require the model and serial
number, as well as a brief description of the problem prior to issuing the RMA number. All material
must be pre-authorized before being returned.
See document 048-507-10 “Warranty and Repair Information” for more details.
Moving and Storage
Units must be suitably packed in the original shipping container (or equivalent) prior to re-shipping.
The box should be completely enclosed and constructed of wood or double-wall, corrugated
cardboard. At least 3” of foam or shock absorbing packing material must surround the unit.
Factory Service Centers
Canada and International
Argus Technologies Ltd.
ATTN: RMA Returns
7033 Antrim Avenue
Burnaby, BC, V5J 4M5 Canada
Tel:
+1 604 436 5900
Fax:
+1 604 436 1233
Email: [email protected]
USA
Argus Technologies Inc.
ATTN: RMA Returns
3116 Mercer Avenue
Bellingham, WA, 98225 USA
Tel:
+1-360 756 4904
Fax:
+1-360 647 0498
Email: [email protected]
Asia-Pacific
PCM Electronics (Dong Guan) Co., Ltd.
Hongli Industrial Area, Miaobian, Liaobu Town,
Dongguan City, Guangdong Province,
523400 China
Tel:
+86 755 8895 3310
Fax:
+86 755 8895 3307
Authorized Service Center
Argentina
Argus Technologies de Argentina
Belen 315, Capital Federal, Buenos Aires,
1407l Argentina
Tel:
+54 (11) 4672 4821
Fax:
+54 (11) 4504 4698
Cell:
+54 9 (11) 4993 9996
Email: [email protected]
Asia
Argus Technologies Asia Pte Ltd
Blk 6 Tagore Lane #160
Singapore 787570
Tel:
+65 6458 8900
Fax:
+65 6458 2122
Australia
CPS National
8/376 Newbridge Rd
Moorebank, NSW, 2170 Australia
Tel:
+61 02 9822 8977
Fax:
+61 02 9822 8077
Australia/New Zealand
Alpha Power Systems Pty Ltd
Unit 3, 30 Heathcote Road
Moorebank, NSW, 2170 Australia
Tel:
+61 02 9602 8331
Fax:
+61 02 9602 9180
Century Yuasa
37 - 65 Colbalt Street
Carole Park QLD 4300
Australian Sales & Service
Tel:
+61 07 3361 6587
Fax:
+61 07 3361 6705
New Zealand Sales & Service
Tel:
+64 9 978 6689
Fax:
+64 9 978 6677
Canada
Compower Systems Inc.
118 Tiffield Road
Toronto, ON, M1V 5N2 Canada
Tel:
+1 416 293 3088
Fax:
+1 416 293 0671
Europe
Alpha Technologies Europe Ltd.
Cartel Business Estate
Edinburgh Way
Harlow, Essex, CM20 2DU UK
Tel:
+44 1279 422110
Fax: +44 1279 423355
Mexico & Central America
Technologies Argus First De Mexico SA de CV
Anatole France No. 17
Col. Polanco
Mexico City, 11560 Mexico
Tel:
+52 55 5280 6990
Fax: +52 55 5280 6585
South America
Argus Technologies Argentina
Santo Tome 2573, Capital Federal
Buenos Aires, 1416 Argentina
Tel:
+54 11 4504 4698
Cell:
+54 9 11 4993 9996
E-pager: [email protected]
Turkey
IPC Enerji Elk San ve TIC AS
Inonu cad. Kanarya sok. No:20
Yenisahra - Kadikoy
Istanbul, Turkey
Tel:
+90 216 317 41 42
Fax:
+90 216 472 90 66
048-527-10-I1 Rev L (09/2007)
Canada and USA toll free 24 hour emergency technical support: +1 888 GO ARGUS (462 7487) Outside North America: +1 604 436 5547