1
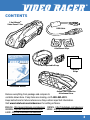
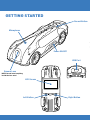
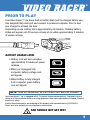
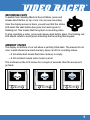
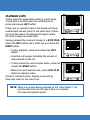
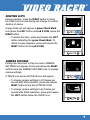
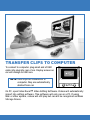
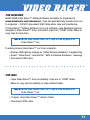
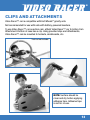
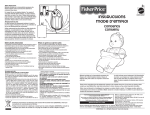
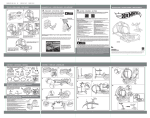
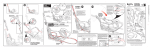
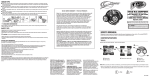
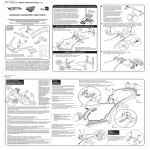
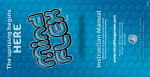
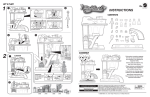
USER MANUAL
TABLE OF CONTENTS
2
Contents . . . . . . . . . . . . . . . . . . . . . . . . . . . . . . . . . . . . 3
Getting Started . . . . . . . . . . . . . . . . . . . . . . . . . . . . . . 4
Prior to Play . . . . . . . . . . . . . . . . . . . . . . . . . . . . . . . . . 5
System Requirements . . . . . . . . . . . . . . . . . . . . . . . . . 6
Using Your Video Racer™ car . . . . . . . . . . . . . . . . . . . 6
• Power On/Off . . . . . . . . . . . . . . . . . . . . . . . . . . . . . . 6
• Home Screen . . . . . . . . . . . . . . . . . . . . . . . . . . . . . . 6
• Recording Clips . . . . . . . . . . . . . . . . . . . . . . . . . . . . 7
• Memory Status . . . . . . . . . . . . . . . . . . . . . . . . . . . . . 7
• Play Back Clips . . . . . . . . . . . . . . . . . . . . . . . . . . . . 8
• Deleting Clips . . . . . . . . . . . . . . . . . . . . . . . . . . . . . 9
• Camera Settings . . . . . . . . . . . . . . . . . . . . . . . . . . . 9
Transfer Clips to Computer . . . . . . . . . . . . . . . . . . . . 10
Video Racer™ Editing Software . . . . . . . . . . . . . . . . 12
Tips for Best Quality Footage . . . . . . . . . . . . . . . . . . 12
Clips & Attachments . . . . . . . . . . . . . . . . . . . . . . . . . 13
Do’s & Don’ts . . . . . . . . . . . . . . . . . . . . . . . . . . . . . . . 14
Troubleshooting . . . . . . . . . . . . . . . . . . . . . . . . . . . . . 14
Technical Specifications . . . . . . . . . . . . . . . . . . . . . . 15
Video Racer
CONTENTS
1 Hot Wheels®
Video Racer™ Car
USB Cable
Attachment Clips
USER MANUAL
Adjustable Strap
Adhesive
Strips
Instruction Manual
Action Cam Protective
Attachment Case
Remove everything from package and compare to
contents shown here. If any items are missing, call 1-888-892-6123.
Keep instructions for future reference as they contain important information.
Visit www.hotwheels.com/videoracer for editing software.
ENGLISH - http://www.hotwheels.com/videoracer FRENCH - http://fr.hotwheels.com/videoracer
GERMAN - http://de.hotwheels.com/videoracer
GREEK - http://gr.hotwheels.com/videoracer
LAAM - http://mx.hotwheels.com/videoracer
3
GETTING STARTED
Record Button
Microphone
Power ON/OFF
USB Port
Camera Lens
NOTE: Do not insert anything
inside the lens area!
LCD Screen
Left Button
4
Right Button
Video Racer
PRIOR TO PLAY
Your Video Racer™ car has a built-in battery that must be charged before use.
Use supplied USB cable port and connect to powered computer. Prior to first
use, charge for at least one hour.
Depending on use, battery life is approximately 45 minutes. Flashing battery
status will appear on LCD screen on back of car when approximately 2 minutes
of power remains.
BATTERY CHARGE LEVEL
• Battery icon will turn red when
approximately 2 minutes of power
remains
• When car is plugged into
computer, battery voltage icon
will appear.
• When battery is fully charged
from computer, green battery
icon will appear.
NOTE: TURN OFF WHEN NOT IN USE OR BATTERY WILL BE DRAINED.
Your Video Racer™ car is equipped with 3.7V internal lithium polymer battery. To properly recycle,
follow local lithium polymer battery recycling guidelines. Non-replaceable battery included. Dispose
of batteries safely.
Protect the environment by not disposing of this product with household waste (2002/96/EC).
Check your local authority for recycling advice and facilities.
CAR SHOULD NOT GET WET.
5
SYSTEM REQUIREMENTS
The Video Racer™ car is Windows/Mac compatible.
It will work with any computer that supports a USB.
USING YOUR VIDEO RACER™ CAR
POWER ON/OFF
• Find power switch on side of car.
• To turn power on, slide switch forward towards front of car. Status LED
in skull on top of car will turn green and LCD screen will activate.
• To turn power off, slide switch backwards toward rear of car.
HOME SCREEN
When powered on, the LCD display screen on bottom of car will illuminate.
The Hot Wheels® logo will appear and then show a live video feed of what the
camera is seeing along with 2 icons on the bottom of the screen.
A PLAY icon above the LEFT button and a CAMERA SETTINGS icon above the
RIGHT button.
• To play back recorded videos,
press and release LEFT button.
• To change Camera Settings,
press and release RIGHT button.
6
Video Racer
RECORDING CLIPS
To switch from Standby Mode to Record Mode, press and
release Skull Button on top of car. You are now recording.
Once the display screen is black, you will see that the status
LED under the skull button has gone from solid green to
flashing red. This means that the system is recording video.
To stop recording a video, press and release skull button again. The blinking red
LED should return to solid green indicating that recording has stopped.
MEMORY STATUS
The display on bottom of car will show a partially-filled skull. The amount of red
color in skull shows how much memory space is left for recording videos.
• A full white skull means that video memory is empty.
• A full red skull means video memory is full.
This is shown on the LCD screen for a couple of seconds, then the screen will
go black.
7
PLAYBACK CLIPS
Videos cannot be played back while in record mode.
To play back recorded video from standby mode,
press and release LEFT button.
If there are no recorded videos, the display will show
a white skull and will return to live video feed. If there
are recorded videos, the display will begin to show
the most recently recorded video.
During playback the icons will change to a STOP ICON
above the LEFT button and a Trash can icon above the
RIGHT button.
• To stop playback, press and release the LEFT
button.
• A number will appear indicating the amount of
videos stored on the car.
• To skip forward to next recorded video, press and
release the RIGHT button.
• When you reach desired video, press LEFT PLAY
button to playback video.
At end of recorded videos, display screen will go
black and return to live video feed.
NOTE: There is no sound during playback on car. Video Racer™ car
records audio but can only play it back on computer.
Car does not playback sound.
8
Video Racer
DELETING CLIPS
During playback, press the RIGHT button to select
the Trash can icon and display will change to confirm
deletion of videos.
A large trash can will appear. A green Check Mark
icon above the LEFT button and red X ICON. above the
RIGHT button.
• To delete the video, press and release the LEFT
button indicating the green Check Mark. To
return to video playback, press and release the
RIGHT button for the red X ICON.
CAMERA SETTINGS
During live video feed, a Play icon and a CAMERA
SETTINGS icon appear. Press and release the RIGHT
button below the CAMERA SETTINGS icon, to change
camera settings.
A TRACK icon and an OUTDOOR icon will appear.
• To change camera settings to 30 frames per
second with VGA resolution, press and release
RIGHT button below the OUTDOOR ICON.
• To change camera settings to 60 frames per
second with QVGA resolution, press and release
the LEFT button below the TRACK icon.
9
TRANSFER CLIPS TO COMPUTER
To connect to computer, plug small end of USB
cable into plug into rear of car. Display screen on
car will change to USB icon.
NOTE: Once clips are transferred to
computer, they are automatically
deleted from car.
On PC, open Video Racer™ Video Editing Software. Videos will automatically
import into editing software. This software will only run on a PC. If using
Mac or other system, videos will still play but car will be recognized as Mass
Storage Device.
10
Video Racer
FOR WINDOWS
Install FREE Video Racer™ Editing Software (available for download at
www.hotwheels.com/videoracer). Clips will automatically transfer from car
to computer – DO NOT disconnect USB Cable while clips are transferring.
If Video Racer™ Editing Software is not yet installed, open Windows Explorer,
navigate to Video Racer™ drive, and select clips from “DCIM” folder. Move or
copy clips to hard drive.
NOTE: MOVE clips rather than COPY clips to free up space on
Video Racer™ car.
To safely remove Video Racer™ car from computer:
• Remove USB cable by clicking on “Safely Remove Hardware” in system tray.
• Select “Video Racer” and wait for “Safe to Remove Hardware” message.
• Disconnect USB cable.
FOR MAC
• Open Video Racer™ drive on desktop. Clips are in “DCIM” folder.
• Move or copy clips to desktop or other desired folder.
NOTE: MOVE clips rather than COPY clips to free up space on
Video Racer™ car.
• To Eject, drag Video Racer™ drive to Trash.
• Disconnect USB cable.
11
VIDEO RACER™ EDITING SOFTWARE
Downloadable Video Racer™ Editing Software is Windows compatible only.
Mac users may refer to editing software included with system. Download FREE
Video Racer™ Editing Software for Windows only from www.hotwheels.com/
videoracer. This exclusive software can edit and create movies. It is pre-loaded
with graphics, sounds effects, music, transitions, etc. You can also add your
own music, sound effects, graphics and transitions to make Video Racer™
movies. New content may
be available periodically so
check back for updates.
SOFTWARE
REQUIREMENTS
PC: Windows XP with SP3 /
Vista with SP2
Pentium III 800 MHz or
equivalent
512 MB of RAM
800 MB free hard drive space
Screen resolution 1024x768
Direct X 9.0
USB 2.0
TIPS FOR BEST QUALITY FOOTAGE
High speed mode operates at 60 frames per second which requires more light
because camera shutter is opening and closing at a higher rate allowing less
light to enter. This mode is best for track play. If using indoors, ensure adequate
lighting is available or footage may be grainy and dark.
Experiment between standard and high speed mode to see which works
best for certain shots. For high speed recording use 60 frames per (FPS), for
standard recording use 30 FPS.
REASONS FOR USING HIGH SPEED MODE
12
• Smoother images
• Less blurring
NOTE: Depending on usage
30 FPS allows about 12 min of shooting
60 FPS allows up to 24 min.
Video Racer
CLIPS AND ATTACHMENTS
Video Racer™ car is compatible with Hot Wheels® gravity sets.
Not recommended for use with sets with battery-powered boosters.
To use Video Racer™ car as action cam, attach Video Racer™ car to Action Cam
Attachment. Bottom of case has a clip. Using provided clips and attachments,
Video Racer™ can be mounted to helmets, skateboards, etc.
Track set not included.
NOTE: Surface should be
clean and dry before applying
adhesive tape. Adhesive tape
is not for re-use.
13
DO’S & DONT’S
• Cars are NOT made for crashing
• Don’t drive through water
• Not recommended for use with sets with battery-powered boosters
TROUBLESHOOTING
PROBLEM
SOLUTION
There is no sound during playback
on Video Racer™ car.
Video Racer™ car records audio but
can only play it back on computer.
Car does not play back sound.
Audio playback on computer
is muffled or scratchy.
Make sure microphone on the car
is not blocked.
Clips do not transfer to
computer automatically.
Automatic transfer is only supported
if Video Racer™ software is installed
(for Windows only). If it is already
installed and software and clips still
don’t transfer automatically, unplug
USB cable, wait a few seconds, and
reconnect. Do not press any buttons
for 5 seconds.
USB device is not recognized.
Try a different USB port on computer.
Video is too dark.
Unit locks up or malfunctions.
Position a light source behind
camera. Do not shoot into light.
Turn the unit off. Wait for 15 seconds,
then turn it on again. If this does not
help, the battery may need to recharge.
For questions about your Video Racer™ car call Technical Support at: 1-888-892-6123
14
Video Racer
TECHNICAL SPECIFICATIONS
Memory capacity 512MB
Battery life approximately 45 to 60 minutes
Video resolution is 320 x 240 (high speed mode) or 640 x 480 (standard mode)
Video capacity approximately 12 min (standard mode) approximately 25 minutes (high
speed mode)
LCD information
0.95” CSTN with backlight
65,000 colors
Operating temperature -20°C to +70°C
Storage temperature -30°C to +80°C
This device complies with Part 15 of the FCC Rules.
Operation is subject to the following two conditions:
(1) This device may not cause harmful interference, and (2) this device must accept any
interference received, including interference that may cause undesired operation.
NOTE: This equipment has been tested and found to comply with the limits for a Class B
digital device, pursuant to part 15 of the FCC rules. These limits are designed to provide
reasonable protection against harmful interference in a residential installation. This
equipment generates, uses and can radiate radio frequency energy and, if not installed
and used in accordance with the instructions, may cause harmful interference to radio
communications. However, there is no guarantee that interference will not occur in a
particular installation. If this equipment does cause harmful interference to radio or
television reception, which can be determined by turning the equipment off and on, the user
is encouraged to try to correct the interference by one or more of the following measures:
• Reorient or relocate receiving antenna.
• Increase the separation between the equipment and receiver.
• Connect the equipment into an outlet on a circuit different from that to which
the receiver is connected.
• Consult the dealer or an experienced radio/TV technician for help.
NOTE: Changes or modifications not expressly approved by
the manufacturer responsible for compliance could
void the user’s authority to operate the equipment.
15
BATTERY SAFETY INFORMATION
In exceptional circumstances batteries may leak fluids that can cause a chemical burn injury or ruin
your product. To avoid battery leakage:
• Non-rechargeable batteries are not to be recharged.
• Rechargeable batteries are to be removed from the product before being charged.
• Rechargeable batteries are only to be charged under adult supervision.
• Do not mix alkaline, standard (carbon-zinc), or rechargeable (nickel-cadmium) batteries.
• Do not mix old and new batteries.
• Only batteries of the same or equivalent type as recommended are to be used.
• Batteries are to be inserted with the correct polarity.
• Exhausted batteries are to be removed from the product.
• The supply terminals are not to be short-circuited.
• Dispose of battery(ies) safely.
• Do not dispose of this product in a fire. The batteries inside may explode or leak.
Protect the environment by not disposing of this product with household waste (2002/96/EC).
Check your local authority for recycling advice and facilities.
© 2011 Mattel, Inc. All Rights Reserved. Mattel, Inc. 636 Girard Avenue, East Aurora, NY 14052,
U.S.A. Consumer Relations 1-888-892-6123. Mattel Canada Inc., Mississauga, Ontario L5R 3W2.
may call us free at 1-888-892-6123. Mattel U.K. Ltd., Vanwall Business Park, Maidenhead SL6 4UB.
Helpline 01628 500303. Mattel Europa, B.V., Gondel 1, 1186 MJ Amstelveen, Nederland. Mattel
Australia Pty., Ltd., Richmond, Victoria. 3121.Consumer Advisory Service - 1300 135 312 Mattel East
Asia Ltd., Room 1106, South Tower, World Finance Centre, Harbour City, Tsimshatsui, HK, China.
Diimport & Diedarkan Oleh: Mattel SEA Ptd Ltd.(993532-P) Lot 13.5, 13th Floor, Menara Lien Hoe,
Persiaran Tropicana Golf Country Resort, 47410 PJ. Tel:03-78803817, Fax:03-78803867.
1-888-892-6123
Asst. W1647
© 2011 Mattel, Inc. All Rights Reserved.
0920G1
W6721
W6722