1
SYSTEM3 POS USER MANUAL
The Security Screen
Functions
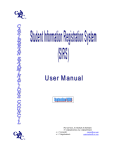
the ‘Use POS’ function.
THE SECURITY SCREEN
Covered in This Section
The screen that appears
whenever System3 is start>Functions of the Security Screen
ed or restarted, or when a
>How to Use It
staff member chooses to
>Clocking In and Out
return to it, is called the
>E-Mail (Staff Messaging)
‘Security Screen’. It’s given
>Printing Logout Reports
this name as it provides
secure access only to individuals who have the permission to use it. If for some reason a
customer walks up to the screen and types in a random number,
chances are that they will be greeted with the large warning message ‘Invalid ID’.
The security screen also acts as a tool for staff to clock in and
out, to send e-mail (staff messaging), and to print copies of Logout reports.
How to Use It
You may notice the 5 buttons in the top right corner. By default
Use POS’ is highlighted. There is also ‘Clock
the button labeled ‘U
In’, ‘Clock Out’, ‘Print Copy’, and ‘Send E-Mail’.To use one of
these other functions, the button needs to be highlighted.
These functions are accessed in one of two ways:
1. The Number Pad
2. Using a Magnetic Swipe Card
Another way to access System3 functions is with a magnetic
swipe card reader. This card would have been issued to you by
your manager and, like your personal ID number, it is tied directly to your individual security profile. This means anyone who
obtains your card would have access to all of the functions that
you do, as well as access to your tables (when using POS features). For this reason, it is very important to keep your card in
a safe place at all times.
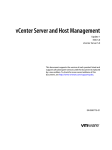
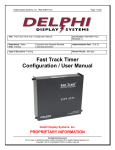
To use your card, the security screen needs to be in swipe card
mode. You’ll know it’s in this mode if you don’t see the number
pad on the security screen, but rather a store logo, or the default
message ‘Please swipe your card to gain access to System3’
(which appears where the number pad would normally be).
If you see
the number pad,
but want
to use
your
card, you
can
switch to
swipe
card
mode by
simply
touching
FIGURE 1b: The Security Screen - Swipe Card
the top
of the
screen, where the System3 logo is.
Swipe the card through the reader. Most card readers will allow
you to swipe the card in either direction, as long as the black magnetic stripe passes through the reader. If nothing happens, run the
card through again, this time either slower or quicker than you
tried previously, as some card readers models, read data at different speeds.
FIGURE 1a: The Security Screen - Number Pad
System3
gives the
option to either use a magnetic swipe card or the number pad to
access its functionality. To use the number pad, a manager MUST
give you a valid personal ID number. Simply type in your number
using the number pad. If you make a mistake, press the “Undo”
button and start over. Once you’ve typed in your correct
Personal ID code, press the ‘OK’ button to access the function
you need.
NOTE: Unless you select something else, System3 will default to
If your card still does not work, which will happen on occasion
due to the magnetic stripe wearing out, either have your manager issue you a new card, or use your personal ID in the number
pad mode. If you do not know your personal ID number, your
manager can provide it to you (from the Employee Setup file)
Clocking In/Out
Clock In’ button by touching
When starting a shift, highlight the ‘C
it. Either key in your ID number on the number pad, or swipe
your card (as discussed in the previous sections). A confirmation
Attempting to Log In [Your Name]? Yes / No’ will appear.
question ‘A
If your name appears with that message, choose ‘Yes’, and a sec-01-
SYSTEM3 POS USER MANUAL
ond confirmation message will appear ‘YYou are successfully logged
in.’. This same message will appear if you attempt to use the clock
in function again before clocking out.
If a name other than yours appears when attempting to log in,
choose ‘No’ when prompted, and try again. If it happens again,
ensure you’ve got YOUR card, or double check your number. It
may have been changed by your manager.
Clock Out’ button by
At the end of your shift, highlight the ‘C
touching it. Either key in your ID number on the number pad or
swipe your card. The screen will change to ‘Please Wait,
Gathering Data’. When System3 is finished gathering your time
and attendance data, it will print a chit(receipt) detailing your
hours. If you’ve been using System3’s POS features, and have accidentally left a bill open, a list of open bills and which terminals
they’re on will print instead. If this is the case, you are not
clocked out, and must close ALL bills before being allowed to
Once the E-mail window is displayed, choose from the following
options:
A. Select Specific Employees
To send a message to a specific employee, or employees:
1. Select the employee(s) from the list that you would like the
message to go to.
2. Ensure that the ‘SSelected’ button is filled with a black circle. (If
it doesn’t have a black circle, just touch it)
Delivery Date & Time’ are correct. (To cor3. Check that the ‘D
rect them, touch the portions of the date or time that you would
like to change, and then use the up/down arrows to change them.
4. Check that the ‘EExpiry Date & Time’ are correct. You can
change them as detailed in Step 3 above. The expiry date and
time control how long the message will be kept unread in
System3 memory, before being deleted.
Eg: If a message is sent to an employee, and they don’t read
it before the expiry date, the message will be automatically deleted from memory.
5. Fill the subject of the message in the ‘SSubject’ line, by touching
the white box. An on-screen keyboard will pop up, allowing you
to type the subject. When done press ‘EEnter’
Message’ by touching the
6. Fill the message in the box marked ‘M
white box. Again, an on screen keyboard will pop up allowing you
to fill in the body of the message.
FIGURE 2: The E-Mail Screen
clock out.
7. Press the ‘Send’ button to send the message, or the ‘Cancel’
button to cancel the message.
If the number of hours on the chit does not match your own calculations, alert a manager in order to correct the situation
B. Select Specific Job Codes
To send a message to all people in a specific Job Code(s),
E-Mail (Staff Messaging)
Not to be confused with internet based e-mail, System3’s E-mail
function is designed to be used as a staff to staff, or manager to
staff messaging system. To use this feature, you must have been
given proper access in your employee security setup.
Highlight the' Send E-mail’ button by touching it, and either type
in your number, or swipe your card. This will bring up a box as
shown in Figure 1-1. Along the left side is a list of All Employees.
To the right is a list of Job Codes, and above that are a number of
Switches that you can use to determine who the e-mail is delivered to. The last options to decide on are Delivery Date/Time,
and Expiry Date/Time, which determine when the message is
sent.
The ‘Subject’ field allows you to fill in a subject line for the e-mail,
and the ‘Message’ box allows you to type an actual message to be
delivered.
There are several different ways to send messages among staff.
1. Select the Job Codes from the Job Code list that you would like
the message to go to.
2. Make sure that the ‘SSelected’ button is deselected (no
black circle in the box).
3. Follow steps 3-7 above.
C. To All Employees
To send a message to all employees.
All Employees’ button
1. Select the ‘A
2. Follow steps 3-7 listed above under ‘...Selected Employees.’
D. Select All Logged In Employees
To send a message to all employees currently logged-in.
-02-
SYSTEM3 POS USER MANUAL - Table Service
Special Section : Reading The Server Logout
Figure 3 : The Server Log Out
Although different options can be turned on by managers that will
vary the look of your log out report, the example to the right shows
the two common components that will appear on all log out reports.
i. Time & Attendance Info
The top of the log out report will give you information regarding
Clock-In(Log In) time and date, and Clock-Out(Log Out) time and
date.
Additionally, the total amount of hours worked is calculated and
printed.
The last line ‘Run on Shift’, indicates how many of the days shifts
that you happened to work. So if you started at a time that was
defined as ‘Shift 1’, and finished during ‘Shift 2’, your ‘Run On Shift’
would be 2.
ii. Sales & Remittance Info
If your shift overlapped more than one of the restaurants shifts, this
info will be broken down by shift, and then totalled.
System3 will break down your sales totals by tender type, and by the
amount of transactions that were settled to each tender type. Any
gratuities that were rung in, will also appear.
The line labeled ‘Total’ gives, in order, sales total, gratuity total, and
Grand Total (Sales + Gratuities).
The line labeled ‘Gratuity’ gives a total of gratuities, and is important
as it is used to help calculate the server drop.
The line labeled ‘ServerDrop’ gives the amount of cash that a server
needs to remit to management. This amount is derived by subtracting any ‘Non-Cash Sales’ (Credit Cards, House Accounts, etc.), as well
as any gratuities made on Credit Cards or House Accounts, from
total cash sales.
As stated before, these amounts will be broken down by shift, and a
total will be printed near the bottom of the printout.
To cash out, servers should verify that they have the correct number of credit card receipts. Once verified, servers need simply remit
the amount indicated on the line that reads ‘Server Drop’.
As per IRS legislation, servers need to report 8% of cash sales, as
well as total Credit Card sales when filing their individual tax returns.
These amounts are calculated and listed on the bottom of the Log
Out Report.
Management can also turn on the option to have Department
totals, Discounts, and/or Voids printed on the cashout.
-03-
SYSTEM3 POS USER MANUAL - Table Service
1. Select the ‘All Logged In’ button by pressing it.
2. Follow steps 3-7 listed above under ‘...Selected Employees.’
The last option in this window is the ‘Only On Log In’ check-box.
With this selection checked, delivery will be delayed until at least
the next time the selected employees log-in.
Print Copy
The ‘Print Copy’ function is used to print a copy of a server/bartender’s logout report. Clocking out with no open orders will
produce the same results, but will also stop tracking your Time
and Attendance information for that shift. Using the ‘Print Copy’
function, a Server Logout Report can be produced, while staying
logged-in for Time and Attendance purposes.
NOTE: Using the ‘Print Copy’
function will cause System3 to
print a line reading ‘Copy of
Logout’, this way a manager
can tell if a server is actually
‘Logged Out’.
Introduction
THE RETRIEVE ORDER
SCREEN
Covered in This Section
> Introduction
> Screen Layout
i. terminal number ID button
ii. order list window layout
>Function Buttons
i. finding and accessing active orders
ii. other functions
iii. cashing out orders
iv. starting new orders
v. the multiple select button
cates, by default, which terminal you are currently working on.
Most of the time the name will start with a ‘T’ (but not always),
and will be followed by a number. If you’d like to view/access
orders that currently reside on another terminal, you can switch
to the Order List for another terminal by touching the button.
(the terminal number will change) If you have several terminals
on the network, you may have to press it numerous times in
order to get to the terminal you’d like to access. See the section
on ‘Finding and Opening Active Orders’ for more details.
ii ORDER LIST WINDOW
Contains a list of current orders in the system. If you’ve been
given access to view others orders, you will see your orders as
well as other server/bartenders.
Managers and cashiers will, by default, see ALL active orders in
the system
NOTE: Because of the unique ‘Peer-to-Peer’ configuration of the
System3 network, only orders that were last accessed on this particular terminal will be visible on this terminal. For example, if you started
an order on this terminal, but retrieved it on another terminal, and are
now back at this terminal, you will not see the order in this list. To see
this order, there are a couple of ways to bring it back to the screen.
See the section on Finding and Accessing Active Orders’.
Depending on the options
set by your manager, the
‘Retrieve Order’ screen is
probably the first screen
you’ll be presented with
after swiping your card (or
keying in your security code). The screen allows you to manage
your tables, and to view them all at a glance. It is also one of the
screens that will allow you to start a ‘New Table’.
If you don’t see the ‘Retrieve Order’ screen upon swipe-in, then
your manager has set the terminal to start at the ‘Main Menu’, in
which case you’ll see the ‘Retrieve Order’ screen anytime you
need to access an active order.
NOTE: If you don’t ever see the ‘Retrieve Order’ screen, it’s
because your manager has decided to use the graphical interface for
Table Management.You’ll know this is the case if you see a floor plan
of your restaurant on the screen. Most of the functions that are available on the ‘Retrieve Order’ screen are available on the Graphical Table
Management screen. Use of Table Management is covered in a separate section.
Retrieve Order Screen Layout
The screen is organized as follows:
i. TERMINAL NUMBER ID BUTTON
The bright yellow button in the top left corner of the screen indi-
FIGURE 4: The Retrieve Order Screen
The Order List Window is the large white box that covers the
entire left half of the retrieve order screen. The window is organized in a number of different fashions.
A] Along the top of the window, in white letters on a blue background, you’ll notice the headings ‘Table Name’, ‘Server’, ‘Value’,
‘Sent’, and ‘Started’. Orders are listed in time-sorted order, with
the most recently accessed order on the bottom of the list, the
second most recently accessed order is second from the bottom,
and so on. In addition to time info, you’ll notice that other crucial information is listed, such as table name (number), the value
of the order, and the server who ‘owns’ the order, all under the
corresponding column headings. Another key piece of info to
-04-
SYSTEM3 POS USER MANUAL - Table Service
watch for is ‘Order Number’, if this function is turned on the
order number will appear in brackets next to the table name on
the ‘Order List’ window.
B] The Color Coding of the orders is very simple. Orders that
appear in Red, have exceeded the preset warning time (Manager
Side > Terminal Options > Program Flow > Number of minutes before
warning on no server access...) since they were last accessed. This
gives both servers and managers a quick visual cue as to which
tables have been accessed recently, and which haven’t.
If an order appears in blue, it has been closed and reopened (by
a manager)
If the order is in black, it is not in any sort of warning state.
C] Along the bottom of the window, there are 4 ‘switches’ that
correspond to Order Types.. By default, System3 shows the order
Normal’. This includes Dine-In, Delivery, Take-Out, and
type as ‘N
Drive Thru orders which were last accessed on this terminal.
To see only Takeout, or only Delivery orders, simply highlight the
button that corresponds to whichever type of order you’d like to
see- for Delivery orders . press the Delivery button, etc.
the button, the number will change from T2 to T3, and you will
see all of the active orders on T3, Press it again to switch it to T4,
etc. When it reaches the last terminal in the network, it will start
at the lowest numbered terminal again (T1), and continue on
from there. Or, to move back in the list, use the yellow ‘<’ button.
To make the order active on the terminal you’re standing at;
Retrieve Order’
select the order by highlighting it > press the ‘R
button. The order will then be open for editing on the current
terminal, and now ‘resides’ on this terminal’.
b.) Retrieve Order by Table # button - Use this if you know the
table name or number of the table you would like to access.
Retrieve by Table #’ > Fill in the exact name/number of
Touch ‘R
the table > Press ‘EEnter’ > The order should now be open for
editing.
c.) The Retrieve by Order # button - Starting with the first new
order of each day as ‘1’, System3 sequentially numbers all orders
that have been started, and tags those orders (in addition to their
table name/number). The reason for this is that some restaurants/bars that allow servers to use the same table number more
than once at the same time (eg. 2 - Table #44s), will often use the
The reason orders are sorted in this manner is to prevent too
many orders from appearing in the window. If you just want to
find a specific ‘Takeout’ order, you don’t have to sort through all
of the other Order Types also, just press the Takeout button, and
only Takeout orders are shown.
NOTE: If a restaurant is using specific terminals for either DriveThru, or Delivery orders, all orders of those types will automatically
‘migrate’ to their specified terminals, additionally these types of orders
will not show up under ‘Normal Orders’.
To see orders that are at the bottom of the window, use the grey
scrollbar on the extreme right hand side of the window. The
scrollbar will only appear if the length of the order list exceeds
the length of the window. To use the scrollbar, simply touch and
hold it, and then move it up or down until you see the order you
need.
3. Retrieve Order Screen Function Buttons
Following is a summary of the buttons that are located on the
right half of the retrieve order screen. We’ll group some of the
ones that have similar functionality together.
i. FINDING AND ACCESSING ACTIVE ORDERS
a.) Terminal Number ID button - As discussed before, by pressing the yellow button in the top right corner, you can switch the
order list window to reflect what is on any of the other terminals. For example if you are at a terminal labeled T2, as you press
FIGURE 5: The Retrieve Order Screen
order number to
retrieve the table instead, as it presents less confusion. To use it
Retrieve by Order#’ > Fill in the
> press ‘R
order # that you would like to access > press ‘EEnter’ > The order
should now be open for editing.
d.). View All - Short for ‘View All Orders’, the ‘View All’ Button
will collect all active orders on the network, and display their
summary info on the current terminal’s Order List window. At
this point you can highlight one of the orders by touching it (it
will turn blue, to indicate that it is selected), and then you can
perform most of the following functions.
e.) Retrieve Order- Used to retrieve an order that is currently
-05-
SYSTEM3 POS USER MANUAL - Table Service
visible on the screen Select the order you would like to access
by touching it (it will turn blue) > press Retrieve Order. The
order should now be open for editing.
before pressing ‘Yes’ > if you are unsure about cashing out the
order, press ‘No’.
ii. OTHER FUNCTIONS
f.) View Order - If you want to see details of an order (actual
items ordered), rather than just what appears in the Order List
window, you can highlight the order you want to see the details
for (touch it and it will turn blue to indicate selection) and then
press > View Order. A small window will pop up to the right of
the order list, allowing you to see the details of the order. To
make the ‘View Order’ window disappear, touch anywhere else
on the Order List Window
Transfer Order - Used to transfer ownership of an active
g.)T
order to another server. To transfer an order: Select the order
> press Transfer Order > Select a server from the pop-up winOK’ > The message ‘A
Are you sure you want to...?
dow > press ‘O
Yes/No’ will appear > If you are not sure about transferring the
No’, and the transfer will be cancelled > If you are
order, select ‘N
Yes’ and the order will disappear
sure about the transfer, select ‘Y
from the order list (or will at least change the name under the
’SServer’ column), and the order is no longer ‘owned’ by you.
NOTE: As a security measure, management can turn off a server’s ability to transfer orders. You will know this is the case if you see
a message appear that says ‘Please Enter Your Manager ID. To Cancel
- Touch this Box’ at any point during the transfer process. If this is the
case you will need someone with Manager Override access to complete the transfer.
FIGURE 6: The Payment Amount Screen
WARNING ! - If you “Fast Cash’ an order in error, it can only be
‘reopened’ by a manager, so be sure to always check the order
name/number before answering ‘yes’ to the ‘Are you Sure...’ message.
l.) Retrieve & Tender (Single Tender Type) - Used to tender a bill
to any of the tender (payment) types, including cash, Visa,
Mastercard, among others. Let’s look at a few.
Cash - To tender a bill, select the bill you would like to enter a
h.) Print Receipt - Used to print a receipt for a customer. To print
a receipt: Select the order > press Print Receipt > a receipt will
print on the designated receipt printer
i.) No Sale - Used to open a cash drawer without tendering a
sale. To use the No Sale function: Ensure no bills are selected >
press the ‘No Sale’ button > if you have access to the cash drawer, it will automatically open.
NOTE: Any time the ‘No Sale’ button is pressed, it is registered
on the ‘No Sale’ report, along with specifics regarding server and time.
j.) Security Screen - Used to return quickly to the security
screen. In order to prevent others from accessing your orders,
a good habit to develop is that of pressing the ‘Security Screen’
button before walking away from the terminal.
iii CASHING OUT ORDERS
k.) Fast Cash - Used to tender a bill (or bills) quickly to cash. To
use the Fast Cash button: Select the bill you would like to ‘Fast
Cash’ > press the ‘Fast Cash’ button > you will be prompted with
the message ‘Are You Sure You want to Fast Cash this order?
Yes/No?’ > ensure that you are cashing out the proper order
FIGURE 7: The Change Due Screen
payment for > press
Retrieve and Tender > select Cash as the payment method >
enter the amount (keep in mind that System3 automatically
assumes 2 decimal places, so pressing 1-0-0 without pressing the
decimal point, will put $100 dollars on the screen. To enter
$1.00, you’ll need to press 1- then the decimal -then 0-0)> press
Reset at any time if you make a mistake entering an amount >
verify that the correct amount is entered > press OK > a large
screen will then be displayed highlighting the Amount Entered,
and the Change Due, as well as the number of guests at the table
(which can be changed using the +/- keys), and a Cancel button >
-06-
SYSTEM3 POS USER MANUAL - Table Service
Receipt for The Customer to Sign? Yes/No’ > Select yes, and a
double receipt is printed out, on which a customer can add tip,
and sign his name > at this point, Cancel the transaction, and
bring the customer the receipt to sign. Once they have signed it,
repeat the above steps, but when System3 asks if you would like
to print a receipt > press No > enter the total amount of the
receipt (including tip) > verify that the amount is correct > press
OK > If the amount entered is greater than the amount of the
bill, System3 will ask ‘Would you like the Difference to be
Gratuity? > If you select No, the difference will be treated as
change for the customer.
House With Card - The steps are identical to those above,
except that System3 will require you to swipe the customers
card through the magnetic card reader attached to the terminal
as soon as you select this as a tender type.
FIGURE 8: The Tender Type Screen
Verify
that
all
amounts are correct (if not press Cancel to re-enter the amount) > touch the
screen anywhere in the Red/Blue area to accept the transaction
> the order is now closed.
All Credit Cards (Not using Credit Card Interface)- If a customer pays with his credit card, and has signed their slip, and left
you a tip, this is how you would settle it > Select the bill you
would like to Tender and press Retrieve and Tender > select the
Card Type as the payment method > fill in the total amount of the
charge slip (including tip) > press Reset at any time if you make a
mistake entering the amount > verify that the amount you’ve
punched in is correct > press OK > System3 will ask ‘Would you
like the difference to be Gratuity?’ Yes/No’ > Press Yes if you
would > Pressing No will assume that the difference will be treated like change.
House No Card - System3 allows the use of House
Accounts. Some restaurants/bars call them ‘Tabs’, others call
them ‘Credit Accounts’. They function as an ‘Eat Now/ Pay Later’
form of payment, but can also be used in a prepaid fashion, where
the customer pays a set amount in advance, and then uses this
prepaid account whenever they come in.
m.) Retrieve & Tender (Multiple Tender Types) - Used when a
table is paying a bill with more than one type of payment. For our
example, let’s assume a $100 tab, and a table wants to pay $50 in
cash, and the rest on Visa.
Select the $100 bill from the order list window > press Retrieve
and Tender > select Cash as the Tender Type > type in $50 >
press OK > System3 pops up a window that says ‘The Amount
You entered is not enough - What would you like to do? Split
Tender / Send the Order with Partial Payment / Try Again ?’ >
select ‘Split Tender’ > the tender type screen comes up again >
select Visa > enter the amount, including tip > System3 will ask
‘Would you Like the Difference to be Gratuity? - Yes/No?’ - select
Yes if you would like the difference to be treated as tip or select
No if you would like the difference to be treated as change for
the customer..
NOTE: If you had chosen ‘Send this order with Partial Payment’,
you would have been brought to either the security screen, or the
retrieve order screen (depending on Terminal Options set by your manager) to continue using the system as normal. In this case the bill Total
in the order list window would remain $100, but when you get to the
These House Accounts can be tracked using either a Magnetic
Card for security, or with no card. The House No Card payment
type is used to settle an order to a House Account without a
card. To do this, accounts will have to have been set up in
advance:
Select the bill you would like to Tender > press Retrieve and
Tender > select House No Card as a payment type > a window
will pop up with a full list of Active House Accounts (if this is an
extensive list, you can use the Alpha Hot Keys on the left to take
you directly to all accounts that start with a particular letter) >
select the House Account you would like to settle the order to
and press OK > System3 will then ask ‘Would you like to Print a
FIGURE 9: The Retrieve Order Screen
-07-
SYSTEM3 POS USER MANUAL - Table Service
screen that allows you to enter a Payment amount, the $50 cash will
have been deducted from the bill total, leaving you with only $50 to
pay. This use of this function is intended for situation, for example,
where a customer(s) is leaving a table, and wants to pay part of the
bill, but the other people at the table want to keep the tab open.
iv STARTING NEW ORDERS
n.) New Order - When using the Retrieve Order screen as a
starting point (as determined by your manager in Terminal
Options), this button is used just as you thought it might be. To
start a new order(table)
Press the New Order button > the Keyboard Screen will pop up
> if the large grey box at the top of the keyboard is blank, fill in
a table name by ‘typing’ on the keyboard > press Enter > or if the
box already has a number in it, it’s because your manager has set
it to automatically generate table names > to accept this table
name, press Enter > to change this table name, take your finger
and touch and drag over the table name that is already filled in
there > when it’s highlighted, press Erase > the dark grey box
should be blank now > type in the desired table name > press
Enter > the main menu screen will appear along with a blank
order window, ready for a new order.
v. THE MULTIPLE SELECT BUTTON
c.) Combining and Cashing out Multiple Orders - If you would
like to select a number of bills to combine, and take you directly
to the Tender screen > Carefully select the orders > press the
Retrieve and Tender button. You will be prompted with
‘Retrieving Multiple Orders will cause System3 to combine these
orders. Would you like to Continue? Yes/No? >ensure that you
have the correct orders selected and press Yes. The tender type
screen will come up next, with the combined total of all of the
bills that you’ve selected. Proceed with the tender as described
in the section on ‘Retrieve and Tender’.
d.) Transferring Multiple Orders - If you would like transfer a
number of orders to the same server > Carefully select the
orders that you would like Transfer > press the Transfer Order
button > you will be prompted with ‘This action will transfer multiple orders. Would you like to continue? Yes/No?’ > Ensure that
you have the correct orders selected and press Yes > you will be
prompted with a list of servers to transfer to > select the server from the list > press OK > you will be prompted with ‘Are you
sure you want to transfer these orders to [Server Name]?
Yes/No? > ensure that it is the correct server name > press Yes
> the orders will disappear from the screen and are no longer
owned by you.
NOTE: The transfer function can be set to only be authorized by
a manager. If this is the case, you’ll need a manager to perform the
previous function.
On the bottom of the Retrieve Order screen,You'll notice a tiny
whit check-box, with the words ‘Multiple Select’ next to it.When
the box is unchecked (default setting) you will only be able to
select one order at a time. When the box IS checked, you will be
allowed to select as many orders as you like.
NOTE: Be extra careful when Multiple select is turned on
(checked), as you can cause issues by incorrectly combining bills, etc.
The multi select works with many of the functions on the
Retrieve Order screen. For any of the following functions, ensure
that the Multiple Select is checked.
a.) Fast Cashing Multiple Orders - Carefully select all of the
orders that you would like to quickly settle to cash, and press
Fast Cash. You will be prompted with ‘Are you sure you want to
Fast Cash these orders? Yes/No? > Ensure that you have the correct orders selected, and press Yes. The orders will disappear
from the screen. If you close an order in error, you will need a
manager to re-open the order.
FIGURE 10: The Retrieve Order Screen
b.) Combining Multiple Orders into One - Carefully select the
orders that you would like to combine > press the Retrieve
Order button > ‘Retrieving Multiple Orders will cause System3
to combine these orders. Would you like to continue? Yes/No? >
ensure that you have the correct orders selected and press Yes.
The main menu screen will come up, with the combined order
open in the Order Window.
-08-
SYSTEM3 POS USER MANUAL - Table Service
THE ORDERING PROCESS
(TABLE SERVICE)
Introduction
Covered in This Section
Because the process of
ordering can vary substantially, depending on what
type of restaurant is being
operated (Table Service,
Counter Service,Take Out,
Delivery), we’ll examine
the most common one first
- Table Service. Most Table
Service restaurants will
perform the everyday
processes (Ordering, sending, printing bills)in much
the same way, with only
minor variations in the way
they do things. If the way
you do things in your
restaurant are different,
consult one of the other
sections of the manual.
> Introduction
> Review
> Main Menu Screen Layout
i. the active order window
ii. main/sub menu buttons
iii. modifiers
iv. function buttons
v. other buttons
> The List Functions Button
>The Ordering Process
i. starting a new order
ii. sending orders / the ‘send’ screen
iii. making changes to a new order
iv. the summary screen
> The Ordering Process - REVIEW
> Adding to / Managing Existing
Orders
>Separate Checks
Review
The process of ordering is closely tied in with managing active
orders, and closing out bills, so let’s review the ordering process
that we’ve already covered in the sections on ‘The Security
Screen’, and on ‘The Retrieve Order Screen’. If you need more
detail, please refer to those sections:
1. To enter from the security screen > swipe your card, or punch
in your number > press OK > you will either be brought to the
‘Retrieve Order’ screen, in which case follow step 2 > if you are
brought directly to the Main Menu screen, skip step 2.
2. You are now on the Retrieve Order screen > press ‘New
Order’ > if the box above the on-screen keyboard is blank, type
in a table name/number using the on-screen keyboard > if the
box above on-screen has a number already filled, it’s because a
manager has the option turned on right now to “use current
order number as table number” > to change this number touch
and drag your finger over the number and press ‘Erase’, then fill
in the new number > to accept the table number, press Enter.
3. You are now on the Main Menu screen, and ready to enter
items.
Main Menu Screen Layout
i. ACTIVE ORDER WINDOW
On the left side of the screen you’ll see a large white box. This
is the actual order window, where items will appear as you order
them, as well as where you will be able to make changes. Items
will appear in BLACK, and modifiers will appear in RED.
Additionally, if you re-open an order you’ll notice that items that
FIGURE 11: The Main Menu Screen
were previously sent,
have changed color slightly. Previously sent items are now DARK
GREY (instead of black), and previously sent modifiers are now
PINK (instead of red).
ii. MAIN / SUB MENU BUTTONS
Directly to the right of the order window is the Main Menu. You
can’t actually order anything directly from the Main Menu, as it is
used to organize the menu into different categories. Those categories should closely resemble the breakdown of your actual
menu. For example, all pasta would be under the ‘Pasta’ button,
appetizers would fall under an ‘Appetizer’ button, bottled wines
would be found under the ‘Wines’ section, etc. Obviously your
actual menu buttons will vary, but that is the general idea with
Main Menu Buttons, as they will be referred to from here on.
Generally, when you touch a main menu button, you will go
directly to a page of items, but not always. From time to time a
main menu category needs to be broken into sub categories. We
call these Submenus. An example of a submenu would be if you
have a main menu button ‘Beer’ > you touch the ‘Beer’ button >
a screen pops up that gives you the choices ‘Draught Beers’ or
‘Bottled Beers’ - this is a SubMenu > Once you make a choice,
touch the button you want > another screen appears with actual items on it.
iii. MODIFIER BUTTONS
The last type of button that you will encounter underneath the
Main Menu is the Modifier button. A modifier is very similar to
an item, except that it’s specific purpose is to MODIFY the preparation of a particular item. (Thus the name). An example of modifiers would be if you rang in a ‘steak’ (items), a page of modifiers
-09-
SYSTEM3 POS USER MANUAL - Table Service
pops up to allow you to choose meat temp (rare, medium
rare,etc.). Another example would be if you rang in a ‘vodka’
(item), and you want it ‘on the rocks’ (modifier). The quickest
way to know that you have rung in a modifier, is to look at the
order window. Items will appear in BLACK, and modifiers are
spaced over from the left and are RED.
iv. FUNCTION BUTTONS
On the far right of the screen, you may notice a
number of different buttons organized from the
top of the screen, to the bottom. These are
called ‘Function Buttons’. System3 currently has
over 100 functions to choose from (these are
covered in a separate section) for use on these
10 buttons. If you need more than 10 of the
functions (most will), we recommend putting
the 10 most common functions that you perform on these 10 buttons, and put the other
ones underneath the ‘Options’ or ‘More
Options’ tabs. (right next to the Main Menu tab.
To get to Options, or More Options, just touch
where the words are printed & to get back to the
Main Menu, touch where it says ‘Main Menu’.) For a
full list of these options, and
FIGURE 12: Function Buttons
their use, see the section
labeled
Edit
Function
Buttons’.
v. OTHER BUTTONS
Between the Main Menu Buttons and the Function Buttons, you’ll
notice number buttons ‘1’ thru ‘0’, plus a decimal and a ‘<’ (which
is used for erasing). The numbers can be used for Seat Number,
or for quantity of an item, depending on the option your manager has set.
On the bottom left of the screen, there is a button that says
‘Recall’. This button will change to ‘Send’ as soon as items are
added to the bill. The ‘Recall’ function will take you back to the
Retrieve Order screen, so that you can access other tables. The
‘Send’ button will send only NEW (previously unsent) items to
the kitchen/bar. One of the most commonly misunderstood concepts when training people in System3, is that ANY TIME an
active bill is Retrieved (re-opened), the ‘Recall’ button will change
to ‘Send’. If no new items are added to the bill and you hit Send,
the items that are already on the bill won’t be reprinted at the
kitchen/bar, so there is no need to worry of items being remade.
Additionally, if you have an order ‘open for editing’, you can’t simply hit the Exit button. You will be greeted with the warning message ‘You Currently Have an Order Open for Editing. You must
Send this order...’. In order to exit to either the security screen,
or to the retrieve order screen, while you have an order open,
you’ll need to hit the ‘Send’ button.
Check’. The ‘Close Check’ button works identically to the
‘Retrieve and Tender’ button covered in the previous section,
except that it is intended for the check that you are currently
editing.
Next to the ‘Close Check’ button, you may (depending on
options set by your manager) see the ‘Fast Cash’ button. Again,
the ‘Fast Cash’ button works exactly the same as the ‘Fast Cash’
button on the Retrieve Order screen (covered in the previous
section), but is intended for the check that you are currently editing.
To the right of the Fast Cash button, is the Quick Screen button
(If this option is turned on). This button will take you directly to
the Quick screen, which is a screen used mostly by busy bars and
clubs, by the bartender. Sel the section on the Quick Screen for
more details.
To the right of the Quick Screen button, is a red box. This box
will display the price of the last item selected.
Above the order window, you’ll notice a row of blue boxes. The
first two ‘Pop-up PLU/Barcode’, and “PLU’ checkbox are intended for use with menus that use Price Look Ups (PLU) for certain
items, or that use barcode scanning to input items.
Next you will see a check-box with the word ‘Multi’ under it.
This is short for ‘Multi Select’. When this box is unchecked you
will only be allowed to select one item (by highlighting it with
your finger) before the ‘Keep/Delete’ screen pops up. (See the
section on ‘The List Functions’ screen for more details.When the
box is checked, you will be able to select as many items as you
wish, and the ‘Keep/Delete’ screen will not pop up, until you press
the ‘List Functions’ button. (Which is probably on the far right of
the screen, unless it has been changed by a manager).
The last item on the Main Menu screen that we’ll discuss, is the
‘Sel All’ button. To Select All items in the currently active order,
press the Sel All button. This will automatically highlight all of the
items in the current order, and will pop up the ‘Keep/Delete’
screen.
The List Functions Button Window
As mentioned before the 10 buttons on the far right-hand side of
the screen are called Function Buttons. Unless changed by your
manager, one of those buttons will have the name ‘List Functions’.
Sometimes to simplify things, the button is renamed
‘Keep/Delete’, as that is what it is used primarily for. It does,
however, offer the option of performing many functions on an
item, or a group of items.
NOTE: It is very important to learn the “List Functions’ button thoroughly, as you will probably end up using it frequently.
Next to the ‘Recall’ button, you’ll notice a button that says ‘Close
-010-
SYSTEM3 POS USER MANUAL - Table Service
The List Functions Button Window (cont’d)
a. The ‘Delete’ Button - As stated above the main purpose of the
‘List Functions’ button is to delete an item. When you make a
mistake in mid-order, and realize that you need to remove an
item:
NOTE: To Delete previously sent items, you’ll need management
authorization.
If the ‘Multi’ check-box is turned on, select the item (or items)
that you would like to delete, and press the ‘List Functions’ button. A window will pop-up on the screen that has the name of
the item you want to remove at the top. Below the name of the
item are 2 large buttons - one red/one green - that read ‘Delete’
(red) and ‘Keep’ (green).To the right of these buttons are several blue function buttons (we’ll cover those later). If you’re sure
you want to delete the item, press the ‘Delete’ button, if you
don’t want to delete them, press ‘Keep’. The item is now
removed from the order.
If the ‘Multi’ check-box is tuned off, as soon as you select an item,
the List Functions Window will automatically pop up, allowing
you to ‘Delete’ the item, or to perform one of the other functions listed.
To delete all items in an order, use the Sel All button, and again,
the List Functions window will pop up, allowing you to Delete the
items.b. Hold Item/Unhold Item - Used to time orders to the
kitchen. If you want to ring an entire order, but only send part of
it to the kitchen, select the items that you wish to HOLD back
from printing. They will turn blue to remind you that they are
held. To make the items print to the kitchen, select the blue
color-coded items and press the UNHOLD button. The items
will then print to the kitchen.
c. Comp Item - ‘Comp’ is short for complementary, so to ‘Comp’
an item, is to make it free for the guest. Comps require management authorization to perform. Select the item(s) that you want
to comp, and press the List Functions button > when the
Window pops up select the ‘Comp Item’ button > the management authorization window will pop up > once authorization is
entered > select a reason for the comp from the pop-up list. The
item will remain on the bill, but will have a zero charge, this way
it can be ‘uncomped’, and it will show up on reports as a sold
item, with a zero total.
d. Replace - On occasion, in the middle of the ordering process,
you’ll realize that you’ve rung in an incorrect item/modifier (for
example ‘medium well’ instead of ‘medium rare’, or large pizza
instead of small pizza). To take you back to the page that contained the modifier or item that you rang in, highlight the mistake
> press the List Functions button > press the ‘Replace’ button
>the item / modifier will be removed > the page that contained
the original modifier will pop up > choose the replacement modifier / item > continue with the ordering process.
e. Waste Item - If an item is rung in, and is made, but something
happens to it (dropped, cold, customer hates it), it will need to
come off of the bill, but it will also need to be accounted for, for
inventory purposes. This is where the ‘Waste Item’ function
comes in handy. To ‘Waste’ an item > select the item from the
order list window > press ‘List Functions’ > press ‘Waste Item’ >
the management authorization window will appear > enter
authorization > select the reason for the waste from the window
that pops up > press OK > the item will disappear from the bill,
but will show up in any Waste report run by management.
f. Don't Make/Reprint (formerly the ‘Make New/Old’ function) - To
ring in an item that you don’t want printing at the kitchen/bar,
select the item that you don’t want to print > press the ‘List
Functions’ button > press the Don’t Make/Reprint button > the
message ‘Do you want this item to print at the Kitchen/Bar?
Yes/No?’ will appear > select No, and the item will not print to
the kitchen/bar.
To force an item to print again to the kitchen or bar, without ringing it in again > select the item(s) that you would like to reprint
> answer Yes to the question ‘Do you want this item to print at
the Kitchen/Bar? Yes/No?’ > the management authorization
screen will appear > enter management auth > the item will
reprint to the kitchen/bar.
FIGURE 13: The ‘List Functions’ Window
g..Taax Exempt - There are certain places (Canada is one) where
specific groups of people are exempt from paying sales taxes (in
Canada, all native peoples are exempt). In order to make an item,
or items, tax exempt > select the item(s) > press the ‘List
Functions’ button > press the ‘Tax Exempt’ button > the manage-011-
SYSTEM3 POS USER MANUAL - Table Service
The List Functions Button Window (cont’d)
ment authorization screen will appear > enter management auth
> taxes will be removed from these items.
the ‘List Functions’ button > press the ‘Split Item’ button > a
number pad will appear asking you how many ways you would
like to split the item up > in this example, press ‘2’ > you will then
see in the order window
0.5 Bottle Valpolicella
0.5 Bottle Valpolicella
17.50
17.50
h. Discount Item - Discounts can be applied in a number of different ways. They can be discounted by a specific dollar amount,
or they can be discounted by a specific percentage, depending on
how it is set up by your manager. Additionally, miscellaneous dollar amount discounts can be applied. If an entire bill can be discounted (instead of item specific), perhaps using the discount
function on the ‘Close Check’ screen may be a better idea.
Which will now allow you to split the two halves of the bottle of wine, on to two separate bills.
Select the items that you would like to discount > press the ‘List
Functions’ button > press the ‘Discount Item’ button > choose
the discount you would like to apply > if it is a miscellaneous $
amount discount, press the ‘Enter Misc.Amount’ button near the
bottom of the discounts page > the management authorization
screen will appear > enter management auth > the item is now
discounted by the selected amount, and will change color to dark
purple, to indicate that it has been discounted.
j. Remove Discount - On occasion it will be necessary to remove
a previously applied discount from an item. To do this > select
the item > press ‘List Functions’ > press ‘Remove Discount’ >
answer ‘Yes’ to the question ‘Are you sure you want to remove
the discount from this item?’ > the item will then be regular
price.
i. Split Item - The best way to explain the ‘Split Item’ function is
by using a couple of examples.
Example 1 - In order to save some time ringing in the same
item repeatedly, you’ve chosen to ring in a quantity of an item,
and then the actual item. ie: ‘3’ > ‘Miller Lite’ , instead of ‘Miller
Lite’ > ‘Miller Lite’ > ‘Miller Lite’. In the order list window you
see,
[a] 3
Miller Lite
15.00
and not,
[b] 1
1
1
Miller Lite
Miller Lite
Miller Lite
5.00
5.00
5.00
Which was fine, until the customer told you that they want
each of the 3 beers on a separate tabs. To make [a] look like [b],
select the item you would like to split - in this example the 3
Miller Lite - and press the ‘List Functions’ button > press the Split
Item button > a number pad appears, asking you for how many
ways you would like the item split up > in this case, press ‘3’ >
now the order list window should look like [b], which will allow
you to now separate the tabs.
Example 2 - You’ve rung in a bottle of wine at a table of 4,
and the two couples want to share the cost of the bottle of wine.
In the order list window you see;
1 Bottle Valpolicella
35.00
To split the wine bottle two ways, select the bottle > press
NOTE: You can split an item into as many ways as you like. An
item has to have been sent, before it can be split.
k. Reorder Item - If you would like to re-order an item or items
> select the item you would like to reorder > press the ‘List
Functions’ button > press ‘Reorder Item’ > the items (including
any modifiers that were previously rung in) will then appear in
the order list window > ring in any other items that you might
need > press ‘Send’. This function can be used before sending an
order. This would be handy in a situation where a customer
orders a pizza with numerous toppings, and then says ‘Make it 2
pizzas, with the same toppings’ > simply select the pizza, and
press the ‘Reorder Item’ button, and the pizza will be reordered,
along with all toppings.
l. Edit Price Level - Certain (or all) items on a menu might have
different “Price Levels’. A simple example of this might be a
restaurant that offers the same items at dinner, that they offer
during the day, and only the price changes (automatically). Using
the same example, there may be situation where a customer
comes in at night and wants the Lunch portion (and price). Ring
the item in as normal > select it > press the ‘List Functions’ button > press ‘Edit Price Level’ > the Management Authorization
Window will appear > enter management auth > a keyboard will
appear, asking for the new price level > type it in and press OK
> the item will be re-priced according to what is filled in for that
price level, on that item.
m. Edit Seat - Some restaurants prefer to ring items in using seat
numbers, as it is sometimes easier to separate the checks at a a
later time. To change the seat number that an item is associated
with > select the item > press the ‘List Functions’ button > press
the ‘Edit Seat’ button > a number pad will appear > fill in the new
seat number > press OK > that item will now have the new seat
number attached to it.
NOTE: Unless entered already, all items will have a ‘default’ seat
number of ‘0’.
-012-
SYSTEM3 POS USER MANUAL - Table Service
n. Edit Prep Group - The Prep Group of an item describes what
it is, and where it will print on a bill. For example, a table orders
a ‘steak’, and an order of ‘nachos’. Normally, the ticket in the
kitchen would print out ‘***Appetizers’ and all appetizers (including the nachos), would print first, and the ticket would then read
‘***Entrees’, and all entrees would print out (including the steak).
If you want the order of ‘Nachos’ to print out under ‘***Entrees’,
simply select the nachos > press the ‘List Functions’ button >
press the ‘Edit Prep Group’ button > a list of prep groups will
appear > select ‘Entrees’ > press OK.
NOTE: This function may be disabled by management, and its
use will be protected by the management authorization screen.
If this is the case, you will need a manager to complete the function.
NOTE: All items with the same Prep Group will print together,
regardless of where on the bill they were rung in.
o. Edit Group Description - Instead of using seat numbers to
keep items on a bill organized, they can be associated to group
names.
For example, four people sit down and order some items,
and inform you that they will be on two tabs. You ask them their
names > ‘Jim’ and ‘Bob’ > ring in the items as normal > send to
the kitchen > highlight the items for ‘JIm’ > press ‘Edit Group
Description’ > fill in the name on the keyboard > press ‘Enter’ >
select the items for ‘Bob’ > press the ‘Edit Group Description’ >
fill in the name on the keyboard > press enter. Now, when you
would like to split the bills, go to the options Tab on the Main
Menu, and find the ‘Split by Group’ button > press it > a window
with a list of group names associated with this bill appear > select
the Group name that you would like to print > press OK > a
new window will appear with the items for that group separated
> ensure that they are correct (if not, simply touch them to move
them back to the bill) > and press OK > the bill for that Group
will print out > if you have more than one group > the window
that allows you to select the group name will pop up again > if
you want to continue splitting and printing the bills, select the
group and press OK> if not, press cancel to return to the order
If the ‘Group’ button is enabled (on the far right side of the
main menu screen), you will be able to create a group name AS
YOU ORDER. Before you order an item, select the ‘Group’ button, fill in a name for the group, and ring in the items that you
need for that group > press the ‘Group’ button > the keyboard
will pop up again> fill in the name of the next group > and so on.
p. Add Message - On occasion,you will need to add a very specific preparation message to a specific item, and that prep instruction is not available on any of the existing modifier pages. To add
a message to an item > select the item that you would like to add
the message to > press ‘List Functions’ > press ‘Add Message’ >
a keyboard will pop up, allowing you to type in a message > when
finished press OK > a confirmation message ‘You message was
successfully attached’ will appear > press OK again > you will
notice that the message does not appear in the order list window, but WILL BE attached to the item when it prints at the
kitchen/bar printer.
q. Stop Timer - Certain items can be set to be charged for based
on the amount of time used. A good example of this would be a
pool table rental. If a person is done playing pool, but would like
to continue with an open tab, you would select the pool table
from the order list window > press the ‘List Functions’ button >
press the ‘Stop Timer’ button > the timer on the item is stopped
immediately, and the charge is calculated (based on the number
of minutes used)
The Ordering Process
STARTING A NEW ORDER
a.) When using the Retrieve Order screen as a starting point (as
determined by your manager in Terminal Options), this button is
used just as you thought it might be. To start a new order(table)
Press the New Order button > the Keyboard Screen will pop up
> if the large grey box at the top of the keyboard is blank, fill in
a table name by ‘typing’ on the keyboard > press Enter > or if the
box already has a number in it, it’s because your manager has set
it to automatically generate table names > to accept this table
name, press Enter > to change this table name, take your finger
and touch and drag over the table name that is already filled in
there > when it’s highlighted, press Erase > the dark grey box
should be blank now > type in the desired table name > press
Enter > the main menu screen will appear along with a blank
order window, ready for a new order.
b.) You can also start a new order from the Main Menu screen (as
determined by your manager in Terminal Options). There is no
button to press to start a new order from the Main Menu screen.
If the Order List Window is blank, you will start a new order as
soon as you ring in items and press the Send button.
Enter your ID number or card > determine which main menu
-013-
SYSTEM3 POS USER MANUAL - Table Service
button will have the item you would like to ring in under it >
press that Main Menu button > now you can select the items you
would like to ring in > the items will appear in the order list window to the left > ring in any modifiers that may pop-up after the
item you ring in > to ring an item in that is under another Main
Menu button, press the ‘Main Menu’ button on the right hand side
of the screen > select the Main Menu category > continue ringing in the order until you are finished > press ‘Send’ > the ’Send’
screen may now appear (see Figure 14), allowing you to fill in a
table number > if there is no Table Number filled in, in the black
box near the top of the screen.
NOTE: Table Name / Number can be changed at any point by
returning to this screen.
b.) To Change Order Type - Depending on how a terminal is set
up, the default Order Type will be ‘Normal’. You’ll find the Order
type ‘switches’ on the top of the screen. The one that has the
black circle filled in is the current order type. Simply highlight one
of the other order types in order to change it.
If the Order Type is anything besides ‘Normal’, a header will print
on the kitchen ticket with the order type on it.
NOTE: Keep in mind that changing the order type may affect
where the bill prints in the kitchen, as well as possible discounts
for that. order type.
c.) To Change Timing Options - The ‘switches’ near the top right
of the screen, are used to time an order. By default, an order will
have the ‘Normal’ switch selected. You can choose to ‘Rush’,
‘Hold 15’, ‘Hold 30’, ‘Hold 45’, or ‘Hold 60’. These options will
print a header on the kitchen ticket, requesting that the order be
rushed, or held for 15, 30, 45, or 60 minutes. These switches will
not delay the print job in the kitchen.
FIGURE 14: The Send Screen
The ‘Send’ screen has a number of different functions which we
will discuss in the next section.
ii. SENDING ORDERS / THE ‘SEND’ SCREEN
Pictured above is the ‘Send’ screen. Depending on configurations
set up by your manager, this screen may or may not appear. The
‘Send’ screen allows not only the ability to change table
name/number, it allows you to change order type, timing options,
number of covers (guests). and perform a wide variety of other
functions.
a.) To Change a Table Name/ Number - The long rectangular box
near the top of the ‘Send’ screen displays the current table name
/ number in yellow. If this box is blank, you can type the table
name using the keyboard. To change from UPPER to lower case
letters, use the ‘Shift’ button. To make changes, use the ‘Erase’ key,
which will either backspace one character at a time, or will erase
any highlighted portion of the name.
If you press the ‘Send’ key and the message ‘That table number is
already in use...’ appears, it is because your manager has chosen
to not allow duplicate table numbers in the system. You can
change the table number (by adding a number or letter to it, or
change it altogether).
To delay the order from printing until a specified time > press the
orange ‘Postpone’ button > change the time using the up down
arrows, to whatever time you would like the order to print in the
kitchen > press ‘OK’ > answer ‘yes’ to the question ‘Are you
sure...?’’ > the order will NOT print in the kitchen until the specified time, and will not appear on your Order List window until
it has been activated in the kitchen.
NOTE: The “Postpone’ order function can be turned off by management. You’ll know that it is turned off if nothing happens when you
press the ‘Postpone’ button.
d.) To Change # of Covers (Guests) - You can change the number of guests associated with any order by using the blue ‘#
Covers’ button on this screen. Simply press the ‘# Covers’ button and fill in the number of covers > answer ‘Yes’ to the ‘Are you
sure...?’ question.
e.) Speak to Server - This checkbox, when turned on (x) will print
‘Please Speak to the Server about This Order’ on the top of the
kitchen/bar ticket. This function is handy if you need to convey
some explicit instructions to the kitchen that are too detailed for
the various messaging functions.
f..) Add Message - Will allow you to type in a custom message to
the kitchen/bar. The message appears at the bottom of the print
ticket.
g.) Return to Security Screen - If this button is highlighted (it may
be by default) you will be returned to the Security screen after
you press the ‘Send’ button. If you do not want to return to the
Security Screen, ensure that this box is UN-highlighted (you may
-014-
SYSTEM3 POS USER MANUAL - Table Service
have to do this yourself by touching it) before you press the
‘Send’ button
Figure 15 : The Main Menu Screen
Often in the middle of making a new order, you will need to make
a change, or changes, to the current order.The way you make the
change will depend on if the change needs to be made to an item
(black) or to a modifier(red).
a.) Item Changes - To change an item > highlight the item that you
want to change > if you have the ‘Multi’ check box turned on,
System3 assumes that you need to change many items, and will
not display the ‘List Functions Window until you press ‘List
Functions’ on the right side of the screen > if the ‘Multi’ box is
not checked, the ‘List Functions’ window will appear automatically > if you would like to select all items in the Active Order window, use the ‘Sel ALL’ button > when the ‘List Functions’ window
appears, press ‘Delete’ to remove an item > if you chose the
wrong item, press ‘Keep’ > the items chosen will be removed
from the active order window > return to the Main Menu page
> select the menu category of the item you would like to add >
choose the correct items.
h.) Keep Order Open - If you would like to keep the order open
for editing, and still send items that you have rung in to the
kitchen / bar, ensure that the box labeled ‘Keep Order Open’ is
highlighted before pressing the send button.
b.) Modifier Changes - Changing modifiers can be a little more
tricky, as modifier pages may only appear after ringing in certain
items, and therefore cannot be accessed from anywhere on the
main menu.
i.) Send - Used to send the current order to the kitchen/bar.
Remember that any items that have already been sent to the
kitchen/bar will not reprint. When you are satisfied that all of the
options on this page are correct, press the ‘Send’ button.
To change a modifier > highlight the modifier that you need to
replace > if the ‘List Functions’ window does not appear, press
the ‘List Functions’ button on the right side of the screen > select
the ‘Replace’ button > the modifier will be removed from the
order list window > you will automatically be returned to the
page of modifiers that you have selected > select the correct
modifier > continue with the order as normal.
Depending on how your manager has set up your terminal, you
may see this screen every time you press the ‘Send’ button on the
Main Menu screen.
iii. MAKING CHANGES TO A NEW ORDER
NOTE: The ‘Replace’ button can also be used for items. It works
the same way, in that it will remove the currently selected item, and
return you to that page of items, allowing you to select a replacement
item.
c.) The ‘Remove Last’ function, if turned on as one of the 10 functions button on the right side of the screen, can be used to
remove the last item rung in on a bill. There is no need to highlight the item > just press ‘Remove Last’ and the last item rung in
will be deleted from the order.
iv. THE SUMMARY SCREEN
The following screen can be accessed one of two ways.(See next
page) It can be accessed manually by pressing the 'Summary
Screen' option button on the Main Menu page, or it can be set to
pop up automatically after the 'Send' button is pressed. The latter way is set up by a manger ( Terminal Options > Program Flow
> Use Summary Screen on Send.)
Figure 16: The List Functions Window
This screen gives an order taker one more chance to make
-015-
SYSTEM3 POS USER MANUAL - Table Service
Figure 17: The Ordering Process Review
-016-
SYSTEM3 POS USER MANUAL - Table Service
changes to an order. These changes can be to the order itself, or
they can modify a number of other things. At this point you can
correct customer info by using the 'Correct Info' button. Both
the 'Promo' and the 'Discount' buttons display a drop down list
of available Promos and Discounts. The user has to simply
choose which one to apply and price information is automatically updated and displayed along the bottom of the screen. There
may be different prices under different order types because discounts can be set to automatically apply depending on whether
it's a delivery, take-out or dine-in order. These prices will also
take Delivery Surcharges into consideration.
The 'Pre-Auth' button allows for Charge Card processing on an
order, but will only work if using System3 to process credit cards.
'Remove Discount' will cancel any discounts that were applied in
error. And 'Print Receipt' allows for check printing before the
order is sent.(if enabled) When everything is to the users satisfaction, they simply choose the order type (Drive-Thru, Pick-Up,
Delivery, Dine-In) and the order is sent to the appropriate printers/kitchen displays.
If using the ‘Retrieve Order’ screen as a starting point, chances
are the ‘Send’ screen will not display after hitting the ‘Send’ button, but will be replaced by the ‘Summary’ screen.
2. System3 always needs to know what table number or name is
associated with the bill. This can come before (Retrieve Order
Screen) or after (Main Menu Screen).
3. System3 needs to know which items and modifiers are going
on the bill
4. The order needs to be sent, whether using the ‘Send’ screen,
the ‘Summary’ screen, or just the ‘Send’ button from the Main
Menu..
Once the order has been sent - ie. - printed at the kitchen/bar the process for adding to that order is slightly different than ringing in new orders.
v. ADDING TO / MANAGING EXISTING ORDERS
a.) From the Security Screen - Swipe your card or enter your ID
number, press OK > if the table appears in the order list window,
highlight it and press ‘Retrieve Order’ > if the table does not
appear in the order list window, press the ‘View All’ button to see
a full list of your active orders > highlight the order > press
‘Retrieve Order’ or press the ‘Retrieve by Table Number’ button
> fill in the table number, press Enter >> the main menu will
appear on the right, with the order open for editing on the left.
b.) From the Retrieve Order Screen - Either highlight the order
you want to select and press ‘Retrieve Order’ > or press the
‘Retrieve by Table #’ button > fill in the table number and press
OK >> the Main Menu screen will appear on the right, and the
order list window will have the order open for editing on the left.
c.) From the Main Menu screen - Ensure the order list window is
blank > press the ‘Recall’ button > the Retrieve Order screen will
appear > either highlight the order you would like to edit and
press ‘Retrieve Order’ or > press the ‘Retrieve by Table #’ button
> fill in the table number and press OK>> the Main Menu screen
will appear on the right, with the order open for editing on the
left.
Figure 18: The Summary Screen
The Ordering Process - REVIEW
As you can see by viewing the diagram on the preceding page, the
ordering process in System3 depends highly on how certain
options are set up by your manager.
Certain steps are common;
1. System3 always needs to know who is ringing in the order, so
at some point, input needs to come in the form of a security card
or ID number.
At this point, regardless of where you started, you will have an
order open for editing. From here you can add items exactly as
you would for a new order. To delete items that were previously sent, however, will require management authorization. > press
the ‘Send’ button > the order will print in the kitchen/bar.
To Change A Table Number
Depending on options, when you press the ‘Send’ button on any
order that isn’t new, System3 may skip the ‘Send’ screen. To get
to the ‘Send’ screen, press the ‘Options’ button (next to the Main
Menu button on the Main Menu screen) > there should be a button entitled ‘Send {Keyboard}’ > press it and the ‘Send’ screen will
appear > change the Table Number > press Send.
-017-
SYSTEM3 POS USER MANUAL - Table Service
To Print a Receipt
a. ) From the Retrieve Order Screen - Select the order(s) you
would like printed from the Order List window, press the ‘Print
Receipt’ button.
b.) From the Main Menu Screen - With the order open for editing, press the ‘Print Receipt’ button on the far right side of the
screen.
Split Order by Seat # - See the explanation above on 'Splitting by
Group', but use 'Seat #' instead.
Split Order Evenly - Will split the bill in as many ways as you
specify > press 'Split Order Evenly' > select how many ways you
would like the bill split > press OK > System3 tells you 'The bills
have been split evenly. You can retrieve them…Would you like to
print copies of the bill?' > press 'Yes' if you want the bills printed.
NOTE: Splitting bills this way may result in some ITEMS being
split into fractions, as System3 splits the bill EXACTLY as you
specify.
c.) From the Summary Screen - Press the ‘Print Receipt’ button.
Splitting (Separate) Checks
To split a check, the order must be open for editing. Follow the
steps outlined above under ‘Adding To / Managing Existing
Orders’.
Split Order - Will allow you to create 'Separate Checks'. Press
the 'Split Order' button > a new 'window' appears to the right
> select items (by touching them) that you want on the new bill
> the items will jump to the new bill as you touch them > if
you make a mistake, touch the item in the new 'window' to
move it back > when satisfied with an order > press OK > this
bill prints out, and a new blank window appears, allowing you to
continue with the splitting > continue splitting until done >
press OK > bills will be numbered the same as they were originally but the first bill will have an 'A' at the end of it, the second
Split Order Screen - Now, instead of having to choose one of the
options above to split a bill, the 'Split Order Screen' will provide
you with all of these options on one screen. The current bill will
appear on the left side of the screen with several blank boxes
next to it. To split the bill manually > drag items from the original bill to a blank window > each window represents 1 new bill
> continue dragging items to the different bills until satisfied > if
you have more than three new bills to create, use the arrows to
navigate left and right to more new bills > press 'Done' > the new
bills will print. The screen also allows you all of the other splitting options (by Group, by Seat #, Evenly). It places the items
automatically into the new windows, but does not print until you
Figure 20: The ‘Split Order’ Screen
hit done. This way, you can ensure accuracy of the new bills
before printing them.
Figure 19: The ‘Split Order’ Window
bill will have a 'B'
at the end of it, and so on.
Split Order by Group - If you have entered items using Group
names you can now split them > press 'Split Order by Group' >
a list of available groups appears > select the group (or groups)
> press OK > all items ordered for that group will appear in the
new window > ensure that they are correct > press OK > continue splitting at will.
-018-