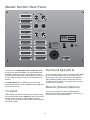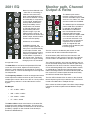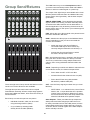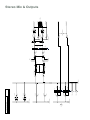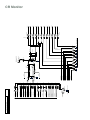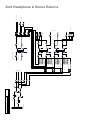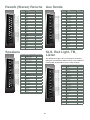
1
revision: 2.2 15 May 2013 5:01 PM Owner’s Manual For Software Version 3 Contents Introduction About This Manual 3 4 Terminology Quickstart 4 4 Master Section Rear Panel Channel Bin Rear Panel 6 8 Powering Up The Power Supply and Soft Start Retro and Modern Circuitry 9 9 10 Installation Health & Safety Connections Operation The 2081 Module Meterbridge Input Module Auxiliaries 2081 EQ Monitor path, Channel Output & Retro Channel Path Fader Master Section Metering 2254 Compressor 5 5 5 9 12 12 13 13 14 14 15 16 17 18 2254 Compressor Meters 2254 Controls Limiter 18 18 19 Channel Routing Channel Functions Scenes Custom User Features 19 19 20 20 Oscillator SLS 21 21 Channel Meter Controls Master Meter Controls 24 24 Control Room Volume and Controls Monitor Source Control Room Headphones Solo Talkback and Listen Mic 26 26 27 27 27 Assign Section Oscillator & SLS Group Send/Returns Reverb Returns Auxiliary Master Section Headphone Sends Channel Meters/Master Meters Console/Channel Modes Control Room Faders 19 21 22 23 23 23 24 24 26 28 2 Modifications 29 Modification 1 - Insert Point Post/Pre EQ Modification 2 - Installing Additional Modules 29 29 Channel & Input Block Diagram Group Amps Stereo Mix & Outputs CR Monitor AUX Headphone & Stereo Returns Ancillary 30 31 32 33 34 35 32 Channel Frame 24 Channel Frame 16 Channel Frame 36 36 36 XLR Connectors 1/4” TRS & TS Connectors DB25 Connectors 40 40 40 7.1 Inputs Surround Spk (Alt2) Reverb (Stereo) Returns Speakers Aux Sends SLS, Red Light, TB, Listen Headphones Mix Insert, 2 Trk 1,2 Mix Outs & 2254 Group Outputs/Insert Sends Stem Outputs DAW/Ins Return 41 41 42 42 42 42 43 43 43 43 44 44 Channel Insert Sends Channel Insert Returns DAW Inputs Line Inputs Direct Outputs 45 45 45 45 46 Amplifying Stages Channel Bin Current Summing Modern Output Stage Retro Output Stage Stem Outputs Voltage Summing 47 47 47 47 47 47 47 Block Diagrams Dimensions Recall Sheets Wiring Diagrams Master Section Rear Panel Channel Bin Rear Panel Glossary Credits 30 36 37 40 41 45 47 48 Introduction band EQ is straight from the 1081, while the output amp is based on the 1970’s BA283, single ended, class A circuitry with a gapped core transformer, as used in the 1073 and 2254. Five auxiliary sends, fader swap and a choice of either classic or modern channel output circuitry are provided. With the release of the 1073 mic preamp/EQ in 1970, and the 1081 released in 1973, Neve’s classic circuitry has consolidated their position in the professional audio industry. Since then, a desire for “cleaner” recordings using modern circuitry has resulted in classic circuitry becoming an option – but not the only option. Two 2254 compressors, four stereo reverb returns, eight recallable scenes, monitoring of up to 12 sources simultaneously and comprehensive 7.1 monitoring are just some of the features found in the master section. The development of technology and the digital world cannot be ignored. Available in a 16, 24, 32, 40, 48, 56 or 64 module chassis, the Series 75 is flexible and able to suit a variety of studio applications from broadcast to music and even film production. With these two mindsets clear, the Custom Series 75 has achieved a world first, the combination of classic circuitry and modern circuitry in one console. The classic Neve circuitry has been painstakingly recreated, keeping faithful to the original whilst taking advantage of modern assembly methods. The original circuits have only been changed where justified by an improvement in reliability or performance. Rather than running the length of the console, the voltage summing busses are a mere 150mm long and they are now balanced, resulting in lower noise and less crosstalk. Other “charming quirks” of the original circuits such as the level onto busses varying as more busses are assigned from a channel, have been overcome. Improved BA338 amplifying stages and legendary BA283 output stages combined with classic Neve LO1166 output transformers, sound warm, defined and punchy. Designed specifically for longevity, gold plated switches and connectors have been used for all audio circuits, and all parts have been selected on their projected availability many years from now. All capacitors in the signal path are polypropylene film or Rubycon ZLH series electrolytic, chosen for superb sonic performance and long life. Ergonomic design allowing the engineer to reach any parameter on the board from a seated position (up to 32 Channels) make this console a workstation that is comfortable for long hours, flexible for countless practical and creative applications, and unbeatable for sonic character or transparency! The Custom Series 75 is a console that is here to stay. Stereo busses are implemented in both classic (voltage summing) and modern (current summing) technology and the feed to these can be selected on a per-channel basis. The 2 busses are combined at the Main Mix Fader then passed via (patchable) 2254 compressors and an insert, to the stereo outputs. There are both modern (transformerless) and classic (transformer) outputs, providing maximum flexibility of sonic “flavour”. Naturally the AFL busses are also replicated for correct Solo monitoring. The eight Group outputs use classic circuitry, with the added bonus of Stem outputs, inserts and 8 dedicated faders to feed groups or playback to the stereo busses. A 32 channel console can mix a total of 80 inputs to stereo. The 2081 inline channel module features a blend of the best features of Neve’s legendary 1073 and 1081 modules. The mic preamp and 4 3 About This Manual Quickstart This manual is designed for Software Version 3.0, and should be used as a quick reference for owners of the Custom Series 75 console, not to be read cover to cover, but as an accompaniment helping you to get to know your new console. Important terms can be found in bold allowing you to skim through to the exact section on a page that is relevant. If you don't want to read the complete manual, you can start with the most important sections below: »» Installation: http://www.customseries75.com/pdf/ health_safety_installation_connections.pdf »» Power Up Procedure: http://www.customseries75.com/pdf/operation.pdf Terminology »» Master Section: http://www.customseries75.com/ pdf/master_section.pdf Extensive use of terminology, of which we feel it necessary to define before continuing, is used throughout this manual. Make sure you are familiar with this before continuing. The glossary located at the end of the manual may also assist! »» Channel Strip: http://www.customseries75.com/ pdf/2081_module.pdf Module - To avoid confusion between a Channel and the Channel path, 'Module' has been used instead to distinguish the physical modules that contain both the Channel path and Monitor path. This will give you a starting point from which you can come back and print out sections that you are interested in. DAW - Digital Audio Workstation. Can I download the complete manual? Bus - A summing point for all signals routed to the same place. All busses in the Series 75 are balanced lines to a particular destination (e.g. ‘Stereo Local Mix Bus’ picks up all signals routed from Channels and takes them to the Main Mix). Yes, the manual can be downloaded at http:www. customseries75.com/pdf/customseries75_manual.pdf Voltage Summing - In the 1970s Voltage Summing was the only way to sum multiple signals onto a bus. Put simply, the signal level on the mix bus drops as more signals are fed to it, typically to around -30dBu. Further, the mix bus must be designed from the outset to have a fixed number of sources, and the impedance and bus level depends on this not changing. The signal passes through an input transformer and amplifying stage – the “mix amp”. This input transformer will subtly colour the signal. Once the signal passes through the mix amp it hits an output transformer. The output transformer is where much of the sonic colour comes from. In effect, a Voltage Summing Mix Bus colours the audio in a way that is pleasing to our ear. Current Summing - Current Summing is a modern solution to the 'deficiencies' of Voltage Summing. No matter how many signals you feed to the mix bus of a Current Summing circuit, the voltage on the bus will remain at 0 Volts. We call this a "Virtual Earth" - the inverted op-amp output voltage is 'fed back' to the virtual earth point via a feedback resistor, resulting in 0V at the op-amp input. A more sophisticated variant of this circuit is used to achieve balanced virtual earth mixing as used in this console. Due to the virtual earth, this design does not require an input or output transformer. A Current Summing Mix Bus does not colour the audio. 4 Installation On the rear panels of the Custom Series 75 you will find the input and output connections on a combination of DB25, TRS and XLR connectors. The wiring diagrams for each connector can be found in the Wiring Diagrams section of this manual. The following section details the console connections. Health & Safety Connections When initially setting up the Custom Series 75 console there are a number of health and safety aspects which must be considered. See the H & S document provided with the console when delivered for in depth information, and observe the following at all times. Countless input and output options, not all of which will apply to any one studio setup, can be found on the Series 75. It is recommended that you read this section of the manual thoroughly, decide exactly which features will be utilised in your studio, then purchase the cabling necessary to get the most out of your console. »» Make sure the power supply and interfaces are switched off, and have been off for at least 1 minute, before connecting/ disconnecting power to the console. A patch bay simplifies the connection of external devices and can be made to order, however is not necessary. Available in 24, 32, 40 or 56 point layouts, the patch bay is a 19" panel that resides in a specially designed Channel bin on either the left or right side of the console. Patch points are terminated to DB25 connectors on the rear of the patch bay for easy connection of console inputs/outputs and external devices. »» Be aware that it is unsafe to expose the console directly to liquid. Position the console away from air conditioners that may drip water unexpectedly. It is also not recommended to house water, i.e., in a vase, on or in close proximity to the console. The size of your studio setup will be the major factor when considering cabling. Individual pre-made cables are easily purchased and may be a time saving option. »» In the unlikely event of the console failing to operate due to an internal issue, contact the supplier immediately for instructions on how to proceed. Alternatively, navigate to 'Contact Us' on the Series 75 website (http:// www.customseries75.com), or have the console professionally serviced at one of our service centres (details on our website). Make sure the power supply and interfaces are switched off, and have been off for at least 1 minute, before connecting or disconnecting power. 5 Master Section Rear Panel 7.1 Input Main Spk R L Surround Spk (Alt2) Reverb (Stereo) Returns 2Trk1 Mon In R L Speakers Mix Out Aux Sends R L model type Made in Australia SLS, Red Light, TB, Listen WARNING Headphones Group Out/Ins Send serial no. N25549 DISCONNECT PSU LEAD BEFORE REMOVING MODULES NO USER SERVICEABLE PARTS INSIDE. REFER TO MANUAL Mix Insert, 2Trk 1,2 Stem Out MIX OUT, 2254 8Trk Play/Ins Ret Console Power Serial Surround Spk (Alt 2) Connectors for the Main Spk L & R and Mix Out can be found on both XLRs and DB25. It is recommended that the DB25 connectors be used. The XLRs may come in handy for guests who prefer to supply their own monitors, or if a 2 track recording of a mix on a portable device is desired. Up to 8 surround monitors can be connected here. When Alt 2 is selected as the monitor source in the Control Room section, the group cuts and solos will effect the eight individual speaker outputs. Note that a third set of stereo monitors could be connected here if surround monitoring is not desired. The 2Trk1 Mon In is an external input to the Control Room monitor section (2T1). Available on both DB25 and XLR for convenience. Reverb (Stereo) Returns 7.1 Input These inputs feed the four stereo Reverb Returns. Naturally, the output of outboard effects, a patch bay, or XLR connectors could be wired here. DAW outputs or a device containing up to 8 outputs may be connected here; the 7.1 Input feeds the Control Room monitor section and can be selected here in order to monitor up to 8 channel surround sound via the Surround Spk (Alt 2) outputs. 6 Speakers Mix Out, 2254 Carries the Main Speaker Outputs, Alt 1 and Monitor Mix Output signals. In an ideal world, the Main Speaker Outputs and Monitor Mix Outputs will be connected to the main studio speakers. Alt 1 would be connected to your secondary studio monitors. There are two separate mix outputs on the Series 75, Modern and Retro. See Modern Output Stage and Retro Output Stage for details. Modern Mix Outputs appear on channels one and two. Retro Mix Outputs appear on channels three and four. Aux Sends Connect these to available interface inputs or a patch bay as your Stereo Mix Outs. The balanced external inputs to the 2254 Compressors appear on channels five through eight. All 7 auxiliary sends (1, 2, 3, A[stereo] and B[stereo]) appear here. Connect these to your patch bay, XLRs, or outboard effects inputs. Group Outputs/Ins Send SLS, Red Light, TB, Listen If Group Outputs (balanced) are desired, these should be connected to available DAW inputs. These outputs can also act as Group Insert Sends, in which case connect these to male XLR connectors or a patch bay. The first two channels carry the Studio Loud Speaker (SLS) output signals. The external input to the SLS are available on channels three and four. The Studio Red Light is to be connected to channel 5, taking into consideration that this circuit is not suitable for mains power and should be run at 1 AMP 24 Volts maximum. Connect an External Talkback Switch, if desired, to channel 6. A Listen Mic Input can be connected to channel 7, and PFL Out is available on channel 8. Stem Out The Stem Outputs carry the eight Group signals postfader. Recommended as inputs to your DAW, and useful for stem mixing. Headphones DAW/Ins Return Carries two balanced (channels one through four) and two unbalanced (channels six and seven) stereo headphone outputs. The unbalanced outputs are able to drive up to 10 headphones (without the need for an external headphone amp), the balanced outputs will need to be connected to a headphone amp. Extra DAW outputs could be connected here to achieve a further eight inputs of monitoring. However, if the Group Outputs/Ins Send connector was used as Insert Sends, use these as your Group Insert Returns. Mix Insert, 2TRK 1,2 Post 2254 balanced insert sends and returns appear on the first four channels of this connector. 2-Track 1, and 2-Track 2 inputs appear on channels five through eight. 7 Channel Bin Rear Panel DI Inputs 8 7 6 5 4 3 2 1 Mic Inputs Send Inserts DAW In Line In Direct Out Return Line In On the rear panel of each Channel Bin you will find eight balanced Mic Inputs (XLR) and eight DI inputs (1/4"). DAW Inputs and Line Inputs are available on DB25 connectors. These feed the input of each 2081 Module. Mic Inputs are supplied Phantom Power on a per-channel basis. Envisioned connection is the output of external devices (such as outboard effects or any other line level devices). These may feed the Monitor path or the Channel path dependent on the state of the module Input selection. Insert Sends/Insert Returns Direct Out Post-fader output from the Channel path. The Direct Out is always active, connect this to your DAW inputs. These carry the Insert Sends and Returns from the Channel path. Connect to a patch bay, or individual XLR connectors. DAW In Connect the outputs of your DAW here. These may feed the Monitor path or the Channel path dependent on the state of the module Input selection. 8 Operation Powering Up The Power Supply and Soft Start The Custom Series 75 is powered by an external Power Supply, and utilises Soft Start Technology. A large current is needed to power the console. A circuit board containing a microchip (known as the Soft Start board) slowly ramps the voltage up to the required amount. This procedure stops the power supply from drawing to much power and tripping the mains circuit. In the event that the console does not power up, the Green Light will not indicate on the front of the Power Supply, and instead the Red Fault Light will be active. To ensure a safe power up, observe the following procedure. 1. Switch off Mains Power. 2. Double check that the 115/230V Voltage Selector on the rear of the Power Supply is in the correct position in relation to your mains supply. This indicates that one of the following errors has occurred: 3. Connect the cable from the rear of the Power Supply to the rear panel of the consoles Master Section. Align one of the two tabs on the outside housing of the power cable, with the Centre Tab indicated on the image below. Slot the power cable into the connector on the rear panel of the Master Section. Screw the outside housing of the power cable into the rear panel connector ensuring that it locks into place. »» The 115/230V Voltage Selector, found on the rear of the power supply, may be in the incorrect position. Or »» One or both of the two fuses found on the Soft Start circuit board may have blown – power down, remove the lid of the Power Supply, and locate the two fuse holders found adjacent to the 115/230V Voltage Selector (this is rare, generally there will be a reason the fuse has blown – it is highly recommended that the power supply be professionally serviced). Replace with 6 AMP fuses. 4. All audio outputs are automatically muted during the consoles power up procedure. 5. Switch the Power Supply on using the two position switch located on the front panel, up is on. The Green Light on the front of the Power Supply should light. Due to the classic circuitry, the console will take 15 seconds to stabilise during which all meters will light before returning to the default view. If neither of the above solutions fix the problem, have the Power Supply professionally serviced. 9 Retro and Modern Circuitry Typical Setups The following outlines how to achieve both Retro and Modern sounds in a record, mixdown and overdub environment. Keep in mind that these are not the only scenarios possible. For further assistance, please consult the block diagrams. The Custom Series 75 console can achieve the Retro sound of classic 1970’s circuitry, or the Modern sound of modern circuitry. There are a few ways in which these sounds can be achieved, however the true versatility of the Custom Series 75 is realized with the combinations of both Retro and Modern circuitry. Recording Retro If you would like to quickly compare the sound of the Voltage and Current summing busses (see the Glossary for definitions of these), and the Retro and Modern output stages, try the following. Please then read on for a more in depth explanation of the signal flow. Using a typical signal path for recording, i.e. Mic Input [Ins-pre] 2081 EQ [Ins-post] Fader Direct Output 1. Make sure you have a large number of signals being routed through the Channel paths of the console. 2. Do not select RETRO on the Channel modules or in the Console Modes section. This will route all channels to the Modern summing bus. Save as Scene 1 by selecting STORE and 1 when the eight scene buttons are flashing. Multi-Track 3. Now select RETRO in the Console Modes section. This will route all channels to the Retro summing bus. Save as Scene 2 by selecting STORE and 2 when the eight scene buttons are flashing. The signal will pass through a L0468 Input Transformer at the input stage, and an LO1166 Output Transformer, post-Fader, before feeding the Direct Out (always active) to the Multi-Track. 4. For now, select MODERN OP in the Monitor Source section so that the main output stage remains uncoloured. The resulting recorded signal will be marginally ‘coloured’. Modern 5. By switching between Scene 1 and Scene 2 you will hear the difference between each summing bus. The stronger the signals are driven the more obvious the colouration will be. To record a clean signal (transformerless), bypass the L01166 Output Transformer by patching the Insert Send directly to the Multi-Track Inputs. The Input Gain and Trim on the Channel will now be the only level to the MultiTrack. Engaging Fader Swap (depressing the High Pass Filter Selector) will result in the Fader controlling the level of the Multi-Track return, which may be more comfortable. 6. Now, toggling between MODERN OP and RETRO OP in the Monitor Source section will enable you to hear the difference between both output stages. Fader Swap can be engaged globally in the Console Modes section of the Master Panel. 10 Mixdown Groups There are two selectable mix busses present in the Custom Series 75. One is based on Voltage Summing technology, the other on Current Summing technology - see the Glossary for explanations of each of these. Further, there are two selectable main mix outputs, the Retro Output (LO1166 Transformer) and the Modern Output (transformerless). Keep in mind that each of the eight Groups contains both a L0468 Input Transformer and an LO1166 Output Transformer. If a Channel is routed to a Group, it is summed on a Current Summing Mix Bus (the Group Mix Bus) before being passed through both transformers and fed to the Main Mix Fader. The Groups are also patchable via the ‘8Trk Play/Ins Ret’ and the ‘Group Out/Ins Send’ DB25’s on the rear panel of the Master Section, or could be made available on a patchbay. Retro On the 2081 module of the Custom Series 75, selecting RETRO assigns the Channel Output to the Voltage Summing Mix Bus. DAW/Line Input [Ins-pre] 2081 EQ [Ins-post] Fader Voltage Summing Mix Bus Further Experimentation The flexibility of the Custom Series 75 becomes apparent when combinations of the above are implemented. Using the RETRO button to rout some channels to the Voltage Summing Mix Bus and others to the Current Summing Mix Bus, which are then summed at the Main Mix Fader, can add desired ‘colour’ to individual sounds. Assigning or patching signals to the Groups allows further colouration, and selecting RETRO OP and/or MODERN OP to output your mix via an LO1166 transformer, an IC, or both (!) results in ultimate control over a mix. This then feeds the Main Mix Fader. Selecting RETRO OP in the Monitor Source section of the Master Panel routes the Main Mix Fader through a LO1166 Output Transformer to the Retro Outputs on the Mix Out DB25. The Channel Retro can be engaged globally in the Console Modes section of the Master Panel. Modern If RETRO is not selected on the Channel module, the Channel output is assigned to the Current Summing Mix Bus. This then feeds the Main Mix Fader. Selecting MODERN OP in the Monitor Source section of the Master Panel DAW/Line Input [Ins-pre] 2081 EQ [Ins-post] Fader Current Summing Mix Bus routes the Main Mix Fader via an IC to the Modern Outputs on the Mix Out DB25. 11 The 2081 Module Each inline 2081 Channel Module has two independent paths, CHANNEL path and MONITOR path. Multiple inputs can be selected for each path. The Channel path is controlled by a fader, and the Monitor path is controlled by a rotary. The Channel path is normally used to process audio to or from your DAW, and the Monitor path is normally used to listen to the return from your DAW or effects processors. You will notice that the multiple inputs for the Channel path can be cycled through at the top of the module using INPUT, when no LEDS are active, the input is set to Line. The Channel path output fader is at the bottom of the module, this feeds the Direct Out or the Stereo Bus via the Voltage or Current Summing Bus (switchable using the Retro button). The controls for the Monitor path can also be found at the bottom of the module, just above the Channel Path Fader. Two stereo and three mono Auxiliary Sends can be sourced from the Channel or Monitor path (pre or post fader) by depressing the level control. Meterbridge N2081 1 2 3 4 5 6 7 8 FADER SWAP MAIN MIX 0 O 18 30 24 36 42 -10 TRIM 10 48 12 6 0 60 66 +48V 54 MIC/DI GAIN INPUT MIC DI DAW 100 150 50 300 25 AUX B L PAN R AUX A AUX 3 AUX 2 +3 AUX 1 OFF 15 10 - +2 + GAIN 6.8 3.3 OFF 1.5 8.2 1.8 4.7 3.3 3.9 OFF 1.2k - 560 33 - 56 GAIN -3 -8 -7 -16 -10 -24 -20 -36 +12 +8 0 -3 -8 -7 -16 -12 -20 -10 -30 EQ +16 -4 -20 + 180 330 INS -1 -12 + GAIN HI Q - 0 CLIP +20 +4 -4 100 -24 -30 -20 -36 LINE L I S O PAN R SEL MON 10 0 0 The EQ found on the 2081 Channel Module offers the classic sonic flavour of the 1073, with the functionality of a 1081. The output amp is based on the BA283, single ended, class A circuitry with a gapped core transformer, as used in the 1073 and 2254 Compressor. The recreation of the circuitry sees the same sonic qualities as the original, heralded as eminently 'musical', whilst a far cleaner and quieter signal through the redesign of the BA338 amplifying stage has been achieved. 0 HI Q 390 470 OFF +1 +8 -1 + GAIN 330 1k 820 680 +12 0 2.7 220 270 +2 +4 2.2 5.6 +16 +3 +1 4.7 6.8 CLIP +20 SIG RETRO L PAN R SOLO PAN CUT At the top of each module, there is a Bargraph Meter. The bargraph meters can display any of the available inputs for the module of which there are four, Mic/Line/DI/ DAW (see Channel Meters section for details). Signals on the Channel path can be routed to multiple destinations by focusing the Channel in the Assign Section using the Channel Select button. Destinations include the Voltage Summing Bus (Retro), Current Summing Bus (Modern), Main Mix, and Groups. In PPM mode, the top 4 LEDs are brighter to indicate proximity to clipping. In VU mode, the top 8 LEDs are brighter. The Channel Number is indicated by an LED display directly below the bargraph meters. These will light once the console has been powered up. The following looks at the individual controls of the 2081 Channel Module in great detail. Descriptions of the console's signal flow can be found in the Signal Flow section, and diagrams can be found in the Block Diagrams section. Labels on the left side of the bargraph indicate VU readings (+4dBu), and the right, PPM (-10dBV). 12 Input Module N2081 1 2 3 4 5 6 7 8 FADER SWAP MAIN MIX 0 O 18 24 30 36 42 48 12 6 0 66 60 MIC DI DAW 100 25 +48V 54 MIC/DI GAIN 50 -10 TRIM 10 150 300 INPUT Auxiliaries The Input Module hosts the Channel Input Selector, Gain and Trim, Phase, 48V, and High Pass Filter. All buttons are recallable using the consoles scenes. AUX B L PAN AUX A The Input Selector cycles through the four available Channel path inputs. Mic, DI and DAW are indicated by LEDs, when no LEDs are active the Channel input is Line. Once the desired input has been selected, Phantom Power (48V), Gain and Trim controls will adjust the input signal level. The 12 position gain switch (0dB → 60dB) will allow an approximate gain value to be reached. The trim control will adjust the input signal more precisely (-10dB → +10dB). AUX 3 R Each module contains two stereo (A & B) and three mono (Aux 1, Aux 2, Aux 3) Auxiliary Sends. The order in which Auxiliaries 1 to 3 are accessed is bottom to top respectively. A & B are situated above the three mono sends. All features other than the level controls in the Auxiliary Section are recallable. Auxiliary 1, 2 and 3 have individual level controls. AUX 2 Auxiliary A and Auxiliary B are stereo sends that share a level control. All Auxiliary's default position is pre-fader on AUX 1 the Channel path. When the level controls are depressed, they cycle through the conventional positions in the following order - Channel Pre, Channel Post, Monitor Pre, Monitor Post. If required, the Phase control will invert the incoming signal. The High Pass Filter with frequency selection allows low frequencies to be rolled off using the continuously variable control between 25Hz and 300Hz (18dB/octave). If desired, Send A and B can be engaged simultaneously. If both sends are active (i.e. for two stereo cue sends), the shared level control will increase/decrease the overall level and the pan will balance the level across the active sends. The HPF Frequency Selector has dual functionality. When the HPF button is selected it will act as a frequency selector. When depressed the module will engage Fader Swap mode. Two available stereo cue sends allow the flexibility of Aux A being active on one module, whilst Aux B is active on another. Fader Swap will swap the Channel Path Fader with the Monitor Path Rotary. For example, when CH IN is selected in the Console Modes section, the Channel Path Fader would control signals to tape, and the Monitor Path Rotary would control Monitor Mix levels. Note that Fader Swap can also be activated on a selected Channel in the Assign Section, or globally activated across all Channels in the Console Modes section. Below the Channel Meter are the Channel Path Destination LEDs. These display the destination to which the Channel path output has been routed. Groups 1 - 8 or Main Mix (Direct Outputs are always active). This is just an indication for convenience (see the Assign Section for how to route a Channel to a group). The Fader Swap LED indicates if Fader Swap is active on the Channel. 13 2081 EQ 15 10 - + GAIN 6.8 3.3 OFF 8.2 1.5 6.8 5.6 4.7 1.8 - HI Q 2.2 4.7 3.9 OFF 1.2k 3.3 2.7 220 270 - 820 680 560 OFF + GAIN HI Q 330 1k + GAIN 56 - GAIN + 100 180 330 INS LINE L I S O EQ as opposed to four. PAN R SEL MON 10 SIG RETRO L PAN R SOLO All buttons are recallable. 390 470 33 Based on the acclaimed 1973 - 1081 EQ. In a recording or mixdown environment the 2081 Channel Module's EQ, blurs the line between circuitry and musicality. In comparison to the original, tweaking the circuitry that controls drive ability and stability versus temperature has resulted in reduced distortion and approximately 9dB more dynamic range. If you are familiar with the original, you will experience far cleaner and quieter output, with that same eminent 'musical' quality. 0 0 OFF Monitor path, Channel Output & Retro Until EQ is selected, the circuitry is hard bypassed, i.e., the input is connected directly to the output. Further, each band is hard bypassed until a frequency is selected. This is a new feature not present in the original 1081, resulting in less noise on a signal running through just one or two bands PAN CUT The Monitor path section features a rotary trim control and two selectable inputs, DAW and Line. Line, Retro, Cut, Solo and Solo Isolate are recallable. The default input for the Monitor path is DAW when CH INPUT is selected, and LINE when MON INPUT is selected in the Console Modes section. Selecting LINE will toggle between these two inputs. DAW is the envisioned return from your chosen multi-track. Line may be a return from external equipment such as effects units. The Signal LED will indicate when the Monitor path is receiving signal. The Pan control in the Monitor path section is dual function and will Solo Isolate when depressed. Channel Select (SEL) will Focus the Channel in the Assign Section of the console. From here, the Channel can be routed to the Main Mix or Groups 1 through 8. The Channel path Pan, Solo (see Solo Modes) and Cut can be accessed directly below the Monitor path section. By default, the Pan knob is inactive. Channel Panning can be activated globally in the Channel Modes section, or individually by selecting the Channel and pressing PAN in the Assign Section. As with the Monitor path, the Pan control in the Channel path has dual functionality and will Solo Isolate when depressed. The 2081 EQ is a four band semi-parametric EQ. Bell curve and Hi Q controls, adjacent to the Frequency Selectors, switch between a narrow/wide Q on the high and low mids, or a narrow Q/shelving EQ on the high and low frequencies. The Frequency Selector controls are stepped and select which frequencies will be boost/cut by the continuously variable gain controls. When set to the 12 o’clock position the Frequency Selector is off and the band is in hard bypass. The Pan LED indicates if Pan is active on the Channel. Note that panning will only be effective if the Channel is routed to the Main Mix or multiple Groups. Retro routes the Channel path to the Retro Output Stage, if inactive the Channel path feeds the Modern Output Stage. EQ Ranges: »» HF - 3.3Khz - 15Khz »» HM - 1.5Khz - 8.2Khz »» LM - 220Hz - 1.2Khz »» LF - 33Hz - 330Hz The INS and EQ controls at the bottom of the 2081 EQ, engage the insert and EQ respectively. The insert point defaults post-EQ, pre-fader. If desired, this can be moved pre-EQ by a jumper on the Channel circuit board (for details see Modifications). 14 Channel Path Fader The Channel Path Fader feeds the Direct Out. The Destination LEDs situated at the top of each Module (below the Channel Path Meters) will indicate whether the Channel Path Output is also routed to one or more of the eight Groups, or the Stereo Bus (via the Retro or Modern bus) - see the Assign Section for routing details. 15 Master Section +3 CLIP +20 +12 +1 +8 0 +4 0 -8 -3 -7 -16 -10 -24 -7 -16 -10 -24 -3 0 +8 0 +1 +8 0 0 -3 -8 -7 -16 -10 -24 -3 -7 -16 -10 -24 -8 -7 -16 -10 -24 -36 N2069 0 +12 +8 +4 0 0 -1 -4 -3 -8 -7 -16 -10 -24 -4 -8 -3 -8 -12 -7 -16 -10 -24 -12 -7 -16 -10 -24 -20 -20 -30 -30 -30 -36 -20 -36 -20 +16 -36 -20 IN GR METER IN GR OUT IN METER LINK OUT 10 0 -10 +8 N3673 IN MAIN MIX +1 -1 -20 -36 -20 +12 +4 -12 -30 -36 -20 -3 -20 -30 0 CLIP +20 +2 +16 -4 -12 -20 -30 +8 0 -1 -4 -12 +1 +4 0 -1 +12 +3 CLIP +20 +2 +16 +4 -4 -8 -20 +12 +3 CLIP +20 +2 +16 +4 -1 +3 CLIP +20 +2 +1 -20 -36 +3 +12 -12 -30 -20 +8 +16 -4 -20 -36 +1 0 -1 -8 -30 +12 +4 -12 -20 CLIP +20 +2 +16 -4 -12 -20 +8 0 -1 -4 -3 +1 +4 0 -1 +12 +3 CLIP +20 +2 +16 800mS 1.5S 400mS AUTO CAL 60 100 1K 10K 16K 40 -20 COMP IN 20 800mS 200mS +16 +4 +20 3:1 2:1 AUTO 100mS PFL EXT MAIN MIX DIR SLS SLS 10 4:1 1.5:1 6:1 0 AUX1 AUX2 0 0 0 +12 +8 OSC LEVEL 10 GRPS PINK COMP RECOVERY 0 0 GAIN MAKE UP 0 0 0 COMP THRESHOLD 0 0 +10 0 0 0 +3 CLIP +20 +2 +16 +1 180 AUX3 0 0 AUX A L BAL R 0 0 0 +2 0 0 +3 AUX B L BAL R AUX SEND TRIMS FAST ATTACK 800mS HP 2 +12 COMP RECOVERY 800mS 200mS 3:1 2:1 AUTO 100mS +16 +8 COMP IN 20 LIMIT RECOVERY 1 2 3 4 5 0 MAIN MIX FADER SWAP PAN GRP VIEW K PEAK LED SIG LED 10 MAIN MIX MON MIX MAIN MIX MON MIX SOLO SOLO ISO SOLO SOLO ISO SOLO SOLO ISO SOLO SOLO ISO AUX 2 AUX A MON MIX AUX 1 AUX 2 AUX A MON MIX AUX B MAIN MIX CR MON AUX B MAIN MIX 2254 LEFT 6 7 8 CR MON REV RET 2 AUX 3 AUX 3 CONSOLE MODES (HOLD) CH MON DIR FADERS VU PEAK CH INPUT MON INPUT PAN ST MON AUX PFL REV RET -6dB FADER SWAP MON MAIN MIX INS MASTER METERS >> GRP5 0 GRP6 0 GRP7 0 0 0 0 0 0 GRP4 0 0 0 RETRO ESC << 0 0 GRP3 0 0 0 0 0 0 0 GRP2 L BAL R 10 HEADPHONE SEND 2 CHANNEL METERS CHANNEL MODES (HOLD) CRM HP 0 REV RET 4 REV RET 3 L BAL R 10 GRP8 PFL Hp1 Hp2 AUX B HP + PFL iMON GRP1 10 MON MIX REV RET 1 COMP RATIO RCL AUTO HP 1 10 MAIN MIX HEADPHONE SEND 1 STORE L BAL R 6:1 FAST ATTACK LIMIT LEVEL HP 1 MON MIX 0 0 LIMIT ON HP 1 10 4:1 1.5:1 +20 HP 1 MAIN MIX AUX 1 +4 L BAL R 0 0 0 GAIN MAKE UP HP 2 L BAL R AUTO +10 COMP THRESHOLD HP 2 L BAL R 0 0 400mS -20 HP 2 1.5S 0 0 -10 2254 RIGHT COMP RATIO 10 0 0 0 LIMIT RECOVERY 0 0 LIMIT ON LIMIT LEVEL 0 0 The Assign Section and Console Modes allow you to quickly and easily shift between record, mixdown and overdub environments. The eight recallable Scenes allow you to recall all software controlled buttons. 90 VU K The Master section of the Custom Series 75 is host to two linkable (and externally patchable) mono 2254 compressors, the 2081 Channel Module routing options, eight Groups, comprehensive monitoring, Listen Back and Talkback controls, Headphone Sends, and an analog Oscillator. There are also eight multiple function bargraphs, two VU meters, a Phase Meter and four Stereo Returns. 0 90 -180 VU 0 2T1 2T2 7.1 iMON AUX 3 AUX A SUM RETRO OP MODERN OP MON MIX AUX 1 AUX 2 GROUP SEND TRIMS MONITOR SOURCE L PAN R L PAN R L PAN R L PAN R L PAN R L PAN R L PAN R L PAN R DAW DAW DAW DAW DAW DAW DAW DAW SOLO ISO SOLO ISO SOLO ISO SOLO ISO SOLO ISO SOLO ISO SOLO ISO SOLO ISO 0 111/2 -30 DIM MAIN ALT1 ALT2 SURROUND SOLO SOLO SOLO SOLO SOLO SOLO SOLO SOLO LCUT MONO 0 TALK AFL PFL SIP SIF SOLO RCUT LISTEN MIC TALKBACK SOLO MODE AUX HP1 LISTEN RED LIGHT LINK CUE HP2 SLS STATUS LOCK SOURCE IN MONO CUT CUT CUT CUT CUT CUT CUT CUT 1 2 3 4 5 6 7 8 1 2 3 5 4 GROUP RETURNS 6 7 8 16 GROUP RETURNS CUT CAL SWAP DIM SOLO CLEAR MAIN MIX MONITOR MIX Metering 90 0 90 -180 VU +3 +2 CLIP +20 +16 +3 +2 CLIP +20 +16 +3 +2 +1 +12 +1 +12 +1 0 +8 0 +8 0 +4 -1 0 -8 -7 -16 -24 -3 -7 -16 -10 -24 -3 -36 +2 +12 +1 +8 0 0 -8 -7 -16 -10 -24 -1 -36 +2 +16 +12 +1 +8 0 -3 0 -1 -8 -7 -16 -24 -3 +3 +2 +12 +1 +8 0 0 -8 -7 -16 -10 -24 -1 -3 -20 The Series 75 Master Section features a comprehensive meterbridge. Eight 42 segment Bargraph Meters allow for seamless VU or PPM metering of the Main Mix, Monitor Mix, Auxiliaries, Groups, or Reverb Returns. When in PPM Mode, the top four segments of each bargraph meter will light brighter to indicate the proximity to clipping. In VU Mode, the top eight segments will light brighter. The Phase Meter is tapped into the physical left and right outputs of the console. The two VU meters display the level of the Main Mix Bus. The signals that are currently being metered are indicated by one of the five LEDs situated in the centre of the bargraphs. The desired metering mode can be selected in the Master Meter Controls section. Further, two seven segment LEDs directly below each bargraph indicate which signal each is metering. The following is an explanation of the possible scenarios. REV - Bargraphs are displaying the four stereo Reverb Returns - 1L, 1r, 2L, 2r, 3L, 3r, 4L, 4r MIX - Bargraphs are displaying Main Mix Outputs, Monitor Mix Outputs, Control Room Outputs and AFL Outputs - L, r, .L, .r, CL, Cr, AL, Ar AUX - Bargraphs are displaying the Auxiliary Sends and the PFL Solo Bus level - A1, A2, A3, AL, Ar, bL, br, PF GRP - Bargraphs are displaying the Group levels (prefader) - 1, 2, 3, 4, 5, 6, 7, 8 17 -36 +3 +2 +12 +1 +8 0 0 -8 -7 -16 -10 -24 -1 -3 +3 +2 +12 +1 +8 0 0 -8 -7 -16 -10 -24 -3 +12 +8 0 -8 -12 -7 -16 -10 -24 -20 -30 -36 +16 -4 -20 -20 CLIP +20 +4 -1 -12 -30 -36 +16 -4 -20 -20 CLIP +20 +4 -12 -30 -36 +16 -4 -20 -30 CLIP +20 +4 -12 -20 -20 +16 -4 -12 -10 CLIP +20 +4 -4 -30 -20 +3 CLIP +20 +4 -20 -30 -20 +3 -12 -20 -30 -36 -8 +16 -4 -12 -20 -20 -1 -4 -12 -10 0 CLIP +20 +4 +4 -1 -4 -3 180 VU -30 -20 -36 2254 Compressor the Master Section. When the Mix button is inactive, the 2254 will process the external inputs. N2069 MAIN MIX METER IN IN IN GR GR OUT IN METER LINK OUT 10 0 -10 IN - Lights yellow when selected. Sends the signal through the units circuitry, even if the unit does not have the Limit or Compress functions selected. If unlit, the unit is hard bypassed, i.e., the input is connected directly to the output. 800mS 1.5S 400mS AUTO +10 -20 0 COMP THRESHOLD +12 +16 +4 +20 COMP RECOVERY 800mS 200mS +8 2:1 AUTO 100mS 3:1 4:1 1.5:1 LIMIT ON LIMIT LEVEL 6:1 FAST ATTACK LIMIT RECOVERY 2254 RIGHT COMP RATIO 10 0 -10 COMP IN 20 GAIN MAKE UP 800mS 1.5S 400mS AUTO 0 COMP THRESHOLD GAIN MAKE UP +12 200mS +8 +16 +4 +20 LIMIT LEVEL COMP IN 20 100mS COMP RECOVERY 800mS 2:1 AUTO 3:1 4:1 1.5:1 LIMIT ON 6:1 FAST ATTACK LIMIT RECOVERY ST LINK - Lights yellow when selected. Press this button when you wish to link both 2254 units together. This will process the left and right side of the Main Mix, or an external signal which has been patched into the rear panel of the Master Section. 2254 Controls COMP IN - Switches the Compressor in (up) and out (down) of the circuit. +10 -20 METER - Cycles through the Meter display options. Meters can be set to display either the Input signal (IN LED will be active), Output signal (OUT LED will be active), or the amount of Gain Reduction applied to the signal by the Compressor and Limiter in total (GR LED will be active). COMP RATIO 2254 LEFT COMP THRESHOLD - Can be varied in 2dB steps from -20dBu to +10dBu, thus a wide variety of effects can be achieved. Low Ratios operated with a low Threshold will preserve the dynamic range and also achieve a high signal to noise ratio. A high Ratio with a high Threshold will behave as a partial limiter. GAIN MAKEUP - Provides up to 20dB of additional gain in 2dB steps. The two on-board 2254 mono compressors are based on the classic 2254 series originally released in 1969. This particular model was re-released in 2009. A powerful compressor/limiter, all buttons can be stored and are recallable using the Series 75 Scenes. COMP RECOVERY - Sets the response time the compressor takes to return to 0dB gain reduction. Three presets are provided: 100 ms, 200 ms, 800 ms, plus an AUTO setting. Both 2254's are available externally on the rear panel of the Master Section, or can be linked and applied to the Main Mix. In the AUTO position, both the Attack and Recovery times are composite and self-adjusting. Speeds are rapid for isolated peaks, while remaining slow for persistently high levels, so the impression of a normal dynamic range is preserved as the program rides on a slowly moving 'gain platform'. 2254 Compressor Meters COMP RATIO - Controls the ratio of gain reduction to input signal level. MIX - Will apply the 2254 Compressors to the Main Mix Outputs, pre-fader and before the insert points. The 2254 Compressors are also available on the rear panel of 18 Five preset ratios are provided: 1.5:1, 2:1, 3:1, 4:1 and 6:1. Any selected Channel(s) can be routed to one or more Groups by pressing and holding any one of the Group Buttons 1 - 8. This sums the selected Channel output(s) onto the selected Group Mix Bus, and outputs the resulting signal to the Group Outputs and the Stem Outputs post-fader. The control characteristic is shaped such that the onset of compression is smooth and progressive, the true ratio being reached within the first 5 to 10dB above the Threshold. GRP VIEW - This displays which Channels are assigned to which Group. Select the GRP VIEW button (latches) and hold the Group button that corresponds to the Group you would like to view. The Channel Select buttons that are lit indicate that those Channels are routed to that Group. Select the GRP VIEW button again, or ESC to exit Group View mode. Limiter Limit On - Switches the Limiter in (up) and out (down) of the circuit. Limiter Level - Sets the threshold of the Limiter. May be set in steps of 1dB increments from +4dBu to +20dBu. Channel Functions Limit Recovery - There are three preset Limit Recovery times (100ms, 200ms & 800ms), plus an automatic setting (AUTO). In the AUTO position, both the Attack and Recovery times are composite and self-adjusting. Speeds are rapid for isolated peaks, while remaining slow for persistently high levels, so the impression of a normal dynamic range is preserved as the program rides on a slowly moving 'gain platform'. Once a Channel has been Focused in the Assign Section using the Channel Select button, or multiple Channels have been Focused using Multi-Select mode: MAIN MIX - Routes the selected Channel(s) to the Retro and Modern Mix Outputs via the Main Mix Fader. FDR SWAP - Swaps the Monitor Path Rotary with the Channel Path Fader, ie, the Monitor Path Rotary now controls the Channel path output, and the Channel Path Fader now controls the Monitor path output. Note: All other controls remain unchanged. Fast Attack - Switches the attack time from 100 µs (up) to 5 ms (down). A slower Attack Time will avoid unpleasant effects when processing signals of a percussive nature (such as solo piano). In this way, a narrow dynamic range may be achieved by feeding high levels into the 2254 and choosing a low limit level. PAN - Activates the Pan control on the Channel. This is indicated by a blue LED to the right of the Channel Pan control. If a Channel is routed to multiple Groups, panning will occur across odd and even Groups. Assign Section 1 2 3 4 5 0 MAIN MIX FADER SWAP PAN GRP VIEW PEAK LED SIG LED STORE AUTO 6 7 8 RCL ESC << >> The Assign Section of the Series 75 allows selected Channels to be routed to multiple destinations, Scenes to be stored and recalled, and Custom User Features to be set up. Channel Routing The Channel path output can be routed to a Group, multiple Groups, or the Main Mix. Note that the Channel Direct Outputs are always active regardless of whether or not the Channel path output has been routed elsewhere. When a Channel is selected it is focused in the Assign Section and the previous Channel is deselected. 19 Scenes Custom User Features All recallable buttons on the console can be stored and instantly recalled later. These stored settings are called Scenes. A total of eight Scenes can be stored using buttons 1 - 8. The following features are aimed at integrating the user's personal workflow with the Series 75 console. All user features are recallable using the console's Scenes. Scene 0 cannot be stored over, and when recalled, returns all recallable buttons to their neutral state based on the state of the CH INPUT/MON INPUT buttons. ↑ & ↓ - Used in conjunction with PEAK LED and SIG LED to calibrate the level at which the Peak LED and Signal LED on the 2081 Channel Module will indicate. Hold PEAK LED or SIG LED and calibrate using ↑ & ↓. The Dim Level in the Control Room section can also be used to perform this function. To Store a Scene: 1. Select STORE. When calibrating, the level will be displayed on a scale of 0 - 100 on the Assign Section 7 segment LED Display. The Peak LED can be calibrated within +6VU to +18VU (corresponds to +10dBu to +24dBu) and the Signal LED can be calibrated between -20VU and -10VU (corresponds to -24dBu to -14dBu). 2. The eight Scene/Group Buttons will flash and the LED display will show 'ST'. 3. Select one of the eight flashing Scene/Group Buttons. LED Display - Ordinarily, the LED Display in the Assign Section displays the Channel currently in focus. It is also, however, momentary for some of the console's other features. The following lists the possible displays: 4. Select STORE again to confirm. To Recall a Scene: 1. Select RECALL. »» Output volume in dB when the Control Room Volume is altered. 2. The eight Scene/Group Buttons, and Scene 0, will flash. The LED display will show 'rc'. »» Threshold of the Peak LED/Signal LED, using a 0 - 100 scale, when calibrating. 3. Select the Scene/Group Button under which a previous Scene has been stored. »» ST whilst storing a Scene. »» rc whilst recalling a Scene. 4. Select RECALL again to confirm. »» cP whilst copying a Scene. BEWARE! This will reset the console, losing the current settings forever… »» Gr whilst in Group View mode. To Copy a Scene: Settings that have been saved under a Scene can easily be copied to another Scene. 1. Select COPY. 2. The eight Scene/Group Buttons, and Scene 0, will flash. The LED display will show 'cP'. 3. Select the Scene/Group Button under which the previously saved Scene is stored. 4. Select COPY again. 5. The eight Scene/Group Buttons will flash again. 6. Select the Scene/Group Button under which you wish to copy the selected Scene to. 7. Select STORE to confirm. 20 Oscillator & SLS Oscillator N3673 60 0 0 40 LEVEL 10 OSC 100 1K 10K 16K GRPS PFL EXT MAIN MIX DIR SLS PINK 0 0 CAL SLS 10 SLS OSC - Activates the Oscillator, which in conjunction with the seven position switch can output 40hz, 60hz, 100hz, 1Khz, 10Khz, 16Khz or pink noise. The Studio Loudspeaker (SLS) is an additional speaker output designed for foldback or playback in the live room. The LEVEL control operates between -20dBu and +10dBu. GRPS - Routes the Oscillator to the Group Outputs. MIX - Routes the Oscillator to the Main Mix Outs. DIR - Routes the Oscillator to the Channel Direct Outputs and the Retro Summing Bus. As signals sum at the Retro Summing Bus, levels will increase substantially. It is strongly recommended to lower the Main Mix Fader prior to engaging DIR in order to avoid excessive levels feeding the monitor system. CR SEL - Routes the currently selected Control Room Source to the SLS output. The Level control operates between -20dBu and +10dBu. To more finely calibrate the Oscillator output level, select CAL. The trim screw adjacent to the level control will now adjust the output level, and the Main Output VUs in the Master Section Meterbridge will meter 0dB, displaying the trim screw changes. Select CAL again to exit calibration mode. PFL - Routes the PFL Solo Bus to the SLS output. EXT - Feeds the External SLS Input (available on the rear panel of the Master Section) to the SLS output via the level control. Note: Talkback can also be sent to the SLS outputs by selecting SLS in the Talkback section. 21 GRP4 0 GRP5 0 GRP6 0 GRP7 0 0 0 0 0 0 GRP3 0 0 0 0 0 GRP2 0 0 0 0 0 GRP1 0 0 0 0 Group Send/Returns GRP8 The DAW button may act as a Group Insert enable if you have connected Group Out/Ins Send and DAW/Ins Return to and from outboard gear or a patch bay. The output of the eight Groups are available at the Local Mix Bus (which feeds both Retro and Modern Mix Outs), Group Out/Ins Send (pre-fader), and the Stem Outputs (post-fader). 0 GROUP SEND TRIMS L PAN R L PAN R L PAN R L PAN R L PAN R L PAN R L PAN R L PAN R DAW DAW DAW DAW DAW DAW DAW DAW SOLO ISO SOLO ISO SOLO ISO SOLO ISO SOLO ISO SOLO ISO SOLO ISO SOLO ISO SOLO SOLO SOLO SOLO SOLO SOLO SOLO SOLO CUT CUT CUT CUT CUT CUT CUT CUT 1 2 3 4 5 6 7 8 GROUP RETURNS GROUP SEND TRIMS - These attenuate the summed signals routed to the Group, pre-fader. Generally these should be left at 0dB, however can be attenuated to -∞. Practical application may be backing off the level at the Group Out/Ins Send, ie, the input to your outboard gear if using Group Inserts. PAN - Allows the mono Group signal to be panned across the Retro and Modern Mix Outs. DAW - Switches the Group input to the DAW/Ins Return signal. Depending on how you have connected the console, this will either: »» Switch the input of the Group Faders to connected DAW outputs and override any currently assigned Channels to that Group, or »» Activate the Group Insert Return of which the send is Group Out/Ins Send. ISO - Solo Isolates the Group, resulting in the Group not being Cut when another Channel or Group is Soloed. This is very useful when routing multiple Channels to a Group, then soloing individual Channels within that Group. SOLO - Depending on which Solo Mode is selected in the Control Room Section, the Channel output will be: 1 2 3 5 4 GROUP RETURNS 6 7 »» Fed to either the AFL or PFL Solo Bus 8 »» Soloed while all other Channels are Cut (SIP) »» Fed to the AFL Bus along with the Main Mix which is padded 10dB (SIF) CUT - Cuts the Group signal (post Stem Out, pre Local Mix Bus). There are eight mono Group Sends and Returns on the Series 75 Console. All buttons are recallable. The eight Groups have each been built as a hybrid Retro/Modern assembly. A Retro Output Stage appears before the DAW/Insert Return, after which the circuitry is transformerless. »» NOTE: When 7.1 is selected in the Control Room Section, the 7.1 Input feeds the ALT 2 Speaker Outputs (see Connections). When this is active, the Cuts and Solos above the Group Faders will effect the individual ALT2 Speaker Outputs. Each Group can take its input from two places. Stem Outputs - These post-fader Group Outputs are always active and allow subgroups within the mix to be easily recorded back into the DAW (stems). A Retro Output Stage at the Group Output effect any grouped Channels, hence Channel signals at the Stem Outputs will be sonically coloured. »» Individual Channels, which can be routed using the Assign Section (Retro). »» Or your DAW, by selecting DAW directly above the fader (Modern). 22 Reverb Returns HP 2 L BAL R L BAL R L BAL R L BAL R HP 1 HP 1 HP 1 HP 1 MON MIX MAIN MIX MON MIX MAIN MIX MON MIX MAIN MIX AUX 1 AUX 2 AUX A MON MIX AUX 1 AUX 2 AUX A MON MIX CR MON AUX 3 AUX B MAIN MIX CR MON AUX 3 AUX B MAIN MIX 10 0 0 10 0 0 10 0 0 10 0 0 HP 2 MON MIX MAIN MIX 10 L BAL R HEADPHONE SEND 1 SOLO ISO SOLO SOLO ISO SOLO REV RET 1 SOLO ISO SOLO REV RET 2 REV RET 4 Aux 1, 2, 3, A & B - Selects the signal at the respective Auxiliary Master, as the Headphone Output source. CR Mon - Selects the Control Room as the Headphone Output source. Solo Isolate - When selected, the Reverb Return will not be cut when a Channel, Group, or another Reverb Return is soloed. Practical application may be monitoring an effect when its dry signal is soloed. Main Mix - Selects the Main Mix, post-fader, as the Headphone Output source. HP1 - Routes the Reverb Return to Headphone Output 1. Mon Mix - Selects the Monitor Mix, post-fader, as the Headphone Output source. HP2 - Routes the Reverb Return to Headphone Output 2. MAIN MIX - Routes the Reverb Return to the Main Mix Out. MON MIX - Routes the Reverb Return to the Monitor Mix Out. AUX2 AUX3 0 AUX A L BAL R 0 0 0 0 0 0 0 0 0 0 0 0 Auxiliary Master Section 0 0 L BAL R The Headphone Sends section allows any of the Auxiliary Sends to be selected as the source for the headphones. Multiple sources may be selected simultaneously. All buttons are recallable. The Series 75 features four stereo Reverb Returns. Envisioned input is the output of external devices that were fed by the consoles Auxiliary Sends. The Reverb Returns can feed Headphone Outputs 1 & 2, the Main Mix, and the Monitor Mix. Multiple destinations can be selected at once. AUX1 10 HEADPHONE SEND 2 SOLO ISO SOLO REV RET 3 0 0 HP 2 0 0 HP 2 Headphone Sends AUX B L BAL R AUX SEND TRIMS The Auxiliary Master Section contains the overall attenuation controls for the three mono and two stereo (or a possible seven mono) Auxiliary Sends. Talkback is available on all Auxiliary Sends. Auxiliary Masters A & B are stereo sends. These pass through a balance control before feeding Headphone Outputs, the Control Room, and/or Auxiliary Outputs on the rear panel of the Master Section. Envisioned as headphone sends during recording, they could be used for other purposes such as stereo effects sends, or 4 mono sends - in which case the pan pot will become a secondary level control. Auxiliary Masters 1, 2 & 3 are mono, and can also feed the above destinations. 23 Channel Meters/ Master Meters GRP - Meter the Group Outputs: 1, 2, 3, 4, 5, 6, 7, 8. AUX/PFL - Meter the Auxiliary Master levels and the PFL Outputs: A1, A2, A3, AL, Ar, bL, br, PF. REV RET - Meter the four stereo Reverb Returns: 1L, 1r, 2L, 2r, 3L, 3r, 4L, 4r. CHANNEL METERS CH ST MON DIR FADERS AUX PFL MON REV RET VU PEAK VU Meters - The two VU Meters in the Master Section Meterbridge display the level at the Retro/Modern Mix Outputs. -6dB Console/Channel Modes MASTER METERS Eight Bargraph Meters are situated above each Channel Bin. Another eight multi-function Bargraphs, and the two Main Output VU Meters are situated in the Master Section Meterbridge. CONSOLE MODES (HOLD) A further eight VU Meters, which meter the Group Outputs, can be located in the Meterbridges adjacent to the Master Section. The signals that are currently being metered are indicated by one of the five LEDs situated in the centre of the bargraphs. Further, two seven segment LEDs directly below each bargraph indicate which signal each is metering. See the Master Metering and Channel Metering sections for details. MON INPUT PAN FADER SWAP MON MAIN MIX INS RETRO Depending on the application at hand, say for example recording as opposed to mixdown, the Console Modes section will change the global state of the console to reflect the most appropriate setup. The top row of buttons consist of Channel Meter buttons, directly below are the Master Meter buttons. These control all Bargraph and VU meters. All buttons are recallable. The top row consists of Console Modes buttons, directly below are the Channel Modes buttons. Channel Meter Controls To prevent the console from being accidentally reset mid-session, the following functions must be held for 1 second. The following metering options effect all Channel Meters. This section details the two global functions, Channel Input (CH INPUT) and Monitor Input (MON INPUT). CH - Meter Channel Path inputs. MON - Meter Monitor Path outputs. Each of the above buttons must be held for one second before the function is executed. This is called the Hold function and, for reasons about to be revealed, allow you to re-think your decision before committing. DIR - Meter Direct Outputs. If FADERS is selected, the Bargraph Meters will display the level of the faders. The following operations will effect all modules. CHAN INPUT - Cycles through the four Channel path input options (Mic, DI, DAW and Line). VU / PEAK toggles between VU metering or Peak Program Metering. In PPM mode, the top 4 LEDs are brighter to indicate proximity to clipping. In VU mode, the top 8 LEDs are brighter. MON INPUT - Switches between the two Monitor path input options (DAW and Line). Master Meter Controls Note: Be careful when cycling through Channel Modes. If the console is in Record Mode and the CHAN INPUT button is cycled to select 'DAW' when the DAW is armed, a feedback loop will exist. Take a moment to think about the result of different Channel and Console Mode combinations. The following metering options effect the Master Section Meters. ST - Meter (in this order) Main Outputs, Monitor Outputs, Control Room Outputs and AFL Outputs. Labeling under the Meters will read: L, r, .L, .r, CL, Cr, AL, Ar. CH INPUT 24 PAN - Activates the Pan control on all Channels. RETRO - Routes the Channel path to the Channel Retro Output Stage or Channel Modern Output Stage before they join either the Voltage Summing or Current Summing Bus respectively. Keep in mind that the above functions can also be changed on a per Channel basis in the Channel/Monitor Modules section. This setup is highly flexible, with a little thought, almost anything is possible. FDR SWAP - Globally swaps the Channel Path Faders with the Monitor Path Rotaries. This may be useful for users who prefer to record with Monitor Path Rotaries controlling the 'to tape' levels, and faders controlling the 'from tape' levels. Note: This function swaps the level controls only. Solos, Cuts, Select, Line and Retro buttons on each module remain unchanged. Also, Fader Swap can be engaged on individual modules by depressing the HPF Selector in the Input section of each module. MON → MAIN - Routes the signal that is present at the Monitor Mix Fader to the Main Mix Outputs, via the Main Mix Fader. This may be useful for bouncing rough mixes whilst recording. It may also be useful when recording a mix back to the DAW - including effects that have been returned to the Monitor path. MIX INS - Activates the patchable Insert over the Main Mix. Note: The send is always active. 25 Control Room Source section in combination with ALT2 routes the 7.1 Input to the ALT2 Speaker Outputs. The high fidelity Control Room monitoring circuitry allows for sonically transparent monitoring of up to 12 sources. Located in the bottom right hand corner of the Master Section, it hosts the Main Monitor Volume Control, source selection for the Control Room Monitors, global Solo Modes, and Talkback controls. LCUT & RCUT - These cut the left and right channels of the currently selected Speaker Outputs. If monitoring surround using ALT2, just the L & R speakers will be cut. Other features include a Control Room Headphone Output and an input labeled iMON - This is an 1/8” TRS input designed for monitoring of external equipment, such as MP3 players, through the Control Room Speakers. Further, if LCUT and MONO are selected, the right channel of the Monitor Source will be routed to the selected left AND right Speaker Outputs. If RCUT and MONO are selected, the opposite occurs. CRM HP PFL Hp1 Hp2 2T1 2T2 7.1 iMON AUX 3 AUX A SUM RETRO OP MODERN OP MON MIX AUX 1 AUX 2 MONO - Feeds a mono sum of the selected Monitor Source to the Speaker Outputs. Further still, if MONO and SWAP are selected, the left and right channels of the selected Monitor Source are subtracted, and only the difference is heard. AUX B HP + PFL iMON When used in conjunction, LCUT, RCUT and MONO could be useful for calibrating speakers, checking for mono mix compatibility, focusing on signals present only in one channel of the selected Monitor Source, and the list goes on… MONITOR SOURCE 0 111/2 CUT - Cuts the selected Speaker Outputs. -30 DIM MAIN ALT1 ALT2 SURROUND LCUT MONO 0 TALK AFL PFL SIP SIF SOLO SOLO MODE RCUT LISTEN MIC SWAP - Reverses the selected L & R Speaker Outputs. TALKBACK AUX HP1 LISTEN RED LIGHT SLS STATUS LOCK DIM - Dims the Speaker Outputs by a level set by the Dim Control. The DIM button will be activated automatically when the following buttons in the Talkback section are activated: AUX, CUE, HP1 and HP2. SOURCE IN MONO CUT CAL SWAP DIM SOLO CLEAR LINK CUE HP2 Monitor Source Control Room Volume and Controls The Monitor Source section of the Series 75 Control Room panel is a 12 input analogue summing mixer, using high fidelity modern assembly methods for transparency. Up to 12 sources may be selected and monitored at once. By far, the most exhaustive amount of effort of all of the Series 75 features has gone into the design of the Control Room Volume circuitry. 2T1 - Routes 2 Track 1 to the selected Speaker Outputs via the Main Volume control. Up to three pairs of monitors can be connected to the Series 75 (see Connections for details). 2T2 - Routes 2 Track 2 to the selected Speaker Outputs via the Main Volume control. MAIN - Routes the selected Monitor Source to the Main Spk outputs. 7.1 - Routes the 7.1 input to the selected Speaker Outputs via the Main Volume control. The ALT2 Speaker Outputs are 7.1 capable. ALT1 - Routes the selected Monitor Source to the Alt Spk 1 outputs. ALT2 - Routes the selected Monitor Source to the Alt Spk 2 outputs. NOTE: Selecting 7.1 also alters the Group Cuts and Solos, which will now affect the ALT2 Speaker Outputs. This allows the additional ability to cut or solo individual speakers when monitoring in surround sound. NOTE: ALT2 can be used as a third pair of stereo monitors, however also supports eight outputs for 7.1 surround sound monitoring. Selecting 7.1 in the Monitor iMON - Routes the iMON input (top left corner of the 26 Control Room section) to the selected Speaker Outputs via the Main Volume control. Outputs. The AFL bus is stereo, and soloing is non-destructive (solo does not affect the Channel Direct Output or Main Mix Out signals). SUM - Is a latching function, and allows multiple Monitor Sources to be selected. When SUM is selected again, the Monitor Source will revert to the last selected source. »» PFL - A Pre-Fader Listen signal will be sent from the soloed Channel or Monitor path to the PFL bus and on to the Speaker Outputs. The PFL bus is mono, and soloing is non-destructive. The PFL Level Control is directly above the Control Room Volume. RETRO OP - Routes the Main Mix (post Master Fader) through the main Retro Mix stage (LO1166) to the Main Output & the Control Room section. »» SIP - A Solo button will simply cut all other signals which have neither their solo isolate mode activated, or been soloed themselves. Soloing is destructive (Channel Direct Outputs and Mix Outputs are Cut). MDRN OP - Routes the Main Mix (post Master Fader) through the main Modern Mix stage (transformerless) to the Main Output & the Control Room section. MON MIX - Routes the Monitor Mix to the Main Output & the Control Room section. »» SIF - An After Fader Listen signal will be sent from the selected Channel or Monitor path to the AFL bus and on to the Speaker Outputs. The Main Mix is padded 10dB and added to the AFL bus. Soloing is non-destructive. AUX 1, AUX 2, AUX 3 and AUX A, AUX B buttons route the respective send to the selected Speaker Outputs via the Master Aux control and the Main Volume control. Control Room Headphones LINK - Links the Channel path and Monitor path Solos. When selected, soloing any signal (Channel or Monitor Path) will result in all other un-soloed channels being cut. If unselected, Channel path and Monitor path Solos operate independently. The Control Room Headphone Output (HP) is located directly above the Main Volume Control. The level control adjacent to it effects the output level of the headphone and the PFL bus. Talkback and Listen Mic CRM HP - Feeds the currently selected Monitor Source to the Control Room Headphones. The built-in TALKBACK microphone is accessed here. Talkback can be fed to the Auxiliary Sends, Cues, two Headphone Outputs, and Studio Loudspeakers. When Talkback is activated, DIM is automatically engaged. HP1 - Routes Headphone Output 1 to the Control Room Headphones. »» AUX - Feeds Talkback to Auxiliary Outputs 1, 2, 3, A and B. HP2 - Routes Headphone Output 2 to the Control Room Headphones. »» HP1 & HP2 - Feeds Talkback to Headphone Send 1 or 2 via the respective Headphone Send Level. PFL - Feeds the PFL bus to the Control Room Headphones. Solo »» CUE - Routes Talkback to both Headphone Sends 1 & 2 via their level controls. The following buttons effect soloing globally. There are four global Solo Modes available on the Series 75 console. After-Fader Listen, Pre-Fader Listen, Solo In Place, and Solo In Front. LEDs in the Solo Modes section light to display which of the four modes are active at any one time. All buttons other than Solo Clear are recallable. »» SLS - Routes Talkback to the Studio Loudspeakers via the SLS Level Control. The LISTEN MIC is an extra input designed for a dedicated studio to control room communication microphone (dynamic only). The rotary control labeled LISTEN MIC sets the level of this input. The button labeled LISTEN, situated directly below, sends the signal to the Speaker Outputs cutting the currently selected Monitor Source. SOLO CLEAR - Clears all active Solos on the console. SOLO MODE - Cycles through the four Solo Modes. After-Fader Listen (AFL), Pre-Fader Listen (PFL), Solo In Place (SIP), and Solo In Front (SIF). »» AFL - A Solo button will send an After Fader Listen signal from the soloed Channel or Monitor path to the AFL bus and on to the Speaker STATUS LOCK - Locks out the CONSOLE MODE buttons, CHANNEL MODE buttons (other than PAN), OSC to GRPS/MAIN MIX, and the SIP SOLO MODE. 27 This prevents any destructive functions from effecting the Main Mix Output or Channel Direct Outputs. RED LIGHT - Completes the isolated voltage circuit required to activate a red light if connected. Red Light also engages Status Lock to prevent the Main Mix Output or Channel Direct Outputs from being affected. Faders MAIN MIX MONITOR MIX The stereo MAIN MIX Fader is fed by the Channel paths, and controls the level feeding the two stereo Mix Outs via their respective Retro and Modern Output Stages. The two linkable and externally patchable mono 2254 Compressors lie pre-fader, and an Insert point lies prefader, post-compressor. The stereo MONITOR MIX Fader is fed by the Monitor paths, and controls the level feeding the (Modern) Monitor Mix Outputs. When MON → MAIN is selected in the Console Modes section, the output of the Monitor Mix Fader joins the signal on the Main Mix Fader, and on to the Retro and Modern Mix Outputs. 28 Modifications 7. If all three jumpers are placed on the two pins closest to the Channel Bin Motherboard, the Insert will fall pre-EQ. There are two modifications that, depending on your workflow, you may like to make. 8. Once the changes have been made, replace the Module carefully and firmly back into the Channel Bin Motherboard. Insert Points on each 2081 Module default post-EQ. A quick jumper change on the Channel PCB will move it pre-EQ. 9. Replace both hex screws before powering up. Modification 2 Installing Additional Modules Additional Modules can be purchased and installed if there is still room in your console chassis. Before completing either of the following modifications make sure the power supply and interfaces are switched off, and have been off for at least 1 minute. Modification 1 - Insert Point Post/Pre EQ 1. Double check the power supply is off. 2. Remove the hex screws situated at the top and bottom of the blank Channel Bin panels. 1. Double check the power supply is off. 3. Remove the panels. 2. Remove the hex screws situated at the top and bottom of the 2081 Module. 4. Place the Module(s) carefully and firmly into the Channel Bin Motherboard. This should provide a satisfying click… 3. The Modules are attached to the Channel Bin Motherboard beneath them, firmly grip the Aux A/B Pan Control and the Monitor Path Pan Control. Carefully remove the Module from the Channel Bin. 5. Fit both hex screws before powering up. 6. Make sure the correct size blank panels have been ordered and are refitted to protect the console from dust etc. 4. Find the area on the Module PCB that is indicated in the image below. 7. On power up, the console will recognise the additional modules and update the SMD chip to the current motherboard version if necessary. 5. Three jumpers indicated J601, J602 and J603 need to be moved. 6. If all three jumpers are placed on the two pins closest to the front panel of the Module, the Insert will fall post-EQ. 29 File: Size: A3 30 Line DAW DI Mic Line DAW +48v BA283 Line Amp PAD PAD Number: N2081 Title: 2081 Module Block Diagrams Revision: A ø I/P Tfmr 10468 PAD 17-41db Mic Stage 1 Pre +/- 10db Trim +18db Mic Stage 2 Pre HPF Monitor Post Monitor Pre Channel Post Channel Pre ALTERNATE INSERT POSITION (PCB Jumper) AUX TREB MF 2 1 2 3 AL AR BL BR BASS Modern Mix Busses MF 1 1081 EQ Ins Ins Rtn Snd Monitor Level Fader Swap Fader Osc BA283 Line Amp I/P Tfmr 10468 Monitor Post to Aux Channel Post to Aux Cut Bus Sw R L R L Bus Sw PFL + - + - + - + - Bus Switching Monitor Pre to Meter Panpot Panpot Bus Switching even odd To Meter Panpot Channel Pre to Meter PFL Modern AFL, L,R Modern L, R Modern AFL, L,R Modern L, R Direct Out To Bussing (retro) Block Diagrams Channel & Input Block Diagram File: Size: A3 Group Mix Bus (balanced) Group Mix Bus 1 BA283 I/P Tfmr Bus Trim Bus Amp Revision: A 10468 Number: Group Amps Title: Channel Module Block Diagrams Osc Relay Osc & Talkback Internal Trim BA283 Bus Amp Buffer DAW Play Buffer Group Out (balanced) Insert Send O/P Tfmr LO1166 DAW Playback Insert Return DAW Bus Relay To Meter Fader CW Stem Output Fader Buffer Panpot Balance Bus Drive Balance Bus Drive Balance Bus Drive Balance Bus Drive Balance Bus Drive 31 To AFL To AFL To MIX To MIX To PFL AFL R AFL L Mix Busses Group Amps PFL Local Mix R Local Mix L File: Monitor Mix Right BA283 Bus Amp BA283 I/P Tfmr 10468 I/P Tfmr Current Mix Busses Right Current Mix Busses From Rev Return 4-8 From Rev Return 1-4 BA283 Bus Amp BA283 Bus Amp BA283 Bus Amp BA283 Bus Amp Bus Amp 10468 Revision: A Voltage Mix Busses Number: Stereo Left Left Mon 32 Right Mon Size: A3 Left Title: Master Section Block Diagrams Mon Fader CW Mon Fader CW Local Mix R Local Mix L Local Mix Busses 2254 In Local Mix Buffer Bal Out 2254 In Local Mix Buffer Bal Out 2254 2254 2254 Out 2254 Out R L Insert Insert R L Insert In Insert In Bal Buffer Bal Buffer Fader CW Fader CW BA283 Line Amp O/P Tfmr LO1166 O/P Tfmr LO1166 Bal Buffer To Meter & CR Mon & HP Bal Buffer Bal Buffer To Meter & HP BA283 Bal Buffer To Meter & HP Line Amp Osc to Mix Osc Osc to Mix Osc Monitor Mix Out R Monitor Mix Out L Modern O/P R Retro O/P R Modern O/P L Retro O/P L To CR Mon Stereo Mix & Outputs File: Size: A3 Number: CR Monitor Revision: A Monitor Sources Title: Master Section Block Diagrams 33 Pre & Limiter PCB Right Listen Mix Mix Mon Mix 2Trk2 2Trk1 Aux B Aux A Aux 3 Aux 2 Aux 3 I-Mon Listen Level CW Bal In Bal In Bal In Bal In Unbal In Unbal In Listen mic overrides all other sources Listen Mic Mix Modern R Mix Modern L Mix Retro R Mix Retro L Mon Mix R Mon Mix L 2 TRACK 2 R 2 TRACK 2 L 2 TRACK 1 R 2 TRACK 1 L Aux B Post Fade R Aux B Post Fade L Aux A Post Fade R Aux A Post Fade L Aux 3 Post Fade R Aux 3 Post Fade L Aux 2 Post Fade R Aux 2 Post Fade L Aux 1 Post Fade R Aux 1 Post Fade L MiniJack In R MiniJack In L CW CW Surround Input Surround Input Surround Input Surround Input Surround Input Surround Input Surround Input Surround Input Mix Amp CR Sel R Mix Amp CR Sel L AFL R AFL Level AFL Level AFL L Mix Amp Mix Amp CW To SLS To SLS CW AFL AFL CW CW CW Level CW Level Mono Dim Main Volume Control DC Control CW Level DC Control CW Dim CW CW L-R Swap CW PCB Right CW Main Volume Control PCB Right Buffer Buffer Buffer Buffer Buffer Buffer Buffer Buffer Buffer Buffer Buffer Buffer PCB Right Alt 2 RC Alt 2 LC Alt 2 RS Alt 2 LS Alt 2 LFE Alt 2 C Alt 2 R Alt 2 L Alt R Alt L Main R Main L CR Monitor Cut Switches File: Aux 1 (2,3,4 Identical Current Mix Busses Level CW Talkback Bal In Unbal Out Bus Amp Revision: A Talkback Bal In Unbal Out Bus Amp Number: Aux HP Rets Aux A (Aux B Identical Size: A3 Buffer Level CW To CR Mon Balance To CR Mon To CR Mon Bal Buffer Bal Buffer Bal Buffer Bal Buffer Bal Buffer Bal Buffer Aux A R Out Aux A L Out Aux 1 Out 34 Rev 2 Left Rev 3 Left Rev 4 Left Aux 2 Aux 3 Aux B Left St Mix Left Mon Mix Left CR Mix Left Rev 2 Left Rev 3 Left Rev 4 Left Aux 2 Aux 3 Aux B Left St Mix Left Mon Mix Left CR Mix Left Rev 2 Left Rev 3 Left Rev 4 Left Aux 2 Aux 3 Aux B Left St Mix Left Mon Mix Left CR Mix Left Rev 2 Left Rev 3 Left Rev 4 Left Aux 2 Aux 3 Aux B Left St Mix Left Mon Mix Left CR Mix Left Right Rev Ret 1 Left Talkback Mix Amp Talkback Mix Amp Talkback Mix Amp Talkback Mix Amp Bal In Buffer Bal In Buffer CW CW CW CW Level CW Level CW Reverb Return 1 (2,3,4 Identical) Balance CW Balance CW Balance CW Balance CW Balance CW Balance CW HP Amp HP Amp HP Amp HP Amp Buffer Buffer HP2 Bal Output HP2 Bal Output HP1 Bal Output HP1 Bal Output To HP2 To HP1 To Mix B To Mix A Headphone 1 Headphone 2 Rear Connections Title: Channel Module Block Diagrams L Bal Buffer R Bal Buffer L R To Mon Mix Bus To Local Stereo Mix Bus AUX Headphone & Stereo Returns Balanced Outputs File: Size: A3 Revision: A 35 SLS Ext In R CR Mon Pre Fade R PFL to SLS SLS Ext In L CR Mon Pre Fade L PFL to SLS Number: Other Stuff Voltage Mix Busses AFL L Current Mix Busses AFL L Title: Channel Module Block Diagrams BA283 I/P Tfmr Ext Ext Talkback Internal Trim Buffer Line Amp Talkback Talkback On On CW Level CW Level Studio Loudspeaker (SLS) BA283 Bus Amp Bus Amp 10468 To CR Mon Bal Out Bal Out AFL Amps (Left shown, Right Identical) SLS Left SLS Left Pink Noise Sine Osc Mic Talkback Pre & Limiter Level CW Cal Trim To Groups To SLS To Aux To HP2 To HP1 HP2 L&R HP1 L&R Groups Direct Outs SLS Aux 1-3,A,B To Channels To Slate Talkback HP Level CW Cal To Mix PCB Left Oscillator Talkback Talkback Talkback Osc & TB Osc & TB Osc to Group Osc to Direct Outs Osc to Mix Osc & TB Osc & TB Oscillator Ancillary d c a e b Dimensions »» a: 45cm b: 99cm c: 30.7cm d: 70.5cm e: 12cm 32 Channel Frame »» Width: 167cm (65.75 in) »» Depth: 99cm (38.98 in) »» Height (without stand): 45cm (17.72 in) 24 Channel Frame »» Width: 135cm (53.15 in) »» Depth: 99cm (38.98 in) »» Height (without stand): 45cm (17.72 in) 16 Channel Frame »» Width: 102cm (40.16 in) »» Depth: 99cm (38.98 in) »» Height (without stand): 45cm (17.72 in) 36 Recall Sheets The following pages contain printable Recall sheets for the Custom Series 75. 37 Session: Date: 800mS 1.5S 400mS AUTO CAL 60 100 1K 10K 16K 40 EXT MAIN MIX DIR SLS SLS 10 4:1 1.5:1 6:1 0 AUX1 AUX2 0 AUX3 0 0 AUX A L BAL R 0 0 0 3:1 2:1 AUTO 0 0 800mS 200mS 100mS +16 OSC LEVEL 10 PFL COMP RECOVERY 0 0 +12 +8 COMP IN 20 GAIN MAKE UP 0 0 0 COMP THRESHOLD 0 0 +10 -20 GRPS PINK 0 0 10 0 -10 0 0 Notes: AUX B L BAL R AUX SEND TRIMS FAST ATTACK 10 0 800mS HP 2 +12 +16 +8 +4 3:1 2:1 AUTO +20 LIMIT ON 4 2254 LEFT COMP RATIO 5 HP 1 10 MON MIX MAIN MIX SOLO ISO SOLO REV RET 1 FAST ATTACK 3 HP 1 MAIN MIX FADER SWAP MON MIX MAIN MIX SOLO ISO SOLO REV RET 2 PEAK LED SIG LED 6 7 8 0 GRP5 0 GRP6 0 GRP7 0 0 0 GRP4 0 0 0 SOLO SOLO ISO REV RET 4 AUX A MON MIX AUX 1 AUX 2 AUX A MON MIX CR MON AUX 3 AUX B MAIN MIX CR MON AUX 3 AUX B MAIN MIX L BAL R 10 CH MON ST MON L BAL R 10 HEADPHONE SEND 2 CONSOLE MODES (HOLD) DIR FADERS VU PEAK CH INPUT AUX PFL REV RET -6dB FADER SWAP MASTER METERS >> 0 0 GRP3 0 0 0 0 0 GRP2 0 0 0 0 0 0 0 SOLO ISO MON MIX AUX 2 MON INPUT PAN MON MAIN MIX INS RETRO GRP8 CHANNEL MODES (HOLD) CRM HP PFL Hp1 Hp2 2T1 2T2 7.1 iMON AUX 3 AUX A SUM RETRO OP MODERN OP MON MIX AUX 1 AUX 2 AUX B HP + PFL iMON GRP1 MAIN MIX ESC << AUTO MON MIX REV RET 3 CHANNEL METERS RCL STORE 10 AUX 1 GRP VIEW PAN HP 1 10 HEADPHONE SEND 1 0 L BAL R 6:1 LIMIT RECOVERY 2 HP 1 SOLO 4:1 1.5:1 LIMIT LEVEL 1 COMP RECOVERY 800mS 200mS 100mS L BAL R MAIN MIX COMP IN 20 GAIN MAKE UP HP 2 L BAL R 10 0 0 0 COMP THRESHOLD HP 2 L BAL R AUTO +10 -20 HP 2 1.5S 400mS 0 0 -10 2254 RIGHT COMP RATIO 0 0 LIMIT RECOVERY 0 0 LIMIT ON 0 0 +20 LIMIT LEVEL 0 0 +4 0 GROUP SEND TRIMS MONITOR SOURCE L PAN R L PAN R L PAN R L PAN R L PAN R L PAN R L PAN R L PAN R DAW DAW DAW DAW DAW DAW DAW DAW SOLO ISO SOLO ISO SOLO ISO SOLO ISO SOLO ISO SOLO ISO SOLO ISO SOLO ISO MAIN ALT1 SOLO SOLO SOLO SOLO SOLO SOLO SOLO SOLO LCUT MONO 0 111/2 -30 DIM ALT2 SURROUND 0 TALK AFL PFL SIP SIF SOLO RCUT LISTEN MIC TALKBACK SOLO MODE AUX HP1 LISTEN RED LIGHT LINK CUE HP2 SLS STATUS LOCK SOURCE IN MONO CUT CUT CUT CUT CUT CUT CUT CUT 1 2 3 4 5 6 7 8 1 2 3 5 4 GROUP RETURNS 6 7 8 GROUP RETURNS 38 CUT CAL SWAP DIM SOLO CLEAR MAIN MIX MONITOR MIX Session: Date: Notes: 0 0 O -10 TRIM 10 0 60 66 54 0 54 300 15 - 10 PAN OFF 1.5 3.9 OFF 1.2k 3.3 L 560 33 300 25 PAN AUX B R L PAN R L PAN AUX3 AUX3 AUX 2 AUX 2 AUX 2 AUX 2 AUX 2 AUX 2 AUX 2 AUX 2 AUX 1 AUX 1 AUX 1 AUX 1 AUX 1 AUX 1 AUX 1 AUX 1 OFF + GAIN 15 - 10 OFF + GAIN 15 + GAIN OFF 8.2 + GAIN GAIN 1.5 4.7 3.3 - 1.8 6.8 3.9 OFF 1.2k 3.3 HI Q - + GAIN HI Q 330 33 - GAIN 4.7 3.9 OFF 1.2k 3.3 33 I S O MON 10 I S O PAN HI Q 3.9 OFF 1.2k GAIN SWAP CUT - 1.8 3.3 HI Q - 220 270 33 HI Q - GAIN 1.5 MON 10 4.7 3.9 OFF 1.2k CUT - 1.8 3.3 HI Q - 220 270 HI Q 33 I S O - 56 SEL 4.7 3.9 OFF 1.2k MON 10 SWAP CUT - 1.8 3.3 HI Q - 220 270 I S O 33 HI Q - GAIN 1.5 MON 10 4.7 3.9 OFF 1.2k CUT - 1.8 3.3 HI Q - 220 270 33 I S O - 4.7 3.9 OFF 1.2k MON 10 CUT + 1.8 - GAIN + HI Q 3.3 2.7 - 220 270 560 OFF + I S O HI Q 33 - 56 + EQ INS LINE L SEL MON 10 I S O PAN R SEL SIG SWAP CUT MON 10 SIG RETRO SOLO GAIN 100 180 330 R L PAN R + GAIN 390 470 LINE PAN RETRO SWAP GAIN 330 EQ SIG SOLO GAIN INS L SEL - 2.2 820 680 56 1.5 100 R L PAN R OFF 8.2 1k 390 470 OFF + + GAIN HI Q LINE PAN 10 4.7 6.8 5.6 330 560 + GAIN 2.7 1k EQ RETRO SWAP 3.3 180 330 INS L 15 R 6.8 2.2 820 680 56 OFF + GAIN 4.7 100 SIG SOLO OFF 8.2 180 330 SEL L PAN R + GAIN 390 470 OFF + - 10 6.8 5.6 330 560 + GAIN 2.7 1k R RETRO RETRO L PAN R SOLO SWAP CUT 0 0 0 0 0 0 0 0 0 0 0 0 0 0 0 0 39 1.5 3.3 LINE PAN 15 6.8 2.2 EQ SIG SOLO GAIN INS L OFF + GAIN 4.7 100 R L PAN R OFF 8.2 820 680 LINE PAN + GAIN 390 470 OFF + - 10 6.8 5.6 330 560 + GAIN 2.7 1k EQ RETRO SWAP 3.3 180 330 INS L 15 6.8 2.2 820 680 56 OFF + GAIN 4.7 100 SIG SOLO OFF 8.2 180 330 SEL L PAN R + GAIN 390 470 OFF + - 10 6.8 5.6 330 560 + GAIN 2.7 1k R RETRO SOLO 4.7 820 680 - 1.5 3.3 2.2 EQ SIG 15 6.8 LINE L SEL L PAN R + GAIN INS R RETRO CUT - LINE PAN OFF 8.2 5.6 56 OFF + GAIN 4.7 6.8 390 470 OFF + EQ SIG SWAP HI Q 330 560 + GAIN 2.7 220 270 - 10 100 0 0 MON 10 - 180 330 INS L SEL 3.3 1.8 100 R 15 6.8 2.2 820 680 56 1.5 1k 390 470 OFF + OFF 8.2 5.6 220 270 OFF + GAIN 4.7 6.8 2.7 1k 560 + GAIN 2.2 4.7 - 10 6.8 180 330 0 0 300 AUX3 LINE SOLO L INPUT 150 50 AUX B R +48V AUX3 EQ L PAN R PAN 60 66 100 150 25 0 MIC DI MON 100 300 -10 TRIM 10 42 54 MIC/DI GAIN INPUT MIC DI MON 36 48 6 AUX3 INS I S O L 54 50 AUX B R 60 66 30 24 AUX3 100 PAN PAN INPUT 150 25 0 18 12 +48V MIC/DI GAIN 100 300 -10 TRIM 10 42 48 6 MIC DI MON 36 AUX3 180 330 L L 54 50 AUX B R 60 66 30 24 AUX3 HI Q - PAN INPUT 150 25 0 18 12 +48V MIC/DI GAIN 100 300 48 6 MIC DI MON -10 TRIM 10 42 AUX A 820 680 56 L 54 50 36 AUX A 390 470 OFF INPUT 150 AUX B R 60 66 30 24 AUX A 330 820 680 0 18 12 +48V MIC/DI GAIN 100 25 48 6 MIC DI MON -10 TRIM 10 42 AUX A HI Q - 54 50 36 AUX A 5.6 220 270 PAN 60 66 30 24 AUX A 2.7 1k INPUT 300 6.8 - 0 18 12 +48V MIC/DI GAIN 150 25 -10 TRIM 10 42 48 6 MIC DI MON 50 36 AUX A 2.2 4.7 54 100 R 3.3 1.8 60 66 30 24 AUX A 4.7 6.8 5.6 0 18 12 +48V AUX B 6.8 3.3 -10 TRIM 10 42 48 AUX B L 8.2 INPUT 300 25 AUX B 36 MIC/DI GAIN 150 50 30 24 6 100 150 OFF 60 66 18 12 +48V MIC DI MON 100 25 -10 TRIM 10 42 MIC/DI GAIN INPUT MIC DI MON 50 36 48 6 MIC/DI GAIN 30 24 O 0 0 6 18 12 +48V 0 O 0 0 48 0 O 0 0 42 0 O 0 0 36 0 O 0 0 30 24 12 0 O 0 0 18 0 O Wiring Diagrams XLR Connectors 1 3 2 Shield Cold (-) Hot (+) Shield Cold (-) Hot (+) Hot (+) Cold (-) Shield 1/4” TRS & TS Sleeve Ring Tip Sleeve Tip Connectors 1 13 14 DB25 Connectors All DB25 connectors are wired with Tascam pinout & numbering, housing screws are imperial thread. Each Channel Bin uses DB25 for Direct Out, Line In, DAW In, Insert Send & Insert Return. Broadcast Users Note: Pin 13 of the DB25 is CHASSIS, whilst other ‘earth’ or ‘ground’ pins (25, 11, 22, 8, 19, 5, 16, 2) are connected to “0 Volts”. Pin 13 can be used to connect to outer shield of cables with double shielding. Inside the console these 2 circuits are connected together at one place. Separately wiring the outer shield will reduce susceptibility to radio interference. 40 Master Section Rear Panel Surround Spk (Alt2) Naturally, the following labels are just a guide. Labels have not been added to the console, maintaining consistency between the 7.1 input wiring and the Surround Spk (Alt2) output wiring is the main consideration. As mentioned previously, the following labels are just a guide. Labels have not been added to the console, maintaining consistency between the 7.1 input wiring and the Surround Spk (Alt2) output wiring is the main consideration. Connection Cable # Pin # Connection Cable # LFE + 8 1 LFE + 8 14 LFE - 14 LFE - 2 0V 2 0VS 15 Rs + 15 Rs + 3 Rs - 3 Rs - 16 0V 16 0VS 4 Ls + 4 Ls + 17 Ls - 17 Ls - 5 0V 5 0VS 18 R+ 18 R+ 6 R- 6 R- 19 0V 19 0VS 7 Rc + 7 Rc + 20 Rc - 20 Rc - 8 0V 8 0VS 21 C+ 21 C+ 9 C- 9 C- 22 0V 22 0VS 10 Lc + 10 Lc + 23 Lc - 23 Lc - 11 0V 11 0VS 24 L+ 24 L+ 12 L- 12 L- 25 0V 25 0VS 13 Chassis 13 Chassis 7 8 7 6 6 5 5 3 4 4 3 2 1 14 2 15 3 16 4 17 5 18 6 19 7 20 8 21 9 22 10 23 11 24 12 25 13 Pin # 1 2 1 1 2 3 4 5 6 7 8 7.1 Inputs 1 41 1 14 2 15 3 16 4 17 5 18 6 19 7 20 8 21 9 22 10 23 11 24 12 25 13 7 6 5 4 3 2 1 Connection Cable # Pin # Connection Cable # 1 Ret+4R 8 1 Osc+ 8 14 Ret-4R 14 Osc- 2 0VR 15 Ret+4L 2 0V 3 Ret-4L 15 AUX Out BR+ 16 0VR 3 AUX Out BR- 4 Ret+3R 16 0V 17 Ret-3R 4 AUX Out BL+ 5 0VR 17 AUX Out BL- 18 Ret+3L 5 0V 6 Ret-3L 18 AUX Out AR+ 19 0VR 6 AUX Out AR- 7 Ret+2R 19 0V 20 Ret-2R 7 AUX Out AL+ 8 0VR 20 AUX Out AL- 21 Ret+2L 8 0V 9 Ret-2L 21 AUX Out 3+ 22 0VR 9 AUX Out 3- 10 Ret+1R 22 0V 23 Ret-1R 10 AUX Out 2+ 11 0VR 23 AUX Out 2- 24 Ret+1L 11 0V 12 Ret-1L 24 AUX Out 1+ 25 0VR 12 AUX Out 1- 13 Chassis 25 0V 13 Chassis 7 8 7 6 6 5 5 3 4 4 3 2 1 14 2 15 3 16 4 17 5 18 6 19 7 20 8 21 9 22 10 23 11 24 12 25 13 Pin # 2 1 1 2 3 4 5 6 7 8 Reverb (Stereo) Returns Aux Sends 1 Connection Cable # 1 Mon Mix Out R+ 8 14 Mon Mix Out R- 2 0V 15 Mon Mix Out L+ 3 Mon Mix Out L- 16 0V 4 6 17 5 0V 18 5 8 6 0V 21 Alt Spk1 L+ 9 Alt Spk1 L- 22 0V 10 Main Spk R+ 23 Main Spk R- 11 0V 24 Main Spk L+ 12 Main Spk L- 25 0V 13 Chassis 7 8 4 6 Alt Spk1 R3 5 Alt Spk1 R+ 20 2 4 7 3 0V 1 2 19 6 5 4 3 2 1 The Studio Red Light is to be connected to Channel 5, taking into consideration that this circuit is not suitable for mains power and should be run at 1 Amp 24 Volts. 7 1 8 7 6 5 4 3 2 1 Pin # 7 SLS, Red Light, TB, Listen Speakers 1 14 2 15 3 16 4 17 5 18 6 19 7 20 8 21 9 22 10 23 11 24 12 25 13 1 14 2 15 3 16 4 17 5 18 6 19 7 20 8 21 9 22 10 23 11 24 12 25 13 42 1 14 2 15 3 16 4 17 5 18 6 19 7 20 8 21 9 22 10 23 11 24 12 25 13 Pin # Connection Cable # 1 PFL Out+ 8 14 PFL Out- 2 0V 15 Listen Mic+ 3 Listen Mic- 16 0V 4 Talkback Sw1 17 Talkback Sw2 5 0V 18 Red Light1 6 Red Light2 19 0V 7 Ext to SLS R+ 20 Ext to SLS R- 8 0V 21 Ext to SLS L+ 9 Ext to SLS L- 22 0V 10 SLS R+ 23 SLS R- 11 0V 24 SLS L+ 12 SLS L- 25 0V 13 Chassis 7 6 5 4 3 2 1 Headphones Mix Outs & 2254 Connection Cable # 7 Pin # 1 8 Note: Unbalanced outputs are able to drive up to 10 headphones without the need for an external headphone amp, the balanced outputs will need to be connected to a headphone amp. 8 1 2 3 HP2 L 16 0VHP 4 HP1 R 17 HP1 L 5 0VHP 18 6 3 7 5 HP2 R 6 4 0V 15 3 2 5 6 2 1 14 2 15 3 16 4 17 5 18 6 19 7 20 8 21 9 22 10 23 11 24 12 25 13 19 0V 7 HP2 R+ 20 HP2 R- 8 0V 21 HP2 L+ 9 HP2 L- 22 0V 10 HP1 R+ 23 HP1 R- 11 0V 24 HP1 L+ 12 HP1 L- 25 0V 13 Chassis 4 1 4 5 6 7 8 14 3 2 3 2Trk2 L- 16 0V 4 2Trk1 R+ 17 2Trk1 R- 5 0V 18 2Trk1 L+ 6 2Trk1 L- 19 0V 7 Ins Ret R+ 20 Ins Ret R- 8 0V 21 Ins Ret L+ 9 Ins Ret L- 22 0V 10 Ins Send R+ 23 Ins Send R- 11 0V 24 Ins Send L+ 12 Ins Send L- 25 0V 13 Chassis 7 6 2Trk2 L+ 6 5 15 4 0V 5 3 2 4 2 2Trk2 R+ 2Trk2 R- 8 8 1 14 7 Cable # 1 8 7 6 5 4 3 2 1 1 14 2 15 3 16 4 17 5 18 6 19 7 20 8 21 9 22 10 23 11 24 12 25 13 Connection Connection Cable # 1 2254 In R+ 8 14 2254 In R- 2 0V 15 2254 In L+ 3 2254 In L- 16 0V 4 2254 Out R+ 17 2254 Out R- 5 0V 18 2254 Out L+ 6 2254 Out L- 19 0V 7 Retro R+ 20 Retro R- 8 0V 21 Retro L+ 9 Retro L- 22 0V 10 Modern R+ 23 Modern R- 11 0V 24 Modern L+ 12 Modern L- 25 0V 13 Chassis 7 6 5 4 3 2 1 Group Outputs/Insert Sends 1 Mix Insert, 2 Trk 1,2 Pin # 1 14 2 15 3 16 4 17 5 18 6 19 7 20 8 21 9 22 10 23 11 24 12 25 13 Pin # 3 2 1 43 1 14 2 15 3 16 4 17 5 18 6 19 7 20 8 21 9 22 10 23 11 24 12 25 13 Pin # Connection Cable # 1 Grp +8 8 14 Grp -8 2 0V 15 Grp +7 3 Grp -7 16 0V 4 Grp +6 17 Grp -6 5 0V 18 Grp +5 6 Grp -5 19 0V 7 Grp +4 20 Grp -4 8 0V 21 Grp +3 9 Grp -3 22 0V 10 Grp +2 23 Grp -2 11 0V 24 Grp +1 12 Grp -1 25 0V 13 Chassis 7 6 5 4 3 2 1 1 2 3 4 5 6 7 8 Stem Outputs 1 14 2 15 3 16 4 17 5 18 6 19 7 20 8 21 9 22 10 23 11 24 12 25 13 Pin # Connection Cable # 1 Stem +8 8 14 Stem -8 2 0V 15 Stem +7 3 Stem -7 16 0V 4 Stem +6 17 Stem -6 5 0V 18 Stem +5 6 Stem -5 19 0V 7 Stem +4 20 Stem -4 8 0V 21 Stem +3 9 Stem -3 22 0V 10 Stem +2 23 Stem -2 11 0V 24 Stem +1 12 Stem -1 25 0V 13 Chassis 7 6 5 4 3 2 1 1 2 3 4 5 6 7 8 DAW/Ins Return 1 14 2 15 3 16 4 17 5 18 6 19 7 20 8 21 9 22 10 23 11 24 12 25 13 Pin # Connection Cable # 1 DAW +8 8 14 DAW -8 2 0V 15 DAW +7 3 DAW -7 16 0V 4 DAW +6 17 DAW -6 5 0V 18 DAW +5 6 DAW -5 19 0V 7 DAW +4 20 DAW -4 8 0V 21 DAW +3 9 DAW -3 22 0V 10 DAW +2 23 DAW -2 11 0V 24 DAW +1 12 DAW -1 25 0V 13 Chassis 7 6 5 4 3 2 1 44 Channel Bin Rear Panel Pin # Connection Cable # Pin # Connection Cable # 1 Snd +8 8 1 DAW +8 8 14 Snd -8 14 DAW -8 2 0V 2 0V 15 Snd +7 3 Snd -7 16 0V 4 Snd +6 17 Snd -6 5 0V 18 Snd +5 6 Snd -5 19 0V 7 Snd +4 20 Snd -4 8 0V 21 Snd +3 9 Snd -3 22 0V 10 Snd +2 23 Snd -2 11 0V 24 Snd +1 12 Snd -1 25 0V 13 Chassis 7 8 7 6 6 4 5 5 3 4 3 2 1 14 2 15 3 16 4 17 5 18 6 19 7 20 8 21 9 22 10 23 11 24 12 25 13 2 15 DAW +7 3 DAW -7 16 0V 4 DAW +6 17 DAW -6 5 0V 18 DAW +5 6 DAW -5 19 0V 7 DAW +4 20 DAW -4 8 0V 21 DAW +3 9 DAW -3 22 0V 10 DAW +2 23 DAW -2 11 0V 24 DAW +1 12 DAW -1 25 0V 13 Chassis 7 6 5 4 3 2 1 Line Inputs Pin # Connection Cable # Pin # Connection Cable # 1 Ret +8 8 1 Line +8 8 14 Ret -8 14 Line -8 2 0V 2 0V 15 Ret +7 3 Ret -7 16 0V 4 Ret +6 17 Ret -6 5 0V 18 Ret +5 6 Ret -5 19 0V 7 Ret +4 20 Ret -4 8 0V 21 Ret +3 9 Ret -3 22 0V 10 Ret +2 23 Ret -2 11 0V 24 Ret +1 12 Ret -1 25 0V 13 Chassis 7 8 7 6 6 4 5 5 3 4 2 3 1 8 7 6 5 4 3 2 1 1 14 2 15 3 16 4 17 5 18 6 19 7 20 8 21 9 22 10 23 11 24 12 25 13 1 Channel Insert Returns 1 14 2 15 3 16 4 17 5 18 6 19 7 20 8 21 9 22 10 23 11 24 12 25 13 DAW Inputs 1 1 2 3 4 5 6 7 8 Channel Insert Sends 2 1 45 1 14 2 15 3 16 4 17 5 18 6 19 7 20 8 21 9 22 10 23 11 24 12 25 13 15 Line +7 3 Line -7 16 0V 4 Line +6 17 Line -6 5 0V 18 Line +5 6 Line -5 19 0V 7 Line +4 20 Line -4 8 0V 21 Line +3 9 Line -3 22 0V 10 Line +2 23 Line -2 11 0V 24 Line +1 12 Line -1 25 0V 13 Chassis 7 6 5 4 3 2 1 1 2 3 4 5 6 7 8 Direct Outputs 1 14 2 15 3 16 4 17 5 18 6 19 7 20 8 21 9 22 10 23 11 24 12 25 13 Pin # Connection Cable # 1 DIR +8 8 14 DIR -8 2 0V 15 DIR +7 3 DIR -7 16 0V 4 DIR +6 17 DIR -6 5 0V 18 DIR +5 6 DIR -5 19 0V 7 DIR +4 20 DIR -4 8 0V 21 DIR +3 9 DIR -3 22 0V 10 DIR +2 23 DIR -2 11 0V 24 DIR +1 12 DIR -1 25 0V 13 Chassis 7 6 5 4 3 2 1 46 Glossary Retro Output Stage Amplifying Stages The Classic Output Stage which was made famous by the Neve 1073, 1272 and 2254 could be described using words such as warm, defined and flattering. The only way to truly know is to listen. Circuitry wise, the sound is largely due to the BA283 output amplifier and L01166 output transformer. These two components, when used together, have a significant sonic effect. Each EQ band contains an amplifying stage. The mic pre contains two, as does the HPF. The original Neve BA338 amplifying stages have been tweaked to improve their drive ability and stability versus temperature, resulting in reduced distortion and approximately 9dB more dynamic range. As a further improvement to the original designs, each section of the 2081 channel module has its own power supply filtering. Care has been taken to recreate the renowned Classic Output Stage for the Series 75 Console. The BA283X output stage, single ended, class A circuitry with a gapped core transformer, and the L01166 output transformer are as it was originally. Channel Bin All capacitors in the audio signal path (Retro & Modern) are WIMA polypropylene film or Rubycon ZLH electrolytic chosen for long life and superior sonic performance. All relays, switches and connectors in the audio signal path have gold plated contacts. Front on, the Channel Bins of the Custom Series 75 are almost indiscernible. However each group of eight 2081 channel modules are housed in an aluminum casing known as a 'bin'. Beneath this are the individual Channel Bin motherboards. From the rear, each bin can be seen clearly. Depending on the chassis size, there may be up to eight Channel Bins. Stem Outputs Current Summing A Stem is a sub-mix output. In music mixing, stems are more often stereo mixes of just the drums, guitars, or vocals etc. These can then be subsequently re-mixed together for a complete stereo mix. The Series 75 Stem Outputs are post-fader, and may be used to record just the sub-grouped signals. Current Summing is a modern solution to the 'deficiencies' of Voltage Summing. No matter how many signals you feed to the mix bus of a Current Summing circuit, the voltage on the bus will remain at 0 Volts. We call this a “Virtual Earth” - the inverted op-amp output voltage is 'fed back' to the virtual earth point via a feedback resistor, resulting in 0V at the op-amp input. A more sophisticated variant of this circuit is used to achieve balanced virtual earth mixing as used in this console. Due to the virtual earth, this design does not require an input or output transformer. A Current Summing Mix Bus does not colour the audio. Voltage Summing In the 1970s Voltage Summing was the only way to sum multiple signals onto a bus. Put simply, the signal level on the mix bus drops as more signals are fed to it, typically to around -30dbu. Further, the mix bus must be designed from the outset to have a fixed number of sources, and the impedance and bus level depends on this not changing. The signal passes through an input transformer and amplifying stage – the “mix amp”. This input transformer will subtly colour the signal. Once the signal passes through the mix amp it hits an output transformer. The output transformer is where much of the sonic colour comes from. In effect, a Voltage Summing Mix Bus colours the audio in a way that is pleasing to our ear. Modern Output Stage The Modern Output Stage of the Custom Series 75 has been designed for sonic transparency and excellent technical specification. It's a transformer-less balanced floating output, that can drive balanced or unbalanced professional grade studio equipment. All op amps are LM4562 by National Semiconductor, generally regarded as the best sounding opamp available. All capacitors in the audio signal path (Modern & Retro) are WIMA polypropylene film or Rubycon ZLH electrolytic chosen for long life and superior sonic performance. All relays, switches and connectors in the audio signal path have gold plated contacts. 47 Credits Tom Misner – Owner/Designer/Marketing Bruce McBean - Design Team Leader Stephen Crane - Mechanical Design Grzegorz Rozek - Software Design Rod Harris - Design Engineer Murray Irvine - Design Engineer Attila Acs – Website, Graphics & Photos Dirk Terrill - Documentation The Team wishes to thank the numerous people whose valuable suggestions and criticisms during the development of this console have helped to make it even better. 48