1
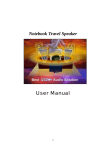
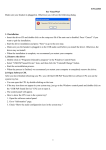
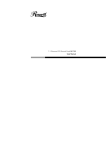
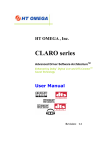
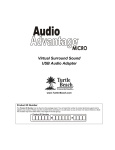
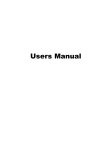
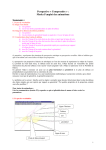
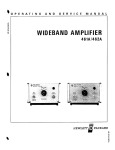
C-Media Electronics Inc.
CMI8768/8768+
Advanced Driver Software ArchitectureTM
Enhanced by Dolby Digital Live and C-Media Xear
3DTM Sound Technology
®
User Manual
Revision: 1.0
Rev. Date: May. 25, 2004
CMI8768/8768+ Xear 3D Audio Driver
User Manual Rev. 1.0
Notice
The content furnished in this document is C-Media audio product knowledge for
customers’ reference. However, C-Media Inc. assumes no responsibility for the
consequences of use of such information. The information included is subject to
change without notice. This publication supersedes and replaces all information
supplied previously. No part of this manual can be reproduced or transmitted in any
form or by any means for any purpose without the permission of C-Media Electronics
Inc.
Trademarks
C-Media, C-Media logo and Xear 3D are trademarks of C-Media Electronics Inc.
“Dolby”and “Dolby Digital” are trademarks of Dolby Laboratories. EAX and A3D are
trademarks of Creative Technology Ltd. Microsoft, DirectSound3D, Windows are
trademarks of Microsoft Corporation. Other company and product names may be
trademarks of the respective companies with which they are associated.
License
Dolby Digital RTCE driver is manufactured under license from Dolby Laboratories.
Copyright
Copyright © 2003-2004 C-MEDIA Electronics Inc.
C-MEDIA Electronics Inc.
6F, 100, Sec. 4, Civil Boulevard, Taipei, Taiwan 106 R.O.C.
URL: HTTP://WWW.CMEDIA.COM.TW/
Copyright © 2003-2004, C-Media Inc. All Right Reserved.
http://www.cmedia.com.tw/ , http://www.Xear3D.com/
2
CMI8768/8768+ Xear 3D Audio Driver
User Manual Rev. 1.0
Revision History
Revision
Date
Applicable
Description
Driver Version
1.0
2004/5/25
V.040 or revision Preliminary
Chip Version
Product Name
Description
®
CMI8768+
Supports Dolby Digital Live real-time AC-3 encoder
CMI8768
Doesn’t support Dolby Digital Live real-time AC-3 encoder
®
Copyright © 2003-2004, C-Media Inc. All Right Reserved.
http://www.cmedia.com.tw/ , http://www.Xear3D.com/
3
CMI8768/8768+ Xear 3D Audio Driver
User Manual Rev. 1.0
Table of Content
1. Introduction ............................................................... 5
2. Feature Overview ....................................................... 6
3. Installing H/W, S/W, and Speakers ........................... 7
3.1 Audio Hardware ........................................................................................................... 7
3.2 Audio Software............................................................................................................. 7
3.3 Connection and Speaker Setup..................................................................................... 8
4. Using Audio Driver ....................................................11
4.1 Find Out “3D Audio Configuration”.......................................................................... 11
4.2 Main Setting ............................................................................................................... 12
4.3 Mixer/Volume............................................................................................................. 15
4.4 Sound Effects ............................................................................................................. 18
4.5 Magic VoiceTM and Karaoke ...................................................................................... 19
4.6 Look for Information.................................................................................................. 21
5. Using Play3D Demo ...................................................22
6. Number of Output Channel........................................23
7. FAQ & Trouble Shooting ............................................25
Copyright © 2003-2004, C-Media Inc. All Right Reserved.
http://www.cmedia.com.tw/ , http://www.Xear3D.com/
4
CMI8768/8768+ Xear 3D Audio Driver
User Manual Rev. 1.0
1. Introduction
Thanks for choosing C-Media audio solution! The user manual is a guide
for users to understand how to use the new generation Advanced Driver
Software Architecture (ADSATM) for C-Media CMI8768/8768+ chips
®
powered by Dolby Digital Live encoder (AC3) and Xear 3DTM sound
technology. C-Media provides a value-added PC audio total solution.
All kinds of applications can get maximum support. With this manual,
users can quickly take advantage of these great features to enjoy
amazing sound effects even better than consumer acoustics.
- Support EAX2.0TM or A3D1.0TM
- Support DS3DTM H/W &S/W
- Magic VoiceTM
®
- Sensaura CPL3D engine
Games
-
7.1 Virtual SPEAKER SHIFTER
5.1 Xearphone
2-Speaker Virtual Theater
Earphone Plus Personal Theater
-
Environment Emulation
Environment Sizes
10-Band Equalizer
DVD Movies
Music
(MP3/CD)
-
Magic VoiceTM
Microphone Echo Effect
Key-Shifting
Vocal Cancellation
Messenger/
Karaoke/
VOIP
Figure 1. ADSATM Features for All Applications
Copyright © 2003-2004, C-Media Inc. All Right Reserved.
http://www.cmedia.com.tw/ , http://www.Xear3D.com/
5
CMI8768/8768+ Xear 3D Audio Driver
User Manual Rev. 1.0
2. Feature Overview
The following shows the function overview of the driver. Dolby Digital Live encoder
is only supported by CMI8768+ version.
8768+ Feature!
Dolby®
Audio
Dolby® Digital Live
Encoder
7.1 Virtual
SPEAKER
SHIFTER
ADSATM
Driver
(Xear 3DTM)
Sensaura®
HRTF 3D
Positional
Audio
EAX2.0&1.0&A3D
1.0
Microsoft
DirectSound 3D
H/W & S/W
Multi-drive 7.1
Sound
Environment
Emulation/Size
Effect
10-Band Equalizer
Magic VoiceTM
Magic
VoiceTM
/Karaoke
Microphone Echo
Key-Shifting
Vocal Cancellation
Figure 2. ADSATM Xear 3D Driver Function
Diagram
Copyright © 2003-2004, C-Media Inc. All Right Reserved.
http://www.cmedia.com.tw/ , http://www.Xear3D.com/
6
CMI8768/8768+ Xear 3D Audio Driver
User Manual Rev. 1.0
3. Installing H/W, S/W, and Speakers
3.1 Audio Hardware
The C-Media audio driver is designed to support the following
C-Media audio chips:
1. CMI8768+ (PCI 8ch audio chips with Dolby® Digital Live
encoder)
2. CMI8768 (PCI 8ch audio chips without Dolby® Digital Live
encoder)
PS. The “+” version chips mean Dolby Digital Live encoder is
included.
If you bought a sound card using C-Media PCI audio chip, you
should install your sound card to the PCI slot on your
motherboard when power-off first. After that, you can continue to
install the audio driver/software. If you bought a motherboard or a
system with a C-Media audio chip on board, you don’t have to do
any audio hardware setup.
3.2 Audio Software
Just put the support/driver CD into your CD-ROM/DVD-ROM to
install the C-Media audio driver/software via the installation
program. (Please also refer to the Guide from the product
manufacturer.) If your system use Windows® ME, you have to
install DirectX 9.0 or post version (from the website below) to
support 7.1 channel surround sound normally.
(http://www.microsoft.com/downloads/details.aspx?FamilyID=141d5f9e-07c1-462a-baef-5
eab5c851cf5&displaylang=en)
Copyright © 2003-2004, C-Media Inc. All Right Reserved.
http://www.cmedia.com.tw/ , http://www.Xear3D.com/
7
CMI8768/8768+ Xear 3D Audio Driver
User Manual Rev. 1.0
3.3 Connection and Speaker Setup
The following figure shows an example for the port design of a
sound card bracket and also illustrate how to connecting your audio
devices to the sound card. The real design should be in accordance
with the product manufacturer.
Sound Card Bracket
Front Speakers
LINE IN
MIC IN
Side Surround
Speakers
Front OUT/Headphone
Side Surround OUT
Back Surround
Speakers
Back Surround OUT
Center/Subwoofer
Mini Disc
Center/Subwoofer
Speakers
AV Player
S/PDIF OUT
S/PDIF IN
Figure 3. Device Connection Samples
Copyright © 2003-2004, C-Media Inc. All Right Reserved.
http://www.cmedia.com.tw/ , http://www.Xear3D.com/
8
CMI8768/8768+ Xear 3D Audio Driver
User Manual Rev. 1.0
After connecting your speakers, you should place your 7.1 or 5.1
speakers standing on the pictures below to get best surround sounds.
Dolby Digtial Surround EX and DTS ES 6.1/7.1 soundtracks are
recorded for additional back surround speakers behind the listeners.
As a result, alien creatures in the movie can circle all around you,
fighter planes can fly directly over you, and rain can pour down all
around you more realistically than ever before.
7.1 Speakers
5.1 Speakers
Dolby® website provides a picture about the positions for 5.1, 6.1, and 7.1 speakers.
Copyright © 2003-2004, C-Media Inc. All Right Reserved.
http://www.cmedia.com.tw/ , http://www.Xear3D.com/
9
CMI8768/8768+ Xear 3D Audio Driver
User Manual Rev. 1.0
Speaker Setup for Dolby® Digital Live Encoder
If the system manufacturer provides the value-added Dolby Digital Live
Real-Time Content Encoder (only available on CMI8768+), you can generate the
Dolby Digital audio stream for any digital PC sounds (3D Games, WMA, DVD,
MP3, CD, Wave, streaming audio…) on your PC and make use of your hi-fi
home theater to decode and play the perfect sound. Just connect your PC to the
external decoder/AV receiver with a S/PDIF optical fiber or coaxial cable like the
figure below.
Realize Dolby PC / Media Center at Home
Copyright © 2003-2004, C-Media Inc. All Right Reserved.
http://www.cmedia.com.tw/ , http://www.Xear3D.com/
10
CMI8768/8768+ Xear 3D Audio Driver
User Manual Rev. 1.0
4. Using Audio Driver
4.1 Find Out “3D Audio Configuration”
“3D Audio Configuration” is C-Media’s 3D audio control panel with that you
can control all audio configuration. After finishing the installation of the driver
and rebooting the system, you can find the panel from two places:
1.Left-Click the icon in the system tray in the right-bottom of your screen. You
can also click right button of the mouse on it to get an audio-related menu as
follows.
2. Double-click “CMI Audio Config” icon in Windows “Control Panel”.
(Start=>Setting=>Control Panel)
Copyright © 2003-2004, C-Media Inc. All Right Reserved.
http://www.cmedia.com.tw/ , http://www.Xear3D.com/
11
CMI8768/8768+ Xear 3D Audio Driver
User Manual Rev. 1.0
4.2 Main Setting
Using Analog Output or Digital S/PDIF-Out
Step 1: Turn on Analog Output and select Speaker Type, or turn on Digital S/PDIF
Output
Step 2: Check the connection is consistent with the audio jack configuration
information
Step 3: Do Speaker Test/3D Sound/Multi-channel Music Demo if you want
Step 4: You can click “Digital Volume” button to fine-tune the volume for each
speaker.
Step 1
On/Off
Step 4
On/Off
Digital
Volume
Step 2
Step 3
Copyright © 2003-2004, C-Media Inc. All Right Reserved.
http://www.cmedia.com.tw/ , http://www.Xear3D.com/
Speaker 3D
5.1
Stop
Test
Sound Music
12
CMI8768/8768+ Xear 3D Audio Driver
User Manual Rev. 1.0
Using Dolby® Digital Live Real-Time Encoder (DDL)
Step 1: Connect the S/PDIF-Out to the external Dolby Digital decoder using
Optical fiber or RCA coaxial cable like the interface indicates. (Especially if
you have hi-fi home theater high-quality 5.1 speakers at home. This
function lets you to make use of both your PC and consumer electronics.
Your Dolby PC can be a multi-media platform in the living room, which is
often called Media Center.)
Step 2: Select Dolby Digital 5.1 Encoding if you have the option and then you will
get high-quality Dolby Digital audio stream output.
PS. When Dolby Digital Live is enabled, analog output will be turned off in case
of interference.
Step 2
Step 1
Copyright © 2003-2004, C-Media Inc. All Right Reserved.
http://www.cmedia.com.tw/ , http://www.Xear3D.com/
13
CMI8768/8768+ Xear 3D Audio Driver
User Manual Rev. 1.0
Using Xear 3DTM -7.1 Virtual Speaker Shifter
Step 1: Select Xear 3D in DSP Mode
Step 2: Click the “7.1 Virtual Speaker Shifter” button.
Step 3: Each virtual speaker represents the specified channel sound. You can move
each virtual speaker to anywhere you want to optimize the sound field when
you are running any application. You can even move the place of the virtual
listener.
Step 4: You can reset the placement, manual shifting, group-rotate, auto-rotate and
increase/decrease the volume of the virtual speakers
Step 1
Step 2
Step 4
Step 3
Volume
Display
Copyright © 2003-2004, C-Media Inc. All Right Reserved.
http://www.cmedia.com.tw/ , http://www.Xear3D.com/
14
CMI8768/8768+ Xear 3D Audio Driver
User Manual Rev. 1.0
4.3 Mixer/Volume
Playback Volume
Step 1: Check that the playback devices/sources you want are turned on (in blue
color). You can turn others off (it means to mute them). There might be some
hided sources that cannot be showed in the block. Please click the arrow to
move to the rest items.
Step 2: In general cases, you can adjust “Master Volume Control” knob (just using
the mouse) to change the volume level for all sources.
Step 3: If you want to change the volume for a specific device/source, please
fine-tune the correspondent scroll bar.
Recording Gain
Step 4: Select the recording source you want (one for once). The left picture will
show the related sign for the source you have selected.
Step 5: If you want to change the volume for a specific device/source, please
fine-tune the correspondent scroll bar. In general cases, you don’t have to
make slider higher than half of the scroll bar in case the signal will be scaled
too much and will be distorted.
Step 3
Step 1
Meter
Step 2
Step 5
Advanced
Setting
Copyright © 2003-2004, C-Media Inc. All Right Reserved.
http://www.cmedia.com.tw/ , http://www.Xear3D.com/
Step 4
15
CMI8768/8768+ Xear 3D Audio Driver
User Manual Rev. 1.0
Advanced Setting
1.Microphone Setting
Step 1: You can click the checkbox to mute the microphone. Normally open.
Step 2: If you feel the mic sound is too quiet, there are +20dB boost option. Click
the checkbox of “Boost” to enable it. It’s nature that you will also get the
background noise louder certainly.
Step 1
Step 2
2.S/PDIF-IN Setting
Step 1: Before you connect S/PDIF interface, you should select the connection type:
coaxial cable (RCA connector) or optical cable (TOS-LINK connector). It
depends on whether your product provide both connectors. Even your
system have both, you cannot use both concurrently.
Step 2: The format of some SPDIF signal sources may be inverse, and you will
hear kind of noise. You have an option to reverse the format for normal
reception.
Step 3: “Vaility Check” will assure to neglect the non-PCM audio to avoid the
noise. It requires that the input data follow the specification of IEC60958.
Copyright © 2003-2004, C-Media Inc. All Right Reserved.
http://www.cmedia.com.tw/ , http://www.Xear3D.com/
16
CMI8768/8768+ Xear 3D Audio Driver
User Manual Rev. 1.0
Step 4: When you are recording S/PDIF-In audio, you can choose to monitor it
using analog speakers. However, it may stop usual playback function.
Therefore, please remember to keep it unchecked when you don’t need to
monitor.
Step 1
Step 2
Step 3
Step 4
Copyright © 2003-2004, C-Media Inc. All Right Reserved.
http://www.cmedia.com.tw/ , http://www.Xear3D.com/
17
CMI8768/8768+ Xear 3D Audio Driver
User Manual Rev. 1.0
4.4 Sound Effects
Environment Emulation
Step 1: Select an “Environment” button for emulation that is implemented by
producing the sound reflection and reverberation
Step 2: You can change the “Environment Size” to Large or Small (pre-setting is
Medium). You will hear the different feeling about the environment space.
10-Band Equalizer
Step 3: Select a pre-set mode for equalizer that is actually frequency response
modeling. There are 12 preset modes such as Bass, Treble, Live, Rock, Jazz,
etc..
Step 4: You can change the gain setting for each band and then give it a name in the
following blank. Click “+” to add your personal setting into the “User
Defined” list. Click “-“ is to delete current setting record.
Step 1
Step 3
Step 2
Step 4
Copyright © 2003-2004, C-Media Inc. All Right Reserved.
http://www.cmedia.com.tw/ , http://www.Xear3D.com/
18
CMI8768/8768+ Xear 3D Audio Driver
User Manual Rev. 1.0
4.5 Magic VoiceTM and Karaoke
This function is optional for system manufacturers. You may or may not see the page.
Step 1: Click “On” to turn on the Karaoke function (that button will be blue.)
Step 2: When singing a song, you may need the Voice Echo to make the singing
more euphonious. You can select “Microphone Echo” to get the effect and
adjust the volume of the echo sound to optimize it. When you are talking to
other people over the network like messenger, VOIP, online game
applications, you can also choose Magic VoiceTM effect in the pull-down
menu to disguise your identification or just for fun. Just select one kind of
the voice type.
(These two features require real-time Microphone recording. You should
suspend other recording application.)
Step 3: You can enable Key-Shifting for the Karaoke VCD or the music to make it
suitable for your voice pitch. The range is -4b to +4#.
Step 4: If the music source includes original singer’s voice, you may try “Vocal
Cancellation” function to cancel it (0~100). But the effect doesn’t always work
well and it depends on the recording method of the source. It’s usually not
needed for Karaoke VCD or CD, which do not have voice inside generally.
Step 1
Reset all setting to default value
Step 2
Step 3
Step 4
Copyright © 2003-2004, C-Media Inc. All Right Reserved.
http://www.cmedia.com.tw/ , http://www.Xear3D.com/
19
CMI8768/8768+ Xear 3D Audio Driver
User Manual Rev. 1.0
Microphone Echo
Copyright © 2003-2004, C-Media Inc. All Right Reserved.
http://www.cmedia.com.tw/ , http://www.Xear3D.com/
20
CMI8768/8768+ Xear 3D Audio Driver
User Manual Rev. 1.0
4.6 Look for Information
There is a C-Media audio-related Information tab in 3D Audio Configuration. You
can get a whole picture about the audio chip, driver version, 3D Audio Engine,
Microsoft DirectX Version, and Configuration Version itself.
Besides, you can decide if the audio configuration icon should be showed in the
system tray.
Copyright © 2003-2004, C-Media Inc. All Right Reserved.
http://www.cmedia.com.tw/ , http://www.Xear3D.com/
21
CMI8768/8768+ Xear 3D Audio Driver
User Manual Rev. 1.0
5. Using Play3D Demo
C-Media also provides an interesting Play3D demo program as below. After
installing the setup program, you will find the demo program from the path:
“Start->Programs->C-Media 3D Audio->Play3D Demo”.
Step 1: Select a “Sound Source” you want to play. There are five saved sound
sources and you can to add your own .wav audio into the list (Click “+” to
add, and “-“ to delete.)
Step 2: Select a “Moving Path” for the 3D sound
Step 3: Select a Environment emulation if you want.
Step 4: Click “Play” or “Stop” button.
Step 1
Step 2
Step 3
Step 4
Copyright © 2003-2004, C-Media Inc. All Right Reserved.
http://www.cmedia.com.tw/ , http://www.Xear3D.com/
22
CMI8768/8768+ Xear 3D Audio Driver
User Manual Rev. 1.0
6. Number of Output Channel
The following table summarizes the specification about the actual output channel
(the speakers that will have sounds) for different audio applications/sources.
Sound Source
5.1-channel
PCM Audio
(DVD)
2-channel
Stereo PCM
Wave Audio
(MP3, CD,
VCD, …)
2-channel
MIDI
3D Sound
AP
WinDVD /
PowerDVD
(Select
5.1/6.1/7.1
speakers in the
AP audio
setting)
Digital
S/PDIF-Out
Down-mix
6ch to 2ch
2CH
Down-mix
6ch to 2ch
(Xear 3D
Virtual
5.1ch with
SHIFTER
ON)
AC-3/DTS
WinDVD /
Format Data
PowerDVD
(Select
N.A.
S/PDIF-Out in
the AP audio
setting)
MS Media
2ch
L, R
Player /
C-Media Media
Rack (Use
DirectSound
Interface)
Winamp old
version ( Use
MCI Interface
by default
before V.3.0)
All Players
2ch
L, R
2ch
L, R
Games
2ch
L, R
2ch
L, R
Analog Input May not need
players
Analog Speaker Type
4CH
6CH
Down-mix
6ch to 4ch
5.1 ch
(Xear 3D
(L, F, Ls, Rs,
Virtual
Center,
5.1ch with
Subwoofer)
SHIFTER
ON)
N.A.
N.A.
8CH
7.1ch but
DirectX 9.0
above is
required
(L, F, Ls, Rs,
Lb, Rb,
Center,
Subwoofer)
N.A.
L, R, Ls,
Rs
L, F, Ls, Rs,
L, F, Ls, Rs,
Center,
Lb, Rb,
Subwoofer (if Center,
“Bass
Subwoofer (if
Enhancement” “Bass
Enhancement”
is enabled.)
is enabled.)
L, R
L, R,
L, R,
Subwoofer (if Subwoofer (if
“Bass
“Bass
Enhancement” Enhancement”
is enabled.) 1 is enabled.)
L, R
L, R,
L, R,
Subwoofer (if Subwoofer (if
“Bass
“Bass
Enhancement” Enhancement”
is enabled.)
is enabled.) 1
L, F, Ls, Rs L, F, Ls, Rs,
L, F, Ls, Rs,
Center
Lb, Rb,
Center2
L, R 3
L, R
L, R
Note: 1. For MCI application program like Winamp old version, it just can deliver
2-channel stereo sound when playing general stereo music even you set 8CH.
Copyright © 2003-2004, C-Media Inc. All Right Reserved.
http://www.cmedia.com.tw/ , http://www.Xear3D.com/
23
CMI8768/8768+ Xear 3D Audio Driver
User Manual Rev. 1.0
It’s only proper for the driver to enhance Bass sound which is directionless.
MIDI is in the similar situation. Therefore, you will only get 2-speaker or
2.1-speaker sound (if you enable “Bass Enhancement” option).
2. 3D Sound is positioned by HRTF 3D Engine by maximum 7 speakers (L, F,
Ls, Rs, Lb, Rb, Center) when you set 6CH which is called multi-drive 7.1
function by Sensaura.
3. In 4, 6, 8 CH mode, the analog pass-through can only output original stereo
audio (microphone or stereo input) mainly for monitoring purpose
especially when recording some input source.
Copyright © 2003-2004, C-Media Inc. All Right Reserved.
http://www.cmedia.com.tw/ , http://www.Xear3D.com/
24
CMI8768/8768+ Xear 3D Audio Driver
User Manual Rev. 1.0
7. FAQ & Trouble Shooting
Q1:Why no 7.1 channel sounds on Windows ME?
Windows ME requires to update DirectX 9.0 or above to support 7.1 channel
surround sound. Please goes to download from
http://www.microsoft.com/downloads/details.aspx?FamilyID=141d5f9e-07c1-462a-baef-5eab5c851cf
5&displaylang=en
Q2: Why don’t I hear sound while playing CD?
Most cases are because the OS is set in analog CD mode and you didn’t
connect CD cable from the back panel of the CD-ROM to CD-In header on your
sound card.
Please open “Device Manager”, select “DVD/CD ROM drives” and open it. Then
switch to “properties” page and enable digital CD audio. Windows XP default
setting is digital CD enabled.
You need to also check Media Player setting is in digital playback mode. Go to
[Tools=>Options=>Devices=>DVD-ROM or CD-ROM]. You will see the following
window
Copyright © 2003-2004, C-Media Inc. All Right Reserved.
http://www.cmedia.com.tw/ , http://www.Xear3D.com/
25
CMI8768/8768+ Xear 3D Audio Driver
User Manual Rev. 1.0
Q3:Xear 3DTM Sound technology provide amazing function in 7.1
Virtual Speaker Shifter. How to use this function in different
applications?
7.1 Virtual Speaker Shifter can be utilized for 2CH, 4CH, 5.1CH, or 7.1CH audio
source over any kind of output device (even your earphone, stereo speakers).
Each virtual speaker represents a source channel. You can move each virtual
speaker anywhere you want to get the best sound field.
If you want to enjoy real 5.1/7.1CH DVD surround sound, you should buy a
software DVD player with Dolby Digital EX or DTS ES 7.1CH decoding function
such as WinDVD or Power DVD. With Xear 3D Virtual Speaker Shifter DSP
mode, you should always set the maximum output channel from the players to
get best sound effects. Virtual Speaker SHIFTER engine can deliver the
multi-channel sound sources over your real speakers (it should be corresponding
to the speaker mode in “Main Setting” of C-Media 3D Audio configuration panel).
1. Open Software DVD Player
2. Click display windows
3. Click right key of mouse
4. Select “Configuration” or “Setup”
5. Choice “Audio” function setting page
6. Check “Audio Output”→If you can see or select speaker from 2 to 8 ch
Copyright © 2003-2004, C-Media Inc. All Right Reserved.
http://www.cmedia.com.tw/ , http://www.Xear3D.com/
26
CMI8768/8768+ Xear 3D Audio Driver
User Manual Rev. 1.0
that mean this version was supported 7.1CH decoding capability.
Please choose 7.1 speakers mode no matter what kind of speakers you
really use. Otherwise, you should select the max. output capability.
or
Copyright © 2003-2004, C-Media Inc. All Right Reserved.
http://www.cmedia.com.tw/ , http://www.Xear3D.com/
27
CMI8768/8768+ Xear 3D Audio Driver
User Manual Rev. 1.0
Q4:What is 7.1CH listening environment and what difference with
5.1CH?
1. The 7.1 channel mode is newest multi-channel audio format and technology
in the market. It includes center, subwoofer, front left, front right, left surround,
right surround, left back surround, and right back surround according to Dolby
Copyright © 2003-2004, C-Media Inc. All Right Reserved.
http://www.cmedia.com.tw/ , http://www.Xear3D.com/
28
CMI8768/8768+ Xear 3D Audio Driver
User Manual Rev. 1.0
Digital and DTS ES standards.
2. The 7.1CH content was naming Dolby Digital EX by Dolby Lab. and DTS
was naming DTS-ES (Extended Surround).
3. The difference of 5.1CH and 7.1CH is additional 2CH. This extra 2 speakers
were placed on rear side to enrich back sound sources for entire enveloping
surround feeling.
5.1CH Environment
Copyright © 2003-2004, C-Media Inc. All Right Reserved.
http://www.cmedia.com.tw/ , http://www.Xear3D.com/
7.1CH Environment
29