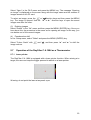
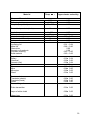
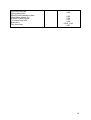
1
Infrared Camera
C.A 1884
ENGLISH
User’s Manual
WARNING
A Infrared Camera is a top-quality optical measurement instrument high
precious optics and measurement equipment, so you are advised to comply
with the following recommendations:
1. Do not point the camera at the sun, a welding torch or other hightemperature source
2. Do not use the incorrect temperature measurement range to measure a
high-temperature target.
3. When you switch on the camera, please wait for 10-15 minutes before
saving your first thermograms to ensure that the camera's temperature
has stabilized , thus guaranteeing accurate measurements.
4.
Device which may be sensitive to electrostatic discharges, but
only in specific conditions.
If parts of the camera are burned or damaged or show evidence of problems
caused by non-compliance with the instructions above, the manufacturer shall
not be liable under any circumstances and any expenses incurred shall be
payable entirely by the user.
1
Contents
FOREWORD .............................................................................................................. 4
1
PRESENTATION OF RayCAm C.A 1884 IR CAMERA...................................... 5
1.1
1.2
Overview ...................................................................................................... 5
Packaging and Components ........................................................................ 6
2
STRUCTURE OF THE RayCAm C.A 1884 ........................................................ 7
3
RayCAm C.A 1884 INTERFACE ........................................................................ 8
4
USE OF THE RayCAm C.A 1884 ....................................................................... 9
4.1
4.2
4.2.1
4.2.2
4.2.3
4.2.4
4.3
4.3.1
4.3.2
4.3.3
4.3.4
4.3.5
4.3.6
4.3.7
5
Observation and Adjustment of Infrared Image............................................................... 10
Analysis of temperature measurement ............................................................................ 10
Storing an infrared image ................................................................................................ 11
Recalling an infrared image ............................................................................................. 11
Menu Items and Functions ......................................................................... 11
"Analysis" submenu ......................................................................................................... 12
"File" submenu................................................................................................................. 13
"Auto. Adjustment" submenu ........................................................................................... 13
"Manual Adjustment" submenu........................................................................................ 13
"Obj. Par" submenu ......................................................................................................... 13
"Image Only" submenu .................................................................................................... 14
"Setup" submenu ............................................................................................................. 14
RayCAm C.A 1884: EXAMPLES OF TYPICAL OPERATIONS ....................... 19
5.1
5.2
5.3
5.4
5.4.1
5.4.2
5.4.3
5.5
5.5.1
5.5.2
5.5.3
5.6
5.7
5.7.1
5.7.2
5.8
6
Description of Keys ...................................................................................... 9
Brief introduction ........................................................................................ 10
Inserting the Battery ................................................................................... 19
Start-up ...................................................................................................... 19
Description of Display Bars ........................................................................ 19
Adjustment of the Camera.......................................................................... 20
Adjustment of focus ......................................................................................................... 20
Adjustment of image (in "Null" and "Menu" modes) ........................................................ 20
Freeze and Live image (in all modes).............................................................................. 21
Implementation of the Instrument's Functions ............................................ 21
Access to the menu ......................................................................................................... 21
Temperature measurement ............................................................................................. 21
Isothermal analysis .......................................................................................................... 22
Storage of Images and Inversion of Pseudocolours ................................... 22
Operation of the RayCAm C.A 1884 as a Thermometer ............................ 23
Laser pointer .................................................................................................................... 23
Setting the laser pointer as the measuring instruction..................................................... 24
RayCAm C.A 1884 power-saving mode..................................................... 25
RayCAm C.A 1884 BATTERY SYSTEM .......................................................... 25
6.1
6.2
6.3
6.4
6.5
Battery........................................................................................................ 25
Charger and Charging................................................................................ 25
Additional Information................................................................................. 26
Precautions for Use.................................................................................... 26
Use of an External Power Supply............................................................... 26
2
7
INFRARED CAMERA MAINTENANCE ............................................................ 27
7.1
7.1.1
7.1.2
7.2
7.2.1
7.2.2
Routine maintenance ................................................................................. 27
Lens and screen .............................................................................................................. 27
Camera body ................................................................................................................... 27
Storage and Transportation........................................................................ 27
Storage ............................................................................................................................ 27
Transportation.................................................................................................................. 27
8
TECHNICAL SPECIFICATIONS OF THE RayCAm C.A 1884 ......................... 28
9
RayCAm C.A 1884 SHORTCUT KEYS ............................................................ 30
EMISSIVITY ............................................................................................................. 31
10 TO ORDER........................................................................................................ 35
3
FOREWORD
Infrared thermal imaging inspection technology has been available for many years in
industrialized countries, where it has become a crucial means of guaranteeing safe
industrial production conditions. It is widely used in a whole range of industrial
sectors including metallurgy, steel-making, electrical power, the oil industry,
automation, natural gas, the transport industry, fire-fighting and border control. For all
these activities involving just-in-time operating procedures, high-voltage production
equipment, strong electric currents or high operating speeds, thermal imaging offers
an ideal no-contact, real-time inspection method.
With this detection method, it is not necessary to cut off the power, shut down
the machines or interrupt production. It can be used to diagnose latent malfunctions
in advance, thus preventing breakdowns and avoiding production downtime. Infrared
detection by thermal imaging is an innovative no-contact assessment technique
which is safe, reliable and quick.
Compared with "contact" detection instruments, which are still widely used, this
new technology clearly represents a revolution. Infrared thermal imaging inspection
technology is used on a large scale in the following fields:
Monitoring of power equipment and high-voltage transformers
Fire-fighting and detection of hidden smouldering fire sources
On the site of a fire, emergency assistance for victims and tactical control
Location of leaks on thermal equipment and heat exchangers, analysis of heat
loss
Location of thermal faults on rail transport
Rationalization of circuits by thermal control in the micro-electronics industry
After-dark monitoring for security departments
This is why infrared detection technology using thermal imaging is unanimously
considered the "cutting edge" in industrial monitoring.
4
1 PRESENTATION OF RayCAm C.A 1884 IR CAMERA
1.1
Overview
The RayCAm C.A 1884 is small, easy to use and equipped with powerful functions.
The camera combines particularly advanced detection technology, very sophisticated
IR image processing and a user-friendly computer interface. It is one of the advanced
portable IR cameras for industrial inspection. Its advantages include:
No need for cooling, optimum reliability, significantly longer service life than cooled
thermal imaging systems
Dust-proof, moisture-proof and protected against electromagnetic interference for
use in extreme conditions
Small, lightweight and easy to use one-handed
Longer battery life, short charging time and the smart charger clearly indicates the
charge status
Advanced electronic circuit to guarantee optimum operation
Attractive, user-friendly Windows-type menu windows
High-resolution colour images captured in real time
Clear images
High thermal sensitivity
Powerful temperature measurement functions
Powerful thermal analysis functions, with spot, line and area temperature analyses
performed directly on the equipment
PC Card for image storage: large capacity to keep your images safe
Image processing software called RayCAm Report has been specially developed
for use with the C.A 1884. The operator can not only view the infrared images but
also perform spot, line and area analyses. This ensures greater accuracy when
creating the measurement report (including thermal images, photos in the visible
spectrum, max., min. and average of the temperatures mapped, line, spot and area
analysis, infrared parameters, etc.). This means the operator can aggregate or give
details of the analytical results, making the report more specific and dynamic.
5
1.2
Packaging and Components
When you receive your RayCAm C.A 1884, please take out all the components from
the cardboard box and check against the delivery form. The RayCAm C.A 1884 is
delivered in a case containing:
RayCAm CA 1884 ×1
Rechargeable lithium battery ×1
Battery charger ×1
Video signal output cable ×1
Video connector ×1
USB cable ×1
Lens cap ×1
User’s manual ×1 (CD)
RayCAm report software x1 (CD)
Optional accessories:
Spare battery
Mains power supply
Tripod adapter
Sunshield x1
6
2 STRUCTURE OF THE RayCAm C.A 1884
1
5
2
3
4
1.
2.
3.
4.
5.
LCD SCREEN
Power switch
Key pad
Trigger
Manual focus lens
7
6
6. Pushkey of battery compartment
7. Cover of battery compartment
7
3 RayCAm C.A 1884 INTERFACE
1
2
4
3
1. Power supply interface. External 8V DC input
2. USB interface. Standard USB connection for PC
3. Standard RCA video interface
4. Standard RS232 interface (for firmware upgrades only)
8
4
4.1
USE OF THE RayCAm C.A 1884
Description of Keys
2
1
3
1. Camera ON/OFF switch
Press this button for a few seconds to turn the camera on or off.
2. Power LED
When the camera is switched on, this LED lights up.
3. Control panel
This panel contains:
“A”: Auto Adjust key
“C“: Cancel / correction key
“S”: Freeze/live key / Image back-up key
Menu (enter) key and 4 direction keys
“A”: Auto Adjust key
This key automatically adjusts the brightness (Span) and the contrast (Level) or the
scale, based on the temperature range of the target. This can be repeated several
times to achieve the optimum observation conditions.
“C”: Cancel key
In MENU mode, press this key to return to the previous submenu; continue pressing “C” until the
screen returns to Non-Menu mode. This key will not save the prior operations on the submenus.
In analysis mode (spot or isotherm tool), if you press the “C” key, it will cancel the
current tool.
9
“S”: Freeze/live key, save
Use this key to freeze an image or to return to the live image. If you keep pressing
the key for more than 3 seconds, the current IR image is saved.
“
”: Menu (enter) key
Press this key to display the system menu, to open a submenu or to confirm a
selection.
In menu mode, you can use the " " or " " keys to move around within a menu. You
can also use the " " or " " keys to select the required option. Press the Menu
(enter ) key to confirm the selection.
◄ ►
“ ”,“ ”,“ ” et “ ”:Direction keys
The keys can be used to move Left, Right, Up and Dow, respectively. They are used
to select options in a menu, to move the cursors in Analysis mode, to select and set
the menu parameters and to zoom in or out on the areas analysed (see Chapter 5).
In addition, in Non-Menu mode, as well as using the “A” key to automatically adjust
the brightness (Span) and contrast (Level), the user can also press the Direction keys
to adjust them manually.
for the brightness (Span),
for the contrast (Level).
◄ ►
4.2
Brief introduction
This paragraph offers a brief introduction to use of the RayCAm C.A 1884.
4.2.1 Observation and Adjustment of Infrared Image
1.
2.
3.
4.
5.
Press the On / Off key for a few seconds to turn on the camera
Wait until initialization and data loading have been completed.
Take off the lens cover and point the camera at the target;
Turn the lens manually to adjust the focus;
Press the “A” key to adjust the brightness (Span), contrast (Level) and scale
automatically;
Note: the noise from the camera when operating is normal.
4.2.2 Analysis of temperature measurement
1. After switching on the camera, press the “MENU (ENTER)” key to display
the menu;
2. Press the direction keys(" " or " ")to open the “Analysis” submenu;
◄
►
3. Press the direction key(" " or " ")to select “Spot 1”;
4. Press the MENU (ENTER) key again;
5. Move the camera or move the cursor by means of the direction keys so that
it points at the target;
6. The value displayed in the top right-hand corner is the temperature of the
target;
10
7. Multi-spot measurement is possible by selecting “Spot 2” and “Spot 3”
Note: you will only be able to move cursor 1 if “SP1” is displayed in the status bar
(see §5.3).
4.2.3 Storing an infrared image
Solution 1:
Keep the “S” key pressed down for 2-3 seconds to store the image and the
annotation
Solution 2:
1. After freezing the image, press the "MENU (ENTER)" key to display the
menu ;
2. Use the direction keys
and
to select the "FILE" submenu and then
press "ENTER";
3. Select “Save” and press the “MENU (ENTER)” key.
4.2.4 Recalling an infrared image
1. Press the "MENU (ENTER)" key to display the menu;
2. Use the direction keys
and
to select the "FILE" submenu and then
press "ENTER";
3. Select “OPEN” and confirm by pressing the “ENTER” key;
4. Use the
direction keys to scroll through the images.
◄ ►
To open an image directly without scrolling through all the thermograms recorded,
and
keys.
press the
4.3
Menu Items and Functions
The RayCAm C.A 1884 is equipped with a powerful processing and analysis system.
It contains seven submenus: “Analysis”, “File”, “Auto-adjustment”, “Manual
adjustment”, “Object parameters”, “Image only” and “Setup”.
Analysis
File
Auto Adjust
Manual Adj.
Obj. Par.
Image Only
Setup
►
►
►
11
4.3.1
"Analysis" submenu
Display the menu and select “Analysis”. Press the MENU (ENTER) key to open the
submenu.
►
Analysis
File
Auto Adj.
Manual Adj.
Obj. Par.
Image Only
Setup
Spot 1
Spot 2
Spot 3
Max Sp.
Isotherm
Remove all
1. Spot 1
Select this item and press the MENU (ENTER) key: the camera will switch to
temperature measurement mode. A cross-shaped cursor will appear in the centre of
the screen and SP1 will be displayed in the status bar. Move the camera or use the
direction keys to point the cursor at the target. The temperature of the target spot will
then be displayed in the top right-hand corner of the screen. The “Spot2” and “Spot
3” cursors function in the same way.
►
►
2. Max. Sp.: Max / Min temperature
Analysis
Capture spot)
(Choice between max or min temperature: Setup
This option can be used to identify and monitor the hottest or coldest spot in an area.
The user can change the size of the area by pressing simultaneously on the “left-up”,
“left-down”, “right-up” or “right-down” key combinations. This adjustment is only
possible if "CAPT" is displayed in the status bar.
3. Isotherm
Select this option and press the MENU (ENTER) key: the RayCAm will perform
isotherm analysis of the infrared image. Objects in the same temperature range will
then be displayed in the same colour.
The display mode for the colours and isotherms can be set by selecting:
Setup
Analysis
Isother width
Isoth colour)
(See § 5.5.3 for more information)
►
►
4. Remove all
"Remove all" can be used to delete all the analyses.
12
4.3.2
"File" submenu
Display the menu and select "File"; then press the MENU (ENTER) key to display the
submenu.
►
Analysis
File
Auto Adj.
Manual Adj.
Obj. Par.
Image Only
Setup
1.
2.
3.
Open
Save
Delete
Open:to open an image file stored on the memory card.
Save: to save an IR image on the memory card.
Delete: to delete an image file stored on the memory card
4.3.3 "Auto. Adjustment" submenu
Select this item and press the MENU (ENTER) key to adjust the brightness and
contrast automatically. The “A” key has the same function.
4.3.4 "Manual Adjustment" submenu
Select this item and press the MENU (ENTER) key to display the bar shown below.
Use the
and
keys to change the parameters manually. Use " " or " " to move
from one parameter to another.
◄
Level
30°C
Span
10°C
Temp. Range
-20 -250
►
Filter
Off
Level: this represents the median value of the temperature scale.
Span: this represents the amplitude of the scale, i.e. the difference between the max.
temperature and the min. temperature.
Example: in the settings above, the scale of the thermogram is from 25 °C to 35 °C.
Temperature range: "-20°C to +250°C" is the standard measurement ran ge of the
RayCAm C.A. 1884. If you have a high-temperature camera, press the up or down
arrow to change from one temperature range to another (you must not be in freeze
mode for this).
4.3.5 "Obj. Par" submenu
Select this item and press the MENU (ENTER) key to display the window shown
below. Use the direction keys to change the parameters manually.
13
Emiss
:
0.95
Distance
:
5m
Amb Temp
:
25.0°C
Humidity
:
50%
Emissivity: property of the material which is essential for correct determination of the
target's temperature. Setting between 0 and 1, in increments of 0.01.
Distance: distance between the thermography user and the target. This setting can
be adjusted in 1 m increments (only necessary when the user is a long way from the
target, i.e. 5 m or more.
Ambient temperature: temperature of the area around the target. This must be set
with precision, particularly if there is a heat source close to the target.
Humidity: this setting concerns the air around the target, adjustable in 1 %
increments (to be determined precisely if the user is a long way from the target, i.e.
5 m or more.
4.3.6 "Image Only" submenu
Select this item and press the MENU (ENTER) key to clear the various information
from the screen. The screen will then show only the IR image. To redisplay the
information, simply press any key.
4.3.7 "Setup" submenu
Select this item and press the MENU (ENTER) key that it will pop up the submenu.
►
►
Analysis
File
Auto Adj.
Man. Adj.
Obj. Par.
Image Only
Setup
1. Setup
Analysis
Local
Date & Hour
Other
System info
►
► Analysis
Select this item and press the MENU (ENTER) key to display the window shown
below. Use the direction keys to change the parameters:
or : to scroll through the options in the submenus
or : to move from one submenu to another
◄ ►
14
Capture spot :
Maximum
Alert
:
On
Temp alert
:
100°C
Correct temp :
0° C
Isotherm width :
0.7° C
Isotherm colour:
Green
Isotherm alert :
50° C
Laser Adjust :
On
(1)
Capture Spot
This is for setting the "Max SP" option in the "Analysis" submenu. If you select
Maximum, the camera will automatically track the hottest spot. If "Minimum" is
chosen, it will automatically track the coldest spot.
(2)
Alert
This option is for activating or deactivating the Alarm function. When this
function is activated, the heat readings for the Max spot are displayed in red and the
camera sounds a buzzer if the value is greater than the threshold programmed. If
"Capture Spot" has been configured with Min, the Min spot temperature readings will
be displayed in red and the camera sounds a buzzer if the value is less than the
threshold programmed.
(3)
Temp Alert
This option is used to set the alarm threshold.
(4)
Correct Temp
In certain specific conditions, this option can be used to correct the temperature
value measured by the camera in order to guarantee accurate measurements. In
normal conditions, this option is set to 0 °C.
Example: If the setting is 1 °C, all the temperatur es displayed will be increased by
1 °C.
(5)
Isotherm Width
This option is used to set the width of the isotherm range for the "Isotherm"
function in the ANALYSIS submenu. The width can be set using 0.1 °C increments
until the upper limit is reached.
(6)
Isotherm colour
This option is used to choose the colour of the isotherm range. Two colours are
possible: red or green.
15
(7)
Isotherm Alert
This can be set to a value from 1 to 255, where 1 is the most sensitive and 255
is the least sensitive.
(8)
Laser Adjust
This option is used to define the position of the laser pointer image to match
spot 1. When it is activated, the user can readjust the position so that it corresponds
to the value of spot 1. When this option is deactivated, the laser pointer position will
be recorded. See Chapter 5.7 for further details.
2. Setup
► Local
Select this item and press the MENU (ENTER) key to display the window shown
below. Use the direction keys to change the settings.
Language
:
French
Video output :
PAL
Temp unit
:
°C
Dist unit
:
Meter
Date format
:
DD/MM/YY
(1)
Language
English, French, Chinese, German, Italian, Spanish and Portuguese are
available.
(2)
Video output
Choice between PAL and NTSC video output.
(3)
Temperature unit
Choice between Celsius and Fahrenheit
(4)
Distance unit
Choice between "Metre" and "Foot" are available.
(5)
Date format
“DD” is the day, “MM” is the month and “YY” is the year
3. Setup
► Date & Hour
Select this item and press the MENU (ENTER) key to display the window shown
below. Use the direction keys to change the date/time settings.
Year
:
2008
Month
:
8
Day
:
5
Hour
:
7
Minute
:
15
16
4. Setup
► Other
Select this item and press the MENU (ENTER) key to display the window shown
below. Use the direction keys to change the settings.
Palette
:
Auto Adjust
:
Level & Span
Continuos Adj :
Level & Span
Iron
Shut down
:
Never
LCD display
:
Never
Shutter period :
Short
File name
:
Directory name :
Trigger Button :
Laser on
(1)
Palette
This option allows you to choose among a set of pseudocolour schemes. The
RayCAm offers 6 colour modes: “Iron”, “Iron inverted”, “Rainbow”, “Feather”, “Grey”
and “Grey inverted”.
(2)
Auto Adjust
This option can be used to define the "A" key adjustment mode. Three options
are available: “Level & Span”, “Level” and “Span”. If “Level & Span” is selected, when
you press the “A” key, the camera will automatically adjust the brightness and
contrast of the image to the default value for image optimization. If “Level” is
selected, when you press the “A” key, the camera will automatically adjust the
brightness of the image, whereas the contrast will have to be adjusted manually. If
“Span” is selected, however, when you press the “A” key, the camera will
automatically adjust the contrast of the image, while the brightness will have to be
adjusted manually.
(3)
Continuous adjust
This is used to define whether the camera should continuously auto-adjust the
moving image. There are three options provided: "Level & Span", “Level” and “Off”.
If “Level & Span” is selected, the camera will automatically adjust the brightness
and contrast of the image continuously as the image changes;
If “Level” is selected, the camera will automatically adjust the brightness of the
image continuously as the image changes.
If “Off ” is selected, the camera will not automatically adjust the brightness and
contrast of the image according to the image changes, so the image display must be
adjusted manually or by pressing the “A” key.
17
(4)
Shutdown
To schedule automatic shutdown of the camera. There are 4 selections:
“never”/“2min.”/“5min.”/“10min.”.
(5)
LCD Display
This is for programming the automatic screen shutdown (standby) time. 4
selections are available: “never”, “30 sec.”, “60 sec.”, “2 min.”.
The screen can be reactivated by pressing any key.
(6)
Shutter Period
For programming the periodicity of the auto-adjust function. 2 selections are
available: "normal" and "short". With the "normal" setting, the camera auto-adjusts
every 2 minutes. With the "short" setting, it performs an auto-adjustment once per
minute.
This shows the name of the current file. It is not necessary for the user to
change this file name. In NULL mode, press simultaneously on "C"+"A"+"S" to
reset the file name to CA00000
(7)
Directory Name
This shows the current Directory name. The user can change this name and the
camera will then create a new DIR name and use it when saving images.
(8)
Trigger Button
The user can choose between several settings:
i.
“Laser on":the laser function will be activated to detect the target (when the
trigger button is pressed)
ii.
“None”:the trigger button will be deactivated;
iii.
“Save”: the trigger button will offer the same functions as the “S” key;
iv.
“Auto Adjust”:the trigger button will offer the same functions as the “A” key;
5. System Information
Select this item and press the MENU (ENTER) key to display the information window.
This window contains general information: serial number, production date and
software version.
18
5 RayCAm C.A 1884: EXAMPLES OF TYPICAL
OPERATIONS
5.1
Inserting the Battery
When the RayCAm C.A 1884 IR camera is used for the first time, the battery may not
be sufficiently charged. The battery can be recharged with the special charger.
(1) Inserting the battery keep the pushkey pressed down and remove the battery
compartment cover. Place the battery in the compartment and push it until it comes
into contact with the bottom of the compartment. Then close the compartment cover.
(2) Removing the battery remove the cover and pull out the battery.
:
:
5.2
Start-up
Press the ON/OFF switch for several seconds to power up the IR camera.
After 30 seconds, the CHAUVIN ARNOUX logo is displayed in the top left-hand
corner of the screen, while the temperature colour bar is displayed on the right and a
status bar is displayed at the foot of the screen.
Remove the lens cap and point at the target: an infrared image will appear on the
screen.
Warning: do not point the IR camera at the sun or any other radiometric source for
too long to avoid damaging the detector.
5.3
Description of Display Bars
(1)
(2)
A
E
B
C
D
(1)
Colour scale bar
The pseudocolours and colour scale are displayed on the right. The central
band of colour shows the pseudocolours.
19
(2)
Status bar
The status bar is displayed at the bottom of the screen, as shown in the
illustration. From left to right:
A:
" ": dynamic mode
" ": freeze mode
B:
Operating mode. Various modes are possible:
- "NULL": no current function. Idle.
- "MENU": camera in Menu mode.
- "SP1": camera in "Spot 1" Analysis mode. It is possible to move the cursor
around on the IR image (ditto for SP2 and SP3).
- "ISO": isotherm analysis mode. It is possible to change or move the isotherm
range.
- "CAP.": automatic hottest/coldest spot detection mode. It is then possible to
change the area of the max/min temperature tracking spot.
To return to NULL mode and stop the current analysis, simply press the “C” key.
When you press this key, only the current analysis is cleared. To clear everything, go
into the ANALYSIS menu and select "Remove All".
To return to the previous analysis mode or change to a different mode, you must
select the required mode in the menu.
C:
Emissivity of the target
The value displayed corresponds to the value entered in the menu.
D:
Battery charge status
E:
Time
5.4
Adjustment of the Camera
5.4.1 Adjustment of focus
Point the camera at the target and focus the image manually.
5.4.2 Adjustment of image (in "Null" and "Menu" modes)
In “Null” or “Menu” mode, press the "A" key: the RayCAm C.A 1884 will automatically
optimize the image captured on the basis of the options selected in the Setup-Image
submenu.
In other modes, if you need to make an adjustment without changer the analysis
mode, press the "A" key: “Null” will then be displayed in the status bar. To adjust the
image, press the "A" key again or adjust manually. If you want to adjust the image
without keeping the current analysis mode, press the "C" key: the current analysis
mode will be cleared and “Null” will be displayed in the status bar. To adjust the
image, press the "A" key again or adjust manually.
20
5.4.3 Freeze and Live image (in all modes)
In the "live" mode, press the "S" key to freeze the image. Conversely, if you press the
"S" key when in Freeze mode, the image will return to "Live" mode. This can be done
in all the modes.
5.5
Implementation of the Instrument's Functions
5.5.1 Access to the menu
(1)
Press the MENU (ENTER) key: the Main Menu appears at the top of the
screen.
Analysis
File
Auto Adj.
Manual Adj.
Obj. Par.
Image only
Setup
►
►
►
(2)
Use the
and
direction keys to pull down the menu and move around
inside it. To access a submenu, press the "ENTER" key.
(3)
When you have modified an option in the menu,press the “ENTER” key to
confirm.
(4)
To exit from the MENU or to cancel a modification, press the "C" key to return
to the previous menu. Press "C" until you exit from the "MENU" mode.
5.5.2 Temperature measurement
The RayCAm can simultaneously measure the temperature of 4 spots, tracking and
displaying the highest/lowest temperature and alarm. The specific operation see
follows.
(1)
Set “Analysis” Menu,Select “Setup Analysis” of “Setup” menu, and set as the
following examples
Capture spot :
Maximum
Alert
:
On
Temp alert
:
100°C
Correct temp :
0° C
Isotherm width :
0.7° C
Isotherm color :
Green
Isotherm alert :
50° C
Laser Adjust :
On
21
(2)
Configuration of the "Obj. Par." submenu
Select this submenu and adapt the various values available to suit your
requirements
Emiss
:
Distance
Temp Amb :
Humidity
0.95
5: m
25 . 0 °C
50: %
(3)
Temperature measurement
Go into the “Analysis” menu, select one or more options among “Spot 1”, “Spot
2” and “Spot 3”. One or more cursors will then appear on the screen. At the same
time, the temperatures corresponding to the cursors are indicated in the top righthand corner of the screen. These spots can be moved around on the image by
means of the direction keys. Automatic detection of the hottest/coldest spot
corresponds to cursor 4 (SP4). The temperature value is also displayed in the top
right-hand corner of the screen. If the temperature exceeds the preprogrammed
temperature, the value is displayed in red and the camera sounds a buzzer: this is
the thermal alarm function.
5.5.3 Isothermal analysis
►
(1) Setup
Analysis
Choose the “Isotherm type”, “Isotherm width” and “Isotherm colour”.
(2) Analysis
Select “Isotherm” in the ANALYSIS menu and then press the MENU key. The
RayCAm C.A 1884 will display the temperature range selected, based on the settings
entered by the user. This makes the image clearer.
(3) Moving the isothermal area and changing its size
In Isotherm Analysis mode, use the “ ” and “ ” keys to modify the size of the
isotherm range and use the “ ” and “ ” keys to change the area concerned.
►
5.6
◄
Storage of Images and Inversion of Pseudocolours
(1) Storing images
After adjusting an image, select “Save” in the FILE menu, and press the MENU key.
The RayCAm C.A 1884 will then save the current image to the memory card (Note:
this can be done in both Freeze and Live mode).
Another method involves pressing the "S" key for more than 2 seconds.
Description of storage procedure: the camera creates a folder and inserts the IR
image into it.
(2) Opening images
Make sure that the PC card already contains images.
22
Select “Open” in the FILE menu and press the MENU key. The message “Opening
an image” is displayed on the screen along with the image name and the number of
images saved on the PC card.
◄
►
To select an image, press the “ ” or “ ”direction keys and then press the MENU
key. The image is opened. Use the “ ” or “ ” direction keys to open the saved
images one after the other.
(3) Deleting images
Select “Delete” in the “file” menu and then press the MENU (ENTER) key. Once you
have done this, the procedure is the same as for opening an image. In this way, you
can delete one of the current images.
(4) Pseudocolour shift
In the Setup menu, select "Other" and press the MENU (ENTER) key.
Select "Colour Scale" with “
image colours.
5.7
◄
►
” and “ ”, and then press “ ” and “ ” to shift the
Operation of the RayCAm C.A 1884 as a Thermometer
5.7.1 Laser pointer
The RayCAm C.A 1884 is equipped with a laser pointer function. When aiming at a
target, the user can keep the trigger pressed to switch on a laser pointer.
Warning: do not point the laser at anyone's eyes.
23
5.7.2 Setting the laser pointer as the measuring instruction
The aim is to move the image of the laser pointer so that it matches up with cursor 1.
►
1. Go into the Menu
Analysis
Choose “ON” and press enter.
► Laser adjustment
Capture spot :
Maximum
Alert
:
On
Temp alert
:
100°C
Correct temp :
0° C
Isotherm width :
0.7° C
Isotherm color :
Green
Isotherm alert :
50° C
Laser Adjust :
On
The information below will be displayed on the screen:
(This information corresponds to the current position of cursor 1).
►
2. Go to Analysis
Spot 1
Press “ENTER” to activate cursor 1 and move it on the screen (SP1 is displayed in
the status bar).
3. Move Spot 1 to where you wish to place the image of the laser pointer.
►
►
4. Go to Menu
Analysis
Laser Adjustment
Choose “OFF” and press ENTER.
You can then see that the image of the laser pointer has moved and is coordinated
with cursor 1.
The temperature of the point aimed at by the laser pointer now corresponds to
cursor 1.
24
5.8
RayCAm C.A 1884 power-saving mode
When the camera is not used for a certain time (defined by the user), the screen will
automatically switch to standby. It can be reactivated by pressing any key.
6 RayCAm C.A 1884 BATTERY SYSTEM
The RayCAm C.A 1884 battery system comprises a rechargeable lithium battery and
a charger.
6.1
Battery
The battery capacity of RayCAm C.A 1884 is 8.5 Wh. The system includes a circuit
protecting against overvoltages and overheating. Each battery cell can be recharged
at least 500 times. Each rechargeable battery has an operational charge life of 2
hours. When the battery is low, the camera will be switched off automatically to
optimize safety.
6.2
Charger and Charging
Smart charger
Rechargeable
lithium battery
Connect the power cord located on the back of the charger to the electrical power
source. The charger will automatically convert between 100-240 V. When the light
comes on, it means that the charger is ready for use.
Place the battery in the charger.
25
6.3
Additional Information
Heat will be produced while charging.
There is no risk of "overcharging" or damage for a full battery, but it is still
recommended not to charge for longer than 20 hours.
A new lithium cell will reach its full capacity after 5 charge operations.
Unlike nickel-cadmium batteries, lithium batteries do not need to be fully
discharged because there is no "memory effect".
A 10 mA current persists when the camera is off. You can in this case disconnect
the battery to prevent its discharging.
6.4
Precautions for Use
There is a risk of explosion if the battery is replaced incorrectly.
Only replace the batteries with batteries of the same type or a type recommended
by the manufacturer.
When the batteries are no longer fit for use, they must be disposed of as specified
by the manufacturer.
6.5
Use of an External Power Supply
When you use the RayCAm C.A 1884, the camera will shut down automatically
when the battery is empty. If the user wants to connect the camera to an external
power supply, the battery must be removed beforehand. If not, the camera will not
start up because of the protection system.
26
7 INFRARED CAMERA MAINTENANCE
7.1
Routine maintenance
7.1.1 Lens and screen
The lens cap must be put back in place each time after using the camera in order to
protect the lens against contact with dust or accidental damage. When the lens
needs to be cleaned, please wipe it with a special lens tissue. Do not wipe it with your
hand or the image quality will be affected.
7.1.2 Camera body
Take care not to drop the camera. After using the camera outside, carefully wipe the
camera to avoid dust deposits and infiltration by liquids. Store the camera in its
protective case.
7.2
Storage and Transportation
7.2.1 Storage
Do not store in a humid, dusty or insufficiently-ventilated place. Do not place it too
close to a high-temperature heat source to prevent damage or distortion of the
instrument.
7.2.2 Transportation
To prevent damage to the camera's components when moving or transporting it,
avoid any shocks or vibrations.
27
8 TECHNICAL SPECIFICATIONS OF THE RayCAm C.A
1884
1
2
3
4
5
6
7
8
9
10
11
12
Environmental requirements for operation
Operating temperature
-15 °C ~+50 °C
Relative humidity
10 – 95 %
Storage temperature
-40 °C ~+70 °C
Technical specifications of the RayCAm C.A 1884
Type of Detector
Uncooled focal plane
Spectral response
8~14um
Weight
NETD
Temperature range
Temperature accuracy
Battery operating time
Spatial resolution
13
Image display and temperature
measurement
14
Structure
15
16
17
18
19
Frame frequency/ output mode
Packaging
Shock resistance
Vibration resistance
Protection rating
20
21
22
23
24
25
≤0.7 kg (including battery)
0.1 °C
-20 ~+250 °C
±2 °C/±2 %
Min. 2 h 30
2.2 mrad
Full-screen pseudocolours and full-screen
temperature measurement
Integrated design and one-handed
operation
50 Hz, PAL/NTSC as required
High-strength plastic portable case
25 G as per IEC 68-2-29
2 G as per IEC 68-2-6
IP 54 as per IEC 529
Temperature measurement functions
Specially-designed Windows-style menus
Operation
using control keys
Automatic adjustment of measurement
ranges, brightness and contrast, electricallyAdjustment
controlled focus adjustment, automatic /
manual colour adjustment
Display of temperature at the position of the
cross-shaped cursor, simultaneous
Spot temperature measurement
temperature measurement of 4 separate
spots
Auto-tracking of max and min
Automatic tracking of the coldest/hottest
temperatures
spots in the image over an adjustable area
Isothermal analysis
Display of isothermal areas in the image
Automatic spot temperature
Set the alarm to a given temperature: if this
alarm
value is exceeded, a buzzer will sound
28
26
Automatic alarm on isothermal
area
27
Analysis function
28
Operation mode
29
Power-saving mode
30
Image storage
31
USB
Set the alarm to a given temperature in the
isothermal area and select the sensitivity: if
this value is exceeded, the display colour
will change and a buzzer will sound
When the user opens an image, it will be
displayed with the analytical details linked to
it when it was saved
When the user switches the camera on, it
will show the last current analytical details
(from when it was switched off)
Adjustment of automatic shutdown and
standby mode
Built-in 128 MB PC memory card capable of
storing 1,000 thermal images
The infrared images can be transferred
directly via a USB port
29
9
RayCAm C.A 1884 SHORTCUT KEYS
1. “A” can be used to cancel any analysis or to perform auto-adjustment when not
in Analysis mode.
2. “S”: freezes or unfreezes (Live) the IR image. By keeping it pressed down for
longer, it can be used to save an IR image.
◄
3. “
”/“
the image.
► ”: in non-menu mode, these keys can adjust the contrast (level) of
4. “
” / “ ”: in non-menu mode, these keys can be used to adjust the brightness
(span) of the image.
5. “C”+“S”: in non-menu mode, this key combination can be used to
activate/deactivate the buzzer.
6. “C”+“
”/“
“: in non-menu mode, this key combination can be used to adjust
the brightness of the LCD screen.
◄
►
7. “C”+“
”/“
”: In non-menu mode, this key combination can be used to adjust
the contrast of the LCD screen.
”/“
“: In non-menu mode, this key combination can be
8. “C”+ menu key + “
used to adjust the colour level on the LCD screen.
9. Press the "C" key before switching on the camera to reset the system parameters
with the default values. (Note 1)
10. In “NULL” mode, “C”+“A”+“S” will reset the file name and folder name to 0. (Note 2)
11. When the RayCAm C.A 1884 is connected to a PC, the user can copy, erase and
format memory card via the PC. (Note 3)
Note 1: This can be used to reset the camera if it does not work because of the
system parameters defined.
Note 2: Delete all the files in the camera before initializing the file name.
Note 3: FAT 16 is selected when formatting the file system.
30
EMISSIVITY
Emissivity of Various Materials
Material
Temperature
°C
( )
Approximate emissivity
100
100
25~600
25~600
0.09
0.09
0.55
0.10~0.20
0.30~0.40
28
0.03
200~600
0.61~0.59
40~1090
0.08~0.36
100
25
800~1100
1080~1280
0.05
0.078
0.66~0.54
0.16~0.13
230~630
0.02
200
20
40~250
770~1040
945~1100
0.21
0.44
0.28
0.52~0.56
0.52~0.61
20
22
100
198~600
198~600
0.69
0.66
0.74
0.64~0.78
0.79
125~520
500~1200
0.78~0.82
0.85~0.89
Iron plate
Cast iron, heavy ferric oxide
Tempered iron, ferric oxide
Molten surface
925~1120
25
40~250
22
0.87~0.95
0.80
0.95
0.94
Molten cast iron
1300~1400
0.29
Metal
Aluminium
Polished aluminium
Commercial aluminium foil
Electrolytic chrome-plated alumina
Mild alumina
Strong alumina
Brass
Polished brass
Oxidized brass
Chrome
Polished chrome
Copper
Copper mirror
Strong copper oxide
Cuprous oxide
Liquid copper
Gold
Polished gold
Iron
Polished cast iron
Processed cast iron
Polished tempered iron
Polished steel ingot
Raw welded steel
Surface ferric oxide
Completely rusted surface
Rolled iron plate
Oxidized steel
Cast iron (oxidizing at 600 °C)
Steel (oxidizing at 600 °C)
Electrolytic ferric oxide
Ferric oxide
Cast-iron ingot
31
Molten mild steel
Liquid steel
Pure liquid iron
Lead
Pure lead (non-oxidized)
Slightly oxidized
Magnesium
Magnesium oxide
Magnesium oxide
Mercury
Nickel
Electroplate polishing
Electroplate without polishing
Nickel wire
Nickel plate (oxidized)
Nickel oxide
Nickel alloys
Shiny nickel-chrome alloy wire (heat
resistance)
Nickel-chrome alloy
Nickel-chrome (heat resistance)
Alloy wire (oxidized)
Nickel-silver alloy
Silver
Polished silver
Stainless steel
18-8
304(8Cr, 18Ni)
310(25Cr,20Ni)
Tin
Commercial tin plate
Highly-oxidized
Zinc
Oxidizing at 400 °C
Commercial zinc plate
Grey oxidized zinc
1600~1800
1500~1650
1515~1680
0.28
0.42~0.53
0.42~0.45
125~225
25~300
0.06~0.08
0.20~0.45
275~825
900~1670
0.55~0.20
0.20
0~100
0.09~0.12
25
20
0.05
0.01
185~1010
198~600
650~1255
0.09~0.19
0.37~0.48
0.59~0.86
50~1000
0.65~0.79
50~1040
50~500
0.64~0.76
0.95~0.98
100
0.14
100
0.05
25
215~490
215~520
0.16
0.44~0.36
0.90~0.97
100
0~200
0.07
0.60
400
28
25
0.01
0.23
0.28
32
Material
Non-metallic materials
Brick
Refractory brick
Graphite(lamp-black)
Enamelled porcelain (white)
Asphalt
Glass (surface)
Heat-resistant glass
Calcimine (whitewash)
Oak
Graphene
Insulating foil
Metal foil
Glass tube
Ceramic coil products
Porcelain mottling
Solid material
(℃)
Temp
Approximate emissivity
1100
1100
96~225
0.75
0.75
0.95
18
0.90
0~200
23
200~540
20
20
0.85
0.94
0.85~0.95
0.90
0.90
0.85
0.91 ~ 0.94
0.88 ~ 0.90
0.90
0.90
0.83 ~ 0.95
0.80 ~ 0.93
Capacitor
Rotary
Chemical
Ceramic (flat)
Ceramic(vase)
Film
Mica
Mica pipe
Glass
0.30~0.34
0.25~0.36
0.90~0.94
0.90
0.90~0.93
0.94~0.95
0.90~0.93
0.91~0.92
Semi-conductors
Transistor (plastic)
Transistor(metal)
Diode
Transmitting coil
0.80~0.90
0.30~0.40
0.89~0.90
Pulse transmitter
0.91~0.92
Layer of white chalk
0.88~0.93
Upper loop
0.91~0.92
33
Electrical materials
Epoxy-glass plate
Epoxy-hydroxybenzene plate
Gold-plated copper foil
Sodium-coated copper
Tin-coated lead wire
Brass wire
Talc connector
0.86
0.80
0.30
0.35
0.28
0.87~0.88
0.87
34
Thank you for using the RayCAm C.A 1884 IR camera.
We appreciate you support and confidence.
Product Warranty:
We guarantee that each RayCAm C.A 1884 IR camera complies with the corporate
standards. We provide a one-year warranty starting on the date of delivery for any
materials or process defects in the context of proper storage, operation and service.
We will charge for any maintenance required due to damage resulting from improper
use, negligence or accident.
10 TO ORDER
RayCAm CA 1884………………………………………………………….….P01.6512.28
Spares and accessories
Battery……………………………………………………….………………….P01.2960.41
USB cable…………………………………………………………………..…..P01.2952.74
Infrared lens cap………………………………………………………………..P01.6515.22
Sunshield………………………………………………………………………..P01.6515.25
Tripod adapter…………………………………………………………………..P01.6515.26
External power supply………………………………………...……………….P01.6515.27
35
07 - 2010
Code 693142A02 - Ed. 3
DEUTSCHLAND - Chauvin Arnoux GmbH
Straßburger Str. 34 - 77694 Kehl / Rhein
Tel: (07851) 99 26-0 - Fax: (07851) 99 26-60
SCHWEIZ - Chauvin Arnoux AG
Moosacherstrasse 15 – 8804 AU / ZH
Tel: 044 727 75 55 - Fax: 044 727 75 56
ESPAÑA - Chauvin Arnoux Ibérica S.A.
C/ Roger de Flor N° 293, Planta 1- 08025 Barcelona
Tel: 902 20 22 26 - Fax: 934 59 14 43
UNITED KINGDOM - Chauvin Arnoux Ltd
Unit 1 Nelson Court – Flagship Square-Shaw Cross Business
ParkDEWSBURY – West Yorkshire – WF12 7THTel : 011628
788 888 – Fax : 01628 628 099
ITALIA - Amra SpA
Via Sant’Ambrogio, 23/25 - 20050 Bareggia di Macherio (MI)
Tel: 039 245 75 45 - Fax: 039 481 561
MIDDLE EAST - Chauvin Arnoux Middle East
P.O. BOX 60-154 - 1241 2020 JAL EL DIB (Beirut) - LEBANON
Tel: (01) 89 04 25 - Fax: (01) 89 04 24
ÖSTERREICH - Chauvin Arnoux Ges.m.b.H
Slamastrasse 29/3 - 1230 Wien
Tel: 01 61 61 961-0 - Fax: 01 61 61 961-61
CHINA - Shanghai Pu-Jiang - Enerdis Instruments Co. Ltd
3 F, 3 rd Building - N° 381 Xiang De Road - 200081 SHANGHAI
Tel: +86 21 65 21 51 96 - Fax: +86 21 65 21 61 07
SCANDINAVIA - CA Mätsystem AB
Box 4501 - SE 18304 TÄBY
Tel: +46 8 50 52 68 00 - Fax: +46 8 50 52 68 10
USA - Chauvin Arnoux Inc - d.b.a AEMC Instruments
200 Foxborough Blvd. - Foxborough - MA 02035
Tel: (508) 698-2115 - Fax: (508) 698-2118
http://www.chauvin-arnoux.com
190, rue Championnet - 75876 PARIS Cedex 18 - FRANCE
Tél. : +33 1 44 85 44 85 - Fax : +33 1 46 27 73 89 - [email protected]
Export : Tél. : +33 1 44 85 44 86 - Fax : +33 1 46 27 95 59 - [email protected]
36