1
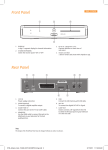
ENG_111379 User's Manual Digital HD Satellite Receiver CCR545 English Please read the entire manual thoroughly and retain it for future reference. STB_CityCom_Sat_111379_CCR545_Eng.indd 1 2010-08-03 �� 8:26:50 General Safety Cautions CAUTION RISK OF ELECTRIC SHOCK DO NOT OPEN CAUTION : To reduce the risk of electrical shock, do not remove the cover. No user serviceable parts inside. Refer any servicing to qualified Service personnel. Read this manual carefully before using the product. The cautions described below contain important information about safety, and are categorized into: Danger, Warning and Notice. The company will not take any responsibility for accidents or damage resulting from careless handling by the user. Danger ENGLISH If the user mishandles the product, there is a risk of loss of life or critical injury. • Connect the power cord only to A/C outlets as specified by the user manual or product specification. If the power cord is connected to a non-specified A/C outlet, it could result in fire or electric shock. • The product must not be exposed to water or liquid of any sort, or be exposed to drips or splashes. It could result in fire or electric shock. • Do not place heavy objects, including the product itself, on top of the power cord. If it is damaged, it could result in fire or electric shock. • Do not place metal objects on top of the apparatus. If metal objects fall into the apparatus, it could result in fire or electric shock. • Do not repair, disassemble or modify this apparatus yourself. It might cause fire or electric shock. If internal checking or maintenance is needed, please contact your service center or agency. • Do not block or cover any ventilation opening. A fire might result from overheating. • Turn off and unplug the power as quickly as possible during electric storms. Failure to do so could result in fire or electric shock. • Remove the antenna’s power plug from the outlet as quickly as possible during electric storms. Failure to do so could result in fire or electric shock. • Do not drop the apparatus (for example by putting it in a place where it may fall) or subject it to impact. The product might be damaged. If it is damaged, please turn off the power and remove the plug from the power outlet, or fire or electric shock may result. • Never touch the power cord with wet hands. It could result in an electric shock. 2 - ENG STB_CityCom_Sat_111379_CCR545_Eng.indd 2 2010-08-03 �� 8:26:50 Cautions Warning If the product is mishandled, the user might receive a serious or minor injury. Damage or loss to the user’s property might also result. • The product must not be exposed to water or liquid. If the apparatus is exposed to drips or splashes, it might cause a problem that cannot be repaired. • Do not repair, disassemble or modify this apparatus yourself. It might be seriously damaged, possibly beyond repair. • Turn off the power and unplug the power cord as quickly as possible during electric storms. They might damage the apparatus. • Remove the antenna’s power plug from the outlet as quickly as possible during electric storms, or the apparatus might be damaged. • Data recorded in the HDD might be lost due to a shock, lightening or electricity failure. The user must back up his or her own data, and the company does not take any responsibility for failure to do so. • In cases of USB stick or slow writing speed, abnormal case can be appeared. • Do not extract the USB memory during use of USB. • USB device which exceed STB’s power for USB device cannot be controlled. • Some of USB devices in the market may not be supported. ENGLISH Notice If the product is mishandled, it might cause minor damage. • If the apparatus becomes marked, clean it gently with a soft cloth or towel. Never use chemical solvents such as benzene, thinner, acetone or other solvents. The surface of the apparatus might become discolored and the paint might peel. • Do not place or keep the apparatus in the following situations. Doing so might cause problems. - where it is too hot or cold. - where there is high humidity. - where there are excessive temperatures, for example in front of airconditioners or heating vents. - where there is dust or soot. - in confined areas where the heat cannot be released. - where it is exposed to direct sunlight. • Turn the apparatus off or unplug the power cord if it is to remain unused for a long period of time. • Do not place heavy objects on top of this apparatus. It might cause malfunction or damage. • If the apparatus is so seriously damaged that it cannot be repaired, or has stopped working altogether, dispose of it properly in accordance with the local laws or regulations in your area. • To completely disconnect this apparatus from the AC Mains, disconnect the power supply cord plug from the AC receptacle. The mains plug of the power supply cord shall remain readily operable. ENG - 3 STB_CityCom_Sat_111379_CCR545_Eng.indd 3 2010-08-03 �� 8:26:50 Contents General Safety................................................................................................... 2 1. Functions and Installation......................................................................... 5 1.1 Remote Control Unit................................................................. 5 1.2 Front Panel................................................................................. 7 1.3 Rear Panel.................................................................................. 7 1.4 CAM(Conditional Access Module) and Smart Card...................... 8 1.5 Connecting and Installation................................................... 9 2. Basic Operation........................................................................................... 11 2.1 Basic Function Usage ............................................................ 11 3. Main Menu Guide........................................................................................ 12 3.1 Installation............................................................................... 12 3.2 Edit Channel List..................................................................... 14 3.3 Program Guide......................................................................... 15 3.4 System Setting........................................................................ 16 3.5 Irdeto CA Status...................................................................... 19 3.6 Common Interface.................................................................. 19 3.7 PVR Menu................................................................................. 20 3.8 Playing a recorded file........................................................... 21 3.9 Reservation.............................................................................. 21 ENGLISH 4. Troubleshooting . ....................................................................................... 22 4 - ENG STB_CityCom_Sat_111379_CCR545_Eng.indd 4 2010-08-03 �� 8:26:51 1. Functions and Installation 1.1 Remote Control Unit Basic functions 1 2 3 4 5 6 ! @ # $ % ^ 7 & 8 * 9 ENGLISH 0 1. STANDBY Press to switch between operation and standby mode. 2. SUB-T Press to enable or disable subtitle. 3. TV/STB Press to switch between TV and Receiver mode. 4. TEXT Press to see the teletext by OSD. 5. TV/RADIO Press to switch between TV and Radio. 6. GUIDE Press to display the TV/Radio program guide. 7. VOL (+/-) Press to increase or decrease the volume. 8. MENU Press to display the main menu on the screen or return to the previous menu. 9. Color buttons Red: Press to perform functions in "PVR", “Program Guide” or “Edit Channel List” menu. Green (SORT): Press to sort channel list. Yellow: Press to perform functions in "PVR", "Program Guide" or "Edit Channel List" menu. Press to use the Timer. Blue (INFO): Press to display the information box on the screen, or to perform functions in “Program Guide” or “Edit Channel List” menu. 10. Numeric buttons Press to select the channel and enter the PIN code. 11. AUDIO Press to select the audio language or the sound mode. (Mono, Left, Right, Stereo). 12. PRE-CH Press to return to the previous channel. 13. SLEEP Press to select a present time interval for automatic shut off. 14. Mute Press to enable or disable audio temporarily. 15. P.STD Press to change picture standard. (Option) 16. /// (Arrow buttons) Press to move the cursor to the up, down, left or right menu option. OK Press to select a menu, or confirm the selected operation. 17. CH (+/-) Press to change channel up and down. 18. EXIT Press to return the normal viewing mode from a menu. ENG - 5 STB_CityCom_Sat_111379_CCR545_Eng.indd 5 2010-08-03 �� 8:26:51 1.1 Remote Control Unit TV Control Buttons 1. TV STANDBY Press to turn on and off your TV. 3 2. TV Volume Press to increase or decrease the TV volume. 1 4 2 5 3. TV MUTE Press to enable or disable the TV audio temporarily. 4. INPUT Press to check the TV’s external connection status and select an external device. 5. TV Channel Press to change the current TV channel. PVR Functions 6. Record Press to record the current channel to the HDD. 7. Pause Press to pause. 8. Fast rewind Press to rewind at high speed. Each time you press this button the rewind speed is increased. 9. Play Press to play at normal speed or resumes. 10. Recorded List Press to display the recording list. 6 7 8 9 0 ! @ 11. Stop Press to stop a recording or playback. 12. Fast forward Press to fast forward at high speed. Each time you press this button the fast forward speed is increased. 13. Instant replay Press to jump back and plays from that location. 14. Commercial Skip Press to jump ahead in a recording. Installing Batteries in the Remote Control When inserting batteries, make sure that the polarity (+/-) is correct. # $ ENGLISH Note The design of the remote control may be changed without any notice in advance. 6 - ENG STB_CityCom_Sat_111379_CCR545_Eng.indd 6 2010-08-03 �� 8:26:51 1.2 Front Panel 1 2 9 3 4 5 6 7 1. STANDBY(POWER) Switch the receiver power "ON" or "OFF". 2. MENU To see main menu. 3. EXIT Exit from parameter and cancel selected function. 4. CH (-/+)(Program -/+) Channel Up/Down or select item of sub-menu. 5. OK To select a program, a highlighted line or parameter value. 6. VOL (-/+) To turn the volume Up/Down or select a sub-menu item. 10 11 12 8 7. STOP To stop a recording or playback. 8. REC To record a programme. 9. VFD To display the current state, such as channel, time and display. 10. USB Connect the USB memory with USB cable. 11. Smartcard Slot 1 Slot for smart card. 12. Cam Slot 2 Slot for Common Interface CAM with smart card. 1.3 Rear Panel 3. 4. 5. 6. 3 2 4 6 5 7 8 10 11 12 9 LNB To connect to a satellite antenna and cable jacks. LOOP THROUGH Used to connect a RF signal from the STB to either the RF input jack on your television or to the STB. SCART for VCR Connect this port to the VCR via SCART cable. SCART for TV Connect this port to the TV via SCART cable. HDMI Use the HDMI cable to connect this jack to the HDMI jack on your television for the best quality picture. VIDEO Video connection port to the TV or other equipment. AUDIO Audio connection port to the TV or other equipment. COMPONENT If you select Y/Pb/Pr, you can connect your receiver to a TV or VCR that accepts high-quality video input. 9. S/PDIF(Optical) To connect a digital amplifier output. 10. RS-232 To connect to a personal computer for software upgrade. 11. POWER Switch Provide power to the main unit. 12. POWER Supply 90 ~ 250V AC, 50/60Hz. 7. 8. ENGLISH 1. 2. 1 Note The design of the Front/Rear Panel may be changed without any notice in advance. ENG - 7 STB_CityCom_Sat_111379_CCR545_Eng.indd 7 2010-08-03 �� 8:26:52 1.4 CAM(Conditional Access Module) and Smart Card Caution Please do not plug in the main power supply cord until you have finished all of the connections! Although some TV and radio channels are free to view, you must subscribe to most TV and radio/music channels and a Conditional Access component is required. If you want to enjoy watching scrambled broadcasting channels, you need to purchase the CAMs and smart cards from a service provider’s sales department. However, broadcasting channels from multiple service providers call for multiple CAMs and Smart cards. Receivers which have only the CAMs and smartcards provided by the one service provider can show several broadcasting channels of the provider. Please refer to manuals provided by service providers for details because the CAM and smartcards are featured with unique menus, apart from menus given by the receiver. Watching "Free-To-Air" channel is available regardless of the CAM and smart cards. As service providers download new information to smart cards if necessary, those who have CAMs and smart cards should always put the smart cards in proper slots. Inserting a Smart card A Smart card looks similar to a credit card and entitles you to view and listen to all the channels you choose to subscribe to. The Smart card slot on the receiver can be used for Smart cards only. 1. Open the right-hand cover on the front panel of the receiver. 2. Hold the Smart card horizontally with the electronic chip (small square-shaped, gold in colour) facing upwards. 3. Insert the Smart card into the top slot. • Smartcard Inserting the CI (Common Interface) Module Your digital satellite receiver is equipped with a slot for the Common Interface (CI). 1. Open the right-hand cover on the front panel of the digital satellite receiver. 2. Insert the smart card into the CI-Module, and the CI-Module into the slot. Note CI and CAS embedded model only. ENGLISH • CI Module • Smartcard 8 - ENG STB_CityCom_Sat_111379_CCR545_Eng.indd 8 2010-08-03 �� 8:26:53 1.5 Connecting and Installation 1.5.1 How to connect the receiver to various other systems There are several ways of connecting the receiver to your TV, VCR and/or Hi-Fi SYSTEM. Consult your local supplier for assistance in setting-up your system that is best suited to your requirements. 1.5.2 To Connect Satellite Antenna ♦ DiSEqC 1.0 • Connect the coaxial cable from the LNB to the LNB IN jack on back of the receiver. ♦DiSEqC 1.2 Motor • Connect one end of your coaxial cable to the LNB IN connector on the receiver and the other end to the REC or Receiver connector on the DiSEqC 1.2 motor. • Connect the coaxial cable from the LNB to the LNB connector on the DiSEqC 1.2 motor. • Satellite Receiver • Satellite Receiver 1.5.3 Connect the receiver to a TV set • Connect the receiver to a TV set with A/V, if your TV set is equipped for it. 1.5.4 Connect the receiver to a VCR • Connect the A/V jack from the VCR to the back of the receiver. • Video • Satellite Receiver • TV • TV STB_CityCom_Sat_111379_CCR545_Eng.indd 9 • Satellite Receiver ENGLISH 1.5.5 Connect STB to a TV set - Component • Component video separates the video into Y (Yellow), Pb (Blue), and Pr (Red) for enhanced video quality. Be sure to match the component video and audio connections. Each external input source device has a different back panel configuration. When connecting an external device, match the color of the connection terminal to the cable. ENG - 9 2010-08-03 �� 8:26:55 1.5 Connecting and Installation 1.5.6 Connect STB to a TV set - HDMI HDMI, or high-definition multimedia interface, is a next-generation interface that enables the transmission of digital audio and video signals using a single cable without compression. “Multimedia interface” is a more accurate name for it especially because it allows multiple channels of digital audio (5.1 channels). When connecting via HDMI, you do not need to connect Audio Cables. You only need to connect Audio cables when connecting via HDMI/DVI. • Satellite Receiver • TV 1.5.7 Connect the receiver to a Hi-Fi System • Connect a RCA stereo cable from the AUDIO L/R jacks, S/PDIF on the receiver to the LINE, AUX, SPARE or EXTRA input jacks on your Hi-Fi System. 1.5.8 Connect the receiver to a Digital Audio System • If you have a DAC with S/PDIF coaxial cable input, you can connect the receiver with it to enjoy higher quality sound. Connect S/PDIF optical cable to a digital amplifier. • Hi-Fi System • Satellite Receiver • Digital Amp ENGLISH 1.5.9 Loop Though • If you have another analogue or digital STB and you wish to use the same antenna cable then you can connect it via the loop through. Connect one end of the coaxial cable to the Loop Through on the STB and connect the other end to the ANT IN jack on your second STB. Note •Connect the cable with input jack on STB properly shown in the picture. •The design of the Rear Panel may be changed without any notice in advance. • Satellite Receiver • STB 10 - ENG STB_CityCom_Sat_111379_CCR545_Eng.indd 10 2010-08-03 �� 8:26:58 2. Basic Operation 2.1 Basic Function Usage 2.1.1 Program Information After the television channels have been programmed, you will see the information box each time you change the channels. • Every time you change channels you will receive program information for a few seconds. (In the Banner Time menu you can select how long this information will be shown.) • You may change channel with the UP/DOWN button. You can get Channel Banner at the bottom of the screen. • When you press the COLOR button, you can use the banner as a simple channel operation. • Press the COLOR button to view the detailed channel information. • YELLOW button : Transponder information. • BLUE button : EPG information. 2.1.2 Subtitle • Press the SUB-T button and the popup window will be displayed on the screen. • Select the Off then subtitle function is off. • Select the Subtitle language, and then you can see Subtitles. 2.1.3 Teletext • If a broadcast supports teletext, you can watch teletext. • If you press the TEXT button, teletext will appear on the screen. 2.1.4 Simple Channel List • When you press the OK button during receiving service stream, you can get “Channel List” view. • Using the UP/DOWN button in “Channel List” view, you can choose another channel. • After moving highlight on a channel, then press the OK button. • To get the channel sort list, press the GREEN button. Pop up window will be displayed on the screen. • Select the sort list you want with the UP/DOWN buttons and then press the OK button to get it. ENGLISH 2.1.5 Soundtrack • When you want to change the Audio Language of current channel, press the AUDIO button on the remote control. The on-screen menu is displayed on the left side of the screen. Use the UP/DOWN Buttons to change Audio Language. • Use the LEFT/RIGHT Buttons repeatedly to change the sound mode(Mono, Left, Right, Stereo). • You can change a default audio language in the system setting menu mode. ENG - 11 STB_CityCom_Sat_111379_CCR545_Eng.indd 11 2010-08-03 �� 8:26:59 3. Main Menu Guide 3.1 Installation ENGLISH Satellite Search Select the satellite list you want using UP/DOWN buttons on the satellite list. you can go to the right side with OK/RIGHT button and to the left side with the LEFT button. • C/KU Switch You can select C/KU band by selection of switch type. • Position (MOTOR DiSEqC 1,2) After selecting a satellite, please select position number. To change value, press OK button. The position list will be displayed. • Degree (USALS) Press the NUMERIC buttons and enter the degree. • LNB Freq. Select the proper LNB frequency referring to your LNB using OK and UP/DOWN buttons. • C-LNB Freq. When selecting the C/KU Switch is selected as None, the C-LNB Freq will be dimmed atomatically. Press OK button, and then the C-LNB Freq. List will be displayed. You can also input the freq. you want. After inputting freq. using NUMERIC buttons, press OK button. • LNB Power Select the LNB Power On or OFF. • 22KHz Depending on the user's antenna switch box or LNB. You can supply either 22KHz by setting ON or not by setting OFF. When selecting the U-LNB 1 and U-LNB 2, the 22KHz will be dimmed. (MOTOR DiSEqC 1,2). • 0V/12V Depending on the user's antenna switch box. You can choose either 0V/12V. • Tone Position Depending on the user's antenna switch box. (off, SAT A or SAT B) • Press the INFO(BLUE) button to set Drive(Fine Drive or Normal Drive) to run the motor. (MOTOR DiSEqC 1,2 / USALS) • Fine Drive/Normal Drive : To move the motor, press LEFT/RIGHT button. • Go to zero : To move the zero position, press OK button. • Store to location : To store the current position, press OK button. • East Limit : To set the east limit by current position, press OK button. • West Limit : To set the west limit by current position, press OK button. • Clear Limit : To clear the stored limit value, press OK button. • DiSEqC You can select and use appropriate port for your DiSEqC switch box. Press OK button to select DiSEqC List. (None, DiSEqC A, DiSEqC B, DiSEqC C, DiSEqC D) • Longitude (USALS) Press the NUMERIC buttons and enter the Longitude. When the OK button is pressed. It can be toggled East/West. • Latitude (USALS) Press the NUMERIC button and enter the Latitude. When the OK is pressed, it can be toggled North/South. 12 - ENG STB_CityCom_Sat_111379_CCR545_Eng.indd 12 2010-08-03 �� 8:26:59 3.1 Installation Note After the Degree, Longitude and Latitude is enterted accurately the DiSEqC Motor will automatically move to the satellite's position. After selecting all that is necessary, press RED button to scan the satellite list. • Select ON or OFF according to your Network. • Select All or FTA Search Type. • Press OK button and searching will start. ENGLISH • Scan Press the RED button on the TP list. → Frequency : Input a proper Frequency using NUMERIC buttons. → Symbol Rate : Input a proper Symbol Rate using NUMERIC buttons. → Polarity : Use the LEFT/RIGHT buttons to select the Polarisation of the transponder. (Horizontal, Vertical) → FEC : Use the LEFT/RIGHT buttons to select the FEC of the transponder. Press YELLOW button to edit, add or delete the TP list. Input Mode, Frequency, Symbol Rate, Polarity, Transmission, Modulation, and FEC, and Pilot. Press OK button to save. You can select the value of Auto, 1/2, 2/3, 3/4, 5/6, and 7/8. → Network : You can select Yes or No. When you select Yes, you can find more transponders using the home network. → Video PID/Audio PID/PCR PID : You can set PID to search for services. Use the LEFT/RIGHT buttons or NUMERIC buttons to input the value. Press OK button to start Scanning. ENG - 13 STB_CityCom_Sat_111379_CCR545_Eng.indd 13 2010-08-03 �� 8:26:59 3.2 Edit Channel List From these menus, you can edit favorite lists, lock, skip, delete, or move channel. • Select “Edit Channel List” in the main menu with the UP/DOWN buttons and press the OK button. • If the menu lock is activated at the request window, input PIN code. If you have not entered your own PIN code, then the PIN code 0000 applies, which was set at the factory. • Press the UP/DOWN/LEFT/RIGHT button in MODE to select the desired MODE and then press the OK button. Favorite 1~8, Skip, Delete, Genre • Among the all channel list, the selected channel can be moved to the right folder of Favorite 1~8, Skip, Delete, or Genre. • Press the OK button to add from edit list at right folder. • To remove the channel list from edit list at right folder, press the OK button. The edited list will be removed. ENGLISH Move • Among the all channel list, the selected channel can be moved to the right folder of Move. • Press the OK button to add from edit list at right folder. • To remove the channel list from edit list at right folder, press the OK button. The edited list will be removed. • Press the BLUE button to open the pup-up window that displays the channels. • Press UP/DOWN button to go to any point and then click on OK button to go to the selected channel. • To confirm the channel list, press the MENU button or the EXIT button. The request window will be displayed on the screen, press the OK button to save or the EXIT button to exit this menu. • Press the BLUE button to change the favorite name. • Press the RED button to change edit list. • Press the YELLOW button to change channel name. 14 - ENG STB_CityCom_Sat_111379_CCR545_Eng.indd 14 2010-08-03 �� 8:27:00 3.3 Program Guide The program guide displays programme information about each channel, based on the date and time. You can also reserve a recording or watch the channel by pressing the Yellow button. 3.3.1 Viewing the Program Guide Information • Select "Program Guide" in the main menu with the UP/DOWN buttons and press the OK button. • Use the UP/DOWN/LEFT/RIGHT button to move to the desired channel and press the OK button to switch the selected programme. • Press the RED button to check the program guide on a required date. • Press the GREEN button to sort the channel lists. • Press the YELLOW button to reserve recording or watch the channel. Note • The Program Guide information might not be supported by the service providers. 3.3.2 Recording or reserve a watch by Program Guide You can set a programme to record or play at a specific time by program guide. If the receiver is not connected to a USB memory device, you can perform the scheduled watch only. • Press the YELLOW button to reserve a recording or watch. • Select a required option and set it as you want. - Channel: Select the channel to record or watch -S ervice: Select any of Record and Wake up (Wake up - scheduled watch, Record - scheduled recording) - Mode: Off, Once, Weekly, Daily - Date: Set the date for reservation - Start time/End time: Set the schedule start time and end time • Press the RED button to save. ENGLISH Note • For more information about recording reservation, refer to 5.3 Reservation. ENG - 15 STB_CityCom_Sat_111379_CCR545_Eng.indd 15 2010-08-03 �� 8:27:00 3.4 System Setting If the menu lock is activated, you will be asked to enter your PIN code before you can enter this menu. The PIN code preset to 0000 from the factory. If you want to customize the system to suit you better, you can specify some settings from the submenus in the “System Setting” menu. • Select “System Setting” in the main menu with the UP/DOWN buttons and press the OK button. • If you move the focus on the main menu, the contents of the selected menu will be shown. • Use OK/RIGHT buttons to go to the right side and change the stetting. • Use the LEFT button to go to the left side. 3.4.1 Menu Language Here you may select in which language the menus will be shown. Use the UP/DOWN buttons to move to the language you want and then press the OK button. 3.4.2 Audio Language In this menu, you can change default language for audio when changing services. Use the UP/DOWN buttons to move to language you want and then press the OK button. ENGLISH 3.4.3 Subtitle Language In this menu, you can change default language for subtitle when changing services. Use the UP/DOWN buttons to move to language you want and then press the OK button. 16 - ENG STB_CityCom_Sat_111379_CCR545_Eng.indd 16 2010-08-03 �� 8:27:00 3.4 System Setting 3.4.4 SD Video Output This menu is used for viewing screen. • If the receiver and TV are connected using the composite cable, select CVBS using the UP/DOWN buttons. • If the receiver and TV are connected using the Scart cable, select SCART-RGB using the UP/DOWN buttons. 3.4.5 Screen Type Select the TV setting type. • Press the LEFT/RIGHT buttons to select either 4:3 TV or 16:9 TV. • Press the UP/DOWN buttons to select either Letter Box, Cinema, or Full. 3.4.6 Banner Time When you switch channels, an information banner will be shown for a few seconds. You can select for how long the banner will be shown. • Select the banner time you want and then press the OK button. • Each selectable time items has meaning of the interval time during a channel banner stays on changed channel screens. The time ranges 1, 3, 6, 9 12, and 15 seconds. 3.4.7 Local Time Select the time setting type. • Press the LEFT/RIGHT button to select the current time zone from standard time and then press the OK button. When you press the LEFT/RIGHT button, the time zone will move by 30 minutes. 3.4.9 Change PIN Code From here you can change the PIN code from the standard 0000. DO NOT FORGET IT! Without it, you are not able to access to any of the functions where the code is required. You can change password for Parental Lock and Receiver Lock simultaneously. • Input the current PIN code using the NUMERIC buttons on the remote control. • In the highlighted new PIN code, input a new PIN code. • To verify the new PIN code, re-enter a new PIN code in the highlighted confirm PIN code. If the PIN code is correct, the message “Success” will be displayed on the display window. Note • If you forget the PIN code, press the RGYB(Color) button in sequence. (i.e. Red → Green → Yellow → Blue button) The PIN code will be changed to 0000. ENGLISH 3.4.8 Menu Transparency From 20% to 100% will give the variable transparency on Video and OSD screen. To set menu transparency, press the UP/DOWN buttons. Press the OK button and then press the UP/DOWN buttons to select the Menu Transparency, Subtitle Transparency, or Teletext Transparency. The transparency will be applied on the screen. ENG - 17 STB_CityCom_Sat_111379_CCR545_Eng.indd 17 2010-08-03 �� 8:27:00 3.4 System Setting 3.4.10 Receiver Lock If you select “On”, you will have to enter the PIN code every time you start the receiver from standby. 3.4.11 Menu Lock If the Menu Lock is already set, the PIN code is needed to set the Edit Channel List and System Setting. If you want to set the Menu Lock, press the UP/DOWN buttons to select Locked and then press the OK button. 3.4.12 SPDIF Output You can hear digital audio of the Dolby 5.1 channel using S/PDIF Output. • If selecting OFF, the digital audio will not be output. • When selecting PCM, the unzipped digital audio is output through S/PDIF. • When selecting Dolby Digital, if the current channel is a Dolby audio channel, the zipped Dolby stream is output through S/PDIF. 3.4.13 Factory Reset Press the UP/DOWN button on the Setup list to select Factory Reset. Use this option only if you have to start the complete installation procedure from scratch. If you continue from here, all your previous settings and all channels will be cleared! The default data will be loaded. If you press the OK button, it asks for your confirmation. If you want to reset, press the OK button, or press the EXIT button to exit this menu. ENGLISH 3.4.14 System Information Displays the system information: MODEL name, Last Update, S/W, H/W, Loader version, C.A Press the UP/DOWN button on the Setup list to select System Information and then press the OK button. 18 - ENG STB_CityCom_Sat_111379_CCR545_Eng.indd 18 2010-08-03 �� 8:27:00 3.5 Irdeto CA Status In this menu, you can see the Smart Card Status, Service Status, Loader Status, Components, and Mail Box. Maturity Rating Select “Maturity Rating” in the Irdeto CA Status menu with the UP/DOWN buttons and press the OK button. Then the PIN code entry screen appears Enter the subscriver's PIN (master PIN) number. For the number, consult with the local provider. • • • • MR ON/OFF : Switches On or Off for Maturity Rating MR MODE : Changes the maturity rating settings. SET : Switches MR On/Off or changes the profile information. DELETE : Deletes the profile information. • MR PROFILE : Displays the profile number. For example, profile number 1 - Parents profile number 2 - High school student profile number 3 - Elementary school students • MR AGE : Displays the age range for the profile.(4 to 18 years old) For example, profile number 1's age : 18 profile number 2's age : 16 profile number 3's age : 8 • USER PIN CODE : User PIN code for the corresponding profile. 3.6 Common Interface Your receiver is equipped with two slots of Common Interface (CI), accepting both Type 1 and Type 2 PCMCIA. Plug in the appropriate CI module together with a valid smart card. You will then have access to the respective scrambled and Pay-Per-View services. Insert the smart card into the CI module, and the CI module into the slot behind the flap on the front panel. The CI and smart card modules determine the programs that can be de-scrambled. The receiver supports two CI slots so you can plug in two different modules, automatically provide access to both services. Each smart card contains your subscription details. ENGLISH CAM(Conditional Access Module) : Electric unit that has the smart card slot for pay programmes. ENG - 19 STB_CityCom_Sat_111379_CCR545_Eng.indd 19 2010-08-03 �� 8:27:01 3.7 PVR Menu ENGLISH Connect a USB memory device to the receiver by using the USB port and select "Information" in "PVR Menu." • Image Viewer : When you connect a USB device to the receiver, this function is active. • File List : Displays the recorded files. It plays the image that has been recorded on File List. When you press the Yellow button on File List, you can select File List or Image Viewer. (Only JPG format available) In order to see a JPG image, press the Yellow button and select Image Viewer. You cannot see JPG images on File List. • Format HDD : Formats the hard disk. When you format the hard disk, the PVR folder is created. • PVR Setting - D efault HDD Volume To set default HDD Volume. If HDD has one partition, you can set for Volume 0. If HDD has two partition, you can set for Volume 1. - D efault Record Duration To set the default record duration. - I nstant Replay Press the replay button to jump back and play from that location. When the replay is completed the program will play from the current point. You can set the replay time interval by using the PVR Setting menu. - C ommercial Skip Press the skip button to jump forward and play from that location. When the skip is completed the program will play from the current point. You can set the skip time interval by using the PVR Setting menu. - R ecording Notify Duration To set duration icon appears. - T ime Shift To select Time Shift Off or On. - T ime Shift Recording Time To set recording Time. • DB Upgrade via USB : It upgrades the information for satellite, TP, and channel through an USB. With Channel Editor PC tool, complete data can be stored on the local file, and at this point the default extension is destined to save the “*.Bin”. Connect USB stick or HDD on PC and then save “*.bin” file, and connect to STB USB port. DB Upgrading can be made with following sequence. DB upgrade via USB → OK → Select bin file and press OK → STB will reboot automatically and new DB will be uploaded. • Information : Displays information of hard disk that is connected to the receiver. 20 - ENG STB_CityCom_Sat_111379_CCR545_Eng.indd 20 2010-08-03 �� 8:27:01 3.8 Playing a recorded file You can play a recorded file through the File List menu. • Select "File List" in the main menu with the UP/DOWN buttons and press the OK button. • Select a file with the UP/DOWN button and press the OK button to play the select file. • Select a play option with the UP/DOWN button and press the OK button to start playback. - C ontinue: Plays from the paused point - B egin: Plays from the start 1 2 3 1 Status icon (Playback, Pause, Search playback, Skip playback, etc.) 2 Start time 3 Progress bar 4 End time 4 3.9 Reservation The list reserved by Program Guide or Timer appears. • You can reserve up to 8. • When the receiver is connected to a USB memory device, you can perform any of scheduled recording or scheduled watch. Otherwise, you can perform the scheduled watch function only. ENGLISH Note • The + mark on the date display indicates that the scheduled end time is over the midnight or the file has been recorded by Timer. • Use YELLOW button to go to Timer Function menu directly. ENG - 21 STB_CityCom_Sat_111379_CCR545_Eng.indd 21 2010-08-03 �� 8:27:01 4. Troubleshooting Solution No display LED on the front panel. No power supply Power cord plug in correctly. No Picture Ensure that the STB is switched on. Check connection and correct. Check channel and video output and correct. Poor picture quality Check the signal level, if this is low then try adjusting the alignment of your dish. No Sound Check the volume level of the TV and STB. Check the mute status of the TV and STB. Check the connection of audio cord. Remote Control does not operate Point remote control directly towards the receiver. Check and replace batteries. Check that nothing blocks the front panel. Service is not running or scrambled Check the whether the Common Interface module and smart card is correctly inserted. Check that the smart card is appropriate for the selected service. You have forgotten your secret PIN code Refer to Change PIN code of this user's manual. ENGLISH Problem 22 - ENG STB_CityCom_Sat_111379_CCR545_Eng.indd 22 2010-08-03 �� 8:27:01 Note STB_CityCom_Sat_111379_CCR545_Eng.indd 23 2010-08-03 �� 8:27:01 ENG_111379 STB_CityCom_Sat_111379_CCR545_Eng.indd 24 2010-08-03 �� 8:27:01