1
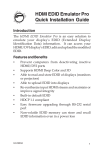
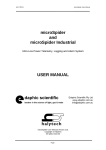
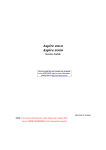
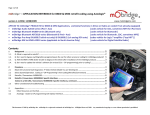
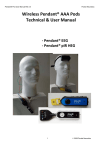
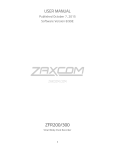
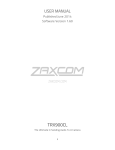
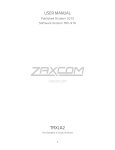
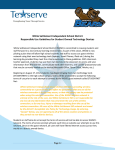
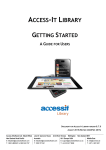
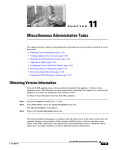
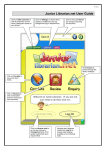
STUDENTNET Cloudwork Dashboard User Manual Make the Cloud Yours! Studentnet Technical Support 1/1/2015 User manual for the Cloudwork Dashboard introduced in January 2015 with the release of Version 2 of Cloudwork. Contact: [email protected] www.studentnet.net +61 2 2981 1626 Copyright© 2015 Studentnet, ABN 90 001 966 892 Page 1 Studentnet, the Studentnet logo, Cloudwork and Make the Cloud Yours are all registered trademarks of Studentnet Cloudwork® Dashboard User Manual Table of Contents Logging In and Out .............................................................................................................................. 3 User Management .............................................................................................................................. 4 Creating a New User ....................................................................................................................... 4 Editing Users ....................................................................................................................................... 6 Change Password ............................................................................................................................ 6 Silent Inspection.............................................................................................................................. 6 Recovery Info .................................................................................................................................. 7 Delete User ..................................................................................................................................... 7 Bulk User Add...................................................................................................................................... 7 Organisational Units............................................................................................................................ 9 Creating a new Organisational Unit ................................................................................................ 9 Google Apps Domains ....................................................................................................................... 11 Adding a Google Apps Domain ..................................................................................................... 11 Groups ............................................................................................................................................... 12 Adding Groups .............................................................................................................................. 12 Group Upload ................................................................................................................................ 12 Sync Profiles ...................................................................................................................................... 14 Base Settings ................................................................................................................................. 14 User Settings ................................................................................................................................. 16 Group Settings .............................................................................................................................. 17 Advanced Settings ......................................................................................................................... 19 Appendix A - Google Apps API Access............................................................................................... 20 Copyright© 2015 Studentnet, ABN 90 001 966 892 Page 2 Studentnet, the Studentnet logo, Cloudwork and Make the Cloud Yours are all registered trademarks of Studentnet Cloudwork® Dashboard User Manual Logging In and Out Logging into your dashboard is the first step that needs to be done to be able to administer your domain. The URL for your dashboard will be issued to you when the setup if completed. Going to this URL will take you to your own SSO login page or if you are already logged in you will go straight to the dashboard. If you need to login then your normal login will now suffice. If you do not have access please contact Cloudwork to be given appropriate access to the system. Upon successfully logging in you should be presented with the following options. Figure 1 - Dashboard Overview Copyright© 2015 Studentnet, ABN 90 001 966 892 Page 3 Studentnet, the Studentnet logo, Cloudwork and Make the Cloud Yours are all registered trademarks of Studentnet Cloudwork® Dashboard User Manual User Management Users can be accessed through the front panel or via the side menu Figure 2 - User Menu Clicking on the active users link or the Users side menu will give a listing of all of the users in the system. Creating a New User You should only need to manually create users for administrative purposes to this dashboard or to create special users that are not synchronised by normal processes. To create a new user simply click on the “Add new user” link either on the home page or on the top menu after clicking on Users in the side menu. Figure 3 - User Top Menu You will then be presented with the User Creation screen. Copyright© 2015 Studentnet, ABN 90 001 966 892 Page 4 Studentnet, the Studentnet logo, Cloudwork and Make the Cloud Yours are all registered trademarks of Studentnet Cloudwork® Dashboard User Manual Figure 4 - New User Form Email - This must be a valid email address, something like [email protected]. If you with this use to be available in a Google apps domain then it must have the same domain as the google apps domain you with to synchronise with User Name - This will be the user name that the user will use to log in with. Role - This will indicate what role this user will have. This will be sent to service providers, some service providers will give different access levels based on what this value is. Default dropdown values are Teacher Student Copyright© 2015 Studentnet, ABN 90 001 966 892 Page 5 Studentnet, the Studentnet logo, Cloudwork and Make the Cloud Yours are all registered trademarks of Studentnet Cloudwork® Dashboard User Manual Alum Parent Please note: Currently all users that are marked at Alum or Parent are not considered chargeable in Cloudwork. Status - By default there are three possible statuses Active: Ordinary user. Administrator: Can access this control panel . Suspended: Prevented from logging in to any service After filling in these details you will be prompted to give the user a password. Once you do that the new user will be ready. Editing Users Editing users in this interface is not recommended if you have synchronisation running. Any changes made on the directory will be reflected automatically. This will remain the place to make changes to manual users or special users that are not automatically synchronised. The options on the form remain the same as the Create user form which is described in detail above. There are, however other options that are available to use, some of these will depend on the options that are available to your institution. Figure 5 - Edit User menu Change Password This will allow you to change the password of a user. If the user is being synchronised then this will force the password change back to the directory. If this user is not being synchronised it will only be reflected for this system. Silent Inspection Silent inspection will allow an administrator to set a temporary password that will also work for that user’s account. This will work for one login or 1 hour (configurable) whichever comes first. This is designed to let an administrator to login as a user without having to change a user’s password. This feature is not on by default and needs to be specifically requested to be activated. Copyright© 2015 Studentnet, ABN 90 001 966 892 Page 6 Studentnet, the Studentnet logo, Cloudwork and Make the Cloud Yours are all registered trademarks of Studentnet Cloudwork® Dashboard User Manual Recovery Info This is the information that the user has listed for their password recovery. You can view and edit what they entered so they can recover a lost password without need of administrative intervention. This option will only be enabled if Password recovery is enabled for your domain. Delete User This will delete the user from the Cloudwork system. It will also delete the user from any service provider that Cloudwork is provisioning accounts in (eg Google Apps), if it is supported. It will not delete the user from the directory. If this user is synchronising with a directory then it will remain deleted. If you wish to prevent someone from logging in through the Identity provider then it is better to set the status of the user to Suspended. You will be presented with a confirmation screen before the delete is actioned. Use this function with care. Currently the ability to undelete users is under development. Bulk User Add Under the user menu is ability to add a bulk list of users. This is generally for users that will not exist in the directory such as parents. To use this facility it will require a csv of the users in a format so that the system can use it. Your CSV file should contain the following headings: Email, Username, First Name, Last Name, Password, Role For example Email, User Name, First Name, Last Name, Password, Role [email protected],principal,School,Principal,pri2009,teacher [email protected],joeblogs,joe,blogs,joe2009,teacher [email protected],SN1234,Alfred,Student,as2010,student The following email accounts will be created: [email protected] with a password of pri2009 [email protected] with a password of joe2009 [email protected] with a password of as2010, and a SSO username of SN12345678 Valid roles must be chosen from the following list: Student Alum Copyright© 2015 Studentnet, ABN 90 001 966 892 Page 7 Studentnet, the Studentnet logo, Cloudwork and Make the Cloud Yours are all registered trademarks of Studentnet Cloudwork® Dashboard User Manual Teacher Parent Copyright© 2015 Studentnet, ABN 90 001 966 892 Page 8 Studentnet, the Studentnet logo, Cloudwork and Make the Cloud Yours are all registered trademarks of Studentnet Cloudwork® Dashboard User Manual Organisational Units Organisational Units (OU’s) are used to keep distinct groups inside the same institution into separate containers so they can be more easily administered. This can be illustrated by an example structure in the image below. Figure 6 - Organisational Unit Side Menu You can create OU’s to for manually created users to live in. Most OU’s will be created by the automated synchronisation process. Clicking on any OU in the side menu will give you a list of the users that are contained inside that OU. Creating a new Organisational Unit To create a new OU simply click on the Organisational Unit link on the sidebar. This will give you a new link in the top menu to Add New. Once in the “add new” screen it will look something like the below. Copyright© 2015 Studentnet, ABN 90 001 966 892 Page 9 Studentnet, the Studentnet logo, Cloudwork and Make the Cloud Yours are all registered trademarks of Studentnet Cloudwork® Dashboard User Manual Figure 7 - New Organisational Unit Form Name - This is the name of the OU that will be displayed. Parent - This will determine which OU this new OU will live within. For example in Figure 6 above the Administration OU’s Parent is the Staff OU. Description - This is a description for reference of the user to be able to know what the OU is being used for. Copyright© 2015 Studentnet, ABN 90 001 966 892 Page 10 Studentnet, the Studentnet logo, Cloudwork and Make the Cloud Yours are all registered trademarks of Studentnet Cloudwork® Dashboard User Manual Google Apps Domains This menu item allows you to view and edit your Google Apps Domains. Adding a Google Apps Domain The add screen will require some details about your Google Apps domain. Once this is completed there is an additional step that needs to be done for it to correctly be able to communicate with your Google Apps Domain. This is a manual Step required by Google to complete that we need to do at the server side end. You can request we do this for you or you can follow the instructions in Appendix A. Figure 8 - Google Apps Domain Add Domain Name - This is the Google Apps domain Administrator Account - This needs to be a Super Administrator account no password details are required, just the full email address of the account name. Copyright© 2015 Studentnet, ABN 90 001 966 892 Page 11 Studentnet, the Studentnet logo, Cloudwork and Make the Cloud Yours are all registered trademarks of Studentnet Cloudwork® Dashboard User Manual Groups Groups can represent Security or Distribution Groups that exists in your directory or School Management System. They can also be manually created groups. The can serve as email groups or attributes for use by service providers or any number of other purposes. Adding Groups Groups can be added in the normal process of synchronising users in Sync Profiles or they can be added manually inside the dashboard. Adding a new group Manually will show the following form. Group Name - This is the full name of the group. If this is intended to be an email distribution group this needs to be a full email address. Friendly Name - This is the name that will be displayed when using the group. Description - This is a description that will only be visible to this dashboard for reference of administrators Email Permission - This is the permissions that apply to email groups as to who can send email to them. The options available are listed below. Anyone can send to group Anyone within the domain can send to the group Only group members can post Only Teachers can post Bulk Group Upload The other option for creating groups manually is through the bulk upload facility Copyright© 2015 Studentnet, ABN 90 001 966 892 Page 12 Studentnet, the Studentnet logo, Cloudwork and Make the Cloud Yours are all registered trademarks of Studentnet Cloudwork® Dashboard User Manual You can create a CSV file with the user account information using spreadsheet programs like Microsoft Excel or OpenOffice Calc. Your CSV file should contain the following headings: Group Email Address, Member Email Address For example Group Email Address, Member Email Address [email protected], [email protected] [email protected], [email protected] [email protected], [email protected] The following groups will be created or added to: class-1 [email protected] class-2 [email protected] [email protected] Valid roles must be chosen from the following list: Student Alum Teacher Parent Copyright© 2015 Studentnet, ABN 90 001 966 892 Page 13 Studentnet, the Studentnet logo, Cloudwork and Make the Cloud Yours are all registered trademarks of Studentnet Cloudwork® Dashboard User Manual Sync Profiles Sync profiles are the profiles used to connect to a directory and automatically synchronise users. They are setup to collect both users and groups automatically every 3 minutes to collect anything that has changed in the period since the last time it synchronised. To setup a sync profile it is recommended you consult with Cloudwork to make sure you will be adding the correct information. Base Settings Base settings will determines what server we are connecting to and what authentication we are using to do the synchronisation with. Figure 9 - Sync Profile Base Settings Description - This is only for the administrator’s reference. Copyright© 2015 Studentnet, ABN 90 001 966 892 Page 14 Studentnet, the Studentnet logo, Cloudwork and Make the Cloud Yours are all registered trademarks of Studentnet Cloudwork® Dashboard User Manual Sync Type - Determines what objects are being synchronised. Options available are Accounts Groups Both It is recommended that Sync Profiles are setup to do either accounts or groups only. Using the “Both” option is a more advanced option. Role - This will be the default user type that anyone inside this profile will be imported with. Available options are: Student Alum Teacher Parent LDAP Server - The is the address of the LDAP server it can be in the form of an IP address or a domain name. To use a non standard port simply put the port on the end of the domain/IP eg to connect to the server on port 1234 you would enter ldaps://schooltest.studentnet.edu.au:1234 If you do not put ldaps:// at the start we will assume ldaps:// for the protocol. If you wish to use ldap:// you must include that in the domain/IP that you put into this field. While we support it we do not recommend it. NB for Password Reset to work LDAPS MUST be in use. LDAP User - This is the user that has permission to be able to connect to the server. It is recommended that this be a user specifically designed for this connection. This is in the form of the distinguished name of the user, and will look something like the below example. CN=St Ldap,CN=Users,DC=schooltest,DC=studentnet,DC=edu,DC=au This user will need read access to the domain that it will be connecting to, and if Password Reset is enabled it will need the “Reset Password” permission on the domain also. LDAP Password - This is the password of the previously entered user. Copyright© 2015 Studentnet, ABN 90 001 966 892 Page 15 Studentnet, the Studentnet logo, Cloudwork and Make the Cloud Yours are all registered trademarks of Studentnet Cloudwork® Dashboard User Manual User Settings User settings are required if the sync is set to pick up Accounts, this will give us the container that we are looking for users to synchronise. And the attributes that we will be looking at to be correctly set users up. Most of the attribute fields will be pre filled in with defaults for Active Directory. Unless you have a differing configuration then it recommended to leave them as they are. In which case the only setting required will be the Search Container. Figure 10 - Sync Profiles User Settings Search Container - This is the base OU that we will search in for user accounts. This is always presented in the form of a distinguished name. All OU’s below this will also be searched. If this is being setup for a Group Sync then this field needs to be added so we know where to collect the user that belong to that Group. Mail Field - This is the Attribute that contains the email address of the user. Default: mail Copyright© 2015 Studentnet, ABN 90 001 966 892 Page 16 Studentnet, the Studentnet logo, Cloudwork and Make the Cloud Yours are all registered trademarks of Studentnet Cloudwork® Dashboard User Manual Username Field - This is the username attribute that a user will use to log in to most systems with. Default: sAMAccountName Password Field - This is the hashed password field that is saved via ADI. Default: hashedpassword GUID Field - This is the immutable ID of the user. Default: objectGUID First Name Field - This is the field containing the first (given) name of the user. Default: givenname Last Name Field - This is the field containing the last name (surname) of the user. Default: sn Group Settings These are the settings that will allow the synchronisation of group out of the directory. Figure 11 - Sync Profiles Group Settings Search Container - This is the base OU that we will search in for groups. This is always presented in the form of a distinguished name. All OU’s below this will also be searched. Friendly Name Field - This is the friendly name of the group that users will see when it is presented to them. Default: cn While this default is appropriate for things like email groups, if you are using groups for permissions in service providers like ClickView or Complispace then it is recommended to change this to “dn” Group Email Field - This will be the full email address of the group. If the field is not in the form of an email address it will have the default domain attached to it. So if it is set to samaccountname then it will be end up being [email protected]. If all of the groups that require synchronisation have their own mail attribute then you can set this to mail. NB if this attribute is blank on the group in the directory then it will not be synchronised. Default Group Type - This is the default group settings that will apply to email groups when they are created. Options that are available are. Copyright© 2015 Studentnet, ABN 90 001 966 892 Page 17 Studentnet, the Studentnet logo, Cloudwork and Make the Cloud Yours are all registered trademarks of Studentnet Cloudwork® Dashboard User Manual Anyone can send to group Anyone within the domain can send to the group Only group members can post Only Teachers can post Copyright© 2015 Studentnet, ABN 90 001 966 892 Page 18 Studentnet, the Studentnet logo, Cloudwork and Make the Cloud Yours are all registered trademarks of Studentnet Cloudwork® Dashboard User Manual Advanced Settings Advanced settings revolve around the setup of email domains and other such issues that arise from mail attributes that may not have enough information. It is recommended that you consult with Cloudwork about making adjustments to these settings. Figure 12 - Sync Profiles Advanced Settings Domain - This will be the default domain of any email addresses that need to be created for either users or groups. This will be used if the group does not have a proper email address in it’s set “Group Email Field” Force Mail Domain - This option will force all users to have the set domain as their email domain. This is mainly used of the mail attribute of user does not contain a valid email address. Eg for a domain all users at school (schooltest.studentnet.edu.au) have the mail attribute in the format [email protected] .While this is in the format of an email address it will not work as an email address. In this case if “Force Mail Domain” is checked then it will import that email address as [email protected] instead. Care needs to be taken when using this flag. Copyright© 2015 Studentnet, ABN 90 001 966 892 Page 19 Studentnet, the Studentnet logo, Cloudwork and Make the Cloud Yours are all registered trademarks of Studentnet Cloudwork® Dashboard User Manual Appendix A - Google Apps API Access https://www.googleapis.com/auth/admin.directory.group,https://www.googleapis.com/auth/admin .directory.orgunit,https://www.googleapis.com/auth/admin.directory.user,https://www.googleapis. com/auth/admin.reports.audit.readonly,https://www.googleapis.com/auth/admin.reports.usage.re adonly,https://www.googleapis.com/auth/drive,https://www.googleapis.com/auth/spreadsheets,ht tps://www.googleapis.com/auth/apps.groups.settings,https://spreadsheets.google.com/feeds/,http ://www.google.com/m8/feeds/ Copyright© 2015 Studentnet, ABN 90 001 966 892 Page 20 Studentnet, the Studentnet logo, Cloudwork and Make the Cloud Yours are all registered trademarks of Studentnet