1
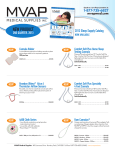
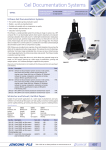
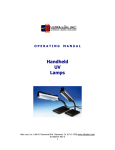
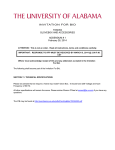
GDS-8000 Image Acquisition and Analysis System Set-Up and User Manual BIOIMAGING SYSTEMS GDS-8000 Image Acquisition and Analysis System Set-Up and User Manual UVP, Inc. 2066 W. 11th Street Upland, CA 91786 (800) 452-6788 or (909) 946-3597 Fax: (909) 946-3597 E-Mail: [email protected] Ultra-Violet Products Ltd Unit 1, Trinity Hall Farm Estate Nuffield Road Cambridge CB4 1TG UK +44(0)1223-420022 Fax: +44(0)1223-420561 E-Mail: [email protected] http:\\www.uvp.com 81-0145-02 WWW.UVP.COM 2 US Technical Support: 1.800.452.6788 UK Technical Support: +44.0.1223.420022 GDS-8000 BIOIMAGING SYSTEM Table of Contents 1. Introduction 2. Safety Information 3. GDS-8000 System Set Up A. Camera Stand 1. Assembly/Adjustment B. Darkrooms 1. Mini Darkroom 2. UV/White Darkroom 3. EpiChemi II Darkroom C. Software D. Accessories 4. 8-bit monochrome camera A. Camera B. Assembly instructions C. Zoom Lens 5. System Check Out A. Camera configuration B. Focusing 6. Image Capture Methodologies A. Non-Fluorescent Gels B. Fluorescent Gels Appendix A – Troubleshooting Appendix B – Maintenance WWW.UVP.COM 3 US Technical Support: 1.800.452.6788 UK Technical Support: +44.0.1223.420022 SECTION 1 Introduction Congratulations! You have selected the most comprehensive BioImaging Systems (GDS) available on the market today. UVP strives to keep up with the advancements in technology, and wishes to assist you in any way possible. How to use this manual: The following compilation is intended to help the user install and upgrade their darkroom systems in a step by step procedure. The first section will discuss setting up the computer hardware (computer boards, monitor, printer). Once you have completed that step, we will guide you through your darkroom and camera system. From there, the manual will outline software installation, including video board settings and acquisition software installation. The final step is setting up the capture As there are several products available, please make sure you are following the instructions for your particular system. Important Features of your system: 1. CCD Camera • GDS 8000 : 8-bit monochrome offers great image quality with varying focus and multiple darkroom options (UV/White, Mini Darkroom, EpiChemi II). 2. Computer • Minimum specifications: • Standard 8-bit camera operation. - Pentium II processor (or equivelant) - 1 GB Hard drive - 16 MB RAM - 3 ½-in floppy drive - CD ROM drive - 8 MB Video 3. LabWorks Software • Combines powerful image capture capability with sophisticated analysis options. Acquire, calibrate, and quantitate molecular weights, intensities, mass, and object counts on: • DNA, RNA, and Protein gels • Slides and specimen selections • Colony, culture, and microtiter plates • Dot and Slot blots • Films and Membranes WWW.UVP.COM 4 US Technical Support: 1.800.452.6788 UK Technical Support: +44.0.1223.420022 For EpiChemi II Darkroom customers: 4. EpiChemi II Darkroom • Overhead 254 nm UV, 365 nm UV, and fluorescent white light • Enables the user to view the setup of the experiment in the darkroom while the darkroom door is open. • Concealed viewer with UV blocking safety glass. • Enables the user to view the experiment while in progress, while protecting from UV exposure. • Completely light tight darkroom. • Allows for best analysis of experiments under low levels of phosphorescence. • Retractable, sliding transilluminator tray. • Allows for easier facilitation of experiments. • Five-Position Filter Wheel. • The filter wheel allows the user to select the specific bandpass wavelengths for the experiments the researcher would like to view. This enables the user to increase the contrast and optimize the view of their experiments under different excitation wavelengths. • 1 stained glass bandpass filter. • 3 dichroic interference filters for greater contrast. • 1 Visible/White light pass filter WWW.UVP.COM 5 US Technical Support: 1.800.452.6788 UK Technical Support: +44.0.1223.420022 SECTION 2 Safety Information Warning: All UVP High Performance Transilluminators are powerful sources of Ultraviolet (UV) radiation that can cause damage to unprotected eyes and skin. Be sure all personnel in the area are properly trained and protected before operating any unit that uses UV radiation. It is further recommended that the transilluminator be installed and operated in a darkroom where access and exposure is limited while the unit is in operation. If a darkroom is unavailable, UVP offers a wide selection of darkrooms or a shroud, which provide protection from accidental exposure. For your safety and for the safety of those around you, the transilluminator in a UVP darkroom is controlled through the darkroom, and each darkroom is equipped with a safety switch that controls the power to the transilluminator to prevent accidental exposure. Each transilluminator is shipped with an ultraviolet blocking cover. Even though the cover blocks out the UV radiation emitted by the unit, we recommend the usage of UV blocking eyewear for additional protection. WWW.UVP.COM 6 US Technical Support: 1.800.452.6788 UK Technical Support: +44.0.1223.420022 Section 3 GDS-8000 System Set Up IF YOU RECEIVED YOUR BIOIMAGING SYSTEM WITH A COMPUTER DIRECTLY FROM UVP, PLEASE SKIP TO SECTION 4: DARKROOM AND CAMERA SYSTEMS A) CAMERA STAND A. B. C. D. E. F. G. H. I. J. Crank for vertical adjustment Setscrew for vertical adjustment Crank for adjustment of the camera bracket Setscrew for camera bracket Camera platform with rubber lining and line pattern for correct positioning of the camera ¼” camera screw adjustment screws Sliding carrier Camera bracket Adjustable camera arm WWW.UVP.COM 7 US Technical Support: 1.800.452.6788 UK Technical Support: +44.0.1223.420022 ASSEMBLING INSTRUCTIONS 1. Mount the column on the baseboard, using the screws, washers and wing nuts, (see drawings A and B). 2. Mount the two cranks on the hexagonal studs in such a way that the pin of the studs engages in the recess of the cranks, (see drawing C). 1 2 ADJUSTMENT 1. Vertical adjustment is by means of crank “A”; the sliding carrier “H” is fixed in position with Setscrew “B”. 2. Horizontal adjustment of the camera bracket “J” is done by crank “C”; it is fixed in position with Setscrew “D”. 3. The recessed adjustment screws “G” are used to control smooth movement of the horizontal and vertical adjustment. An Allen type wrench is required to turn screws. MOUNTING THE CAMERA 1. Unpack the camera and fixed lens from their protective boxes and remove the protective plugs. 2. Screw the fixed lens onto the end of the C-mount of the camera. Make sure that the UV filter is on the end of the lens if doing Ethidium Bromide work. QUICK SNAP-ON MOUNT (#1 in picture C above) 1. Place the triangle onto the Adjustable Camera Arm “J” and tighten the bolt. 2. Detach the recessed square with the mounting screw by disengaging the locking lever. 3. Screw the camera onto the side that has one mounting hole. Secure the connection well. Do not worry about the spring-loaded tab. WWW.UVP.COM 8 US Technical Support: 1.800.452.6788 UK Technical Support: +44.0.1223.420022 4. With the camera facing the baseboard insert the bottom side of the square into the bottom of the recessed square on the camera arm. Push in. It should snap and secure into place. ADJUSTABLE CAMERA TRIANGLE (#2 in the picture C above) 1. Place the triangle onto the Adjustable Camera Arm “J” and tighten the bolt. Position the camera lens down and serial numbers facing out. Reach around, locate, and tighten the securing bolt of the camera to the mount. Adjust as necessary. B) Darkrooms The GDS-8000 system is a flexible system allowing users to choose from 3 darkroom options to use alongside an 8 bit non-cooled CCD camera: The Mini Darkroom is designed to digitally document test results within the laboratory. By placing a “benchtop” style transilluminator beneath the darkroom, you are able to capture low-light fluorescent and visibly stained media of various types with brightness and clarity. The UV/White Darkroom is designed to digitally document results within the laboratory. By placing either a standard format, UV/White, or a high performance transilluminator beneath the darkroom, you are able to capture low-light level media of various types with brightness and clarity. The UV/White darkroom allows for use with the UV/White combination, and larger transilluminators. The EPICHEMI II Darkroom is designed specifically for low light and fluorescence imaging. The special design incorporates a convenient accessible sliding tray for a “benchtop” transilluminator. Its many dynamic features make this the darkroom suitable for most every imaging application. WWW.UVP.COM 9 US Technical Support: 1.800.452.6788 UK Technical Support: +44.0.1223.420022 MINI DARKROOM A. Camera B. Mounting bolts and washers C. Camera mount D. Zoom lens E. Rubber light tight seal F. Darkroom door G. Transilluminator *NOTE: THE TRANSILLUMINATOR POWER CORD PLUGS INTO THE DARKROOM. THIS ENABLES THE DARKROOM DOOR TO CONTROL THE POWER SWITCH OF THE TRANSILLUMINATOR. OPEN: OFF, CLOSED: ON. WWW.UVP.COM 10 US Technical Support: 1.800.452.6788 UK Technical Support: +44.0.1223.420022 UV/WHITE DARKROOM A. Camera B. Mounting bolts and washers C. Interchangeable Camera Mount D. Zoom lens E. Optional Mounting Positions and Plugs F. Darkroom Door G. Transilluminator *NOTE: THE TRANSILLUMINATOR POWER CORD PLUGS INTO THE DARKROOM. THIS ENABLES THE DARKROOM DOOR TO CONTROL THE POWER SWITCH OF THE TRANSILLUMINATOR. OPEN: OFF, CLOSED: ON. WWW.UVP.COM 11 US Technical Support: 1.800.452.6788 UK Technical Support: +44.0.1223.420022 EPICHEMI II DARKROOM A. Mounting knobs and washers B. Camera C. Camera mount D. Zoom lens E. Rubber light tight seal F. White Light Power Switch G. 5-position Filter Control H. Master Darkroom Power Switch I. Darkroom Door J. Fold Away Chemi Tray K. Compression Door Lock L. Sliding Transilluminator Drawer *Note: The transilluminator is powered from the inside of the darkroom, which allows the transilluminator to be controlled from external darkroom switches. 1. Unpack the EpiChemi II Darkroom and Benchtop transilluminator from the packaging materials. 2. Assemble the two together by placing the transilluminator on the sliding tray of the darkroom. Plug the Transilluminator in by using the internal power cord found inside the darkroom. WWW.UVP.COM 12 US Technical Support: 1.800.452.6788 UK Technical Support: +44.0.1223.420022 C) Software Computer The computer power cable should plug directly into a power strip or surge protector. Find and locate the mouse, keyboard, and other accessories, plug in and secure all connections. Start up the computer once all of the connections have been made and the power is attached. Software Installation Windows 98 1. Insert the UVP software CD in to the CDROM drive to load the image acquisition software found on the LABWORKS CD. Windows 98 should automatically detect and bring you to the SET UP OPTIONS menu of the software. If this does not work, double click on the main computer icon (usually called “My Computer” ) on the desktop. Then double click on the CD ROM drive. The installation wizard will run the installation program now. 2. The installation dialogue box will appear. 3. Install the software first by double clicking on either the LABWORKS icon. This will take you through an Install Shield Wizard and guide you through installation. 4. Choose NEXT and follow the instructions closely. The destination directory should be LABWORKS. 5. Click on NEXT. 6. The Installation Type should be TYPICAL. Program folders should be LABWORKS4, choose NEXT. 7. This will go through the LABWORKS or Setup. After this is completed the dialogue box will prompt you with “Installation completed. Would you like to install the Capture Kit now?” Choose YES. 8. This takes you through another Install Shield Wizard. Under the dialogue box WELCOME, click on BROWSE. 9. Choose the folder (LABWORKS) that you installed the software in. 10. Choose OK and then NEXT. This will install the Pro Series MV Capture Kit. 11. When installation is complete click on FINISH. 12. The computer will ask you if you would like to reboot the computer for the changes to take effect. Select YES and allow the computer to reboot in order for the desired software to be operational. If you need to install the Capture Driver only: 1. Insert the LABWORKS CD and allow it to autorun. If your computer does not take you to the InstallShield Wizard, double click on your main computer icon (typically “My Computer”) and select the CD ROM drive to run the InstallShield Wizard. WWW.UVP.COM 13 US Technical Support: 1.800.452.6788 UK Technical Support: +44.0.1223.420022 2. Click on the button with the camera icon to select capture driver installation. Click NEXT. Exit all open programs. 3. The capture driver needs to be installed into the LABWORKS folder. If the listed location is not the correct folder, click BROWSE and locate the LABWORKS folder. Once you have found the correct folder, click OK and then NEXT. The driver will be installed. 4. When installation is complete click on FINISH. Windows NT 1. First load the software found on the LABWORKS CD. This is done by loading the UVP software CD. Win NT should initially detect and bring you to the SET UP OPTIONS menu of the software. If this does not work go to the “My Computer” icon and double click. Double click on the CD ROM drive. The dialogue box should now appear. 2. Install the software first by double clicking the LABWORKS icon. This will take you through an INSTALL SHIELD WIZARD and guide you through installation. 3. Choose next and follow the instructions closely. The destination directory should be LABWORKS. Click on Next. 4. Selection of Installation Type should be Typical. 5. Program folders should be LABWORKS4, choose NEXT. 6. This will go through LABWORKS Setup. After this is completed the dialogue box reads, “Installation completed. Would you like to install the Capture Kit now?” Choose Yes. 7. This takes you through another Install Shield Wizard. Under the dialogue box “Welcome”, click on Browse. 8. Choose the directory, (LABWORKS) that you originally installed the software in. Choose OK and then NEXT. This will install the Pro Series MV Capture Kit. 9. When installation is complete click on FINISH. If you need to install the Capture Driver only: 1. Click on the BROWSE button 2. Change the lookup file drive designation to the CD ROM drive. 3. Click on the CAPTURE FOLDER 4. Click on DISK 1 5. Chose Winnt40 6. Run OEMSETUP 7. Click OK, 3 times 8. YES you wish to proceed 9. The display properties window should still be open 10. Change the color palette setting to 16777216 colors 11. Change the desktop area to 1024x768 (recommended) 12. Click on APPLY 13. Do not restart WWW.UVP.COM 14 US Technical Support: 1.800.452.6788 UK Technical Support: +44.0.1223.420022 14. Click on START 15. Click on SETTINGS 16. Click on CONTROL PANEL 17. Select MULTIMEDIA 18. Choose DEVICES tab 19. Click on the ADD button 20. Highlight the UNLISTED OR UPDATED driver then click ok 21. Install driver window 22. Click BROWSE and double click on C: 23. Double click on LABWORKS4 folder, then double click on WinNT folder, and click OK twice 24. Click OK with the listed driver. Close all windows and reboot the computer For Win NT one further configuration is required. 1. Updating the Capture Kit drivers. 2. Go to START, SETTINGS, CONTROL PANEL, and double click on MULTIMEDIA. 3. Go to the DEVICES tab and make sure “Add unlisted or update drivers,” is highlighted and choose OK 4. Browse at the Install Drivers window, double click on C:/ LabWorks/WinNT. 5. Click OK until the Install Driver box reads C:/LabWorks/Win NT. 6. Click OK 7. Add unlisted or updated drivers. 8. Select CapKit Video. 9. Choose OK until finished. Restart the computer for these changes to take place. WWW.UVP.COM 15 US Technical Support: 1.800.452.6788 UK Technical Support: +44.0.1223.420022 Installing the Capture Kit Board Note: The Capture Kit Board is relatively easy to install. If, however, you have reservations about installing it, we recommend that you ask an experienced technician to do so. If someone is not available, call UVP technical support for further instructions. 1. Be sure the power to your computer, monitor and other peripheral devices are turned off. You can cause damage to the components in your computer if you attempt to remove or insert boards with the power on. 2. Ground yourself to remove static electricity. Static electricity can cause damage to your system components. To discharge your body's static electricity, touch a grounded surface. This might be a grounding mat or grounding wrist strap. Or, before unplugging the computer power cord, you can usually ground yourself by touching any part of the system's bare metal (unpainted) chassis. Discharge static electricity periodically while installing your Capture Kit Board. 3. Unplug the computer from its power outlet. This will ensure that no power is available to the computer while you are exchanging boards. Note, however, that you will no longer be able to use the computer chassis for discharging static electricity. WWW.UVP.COM 16 US Technical Support: 1.800.452.6788 UK Technical Support: +44.0.1223.420022 4. To remove the computer cover, remove the screws from the back of the case and slide the case off the computer. Note: A tower-shaped computer is illustrated here. If you have a desktop computer, the motherboard is on the bottom rather than the side, as shown in the next picture. 5. Install the Capture Kit board into the PCI slot. Take the new board out of the anti-static bag. Hold it by the edges to prevent damage to the components or the edge connectors (the gold-colored “fingers” that extend from the board). 6. Still holding it by its edges, gently but firmly seat the “fingers” into the PCI slot. Avoid touching the “fingers” themselves or any component part on the board. When the board is seated in the slot, secure the card to the chassis with the screw provided. Place the VGA board you just removed into the anti-static bag for protection. 7. Replace the computer cover by sliding the cover back into place, and use the screws that you removed in Step 5 to refasten it onto the chassis. WWW.UVP.COM 17 US Technical Support: 1.800.452.6788 UK Technical Support: +44.0.1223.420022 D) ACCESSORIES Printer and Security Dongle Unpack the Thermal Printer and place this alongside the computer. The printer is supplied with a separate instruction manual giving full operation and service details. The printer driver is preloaded on the computer. You have been supplied with a printer cable that should be connected at one end to the security dongle provided with the software, which is connected to the LPT1 parallel out-port of the computer, and into the Centronics port of the printer at the other end. A power cable should be connected between the electrical supply and the printer. Power ON/OFF Press the switch at the top left-hand corner of the front panel. -The indicator light glows while the power is on. Loading Paper 1. Ensure the power is ON. 2. Press the open/close lever to open the paper door. 3. Place the paper roll in the printer ensuring that the thermosensitive side is up. 4. Pull out the first 15-20cm of paper to remove any slack in the roll. 5. Push the paper door closed. PRINTER DRIVER INSTALLATION To add a printer to the GDS 8000 the procedure is as follows: 1. Go to the START menu. 2. SETTINGS 3. PRINTERS 4. Choose ADD PRINTER. This will take you through the printer set up wizard. 5. When appropriate choose HAVE DISK. 6. Select BROWSE. Select the appropriate operating system and choose O.K. Follow the wizard’s instructions. Note: For more specific information about the Thermal Printer, refer to the Operation Manual supplied with the printer. WWW.UVP.COM 18 US Technical Support: 1.800.452.6788 UK Technical Support: +44.0.1223.420022 The printer power cable should plug directly into the wall or a power strip. The data cable for the printer is a 25pin parallel connector. This 25-pin connector will plug into the female equivalent in the back of the computer. This plug looks identical to that of the Image Acquisition Board where you should have already plugged in the camera. Do not plug this into the slot adjacent to the monitor plug, or the video board will be rendered useless! Find the open 25 pin female slot, this is the printer port. As soon as this port has been identified, locate the Security Dongle, supplied with the software package. This will be a small “key” that will fit between the computer and the printer cable. When you have secured this dongle onto the printer port on the back of the computer, plug the printer cable directly into the back of the dongle. WWW.UVP.COM dongle Once the computer end of the cord is secured, locate the other end and plug it into the designated port on the printer. Plug in and secure the clips. 19 US Technical Support: 1.800.452.6788 UK Technical Support: +44.0.1223.420022 Section 4 8-BIT MONOCHROME CAMERA A) Camera 8-BIT MONCHROME 1. The camera power should plug directly into the back of the computer. Locate the camera cable. This will have a 25 pin male parallel connector on one end, a BNC connector, an 8-pin connector as well as 2 open wires on the other end. The BNC (video) connector plugs into the video socket on the camera. The 8-pin connector connects into the AUX port on the camera. Loosen the two screws to the right of the video port. Insert the power cables and tighten the screws. Be sure the cables do not wiggle loose. Once these connections are secure, plug the other end into the Image Acquisition Board. This 25 pin female connector on the computer is adjacent to where the monitor cord is plugged in. If you purchased a computer with your system, you have completed hooking up your camera! Please proceed to the Camera Assembly section. • Power Cables (plug either wire into either slot) • Video Cables WWW.UVP.COM 20 US Technical Support: 1.800.452.6788 UK Technical Support: +44.0.1223.420022 The Camera you have purchased comes equipped with an internal power supply that should be installed in the computer as follows: 2. Turn off and unplug the computer and any peripherals. 3. Remove protected plate and insert power supply into the open slot. 4. Locate the power supply on the computer and the wires that connect to it; there should be a 4pin female connector on one end. Plug in the 4-pin male connector, from what you have just installed, to the 4-pin female connector. The computer should now supply power to the camera. Then connect the 8pin camera power cable and the internal Power Plug that was just installed. 5. Once these connections are secure, plug the other end into the Image Acquisition Board. This 25 pin female connector on the computer is adjacent to where the monitor cord is plugged into. WWW.UVP.COM 21 US Technical Support: 1.800.452.6788 UK Technical Support: +44.0.1223.420022 B) 8-bit Monochrome CCD Assembly and Installation instructions MOUNTING THE CAMERA 1. Unpack the camera and zoom lens from their protective boxes and remove the protective plugs. 2. Screw the zoom lens into the end of the camera housing. Make sure that the UV filter is on the end of the lens if doing Ethidium Bromide work. *Note: When using the EpiChemi II darkroom the UV filter is not necessary on the lens. 3. To attach the camera bracket to the top of the darkroom place the black rubber gasket over the four screw holes and align the camera mount. Screw in the (4) provided screws to attach the camera mounting bracket and light sealing gasket to the top of the darkroom. The slots for the mounting bolts should face the front and back of the darkroom. • WWW.UVP.COM Light Sealing gasket 22 US Technical Support: 1.800.452.6788 UK Technical Support: +44.0.1223.420022 4. Then slide the camera into the camera bracket with the serial numbers facing forward. • Serial Numbers 5. Elevate the camera assembly 1/8” and screw the mounting bolts into the camera. Tighten, straighten, and secure. Make sure the zoom lens and the light sealing gasket are situated properly. WWW.UVP.COM 23 US Technical Support: 1.800.452.6788 UK Technical Support: +44.0.1223.420022 C) Zoom Lens Zoom lens features: Components of the zoom lens are as follows: 1. Top Ring: f-stop. This ring controls how much light the camera will see. 2. Middle Ring: Zoom. This ring controls the field of view that the camera will image. 3. Bottom Ring: Focus. This will adjust the sharpness of the image the camera will image. 4. Diopters: A +2 diopter is included. This is necessary to enable Auto Focus. 5. Filters: The colored filters will remove unwanted wavelengths from being passed through to the image. The filters are attached by screwing on to the end of the zoom lens. WWW.UVP.COM 24 US Technical Support: 1.800.452.6788 UK Technical Support: +44.0.1223.420022 Section 5 SYSTEM CHECK OUT A) Camera Configuration The camera will need to be configured once the system is operational. The settings are factory set on systems bought with computers. Otherwise some necessary adjustments may be needed. If the camera is not working properly: 1. 2. 3. 4. 5. Click on the camera icon. Go to SETUP. Make sure the type of camera is correct, either NTSC or PAL. CONFIGURE. Make sure the correct camera is selected. Check by clicking on START PREVIEW. If the camera is still not working make sure that the driver for the video board has been installed properly. B) Focusing • • • Turn on the white lights in the darkroom. Insert a printed piece of text with black and white lettering. Open LabWorks, and click on the Camera Icon (Video/Digital Capture). • • Select live preview. Locate the f-stop adjustment (top lens ring) and turn it counterclockwise until light is seen on the image. If you have a zoom lens, locate the zoom adjustment (middle lens ring) and turn it clockwise so the image is as large as possible. Note image will in most cases not be in focus. If you have a fixed lens there is no need for adjustment. Locate the Focus adjustment (the bottom ring) and turn it until text appears clear and in focus. Adjust the f-stop again to the correct amount of light, which will make the blacks appear black and the whites appear white. • • • *Note once the camera is in focus, you may adjust the zoom without losing the focus. WWW.UVP.COM 25 US Technical Support: 1.800.452.6788 UK Technical Support: +44.0.1223.420022 Section 6 Image Capture Methodologies A. Non-Fluorescent Gels (Protein Gels) Transmitted White Light • Coomassie Blue • Sliver Stain • SYPRO Red • SYPRO Orange NO INTEGRATION NECESSARY 1. 2. 3. 4. 5. 6. 7. 8. 9. 10. Make sure the Ethidium Bromide filter is not on the lens or selected on the darkroom. Open up LabWorks. Click on the Camera Icon. Open up the Integration tab. Click on the start Preview icon. Place the UVP gel cutter on the transilluminator. Zoom in all the way and focus. Adjust the light shutter on the zoom lens. Make sure Accumulate, Integrate, and Dynamic Integration are NOT checked. Click the Capture button to capture the image. B. Fluorescent Gels (DNA/RNA Gels) Transmitted UV Light • Ethidium Bromide • SYBR Green • SYBR Gold • Fluorescein • Rhodamine • Texas Red WWW.UVP.COM 26 US Technical Support: 1.800.452.6788 UK Technical Support: +44.0.1223.420022 Usually requires integration to make stained bands appear. To increase the brightness of the bands, increase the integration time. 1. 2. 3. 4. 5. 6. 7. 8. 9. 10. 11. 12. Make sure the appropriate filter for the right stain is on the lens or selected on the darkroom. Open up LabWorks. Click on the Camera Icon. Open up the Integration tab. Click on the Start Preview Icon. Place the UVP Gel cutter on the transilluminator. Zoom in all the way and Focus. Adjust the light shutter on the zoom lens. Check the Integration box and set the integration seconds to the desired exposure. Make sure Accumulate and Dynamic Integration are not checked. Click the Capture button to capture image. If the image captured is not satisfactory, adjust the integration tab and repeat steps 9-11. WWW.UVP.COM 27 US Technical Support: 1.800.452.6788 UK Technical Support: +44.0.1223.420022 Appendix A – Troubleshooting Guide Can not capture Image. When selecting the Camera Icon on the toolbar, there is a tab named Signal tab, which has an option called External Trigger, please make sure this option is NOT checked. The only way to capture image if this option is checked is to press any key on the keyboard, this acts as the external trigger. Can not view live preview, or image shows red or gray. Remove all PCI, ISA, or EISA boards, the situation that we had arise within a PC came from a third party sound card, which was an ISA board. Macros become Disabled. When naming a file to print, do not name the file PRINT, or else the Macros will be disabled. When I select live preview I get an image of black dots on a white background. Check your camera settings by clicking on the camera icon. Make sure the appropriate camera driver is selected. I do not see a live preview through my camera. Check to make sure you have power going to your camera and that all of your cables are properly connected. Also make sure your aperture is opened all the way to get the most light in. Appendix B – Maintenance Cleaning: Zoom or fixed lens ; gently wipe the glass surfaces with a lens cloth, do not use any abrasives or detergents. Transilluminator ; gently wipe with a non-abrasive cloth to clean. You can use distilled or deionized water to rinse the surface. Folddown platform ; wipe with a non-abrasive cloth to clean. You can use distilled or deionized water to rinse the surface. WWW.UVP.COM 28 US Technical Support: 1.800.452.6788 UK Technical Support: +44.0.1223.420022