1
1
BPM Studio 2.0 gastro edition
2
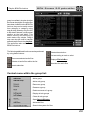
Inhalt
BPM Studio 2.0 gastro edition
Inhalt
Einführung
Über dieses Handbuch .................................
Systemanforderungen ...................................
Verpackungsinhalt ........................................
4
4
4
Softwareinstallation ......................................
Der erste Programmstart .............................
4
4
Installation
Hauptmodule
Die Hauptmodule ......................................... 5
Der Player ................................................... 5
Die Playliste ................................................. 7
Das BPM File Archiv ..................................... 8
Der File Editor ............................................ 10
Die File Info Box ......................................... 13
Programmoptionen
Die Programmoptionen ................................ 13
Zusatzfunktionen
Die Normalize-Funktion ................................
Der Suchen-Dialog ......................................
Die Preview-Player ......................................
Die Backup-Funktion .....................................
15
15
15
15
Tips und Hinweise ........................................ 16
Tastaturbelegung .......................................... 16
Systemanforderungen
Für die Nutzung von BPM Studio benötigen Sie
folgende Hardware und Software:
• IBM PC mit Pentuim II Prozessor und
einer Taktfrequenz von min. 350 MHz
• min. 128 MB Arbeitsspeicher
• Mindestens 10 MB Festplattenspeicher
für die Installation von BPM Studio
• SVGA-Grafikkarte mit einer
Auflösung von 1024 x 768 Pixel
• 1 16 Bit Soundarte (empfohlen: 6 Soundkarten bzw. Multikanal-Karte)
• 24-fach CD-ROM Laufwerk
• Windows 95, Windows 98
oder Windows NT ab Version 4.0
3
BPM Studio 2.0 gastro edition
Einführung
Herzlichen Glückwunsch zum Er- Verpackungsinhalt
Bitte prüfen Sie, ob folgende Teile
werb von BPM Studio!
Die BPM Studio gastro edition ist ein speziell für
die Gastronomie entwickelter MP3-6fach-Player.
Der Player ermöglicht die Beschallung von bis
zu 6 verschiedenen Gebäudebereichen zentral
von einem PC aus mit einer Multichannel-Soundkarte.
Zum Einlesen der Audio-CDs und komprimieren
in das MP3 Format ist der BPM Grabber im Paket enthalten. Dieser kann bei Bedarf zusätzlich
gestartet werden. Das File Archiv der gastro
edition ist kompatibel zu dem File Archiv der Standardversionen BPM Studio light bis professional.
vorhanden sind:
1. BPM Studio CD
2. Dongle
3. Handbuch BPM Studio gastro edition
4. Handbuch BPM Studio grabber
5. Registrierungskarte
BPM Studio ist außer in der hier vorliegenden
gastro edition in 3 weiteren Versionen für den professionellen Einsatz erhältlich:
1. Legen Sie die Installations-CD in Ihr
CD-ROM-Laufwerk ein
• BPM Studio light
• BPM Studio home
• BPM Studio professional
mit externem 19'' Bedienteil
Weitere Informationen erhalten Sie auf unserer
Homepage unter www.alcatech.de oder bei Ihrem Fachhändler.
Über dieses Handbuch
Im BPM Studio Handbuch finden Sie ausführliche Informationen über die Bedienung der Softund Hardware. Es soll Ihnen helfen, den Umgang
mit dem Programm zu erleichtern und Ihnen Antworten auf häufig gestellte Fragen geben.
Bevor Sie dieses Handbuch durcharbeiten, empfiehlt es sich, die Software zu installieren. Befolgen Sie hierzu die Anweisungen im nachfolgenden Kapitel. In diesem Kapitel werden außerdem
die Systemanforderungen beschrieben.
Dieses Handbuch setzt voraus, daß Sie mit den
wichtigsten Funktionen und Konventionen Ihres
Betriebssystems vertraut sind und wissen, wie
man mit der Maus arbeitet.
4
Softwareinstallation
Das Programm muß von der Anwendungs-CD auf
Ihre Festplatte installiert werden. Sie können es
nicht von der CD starten.
2. Wenn Ihr Computer auf automatisches
Erkennen eines CD-Wechsels
eingestellt ist, startet jetzt das
Installationsprogramm. Wenn dies nicht
der Fall ist, wählen Sie „Ausführen“
im Windows95/98-Startmenü
und geben ein: „D:\setup.exe“,
wobei D der Laufwerksbuchstabe
Ihres CD-ROM-Laufwerkes mit der
Installations-CD sein muß.
3. Befolgen Sie die Anweisungen auf
dem Bildschirm, um die Programmdateien zu installieren.
4. Wenn die Installation abgeschlossen
ist, wird eine entsprechende Meldung
angezeigt.
Der erste Programmstart
Doppelklicken Sie auf das Programm-Icon, welches auf dem Desktop angelegt wurde oder wählen Sie im Startmenü [PROGRAMME]
[ALCATech] [BPM-Studio].
An dieser Stelle können Sie noch BPM Studio
als Ihren bevorzugter Player festlegen. (Bei
Doppelklick im Windows-Explorer auf WAVE- oder
MP3-Dateien startet dann der BPM Studio
Player.) Danach können Sie die Arbeit mit BPM
Studio beginnen.
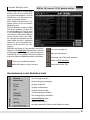
BPM Studio 2.0 gastro edition
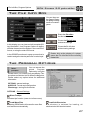
Hauptmodule, Player
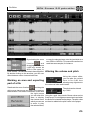
Die Hauptmodule
Das Hauptprogramm unterteilt sich in 6 Player/Playlist-Module (1-6) und dem BPM File Archiv (7).
Der Player
Ändern des Playernamens:
Zur besseren Übersichtlichkeit kann jedem Player ein
Name zugewiesen
werden.
Der Player steuert die Wiedergabe der
Audiodateien oder, mit dem gleichen Funktionsumfang, das CD-ROM-Laufwerk, falls Audio-CDs
eingelegt sind. Neben den Funktionen eines analogen CD-Players stehen durch die digitale Verarbeitung der Audio-Daten eine große Anzahl zusätzlicher Funktionen zur Verfügung.
Alle Titel können per Drag & Drop aus den
Playlisten oder dem BPM File Archiv übernommen und abgespielt werden. Auch ein Doppelklick in der zugehörigen Playliste lädt und startet den Titel im Player. Es besteht weiterhin die
Möglichkeit, über das Kontextmenü einen beliebigen Titel von der Festplatte zu laden.
5
BPM Studio 2.0 gastro edition
Player
Die Anzeige des Players
Track-Tasten:
springt zum Titelanfang, wenn der Titel
weniger als 2 Sekunden gelaufen ist,
wird der vorhergehende Titel geladen
Lädt den nächsten Titel
in den Player
Positionsslider
Die Anzeige unterteilt sich grundsätzlich in 2 Bereiche. Im oberen Bereich wird links die Position
des Titels in der Playliste angezeigt (TRACK). Der
mittlere Bereich zeigt wahlweise die vergangene
Spielzeit (ELAPSED) oder die noch verbleibende Spielzeit (REMAIN). Duch einen Klick auf diesen Bereich oder auf die TIME-Taste schaltet die Anzeige jeweils um.
Search-Tasten:
Tasten für den schnellen Vorbzw. Rücklauf.
Playmodi (Schalter):
Single Play, stoppt beim nächsten Titel
Loop, wiederholt die Playliste ständig
spielt die Titel aus der Playliste
zufällig
Hauptfunktionen:
Im rechten, oberen Bereich wird die mit dem Lautstärkeregler eingestellte Lautstärke angezeigt.
Im unteren Bereich befindet sich links eine Ressourcen-Anzeige (Audiodaten-Pufferspeicher).
Daran schließt sich eine umschaltbare Pegelanzeige an. Es sind 8 verschiedene Betriebsmodi
umschaltbar.
Play / Pause
5 Sekunden vor Ende der Spielzeit blinkt
diese Anzeige rot und signalisiert damit
das bevorstehende Ende des Titels.
STOP
Kontextmenü im Player
Entfernen des Titels aus dem Player
Laden einer Audiodatei direkt in den Player
File Info Box zum geladenen Titel anzeigen
File Editor starten
Suchen-Dialog öffnen
Normalize-Funktion für diesen Titel ausführen
Löschen der Cue-Punkte, Fades und des Playcounters
Dialogfeld für die Programmoptionen öffnen
6
Playliste
BPM Studio 2.0 gastro edition
Die Playliste
Legt eine leere Playliste an
Lädt eine Playliste
Speichert eine Playliste
Fügt eine Audiodatei hinzu
Entfernt einen Titel aus der Playliste
Wählt alle Titel in der Liste aus
Die Playlisten sind ebenfalls identisch aufgebaut.
Sie dienen der komfortablen Titelzusammenstellung bis hin zu einem kompletten Programmablauf. In der Playliste werden Titel, Interpret und
Spieldauer der Audiodatei angezeigt. Die AudioDatei, welche sich im Player befindet, wird weiß
dargestellt. Der blaue Balken markiert eine
Audiodatei.
Alle Playlisten können als Playlist-Dateien (*.LST)
gespeichert werden.
Wurde die Datei im File-Editor
bearbeitet, dann wird sie mit einem grünen Rechteck markiert.
Eine bereits gespielte
Audiodatei (mind.
1 Minute im Player) wird mit einem
roten Rechteck markiert.
Grundsätzlich gibt es 3 Möglichkeiten,
Audiodateien in die Playliste einzufügen: Über das
Kontextmenü direkt von der Festplatte, per Drag
& Drop aus der anderen Liste oder dem BPM
File Archiv und über den Button
. Die Reihenfolge wird ebenfalls per Drag & Drop verändert. Dabei erleichter ein roter Pfeil
das Einsortieren. Einen Titel können Sie per Drag & Drop, Kontextmenü oder
Doppelklick in den Player übernehmen. Je nach
Grundeinstellung des Programms wird dieser
dann sofort gespielt oder der Player stellt sich
am Titelanfang auf Pause. Folgende weitere Funktionen stehen zur Verfügung:
Öffnet die File Info Box
Die Funktionen des Statusfensters im rechten
unteren Bereich der Playliste sind durch Mausklick umschaltbar:
zeigt die Anzahl
der in der Liste vorhandenen Titel
zeigt die Gesamtspielzeit der Liste
zeigt die Restspielzeit der Liste
Durch die Möglichkeit des Abspeicherns von
Playlisten können Sie komplette Programmabläufe erstellen. Die Originaldateien der Titel werden
jedoch nur einmal im System gespeichert, auch
wenn sie in verschiedene Playlisten eingefügt
sind.
Auch der Import von Playlisten anderer Systeme
und Player wie zum Beispiel WinAMP ist möglich, die Version 1.5 von BPM Studio importiert
die Formate *.m3u und *.pls.
Klickt man mit der Maus neben den
Sliderregler auf die Skala, dann wird
der Regler automatisch langsam in die
jeweilige Richtung bewegt.
7
BPM Studio 2.0 gastro edition
Kontextmenü in der Playliste
Titel in den Player laden
Titel im Monitor-Player abspielen
Titel aus der Playliste entfernen
Audiodatei(en) zur Playliste hinzufügen
File Info Box für ausgewählte Datei aufrufen
File Editor für ausgewählte Datei aufrufen
Suchen-Dialog öffnen
Normalize-Funktion starten
Playcounter zurücksetzen
Dialogfeld für die Programmoptionen öffnen
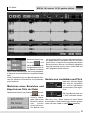
Das BPM File Archiv
Das BPM File Archiv dient dem komfortablen
Importieren und Verwalten der Audiodateien. Auf
der linken Seite haben Sie die Möglichkeit, eigene Kategorien anzulegen. Auf der rechten Seite
wird der Inhalt der Kategorien angezeigt.
Es werden alle geladenen Titel mit allen Informationen wie Titel, Interpret, Version, Format und
die Spieldauer dargestellt.
Über die Tasten
und
haben Sie die Möglichkeit, Audiodateien in diese Kategorien zu importieren. Diese Funktion ist auch über das
Kontextmenü des BPM File Archiv zu erreichen.
Der Unterschied zwischen
und
besteht
darin, daß mit
einzelne Dateien und mit
ganze Unterverzeichnisse bis hin zu einer gesamten Festplatte importiert werden können. Im
8
Playliste
BPM Studio 2.0 gastro edition
Playliste, BPM File Archiv
LOAD DIRECTORY Dialog (Bild)
können Sie mit den beiden Buttons unten links angeben, ob auch
WAVE-Files und Unterverzeichnisse mit geladen werden.
Beim Laden überprüft das Programm sofort, ob die zu Dateien
abspielbar sind.
Sind die Dateien einmal im BPM
File Archiv geladen, können Sie
sie komfortabel per Drag & Drop
in die verschiedenen Kategorien
verschieben. (Sie ändern dadurch
immer nur den Link zu den Dateien, niemals den Standort der Dateien selbst auf der Festplatte!)
Hiermit ist ein komfortables Sortieren und Archivieren der Titel
möglich.
Ebenfalls per Drag & Drop werden die AudioDateien in die Playlisten übernommen und dort
an beliebiger Stelle eingefügt. Dabei bleiben sie
im BPM File Archiv erhalten. Weitere Funktionen
sind über folgende Bedienelemente ausführbar:
Kehrt die Auswahl um
Hebt die Auswahl auf
Sortierung nach Titel oder Interpret
Entfernt die markierten Dateien
Öffnet die File Info Box
Wählt alle Dateien in der Liste aus
Sucht nach einem Titel
Kontextmenü in der Rubriken-Liste
Neue Gruppe anlegen
Neue Untergruppe anlegen
Gruppe entfernen
Gruppe umbenennen
Gruppeninhalt löschen
Alle Untergruppen zeigen
Alle Untergruppen schließen
Suchen-Dialog öffnen
Dateien hinzufügen
auf dem gesamten System nach Dateien suchen
9
BPM Studio 2.0 gastro edition
File Editor
Kontextmenü in der Titelliste
Titel im Monitor-Player abspielen (entspricht Doppelklick)
ausgewählte Dateien entfernen
Dateien hinzufügen
File Info Box für ausgewählte Datei aufrufen
File Editor für ausgewählte Datei aufrufen
Suchen-Dialog öffnen
Normalize-Funktion starten
Titel zurücksetzen (Cue-Punkte, Fades, Playcounter)
Dialogfeld für die Programmoptionen öffnen
Der File Editor
Mit dem File Editor ist es möglich, einzelne Sequenzen aus einer Datei herauszuschneiden oder
Cue-Punkte taktgenau festzulegen. Die CuePunkte werden in BPM Studio gastro edition nicht
berücksichtigt, diese Funktionalität dient der Kompatibilität des File Archiv mit den anderen Versionen von BPM Studio.
ihrer vollen Länge angezeigt. Hierdurch behalten
Sie den Überblick über die Datei und können
schnell zu jeder beliebigen anderen Stelle der
Datei wechseln. Das obere Fenster dient zum
Editieren der Datei, setzen von Cue-Punkten,
Anfangs- und Endpunkt oder dem Selektieren
eines Bereiches und Export in eine neue Datei.
Laden eines Titels und Anzeige
Ändern des Anzeigebereiches
Beim ersten Laden einer Audiodatei werden zunächst Peaks gebildet und gespeichert.
Es gibt zwei verschiedene Möglichkeiten, den
Anzeigebereich des oberen Arbeitsfensters zu
ändern: Verändern Sie die
Breite oder
Verschieben
Sie die Position
des
Bereichsbalkens zwischen dem oberen und unteren Arbeitsfenster. Es
wird immer im oberen Fenster der Bereich angezeigt, welcher mit dem Bereichsbalken über dem
unteren Fenster markiert ist. Im Bereichsbalken
wird die Spieldauer angezeigt, wenn dieser breit
genug ist.
Durch dieses Verfahren müssen an der Datei
selbst keine Veränderungen vorgenommen werden, die Datei bleibt im Original erhalten. Die
Peaks werden separat auf der Festplatte gespeichert, in den Programmoptionen kann festgelegt werden, ob diese bei Programmende gelöscht werden (platzsparender) oder auf der Festplatte verbleiben (zeitsparender).
Nach dem Laden wird die Audiodatei grafisch
dargestellt. Der File Editor besitzt 2 Arbeitsfenster.
Im unteren Fenster wird die Audiodatei immer in
10
BPM Studio 2.0 gastro edition
File Editor
Aktivieren Sie die LupeFunktion
und
ziehen Sie mit der rechten Maustaste über einen Bereich im oberen
oder unteren Arbeitsfenster. Der invers dargestellte Bereich wird anschließend vergrößert dargestellt.
Durch Doppelklick auf den Bereichsbalken können Sie zwischen Zoomansicht und Gesamtansicht wechseln.
Markieren eines Bereiches und
Export eines Teils der Datei
rot hinterlegt. Mit der rechten Maustaste können
Sie diesen Bereich verändern oder ein Kontextmenü öffnen, in dem Sie hier nochmals auf diesen
Bereich zoomen können, den Bereich abspielen
oder den Bereich als eine neue *.WAV-Datei auf
die Festplatte kopieren können.
Ändern von Lautstärke und Pitch
Über den Volume-Regler
läßt sich die Lautstärke
von -inf bis 0 dB ändern
und an andere Titel angleichen.
Deaktivieren Sie die Lupe-Funktion
und zieDer Pitch-Bereich kann um
+/- 20% verändert werden.
hen Sie mit der
rechten Maustaste über einen Über die + und - Tasten lassen sich diese Werte
Bereich im oberen fein einstellen. Diese Änderungen werden gespeioder
unteren chert und beim Laden in den Player beachtet.
Arbeitsfenster.
Der Bereich wird
11
BPM Studio 2.0 gastro edition
Die Werkzeugleiste
Die Funktion der Marker
STOP - Stopt das Abspielen
im File Editor
Mit den 4 verschiedenen Markern werden bestimmte Positionen oder Abschnitte markiert.
Änderungen werden über Kontext-Menüs in der
Marker-Zeile oder mit der Maus vorgenommen.
PLAY - Startet das Abspielen
im File Editor
REWIND - Springt während des Abspielens zum Anfang des markierten
Bereiches (bzw. zum Titelanfang,
wenn kein Bereich markiert ist) bzw.
setzt (bei STOP) den Locator zum Anfangspunkt
zurück
LOOP - Spielt den markierten Bereich
(blauer Marker) / den Titel in einer
Endlosschleife
ZOOM - schaltet die rechte Maustaste
um zwischen Lupe- und MarkierenFunktion
Stellt die Audio-Datei in Wave-Form dar
Stellt die Audio-Datei in Form von
Punkten dar
Die Kontextmenüs stehen nur zur
Verfügung, wenn sich der File Editor im
Pause-Modus befindet.
Der rote Locator kennzeichnet die aktuelle
Spiel- bzw. Pause-Position und ist vergleichbar
mit dem Positionsslider in den Playern und
Monitorplayern. Durch Klick mit der linken Maustaste wird die Position dieses Markers festgelegt.
Die blauen Einstiegs- und Endmarker
markieren den Anfang und das Ende des Titels.
Mit der Maus legt man hier den neuen Anfangsund Endpunkt des Titels fest.
Die gelben Cue-Punkt-Marker legen die CuePunkte fest. Auch sie können mit der Maus taktgenau positioniert werden. Über das KontextMenü der Marker-Zeile können neue Cue-Punkte hinzugefügt werden.
Der blaue Cue-Punkt-Marker stellt den aktiven Cue-Punkt dar. Er wird in der Cue-Punkt-Liste rechts oben, im Kontext-Menü der CUE- oder
CUP-Tasten des Players oder über das KontextMenü der Marker-Zeile festgelegt.
Die Kontextmenüs der Marker-Zeile
Über die Marker-Zeile erhalten Sie folgendes Kontext-Menü:
Cue-Punkt an dieser Position hinzufügen
Setzt den Anfangsmarker
Setzt den Endmarker
Bei den Cue-Punkt-Markern
auf diese Position
auf diese Position
ändert sich das Kontext-Menü wie folgt:
diesen Cue-Punkt als Standard-Cue-Punkt festlegen
diesen Cue-Punkt löschen
Setzt den Anfangsmarker
Setzt den Endmarker
12
File Editor
auf diese Position
auf diese Position
File Info Box, Programmoptionen
BPM Studio 2.0 gastro edition
Die File Info Box
richtungen zuordnen kann.
Über den Suchen-Dialog lassen sich auf diese Weise schnell
Titel aus einer
bestimmten
Musikrichtung finden.
startet den File Editor für diesen
Titel
schließt die File Info Box und
übernimmt die Einstellungen
In der File Info Box kann der komplette ID3-Tag
editiert werden. In den Programmoptionen wird
festgelegt, ob dieser dann im neuen ID3v3-Format oder im alten ID3-Format geschrieben wird.
Für das Feld GENRE existiert ein Popup-Menü,
in welchem man den Titel einer der Musik-
schließt die File Info Box, ohne
die Einstellungen zu übernehmen
Ein Doppelklick in die Anzeige eines
Players öffnet die File Info Box zu dem
aktuell geladenen Titel.
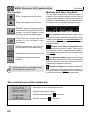
Die Programmoptionen
Über ein beliebiges Kontext-menü
unter OPTIONS
gelangt
man
zu
den
Programmgrundeinstellungen. Diese unterteilen sich in 3
verschiedene Bereiche, welche auf den 3
Registerkarten zur Auswahl stehen:
OPTIONS - Allgemeine Einstellungen
AUDIO I/O - Konfiguration der Soundkarten
File Storage - Festlegen der Datenverzeichnisse
OPTIONS - Allgemeine Einstellungen
Show Tooltips
aktiviert die Tips-Funktion
(benötigt einige Systemressourcen)
Load Wave Files
scannt beim Programmstart auch nach WaveFiles und lädt diese
Load Sub Directories
Das Programm liest bei der Auswahl eines Verzeichnisses auch die Unterverzeichnisse
13
BPM Studio 2.0 gastro edition
Soft Pitch and Bend changes
ermöglicht ein weiches Bedienen der Slider und
simuliert bei Pitch und Pitch Bend die Trägheit
einer Schallplatte
Start Player after loading a file
startet den Player sofort nach dem Laden eines
Titels
Double Klick loads player
beim Doppelklick in einer der Playlisten wird nicht
der Preview-Player gestartet, sondern der Titel
in den Hauptplayer geladen
Programmoptionen
Save ID3 Tags
Das Programm schreibt in den ID3-Tag der Original-MP3-Files
Write ID3V3 Tags
Das Programm schreibt den ID3-Tag der Original-MP3-Files als Version 3 (der ID3-Tag ist dann
mit älteren Playern nicht mehr auslesbar)
Lock Main Window Position
Die Bildschirmposition des Hauptprogrammes
wird gelockt
Reload File in Single Play Mode
Wenn Single Play und Loop aktiviert ist, wird der
Titel wiederholt, ansonsten die gesamte Playliste
Show Playlist Columns
schaltet die senkrechten Linien in den Playlisten
und im Explorer ein (benötigt einige Systemressourcen)
Blink Display before file is done
5 Sekunden vor Ende des aktuellen Titels blinkt
die Anzeige rot
Remove files from PlayList if played
Der Titel wird automatisch aus der Playliste entfernt, nachdem er gespielt wurde
Use normalization if file is normalized
Bei aktivierter Checkbox werden die Einstellungen
der normalisierten Audio-Datei verwendet, ansonsten werden diese ignoriert
AUDIO I/O - Konfiguration der Soundkarten
Check Playlists when loading
Beim Laden einer Playliste wird überprüft, ob alle
Titel im System vorhanden sind
Alternate Bitmap Drawing
Verwenden Sie diese Funktion, wenn Sie Probleme bei der Darstellung der Grafiken, z. B. der
Slider, haben
Delete Cutter Peakfiles
Bei Programmende werden die Peakfiles, welche
durch den File Editor generiert werden, gelöscht
Scan VBR Files
aktivieren Sie diese Checkbox, um bei Files mit
variabler Bitrate ein exaktes Positionieren zu ermöglichen
14
Legen Sie in dieser Registerkarte fest, auf welchen Kanälen die Ausgabe der einzelnen Player
und des Monitor-Kanals erfolgen soll. Bitte beachten Sie, daß die meisten Mehrkanal-Soundkarten diese Funktionen nur über WAVE- oder
ASIO-Treiber zulassen.
BPM Studio 2.0 gastro edition
Zusatzfunktionen
FILE STORAGE
Festlegen der Datenverzeichnisse
search directory
in dieses Verzeichnis werden die Playlisten, die
Gruppen und Untergruppen des BPM File Archiv
und die Sample-Block-Daten gespeichert
File names
Hier erfolgt die Festlegung des Dateinamens, welcher automatisch vom Programm generiert wird.
Es wird empfohlen, die Default-Werte beizubehalten.
Zusatzfunktionen
Die Normalize-Funktion
Über das Kontextmenü des BPM File Archiv und
der verschiedenen Playlisten erreichen Sie die
Normalize-Funktion. Wenn Sie diese Option auf
alle Titel im System anwenden, liefern die AudioDateien beim Abspielen einen optimalen und
konstanten Ausgangspegel.
Der Suchen-Dialog
Den Suchen-Dialog erreichen Sie ebenfalls über
die Kontextmenüs im BPM File Archiv oder den
Playlisten oder über den Button
. Hier kön-
nen Sie nach folgenden Titel-Eigenschaften suchen: BPM-Bereich, Artist, Titel, Version und Album. Der Suchbegriff oder Text-String wird immer mit dem Anfang der Eigenschaft verglichen.
Der Suchbegriff WEST findet also sowohl alle Titel
mit WESTBAM, WESTERNHAGEN etc.
Wenn die Suche erfolgreich war, wird im BPM
File Archiv ein neues Verzeichnis SEARCH
RESULTS angelegt, in dem die Suchergebnisse
aufgelistet werden. Falls das Verzeichnis bereits
existiert, werden die vorher darin enthaltenen Titel entfernt.
Die Preview-Player
Die Preview-Player dienen dem Vorhören der
Titel in den Playlisten.
Es wird immer der mit
dem blauen Balken in der Playliste markierte Titel wiedergegeben. Ist in den Programmoptionen die Checkbox „Double Klick loads
Player“ deaktiviert, können Sie durch Doppelklick
auf einen Listeneintrag den Titel sofort im
Preview-Player starten oder stoppen.
Bedienelemente des Preview-Player:
vorherigen Titel aus der Liste laden
Play
Stop
nächsten Titel aus der Liste laden
Positionsslider
aktuelle Spielzeit
Rechts neben der Playlist-Anzeige und dem
Preview-Player befindet sich eine kleine Pegelanzeige für den Player.
Die Backup Funktion
Über das Kontextmenü im Groups-Fenster des
File Archivs können Sie eine Sicherheitskopie des
gesamten File Archivs anlegen oder zurückschreiben. Auf diese Weise läßt sich auch eine
Kopie des File Archiv auf einen anderen PC übertragen.
15
BPM Studio 2.0 gastro edition
Einige Worte zu Soundkarten:
Die ALCATech GmbH testet ständig verschiedene Soundkarten in Verbindung mit den unterschiedlichen Versionen von BPM Studio und gibt
die Ergebnisse zusammengefaßt im Internet unter www.bpmstudio.de bekannt. Zusätzlich finden
Sie aktuelle Informationen der Soundkartenhersteller.
Allgemeine Informationen:
BPM Studio gastro edition dient der Beschallung
von bis zu 6 verschiedenen Gebäudebereichen
mit unterschiedlichen Playlisten. Die Vorraussetzung dafür ist eine Mehrkanal-Soundkarte
oder mehrere einzelne Soundkarten. Die Zuordnung erfolgt über die Registerkarte Audio I/O in
den Programmoptionen. Grundsätzlich arbeitet
BPM Studio mit allen DirectSound-Soundkarten
zusammen. Außerdem werden alle Karten mit
WAVE- und/oder ASIO-Treibern unterstützt.
Tips und Hinweise
Mehrere Soundkarten in einem PC:
(Diese Information betrifft die „normalen“ Soundkarten mit einem Stereo-Ausgang)
Ein Soundkartentreiber kann nur eine Soundkarte
ansteuern. Er erkennt nicht das Vorhandensein
von 2 gleichen Soundkarten im PC. Deshalb
müssen grundsätzlich unterschiedliche Karten
eingesetzt werden. Wenn aktuelle Treiber ab November '99 eingesetzt werden sollen, müssen
diese auch von verschiedenen Herstellern sein.
Ressourcenverteilung:
BPM Studio wertet alle Frames der MP3-Datei
aus und benötigt daher mehr Ressourcen als
andere MP3-Wiedergabeprogramme. Daher ist
auch großer Wert darauf zu legen, daß alle
Soundkarten einen eigenen, freien IRQ besitzen,
der von keiner anderen Karte oder PC-Komponente mit benutzt wird.
Weitere Informationen, aktuelle Soundkarten-Testberichte, Programmupdates und Antworten
auf oft gestellte Fragen (FAQ) finden Sie auf unseren Web-Seiten: www.alcatech.de
Tastaturbelegung
Alt + E: File Editor
Alt + I: File Info Box
Alt + N: Normalize
Alt + O: Options
Alt + S: Search Files
Alt + X: Exit
Insert:
1. Hinzufügen von Einträgen zur Liste
mit dem Focus
2. Hinzufügen einer neuen Gruppe
3. Alt+Insert: Hinzufügen einer neuen
Untergruppe
Space:
Play/Stop Monitor oder Expand/Collapse Group
Cursor Left, Right:
Wenn Monitor in Listen spielt dann suchen
F1: Help
TAB: Change Focus
16
Contents
BPM Studio 2.0 gastro edition
Contents
Introduction
About this manual .......................................... 18
System requirements ..................................... 18
Contents of Box ............................................... 18
Installation
Software installation ....................................... 18
First start ........................................................ 18
Basic modules
The basic modules .........................................
Player .............................................................
Playlists ..........................................................
BPM File Archive ............................................
File Editor .......................................................
File Info Box ...................................................
Program Options
Program Options ............................................ 27
Additional functions
Normalize Funktion ........................................
Search Window ..............................................
Preview Player ...............................................
Backup- Functions ..........................................
19
19
21
22
24
27
29
29
29
29
Hints ................................................................ 30
Key Assignment ............................................. 30
System requirements
To use BPM Studio you require the following:
• IBM PC with Pentium-II Processor
with min. 350Hz
• min. 128 MB memory
• min. 10 MB harddisk space
for installing BPM Studio
• SVGA video card with resolution
of 1024 x 768 pixels
• 1x 16 bit sound card
(6 channel multi sound card recommended)
• 32 speed CD-ROM drive
• Windows 95, Windows 98
or Windows NT from version 4.0
• DirectX 5.0 or better
• Printer port LPT1
17
BPM Studio 2.0 gastro edition
Congratulations for purchasing
BPM Studio!
BPM Studio gastro is a 6x player developed
especially for gastronomy. The player allows
playback in up to 6 different house areas from one
PC equipped with a multi-channel soundcard.
For ripping audio CD's and compressing into the
MP3 format the package contains the BPM
Grabber which can be started if desired. The file
archive is compatible to the file archive of the
standard versions of BPM Studio.
Except for the gastro version BPM Studio is
available in 3 other versions
BPM Studio light
BPM Studio home
BPM Studio professional including 19" control unit
See your dealer for further information or visit our
website www.alcatech.com.
Introduction
Software installation
To install BPM Studio, please follow these
instructions. Please note that the program must be
installed onto your hard disk from the application
CD. It cannot be started from the CD or without the
hardware dongle.
1. Connect the hardware dongle to a parallel port
on your PC. (printers already connected
may also be used)
2. Insert the installation CD into your
CD-ROM drive.
3. If your computer is programmed to recognize
CD changes then the installation program will
start automatically. If not, click on "RUN" in the
Windows 95/98 start menu and type
"D:/setup.exe", where 'D' is the letter
of your CD-ROM drive.
4. Follow the instructions on the screen
to complete your installation.
About this manual
In this manual you will find comprehensive
information about how to use the software and
hardware. It will help to simplify daily use with the
program, and provide answers to the most
frequently asked questions. Before reading this
manual it is advisable that you first install the program. To do this, read the instructions in the
following chapter. In this chapter the system
requirements and contents of BPM Studio are
described. It is assumed that you are familiar with
the most important functions and conventions of
your operating system and know how to work with
a mouse. Terms printed in bold and underlined
are explained elsewhere in the manual.
First start
During the installation process, a shortcut to BPM
Studio was installed on your desktop, as well as
under the Start menu. Simply double click on either
the program icon on your desktop (or the start menu
(PROGRAMS) (ALCATech) (BPM Studio)). When
the program first starts, it will automatically check
your system to ensure proper operation is possible,
and if you have purchased the professional version,
a check will be performed to see if the remote
control unit is connected. If BPM Studio is not
currently your default player, you will be given the
opportunity to do so here.
Contents of Box
Please ensure that the following
parts are included:
1. BPM Studio CD
2. Manual
3. Registration card
4. Dongle
18
Now you can start having fun with BPM Studio.
BPM Studio 2.0 gastro edition
Basic Modules, Player
Basic Modules
The main program is consists of 7 modules: 6 Player/Playlist-Modules (1-6) and the File Archive (7).
The Player
Altering the player name:
For a better overview
a name can be
assigned to each
player.
As both audio players are identical in functionality,
only one will be described here. The player controls
the output of audio, whether that audio resides on
your hard disk or on a CD-ROM. Aside from the
normal functions you are used to with virtually any
analog CD player, there are many more extra
features which are only made possible by
processing audio data on a PC. Using drag & drop
all tracks can be transferred from the playlists or
the BPM file archive and played. A track can also
be loaded and started by double-clicking on the
relevant playlist. And, you can also load a track
from the hard disk via the context menu.
19
BPM Studio 2.0 gastro edition
Player
The Displays
Track - buttons:
rewinds the current audio file to the
beginning of its track. If the track has been
playing less than 2 seconds, the previous
track will be loaded.
loads the next track into the player
The display is divided into two areas. In the upper
area, the position of the track in the playlist is
displayed on the left (TRACK). The middle area
displays either the elapsed time (ELAPSED) or the
remaining time (REMAIN). To switch
between displays, simply click directly on
the area or on the TIME key.
is a position slider
that can be used for adjusting the current playback
position.
Search-Buttons:
Keys for fast forward
and fast rewind.
Playmodes (Switch):
single play, stops at next track
Loop, continually repeats
the current playlist.
randomly plays tracks
from current playlist.
The upper right area serves to display either the
BPM of the track (data taken from the BPM
database) or the pitch value. Switching between
these displays is again carried out by clicking on
the area. In the lower area on the left there is a
resource display (audio data buffer memory). Next
to this is a VU meter with some different modes
which can be selected by mouse click.
Main Functions:
5 seconds before the end of playing time,
this display flashes red as a warning signal.
Play / Pause
STOP
Context menu in the player
Remove current track from Player
Load an audio track into the Player
Display File Info Box for the current track
Start the File Editor
Open the Search Window
Carries out normalize function for the current track
Delete cue points, fades and play counters
Displays the program options
20
Playlist
BPM Studio 2.0 gastro edition
The Playlist
Creates an empty playlist
Loads a saved playlist
Saves the current playlist
Adds an audio file to the playlist
Removes a track from the playlist
Selects all tracks in the list
Playlists make it extremely simple to put together
a complete set or entire evening's worth of music.
The name of the track, artist, BPM and playing time
of each track is displayed in the playlist. The track
currently being played is marked in white.
The blue bar marks an audio file. All playlists can
be saved as playlist data. (*.LST).
If the file has been processed in
the file editor you will see a green
square next to the BPM.
Displays the File Info Box for the track
The lower right field contains the status window as
well as a preview player. The following displays of
the status window can be changed by mouse click:
Displays the number of tracks in the current playlist
Displays the total playing time of the playlist
audio files already played
(min. 1 minute in player)
are marked with a red square
There are three basic methods of adding audio files
to playlists: via the context menu directly from your
hard disk, by dragging & dropping from the other
list or the BPM File Archive, and by using the
button. The order in which audio files are played
back can also be altered by simply dragging &
dropping each file into its new place. A red arrow
next to each file makes sorting
much easier. You can also transfer tracks to a player
with drag & drop, context menu or double clicking
on the file. Depending on the basic program setting,
the track will then either be played immediately or
paused at the beginning of the track. The following
functions are also available:
Displays the remaining playing time of the playlist
By the capability of saving playlists complete music
programs can be stored. The original track files are
only saved once in the system even if they are
allocated to several playlists.
It is also possible to import playlists from other
systems and players such as WinAMP. Please note
that BPM Studio version 1.5 imports both *.m3u
and *.pls formats.
By clicking next to each slider (on the
scale itself), the value is altered in small
steps.
21
BPM Studio 2.0 gastro edition
Playlist Context Menu
Loads an audio track into a Player
Plays selected audio track in the preview player
Removes the selected audio track from the Playlist
Adds audio file(s) to the Playlist
Displays the File Info Box for the current audio file
Displays the File Editor for the current audio file
Displays the search window
Begin Normalization on the current audio file
Resets track (cues, fades, play counter)
Displays the program options
The BPM File Archive
The BPM File Archive facilitates easy import and
management of audio files. On the left you can set
up your own list categories. On the right the
contents of that category is displayed. There is a
display with all loaded tracks which contains
information for each track such as track name,
artist, version, format, BPM (if available in internal
database) and playing time.Using
and
buttons you can import audio files into these
categories. This function can also be accessed via
the BPM file archive's context menu. The difference
between
and
is that the former is used to
import individual files whereas the latter can be
deployed to import whole directories or even up to
an entire harddisc. At the time of import, the pro-
22
Playlist
BPM Studio 2.0 gastro edition
Playlist, BPM File Archive
gram immediately checks whether
the file can be played. Once the files
have been loaded into the BPM File
Archive, they can be easily moved
from category to category using
drag & drop (whereby only the link
to the data is altered, not the actual
position on the hard disk!). This
makes sorting and archiving of
audio tracks very simple. Drag &
drop can also be used to transfer
and add audio files to the playlists.
The audio files also remain in the
BPM File Archive.
The following additional functions can be performed
by using these buttons:
Deletes the selection
Sort according to track or artist
Removes selected audio files
Selects all audio files within the list
Displays File Info Box
Searches for audio files
Inverts selection
Context menu within the group list:
Add a group
Add a sub group
Remove a group
Rename a group
Delete contents of a group
Display all sub-groups
Close all sub-groups
Open Search Window
Add audio files
Search the system for files
23
BPM Studio 2.0 gastro edition
File Editor
Context menu within the track list:
Play selected track in preview player
Remove selected tracks
Add Tracks
Displays the File Info Box for the selected track
Displays the File Editor for the selected track
Displays the search window
Start the normalize function
Reset Track (cues, fades, play counter)
Display the program options
The File Editor
The file editor makes it possible to edit individual
sequences of an audio file, or to set up cue points
exactly upon an individual beat. Up to 9 different
cues can be saved per track and called up in a
player. All settings such as volume, pitch, cue-in
and cue-out are recognized by the players and can
be saved via the playlists.
to quickly locate any position within the file. The
upper window is used for editing of files, setting
cues, beginning and end points, or selecting an
area for export to a new file.
Loading a track and display
Altering the display range
The first time an audio file is loaded peaks are
formed and saved, as shown below.
There are two ways of altering the display of the
upper working window:
When this happens, no alterations are being made
to the file itself, it remains in its original state. The
peaks are saved separately on your hard disk, and
in the Program Options, you can decide whether
or not to delete these peaks at the end of the program, or to keep them on the hard disk. By keeping
this information, you will save time later on. After
loading, the audio file is shown in graph form. The
file editor has 2 working windows. In the lower
window the file is always displayed in its full length.
This helps to maintain transparency and helps you
24
By changing
the width or
moving the
position of the
area
bar
between the
upper and
lower windows. In the upper window, the area which
is marked by the area bar above the lower window
is always displayed. In the area bar, the playing
time is displayed if the bar is wide enough.
BPM Studio 2.0 gastro edition
File Editor
By activating the zoom
function
and
dragging the mouse
(right key) across an
area in the upper or
lower window. The selected area is then magnified.
By double clicking on the area bar, you can now
select between zoom view and total view.
Marking an area and exporting
part of a file
Deactivate the zoom function
and drag the
right mouse key across an area in the upper or
lower window. The area is now shown in red. With
the right mouse
you can alter this
area, or display
the context menu
which you can use
to zoom in, play
the selected area,
or copy the selected area onto the hard disk as a
new .WAV or .MP3 file. This saved file can then be
used later as a sample, for instance.
Altering the volume and pitch
Using the volume slider,
you can alter the volume
from -inf to 0 dB, thus
allowing easy alignment to
the volume of other audio tracks.
The pitch can be altered
by +/-20%.
Using the + and - keys, each of these values can be
finely tuned. This changes are saved and used when
the audio file is loaded into the player. The pitch value
set here is added to the pitch value in the player.
25
BPM Studio 2.0 gastro edition
The tool bar
File Editor
Markers and their functions
STOP - stops play in the file editor
PLAY - starts play in the file editor
The file editor recognises 4 different types of
markers. Each of these markers can be used for
marking certain positions or sections of a track. All
markers can be edited by using context menus in
the marker bar, or moved by using the mouse.
REWIND - goes to the beginning of the
marked area during playto the start of
a track if no area is marked, or sets
the locator (at STOP) back to the starting point.
LOOP Plays the marked area (blue
marker) or the complete track
continuously.
ZOOM Switches the right function
mouse between zoom and marking.
Displays the wave form of the audio file.
Displays the audio file in the form
of points.
Context menus are only available when
the file editor is in pause mode
The red locator marks the current play or pause position, and is identical to the position sliders
in each of the players and preview players. By
clicking the left mouse key, the position of each
marker is defined.
The blue cue-in and cue-out marker mark
the beginning and end of a track. They can be
moved with the mouse, and the position slider in
each player recognizes them as new beginnings
and endings.
The yellow cue marker marks cue points. They
can also be moved by the mouse and positioned
exactly to the beat. Use the context menu of the
marker bar to add new cue points.
The blue cue marker represents the active cue.
This is defined in the cue list at the top right, via
the context menu of the player's CUE or CUP keys,
or using the context menu of the marker bar.
The context menu of the marker bar
Defines this cue as a standard cue point
Delete the selected cue point
Sets the beginning marker
Sets the end marker
26
to this point
to this point
File Info Box, Program Options
BPM Studio 2.0 gastro edition
The File Info Box
You can then use
the Search Dialog
for rapidly locating
tracks of a certain
genre.
Starts the file editor
for this track
Closes the file info box
and saves settings
In this display you can view and edit complete ID3
tag information. Use Program Options to define
whether these should be written in the new ID3v3
format, or using the older ID3 format.
In the GENRE area there is a pop-up menu that is
used to assign the track a particular musical style.
Closes the file info box
without saving settings
Double klick at the display of a player
opens the File Info Box for the currently
loaded title.
The Program Options
You can access the
global
Program
Options by using the
context menu ("OPTIONS") from any display. These options are divided into 6 different categories.
Please select any option below for additional
information.
OPTIONS - general settings
AUDIO I/O - sound card configuration
File storage - storing file directories
OPTIONS - General Settings
Show Tooltips
activates tips function (uses a lot of resources)
Load Wave Files
at startup, BPM Studio will scans for wave files
and load them automatically
Load Sub Directories
If a directory is selected for loading, all
subdirectories will also be loaded
27
BPM Studio 2.0 gastro edition
Soft Pitch and Bend changes
facilitates soft pitch and bend changes, helping to
simulate the sluggishness of an LP
Start Player after loading a file
starts player after loading an audio file
Double Klick loads player
a double click on either playlist does not start
preview player, but loads track into the main player
Reload File in Single Play Mode
If single play and loop is activated, the track is
repeated. If not, then the entire playlist is activated
Program Options
Write ID3V3 Tags
the program writes the ID3 tag of the original MP3
files as version 3 (the ID3 tag is no longer readable
for older players)
Lock Main Window Position
the main window position is locked
Show Playlist Columns
switchs on vertical columns in the playlist and
explorer (uses a lot of system resources)
Remove files from PlayList if played
track is automatically removed from playlist after it
is played
Blink Display before file is done
5 seconds before the end of the current track, the
time display turns red and flashes
AUDIO I/O - Sound Card Configuration
Use normalization if file is normalized
If this checkbox is selected, the settings of the
normalized audio file are used. If not, they are
ignored
Check Playlists when loading
checks playlists when loading to ensure that all
tracks are still available in the system
Alternate Bitmap Drawing
use this function if you experience display
problems, such as with bitmaps, sliders, etc.
Delete Cutter Peakfiles
at program exit, peakfiles generated by the file
editor are deleted
Scan VBR Files
Select this option to facilitate exact positioning of
files with a variable bitrate
Save ID3 Tags
the program writes the ID3 tag of the original MP3
files
28
Using the pulldown menus, each player can be
allocated a sound card or stereo channel of a multichannel sound card. Please notice, the most multi
channel sound cards only allow this functions with
WAVE or ASIO drivers.
BPM Studio 2.0 gastro edition
Additional Functions
FILE STORAGE
Storing File Directories
search directory
playlists, groups and subgroups of the BPM File
Archive and sample block data are stored in this
directory
File names
Here file names automatically generated by the
program are defined. It is advisable to retain default
values.
Additional Functions
The normalize function
Via the context menu, used inside of the BPM File
Archive and various playlists, you can access the
normalize function. If you use this function for all
audio tracks, then all audio files are played at an
optimum and constant output level. This guarantees
a better mixing result when using the autofade
function.
The search window
The Search dialog can be displayed using the
context menu inside of the BPM File Archive or
the playlists, or by using the
button.
In this dialog, you can search according to the
following track features: BPM range, artist, title,
version and album. The search word or text string
is always compared exactly as entered, i.e., case
sensitive.
If the search has been successful, a new SEARCH
RESULTS directory is set up in the BPM File Archive listing all the results. If the directory exists,
the entries are updated.
The preview player
The preview players are
used to preview audio
tracks in the playlists.
The track marked with a
blue bar in the playlists is always the one that is
played. If the "Double Click Loads Player" option
has been de-selected (under Program Options),
you can start or stop a track immediately by simply
double clicking on any list entry.
Panel facilities of the preview player:
load previous track from list
play
stop
load next track from list
position slider
current playing time
In the right corner of the preview player
are a small level meter of the player.
The Backup funktion
By using the context menu in the groups window
of the File Archive you get to the Backup-function.
This function allowes you to create a backup of the
whole File Archive in a previously created folder
on your harddisk or restore it from there. This way
a copy of the File Archive can be transferred to
another PC also.
29
BPM Studio 2.0 gastro edition
Hints, Key Assignement
General information:
The 5 virtual devices of BPM Studio can be put on
up to 5 different sound cards, or a multi-channel
soundcard. The allocation is made via the Program
Options. Basically, BPM studio co-operates with
all DirectSound soundcards. Additionally, all
soundcards with WAVE and/or ASIO drivers are
supported.
Direct Sound drivers:
This is the fastest and sturdiest driver currently
available on the Microsoft Windows platform.
Depending upon hardware configuration, it enables
switching between Play and Cue functions with
fewer than 10-20 ms delay. For the DJ, who
attaches great importance to clock-exact mixing
and uses BPM Studio's Cue/Play and loop
functions for this, this driver is usually necessary.
More than one sound cards in one PC:
(this infomation affects all 'normal' soundcards with
one stereo output). A sound card driver can control
only one sound card. It does not detect the
presence of 2 equal sound cards in the PC,
therefore at least 2 basically different cards must
be used. If you are using drivers from November '
99 and later, these must be also from different
manufacturers.
ASIO drivers:
This Steinberg developed driver serves as an
interface for many multi-channel cards. It is
somewhat slower than the DirectSound driver, but
sufficient for most applications and uses. With some
of the tested cards, the ASIO driver does not run
reliably yet.
WAVE drivers (wave out):
This driver is a stable driver, which can be used as
an alternative to the DirectSound driver, albeit with
higher latencies. With multi-channel cards without
ASIO drivers, this is the only possibility of
supporting different channels separately.
Ressource management:
BPM Studio analyses all frames of the MP3-file,
thus requiring more resources than other
conventional MP3-players. For this reason, it is
important that each sound card has its own IRQ
and does not share the IRQ with an other device.
Further Informations, actual test reports of sound cards, program updates and answers
of frequently asked questions you can find at our web site: www.alcatech.com
Key Assignement
Alt + E: File Editor
Alt + I: File Info Box
Alt + N: Normalize
Alt + O: Options
Alt + S: Search Files
Alt + X: Exit
Insert:
1. Add an entry to the list with the focus
2. Add new group
3. Alt+Insert: Add new sub group
Space:
Play/Stop Monitor or Expand/Collapse Group
Cursor Left, Right:
If monitor in list is playing: search
F1: Help
TAB: Change Focus
30
© 1999 ALCATech GmbH. Alle Rechte vorbehalten. BPM Studio gastro edition Benutzerhandbuch
für Windows
Dieses Handbuch sowie die darin beschriebene Software ist Teil
des Lizenzvertrages und kann nur in Übereinstimmung mit den
Lizenzbedingungen benutzt oder kopiert werden und ist nicht als
Verpflichtung der ALCATech GmbH anzusehen. Die ALCATech
GmbH gibt keine Gewähr oder Garantie hinsichtlich der Richtigkeit und Genauigkeit der Angaben in diesem Buch.
Kein Teil dieser Lizenz darf, außer durch den Lizenzvertrag ausdrücklich erlaubt, reproduziert, in Datenbanken gespeichert oder
in irgendeiner Form - elektronisch, fotomechanisch, auf Tonträger oder auf irgendeine andere Weise - übertragen werden, ohne
die vorherige schriftliche Genehmigung von ALCATech GmbH
einzuholen.
Lizenzbedingungen:
Das Programm und alle Bestandteile sind urheberrechtlich geschützt. Der/die Käufer/in erhält das Recht zur Nutzung des Programms an einem Computerarbeitsplatz. Dieses Recht ist nicht
übertragbar, vermietbar oder verleihbar. Es ist untersagt, die Inhalte der CD-ROMs zu verändern, zu vervielfältigen zu vermieten, auf andere datenträger zu übertragen und zu nutzen. Alle
Urheber- und Leistungsschutzrechte vorbehalten. Die ALCATech
GmbH haftet für keine Schäden, die sich aus der Verwendung
der CD-ROM ergeben. Vor Installation eines neuen Software-Programmes - so auch bei BPM Studio - sollten Sie ein backup Ihrer
Daten vornehmen.
Intel ist ein eingetragenes Warenzeichen der Intel Corporation.
Microsoft, Windows, Windows 95, Windows NT und Windows 2000
sind eingetragene Warenzeichen von Microsoft in den USA und
anderen Ländern. Pentium, Pentium II und Pentium Pro sind Warenzeichen der Intel Corporation. Alle weiteren Warenzeichen sind
Eigentum ihrer jeweiligen Eigner.
Verfaßt und Entworfen von ROOMER Grafix,
D-96515 Sonneberg, Oberlinder Straße 70, Germany
Copyright © 1999-2002 ALCATech GmbH,
D-96515 Sonneberg,
Otto Bergner Straße 30, Germany
Internet: www.bpmstudio.de • www.bpmstudio.com
Gedruckt in Deutschland
© 1999 ALCATech GmbH. Rights reserved.
BPM Studio gastro edition
User Manual for Windows
This manual and the software described therein is part of a license
contract and may only be used or copied in accordance with the
terms of the contract and is not to be regarded as an obligation of
ALCATech. ALCATech Gmbh gives no guarantees regarding the
accuracy and exactitude of details in this manual. Unless
expressly permitted by the license contract, no part of this license
may be reproduced, saved in data banks or transferred
electronically, photo-mechanically or in any other way to another
data carrier without first receiving written permission from
ALCATech GmbH. Intel is a registered trademark of the Intel Corporation. Microsoft, Windows, Windows 95, Windows NT and
Windows 2000 are registered trademarks of Microsoft in the USA
and other countries. Pentium, Pentium II and Pentium Pro are
trademarks of the Intel Corporation. All further trademarks are
property of their respective owners.
Copyright © 1999-2002 ALCATech GmbH, D-96515 Sonneberg,
Otto Bergner Straße 30, Germany
Internet: www.bpmstudio.de • www.bpmstudio.com
31
BPM Studio 2.0 gastro edition
32