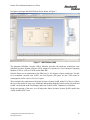
1
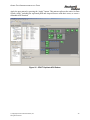
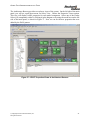
30 September 2011
Design Documentation
Guided Tour
Complexity-Reducing Design Patterns for Cyber-Physical Systems
Prepared for DARPA TTO
META
Contract FA8650-10-C-7081
Technical Point of Contact:
Dr. Darren Cofer
Rockwell Collins, Inc.
7805 Telegraph Rd. #100
Bloomington, MN 55438
Telephone: (319) 263-2571
[email protected]
Business Point of Contact:
Mr. James Steggall
Rockwell Collins, Inc.
400 Collins Rd. NE, MS 121-200
Cedar Rapids, IA 52498
Telephone: (319) 295-3107
[email protected]
DISTRIBUTION STATEMENT A. Approved for public release: distribution unlimited.
Rockwell Collins, Inc.
400 Collins Rd. NE
Cedar Rapids, Iowa 52498
© Copyright 2011 Rockwell Collins, Inc.
All rights reserved.
GUIDED TOUR DEMONSTRATION OF THE TOOLS
Table of Contents
1
Overview ................................................................................................................................ 5
2
Reviewing the SysML Model................................................................................................. 6
3
Importing the Model............................................................................................................. 13
4
Applying Patterns to the Model............................................................................................ 20
5
Exporting the Model............................................................................................................. 42
6
Verification of the Final Avionics System ........................................................................... 50
7
Using the Lute Structural Checker ....................................................................................... 51
8
Using the AGREE Model Checking Tool ............................................................................ 54
8.1 Removing Leader Selection Agreement ........................................................................55
8.2 Allowing Immediate Re-failure .....................................................................................56
8.3 Increasing ADS Max Pitch Delta...................................................................................57
© Copyright 2011 Rockwell Collins, Inc.
All rights reserved.
2
GUIDED TOUR DEMONSTRATION OF THE TOOLS
List of Figures
Figure 1 – SysML Initial Avionics System Model ......................................................................... 6
Figure 2 – SysML Initial Avionics System Top (SW & HW)........................................................ 7
Figure 3 – SysML Initial Avionics System (SW)........................................................................... 8
Figure 4 – SysML Flight Control System (FCS) ............................................................................ 9
Figure 5 – SysML Flight Guidance System (FGS)....................................................................... 10
Figure 6 – SysML Flight Guidance Process (FGP) ...................................................................... 11
Figure 7 – IMA Platform (HW) .................................................................................................... 12
Figure 8 – EDICT Displaying the AADL Perspective ................................................................. 14
Figure 9 – EDICT Importing the Initial Avionics System SysML Model ................................... 15
Figure 10 ....................................................................................................................................... 16
Figure 11 ....................................................................................................................................... 16
Figure 12 – EDICT Instantiating the Complete Avionics System Implementation ..................... 17
Figure 13 – EDICT Displaying the EDICT Design Perspective .................................................. 18
Figure 14 – EDICT Importing AADL Model into EDICT........................................................... 19
Figure 15 – EDICT Initial to Final Avionics Architecture Pattern............................................... 20
Figure 16 – EDICT Reset Pattern Application to Initial System.................................................. 21
Figure 17 – EDICT Replicate FGS Pattern................................................................................... 22
Figure 18 – EDICT Insert FGS Leader Selection Pattern............................................................. 23
Figure 19 – EDICT Apply PALS to FGS Leader Selection Pattern............................................. 24
Figure 20 – EDICT Insert Guidance Command Selector Pattern................................................. 25
Figure 21 – EDICT Replicate Pitch Sensor Pattern...................................................................... 26
Figure 22 – EDICT Insert Pitch Voter Pattern.............................................................................. 27
Figure 23 – EDICT Replicate Airspeed Sensor Pattern................................................................ 28
Figure 24 – EDICT Insert Airspeed Voter Pattern ....................................................................... 29
Figure 25 – EDICT Replicate ADS Pattern.................................................................................. 30
Figure 26 – EDICT Replicate AHS Pattern.................................................................................. 31
Figure 27 – EDICT Replicate FMS Pattern.................................................................................. 32
Figure 28 – EDICT Replicate NAV Pattern ................................................................................. 33
Figure 29 – EDICT Replicate PFD Pattern................................................................................... 34
© Copyright 2011 Rockwell Collins, Inc.
All rights reserved.
3
GUIDED TOUR DEMONSTRATION OF THE TOOLS
Figure 30 – EDICT Replicate Yoke Pattern ................................................................................. 35
Figure 31 – EDICT Replicate Throttle Pattern ............................................................................. 36
Figure 32 – EDICT Replicate Fast CCM Pattern ......................................................................... 37
Figure 33 – EDICT Final Avionics System.................................................................................. 38
Figure 34 – EDICT Save Copy of Transformed Model ............................................................... 39
Figure 35 – EDICT Open Architecture Browser .......................................................................... 40
Figure 36 – EDICT Select Model for Architecture Browser........................................................ 40
Figure 37 – EDICT Properties Viewer in Architecture Browser.................................................. 41
Figure 38 – EDICT Export the Transformed Model to AADL .................................................... 42
Figure 39 – EDICT Select System Architecture to Export........................................................... 43
Figure 40 – EDICT Select Destination for AADL System Instance ............................................ 44
Figure 41 – META Generate AADL Textual Model.................................................................... 45
Figure 42 – META Export AADL Model to SysML ................................................................... 46
Figure 43 – SysML Open Exported SysML Model...................................................................... 47
Figure 44 – SysML Redundant Flight Control System ................................................................ 48
Figure 45 - SysML Redundant Avionics System ......................................................................... 49
Figure 46 – Selecting a System Implementation .......................................................................... 51
Figure 47 – Successful Results of Running Lute Built-in Theorems ........................................... 52
Figure 48 – A Failure of the Not_Collocated Theorem................................................................ 53
Figure 49 – A Failure of the PALS_Period Theorem ................................................................... 53
Figure 50 – Selecting a System Implementation .......................................................................... 54
Figure 51 – Successful Results of Running AGREE.................................................................... 55
© Copyright 2011 Rockwell Collins, Inc.
All rights reserved.
4
GUIDED TOUR DEMONSTRATION OF THE TOOLS
1
Overview
The purpose of this “Guided Tour” is to provide evaluators and potential users of the Rockwell
Collins META toolset with an overview of its capabilities. It will lead you through a
demonstration based on our Avionics System example to illustrate the functionality provided by
each part of the toolset.
The tool framework consists of the following parts:
1. Enterprise Architect – UML/SysML tool for constructing and editing system architecture
models. This is a commercial tool, but you can download a trial version to use for the demo.
2. EDICT – System design and analysis tool that hosts our architectural design pattern
functionality. This is a commercial tool developed by WW Technology Group, but an
evaluation license has been included with the distribution.
3. OSATE – An open-source tool for constructing and editing system architecture models in
AADL. This tool may be used as an alternative to the EDICT tool as a way to access the
functionality of our other META tools, but the design pattern functionality will not be
available.
4. Rockwell Collins META plug-ins – Translation and analysis tools for system architecture
models. These tools are provided as plug-ins for both the EDICT and OSATE tools.
a. SysML/AADL model translator
b. Lute tool for checking structural properties of AADL models
c. AGREE tool for compositional verification of AADL models
5. Kind model checker – Model checking engine used by the AGREE tool. Kind is an opensource tool developed by the University of Iowa.
We have also provided a collection of example models of an avionics system in both SysML and
AADL formats. These models and their use will be described in the course of this Guided Tour.
The Guided Tour will lead you through the following steps:
1. Examine an initial version of the avionics system model in SysML.
2. Translate the model into AADL.
3. Import the model into EDICT.
4. Transform the model using architectural design patterns to add fault-tolerance functionality.
5. Export the transformed model back to AADL.
6. Verify structural properties of the final version of the avionics system model using Lute.
7. Verify behavioral properties of the final model with assume-guarantee reasoning using the
AGREE tool.
8. Understand the impact of changing the model by generating and viewing verification
counterexamples produced by the AGREE tool.
Let’s begin – we hope you enjoy the tour!
© Copyright 2011 Rockwell Collins, Inc.
All rights reserved.
5
GUIDED TOUR DEMONSTRATION OF THE TOOLS
2 Reviewing the SysML Model
If you have installed Enterprise Architect, you can use it to review the Initial Avionics System
SysML model that will be used in this example. If you have not installed Enterprise Architect,
you should proceed to Section 3 where we describe how to import the AADL version of the
model.
Start by making a working copy of the Example Models directory found in the distribution and
double-click on the Initial_Avionics_System.eap file found in the Initial_Avionics_System
directory. This should open a screen similar to that shown in Figure 1.
Figure 1 – SysML Initial Avionics System Model
© Copyright 2011 Rockwell Collins, Inc.
All rights reserved.
6
GUIDED TOUR DEMONSTRATION OF THE TOOLS
Expand the package for TOP in the Project Browser window on the right side until you see the
icon for the SysML Internal Block Diagram (ibd) labeled Complete_Avionics_System (located
under the icon for SysML block labeled Complete_Avionics_System_Impl). Double click on the
icon for the Complete_Avionics_System ibd. This should open the image shown in Figure 2.
Figure 2 – SysML Initial Avionics System Top (SW & HW)
As shown in Figure 2, the Complete_Avionics_System consists of components for software
(SW:Avionics_System) and hardware (HW:IMA_Platform).
Next, we will review the internal structure of the Avionics System (SW) component.
© Copyright 2011 Rockwell Collins, Inc.
All rights reserved.
7
GUIDED TOUR DEMONSTRATION OF THE TOOLS
Navigate in the Project Browser to open the ibd for Avionics System as shown in Figure 3. This
ibd is labeled AV and is located under the Avionics_System_Impl block in the AS package.
Figure 3 – SysML Initial Avionics System (SW)
As shown in Figure 3, the Avionics System software consists of several subsystems such the
Flight Control System (FCS), the Primary Flight Display (PFD), and the Control Surface
Actuators (CSA).
This Initial Avionics System example is a “sunny day” design that assumes no component will
ever fail, so there are no redundant components to provide fault tolerance. In Section 4 we will
add components to implement fault-tolerance.
Next, we will review the internal structure of the Flight Control System (FCS).
© Copyright 2011 Rockwell Collins, Inc.
All rights reserved.
8
GUIDED TOUR DEMONSTRATION OF THE TOOLS
Navigate to and open the ibd for the Flight Control System as shown in Figure 4.
Figure 4 – SysML Flight Control System (FCS)
The Flight Control System consists of a single Autopilot System (AP), a single Flight Guidance
System (FGS), and a single Flight Crew Interface (FCI). The FCI processes the yoke and throttle
inputs from the pilot.
Next, we will review the internal structure of the Flight Guidance System (FGS).
© Copyright 2011 Rockwell Collins, Inc.
All rights reserved.
9
GUIDED TOUR DEMONSTRATION OF THE TOOLS
Navigate to and open the Flight Guidance System ibd as shown in Figure 5.
Figure 5 – SysML Flight Guidance System (FGS)
The Flight Guidance System consists of a single Flight Guidance Process (FCP) component. This
component is stereotyped in the model as an AADL process1. It provides a single address space
shared by all the software components for the Flight Guidance System.
Next, we will review the internal structure of the Flight Guidance System Process (FCP).
1
While this stereotype is not visible on the ibd, it can be seen be seen on the SysML block diagram located directly
under the FGS package. See the SysML/AADL Translator User Manual for more details.
© Copyright 2011 Rockwell Collins, Inc.
All rights reserved.
10
GUIDED TOUR DEMONSTRATION OF THE TOOLS
Navigate to and open the Flight Guidance Process ibd as shown in Figure 6.
Figure 6 – SysML Flight Guidance Process (FGP)
The Flight Guidance Process consists of a Mode Logic (ML) and Control Laws (CL) component.
These components are stereotyped in the model as an AADL threads2. Since this is a system
architectural diagram, no further information is provided about these components. The
implementations of these “leaf-level” components will be specified outside the system
architecture model. In complete system architecture, a contract would be specified for each
thread defining the assumptions the thread makes about its environment and the guarantees the
thread provides to its environment. The guarantees correspond to the requirements that must be
satisfied by the component implementation.
Next, we will review the internal structure of the hardware component of the Complete Avionics
System, the IMA Platform.
2
Visible in the SysML block diagram located directly under the FGS package.
© Copyright 2011 Rockwell Collins, Inc.
All rights reserved.
11
GUIDED TOUR DEMONSTRATION OF THE TOOLS
Navigate to and open the IMA Platform ibd as shown in Figure 7.
Figure 7 – IMA Platform (HW)
The Integrated Modular Avionics (IMA) Platform describes the hardware architecture onto
which the Avionics System software will be mapped. It consists of a Fast Common Computing
Module (CCM) A, a Slow CCM B, and an IMA Bus.
Note the direct access connections to the IMA bus (i.e., the absence of ports on the bus). For this
to be translated correctly into AADL, the End System (ES) ports on the CCMs must be
stereotyped as AADL requires bus access ports.
This concludes the exploration of the Initial Avionics System SysML model. Feel free to explore
the rest of the model on your own. Additional information about the Initial Avionics System and
SysML can be found in the Final Report and in the SysML/AADL Translator User Manual.
In the next portion of the tour, we will import the Initial Avionics System SysML model into
AADL and the EDICT tool.
© Copyright 2011 Rockwell Collins, Inc.
All rights reserved.
12
GUIDED TOUR DEMONSTRATION OF THE TOOLS
3 Importing the Model
In this portion of the tour, we will import the Initial Avionics System SysML model into both
AADL and the EDICT tool. If you do not have EDICT installed or do not have a current license,
you can import the model as described in this section using the OSATE tool instead. Then
proceed to Section 6 for demonstration of the verification tools.
To simplify the import process, we have provided a workspace for the EDICT tool that is
configured with the necessary EDICT options3 and loaded with the design patterns we will be
using in this exercise. To load this workspace, make sure the EDICT tool is not currently
running. Make a copy of the demo-workspace folder found in the root directory of your EDICT
installation4 and rename this folder workspace. This will save the original version of the
workspace in case you wish to do the guided tour demonstration on another occasion.
Lauch the EDICT tool. If this is your first time to run EDICT, you will need to enter your license
key. An evaluation license and key have been included with the distribution. You will find the
key in the file DARPA20110817-EdictLicenseKeys.txt in the EDICT folder of the installation.
3
See the EDICT-Core User’s Guide and the EDICT-AADL Adapter Guide for guidance on configuring EDICT.
4
Typically C:\Program Files\rc_meta_tools\EDICT
© Copyright 2011 Rockwell Collins, Inc.
All rights reserved.
13
GUIDED TOUR DEMONSTRATION OF THE TOOLS
When prompted to select a workspace, choose the workspace folder that you just created. Be
sure to select the workspace folder in the RC_META_TOOLS\EDICT folder, which may not be
the default workspace suggested by the dialog. This should result in a screen similar to that
shown in Figure 8 of EDICT presenting the AADL perspective.
Figure 8 – EDICT Displaying the AADL Perspective
© Copyright 2011 Rockwell Collins, Inc.
All rights reserved.
14
GUIDED TOUR DEMONSTRATION OF THE TOOLS
There are two ways to import the Initial Avionics System into EDICT.
1) If you have Enterprise Architect and the SysML/AADL Translator installed, import the
Initial Avionics System SysML model by selecting META → Import SysML from the menu bar
at the top of the screen. Use the Open file window that pops up to navigate to and select your
copy
of
the
Initial_Avionics_System.eap
file
found
the
folder
Example
Models\Initial_Avionics_System.
Figure 9 – EDICT Importing the Initial Avionics System SysML Model
Importing the SysML model will run Enterprise Architect in the background and may take
several seconds. Note that status messages indicating progress will be displayed in the console
window as shown in Figure 9.
2) If you do not have Enterprise Architect or the SysML/AADL Translator installed, you
can import a pre-translated AADL version of the model by selecting File → Import and selecting
the options for General → Existing Projects Into Workspace as shown in Figure 10. Select the
project root directory Example Models\Initial_Avionics_System\Initial_Avionics_System as
shown in Figure 11. Be sure to check the box for Copy projects into workspace.
© Copyright 2011 Rockwell Collins, Inc.
All rights reserved.
15
GUIDED TOUR DEMONSTRATION OF THE TOOLS
Figure 10
Figure 11
© Copyright 2011 Rockwell Collins, Inc.
All rights reserved.
16
GUIDED TOUR DEMONSTRATION OF THE TOOLS
It is next necessary to instantiate the implementation of the Complete Avionics System. First,
recompile the model by selecting Project →Clean and selecting the Initial_Avionics_System
model for cleaning.
Next, expand the aaxl (not the aadl) packages folder under the Initial_Avionics_System folder
created when you imported the SysML model. Double click on the file labeled TOP.aaxl2 in the
AADL Navigator window shown on the left of Figure 12.
Figure 12 – EDICT Instantiating the Complete Avionics System Implementation
Expand the TOP.aaxl2 file displayed in the main window until you see the line for the
implementation of the Complete Avionics System5. Click once on this line to select it and then
select OSATE → Instantiate system.
5
<owned…> SystemImplementation Complete_Avionics_System.Complete_Avionics_System_Impl
© Copyright 2011 Rockwell Collins, Inc.
All rights reserved.
17
GUIDED TOUR DEMONSTRATION OF THE TOOLS
Next, display the EDICT Design perspective by clicking on the “EDICT Design” button in the
upper left-hand corner or by selecting Window → Open Perspective → Other → EDICT Design
from the menu bar. The EDICT display should change to that shown in Figure 13.
Figure 13 – EDICT Displaying the EDICT Design Perspective
© Copyright 2011 Rockwell Collins, Inc.
All rights reserved.
18
GUIDED TOUR DEMONSTRATION OF THE TOOLS
Next, click on the “System” tab on the tabbed window in the lower left of the screen to display
the current status of the imported model as shown in Figure 14.
Figure 14 – EDICT Importing AADL Model into EDICT
The current status of the model is “stale” since we’ve created a new source instance model in
AADL/OSATE but have not yet imported it into EDICT. To refresh the model in EDICT, click
on the “Import” button.
The Initial_Avionics_System model should now be imported into EDICT.
© Copyright 2011 Rockwell Collins, Inc.
All rights reserved.
19
GUIDED TOUR DEMONSTRATION OF THE TOOLS
4 Applying Patterns to the Model
In this section we will apply several design patterns to the Initial Avionics System imported into
EDICT to make its design more tolerant to faults. To begin, first expand the tree in the EDICT
Design Workspace window in the upper left corner of the screen until you can see the
Initial_to_Final_Avionics_Architecture pattern transform as shown in Figure 15. Double click on
this pattern to select it.
Figure 15 – EDICT Initial to Final Avionics Architecture Pattern
EDICT will open the Pattern Transform window and apply all the pattern instances to the
imported model.
© Copyright 2011 Rockwell Collins, Inc.
All rights reserved.
20
GUIDED TOUR DEMONSTRATION OF THE TOOLS
To study the pattern application more carefully, click once on the graphical display of the mode,
then use the mouse scroll wheel to size the image to fit in the window. Then click the “Reset”
button in the Pattern Transform window to undo all the pattern instances. The EDICT display
should appear similar to that shown in Figure 16.
Figure 16 – EDICT Reset Pattern Application to Initial System
© Copyright 2011 Rockwell Collins, Inc.
All rights reserved.
21
GUIDED TOUR DEMONSTRATION OF THE TOOLS
Apply the first pattern to the Initial Avionics System by clicking on the “Apply” button in the
Pattern Transform window. This pattern will replicate the Flight Guidance System (FGS) in the
Flight Control System (FCS) along with its connections and the ports on those connections as
shown in Figure 17
Figure 17 – EDICT Replicate FGS Pattern
© Copyright 2011 Rockwell Collins, Inc.
All rights reserved.
22
GUIDED TOUR DEMONSTRATION OF THE TOOLS
Apply the next pattern by pressing the “Apply” button. This pattern inserts a Leader Selection
thread and many of its connections inside of both copies of the FGS to ensure that only one FGS
is ever active at the same time. It also inserts a contract formally specifying the behavior of the
Leader Selection thread.
Figure 18 – EDICT Insert FGS Leader Selection Pattern
© Copyright 2011 Rockwell Collins, Inc.
All rights reserved.
23
GUIDED TOUR DEMONSTRATION OF THE TOOLS
Apply the next pattern by pressing the “Apply” button. This pattern applies the PALS pattern to
both Leader Selection threads. While this does not change the graphical display of the model, it
does add AADL properties to the model that implement the PALS logical synchronization
protocol. The pattern also adds contracts to the model that will satisfy the assumptions of
synchronous operation that are made by the Leader Selection pattern.
Figure 19 – EDICT Apply PALS to FGS Leader Selection Pattern
© Copyright 2011 Rockwell Collins, Inc.
All rights reserved.
24
GUIDED TOUR DEMONSTRATION OF THE TOOLS
Apply the next pattern by pressing the “Apply” button. This pattern inserts a Selector (a type of
voter) in the Autopilot (AP) system so that the Autopilot only accepts Guidance Commands from
the active FGS.
Figure 20 – EDICT Insert Guidance Command Selector Pattern
© Copyright 2011 Rockwell Collins, Inc.
All rights reserved.
25
GUIDED TOUR DEMONSTRATION OF THE TOOLS
Apply the next pattern by pressing the “Apply” button. This pattern replicates two copies of the
pitch sensor in the Air Data System (ADS) to create a triply redundant sensor system.
Figure 21 – EDICT Replicate Pitch Sensor Pattern
© Copyright 2011 Rockwell Collins, Inc.
All rights reserved.
26
GUIDED TOUR DEMONSTRATION OF THE TOOLS
Apply the next pattern by pressing the “Apply” button. This pattern inserts a voter that selects
the medial value of the three pitch sensors.
Figure 22 – EDICT Insert Pitch Voter Pattern
© Copyright 2011 Rockwell Collins, Inc.
All rights reserved.
27
GUIDED TOUR DEMONSTRATION OF THE TOOLS
Apply the next pattern by pressing the “Apply” button. This pattern replicates two copies of the
airspeed sensor in the Air Data System (ADS) to create a triply redundant sensor system.
Figure 23 – EDICT Replicate Airspeed Sensor Pattern
© Copyright 2011 Rockwell Collins, Inc.
All rights reserved.
28
GUIDED TOUR DEMONSTRATION OF THE TOOLS
Apply the next pattern by pressing the “Apply” button. This pattern inserts a voter that selects
the medial value of the three airspeed sensors.
Figure 24 – EDICT Insert Airspeed Voter Pattern
© Copyright 2011 Rockwell Collins, Inc.
All rights reserved.
29
GUIDED TOUR DEMONSTRATION OF THE TOOLS
Apply the next pattern by pressing the “Apply” button. This pattern replicates the entire Air Data
System (ADS), including the replicated pitch and airspeed sensors with their voters, to create a
redundant ADS function.
Figure 25 – EDICT Replicate ADS Pattern
© Copyright 2011 Rockwell Collins, Inc.
All rights reserved.
30
GUIDED TOUR DEMONSTRATION OF THE TOOLS
Apply the next pattern by pressing the “Apply” button. This pattern replicates the Attitude
Heading System (AHS) to create a redundant AHS function.
Figure 26 – EDICT Replicate AHS Pattern
© Copyright 2011 Rockwell Collins, Inc.
All rights reserved.
31
GUIDED TOUR DEMONSTRATION OF THE TOOLS
Apply the next pattern by pressing the “Apply” button. This pattern replicates the Flight
Management System (FMS) to create a redundant FMS function.
Figure 27 – EDICT Replicate FMS Pattern
© Copyright 2011 Rockwell Collins, Inc.
All rights reserved.
32
GUIDED TOUR DEMONSTRATION OF THE TOOLS
Apply the next pattern by pressing the “Apply” button. This pattern replicates the Navigation
System (NAV) to create a redundant NAV function.
Figure 28 – EDICT Replicate NAV Pattern
© Copyright 2011 Rockwell Collins, Inc.
All rights reserved.
33
GUIDED TOUR DEMONSTRATION OF THE TOOLS
Apply the next pattern by pressing the “Apply” button. This pattern replicates the Primary Flight
Display (PFD) to create redundant Primary Flight Display systems.
Figure 29 – EDICT Replicate PFD Pattern
© Copyright 2011 Rockwell Collins, Inc.
All rights reserved.
34
GUIDED TOUR DEMONSTRATION OF THE TOOLS
Apply the next pattern by pressing the “Apply” button. This pattern replicates the Yoke
subsystem to create redundant yoke control systems.
Figure 30 – EDICT Replicate Yoke Pattern
© Copyright 2011 Rockwell Collins, Inc.
All rights reserved.
35
GUIDED TOUR DEMONSTRATION OF THE TOOLS
Apply the next pattern by pressing the “Apply” button. This pattern replicates the Throttle
subsystem to create redundant throttle control systems.
Figure 31 – EDICT Replicate Throttle Pattern
© Copyright 2011 Rockwell Collins, Inc.
All rights reserved.
36
GUIDED TOUR DEMONSTRATION OF THE TOOLS
Apply the last pattern by pressing the “Apply” button. This pattern replicates the Fast Common
Computing Module (CCM) in the IMA Platform.
Figure 32 – EDICT Replicate Fast CCM Pattern
© Copyright 2011 Rockwell Collins, Inc.
All rights reserved.
37
GUIDED TOUR DEMONSTRATION OF THE TOOLS
Your screen should now look similar to the one shown in Figure 33. This system includes
redundant components with voters or selectors, leader selection to ensure that only one side is
active at a time, and logical synchronization (PALS) of key components.
Figure 33 – EDICT Final Avionics System
© Copyright 2011 Rockwell Collins, Inc.
All rights reserved.
38
GUIDED TOUR DEMONSTRATION OF THE TOOLS
EDICT provides an architecture browser view that allows us to see some of the other features
that have been added by the pattern transforms. We first need to save a copy of the transformed
model. Select the “Save Copy” tab towards the bottom of the Pattern Transform window. This
will display the screen shown in Figure 34. Enter the name you would like to save your copy
under and click on the “Save” button. The default name, PatternCopy_Initial_Avionics_System,
is fine.
Figure 34 – EDICT Save Copy of Transformed Model
© Copyright 2011 Rockwell Collins, Inc.
All rights reserved.
39
GUIDED TOUR DEMONSTRATION OF THE TOOLS
To open the architecture browser view, select from the menu bar EDICT → System Composer
→ Open → View → Architecture Browser, as shown in Figure 35.
Figure 35 – EDICT Open Architecture Browser
Select the transformed model that you just saved.
Figure 36 – EDICT Select Model for Architecture Browser
© Copyright 2011 Rockwell Collins, Inc.
All rights reserved.
40
GUIDED TOUR DEMONSTRATION OF THE TOOLS
The Architecture Browser provides several new views of the system. On the left side of the main
panel, you will see a pull-down menu for Select View. Choose the Properties Viewer option.
This view will display AADL properties for each model component. Select one of the Leader
Select (LS) components, either by clicking it in the diagram or by using the model tree on the left
side of the main panel, as shown in Figure 37. Now we can see the new properties that were
added by the PALS pattern.
Figure 37 – EDICT Properties Viewer in Architecture Browser
© Copyright 2011 Rockwell Collins, Inc.
All rights reserved.
41
GUIDED TOUR DEMONSTRATION OF THE TOOLS
5 Exporting the Model
At this point, we are ready to export our transformed model out of EDICT back into
AADL/OSATE and then back to SysML for final editing. Select File → Export from the main
menu. This will display the screen shown in Figure 38. In the Export window that pops up,
expand the “Other” folder, select “AADL System Instance”, and click on the “Next” button.
Figure 38 – EDICT Export the Transformed Model to AADL
© Copyright 2011 Rockwell Collins, Inc.
All rights reserved.
42
GUIDED TOUR DEMONSTRATION OF THE TOOLS
A new pop-up window will appear asking you to select the architectural model to export. Select
the name of the model you saved at the end of the pattern transform exercise.
Figure 39 – EDICT Select System Architecture to Export
© Copyright 2011 Rockwell Collins, Inc.
All rights reserved.
43
GUIDED TOUR DEMONSTRATION OF THE TOOLS
Another pop-up window will appear asking you if you want to write the AADL instance mode to
an existing instance or create a new instance. Select “Create a New System Instance”.
Another pop-up window will appear adding you to where to create the new system instance. You
must create the instance in the aaxl package structure of the Initial_Avionics_System.
Expand the Initial_Avionics_System folder in the pop-up window, then expand the aaxl (not the
aadl) folder, and select the “packages” folder as shown in Figure 40.
Finally, type in “Final_Avionics_System” as the name of the AADL system instance, click on
the “Next” button, and then click on the “Finish” button.
Figure 40 – EDICT Select Destination for AADL System Instance
© Copyright 2011 Rockwell Collins, Inc.
All rights reserved.
44
GUIDED TOUR DEMONSTRATION OF THE TOOLS
This has exported the AADL system instance of the transformed model and has also modified
the AADL declarative model of the Initial_Avionics_System model to be consistent with the
transformed model.
Normally, the OSATE tool would also update the textual AADL to be consistent with the
updated AADL declarative model. However, this capability is not implemented in the alpha
version of OSATE 2 currently available. For this reason, a few more steps are needed to export
the transformed model to AADL and OSATE.
First, select the AADL Perspective button in the upper left hand corner to switch to the AADL
perspective. Then, before cleaning the AADL model, select the Initial_Avionics_System model in
the AADL Navigator window (shown on the left in Figure 41) and select “META → Generate”
AADL from the main menu bar. This will generate the textual AADL to be consistent with the
AADL declarative model.
Finally, select “Project → Clean” for the Initial_Avionics_System model to recompile it and
check for errors. Since the Initial_Avionics_System model is really the transformed model, you
may wish to use the “File → Rename” function to rename it to Final_Avionics_System.
Figure 41 – META Generate AADL Textual Model
© Copyright 2011 Rockwell Collins, Inc.
All rights reserved.
45
GUIDED TOUR DEMONSTRATION OF THE TOOLS
The transformed model still requires some manual editing before it is complete. While this can
be done directly in OSATE on the textual AADL model, it is easier to do this on the graphical
SysML model.
To export the transformed AADL model to SysML, select the Initial_Avionics_System model
(or Final_Avionics_System model if your renamed it) and select the “META Export SysML”
function from the main menu bar. In the pop-up window that appears, navigate to and select the
Avionics_System_After_Pattern_Application.eap file in the Avionics_System_After_Pattern_
Application folder in your Examples folder. This will export a copy of the transformed model
into this EA repository, providing status messages as shown in Figure 42.
Figure 42 – META Export AADL Model to SysML
Normally, the new features added by the pattern applications would be laid out using the default
layout provided by Enterprise Architect. To avoid the need for extensive editing in this exercise,
a layout file has already been created in placed in the directory for the
Avionics_System_After_Pattern_Application. The SysML export function will use this layout
file to position the new features neatly.
© Copyright 2011 Rockwell Collins, Inc.
All rights reserved.
46
GUIDED TOUR DEMONSTRATION OF THE TOOLS
Navigate to the Avionics_System_After_Pattern_Application directory and double click on the
Avionics_System_After_Pattern_Applicate.eap file. An Enterprise Architect window similar to
that shown in Figure 43 should appear. The transformed Avionics System model is in the
“Exported_System” model.
Figure 43 – SysML Open Exported SysML Model
© Copyright 2011 Rockwell Collins, Inc.
All rights reserved.
47
GUIDED TOUR DEMONSTRATION OF THE TOOLS
Navigate in the Project Browser window on the left to the Flight_Control_System_Impl and
double click on the ibd icon to open the diagram as shown Figure 44. As you can see, the new
replicated FGS along with its ports and connections is now part of the transformed model.
Figure 44 – SysML Redundant Flight Control System
© Copyright 2011 Rockwell Collins, Inc.
All rights reserved.
48
GUIDED TOUR DEMONSTRATION OF THE TOOLS
Next, navigate to and open the ibd for the Avionics System as shown in Figure 45. As you can,
the new subsystems created during pattern application are now present. However, some manual
editing is still needed. For example, the connections from the new subsystems on the right need
to be manually connected to the new ports on the Flight Control System (FCS).
Figure 45 - SysML Redundant Avionics System
© Copyright 2011 Rockwell Collins, Inc.
All rights reserved.
49
GUIDED TOUR DEMONSTRATION OF THE TOOLS
6 Verification of the Final Avionics System
To simplify the demonstration, we have provided a final version of the avionics system model.
This model was created in SysML by editing the exported model from the previous section to
add hardware/software bindings, timing properties for threads and connections, and any
additional ports and connections that were not added automatically by the pattern transforms.
We have also added system level properties in the form of contracts that are appropriate for the
fault-tolerant version of the system.
The Final_Avionics_System model can be imported through the SysML translator using
Final_Avonics_System.eap, or the pre-translated AADL version can be imported directly. To do
this, we must start by deleting the Initial_Avionics_System AADL model. This is necessary
since an EDICT/OSATE workspace is a single namespace there would be conflicts if we
attempted to load the models together. Return to the AADL perspective, and select the
Initial_Avionics_System in the AADL Navigator pane on the left. Then select Edit → Delete
from the menu bar. In the dialog that appears, be sure to check the box for “Delete project
contents on disk.”
Now we can import the Final_Avionics_System model using the same procedure as in Section 3.
The models are found in the Example Models\Final Avionics System folder in the tool
installation. You can import either the SysML version or the AADL version.
In the next sections we will use the Lute and AGREE tools to verify different aspects of the final
system design.
© Copyright 2011 Rockwell Collins, Inc.
All rights reserved.
50
GUIDED TOUR DEMONSTRATION OF THE TOOLS
7 Using the Lute Structural Checker
The Lute Structural Checker verifies user defined structural properties of AADL instance
models. Since one normally works with AADL declarative models, the Lute checker is invoked
by selecting an AADL system implementation which Lute will then instantiate to create an
AADL instance model. For example, using the Final Avionics System, we can open TOP.aaxl2
and select the Complete_Avionics_System_Impl as shown in Figure 46.
Figure 46 – Selecting a System Implementation
We run the Lute Structural Checker by selecting “Run Built-in Lute Theorems” from the META
menu. The results will be displayed in the Eclipse console (If the console is not visible, it can be
opened using “Window → Show View → Other… → Console”). The results for the
Complete_Avionics_System_Impl are shown in Figure 47. Here we see a successful run where
all the Lute theorems pass. For each theorem, a count of the number of checks executed is
provided. This count is useful for discovering when a theorem passes vacuously (i.e. when 0
checks are performed).
© Copyright 2011 Rockwell Collins, Inc.
All rights reserved.
51
GUIDED TOUR DEMONSTRATION OF THE TOOLS
Figure 47 – Successful Results of Running Lute Built-in Theorems
We can break the Lute theorems by modifying properties on the model. For example, in
TOP.aadl we have the following line
Actual_Processor_Binding => (reference (HW.B.PRC)) applies to SW.FCS.FGS_R;
If we change HW.B.PRC to HW.A.PRC, then the Not_Collocated theorem should fail. To confirm
this, we make the described change and rebuild the AAXL files. Note that every time we change
AADL files we must explicitly tell OSATE / EDICT to rebuild the corresponding AAXL files.
To do this, from the “Project” menu select the “Clean…” option, choose “Clean all projects” and
press “OK.” We can then open TOP.aaxl2 again, select the Final_Avonics_System_Impl, and
run the built-in Lute theorems on it again. This time the Not_Collocated property fails as shown
in Figure 48. The results show that the systems SW.FCS.FGS_L and SW.FCS.FGS_R are
declared
as
Not_Collocated
but
they
respectively
contain
the
threads
SW.FCS.FGS_L.FGP.LS and SW.FCS.FGS_R.FGP.LS which are bound to the same
processor.
We can see another example of a Lute theorem failing by modifying timing information on the
model. To do this we look in FCS.aadl and change the following line
Latency => 5 ms .. 8 ms applies to FGSLtoFGSR;
replacing the value of 8 with 10. Then we can rebuild the AAXL files using “Project →
Clean…” again. The results of running Lute on the modified model are shown in Figure 49. Here
we see that the PALS_Period property fails to hold for the thread SW.FCS.FGS_L.FGP.LS.
© Copyright 2011 Rockwell Collins, Inc.
All rights reserved.
52
GUIDED TOUR DEMONSTRATION OF THE TOOLS
Figure 48 – A Failure of the Not_Collocated Theorem
Figure 49 – A Failure of the PALS_Period Theorem
© Copyright 2011 Rockwell Collins, Inc.
All rights reserved.
53
GUIDED TOUR DEMONSTRATION OF THE TOOLS
8 Using the AGREE Model Checking Tool
The Assume Guarantee Reasoning Environment (AGREE) tool performs compositional
reasoning over AADL models augmented with assumptions and guarantees. The final avionics
system model has been annotated so that the flight control system has all the assumptions and
guarantees needed to verify its compositional correctness.
AGREE runs on an AADL system implementation. That AADL system implementation must be
selected when AGREE is invoked. For example, using the final avionics system, we can open
FCS.aaxl2 and select the Flight_Control_System_Impl as shown in Figure 50.
Figure 50 – Selecting a System Implementation
We run AGREE by selecting “Verify with Kind” from the META menu. The results will be
displayed in a new window within Eclipse. The results for the Flight_Control_System_Impl are
shown in Figure 51. Here we see a successful run where all the system properties are verified.
© Copyright 2011 Rockwell Collins, Inc.
All rights reserved.
54
GUIDED TOUR DEMONSTRATION OF THE TOOLS
Figure 51 – Successful Results of Running AGREE
In the subsections that follow we detail different ways of modifying the model so that AGREE
reports a counterexample to the verification properties. Each counterexample violates the system
level guarantee that the pitch value reported by the autopilot must be within 5.0 units of its
previous value. In each case, we highlight the most interesting parts of the counterexample
manually, and we sketch out the underlying reason why the property failed. Note that the
specifics of each counterexample may change from one run of AGREE to the next, but validity
or non-validity will remain the same.
8.1
Removing Leader Selection Agreement
One fact about leader selection is that both sides will agree on the leader:
leader_agreement:
assert (FGS_L.LSO.Valid and FGS_R.LSO.Valid) =>
FGS_L.LSO.Leader = FGS_R.LSO.Leader ;
If we remove this fact from FCS.aadl, rebuild the AAXL files, and re-run AGREE, then the
following follow counterexample is generated:
© Copyright 2011 Rockwell Collins, Inc.
All rights reserved.
55
GUIDED TOUR DEMONSTRATION OF THE TOOLS
Signal
Type
AD_L.pitch.val
AD_R.pitch.val
AP.CSA.csa_pitch_delta
AP.GC_L.cmds.pitch_delta
AP.GC_L.mds.active
AP.GC_R.cmds.pitch_delta
AP.GC_R.mds.active
FGS_L.GC.cmds.pitch_delta
FGS_L.GC.mds.active
FGS_L.GC.mds.valid
FGS_L.LSO.leader
FGS_L.LSO.valid
FGS_R.GC.cmds.pitch_delta
FGS_R.GC.mds.active
FGS_R.GC.mds.valid
FGS_R.LSO.leader
FGS_R.LSO.valid
leader_pitch_delta
real
real
real
real
bool
real
bool
real
bool
bool
int
bool
real
bool
bool
int
bool
real
Step...
0
4.8
3.4
0
0
TRUE
0
TRUE
4.8
TRUE
TRUE
3
TRUE
3.933333
FALSE
TRUE
3
TRUE
0
1
3.866667
2.466667
0.066667
4.8
TRUE
3.933333
FALSE
4.933333
FALSE
TRUE
2
TRUE
4.866667
FALSE
TRUE
1
TRUE
4.8
2
3
4
5
2.933333
2 1.066667 0.133333
1.533333
0.6 -0.33333 0.166667
0.133333
0.1 4.733333 -0.26667
4.933333 -0.46667 -0.13333 -0.06667
FALSE
FALSE
FALSE
FALSE
4.866667
-0.4 0.533333 -0.33333
FALSE
FALSE
FALSE
TRUE
-0.46667 -0.13333 -0.06667 0.066667
FALSE
FALSE
FALSE
FALSE
TRUE
FALSE
FALSE
TRUE
2
3
3
2
TRUE
FALSE
FALSE
TRUE
-0.4 0.533333 -0.33333 -0.03333
FALSE
FALSE
TRUE
FALSE
FALSE
TRUE
TRUE
FALSE
0
1
2
0
FALSE
TRUE
TRUE
FALSE
4.8
4.8
4.8 -0.33333
Note that the value of the leader variable makes sense only when the corresponding side is valid;
otherwise the value is arbitrary. A leader value of 1 corresponds to the left side while 2
corresponds to the right side. In step 0, the left FGS is active and report a pitch value of 4.8 while
the right FGS is inactive with a pitch value of 3.4 (within the 2.0 bound of the other side). Then
in steps 1, 2, and 3 neither FGS puts itself in the active state since it is either invalid or it believes
the other side to be the leader. During these steps, the pitch values on the right side drift
downward, while staying within the 1.0 bound of previous values. In step 4, the right FGS
becomes active and reports -0.3333 as its pitch value. In step 5, this value is picked up by the
autopilot which previously was using the stale value of 4.8. This results in a pitch delta which
exceeds the 5.0 bound.
Similar counterexamples can be generated by removing other facts about the leader selection
such as the property that a leader always exists or the property that when the leader fails,
leadership is transferred to a non-failed node.
8.2
Allowing Immediate Re-failure
The flight control system has an assumption that when a FGS recovers from failure, it does not
fail immediately in the next step:
assume prev(prev(not FD_L.mds.valid, false), false) and
prev(FD_L.mds.valid, false) =>
FD_L.mds.valid ;
assume prev(prev(not FD_R.mds.valid, false), false) and
prev(FD_R.mds.valid, false) =>
FD_R.mds.valid ;
© Copyright 2011 Rockwell Collins, Inc.
All rights reserved.
56
GUIDED TOUR DEMONSTRATION OF THE TOOLS
If we remove this assumption, the following counterexample to the system level guarantees is
generated:
Signal
Type
AD_L.pitch.val
AD_R.pitch.val
AP.CSA.csa_pitch_delta
AP.GC_L.cmds.pitch_delta
AP.GC_L.mds.active
AP.GC_R.cmds.pitch_delta
AP.GC_R.mds.active
FGS_L.GC.cmds.pitch_delta
FGS_L.GC.mds.active
FGS_L.GC.mds.valid
FGS_L.LSO.leader
FGS_L.LSO.valid
FGS_R.GC.cmds.pitch_delta
FGS_R.GC.mds.active
FGS_R.GC.mds.valid
FGS_R.LSO.leader
FGS_R.LSO.valid
leader_pitch_delta
real
real
real
real
bool
real
bool
real
bool
bool
int
bool
real
bool
bool
int
bool
real
Step...
0
4.486486
2.540541
0
0
TRUE
0
TRUE
4.486486
TRUE
TRUE
2
TRUE
-0.05405
FALSE
FALSE
0
FALSE
0
1
3.540541
1.594595
4.432432
4.486486
TRUE
-0.05405
FALSE
-0.05405
FALSE
FALSE
3
FALSE
-0.67568
FALSE
TRUE
1
TRUE
4.486486
2
3
4
5
2.594595 1.648649 1.189189 0.243243
0.648649
-0.2973 -0.62162 0.27027
0.054054 0.108108 4.432432 -0.56757
-0.05405 -0.78378 -0.83784 -0.89189
FALSE
FALSE
FALSE
FALSE
-0.67568
-0.7027 -0.72973 -0.62162
FALSE
FALSE
FALSE
TRUE
-0.78378 -0.83784 -0.89189 0.054054
FALSE
FALSE
FALSE
FALSE
TRUE
FALSE
FALSE
TRUE
2
0
3
2
TRUE
FALSE
FALSE
TRUE
-0.7027 -0.72973 -0.62162 0.324324
FALSE
FALSE
TRUE
FALSE
FALSE
TRUE
TRUE
FALSE
0
1
2
0
FALSE
TRUE
TRUE
FALSE
4.486486 4.486486 4.486486 -0.62162
In this counterexample, each FGS goes through cycles of valid and invalid so quickly that it
never becomes active (during steps 1, 2, and 3). This allows an unacceptable pitch delta is
accumulate just as in the previous counterexample.
8.3
Increasing ADS Max Pitch Delta
The Air Data System max pitch delta is 1.0 by default:
const ADS_MAX_PITCH_DELTA: real = 1.0 ;
If we increase this to 2.0 the following counterexample is generated:
© Copyright 2011 Rockwell Collins, Inc.
All rights reserved.
57
GUIDED TOUR DEMONSTRATION OF THE TOOLS
Signal
Type
AD_L.pitch.val
AD_R.pitch.val
AP.CSA.csa_pitch_delta
AP.GC_L.cmds.pitch_delta
AP.GC_L.mds.active
AP.GC_R.cmds.pitch_delta
AP.GC_R.mds.active
FGS_L.GC.cmds.pitch_delta
FGS_L.GC.mds.active
FGS_L.GC.mds.valid
FGS_L.LSO.leader
FGS_L.LSO.valid
FGS_R.GC.cmds.pitch_delta
FGS_R.GC.mds.active
FGS_R.GC.mds.valid
FGS_R.LSO.leader
FGS_R.LSO.valid
leader_pitch_delta
real
real
real
real
bool
real
bool
real
bool
bool
int
bool
real
bool
bool
int
bool
real
Step...
0
4.8
2.9
0
0
TRUE
0
TRUE
4.8
TRUE
TRUE
2
TRUE
3
FALSE
FALSE
0
FALSE
0
1
3
1.1
0.1
4.8
TRUE
3
FALSE
0.6
FALSE
FALSE
3
FALSE
0.5
FALSE
TRUE
1
TRUE
4.8
2
1.1
-0.4
4.7
0.6
FALSE
0.5
FALSE
4.9
FALSE
FALSE
0
FALSE
-0.4
TRUE
TRUE
2
TRUE
4.8
3
1.05
0.85
-0.3
4.9
FALSE
-0.4
TRUE
4.85
FALSE
TRUE
2
TRUE
-0.45
FALSE
FALSE
0
FALSE
-0.4
In step 0 the left FGS is active with a pitch value of 4.8 while the right FGS is inactive and has a
pitch value of 2.9 (within the 2.0 bound of the left FGS value). In step 1, the right FGS is invalid
and becomes inactive while the right FGS remains inactive and its pitch value becomes 1.1
(within the 2.0 bound of its previous value). In step 2, the right FGS becomes active and its pitch
value is -0.4 (again within 2.0 of its previous value). This pitch value is picked up by the
autopilot system in step 3 which now sees a sudden jump from 4.8 to -0.4 which exceeds the 5.0
bound on pitch delta, thus invalidating the system level guarantee.
The essential problem is that although the two sides are within 2.0 of each other and each side
may change only 2.0 per step, leader selection requires that there is one step where neither side is
active while leadership is transferred. Thus two changes of 2.0 may occur during this time
leaving a total delta of up to 6.0. This does not occur when each side may only have a delta of
1.0 per step since then the total maximum delta is only 4.0.
© Copyright 2011 Rockwell Collins, Inc.
All rights reserved.
58