1
CONTENTS
CHAPTER 1
1.1
1.2
1.3
1.3.1
INTRODUCTION TO ESA MCB 51
ESA MCB 51 Capabilities
Specifications
General Description
Block Diagram
CHAPTER 2
CONFIGURATION AND INSTALLATION
2.1 Configuration
2.2 Installation
2.3 Integration with Keil
CHAPTER 3
3.1
3.1.1
3.1.2
3.1.3
3.2
3.2.1
3.2.2
3.3
3.4
3.5
3.5.1
3.5.2
3.5.3
3.5.4
3.6
3.7
3.7.1
3.7.2
3.7.3
CHAPTER 4
ESA MCB 51 HARWARE DESIGN DETAILS
CPU
CPU Reset
CPU Clock
CPU Bus
On-Chip Memory Map
Code or Program Memory
Data Memory
Ports
Serial Interface
LCD Interface
Description of the LCD Module
LCD Pin Description and Interface to MCU
Initialization of LCD Module
LCD Instruction Set
Interrupts
Connector details
Connector Descriptions
Connection Details and Signal Definitions
RS-232C Connection Details
Page Nos
1
2
3
3
5
5
6
11
11
11
11
11
11
12
13
14
14
14
15
15
16
17
17
17
18
21
ESA MCB 51 MONITOR ROUTINES AND LCD LIBRARY
FUNCTIONS
4.1 MONITOR ROUTINES
4.2 LCD LIBRARY FUNCTIONS
22
24
1. INTRODUCTION
ESA MCB 51 is a development board and supports a wide variety of 8051 (with onchip ROM) compatible 8-bit micro controllers. The 8051 family of micro controllers
are extensively used for embedded and real-time applications. ESA MCB 51 is
designed to be a general-purpose development board for Single Chip MCU
applications that may be used as an instructional learning aid and also as a
development tool in R&D labs in industries.
ESA MCB 51 development board is built around Atmel AT89C51ED2 / RD2 micro
controller that has 64Kbytes of on-chip program memory.
1.1
ESA MCB 51 CAPABILITIES
• The power full on-chip flash monitor provides communication with Keil µ Vision
Debugger.
• Executes the User Programs at full speed or Debug the Program using
Single Step and Break Point facilities available in Keil µ Vision Debugger.
• Examine/Modify the contents of CPU registers and memory contents.
• On-Board LCD (16x2), interfaced to port lines.
• All the 32 I/O (Port) lines are terminated on 4 different 10-pin connectors.
• 24 port lines (i.e. P0, P1 and P2) are terminated on a 26-pin connector.
• All the CPU Signals are terminated on a 40-pin connector for system expansion.
• On-Board ISP support for On-Chip flash programming.
The ESA MCB 51 kit includes the following items
• ESA MCB 51 Board
•
ESA MCB 51 User Manual (this manual)
•
RS-232 C Cable
•
A CD-ROM containing
I. Keil Evaluation version.
II. Sample Programs for ESA Interface Modules.
III. ESA MCB 51 Monitor Hex file.
IV. Atmel’s FLIP flash programming utility.
V. AT89C51ED2 /RD2 Data Sheet.
•
8051 Instruction set reference Card.
1
1.2 SPECIFICATIONS
PROCESSOR
•
AT 89C51ED2 / RD2 operating at 11.0592 MHz
PROCESSOR FEATURES
ON-CHIP MEMORY
CODE MEMORY: 64K Bytes of flash.
DATA MEMORY:
256 Bytes of RAM.
1792 Bytes of XRAM.
2K Bytes of EEPROM.
ON-CHIP PERIPHERALS
•
3 16-bit Timers/Counters.
•
Watch Dog Timer.
•
Programmable Counter Array (PCA) on Port1 i.e. PWM and Capture &
Compare.
•
SPI (Serial Peripheral Interface) on Port1.
•
Full duplex enhanced UART.
INTERRUPTS
Nine sources of interrupt (both external and internal).
Two External interrupts INT0 and INT1 are provided with push button switches;
these can also be used as general-purpose switches.
INTERFACE SIGNALS
CPU:
All the CPU signals available on a 40-pin connector site.
I/O (Port) Lines:
P0, P1 and P2 Port lines are available on a 26-pin connector,
compatible to ESA Interface Modules.
Four 10-pin connectors for all the 32 I/O lines.
LCD:
LCD compatible signals are available on a 16 Pin flow strip connector.
SERIAL I/O:
On-Chip UART signals are available through MAX 232 on a RJ-11 connector.
2
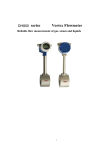
1.3 GENERAL DESCRIPTION
1.3.1 BLOCK DIAGRAM
PC with
KEIL µVision
UART
RS-232
SHIFTER
LCD
P1[0..7]
64K Bytes
Flash memory
P0[0..7]
P3[0..7]
P2[0..7]
P3.7, P3.6
P3.5
256 Byte RAM
1792 byte XRAM
2048 bytes EEPROM
P2[0..7]
26-Pin Connector
AT89C51ED2/RD2
µC
P0
P1
P2
The ESA MCB 51 is built around AT89C51ED2/RD2; this board provides a platform
to user to evaluate the on-chip features of 8051 family microcontrollers. Please refer
the datasheet of AT89C51ED2/RD2 for more details of the chip. The 32 I/O lines of
the microcontroller are available to user on different connectors (Please refer
Hardware chapter for more details on these connectors). A 16x2 LCD, which is
interfaced to 11 port lines, is available to user. The on-chip UART is used to
interface the board with PC.
3
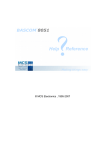
The trainer uses the on-chip flash monitor to communicate with Keil µVision
Debugger. The Flash monitor allows the user to program and debug the on-chip
code. The monitor uses the on-chip UART to communicate with µVision Debugger.
Typical layout of the flash monitor and Keil debugger is as follows.
PC with
Keil µVision
Debugger
Monitor
Code
EFFFH
E000H
User Code
6FFH
600H
CODE Flash ROM
Monitor Driver
UART
User
DATA
Monitor
Data
User
DATA
XDATA RAM
AT89C51ED2 / RD2
4
2. CONFIGURATION AND INSTALLATION
This chapter describes about configuration and the installation procedures of ESA
MCB 51. The ESA MCB 51 board requires +5V power and a serial connection to a
PC running Keil µVision debugger.
Hardware Requirements
•
The ESA MCB 51 Board.
•
A serial cable, given by the manufacturer i.e.RJ11 to 9-Pin female cable.
•
A PC (450Mhz and above) with an available RS-232 Port, 128 MB RAM and
30MB Hard Disk Space.
Software Requirements
•
Microsoft Windows 98/ME/NT/XP/2000
•
The Keil µ Vision ΙDE and Debugger. The flash monitor is already
programmed in the on-chip flash of AT89C51ED2 / RD2
2.1 CONFIGURATION
The Board will be shipped with ready configuration to connect with Keil IDE. Make
sure that the switch SW1 is kept in the Exec Mode before connecting.
2.2 INSTALLATION
1. Connect +5V@1A power supply to the board.
2. Connect the serial cable, 9-Pin Female connector to PC and RJ11 connector
to ESA MCB 51.
3. Switch ON the power to board; the following Sign On message should be
displayed on the LCD.
ESA MCB 51 VX.YY
here x-indicates version
Y-indicates revision
If no message is displayed on the LCD, then check the power supply connections
and the switch SW1 as described in the earlier section. If the problem still persists,
please contact the manufacturer.
After the Power up, the board can be connected to Keil IDE to download and
execute the user programs. The Keil Monitor-51 Driver is used to download the
5
user application code into on-chip flash, and also to debug the downloaded user
application code.
2.3 INTEGRATION WITH KEIL
The following steps describe the user, how to create and compile µ Vision2 project
for ESA MCB 51 board. User can find more information on Keil project creation and
compilation in the µ Vision2 and C51 Getting Stated User’s Guide.
1.
(Or)
Start the µ Vision2 or µ Vision3 IDE, create a project
file with Project – New Project, and select the CPU from the device
database. Select AT89C51ED2 or AT89C51RD2 as per the board.
2. Create and save a source file and add this source file to the project. This can
be done in the dialog Project – Target, Groups, Files…or with a right click
on the Source Group in the Project Window and the Add Files to Group
option.
6
3.
Set the Target options for the ESA MCB 51 as shown below.
Project – Options for Target opens the µ Vision2 Options for Target –
Target configuration dialog. Set the Xtal frequency as 11.0592 Mhz, as per
ESA MCB 51.
4. Since the ESA MCB 51 Monitor uses the code memory area from 0x0E000 to
0x0EFFF, the user application source need to use memory from 0x0000 to
0x0DFFF. Compile the written source and set the required debug options as
shown below.
7
5. Select Use Keil Monitor-51 Driver in the Options for Target – Debug page.
To load and start user application, enable Load Application at Startup
option.
6. Select appropriate communication settings using the Settings button in the
Debug page as shown below.
8
7. Under the COM Port settings select the COM Port to which the board is
connected and select the baud rate as 19200 or 9600 (recommended).
Enable Serial Interrupt option if the user application is not using on-chip
UART, to stop program execution.
8. Build the project; µ Vision translates all the user application and links.
9. After the Build, press Reset on ESA MCB 51.
10.
Now user can enter into Debug mode with Debug- Stat / Stop Debug
session dialog.
11. The debugger connects to ESA MCB 51 and downloads the user application
program into flash memory and also the debugger enables all the debugging
features like Run, Step, Step Over etc.,
9
12. In Case of any Communication problems a dialog box opens that displays
further options and instructions as shown below.
13. Here check for correct COM Port settings and ensure the COM Port working
condition. Check the monitor configuration whether Keil Monitor-51 Driver is
selected or not. Press Reset on ESA MCB 51 and Try again. If the problem
still persists, please contact the manufacturer.
14. To stop the execution of user application programs, use Stop option in
Debug dialog. If the user enabled the Serial Interrupt in Target – Debug
settings then the program execution stops normally, otherwise it displays a
sub window as shown below.
15. Here user can use the Stop Debugging button to stop the application
program execution.
10
3. ESA MCB 51 HARWARE DESIGN DETAILS
This chapter describes the following hardware design details of ESA MCB 51:
CPU
On-Chip Memory Map.
Ports.
Serial Interface.
LCD Interface.
Interrupts.
Connector Details.
Note: Please refer AT89C51ED2 / RD2 Data Sheet for more details about the
features of microcontroller.
3.1
CPU
ESA MCB 51 can be operated with AT89C51ED2 or AT89C51RD2 micro controller.
The board will be shipped with either of the above-mentioned CPU.
3.1.1 CPU RESET
The board comprises of power on reset circuit, the switch named as
RESET switch can be used to reset the microcontroller.
3.1.2 CPU CLOCK
An 11.0592 Mhz crystal is connected between the oscillator pins of the
microcontroller. The CPU uses this as clock source.
3.1.3 CPU BUS
All the CPU signals are terminated on a 40-Pin connector site J8. User
can make use of this connector for system expansion.
3.2 ON-CHIP MEMORY MAP
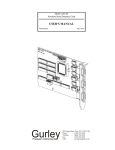
3.2.1 CODE or PROGRAM MEMORY
The AT89C51ED2 / RD2 provides on-chip flash program memory of
64Kbytes, ranges from 0000h to FFFFh. The EA* signal of the MCU is
hard wired to Vcc, so that the Processor fetches the code from on-chip
memory. The ESA MCB 51 uses 6K bytes of on-chip flash for monitor
program, the monitor program ranges from E000h to F800h. The Boot
Loader (provided by Chip Vendor) for ISP (In-System Programming)
11
occupies 1K bytes of flash memory from FC00h to FFFFh. User has to
make sure that the user application program should not use the
Monitor and Boot Loader memory ranges. The diagram given below
shows the Code or Program memory layout of ESA MCB 51.
0000h
CODE
Memory
USER
APPLICATION
AREA
56K bytes
DFFFh
E000h
MONITOR
6K bytes
USER AREA
1K bytes
BOOT
LOADER
1K bytes
F800h
FC00h
FFFFh
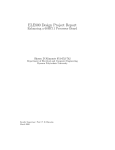
3.2.2 DATA MEMORY
The on-chip data memory of AT89C51ED2 / RD2 is as shown in the
following diagram.
7FFh
FFh
Upper 128
bytes of
Internal
DATA RAM
6FFh
600h
700h
MONITOR
DATA
80h
7Fh
Lower 128
bytes of
Internal
DATA RAM
00h 000h
1792 Bytes
Of
XRAM
DATA
RAM
2K Bytes
Of
EEPROM
DATA
MEMORY
(Available only
in
AT89C51ED2)
12
The on-chip data memory includes 256 bytes of RAM as internal data
memory, 1792 bytes of RAM as external data memory and 2K bytes of
EEPROM as external data memory. Of these ESA MCB 51 monitor
uses 256 bytes of XRAM for monitor data. So, User has to make sure
that the monitor data area should not be disturbed.
3.3 PORTS
All the 4 Ports of the microcontroller are available on different connectors for
different interfacing options. The connector details are as follows.
1) 4 Ports on 4 different 10-Pin connectors.
PORT
CONNECTOR
P0
J1
P1
J2
P2
J3
P3
J4
2) The Ports P0, P1 and P2 are on 26-Pin connector J7.
User can make use of the above connectors for different interfacings and
also care has to be taken while interfacing the same port lines on the
different connectors.
3) 3 lines from P3 (i.e. P3.7, P3.6, P3.5) and 8 lines from P2 are used to
interface the on-board LCD.
4) On-chip UART lines i.e. P3.0 and P3.1 are used for serial interface.
IMPORTANT NOTE: Since the same the Port lines are available in different
connectors for different interfacing options, the user should take care about using
the same port lines on different connectors i.e. the port lines that are under use in
one connector should not be used in other connectors. However in some
exceptional cases this can be done without any conflict.
13
3.4 SERIAL INTERFACE
The on-chip UART is used for serial interface with the PC; these signals are
level shifted using MAX232 for RS-232C compatibility. The RS-232C signals
are available on RJ11 connector J6.
The ESA MCB 51 monitor uses the on-chip UART to communicate with the
Keil µ Vision debugger.
3.5
LCD INTERFACE
A 16x2 LCD is interfaced to the port lines of MCU. User application programs can
make use o this LCD as a console.
3.5.1 Description of the LCD Module
These modules come in variety of formats like 8x1(eight characters per line and one
line), 8x2(eight characters per line and two lines), 16x1(sixteen characters per line
and one line), 16x2(sixteen characters per line and two lines), 20x2(twenty
characters per line and two lines), 20x4 (twenty characters per line and four lines)
etc.
LCD accepts characters in ASCII format. Character display font in LCD module is by
matrix of dots i.e. each character in LCD module can be represented by 7x5 matrix
(7 rows and 5 columns of dots) or 10x5 matrix (10 rows and 5 columns of dots).
This interface is built over 16x2 LCD module in which the display data RAM address
of LCD module for the first line starts from 00H to 14H and the second line starts
from 29H to 3CH. The following table shows the interfacing details of the LCD.
14
3.5.2 LCD Pin Description and Interface to MCU
PIN
1
2
3
SYMBOL
Vss
Vcc
Vo
4
RS
5
R/W*
6
7 to 14
E
DB0 to DB7
15
L+
FUNCTION
Ground
+5v supply
LCD contrast
control
Register Select
RS=0
Instruction
register
RS=1
Data Register
Read/Write
1=Read
0=Write
Enable
Bi-directional
data bus
Back light
power of +5V
PORT on MCU
P3.7
P3.6
P3.5
P2.0 to P2.7
Hard wired to
Vcc
LCD module has an automatic reset, which is critically dependent upon power
supply voltage. Voltage has to rise from 0.2v to 5v within 10 to 15ms for the LCD to
reset. Since this is not accurate we choose to give some delay in the application
program while initializing it. The Busy Flag of the LCD module will be set while LCD
is resetting and also when data or command has been written. At this time user
cannot write on to the LCD module. Data can be written on to the module only when
busy flag goes low.
3.5.3 Initialization of LCD Module
LCD module has to be initialized before writing any program on to it. Initializing
includes choosing character font, initializing cursor for blinking and auto increment
etc. User has to choose the appropriate instruction code from the instruction set and
send it over the module. The control signals viz RS, R/W*and E signals has to be
selected using the corresponding Port bits i.e. P3.7, P3.6, P3.5 respectively. The
data has to be sent over data bus i.e.P2.
15
The instruction set given below will be used to initialize the LCD module as required
by the application programs.
3.5.4 LCD Instruction Set
INSTRUCTION
CODE
RS
R/W
DB7
Clear display
0
0
0
0
0
0
0
0
0
1
Return home
Cursor to 00
0
0
0
0
0
0
0
0
1
X
entry mode set
0
0
0
0
0
0
0
1
1/D
S
display on/off
control
0
0
0
0
0
0
1
D
C
B
cursor on/
display shift
0
0
0
0
0
1
S/C
R/L
X
function set
0
0
0
0
1
DL
N
F
read busy flag
address
0
1
BF
X
= don'
t care
DB6
DB5
DB4
DB3
DB2
DB1
X
DB0
X
X
AC
S = 1 display shift when data is written
1/D = 1 increment cursor
for normal operation, set to 0
1/D = 0 decrement cursor
DL = 1 8 bits data length
S/C = 1 display shift
DL = 0 4 bits data length
S/C = 0 cursor move
N = 1 2 display lines
R/L =1 shift to right
N = 0 1 line
R/L = 0 shift to left
F
= 1 10x5 dots
B = 1 blink on
F
= 0 7x5 dots
B = 0 blink off
D = 1 display on
AC = address
D = 0 display off
C = 1 cursor on
BF = 1 LCD Busy
C = 0 cursor off
BF = 0 can accept instruction or data
16
3.6
INTERRUPTS
External Interrupts: The INT0 and INT1 interrupts are available to user,
these are provided with on-board switches.
Internal Interrupts: On-Chip Timer interrupts are available to user.
The ESA MCB 51 monitor program uses the on-chip
serial interrupt, so this should not be used in application
programs.
3.7
CONNECTOR DETAILS
The ESA MCB 51 comprises of eight different connectors in addition to one 40-Pin
connector site.
3.7.1 CONNECTOR DESCRIPTIONS
J5
:
Power Connector or Jack
J1
:
10-Pin connector for Port P0
J2
:
10-Pin connector for Port P1
J3
:
10-Pin connector for Port P2
J4
:
10-Pin connector for Port P3
LCD :
15-Pin Flow Strip Connector for LCD
J7
:
26-Pin connector fro Ports P0, P1 and P2.
J6
:
RJ11 connector for RS-232C signals.
J8
:
40-Pin connector site for all CPU signals.
17
3.7.2 CONNECTION DETAILS AND SIGNAL DEFINITIONS
J5:
+5 Volts Power Jack
Center - +ve
Outer - Gnd
J1: 10-Pin Male Connector for Port P0
J2: 10-Pin Male Connector for Port P1
Pin No. on J1
P0
Pin No. on J2
P1
1
P0.0
1
P1.0
2
P0.1
2
P1.1
3
P0.2
3
P1.2
4
P0.3
4
P1.3
5
P0.4
5
P1.4
6
P0.5
6
P1.5
7
P0.6
7
P1.6
8
P0.7
8
P1.7
9
Vcc
9
Vcc
10
Gnd
10
Gnd
J1: 10-Pin Male Connector for Port P2
J2: 10-Pin Male Connector for Port P3
Pin No. on J1
P2
Pin No. on J2
P3
1
P2.0
1
P3.0
2
P2.1
2
P3.1
3
P2.2
3
P3.2
4
P2.3
4
P3.3
5
P2.4
5
P3.4
6
P2.5
6
P3.5
7
P2.6
7
P3.6
8
P2.7
8
P3.7
9
Vcc
9
Vcc
10
Gnd
10
Gnd
18
LCD: 15- Pin Flow strip connector for LCD interface
Pin. No on Connector
LCD Signal
PORTS interfaced
1
Vss (Gnd)
2
Vdd (Vcc)
3
Contrast Control
4
RS (Reg Select)
P3.7
5
R/W* (Read/Write)
P3.6
6
E (Enable)
P3.5
7
DB0
P2.0
8
DB1
P2.1
9
DB2
P2.2
10
DB3
P2.3
11
DB4
P2.4
12
DB5
P2.5
13
DB6
P2.6
14
DB7
P2.7
15
Back Light
Hard wired to Vcc
19
J7:
26-Pin Male Connector for Ports P0, P1 and P2
Pin No. on J7
PORT Line
Pin No. on J7
PORT Line
1
P2.4
2
P2.5
3
P2.2
4
P2.3
5
P2.0
6
P2.1
7
P1.6
8
P1.7
9
P1.4
10
P1.5
11
P1.2
12
P1.3
13
P1.0
14
P1.1
15
P0.6
16
P0.7
17
P0.4
18
P0.5
19
P0.2
20
P0.3
21
P0.0
22
P0.1
23
P2.6
24
P2.7
25
Vcc
26
Gnd
J6:
J8:
6-Pin RJ11 Connector for RS-232C
Pin No. on J6
RS-232C Signals
1
Gnd
2
CRXD
3
CTXD
4
-
5
Gnd
6
-
40-Pin Connector site for CPU signals
All the 40 CPU signals are available on this connector as it is from CPU.
20
3.7.3
RS-232C CABLE CONNECTION DETAILS
J6: RJ11 (6-Pin) to 9-Pin D-Type female connector
Pin No. on J6 (RJ11 )
Pin No. on 9-Pin D-type
1
1
2
3
3
2
4
-
5
5
6
-
Note: ‘-‘ indicates No Connection.
21
4. ESA MCB 51 MONITOR ROUTINES AND LCD LIBRARY
FUNCTIONS
ESA MCB 51 Monitor provides the user with several useful LCD routines that
significantly simplifies the task of program development. This chapter gives a list of
routines provided by ESA MCB 51 Monitor, which are accessible to the user with
their address. Example programs using these routines are given in CD-ROM.
4.1 MONITOR ROUTINES
1.
Name of routine:
Function:
Call Address:
LCDINIT
Initializes the LCD with minimum settings like 5x7 font,
No cursor & Blink off, Clear display etc.,
0E267h
2.
Name of routine:
Function:
Input:
Call Address:
LCDCMD
Writes the Commands to the Instruction register of LCD
Store the Command byte in accumulator i.e. A register.
0E295h
3.
Name of routine:
Function:
Input:
Call Address:
LCDDAT
Writes the ASCII Characters to the Data register of LCD
Store the ASCII Character in accumulator i.e. A register.
0E2B4h
4.
Name of routine:
Function:
LCDSTATUS
Reads the Busy Flag of LCD and comes out the routine
when Busy Flag becomes low.
0E2D3h
Call Address:
5.
Name of routine:
Function:
Input:
Call Address:
DELAY
Provides 500 µsec
delay, the R2 register can be used
µ
multiply the base delay i.e. to increase the time delay.
Store the delay multiplier in R2 register.
0E2EEh
6.
Name of routine:
Function:
Call Address:
CLRLCD
Clears the LCD module and brings cursor to home.
0E2F9h
7.
Name of routine:
Function:
Call Address:
HOMECURSOR
Brings the LCD Cursor to Home Position.
0E306h
22
8.
Name of routine:
SETCURSOR
Function:
This routine sets the LCD cursor type; the Cursor type
has to be stored in B (0F0h) register.
B=00h – Selects No Cursor.
B=01h – Selects Normal Cursor.
B=02h – Selects No Cursor & Blink ON
B=03h – Selects Normal Cursor & Blink ON.
Store Cursor type in B (0F0h) register.
0E313h
Input:
Call Address:
9.
Name of routine:
Function:
Call Address:
10.
Name of routine:
Function:
Input:
Call Address:
11.
Name of routine:
Function:
Input:
Call Address:
12.
Name of routine:
Function:
Input:
Call Address:
SHIFTCURSOR
Shifts the LCD Cursor to left or right depends on the
values stored in B (0F0h) and R0 registers.
B=00h - Shifts the Cursor to Left side
B=01h- Shifts the Cursor to Right side
R0= No.of positions to be shifted.
0E35Ah
GOTOXY
Moves the Cursor to X-Line, Y-column.
Store Line number in B (0F0h) register and Column
number in R0 register. The On-Board LCD consists of 2
Lines and 16 Columns.
B=00h for Line=1.
B=01h for Line=2.
0E380h
LCDSTR
Displays the string pointing by DPTR register and the
string should be terminated with 00h.
Store the starting address of the string in DPTR register
and the string should be stored in CODE memory.
0E39Eh
HEX2ASCII
This Routine converts the lower nibble of accumulator to
ASCII number.
Store the number to be converted in lower nibble of
Accumulator A register.
0E3B0h
23
4.2
LCD LIBRARY FUNCTIONS
User can use this Library to do operations on-board LCD.
The Library files includes 1.LCD.LIB
2.LCD.H
User has to add this LCD.LIB file to the source group of the Project to include
LCD.H in the source code file. ‘C’ Language Examples are given in the CDROM, which includes the LCD library.
The functions available in this library are given below.
1. void InitLcd()
Description
: Initializes LCD for minimum settings
i.e.Func Set-8-bit data, 2lines of display, 5x8 dots,
Clear display, Disp on & Normal Cursor & Address
of first line.
2. void LcdCmdWrite(unsigned char)
Description : Writes a command to Instruction Register.
Argument
: Command Data.
3. unsigned char LcdCmdRead()
Description : Reads LCD'
s Instruction Register.
Return Value: Instruction Register content
4. void LcdDataWrite(unsigned char)
Description : Writes a Value into Display RAM.
Argument
: Character value.
5. void ClrLcd()
Description : Clears the LCD.
6. void WriteChar(unsigned char)
Description : Output a character in current Cursor.
Argument
: Character value.
24
7. void WriteString(char *)
Description : Output character string in current Cursor.
Argument
: Character string'
s Pointer.
8. void BusyWait();
Description : Wait & Check LCD to be ready.
9. void LcdDelay(unsigned int)
10. void HomeCursor(void)
Description : Brings Cursor to home.
11. void SetCursorType(unsigned char type);
Description
: Decide Cursor type.
Argument
: type - Cursor type(INPUT)
type=0- No Cursor;
type=1-Normal Cursor;
type=2-No Cursor, Blink
type=3-Normal Cursor & Blink
12. void ShiftCursor(unsigned char dir, unsigned char num)
Description : Shift to Left and Right current Cursor.
Argument
: dir - Decide direction to be Shift.(INPUT) dir !=0 -> Right
Shift, dir= 0 -> Left Shift.
13. void GotoXY(unsigned char x, unsigned char y)
Description
: Move Cursor to X Column, Y Row.
Argument
: x - Column to move(INPUT),
y - Row to move(INPUT),
Note: LCD used on ESA MCB 51 is ‘2x16’ dimension,
No. of Rows=2, i.e Y=0 or 1.
No. of Columns= 0fh i.e. X=0h to 0fh
25
ASCII CODES
HEX
00
01
02
03
04
05
06
07
08
09
0A
0B
0C
0D
0E
0F
10
11
12
13
14
15
16
17
18
19
1A
1B
1C
1D
1E
1F
20
21
DEC
0
1
2
3
4
5
6
7
8
9
10
11
12
13
14
15
16
17
18
19
20
21
22
23
24
25
26
27
28
29
30
31
32
33
CHAR
NUL
SOH
STX
ETX
EOT
ENQ
ACK
BEL
BS
HT
LF
VT
FF
CR
SO
SI
DLE
DC1
DC2
DC3
DC4
NAK
SYN
ETB
CAN
EM
SUB
ESC
FS
GS
RS
US
SP
!
HEX
22
23
24
25
26
27
28
29
2A
2B
2C
2D
2E
2F
30
31
32
33
34
35
36
37
38
39
3A
3B
3C
3D
3E
3F
40
41
42
43
DEC
34
35
36
37
38
39
40
41
42
43
44
45
46
47
48
49
50
51
52
53
54
55
56
57
58
59
60
61
62
63
64
65
66
67
CHAR
‘’
#
$
%
&
!
(
)
*
+
‘
.
/
0
1
2
3
4
5
6
7
8
9
:
;
<
=
>
?
@
A
B
C
26
HEX
44
45
46
47
48
49
4A
4B
4C
4D
4E
4F
50
51
52
53
54
55
56
57
58
59
5A
5B
5C
5D
5E
5F
60
61
DEC
68
69
70
71
72
73
74
75
76
77
78
79
80
81
82
83
84
85
86
87
88
89
90
91
92
93
94
95
96
97
CHAR
D
E
F
G
H
I
J
K
L
M
N
O
P
Q
R
S
T
U
V
W
X
Y
Z
[
\
]
^
‘
a
HEX
62
63
64
65
66
67
68
69
6A
6B
6C
6D
6E
6F
70
71
72
73
74
75
76
77
78
79
7A
7B
7C
7D
7E
7F
DEC
98
99
100
101
102
103
104
105
106
107
108
109
110
111
112
113
114
115
116
117
118
119
120
121
122
123
124
125
126
127
CHAR
b
c
d
e
f
g
h
I
j
k
l
m
n
o
p
q
r
s
t
u
v
w
x
y
z
{
l
}
~
DEL
27