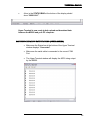
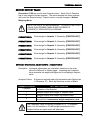
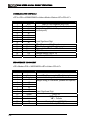
1
* FOR SOFTWARE VERSION 1.45 *
* RELEASE DATE: FEB. 24th, 2004 *
M2000 DIGITAL WEIGHT INDICATORS
M2000 A, M2000 A-S TECHNICAL MANUAL
Copyright © 2004 Western Scale Co. Limited. All rights reserved.
Published by:
WESTERN SCALE CO. LTD.
1670 Kingsway Avenue
Port Coquitlam, B.C.
Canada
V3C 3Y9
Information in this Technical Manual is subject to change without notice due to
correction or enhancement. The information described in this manual is the
property of Western Scale Co. Ltd. No part of this manual may be reproduced or
transmitted in any form, without the expressed written permission of Western
Scale Co. Ltd.
WESTERN SCALE LOCATIONS
WESTERN SCALE CO. LTD.
1670 Kingsway Avenue
Port Coquitlam, B.C.
Canada
V3C 3Y9
Ph: (604) 941-3474
Fx: (604)-941-4020
WESCALE INC.
DIVISION OF WESTERN SCALE
3873 Airport Way
Bellingham, WA.
USA
98227 - 9754
www.wescale.com
[email protected]
www.westernscale.com
www.westernscale.ca
[email protected]
FOR TECHNICAL SUPPORT REGARDING THIS PRODUCT, PLEASE CALL:
(604) 941- 3474
FOR MORE INFORMATION, CONTACT [email protected]
TABLE OF CONTENTS
INTRODUCTION………………………………………………………………………..1
M2000 Indicators………………………………………………………………………2
M2000 System Features……………………………………………………...…...…3
M2000 Enclosures………………………………………………………………….…4
Pre-installation (Receiving Inspection)……………………………………...……5
M2000 User Interface…………………………………………………………………6
Alpha-Numeric Display……………………………………………………...6
LED Indicator Lamps…………………………………………………...……7
Keypad & Key Functions……………………………………………………8
ON/OFF key……………………………………….……………….….8
ZERO key…………………………………………………………...…8
CLEAR key………………………………………………………...….8
TARE key………………………………………………………...……9
PRINT/SELECT key………………………………………………….9
User Functions………………………………………………………………………..10
Selecting Scale Channels………………….……………………………....10
Total Mode…………………………………………………………..……..…11
Example: Total Mode (1)………………… …………….………...11
Example: Total Mode (2)………………… …………….………...12
Scale Operations in Total Mode……………………...………….12
Scan Mode………………………………………………………..….…….…13
Gross/Net Weighing Modes……………………………………….……….13
Selecting lbs/kgs…………………………………………………….…....…13
Test Display…………………………………………………………………..13
Security Features………………………………………………………………….…14
Electronic Seal……………………………………………………………….14
Password……………………………………………………………….……..14
Change the Password………………………………………………………14
Audit Trail……………………………………………………………………..15
Accessing the Audit Trail…………………………………………………..15
Battery Replacement………………………………………………………………...16
Testing the Battery………………………………………………………….16
Replacing the Battery………………………………………………...…….16
i
HIGH SPEED DIGITAL WEIGHT INDICATORS
INSTALLATION………………………………………………………………………..17
Power Requirements………………………………………………………………...18
Power Aids……………………………………………………………………18
Battery Power…………………………………………………………….…..18
Grounding Requirements………………………………………………………..….19
Static Environments………………………………………………………....19
Line Noise……………………………………………………………………...19
Accessing the M2000 Terminals……………………………………………………20
M2000 Wiring Terminals……………………………………………………………..21
M2000A Analog Loadcell Wiring…………………………………………………...22
Scale Systems with 1 Loadcell…………………………………………….22
Scale Systems with Multiple Loadcells…………………………………..23
Wiring Power to the M2000………………………………………………………….24
M2000 Power Up………………………………………………………………………25
Power Up Trouble Shooting………………………………………………..25
STANDARD CALIBRATION & SET-UP……………………………………………27
Calibration Mode……………………………………………………………………..28
Entering Calibration Mode…………………………………………………28
Entering Commands in Calibration Mode………………………………28
Key Functions in Calibration Mode………………………………………29
Exiting Calibration Mode…………………………………………………..29
Standard Scale Set-Up Parameters……………………………………………….30
Decimal Point Position……………………………………………………..30
Graduation Size……………………………………………………………...30
Scale Capacity……………………………………………………………….30
EXAMPLE: Set-up a scale…………………………………………………31
Scale Calibration Parameters……………………………………………………...32
Scale Calibration Units……………………………………………………..32
Deadload Scale………………………………………………………………32
Set Span (Example)………………………………………………………....33
Time & Date……………………………………………………………………………34
Set Time (Example)………………………………………………………….34
Set Date (Example)……………………………………………………….....35
Time Format………………………………………………………………….35
ii
TABLE OF CONTENTS
ADVANCED CALIBRATION & SET-UP……………………………………………37
Scale Motion Parameters…………………………………………………………...38
Motion Window Multiplier (Example)…………………………………….38
Motion Settle Time (Example)……………………………………………..39
Zero Scale Parameters……………………………………………………………...40
Power On “Zero Scale” Message………………………………………...40
Push to Zero Window (Zero Range)……………………………………...40
Auto Zero Tracking (On/Off)……………………………………………….40
Auto Zero Tracking Window (AZSM)…………………………………….41
Power On Zero (IZSM)………………...……………………………………41
Disable ZERO key…………………………………………………………...41
Tare Parameters……………………………………………………………………...42
Tare Function Mode…………………………………………………………42
Force Zero For Keyboard Tare……………………………………………42
Auto Tare Clear………………………………………………………………42
Tare Offset…………………………………………………………………….43
Tare Offset Flag……………………………………………………………...43
Scale Channel & Total Mode Parameters………………………………………..44
Enable Scale Channel (Example)…………………………………………44
Power Up Channel Select………………………………………………….45
Enable Total Mode…………………………………………………………..45
More Set-Up Parameters……………………………………………………………46
Power On Units………………………………………………………………46
Scale Overload Setting (Example)………………………………………..46
Power Switch (On/Off key) Bypass………………………………………47
Loadcell Voltage Range……………………………………………………47
Display Update Rate………………………………………………………..48
Scale Over Message………………………………………………………..48
Sound Volume……………………………………………………………….48
Keypress Feedback…………………………………………………………49
Lock Measuring Units (Example)…………………………………………49
iii
HIGH SPEED DIGITAL WEIGHT INDICATORS
Scale Filtering Parameters………………………………………………………….50
Main Filter Setting (Digital Averaging)…………………………………...51
Faststep Filter Threshold (Example)………………………………….51/52
Faststep Filter Sensitivity (Example)………………………………….….53
Disable Faststep………………………………………………………….…..53
Linearity Correction……………………………………………………………….….54
Reset Span Table…………………………………………………………….54
Increment Span Table Pointer………………………………………….….54
Decrement Span Table Pointer………………………………………….…54
EXAMPLE: Linearity Correction…………………………………………...55
Reset M2000 Calibration & Settings……………………………………………….56
Span Factor (Example)……………………………………………………...56
Complete Factory Initialization……………………………………………57
Clear Calibration……………………………………………………………..57
SERIAL COMMUNICATIONS………………………………………………………..59
Serial Communications Set-Up Parameters…………………………………….60
Serial Wiring Connections…………………………………………………60
Default Settings……………………………………………………………...60
Data Bits………………………………………………………………………61
Baud Rate……………………………………………………………………..61
Parity…………………………………………………………………………..61
Output String Format……………………………………………………….62
Serial Handshaking (RTS/CTS)……………………………………………63
String Output Mode………………………………………………………....63
Configure COM Ports for RS422 Mode……………………………..…...64
Serial Output String Routing………………………………………………65
Transmission Delay for COM1 & COM2…………………………………65
Connecting the M2000 to Hyper Terminal……………………………………….66
Connecting the M2000 to the PC…………………………………………66
Starting Hyper Terminal…………………………………………………....66
Running the Hyper Terminal Set-Up File………………………………..66
Creating a Shortcut to Hyper Terminal……………………………….....67
Manually Setting Up Hyper Terminal for the M2000…………………..68
Capturing the M2000 Output String………………………………………69
iv
TABLE OF CONTENTS
Transmitting Calibration Information (UPLOADING)………………………….70
Transmit Calibration Information to PC…………………………………70
Capture a Text File from the M2000 Using Hyper Terminal………….70
Example: Transmit Calibration Information to a PC………………….71
Receiving Calibration Information (DOWNLOADING)…………………………72
Receive Calibration Information from PC……………………………….72
Sending Data to the M2000 Using Hyper Terminal……………………72
Example: Receive Calibration Information from a PC……………….73
Connecting a Barcode Scanner to the M2000…………………………………..74
Wiring the Barcode Scanner to the M2000……………………………..74
Enabling the Barcode Scanner…………………………………………...74
M2000 – Barcode Scanner Overview…………………………………….74
Assigning a Ticket Event to the Barcode Scanner……………………75
Scanner Handshaking Mode………………………………………………75
CONNECTING AUXILLARY PERIPHERALS VIA SMARTWIRE……………….77
Wiring for Smartwire…………………………………………………………………78
Smartwire Bridge Interface…………………………………………………………78
Smartwire Set-Up……………………………………………………………79
Enabling Smartwire…………………………………………………………79
Smartwire failure…………………………………………………………….79
4-20 mA Option Board………………………………………………………………80
Connecting the 4-20 mA Board…………………………………………...80
Select Scale Channel to Connect to Current Loop……………………80
Current Loop Offset Adjustment (Zero)…………………………………81
Current Loop Span Adjustment (Capacity)……………………………..82
Current Loop (Gross or Net Mode)……………………………………….83
Current Loop (Span)………………………………………………………...83
Example: Set-Up the 4-20mA Board…………………………………84/87
Setpoint Output Option Board……………………………………………………..88
Connecting the Setpoint Board…………………………………………...88
Setpoint Control Mask………………………………………………………89
Example: Assigning Setpoints……………………………………...……90
Entering Setpoint Values…………………………………………………..91
Setpoint Hysteresis Adjustments………………………………………...91
v
HIGH SPEED DIGITAL WEIGHT INDICATORS
Remote Input Option Board………………………………………………………..92
Connecting the Remote Input Board…………………………………….92
Remote Input Board Functions…………………………………………...93
Example: Connect a Remote ZERO Switch……………………………93
APPENDICES………………………………………………………………………….95
Appendix A - M2000 Parameters………………………………………………96/98
Appendix B - Error Messages……………………..………………………….99/100
Appendix C - String Formats…………………………….……………………….101
DF1000 String………………………………………………………………101
DF1500 String………………………………………………………………102
DF2000 String………………………………………………………………103
Channel Info Character…………………………………………..104
DF2000 Command Mode…………………………………………104
DF2500 String………………………………………………………………105
DF2500 Command Mode 6………………………………………106
DF2500 Command Mode 7………………………………………107
Consolidated Controls String……………………………………………108
Weightronix 120 String……………………………………………………108
Cardinal 738 String………………………………………………………...109
Analogic 5316 String………………………………………………………110
Appendix D – Specifications……………………………………………………..111
Appendix E – Warranty……………………………………………………………112
vi
TECHNICAL MANUAL
INTRODUCTION
1
HIGH SPEED DIGITAL WEIGHT INDICATORS
M2000 INDICATORS
Utilizing over 25 years of research and development in electronic weighing
systems, Western’s M2000 high performance scale indicators are the industry
standard for speed, versatility, and reliability.
M2000 weighing systems can be custom-tailored to meet the needs of any
application and are ideal for new installations as well as upgrades to existing
systems. The M2000 Indicator performs equally well on heavy industrial (Truck)
scales and small capacity (packaging) scales. For a complete synopsis of
M2000 Indicator functions and other custom weighing services, please visit
www.westernscale.com or contact the Western Scale Co. Ltd. factory.
The M2000 Indicator family includes:
•
M2000 A – 3 Channel Analog Indicator (2 COM Ports). One of the
world’s best and most affordable high speed, fully featured indicators.
For use with Analog loadcells.
•
M2000 A-S – Single Channel Indicator (1 COM Port). M2000 features
and quality at a low cost. For use with Analog loadcells.
•
M2000 D - 3 Channel Digital Indicator (2 COM Ports). Digital
Communication with your scale for maximum lightning protection and
data integrity. Converts Analog loadcell signals to digital data at the
scale via the DLC Smart Box.
This technical manual contains specific information regarding:
•
M2000 System Installations
•
Scale Set-up
•
Scale Calibration
•
Enabling and Disabling M2000 functions
•
Scale Communications
The following information is for the exclusive use of Western Scale Dealers
and Customers.
2
TECHNICAL MANUAL
M2000 SYSTEM FEATURES
FAST.
•
•
100 weight samples per second on each channel
FASTSTEP filtering: The industry’s most advanced, algorithmadjustable filter system
ACCURATE.
•
•
•
Resolution: 520,000 internal A/D counts
Up to 20,000 displayed divisions
Measurement Canada & NTEP certified to 10,000 divisions
VERSATILE.
•
•
•
•
•
•
•
Up to 3 independent Scale Channels
Total Mode for summing Channels
Fully Configurable Serial Communications
Available Analog Output (4-20mA Option board)
Up to 6 Setpoints available (Setpoint Option board)
4 Remote Inputs available (Remote Input Option board)
Ticket Editor Interface for easy to create, custom weigh tickets
(See M2000 Printing & Ticket Formatting Guide for more info)
DURABLE.
•
A variety of enclosures to suit any application.
3
HIGH SPEED DIGITAL WEIGHT INDICATORS
M2000 SLIMLINE
•
•
•
•
•
12 GA. Aluminum enclosure
Powder Coated Finish
External Power Supply
9” W X 4” H X 1 ¾” D
With bracket 10 ½” W X, 4 ½” H X 2” D
M2000 DT (DESKTOP)
•
•
•
Lightweight Stainless Steel enclosure
No-skid foot pads
9 ¾” W X 6” H X 3 ¼” D
M2000 LSB (LIGHTWEIGHT SWIVEL BRACKET)
•
•
•
Lightweight Stainless Steel enclosure
7 ¼” W X 10” H X 2 ¾” D
Stainless Steel Mounting bracket
M2000 NSS (STAINLESS STEEL WASHDOWN)
•
•
•
Stainless Steel enclosure with wall-mount tabs
Suitable for damp environments
8” W X 11 ½” H X 4 ½” D
M2000 NSS-1 (HEAVY DUTY)
•
•
•
•
4
Heavy Duty Stainless Steel enclosure
Suitable for tough, wet environments
6 Adjustable, Stainless Steel latches
8” W X 11 ½” H X 4 ½” D
TECHNICAL MANUAL
M2000 PRE-INSTALLATION
RECEIVING INSPECTION
It is always good practice to verify that the M2000 Indicator Kit is
undamaged upon receipt.
•
Check over packaging for any signs of damage.
•
Remove the M2000 indicator from its protective packaging and
check for damage.
Each M2000 Indicator Kit should include:
M2000 Indicator
External 12 Volt Power Supply & Power cord (Slimline
models only)
M2000 User Manual
Capacity Label Set
Removable Connectors for all terminals in the back of the
M2000
Verify that the correct number of cable strain-reliefs are
included
BE SURE TO CHECK THAT ALL NECESSARY OPTION BOARDS
HAVE BEEN INCLUDED.
5
HIGH SPEED DIGITAL WEIGHT INDICATORS
M2000 USER INTERFACE (DISPLAY & KEYPAD)
M2000 Displays are split into two components: The Alpha-Numeric Weight
Display and the LED indicators.
ALPHA-NUMERIC DISPLAY
[]2000
•
The Alpha-Numeric Weight Display has 6 multi-character LED’s. Scale
weights, Error messages, and Calibration information are shown here.
•
A negative weight is shown by a (-) minus sign on the far left LED
character.
•
The number of decimal points on the display is determined in Calibration
Mode. (See Scale Set-Up Parameters - Page 30)
•
On power-up, a scrolling “[]2000” will be displayed, followed by the
software version number. The scale weight will then be displayed.
LED INDICATOR LAMPS
•
6
These triangular LED’s will illuminate to indicate certain scale conditions.
TECHNICAL MANUAL
SCALE CHANNEL 1 INDICATOR
CH1
Illuminated LED indicates the weight from Scale Channel 1 is displayed.
A blinking LED indicates MOTION on the scale.
SCALE CHANNEL 2 INDICATOR
CH2
Illuminated LED indicates the weight from Scale Channel 2 is displayed.
A blinking LED indicates MOTION on the scale.
SCALE CHANNEL 3 INDICATOR
CH3
Illuminated LED indicates the weight from Scale Channel 3 is displayed.
A blinking LED indicates MOTION on the scale.
GROSS WEIGHING MODE INDICATOR
Indicates the scale is in GROSS weighing mode (No tare is stored).
GR
CENTRE ZERO INDICATOR
0
Indicates scale is within 0.2 graduations of true ZERO. May illuminate
with a displayed weight in NET mode or if Tare Offset is being utilized.
NET WEIGHING MODE INDICATOR
NET
Indicates the scale is in NET weighing mode (Scale has a tare weight
stored).
LB INDICATOR
The scale is weighing in IMPERIAL units (Pounds or a fraction thereof).
lb
KG INDICATOR
The scale is weighing in METRIC units (Kilograms or a fraction thereof).
kg
SCALE MOTION INDICATOR
A blinking Scale Channel LED indicates MOTION on that scale.
CH3
TOTAL MODE INDICATOR
CH1 CH2 CH3
Multiple illuminated Scale Channel LED’s indicate TOTAL
MODE. Only those channels illuminated are included.
7
HIGH SPEED DIGITAL WEIGHT INDICATORS
KEYPAD & KEY FUNCTIONS
NUMERIC
KEYS
ON / OFF KEY
Powers-up the M2000. The key must be pressed and held for 1
second to turn the M2000 off.
The [ON/OFF] key is not hard wired to the M2000 power supply. A
Power Bypass function is available for Process Control and other
applications. (See Power Switch Bypass - Page 47)
ZERO SCALE KEY
Removes small, residual weight values to return the displayed weight
to zero. The Centre Zero LED will be illuminated.
If the [ZERO SCALE] button is pressed in NET weighing mode, the
stored tare weight will appear as a negative weight on the display.
The scale cannot be zeroed if:
•
•
•
The [ZERO] key has been disabled.
The scale is in MOTION.
The residual weight on the scale is too great (More than 2%
of Scale Capacity. See Push to Zero Window – Page 40)
Three rapid beeps will sound to indicate any of these conditions!
CLEAR KEY
Press the [CLEAR] key to erase previously entered tare values. The
[CLEAR] key will also function to cancel any keypad entry.
8
TECHNICAL MANUAL
TARE KEY
There are 2 methods used to tare the scale:
Method 1: Tare a random weight on the scale.
•
Place an item of unknown weight on the scale. (Container, Box, etc.)
•
Press the [TARE] key and the displayed weight will be tared. Note that
the NET LED will illuminate to indicate that the scale is now in NET mode.
Method 2: Manually enter a tare.
•
With a stable weight on the scale, enter the desired tare weight using the
numeric keypad, followed by the [TARE] key. The NET LED will
illuminate to indicate the scale is in NET mode.
•
If the scale was at zero, the tare will be displayed as a negative weight.
The scale cannot be tared if:
• There is a negative weight on the scale.
• The scale is in motion.
• The [TARE] function is disabled. (See Tare Mode - Page 42)
PRINT / SELECT KEY
The [PRINT/SELECT] key has two functions:
Function 1: PRINT a Weigh Ticket to a printer.
•
Press the [PRINT/SELECT] key. A ticket will be sent to the
printer connected to an M2000 COM Port. (See the M2000
Printing & Ticket Formatting Guide for more information)
Function 2: SELECT a function.
•
Enter the function number on the numeric keypad, followed by
the [PRINT/SELECT] key.
See M2000 Functions – Page 10.
9
HIGH SPEED DIGITAL WEIGHT INDICATORS
M2000 USER FUNCTIONS
M2000 functions are accessible via the keypad. To prevent accidental misuse,
some functions may need to be enabled upon installation. Additional fine-tuning
may also be recommended to maximize a weighing systems performance. To
help your customer get the most out of the M2000, discuss specific system
requirements with them prior to installation.
SELECTING SCALE CHANNELS
•
M2000 Indicators utilize 3 independent scale channels. Channel 1 is the
default scale channel.
•
To view the weight display for the desired channel, press the channel
number on the numeric keypad followed by the [PRINT/SELECT] key.
•
Note the appropriate Scale Channel LED indicator will illuminate.
Scale Channels 2 & 3 must be enabled in Calibration/Set-up Mode.
(See Enable Scale Channel – Page 44)
10
TECHNICAL MANUAL
TOTAL MODE (SUMMING CHANNELS)
•
Up to 3 channels may be summed together to display a total
weight.
•
Only channels that are enabled and calibrated with the same
grad size, decimal places, and units of weight will be
displayed in TOTAL MODE.
•
Channel 1 is always included in TOTAL MODE.
•
TOTAL MODE is indicated when more than one of the Scale
Channel LEDs are illuminated.
•
To return the M2000 to Single Channel Mode, select a
channel followed by the [PRINT/SELECT] key.
TOTAL MODE EXAMPLE 1:
•
A Truck scale with 3 sections.
•
Each section is wired to a separate channel on the M2000, allowing the
operator to record the total weight of the vehicle along with the individual axle
weights.
SECTION 3 WIRED
TO CHANNEL 3
3000
SECTION 2 WIRED
TO CHANNEL 2
2000
SECTION 1 WIRED
TO CHANNEL 1
1000
1. To view the rear axle weight (Section 3), select Scale Channel 3.
(CH3 LED will illuminate)
3P
3000
CH1 CH2 CH3
2. To view the total weight (Sum of all sections), enter TOTAL MODE.
Press [4], followed by the [PRINT/SELECT] key. (CH1, CH2, & CH3 LEDs
will illuminate)
4P
6000
CH1 CH2 CH3
11
HIGH SPEED DIGITAL WEIGHT INDICATORS
TOTAL MODE EXAMPLE 2:
•
3 Floor scales, each using a channel on a single M2000.
•
CH1 and CH3 are calibrated as 2000 x 2 lbs.
•
CH2 is calibrated to 500 x 0.2 lb.
As a result, only Channels 1 and 3 will be included in Total Mode.
1. Press [4], followed by the [PRINT/SELECT] key.
4P
2. The CH1 and CH3 LED indicators will illuminate.
CH1 CH2 CH3
3. The weight on the display is the sum of these two channels.
SCALE OPERATIONS IN TOTAL MODE
•
Pressing the [ZERO SCALE] button will zero all the channels that are
included in Total Mode.
•
The TARE function will tare all channels included in Total Mode
simultaneously, displaying the total NET weight.
•
The MOTION and SCALE ZERO LEDs will indicate the status of all the
scales included in Total Mode. (E.g. If Channel 1 has MOTION, Motion
will be indicated for Total Mode)
TOTAL MODE must be enabled in Calibration before it can be used.
(See Enable Total Mode - Page 45)
TOTAL MODE cannot be used in legal for trade applications in
Canada!
12
TECHNICAL MANUAL
SCAN MODE
•
SCAN MODE allows the indicator to cycle
between the scale channels that are enabled.
•
The M2000 will automatically switch the display to
the next available channel and pause for 3
seconds before switching to the next channel.
•
To enter SCAN MODE, press [5] followed by the
[PRINT/SELECT] key.
•
Select a specific channel to stop scanning.
GROSS / NET WEIGHING MODES
•
To change the weighing mode, press [6] followed
by the [PRINT/SELECT] key.
•
If the M2000 has a tare value stored, it will toggle
between GROSS and NET weighing modes.
•
If no tare value is stored, the M2000 will remain in
GROSS weighing mode.
SELECTING POUNDS / KILOGRAMS
•
To change the weighing units on the display, press
[7] followed by the [PRINT/SELECT] key.
•
The indicator will toggle units from lbs to kgs or
kgs to lbs.
•
Either unit of measurement can be set up as the
default. (See Power On Units – Page 46)
•
To test the display segments, press [8] followed
by the [PRINT/SELECT] key.
•
All the segments in the display will light up for a
short period of time.
TEST DISPLAY
13
HIGH SPEED DIGITAL WEIGHT INDICATORS
SECURITY FEATURES
ELECTRONIC SEAL
M2000 Set-Up and Calibration settings are electronically sealed with a password.
This safeguard helps prevent accidental or unauthorized alteration of important
scale settings.
THE PASSWORD
Passwords are 4 digit numbers (0000 to 9999). The factory default for the
password is 1111, and can be changed in Calibration Mode.
If an incorrect Password is entered, the M2000 display will read:
FAiL
IMPORTANT: IF THE PASSWORD IS FORGOTTEN,
CALIBRATION MODE WILL BE INACCESSIBLE. CONTACT THE
WESTERN SCALE CO. LTD. FACTORY FOR ASSISTANCE.
VIEW OR CHANGE THE PASSWORD - PARAMETER 96
The Password must be changed in the M2000’s Calibration Mode.
(See Enter Calibration Mode - Page 28)
To view the current Password:
•
Enter Parameter 96. The current Password is displayed.
•
Press the [CLEAR] key to exit without changing.
To change the Password:
14
•
Enter Parameter 96. The current Password is displayed.
•
Enter a new 4 digit Password followed by the [PRINT/SELECT] key.
TECHNICAL MANUAL
AUDIT TRAIL
The M2000 is equipped with a Category 1 Audit Trail system. The Audit Trail
has two counters:
Calibration Counter: Changing parameters that affect the calibration of
weight will increment the Calibration counter by 1.
Config. Counter:
Changes to all other parameters (Configuration
parameters) will increment the Parameter counter by 1.
The counters will count from 000 to 999 before rolling over again. Changing
one or more parameters will increment the counter by 1 (One Counter tick per
Calibration session). Only an actual change of value to the Calibration or SetUp parameters will register to the Audit Trail.
Important Note: Because the Audit Trail becomes active at the
factory, the counters may not initially show 0, even when the M2000
is new out of the box.
IT IS EXTREMELY IMPORTANT THAT THE CORRECT TIME AND
DATE BE SET FOR THE AUDIT TRAIL TO BE ACCURATE. THE
AUDIT TRAIL IS PERMANENT AND CANNOT BE DISABLED OR
ERASED BY REMOVING THE INTERNAL BATTERY.
ACCESSING THE AUDIT TRAIL
The Audit Trail can only be accessed from Normal Weighing Mode.
1. Enter 1000 followed by the [PRINT/SELECT]. The message “Avdit” will
briefly be displayed.
avdit
1000P
2. Shortly after, the M2000 will display (in order) the date of the last change
made to the M2000’s calibration parameters, the Calibration (CAL) counter,
and the Configuration (CFG) counter.
03.10.31
Cal.001
Cfc.001
You may press the [CLEAR] key at any time to cancel this operation.
15
HIGH SPEED DIGITAL WEIGHT INDICATORS
BATTERY REPLACEMENT ON THE M2000
The M2000 uses a 3 Volt Lithium Battery to run the real-time clock and backup
the indicator’s memory. Power is drawn from the battery only when the indicator
is disconnected from the 12 Volt power supply. So, if the indicator is in regular
use, the battery should have a long lifespan.
TESTING THE BATTERY - PARAMETER 244
Description: Used to take a measurement of the 3 Volt lithium battery. Voltage
levels are in mV and can be interpreted below.
In Calibration Mode, enter Parameter 244.
PARAMETER VALUE
SETPOINT FUNCTION
3000 (3.0V)
2700 (2.7V)
3 Volts and above is considered good.
2.7 Volts and above is considered acceptable.
2600 (2.6V)
2.6 Volts or less is considered as low. Replace
battery.
REPLACING THE BATTERY
1. Remove the M2000’s back cover.
2. A coin-sized battery is located in a battery holder. (Upper left corner of the
M2000 PCB).
3. Use your fingers to grab each edge of the battery.
4. Gently pull on an angle removing the battery from the holder.
Replace the battery with a type RENATA CR2450N 3V 540mAh
lithium battery or equivalent. This battery should be available at
most electronics stores.
NEVER USE METAL OBJECTS SUCH AS SCREWDRIVERS TO
REMOVE THE BATTERY. THIS CAN RESULT IN PERSONAL
INJURY AND/OR A SHORT-CIRCUITING OF THE BATTERY
CAUSING DAMAGE TO THE INDICATOR.
16
TECHNICAL MANUAL
INSTALLATION
17
HIGH SPEED DIGITAL WEIGHT INDICATORS
POWER REQUIREMENTS
M2000 Indicators are precise electronic instruments that require clean, quality
power. Most M2000 models plug into 120 VAC external power. Inside the
enclosure, a 12 VDC power supply adaptor is utilized to run the indicator.
Slimline models connect to this power supply (included) externally.
It is important to note that in very noisy industrial environments,
power-conditioning filters would be a requirement to ensure failsafe operation under all conditions. Indicators should not share
AC power with electrical motors and switchgear. Consult with the
site engineer for clean AC power.
POWER AIDS
The following items may prove useful for some installations:
•
Line Filters and Surge Protectors: For installations in minor static
environments.
•
Constant Voltage Transformers: For installations where the power circuit
is shared.
•
True Uninterrupted Power Supply (UPS): For installations with highly
unstable power sources.
BATTERY POWER
A 12 Volt battery may be used to power the M2000.
The M2000 draws 200 mA, which will allow the indicator to run from a full 12 Volt
car battery for a long time. However, the M2000 provides no “Low Power”
indication.
USE OF A BATTERY TO POWER THE M2000 IS NOT
RECOMMENDED. IF POSSIBLE, THE 12 VDC POWER SUPPLY
INCLUDED WITH THE INDICATOR SHOULD BE USED AT ALL
TIMES.
IN CASES WHERE THE M2000 IS INSTALLED IN A VEHICLE,
POWER CONDITIONING MUST BE PROVIDED. CONTACT THE
WESTERN SCALE CO. LTD. FACTORY FOR DETAILS.
18
TECHNICAL MANUAL
GROUNDING REQUIREMENTS
Proper grounding of weighing system components is essential to avoid
problems with static, transmission line “noise”, and voltage surges that may
damage the equipment. It is essential that M2000 Indicators have a good
ground connection.
STATIC ENVIRONMENTS
To reduce static interference, some weighing systems should have a solid
connection from the scale base to Earth Ground.
This includes:
•
Systems incorporating conveyors
•
Systems incorporating Shrink-wrappers
•
Other devices that produce a lot of static
•
Devices used to weigh static-charged materials (such as plastics)
should also be grounded in this fashion.
LINE NOISE
To reduce line noise, connect the Loadcell shield wire to the Ground
terminal, labeled “GND”, on the back of the M2000.
(See M2000A Wiring Terminals – Page 21)
PLEASE NOTE THAT THE GROUNDING REQUIREMENTS FOR
THE M2000D DIGITAL SYSTEM ARE MUCH MORE STRINGENT!
FOR MORE INFORMATION ABOUT THE M2000D AND
LIGHTNING PROTECTION, SEE THE M2000D TECHNICAL
MANUAL OR CONTACT THE WESTERN SCALE FACTORY.
19
HIGH SPEED DIGITAL WEIGHT INDICATORS
ACCESSING THE M2000 TERMINALS
DISCONNECT POWER TO THE M2000 BEFORE OPENING THE
ENCLOSURE FOR INSTALLATION OR SERVICING.
M2000 SLIMLINE
•
Remove the Terminal Access Cover (2 small Phillips screws on back of
indicator).
M2000 DT (DESKTOP)
•
Remove 4 small Phillips screws on side of indicator enclosure.
•
Carefully lift top portion of stainless steel enclosure.
M2000 LSB (LIGHTWEIGHT SWIVEL BRACKET)
•
Remove 8 medium Phillips screws on the back of the stainless steel
enclosure.
•
Lift back plate away.
M2000 NSS (STAINLESS STEEL WASHDOWN)
•
Remove 8 medium Phillips screws from the front of the stainless steel
enclosure.
•
Carefully lift the front plate.
M2000 NSS (STAINLESS STEEL WASHDOWN)
•
Release the 6 adjustable enclosure latches.
•
Carefully lift the front plate.
TO AVOID THE RISK OF DAMAGE TO EQUIPMENT, DO NOT
CONNECT OR DISCONNECT ANY TERMINAL CONNECTORS
WHEN POWER IS BEING SUPPLIED TO THE M2000.
20
TECHNICAL MANUAL
M2000A WIRING TERMINALS
All wiring to M2000 indicators terminate at the main circuit board. If
possible, all wiring to the M2000 motherboard should be done before
power is applied to the unit.
COM2
COM1
SMARTWIRE
3.3V Li
BATTERY
12VDC CHANNEL 3
CHANNEL 2
CHANNEL 1
KEYPAD
BACK OF M2000 PCB
CTS
COM1
RS 232/422 PORT
COM2
RS 232/422 PORT
MAIN POWER
CONNECTOR
12VDC
SMARTWIRE
FOR
PERIPHERAL
INTERFACE
SCALE CHANNEL 1,2,3
FOR LOADCELL
CONNECTION
Clear To Send (Input – M2000 checks if communication is available)
RX
Receive Data (Input – Data received by the M2000)
TX
Transmit Data (Output – Data transmitted by the M2000)
RTS
Request To Send (Output – Signals M2000 ready to receive data)
COM
Common (Ground)
CTS
Clear To Send (Input – M2000 checks if communication is available)
RX
Receive Data (Input – Data received by the M2000)
TX
Transmit Data (Output – Data transmitted by the M2000)
RTS
Request To Send (Output – Signals M2000 ready to receive data)
COM
Common (Ground)
V-
(Negative)
GND
(Earth ground)
V+
(Positive power)
NC
(No connection)
B
(RS485 differential signal)
A
(RS485 differential signal)
V+
(SMARTWIRE Power supply)
V-
(SMARTWIRE Power supply)
- EXC
(Negative Excitation)
- SNS
(Negative Sense)
+ SNS (Positive Sense)
+ EXC (Positive Excitation)
SHLD
(Loadcell cable Shield)
- SIG
(Negative Signal)
+ SIG
(Positive Signal)
21
HIGH SPEED DIGITAL WEIGHT INDICATORS
M2000A ANALOG LOADCELL WIRING
Loadcell connections are labeled as follows:
LABEL
CONNECTION
- EXC
- SNS
+ SNS
+ EXC
SHLD
- SIG
+ SIG
Negative Excitation
Negative Sense
Positive Sense
Positive Excitation
Loadcell Shield
Negative Signal
Positive Signal
BE SURE TO CHECK THE LOADCELL MANUFACTURER’S
INSTRUCTIONS FOR THE CORRECT WIRE COLOUR CODE.
SCALE SYSTEMS WITH ONE LOADCELL ONLY
The Loadcell is wired directly to the M2000A using a 7 pin terminal connector.
The connector can be unplugged from the M2000 to make wiring easier.
•
Pass the loadcell cable through the strain-relief, into the enclosure (Not
required for Slimline models).
•
Terminate the loadcell wires, according to the Loadcell Connection table
above. Make sure each wire is securely fastened in the appropriate
position.
•
Plug the connector into the appropriate terminal (Scale Channel).
•
Re-assemble the M2000 enclosure as necessary.
22
+SIG
-SIG
SHLD
+EXC
+SNS
-SNS
-EXC
CHANNEL 1
TECHNICAL MANUAL
IMPORTANT WIRING NOTE!
When connecting loadcells without SENSE wires, the +EXC wire
must be jumpered to the +SNS terminal and the –EXC wire must
be jumpered to the –SNS terminal.
SCALE SYSTEMS WITH MULTIPLE LOADCELLS
These systems typically utilize a Summation board that is wired to the
M2000A using 7 pin terminal connectors. The connectors can be
unplugged from the M2000 to make wiring easier.
•
Terminate the loadcell wires at the Sum board, making sure each
wire is securely fastened in the appropriate position.
•
Pass the cable from the Sum board through the strain-relief, into the
enclosure (Not required for Slimline models).
•
Terminate the wires from the Sum board to the connector. Make
sure each wire is securely fastened in the appropriate position.
•
Plug the connector into the appropriate terminal (Scale Channel).
•
Re-assemble the M2000 enclosure as necessary.
+SIG
-SIG
SHLD
+EXC
+SNS
-SNS
-EXC
CHANNEL 1
23
HIGH SPEED DIGITAL WEIGHT INDICATORS
WIRING POWER TO M2000 INDICATORS
1.
Pass the power cable through the strain-relief, into the enclosure
(Not required for Slimline models).
2.
Terminate the power wires to the connector in the terminal labeled
“12VDC”, making sure each wire is securely fastened in the
appropriate position.
•
The “HOT” wire from the 12 VDC Power Supply connects to
the “+” terminal.
•
The “NEGATIVE” wire from the 12 VDC Power Supply
connects to the “-” terminal.
•
Make sure the Earth Ground wire is securely connected to
the “GND” terminal.
12VDC
PLEASE PAY CLOSE ATTENTION TO THE POLARITY OF THE
POWER CORD! WIRING POWER INCORRECTLY MAY DAMAGE
THE M2000!
24
TECHNICAL MANUAL
M2000 POWER UP
•
On power up, M2000 Indicators should display a scrolling “M2000”
followed by the software version number.
•
If the scale system has been installed correctly, a weight should then
be displayed.
[]2000
ver1.46
123456
TROUBLE SHOOTING
IF THE M2000 DOES NOT POWER UP:
•
Check External power source and Circuit Breaker.
•
Check 12V Power Supply and replace if necessary.
IF THE ALPHA-NUMERIC DISPLAY SHOWS:
•
There is no Signal Input. The loadcell cable to the M2000
may have been disconnected, wired incorrectly, or
severed. The loadcell could be defective.
•
Sense lines from the loadcell have not been terminated.
Connect Sense wires or jumper +EXC to +SNS and
–EXC to –SNS.
•
The loadcell’s output is beyond the M2000’s Input
Voltage Range. (See Parameter 11 - Page 47 to adjust
this range)
•
The scale is overloaded at the M2000’s default settings.
Remove any weights that may be on the scale and
Deadload the scale. (See Parameter 12 – Page 32)
vvvvvv
aaaaaa
888888
eeeeee
25
HIGH SPEED DIGITAL WEIGHT INDICATORS
NOTES:
26
TECHNICAL MANUAL
STANDARD
CALIBRATION & SET-UP
27
HIGH SPEED DIGITAL WEIGHT INDICATORS
CALIBRATION MODE
All Calibration and Set-up functions are executed via the keypad in Calibration
Mode. Each function or parameter has a unique code with which to access and
edit values. For a complete listing of all parameters, see Appendix A.
ENTERING INTO CALIBRATION MODE
TO ENTER CALIBRATION MODE FOR SCALE CHANNEL 1:
19P
1.
Enter 19 followed by the [PRINT/SELECT] key.
2.
The display will flash “ PA55
password is required.
C12320
3.
Enter 1111 (factory default password). A blinking “C” should
appear on the left hand side of the display, indicating
Calibration Mode has been entered. (For more information
on passwords, see Security Features - Page 14)
”. At this point, a four-digit
Note: To enter Calibration Mode for Channels 2 & 3, use
Parameters 29 & 39 respectively and follow the exact same steps
as for Channel 1.
ENTERING COMMANDS IN CALIBRATION MODE
SELECT A PARAMETER
•
Calibration & Set-up parameters are selected by entering their unique
numeric code followed by the [PRINT/SELECT] key. This method is
similar to selecting a function in Normal Weighing Mode.
EDIT A PARAMETER
28
•
After a parameter is selected, its current value will be displayed. There is
a 6 second window to edit the parameter. Parameter values are entered
using the numeric keys followed by the [PRINT/SELECT] key.
•
In some cases, the [TARE] key must be used to enter a parameter value.
Specific Parameter Descriptions will address the use of the [TARE] key.
TECHNICAL MANUAL
KEY FUNCTIONS IN CALIBRATION MODE
O
Z
T
P
C
0
.
Cycles the display between Graduated Counts (Displayed weight
prefixed by a blinking letter “C”) and Raw Internal Counts (Prefixed
by a blinking letter “a”).
Continues to function as in normal Weighing Mode.
Confirms entry of new Parameter Values (in certain cases only).
Select Parameters and confirms entry of most Parameter Values.
Aborts any parameter change without saving.
Used to increase some parameter values. Specific Parameter
Descriptions will address the exact function of this key.
Used to decrease some parameter values. Specific Parameter
Descriptions will address the exact function of this key.
EXIT CALIBRATION MODE - PARAMETER 99
Description:
1.
Exits Calibration Mode and restarts the M2000. All
calibration changes are saved to flash memory and the
Audit Trail is updated.
Enter 99 followed by the [PRINT/SELECT] key.
99P
2.
The display will flash, run through a save series, and return to
Normal Weighing Mode.
cal
5ave
{}ait
0.0
29
HIGH SPEED DIGITAL WEIGHT INDICATORS
STANDARD SCALE SET-UP PARAMETERS
The following parameters are standard for getting a scale up and running.
DECIMAL POINT POSITION - PARAMETER 2
Description: Sets the number of decimal places to correspond with Grad Size.
PARAMETER VALUE
DISPLAY EXAMPLE
0 (default)
1
2
3
4
123456.
12345.6
1234.56
123.456
12.3456
GRADUATION SIZE - PARAMETER 3
Description: The number the scale will count by.
PARAMETER VALUE
1 (default)
2
5
10
20
50
100
DISPLAY EXAMPLE
1,
2,
5,
10,
20,
50,
100,
2,
4,
10,
20,
40,
100,
200,
3, etc.
6, etc.
15, etc.
30, etc.
60, etc.
150, etc.
300, etc.
SCALE CAPACITY - PARAMETER 4
Description: True Scale Capacity. The Zero Range is calculated from this value.
Accepted Parameter Values: Any number (weight) up to 999999.
For “Scale Over” above True Scale Capacity, see Parameter 8 –
Page 46.
30
TECHNICAL MANUAL
EXAMPLE:
SET UP A 5,000 LB. CAPACITY SCALE WITH A
GRADUATION SIZE OF 0.5 LB. ON CHANNEL 1.
1. Enter Calibration Mode for Channel 1.
19P
Pa55
1111
C12344
2. Select the weighing units for Set-Up by pressing 7 followed by the
[PRINT/SELECT] key. Either the lb or kg LED indicator LED will illuminate.
3. To select Decimal Point Position, press 2 on the keypad followed by
[PRINT/SELECT]. The display will show the current position (default: 0).
2P
0
4. For 1 decimal place, press 1 on the keypad followed by the [PRINT/SELECT]
key.
1P
C1234.4
5. To select Graduation size, press 3 on the keypad followed by [PRINT/SELECT].
The display will show the current Graduation size (default: 1)
3P
1
6. For a grad size of half a pound, press 5 on the keypad followed by
[PRINT/SELECT].
5P
C1232.5
7. To select Scale Capacity, press 4 on the keypad followed by [PRINT/SELECT].
The display will show the current Scale Capacity.
4P
C1000.0
8. For a Scale Capacity of 5,000 lb., enter 5000 on the keypad followed by the
[PRINT/SELECT] key.
5000P
The Scale is now ready for calibration and/or more advanced Set-Up.
31
HIGH SPEED DIGITAL WEIGHT INDICATORS
SCALE CALIBRATION PARAMETERS
The following parameters relate to basic Scale Calibration.
SCALE CALIBRATION UNITS - PARAMETER 7
Description: Selects measurement units for calibration. Test Weight units
should match Calibration units. Verify on indicator display.
•
Toggle weighing units by pressing 7 followed by the
[PRINT/SELECT] key.
DEADLOAD SCALE - PARAMETER 12
Description: Identifies the weight of the scale itself. Before spanning the scale
for the first time, the scale must be deadloaded.
EXAMPLE:
1. Ensure that all test weights are removed from the weighing
platform and that the weight is stable.
2. Enter 12 followed by the [PRINT/SELECT] key. The Indicator
Password will be required (Factory default “1111”).
12P
Pa55
1111
-dead-
3. After the deadload is complete, the indicator will briefly display
the Deadload Value in raw A/D counts before returning to
weight display mode.
1933
c
0.0
Older M2000 software versions (1.44 and older) will not prompt for
the Password when the scale is deadloaded. Instead, the
“Reconfirm” screen appears.
r
At this point, press [1] followed by the [PRINT/SELECT] key to
activate the deadload function.
1P
32
-dead-
TECHNICAL MANUAL
IMPORTANT NOTICE FOR HIGH CAPACITY SCALES & SCALES
UTILIZING A LARGE NUMBER OF LOADCELLS!
PLEASE VERIFY THAT THE CORRECT ANALOG INPUT RANGE
IS SET BEFORE PROCEEDING TO SPAN SCALE. (SEE
PARAMETER 11 - PAGE 47)
SET SPAN - PARAMETER 13
Description: Calibrates (Spans) the scale with a known Test Weight.
EXAMPLE: IN CALIBRATION MODE, SPAN A SCALE TO 5,000 LBS.
1.
Verify that scale is reading zero with the Centre of Zero LED
illuminated.
C
0.0
2.
Place Test Weights on the scale (5,000 lbs).
3.
Enter 13 followed by the [PRINT/SELECT] key. Once
activated, the current displayed weight will be frozen on the
display.
13P
4.
C4276.5
Enter the known test weight value followed by the
[PRINT/SELECT] key. The display will show the new, corrected
weight on the scale.
5000P
C5000.0
33
HIGH SPEED DIGITAL WEIGHT INDICATORS
TIME & DATE ON THE M2000
M2000 Indicators have a built-in Time & Date Clock that is Y2K compliant and
automatically adjusts for leap years. The real time clock runs from a battery on
the main board and will continue to operate when power is cut. The time and
date settings are changed when the M2000 is in Normal Weighing Mode.
PARAMETER 80 - SET TIME
Using the numeric keypad, enter the new 6-digit time in the format shown
below. Press [PRINT/SELECT] to save the new time or cancel at any time by
pressing the [CLEAR] key.
HH:MM:SS
2 Digit Seconds (00 – 59)
2 Digit Minute (00 – 59)
2 Digit Hour (01 – 12 or 00 – 23)
EXAMPLE: 11:00 AM
1. Select Parameter 80. The current time will be displayed.
80P
10.00.00
2. Enter the new time, followed by the [PRINT/SELECT] key.
110000P
FOR 12-HOUR CLOCK MODE, PARAMETER 83 MUST BE USED
TO SELECT AM OR PM.
34
TECHNICAL MANUAL
PARAMETER 81 - SET DATE
Using the numeric keypad, enter the new 6-digit date in the format shown
below. Press [PRINT/SELECT] to save the new date or cancel at any
time by pressing the [CLEAR] key.
YY:MM:DD
2 Digit Day (01 – 31)
2 Digit Month (01 – 12)
2 Digit Year (00 – 99)
EXAMPLE: January 1, 2004
1. Select Parameter 81. The current date will be displayed.
81P
01.01.01
2. Enter the new time, followed by the [PRINT/SELECT] key.
040101P
PARAMETER 83 - TIME FORMAT
Description: Controls Time Format settings. 12 Hour or 24 Hour (military
time) clock settings are available.
PARAMETER VALUE
TIME FORMAT
0 (default)
1
2
24 Hour Mode
12 Hour Mode AM
12 Hour Mode PM
35
HIGH SPEED DIGITAL WEIGHT INDICATORS
NOTES:
36
TECHNICAL MANUAL
ADVANCED
CALIBRATION & SET-UP
37
HIGH SPEED DIGITAL WEIGHT INDICATORS
SCALE MOTION PARAMETERS
The following parameters are used for adjusting MOTION characteristics.
These settings are useful for installations experiencing instability problems, and
adjusting the performance of the Motion character in the Output string.
MOTION WINDOW MULTIPLIER - PARAMETER 5
Description: Determines the scale’s sensitivity to motion.
This Parameter Value is multiplied by the Graduation Size to give
the Motion Window. A change in weight must be greater than this
window to activate the MOTION LED.
To decrease Motion Sensitivity, increase the value of this
parameter.
Default Value: 2 - When Graduation Size (Parameter 3) is set, the Motion
Window is automatically set to 2 times the Graduation size.
Accepted Values: 1 – 10
EXAMPLE:
AN OLD AND UNSTABLE SCALE. THE WEIGHT IS NOT
SETTLING FAST ENOUGH. DECREASE MOTION SENSITIVITY.
1. In Calibration Mode, press 5, followed by the [PRINT/SELECT] key to
select “Motion Window.” A “2” will be displayed (Default value).
5P
2
2. Press 4 followed by the [PRINT/SELECT] key to double the value.
4
4
P
3. The motion sensitivity will now be 4 times the graduation size. If the Grad
Size is 10 kg, MOTION will not be indicated (blinking LED) unless the
weight on the scale changes by more than 40 kg (4 x 10 kg).
BE SURE TO REFERENCE LOCAL REGULATORY
REQUIREMENTS.
38
TECHNICAL MANUAL
MOTION SETTLE TIME - PARAMETER 24
Description: Displays the number of ¼ second intervals that Motion will
be indicated after the scale reading has stabilized within
tolerance.
Motion is indicated by:
•
A blinking Scale Channel LED.
•
The presence of an ASCII character ‘M’ in the Output
String. (For most Output String Formats)
Default Value: 8 (2 seconds)
Accepted Values: 1 - 255
EXAMPLE:
THE SCALE COMMUNICATES WITH A CONTROL SYSTEM OR
DATABASE. THE SYSTEM WANTS TO SEE A STABLE
WEIGHT FOR AT LEAST 4 SECONDS BEFORE IT PROCESSES
THE SCALE INFORMATION.
1. Enter 24 followed by the [PRINT/SELECT] key. An ‘8’ will be
displayed (Default value).
24P
8
2. Sixteen (16) ¼ second intervals are needed for a Motion Settle
Time of 4 seconds (16 x ¼ sec).
16P
39
HIGH SPEED DIGITAL WEIGHT INDICATORS
ZERO SCALE PARAMETERS
Track-off mud, dirt, rocks or other materials that may accumulate on the scale.
Also, utilize Zero functionality to satisfy certain Legal For Trade requirements.
POWER ON “ZERO SCALE” MESSAGE - PARAMETER 9
Description: Enables a “Zero” prompt for the Scale Operator.
PARAMETER VALUE
0 (default)
1
DISPLAY EXAMPLE
Disabled. Weight is displayed. Normal
Operation.
Enabled. “2ER0” is displayed. The Operator
must Zero the scale before weighing.
This parameter may be a requirement for certain ‘Legal For Trade’
applications.
PUSH TO ZERO WINDOW (OR ZERO RANGE) - PARAMETER 21
Description: The weight range, as a percentage of scale capacity, that can be
zeroed-out by pressing the [ZERO] key.
Default Value: 2 (%)
Accepted Values: 0 to 99 (%)
AUTO ZERO TRACKING (ON/OFF) - PARAMETER 22
Description: Allows the M2000 to automatically zero off any residual weight on
the scale (Up to a pre-determined limit – See Parameter 23)
40
PARAMETER VALUE
AUTO ZERO TRACKING
0
1 (default)
OFF
ON
TECHNICAL MANUAL
AUTO ZERO TRACKING WINDOW (AZSM) - PARAMETER 23
Description: Adjusts the percentage of a graduation that can be tracked
off during Auto Zero Tracking.
ACCEPTED PARAMETER VALUES
1-99 (default: 60)
100
200
300
AUTO ZERO
Track off 1 to 99% of a graduation (d)
Track off 1 graduation (1d)
Track off 2 graduation (2d)
Track off 3 graduations (3d)
Auto Zero Tracking (Parameters 22 & 23) is subject to local
regulatory requirements.
POWER ON ZERO (IZSM) - PARAMETER 45
Description: Automatically zeroes the scale on power up. The maximum
range is set to +/- 10% of Scale Capacity.
If the initial load on the scale exceeds +/- 10% of Scale
Capacity, no initial scale zero will take place.
PARAMETER VALUE
POWER UP ZERO
0 (default)
1
OFF
ON
DISABLE ZERO KEY - PARAMETER 111
Description: Prevents the user from zeroing the scale. The [ZERO] key
will continue to perform its other functions (In Calibration
Mode, etc.).
PARAMETER VALUE
ZERO KEY
0 (default)
1
Enabled.
Disabled.
41
HIGH SPEED DIGITAL WEIGHT INDICATORS
TARE PARAMETERS
Tare function can be extremely important, especially in Legal For Trade
applications. These parameters allow the customer to optimize the tare settings,
reducing the potential for human error.
TARE FUNCTION MODE - PARAMETER 50
Description: Controls how the tare function is used on the M2000.
PARAMETER VALUE
0
1 (default)
ACTION
Disable keyboard and scale tare.
• No weight can be tared off the scale.
• No tare can be entered using the keypad.
Enable both keyboard and scale tare.
• Both keyboard tare entry and pushbutton tare
can be used.
2
Enable pushbutton tare only.
• Weight may only be tared from the scale.
3
Enable keyboard tare only.
• Tare entry can only be done from the keyboard.
FORCE ZERO FOR KEYBOARD TARE - PARAMETER 71
Description: Verifies the scale is at zero before allowing an operator to enter a
keyboard tare.
42
PARAMETER VALUE
FORCE ZERO FOR KEYBOARD TARE
0 (default)
1
Disabled
Enabled
TECHNICAL MANUAL
The following 2 parameters deal with TARE OFFSET and are
intended specifically for use in Grain Weighing applications.
There should be no reason to access these parameters for
any other application or reason.
TARE OFFSET VALUE - PARAMETER 25
Description: This value represents a build up of material in the scale that
could come loose, resulting in an undesirable negative
weight.
At Scale Zero, the Centre of Zero LED will illuminate, but
the indicator display will show the tare offset value. This tare
weight is always present.
Default Value: 0 (No Tare Offset Value)
Accepted Values: Any weight
TARE OFFSET FLAG - PARAMETER 26
Description: This command controls the operating mode of the Tare
Offset.
PARAMETER VALUE
DISPLAY EXAMPLE
0 (default)
Offset Disabled.
1
Legal For Trade Mode: M2000 cannot be put in NET
mode if no value has been set for tare. If a tare has
been entered, the Offset Value is included in the NET
display.
80
Not Legal For Trade Mode: Allows GROSS/NET
switching when the M2000 displays ZERO. If NET is
selected, the Offset Value is subtracted from the
displayed GROSS weight.
43
HIGH SPEED DIGITAL WEIGHT INDICATORS
SCALE CHANNEL & TOTAL MODE PARAMETERS
ENABLE SCALE CHANNEL - PARAMETER 98
Description: Enables Scale Channels 2 or 3. By default, channels 2 and 3 are
turned off.
Channel 1 is always enabled.
To enable a channel, enter Calibration Mode for that channel.
Press 1 followed by the [PRINT/SECLECT] key.
To disable the channel, enter 0 followed by the [PRINT/SECLECT]
key.
EXAMPLE:
PARAMETER VALUE
SCALE CHANNEL
0 (default)
1
Disabled
Enabled
ENABLE SCALE CHANNEL 2.
1. Enter Calibration Mode for Scale Channel 2.
29P
C
4998
2. Select Parameter 98. The current value (0) will be shown
98P
0
3. Press 1 followed by the [PRINT/SELECT] key.
1P
4. Set-up and calibrate scale connected to Channel 2.
44
TECHNICAL MANUAL
POWER UP CHANNEL SELECT - PARAMETER 46
Description: Determines which scale channel will be displayed on power
up.
PARAMETER VALUE
1 (default)
2
3
4
5
ACTION ON POWER UP
Channel 1 as default at startup
Channel 2 as default at startup (if enabled)
Channel 3 as default at startup (if enabled)
Total mode (if criteria is met)
Scan mode
ENABLE TOTAL MODE - PARAMETER 70
Description: Sums all the scale channels into a single, total weight. Total
mode is not legal for trade in Canada.
PARAMETER VALUE
TOTAL MODE
0 (default)
Disabled
1
Enabled
Scale Channels must first be enabled before they are available
when using TOTAL MODE and SCAN MODE. (See M2000 User
Functions - Page 10)
45
HIGH SPEED DIGITAL WEIGHT INDICATORS
MORE SET-UP PARAMETERS
POWER ON UNITS - PARAMETER 6
Description: Selects the weighing units the M2000 will default to when powered
on.
Example:
For the M2000 to start up weighing in pounds, set this parameter
value to “0”.
PARAMETER VALUE
POWER ON UNITS
0
1 (default)
lbs
kgs
SCALE OVERLOAD SETTING - PARAMETER 8
Description: Assigns the number of graduations for Scale Over. At this point
beyond True Scale Capacity, the M2000 displays “EEEEEE”.
Default Value:
EXAMPLE:
1 Graduation. (See Parameter 3 – Page 30)
SCALE CAPACITY: 1000 lbs
GRADUATION SIZE: 2 lbs
DESIRED SCALE OVERLOAD THRESHOLD: 1010 lbs
1. Enter Parameter 8.
8P
1
2. Enter 5 for the parameter value. 5 Grads at 2 lbs per Grad equals 10
lbs (5 x 2lbs).
5P
3. At 10 lbs over scale capacity (1010 lbs) the M2000 will display its
Overload message on the screen.
eeeeee
46
TECHNICAL MANUAL
POWER SWITCH ([ON/OFF] KEY) BYPASS - PARAMETER 10
Description: Allows the [ON/OFF] key to be disabled.
PARAMETER VALUE
ACTION
Disables the [ON/OFF] key. The M2000 cannot be
turned off from the keypad. The M2000 will power on
when plugged in without pressing the [ON/OFF] key.
0
1 (default)
Enables the [ON/OFF] key.
Note: This parameter is used in applications such as control
systems where the M2000 must power up running after a power
outage.
LOADCELL VOLTAGE RANGE - PARAMETER 11
Description: Adjusts the Loadcell Voltage Range. This parameter
accounts for loadcells with reversed polarity as shown by the
“+/-“.
It is important that the correct range be selected for optimal
performance of the indicator.
PARAMETER VALUE
LOADCELL VOLTAGE RANGE
1 (default)
2
3
4
0 to +/- 9mV
0 to +/- 19mV
0 to +/- 39mV
0 to +/- 79mV
Note: If the loadcell input voltage exceeds the input range of the
indicator the display will display ‘AAAAAA’ for “Analog over-range”.
Select the next highest input range to rectify the problem.
Selecting a lower voltage range does not guarantee better
performance! Lower ranges have more amplification so as A/D
counts rise, line noise may be amplified depending on the scale
installation.
47
HIGH SPEED DIGITAL WEIGHT INDICATORS
DISPLAY UPDATE RATE - PARAMETER 19
Description: The speed at which the M2000 displays changes in weight.
At a value of 0, the Update Rate is very fast and the display may
appear jittery in some applications. In this case, increase the
parameter value.
The Display (LED) Update Rate has nothing to do with the actual
A/D converter update rate or filtering.
PARAMETER VALUE
DISPLAY UPDATE RATE
0 (default)
Up to 9 (maximum)
No delay in the display update. Very fast.
Maximum 3-second delay in display update.
SCALE OVER MESSAGE - PARAMETER 20
Description: Changes the way Scale Over (capacity) is displayed on M2000
indicators and how the condition will appear in the Output Strings.
If attempting to maintain compatibility with older Western Scale
equipment, set this parameter to 1.
PARAMETER VALUE
SCALE OVER DISPLAY / TRANSMISSION
0 (default)
1
eeeeee
888888
SOUND VOLUME - PARAMETER 28
Description: This command controls the volume of the internal speaker.
PARAMETER VALUE
0
1
2 (default)
3
48
ACTION
Sound off
Volume low
Volume medium
Volume high
TECHNICAL MANUAL
KEYPRESS FEEDBACK - PARAMETER 29
Description: This function will cause the display to blink every time a key
is pressed. This gives the User a sense of feedback,
especially in noisy environments where hearing the key
beeps may be difficult.
PARAMETER VALUE
KEYPRESS FEEDBACK
0 (default)
1
OFF
ON
LOCK UNITS - PARAMETER 105
Description: Prevents the user from switching the measuring units.
Used in conjunction with Parameter 6 – Power On Units.
Use Parameter 6 (See Page 46) to select the desired units,
then use Parameter 105 to lock the M2000 on those units.
PARAMETER VALUE
MEASUREMENT UNITS
0 (default)
1
Not Locked
Locked
EXAMPLE:
LOCK UNITS ON lbs.
1. Enter Parameter 6 and select 0 for “lbs”.
6P
1
0P
2. Select Parameter 105.
105P
3. Press 1 followed by the [PRINT/SELECT] key to lock the units.
1P
49
HIGH SPEED DIGITAL WEIGHT INDICATORS
SCALE FILTERING PARAMETERS
Digital Averaging, or Filtering, applies a certain number of weight samples taken
by the indicator and averages them to display a stable weight in situations where
the scale is subject to vibration or any other movement.
The M2000 has 2 digital filters to provide optimal weight readings on the display
in unstable conditions such as in-motion, on-board, and livestock weighing.
Main Filter:
Used to stabilize the scale once a sustained weight is supplied
or the scale is at zero. The M2000 detects that a weight change
is “flattening out” and uses the Main Filter.
Faststep Filter: Used to dramatically improve the display response time for a
significant change in weight. When weight is being applied to
(or removed from) the scale, the M2000 detects that the weight
is changing rapidly and switches to the Fastep Filter, quickly
bringing the M2000 display to the target weight.
Without the Faststep Filter, the scale would be much slower in reaching the final
weight reading and returning to zero.
The default Filtering Settings should be appropriate for most
applications.
FASTSTEP DIAGRAM:
SCALE IS BEING
LOADED. M2000
SWITCHES TO
FASTSTEP TO GET
WEIGHT CLOSE TO
TARGET QUICKLY.
SCALE HAS A
STABLE LOAD
AT ZERO.
(MAIN FILTER)
50
M2000 DETECTS
WEIGHT IS
FLATTENING
OUT.
SWITCHES TO
MAIN FILTER
A SLIGHTLY
SHIFTING LOAD IS
STABLIZED BY
MAIN FILTER.
WEIGHT IS BEING
REMOVED. M2000
SWITCHES TO
FASTSTEP TO GET
WEIGHT CLOSE TO
ZERO QUICKLY.
M2000 DETECTS
APPROACHING ZERO,
SWITCHES TO MAIN
FILTER TO STABLIZE
ZERO
TECHNICAL MANUAL
MAIN FILTER (DIGITAL AVERAGING) SETTING - PARAMETER 41
Description: Adjusts the level of filtering (averaging) performed to get the
final weight.
Increasing the filter value increases the number of weight samples
used for the average. At a time of sustained weight, the display
value will change very little.
Changing the filter value alters the settling time for the final weight.
Accepted Values: 1 to 255
PARAMETER VALUE
1
RESULT OF FILTERING
Very little Main Filter. M2000 will be extremely fast,
but will likely not settle.
64 (default)
255
Mid-range. Suitable for most applications.
Heavy Main Filter. M2000 will be very slow in any
small weight change.
FASTSTEP FILTER THRESHOLD - PARAMETER 42
Description: Controls the how the M2000 switches from the Main Filter to
the Faststep Filter.
The threshold value is the number of graduations the weight
on the scale must change before the Faststep Filter kicks in.
Default Value: 8 graduations.
IF THE FASTSTEP FILTER THRESHOLD VALUE IS TOO LOW,
WEIGHT READINGS WILL BE UNSTABLE REGARDLESS OF
THE MAIN FILTER SETTING!
51
HIGH SPEED DIGITAL WEIGHT INDICATORS
EXAMPLE:
SCALE CAPACITY OF 5000 lbs, 0.5 lb GRADUATIONS.
THE FASTEP FILTER THRESHOLD VALUE IS 8
GRADUATIONS (= 4 lb).
1. At zero, the scale is stable in Main Filter mode. A 200 lb man jumps on
the scale.
2. The rapid increase in weight causes the M2000 to go into Faststep mode,
bypassing the Main Filter and displaying a quick jump to 200lbs.
3. When the final weight is settling, the M2000 returns to Main Filter mode.
Slight movements (resulting in small weight changes) will be masked by
the Main Filter.
4. If a 2 lb weight (less than Threshold Value) is placed on the scale,
Faststep will not kick in and the weight change will be a little slower. The
time needed for this change is a function of Parameter 41.
5. If a 5 lb weight (greater than Threshold Value) is placed on the scale, the
M2000 will briefly enter Faststep Mode and the weight will change
quickly.
6. The man starts moving around. Every step exerts 10 lbs of force on the
scale. At the default values above, reading a weight would be virtually
impossible.
7. Changing the Main Filter Setting to average out these changes in weight
will be ineffective, since the M2000 currently switches to the Faststep
Filter when the weight suddenly changes more than 4 lbs.
8. To achieve a stable weight display, we want the M2000 to remain in Main
Filter Mode while the man is on the scale.
9. Set the Faststep Filter Threshold value (Parameter 42) to 24, resulting in
a threshold of 12 lbs (24 x 0.5 lbs). Note this is greater than the weight of
the man’s steps.
10. At these values, the man’s steps will not trigger the M2000 to switch to
Faststep Filter Mode. The 10 lb steps will be filtered out by the Main Filter
and the weight display will be stabilized.
52
TECHNICAL MANUAL
FASTSTEP FILTER SENSITIVITY - PARMETER 43
Description: The number of A/D weight samples in a row where the weight has
to change before the Faststep Filter kicks in.
This controls the M2000’s sensitivity to a weight change greater
than or equal to the Threshold Value (Parameter 42).
Increasing this parameter makes the Faststep Filter Threshold less
sensitive.
Default Value: 8 samples
Faststep Filter Sensitivity is used to filter out false triggers
induced by vibrations. This parameter is typically only used in
extremely demanding weighing applications.
EXAMPLE 2:
THE MAN ON THE SCALE.
1. Using the previous example, it takes a sudden weight change of over
12 lbs for the M2000 to switch to Faststep Filter mode.
2. This weight change must be recorded for at least 8 consecutive
samples (default value) for Faststep to kick in.
3. If vibrations are causing the M2000 to trigger Faststep Filter Mode to
early, we can increase the value of Parameter 43.
4. The M2000 now needs to see the weight change of over 12 lbs for a
longer period (more consecutive samples) before entering Faststep
Filtering Mode.
DISABLE FASTSTEP - PARAMETER 44
Description: This parameter disables the Faststep Filtering system altogether.
The M2000 will run with the Main Filter only. The response time for
the indicator becomes a function of Parameter 41.
PARAMETER VALUE
FASTSTEP FILTERING
0 (default)
1
Enabled.
Disabled. (Main Filter Only)
SOME CONTROL/BATCHING APPLICATIONS MAY REQUIRE
THAT FASTSTEP BE TURNED OFF.
53
HIGH SPEED DIGITAL WEIGHT INDICATORS
USING LINEARITY TABLES TO SET SPAN
Having different Span Values at different weight ranges helps to correct any
structural or loadcell non-linearity. M2000 Indicators allow Technicians to set
spans for up to 4 weight ranges using 4 linearity table entries.
IF YOU HAVE A NON-LINEARITY ERROR OF MORE THAN 3
GRADUATIONS, A CLOSER MECHANICAL INSPECTION OF THE
SCALE AND ITS INSTALLATION IS REQUIRED.
RESET SPAN TABLE - PARAMETER 15
Description: Clears the span table except for the first entry. It is recommended
that this be done before calibrating the M2000.
INCREMENT SPAN TABLE POINTER - PARAMETER 16
Description: To add a calibration entry to the Span Table, the Span Table
Pointer must be incremented. This allows for further Span
adjustments to correct scale linearity errors.
Upon activation, the current Span Table Pointer (1 to 4) will be
displayed. Press [TARE] to increment the Pointer by 1
DECREMENT SPAN TABLE POINTER - PARAMETER 17
Description: Moves the Span Table Pointer back through the Span Table.
Upon activation, the current Span Table Pointer value (1 to 4) will
be displayed. Press [TARE] to decrement the Pointer.
The Pointer cannot decrement past 1.
54
TECHNICAL MANUAL
EXAMPLE:
SCALE CAPACITY OF 5000 LBS, 1 LB GRADUATIONS.
THE SCALE IS INITIALLY CALIBRATED WITH 2500 LBS.
IF 5000 LBS ARE LOADED AND THE SCALE DOES
NOT READ “5000”, THERE MAY BE A LINEARITY
PROBLEM.
The Indicator reads “4998”. Using the Span table, calibrate to
correct the error.
1. Enter Calibration Mode.
19P
C
4998
2. Select Parameter 16 - Increment the Span Table Pointer. The current
value (1) will be shown
16P
1
3. Press [TARE] to increment the Pointer to 2.
T
2
4. Select Parameter 13 to Span. The Span Table Pointer will briefly be
displayed.
13P
C
2
4998
5. Enter a new Test Weight Calibration value.
(See Parameter 13 - Set Span – Page 33)
5000P
C
5000
6. Check the scale again (Return to Zero, Holding Calibration) to see if more
adjustments are needed.
7. Exit Calibration Mode.
99P
55
HIGH SPEED DIGITAL WEIGHT INDICATORS
RESET M2000 CALIBRATION & SETTINGS
SPAN FACTOR (SET SPAN) - PARAMETER 110
Description: Displays and allows entry of a Calibration Span factor. Field
Service Technicians can instantly calibrate the M2000 to a
specified value.
This feature is useful for replacing an indicator when a full span
cannot be carried out, and for easily resetting the scale’s calibration
when experimenting with calibration solutions.
Accepted Values:
EXAMPLE:
Numeric. Up to 6 digits (No decimals)
ENTERING THE SPAN FACTOR ON A REPLACEMENT
INDICATOR.
1. On the old indicator, enter Parameter 110. The scale’s Span Factor (a
number) will be displayed.
110P
2637
2. Connect the new indicator to the scale. If possible, Deadload the scale
(See Parameter 12 - Page 32) before proceeding.
3. Enter Parameter 110. A Span Factor is displayed. Enter the Span Factor
(number) from the old indicator followed by the [PRINT/SELECT] key.
110P
366
2637P
THE SCALE MUST BE DEADLOADED AT SOME POINT
DURING THIS PROCESS!
56
TECHNICAL MANUAL
RELOAD FACTORY CALIBRATION SETTINGS - PARAMETER 1
Description: Clears all previous Calibration values for the selected Scale
Channel. The User will be prompted for the Password.
1. Enter Parameter 260.
1P
cal
CLEAR
Pa55
2. Enter the Password.
Cal
1
init
3. The M2000 will restart.
The following Parameters will be reset:
Span & Span Table entries (13, 110)
Motion (5, 24)
Zero & Zero Tracking (12, 21, 22, 23)
Standard Scale Set-Up (2, 3, 4)
Units (6, 7)
Scale Filtering (41, 42, 43, 44)
COMPLETE FACTORY INITIALIZATION - PARAMETER 260
Description: Completely resets all M2000 parameters to factory default
values. All previous Calibration information will be lost.
ALL PREVIOUSLY SAVED SETTINGS & CALIBRATION IN THE
M2000 WILL BE LOST! MAKE SURE ANY IMPORTANT
SETTINGS ARE RECORDED BEFORE ACTIVATING THIS
PARAMETER!
1. Enter Parameter 260.
260P
fac
Re5et
Pa55
2. Enter the Password.
fac
init
3. The M2000 will remain in Calibration Mode.
57
HIGH SPEED DIGITAL WEIGHT INDICATORS
NOTES:
58
TECHNICAL MANUAL
SERIAL COMMUNICATIONS
59
HIGH SPEED DIGITAL WEIGHT INDICATORS
SERIAL COMMUNICATIONS SET-UP PARAMETERS
The M2000 has 2 fully independent, fully configurable serial ports (COM1 and
COM2) on the back of the indicator. The factory default settings allocate COM1
for printing tickets. COM2 is allocated for outputting a weight string (DF1500) in
continuous mode. RS232 & RS422 are available.
Please note that Single Channel Models only have one serial port
(COM1).
Parameters and Parameter Values pertaining to COM2 are not
supported on single channel indicators.
M2000 SERIAL WIRING CONNECTIONS
•
A serial cable is required to connect the M2000 to a PC, Printer, data
controller, or other serial device. Connections are as follows:
M2000
9 PIN SERIAL PORT
CTS
RX
TX
RTS
COM
PIN
PIN
PIN
PIN
PIN
8
2
3
7
5
25 PIN SERIAL PORT
PIN
PIN
PIN
PIN
PIN
5
3
2
4
7
DEFAULT SETTINGS
COM 1 DEFAULT SETTINGS
Baud Rate
Parity
Data Bits
Stop Bits
String Output
Flow Control
Output Mode
Driver
60
9600
None
8 (fixed)
1
[PRINT/SELECT] KEY
None
Press [PRINT/SELECT]
RS 232
COM 2 DEFAULT SETTINGS
9600
None
8
1
Continuous
None
Continuous
RS 232
TECHNICAL MANUAL
DATA BITS (COM2 ONLY) - PARAMETER 27
Description: COM1 on the M2000 is fixed at 8 Data Bits. However, if
EVEN or ODD Parity is selected then 7 Data Bits will
automatically be used.
COM2 allows for independent selection of Data Bits.
Parameter 27 is used to set this value.
PARAMETER VALUE
DATA BITS
0
1
2
3
4
COM2 Data Bits set to 4
COM2 Data Bits set to 5
COM2 Data Bits set to 6
COM2 Data Bits set to 7
COM2 Data Bits set to 8 (default)
BAUD RATE - PARAMETER 30 & 32
Baud rate for COM1:
Baud rate for COM2:
Parameter 30
Parameter 32
PARAMETER VALUE
0
1
2
3
4
5
6
7
8
9
BAUD RATE
150
300
600
1200
2400
4800
9600 (factory default)
14400
19200
32400
PARITY - PARAMETER 31 & 33
Parity for COM1:
Parity for COM2:
Parameter 31
Parameter 33
PARAMETER VALUE
0
1
2
PARITY
No parity (factory default)
ODD parity
Even parity
61
HIGH SPEED DIGITAL WEIGHT INDICATORS
OUTPUT STRING FORMAT - PARAMETER 34 & 35
Description: Several different indicator string formats can be emulated by the
M2000. To create a custom transmit string for a ticket, the COM
Port must be set to 99.
String Format for COM1:
Parameter 34
String Format for COM2:
Parameter 35
PARAMETER VALUE
1
3
5
8
9
10
12
13
14
16
17
18
19
99
100
OUTPUT STRING
DF1000
DF2000 (DF2000 Command Mode)
DF2500 mode1
DF1500 (factory default Com2))
DF2500 Command Mode 6
DF2500 Command Mode 7
AD4321, AD4323, AD5000
Cardinal 708
Cardinal 738
Weightronix 120
Consolidated Controls UMC600
Analogic 5316
Toledo & Fairbanks R2500
Custom Transmit/Ticket Printer Mode (default Com1)
Bar Code Scanner Mode (See Page 74)
For a complete breakdown of M2000 emulated string formats,
please see Appendix C.
For more information on creating a custom ticket and other M2000
ticket options, please refer to the M2000 Ticket Options Manual.
62
TECHNICAL MANUAL
SERIAL HANDSHAKING (RTS / CTS) - PARAMETER 36 & 37
Handshaking for COM1:
Parameter 36
Handshaking for COM2:
Parameter 37
PARAMETER VALUE
SERIAL HANDSHAKING
0
Disabled (factory default)
1
Enabled
STRING OUTPUT MODE - PARAMETER 38 & 39
Description: Determines how the M2000 outputs strings to the COM
ports.
String Output Mode for COM1:
Parameter 38
String Output Mode for COM2:
Parameter 39
PARAMETER VALUE
1
2
3
STRING TRANSMITS TO COM PORT…
When the [PRINT/SELECT] key has been pressed.
When the COM port receive data input is at logic low (-9
Volts DC).
When the COM port receive data input is at logic high (+9
Volts DC).
4
When the ‘?’ character is received.
5
Continuously (factory default).
Remember that the default String Output Modes for COM1 and
COM2 are different.
Parameters 38 and 39 can be ignored if a “Command Mode”
Output String (Eg. DF2500 Command Mode 7) has been selected.
(See Parameters 34 & 35 – Page 33)
63
HIGH SPEED DIGITAL WEIGHT INDICATORS
CONFIGURE COM PORTS FOR RS422 MODE - PARAMETER 40
Description: Some scoreboards and other equipment now support RS422,
which allows for cable runs of up to 1000 feet. If the equipment
connecting to the M2000 Indicator supports RS422, the M2000
COM ports can be configured to RS422 mode.
The default hardware settings for both COM ports are RS232. The
output setting is changed using Parameter 40 and the values
below:
PARAMETER VALUE
0 (default)
1
2
3
COM1
COM2
RS232
RS232
RS422
RS232
NOT CURRENTLY SUPPORTED
RS422
RS422
FOR RS422 COMMUNICATIONS:
The wire connections to the COM ports on the back of the indicator are different
for RS422 than for RS232. RS422 requires 2 lines for transmit (TX+ and TX-)
and 2 lines for receive (RX+ and RX-).
64
CTS
Terminal becomes
RX -
RX
Terminal becomes
RX +
TX
Terminal becomes
TX +
RTS
Terminal becomes
TX -
TECHNICAL MANUAL
SERIAL OUTPUT STRING ROUTING - PARAMETER 47 & 48
Description: In certain applications, the M2000 indicator’s COM ports
may need to be locked to one of the 3 Scale Channels.
Serial String Output Routing for COM1: Parameter 47
Serial String Output Routing for COM2: Parameter 48
PARAMETER VALUE
0 (default)
1
2
3
4
OUTPUT ROUTING
COM port serial output string transmits from
current active channel.
COM port serial output string locked on
Channel 1.
COM port serial output string locked on
Channel 2.
COM port serial output string locked on
Channel 3.
COM port serial output string locked on
Total Mode.
TRANSMISSION DELAY FOR COM1 & COM2 - PARAMETER 65
Description: Some older equipment may experience problems keeping up to
the high update rate of the M2000. Parameter 65 inserts delays
between string transmissions to slow down the output rate.
Accepted Parameter Values:
PARAMETER VALUE
0 (default)
4
8
16
32
0 to 100. Each Parameter Value represents
approximately 1/16 of a second.
COM1 & COM2
Fastest Output
Approximately ¼ second
Approximately ½ second
Approximately 1 second
Approximately 2 seconds
If a Scoreboard or other device is experiencing erratic behavior
when connected to the M2000, a transmission delay of ½ second
will likely fix the problem.
65
HIGH SPEED DIGITAL WEIGHT INDICATORS
CONNECTING THE M2000 TO HYPER TERMINAL
Hyper Terminal is a terminal utility program that is supplied with all versions of
Windows. The program is useful for:
•
Viewing the M2000’s String Output.
•
Saving calibration data to a PC file.
•
Loading calibration data from a PC.
•
Saving tickets macros to a file on a PC.
•
Loading ticket macros from a file on a PC.
•
Trouble shooting serial ports.
CONNECTING THE M2000 TO THE PC COMPUTER
•
Determine which COM port you are connecting to on the back of the
computer. This will most likely be COM1 or COM2.
•
A serial cable is required to connect the PC to the M2000. Determine
whether your computer’s COM port has a 9 PIN or 25 Pin Terminal.
•
See the Connections Table at the start of the Serial Communications
Section (Page XXX) for Pin-outs.
STARTING HYPER TERMINAL
Hyper Terminal can be started and setup manually, or with the help of the M2000
Hyper Terminal Set-Up Files.
RUNNING THE HYPER TERMINAL SET-UP FILE
To make things easier, using a Set-Up file is recommended. Western Scale has
supplied Set-up files that will automatically start Hyper Terminal with the correct
settings.
Set-Up files can be downloaded from the website at www.westernscale.ca.
Contact your sales rep if you want the files sent via email or floppy disk.
The files to download are “M2000COM1.ht” if you are using COM1 on your PC
computer or “M2000COM2.ht” if you are using COM2.
Copy these files to your computer hard drive. Double clicking the file will
automatically start Hyper Terminal with the all the correct settings in place for the
COM port you are using.
66
TECHNICAL MANUAL
CREATING A SHORTCUT TO HYPER TERMINAL
Creating a Hyper Terminal shortcut on your computer desktop eliminates
searching through the computers files each time you use Hyper Terminal.
•
Locate the Set-Up file you downloaded from Western Scale.
Right click your mouse on the file “M2000 COM1.ht” or “M2000
COM2.ht” (see below). Click on “Send To” then “Desktop”.
•
An icon will be created on your desktop. Every time you double
click the icon, Hyper Terminal will automatically start with the
correct settings for the M2000.
67
HIGH SPEED DIGITAL WEIGHT INDICATORS
MANUALLY SETTING UP HYPER TERMINAL FOR THE M2000
•
Hyper terminal can be found in Windows under “Accessories” and then
“Communications” on practically all PC computer installations. Click on
Hyper Terminal to start the program.
•
Select the appropriate COM Port on your computer.
•
Hyper Terminal needs to be setup to operate with the M2000. The default
M2000 Communications settings are:
Baud rate:
9600
Parity:
None
Data Bits:
8
Stop Bits:
1
Flow Control:
None
Hyper Terminal must also be configured to these settings.
68
TECHNICAL MANUAL
•
A box in the STATUS BAR at the bottom of the display should
show “9600 8-N-1”.
Hyper Terminal is now ready to help upload and download data
between the M2000 and your PC computer.
CAPTURING THE M2000 OUTPUT STRING (DOWNLOADING)
•
Make sure the Status bar at the bottom of the Hyper Terminal
window displays “Connected”.
•
Make sure the serial cable is connected to the correct COM
Port.
•
The Hyper Terminal window will display the ASCII string output
by the M2000.
69
HIGH SPEED DIGITAL WEIGHT INDICATORS
TRANSMITTING CALIBRATION INFORMATION (UPLOADING)
TRANSMIT CALIBRATION INFORMATION TO PC - PARAMETER 75
Description: Transmits the M2000’s full calibration structure information as an
ASCII string to the designated serial port. The data structure is
protected by a CRC checksum embedded inside the data. The
ASCII string can be captured with any serial terminal program.
PARAMETER VALUE
ACTION
1
2
Output calibration data to COM1.
Output calibration data to COM2.
CAPTURE A TEXT FILE FROM THE M2000 USING HYPER TERMINAL
This feature is useful for capturing and saving the Calibration Information or
Ticket Buffer Information from the M2000 for creating back-ups.
•
70
Click on the “TRANSFER” menu and then click on “CAPTURE
TEXT” as shown below.
•
Enter a file name save the ticket or calibration data under. Use logical
names to help keep track of your files.
•
Click “START”.
TECHNICAL MANUAL
EXAMPLE:
TRANSMIT CALIBRATION INFORMATION TO A PC
(CONNECTED TO COM1).
1.
Connect the M2000 (COM1) to the PC serial port.
2.
Open the Terminal Program (HyperTerminal, Terminal, etc.) on the PC.
3.
Set the program’s communication properties to match those of the M2000
(or vice versa). For most cases: 9600-N-8-1.
4.
Enter Calibration Mode on the M2000.
5.
If the M2000 is transmitting continuously, enter Parameter 38. Set
Parameter 38 to “1” to prevent weight string from disrupting the
Calibration Information.
6.
In Hyper Terminal, go the “TRANSFER” menu and select “CAPTURE
TEXT”.
7.
Select or create a file to save the Calibration Information to. Click
“START” when ready.
8.
On the M2000, enter Parameter 75. The display will prompt, “Ready”.
75P
9.
readi
Press [1] followed by [PRINT/SELECT] to transmit out of COM1.
1P
Bv5i
Fini5h
10.
The Calibration Information will appear on the Hyper Terminal screen and
be saved in the file you selected.
11.
In Hyper Terminal, go to “CAPTURE TEXT”, then “STOP”.
To capture Ticket Buffer Information, follow the same steps,
replacing Parameter 75 with Parameter 77 – Transmit Ticket
Buffer Information to PC.
71
HIGH SPEED DIGITAL WEIGHT INDICATORS
RECEIVING CALIBRATION INFORMATION (DOWNLOADING)
RECEIVE CALIBRATION INFORMATION FROM PC - PARAMETER 76
Description: Captures calibration information as an ASCII data dump from the
designated serial port. The data structure is protected by a CRC
checksum embedded inside the data. The ASCII string can be
captured from any serial terminal program.
PARAMETER VALUE
ACTION
1
2
Capture calibration data via COM1
Capture calibration data via COM2
SENDING DATA TO THE M2000 USING HYPER TERMINAL
This feature is useful for capturing and saving the Calibration Information or
Ticket Buffer Information from the M2000 for creating back-ups.
72
•
Click on the “TRANSFER” menu and then click on “SEND
TEXT FILE” as shown below.
•
Select the file to send.
•
The contents of the file will be transmitted from the PC.
TECHNICAL MANUAL
EXAMPLE:
RECEIVE CALIBRATION INFORMATION FROM A PC TO THE
M2000 (CONNECTED TO COM2).
1.
Connect the M2000 (COM1) to the PC serial port.
2.
Open the Terminal Program (HyperTerminal, Terminal, etc.) on the
PC.
3.
Set the program’s communication properties to match those of the
M2000 (or vice versa). For most cases: 9600-N-8-1.
4.
Enter Calibration Mode on the M2000.
5.
Enter Parameter 76. The display will prompt, “Ready”.
76P
6.
readi
Press [2] followed by [PRINT/SELECT] to transmit to COM2.
2P
{}ait
F0r
data
7.
The M2000 will wait to receive the transmission.
8.
In Hyper Terminal, go the “TRANSFER” menu and select “SEND
TEXT FILE”.
9.
Select the file to send to the M2000. Click “OPEN” when ready.
10.
The sent file will appear on the Hyper Terminal screen.
11.
The M2000 will display “Finish” when the transfer is complete and
automatically restart.
Fini5h
[]2000
To transfer Ticket Buffer Information, follow the same steps,
replacing Parameter 76 with Parameter 78 – Capture Ticket Buffer
Information from PC.
73
HIGH SPEED DIGITAL WEIGHT INDICATORS
CONNECTING A BARCODE SCANNER TO THE M2000
The M2000 allows for easy connection to a barcode
scanner. Combine your scanner and your scale to print
out accurate product/weight tickets.
Barcode scanners are intelligent devices that decipher
bar codes into normal ASCII strings. Most brands of
barcode scanner transmit an identical string that is
easily transmitted to the M2000.
WIRING THE BARCODE SCANNER TO THE M2000
•
Scanners can only be connected to COM1.
•
Establish the Barcode Scanner’s Pin-out. Use the M2000 Serial Wiring
Connections Table (Page 60) to determine the proper connections.
ENABLING THE BAR CODE SCANNER
•
To enable Scanner Input on the M2000, Parameter 34 must be set to 100
(See Output String Format – Page 62).
M2000 - BARCODE SCANNER OVERVIEW
74
•
The M2000 identifies that it has received a barcode string when it receives
a burst of characters from the scanner.
•
Before transferring the received string to the string register, the M2000
waits a short time after it receives the last character. This allows the
M2000 to accept any string type not relying on a Carriage Return or Line
Feed to mark the end of the barcode transmission.
TECHNICAL MANUAL
ASSIGNING A TICKET EVENT TO THE SCANNER - PARAMETER 95
Description: Print a specific ticket as soon as a barcode is scanned. The
ticket is executed as soon as the M2000 receives a scanner
string. Use Parameter 95 to assign the ticket number to the
scanner.
Default Value:
0 (Disabled).
The M2000 will not execute the ticket if there is motion on the
scale. The indicator will display ERR 36.
SCANNER HANDSHAKING MODE - PARAMETER 90
Description: The M2000 has 4 handshaking options.
PARAMETER VALUE
0 (default)
1
2
3
FUNCTION
No handshaking, No beep.
No handshaking with a beep.
Hardware handshaking with no beep.
Hardware handshaking with a beep.
The beep option will cause the M2000 to beep every time it
receives a bar code scan. Hardware handshaking disables the
scanner if there is motion on the scale. Hardware handshaking
must be enabled on the scanner, and is scanner specific. Most
applications will require a Parameter Value of 0 or 1.
75
HIGH SPEED DIGITAL WEIGHT INDICATORS
NOTES:
76
TECHNICAL MANUAL
CONNECTING AUXILLERY
PERIPHERALS VIA
SMARTWIRE
77
HIGH SPEED DIGITAL WEIGHT INDICATORS
CONNECTING AUXILIARY PERIPHERALS VIA SMARTWIRE
The SMARTWIRE terminal on the back of the M2000 is a multi-drop, RS485
communications interface. It may be used to network several Option boards
together in a “daisy chain” fashion.
WIRING FOR SMARTWIRE
V-
V+
A
Positive SMARTWIRE power
Negative SMARTWIRE power
RS485 differential + signal
RS485 differential - signal
B
(V+)
(V-)
(A)
(B)
NC
SMARTWIRE terminal connections:
SMARTWIRE
•
The peripheral device being connected should have a terminal block with
the same signal names.
•
Connections between the M2000 and the peripheral should be done using
a Beldon type 8723 cable or equivalent. The shield wire can be
connected to “V-“ terminal.
Since SMARTWIRE uses a differential type driver, cable lengths
can run several hundred feet.
SMARTWIRE BRIDGE INTERFACE
V-
V+
A
B
NC
Some available M2000 Option Boards utilize older technology and are not
SMARTWIRE compatible. The SMARTWIRE Bridge Interface board will be
included with these boards. If you have a 4-20 mA or Setpoint option board and
do not have a SMARTWIRE Bridge Interface, please contact the factory.
SMARTWIRE
78
•
A cable will be provided to connect TB1 on the SMARTWIRE Bridge
Interface board to the SMARTWIRE terminal on the M2000.
•
Use the ribbon cable provided to connect the option boards to J1.
TECHNICAL MANUAL
SMARTWIRE SET-UP PARAMETERS
SMARTWIRE must be enabled to communicate with any
connected device.
ENABLING SMARTWIRE - PARAMETER 59
Description: Opens or closes the SMARTWIRE port.
PARAMETER VALUE
0 (default)
1
ACTION
Disable SMARTWIRE port
Enable SMARTWIRE port
IF NO DEVICE IS PLUGGED INTO THE ENABLED
SMARTWIRE PORT, A COMMUNICATIONS TIMEOUT WILL
OCCUR PRODUCING AN ERROR (ERR 185).
SMARTWIRE FAILURE - ERROR 185
If there is a component failure, or the SMARTWIRE connection is lost due to
breakage of the communications wire, “ERR185” will be displayed. This error
message will continuously appear until a new link is established.
To regain control of the indicator, you may have to disable the SMARTWIRE
port. This can be done in Calibration or Normal Weighing Mode.
1. Press [CLEAR] to temporarily get rid of the Error message.
Err185
C
0.0
2. Enter Parameter 59.
59P
1
3. Enter [0] followed by the [PRINT/SELECT] key to disable.
0P
79
HIGH SPEED DIGITAL WEIGHT INDICATORS
4-20 mA OPTION BOARD
The M2000 has a 16bit, 4-20mA current loop board that connects to the
SMARTWIRE Bridge Interface Board. This standard industrial sensor is useful
for a wide variety of applications.
CONNECTING THE 4-20 mA BOARD
•
Using the ribbon cable provided, connect J1 or J2 on the 4-20 mA board
to J1 on the SMARTWIRE Bridge Interface board.
•
Make sure the boards have adequate clearance between them.
•
Make sure the SMARTWIRE Bridge Interface board has been wired
properly to the SMARTWIRE terminal (See page 78).
FOR THE 4-20 MA BOARD TO WORK, PARAMETER 59 MUST
BE ENABLED!
PARAMETER 60 - SELECT SCALE CHANNEL TO CONNECT TO CURRENT LOOP
Description: Assigns the current loop to one of the M2000’s 3 Scale Channels.
PARAMETER VALUE
0 (default)
1
2
3
4
80
ACTION
Current Loop Interface not connected
Current Loop Interface connected to Channel 1
Current Loop Interface connected to Channel 2
Current Loop Interface connected to Channel 3
Current Loop Interface connected in Total Mode
TECHNICAL MANUAL
PARAMETER 61 - CURRENT LOOP OFFSET ADJUSTMENT (ZERO)
Description: Sets the 4 mA base current value (the value of the output
board when the scale is at zero). The technician selects a
Current Output Value (from the M2000) that will correspond
to a 4 mA output by the 4-20 mA board.
Range:
The Current Output Value is a linear representation of the
current and can be adjusted from 0 to 65530.
To make the process of arriving at the target current as easy
as possible, preset current output values are assigned to
HOT KEYS. The key assignments are shown below:
PARAMETER VALUE
CURRENT OUTPUT VALUE
1 (default)
2
3
4
5
6
7
8
Preset Output to
0
Preset Output to 10000
Preset Output to 20000
Preset Output to 30000
Preset Output to 40000
Preset Output to 50000
Preset Output to 60000
Current value
FINE TUNING:
0
.
The Current Output Value can be micro-adjusted:
Increase Current Output Value
Decrease Current Output Value
•
When the Current Output Value results in a 4 mA output from the 4-20 mA
board, press [TARE] to lock in the current output value.
•
To abort without saving changes, press the [CLEAR] key.
81
HIGH SPEED DIGITAL WEIGHT INDICATORS
PARAMETER 62 - CURRENT LOOP SPAN ADJUSTMENT (CAPACITY)
Description: Sets the 20 mA capacity current value (the value of the output
board when the scale is at maximum capacity). The technician
selects a Current Output Value (from the M2000) that will
correspond to a 20 mA output by the 4-20 mA board.
Range:
The Current Output Value is a linear representation of the current
and can be adjusted from 0 to 65530.
To make the process of arriving at the target current as easy as
possible, preset current output values are assigned to HOT KEYS.
The key assignments are shown below:
PARAMETER VALUE
CURRENT OUTPUT VALUE
1 (default)
2
3
4
5
6
7
8
Preset Output to
0
Preset Output to 10000
Preset Output to 20000
Preset Output to 30000
Preset Output to 40000
Preset Output to 50000
Preset Output to 60000
Current value
FINE TUNING:
0
.
82
The Current Output Value can be micro-adjusted:
Increase Current Output Value
Decrease Current Output Value
•
When the Current Output Value results in a 20 mA output from the 4-20
mA board, press [TARE] to lock in the current output value.
•
To abort without saving changes, press the [CLEAR] key.
TECHNICAL MANUAL
PARAMETER 63 - CURRENT LOOP (GROSS OR NET MODE)
Description: Sets the current loop to operate in GROSS mode or NET mode.
GROSS:
For most applications. 4 mA is output when the scale is at zero
(Centre of Zero LED illuminated).
NET:
For applications with varying tare weights. The 4-20 mA board
will output only after a tare has been entered. 4 mA is out put
when the weight display shows zero, even though the true weight
on the scale is greater (NET LED illuminated).
PARAMETER VALUE
CURRENT LOOP MODE
0 (default)
1
GROSS mode
NET mode
PARAMETER 64 - CURRENT LOOP (SPAN)
Description: Spans the Current Loop Output to a custom weight entry. This is
the weight at which the Current Loop will output its highest level (20
mA).
The True Scale Capacity weight is typically selected. In some
applications (such as those utilizing NET mode), a weight less than
Scale Capacity is desired.
Enter the weight on the keypad, followed by the [PRINT/SELECT]
key.
If, for example, the scale capacity is 1000 kg, but Parameter 64 is
set to 500 kg, the Current Loop will reach 20mA at 500 kg.
IF, FOR ANY REASON, THE M2000 STOPS TRANSMITTING
COMMANDS TO THE 4-20 MA BOARD, THE CURRENT LOOP
OUTPUT WILL BE SET TO ZERO.
83
HIGH SPEED DIGITAL WEIGHT INDICATORS
4-20 MA EXAMPLE:
SET UP THE 4-20 MA BOARD FOR A 5000 LB. CAPACITY
SCALE ON CHANNEL 1. SET THE 20 MA OUTPUT FOR
FULL SCALE CAPACITY. THE SCALE OPERATES IN
GROSS WEIGHING MODE.
1. Make sure that SMARTWIRE is enabled (Parameter 59 set to 1).
2. Select the Scale Channel (Channel 1) that the 4-20 mA board is to read
(Parameter 60).
60P
1P
3. Connect an Amp-meter (in series) to the 4-20 mA board.
•
•
•
84
Place the COM lead in the terminal marked “-“ on TB1.
Place the mA lead in the terminal marked “+”.
Select the appropriate meter range ( ~ 100 mA on most models).
TECHNICAL MANUAL
4.
Adjust the current loop output offset for zero (Parameter 61).
•
Watch the Meter readings.
•
Use the Hot Keys (course adjustment) to select an output value that
gives a reading close to 4 mA. (Should be around 1, 2, or 3)
61P
0
2P
•
If the closest reading is less than 4 mA, press the [IN] key to
increase the output value.
0
0
•
10000
3.80
10467
12671
3.95
If the closest reading is greater than 4 mA, press the [OUT] key to
decrease the output value.
.
14771
.
13551
4.30
4.00
•
Holding down the [IN] or [OUT] keys cause the output value to
change faster.
•
Press [TARE] to save the current output value. To abort without
saving, press [CLEAR].
T
- OR-
C
The meter will not receive a reading if the output value is changing
([IN] or [OUT] key being held down). Fine tune in smaller
increments as you approach the target output value.
85
HIGH SPEED DIGITAL WEIGHT INDICATORS
5. Adjust the current loop output offset for scale capacity. (Parameter 62)
•
Watch the Meter readings.
•
Use the Hot Keys (course adjustment) to select an output value that
gives a reading close to 20 mA. (Should be around 5, 6, or 7)
62P
0
6P
•
•
If the closest reading is less than 20 mA, press the [IN] key to increase
the output value.
0
50897
0
52671
19.80
20.95
If the closest reading is greater than 4 mA, press the [OUT] key to
decrease the output value.
.
52671
.
51532
20.95
20.00
•
Holding down the [IN] or [OUT] keys cause the output value to change
faster.
•
Press [TARE] to save the current output value. To abort without
saving, press [CLEAR].
T
86
50000
- OR-
C
TECHNICAL MANUAL
6.
Select the current loop mode (Parameter 63).
63P
7.
P
0
Span the current loop for maximum (20 mA) output at the selected
weight (Parameter 64).
•
Enter the desired weight for 20 mA output. It is good practice to
increase this number by one or two grads to keep the output
within metering range.
64P
0
5002P
87
HIGH SPEED DIGITAL WEIGHT INDICATORS
SETPOINT OPTION BOARD
There are a total of 6 Setpoints available on the M2000. Any of the 6 Setpoints
can be assigned to any of the 3 channels. Once a Setpoint is assigned to a
scale channel, it is not available for use by the other channels. The Setpoint
Board connects to the SMARTWIRE BRIDGE INTERFACE and uses solid-state
relay modules to switch AC and DC loads.
CONNECTING THE SETPOINT BOARD
•
Using the ribbon cable provided, connect J1 on the Setpoint board to J1
on the SMARTWIRE Bridge Interface board.
•
Make sure the boards have adequate clearance between them.
•
Make sure the SMARTWIRE Bridge Interface board has been wired
properly to the SMARTWIRE terminal.
FOR THE SETPOINT BOARD TO WORK, PARAMETER 59
MUST BE ENABLED!
IF, FOR ANY REASON, THE M2000 STOPS TRANSMITTING
COMMANDS TO THE SETPOINT BOARD, ALL OUTPUTS WILL
BE RESET TO “OFF”.
88
TECHNICAL MANUAL
SETPOINT SET-UP PARAMETERS
SETPOINT CONTROL MASK - PARAMETER 57
Description: Controls how each of the 6 Setpoints will function. This is a 6 digit
parameter with each digit representing one of the Setpoints.
654321
The left most digit represents Setpoint # 6 while the
rightmost digit represents Setpoint # 1.
When entering the control mask, 6 digits must be entered. The first
digit entered represents Setpoint 6 of 6. The last digit entered
represents Setpoint 1 of 6.
The value of each digit represents the function of that particular Setpoint.
PARAMETER VALUE
0 (default)
1
2
3
SETPOINT FUNCTION
Do not modify.
Energize output when weight < Setpoint value.
Energize output when weight >= Setpoint value.
Disable the Setpoint.
A dash (-) in a digit indicates the Setpoint is not assigned to this
scale channel. It is either not used, or is being used by another
scale channel.
A common Setpoint Mask may look like this:
---121
Remember: It is very important to enter “0” for a Setpoint that you
do not want to modify.
89
HIGH SPEED DIGITAL WEIGHT INDICATORS
EXAMPLE:
ASSIGN SETPOINTS 1 & 2 TO ENERGIZE OUTPUT WHEN THE
WEIGHT ON CHANNEL 1 IS LESS THAN THE SETPOINT VALUE.
1. Enter Calibration Mode for Scale Channel 1.
19P
c
0
2. Enter the Setpoint Control Mask (Parameter 57). When Parameter 57 is
entered for the first time, dashes will be shown across the display.
57P
------
3. Press [0] four times to skip Setpoints 6, 5, 4, and 3.
0000
0000
4. See the Setpoint Function table. Press [1] twice.
11P
000011
5. Enter Parameter 57 again to check the value. Note the Setpoint mask.
----11
Setpoints 1 and 2 have now been assigned the “>=” function. Now assign
Setpoint 6 the “<” function.
1. Enter Parameter 57 followed by the [PRINT/SELECT] key.
2. Then enter “200000” followed by the [PRINT/SELECT] key.
3. If Parameter 57 is entered, the Setpoint Mask shows “2---11”.
Disable Setpoint 6.
1. Enter Parameter 57 followed by the [PRINT/SELECT] key.
2. Then enter “300000” followed by the [PRINT/SELECT] key.
3. If Parameter 57 is entered, the Setpoint Mask shows “----11”.
To exit or abort, press the [CLEAR] key at any time.
90
TECHNICAL MANUAL
ENTERING SETPOINT VALUES
Parameters 51-56 are used to enter Setpoint values. Each of the 6 Setpoints
has its own weight compare registers. The values entered into these registers
will control the Setpoint relays. Setpoint values may be changed in Normal
Weighing Mode.
NOTE THE UNITS OF MEASUREMENT! TO ENTER A SETPOINT
VALUE IN KILOGRAMS, MAKE SURE THE M2000 IS
CURRENTLY WEIGHING IN KILOGRAMS.
PARAMETER 51:
Enter weight for Setpoint 1, followed by [PRINT/SELECT].
PARAMETER 52:
Enter weight for Setpoint 2, followed by [PRINT/SELECT].
PARAMETER 53:
Enter weight for Setpoint 3, followed by [PRINT/SELECT].
PARAMETER 54:
Enter weight for Setpoint 4, followed by [PRINT/SELECT].
PARAMETER 55:
Enter weight for Setpoint 5, followed by [PRINT/SELECT].
PARAMETER 56:
Enter weight for Setpoint 6, followed by [PRINT/SELECT].
SETPOINT HYSTERESIS ADJUSTMENTS - PARAMETER 58
Description: Hysteresis adjustments are used when vibrations in the scale
cause the Setpoints to falsely trigger. Increasing the Hysteresis
value increases the weight settling period for accepting a Setpoint
value.
Accepted Values:
6 digits are required (each digit represents each Setpoint as
in Parameter 57). Each digit can have a value of 0 to 9.
PARAMETER VALUE
0 (default)
1
2
9
SETPOINT FUNCTION
Output action on the first occurrence of a weight
evaluation of the Setpoint.
Energize output when weight < Setpoint value.
Energize output when weight >= Setpoint value.
The Setpoint will only change after an evaluation has
occurred for 9 consecutive weight samples in a row.
The Parameter Value is internally multiplied by 10. A Hysteresis
factor of 3 will translate to 30 valid weight comparisons to the
Setpoint before an output action will take place.
91
HIGH SPEED DIGITAL WEIGHT INDICATORS
REMOTE INPUT OPTION BOARD
The isolated Remote Input board allows the M2000 to accept remote input switch
control.
CONNECTING THE REMOTE INPUT BOARD
92
•
Using the ribbon cable provided, connect J1 on the Remote Input board to
J1 on the SMARTWIRE Bridge Interface board.
•
Make sure the boards have adequate clearance between them.
•
Make sure the SMARTWIRE Bridge Interface board has been wired
properly to the SMARTWIRE terminal.
•
Wire the POSITIVE power supply wire (24 VDC) to the Terminal marked
+24V.
•
The NEGATIVE power wire should run through the switch and terminate
at the desired terminal.
TECHNICAL MANUAL
REMOTE INPUT BOARD FUNCTIONS
The following remote functions are supported:
•
ZR - ZERO (Zero scale)
•
TR - TARE (Tare current weight from scale)
•
CL - CLEAR (Clear tare)
•
GR - GROSS (Switch to Gross weighing mode)
•
PR - PRINT (Print ticket)
EXAMPLE:
CONNECT A REMOTE ZERO SWITCH. WIRING DIAGRAM.
+24V ZR
POWER
SUPPLY
(24 VDC)
+
-
SWITCH
TRIGGERING THE SWITCH WILL ZERO THE M2000.
93
HIGH SPEED DIGITAL WEIGHT INDICATORS
NOTES:
94
APPENDICES
APPENDICES
95
HIGH SPEED DIGITAL WEIGHT INDICATORS
APPENDIX A – PARAMETER LISTING
PARAMETER
96
FUNCTION
PARAMETER GROUP
PAGE
1
Reload Factory Default Values (Calibration Only)
Reset
57
2
Decimal Point Position
Standard Scale Set-Up
30
3
Display Divisions (Graduations)
Standard Scale Set-Up
30
4
Scale Capacity
Standard Scale Set-Up
30
5
Motion Window
MOTION
38
6
Power On Units
Advanced Set-Up
46
7
Calibration Scale Units
Standard Calibration
32
8
Scale Over
Advanced Set-Up
46
9
Power On ZERO Prompt
ZERO
40
10
Power Switch Bypass
Scale Set-Up
47
11
Loadcell Voltage Range
Scale Set-Up
47
12
Deadload the Scale
Standard Calibration
32
13
Set Span (Spanning the Indicator)
Standard Calibration
33
15
Reset Span Table
Linearity Adjustment
54
16
Increment Span Table Pointer
Linearity Adjustment
54
17
Decrement Span Table Pointer
Linearity Adjustment
54
19
Display Update Rate
Advanced Set-Up
48
20
Scale Over Message
Advanced Set-Up
48
21
Push to Zero Window
ZERO
40
22
Auto Zero ON/OFF
ZERO
40
23
Zero Tracking Window
ZERO
41
24
Motion Settle Time
MOTION
39
25
Offset Value
TARE
43
26
Offset Flag
TARE
43
27
Data Bits (COM2 Only)
Serial Communications
61
28
Sound Volume
Advanced Set-Up
48
29
Keypress Feedback
Advanced Set-Up
49
30
Baud Rate (COM1)
Serial Communications
61
31
Parity (COM1)
Serial Communications
61
32
Baud Rate (COM2)
Serial Communications
61
33
Parity (COM2)
Serial Communications
61
34
Output String Format (COM1)
Serial Communications
62
35
Output String Format (COM2)
Serial Communications
62
36
Serial Handshaking (COM 1)
Serial Communications
63
37
Serial Handshaking (COM 2)
Serial Communications
63
38
String Output Mode (COM1)
Serial Communications
63
APPENDICES
PARAMETER
FUNCTION
PARAMETER GROUP
PAGE
39
String Output Mode (COM2)
Serial Communications
63
40
Configure COM Ports for RS422 Mode
Serial Communications
64
41
Main Filter (Digital Averaging) Setting
FILTERING
51
42
Faststep Filter Threshold
FILTERING
51
43
Faststep Filter Sensitivity
FILTERING
53
44
Disable Faststep Filter
FILTERING
53
45
Power ON ZERO (IZSM)
ZERO
41
46
Selecting Power Up Default Channel
Scale Channel & Total Mode
45
47
Serial Output String Routing (Channel Allocation): COM 1
Serial Communications
65
48
Serial Output String Routing (Channel Allocation): COM 2
Serial Communications
65
50
Tare Function Mode
TARE
42
51
Set Weight for Setpoint 1
SETPOINT
91
52
Set Weight for Setpoint 2
SETPOINT
91
53
Set Weight for Setpoint 3
SETPOINT
91
54
Set Weight for Setpoint 4
SETPOINT
91
55
Set Weight for Setpoint 5
SETPOINT
91
56
Set Weight for Setpoint 6
SETPOINT
91
57
Set Point Control Mask
SETPOINT
89
58
Set Point Hysteresis Adjustments
SETPOINT
91
59
Enabling SmartWire Interface
SMARTWIRE
79
60
Selecting Scale Channel to Connect to Current Loop
4-20 mA (Analog Output)
80
61
Current Loop Offset Adjustment
4-20 mA (Analog Output)
81
62
Current Loop Span Adjustment
4-20 mA (Analog Output)
82
63
Current Loop Gross or Net Mode
4-20 mA (Analog Output)
83
64
Current Loop Span
4-20 mA (Analog Output)
83
65
Transmission Delay for COM1 and COM2
Serial Communications
65
70
Enable Total Mode
Scale Channel & Total Mode
45
71
Force Zero for Keyboard Tare
TARE
42
75
Transmit Calibration Information to Serial Port
Serial Communications
70
76
Capture Calibration Information From a Serial Port
Serial Communications
72
77
Transmit Ticket Buffer Information To Serial Port
See Printing & Ticket Formatting Guide
78
Capture Ticket Buffer Information From Serial Port
See Printing & Ticket Formatting Guide
80
Set Time of Day
Time & Date
34
81
Set the Date
Time & Date
35
83
Time Format Mode
Time & Date
35
84
Add New Ticket
See Printing & Ticket Formatting Guide
85
Edit Existing Ticket
See Printing & Ticket Formatting Guide
86
Number of Ticket Saved in the Ticket Buffer
See Printing & Ticket Formatting Guide
97
HIGH SPEED DIGITAL WEIGHT INDICATORS
PARAMETER
98
FUNCTION
PARAMETER GROUP
PAGE
87
Show Available Space in Custom Ticket Buffer
See Printing & Ticket Formatting Guide
88
Clear Custom Ticket Buffer
See Printing & Ticket Formatting Guide
89
Print Specific Ticket
See Printing & Ticket Formatting Guide
90
Scanner Handshaking Mode
Serial Communications
75
95
Assigning a Ticket Event to the Scanner
Serial Communications
75
96
View/Change Password
Security Features
14
98
Enables Scale Channel
Scale Channel & Total Mode
44
99
Exit Calibration Mode
CALIBRATION MODE
29
100
Delete Truck IN/OUT Database
See Printing & Ticket Formatting Guide
101
Delete Truck IN/OUT Database
See Printing & Ticket Formatting Guide
105
Lock Units (lbs or kgs)
Advanced Set-Up
49
106
Auto Tare Clear
TARE
42
107
Peak Hold Threshold
See Applications & Examples Guide
110
Span Factor
Reset
56
111
Disable ZERO key
ZERO
41
240
Boot Loader Version Information
Call Factory for Assistance
**
244
Testing Battery Information
Battery
255
Software Upgrade Download
Call Factory for Assistance
**
260
Complete Factory Initialize
Reset
57
400
Grading Mode - Set Grade Entry 1 of 10
See Applications & Examples Guide
401
Grading Mode - Set Grade Entry 2 of 10
See Applications & Examples Guide
402
Grading Mode - Set Grade Entry 3 of 10
See Applications & Examples Guide
403
Grading Mode - Set Grade Entry 4 of 10
See Applications & Examples Guide
404
Grading Mode - Set Grade Entry 5 of 10
See Applications & Examples Guide
405
Grading Mode - Set Grade Entry 6 of 10
See Applications & Examples Guide
406
Grading Mode - Set Grade Entry 7 of 10
See Applications & Examples Guide
407
Grading Mode - Set Grade Entry 8 of 10
See Applications & Examples Guide
408
Grading Mode - Set Grade Entry 9 of 10
See Applications & Examples Guide
409
Grading Mode - Set Grade Entry 10 of 10
See Applications & Examples Guide
410
Enable Grading Mode
See Applications & Examples Guide
411
Grading Mode - Select Product
See Applications & Examples Guide
412
Grading Sample - Minimum weight
See Applications & Examples Guide
413
Grading Sample - Validation Threshold
See Applications & Examples Guide
414
Grading Mode - Reset All
See Applications & Examples Guide
APPENDICES
APPENDIX B - ERROR CODES
ERROR CODE
DESCRIPTION
SEE PARAMETER
1
Invalid parameter number for Calibration Mode
Calibration Mode
2
Invalid Graduation size
3
3
Invalid Decimal Position
2
4
Parameter value must be 1 for ‘ON’ or 0 for ‘OFF’
22
5
Push to Zero Window must be 0-99
21
8
Only 1 will reset Span Table
15
10
IZSM value can be 1 for ON and 0 for OFF
45
12
Motion settle time out of range (1-50)
24
13
Power on units may only be 0=lb, 1=kg.
6
14
Invalid Time entry HH.MM.SS
80
15
Invalid Date entry YY.MM.DD
81
16
Motion value is out of range (1-10)
5
17
Press tare to increment span table, any other key invalid
16
17
Press tare to decrement span table, any other key invalid
17
19
Span table cannot be decremented past 1
17
23
Invalid Serial Port speed setting
24
Invalid Serial Port Parity parameter
25
Cannot increment Span Table any further
16
26
Entered offset larger than Capacity
25
28
Power on Zero warning 0=Off, 1=On
9
29
Channel enable is 0=Off and 1=On
98
30
Only 1 will set the deadload
12
31
Sound Volume can be between 0-3
28
32
Keypress feedback can be 0=OFF or 1=ON
29
37
Channel 1 cannot be disabled
98
38
Invalid Print Select Function Number
Normal Weighing Mode
40
Scale channel is not enabled
Normal Weighing Mode
41
Pushbutton Tare is invalid (Over, Motion, or disabled)
Normal Weighing Mode
42
Keyboard tare available on channel 1 only
Normal Weighing Mode
43
Tare greater than capacity
Normal Weighing Mode
46
Invalid Entry (Parameter 26 - Values of 0, 1 & 80 are acceptable)
26
47
Bad Clock Mode (0-2)
83
48
Invalid Main Filter Value
41
49
Invalid Output String Format
34
49
Invalid Faststep Threshold Value
42
50
Zero tracking must be 1-99 or 100, 200, 300.
23
30, 32
27, 31, 33
99
HIGH SPEED DIGITAL WEIGHT INDICATORS
ERROR CODE
100
DESCRIPTION
SEE PARAMETER
50
Invalid Faststep Sensitivity
43
51
Keypad Tare Function Disabled
51
Invalid Faststep Setting 0=OFF or 1=ON
52
Tare function Disabled.
54
Invalid Tare Mode Entry (0-3)
50
56
Invalid Power Bypass Entry (0 or 1)
10
56
Invalid Display Update Rate (0-9)
19
56
Cannot delete ticket. Ticket # not found.
89
57
Invalid input for AD voltage range
11
100
Invalid Password number range, can only be 0000-9999.
96
110
SRAM failure
Call for Support
151
Audit trail CRC failed
Call for Support
152
Database CRC failed
Call for Support
153
CAL copy CRC failed
Call for Support
154
Ticket Buffer CRC failed
Call for Support
185
SMART wire COM link not responding
59
191
SMART wire set-point checksum failed
59
192
Channel 1 AD converter not responding
Call for Support
193
Channel 2 AD converter not responding
Call for Support
200
Channel 3 AD converter not responding
Call for Support
231
Ticket does not exist
Tare Scale
44
Tare Scale
Ticket Printing
APPENDICES
APPENDIX C - SUPPORTED STRING SPECIFICATIONS
DF1000 STRING
<STX><POL><SP>WWWWWW><SP><Units><SP><Mode><SP><Status><CR><LF>
POSITION
CHARACTER
1
2
3
4
5
6
7
8
9
10
11
12
13
14
15
16
17
18
19
STX
Polarity
Space
W
W
W
W
W
W
Space
Units
Units
Space
Mode
Mode
Space
Status
CR
LF
CHARACTER VALUES
Start of Text Character (ASCII 02)
“-“ for Negative , Space for Positive
ASCII 32
Weight String (Padded with spaces)
Least Significant Digit
ASCII 32
“KG” = Kilograms
“LB” = Pounds
ASCII 32
“GR” = Gross weight
“NT” = Net weight
ASCII 32
Space=Valid, “O”=Over, “M”=Motion, “-“=Negative
Carriage Return (ASCII 13)
Line Feed (ASCII 10)
101
HIGH SPEED DIGITAL WEIGHT INDICATORS
DF1500 STRING
<STX><POL><WWWWWWW><SP><Units><SP><Mode><SP><Status><CR><LF>
102
POSITION
CHARACTER
1
2
3
4
5
6
7
8
9
10
11
12
13
14
15
16
17
18
19
STX
Polarity
W
W
W
W
W
W
W
Space
Units
Units
Space
Mode
Mode
Space
Status
CR
LF
CHARACTER VALUES
Start of Text Character (ASCII 02)
“-“ for Negative , Space for Positive
Weight String (Padded with spaces, includes
decimal point)
Least Significant Digit
ASCII 32
“KG” = Kilograms
“LB” = Pounds
ASCII 32
“GR” = Gross weight
“NT” = Net weight
ASCII 32
Space=Valid, “O”=Over, “M”=Motion, “-“=Negative
Carriage Return (ASCII 13)
Line Feed (ASCII 10)
APPENDICES
DF2000 STRING
<STX><POL><SP><WWWWWW><SP><Units><Channel Info><Mode><SP><Status><CR><LF>
POSITION
1
2
3
4
5
6
7
8
9
10
11
12
13
14
15
16
17
18
19
CHARACTER
STX
Polarity
Space
W
W
W
W
W
W
Space
Units
Units
Channel Info
Mode
Mode
Space
Status
CR
LF
CHARACTER VALUES
Start of Text Character (ASCII 02)
“-“ for Negative , Space for Positive
ASCII 32
Weight String (Padded with spaces)
Least Significant Digit
ASCII 32
“KG” = Kilograms
“LB” = Pounds
* See Command Mode table below:
“GR” = Gross weight
“NT” = Net weight
ASCII 32
Space=Valid, “O”=Over, “M”=Motion, “-“=Negative
Carriage Return (ASCII 13)
Line Feed (ASCII 10)
103
HIGH SPEED DIGITAL WEIGHT INDICATORS
CHANNEL INFO CHARACTER:
CHARACTER
1
2
4
3
5
7
WEIGHT FROM:
Channel 1
Channel 2
Channel 3
Sum of channels 1 and 2
Sum of channels 1 and 3
Total Mode (Sum of Channels 1,2,3)
DF2000 COMMAND MODE
Simple 1-character command mode. When the indicator receives a command, it
replies with the DF2000 string. The single character commands are listed below.
CHARACTER
?
1
2
3
4
T
C
G
N
Z
104
ACTION
Send Current Displayed Weight
Set to Channel 1 and send displayed weight
Set to Channel 2 and send displayed weight
Set to Channel 3 and send displayed weight
Set to Total Mode and send displayed weight
Set Tare on current channel
Clears stored Tare weight
Switches to Gross mode
Switch to Net mode if a Tare weight is stored
Zeroes indicator if within ZERO window
APPENDICES
DF2500 STRING
<STX><POL><SP><WWWWWWW><SP><Units><SP><Mode><SP><Status><CR><LF>
POSITION
1
2
3
4
5
6
7
8
9
10
11
12
13
14
15
16
17
CHARACTER
STX
Polarity
W
W
W
W
W
W
W
Space
Units
Units
Space
Mode
Mode
Space
Status
18
19
CR
LF
CHARACTER VALUES
Start of Text Character (ASCII 02)
“-“ for Negative , Space for Positive
Weight String (Padded with spaces)
Least Significant Digit
ASCII 32
“KG” = Kilograms
“LB” = Pounds
ASCII 32
“GR” = Gross weight
“NT” = Net weight
ASCII 32
Space=Valid, “O”=Over, “M”=Motion,
“-“=Negative, “F”= Fault.
Carriage Return (ASCII 13)
Line Feed (ASCII 10)
105
HIGH SPEED DIGITAL WEIGHT INDICATORS
DF2500 COMMAND MODE 6
A fully interactive Command Set can be sent from a remote computer to operate
the indicator. This Command Mode has no checksum.
The maximum number of characters sent before the CR must not exceed 20.
The M2000 may fail to respond to the command if this number is exceeded.
Preceding the message with the STX insures the input buffer is cleared before
the next message. The indicator ignores LF and other control characters.
The following is a list of commands that can be executed:
COMMAND
G
N
P
T
R
C
?
L
K
Z
A
S
B
X
1
2
3
4
5
6
106
DATA REQ’D.
None
None
None
Tare Weight
(left pad with spaces)
None
None
None
None
None
None
None
None
None
None
Setpoint 1
(left pad with spaces)
Setpoint 2
(left pad with spaces)
Setpoint 3
(left pad with spaces)
Setpoint 4
(left pad with spaces)
Setpoint 5
(left pad with spaces)
Setpoint 6
(left pad with spaces)
FUNCTION
Set to GROSS mode and send string
Set to NET mode and send string
Tare scale & send NET string (0)
Set tare weight and send NET string
Recall tare weight
Clear tare weight & send GROSS string
Poll for weight (any mode)
Set units to LB & send string (any mode)
Set units to KG & send string (any mode)
Zero the scale & send string (any mode)
Add to accumulator
Recall accumulator
Recall load counter
Clear accumulator
Enter Setpoint 1
Enter Setpoint 2
Enter Setpoint 3
Enter Setpoint 4
Enter Setpoint 5
Enter Setpoint 6
APPENDICES
The format of the command string sent to the indicator must be as follows:
POSITION
1
2
3
4
5
6
7
8
9
10
CHARACTER
STX
D0
D1
D2
D3
D4
D5
D6
*Cmd
CR
CHARACTER VALUES
Start of text (02H)
Data. These characters are filled by the
numeric weight values used for the TARE and
SETPOINT functions.
The command character (see table below)
Carriage Return
The M2000 will reply with the DF2500 output string when it receives a valid
command. The returned data will reflect the command executed. Failure of the
indicator to respond with the correct mode or weight indicates that execution of
the command was not permitted.
Some commands may be inhibited (i.e. push to zero) and the return data will
reflect the indicator’s inability to complete these commands.
DF2500 COMMAND MODE 7
This mode is identical to DF2500 Command Mode 6 with the inclusion of an
‘Exclusive OR’ checksum. The checksum is included in both the SEND and
RECEIVE data strings as a two-character string immediately preceding the CR.
The checksum is calculated using an ‘Exclusive OR’ of all characters between
the STX and the first character of the checksum. The STX, checksum and CR
are not included in the checksum . The single byte calculated is converted into
two hexadecimal characters, each representing half of the byte. The most
significant 4 bits are sent first. The values are sent in hexadecimal format (0-F).
107
HIGH SPEED DIGITAL WEIGHT INDICATORS
CONSOLODATED CONTROLS
<STX><POL><WWWWWWW><Units><Mode><Status><SP><CR><LF>
POSITION
CHARACTER
1
2
3
4
5
6
7
8
9
10
11
12
13
14
15
STX
Polarity
W
W
W
W
W
W
W
Units
Mode
Status
Space
CR
LF
CHARACTER VALUES
Start of Text Character (ASCII 02)
“-“ for Negative , Space for Positive
Weight String (Padded with spaces, includes
decimal point)
Least Significant Digit
“K” = Kilograms, “L” = Pounds
“G” = Gross weight, “N” = Net weight
Space=Valid, “O”=Over, “M”=Motion
ASCII 32
Carriage Return (ASCII 13)
Line Feed (ASCII 10)
WEIGHTRONIX 120 FORMAT
<SP><Mode><POL><WWWWWW><SP><Units><CR><LF>
POSITION
1
2
3
4
5
6
7
8
9
10
11
12
13
14
108
CHARACTER
Space
Mode
Polarity
W
W
W
W
W
W
Space
Units
Units
CR
LF
CHARACTER VALUES
ASCII 32
“G” = Gross weight, “N” = Net weight
“-“ for Negative , “+” for Positive
Weight String (6 Characters, padded with spaces)
Least Significant Digit
ASCII 32
“KG” = Kilograms
“LB” = Pounds
Carriage Return (ASCII 13)
Line Feed (ASCII 10)
APPENDICES
CARDINAL 738 FORMAT
<CR><POL><WWWWWWW><SP><Status><SP><Units><SP><Mode><SP><SP><EOL>
POSITION
CHARACTER
1
2
3
4
5
6
7
8
9
10
11
12
13
14
15
16
17
18
19
CR
Polarity
W
W
W
W
W
W
W
Space
Status
Space
Units
Units
Space
Mode
Space
Space
EOL
CHARACTER VALUES
Carriage Return (ASCII 13)
“-“ for Negative , “+” for Positive
Weight String (Padded with spaces, includes
decimal point)
Least Significant Digit
ASCII 32
Space=Valid, “O”=Out of Range, “M”=Motion
ASCII 32
“kg” = Kilograms
“lb” = Pounds
ASCII 32
“G” = Gross weight, “N” = Net weight
ASCII 32
ASCII 32
End of Line Character (ASCII 03)
109
HIGH SPEED DIGITAL WEIGHT INDICATORS
ANALOGIC 5316
<STX><WWWWWWWWW><TTTTTTTTT><SP><Status><Units><SP><CR><LF>
110
POSITION
CHARACTER
1
2
3
4
5
6
7
8
9
10
11
12
13
14
15
16
17
18
19
20
21
STX
W
W
W
W
W
W
W
W
W
T
T
T
T
T
T
T
T
T
Space
Status
22
23
24
25
Units
Space
CR
LF
CHARACTER VALUES
Start of Text Character (ASCII 02)
Weight String (Padded with spaces, includes
decimal point and SIGN character)
Least Significant Digit
TARE Weight String (Padded with spaces,
includes decimal point and SIGN character)
Least Significant Digit
ASCII 32
“1”= In Range, “2”= Standstill, “4”= Center of Zero,
“8”= Net Mode (Bit Masking)
“0”= Kilograms, “1”= Pounds
ASCII 32
Carriage Return (ASCII 13)
Line Feed (ASCII 10)
APPENDICES
APPENDIX D - M2000 SPECIFICATIONS
INDICATOR PERFORMANCE
UNIT CONVERSION
ZERO TRACKING
RESOLUTION (M2000A)
RESOLUTION (M2000D)
SAMPLING RATE
SPAN STABILITY
ZERO STABILITY
LINEARITY CORRECTION
CALIBRATION METHOD
CALIBRATION SEALING
FILTERING
MODES
FIRMWARE UPGRADING
LOAD CELLS
LOADCELL INPUTS
FULL SCALE
EXCITATION (M2000D)
EXCITATION (M2000A)
COMMUNICATIONS
SERIAL OUTPUTS
IO INTERFACE
EXTERNAL IO:
SETPOINTS
EXTERNAL IO:
ANALOG OUTPUT
EXTERNAL IO:
DIGITAL INPUTS
NETWORKING
lbs / kg
1-99% of d or 1,2,3d
+/- 520,000 A/D counts per loadcell
+/- 256,000 A/D counts per loadcell
100 times per second per AD channel
2ppm/ Celsius
5nV/Celsius
5 span entries
Calibration through software stored in Flash memory
Class 1 Audit Trail System, password protected
FASTSTEP quick response
Display from CH1, CH2, CH3 and TOTAL MODE (All Channels)
Flash Memory - In field Firmware upgrading without affecting
calibration data.
Analog Cells. M2000D: Up to 16 Loadcells using two DLC slaves
4 ranges: 0-9mV, 0-19mV, 0-39mV, and 0-79mV
5VDC,16x350, 32x700 ohm in total
7.5VDC,16x350, 32x700 ohm in total
2 full duplex RS232/RS422 (1 only with Single Channel model)
SMART WIRE peripheral expansion: RS485 multi-drop
6 channel Setpoint via SMARTWIRE (optional)
4-20mA board via SMARTWIRE (optional)
6 optically isolated inputs via SMARTWIRE (optional)
RS485 Multi-drop Networking of up to 32 indicators as slaves
ELECTRICAL
POWER REQUIREMENTS
POWER DRAW
TEMPERATURE RANGE
RFI PROTECTION
12VDC, 1 Amp. (1.5A maximum)
200 mA
-10C to +40C
Filtered Signal, Excitation, & Sense lines
ENCLOSURES
STAINLESS
Wash-down stainless steel enclosures. Panel mount, swivel-bracket, or
desktop. Light Stainless or NEMA 4-X.
ALUMINIUM
Slimline. M2000A only. 12 GA. Cast aluminium.
APPROVALS
MEASUREMENT CANADA
NTEP
CSA
OIML
AM 5371 – Rev.1
00-076A1
CSA Approved Power Supply
Pending
111
HIGH SPEED DIGITAL WEIGHT INDICATORS
APPENDIX E - WARRANTY
112