1
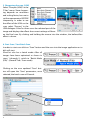
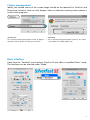
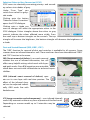
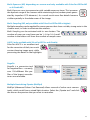
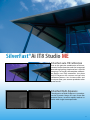
SilverFast ® SilverFast SE SilverFast the Digital Power Tool English Opportunity for very specific fine tuning: thanks to the ScanPilot and the QuickTime movies. These movies are also very helpful for beginners. The automatic adjustments will help you to create very good results immediately. Upgrade to SilverFast®SEPlus High Quality Scanning made simple! SilverFast SE Plus is especially designed for those who want to enter the world of digital image processing. Images will immensely benefit from SilverFast‘s intelligent automatic functions which help to make the process of various adjustments much easier. Predictable color from the SilverFast SE preview gives imaging and color reproduction a new dimension securing the correct workflow with the ScanPilot. SilverFastSE Plus wurde speziell für die Anwender entwickelt, die den Einstieg in den Bereich der Bildoptimierung suchen. Integrierte Automatikfunktionen und optimale Schärfeeinstellungen perfektionieren die Bilder wie von selbst. Der ScanPilot begleitet Sie Punkt für Punkt durch den Scanprozess nach empfohlenen Optimierungsschritten. Damit demonstriert er den professionellen Weg zum perfekten Bild. SilverFast SE Plus a été spécialement conçu pour des utilisateurs qui souhaitent faire leurs débuts dans le domaine de l‘optimisation de l‘image. Des fonctions automatiques intégrées et des réglages optimaux de la netteté perfectionnent directement les images. Le ScanPilot vous accompagne point par point durant le processus de numérisation selon les étapes d‘optimisation prescrites. SilverFast SE Plus è progettato in maniera specifica per chi si avvicina al mondo del digital image processing. Grazie alle funzioni intelligenti automatiche di SilverFast, gli interventi sulle immagini risultano semplici ed efficaci. L‘anteprima consente di previsualizzare i colori della scansione, fornendo così eccellenti risultati in termini di fedeltà cromatica; il tutto all‘interno di un flusso di lavoro gestito da ScanPilot. SilverFast SE Plus está especialmente diseñado para aquellos que se quieren iniciar en el mundo del procesamiento de imágenes digitales. Las imágenes se beneficiarán notablemente de las funciones inteligentes automáticas de SilverFast, que hacen mucho más fácil la realización de varios ajustes. La posibilidad de predecir los colores desde la previsualización de SilverFast SE da una nueva dimensión a la reproducción de imágenes y de color; mientras, el ScanPilot asegura un flujo de trabajo correcto. SilverFast SE Plus foi desenvolvido especialmente para usuários iniciantes na área de otimização de imagens. Funções automáticas integradas e ajustes ótimos de nitidez aperfeiçoam as imagens sem esforço do usuário. O ScanPilot acompanha o usuário passo a passo pela sequência recomendada nos processos de digitalização e otimização. Ele demonstra o caminho profissional para a imagem perfeita. 2 Content SilverFast® Software-Licence Agreement 4 Installation of SilverFast Start SilverFast Serialization and Registration 5 5 6 SilverFast Workflow in six Steps 1. Prescan 2. Image types and Auto-Optimization 3. Correcting Brightness 4. Setting the Image Dimensions of the Scan 5. Sharpening the scan (USM) 6 6 7 7 7 8 Colour management 9 Basic interface Additional Functions Flexible Zoom (only available with SilverFast Ai Studio ME) Automatic Frame Detection and Frame Rotation* Global Colour Correction (GCC) Selective Colour Correction (SCC) Selective Colour to Grey Conversion (SC2G) Dust and Scratch Removal (SRD, iSRD*, ICE**) Multi-Exposure (ME, depending on scanner and only available with SilverFastSEPlusME or AiStudioME) NegaFix Multiple Neutralising Pipette (MidPip4) Reset / General Reset Removing the Screen from Printed Artwork 9 10 10 10 11 11 12 12 13 13 13 14 14 3 SilverFast® Software-Licence Agreement Do not open the software package or use this software until you have read and agreed to the terms and conditions of this software-licence Agreement! If you do not accept these terms and conditions, please leave the software in its packaging untouched and send it back to LaserSoft Imaging immediately! SilverFast (trademark) is a software package comprising software and user manual for a method of generating scans for the subsequent production of colour separations and printing images. LaserSoft Imaging (“LS Imaging”) has developed the software and owns all rights of it: 1. 2. 3. 4. 5. 6. 7. 8. 9. Copyright (1) The user and licensee acknowledges that the copyright of the software in both source and object code form is owned by LS Imaging. (2) Manual and other documentation are protected by copyright. Illegal usage, also of the images of the manual, will cause claim for damages. Licence (1) LS Imaging grants the licensee an exclusive and non-transferable licence to use the software object code and user manual for his or her own use. (2) This licence authorizes the use of SilverFast on a single personal computer at one time. Separate licenses are required for use on multiple processors and/or multiple sites. (3) The user and licensee is not allowed to copy in whole or in part SilverFast except for the purpose of making a backup copy. The licensee is neither allowed to copy in whole or in part supporting documentation supplied with SilverFast. (4) The software contains confidential information; this licence does not allow the licensee to change, adjust, to decompile, to disassemble or in any other way trying to find out the source code. (5) The licensee is not allowed to rent, lease, sublicense or loan the software. Transfer of software and documentation is possible under the condition that all software and documentation is transferred, no copy (for backup purposes) is retained and the third party accepts this Licence Agreement. Validity (1) This licence will be valid from the day the software package is opened. It will be valid until the day LS Imaging or the licensee terminates this agreement. (2) This licence agreement may be terminated to the terms and conditions as follows: (a) LS Imaging may terminate this licence upon written notice if the licensee is in breach of the agreement in whole or parts of it. (b) The licensee may terminate this licence upon written notice to LS Imaging under the terms and conditions of No. 4, if he sends back the opened software package, deletes the copy on his computer and any backup copy immediately. Warranty (1) SilverFast is provided „as is“. LS Imaging does not warrant – neither expressed nor implied – the usefulness of the software SilverFast for a particular purpose or its merchantability or the fitness for licencee´s requirements. Although every effort has been made to eliminate errors, LaserSoft Imaging AG does not warrant that SilverFast is free of errors. (2) The licensee has to examine the software for considerable, recognizable defects within 14 days. These defects must be notified to LS Imaging in writing. Hidden defects are to be notified upon recognition in writing. Otherwise software and documentation are approved without reserve. (3) At considerable defects LS Imaging has the choice of either providing the licensee with another version or to eliminate the defect within reasonable time. If LS Imaging is not able to allow use of the software within this time, the licensee may reduce compensation or terminate this contract. (4) Upon assertion of warranty the licensee is obliged to send back software and receipt at the costs of LS Imaging. Limitation of Liability In no event shall LS Imaging, a distributor or authorized dealer be liable for any direct, indirect or consequential damages including economic loss even if LS Imaging, the distributor or authorized dealer has been advised of the possibility of such damage. The licensee agrees that any liability of LS Imaging arising out of the usage of SilverFast whether in contract or in tort shall not exceed the amount paid by the licensee for the software involved. Trademarks SilverFast and the trademarks mentioned in the documentation are (registered) trademarks of LS Imaging or their respective owners. The usage of these trademarks, logos, documentation, screenshots can only be allowed by LS Imaging or the respective owners. Illegal usage will cause claim for damages. Ineffective Provisions Should individual provisions of this contract, for any reason, found to be or become ineffective, or should a fulfillment discrepancy arise, then notwithstanding this agreement shall remain in full force. A provision that is closest in the scope of the legal possibilities of what the parties intended - or if they had considered the provision would have wanted - shall replace the ineffective provision or the fulfillment discrepancy, if necessary retrospectively. Amendments Amendments of this Agreement have to be in writing. Applicable Law Applicable law is the German law; the United Convention of the International Sales of Goods (CISG) is hereby expressively excluded. 1996-2009 Copyright LaserSoft Imaging AG Germany • Luisenweg 6-8 • D 24105 Kiel 4 DVDBookletSFSEv66_neutral_EN.indd 2009.10.27; 14.32 Installation of SilverFast Insert the SilverFast installation CD-ROM into the drive. Start the CD if it does not run automatically. Double-click on the installation program “SilverFast Install Pilot.app”. • Select your language. Go on with “Next”.. • Click „Install SilverFast“ • Decide whether the SilverFast manuals and the SilverFast QuickTime movies should also be installed. Click on “Install”. • The installation parameters are now set and the actual installation process can begin. Follow the installation instructions of the operating system. Make sure that you have all installation rights (root or administrator) for your computer. End the installation process under “Quit”. Start SilverFast Start from SFLauncher: Start SFLauncher by double-clicking the application. Choose the installed SilverFast SE version with a mouse-click on the appropriate palette. SilverFast will start as usual. Start from Photoshop: Start Photoshop and select your SilverFast version under “Import” in the ”File“ menu (Windows: “File“ menu). 5 Serialization and Registration The main dialogue comes up with the serialization dialogue, where you input your first name, last name, company and the serial number. This code consists of numbers between 2 and 9 (no ones and no zeros) and all letters between A and Z – except the letters “i” and “o”. Click “Unlock SilverFast” once you have entered all data. Please register your version of SilverFast; only then will you receive support and have access to the latest versions using the Online-Update. Clicking the „i“ button, and then hitting the „Register“ button will then launch the registration procedure. SilverFast Workflow in six Steps 1. Prescan Click “Prescan” to launch a pre scan. Next, adjust your scan frame to the desired size Adjust your frame by dragging the selection marquee over the image accordingly. Make sure the marqueed frame is inside the actual image area itself. 6 2. Image types and Auto-Optimization Under “Image Type”, make the appropriate selection to con figure the “Auto-Adjust”, so the automatic image control knows how to optimise the image. Immediately after the selection of an image type, the auto-adjust is applied auto matically (notice how your image is optimised). If you do not change “Image Type” selection you can press the auto-adjust icon in the tool bar to optimise the image. You’ll soon notice how high lights, shadows and midtones are automatically corrected. 3. Correcting Brightness If the image looks too bright or too dark you can open the “Gradation Curves” from the tool bar. Use the midtone slider to correct the overall brightness of your image. Any correction that you perform can easily be undone by typing “Command-Z” and redone by typing “Command-Z” again (“Crtl-Z” on a Windows PC, respectively). In fact, you can toggle between the two. 4. Setting the Image Dimensions of the Scan Enter the desired output settings like output size and output resolution. An output resolution between 200 and 300ppi is recommended for Ink jet and laser printers. Setting the output size. Setting the output resolution. 7 5. Sharpening the scan (USM) Select “Sharpen (USM)” in the “Filter” menu. Since sharpening depends on resolution and scaling factor, be sure to set these parameters BEFORE sharpening. In order to see the effect of the USM on the scan, select “Prescan” in the USM dialogue. SilverFast then scans the selected part of the image and displays the effects the current settings will have on the final scan. By clicking and holding the mouse into the window, the before/after effect is shown. 6. Start Scan / Start Batch Scan In order to start scan click on “Scan” button and the scan into the image application or to disk will start. SilverFast also has a batch mode. After all images have been optimized as shown in steps 1 through 5, switch to “Batch Mode (File)”. (General Tab / Scan mode). Clicking on the now updated “Scan” button will open the “Save” parameters; once selected, the batch scan will launch. 8 Colour management Ideally, the viewed colour of the screen image should be the identical for SilverFast and Photoshop. However, that can only happen when an identical working colour palette is used in both programs. SilverFast SE Photoshop The set up for a working colour palette is done in „Options… / The set up of a working colour palette is done in „file / colour CMS (Win: ICM)” at „Profiles for ColorSync / Internal”. set up / RGB”. Here „Adobe RGB (1998)”. Basic interface Apart from the “Standard” user interface, SilverFast SE also offers a simplified “Basic” mode. The interfaces can be selected under “Mode”. 9 Additional Functions Flexible Zoom (only available with SilverFast Ai Studio ME) Holding down the “Ctrl” key turns the mouse button into a plus-magnifier. To perform a zoom, simply keep the key pressed and drag a scan frame within the prescan window. The contents of this frame will immediately be magnified once the mouse button is released. Alternatively, a preset zoom ratio can be selected in the pull down menu in the lower left of the prescan window. Automatic Frame Detection and Frame Rotation* This function places automatic scan frames on the preview. Note that it is necessary that these images have a certain distance between them and the scanner edges. A strong contrast background is very helpful for reflective images. Transparencies should be placed into the respective holders whenever possible. Inactive frames will be displayed in white colour; the active frame in red. *The SilverFast SE Plus and Ai Studio Upgrades additionally include the auto-rotation feature which aligns all frames automatically. The moue can be used to adjust the frame size by moving it over the frames corners or sides and the frame itself can be rotated by click dragging the as well as to align the frame manually. 10 Global Colour Correction (GCC) In this dialogue, you can change the entire colour rendering of the scanned artwork. By clicking or click dragging within the colour sphere, the colour characteristic of the scanned artwork will be moved into the selected area. The degree of changes can be adjusted by means of the three-step slider. The lower level will produce small changes. The upper level will produce large changes Selective Colour Correction (SCC) Open the selective colour correction from the tool bar and click into your image on the coloured object you wish to correct. SilverFast detects the colour and displays the colour sector in a list. The Presets in the roll down menus allows quick colour correction. The “ACR” slider regulates the saturation of the colour. Note that the ACR checkbox needs to be activated. Histogram The highlight, shadow and midpoints can be corrected by mouse dragging the small triangles. The respective values are displayed numerically as well. Colour casts which may possibly be there in the image can be reduced with the slider at the bottom of the dialogue. 11 Selective Colour to Grey Conversion (SC2G) SC2G serves to selectively converting primary- and secondary colours into shades of grey. Under “Scan Type” you switch from colour to greyscale mode. Clicking onto the button “Selective Colour Correction“ opens the SC2G dialogue. Clicking onto a shade you want to change will select the appropriate colour in the SC2G dialogue. Colour triangles above the colour to gray controls indicate the colour effected more visibly. Press the small top or bottom triangles on the controls. The top triangle will increase the brightness, the bottom triangle will decrease the brightness of a shade. Dust and Scratch Removal (SRD, iSRD*, ICE**) The “SRD” function for removal of dust and scratches is available for all scanners. Some scanners have an infrared channel as well. These machines then have the additional “iSRD” and “ICE” function in the menu. SRD (Smart removal of defects) is a scratch removal without the use of infrared information, but still offers many helpful settings which work with layers and quick masks. Even B/W negatives are restorable which does not work with infrared due to technical impossibilities. iSRD (infrared smart removal of defects) operates on its own layer with real time preview. The effect of the infrared channel can be adjusted individually. iSRD works fine with Kodachrome. ICE (Image correction and enhancement) – uses infrared channel) works fully automatic without any form of preview of the final result. Depending on scanner model up to 2 intensities may be selected. 12 Multi-Exposure (ME, depending on scanner and only available with SilverFast SEPlus ME or Ai StudioME) Multi-Exposure scans transparencies with variable exposure times. This increases the dynamic range of the scanner while minimizing noise (random pixels generated by imperfect CCD elements). As a result much more fine details become visible especially in the darker areas of the image. Multi-Sampling (MS, only available with SilverFastSE Plus ME or higher) Multiple sampling can be applied for some scanners that show a visible, strong noise in the shadow areas, in order to eliminate the artefacts. Multi-Sampling can be activated with its own button. The number of scans per scan frame can be 1, 4, 8 or 16. A small number in the button will show the number of sample scans. AACO (only available with SilverFastSE Plus or Ai Studio) SilverFast AACO is an excellent tool for the correction of dark, too much contrast bearing image parts while preserving the details in the highlights. NegaFix NegaFix is a conversion tool for negative films – currently, over 120 different film profiles of the largest manufacturers are selectable. Multiple Neutralising Pipette (MidPip4) MidPip4 (Advanced Colour Cast Removal) allows removal of colour casts conveniently, which result from a mixed light situation. Select the „Pipette tool” and click the area on the preview that you want to neutralize. 13 Reset / General Reset In order to reset the correction within the active scan frame, click the “Reset”-button in the SilverFast dialogue window. In order to reset all SilverFast correction settings, press the “Shift” key and click on the “Reset-All”-button in the SilverFast dialogue window. . .+q Removing the Screen from Printed Artwork To scan artwork done with offset printing, as for example from a magazine, the scans have to be “descreened.” First, select the function “descreen” in “Filter.” Enter the output screen as a numerical value under “De-screening parameters” Please use the link below to see further explanations, examples and help http://www.silverfast.com/en/ Quick Time Training videos SF6 manual Official Guide, by Taz Tally 14 PDF tutorials and instructions 6.6 Addendum to manual Support forum SilverFast®Ai IT8 Studio ME SilverFast auto IT8 Calibration without IT8 Calibration with IT8 Calibration Due to the genuine combination of the automatic frame detection and the integrated barcode technology imprinted on LaserSoft Imagings IT8-Targets the complete calibration process runs fully automatic. Just place the LSI-Target on the scanner and start the calibration process. Just 2 mouse clicks and 2 minutes later your scanner produdes color proof results. SilverFast Multi-Exposure The objective of Multi-Exposure is to enhance the Dynamic Range of scans from film material since a scanner rapidly reaches its limits with single scan acquisition. without Multi-Exposure with Multi-Exposure 15 LaserSoft Imaging AG Luisenweg 6-8 24105 Kiel • Germany Tel.: +49 (0) 431/5 60 09-0 Fax: +49 (0) 431/5 60 09-96 E-Mail: [email protected] www.SilverFast.de System requirements* Mac OS X, Windows 2000, XP, Vista, Windows 7, 512 MB RAM, (1 GB RAM recommended), 500 MB free hard disk space, CD-/ DVD-drive * Please check the compatibility of the software and features, your device and operating system at http://www.silverfast.com/product/en.html or ask your dealer. SilverFast® and LaserSoft Imaging™ are registered trademarks of LaserSoft Imaging AG, Germany. All mentioned trademarks are the protected trademarks of the respective owners. Systemanforderungen* Mac OS X, Windows 2000, XP, Vista, Windows 7, 512 MB RAM, (1 GB RAM empfohlen), 500 MB freier Festplattenspeicher, CD-/ DVD-Laufwerk * Bitte überprüfen Sie die Lauffähigkeit der Software und Features für Ihr Gerät und Betriebssystem unter http://www.silverfast.com/product/ de.html oder befragen Sie Ihren Händler. SilverFast® und LaserSoft Imaging™ sind die eingetragenen Warenzeichen der LaserSoft Imaging AG, Deutschland. Alle erwähnten Warenzeichen sind die geschützten Warenzeichen der jeweiligen Inhaber. Configuration système requise* Mac OS X, Windows 2000, XP, Vista, Windows 7, 512 Mo de RAM, (1 GB RAM recommandé), 500 Mo d‘espace libre sur le disque dur, lecteur CD/ DVD. * Vérifiez le fonctionnement du logiciel pour votre appareil et système d’exploitation sous http:// www.silverfast.com/product/fr.html ou consultez votre revendeur. SilverFast® et LaserSoft Imaging™ sont des marques déposées de LaserSoft Imaging AG, Allemagne. Toutes les marques mentionnées sont les marques protégées des propriétaires respectifs. Patents: EP 1594301, EP 1744278 SilverFast the Digital Power Tool LaserSoft Imaging, Inc. 625 Freeling Drive Sarasota, FL 34242, USA Phone: (+1) 941-312-0690 Fax: (+1) 941-312-0608 E-Mail: [email protected] www.SilverFast.com 10-2009