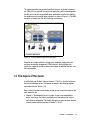
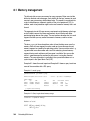
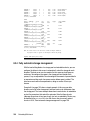
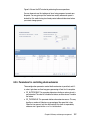
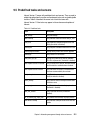
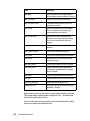
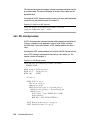
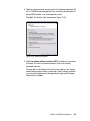
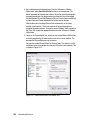
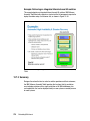
1
Front cover Embedding IBM Informix A full function, high performance, and highly available relational DBMS A small footprint and scalable to fit your environment Low administrative requirements Whei-Jen Chen Oluwatosin Ajayi Mirav Kapadia Alexander Koerner Jacques Roy Dick Snoke ibm.com/redbooks International Technical Support Organization Embedding IBM Informix February 2011 SG24-7666-01 Note: Before using this information and the product it supports, read the information in “Notices” on page xiii. Second Edition (February 2011) This edition applies to IBM Informix Version 11.7. © Copyright International Business Machines Corporation 2011. All rights reserved. Note to U.S. Government Users Restricted Rights -- Use, duplication or disclosure restricted by GSA ADP Schedule Contract with IBM Corp. Contents Notices . . . . . . . . . . . . . . . . . . . . . . . . . . . . . . . . . . . . . . . . . . . . . . . . . . . . . . xiii Trademarks . . . . . . . . . . . . . . . . . . . . . . . . . . . . . . . . . . . . . . . . . . . . . . . . . . . xiv Preface . . . . . . . . . . . . . . . . . . . . . . . . . . . . . . . . . . . . . . . . . . . . . . . . . . . . . . xv The team who wrote this book . . . . . . . . . . . . . . . . . . . . . . . . . . . . . . . . . . . . xvii Acknowledgement. . . . . . . . . . . . . . . . . . . . . . . . . . . . . . . . . . . . . . . . . . . xviii Now you can become a published author, too! . . . . . . . . . . . . . . . . . . . . . . . . xix Comments welcome. . . . . . . . . . . . . . . . . . . . . . . . . . . . . . . . . . . . . . . . . . . . . xix Stay connected to IBM Redbooks . . . . . . . . . . . . . . . . . . . . . . . . . . . . . . . . . . xx Summary of changes . . . . . . . . . . . . . . . . . . . . . . . . . . . . . . . . . . . . . . . . . . . xxi February 2011, Second Edition . . . . . . . . . . . . . . . . . . . . . . . . . . . . . . . . . . . . xxi Chapter 1. Introduction . . . . . . . . . . . . . . . . . . . . . . . . . . . . . . . . . . . . . . . . . . 1 1.1 The need for embedding database services . . . . . . . . . . . . . . . . . . . . . . . . 2 1.1.1 Virtualization . . . . . . . . . . . . . . . . . . . . . . . . . . . . . . . . . . . . . . . . . . . . 3 1.2 What is an embedded database . . . . . . . . . . . . . . . . . . . . . . . . . . . . . . . . . 4 1.2.1 One size does not fit all. . . . . . . . . . . . . . . . . . . . . . . . . . . . . . . . . . . . 4 1.2.2 Requirements of an embedded database . . . . . . . . . . . . . . . . . . . . . . 4 1.3 Types of embedding . . . . . . . . . . . . . . . . . . . . . . . . . . . . . . . . . . . . . . . . . . 6 1.3.1 Invisible (or deep) embedding . . . . . . . . . . . . . . . . . . . . . . . . . . . . . . . 7 1.3.2 Integrated administration. . . . . . . . . . . . . . . . . . . . . . . . . . . . . . . . . . . 7 1.3.3 Bundled . . . . . . . . . . . . . . . . . . . . . . . . . . . . . . . . . . . . . . . . . . . . . . . . 8 1.4 The topics of this book . . . . . . . . . . . . . . . . . . . . . . . . . . . . . . . . . . . . . . . . 9 Chapter 2. Embeddability basics . . . . . . . . . . . . . . . . . . . . . . . . . . . . . . . . . 13 2.1 Informix architecture . . . . . . . . . . . . . . . . . . . . . . . . . . . . . . . . . . . . . . . . . 14 2.2 Terminology. . . . . . . . . . . . . . . . . . . . . . . . . . . . . . . . . . . . . . . . . . . . . . . . 15 2.2.1 Virtualization . . . . . . . . . . . . . . . . . . . . . . . . . . . . . . . . . . . . . . . . . . . 15 2.2.2 Silent installation . . . . . . . . . . . . . . . . . . . . . . . . . . . . . . . . . . . . . . . . 17 2.2.3 Deep embedding. . . . . . . . . . . . . . . . . . . . . . . . . . . . . . . . . . . . . . . . 17 2.2.4 Deployment . . . . . . . . . . . . . . . . . . . . . . . . . . . . . . . . . . . . . . . . . . . . 17 2.2.5 Response file . . . . . . . . . . . . . . . . . . . . . . . . . . . . . . . . . . . . . . . . . . 17 2.3 Features that makes embedding Informix easy . . . . . . . . . . . . . . . . . . . . 18 2.3.1 Small footprint and customizable installation . . . . . . . . . . . . . . . . . . 18 2.3.2 Silent installation . . . . . . . . . . . . . . . . . . . . . . . . . . . . . . . . . . . . . . . . 20 2.3.3 Low administration requirements . . . . . . . . . . . . . . . . . . . . . . . . . . . 21 2.3.4 Security . . . . . . . . . . . . . . . . . . . . . . . . . . . . . . . . . . . . . . . . . . . . . . . 21 2.3.5 Self-tuning features . . . . . . . . . . . . . . . . . . . . . . . . . . . . . . . . . . . . . . 22 © Copyright IBM Corp. 2011. All rights reserved. iii 2.3.6 Storage optimization . . . . . . . . . . . . . . . . . . . . . . . . . . . . . . . . . . . . . 23 2.3.7 Dynamic configuration. . . . . . . . . . . . . . . . . . . . . . . . . . . . . . . . . . . . 23 2.3.8 SQL administration API. . . . . . . . . . . . . . . . . . . . . . . . . . . . . . . . . . . 25 2.3.9 Scheduling tasks . . . . . . . . . . . . . . . . . . . . . . . . . . . . . . . . . . . . . . . . 25 2.3.10 Communication protocol support . . . . . . . . . . . . . . . . . . . . . . . . . . 26 2.3.11 Informix stability . . . . . . . . . . . . . . . . . . . . . . . . . . . . . . . . . . . . . . . 26 2.3.12 Scalable architecture. . . . . . . . . . . . . . . . . . . . . . . . . . . . . . . . . . . . 27 2.3.13 Hardware and operating system support . . . . . . . . . . . . . . . . . . . . 27 2.3.14 Virtualization . . . . . . . . . . . . . . . . . . . . . . . . . . . . . . . . . . . . . . . . . . 28 2.3.15 Extensibility support . . . . . . . . . . . . . . . . . . . . . . . . . . . . . . . . . . . . 29 2.3.16 Collecting diagnostic data . . . . . . . . . . . . . . . . . . . . . . . . . . . . . . . . 30 2.4 Informix product editions . . . . . . . . . . . . . . . . . . . . . . . . . . . . . . . . . . . . . . 31 2.4.1 No cost editions. . . . . . . . . . . . . . . . . . . . . . . . . . . . . . . . . . . . . . . . . 32 2.4.2 For-purchase editions . . . . . . . . . . . . . . . . . . . . . . . . . . . . . . . . . . . . 33 Chapter 3. Preparing to embed IBM Informix . . . . . . . . . . . . . . . . . . . . . . . 35 3.1 Choice of platform . . . . . . . . . . . . . . . . . . . . . . . . . . . . . . . . . . . . . . . . . . . 36 3.2 Application design . . . . . . . . . . . . . . . . . . . . . . . . . . . . . . . . . . . . . . . . . . . 36 3.2.1 Application set processing . . . . . . . . . . . . . . . . . . . . . . . . . . . . . . . . 36 3.2.2 Using database extensions . . . . . . . . . . . . . . . . . . . . . . . . . . . . . . . . 37 3.2.3 Indexing. . . . . . . . . . . . . . . . . . . . . . . . . . . . . . . . . . . . . . . . . . . . . . . 38 3.2.4 Using multiple DBMSs or databases. . . . . . . . . . . . . . . . . . . . . . . . . 39 3.3 Data and database administration. . . . . . . . . . . . . . . . . . . . . . . . . . . . . . . 40 3.3.1 Application error monitoring . . . . . . . . . . . . . . . . . . . . . . . . . . . . . . . 40 3.3.2 Security issues . . . . . . . . . . . . . . . . . . . . . . . . . . . . . . . . . . . . . . . . . 40 3.3.3 Managing backups and log archives . . . . . . . . . . . . . . . . . . . . . . . . . 43 3.3.4 Storage sizing and management . . . . . . . . . . . . . . . . . . . . . . . . . . . 47 3.4 Installing, deploying, upgrading, and migrating . . . . . . . . . . . . . . . . . . . . . 48 3.4.1 Installing . . . . . . . . . . . . . . . . . . . . . . . . . . . . . . . . . . . . . . . . . . . . . . 48 3.4.2 Upgrading . . . . . . . . . . . . . . . . . . . . . . . . . . . . . . . . . . . . . . . . . . . . . 48 3.4.3 Shared systems . . . . . . . . . . . . . . . . . . . . . . . . . . . . . . . . . . . . . . . . 49 3.4.4 Application management. . . . . . . . . . . . . . . . . . . . . . . . . . . . . . . . . . 51 3.5 Extremely low footprint Informix installations . . . . . . . . . . . . . . . . . . . . . . 51 3.5.1 Minimizing the Informix installation footprint . . . . . . . . . . . . . . . . . . . 51 3.5.2 Extremely small footprint Informix instance. . . . . . . . . . . . . . . . . . . . 56 Chapter 4. Installation strategies. . . . . . . . . . . . . . . . . . . . . . . . . . . . . . . . . 63 4.1 Informix installation considerations . . . . . . . . . . . . . . . . . . . . . . . . . . . . . . 64 4.1.1 Technical installation requirements . . . . . . . . . . . . . . . . . . . . . . . . . . 64 4.1.2 A note about Mac OS X . . . . . . . . . . . . . . . . . . . . . . . . . . . . . . . . . . 65 4.2 Interactive installations . . . . . . . . . . . . . . . . . . . . . . . . . . . . . . . . . . . . . . . 66 4.2.1 Interactive installation methods. . . . . . . . . . . . . . . . . . . . . . . . . . . . . 67 4.2.2 Typical and custom installation options. . . . . . . . . . . . . . . . . . . . . . . 67 iv Embedding IBM Informix 4.2.3 GUI or console mode installation . . . . . . . . . . . . . . . . . . . . . . . . . . . 68 4.2.4 Custom installations and the Deployment Wizard. . . . . . . . . . . . . . . 69 4.3 Silent installation . . . . . . . . . . . . . . . . . . . . . . . . . . . . . . . . . . . . . . . . . . . . 76 4.3.1 Recording a response file . . . . . . . . . . . . . . . . . . . . . . . . . . . . . . . . . 77 4.3.2 Performing a silent installation . . . . . . . . . . . . . . . . . . . . . . . . . . . . . 77 4.3.3 Modifying a response file . . . . . . . . . . . . . . . . . . . . . . . . . . . . . . . . . 80 4.3.4 Installing multiple copies of Informix . . . . . . . . . . . . . . . . . . . . . . . . . 87 4.4 Client applications . . . . . . . . . . . . . . . . . . . . . . . . . . . . . . . . . . . . . . . . . . . 88 4.4.1 Client SDK and Informix Connect . . . . . . . . . . . . . . . . . . . . . . . . . . . 88 4.4.2 IBM Informix Java Database Connectivity Driver . . . . . . . . . . . . . . . 90 4.5 Log files . . . . . . . . . . . . . . . . . . . . . . . . . . . . . . . . . . . . . . . . . . . . . . . . . . . 91 4.6 Additional Informix installation procedures . . . . . . . . . . . . . . . . . . . . . . . . 92 4.6.1 The Informix deployment utility . . . . . . . . . . . . . . . . . . . . . . . . . . . . . 92 Chapter 5. Deployment . . . . . . . . . . . . . . . . . . . . . . . . . . . . . . . . . . . . . . . . . 95 5.1 Deployment strategies. . . . . . . . . . . . . . . . . . . . . . . . . . . . . . . . . . . . . . . . 96 5.1.1 Considerations . . . . . . . . . . . . . . . . . . . . . . . . . . . . . . . . . . . . . . . . . 97 5.2 Components needed for packaging . . . . . . . . . . . . . . . . . . . . . . . . . . . . . 97 5.3 Integrated deployment. . . . . . . . . . . . . . . . . . . . . . . . . . . . . . . . . . . . . . . . 98 5.3.1 Installer-based instance configuration. . . . . . . . . . . . . . . . . . . . . . . . 98 5.3.2 Directions for integrated deployment . . . . . . . . . . . . . . . . . . . . . . . 101 5.4 Connectivity. . . . . . . . . . . . . . . . . . . . . . . . . . . . . . . . . . . . . . . . . . . . . . . 105 5.4.1 Connectivity on Windows . . . . . . . . . . . . . . . . . . . . . . . . . . . . . . . . 105 5.4.2 Connectivity on UNIX . . . . . . . . . . . . . . . . . . . . . . . . . . . . . . . . . . . 107 5.4.3 Connectivity protocols . . . . . . . . . . . . . . . . . . . . . . . . . . . . . . . . . . . 108 5.5 Invisible deployment (deeply embedded) . . . . . . . . . . . . . . . . . . . . . . . . 109 5.5.1 Informix deployment assistant. . . . . . . . . . . . . . . . . . . . . . . . . . . . . 110 5.5.2 The Informix deployment utility . . . . . . . . . . . . . . . . . . . . . . . . . . . . 121 5.6 Post-deployment . . . . . . . . . . . . . . . . . . . . . . . . . . . . . . . . . . . . . . . . . . . 135 5.7 Client applications . . . . . . . . . . . . . . . . . . . . . . . . . . . . . . . . . . . . . . . . . . 136 5.7.1 Integrated deployment for client applications . . . . . . . . . . . . . . . . . 136 5.7.2 Invisible deployment for client applications . . . . . . . . . . . . . . . . . . . 136 5.8 Post-deployment . . . . . . . . . . . . . . . . . . . . . . . . . . . . . . . . . . . . . . . . . . . 139 5.8.1 Storage space management . . . . . . . . . . . . . . . . . . . . . . . . . . . . . . 139 5.9 Final note. . . . . . . . . . . . . . . . . . . . . . . . . . . . . . . . . . . . . . . . . . . . . . . . . 146 Chapter 6. IBM Informix configuration for embeddability . . . . . . . . . . . . 147 6.1 Autonomic parameters . . . . . . . . . . . . . . . . . . . . . . . . . . . . . . . . . . . . . . 148 6.1.1 AUTO_AIOVPS. . . . . . . . . . . . . . . . . . . . . . . . . . . . . . . . . . . . . . . . 148 6.1.2 AUTO_CKPTS . . . . . . . . . . . . . . . . . . . . . . . . . . . . . . . . . . . . . . . . 148 6.1.3 AUTO_LRU_TUNING . . . . . . . . . . . . . . . . . . . . . . . . . . . . . . . . . . . 149 6.1.4 AUTO_REPREPARE . . . . . . . . . . . . . . . . . . . . . . . . . . . . . . . . . . . 149 6.1.5 AUTO_STAT_MODE . . . . . . . . . . . . . . . . . . . . . . . . . . . . . . . . . . . 149 Contents v 6.1.6 DYNAMIC_LOGS . . . . . . . . . . . . . . . . . . . . . . . . . . . . . . . . . . . . . . 150 6.1.7 LOCKS . . . . . . . . . . . . . . . . . . . . . . . . . . . . . . . . . . . . . . . . . . . . . . 150 6.1.8 RTO_SERVER_RESTART . . . . . . . . . . . . . . . . . . . . . . . . . . . . . . . 151 6.2 Other configuration parameters. . . . . . . . . . . . . . . . . . . . . . . . . . . . . . . . 151 6.2.1 ALARMPROGRAM . . . . . . . . . . . . . . . . . . . . . . . . . . . . . . . . . . . . . 151 6.2.2 CONSOLE. . . . . . . . . . . . . . . . . . . . . . . . . . . . . . . . . . . . . . . . . . . . 152 6.2.3 LTAPEDEV and TAPEDEV. . . . . . . . . . . . . . . . . . . . . . . . . . . . . . . 152 6.2.4 MSG_DATE . . . . . . . . . . . . . . . . . . . . . . . . . . . . . . . . . . . . . . . . . . 152 6.2.5 MSGPATH . . . . . . . . . . . . . . . . . . . . . . . . . . . . . . . . . . . . . . . . . . . 153 6.2.6 NS_CACHE. . . . . . . . . . . . . . . . . . . . . . . . . . . . . . . . . . . . . . . . . . . 153 6.2.7 SYSALARMPROGRAM . . . . . . . . . . . . . . . . . . . . . . . . . . . . . . . . . 154 6.3 Auto update statistics . . . . . . . . . . . . . . . . . . . . . . . . . . . . . . . . . . . . . . . 154 6.4 Sysdbopen and sysdbclose procedures . . . . . . . . . . . . . . . . . . . . . . . . . 155 6.5 The alarm program . . . . . . . . . . . . . . . . . . . . . . . . . . . . . . . . . . . . . . . . . 158 6.5.1 Alarm program parameters . . . . . . . . . . . . . . . . . . . . . . . . . . . . . . . 159 6.5.2 Custom alarm program . . . . . . . . . . . . . . . . . . . . . . . . . . . . . . . . . . 161 6.6 Application-specific DBMS functions. . . . . . . . . . . . . . . . . . . . . . . . . . . . 162 Chapter 7. The SQL administration API . . . . . . . . . . . . . . . . . . . . . . . . . . 167 7.1 SQL Administration API functions . . . . . . . . . . . . . . . . . . . . . . . . . . . . . . 168 7.1.1 The command_history table . . . . . . . . . . . . . . . . . . . . . . . . . . . . . . 168 7.1.2 The task() function . . . . . . . . . . . . . . . . . . . . . . . . . . . . . . . . . . . . . 169 7.1.3 The admin() function . . . . . . . . . . . . . . . . . . . . . . . . . . . . . . . . . . . . 169 7.2 Administrative commands . . . . . . . . . . . . . . . . . . . . . . . . . . . . . . . . . . . . 170 7.2.1 Status and error reporting . . . . . . . . . . . . . . . . . . . . . . . . . . . . . . . . 170 7.2.2 Potential onmode traps . . . . . . . . . . . . . . . . . . . . . . . . . . . . . . . . . . 171 7.2.3 Stopping the Scheduler. . . . . . . . . . . . . . . . . . . . . . . . . . . . . . . . . . 171 7.3 Scripting examples . . . . . . . . . . . . . . . . . . . . . . . . . . . . . . . . . . . . . . . . . 172 7.3.1 System setup example . . . . . . . . . . . . . . . . . . . . . . . . . . . . . . . . . . 172 7.3.2 SQL tracing example. . . . . . . . . . . . . . . . . . . . . . . . . . . . . . . . . . . . 174 7.3.3 Incorporating SQL into shell scripts . . . . . . . . . . . . . . . . . . . . . . . . 176 7.4 Programming examples . . . . . . . . . . . . . . . . . . . . . . . . . . . . . . . . . . . . . 178 7.4.1 Adding a dbspace to an Informix instance . . . . . . . . . . . . . . . . . . . 178 7.4.2 A general purpose task() calling program . . . . . . . . . . . . . . . . . . . . 180 7.5 Further reading . . . . . . . . . . . . . . . . . . . . . . . . . . . . . . . . . . . . . . . . . . . . 182 Chapter 8. Memory and storage management . . . . . . . . . . . . . . . . . . . . . 183 8.1 Memory management . . . . . . . . . . . . . . . . . . . . . . . . . . . . . . . . . . . . . . . 184 8.1.1 The shared memory resident segment . . . . . . . . . . . . . . . . . . . . . . 185 8.1.2 The shared memory virtual segments . . . . . . . . . . . . . . . . . . . . . . . 185 8.1.3 The shared memory messaging segments . . . . . . . . . . . . . . . . . . . 186 8.1.4 Releasing unused memory . . . . . . . . . . . . . . . . . . . . . . . . . . . . . . . 186 8.2 Low Memory Manager. . . . . . . . . . . . . . . . . . . . . . . . . . . . . . . . . . . . . . . 186 vi Embedding IBM Informix 8.2.1 How the Low Memory Manager works . . . . . . . . . . . . . . . . . . . . . . 187 8.2.2 Configuring, using, and monitoring Low Memory Manager. . . . . . . 188 8.3 Storage provisioning and management. . . . . . . . . . . . . . . . . . . . . . . . . . 191 8.3.1 Requirements and planning . . . . . . . . . . . . . . . . . . . . . . . . . . . . . . 191 8.3.2 The storage pool . . . . . . . . . . . . . . . . . . . . . . . . . . . . . . . . . . . . . . . 192 8.3.3 Extendable chunks . . . . . . . . . . . . . . . . . . . . . . . . . . . . . . . . . . . . . 195 8.3.4 Fully automatic storage management . . . . . . . . . . . . . . . . . . . . . . . 196 8.3.5 Parameters for controlling chunk extension . . . . . . . . . . . . . . . . . . 197 8.3.6 Semi-automatic storage management . . . . . . . . . . . . . . . . . . . . . . 198 8.3.7 Manual storage management . . . . . . . . . . . . . . . . . . . . . . . . . . . . . 199 8.3.8 Deferring extent allocation . . . . . . . . . . . . . . . . . . . . . . . . . . . . . . . 199 8.3.9 Reclaiming unused storage space . . . . . . . . . . . . . . . . . . . . . . . . . 199 Chapter 9. Automating management through tasks and sensors . . . . . 203 9.1 A brief overview of tasks and sensors. . . . . . . . . . . . . . . . . . . . . . . . . . . 204 9.2 The Scheduler . . . . . . . . . . . . . . . . . . . . . . . . . . . . . . . . . . . . . . . . . . . . . 205 9.3 Tasks and sensors . . . . . . . . . . . . . . . . . . . . . . . . . . . . . . . . . . . . . . . . . 205 9.4 Supporting database and tables . . . . . . . . . . . . . . . . . . . . . . . . . . . . . . . 206 9.4.1 The ph_alert table . . . . . . . . . . . . . . . . . . . . . . . . . . . . . . . . . . . . . . 208 9.4.2 The ph_group table . . . . . . . . . . . . . . . . . . . . . . . . . . . . . . . . . . . . . 210 9.4.3 The ph_run table . . . . . . . . . . . . . . . . . . . . . . . . . . . . . . . . . . . . . . . 211 9.4.4 The ph_task table . . . . . . . . . . . . . . . . . . . . . . . . . . . . . . . . . . . . . . 212 9.4.5 The ph_threshold table . . . . . . . . . . . . . . . . . . . . . . . . . . . . . . . . . . 214 9.4.6 The ph_version table. . . . . . . . . . . . . . . . . . . . . . . . . . . . . . . . . . . . 214 9.5 Predefined tasks and sensors . . . . . . . . . . . . . . . . . . . . . . . . . . . . . . . . . 215 9.6 Defining tasks . . . . . . . . . . . . . . . . . . . . . . . . . . . . . . . . . . . . . . . . . . . . . 217 9.6.1 SQL statement . . . . . . . . . . . . . . . . . . . . . . . . . . . . . . . . . . . . . . . . 217 9.6.2 SPL stored procedure . . . . . . . . . . . . . . . . . . . . . . . . . . . . . . . . . . . 218 9.6.3 C or Java functions . . . . . . . . . . . . . . . . . . . . . . . . . . . . . . . . . . . . . 219 9.6.4 Defining a task . . . . . . . . . . . . . . . . . . . . . . . . . . . . . . . . . . . . . . . . 221 9.6.5 Defining a startup task . . . . . . . . . . . . . . . . . . . . . . . . . . . . . . . . . . 223 9.6.6 Defining a sensor . . . . . . . . . . . . . . . . . . . . . . . . . . . . . . . . . . . . . . 223 9.6.7 Defining a startup sensor . . . . . . . . . . . . . . . . . . . . . . . . . . . . . . . . 226 9.6.8 Generating alerts. . . . . . . . . . . . . . . . . . . . . . . . . . . . . . . . . . . . . . . 227 9.6.9 Testing a task or sensor . . . . . . . . . . . . . . . . . . . . . . . . . . . . . . . . . 228 9.6.10 Tasks and sensors tricks. . . . . . . . . . . . . . . . . . . . . . . . . . . . . . . . 228 9.7 Using tasks for embedded systems . . . . . . . . . . . . . . . . . . . . . . . . . . . . 229 9.8 The job runner . . . . . . . . . . . . . . . . . . . . . . . . . . . . . . . . . . . . . . . . . . . . . 230 9.8.1 The ph_bg_jobs table . . . . . . . . . . . . . . . . . . . . . . . . . . . . . . . . . . . 231 9.8.2 The ph_bg_jobs_results table . . . . . . . . . . . . . . . . . . . . . . . . . . . . . 231 9.8.3 Creating a job . . . . . . . . . . . . . . . . . . . . . . . . . . . . . . . . . . . . . . . . . 232 9.8.4 Running a job . . . . . . . . . . . . . . . . . . . . . . . . . . . . . . . . . . . . . . . . . 233 9.8.5 Checking the execution results . . . . . . . . . . . . . . . . . . . . . . . . . . . . 234 Contents vii Chapter 10. Administration of an embedded IBM Informix system . . . . 237 10.1 Applying lessons learned after deployment. . . . . . . . . . . . . . . . . . . . . . 238 10.2 Basic concepts for automating administration. . . . . . . . . . . . . . . . . . . . 239 10.3 Typical post-deployment tasks . . . . . . . . . . . . . . . . . . . . . . . . . . . . . . . 240 10.3.1 Limiting and securing interfaces around Informix . . . . . . . . . . . . . 241 10.3.2 New security options in the Informix data server . . . . . . . . . . . . . 243 10.3.3 Starting and stopping the DBMS. . . . . . . . . . . . . . . . . . . . . . . . . . 245 10.3.4 Automatic startup and shutdown. . . . . . . . . . . . . . . . . . . . . . . . . . 246 10.3.5 Manual startup and shutdown . . . . . . . . . . . . . . . . . . . . . . . . . . . . 253 10.4 The informix user password expires or changes. . . . . . . . . . . . . . . . . . 258 10.4.1 The informix user password has expired . . . . . . . . . . . . . . . . . . . 260 10.4.2 The informix use password has been changed. . . . . . . . . . . . . . . 262 10.4.3 Preventing informix password expiration in the future . . . . . . . . . 265 10.5 Backups and log archives . . . . . . . . . . . . . . . . . . . . . . . . . . . . . . . . . . . 270 10.5.1 Automating database backups with ontape . . . . . . . . . . . . . . . . . 270 10.5.2 Automating backups with onbar . . . . . . . . . . . . . . . . . . . . . . . . . . 271 10.5.3 Exporting a database with dbexport . . . . . . . . . . . . . . . . . . . . . . . 272 10.5.4 Unloading data from tables . . . . . . . . . . . . . . . . . . . . . . . . . . . . . . 273 10.5.5 Moving data to external tables . . . . . . . . . . . . . . . . . . . . . . . . . . . 273 10.5.6 Automating log archives . . . . . . . . . . . . . . . . . . . . . . . . . . . . . . . . 273 10.5.7 Restoring archived data . . . . . . . . . . . . . . . . . . . . . . . . . . . . . . . . 274 10.5.8 Removing unnecessary files . . . . . . . . . . . . . . . . . . . . . . . . . . . . . 276 10.6 Handling excess data . . . . . . . . . . . . . . . . . . . . . . . . . . . . . . . . . . . . . . 277 10.6.1 Monitoring how much space is used . . . . . . . . . . . . . . . . . . . . . . . 277 10.6.2 Adding space to a dbspace before it fills. . . . . . . . . . . . . . . . . . . . 279 10.6.3 Removing old or unnecessary data. . . . . . . . . . . . . . . . . . . . . . . . 282 10.6.4 Rejecting additional data if the database is full . . . . . . . . . . . . . . . 282 10.7 When bad things happen . . . . . . . . . . . . . . . . . . . . . . . . . . . . . . . . . . . 283 10.8 Upgrading software and migrating systems . . . . . . . . . . . . . . . . . . . . . 285 10.9 The deployment utility (ifxdeploy) . . . . . . . . . . . . . . . . . . . . . . . . . . . . . 285 10.10 Cloning instances with ifxclone . . . . . . . . . . . . . . . . . . . . . . . . . . . . . . 285 10.11 Summary . . . . . . . . . . . . . . . . . . . . . . . . . . . . . . . . . . . . . . . . . . . . . . . 286 Chapter 11. Embedding high availability IBM Informix configurations . 287 11.1 High Availability Data Replication and Enterprise Replication . . . . . . . 288 11.2 Maximizing availability. . . . . . . . . . . . . . . . . . . . . . . . . . . . . . . . . . . . . . 290 11.2.1 Protecting the system from database server failures . . . . . . . . . . 290 11.2.2 Protecting the system from site failure . . . . . . . . . . . . . . . . . . . . . 291 11.2.3 Providing multilevel site failure protection . . . . . . . . . . . . . . . . . . . 291 11.3 Maximizing scalability . . . . . . . . . . . . . . . . . . . . . . . . . . . . . . . . . . . . . . 292 11.3.1 Balancing workload to optimize use of resources . . . . . . . . . . . . . 292 11.3.2 Increasing capacity periodically . . . . . . . . . . . . . . . . . . . . . . . . . . 292 11.3.3 Dispersing processing geographically with increased reporting viii Embedding IBM Informix capacity. . . . . . . . . . . . . . . . . . . . . . . . . . . . . . . . . . . . . . . . . . . . . . 292 11.4 Dynamically modifying configuration parameters for a replication server . . 293 11.5 The ifxclone command . . . . . . . . . . . . . . . . . . . . . . . . . . . . . . . . . . . . . 294 Chapter 12. IBM Informix appliances. . . . . . . . . . . . . . . . . . . . . . . . . . . . . 299 12.1 Informix-based appliances: The basics . . . . . . . . . . . . . . . . . . . . . . . . . 300 12.1.1 Use cases for an Informix-based appliance . . . . . . . . . . . . . . . . . 300 12.1.2 The Informix virtual appliance demo base image . . . . . . . . . . . . . 301 12.2 Considerations for an Informix appliance base image . . . . . . . . . . . . . 302 12.2.1 Choosing a suitable Linux distribution. . . . . . . . . . . . . . . . . . . . . . 302 12.2.2 Choosing a suitable Windows edition . . . . . . . . . . . . . . . . . . . . . . 303 12.2.3 Choosing a virtualization technology. . . . . . . . . . . . . . . . . . . . . . . 304 12.3 The Informix Developer Edition virtual appliance . . . . . . . . . . . . . . . . . 306 12.3.1 System requirements and pre-installed software . . . . . . . . . . . . . 307 12.3.2 Installing and running the Informix virtual appliance . . . . . . . . . . . 308 12.3.3 First steps in the Informix Developer Edition virtual appliance . . . 309 12.3.4 The Informix Version 11.70 demonstration cluster environment . . 310 12.3.5 Informix Developer Edition virtual appliance configuration tips . . . 312 12.4 How to create an Informix/Linux-based virtual appliance . . . . . . . . . . . 314 12.4.1 Initial setup of the Ubuntu JeOS VMware image . . . . . . . . . . . . . 315 12.4.2 Basic customization of the Ubuntu JeOS image . . . . . . . . . . . . . . 322 12.4.3 (Optional) Adding a graphical (GUI) desktop environment . . . . . . 328 12.4.4 Installing Informix Version 11.70 and Client SDK on Ubuntu Version 10.04 . . . . . . . . . . . . . . . . . . . . . . . . . . . . . . . . . . . . . . . . . . . . . . . . 331 12.4.5 Installing and configuring the Open Admin Tool for Informix . . . . 333 12.4.6 Preparing your Informix virtual appliance for re-distribution . . . . . 335 12.4.7 Informix/Ubuntu virtual appliance tips and tricks section . . . . . . . 343 12.5 An USB memory stick-based Informix/Linux appliance. . . . . . . . . . . . . 345 12.5.1 Which building blocks to choose . . . . . . . . . . . . . . . . . . . . . . . . . . 345 12.5.2 Creating a QEMU-based Informix virtual appliance . . . . . . . . . . . 346 12.6 Creating an Informix/Windows-based appliance . . . . . . . . . . . . . . . . . . 356 12.6.1 Initial setup of the Windows Server 2008 Core VMware image . . 356 12.7 IBM Software Assembly Toolkit and real Informix appliances. . . . . . . . 372 12.7.1 IBM Software Assembly Toolkit components . . . . . . . . . . . . . . . . 372 12.7.2 IBM Software Assembly Toolkit usage scenario . . . . . . . . . . . . . . 375 12.7.3 Summary. . . . . . . . . . . . . . . . . . . . . . . . . . . . . . . . . . . . . . . . . . . . 376 Appendix A. SQL administration commands and scripts . . . . . . . . . . . . 377 SQL adminstration API commands . . . . . . . . . . . . . . . . . . . . . . . . . . . . . . . . 378 Script to build an instance . . . . . . . . . . . . . . . . . . . . . . . . . . . . . . . . . . . . . . . 381 Appendix B. IBM Informix Version 11.50 installation and configuring client connectivity . . . . . . . . . . . . . . . . . . . . . . . . . . . . . . . . . . . . . . 387 Contents ix Informix Version 11.50 installation . . . . . . . . . . . . . . . . . . . . . . . . . . . . . . . . . 388 Technical installation requirements . . . . . . . . . . . . . . . . . . . . . . . . . . . . . . . . 388 Interactive installations methods . . . . . . . . . . . . . . . . . . . . . . . . . . . . . . . . . . 388 Launchpad . . . . . . . . . . . . . . . . . . . . . . . . . . . . . . . . . . . . . . . . . . . . . . . . 389 Installation scripts . . . . . . . . . . . . . . . . . . . . . . . . . . . . . . . . . . . . . . . . . . . 389 Typical and custom installation options. . . . . . . . . . . . . . . . . . . . . . . . . . . 389 GUI or console mode installation . . . . . . . . . . . . . . . . . . . . . . . . . . . . . . . 389 Custom installations and the Deployment Wizard. . . . . . . . . . . . . . . . . . . 390 Silent installation . . . . . . . . . . . . . . . . . . . . . . . . . . . . . . . . . . . . . . . . . . . . . . 391 Recording a Windows response file . . . . . . . . . . . . . . . . . . . . . . . . . . . . . 391 Performing a silent installation on Windows . . . . . . . . . . . . . . . . . . . . . . . 392 Uninstalling . . . . . . . . . . . . . . . . . . . . . . . . . . . . . . . . . . . . . . . . . . . . . . . . 393 Modifying a Windows response file . . . . . . . . . . . . . . . . . . . . . . . . . . . . . . 394 Recording a UNIX response file . . . . . . . . . . . . . . . . . . . . . . . . . . . . . . . . 397 Performing a silent installation on UNIX . . . . . . . . . . . . . . . . . . . . . . . . . . 398 Uninstalling . . . . . . . . . . . . . . . . . . . . . . . . . . . . . . . . . . . . . . . . . . . . . . . . 399 Modifying a UNIX response file . . . . . . . . . . . . . . . . . . . . . . . . . . . . . . . . . 399 Installing multiple copies of Informix. . . . . . . . . . . . . . . . . . . . . . . . . . . . . . . . 404 Client applications . . . . . . . . . . . . . . . . . . . . . . . . . . . . . . . . . . . . . . . . . . . . . 406 Installing Client SDK and Informix Connect on Windows . . . . . . . . . . . . . 406 Uninstalling Client SDK and Informix Connect on Windows . . . . . . . . . . . 407 Installing Client SDK and Informix Connect on UNIX . . . . . . . . . . . . . . . . 408 Uninstalling Client SDK and Informix Connect on UNIX . . . . . . . . . . . . . . 409 IBM Informix Java Database Connectivity (JDBC) Driver . . . . . . . . . . . . . . . 409 Silent installation of IBM Informix JDBC Driver . . . . . . . . . . . . . . . . . . . . . 410 Uninstallation of IBM Informix JDBC Driver . . . . . . . . . . . . . . . . . . . . . . . 410 Additional Informix installation procedures. . . . . . . . . . . . . . . . . . . . . . . . . . . 411 The Informix Lightweight Installer for Windows. . . . . . . . . . . . . . . . . . . . . 411 Informix installation on Mac OS X . . . . . . . . . . . . . . . . . . . . . . . . . . . . . . . 411 Informix Version 11.50 script-based invisible deployment . . . . . . . . . . . . . . . 415 Using a deployment script on UNIX . . . . . . . . . . . . . . . . . . . . . . . . . . . . . 416 Lightweight Installer on Windows . . . . . . . . . . . . . . . . . . . . . . . . . . . . . . . 420 Setting up a database using dbaccess. . . . . . . . . . . . . . . . . . . . . . . . . . . . . . 425 Setting up the environment for ODBC . . . . . . . . . . . . . . . . . . . . . . . . . . . . . . 425 Setting up the environment for ODBC on Windows . . . . . . . . . . . . . . . . . 426 Setting up the environment for ODBC on UNIX . . . . . . . . . . . . . . . . . . . . 426 Setting up and connecting to Informix server using JDBC . . . . . . . . . . . . 427 Appendix C. Event classes and event IDs . . . . . . . . . . . . . . . . . . . . . . . . 431 Event classes . . . . . . . . . . . . . . . . . . . . . . . . . . . . . . . . . . . . . . . . . . . . . . . . . 432 Glossary . . . . . . . . . . . . . . . . . . . . . . . . . . . . . . . . . . . . . . . . . . . . . . . . . . . . 453 Abbreviations and acronyms . . . . . . . . . . . . . . . . . . . . . . . . . . . . . . . . . . . 457 x Embedding IBM Informix Related publications . . . . . . . . . . . . . . . . . . . . . . . . . . . . . . . . . . . . . . . . . . 461 IBM Redbooks . . . . . . . . . . . . . . . . . . . . . . . . . . . . . . . . . . . . . . . . . . . . . . . . 461 Other publications . . . . . . . . . . . . . . . . . . . . . . . . . . . . . . . . . . . . . . . . . . . . . 461 Online resources . . . . . . . . . . . . . . . . . . . . . . . . . . . . . . . . . . . . . . . . . . . . . . 462 How to get Redbooks . . . . . . . . . . . . . . . . . . . . . . . . . . . . . . . . . . . . . . . . . . . 462 Help from IBM . . . . . . . . . . . . . . . . . . . . . . . . . . . . . . . . . . . . . . . . . . . . . . . . 463 Index . . . . . . . . . . . . . . . . . . . . . . . . . . . . . . . . . . . . . . . . . . . . . . . . . . . . . . . 465 Contents xi xii Embedding IBM Informix Notices This information was developed for products and services offered in the U.S.A. IBM may not offer the products, services, or features discussed in this document in other countries. Consult your local IBM representative for information on the products and services currently available in your area. Any reference to an IBM product, program, or service is not intended to state or imply that only that IBM product, program, or service may be used. Any functionally equivalent product, program, or service that does not infringe any IBM intellectual property right may be used instead. However, it is the user's responsibility to evaluate and verify the operation of any non-IBM product, program, or service. IBM may have patents or pending patent applications covering subject matter described in this document. The furnishing of this document does not give you any license to these patents. You can send license inquiries, in writing, to: IBM Director of Licensing, IBM Corporation, North Castle Drive, Armonk, NY 10504-1785 U.S.A. The following paragraph does not apply to the United Kingdom or any other country where such provisions are inconsistent with local law: INTERNATIONAL BUSINESS MACHINES CORPORATION PROVIDES THIS PUBLICATION "AS IS" WITHOUT WARRANTY OF ANY KIND, EITHER EXPRESS OR IMPLIED, INCLUDING, BUT NOT LIMITED TO, THE IMPLIED WARRANTIES OF NON-INFRINGEMENT, MERCHANTABILITY OR FITNESS FOR A PARTICULAR PURPOSE. Some states do not allow disclaimer of express or implied warranties in certain transactions, therefore, this statement may not apply to you. This information could include technical inaccuracies or typographical errors. Changes are periodically made to the information herein; these changes will be incorporated in new editions of the publication. IBM may make improvements and/or changes in the product(s) and/or the program(s) described in this publication at any time without notice. Any references in this information to non-IBM Web sites are provided for convenience only and do not in any manner serve as an endorsement of those Web sites. The materials at those Web sites are not part of the materials for this IBM product and use of those Web sites is at your own risk. IBM may use or distribute any of the information you supply in any way it believes appropriate without incurring any obligation to you. Information concerning non-IBM products was obtained from the suppliers of those products, their published announcements or other publicly available sources. IBM has not tested those products and cannot confirm the accuracy of performance, compatibility or any other claims related to non-IBM products. Questions on the capabilities of non-IBM products should be addressed to the suppliers of those products. This information contains examples of data and reports used in daily business operations. To illustrate them as completely as possible, the examples include the names of individuals, companies, brands, and products. All of these names are fictitious and any similarity to the names and addresses used by an actual business enterprise is entirely coincidental. COPYRIGHT LICENSE: This information contains sample application programs in source language, which illustrate programming techniques on various operating platforms. You may copy, modify, and distribute these sample programs in any form without payment to IBM, for the purposes of developing, using, marketing or distributing application programs conforming to the application programming interface for the operating platform for which the sample programs are written. These examples have not been thoroughly tested under all conditions. IBM, therefore, cannot guarantee or imply reliability, serviceability, or function of these programs. © Copyright IBM Corp. 2011. All rights reserved. xiii Trademarks IBM, the IBM logo, and ibm.com are trademarks or registered trademarks of International Business Machines Corporation in the United States, other countries, or both. These and other IBM trademarked terms are marked on their first occurrence in this information with the appropriate symbol (® or ™), indicating US registered or common law trademarks owned by IBM at the time this information was published. Such trademarks may also be registered or common law trademarks in other countries. A current list of IBM trademarks is available on the Web at http://www.ibm.com/legal/copytrade.shtml The following terms are trademarks of the International Business Machines Corporation in the United States, other countries, or both: AIX® Cognos® DataBlade® DB2 Universal Database™ DB2® developerWorks® Distributed Relational Database Architecture™ Domino® DRDA® eServer™ i5/OS® IBM® IMS™ Informix® iSeries® Lotus® OS/400® PowerPC® pSeries® Redbooks® Redbooks (logo) Sametime® Tivoli® WebSphere® zSeries® ® The following terms are trademarks of other companies: Adobe, the Adobe logo, and the PostScript logo are either registered trademarks or trademarks of Adobe Systems Incorporated in the United States, and/or other countries. Snapshot, and the NetApp logo are trademarks or registered trademarks of NetApp, Inc. in the U.S. and other countries. Java, and all Java-based trademarks are trademarks of Sun Microsystems, Inc. in the United States, other countries, or both. Microsoft, Windows, and the Windows logo are trademarks of Microsoft Corporation in the United States, other countries, or both. Itanium, Intel logo, Intel Inside logo, and Intel Centrino logo are trademarks or registered trademarks of Intel Corporation or its subsidiaries in the United States and other countries. UNIX is a registered trademark of The Open Group in the United States and other countries. Linux is a trademark of Linus Torvalds in the United States, other countries, or both. Other company, product, or service names may be trademarks or service marks of others. xiv Embedding IBM Informix Preface Many IBM® clients, Business Partners, and independent software vendors are looking for a robust database management system (DBMS) that can be easily embedded into their applications and software solutions. This situation is becoming a requirement as more and more companies operate globally. Companies now have employees or customers all around the world that need access to their systems and applications, and it is difficult to have IT support in every location at all times. Embedded applications and software products are running today in industries such as telecommunications, retail, health care, and government. The real requirement is for applications with embedded databases that require little or no administration, have small disk and memory footprints, use storage resources efficiently, have excellent performance characteristics, and are highly reliable. Software developers must be able to set up these applications so that they can be used without needing an onsite database system administrator. Some examples of other requirements for such applications and database system are as follows: Easy to be silently installed, configured, and packaged with the application Run seamlessly, with little or no administration Have full relational database functionality Low cost and a low total cost of ownership Run in multiple operating environments Excellent performance Require minimal memory and storage for execution Highly reliable Scalable to enable growth Easy to use The IBM Informix® database server supports these requirements and is doing so for many companies today. The minimal administration requirements of Informix enable clients to deploy thousands of Informix instances world-wide, embedded in applications in locations where there are no technical resources to support the database. With the help of more than 2,500 Business Partners, numerous Informix database server instances have been deployed in enterprises across many industries. Most of these deployments are “invisible”, that is, the user does not know that an Informix instance is running behind the scenes. © Copyright IBM Corp. 2011. All rights reserved. xv For example: If you have ever placed a cell phone call in North America, Europe, or Asia, it is likely that an application with an embedded Informix database validated your call information. Database applications in emergency call centers have relied on enterprise data replication features in Informix to ensure that critical systems are available 24x7. IP telephony call-processing systems use Informix as their embedded database server, as it can handle massive transaction volumes without sacrificing performance. It is highly likely that an Informix database verified your major credit card transactions or registered your purchase at a point-of-sale application in a retail store. Informix is the default embedded content store for IBM Cognos® Express, which is an integrated business intelligence and planning solution for midsize companies. In this IBM Redbooks® publication, we provide an overview of the Informix Version 11.7 database server. In particular, we introduce the technological architecture, and describe in detail several of the new functions and features that support Informix as a robust and powerful embeddable DBMS. Many of these features are unique in the industry today and can create a business advantage for clients. Informix is designed to help businesses make better use of their existing information assets as they move into an on demand business environment. Meeting these requirements calls for a database server that is flexible and can accommodate change and growth in applications, data volume, and number of concurrent users. It must be able to scale in performance as well as in functionality. It is particularly important in an embedded DBMS market to provide flexibility, performance, and minimal administrative requirements. This translates to a stable environment and minimizes the cost to operate the database server. In addition, Informix delivers proven technology that efficiently integrates new and complex data directly into the database. It also helps businesses lower their total cost of ownership (TCO) by using its well-regarded general ease of use and administration, as well as its support of existing standards for development tools and systems infrastructure. Informix is a development-neutral environment and supports a comprehensive array of application development tools for rapid deployment of applications under Linux®, Microsoft® Windows®, and UNIX® operating environments. xvi Embedding IBM Informix The team who wrote this book This book was produced by a team of specialists from around the world working at the International Technical Support Organization, San Jose Center. Whei-Jen Chen is a Project Leader at the International Technical Support Organization, San Jose Center. She has extensive experience in application development, database design and modeling, and IBM DB2® system administration. Whei-Jen is an IBM Certified Solutions Expert in Database Administration and Application Development, and an IBM Certified IT Specialist. Oluwatosin Ajayi is a member of the IBM Informix Development Team in Lenexa, KS. He has worked extensively on installation and deployment of IBM Informix. Tosin has been closely involved with customers and business partners who have been deploying IBM Informix as an embedded solution. Mirav Kapadia is an Advisory Software Engineer in the IBM Informix Embeddability, Virtualization, and Cloud Computing team, based in Lenexa, KS. He has been working with Informix product development teams for more than a decade. He has also contributed to the Informix community using presentations, products demonstrations at International Informix Users Group, IBM Information On Demand conferences, and IBM developerWorks® articles. Mirav is also an IBM Certified System Administrator for Informix Version 11. Preface xvii Alexander Koerner is a Consulting IT-Specialist in the IBM Germany Information Management Technical Sales organization, based in Munich, Germany. Joining Informix in October 1989, he was instrumental in starting and leading the SAP/R3 on Informix project and has contributed to the success of many strategic projects across the region. Alexander currently focuses on Informix virtual appliances and actively supports Informix Continuous Availability, Informix SOA integration, and Database Extensions technology. His activities include contributions to several IBM Redbooks publications, presentations at conferences and events, such as the IBM Information On Demand Conference, IIUG Conference, and IBM Informix Infobahns and regional IUG meetings. Alexander is a member of the German Informatics Society and holds a Master’s degree in Computer Science from the Technical University of Berlin. Jacques Roy is an Informix Technical Product Manager in Competitive Technologies and Enablement in the Informix Development organization. He is the author of IDS.2000: Server-Side Programming in C and the lead author of Open-Source Components for IDS 9.x. He is also the author of multiple technical developerWorks articles on a variety of subjects. Jacques is a frequent speaker at data management conferences, IDUG conferences, and user group meetings. Dick Snoke is a Senior Certified IT Specialist in the ChannelWorks group in the Unites States. Dick has 33 years of experience in the software industry. That experience includes activities such as managing, developing, and selling operating systems and DBMS software for mainframes, minicomputers, and personal computers. His current focus is on the IBM DBMS products and, in particular, the Informix database products. Dick also supports related areas, such as information integration and high availability solutions. Acknowledgement Thanks to the following people for their contributions to this project: Fred Ho, Cindy Fung, John Miller iii, Damian Madden, Amit Vashishtha IBM Software Group, USA xviii Embedding IBM Informix Emma Jacobs International Technical Support Organization, San Jose Center Thanks to the authors of the previous editions of this book. The authors of the first edition, Embedding IBM Informix Dynamic Server: An Introduction, published in March 16, 2009, were: Chuck Ballard, Oluwatosin Ajayi, Guy Bowerman, Alexander Koerner, Jacques Roy, Dick Snoke Now you can become a published author, too! Here's an opportunity to spotlight your skills, grow your career, and become a published author—all at the same time! Join an ITSO residency project and help write a book in your area of expertise, while honing your experience using leading-edge technologies. Your efforts will help to increase product acceptance and customer satisfaction, as you expand your network of technical contacts and relationships. Residencies run from two to six weeks in length, and you can participate either in person or as a remote resident working from your home base. Find out more about the residency program, browse the residency index, and apply online at: ibm.com/redbooks/residencies.html Comments welcome Your comments are important to us! We want our books to be as helpful as possible. Send us your comments about this book or other IBM Redbooks publications in one of the following ways: Use the online Contact us review Redbooks form found at: ibm.com/redbooks Send your comments in an email to: [email protected] Preface xix Mail your comments to: IBM Corporation, International Technical Support Organization Dept. HYTD Mail Station P099 2455 South Road Poughkeepsie, NY 12601-5400 Stay connected to IBM Redbooks Find us on Facebook: http://www.facebook.com/IBMRedbooks Follow us on Twitter: http://twitter.com/ibmredbooks Look for us on LinkedIn: http://www.linkedin.com/groups?home=&gid=2130806 Explore new Redbooks publications, residencies, and workshops with the IBM Redbooks weekly newsletter: https://www.redbooks.ibm.com/Redbooks.nsf/subscribe?OpenForm Stay current on recent Redbooks publications with RSS Feeds: http://www.redbooks.ibm.com/rss.html xx Embedding IBM Informix Summary of changes This section describes the technical changes made in this edition of the book and in previous editions. This edition might also include minor corrections and editorial changes that are not identified. Summary of Changes for SG24-7666-01 for Embedding IBM Informix as created or updated on February 16, 2011. February 2011, Second Edition This revision reflects the addition, deletion, or modification of new and changed information described below. New information Covers the new embeddability features introduced in IBM Informix Version 11.7, such as storage provisioning, online defragmentation, new database scheduler procedures, and new tools, including Deployment Assistant and enhancements to Deployment Utility. Covers newer features introduced up to Informix Version 11.50.xC7, such as compression, external tables, and conversion guard. Changed information Reorganized chapters for better understanding and ease-of-flow. Moved SQL Administration API commands to an appendix. Updated Informix virtual appliance using Ubuntu. © Copyright IBM Corp. 2011. All rights reserved. xxi xxii Embedding IBM Informix 1 Chapter 1. Introduction In a traditional server-based database system designed for high performance, reliability, and scalability, configuring and maintaining the database requires professional knowledge of database design and dynamics of application behavior. There is continual demand for database-driven, self-contained applications that should work “out-of-the-box” without any user setup or database administrator. In an embedded scenario, independent software vendors and application developers integrate the database server with their application such that the database server is “invisible” to the user of the application and requires minimal or no administration. There are no IT personnel required to manage or administer the database server. IBM Informix database server is the IBM flagship database solution for industrial-strength, embedded computing. This is the claim made in IBM product literature and the claim is not made lightly. Informix is used extensively in embedded environments and in situations with extreme availability demands, such as telecommunications, emergency services, health care, and credit card and retail transactions. Informix is chosen for these scenarios because it is easy to embed in other applications, is extremely reliable, and has a proven performance record in limited resource environments. In this book, we describe some of the features that make Informix database server particularly well suited for embedding, and some of the ways to automate administration and embed Informix in your applications. © Copyright IBM Corp. 2011. All rights reserved. 1 1.1 The need for embedding database services Complex applications frequently rely on database services to manage their data. When applications are sold and delivered as complete solutions, the users typically do not want to be concerned with how they work, what components and services are used, or the operating system and hardware on which they run. The better hidden the way an application interacts with components such as databases, the operating system, and network infrastructure, the more the overall usability of the application improves. As the processing power and price performance of hardware improves, the market for powerful embedded databases expands correspondingly. The possibilities opened up by the advanced data processing and high availability of data servers extends the functionality of consumer devices. Examples are smart devices such as the BlackBerry and iPhone. Applications running on these devices now have the possibility of organizing, updating, and accessing local copies of data using embedded data servers and making use of the advanced replication technologies these data servers support to maintain a synchronized and highly available view of data across an enterprise. Applications that read water and electric meters are examples of such embedded applications. Database administration is expensive, so the less direct action a user or database administrator needs to take to maintain the data used by their application or solution, the lower the total cost of ownership (TCO) becomes. When solutions are deployed to customer sites where DBA skills might not be present, this consideration becomes more important. As devices with embedded data servers increasingly move into the hands of non-technical consumers, access to direct DBA skills is no longer an option. Therefore, these devices must take care of themselves and have automated procedures to cope with any error or other unexpected conditions that arise. As service-oriented architecture (SOA) becomes commonplace, there is increased adoption of the notion of Data as a Service (DaaS). DaaS means the physical location of the database becomes less important and users consume database services at a layer abstracted from the database management system. In some DaaS implementations, the data server is effectively embedded in the service application and so many of the requirements of an embedded database need to be met. Independent software vendors (ISVs) are aware of the significant advantages of embedding a database server directly within their application. They can save significant costs during development, quality assurance, and support by controlling the exact version of the database server that their application supports. They do not have to worry about the installation, configuration, and 2 Embedding IBM Informix maintenance for a multitude of database servers available in the market. Their customers can actually focus on the value proposition for the application rather than deal with the hassle of installing and evaluating different databases. In short, by embedding the database server in their application, ISVs not only save significant engineering costs, but also bring their applications faster to the market and with a competitive edge. 1.1.1 Virtualization Another trend that results in a need for embedding database services is the increased use of virtualization. Virtualization is the result of operating systems and applications that are abstracted into virtual machines running as guests on physical machines, as shown in Figure 1-1. Figure 1-1 Applications running as virtual appliances The reasons for virtualizing systems range among the following factors: Hardware consolidation Saving power and rack space by consolidating older machines into multiple virtual machines running on more efficient and new hardware Flexibility provided by making an application or solution available as a self-contained and hardware independent virtual appliance When solutions are provided as self-contained appliances, there is an expectation that the components of the appliance should not require individual maintenance, but that the appliance should work with the embedded components embedded and automatically maintained. Chapter 1. Introduction 3 The growing importance of this topic is reflected by an in-depth section on Informix virtual appliances in Chapter 12, “IBM Informix appliances” on page 299. 1.2 What is an embedded database An embedded database can be described as one that works exclusively with a single application or in an appliance. In this context, an appliance is defined as a dedicated embedded system with a specific range of functionality, which can be implemented on a physical device or a virtual machine running on a physical host machine. 1.2.1 One size does not fit all There are various types of embedded databases, and the required characteristics will depend on the nature of the application and the hardware and software resources available. Smaller devices, such as low-end cell phones with memory capacities in tens of megabytes or less, will sacrifice some of the capabilities of fully featured data servers in favor of extremely small footprints. A limited set of data manipulation functionality is provided in a more compact package. Conversely, larger scale appliances (such as high-end IP telephony systems) may be supplied with the hardware resources of a powerful PC. Here, the automation features of an embedded database become more important than the memory or disk footprint. In this book, we take a balanced approach and assume that hardware resources, functionality, and automatic features are all important considerations for embedded databases. This positions Informix as an optimal solution for these requirements in all but the smallest classes of consumer devices. 1.2.2 Requirements of an embedded database The primary requirements of an embedded database can broadly be described as those in the following list: Be invisible to the user. The database server is viewed as an internal component of the application or appliance, and not externalized to the user. 4 Embedding IBM Informix Require minimal or zero administration and downtime. As an internal component of an application, the database server should be robust. The database server is “hidden”. If the database server fails or crashes, there is no administrator or manual intervention to fix the situation. It should be capable of taking care its own maintenance wherever possible, with a minimal level of manual intervention, that is, it should always be on, and never require its own downtime independently from the host application. Have a small footprint, which minimizes the use of memory and disk space. Embedded database services compete for machine resources, such as memory and disk space, with other application components. So, in some instances, they should be on a dedicated device where cost-based design decisions limit the hardware specifications to a minimum. The storage and memory footprints for the embedded database server should match the hardware and software environments in which it will be operating. Be easy to deploy with an application. There should be a customizable and silent installation process. Just as database server maintenance tasks should not be externalized to users of embedded databases, database server installation should be a seamless part of the application installation process. Therefore, the database server installation and database setup should support scripted and unattended methods of deploying the software. Be programmatically configurable. There should be sufficient programmable and autonomic capabilities in the database server to administer it directly from within the application. These should guarantee that the embedded database server can be recovered and made fully operational quickly. If database administration tasks are required, the administration interface should be programmable (preferably with a well defined and comprehensive API, with meaningful return codes and capable of error handling). As such, it would allow the host application code to handle many or all of the administration tasks. The database server should optimize the use of resources to provide adequate performance in a constrained environment. As well as having a small disk and memory footprint, an embedded database server needs to be able to handle low or out of memory situations gracefully and predictably, and allow a host application to receive warnings of low and out of memory situations by way of return codes, with mechanisms for recovery. The database server should be highly reliable, scalable with excellent operating performance. It should chug along continuously with the same performance characteristics as that of the application with which it was designed to work. There can be no performance degradation. Chapter 1. Introduction 5 Keep data protected from unauthorized access. Multi-user systems and applications with public interfaces need to ensure data is accessed in a predictable and authorized fashion. Security standards may apply in the environment where the solution is deployed. These standards can apply to all components of the application. 1.3 Types of embedding Database services can be embedded into an application in three ways: Invisible (or deep) embedding Integrated administration Bundled For the purposes of this book, we are only concerned with the first two ways, because both take advantage of methods to reduce the database administration required by users. However, these techniques may be useful for DBAs wanting to automate any administrative processes and procedures. 6 Embedding IBM Informix 1.3.1 Invisible (or deep) embedding With a deeply embedded database server, there is no database administrator. Any required administration is done programmatically or is scripted. Users are not aware of, or at least need not be concerned with, the database server or the database. This type of embedding, shown in Figure 1-2 is the subject of much of this book. Figure 1-2 Deeply embedded database application: Conceptual Deep embedding can be seen as the most demanding situations of embedded database environments. Every possible usage scenario and error condition needs to be taken into account and handled by the application. An example of deep embedding is a consumer electronics device designed to operate on a stand-alone basis, independent of any network support. A key advantage of Informix for this purpose is ease of use. The database server component of the application solution is simple to use and does not require maintenance or awareness from the user. In this scenario, database technical support should be almost unnecessary. The embedded solution is expected only to work. 1.3.2 Integrated administration In this scenario, the data server administration is included with the application administration. The application provider includes all the necessary administration components (for example backup tools) in the application administration tooling. Chapter 1. Introduction 7 The user is aware of the data server and the database, but does not have to be trained on the product, because the application includes all that is required. Examples of an integrated solution include software products designed to run in a networked environment, with high availability and backup requirements, where the IT staff is expected to retain some control over data archiving and recovery. The data server typically remains a dedicated component of the application. See Figure 1-3. Figure 1-3 Integrated database application: Conceptual 1.3.3 Bundled Here the database server is bundled with the application, but the administration and tuning is handled by the user or a DBA. 8 Embedding IBM Informix This scenario provides the greatest flexibility to the user, at the cost of ease of use. DBA skills are required to maintain the application, with the advantage that the data server can be integrated with other applications, and the data stored in the database can be mined for other purposes, as shown in Figure 1-4. The DBA maintains full control over the data, archiving, and recovery. Figure 1-4 Included database application: Conceptual Examples of included solutions are large scale integrated supply chain and customer relationship management (CRM) solutions, where multiple data servers are supported and the customer can choose the provider that best suits their requirements. 1.4 The topics of this book As of the writing of this book, Informix Version 11.70.xC1 is the latest release of the Informix database server. The content described in the following chapters supersedes Informix Version 11.5. Here is a brief overview of each chapter so that you can select those topics of the most interest to you: Chapter 2, “Embeddability basics” on page 13 covers the embeddability basics, focusing on the Informix architecture and the features that make it well-suited for embedding. This chapter also gives an overview about the new Informix product editions available in Version 11.70.xC1. Chapter 1. Introduction 9 Chapter 3, “Preparing to embed IBM Informix” on page 35 describes the preoperational tasks and design considerations for embedding Informix, including migration, platform, installation and deployment, user administration, multiple instances versus multiple databases, performance, database extensions, application administration, and capacity planning. Chapter 4, “Installation strategies” on page 63 describes installation strategies, discussing the different methods of installing IBM Informix. We include the graphical and silent strategies, and describe how they relate to embedding. We include platform-specific installation characteristics for Mac OS X, UNIX, and Windows, as well as installation and uninstallation of client and driver components, such as CSDK and JDBC. Chapter 5, “Deployment” on page 95 reviews the steps to successfully deploy Informix as part of a complete solution. Topics include deployment strategies of bundled, integrated, and invisible installations, and how to implement them. We discuss the components of a solution that require packaging, silent installation, use of deployment scripts, Deployment Assistant, Deployment Utility, deploying client applications, and post-deployment activities, such as relocating data spaces. Chapter 6, “IBM Informix configuration for embeddability” on page 147 describes Informix autonomic configuration parameters and features that help make Informix an administrator-free database system. This section describes multiple autonomic features, such as automatic detection of stale statistics, new database scheduler tasks, improving name service connection time, and so on. Chapter 7, “The SQL administration API” on page 167 looks at the SQL administration API. It includes a reference guide to the task() and admin() SQL functions, and shows examples of calling those functions from shell scripts and Java™ programs. Appendix A, “SQL administration commands and scripts” on page 377 enumerates the SQL Administration API commands available in Informix Version 11.7. Chapter 8, “Memory and storage management” on page 183 describes storage and memory considerations. It includes the latest autonomic storage management features introduced in Informix Version 11.7, such as storage provisioning, online defragmentation, optimizing data storage, and managing table extents. Chapter 9, “Automating management through tasks and sensors” on page 203 describes the task scheduler and how to collect information with sensors. Starting with an overview of tasks and sensors, we describe the supporting tables in the sysadmin database, the predefined tasks, and sensors provided to automate tasks (such as update statistics, compressing tables, and terminating idle sessions automatically). 10 Embedding IBM Informix Chapter 10, “Administration of an embedded IBM Informix system” on page 237 describes post-deployment considerations and typical post-deployment tasks, including embedded methods of starting and stopping Informix, ways to deal with unexpected events (such as password expiration), and automation of database monitoring and administration tasks (such as data growth and backup and recovery). This chapter gives an overview about upgrading to a different Informix version or fix pack, how to quickly revert to your source server version after a failed upgrade, and about the ifxcollect tool for collecting data for specific Informix problems. Chapter 11, “Embedding high availability IBM Informix configurations” on page 287 gives an overview about the excellent high-availability solutions available in Informix. This chapters briefly describes High-Availability Data Replication, Enterprise Replication, Continuous Availability, and Flexible Grid. Chapter 12, “IBM Informix appliances” on page 299 takes an in-depth look at Informix-based virtual appliances. Starting with some basic definitions and use-cases, we describe how to create a Linux-based Informix VMware image, how to create an Informix virtual appliance that can be run from an USB memory stick, and the no-cost Informix Developer Edition virtual appliance. We suggest that you read the entire book if you are considering constructing an embedded environment. However, we feel it equally important if you are seeking information to develop a strategic direction for your organization regarding embedded applications. Understanding the issues and considerations presented in this book is vital to get you started in the right direction, enable you to avoid problem areas, and to design and implement your environment much faster and easier. If you have not already selected Informix as the database for your embedded systems, take a look at Chapter 2, “Embeddability basics” on page 13 to understand why it is a good choice. Chapter 1. Introduction 11 12 Embedding IBM Informix 2 Chapter 2. Embeddability basics In this chapter, we describe some of the basic concepts that will be used in this book, including a brief overview of IBM Informix database server’s architecture and terminology, and a look at why Informix is so well suited for embedding. © Copyright IBM Corp. 2011. All rights reserved. 13 2.1 Informix architecture Before looking at the different aspects of embedding that must be reviewed when planning for an embedded system, you need to understand the Informix architecture, because it impacts the way the overall embedded system is viewed. Informix implements a client-server architecture that optimizes the use of resources to provide a high level of performance and scalability. An overview of the Informix architecture is shown in Figure 2-1. CPU AIO UD-VP ENCRYPT Virtual processors Shared Memory Session Info Buffers CPU-1 CPU-2 SQL Cache CPU-3 Message CPU-4 Figure 2-1 IBM Informix high-level architecture The figure includes user connections, virtual processors (partial list), memory structures, processors, and disks. The impact of the architecture on an embedded system is as follows: Application connections Because the server is separate from the application, you must decide on the type of connections that should be used by the applications. The application connection can be done through mechanisms such as shared memory, stream/named pipe, or network. The choice of connection type impacts performance, the use of multiple connections in one application, and security concerns. 14 Embedding IBM Informix Database server processes In a UNIX-type system (UNIX, Linux, or Macintosh), the Informix instance consists of multiple multi-threaded processes, each representing a virtual processor. On Windows systems, the Informix instance consists of one process with multiple threads, each representing a virtual processor. This would impact, for example, how system monitoring is done. Shared memory allocation Informix creates an in-memory structure using shared memory. The operating system must be configured properly to support shared memory, so the maximum allowed allocation size might need to be changed. Disk usage Informix can allocate disk space either through physical or logical devices, or through files in a file system. This choice has an impact on performance, database server configuration, and ease of administration. For more information about the Informix architecture and features, the following books provide an excellent starting point: Informix Dynamic Server 11: Advanced Functionality for Modern Business, SG24-7465 Customizing the Informix Dynamic Server for Your Environment, SG24-7522 These two books and other excellent books can be downloaded for at no cost from the following website: http://www.redbooks.ibm.com Once there, do a search for Informix and find all the titles that relate to Informix. Sorting by date will give you the most recent ones first. 2.2 Terminology In this section, we give some of the terms that are used when discussing and defining database embedding technology in this book. 2.2.1 Virtualization Virtualization is, from a computer science and engineering perspective, the abstraction of a physical computing environment using generated virtual resources to create a logical simulated environment. Chapter 2. Embeddability basics 15 There are many types of virtualization, but they all do one of two things: Create a smaller working environment. Create a larger working environment. Multiple working environments created from a single physical computing environment result in a smaller but similar working environment, whereas a larger working environment is built upon many physical computing environments to create one working environment. So virtualization, in a general sense, either creates a smaller or larger working environment that is similar to the underlying hardware. There are many types of virtualization being used today. The most common types of virtualization are: Server virtualization Server virtualization creates multiple virtual servers within a single physical server. These virtual servers are independent working environments that use virtual resources, where the virtual resources are an abstraction of the underlying hardware from the physical server. As a result, the virtual resources share the same characteristics as underlying hardware. So the virtual server is exactly like the physical server, only smaller in capacity. The types of virtual resources that are used by the virtual server include CPU and memory, which can be shared or dedicated resources among the virtual servers hosted on a single physical server. Storage virtualization Storage virtualization used in enterprise environments is essentially an amalgamation of physical storage. Multiple physical storage devices are combined into a single logical resource. This single logical resource appears as a single storage device to the system user. The use of logical resources creates an abstraction by hiding the complexities of the physical storage devices. This abstraction improves the management and administration of the storage devices. Network virtualization Network virtualization usually involves the splitting of available bandwidth into separate smaller channels. The smaller channels allow the network to be shared among different devices, which include servers and storage arrays. However, even though the bandwidth is shared, the separate channels can be isolated from each other. This helps improve the network resource utilization and the management of the network infrastructure. See 1.3.1, “Invisible (or deep) embedding” on page 7 for more information. 16 Embedding IBM Informix 2.2.2 Silent installation Silent installation is an installation method requiring no user interaction with the setup program. You can install Informix and custom options without the need for user interaction. The installation is driven by a response file that declares the desired actions. It is a useful type of installation for an embedded database server. 2.2.3 Deep embedding Relative to a database, deep embedding means there is no visibility of the database server to users and no ongoing presence of an operator or database administrator. Therefore, the database must be small in footprint, robust, highly available, extensible, and capable of some degree of automation, self managing, self healing, and self tuning. 2.2.4 Deployment Deployment defines how you will place the database into service. Basically, deployment means how you implement the database. In this case, we want to implement it to meet the requirements of an embedded database application environment. There are three strategies to accomplish this goal: The database CD is in the package along with the installation manual. The database is integrated with the application (silent installation). The database is pre-installed and pre-configured with the application. 2.2.5 Response file A response file is a file that can be created at Informix installation time. It contains the installation settings for the product and its features. That file can then be used on subsequent installations for a silent installation, or when you want to use the same installation settings in more than one directory or computer. Chapter 2. Embeddability basics 17 2.3 Features that makes embedding Informix easy Informix is well-suited to many embedding scenarios, due to the following features: A small footprint with customizable and componentized installation Low administration requirements Silent installation and recorded installation Built-in support for encryption and secure communication protocols Self-tuning features Storage optimization Dynamic configuration SQL Administration API Scheduled administration tasks Multiple standard communication protocols, including XML communication through web services Stable and reliable, and includes failover features A scalable architecture designed to perform well with limited resources Runs on a wide variety of hardware platforms Runs well in virtualized environments Extensibility support to better integrate a database in its environment 2.3.1 Small footprint and customizable installation In many cases, applications with embedded data servers are provided with the hardware and sold as a complete package. To keep costs (or physical size) down, there is pressure to keep hardware specifications to a minimum. If the data server can function well in a constrained environment with the disk and memory footprint kept to a minimum, it can make a big difference when deploying to a large number of sites. Informix has several features to facilitate the reduction of the disk space required by an installation. One such feature introduced in Informix is the Deployment Wizard. This wizard allows Informix to be installed as a set of optional components. Only the components that are required by your application need be installed to disk. 18 Embedding IBM Informix Figure 2-2 shows a subset of the Deployment Wizard options seen during an interactive Informix installation when Custom mode is chosen. Figure 2-2 The Informix Deployment Wizard Selecting specific components through the Deployment Wizard is also supported during silent installation. Using the Deployment Wizard allows you to reduce the standard Informix installation size to close to 300 MB to as little as 100 MB. All interdependencies between components are checked by the installer during installation. For more information about the Deployment Wizard, see the developerWorks article Using the new Deployment Wizard in IDS Cheetah, available from the following website: http://www.ibm.com/developerworks/db2/library/techarticle/dm-0704mathur/index.h tml With some additional manual configuration, it is possible to reduce the overall installed footprint of an Informix installation. See 3.5.1, “Minimizing the Informix installation footprint” on page 51 for an example of a minimal installation. Chapter 2. Embeddability basics 19 2.3.2 Silent installation Informix can be installed interactively through a graphical user interface, through a command line (UNIX only), or silently with no user interaction. A silent installation is useful for an embedded data server because the installation can be triggered as part of the application installation and run unattended. A silent installation of Informix uses a response file to set configurable options during installation. Two types of a response file are available in Informix Version 11.50: Server response file The server response file contains the configurable options for installing Informix database server. Bundle response file The bundle response file installs multiple products provided with Informix (such as Informix and CSDK). Template server and bundle response files named server.ini and bundle.ini can be found in the Informix media. Template and bundle response files can be edited manually with instance-specific details, or created by recording an interactive installation using the record argument to the ids_install (bundle installation) or the installserver (Informix installation) command. In Informix Version 11.7, the installer has been completely revamped. The complete bundle is in a single monolithic installer named ids_install. Newer tools such as Deployment Assistant (ifxdeployassist) and Deployment Utility (ifxdeploy) can deploy pre-configured Informix instances rapidly. Both of these utilities can operate at the command line and provide a variety of options to package, compress, and deploy the snapshot of the Informix instance. Chapter 5, “Deployment” on page 95 discusses deployment strategies with Deployment Assistant and Deployment Utility. 20 Embedding IBM Informix 2.3.3 Low administration requirements If a data server instance requires little or no direct administration, or needs to be administrated entirely from within a program, it needs to provide a comprehensive view of what is happening inside the database engine. One way Informix provides this is with a set of system databases (sysmaster, sysadmin, syscdr) that allow a program or user to query any aspect of the system status through SQL. The number of necessary maintenance tasks is kept to a minimum, and administrations tasks that are required can be scheduled automatically through a system of scheduled tasks, sensors, and alarm handlers. 2.3.4 Security An application needs to maintain security, and an embedded data server needs to provide a comprehensive set of security features. An application provides a specific view of data to its users. However, there may be data that is used internally in the application and is not appropriate for the user. Users of the application may not be permitted to modify the data directly, so measures need to be in place to prevent unauthorized access to sensitive data. Informix provides security features at multiple levels: Setting of file permissions Separation of roles Authentication at the network level Auditing Label Based Access Control Encryption of data to secure backups Perform fine-grained data access and manipulation auditing inside the database engine Support for web-based and non-operating system based user IDs Chapter 2. Embeddability basics 21 An overview of the security features are shown in Figure 2-3. OS security • User Permissions and Authentication Administration • Role Separation Connection • Limiting denial flood attacks • Secure local connection to hosts Communication • Simple password encryption (SPWDCSM) • Data encryption (ENCCSM) Authentication • Trusted user • Pluggable authentication module (PAM) • Lightweight Directory Access Protocol (LDAP) Auditing • Audit mask setting • Audit record analysis Access Control • Discretionary access control (DAC) (Role and privileges) • Label Based Access Control (LBAC) Data encryption • Column level encryption Backup and Restore • Data compression • Data encryption • Data transformation ER/HDR/Mach11 • Data encryp ti on • Co nfiguri ng dedi cated po rt Distributed Queries • Data encr yption • Passwo rd encryptio n • User authentication using system database Figure 2-3 An overview of Informix security features For more details, see Security and Compliance Solutions for IBM Informix Dynamic Server, SG24-7556. View the abstract for this book at the following website: http://www.redbooks.ibm.com/abstracts/sg247556.html 2.3.5 Self-tuning features Being able to adapt dynamically to changing conditions (such as changing I/O volume or resource availability) enables a data server to be left unattended for a longer period of time without degraded performance. Informix has several self-tuning features that can be configured by setting the onconfig file parameters. For example, Informix can dynamically adapt to an increased I/O workload by increasing the number of AIO Virtual Processors and page cleaner threads. Checkpoints can be triggered more frequently to avoid transaction blocking. 22 Embedding IBM Informix See Chapter 6, “IBM Informix configuration for embeddability” on page 147 for a guide to using the autonomic and self-tuning features available in Informix. 2.3.6 Storage optimization Informix Version 11.5 and later now provide dictionary based data compression. The advantages of data compression and storage optimization include significant storage savings, reduced I/O activity, and faster backup and restoration. Informix provides full online support for enabling storage optimization and compressing existing table data, while applications continue to use the table. There are three different options for optimizing storage: The compress operation compresses the contents as per the common patterns in the compression dictionary. The repack operation assembles all rows to the front of the table or fragment’s partition. The shrink operation returns the free space at the end of the table or fragment’s partition back to the dbspace. For more information about data compression and storage optimization, see the developerWorks article Informix data compression and storage optimization, available from the following website: https://www.ibm.com/developerworks/data/library/techarticle/dm-0904idsoptimizat ion/ One of the most common database administration tasks is to manage space in the database server. With Informix Version 11.7, you can set the database server to manage space automatically and forget about receiving any out-of-space errors. Informix provides both reactive and proactive methods for automating storage space management. See Chapter 8, “Memory and storage management” on page 183 for details about how to optimize and automate storage management in Informix Version 11.7. 2.3.7 Dynamic configuration If a database server needs to be shut down and restarted to change a configuration value, it poses a challenge to application designers and reduces the online availability of the application. Chapter 2. Embeddability basics 23 Many onconfig parameters can be set dynamically using the onmode -w command: onmode -wm changes a parameter in memory. onmode -wf updates the parameter in memory and modifies the onconfig file. Table 2-1 lists the onconfig parameters that can be configured dynamically using the onmode -wm and onmode -wf commands. Table 2-1 Onconfig parameters 24 ADMIN_MODE_USERS LTXEHWM AUTO_AIOVPS LTXHWM AUTO_CKPTS MAX_INCOMPLETE_CONNECTIONS AUTO_LRU_TUNING MAX_PDQPRIORITY AUTO_STAT_MODE MSG_DATE BATCHEDREAD_INDEX ONLIDX_MAXMEM BATCHEDREAD_KEYONLY RESIDENT BATCHEDREAD_TABLE RSS_FLOW_CONTROL CDR_DELAY_PURGE_DTC RTO_SERVER_RESTART CDR_LOG_LAG_ACTION SBSPACENAME CDR_LOG_STAGING_MAXSIZE SBSPACETEMP DELAY_APPLY SDS_TIMEOUT DS_MAX_QUERIES SMX_COMPRESS DS_MAX_SCANS SP_AUTOEXPAND DS_NONPDQ_QUERY_MEM SP_THRESHOLD DS_TOTAL_MEMORY SP_WAITTIME DUMPCNT STATCHANGE DUMPSHMEM STOP_APPLY DYNAMIC_LOGS SYSSBSPACENAME ENABLE_SNAPSHOT_COPY TEMPTAB_NOLOG EXPLAIN_STAT USELASTCOMMITTED FAILOVER_TX_TIMEOUT USERMAPPING Embedding IBM Informix HA_ALIAS VP_MEMORY_CACHE_KB IFX_EXTEND_ROLE BAR_CKPTSEC_TIMEOUT LIMITNUMSESSIONS LISTEN_TIMEOUT LOG_INDEX_BUILDS LOG_STAGING_DIR The SQL adminstration API is also available as another means of making these changes. 2.3.8 SQL administration API The ability to perform routine administration tasks (such as allocating disk space to a data server, adding logs, and checking data consistency without manual intervention) is an important component of an embedded data server. A key embeddability enhancement introduced in Informix Version 11 is the SQL administration API. Prior to the introduction of the SQL administration API, deeply embedding Informix meant scripting calls to Informix utilities, such as onmode, onspaces, and onparams, to automate the administrative tasks. In Version 11.10, a new system database, named sysadmin, was provided, which contains two SQL functions, task() and admin(). The task() and admin() functions can be used to run onmode commands, manipulate logical logs, and add and remove chunks and dbspaces. Both functions perform the same operations, with the admin() function returning an integer reference to a row in a command history table, and the task() function returning a descriptive status message. See Chapter 7, “The SQL administration API” on page 167 for a guide to the SQL administration API. 2.3.9 Scheduling tasks How does an application initiate data server administration tasks that need to take place at regular intervals or in response to specific triggers? This becomes easier in Informix Version 11 with the introduction of the DB Scheduler (or Task Scheduler). A stored procedure or UDR can be scheduled to run at specific intervals by adding a row to the ph_task table in the sysadmin database. The routine can take advantage of the SQL administration API to perform administrative tasks. Chapter 2. Embeddability basics 25 Chapter 9, “Automating management through tasks and sensors” on page 203 explains the Task Scheduler and how to create scheduled tasks. 2.3.10 Communication protocol support The more standard networking and communication protocols a data server supports, the easier it becomes for it to interface with other programs and applications. In Informix Version 11, support was added for the open standard DRDA® database communication protocol, which enables a common client between Informix and DB2, opening up a greater range of programming APIs. Informix supports a variety of network communication protocols, depending on the platform and whether it is connecting locally or remotely. The supported protocols are shown in Figure 2-4. Figure 2-4 IBM Informix network communication protocols 2.3.11 Informix stability Stability is particularly important for deeply embedded applications where a DBA will not be immediately available to fix a problem. In these situations, any data server problem or maintenance issue will need to be handled by the application. Informix has multiple data replication technologies, such as High Availability Data Replication (HDR), which provides hot-standby capabilities, and Enterprise Replication (ER), which provides fine grained data replication. From Informix Version 11.10 onwards, Informix provides Continuous Availability, which supports multiple secondary nodes that provide read access to the database and can take over transaction processing in the event of an unexpected failure, and multiple shared disk secondaries, where many copies of Informix share the same set of disks and a single copy of the data. 26 Embedding IBM Informix Informix Version 11.7 extends the high availability to a grid environment. The new Informix Flexible Grid provides simplified replication setup and maintenance for replication grids. This functionality makes it easy to define servers in a replication grid, add or remove servers as necessary, perform DDL operations, and manage tables across the grid. For information about Informix stability, see the Informix Uptime Survey at the following website: http://www.informix-zone.com/oninit-openpsl-survey 2.3.12 Scalable architecture For data server performance to deliver optimally across a wide range of hardware, including embedded systems that might have constrained resources, the data server solution needs to be able to scale. The Informix Dynamic Scalable Architecture (DSA) is based around Virtual Processors and inherently supports parallelism, scaling to multiple CPUs or processor cores. Features such as the Instance Configuration Wizard allow your instance to be automatically configured at installation time, based on detected hardware resources and expected number of users. 2.3.13 Hardware and operating system support Informix is ported to a large number of platforms and operating systems, which means platform dependency is unlikely to be a limiting factor when designing an embedded application that uses Informix. Table 2-2 shows the initial platform support matrix for Informix Version 11.70.xC1. Support and certifications for later versions tend to get added in subsequent fix pack releases, such as xC2 and later. If your operating system version is not listed, check the Informix Platform Availability Matrix, which is updated monthly, at the following website: http://www.ibm.com/software/data/informix/pubs/roadmaps.html Table 2-2 Informix Version 11.7: Platform support Platform Architecture OS build Certification Linux 64-bit Linux 32-bit AMD64 and EM64T x86 Red Hat 5 Asianux 3.0 Debian 5.0 Fedora 13 SLES 11 Ubuntu 10.04 openSUSE 11.2 Chapter 2. Embeddability basics 27 Platform Architecture OS build Certification Windows 64-bit Windows 32-bit AMD64 and EM64T x86 Windows Server 2003 Windows XP Windows Vista, Windows Server 2008, Windows 7 Apple 64-bit EM64T Mac OS X 10.5 Mac OS X 10.6 HP 64-bit PA-RISC Itanium® HP-UX 11i HP-UX 11.11 HP-UX 11.23 HP-UX 11.31 IBM 64-bit PowerPC® AIX® V6.1 AIX V6.1 IBM 64-bit IBM eServer™ pSeries® IBM eServer iSeries® IBM eServer zSeries® Red Hat 5 SLES 11 Sun 64-bit Sparc AMD64 Solaris 10 Solaris 10 2.3.14 Virtualization Virtualization is increasingly used as a means to save on hardware resources, but it is also a valuable option for applications that embed databases and other components. Packaging an application in a virtual machine frees the application provider from hardware dependencies and allows all the installation and configuration to be completed before deployment. A single self-contained appliance consisting of an operating system, data server, the application, and all its dependencies, can run on any hardware platform that supports the virtual machine manager being used. Informix lends itself well to running in a Virtual Appliance, and no cost VMware Informix developer appliances are available for SUSE and Ubuntu. Informix has also been successfully tested in the Xen Hypervisor environment. For information about running Informix in a Xen Hypervisor environment, see the developerWorks article Running Informix Dynamic Server on Linux in Xen hypervisor, available from the following website: http://www.ibm.com/developerworks/db2/library/techarticle/dm-0807fuerderer/ 28 Embedding IBM Informix It is also easy to create your own appliances using a variety of no cost and commercially available virtualization tools, such as QEMU, VMware, Xen, Microsoft Virtual PC/Server, and Hyper-V. The complete list of supported virtualization environments for Informix is available at the following website: http://www.ibm.com/developerworks/wikis/display/im/IDS+virtualization+support See Chapter 12, “IBM Informix appliances” on page 299 for further information about IBM Informix appliances and instructions about how to create your own virtual appliances. 2.3.15 Extensibility support Informix has built in extensibility support in the form of user defined data types (UDTs), user defined functions, user defined aggregates, virtual table interfaces (VTIs), and virtual index interfaces (VIIs). Extensibility support provides greater flexibility in customizing your Informix instance and integrating it into an embedded environment. Being able to define your own data types, create functions in C and Java to perform custom operations, or map an external file to a table reduces the number of separate components in an application. A low number of separate components in an embedded application means a lower number of potential failure points when it is deployed. With IBM Informix Version 11.7, the whole registration workflow has been streamlined with the following database extensions being registered automatically upon first use: LOB Locator (LLD) Node BinaryUDT Basic Text Search (BTS) Spatial Web Feature Service (WFS) MQ Messaging In addition to registering the extension within the current database, the auto registration feature will, if necessary, create sbspaces if required by the extension, as well as creating any specific virtual processors required to run the extension. Chapter 2. Embeddability basics 29 For more information, see Customizing the Informix Dynamic Server for Your Environment, SG24-7522. The abstract for this book is available from the following website: http://www.redbooks.ibm.com/abstracts/sg247522.html 2.3.16 Collecting diagnostic data In Informix Version 11.7, you can use the ifxcollect utility to collect diagnostic data to troubleshoot a specific problem. This tool also allows you to transmit the collected data using FTP. You can collect data with ifxcollect for: Assertion failures Enterprise Replication Performance issues CPU utilization Onbar archive and restore failures Ontape backup and restore failures Connection failures Connection hangs Customer profile information The command-line options for the ifxcollect utility are as follows: General -r = Num Times to repeat Collection -d = Seconds for delay between Collection -y = Answer yes to all prompts -V = Version Information -version = Extended Version Information FTP -f -e -p -m -l -u -w = = = = = = = FTP the data collection Email Address PMR Number Machine to ftp to Directory Location for ftp Username for ftp Password for ftp Collection -c ids -s general General Collector For All Informix Family Products -c af -s general General Collector For Assertion Failures -c er -s general 30 Embedding IBM Informix Collect general information For ER -c er -s init Collect information For ER Initialize Issues -c performance -s general Collect general information for performance Issues -c performance -s cpu Collect information for cpu utilization issues -c onbar -s archive_failure Collect information for onbar archive failures. -c onbar -s restore_failure Collect information for onbar restore failures. -c ontape -s archive_failure Collect information for ontape archive failures. -c ontape -s restore_failure Collect information for ontape restore failures. -c connection -s failure Collect information for connection failures. -c connection -s hang Collect information for connection hangs. -c cust -s prof Customer profile For example, to collect information for a general assertion failure, run this command: ifxcollect -c af -s general To collect information for a performance problem related to CPU utilization, run this command: ifxcollect –c performance –s cpu To include FTP information, specify the additional information, as shown in the following examples: -f -e user_name@company_name.org -p 9999.999.999 -f -m machine -l /tmp -u user_name -w password 2.4 Informix product editions In 2010, IBM revised the editions for the Informix product. Regardless of the edition you use, Informix comes with the full implementation of the Dynamic Scalable Architecture (DSA) with its unmatched performance, reliability, ease of use, and availability. Chapter 2. Embeddability basics 31 In some cases, particularly with the no cost editions, there are restrictions on the breadth and depth of features and functionality available for you to use. With some of the Informix For-purchase editions, there are similar though not as dramatic restrictions. Pricing for these editions varies based on functionality and scalability differentiation. 2.4.1 No cost editions Informix no cost editions can be downloaded and used for development, test, and, with the Informix Innovator-C Edition, user production workloads without a license fee. These editions can only be used by user organizations, however. They cannot be re-distributed without signing a re-distribution contract. The intent of the Informix Developer Edition is for system development and test only; it cannot be used in a production environment and there is no optional support package. Support is community-based, though an optional for-charge service and support package is available for Informix Innovator-C edition. Community support is available through discussion forums hosted by the International Informix User Group (IIUG) as well as the IBM developerWorks Informix technical forums. IBM Informix Developer Edition For application development and testing only, this edition packs the full suite of Informix functionality into an attractive price point: no cost to you! The Developer Edition includes all the functionality available in the Informix-Ultimate edition, but does contain scalability constraints, including processing, memory, and storage limitations. It is available on a wide range of operating systems in 32- and 64-bit versions where appropriate. You can upgrade from the Developer Edition directly to any other edition simply by installing the new database binaries. IBM Informix Innovator-C Edition For customers looking for a robust and powerful database environment that can support small production workloads, this edition provides the most widely used data processing functionality, including limited Enterprise Replication, High Availability, and Informix Flexible Grid clustering. Available on all supported platforms, this edition is limited to one socket with no more than four cores and a total of 2 GB of RAM operating from the same installation. 32 Embedding IBM Informix 2.4.2 For-purchase editions Each of these editions is tailored from a price and functionality perspective to a specific market segment. IBM Informix Choice Editions For Macintosh and Windows The Informix Choice Editions for Macintosh and Windows are perfect for small to mid-sized companies or departmental servers in an enterprise deployment. These editions can be deployed on up to eight cores over a maximum of two sockets and 8 GB of RAM operating from the same installation. Informix Choice Editions for Macintosh and Windows gives you additional database functionality, including a two root node ER or Informix Flexible Grid cluster. IBM Informix Growth Edition Available on all supported operating systems, this edition is perfect for mid-sized companies or departmental servers in an enterprise deployment. In most cases, this edition should satisfy the requirements of an embedded solution. This edition can be deployed on up to 16 cores over a maximum of four sockets and 16 GB of RAM operating from the same installation. Informix Growth Edition gives you additional database functionality, including unlimited ER or Informix Flexible Grid cluster nodes of any type to send or receive data updates within the cluster. IBM Informix Ultimate Edition As the name suggests, this edition includes all Informix features and functionality (except those specifically listed as optional add-ons) with unlimited scalability required for the highest OLTP and warehousing performance and full functionality. With this edition, full H/A, ER, and Informix Flexible Grid functionality is available, including unlimited ER/Grid nodes and all H/A cluster secondary instance types. Because almost all features and functionality are included with this edition, there are only a few optional add-ons. They include the Geodetic and Excalibur DataBlades and the Storage Optimization feature released with Informix Version 11.50.xC4. For more information about the comparison between the various Informix editions, see the developerWorks article Compare the various Informix version 11 editions, available from the following website: http://www.ibm.com/developerworks/data/library/techarticle/dm-0801doe/ Chapter 2. Embeddability basics 33 34 Embedding IBM Informix 3 Chapter 3. Preparing to embed IBM Informix In this chapter, we describe the areas that must be considered before implementing an embedded solution. Not all areas apply to all situations and the effort required to implement them can vary. In each case, you should decide what you care about, and that answer determines which features you use and how you configure the system. For example, if the solution does not really need to be secured, then you may not encrypt anything on the disk or in the network. You also may just grant all access rights to “public” and not worry about granting privileges to any users. However, if security does matter, you may want to use all those features. Most of these items do not apply exclusively to embedded systems, but may be addressed differently for an embedded environment. © Copyright IBM Corp. 2011. All rights reserved. 35 3.1 Choice of platform Informix is available on UNIX, Linux, Microsoft Windows, and Apple Mac OS X platforms. The biggest impacts caused by the choice of a platform are on installation and system monitoring. Consideration should be given to deciding how many platforms should be supported. For example, scripting is different for Microsoft Windows than it is for most UNIX or Linux systems. If you support both Windows and Linux, then you have to maintain two sets of scripts, one for each platform. 3.2 Application design Informix capabilities should be an integral part of an embedded application design. Both the application and Informix work hand-in-hand to provide a solution. The result can be a smaller application, lower resource consumption, and better performance. In the case of an existing application, some simple changes can yield significant improvements. Other areas, relating to the management of the environment, can take advantage of Informix capabilities to make it simpler and more efficient. Another advantage of integrating Informix in the application design is that you can make the database more invisible to the users. That is, they can use the application without ever knowing, or caring, if there is an associated database. The following sections describe some of these possibilities. 3.2.1 Application set processing Anytime an application reads a set of rows from the database and processes them to get to a single answer, there is an opportunity to move this processing to the database. The first approach that comes to mind is to use a stored procedure language (SPL) stored procedure. This approach moves procedural code from the application to the database server. There can also be easier or more efficient approaches for solving the problem. One reason for putting the processing in the application is because the database server does not know how to group the data the way you desire. This can be solved by adding code that tells the database how to group the data. Some examples of new grouping functions are as follows: Grouping by week of the year Other date manipulation, such as by weekdays, can be created. 36 Embedding IBM Informix Grouping by range of values It is easy to take a value and return a representation of the range it is in. Another reason that the processing is put in the application is because the database server does not provide the processing needed. For example, you might need to use some statistics to calculate a reliability factor for a specific piece of equipment. In Informix, it is easy to create a user-defined aggregate to do this processing. The result can be less code and better performance. 3.2.2 Using database extensions Informix includes several DataBlades that can facilitate the application processing. Because Informix supports modularized installation, you have to decide whether or not you want to install these DataBlades. In many cases, the extensions are registered, loaded, and made available for use the first time any user executes a SQL statement that needs the extension. In that case, you do not have to take any action to prepare the extension. However, some of the less frequently used extensions require an explicit registration before they are used. Currently, the basic text search, node data type, binary data types, large object locator, MQ messaging, and Informix web feature service are automatically registered at their first use. Here is a brief description of the most commonly-used extensions: Large Object Locator This DataBlade® facilitates the manipulation of large objects in the database if they are stored outside the database. MQ Messaging This DataBlade provides an easy to use interface with the IBM WebSphere® MQ product. Binary DataBlade This DataBlade adds indexable binary data types, with one fixed-length of 18 bytes, and another variable length of up to 255 bytes. Basic Text Search This DataBlade allows for a quick search of text fields or XML elements through full text indexing. Node DataBlade This DataBlade is an indexable type that facilitates the manipulation of hierarchical relationships, such as in bills-of-material. Chapter 3. Preparing to embed IBM Informix 37 Web Features Services DataBlade This DataBlade provides database-independent access to spatial objects stored in Informix through a web interface. In addition, there are two DataBlades that are bundled with the database server: IBM Informix Spatial DataBlade Module This DataBlade enables you to create web applications that incorporate data retrieved dynamically from an Informix database. IBM Informix Web DataBlade Module This DataBlade embeds a geographic information system (GIS) into your IBM Informix data server kernel by implementing the Open GIS Consortium, Inc. (OpenGIS (OGC)) SQL3 specification of abstract data types (ADTs). These data types can store spatial data, such as the location of a landmark, a street, or a parcel of land. For more information about products bundled with the database server and full details about each of the database extensions, see the Informix Info Center at the following website: http://publib.boulder.ibm.com/infocenter/idshelp/v117/index.jsp More detailed information about the IBM Informix database extensions can be found in the IBM Informix Database Extensions User’s Guide, G229-6362 or in the Information Center under the Extending Informix subtopic. Analyze your application needs carefully to discover whether or not DataBlades can improve overall performance while reducing the amount of code needed. 3.2.3 Indexing Most applications have some performance requirements, and embedded applications are no different. The most common way to improve query performance is the judicious use of indices. In the case of Informix, you should consider the use of functional indices and the R-tree multi-dimensional index. A functional index is one that is created as the result of a function. Its use has an impact on how SQL statements are written. Assume that you have a function called WeekOfYear(). This function takes a date as input and returns an integer representing the week of the year the date is in. If you have a table named transaction with a column tran_date representing the date the transaction took place, you can create a functional index representing the week of the year the transaction took place, as follows: CREATE INDEX tran_week_ix ON transaction (weekOfYear(tran_date)) 38 Embedding IBM Informix To take advantage of this index, the WeekOfYear() function must be used in the WHERE clause or in the GROUP BY clause. Here is an example that shows its use: SELECT weekOfYear(tran_date), SUM(amount) FROM transaction WHERE weekOfYear(tran_date) > 39 AND weekOfYear(tran_date) < 46 GROUP BY weeekOfYear(tran_dave); The result of this query would be the sum of all transactions per week, for weeks 40–45. R-tree indices are heavily used in spatial type applications. This is a perfect fit, because an R-tree index can quickly identify if multiple areas overlap or if one area is within another. This capability can be extended to fit other types of queries. This can be any range of values, such as status readings on multiple aspects of a piece of equipment. The combination of a set of readings can indicate a problem, but when taken individually, it can still be in the tolerated range. The use of an R-tree index can identify the problem where multiple standard indices (B-tree) may not discriminate enough to be used, forcing a table scan that would greatly impact performance. Now that you know how you can take advantage of indexing to improve performance, you need to know how to identify problem areas. Informix Version 11 provides the ability to collect historical information about the execution of SQL statements. It is then possible to examine the results and identify statements that require further analysis. This capability can be used on installed systems to generate alerts about slow SQL statements. The application can, as an example, ask the user to contact support and report the issue. Depending on the arrangement, this can be automated and the support organization can then resolve the problem proactively. 3.2.4 Using multiple DBMSs or databases It is better to keep the number of database server instances to a minimum. Each database server instance requires its own set of support processes and memory structures. The use of multiple database server instances, when one would suffice, increases the impact on the system’s performance, because there will be more processes competing for resources. This impacts CPU resource use, and decreases the efficiency of memory use, because each server will have less memory to use, increasing disk accesses and reducing overall performance. If multiple applications or modules each require their own databases, these databases can be created in the same Informix server. If a module requires access to another module’s database, it can be done either by opening an Chapter 3. Preparing to embed IBM Informix 39 additional connection to the second database or through distributed queries if data must be joined between databases. If you use multiple databases in one Informix data server, then you must take care that the users of one database do not consume so much of the system that users of the other database are “starved” for resources. You may need more CPU virtual processors or more memory or both. In addition, you may need to limit the number of sessions that are allowed for one or more databases. That task can be performed by using a sysdbopen() procedure and a table to keep track of how many sessions exist. 3.3 Data and database administration Even in the case of embedded databases, proper database design is still required. This section briefly describes the major points to consider. This topic is related to application management. Once again, tasks and sensors can be used to manage database activity, such as backups. The users only have to move files and do not have to touch the database. Other table manipulations, such as detaching, backing up and removing old table fragments, and adding new table fragments, can be automated. 3.3.1 Application error monitoring Errors occur in applications. An embedded application can catch these errors and generate context information that will help the support team diagnose the problem. The error can also be reported to the user, who can then provide the appropriate information as required. 3.3.2 Security issues Securing the data is becoming increasingly important. In this section, we discuss security consideration and techniques available in Informix to secure your data. Issues to consider in design Major security issues to consider when designing an embedded Informix system are as follows: Application users Which user names will the application use? Will there be a distinction between the various users of the application? 40 Embedding IBM Informix Ad hoc users Can users access the database directly, and run ad hoc queries? Database, tables, views, and procedures permissions For each user allowed in the database, permission to read and modify the database objects must be given. Column encryption There are cases where key data must be protected from access by anyone outside the context of the application. This task can be done by using the column-level encryption feature of Informix. However, this task impacts the system in terms of space and processing time, so you must determine if this task is required or necessary. Local or global connections It is likely that the application will run on the same machine as the database server. Informix can be set up so only programs running on the local machine can connect to it. This setup adds another level of security against unauthorized access. Communication encryption If outside communication is allowed either for client access or Informix-to-Informix communication (such as in the case of replication), should you encrypt these messages? Techniques available in the Informix data server The Informix data server provides a number of options for handling all these issues. Here we briefly describe the choices about how you manage users and what they are permitted to do. We do not discuss encryption. Part of designing a solution is to choose which of these methods, if any, will be used and to prepare the proper scripts to set up the configuration. The principle of least required privilege In general, it is wise to avoid giving any user more privileges than are required for the work they are supposed to do. An extreme example might be to let everyone use the user ID of informix. That would let anyone do anything and is not a good idea. In general, you have a few people who are responsible for the system, and those people require greater privileges than others. But most of your users probably should be limited to the basic SQL of the application. Even within the basic users, you might have groups responsible for various tasks, and you may not want to restrict people from seeing or changing data inappropriately. For example, in a payroll solution, you may want to restrict granting of raises to managers or even a select few managers. Chapter 3. Preparing to embed IBM Informix 41 Most people should be able to see their salary but not everyone’s salary, and most people should not be able to grant themselves or anyone else a raise. You may even want to restrict managers from granting raises outside a limited time each year. Your challenge to is to know the business rules and enforce them. Privileges, roles, and default roles To enforce the business rules, you may be required to grant the proper privileges on each table to individual users. This can be extremely complicated, and the Informix data server offers methods to simplify the management of privileges. All of these methods are intended to reduce the number of GRANT and REVOKE statements you need. Roles are just groups of privileges. You can define a role, grant privileges to a role, and then grant the role to a user. This usually simplifies management and tasks when a number of users require the same set of privileges. You can define a role with the proper privileges and then grant the role to each of the users, which means you have only one set of the GRANT statements, not one set for each user. A user may have been granted several roles. Their default role is whichever of those several roles should be enforced when the user first connects. Other roles can be adopted as required using the SET ROLE SQL statement. Alternatively, you could set the initial role in the sysdbopen() procedure for each user. Default roles are typically simpler. Non-OS and mapped users Normally, each user of an Informix data server has a operating system account on the server. However, many enterprises use a centralized directory, an LDAP directory or such, rather than manage accounts on many servers. The Informix data server has two features to take advantage of that situation and reduce the number of local accounts that are required on each server. First is mapped users. If you define a user with appropriate privileges, then you can declare that other users should use that same user ID as the basis of checking permissions and privileges. This is called mapping one user to another. The effect is rather like roles, but this further reduces the number of users for which roles are required. However, even then, each user must have permission to connect to the server and the data server. With mapped users, you must still have a local OS account for each user. To simplify things further, you may choose to authenticate user connections using LDAP or some other pluggable authentication module (PAM). 42 Embedding IBM Informix When you do that and also map those users to some local user, you have what are called non-OS users. This can significantly simplify things by removing the need for more than a few local users, each with a distinct set of privileges. Trusted contexts Lastly, if your solution uses an application server (IBM WebSphere or Tomcat, for example), there are typically a pool of permanent connections shared among all the users. In that case, it is usually impossible to associate a particular SQL statement with a real users, because some common user ID is used for all the pooled connections. A trusted context can solve that problem, but it does impose the requirement for each user to be known to the data server. A trusted context is established when some client program, often the application server, is declared to be trusted by the data server. A trusted context is a connection from a particular system (host name or IP address using a particular user ID). The host name or IP address would be that of the server on which the application server executes. The user ID would be the ID used to establish the pooled connections. Using a trusted context, the trusted client is allowed to tell the data server the real user ID to use for each SQL statement. The data server then uses that ID to do the permissions and privileges checks for each statement. This allows proper auditing for who is taking each action and also helps in debugging problems. 3.3.3 Managing backups and log archives In this section, we discuss database backup and log management administrative tasks. To log or not to log Depending on how deeply embedded a DBMS is, there might or might not be any requirement to keep a copy of the database to restore after a failure. For example, if the data is reloaded from some central source each time the DBMS starts execution, then there is no purpose to keeping any backup copy of the data. On the opposite extreme is a system that is deeply embedded and has no connection to any other system. In this case, it may be imperative to keep a copy that can be restored. A second question is whether or not any groups of tasks in the application are required to be accomplished as an atomic group. That is, are there sets of changes that all need to succeed or fail as a group? If there are not, then you do not require transactional controls and the associated log records. Chapter 3. Preparing to embed IBM Informix 43 Therefore, if you do not need to reload or recover data after a failure, then no database backup is required. If you do not need transactions, then you do not need database logs. However, if you need transactions, with or without backups, then you need database logs. If logs are not required, create the database with no log. That action removes any need for disk space for log files and the need for start work or commit statements in the application programs. Example 3-1 shows the SQL statements for creating databases with various logging options. The first statement creates a database with an unbuffered log, the second with no log, and the third with a buffered log. Example 3-1 Creating databases F:\queries>dbaccess -e - mkdbs create database loggedexample with log; Database created. create database unloggedexample; Database closed. Database created. create database bufferedexample with buffered log; Database closed. Database created. Note: The work to change from one model (transactions or no transactions) to the other is often substantial, so logging is an important choice. If you do decide to use logging, but do not use BEGIN WORK and COMMIT statements, each SQL statement will be treated as a transaction. Be sure that action is what you want. Logs and log archives If you choose to use a logged database, then, to ensure your ability to fully recover your data, you must archive (back up) the log files as they fill. If you do not archive the files, the data server uses all the log files and waits until you archive one or more files to make more space available. In certain cases, when a single transaction requires more space than is available (long transactions), you can configure the data server to automatically add log files. In all other cases, you have to archive log files before they all become full. To configure the data server to add logs to avoid long transactions that fill up the logs, set the DYNAMIC_LOGS configuration parameter. 44 Embedding IBM Informix You can set this parameter to either pause while you add more files or to automatically add files as necessary. Use the ontape or onbar program to archive the log files. To restore your data properly, you must use the same utility you use for your database backups. So, if you use onbar for database backups, use onbar for log archiving also. A good practice is to set up the ALARMPROGRAM script to capture the event for each log file and do the log archive at that point. Alternatively, you can schedule a log archive at some regular interval, daily or hourly perhaps. Database backups Not all embedded databases must have a backup copy of the data, but many do. This section discusses techniques for creating a copy of the database that may be used to recover the data in case of failure. You only need to choose one. You do not need to use them all. By far, the most common and useful options are ontape and onbar, but the others may be useful in some situations. Whichever you choose, you must have file system space or tape capacity to hold the data. If there is a requirement to save copies of the information in case of device failure, then the application can do it as part of an administration menu or it can be set up in a more automated way. This means that sufficient disk space must be available for storing a backup and possibly several log archives. To limit the storage consumed by backup files, the log archives older than the most recent full backup should be removed. Old full backup files should also be removed unless a specific requirement exists to keep them. There are multiple possibilities for managing backups. Which one you use depends on the requirements of each system. There is not a single best technique. In some cases, if down time is allowed, the backup can consist of bringing down Informix and backing up all the directories where there is database storage. If the database devices are on physical disks, the disks image can be copied to another device. In this case, you may also need to remove old backup files and log archives. For invisibly embedded systems, there may be no method for restoring a backup. In that case, there is no point in taking a backup, and there is no issue for keeping or removing backup files. One of the most difficult issues with any DBMS or database is the policy about what to do in case of failure. Most organizations prudently insist on making regular copies of their data so that it can be restored if the production data is lost for any reason. That policy makes sense for most systems and, if you are using an integrated Informix instance, you should plan on following that policy. Chapter 3. Preparing to embed IBM Informix 45 Automating backups is discussed in 9.7, “Using tasks for embedded systems” on page 229. Along with backup copies of the data, copies of the logical log files are required to ensure recovery of all the data up to the last few transactions. Log file archiving can be automated using ALARMPROGRAM. However, for an invisibly embedded instance of Informix, the solution is more difficult. If there is no administrative interface for the system, and if the only possible action in case of failure is to restart the entire system, then there may be no point in taking backups. This case is relatively rare at the time of the writing of this book, but there is a growing class of appliances that include a database. Examples include water and electric meters that record usage over time, and traffic controls that contain a database of scheduled changes. In the case of the traffic controls, there are few changes, and the system can be restarted and reloaded without concern for what data was lost. In the case of utility meters, the daily or hourly data is not critical to the billing and so if it is lost, little damage is done. In both cases, the work and space to manage backup files is not justified. There are a number of ways to create a copy of data held in an Informix data server. Two of these, ontape and onbar, are what most people mean when they refer to archiving or “backing up” a database. However, you might choose to unload the data by other means: the dbexport and onunload commands, the unload SQL command, or inserting the data into an external table. Any of these commands will make a copy of data, but each has limits on how hard it is to recover and how complete that recovery can be. Archiving with either ontape or onbar allows you to include the logical logs with the data from the tables, which means you do not have to take care to be sure the data server is idle while the archive is being done. Furthermore, if you also archive the logical logs, a recovery can restore the data to the point of failure. Any other technique imposes two constraints. First, to ensure that the archived data is consistent, no changes can be allowed while the data is being copied. Second, any recovery can only be to the time the data was copied. Any changes between copies will be lost. Archiving strategies There are many possible useful archiving strategies. Your choice depends on how much time you can afford to wait for a recovery. Archive more frequently if you want to restore more quickly. A common strategy is to perform a full (or level 0) archive once a month, a level 1 archive each week, and a level 2 archive each day. That mean as many as 31 archive files may be required to restore an instance or database. 46 Embedding IBM Informix Another common strategy is to perform a level 0 archive once a week with level 1 archives daily. This means at most seven archive files must be processed for a full recovery. In either of these strategies, all the archived logs are also required. You can choose many other patterns of level 0, 1, and 2 archives. There is no one superior strategy. 3.3.4 Storage sizing and management Chapter 8, “Memory and storage management” on page 183 covers automatic storage management in detail. With or without the automatic management, you should plan for the disk space you will need and how you expect to allocate that space. This planning includes deciding what indexes, large objects, temporary tables, external tables, and so on, will be required for the solution. With that knowledge, you should decide which tables or indexes will be placed in each dbspace. That decision should let you estimate the relative space to set aside for each dbspace and sbspace. With that information, you can choose how you want to manage the space. You can use the onspaces utility to declare exactly where each dbspace (and any chunks beyond the first one) should be. You can also choose to let the data server automatically expand the space if most of the space is used, or you can choose to monitor and manage that yourself. Which approach to use depends on a number of factors, including at least how much storage is available, whether or not storage can be added, and what constraints may exist on the size of the database. For example, if the solution is designed for some maximum number of objects (customers, orders, drawings, and so on), then you may enforce that limit, not allowing more objects to be created. Therefore, if your solution is designed to manage up to 1000 customers, you do not need to configure space for more than a few more that 1000 customers. That will probably also limit the size of other tables, such as addresses and phone numbers. However, if you intend to let the solution hold and work with an unlimited number of objects (for example, truck routes and sports statistics), then you should plan on some initial space for each object with the option to add more space if the users want to have more data. In this case, the automatic storage management offers a simple solution, but you have to make the space available. This may means monitoring the data so that additional disks can be installed before all the available space is full. Chapter 3. Preparing to embed IBM Informix 47 3.4 Installing, deploying, upgrading, and migrating We can say that deployment includes installation, but there is a difference between those two activities. During installation, you have to decide which features to install, which directory to use, and decide on configuration parameters (onconfig parameters). In the deployment, you have to decide how to replicate the installation decisions and deploy a packaging of the applications and Informix to multiple sites, while minimizing the effort required to get to a running environment. 3.4.1 Installing Informix includes an installer that provides the ability to select which Informix feature is installed. The selection can be done interactively or through a configuration file, which provides the additional capability to do a silent installation. When it comes to deploying the complete package, the Informix installation part can be done through the silent installation. The other option would be to create an image of a completely installed system and copy it to a target machine. All this is fine for installation and deployment on a dedicated system. However, other issues arise on a shared system. Deployment issues are discussed in Chapter 5, “Deployment” on page 95. 3.4.2 Upgrading Upgrading the Informix data server to a newer version is straightforward, but you do need to plan and be prudent about the work. You can upgrade “in place” using the existing database. You could also upgrade by making an entirely new data server instance and loading your data into the new instance. The second approach does require extra time to reload the data. Also, you cannot load the data from a database backup. You will have to unload each table or export the database and then load the tables or import the database. A process for an in-place upgrade might be Ensure you have a complete full backup copy of the database. Read the release notes and machine notes for the new release carefully. Pay special attention to the operating system configuration parameters that may have changed, or any requirements on the process. 48 Embedding IBM Informix For example, an upgrade might require ensuring extra log space or some minimum free space in each dbspace. You want to follow any such directions to ensure your upgrade is correct. Allow enough time to perform the upgrade, verify the correctness of your data afterward, confirm the correct operation of our solution, and, in rare cases, revert everything back to your current version. Install the new version in a separate directory. Do not overwrite the current software so that you can quickly revert if that is required. It is often convenient to have $INFORMIXDIR be a link so that your scripts will not have to change when you use the new directory. Perform the actual upgrade by executing the new version of the data server. Be careful not to initialize, as that would destroy your database. Be sure to drop and recreate all the database statistics. While this may not be strictly required, experience shows that this often avoids performance problems. Use oncheck or the SQL adminstration API to verify the consistency of the tables and indexes Spot check the data to verify its correctness. 3.4.3 Shared systems What if the application that embeds Informix must be installed on an already running system that includes other applications? There can be cases where the Informix data server is already installed on the system, which is sometimes called multiple residency. That situation raises issues of installation directories and the usage of network client connection ports. In these situations, where there are multiple data server instances running, SERVERNUM needs to be a distinct value. In these situations there could also be library issues, because Informix makes and uses links with its libraries. In multiple residency implementations, there are two primary situations to be addressed: There is already a different version of Informix installed. In this situation, the installation procedure must install the new version and work around the issues previously mentioned. Environment variables must be set properly to start Informix and for the application to run properly. The application must not include hardcoded values, such as the port number in a JDBC connection URL, or it will not connect to the proper database server. Chapter 3. Preparing to embed IBM Informix 49 Of course, with a little planning, it might be possible to upgrade the current Informix installation, if the application supports it, before installing the new application. So, here is yet another possibility to consider. The proper Informix version is already installed. If the version matches, it does not mean that the features required by the application are installed. For example, what if a company policy does not allow the new application to share the same database server? There is still the choice of ignoring many of these issues and assume that the situation will not occur. In some cases, it can be the right assumption. Still, knowing the possibilities should allow you to make better decisions. Not all Informix data server installations are for development. There are situations, for example, where data and applications must be migrated from the existing system to the new one. In addition, it can involve migrating to a new hardware platform. Some of the considerations when planning a migration are as follows: Migrating existing installations Because we are talking about embedded systems, the data management is left to the application. As such, it must be able to address, as examples, how the data migration will occur between the old system and the new so it is easy for the users, and how it can recover from potential problems. There can be space issues on the system that will require a hardware upgrade. Another solution can be to upload the data to another larger system, and re-initialize the machine in the new environment, freeing the space used by the old application and data storage. If the migration has to occur on a large number of systems, proper planning is essential to minimize the effort and the impact on the users. Performance impact due to differences in architecture As examples, consider Informix and Informix SE. In the former case, a totally different approach to data access is required. In the later case, there is a two task architecture where the application spawns a background process to provide database access. There are differences in disk and memory footprints that may require a hardware upgrade. The additional functionality in Informix can provide a simpler and more efficient way to solve problems, which can require additional analysis and implementation effort. The migration to Informix should also be an opportunity to review the table organization, such as partitioning/fragmentation and extent allocation and index usage to improve the efficiency of data access. 50 Embedding IBM Informix 3.4.4 Application management An embedded application must keep track of its resource use to make sure it does not expend them. For example, an application can keep track of the number of rows in its tables over time. With this information, it can calculate a rate of growth and estimate when the system is expected to run out of space. Then, actions can be taken to back up older information to make space for new. This may be difficult to do from an application. Using the tasks and sensors capabilities described in Chapter 8, “Memory and storage management” on page 183 would make this easy to implement. 3.5 Extremely low footprint Informix installations The deployment wizard, as part of the Informix custom installation process, supports an Informix server-only installation footprint below 240 MB. In some instances, it may be necessary to install Informix in a tight footprint-constrained environment. There are already quite a few IBM Informix Business Partners and clients worldwide who are actually using Informix deeply embedded in resource-limited environments, such as phone systems, network appliances, specialized electronic scales, and much more. For those usage scenarios, a 240 MB installation footprint (for the database server executables alone) can be too large. And do not forget the actual database instance size to maintain the deeply embedded application’s database. In the following sections, we discuss and describe how an extremely low footprint installation of Informix Version 11.70 can be achieved from both an installation footprint perspective and from a live production Informix database instance perspective. 3.5.1 Minimizing the Informix installation footprint The first part of an exercise to achieve an extremely small Informix Version 11.70 production environment is to scale down the Informix installation footprint to a bare minimum. By performing the following steps, you will be able to shrink the footprint from an initial size of 236 MB. Chapter 3. Preparing to embed IBM Informix 51 Important: At the time of the writing of this book, Informix (and IBM Informix technical support) officially only supports installations that have been performed through the standard Informix installation procedures (using the Deployment Wizard). The following steps describe a way of scaling down an Informix installation that might not be supported by IBM technical support. Contact IBM technical support for Informix before you use such a scaled down Informix installation in a production environment. As the foundation for the scaled down exercise, we use the Informix Version 11.70 Base Server installation option, which provides a starting footprint of about 236 MB (on Linux/Intel® 32-bit). Ensure that the XML Publishing component was not installed by mistake through the Base Server install option. 1. Delete the following directories and files in the $INFORMIXDIR directory: – – – – – – – – – – $INFORMIXDIR/extend/* $INFORMIXDIR/bin/plugins $INFORMIXDIR/release $INFORMIXDIR/uninstall $INFORMIXDIR/license $INFORMIXDIR/doc $INFORMIXDIR/SDK $INFORMIXDIR/isa $INFORMIXDIR/incl $INFORMIXDIR/*.log These directories and files contain either release or license-related documentation and are only required if there is a need to uninstall Informix through the official uninstaller. The $INFORMIXDIR/bin/plugins folder is only required by the Informix Deployment Assistant (ifxdeployassist). So if you need the deployment assistant, keep it. 2. Remove the $INFORMIXDIR/gskit directory. Each Informix Version 11.70 installation includes a re-distributable version of the IBM GSKit (Global Security Kit), which provides libraries for data encryption and Secure Sockets Layer (SSL) communication. You will want to keep that kit somewhere for future use, but you do not need it as part of an extremely low footprint installation. Footprint size check: At this point, the size is down to a footprint of about 98 MB, without giving up anything important or critical. The next steps are dependent on the functional requirements of your Informix server installation. 52 Embedding IBM Informix 3. Look in the $INFORMIXDIR/bin directory. There are likely some executables and other files there that you will not need in a deeply embedded production or runtime environment and can delete. The following files are examples: – finderr and rofferr These commands are only required either to display or to print an Informix error message. – chkenv This command is used to verify some Informix related environment variables in a given file. – GenMacKey This is required to generate new MAC keys for encrypted communication between client and server, and server and server. You can keep a copy in a different location, and delete the one in $INFORMIXDIR/bin. – ibmifmx_security.sh This is a script provided by IBM Informix tech support to verify security related settings in your Informix installation. You can use it, but you will likely not need it in a deeply embedded production environment. – hdrmkpri.sh/hdrmksec.sh These are two shell scripts to make a role switch-over in an High Availability Data Replication (HDR) environment a bit easier. Because the outcome can be also achieved manually, you can delete them. – crtcmap This is a file that is only required to create special mapping files. If you need it, keep a copy with your development instance. But you can remove it from a runtime instance. – blademgr This is the executable of the Informix command-line blade manager that can be used to register and un-register (plus upgrade) Informix extensions (called DataBlades). If you are not planning to use DataBlades with your deeply embedded system, you can delete it. – oncheck This command allows the consistency check of an Informix instance, especially its databases, tables, and indexes. Depending on your requirements you can keep it (for example if you foresee regular database checks later on during run time). Chapter 3. Preparing to embed IBM Informix 53 – ontape This command can be used to create online backups of the Informix database. If you are planning to use other means of backing up your in production system (for example, by external backup and restore), you can delete it. Keep in mind that ontape can be used to change the log mode of an Informix database (for example, from logging to non-logging and vice versa). – onparams and onspaces With the introduction of the SQL adminstration API in Informix Version 11.10, most of the DBA-related commands can be run through an SQL-based command. If the production system can be managed with only the SQL adminstration API, you can delete either or both of these executables. – onrestorept Because the onrestorept utility is only required to revert an Informix instance to its original state just before its upgrade, its probably not required for an extremely low footprint installation. – onclean The onclean utility can be used to shut down an Informix instance if the onmode command is not able to shut it down in a clean way. Under normal operating scenarios, it can be likely left out a low footprint configuration. – genoncfg This executable is only required in combination with the Informix configuration wizard. Therefore, it is not necessary for a minimalist installation of Informix. – ifxdeploy and ifxdeployassist Both tools are part of the Informix embeddability toolkit. If you are planning to create deployment packages or your stripped down Informix installation, it might be worth to keep the ifxdeployassist executable. – ifxclone If you do not need to directly clone your extremely low footprint Informix instance using a network connection, you can remove that utility. – ifxbkpcloud.jar One of the new features in Informix Version 11.70 is the option to do an ontape backup into the Amazon Simple Storage Service. If you already removed the ontape command or if you are not planning to back up into the Amazon storage cloud, just remove that JAR file from your installation. 54 Embedding IBM Informix – Stripping the remaining executables Most of the Informix executables have been compiled with the symbols attached. Having the symbols attached to an Informix executable can be helpful for debugging purposes (for example, obtaining a stack trace) through IBM Informix technical support. But if you are confident this support is not required, you can run the sudo strip * command in the $INFORMIXDIR/bin directory. Important: Only run the strip command with root permissions, or you will damage the file ownership and suid (set uid) bits on those files. Footprint size check: You can do a quick footprint size check after deleting the following files in $INFORMIXDIR/bin: finderr rofferr chkenv GenMacKey ibmifmx_security.sh hdrmkpri.sh hdrmksec.sh crtcmap blademgr oncheck ontape onparams onspaces onrestorept onclean ifxdeploy ifxdeployassist ifxclone ifxbkpcloud.jar You can do a quick footprint size check after running the strip command on the remaining executables. You will see that the size is down to 77 MB. Chapter 3. Preparing to embed IBM Informix 55 4. If your Informix-based application has relaxed requirements regarding the character sets being used in the database and the client application (for example, if you can use a simple 8-bit character set), review the $INFORMIXDIR/gls directory. Even with a Base Server installation and the ‘West European and Americas’ GLS option selected, that folder has an installation footprint of about 48 MB. Consult the IBM Informix GLS User's Guide, SC27-3551 to learn which files can be deleted based on your GLS requirements. Footprint size check: After cleaning up the $INFORMIXDIR/gls folder, you can achieve an Informix install footprint below 60 MB, and below 50 MB if necessary. For example, if you delete the files in the $INFORMIXDIR/gls/cv9 directory, except for the following files, you end up with an Informix install footprint of only 57 MB: 03330352.cvo 03520333.cvo 04e40333.cvo 033304e4.cvo 035204e4.cvo 04e40352.cvo To achieve an even smaller Informix install footprint (for example, smaller than 40 MB) see the following section for tips based on a real example. 3.5.2 Extremely small footprint Informix instance In this section, we create an extremely small footprint Informix Version 11.70 installation that is capable of maintaining the Informix stores demonstration database in less than 55 MB. The focus is on the Informix installation footprint, as well as on creating a working, minimalist Informix instance. Attention: The following Informix customizations are for demonstration and educational purposes only and will create an Informix installation that is not supported by IBM Informix Technical Support. To start this exercise, create a new Custom Informix Version 11.70 installation with all the install options cleared, except for the base server and the “Demonstration database scripts” plus the “West European and Americas” GLS option. You should end up with an initial installation footprint of about 237 MB. 56 Embedding IBM Informix Perform the procedures in the following sections to create a small working Informix instance installation. Phase 1: Creating a small footprint Informix installation Perform the following steps to create a small footprint Informix installation: 1. After the initial Informix installation, perform steps 1 and 2 from 3.5.1, “Minimizing the Informix installation footprint” on page 51 to start the first cleanup steps. 2. Following step 3 of 3.5.1, “Minimizing the Informix installation footprint” on page 51, delete the following files from the $INFORMIXDIR/bin folder: – – – – – – – – – – – – – – – – – – – – – – – finderr rofferr chkenv GenMacKey ibmifmx_security.sh, hdrmkpri.sh hdrmksec.sh crtcmap blademgr oncheck ontape onparams onspaces onrestorept onclean genoncfg ifxdeploy ifxdeployassist ifxclone ifxbkpcloud.jar dbaccessdemo7 dbaccessdemo9 dbaccessdemo_ud You can run the sudo strip $INFORMIXDIR/bin/* command to remove the attached symbols from the executable files. Chapter 3. Preparing to embed IBM Informix 57 3. Clean up the $INFORMIXDIR/gls folder by deleting all of the files in the $INFORMIXDIR/gls/cv9 sub-folder, except for the following files: – – – – – – 03330352.cvo 03520333.cvo 04e40333.cvo 033304e4.cvo 035204e4.cvo 04e40352.cvo You can also delete the following GLS folders: – – – – – – – – – – – – – – – – – – – – – $INFORMIXDIR/gls/lc11/da_dk $INFORMIXDIR/gls/lc11/de_at $INFORMIXDIR/gls/lc11/de_ch $INFORMIXDIR/gls/lc11/de_de $INFORMIXDIR/gls/lc11/en_au $INFORMIXDIR/gls/lc11/en_gb $INFORMIXDIR/gls/lc11/es_es $INFORMIXDIR/gls/lc11/fi_fi $INFORMIXDIR/gls/lc11/fr_be $INFORMIXDIR/gls/lc11/fr_ca $INFORMIXDIR/gls/lc11/fr_ch $INFORMIXDIR/gls/lc11/fr_fr $INFORMIXDIR/gls/lc11/is_is $INFORMIXDIR/gls/lc11/it_it $INFORMIXDIR/gls/lc11/nl_be $INFORMIXDIR/gls/lc11/nl_nl $INFORMIXDIR/gls/lc11/no_no $INFORMIXDIR/gls/lc11/pl_pl $INFORMIXDIR/gls/lc11/pt_br $INFORMIXDIR/gls/lc11/pt_pt $INFORMIXDIR/gls/lc11/sv_se Footprint size check: The installation footprint is now about 56 MB. 4. Delete the following files and folders, because there are no use for Unicode character sets and support: – – – – – $INFORMIXDIR/gls/etc/icudt34l.dat $INFORMIXDIR/gls/dll $INFORMIXDIR/gls/cm3/e005.cmo $INFORMIXDIR/gls/cm3/e01c.cmo $INFORMIXDIR/gls/cm3/e030.cmo Footprint size check: The installation footprint is now about 31 MB. 58 Embedding IBM Informix 5. (Optional) Clean up the $INFORMIXDIR/etc directory. The footprint gain will not be significant. Delete the following files: – – – – – $INFORMIXDIR/etc/brand $INFORMIXDIR/etc/IIFfiles* $INFORMIXDIR/etc/Glsfiles* $INFORMIXDIR/etc/*.png $INFORMIXDIR/etc/ids_master_doc.xml Note: The $INFORMIXDIR/etc/ids_master_doc.xml is required by the ifxdeployassist utility. If you plan to keep that utility in your installation, you have to keep that file too. Footprint size check: The installation footprint is now about 29 MB. Phase 2: Creating a small footprint Informix instance and database In this phase, you create and initialize an extremely small footprint Informix instance. The task is to create a one chunk/one dbspace Informix instance that can maintain a stores demo database. Perform the following steps to create a small footprint IBM Informix instance and database: 1. Create a new $ONCONFIG file, (for example, named onconfig.informix_small) and set some of the key config variables as follows (assuming that the $INFORMIXDIR variable has been set to /opt/IBM/informixSmall): – – – – – – – – – – – – – – – – PHYSFILE: 200 LOGFILES: 14 LOGSIZE: 200 LTXHWM: 98 LTXEHWM: 99 ROOTPATH: /opt/IBM/informixSmall/demo/server/online_root MSGPATH: /opt/IBM/informixSmall/demo/server/online.log ALARMPROGRAM: /opt/IBM/informixSmall/etc/alarmprogram.sh SYSALARMPROGRAM: /opt/IBM/informixSmall/etc/evidence.sh DUMPDIR: /opt/IBM/informixSmall/tmp TAPEDEV: /dev/null LTAPEDEV: /dev/null DBSERVERNAME: informix_small SERVERNUM: 1 ROOTSIZE: 24000 VPCLASS: cpu,num=1,noage Chapter 3. Preparing to embed IBM Informix 59 – BUFFERPOOL • size=2K • buffers=1000 • lrus=8 • lru_min_dirty=50.000000 • lru_max_dirty=60.000000 – BTSCANNER • num=1 • threshold=5000 • rangesize=-1 • alice=6 • compression=default 2. Create a new $INFORMIXDIR/etc/sqlhosts file with at least the following entry: informix_small onsoctcp localhost 9088 3. Create an empty ROOTDBSPACE chunk: touch $INFORMIXDIR/demo/server/online_root chmod 660 $INFORMIXDIR/demo/server/online_root 4. Open a terminal window (as informix user) and set the following environment variables (Linux/UNIX): – – – – – export export export export export INFORMIXDIR=/opt/IBM/informixSmall INFORMIXSERVER=informix_small ONCONFIG=onconfig.informix_small PATH=$INFORMIXDIR/bin:$PATH TERMCAP=$INFORMIXDIR/etc/termcap You can initialize the new Informix instance by running the following command: oninit -i For the verbose version, you can use the following command: oninit -iv Monitor the initialization phase by running the onstat -m command, which displays the content of the Informix message log file. When you see the message 'sysadmin' database built successfully in the message log file, the initialization phase is finished. 5. Create the Informix stores demo database with logging by running the following command: dbaccessdemo -log 60 Embedding IBM Informix 6. Adjust the two logical log high water mark-related parameters in the $ONCONFIG file to your desired values. They were increased earlier in the process to allow the creation of the system databases and the stores demo database. LTXHWM 60 LTXEHWM 70 7. Restart Informix by using the following command sequence (as informix user): onmode -ky oninit Footprint size check: If you have followed all the steps in Phase 1 and Phase 2, the footprint of the Informix installation should be about 54 MB, which includes the Informix binaries and a working Informix demo instance. Phase 3 (optional): Reducing the Informix memory footprint You now have a small running Informix instance with a live demo database that has been optimized for disk footprint. Memory parameters can be tuned by modifying the related entries in the $ONCONFIG file. Those adjustments are dependent on your application requirements. For the demo Informix instance, you can reduce the number of pages in the buffer pool to 100, the initial number of locks to 2000 (minimum value), and the initial virtual shared memory segment to 8192 KB (or less). Completing these processes yields an extremely small footprint sample Informix instance. Tip 1: If you need to keep the Informix instance memory usage below a certain limit, you should set the SHMTOTAL variable in the $ONCONFIG file. In such a case, you might want to avoid to use parallel SQL (PDQ) queries extensively, because they require additional memory resources. Also, consider setting the VP_MEMORY_CACHE_KB config variable to 0 (zero). Chapter 3. Preparing to embed IBM Informix 61 Tip 2: Informix Version 11.70.xC2 (and also Informix Version 11.50.xC8) introduces a new feature, called the Low Memory Manager (LMM). Through a set of SQL adminstration API functions, you can enable the Informix server to automatically throttle the shared memory usage to stay within a given SHMTOTAL shared memory limit. The LMM might decide to, for example, kill certain idle user sessions to free up memory for other sessions that might need memory more urgently. The goal of the LMM is to avoid any kind of error messages associated with low memory situations in Informix. 62 Embedding IBM Informix 4 Chapter 4. Installation strategies In this chapter, we identify and discuss different methods of installing the IBM Informix product in preparation for mass redeployment or embedding. The chapter highlights the Informix packaging and covers situations for which each installation method is best suited. We then discuss requirements and usage examples for each method. The Informix product bundle can be installed interactively or silently. Interactive installations can be done either in graphical mode or console mode. Graphical mode installation requires that you have your environment configured to support a graphical display (this is supported by default on Windows). Silent mode installation is an unattended installation in which installation inputs are provided from a response file. In addition to the standard installation approaches for Informix, there might be additional procedures, for example, doing a simple file and folder copy of a template installation, using the deployment utility for the database server or the new Informix product bundle installation packages for the Ubuntu Linux distribution. Informix product currently supports Mac OS X Server 10.5.2 and later. While the process of installation and uninstallation is similar across all UNIX-based platforms, Mac OS has minor differences that introduce specificity in how the installer and uninstaller is launched. We also describe how to achieve an extremely low footprint Informix database server installation that goes far beyond the standard Informix product installer and Deployment Wizard capabilities. © Copyright IBM Corp. 2011. All rights reserved. 63 4.1 Informix installation considerations As of the release of IBM Informix Version 11.70, the product installer comes as a single monolithic binary with the capability to install the products in the Informix product bundle and the flexibility to select which products to install and the desired installation customization. While stand-alone installers are available for individual client products, the database server is installable only through the single monolithic binary. There are a number of methods for installing the Informix product, each having its own set of considerations. The method chosen depends on usage requirements. In this section, we discuss a number of the installation methods and their considerations. 4.1.1 Technical installation requirements The Informix installer provides flexibility when it comes to product installation choices, which can be made based on requirement and preferred configuration. The installer has a unified interface that provides consistency in panels and prompts across all platforms. There is little to no difference between the interface for the Informix installer from one platform to another. Due to the nature of the installation application, and the size and packaging of the Informix product bundle, there are certain installation requirements that must be met to effect the installation process. Due to several administrative tasks and checks performed by the installation application, you must log in as an administrative user to run the installer and uninstaller on Windows operating systems and as the root user on UNIX-based operating systems. Disk space requirements A typical installation of the Informix Software Bundle requires approximately 1 GB of disk space. The process inherently includes the installation of the Informix database server, Informix Client Software Development Kit (Client SDK), and Informix JDBC components. For an installation that has only Client SDK selected or only Informix Connection selected, the disk space required can vary between 125 MB and 180 MB, depending on the system and the chosen setup. By default, the typical installation creates a server instance. The disk space required for the instance can be observed at the installation summary along with the installation disk space requirement. 64 Embedding IBM Informix Memory requirements Informix requires that your system has 512 MB of memory for acceptable running performance. The stated memory requirement does not account for the possible usage of other applications already on your system. If you have other applications running on your system, you have to account for system memory accordingly. Modifying the temporary extraction location The Informix installer is a Java-based application that gives you the flexibility to configure an Informix deployment. As a Java-based application, the installer places certain resource demands on the system it is running. As part of the installation process, the installation application extracts the file resources it needs to perform the installation in a temporary directory. This situation contributes to the space requirement for the installation application. Even though the content extracted in the temporary directory will be removed by the installation application after installation, it is important to ensure that there is enough space in the temporary directory so that the installation application can perform the required extraction in preparation for the installation. By default, the temporary location is /tmp on UNIX-based operating systems. On Windows, the default temporary location is the value of the TMP environment variable. You can modify the temporary extraction location of the installation by modifying the value of the TMP environment variable on Windows operating systems. To achieve the same on UNIX-based operating systems, set the IATEMPDIR environment variable to an existing directory where you want the temporary extracted files to be placed. Before starting the installation, be sure that you have the correct Informix media for the operating system on which you want to install the product. See the following website for a complete list of platforms on which the product is certified: http://www.ibm.com/software/data/informix/ids/requirements.html Throughout this chapter, you learn how to customize the footprint requirements down to a low level, which can be suitable for deep embedding of Informix in applications that only need specific and well-defined functionality. 4.1.2 A note about Mac OS X Kernel parameters on Mac OS X can be modified to control system resource usage. The kernel parameter settings are maintained in the /etc/sysctl.conf file and can only be modified by the root user. Informix requires certain minimum settings on Mac OS X in order for the server to start and function appropriately. During installation, the necessary kernel parameters in etc/sysctl.con are checked and modified if necessary. Chapter 4. Installation strategies 65 The parameters are as follows: kern.sysv.shmmax=2046511104 kern.sysv.shmmin=1 kern.sysv.shmmni=512 kern.sysv.shmseg=512 kern.sysv.shmall=1073741824 kern.sysv.semume=10 kern.sysv.semmsl=87381 kern.sysv.semmnu=87381 kern.sysv.semmns=87381 kern.sysv.semmni=87381 kern.maxfiles=8413608 kern.maxfilesperproc=40000 kern.maxvnodes=150000 net.inet.tcp.sendspace=524288 net.inet.tcp.recvspace=524288 The values of these parameters reflect the minimum settings. Lowering these values further may cause the database server initialization failure. For more information about kernel parameters settings, go to the following website: http://publib.boulder.ibm.com/infocenter/idshelp/v117/topic/com.ibm.relnotes.do c/notes/ifx_1170xc1/mach/ids_machine_notes_11.70.macosx64.html 4.2 Interactive installations An interactive Informix installation can be a good choice in a scenario where you need to install and deploy only a few Informix instances to fulfill your requirements. Another usage scenario is where you need to configure a first-time installation of Informix on a system in readiness for redeployment. For large scale installations or deployments, installation modes such as silent installation or other nonstandard installations might be preferred. 66 Embedding IBM Informix 4.2.1 Interactive installation methods Interactive installation provides a prompt-and-response mechanism for providing inputs to the installer. The following installation methods are available for Informix and its client product components: Bundle installer The ids_install command launches a user interface that can be used to install the Informix software bundle. You can choose to install one or more products that are part of the bundle. If you prefer, you can run the installation command in silent mode. For a simple and easy approach, the default configuration file for silent installation (included with the installation media) can be used. Upon launching the command, you are presented with a Getting Started panel that provides quick links to the Release Notes, the Installation Guide, and the Information Center. Stand-alone installers Stand-alone installers are available only for Client SDK and Informix Connect. The installclientsdk and installconnect commands start installation applications that can be used to install and configure individual client products. You can run these commands in silent mode. The default configuration file for silent installation that is included with the installation media can be used. If preferred, the installation configuration can be recorded in a new response file. This response file can be used with the same installation application at a later time for silent installations. See 4.3, “Silent installation” on page 76 for more details. Note: The bundle installer and client installation applications for UNIX and Linux start in console mode by default unless you specify that they are to be started in GUI mode. 4.2.2 Typical and custom installation options As mentioned earlier, configuration options and selections made are based on requirements. The installer provides several customizable options to realize a wide range of preferences. Depending on your experience and understanding of Informix configuration, you can choose either a typical or custom installation setup: Typical installation A typical installation requires minimal inputs from the user. It uses defaults and an auto-configuration mechanism to provide inputs to the installer. Chapter 4. Installation strategies 67 By default, it also creates a working database server instance during installation. In terms of features and components, the typical setup uses the most disk space, but is the recommended installation for most database servers. Note that custom setup can ultimately use more disk space depending on the database server instance configuration. The typical setup installs the database server, all associated feature sets (components), and its associated client products. Some Informix products see this type of installation as a complete installation. Custom installation A custom installation gives the flexibility to select what is installed on the system. A custom Informix installation lets you choose which features are installed. However, some features are mutually dependent and must be installed with one another. Correspondingly, others are mutually exclusive. The installation application manages these dependencies. The Deployment Wizard relies on the custom setup to configure an installation that contains only what the application or deployment requires. The custom installation option in combination with the deployment Wizard should be of interest for embedded or even deeply embedded Informix applications After installation, additional features can be installed, and features can be reinstalled or removed without changing anything else in the base server. Which setup type is selected depends on the system architecture, your technical expertise, and the needs of the implementation. 4.2.3 GUI or console mode installation Either the bundle installer command or individual stand-alone installers provides you with the choice to use the GUI installer or the console installation mode. The console mode can be helpful if GUI support is not available for the installation (for example, while using a remote login through a telnet or rsh session to the system on which the Informix products should be installed). The GUI mode is the default mode on Windows, while the console mode is the default on UNIX or Linux. Console mode installation is not supported on Windows operating system. Tip: If you are new to Informix products and have never performed an Informix installation before, we suggest using the installer in GUI mode to get familiar with the installation options and customization possibilities. 68 Embedding IBM Informix To opt for GUI mode installation, use the -i gui option, as shown in the following example: ids_install -i gui Alternatively, on Mac OS and Windows operating systems, you can invoke the graphical installer by double-clicking the ids_install.app icon and ids_install.exe, respectively. Because the default installer interface is graphical on these operating systems, the installer will be invoked as such. Note: Console mode installation is not supported on Windows Either the GUI installation mode or the console installation mode can be used to record the installation options for later usage in a silent installation (also known as an unattended installation). The next section focuses on the custom installation option in combination with the Informix Deployment Wizard. This provides the freedom of choice about how much Informix functionality is provided to users in direct relationship to the required installation footprint. 4.2.4 Custom installations and the Deployment Wizard One of the key capabilities of the Informix installer, either in GUI or console mode, is its support for an easy customization of the Informix installation options and components. The custom installation allow users to fine-tune the installation options, database user creation/role settings, and instance configuration. Features and products selection can be configured through the Deployment Wizard feature, which Independent Software Vendors (ISVs), for example, can use to adjust the Informix install footprint based on the functional requirements of their applications. Chapter 4. Installation strategies 69 Figure 4-1 shows the Deployment Wizard start window. Figure 4-1 Installation option to activate the Deployment Wizard The installation footprint of Informix (just the server, without the Client SDK) can vary from about 279 MB for a complete installation to about 89 MB (measured on 32-bit Linux/Intel) by only using the provided installation options of the standard Informix Deployment Wizard. 70 Embedding IBM Informix The Deployment Wizard is used during the installation process as soon as the custom installation option is selected. The Deployment Wizard segments the Informix installation into the Informix products, their feature groups, and sub-groups that can be selected or cleared for the installation process. These are shown in Figure 4-2 and Figure 4-3. Each feature has an associated description that is displayed when the feature is selected or highlighted. Figure 4-2 Informix product selection using the Deployment Wizard during a custom installation Figure 4-3 Informix feature groups using Deployment Wizard during a custom installation Chapter 4. Installation strategies 71 Available components To gain a better understanding of the packaging and composition of Informix, we look at the available components and the functionality they provide: Base server The base server refers to the core database server for basic DBA operations without optional extensions, libraries, or utilities. The base server no longer contains the XML publishing feature. It must be included in your Deployment Wizard selection if you want to install it. It is found under the Extensions and tools component. Support for the Distributed Relational Database Architecture™ (DRDA) protocol is included in the Base Server. To use the DRDA support functionality with IBM Data Server .NET Provider or IBM Data Server JDBC Driver, you must obtain and install the .NET Provider or JDBC Driver separately. Extensions and tools Database administration tools and programming extensions, such as the following components: – J/Foundation This component is used for writing user-defined routines in the Java programming language. – Database extensions These components are used for providing large object location management, MQ transaction support, binary user-defined types, the hierarchical node data type, basic text search, and Web Feature Services for geospatial data. – Conversion and reversion Support This component is the framework required for migrating to and from other versions of the database server. – XML publishing This component is the set of functions that enable publishing SQL query results in XML format and for extracting elements and values from XML documents. Demonstration database scripts This component contains programs to create demonstration databases included with Informix. It is used for demonstration and leaning purposes. 72 Embedding IBM Informix Enterprise Replication This component is used for replicating transactions and changes between Informix database servers. Cluster utility (Windows only) This component is used to provide Microsoft Cluster Server support in Informix. Data-loading utilities These components are for efficient loading and unloading of data in certain configurations: – onunload and onload utilities These utilities are for moving data quickly from one operating system or database server to another without changing the database schema. • onunload Use the onunload utility to unload data from the specified database or table onto a tape or a file on disk in disk-page-sized units. • onload Use the onload utility to re-create the database or the table from the tape or file that was created by the onunload utility. – dbload utility This utility is for loading data into databases or tables that IBM Informix products created. Use the dbload utility to transfer data from one or more text files into one or more existing tables. – High-performance loader (HPL) This component is for loading or unloading large quantities of data efficiently to or from a database. Use HPL to exchange data with tapes, data files, and programs, and convert data from these sources into a format compatible with Informix databases. Use HPL to manipulate and filter the data as you perform load and unload operations. Backup and restore The backup and restore components are the feature utilities for backing up and restoring database server data, such as the following components: – archecker utility This component is used for verifying backups and restoring portions of a database, table, portion of a table, or set of tables. Backups created by ontape and onbar can be restored using the archecker utility. Chapter 4. Installation strategies 73 – onbar utilities Onbar is an editable shell script that starts the onbar-driver. Use the onbar script, and its related commands, to customize backup and restore operations and check the storage-manager version. – Informix Storage Manager This component is for managing external storage devices and media that contain backups. – Informix Interface for IBM Tivoli® Storage Manager This component is for implementing XBSA functions that use Tivoli Storage Manager with onbar. Administrative utilities Additional administrative feature sets are as follows. These features contain utilities that provide supplementary administrative functionality within Informix. – Performance monitoring utilities There are two performance monitoring utilities: • ON-Monitor Use the ON-Monitor utility to monitor the disk spaces and data of the database server. • onperf Use the onperf utility as a graphical monitoring tool to track most of the metrics that the onstat utility provides but with more options for viewing and saving data. – Miscellaneous monitoring utilities There are two utilities in this category: • onlog utility This utility is for displaying the logical log. • onsnmp utility This utility is for managing the database server with SNMP. – Auditing utilities There are two auditing utilities: • onaudit • onshowaudit Use these utilities for administering audit masks, trails, and other auditing information about the database server. 74 Embedding IBM Informix – Database import and export utilities Use the database import and export utilities for unloading a database into text files, creating and populating a database from those text files, or unloading a database schema into a text file. Global Language Support (GLS) The global language support components are the feature files that support languages, cultural conventions, and code sets. While GLS can be installed as a stand-alone component, it is required for the operation of Informix database server, Client SDK, and Informix Connect. This dependency is enforced in the installer. – West European and Americas Danish, Dutch, English, Finnish, French, German, Icelandic, Italian, Norwegian, Portuguese, Spanish, and Swedish locales – East European and Cyrillic Czech, Polish, Russian, and Slovak locales – Chinese Traditional Chinese and simplified Chinese locales – Korean – Japanese – Thai Table 4-1 lists the actual footprint requirements for these Informix database server components. Table 4-1 Installation footprint requirements Informix component/feature Installation footprint (Linux/Intel 32-bit) Base server 120 MB Extensions and tools and J/Foundation 70 MB Extensions and tools/Built-in DataBlade modules 21 MB Extensions and tools/Conversion and reversion support 5 MB Extensions and tools/XML publishing 23 MB Demonstration database scripts 1 MB Enterprise Replication 2 MB Chapter 4. Installation strategies 75 Informix component/feature Installation footprint (Linux/Intel 32-bit) Data-loading utilities/onunload and onload utilities 2 MB Data-loading utilities/dbload utility 1 MB Data-loading utilities/High-performance loader 8 MB Backup and restore/Informix Interface for Tivoli Storage Manager <100 KB Backup and restore/Informix Storage Manager 30 MB Backup and restore/archecker utility 2 MB Administrative utilities/Performance monitoring utilities 9 MB Administrative utilities/Miscellaneous monitoring utilities 5 MB Administrative utilities/Auditing utilities 2 MB Administrative utilities/Database import and export utilities GLS (all sub-components) 5 MB Global Language Support (GLS) 5 MB 4.3 Silent installation Installing Informix in silent mode means you can “set it and forget it.” As long as all the required information is supplied in the response file, the installer uses the response file as the source of input. This input takes the place of the information supplied in the graphical or console interface. The response file inputs are acquired by running an installation and recording it. Note: While individual product installers are available for Informix client products, ids_install is the only available means of invoking the database server installer. All installation operations pertaining to the database server can only be performed using this executable file. 76 Embedding IBM Informix 4.3.1 Recording a response file A response file is needed as an input source when running the Informix installer/uninstaller application in silent mode. Recording a response file requires launching the installer or uninstaller from the command line in graphical or console (interactive) mode and using the -r option with the location of the response file to be created. Supply inputs to the panels or console prompts and they will be recorded in the response file supplied on the command line. See the following command as an example: ids_install -i gui -r /tmp/install.properties As ids_install is the only available means to invoke installation of the database server, recording the response file has to be done using ids_install. You can also invoke the installer with the absolute path to the installation application if you want to run it from a specific directory, as shown in the following example: media_location/ids_install -i gui -r /tmp/install.properties These commands launch the installer in graphical mode, as indicated by -i gui, and create the response file in /tmp/install.properties. To record a console mode installation (not supported on Windows), use -i console instead of -i gui. See an example below: ids_install -i console -r /tmp/install.properties For a response to be created, the installation process must be run to completion. That is, if the installation is terminated prematurely, a response file will not be created. As discussed up to this point, you can record a response file that you can use for subsequent silent installations. However, the uninstaller, while it facilitates silent uninstallation, does not record a response file. Later in this chapter, we discuss the uninstallation procedure, talk about the suite uninstaller (similar to the single monolithic executable available for installation), and discuss how it differs from individual product uninstallers. 4.3.2 Performing a silent installation After a response file has been created, it can be used to install Informix across different machines. With a response file specified, the installer uses it as the input source during installation. To perform a silent installation, launch the Informix installation application in silent mode using the -i silent command-line option. Chapter 4. Installation strategies 77 In addition to -i silent, the absolute path of the response file can be passed using the -f command-line option. The example below illustrates the silent installation: ids_install -i silent This command launches the Informix installer in silent (unattended) mode. As you can see, the command does not specify a response file to be used for silent installation. The installation is performed with predefined default input values. Because a license agreement is not accepted by default in the installer, if you are to invoke the installer in silent mode without a response file, you need a mechanism to accept the license agreement. In addition, the default configuration of Informix installer is to create or confirm the presence of the informix user on the system. For silent installation without a response file, the following is a more functional, more complete sample command: ids_install -i silent -DLICENSE_ACCEPTED=TRUE -DUSER_INSTALL_DIR=/tmp/install -DIAD_PASSWORD=password In this example, a license agreement is accepted by specifying -DLICENSE_ACCEPTED=TRUE on the command line. The default installation directory is the value of the INFORMIXDIR environment variable. If INFORMIXDIR is not set in the environment, the product will be installed in /opt/IBM/informix. -DIAD_PASSWORD=password specifies the password that will be used in creating the informix user. In this case, the password is password. Note: On Windows systems, if the informix user exists on the system prior to installation, the supplied password is used to verify the informix user’s password. Silent installation can be performed with or without a response file. If a response file is specified, the inputs and configuration values used in the installer are picked up from the response file. A response file can be used with the installer to install other copies of Informix on the same machine or on other machines. To use a recorded response file, launch the installer in silent mode and use the -f command-line option and the response file, as shown in the following command: ids_install -i silent -f /tmp/install.properties This command launches the installer in silent mode using the response file located in /tmp/install.properties. Because a response file is used in the example above, the license agreement must be accepted in the response file and not on the command line for the installation to proceed. While you can run the installer in silent mode without specifying a response file, using a response file for silent installation is the more practical way of running the installer in silent mode, because it provides the most flexibility for configuration and customization during silent installation. 78 Embedding IBM Informix Uninstallation After an application is installed, you also want the capability to remove the application files and other entries made by the application when they are no longer needed. The uninstaller affords the same set of user interfaces available for installation, that is, you can perform an uninstallation in graphical, console, and silent modes, depending on the requirements and preference. Uninstaller preferences cannot be recorded in a response file. Silent uninstallation without a response file will use uninstaller defaults. The uninstaller executables are located in INFORMIXIDIR/uninstall, where INFORMIXDIR is the installation location. In this location, you will find sub-directories for each product uninstaller. The following examples show how to run the suite uninstaller: $INFORMIXDIR/uninstall/uninstall_ids/uninstallids -i silent The command above executes the uninstaller in silent mode, as indicated by -i silent. For the other user interface, replace -i silent with the respective command-line arguments, that is, use -i gui for graphical uninstallation and -i console for console uninstallation. The example above shows uninstallation using the product bundle uninstaller (also known as the product suite uninstaller). The suite uninstaller removes all Informix products installed in a directory. The installer also deploys stand-alone uninstallers that can be used to uninstall individual products. This function can be useful if you want to uninstall one Informix product without affecting other Informix products in the same directory. For example, you can launch the database server stand-alone uninstaller in silent mode as follows: $INFORMIXDIR/uninstall/uninstall_server/uninstallserver -i silent In place of -i silent, use -i gui for graphical mode uninstallation and -i console (UNIX only) for console mode uninstallation. On Windows operating systems, the database server uninstaller can also be launched interactively from the Windows Start menu by selecting Start All Programs IBM Informix uninstallserver. The Add or Remove Programs function in the Control Panel does not give you the capability or option to remove, modify, or repair an installation. Other functions It is conceivable that you may have installed an Informix database server with a non-exhaustive set of features and later want to add features to the existing installation or otherwise update the installation. To accomplish this task, launch the installation application and select the location of the installation you want to update as the installation directory. Make sure that you select Custom as the installation type. Then select the exhaustive set of features that you want to have installed on the machine. Chapter 4. Installation strategies 79 Important: While configuring the installer for an installation update, select all the features that you want installed, including the ones that have already been installed. Failure to do this might result in the installer reporting a failed feature dependency check. A facility to repair or modify an installation is not available through the Add or Remove Programs menu. 4.3.3 Modifying a response file Because recording a response file requires performing an actual installation, subsequent installations on the same machine (or a different machine) may require a different configuration than the one recorded in the response file. For example, a subsequent installation might need to access a directory that is different from the one in the recorded response file. As straightforward as it is to record a response file, you might not always want to record a new one every time you need make a slight modification in an existing response file. Recording a new response file requires re-installing Informix with preferred configuration options and features. A fresh recording is not the most efficient use of resources, because each installation will have a minimum footprint (about 100 MB) on the system. The Informix media comes with a template response file that can be modified for preferred use. The response file contains a prerecorded response of a Custom mode installation and encapsulates all installation scenarios and options. This means that the response file gives maximum flexibility for modifying installation configurations and installation-based Informix configurations. We suggest that you back up the template response file so that you have a reference copy to which you can return. Table 4-2 on page 81 shows the entries in a sample (default) response file. To modify a response file, open the response file with an editor of your choice and provide the entries you prefer the installer to use during silent installation. As an alternative, record an interactive installation process with the desired entries to create a customized response file. For more information, see 4.3.1, “Recording a response file” on page 77. 80 Embedding IBM Informix Table 4-2 Silent installation response file entries Sample response file entry Description LICENSE_ACCEPTED=FALSE This entry can be set to either TRUE or FALSE: TRUE: Indicates that the License agreement has been accepted. FALSE: Indicates that the License Agreement has been declined. Set this value to TRUE if you have read and want to accept the License Agreement. USER_INSTALL_DIR=C:\\TEMP\\ myInstallation Informix installation directory. Note that the ‘\’ is eclipsed when using the Windows path separator. CHOSEN_FEATURE_LIST=IDS,ID S-SVR,GLS,GLS-WEURAM,GLSEEUR,GLS-CHN,GLS-JPN,GLS-K OR,GLS-OTH Short name identifiers for features and products to be installed. DIR_SEC_SEL_BOOLEAN_1=1 DIR_SEC_SEL_BOOLEAN_2=1 DIR_SEC_SEL_BOOLEAN_3=1 This group of properties is applied only on UNIX operating systems. The properties control the installation directory security options. They are used only when the installation application is able to detect that the installation directory does not contain secure permissions needed for Informix installation. DIR_SEC_SEL_BOOLEAN_1=1 indicates that the installation directory will be automatically secured by the installation application. DIR_SEC_SEL_BOOLEAN_2=1 indicates that you have opted to manually secure the installation directory after installation. DIR_SEC_SEL_BOOLEAN_3=1 indicates that you want to employ the installer options in configuring the installation directory security settings. These properties are mutually exclusive. Therefore, you should enable at most one of them at a time. Chapter 4. Installation strategies 81 82 Sample response file entry Description ACTION2_USER_BOOLEAN_1=1 ACTION2_USER_BOOLEAN_2=1 ACTION2_USER_BOOLEAN_3=1 This group of properties is applied only on UNIX operating systems. The properties should be used only when DIR_SEC_SEL_BOOLEAN_3=1 is enabled. That is, if you want to configure the installation directory security settings using the installer, use these properties to set the user ownership of the installation directory. ACTION2_USER_BOOLEAN_1=1 indicates that you want to change the owner of the installation directory to the Informix administrative user. ACTION2_USER_BOOLEAN_2=1 indicates that you want to add the current owner of the installation directory to the list of trusted owners. ACTION2_USER_BOOLEAN_3=1 indicates that no action is to be taken regarding the current installation directory owner security settings of the installation directory. These properties are mutually exclusive. Therefore, you should enable at most one of them at a time. Embedding IBM Informix Sample response file entry Description ACTION2_GROUP_BOOLEAN_1= 1 ACTION2_GROUP_BOOLEAN_2= 1 ACTION2_GROUP_BOOLEAN_3= 1 ACTION2_GROUP_BOOLEAN_4= 1 This group of properties is applied only on UNIX operating systems. The properties should only be used when DIR_SEC_SEL_BOOLEAN_3=1 is enabled. They are used to configure the group security settings of the installation directory. ACTION2_GROUP_BOOLEAN_1=1 is used to indicate that the you want to change the group ownership of the installation directory to the Informix administrative group. ACTION2_GROUP_BOOLEAN_2=1 indicates that you want to remove write access to the installation directory for the current group that owns the directory. ACTION2_GROUP_BOOLEAN_3=1 is used to indicate that you want to add the current group to the list of trusted groups ACTION2_GROUP_BOOLEAN_4=1 indicates that no action is to be taken regarding group ownership for the installation directory. These properties are mutually exclusive. Therefore, you should enable at most one of them at a time. ACTION2_PERM_BOOLEAN_1=1 ACTION2_PERM_BOOLEAN_2=1 ACTION2_PERM_BOOLEAN_3=1 This group of properties is applied only on UNIX operating systems. The properties should only be used when DIR_SEC_SEL_BOOLEAN_3=1 is enabled. They are used to configure the world permission for the installation directory. ACTION2_PERM_BOOLEAN_1=1 indicates that you want to revoke public write permission for the installation directory. ACTION2_PERM_BOOLEAN_2=1 indicates that you want to add the directory to the list of trusted but insecure directories. ACTION2_PERM_BOOLEAN_3=1 indicates that no action is to be taken regarding the world permission for the installation directory. As is the case for the previous directory security configuration properties, these properties are mutually exclusive. Therefore, you should enable at most one of them at a time. Chapter 4. Installation strategies 83 Sample response file entry Description WINDOWS_USER_SELECT_ BOOLEAN_1=1 WINDOWS_USER_SELECT_ BOOLEAN_2=1 This group of properties is applied only on Windows operating systems. It is used to make the selection that determines whether Informix server should be run using the informix user account or the Local System account on Windows. WINDOWS_USER_SELECT_BOOLEAN_1=1 indicates that you want to create the Informix service using the Local System account. This option requires no password. WINDOWS_USER_SELECT_BOOLEAN_2=1 indicates that you want to create the Informix service using the informix user account. This option requires that you provide a password. The password will be used to create the informix account, if this account does not exist. If the user exists, the password provided will be verified as the correct user password. These properties are mutually exclusive. Therefore, you should enable at most one of them at a time. WINDOWS_USER_CREATE=1 If you have opted to run Informix server using the Local System account, and you still want to create the informix user, enable the property. The informix user is especially needed if you want to use the Enterprise Replication feature. WINDOWS_USER_DOMAIN_ SELECT_BOOLEAN_1=1 WINDOWS_USER_DOMAIN_ SELECT_BOOLEAN_2=1 IAD_PASSWORD=<password> 84 Embedding IBM Informix This group of properties is used when the informix user is created on a computer connected to a domain. WINDOWS_USER_DOMAIN_SELECT_BOO LEAN_1=1 is used to indicate that the informix user is created on the local machine. WINDOWS_USER_DOMAIN_SELECT_BOO LEAN_2=1 is used to indicate that the informix user is created on the domain. As mutually exclusive properties, enable at most one of them at a time. If you have opted for the informix user to be created, the value of this entry is the informix user password. Sample response file entry Description ROLE_SEP_SEL_BOOLEAN_1=1 This property is used to enable and disable role separation. Set to 1 to enable role separation. If you enable role separation, you can assign certain database administrative tasks to existing users and groups. Set to 0 (or leave it as commented) to indicate that role separation is not enabled. DBSA_GROUP=ix_dbsa If role separation is enabled, this property reflects the group account that is assigned Database System Administrator role. This response property is configurable only on Windows operating systems. On UNIX-based systems, this DBSA privileges belong to members of the informix group. DBSSO_GROUP=ix_dbsso If role separation is enabled, this property reflects the group account that is assigned the Database System Security Officer role. DBSSO_USER=DBSSO If role separation is enabled, this property reflects the user account that is assigned the Database System Security Officer role. This response property is configurable only on Windows operating systems. DBSSO_PASSWORD=<password> If role separation is enabled, this property holds the password for the Database System Security Officer user account. This response property is configurable only on Windows operating systems. AAO_GROUP=ix_aao If role separation is enabled, this property reflects the group account that is assigned the Auditing Analysis Officer role. AAO_USER=AAO If role separation is enabled, this property reflects the group account that is assigned the Auditing Analysis officer role. This response property is configurable only on Windows operating systems. AAO_PASSWORD=<password> If role separation is enabled, this property holds the password for the Auditing Analysis Officer user account. This response property is configurable only on Windows operating systems. Chapter 4. Installation strategies 85 86 Sample response file entry Description USERS_GROUP=ix_users If role separation is enabled, this entry holds the group account for database users. IDS_SERVER_INSTANCE_ BOOLEAN_1=1 This property can be set to 1 or 0. 1: Indicates that you want to create an instance as part of installation. 0: Indicates you do not want to create an instance as part of installation. IDS_INFORMIXSERVER= ol_informix1170 If you have opted to create an instance as part of the installation, this property holds the name of the instance that will be created. IDS_INSTANCE_PATH= /tmp/install/data If you have opted to create an instance as part of the installation, this property holds the path where the instance data will be stored. IDS_INIT_SERVER_BOOLEAN_1 =0 This property can be either 1 or 0. 1: Indicates that you want to the installer to initialize the created instance as part of installation 0: Indicates that you do not want to initialize the created instance as part of installation. IDS_SERVER_NUMBER=0 A unique server number identifying the server instance. The minimum server number is 0 and the maximum server number is 255. IDS_TCP_ALIAS=ol_informix1170 This property holds the database service name. The service name has an associated port number, as indicated in the System’s services file. IDS_TCP_PORTNUMBER A unique port number through which a database connection will be established. IDS_DRDA_BOOLEAN_1=0 This property can be set to 1 or 0. 1: Indicates that you want to enable DRDA to facilitate communication between the Informix database server and applications across different platforms. 0: Indicates you do not want DRDA enabled. IDS_DRDA_ALIAS= dr_informix1170 This property holds the server alias if DRDA is enabled. IDS_DRDA_PORTNUMBER=9089 A unique port number through which a DRDA connection to the database server will be established. Embedding IBM Informix The response file for repairing, modifying, or uninstalling Informix can also be modified to reflect desired inputs. Use the # (pound symbol) to precede a comment in the response file. If any of the response file entries are removed or deactivated (by commenting them out), the default installer value will be used. For example, if USER_INSTALL_DIR=<install_dir> is removed from the response file, the default installation location will be used. In the case of USER_INSTALL_DIR, the value of the INFORMIXDIR environment variable is used. If the INFORMIXDIR environment variable is not set, the default installation location is /opt/IBM/informix (on UNIX) or C:\Program Files\IBM\Informix\11.70 (on Windows). For users embedding Informix, an approach to getting Informix installed in the preferred location, if using the installation application, is to set the INFORMIXDIR environment variable in the application launching the installer and making sure that the response file entry for the USER_INSTALL_DIR is deactivated (by commenting it out) or removed. Setting the INFORMIXDIR environment variable in the application launching the Informix installer ensures that the installation application (launched as a sub-process to the application) will inherit its environment and consequently inherit the value of INFORMIXDIR. 4.3.4 Installing multiple copies of Informix Imagine a situation where you require several Informix configurations for your deployment needs. Say you are embedding Informix in an application, but different groups of clients need different Informix configurations. In such situations, you might want to install multiple copies of the Informix database server with different configurations on your template machine. With an existing installation on the machine, select a different installation directory for the subsequent installation. If running in silent mode, prior to running the installer, ensure that you pick unique values for Server Name, Server Number, and Rootpath in the response file. These values must not have been used by another installation. If running the installer in interactive mode, you will be prompted for values that require uniqueness. On Windows operating systems, Start menu entries created for a subsequent installation will be tagged with an installation number to identify the installation. Chapter 4. Installation strategies 87 4.4 Client applications Developers using the Informix product suite are provided with the client connectivity applications that allow them to connect to and use any of the APIs to write applications for Informix. The connectivity applications bundled with Informix are as follows: Informix Client SDK Informix Connect Informix JDBC DriverC 4.4.1 Client SDK and Informix Connect The Client SDK contains APIs that allow programming for Informix using C and ESQL, and runtime libraries for the APIs. In addition, Client SDK and Informix Connect provide the APIs and drivers to create C-based applications and develop (with Client SDK) or deploy (with Informix Connect) applications based on the following languages and APIs: Native (CLI) ESQL/C ODBC OLEDB .NET Object interface for C++ Therefore, with the Client SDK, you are equipped to develop and run your applications for Informix. With an application already developed for Informix, you can use Informix Connect to run the application. Informix Connect contains runtime libraries for Informix applications developed using Client SDK APIs. In essence, Informix Connect is a subset of Client SDK. Each example in this section is presented for either Client SDK or Informix Connect, because the installation and uninstallation methods are similar for both products. Note: The installation principle is similar for Client SDK and Informix Connect. Therefore, installation examples in this section are presented for one of them and not both. Recording a response file for client applications In addition to being part of the product suite installable media, Client SDK and Informix Connect can be installed using stand-alone installable media. They both allow users to generate a response file from an interactive installation. The response file can later be used for a non-interactive (silent) installation. 88 Embedding IBM Informix The mechanism for response file generation is similar to that of the database server. The example below shows how you would record a response file: installclientsdk -i gui -r /tmp/csdk_install.properties In the example above, the responses of the csdk installation will be recorded in a response file named /tmp/csdk_install.properties. The example shows the Client SDK installation being launched in graphical mode. To record a response file, the installation needs to be in interactive mode so that inputs provided during installation can be captured in the response file. Therefore, the example above could also have been presented with a Client SDK installation launched in console mode (UNIX only). Silent installation of Client SDK and Informix Connect Client SDK and Informix Connect support silent installation with and without a response file. Doing the installation without a response file means that you can perform silent installation of the product without having to interactively install an Informix database server or the individual client products. To perform silent installation, the convention is similar to that of the product suite installer. The Client SDK installer executable is called installclientsdk, and the Informix Connect installer executable is called installconnect. For the sake of simplicity, we use only the Client SDK installer executable in the provided examples. The same installation principles apply to the installation of Informix Connect. See the example below for an example of a silent installation of Client SDK: installclientsdk -i silent -DLICENSE_ACCEPTED=TRUE -DUSER_INSTALL_DIR=/tmp/install The Client SDK installer is launched to install Client SDK in silent mode, which is indicated by -i silent, into /tmp/install. The installation is performed with the license agreement accepted. If the installation is launched without using a response file, it is important that the license agreement be accepted on the command line, as shown in the example above. We previously talked about recording a response that can be used for the installation of Client SDK and Informix Connect. You can perform silent installation of Client SDK using the recorded response file. The responses captured in the response will be used during the silent installation: installclientsdk -i silent -f /tmp/csdk_install.properties The example above shows the silent installation of Client SDK using the response file named /tmp/csdk_install.properties. Chapter 4. Installation strategies 89 Silent uninstallation of Client SDK and Informix Connect An installation of Client SDK and Informix Connect places an uninstallation directory in the installation directory. The uninstallation directory contains subdirectories for the Informix products installed in that installation directory. To uninstall Client SDK in silent mode, from the installation directory, run the following command: uninstall/uninstall_clientsdk/uninstallclientsdk -i silent All features of Client SDK will be uninstalled. For Informix Connect, the uninstallation directory name will be uninstall_connect. 4.4.2 IBM Informix Java Database Connectivity Driver The IBM Informix Java Database Connectivity (JDBC) Driver facilitates client connection to Informix in a Java environment. Applications developed in Java can use the JDBC Driver to connect to Informix, and retrieve, query, and update (if permitted) data in an Informix database. The JDBC Driver also facilitates writing User Defined Routines (UDRs) for the database. The JDBC Driver meets Javasoft JDBC specifications, Java data types, and Informix data type compatibility. JDBC is available and can be installed using the product suite installer media. JDBC is also available using a stand-alone installer. Installing JDBC using its stand-alone installer requires Java Runtime Version 1.6 or later. Silent installation of IBM Informix JDBC Driver Informix JDBC Driver silent installation is facilitated both through the suite installer and also through its stand-alone installer. In 4.3.1, “Recording a response file” on page 77 and 4.3.2, “Performing a silent installation” on page 77, we discussed creating a response file and installing it using a response file. Those sections addressed the use of the product suite installer. In this section, we focus on the installation of the Informix JDBC Driver using its stand-alone installer. The stand-alone Informix JDBC Driver installable media contains a setup.jar file, which is the executable jar file needed for installation. To launch the installer, run the following command: java -jar setup.jar -i silent -DUSER_INSTALL_DIR=/tmp/install This command launches the JDBC Driver installer in silent mode and installs in /tmp/install. If the installation location is not set on the command line, JDBC Driver will be installed in the default location. 90 Embedding IBM Informix Silent uninstallation of IBM Informix JDBC Driver After the Informix JDBC Driver has been installed, the uninstallation directory, created in the installation directory during installation, will contain the uninstallation executable jar for uninstallation. The uninstallation jar executable file is named uninstaller.jar and can be used to launch an uninstallation in silent mode. If Informix JDBC Driver was installed using the product suite installer, an executable uninstallation file named uninstalljdbc will be created in addition to the executable jar. To uninstall Informix JDBC Driver, you can use either the executable jar file or the executable file. The example below shows how to run the Informix JDBC Driver uninstaller in silent mode using the executable file: uninstalljdbc -i silent As mentioned earlier, the uninstalljdbc executable will be available only if Informix JDBC Driver was installed using the product suite installer. The product suite installer installs Java, which can be used for uninstallation later. The executable file is created, which can be called directly without Java being present on the system. The stand-alone Informix JDBC Driver installer does not install Java on the system. Because the uninstaller requires Java to function, ensure that you have a JRE 1.6 or later on your system. To uninstall in this scenario, run the following command: java -jar uninstall/uninstall_jdbc/uninstaller.jar -i silent This command launches the JDBC Driver uninstaller in silent mode using the jar executable installed along with the application. The command assumes that you are launching the uninstallation from the JDBC installation directory. 4.5 Log files The installation application captures all actions it performs during the course of installation and the outcome of those actions. The information is captured in a series of log files that correspond to the product being installed. For every product installed using the product suite installer or using its stand-alone installer, there is a log file created in the installation directory that captures installation actions and outcomes of those actions. The Informix products’ installation log file names are as follows: IBM_Informix_11.70_InstallLog.log IBM_Informix_Client_SDK_InstallLog.log IBM_Informix_Connect_InstallLog.log IBM_Informix_GLS_InstallLog.log IBM_Informix_JDBC_Driver_InstallLog.log IBM_Informix_Software_Bundle_InstallLog.log Chapter 4. Installation strategies 91 In the event that an unexpected circumstance results in an error, you might need to observe the content of one or all these files to assist with troubleshooting and possible resolution. The files provide, at times, verbose information about actions, warnings, and errors that occur during installation. They also give the nature of the errors encountered. 4.6 Additional Informix installation procedures In addition to the standard Informix installation procedure, there are other options that should be considered for an application that uses an embedded Informix instance. The installation procedures that we have discussed thus far are well-suited for a deployments where the footprint is not of paramount concern and configuration options provided in the installation application suffices for the deployment needs. The procedures use the Informix products’ installation applications that bundle Java and rely on sufficient disk space to perform extraction and installation of the product on the target. This section discusses additional installation procedures that work in environments that might have more specific, more targeted requirements. Here we discuss the additional procedure for the Informix deployment utility. 4.6.1 The Informix deployment utility The Informix deployment utility has been designed to help with embedding Informix by allowing pre-configured Informix instances to be deployed through a simple command-line interface. The deployment utility was architected primarily for ISVs who deploy Informix as part of their application and require customized configuration settings beyond those available with the silent installer, or who need to deploy an Informix database instance with pre-loaded dbspaces and data. This kind of configuration that caters to the deployment of preconfigured instance can be tedious if it were done manually. The goal of this tool is to eliminate the hard work. The deployment utility is a command-line utility that is designed to be called programmatically, or from a script, as part of an application installation. It completely supports silent Informix deployment. To allow better control of deployed instances and post-deployment ease-of-use, the deployment utility takes a number of parameters from the command line. In addition to taking inputs from the command line, the deployment utility also takes a configuration file as input, which facilitates the lowest level of configuration for an instance to be deployed. The Informix database configuration file be edited using the deployment utility configuration file. Therefore, editing the deployment utility configuration file yields the most granularity in configuring an Informix instance. 92 Embedding IBM Informix In essence, deployment utility is a lightweight alternative to the Informix silent installation mechanism, which offers lowest configuration granularity for Informix database server deployment. In Chapter 5, “Deployment” on page 95, we discuss the Informix deployment utility in more detail, covering different deployment scenarios and configuration options Note: The Informix deployment utility is installed along with the Informix database server. It is located in INFORMIXDIR/bin/ifxdeploy, where INFORMIXDIR is the database server installation location. Chapter 4. Installation strategies 93 94 Embedding IBM Informix 5 Chapter 5. Deployment In this chapter, we review the details necessary to successfully deploy IBM Informix software as a complete solution. Having your application make use of Informix transparently means that it is fully integrated into an application or device. This results in the solution user having little or no knowledge that a database exists within the application or device. In other words, the database is invisible to the user, giving you greater control of your application or device. Successful deployment of Informix facilitates an efficient business integration solution. After reading this chapter, you will be equipped with the knowledge required to deploy Informix in an embedded environment. Topics covered in this chapter include deployment strategies and the components needed for packaging your solution. We provide a detailed discussion, along with examples, of the invisible (or deeply embed) methodology and the integrated (response file) methodology. We also discuss optional tools for packaging and deployment. © Copyright IBM Corp. 2011. All rights reserved. 95 5.1 Deployment strategies A critical aspect of Informix embedding is the successful deployment of Informix in an application or a device. Deployment, as used in the context of this book, is the redistribution of an application (Informix in this case) with its application-level configured options, and an optional working instance of the server. In preparation for deployment, some of these options can be set during installation, while others are set after installation to create a database with the preferred configuration. These options are transferable through the use of an Informix configuration file. Chapter 4, “Installation strategies” on page 63 discusses the Informix installation and its associated considerations in detail. By now, you should be comfortable with installing Informix. While some deployment strategies make use of the Informix installer, deployment goes well beyond the capability and confines of the Informix installer. The idea behind deployment is that you can redistribute a fully configured database instance as was created on your template machine. Later in this chapter, we discuss ways of deploying Informix as an embedded application, while examining ease of adoption. There are three deployment strategies that can be used to redistribute Informix as part of an application or device solution. The deployment strategies are as follows: Integrated This strategy adds a copy of the database media to the application CDs, and uses a silent installation. Invisible This strategy archives the database server, pre-installed and pre-configured, with the initial data loaded, along with the application on the same media. Included The database CD is in the package along with the installation manual. Out of the three strategies listed above, we discuss Integrated and Invisible (deeply embedded) in detail, as they provide the greatest level of scalability and advanced functionality. The Included strategy is briefly mentioned, but not with examples and details. 96 Embedding IBM Informix 5.1.1 Considerations Which deployment method you choose depends on your preference. We identify pros and cons for each method so as to help you better understanding the deployment methods. We also provide detailed instructions and examples. The methods may be used interchangeably, that is, you may perform one installation with one method and another installation on the same machine later with a different method. Choosing one method does not limit you to that method. Prior to any deployment, we suggest that you test your installation on a template machine to verify that the snapshot to be deployed meets the requirement set for the target system. Furthermore, if you are using an integrated deployment strategy, we highly recommend that you use the graphical installer at least once prior to designing a non-interactive deployment of Informix, and before testing the deployment. The graphical installer can help you understand terms and keywords that are present in the non-interactive mode of installation. 5.2 Components needed for packaging The following sections contain brief descriptions of the components needed for packaging. Application software This refers to the Informix application that gives users the facility for data storage, management, and retrieval. It is your custom application. It includes the set of files that make up the core Informix database management system, the installer application, and other supporting utilities used for installation, deployment, and server use. The preferred application functionality can be fine-tuned with greater granularity by selecting from the feature list provided in the Informix installer. This gives the capability of deploying Informix with a small footprint. The installation software that is used to deploy your application will need to make a request through the operating system to launch the Informix installation package. An Informix application software package also includes the client applications, which consists of Informix Client SDK, Informix Connect, and Informix JDBC Driver. Installer The installation application copies the Informix application files onto the target system. Because the Informix software is made up of several features that extend the functionality of the database server, the installer allows you to pick the preferred Informix features as required by the device or application embedding Informix. The installer also stores information about the installation on the machine so that it can be used for a later uninstallation. Chapter 5. Deployment 97 Informix files/binaries These are the core files that comprise the database server, which are the files associated with the installed features. Note that the core database server files do not include the installer application files. Database schema data A database schema is the structure of data that will be stored in the database. It shows the representation of data and the relationships between entities of the database. The data in the database is the value of a particular entry in the database. Note that data in a database can be of different types. The data types in Informix database are described in detail in Informix Dynamic Server 11: Advanced Functionality for Modern Business, SG24-7465. Deployment applications We describe in this chapter the Informix deployment utility that covers the deployment of archived Informix instances, and the Informix deployment assistant, which facilitates snapshot packaging and archiving. 5.3 Integrated deployment The concept of integrated deployment is indicative of a lack of user knowledge of the presence of Informix. Given this premise, the integrated deployment and invisible deployment are somewhat close in nature. What we refer to as an integrated deployment is the use of the Informix silent installer for deployment. In addition to silently installing, integrated deployment includes an end-to-end solution where a working instance of the server is realized. Silent installation is the form of installation where direct user interaction is not required. A response file is provided to the installer where installation-related information will be acquired. Details about how to record and modify a response file are provided in Chapter 4, “Installation strategies” on page 63. The information provided in the response file would have otherwise been provided by the user if installing in an interactive mode. Although a response file can be recorded while installing on a machine, the Informix installable media also has a sample response file that can be modified and used for silent installation. 5.3.1 Installer-based instance configuration To start a working instance of the server, you must specify certain configuration parameters for the server. The installer provides a series of interface windows for instance customization. These interfaces present questions and fields that translate into server parameters required for a server instance. 98 Embedding IBM Informix Figure 5-1 shows a server configuration window in the installer that contains configurable parameters used during installation. For completeness and flexibility with customization, we show the windows presented when going through the installation process using the Custom installation type. Figure 5-1 Server configuration: Server instance The corresponding response file entries are as follows: IDS_SERVER_INSTANCE_BOOLEAN_1=0 IDS_INFORMIXSERVER=ol_informix1170 IDS_INSTANCE_PATH=C:\\demo_install\\ol_informix1170\\dbspaces IDS_INIT_SERVER_BOOLEAN_1=1 The values in the input fields will be stored in the response file. You can choose to further customize your instance configuration by selecting Customize parameters under Configuration parameters. If you opt not to customize parameters, automatically generated defaults will be used by the installer during installation. As indicated in Figure 5-1, you can choose to create a server instance without initializing the instance. When you select the option to create a server instance, the installation application creates the environment, files, and data structure needed to realize a working instance with the preferred configuration options, stopping short of initializing the instance. Chapter 5. Deployment 99 Because the discussion in this section focuses on installer-based instance configuration for the purpose of embedded deployment, we cover this functionality within the installer that gets recorded in the response file and can be reused during an unattended (silent) installation for embedding purposes. Other windows in the installer that allow you to configure your instance but whose parameters do not get recorded in the response file are: Disk Configuration: This window allows you to configure your instance data space size, specify if you want to enable mirroring, and allow you to specify your mirror location. It also allows you to specify whether our not you want to create an sbspace for smart large object storage. System Resource Usage: This window provides an interface to configure how much of the system resources are used by the instance. It allows you to configure processor and memory allocation for the instance. Database Server Usage: This window provides the flexibility to specify the workload type for a server instance, that is, you can specify whether your server instance will be used mainly as an operational system with large numbers of simple transactions, optimizing for response time, or as data warehouse with a few but complex transactions, optimizing for complex query processing. You can also specify the expected number of database users and also specify whether you desire an instance where transaction logging is enabled. As part of the installation process, you can also choose to configure the connectivity settings. 100 Embedding IBM Informix The corresponding response file entries for the fields in the window shown in Figure 5-2 are as follows: IDS_TCP_ALIAS=ol_informix1170 IDS_TCP_PORT=9088 IDS_SERVER_NUMBER=0 IDS_DRDA_BOOLEAN_1=0 Figure 5-2 Server configuration: Connectivity For more information about the description of the contents of a response file, see Table 4-2 on page 81. 5.3.2 Directions for integrated deployment While the response file provides a means of setting some server configuration parameters, the server configuration file allows for a more granular approach to server configuration. A template configuration file is located in $INFORMIXDIR\etc\onconfig.std. You can make a copy of this template file and modify it for use in your deployment. If Informix is installed with the option to initialize the server, a configuration file will be created based on the entries provided during the installation process (either using an interactive interface or using the silent mode installation). The configuration file will be crated in $INFORMIXDIR/etc/onconfig.$DBSERVERNAME, where $INFORMIXDIR is the installation location and $DBSERVERNAME is the name if the database server. Chapter 5. Deployment 101 The configuration file will contain the configuration parameters used in the creating the database server instance; it can be further modified post-installation. During installation, you can also specify your preferred data location, as shown in Figure 5-1 on page 99. This setting allows you to identify a single directory location on the file system where your data will be stored. Because the installation location creates separate spaces for root dbspace, log dbspace, temp dbspace, and smart blob spaces, you see separate devices (files) representing each of these data spaces in the specified data location. Having a central data space location facilitates ease of programmability in an embedded scenario. Creating an instance without initializing Imagine a scenario where you have the Informix installation application and a response file set up in preparation for an integrated deployment. The installation application allows you to specify data space location, server name, server number, port number, and so on. Now imagine that your deployment requirements are such that you have a custom alarm program that you want to use for handling Informix alarm events. The Informix configuration parameter used to specify the alarm program is ALARMPROGRAM. As is the case for some other Informix configuration parameters, this parameter requires that the server be initialized for it to take effect. This means that if the value of this parameter is changed after the database is initialized, the database server must be brought down and reinitialized. Bringing down and reinitializing the database server during deployment introduces an additional time factor that will be prolong deployment completion. Therefore, in the case of integrated deployment, you may rather want to have all the database server structure, files, and environments set up during your installation, and then initialize the database server only after the required setup is complete. Checking the Create a server instance check box in the window shown in Figure 5-1 on page 99 creates a database server instance without initializing the instance. As part of the database server instance creation, the following items are created: Server instance environment file Data spaces Server instance registry entries (Windows) Connectivity configuration (sqlhosts) file on UNIX and registry entries on Windows Server instance configuration file reflecting the configuration deduced from the installer entries 102 Embedding IBM Informix An integrated deployment, which entails silent installation, calls for a means to customize an installed instance post-installation. Therefore, we need a way to install Informix and create and register the instance without initialization. If the Create a server instance check box on Figure 5-1 on page 99 is not checked during installation, all server creation/initialization entries in the installer will be ignored and no actions will be performed as part of the installation process. To deploy Informix in an integrated fashion, you are strongly encouraged to record a response file and check the Create a server instance check box when installing on your template machine prior to deployment. See Chapter 4, “Installation strategies” on page 63 for details about recording a response file. As this section is intended to elaborate on some of the deployment considerations for integrated embedding, it has addressed how to create a server instance without initializing. You will ultimately need to initialize the instance that you have created. To do so, perform the following steps: On Windows In an environment where the variables in environment files are set, run the starts.exe <server_name> -iy command. The naming convention used for the environment file on Windows is $INFORMIXDIR\<server_name>.cmd. On UNIX-based systems There are two environment files created, $INFORMIXDIR/<server_name>.csh and $INFORMIXDIR/<server_name>.ksh. These two files are created to accommodate the different shells that may be used. In an environment where the variables in either of the two environment files are set, run oninit -iy. The starts.exe and oninit utilities are located in $INFORMIXDIR/bin. In the command, <server_name> is the server name that was entered in the installer either through the panel in Figure 5-1 on page 99 or through the response file. The command starts the Informix server instance, initializing the disk space and shared memory (indicated by -i) without requiring input from the user (indicated by -y). These steps should be programmatically added to the application acting as your integrated deployment driver. Running Informix using the local system account on Windows The informix user account is the account that has the necessary privileges to manage and maintain Informix instances on the Windows operating system. By default, during the installation of Informix, you will be prompted to enter the informix user account password. If the informix user does not exist on the machine, it will be created for you using a password you provide. Informix allows you to install and manage the server without using or requiring the informix user account. You can install Informix using the local system account on Windows. Chapter 5. Deployment 103 The local system account has the same privileges as the informix user account, but does not require password verification, because it uses an internal system account. If you decide to start the server as the local system user, you can also choose whether or not to create the informix user. Figure 5-3 shows the window where you enter the input that is used to determine whether or not the server should be started as the local system user. Figure 5-3 Windows user specification window The window in Figure 5-3 shows that the database server created as part of the installation process will be created using the Windows local system user and the informix user will not be created. Despite opting for the local system account for the server created as part of installation, you can choose to create the informix user account. The informix user account is needed if the server is used for Enterprise Replication. Notice that the password field is disabled because the informix user will not be created. The corresponding response file entries for the window in Figure 5-3 are as follows: WINDOWS_USER_SELECT_BOOLEAN_1=1 This response file property can be set to 0 or 1. Setting it to 1 indicates that you want to create and run the server using the local system account. WINDOWS_USER_SELECT_BOOLEAN_2=1 Setting this response file property to 1 indicates that you want to create an informix user. 104 Embedding IBM Informix The server created as part of the installation process will be created using the created informix user account. WINDOWS_USER_SELECT_BOOLEAN_1 and WINDOWS_USER_SELECT_BOOLEAN_2 are mutually exclusive, that is, do not set both properties to the same value in a single installation. WINDOWS_USER_CREATE=1 If you have opted to have the server created using the local system account by setting WINDOWS_USER_SELECT_BOOLEAN=1, this response file property is used to indicate that you still want to create the informix user account. To deploy Informix in an integrated fashion so that the server is started using the local system account, we encouraged you to record a response file using the preferred installer selections when installing on your template machine prior to deployment. Enterprise Replication (ER) between UNIX and Windows systems depends on the presence of the informix user account. If you will be replicating data across Windows and UNIX platforms, you need to have the informix user present on the machine. The installation application gives the option to create the informix user account when the server is being created using the local system account. 5.4 Connectivity The database server requires that connectivity be configured so that “clients” can connect to the database server. In an embedded scenario, the application that embeds Informix may be connecting to the database server in the form of a client. Therefore, connectivity with the database server must be programmatically configurable. Connectivity configuration information is registry-based on Windows, and the database server obtains its connectivity information from a file on UNIX-based systems. 5.4.1 Connectivity on Windows Connection information for the database server on Windows is stored in the HKEY_LOCAL_MACHINE\SOFTWARE\Informix\SQLHOSTS registry key. The subkey for the SQLHOSTS registry key is the server name of the installed server instance: HKEY_LOCAL_MACHINE\SOFTWARE\Informix\SQLHOSTS\<server_name> Chapter 5. Deployment 105 The <server_name> key holds the following values: HOST OPTIONS PROTOCOL SERVICE Because you can have multiple server instances on the machine, the SQLHOSTS key can have multiple subkeys. In Figure 5-4, a server instance called ol_svr_custom exists on a machine whose host name is host1. The connection protocol for the server is onsoctcp and the port alias (or service name) is svc_custom. You can also see that there is a second server called ol_svr_custom_2 on the machine. Figure 5-4 SQLHOSTS registry key on Windows Table 5-1 shows a table outlining the sqlhosts information. Table 5-1 Sqlhosts information description for Windows and UNIX 106 UNIX field name Windows field name Description of connectivity information Description of group information dbservername Database server name key or database server group key Database server name Database server group name. nettype PROTOCOL Connection type The word “group” hostname HOST Host computer for the database server No information. Use a hyphen as a placeholder in this field. servicename SERVICE Alias for the port number No information. Use a hyphen as a placeholder in this field. Embedding IBM Informix UNIX field name Windows field name Description of connectivity information Description of group information options OPTIONS Options that describe or limit the connection Group options. 5.4.2 Connectivity on UNIX On UNIX systems, connection information for the server is stored in a file known as the sqlhosts file. By default, the file is installed in $INFORMIXDIR/etc. If Informix is deployed with the option to create a server in the installer, the sqlhosts file will be $INFORMIXDIR/etc/sqlhosts.<server_name>, where <server_name> is the name given to the server instance during installation. To use a different sqlhosts file, place it in a preferred location and change the value of the $INFORMIXSQLHOSTS environment variable to reflect the full path to the new sqlhosts file. Client applications require the information contained in the sqlhosts file to connect to the database server. The sqlhosts file contains the following fields: Server name Server connection protocol Hostname Service name (port alias)/port number Optionally, an options field See Table 5-1 on page 106 for summary of sqlhosts information in the sqlhosts file. Example 5-1 shows a sample content of a sqlhosts file on UNIX. Example 5-1 Sample content of a sqlhosts file demo_on onsoctcp host1 9088 In Example 5-1, demo_on is the server name, onsoctcp is the Informix protocol which defines the connection type and the network protocol used for connectivity, host1 is the name of the host machine, and 9088 is the connection port number. You can add new lines reflecting information about other server instances on the machine if you want to use a single sqlhosts file for all your instances. After the steps for an integrated deployment have been completed, you should have a working instance of Informix. See 5.4.3, “Connectivity protocols” on page 108 for list and description of valid Informix connectivity protocols. Chapter 5. Deployment 107 5.4.3 Connectivity protocols Informix supports several connection mechanisms that are inherently defined by the Informix connection protocol. Each of the connection mechanisms is characterized by three properties: Server type Connection type Network type The Informix protocol chosen depends on the Informix usage environment and the connectivity requirements. This protocol must be defined before the database server is brought online, that is, the decision about the connectivity protocol to use must be made at the time the server is being created, because the protocol chosen affects the sqlhosts configuration and the NETTYPE server configuration parameter. Also, some protocols are specific to certain operating systems. Using such protocols on unsupported platforms may cause server initialization failure or the inability to connect to the database server. Table 5-2 lists the Informix protocols, their description, and Informix supported platforms. The protocols used on each platform falls under specific protocol categories. The description for each of the protocol category is as follows: BSTP: Berkeley sockets using TCP/IP IPSP: Inter-process communication using stream pipe IPSM: Inter-process communication using shared memory MAXC: Socket using TCP/IP with Informix MaxConnect SSL: Secure Sockets Layer TLTP: Transport layer interface (TLI) using TCP/IP Table 5-2 Connectivity protocols Platforms BSTP IPSP IPSM AIX-64 onsoctcp onipcstr HP Itanium 64 onsoctcp HPUX-64 MAXC SSL onipcshm onsocimc drsocssl onsocssl onipcstr onipcshm onsocimc drsocssl onsocssl onsoctcp onipcstr onipcshm onsocimc drsocssl onsocssl Linux 64 onsoctcp onipcstr onipcshm onsocimc drsocssl onsocssl Linux on IBM eServer pSeries onsoctcp onipcstr onipcshm onsocimc drsocssl onsocssl 108 Embedding IBM Informix TLTP Platforms BSTP IPSP IPSM Mac OS X onsoctcp onipcstr onipcshm Solaris 64 onsoctcp onipcstr onipcshm Windows 32/64 onsoctcp TLTP MAXC SSL onsocimc ontlitcp ontliimc drsocssl onsocssl drsoctcp onsocssl 5.5 Invisible deployment (deeply embedded) Integrated deployment, described in 5.3, “Integrated deployment” on page 98, caters to the fundamental need to deploy Informix as an embedded application onto systems in a manner so that the users are unaware of its presence. However, the integrated deployment entails using the installer, which can impact the system. For example, there is a startup phase in which the installer application is initialized. The installer depends on pre-packaged Java Runtime. Deploying Informix with the bundled JRE increases the size of the media. The larger the media size, the longer the extraction time and total deployment time. In addition to the time consideration, the installer also requires that there be sufficient space in your TMP location to perform the extraction. While the installer gives you the capability to configure the TMP location prior to installation, this is an extra setup step. For users embedding Informix in their application, the extra dependencies and constraints may not be acceptable depending on business requirements. Invisible deployment is a way to deploy Informix without the impact caused by the installer application. In essence, an installed copy of the Informix database will be archived with all server instance information and data, and deployed to a user system. The copy of Informix to be archived has to be installed on the template machine using the Informix installer. Therefore, you install once, and can deploy to as many machines as needed. This section discusses the process of packaging Informix instance(s) and deployment using the Informix deployment assistant and deployment utility. These utilities facilitate the easy and intuitive packaging and deployment of Informix database instance(s) with flexible configuration capabilities. Chapter 5. Deployment 109 5.5.1 Informix deployment assistant To perform multiple deployments of an Informix database on one or more machines, an installation of the database server must be performed on a template machine. The template machine serves as a staging ground for the installation and instance to be deployed. The idea of having a staging ground is that the server can be customized and configured to suit a variety of deployment purposes. After the server is customized, you can collect a snapshot of the server, which can then be deployed as needed. The deployment assistant is a utility that assists in the creation of snapshots of instances and their associated data spaces in preparation for deployment. The deployment assistant is an Eclipse and Java based GUI tool, with a complementary command-line interface (CLI) to facilitate scripting needs. Why would you want to create a snapshot A snapshot refers to the state of the Informix instance’s data and installation files at a particular point in time. Some applications for creating snapshots are: Backing up an instance’s installation state: This can be used as a complement to the data backup that usually takes place. In the event of a catastrophic system failure, an instance snapshot can be used to restore the Informix installation to an acceptable previous state. Cloning an Informix installation: If multiple instances of the same configuration need to be created on multiple systems, a snapshot of a single instance can be deployed with relative ease (using the deployment utility) on the other systems. Deploying with applications: The snapshot produced by deployment assistant is in an archive format, making it easy to package with other software and transfer to other systems, including embedded systems. Additionally, the compressed snapshot formats produced by the deployment assistant are fully supported by the deployment utility. In simple terms, the deployment utility understands how to extract snaphosts created by the deployment assistant. Deployment assistant prerequisite To use the deployment assistant, the following items or actions must be available or taken on the system: Java Runtime Environment (JRE) 1.6 or higher. Ensure data consistency by closing all open transactions before the snapshot is taken. 110 Embedding IBM Informix Note: The the JRE must match the bit-level of the Informix installation with which the Deployment Assistant is associated. The installation of the Informix database deploys a JRE that satisfies this requirement. As of Informix Version 11.70xC1, the JRE installed as part of the database server installation is located in INFORMIXDIR/extend/krakatoa/jre. Creating snapshots with the deployment assistant The deployment assistant executable is located in INFORMIXDIR/bin. To invoke the deployment assistant, run the following command: $INFORMIXDIR/bin/ifxdeployassist $INFORMIXDIR is the Informix database server installation location. On Mac OS, the executable is located at: ifxdeployassist.app/Contents/MacOS/ifxdeployassist Instance detection As mentioned earlier, a snapshot is the state of an instance, instance-related data, and installation files at a particular time. In creating a snapshot, you might need to preserve all instance information if, for example, you have certain stored procedures a databases that you want to use on the target. It may be that the impact of loading the stored procedures and all relevant data on the target might be unacceptable. In this case, you might need to capture all the instance information, including configuration and data. Given the instance name and location, the deployment assistant is able to scan and capture data, installation files, and configuration information for the instance. Chapter 5. Deployment 111 Starting the deployment assistant with the INFORMIXSERVER and INFORMIXSQLHOSTS environment variables set triggers automatic detection of the instance specified (see Figure 5-5). INFORMIXSERVER is the environment variable that identifies the name of the instance, and INFORMIXSQHOSTS identifies the sqlhosts file containing the database connectivity information. After the instance is automatically detected, information regarding the instance is displayed for verification. Figure 5-5 Deployment assistant instance detection window 112 Embedding IBM Informix Connecting to a database server If an instance is not detected based on the INFORMIXSERVER value provided, or the No radio button is selected in Figure 5-5 on page 112, the deployment assistant prompts for the instance’s connection information (See Figure 5-6). The deployment assistant has to make an active connection to the database server instance so that the necessary snapshot information can be acquired. For a successful connection to be possible, the database instance must be online. The instance that deployment assistant connects to is known as the template instance. This is the instance from which the snapshot is being created. Figure 5-6 Deployment assistant instance connection window The connection information given must correspond to a running instance that is located on the host from which the deployment assistant is invoked The deployment assistant cannot create snapshots of instances on remote hosts. Note: In the window shown in Figure 5-5, service names are not allowed when specifying the port number (that is, only digits are allowed). Chapter 5. Deployment 113 Saving the snapshot After a successful connection is made to an instance that is online, the deployment assistant prompts for the location to which the snapshot will be saved (Figure 5-7). A default location and name are given initially. Figure 5-7 Snapshot Location window To change the location in which the template machine snapshot will be saved, click Browse, as shown in Figure 5-7. You can change the name and the format of the snapshot archive that will be created. The deployment assistant supports four archive formats for the snapshot that will be created. Of the four supported formats, three offer compression. The following is a complete list of the supported formats: BZip2 (*.tar.bz2): This format offers the most compression. Consequently, saving the archive in this format takes the most time. GZip (*.tar.gz): This is the default archive format for deployment assistant. Tar (*.tar): This format offers no compression. Zip (*.zip): While this format offers compression, it does not preserve file permissions on UNIX-based operating systems. 114 Embedding IBM Informix As mentioned earlier, the creation of a snapshot entails creating a packaged copy installed files, configuration files, and data. The installed files snapshot archive is stored in a separate location from the data space(s) snapshot archive. The data spaces snapshot archive has _db appended to the name specified for the snapshot. That is, given C:\temp\snapshot1.tar.gz as the location in which the snapshot will be saved as shown in Figure 5-7 on page 114, the data spaces snapshot will be saved in C:\temp\snapshot1_db.tar.gz. By default, the deployment assistant saves snapshots in the location from where it was invoked, that is, unless changed, the deployment assistant will save the snapshot in the user’s present working directory. The default name of the snapshot is the name of the Informix instance that is being packaged. As an example, let us assume the following: Your present working directory is C:\temp\dir. The name of the Informix instance to be packaged is infx_svr. Given the assumptions above, the default save location for the snapshot will be C:\temp\dir\infx_svr.tar.gz and the save location for the data spaces will be C:\temp\dir\infx_svr_db.tar.gz. Chapter 5. Deployment 115 Specifying snapshot features After specifying the location in which the snapshot will be saved, the deployment assistant presents the installed features for the instance that is being packaged (see Figure 5-8). Here you can further customize your snapshot by specifying features that you do not want packaged with your snapshot. You can also go as far as specifying files that are unwanted in your snapshot. This process is known as snapshot reduction. Note: As of Informix Version 11.70.xC1, snapshot reduction cannot be performed using the deployment assistant’s command-line interface. You can reduce the size of your snapshot only through the deployment assistant’s graphical interface. Figure 5-8 Snapshot feature selection window Snapshot reduction can be performed in the event that certain features are not required in the instance to be deployed. For example, if your requirements do not include the ability to develop .NET client applications, you do not need Informix Client SDK to be packaged in the snapshot and consequently deployed to the target. Additionally, snapshot reduction can be performed to attain a desired footprint (size) of the instance. 116 Embedding IBM Informix Packaging instance data With deployment assistant, you have the choice of including or excluding instance data spaces in your snapshot (see Figure 5-9). Therefore, if instance data is simply used for immediate analysis after which it is discarded or overwritten, you might not need to package the instance data. If your data is volatile, you might need to evaluate your need to package the data in your snapshot. A common scenario where the data is included in the snapshot is when Informix is embedded in an application where it is being used as the application’s content store. In this case, the template instance is pre-populated with data required for the application’s initial operations. The choices made during instance packaging depends on the your preferences and also the embedded environment requirements. Figure 5-9 Snapshot instance data window In Figure 5-9, the window lists all the data spaces associated with the ids1170_2 instance. You can opt to have the data packaged in your snapshot. Note: The deployment assistant cannot create snapshots of data spaces residing on raw devices. Chapter 5. Deployment 117 Running the deployment assistant from the command line Embedded cases are ideal cases where automation is required. In such cases, the deployment assistant provides command-line options to perform all the tasks available in the GUI, with the exception of snapshot reduction functionality. To see deployment assistant command-line syntax, specify the -h or --help command-line option when executing ifxdeployassist. Table 5-3 shows the deployment assistant command-line options and their description. Table 5-3 Deployment assistant command-line options Option Description -a, --archive <format> The archive/compression format to use for the snapshot. The supported formats are BZip2, GZip, Tar, and Zip. If no archive format is specified, GZip is used. -c, --command-line Run DA in command-line mode. Snapshot reduction capability is not available when DA is run in this mode. -d, --data Installed files and instance data will be included in the snapshot. -f, --filename <path> The path and file name of the snapshot, with optional archive and compression suffix settings. The -a option overrides any archive and compression types made in the file name here. If the file name is not specified, the following format is used: <current_dir>/<INFORMIXSERVER>.<archive_format> -h, --help Display the DA usage. -i, --instance <connection_info > The connection information of the instance from which to create the snapshot. The format is: <instance>:<host>:<port>[:SQLI | DRDA] Where: <instance>: The name of the Informix instance. <host>: The database instance host name. <port>: The listening port number of the instance. SQLI | DRDA: The connectivity protocol (the default is SQLI). If not specified, the connection information is read from the server environment and configuration information. -n, --no-server Excludes the Informix instance installation from the snapshot. The installation files are not packaged in the snapshot. If you use the -n option, you must also pass the -d option. -v, -verbose Run DA in verbose mode. To run the deployment assistant in the command-line interface, the -c or --command-line command-line option must be specified: ifxdeployassist -c 118 Embedding IBM Informix This command can be used in conjunction with other command-line options. See Table 5-3 on page 118 for the deployment assistant command-line options and their description. Examples of packaging Informix using the deployment assistant In this section, we show examples of snapshot creation based on a Linux environment in which: The ifxdeployassist command is invoked from /tmp. Data is packaged with the snapshot. The command in Example 5-2 creates a snapshot of the database server at /tmp/informix1.tar.gz. The snapshot in this example contains the installed files and instance information, but will not contain data. The informix1:localhost:9088:SQLI value directs the deployment assistant to take a snapshot of the informix1 instance, which is configured for localhost and connects to service port 9088 using the SQLI protocol. Example 5-2 Archive snapshot of instance with all defaults, data excluded ifxdeployassist --command-line -i informix1:localhost:9088:SQLI The command in Example 5-3 creates the database server archive snapshot, including data. The archive format and location are explicitly specified. The command creates a snapshot of the server at /opt/snapshot1.tar and all of its associated data at /opt/snapshot1_db_tar. The deployment assistant is directed to take a snapshot of informix2 instance in this example. Example 5-3 Archive snapshot of instance with data ifxdeployassist -c -d -i informix2:localhost:9090:SQLI -a tar -f /opt/snapshot1 Example 5-4 creates a snapshot of data at /tmp/informix2_db.tar.gz. In this example, the protocol is not specified. Therefore, the default (SQLI) will be used. The example shows the usage of the -d and the -m command-line options to package only the server data. Example 5-4 Archive snapshot of instance, capturing data only ifxdeployassist -cvdni --instance ids1170_2:localhost:9288 Chapter 5. Deployment 119 Verbose mode allows you to observe the progress of the snapshot creation, as shown in Figure 5-10. The command used in this example also shows how several command-line options can be stringed together for the desired results. Figure 5-10 Deployment assistant verbose command-line output Common pitfalls Here are some common problems and troubleshooting steps that can be taken. The deployment assistant fails to start when invoked Make sure that JRE 1.6 or higher is included in the PATH environment variable. PATH should include the location of the Java executable. Additionally, make sure that the JRE in the PATH environment variable is at the same bit-level as the Informix installation with which the deployment assistant is associated. You can check the bit-level and version of the JRE by executing the following command: java -version In addition, make sure that the DISPLAY environment variable is correctly set. The -debug and -consolelog Eclipse options can also be passed as command-line options to ifxdeployassist to further diagnose startup issues. “No connect permission” when packaging data spaces Verify that the user invoking the deployment assistant has the connect privilege to the Informix sysadmin database of the instance for which the data spaces are being packaged. A user with DBA or DBSA privileges can grant this permission to a user by invoking the following command: echo grant connect to alex | dbaccess sysadmin In the command above, connect privilege to the Informix sysadmin database is being granted to user alex. 120 Embedding IBM Informix Problems connecting to the Informix server instance This situation could be due to the host name being specified incorrectly. Some instances are configured in SQLHOSTS environment variable (or registry entry on Windows) to listen on all names/addresses that map back to the local host. There are times, however, when this is not the case, and localhost or a specific host name or IP address must be specified as the host name for the connection. Check to see which of these is the case for your particular instance. 5.5.2 The Informix deployment utility While the Informix installer application provides a way to fully install and deploy Informix, ISVs and other interested users might need to deploy fully customized instances without the impact caused by the Informix installation application. The Informix installation application provides the capability to create customized instances. However, customization through the installation application is limited to the parameters and configuration options provided within the installer interface. If the installation will be used by the deployment vehicle, granular customization of the configuration parameters and deployment of ready-made dbspaces will have to be realized through a script or some other external utility or application after installation. The Informix deployment utility solves these problems by providing the capability to deploy an archived, fully customized instance set up on a template machine. To use the deployment utility, you need to employ the enterprise Informix installation application to install the Informix database server. After installation, configure the instance to suit the needs of the application or device in which Informix will be embedded. Upon configuring the instance, package the configured instance (application files, data spaces, and configuration parameters) by creating an archive of the instance. See 5.5.1, “Informix deployment assistant” on page 110 for detailed information about archiving an Informix instance using the Informix deployment assistant. Alternatively, you can create the archive using your archiving tool of choice. After the Informix instance has been archived, it can be deployed as required using the deployment utility. The deployment utility creates the following items on the target system: Informix service (on Windows) The informix user account (if not present) On Windows, the informix account will be created only if Informix is not being deployed using the local system account. Informix registry keys (on Windows) Chapter 5. Deployment 121 Environment file containing the necessary environment variables to initialize the database server Empty root dbspace storage device (if not present) For seamless compatibility with the deployment assistant, the deployment utility has built-in support for extracting archives of the following formats: BZip2 (*.tar.bz2) GZip (*.tar.gz) Tar (*.tar) Zip (*.zip) Upon deployment, the environment file created by the deployment utility contains the instance-related variables associated with the database server being deployed. In addition to facilitating Informix embeddability in third-party applications or devices, the deployment utility also facilitates quick upgrades from one Informix version to another by allowing quick deployment of Informix onto multiple machines without overwriting data. Due to the high level of configuration and customization that may be required during deployment, the deployment utility supports two modes through which inputs can be supplied to it: Command line Configuration file The configuration file provides the highest level of instance configuration and customization during deployment, as it allows comprehensive modification of the database server configuration file. Installing Informix on a template machine Perform the following steps to use the deployment utility on a template machine: 1. Install Informix on the template machine and set up instances. See Chapter 4, “Installation strategies” on page 63 for information about installing Informix. 2. Configure the instance to the level of granularity desired by editing your configuration file. 3. If required, create database, tables, and load data. 4. Archive the instance. Optionally, include the configured data spaces in the archive. The deployment assistant can be used for easy snapshot archiving. See 5.5.1, “Informix deployment assistant” on page 110 for information about creating the snapshot package using the deployment assistant. 122 Embedding IBM Informix Deployment utility command-line usage This section describes the usage of the deployment utility from the command line. Using the deployment utility on the target machine You can deploy the archived server with a host of options, depending on your needs. Prior to deploying Informix onto the target system, ensure that the following circumstances exist: The INFORMIXDIR environment variable is set to the preferred location in which you want Informix unarchived and deployed. The INFORMIXSERVER environment variable is set to the preferred name of the server instance name to be created on the target machine. For locales other than the default (US English), set the following environment variables: – CLIENT_LOCALE (to the preferred client application locale) – DB_LOCALE (to the preferred database locale) – DBLANG (to the subdirectory of $INFORMIXDIR that contains the language-specific message files) – SERVER_LOCALE (to the server locale for read-write operations on OS files) Table 5-4 lists the options for the deployment utility and corresponding descriptions. Table 5-4 Deployment utility deployment command-line options and their description Option Description -autorecommend Creates Informix recommendations based on the machine resources and saves the recommendations in an alternate onconfig file. -clone Creates and deploys a clone of the primary server in an Informix high-availability cluster. -config <config_file> Specifies a deployment utility configuration file. The deployment utility configuration file has modifiable entries that allows you to customize the Informix server configuration file. -drdaport <port> Specifies the DRDA port number. This port number will be used for IBM common client connectivity. The default is 9089. Chapter 5. Deployment 123 124 Option Description -extractcmd <command> Uses the command specified in <command> to perform the snapshot extraction. This option is especially useful if an external application whose compression is not supported by DU is used to archive the snapshot. -file <archive> Specifies the full or relative path to the location of the archive of the snapshot to be deployed. -force Overwrites the existing environment variables or configuration settings and create new ones at deployment time. -installdrive <DRIVE> Windows only. Specify the drive in which the IFMXDATA directory will be created. The IFMXDATA directory will contain the Informix root chunk file if ROOTPATH is not configured in the DU configuration file (The default is C:). -log <logfile> Sends progress messages to the file specified by <logfile>. -p <password> Windows only. The Informix user password is the one used to create the Informix service. -relocate <path>|<old_path >=<new_path> Specifies the directory to relocate Informix chunks on the target machine. -rootpath <path> The root dbspace location on the target machine. The default is C:\ifmxdata\<svr_name>\rootdbs_dat.000 on Windows and $INFORMIXDIR/rootdbs on UNIX. -servernum <num> Specifies the server number for the instance. This entry updates SERVERNUM in the onconfig file. The default is 0. -silent Actions are performed in silent mode. There is no console interaction. Progress will be logged if -log argument is specified. -sqliport <port> Specifies the SQLI port number. The default is 9088. -start <secs> The database server will be initialized as part of deployment. Optionally, specify <secs> to specify initialization timeout duration. -system Windows only. The Informix service will be created using the Windows local system account. -verbose Performs deployment actions in verbose mode. Embedding IBM Informix Option Description -wow6432 Windows only. Used to redirect registry access to the 32-bit registry view. Use this option when deploying or uninstalling 32-bit Informix on a 64-bit machine. -y Do not prompt for confirmation. Here is the deployment utility syntax showing the command-line usage: ifxdeploy [autorecommend] [-file <archive>] [-p <password>|-system] [-l <logfile>] [-config <configfile>] [-clone] [-silent] [-6432] [-sqliport <portnum>|namedpipe] [-drdaport <port>] [-servernum <num>] [-rootpath <rootdbs_file] [-extractcmd <command>] [-installdrive <DRIVE>] [-start [<secs>]] [-verbose] [-force] [-y] The deployment utility also provides the capability to uninstall a deployed instance. As part of uninstallation, the deployment utility shuts down the Informix instance and removes the files in the installation directory. For uninstallation options and descriptions, see Table 5-5. Table 5-5 Deployment utility uninstallation command-line options and their description Option Description -delifx Deletes the informix user account during the DU uninstallation. On Windows, the Informix-Admin group will be deleted, and the informix group will be deleted on UNIX. -log <logfile> Sends an uninstallation progress message to the file specified by <logfile>. -silent Uninstallation actions are performed in silent mode. There is no console interaction. Progress will be logged if -log argument is specified. -uninstall <path> Uninstalls Informix from the path specified by <path>. -verbose Performs uninstallation actions in verbose mode. -y Do not prompt for confirmation. Data relocation during deployment Take a situation where Informix is being embedded in application that will be deployed onto a target machine. Earlier in 5.5.1, “Informix deployment assistant” on page 110, we talked about archiving an instance snapshot in preparation for deployment. While a snapshot of the instance on the template machine is the one that will be deployed, if the instance data will also be deployed, there is no guarantee that the data will be deployed to the same location on target as it was Chapter 5. Deployment 125 on the template machine. Data chunk files might end up being deployed to a location that is inconsistent with the template machine. Because Informix stores information about all data spaces and the data chunk files in reserved pages located in the root chunk, it important that the reserved pages be updated on the target if necessary. The reserved pages may need to be updated to reflect the new location of the chunk files on the target system after the application and data files have been laid down. If the chunk files locations reflected in the reserved pages are different from the actual location of the chunk files on disk, the chunks will be inaccessible by the database server, rendering data in the chunks unusable. The deployment utility facilitates data relocation to ensure end-to-end deployment and data consistency. If there are multiple chunk files in the snapshot, they can all be relocated to a single directory on the target using the -relocate command-line option. Using the same command-line option, the chunk files can also be relocated to different directories on the target. When relocating data chunks, it is important that the chunk files are present at the desired location on target before the database server is initialized. Examples of Informix deployment using the deployment utility through a command line This section shows examples of Informix deployment driven by specific use cases. While the examples do not cover an exhaustive list of use cases, they serve as reference for the usage of certain command-line options and scenarios. In Example 5-5, C:\myarchive\archive.zip is the Informix archive containing the Informix application files (and dbspaces if needed). Based on the specification of a password in the example, we can see that the example depicts a basic deployment of Informix on Windows. mypassword is the password to be used to create the Informix service. The deployment utility has a built-in capability to extract the “zip” format archive. The informix user account will be created on the machine if it is not present. The default values for server number and port number are used. See Table 5-4 on page 123 for the default values. As will be seen in this example and other command-line examples, if the deployment utility is used, you have to set the INFORMIXDIR environment variable to reflect the location where Informix will be deployed and the INFORMIXSERVER environment variable to reflect the server name for a new instance that will be created by the deployment utility. Example 5-5 Basic deployment: Using defaults set INFORMIXDIR=C:\informix set INFORMIXSERVER=myserver ifxdeploy -file C:\myarchive\archive.zip -p mypassword 126 Embedding IBM Informix Example 5-6 shows the use of the deployment utility with some non-default values. This example illustrates the use of the deployment utility in an embedded scenario where some configuration needs to be done to create a working server. The usage explicitly specifies the Informix port number and the server number. In an embedded scenario, the user application driving the deployment of Informix can invoke deployment utility, specifying parameters such as port number and server number, so that user-preferred server connectivity information is readily available. The example also shows the usage of the -y option, which is used to deactivate prompts and to ensure that no command-line interaction occurs. The example shows a combination of options that allow for a completely non-interactive deployment. The scenario that this example illustrates is applicable to both Windows and UNIX systems, as there are no command-line options unique to either operating system. Example 5-6 Deployment using non-defaults setenv INFORMIXDIR /opt/informix setenv INFORMIXSERVER myserver ifxdeploy -file /tmp/myarchive/archive.zip -silent -log /tmp/myLog.log -y -sqliport 9088 -servernum 2 As part of the deployment, the database can also be initialized by passing the -start command-line option. If -start is passed, the ifxdeploy process will be suspended while the database server is being initialized. If the database has not been fully initialized after 10 minutes, the ifxdeploy process will continue. The -start command-line option can also accept a timeout period (in seconds) as an argument. This specifies the time (in seconds) after which initialization timeout will occur. Example 5-7 shows the deployment of an instance with the option to initialize the database server as part of deployment. The example shows a server being deployed on a Windows operating system where the Informix service will be created using the Windows local system account. In the example, the server initialization will be attempted with a timeout period of 180 seconds (3 minutes). Example 5-7 Deployment with the option to start the server set INFORMIXDIR=C:\informix set INFORMIXSERVER=myserver ifxdeploy -file C:\myarchive\archive.zip -servernum 10 -system -start 180 -y As discussed earlier, certain deployment scenarios may require that the server data chunks be relocated to a location different from the data chunks location on the template machine. To deploy the instance with packaged data, the new location of the chunk files on the target might need to be specified. Chapter 5. Deployment 127 Example 5-8 shows an illustration of chunk relocation. The example depicts a scenario where all chunks on the template are being relocated to the /opt/informix/data directory on the target. Because the relocation entails updating the server instance reserved pages located in the root chunk, the new value of the rootpath is provided on the command line. This updates the ROOTPATH parameter in the server configuration file. If the rootpath is not provided on the command line, the existing value in the server configuration file will be used. As shown in Example 5-8, all chunk files associated with the database server have to placed in /opt/informix/data before the database server is initialized. Example 5-8 Deployment with chunks location to a single location setenv INFORMIXDIR /opt/informix setenv INFORMIXSERVER myserver ifxdeploy -file /tmp/myarchive/myarchive.zip -servernum 11 -sqliport 9090 -rootpath /opt/informix/data/new_root.000 -relocate /opt/informix/data Example 5-8 shows how to relocate all the database server chunk files to a single location on the target. In the example, whether you have one chunk file or multiple chunk files, all chunk files will be relocated to the location specified by the -relocate command-line option. If you had multiple chunk files on the template machine that resided in different locations, and you want to relocate the chunk to various locations on the target, the argument passed to the -relocate option will be a list of semi-colon-separated path assignments. The path assignment format is <SOURCE_DIR>=<TARGET_DIR>, where <SOURCE_DIR> is a directory containing chunk files on the template and <TARGET_DIR> is the directory that the chunk files should be relocated on the target (Example 5-9). Example 5-9 Deployment with chunks relocation to multiple locations set INFORMIXDIR=C:\informix set INFORMIXSERVER=myserver ifxdeploy -file C:\myarchive\archive.zip -servernum 12 -sqliport 9091 -drdaport 9092 -rootpath C:\data\new_root.000 -relocate C:\data\old_dir1=C:\data\new_dir1;C\data\old_dir2=C:\data\new_dir2;C:\data\old_ dir3=C:\data\new_dir3 A slight extension of the scenario in Example 5-9 is where you may want to specify an offset in the target device where the initial chunk will be placed. This can be useful when Informix is being deployed to a machine with raw disk. The offset specification indicates the number of kilobytes in the device for the initial chunk. On a cooked file system, it indicates the number of kilobytes in the partition for the initial chunk for the data space. 128 Embedding IBM Informix An illustration is shown for a UNIX system in Example 5-10. Example 5-10 Deployment with chunk relocation and specifying offset setenv INFORMIXDIR /opt/informix setenv INFORMIXSERVER myserver ifxdeploy -file /tmp/myarchive/myarchive.zip -servernum 13 -sqliport 9093 -rootpath /opt/informix/data/new_root.001 -relocate /opt/informix/data/old_dir1=/opt/informix/data/new_dir1,3;/opt/informix/data/ol d_dir2=/opt/informix/data/new_dir2,10 Given the degree of customization afforded by deployment utility command-line options, we see how an Informix database server can be deployed using an array of command-line arguments to meet the specific embedded deployment needs. The deployment utility also accepts input from a configuration file. The deployment utility configuration file provides an alternative to the command line, which allows more flexibility and versatility. Deployment utility configuration file usage The command-line usage for deployment utility facilitates quick and easy deployment, which can satisfy a number of deployment needs and scenarios. For extended deployment flexibility, the deployment utility configuration file can be used. A template deployment utility configuration file is located in $INFORMIXDIR/etc/ifxdeploy.conf. Inputs allowed on the command line can also be provided using the configuration file. The -config command-line option is used to specify the absolute path to the deployment utility configuration file to be used. In the example below, /tmp/myarchive/myarchive.zip is the Informix archive used for the deployment, and the deployment utility inputs are acquired from the deployment utility configuration file located in /tmp/informix/du_config. ifxdeploy -file /tmp/myarchive/myarchive.zip -config /tmp/informix/du_config The deployment utility configuration file supports granular specifications. Connectivity information sqlhosts While the command line allows you to configure SQLI and DRDA connectivity, the deployment utility configuration file allows you to provide the exact entries that go into the file specified by the INFORMIXSQLHOSTS environment variable (on UNIX) or the SQLHOSTS registry entry (on Windows). This implies that the server can be configured to support any of the Informix connectivity protocols (see Table 5-2 on page 108). The primary server connectivity values will be imported from INFORMIXSERVER, PROTOCOL1, and SQLIPORT entries in the deployment utility configuration file. The open client connectivity information is specified by the DRDA port entry, DRDAPORT. Chapter 5. Deployment 129 When DRDAPORT is specified, the deployment utility generates an DRDA server alias with the convention “dr_INFORMIXSERVER”, where INFORMIXSERVER specifies the name of the database server. Additional server aliases can be provided as part of the deployment process by enclosing connectivity information specification in “BEGIN ALIAS” and “END ALIAS” flags in the deployment utility configuration file. You can enter multiple server aliases by enclosing each set of alias connectivity information in the BEGIN ALIAS/END ALIAS flags. Example 5-11 shows a snippet of the deployment utility configuration in which the primary server name is myserver. The database server connectivity information file will be created in /opt/informix/sqlhosts.svr1, as indicated by the INFORMIXSQLHOSTS entry. The port number for myserver is 9094. The DRDA alias with the default name of dr_myserver is created for the server. Two additional aliases, namely svr_alias1 and svr_alias2, are created for myserver, as indicated by the BEGIN ALIAS/END ALIAS flags. Example 5-11 Deployment using configuration file showing connectivity ... INFORMIXSERVER myserver INFORMIXSQLHOSTS /opt/informix/sqlhosts.svr1 PROTOCOL1 onsoctcp SQLIPORT 9094 DRDAPORT 9095 BEGIN ALIAS SERVERNAME svr_alias1 PROTOCOL onsoctcp PORT 9096 END ALIAS BEGIN ALIAS SERVERNAME svr_alias2 PROTOCOL drsoctcp PORT 9097 END ALIAS ... Error level specification During deployment, the deployment utility can log information about the deployment’s progress. The nature of the information logged can be configured using the deployment utility LOGLEVEL parameter to control the type/amount of information logged: Fatal errors are logged when the deployment utility’s LOGLEVEL configuration parameter is set to 1. Only messages that directly cause an unsuccessful deployment will be logged. Setting LOGLEVEL to 3 indicates that both warning messages and fatal errors should be logged. 130 Embedding IBM Informix When LOGLEVEL is set to 5, all informational, warning, and fatal error messages are logged. This setting is useful to determine the set of actions that have been performed by the deployment utility and possibly debugging errors in the event of a deployment failure. Automatic configuration recommendation Deployment in an embedded scenario often implies that the embedded application has to perform within the performance limitations of the device on which it is embedded. If an application is embedded within another application, the embedded application has to adapt to the performance characteristics of the application. The -autorecommend command-line option tells the deployment utility to generate a new Informix server configuration file based on expected database server usage and machine characteristics. The generated configuration file will be tuned for optimum performance. The BEGIN AUTORECOMMEND and END AUTORECOMMEND flags enclose values that will be used if the -autorecommend command-line option is passed. These values are used to generate a server configuration file based on the expected usage of the server and the environment in which it will be used. Example 5-12 shows a deployment utility configuration file snippet in which the maximum expectation is set for the database server usage. Example 5-12 Deployment using configuration file showing automatic configuration generation ... BEGIN AUTORECOMMEND MAXCPUS 2 MAXDISK 4096 MAXMEM 1024 MAXUSERS 20 MASXDSUSERS 4 RTO_SERVER_RESTART 120 END AUTORECOMMEND ... The description of the parameters are as follows: MAXCPUS: The maximum number of CPUs for which the Informix server instance should be configured. MAXDISKS: The maximum expected disk space (in MB) that will available for the database server. This disk space specification should exclude the space needed for the server files. It accounts only for the disk space expected for the database server instance. MAXMEM: The maximum amount of memory (in MB) for which the server instance should be configured. Be sure to account for other applications running on the machine before deciding on the MAXMEM value. Chapter 5. Deployment 131 MAXUSERS: This parameter specifies the maximum number of OLTP users expected on the server instance. MAXDSUSERS: If the server will be used for the purpose of analytics, this parameter specifies the maximum number of decision support users expected on the server instance. RTO_SERVER_RESTART: This value specifies the maximum amount time (in seconds) it will take for a server to restart in the event of a failure. This value dynamically defines how often server checkpoints will occur. Note: When the -autorecommend option is used, the generated server configuration file is named <ONCONFIG>.auotrec, where <ONCONFIG> is the name of the configuration file defined in the deployment environment. Cloning a database server With the preferred server environment variables set, you can create a clone of a primary server by passing the -clone command-line option to the deployment utility. The clone functionality allows you to deploy a snapshot of a source server on a target server without having to perform any backup and restore. The ENABLE_SNAPSHOT_COPY server configuration parameter indicates whether a server snapshot can be created or not. To enable snapshot creation, set the ENABLE_SNAPSHOT_COPY server configuration parameter to 1. To invoke the deployment utility with the option to clone a server, you can pass the -clone command-line option along with the -config command-line option, as shown below: ifxdeploy -clone -config /tmp/informix/du_config You can also set the deployment utility parameter to clone a server directly in the DU configuration file. The clone configuration parameters are specified in the DU configuration file, as shown in “Server configuration file modification from the deployment utility” on page 134. The CLONE parameter is used to specify that a clone of a source server is to be deployed. The BEGIN CLONE/END CLONE statements enclose the clone configuration parameters. The entries that the BEGIN CLONE/END CLONE statements enclose are read only when the CLONE parameter is set to 1, indicating that the clone of a source server will be created. Example 5-13 Clone server settings in the deployment utility ... CLONE 1 BEGIN CLONE # Source server information SOURCESERVER myserver SOURCEIPADDR 9.10.10.10 132 Embedding IBM Informix SOURCEPORT 9098 # Clone server infomation CLONEIPADDR 9.10.10.11 DISPOSITION Standard TARGETSIZE medium USELOCAL 1 TRUSTED 1 USERNAME informix PASSWORD password END CLONE ... The clone configuration parameters are: CLONE: This parameter can be set to 0 to indicate that cloning is not enabled as part of deployment. Setting it to 1 instructs the deployment utility to enable the clone functionality to clone a source server. SOURCESERVER: The value of this parameter is the name of the source server that will be cloned. SOURCEIPADDR: This parameter specifies the IP address of the source server that will be cloned. SOURCEPORT: This parameter specifies the port number on which the source server is listening. CLONEIPADDR: This parameter specifies the IP address of the clone server. DISPOSITION: A server can be cloned to fulfill several purposes. Set the value of this deployment utility configuration parameter to reflect the final disposition of the clone server. The possible disposition values are “RSS” and “Standard”. TARGETSIZE: This parameter configures the size of the clone server. Size in this context refers to the number of CPU VPs and the number of buffers. The possible values of the TARGETSIZE parameter are “tiny”, “small”, “medium”, and “large”. The value of this parameter is a simple relative indication that maps to the following real values: – – – – Tiny: One CPU VP and 50,000 buffers Small: Two CPU VPs and 100,000 buffers Medium: Four CPU VPs and 250,000 buffers Large: Eight CPU VPs and 500,000 buffers USELOCAL: This parameter specifies the configuration to be used for the clone server. Set to 0 to use the source server’s configuration for the clone server. Set to 1 to use a configuration local to clone server. Chapter 5. Deployment 133 TRUSTED: Access to the source server from the clone server can be controlled using this deployment utility configuration parameter. If set to 1, it indicates that the user is trusted and there is no need to acquire a user name and password to access the source server. If set to 0, it indicates that the user is not trusted and user name and password authentication is required to access the source server. USERNAME: This parameter specifies the user name required for connecting to the source server. This parameter is needed if TRUSTED parameter is set to 0. PASSWORD: This parameter specifies the password for the USERNAME parameter. Server configuration file modification from the deployment utility At the highest level of configurability for embedded deployment, the deployment utility provides the capability to modify the Informix database server configuration file. The server configuration file can be directly tuned, and acquires its inputs from the deployment utility configuration file. To modify the server configuration file, enclose the desired modifications in the BEGIN ONCONFIG and END ONCONFIG statements in the deployment utility configuration file. While this functionality allows manual granular modification of the server configuration parameters, the modifications that conflict with those made by the -autorecommend deployment utility functionality will be overwritten. That is, in terms of changes reflected in the server configuration, changes registered by the -autorecommend functionality take precedence. Example 5-14 shows a snippet of a deployment utility configuration file in which the STMT_CACHE, STMT_CACHE_HITS, and AUTO_STAT_MODE are set to certain preferred values to tune certain characteristics of the server performance. Example 5-14 Server configuration modification in the deployment utility ... BEGIN ONCONFIG STMT_CACHE 2 STMT_CACHE_HITS 5 AUTO_STAT_MODE 1 END ONCONFIG ... 134 Embedding IBM Informix Up to this point, we have discussed how to deploy the Informix server and create an instance using the deployment utility. Your setup may require that you have multiple instances on the system, which means you might need to create new instances as part of the deployment. This is shown in Example 5-15. Example 5-15 Creating a (new) instance using the deployment utility set INFORMIXDIR=C:\informix set INFORMIXSERVER=myserver2 lwt_install.exe -silent -y -port 9090 -servernum 3 -log C:\myLog.log Tip: To use a prepared configuration file during command-line deployment (see “Examples of Informix deployment using the deployment utility through a command line” on page 126), set the ONCONFIG environment variable to the location of the desired configuration file. The configuration file must be located in INFORMIXDIR/etc. After Informix has been deployed and an instance created, there will be an environment file created in $INFORMIXDIR called $INFORMIXSERVER.cmd, where $INFORMIXDIR is the directory in which Informix is deployed and $INFORMIXSERVER is the server name. The deployment utility creates an Informix service with the name specified by the INFORMIXSERVER environment variable. To start the Informix service, and initialize disk space and shared memory, run the following command: starts <server_name> -iy If you want to start the Informix service only by initializing shared memory, run the following command: starts <server_name> -y Important: Using -i will initialize the disk space and cause a loss of existing data. 5.6 Post-deployment After you have successfully deployed Informix with the desired configuration onto the target system, there might still be a few management tasks to perform. As examples, you may want to add storage locations for the application, or based on some conditional requirements, add chunks to the dbspace. This section addresses post-deployment tasks at a high level. Chapter 5. Deployment 135 See Chapter 10, “Administration of an embedded IBM Informix system” on page 237 for an extended coverage of post-deployment administration for an embedded environment. 5.7 Client applications To develop robust applications and facilitate reliable connection and data access for Informix, you can take advantage of the APIs that are part of the Informix client products. Informix client products are as follows Informix Client Software Development Kit (Client SDK) Contains APIs for writing Informix applications and required runtime libraries. Informix Connect Runtime libraries for running Client SDK-developed applications Informix Java Database Connectivity (JDBC) Java specification for writing applications with database connectivity 5.7.1 Integrated deployment for client applications Integrated deployment of Client SDK/Informix Connect/JDBC involves the silent installation process. See Chapter 4, “Installation strategies” on page 63 for more details about silent installation procedures for client applications. 5.7.2 Invisible deployment for client applications In this section, we describe the use of Client SDK and Informix Connect in Windows and UNIX environments. On Windows As of Informix Version 11.70xC1, the deployment utility does not have the capability to deploy the Informix client products. Use the silent installation procedure for Client SDK and Informix Connect deployment. See Chapter 4, “Installation strategies” on page 63 for more information about Client SDK and Informix Connect silent installation. 136 Embedding IBM Informix On UNIX Example 5-16 shows a script that has been constructed to perform the necessary operations for Client SDK deployment. The script can be slightly modified to deploy Informix Connect. Example 5-16 deployclient.sh: Sample script to deploy Client SDK #!/bin/sh #ensure that the system has all the prerequisites for Client SDK or Informix Connect functionality #Note: informix user and group has to be present on the machine #Note: this script must be run as root user. #Usage if [ "x$1" = "x-help" ] ; then echo "Usage: `basename $0` <archive> <server_name> <odbcini_file> <portnum> <protocol>" echo "where" echo "<archive> - full path to the archived client files" echo "<server_name> - Informix server instance name" echo "<odbcini_file> - full path to odbc.ini file" echo "<portnum> - port number for server instance" echo "<protocol> - socket protocol to be used by instance" exit 1 fi CURRDIR=`pwd` HOSTNAME=`hostname` #if $INFORMIXDIR is set, use it. Otherwise, create a new directory and set to $INFORMIXDIR if [ -z "$INFORMIXDIR" ] ; then if [ ! -d "${CURRDIR}/csdk350" ] ; then mkdir $CURRDIR/csdk350 fi export INFORMIXDIR=$CURRDIR/csdk350 fi ARCHIVE=$1 INFORMIXSERVER=$2 ODBCINI=$3 PORT=$4 PROTOCOL=$5 #deploy client application files unzip -d $INFORMIXDIR -q $ARCHIVE cd $INFORMIXDIR/gskit ./installgskit Chapter 5. Deployment 137 #if deploying Informix Connect, replace "cskdfiles" with connfiles #check for presence of files lists and run installation script to set properties for deployed files if [ ! -f "${INFORMIXDIR}/etc/glsfiles" ] || [ ! -f "${INFORMIXDIR}/etc/messagefiles" ] || [ ! -f "${INFORMIXDIR}/etc/clientsdkfiles" ] ; then echo "One or more files list is absent in your archive" exit 1 else cd $INFORMIXDIR $INFORMIXDIR/etc/installc $INFORMIXDIR/etc/glsfiles BRAND NOCHK NO_UPGRADE INSTALLODS AAA\#B000000 NOZDIP $INFORMIXDIR/etc/installc $INFORMIXDIR/etc/messagefiles BRAND NOCHK NO_UPGRADE INSTALLODS AAA\#B000000 NOZDIP $INFORMIXDIR/etc/installc $INFORMIXDIR/etc/clientsdkfiles BRAND NOCHK UPGRADE INSTALLODS AAA\#B000000 NOZDIP fi INFORMIXSQLHOSTS="$INFORMIXDIR/etc/sqlhosts.$INFORMIXSERVER" PATH=${INFORMIXDIR}/bin:${INFORMIXDIR}/lib:${PATH} LD_LIBRARY_PATH=${INFORMIXDIR}/lib:${INFORMIXDIR}/lib/cli:${INFORMIXDIR}/lib/es ql:${LD_LIBRARY_PATH} export INFORMIXSERVER INFORMIXDIR INFORMIXSQLHOSTS ODBCINI LD_LIBRARY_PATH PATH #create sqlhosts file echo "$INFORMIXSERVER $PROTOCOL $HOSTNAME $PORT">$INFORMIXSQLHOSTS The UNIX script in Example 5-16 on page 137 deploys Client SDK and sets the necessary file permissions. It must be run as root. Prior to using the script, install Client SDK on a template machine using the UNIX installer. Archive the installation by using a compression utility (the script assumes unzip is a known command on the machine). The script takes the Client SDK files archive as an argument and extracts the files. It sets certain environment variables that necessary for ODBC, as shown here: ./deployclient.sh <package> <server_name> <odbc_ini> <portnum> <protocol> In the example above, the variables are explained as follows: 138 <package> is the full path to the client files archive. <server_name> is the Informix server instance name. <odbcini_file> is the full path to the odbc.ini file. <portnum> is port number to be used by the server instance. <protocol> is the socket protocol to be used by the instance. Embedding IBM Informix For example: ./deployclient.sh csdk350.zip svr1 /opt/IBM/odbc.ini 9999 onsoctcp The script uses the $INFORMIXDIR environment variable as the deployment location. If $INFORMIXDIR is not set, it creates the csdk350 subdirectory in the current directory and uses it as the deployment directory. The script in Example 5-16 on page 137 is a proof-of-concept. It assumes that the informix user is present on the target system. It performs minimal error checking and handling. Use the script as a means of understanding the required steps when deploying Client SDK files. Modify the script to suit your deployment needs. JDBC Install the JDBC application files on a template machine and archive the installed files. On a template machine, extract the files in a preferred location. 5.8 Post-deployment After you have successfully deployed Informix with the desired configuration onto the target system, there might still be a few management tasks to perform. As examples, you may want to add storage locations for the application, or based on some conditional requirements, add chunks to the dbspace. Furthermore, you may need to perform functions such as load data and unload data. There is a host of command-line utilities for Informix that allow you to perform such administrative tasks. However, this section addresses post-deployment at a high level and covers tasks that may be performed as part of the embedded deployment efforts. The remaining chapters in the book cover administration in more detail. 5.8.1 Storage space management A data space or storage space in Informix is a logical storage facility created for the purpose of data storage in the database server. The physical files that compose a data space are called chunks and a data space can be made up of one or more chunks. The first created chunk in a data space is known as the initial chunk. A data space can be a dbspace, blobspace, smart blobspace, or extspace, depending on the type of data it is intended to store. In a database environment, it is important that a storage space is monitored and managed so that there is always space for the database server to store data. Exhausting the available storage space without adding space or deleting unwanted data to create space can cause database server failure. Chapter 5. Deployment 139 Space management using onspaces The onspaces command line utility in Informix can be used for storage space management. The onspaces utility provides options to create new data spaces, add chunks to existing data spaces, and delete unwanted data spaces. To use onspaces, be sure that shared memory for the server instance is initialized. If you want to create a new dbspace or add a chunk to an existing data space, perform the following steps as the informix user on UNIX or with administrative privileges on Windows: 1. Create a new storage device for the data. To do this task, create an empty file with the desired name. For example, to create a storage device in C:\TEMP\dbspace_dat.000 on Windows, with administrator privileges, run the following command: type nul>C:\TEMP\dbspace_dat.000 To create a storage device in /opt/TEMP/dbspace.dat on UNIX, run the following command: touch /opt/TEMP/dbspace.dat The file must also have read and write permissions for owner and group: chmod 660 /opt/TEMP/dbspace.dat 2. Run the onspaces command with the desired options to create a dbspace or add chunks to an existing data space. To create a new dbspace, you can use the following example command: onspaces -c -d <dbspace_name> -p <path_to_device> -o <offset> -s <dbspace_size_in_KB> The following example creates a new dbspace called new_dbspace: onspaces -c -d new_dbspace -p /opt/TEMP/dbspace.dat -o 0 -s 204800 To add a chunk to the new_dbspace dbspace, use the following example: onspaces -a <new_chunk> -p <path_to_device> -o <offset> -s <chunk_size_in_KB> The following example adds a 50 MB chunk to the new_dbspace dbspace. The chunk is located in opt/TEMP/newchunk.dat: onspaces -a new_dbspace -p /opt/TEMP/newchunk.dat -o 0 -s 512000 To use onspaces in an embedded environment, the steps highlighted above can be scripted and the script(s) executed as needed. With the server initialized, run onspaces -help for more options. 140 Embedding IBM Informix Space management using the SQL adminstration API Informix provides administration capability using a SQL interface. For space management, tasks that can be performed by using the onspace command-line utility can also be performed from a SQL environment, allowing for a more seamless integrated between Informix database serve and the embedding application or device. One of the advantages of the using the SQL adminstration API for administration is that several administrative tasks can be automated by using the tasks and sensors capability with Informix (see Chapter 9, “Automating management through tasks and sensors” on page 203). In essence, storage management can be fully customized so that SQL tasks can be triggered based on a sensor definition. When creating a new data space using the SQL adminstration API, although you can make the API call using the option to ensure that the storage file or device exists before creating the data space, you can also have the API call implicitly create the file. This action adds an extra level of flexibility to the onspaces utility alternative, as you do not always have to worry about creating the chunk file and setting the appropriate permissions before making the space creation call. To create a data space, execute the “task” or “admin” SQL function and pass the necessary arguments to create the type of data space required. Example 5-17 shows the creation of a dbspace called new_dbspace, whose initial chunk will be created in /opt/informix/data/dbspace.dat.chunk1. The initial chunk is specified to be 100MB and created with an offset of 0. Because the “with_check” directive is not included after the “create” directive, the chunk file will be created if it does not exist on the system. The syntax can also include other optional arguments like “offset”, “pagesize”, “first extent size”, and “next extent size”. If these arguments are not specified, the defaults are used. Example 5-17 SQL adminstration API call to create dbspace DATABASE sysadmin; EXECUTE FUNCTION task(“create dbspace”, “new_dbspace”, “/opt/informix/data/dbspace.dat.chunk1”, 102400, 0); close DATABASE; Similarly, you might want to create sbspaces for smart large objects storage. Sbpaces can be useful for storing data consisting of clobs and blobs, which can be typically large in size. For example, to store data such as audio files, PDFs, and images, you might want to use sbspace storage. Chapter 5. Deployment 141 Example 5-18 shows the creation of a smart blobspace called new_sbspace, whose initial chunk is created in /opt/informix/data/sbspace.dat.chunk1. The chunk is 1 GB with an offset of 0. Example 5-18 SQL adminstration API call to create sbspace DATABASE sysadmin; EXECUTE FUNCTION task(“create sbspace”, “new_sbspace”, “/opt/informix/data/sbspace.dat.chunk1”, 1024000, 0); close DATABASE; You can also add chunks to existing data spaces. Example 5-19 builds on Example 5-17 on page 141 by illustrating the addition of a chunk device located in /opt/informix/data/dbspace.dat.chunk2 to new_dbspace. The added chunk will be 50MB and will have an offset of 100KB into the device. Example 5-19 SQL adminstration API call to add a chunk to dbspace DATABASE sysadmin; EXECUTE FUNCTION task(“add chunk”, “new_dbspace”, “/opt/informix/data/dbspace.dat.chunk2”, 51200, 100); close DATABASE; Automatic space management Manual administration in an embedded environment is not always a possibility. In fact, one of the major characteristics of an embedded database is its ability to self-administrate to minimize the chances of database failure. When using data insertion with the embedded database, the limit of the allocated space for data storage can lead to the possibility of server failure as the allocated space becomes exhausted. As of Informix Version 11.70, the database server is configurable to expand storage space, eliminating the need to monitor and add space chunks when existing chunks are filled up. There are certain concepts that need to be understood, as they are essential to the automatic space management functionality: Storage pool In Informix, a storage pool is a collection of files, directories, and devices from which space can be allocated when a data space is running low. Automatic expansion is based on a predefined threshold. Entries in the storage pool are assigned with priorities at the time of creation. The possible priorities are 1, 2, and 3, indicating high, medium, and low priorities, respectively. The priorities assigned to the storage pool entries determine the order in which space will be allocated from the entries. 142 Embedding IBM Informix Chunks These are physical files or devices on a system in which the data is stored. One or more chunks make up a logical storage unit, which can be a dbspace, sbspace, or blobspace. Extending a chunk One of the main factors that drive automatic space management is the ability to automatically expand a data space. To expand a space, chunks can be either be added to the data space, or existing chunks can be made larger. Increasing the size of an existing chunk is referred to as extending the chunk. It is important to note that only non-mirrored dbspace chunks and temporary dbspace chunks can be extended. Storage space management configuration parameters Informix Version 11.70 introduces new server configuration parameters that facilitate storage space management in the database server. – SP_AUTOEXPAND: This parameter can be set to either 0 or 1. Setting it to 0 indicates that automatic space expansion is disabled, that is, the automatically space management functionality will be non-functional. Setting it to 1 enables automatic space expansion. – SP_THRESHOLD: This parameter defines the minimum amount of free disk space that triggers automatic space expansion. At this threshold, the storage space will be automatically expanded. The value can either be the amount of space in KB or a percentage of the total chunk size. Values between 0 and 50 are interpreted as percentages while values between 1000 and the maximum chunk size are interpreted as absolute KB values. – SP_WAITTIME: Thread access to storage pool is serialized. Therefore if one thread is accessing the storage pool, another thread attempting to expand a storage space will be locked out until the current thread completes. This parameter specifies the amount of time (in seconds) that a thread should wait before aborting the storage pool access attempt. If a storage space is not expanded successfully in the time specified by SP_WAITTIME, an out_of_space error will be returned. To set up an automatic storage space management system in Informix, you can choose either the mechanism of expanding storage space by adding chunks or by extending existing chunks. Space expansion by adding a chunk This is the space management mechanism in which a chunk is added to a storage space when it runs low on space. An example of where this approach could suitable is in mirrored dbspaces. Chapter 5. Deployment 143 To use automatic space expansion, perform the following steps: 1. Ensure that the SP_AUTOEXPAND server configuration parameter is enabled. To enable it, set it to 1. 2. Define a storage pool from which chunks will be added. The path used in the definition of the storage pool can be a file, device, or directory. Example 5-20 illustrates adding an entry to the storage pool. In the example, a directory named /tmp/informix/pool is added. The starting offset where space can be allocated is set to 10 KB, the total amount of space that can be allocated from the pool entry is 500,000 KB, each chunk created from the pool entry will be 25,000 KB, and the entry has a medium priority, as indicated by 2. Example 5-20 Adding a storage pool entry DATABASE sysadmin; EXECUTE FUNCTION task(“storagepool add”, “/tmp/informix/pool”, “10”, “500000”, “25000”, “2”); close DATABASE; 3. Optionally, you might also want to define the threshold at which space will be automatically added to a chunk, and the timeout period for a space expansion attempt. Use the SP_THRESHOLD configuration parameter to define the threshold and the SP_WAITTIME to define the timeout period. By performing these steps, you can successfully configure embedded database server automatic space expansion using chunk addition. Space expansion by extending existing chunks Defining a storage pool implies that we are reserving a predefined amount of space for the use of the database server. The database server can then claim the necessary space from this space as needed. In certain embedded environments, such large allocations may not be suitable, as they require a large amount of storage to be reserved for the database server. An alternative might be a situation where the database server takes space from the system as needed and not from an Informix-specific pool. Automatic storage space management can be configured so that a chunk that is low on space can be extended, that is, the size of the chunk will be increased. Note: Only non-mirrored dbspaces and temporary dbspaces can be extended. 144 Embedding IBM Informix To configure automatic space management for chunk extension, perform the following steps: 1. Set the SP_AUTOEXPAND server configuration parameter to 1. When it is set to 0, the automatic storage space management functionality is disabled. 2. Mark the chunk as extendable, which specifies that the chunk should be extended when its free space falls below the threshold. By default, chunks in Informix are marked as non-extendable at the time of their creation. Chunks that are not marked as extendable will not be extended, even if they run out of space. In Example 5-21, chunk number 5 is set as an extendable chunk. You can retrieve the chunk number of a database chunk by checking the output of oncheck -pr or onstat -d. If data will be packaged and deployed as part of the embedded solution, all associated chunks can be marked as extendable on the template machine before packaging. Example 5-21 Mark chunk as extendable DATABASE sysadmin; EXECUTE FUNCTION task(“modify chunk extendable” “5”); close DATABASE; 3. Optionally, modify the extend size of chunks to define the size by which the automatically extended chunks will be increased. In Example 5-22, the storage management of the dbspace numbered 3 is being changed so that a new chunk added to the dbspace will be at least 100,000 KB in size, and the chunk extension in the specified dbspace will be at least 20,000 KB in size. The output of oncheck -pr or onstat -d contains the space number of all storage spaces in the database server. Example 5-22 Set creation and extend chunks sizes DATABASE sysadmin; EXECUTE FUNCTION task(“modify space sp_sizes”, “3”, “100000”, “20000”); close DATABASE; Suppose we have a non-mirrored dbspace that contains both extendable chunks and non-extendable chunks. Depending on which chunk is running low on space as defined by the threshold, the database server can either trigger chunk addition or chunk extension. Chunks that are marked extendable will be extended while new chunks will be added from the storage pool for non-extendable chunks. Example 5-22 shows how the size characteristics are configured for a specified storage space. Chapter 5. Deployment 145 5.9 Final note Now that the Informix server instance is installed and running as described in 5.3, “Integrated deployment” on page 98 and 5.5, “Invisible deployment (deeply embedded)” on page 109, the DBMS is ready for use. If the Informix server instance has been invisibly embedded, then the application will likely also be installed and made ready for use. If the Informix server instance has been only integrated, the application might be ready to use, or some additional work may be required to set up the application. In either case, the work to make the application ready is beyond the scope of this book. This concludes the process to deploy a ready to use server. The next chapter continues with a discussion of Informix server configuration and parameters that are especially suited for embeddability. 146 Embedding IBM Informix 6 Chapter 6. IBM Informix configuration for embeddability In this chapter, we describe the configuration parameters and features that help make Informix an administrator-free database system. We start with the autonomic configuration parameters and continue with other parameters that make it easier to tailor an embedded environment. In the following sections, we discuss the autonomic features, such as auto update statistics. We also discuss tailoring features, including the alarm program and the sysdbopen() and sysdbclose() procedures. We conclude with a discussion about how the database server can be extended to provide specific functionality to better enable you to control and manage Informix. Understanding the information in this chapter is crucial for the proper implementation of an embedded system. © Copyright IBM Corp. 2011. All rights reserved. 147 6.1 Autonomic parameters The Informix server has been designed to reduce system administration as much as possible. The server includes several parameters that help enable self tuning. We provide a brief description of these parameters in the following sections: “AUTO_AIOVPS” on page 148 “AUTO_CKPTS” on page 148 “AUTO_LRU_TUNING” on page 149 “AUTO_REPREPARE” on page 149 “AUTO_STAT_MODE” on page 149 “DYNAMIC_LOGS” on page 150 “LOCKS” on page 150 “RTO_SERVER_RESTART” on page 151 6.1.1 AUTO_AIOVPS AUTO_AIOVPS enables the database server to automatically increase the number of AIO VPs and page cleaner threads when the database server detects that the I/O workload has outpaced the performance of the existing AIO VPs. AUTO_AIOVPS is enabled when set to 1. It can be enabled dynamically by using the onmode -wm or onmode-wf command. For example: onmode -wm AUTO_AIOVPS=1 Important: After AIO VPs are added, they are never removed. 6.1.2 AUTO_CKPTS Using a checkpoint can block transactions if resources are running low. However, the Informix checkpointing algorithm uses database server resources to avoid blocking transactions. AUTO_CKPTS allows the server to trigger checkpoints more frequently to avoid transaction blocking. This parameter is enabled when it is set to 1. It can be enabled dynamically with the onmode -wm or onmode -wf commands. For example: onmode -wm AUTO_CKPTS=1 148 Embedding IBM Informix 6.1.3 AUTO_LRU_TUNING The buffer pool holds data for the purpose of caching to improve overall database server performance. The database server uses the least-recently used (LRU) queues to replace the cached data. Each LRU queue contains a pair of linked lists: Free page list Modified page list Informix uses a high and a low watermark to control how frequently the shared-memory buffers are flushed to disk. Setting these watermark values to a high number increases transaction throughput. The drawback is that, in busy systems, the database server may find it difficult to find available buffers. This parameter allows the database server to automatically tune LRU flushing to maintain the best performance as the load on the system increases. AUTO_LRU_TUNING is enabled when it is set to 1. It can be enabled dynamically by running the onmode -wm or onmode-wf command. For example: onmode -wm AUTO_LRU_TUNING=1 6.1.4 AUTO_REPREPARE AUTO_REPREPARE controls whether Informix automatically re-optimizes SPL routines and re-prepares prepared objects after the schema of a table is referenced by the SPL routine or the prepared object has been changed. These changes can result from statements such as CREATE INDEX, DROP INDEX, DROP COLUMN, and RENAME COLUMN. If AUTO_REPREPARE is not set, users of prepared objects that reference the modified tables or SPL routines that reference the modified tables indirectly receive -710 errors the next time they run the prepared object or the SPL routine. Enabling AUTO_REPREPARE can avoid many -710 errors and can reduce the number of re-prepare and re-optimize operations that users must perform manually after the schema of a table is modified. Enable AUTO_REPREPARE by setting its value to 1. 6.1.5 AUTO_STAT_MODE The AUTO_STAT_MODE configuration parameter enables an additional check for UPDATE STATISTICS operations. Statistics are rebuilt only if the table or fragment has a percentage of changes greater or equal to the value of the Chapter 6. IBM Informix configuration for embeddability 149 STATCHANGE configuration parameter. STATCHANGE represents a percentage of changes. Its default value is 10. AUTO_STAT_MODE is enabled (1) by default. You can enable and disable this parameter using the onmode -wf and onmode -wm commands. 6.1.6 DYNAMIC_LOGS Logging is an important database server activity that ensures that a system can recover from failure and have the database in a consistent state. The amount of log space varies based on system activity and transaction length. If Informix runs out of log space, it will suspend processing. The DYNAMIC_LOGS parameter controls the dynamic allocation of log files by using one of the following three alternatives: No allocation (value 0) The system does not allocate additional log files. Manual allocation (value 1) The system generates an alarm and waits for the database administrator to allocate additional log files. Automatic allocation (value 2) This is the default. Informix automatically allocates log files as needed and generates an alarm as an alert that these actions have been taken. 6.1.7 LOCKS Locks are used throughout Informix to manage access to data by multiple users. As the transaction activity increases, more locks are required. If a transaction cannot obtain a lock, it must perform a rollback. Each lock requires 120 bytes of memory. If the system is configured with too many locks, less memory is available for other functions of the database server. The LOCKS parameter provides an initial number of locks to configure in the system. If Informix runs out of locks during the execution of transactions, it allocates additional locks (up to 99) in the system to continue operating. Locks are required for tables, rows, indexes, BYTE and TEXT pages, and BLOB and CLOB columns. You could do an estimate for the number of locks required in different types of transactions to obtain an estimate about how many locks should initially be allocated. The default value is 20,000 and it can be raised to 8,000,000 on a 32-bit system and 500,000,000 on a 64-bit system. 150 Embedding IBM Informix 6.1.8 RTO_SERVER_RESTART RTO_SERVER_RESTART enables use of the recovery time objective (RTO) standards to set the amount of time, in seconds, that Informix has to recover from a problem after it has been restarted and either brought online or placed in a quiescent mode. RTO_SERVER_RESTART works in conjunction with AUTO_AIOVP, AUTO_CKPS, and AUTO_LRU_TUNING to provide the best performance possible while meeting the recovery time objective. RTO_SERVER_RESTART is disabled when it is set to 0. The acceptable range of values is between 60 and 1800 seconds. This parameter can also be set by using the onmode -wf or onmode-wm command. For example: onmode -wf RTO_SERVER_RESTART=120 6.2 Other configuration parameters Informix has additional parameters that do not fall into the autonomic section, but can be useful for embedded environments. These parameters are briefly described in the following sections: “ALARMPROGRAM” on page 151 “CONSOLE” on page 152 “LTAPEDEV and TAPEDEV” on page 152 “MSG_DATE” on page 152 “MSGPATH” on page 153 “NS_CACHE” on page 153 “SYSALARMPROGRAM” on page 154 6.2.1 ALARMPROGRAM The ALARMPROGRAM parameter allows you to identify a script or a binary program that is run when specific events occur in the database server. To have the program called for information level events, you need to set the ALARM_ALL_EVENTS parameter. We discuss the alarm program in detail in 6.2.7, “SYSALARMPROGRAM” on page 154. Chapter 6. IBM Informix configuration for embeddability 151 6.2.2 CONSOLE The CONSOLE parameter specifies the path name and the file name for console messages. In an embedded environment, it can make sense to set this parameter to point to a bit bucket, such as /dev/null in UNIX and Linux environments, and to NUL in Windows environments. 6.2.3 LTAPEDEV and TAPEDEV The LTAPEDEV parameter specifies the device or directory file system to which the logical logs are backed up when using ontape for backups. The TAPEDEV parameter specifies the device or directory file system to which ontape backs up storage spaces. LTAPEDEV also specifies the device to which data is loaded or unloaded when using the -l option of onload or onunload, while TAPEDEV specifies the default device to which data is loaded or unloaded when you use the onload or onunload utilities. From an embedded point of view, an interesting point for these parameters is that they can be set to back up and restore, using ontape, from a directory instead of a tape device. This simplifies the backup procedure because these files can be copied to safer storage. To use a directory as the backup and restore device, the directory must first be created. Informix ensures that the created files have unique names. For further information, see 10.5, “Backups and log archives” on page 270, and IBM Informix Backup and Restore Guide, SC27-3542. 6.2.4 MSG_DATE By default, the messages written to the log file defined by the MSGPATH parameter are written with a time stamp. The MSG_DATE parameter adds a date at the beginning of each line, which is useful to identify the proper section of the message file when it contains messages from several days. Turn on MSG_DATE by setting its value to 1. The value can be set dynamically with the onmode -wf or onmode -wm command. For example: onmode -wf MSG_DATE=1 In an embedded environment, it might make more sense to not use the message file. This topic is discussed in 6.2.5, “MSGPATH” on page 153. 152 Embedding IBM Informix 6.2.5 MSGPATH MSGPATH specifies the full path name of the message-log file. The database server writes status messages and diagnostic messages to this file during operation. On UNIX, the new default MSGPATH value is $INFORMIXDIR/tmp/online.log. On Windows, the default MSGPATH in the onconfig.std file is online.log. The message file can be accessed directly, or the content of the message can be retrieved through the sysmaster database, as shown by the following command: SELECT * FROM sysmaster:sysonlinelog This SQL statement can be run from any database, because it identifies the name of the database (sysmaster) and the table name (sysonlinelog). The sysonlinelog table defines three columns: offset: The offset in the message file next_offset: Offset to the beginning of the next message line: A single line of text from the message file Because the message file keeps growing, it can make sense in an embedded environment to eliminate the message file by setting it to /dev/null in UNIX and Linux environments or to NUL in Windows environments. Keep in mind that tools such as the Open Admin Tool (OAT) depend on it for specific functionality. Even if the message file is eliminated, you might still want to monitor the events. You can get all these important messages through the events that are sent to the alarm program. See 6.5, “The alarm program” on page 158 for more information. 6.2.6 NS_CACHE This parameter allows you to set the amount of time information about host, service, user, and group stays valid in the server cache. Using the cache can reduce the time it takes to establish a connection instead of having to go to the operating system or a remote name server to get the needed information. The default configuration parameter file (onconfig.std) includes the following definition for this parameter: NS_CACHE host=900,service=900,user=900,group=900 The values are expressed in seconds, which means that the default values of 900 seconds represent 15 minutes. To disable the use of the cache, set the parameter values to zero. Chapter 6. IBM Informix configuration for embeddability 153 This parameter can be set dynamically using the onmode -wm or onmode -wf commands. 6.2.7 SYSALARMPROGRAM The SYSALARMPROGRAM is set to the full path name of the evidence.sh (or.bat on Windows) script found in the $INFORMIXDIR/etc directory. The database server runs evidence.sh when a database server assertion failure occurs. Technical support uses the output from the evidence.sh script to diagnose the cause of a database server failure. These types of errors are not provided to the alarm program (see 6.2.1, “ALARMPROGRAM” on page 151). Either use your own script or modify evidence.sh to add your own processing. One thing that can be done is to restart the database server if it failed, so users can continue and get their application back online as fast as possible. The evidence.sh script generates a good deal of information, including a file that contains the server configuration parameters, the message file, and a shared memory dump that potentially can be many megabytes in size. If you do not want all this information generated, either change the SYSALARMPROGRAM value or change the value of the variable OUTPUT to off. This parameter can be found at the beginning of the script (close to line 42). 6.3 Auto update statistics Informix goes through multiple steps when it runs queries. A query must be parsed to ensure that it is syntactically correct. It then goes through a process that determines how the query can be resolved. Informix generates multiple query plans, because SQL is a descriptive language, as opposed to a procedural language. This means SQL describes what it wants to do, instead of how it plans to do it. The query optimizer evaluates the possible plans to determine which one is most likely to get the fastest result (lowest cost). It uses information such as the number of rows in the tables involved, available indexes, and data distribution. One of the most common performance problems relates to outdated statistics. Over time, rows are added and removed from tables and new indexes are added or removed. To keep the optimizer informed about the state of the databases, the UPDATE STATISTICS command must be run regularly on the system. The command takes multiple arguments. 154 Embedding IBM Informix The way to update statistics differs depending on the indexes defined on the tables. Details about when and how to update statistics can be found in IBM Informix Performance Guide, SC27-3544. To solve the problem of outdated statistics, you can perform two tasks: Auto Update Statistics (AUS) Evaluation This task evaluates which columns and tables should have their statistics and distributions refreshed. Auto Update Statistics Refresh This task refreshes the statistics and distribution that were recommended by the Auto Update Statistics Evaluation task. These tasks are defined as running nightly. This way, statistics are always accurate enough for the optimizer to select the best plan. In the case of an embedded system, it is more important because it has to run without the supervision of a database administrator. However, although the AUS system provides a default built-in criteria for when table statistics should be updated, the DBA can modify the criteria that best fit the system's requirements and workloads. The Auto Statistics Refresh task is impacted by the AUTO_STAT_MODE and STATCHANGE parameters discussed in 6.1.5, “AUTO_STAT_MODE” on page 149. Tasks are useful tools to automate many of the administrative operations and make Informix a self-administrating system. Tasks are described in more detail in Chapter 9, “Automating management through tasks and sensors” on page 203. 6.4 Sysdbopen and sysdbclose procedures An Informix user session includes multiple characteristics that can change the way Informix processes information for the user. Many of the connection properties can be set through the SQL interface. Table 6-1 provides a short description of the properties that can be set. For more information about these SQL statements, see IBM Informix Guide to SQL: Syntax, SC27-3532. Table 6-1 Informix Connection properties statements SQL statement Description SET COLLATION Specifies a new collating order for the session. SET DEBUG FILE Identifies the file that is to receive the runtime trace output of an SPL routine. Chapter 6. IBM Informix configuration for embeddability 155 SQL statement Description SET ENCRYPTION PASSWORD Defines or resets a session password for encryption and decryption of character, BLOB, or CLOB values. SET ENVIRONMENT Specifies options at run time that affect subsequent queries submitted in the same routine. Multiple values can be set, which include IFX_AUTO_REPREPARE, OPCOMPIND, and USELASTCOMMITTED. SET EXPLAIN Enables (or disables) recording measurements of queries in the current session. SET ISOLATION Defines the degree of concurrency among processes that attempt to access the same rows simultaneously. SET LOCK MODE Defines how the database server handles a process that tries to access a locked row or table. SET PDQPRIORITY Enables an application to set the query priority level dynamically in a routine. SET ROLE Enables the privileges of a user-defined role. SET SESSION AUTHORIZATION Permits changing the user name under which database operations are performed in the current session. SET STATEMENT CACHE Turns caching on or off for the current session. SET TRANSACTION Defines the isolation level and specifies whether the access mode of a transaction is read-only or read-write. Applications can run the statements listed in Table 6-1 on page 155 after connecting to their database of choice. The problem with this approach is that they then need to provide a new compiled version of their application to use a different setting. For example, you might need to use SET EXPLAIN to determine the exact interactions the application has with the database. Informix provides a procedure called sysdbopen() to run a stored procedure when a user connects to a specific database. Because it is a stored procedure, any function can be called in it. It does not take any arguments and does not return any values. Similarly, sysdbclose() is called automatically when a user disconnects from a database. It does not take any argument and does not return any values. The names of the procedures are fixed, but it is still possible to create a different procedure for each user. This is done by considering the user name in addition to the procedure name. For example, this means that it is possible to create a procedure called mitch.sysdbopen() and another one called sally.sysdbopen(). These procedures are run when Mitch and Sally connect to the database. 156 Embedding IBM Informix It is also possible to create a procedure that would be run by anyone that does not already have a specific sysdbopen() procedure. That general procedure is called public.sysdbopen(). Example 6-1 shows a simple example of logging procedures. Example 6-1 Logging procedures CREATE TABLE logit ( user varchar(128), inout char(1), tstamp datetime year to second ); CREATE PROCEDURE public.sysdbopen() INSERT INTO logit VALUES(USER, "O", CURRENT::DATETIME YEAR TO SECOND); END PROCEDURE; CREATE PROCEDURE public.sysdbclose() INSERT INTO logit VALUES(USER, "C", CURRENT::DATETIME YEAR TO SECOND); END PROCEDURE; In Example 6-1, we created a table that is used to track when users connect and disconnect from the database. The table LOGIT is used for that purpose. The public.sysdbopen() procedure runs for anyone and inserts a row into LOGIT that includes the user name, if it is opening or closing, and the time when this occurs. The sysdbclose() procedure does the same thing, but this time indicates that the user is closing the connection. An embedded application can create a sysdbopen() procedure. A system can be delivered with specific sysdbopen() procedures so that only a specific user can log in (for example, the user that the application uses). It can also determine the host name where the connection is coming from and deny connection to the server. However, this may be better done with a user-defined routine. We look at this possibility in 6.6, “Application-specific DBMS functions” on page 162. It should be noted that only a database administrator or the informix user are allowed to create or modify sysdbopen() and sysdbclose(). Users cannot disable the execution of that procedure. Chapter 6. IBM Informix configuration for embeddability 157 6.5 The alarm program Informix can be configured to run a program when events occur in the server. The Informix product comes with some scripts that you can use to learn more about this facility. Recall that the full path name of the alarm program (shell script, batch program, or binary program) is given by the value of the onconfig parameter ALARMPROGRAM. The UNIX-like version of the scripts are as follows: alarmprogram.sh This is the default script that is used in the onconfig file. It is designed to be customizable so errors of certain severity generate a page and send an email to a designated person. log_full.sh This is a simple example of a script that would initiate a logical log backup in the situation where a log full event is generated. no_log.sh This script only performs an exit. The Windows version of these scripts have the same names, but have a suffix of “.bat” instead of “.sh”. The alarmprogram.* script is easy to customize. It is a matter of changing the first section of the script, as shown in Example 6-2. Example 6-2 Customizing the alarmprogram.* script # ######################################## # # PUBLIC SECTION : CONFIGURATION VARIABLES # # ######################################## BACKUPLOGS=N ALARMADMIN=0 ALARMPAGER=0 ADMINEMAIL= PAGEREMAIL= MAILUTILITY=/usr/bin/mail 158 Embedding IBM Informix Here is a brief description of the parameters in Example 6-2 on page 158: BACKUPLOGS This parameter indicates whether or not the logical logs are automatically backed up. ALARMADMIN This parameter indicates the minimum event severity that must be sent to the email address identified by the ADMINEMAIL parameter. ALARMPAGER This parameter indicates the minimum event severity that must be sent to the email address identified by the PAGEREMAIL parameter. ADMINEMAIL The email address to which the messages are sent. PAGEREMAIL The email address of the pager to which the messages are sent. MAILUTILITY This parameter sets the value of the parameter MAILUTILITY for /usr/bin/mail for UNIX and $INFORMIXDIR/bin/ntmail.exe for Windows. It is also possible to write your own alarm program by processing the parameters received at program invocation. 6.5.1 Alarm program parameters An alarm program receives the following parameters: Event severity The severity level is an integer between one and five. They are, in order of increasing severity, as follows: 1. 2. 3. 4. 5. Not noteworthy Information Attention Emergency Fatal Chapter 6. IBM Informix configuration for embeddability 159 Event class There are currently 79 event classes defined. A partial list of event classes are shown in Table 6-2. You can find a complete list in Appendix C, “Event classes and event IDs” on page 431. Table 6-2 Event classes examples Event class Event Class message 1 Table failure: 'dbname:"owner".tabname' 2 Index failure: 'dbname:"owner".tabname:idxname' 3 BLOB failure: 'dbname:"owner".tabname' 4 Chunk is offline, mirror is active: chunk_number 5 Dbspace is offline: 'dbspace_name' 6 Internal subsystem failure: 'message' ... ... 79 Dynamically added chunk chunk_name to space Table 6-3 lists a few event classes, identification, and messages that are currently available. For a complete list, see Appendix C, “Event classes and event IDs” on page 431. Table 6-3 Informix event alarm classes, IDs, and messages examples Event class 160 Event ID Event ID message 1 1001 Page allocation error on 'object' 1 1002 Row allocation error on 'object' ... ... ... 1 1048 Error updating table record. 2 2001 Fragid fragment_id, Rowid rowid not found for delete in partnum partition_number ... ... ... 7 7029 Temp transaction not NULL ... ... ... Embedding IBM Informix Event class 79 Event ID Event ID message 79001 Dynamically added chunk chunk_name to space 'space_name' Path: path, offset offset_number kilobytes Size: size kilobytes Here are the descriptions of some of the elements in Table 6-3 on page 160: Event class message The event class message represents from which specific area of the Informix server the alarm comes. Table 6-3 on page 160 lists all the event messages currently available. Event specific message This is usually the text of the message written to the message log. Event see-also file For some events, the database server writes additional information to a file when the event occurs. The path name in this context refers to the path name of the file where the database server writes the additional information. Uniqueid A unique event identifier (event ID) for the specific message 6.5.2 Custom alarm program It is possible to write an alarm program that will take action on all the events listed in Appendix C, “Event classes and event IDs” on page 431. It should be noted that many of these events can be avoided by using tasks to monitor the system and take corrective actions using the SQL adminstration API. These subjects are discussed in Chapter 7, “The SQL administration API” on page 167 and in Chapter 9, “Automating management through tasks and sensors” on page 203. When modifying the alarm program, it should be treated as though it was a multi-threaded program, because multiple copies of the alarm program can run at the same time. This happens when multiple alarms are generated almost simultaneously, where the first copy of the alarm program is still running when a second copy is called. For this reason, actions such as writing to a file are dangerous without synchronization. One reason to write a custom alarm program is to take automatic actions based on specific alarms. For example, event class 20, event ID 20001(Logical logs are full—backup is needed) can be caught and a backup started. Chapter 6. IBM Informix configuration for embeddability 161 Similarly, event class 23 (ID 23001) could generate the same action. You can make contingency plans for many of the events. While taking action, the event should also be reported for further action. Another reason to write a custom alarm program is that you may want to send the alarm through instant messaging, such as IBM Lotus® Sametime®. This would require a daemon process to listen to messages on a socket connection. After it accepts a socket connection, it would read the message and send it to the appropriate Sametime user. The alarm program would have to include a program that opens a connection to a specific service and writes the message to it. This approach would be quicker than email and include more information than is reasonable for a page. A similar approach could be used to interface with cell phone texting. 6.6 Application-specific DBMS functions Custom extensions give you the ability to tailor the capabilities of the database server to better fit your business environment. Extensions can consist of new data types, new functions, and new aggregates. For example, if the application needs to process a large amount of information to get to a single answer, that processing can be put in the database server. In general, the result will be simpler processing and less data movement, resulting in higher performance. It can also take advantage of parallel execution in the server. In an embedded environment, custom extensions can be used to add capabilities to make the environment easier to manage. In 6.4, “Sysdbopen and sysdbclose procedures” on page 155, we mentioned the ability to deny access to the server based on the host name. This action can be accomplished by adding a table that lists all the allowed machines. This table can list which machine each user is allowed to use to access the server. The following SQL statement retrieves the host name for the current session: SELECT hostname FROM syssessions WHERE sid = DBINFO(‘sessionid’); 162 Embedding IBM Informix Another option is to determine which subnet is allowed to access the machine. This capability would require the ability to convert the host name to an IP address. This can be accomplished, for example, by using a user-defined routine written in C. Assuming that you want to return the character representation of the address, the C code shown in Example 6-3 would accomplish this task in an IPv4 type network environment. Example 6-3 Converting a host name #include #include #include #include #include #include <mi.h> <sys/types.h> <sys/socket.h> <netdb.h> <stdio.h> <string.h> mi_lvarchar *gethostaddr(mi_lvarchar *hname, MI_FPARAM *fp) { int ret, len, i; struct addrinfo *info, hints; mi_string buffer[40]; mi_string *phostname; phostname = mi_lvarchar_to_string(hname); memset(&hints, 0, sizeof(struct addrinfo)); hints.ai_family = AF_UNSPEC; hints.ai_flags = AI_PASSIVE; /* For wildcard IP address */ if (0 != (ret = getaddrinfo(phostname, NULL, &hints, &info)) ) { sprintf(buffer, "Error getting the address: %d", ret); mi_db_error_raise(NULL, MI_EXCEPTION, buffer, NULL); } sprintf(buffer, "%s", inet_ntoa(*(struct in_addr *)&info->ai_addr->sa_data[2])); return(mi_string_to_lvarchar(buffer)); } Chapter 6. IBM Informix configuration for embeddability 163 After this function is compiled into a shared library, you can create a new SQL function using the statement shown in Example 6-4. Example 6-4 SQL function CREATE FUNCTION GetHostAddr(LVARCHAR) RETURNING lvarchar WITH(NOT VARIANT) EXTERNAL NAME "$INFORMIXDIR/extend/gethost/gethost.bld(gethostaddr)" LANGUAGE C; LVARCHAR is a variable length character string that has a default maximum length of 2048 characters. You could use such a VARCHAR definition for the function. The function in the shared library is referenced by the EXTERNAL NAME clause that indicates where to find the shared library and what is the function name. The execution of the function would look as follows: EXECUTE FUNCTION GetHostAddr(“jroy”) (expression) 192.168.179.200 1 row(s) retrieved If you want to allow users to log in only if they are on the 192.168 subnet, you can write a sysdbopen() procedure similar to the one shown in Example 6-5. Example 6-5 Procedure CREATE PROCEDURE developer.sysdbopen() DEFINE val LVARCHAR; DEFINE ret LVARCHAR; DEFINE name LVARCHAR; FOREACH SELECT TRIM(hostname) INTO name FROM sysmaster:syssessions WHERE sid = DBINFO('sessionid') LET val = GetHostAddr(name); IF "192.168" <> SUBSTRING(val FROM 1 FOR 7) THEN RAISE EXCEPTION -746, 0, "Not allowed in the database from your subnet"; END IF END FOREACH END PROCEDURE; This is one example of what can be done through the database. Custom extensions enable access to all the power of the environment to enhance the database server and make it more suitable to your embedding needs. 164 Embedding IBM Informix Since the original publication of this book, the Informix team has added a function in the sysmaster database called ifx_get_hostaddr. An example of its use is shown in Example 6-6. Example 6-6 ifx_get_hostaddr use SELECT sysmaster:ifx_get_hostaddr(TRIM(hostname)) FROM sysmaster:syssessions WHERE sid = DBINFO("sessionid"); (expression) 192.168.179.100 Chapter 6. IBM Informix configuration for embeddability 165 166 Embedding IBM Informix 7 Chapter 7. The SQL administration API The SQL administration API provides direct access to data server administration commands through SQL functions. The alternative is to launch processes on the server to call command-line administrative tools, such as oncheck, onstatt, or onmode. One advantage of issuing administration commands through SQL is that the commands become available through remote network connections without any need for dedicated software or logon sessions running on the local server. IBM also provides a no cost PHP-based administration utility for the IBM Informix data server, the Open Admin Tool (OAT). OAT takes advantage of the administration API to provide web-based administration, and also uses enhancements to the data server system tables to provide detailed reporting information. In this chapter, we describe the SQL administration API and provide examples of how to use it to administrate your Informix instance through SQL and programmatically from shell scripts and Java programs. In particular, we discuss the following topics: Admin API functions and the command_history table Scripting examples Programming examples Recommended further reading © Copyright IBM Corp. 2011. All rights reserved. 167 7.1 SQL Administration API functions The SQL administration API is accessed through two functions that are part of the sysadmin database: task() admin() Both functions perform the same operations, and differ only in the status they return to the caller. The task() function returns a text string (T for Text) while the admin() function returns the integer corresponding to the record of the command in the command_history table. Note: The SQL administration API functions can be used only by: The informix user The root user, if the Connect privilege on the sysadmin database is granted to the user The DBSA group members, if the Connect privilege on the sysadmin database is granted to the users in the group Note: Before calling execute function task(...), the user will either need to connect to the sysadmin database or make sure sysadmin is the current database. If sysadmin is not the current database, then the user can also run execute function sysadmin:task(...). 7.1.1 The command_history table Each time the task() or admin() function is called, a row is inserted into the command_history table of the sysadmin database (Table 7-1). Each row is held for a period of time determined by the value in the ph_threshold table with the name column of COMMAND HISTORY RETENTION. The default is 30 days. There is a built-in task named mon_command_history to enforce that limit. You may change the retention period by updating the ph_threshold table. If you want some other policy, you have to write a custom task, or modify the built-in task. Table 7-1 The command_history table of the sysadmin database 168 Column Data type Purpose cmd_number serial(100) Unique command number cmd_exec_time datetime year to second When command was run Embedding IBM Informix Column Data type Purpose cmd_user varchar(254) User who called the task or admin function cmd_hostname varchar(254) Host name of user session cmd_executed varchar(254) Name of command cmd_ret_status integer Return status of the command (0 for success) cmd_ret_msg lvarchar(30000) Status message returned by the command 7.1.2 The task() function When the task() function is run, a status message is returned to the user (Example 7-1). Example 7-1 Creating a dbspace with the task() function > execute function task("create dbspace","tmp3","/tmp/tmp3","50MB"); (expression) Space 'tmp3' added. You can also use the task() or admin() function in a select statement as follows. select sysadmin:task("create dbspace","tmp3","/tmp/tmp3","50MB") as add from sysmaster:sysdual; This statement allows you to add column aliases to your output to improve readability. 7.1.3 The admin() function When the admin() function is run, an integer value is returned to the caller, which corresponds to the cmd_number in the sysadmin command_history table. Example 7-2 shows a command and the associated data in the command_history table. Example 7-2 Creating a dbspace with the admin() function > execute function admin("create dbspace","tmp3","/tmp/tmp3","50MB"); (expression) 401 Chapter 7. The SQL administration API 169 > select * from command_history where cmd_number = 401 cmd_number cmd_exec_time cmd_user cmd_hostname cmd_executed cmd_ret_status cmd_ret_msg 401 2008-08-20 15:07:18 informix logos.beaverton.ibm.com create dbspace 0 Space 'tmp3' added. 7.2 Administrative commands In this section, we describe the uses of the Admin API administrative commands and a few things that might trap the unwary user. The full set of commands is in Appendix A, “SQL administration commands and scripts” on page 377. Recent additions to the command set include the commands to update the configuration either in the running instance or in the configuration file, and the commands to stop, start, and configure SQL Tracing. SQL Tracing is discussed in 7.3.2, “SQL tracing example” on page 174. There are two primary approaches to use the interface. In both cases, a separate row is added to the command_history table, and you can see the result of each action. This simplifies finding and resolving problems. Single statement for each command: In this technique, shown in Example 7-2 on page 169, each operation is a single statement. Multiple commands in a single statement: If you need to perform a sequence of commands to do the same operation for a number of objects, then the technique in Example 7-3 on page 172 might be easier. 7.2.1 Status and error reporting Each time either the function (task() or admin()) is executed, a row is inserted into the command_history table in the sysadmin database. The return codes do differ for the two functions, however. 170 Embedding IBM Informix task() always returns a text string. To check the status, you must query the command_history table. To get the result of the last command recorded in the command_history table, use the following query: select first 1 cmd_ret_status from command_history order by cmd_number desc; admin() always returns an integer. If the value is positive (greater than zero), then that value is the value in the cmd_number in the new row in command_history. If the value is 0, then the function succeeded, but the insertion into command_history failed. If the value is negative, the function failed and the absolute value of the number is the value in cmd_number in the new row in command_history. 7.2.2 Potential onmode traps Be careful when issuing certain onmode commands using the SQL interface. If they result in the server blocking transactions or shutting down, you will not be able to reverse the effect by starting the server or unblocking transactions using SQL. For example, suppose you ran the following command: > execute function task("onmode", "c", "block"); (expression) Check online.log to see if server is blocked At this point, the server is blocked and only accessible in read-only mode to allow an external backup to take place. Because you cannot call the task() function to issue an unblock, you will have to run the onmode command-line utility directly using the following command: > onmode -c unblock Another onmode trap would be to run the following command: > execute function task("onmode", "k"); (expression) IBM Informix Dynamic Server will be shut down in 0 seconds 7.2.3 Stopping the Scheduler If you do not plan to use the Scheduler in your application and want to save resources, shut it down using the SCHEDULER SHUTDOWN command. If you do not want the Scheduler to start when Informix is initialized, create an empty file with the name stop, in $INFORMIXDIR/etc/admin. Creating this file will result in the following message in the online log when Informix is initialized: 17:26:22 17:26:23 On-Line Mode SCHAPI: "INFORMIXDIR/etc/sysadmin/stop" file is present. Bypassing dbScheduler and dbWorker threads startup. Chapter 7. The SQL administration API 171 7.3 Scripting examples A useful source for admin API scripting examples is the $INFORMIXDIR/demo/admin directory. You will find the following scripting examples: Creating a dbspace Creating a smart blobspace Querying the sysonlinelog table for error messages and warnings that were sent to the online log Running a series of onchecks to validate tables and fragments Setting up a system 7.3.1 System setup example The system setup example is in $INFORMIXDIR/demo/admin/system_setup.sql. This script populates a dbspaces table with a set of dbspaces to create, and a chunks table with a set of chunks. It then creates the dbspaces and chunks, and adds three logical logs to a logdbs dbspace. Example 7-3 is an example of a system setup using the SQL adminstration API. Example 7-3 Setting up a system using the SQL adminstration API database sysadmin; { **** Create a table of dbspaces which are to be created ****} create table dbspaces ( type varchar(255), dbspace varchar(255), path varchar(255), offset varchar(255), size varchar(255) ); insert into dbspaces values ("sbspace", "sbspace", "$INFORMIXDIR/CHUNKS/sblob1", 0 , "50 MB" ); insert into dbspaces values ("dbspace", "dbspace1", "$INFORMIXDIR/CHUNKS/dbspace1", 0 , "50 MB" ); insert into dbspaces values ("dbspace", "dbspace2", "$INFORMIXDIR/CHUNKS/dbspace2", 0 , "50 MB" ); insert into dbspaces values ("dbspace", "physdbs", "$INFORMIXDIR/CHUNKS/physdbs", 0 , "50 MB" ); insert into dbspaces values ("dbspace", "logdbs", "$INFORMIXDIR/CHUNKS/logdbs", 0 , "50 MB" ); insert into dbspaces values 172 Embedding IBM Informix ("tempdbspace", "tempdbs", "$INFORMIXDIR/CHUNKS/tempdbs", 0 , "10 MB" ); insert into dbspaces values ("blobspace", "bspace1", "$INFORMIXDIR/CHUNKS/blobdbs", 0 , "50 MB" ); { **** Create a table of chunks which are to be created **** } create table chunks ( dbspace varchar(255), path varchar(255), offset varchar(255), size varchar(255) ); insert into chunks values ("dbspace1", "$INFORMIXDIR/CHUNKS/chunk",0 , "10 MB" ); insert into chunks values ("dbspace1", "$INFORMIXDIR/CHUNKS/chunk2",0 , "10 MB" ); {**** Create all the dbspaces ****} SELECT task( "create "|| type , dbspace, path, size, offset) FROM dbspaces; {**** Add the chunks to the dbspaces ****} select task("add chunk", dbspace, path, size, offset) from chunks; {**** Add 3 logical logs ****} execute function task("add log","logdbs","5 MB",3,"true"); execute function task("checkpoint"); {**** Drop all logical logs in the rootdbs but the current log ****} select task("drop log", number) from sysmaster:syslogfil where chunk = 1 and sysmaster:bitval(flags,"0x02")==0; execute function task("checkpoint"); select task("onmode", "l") from sysmaster:syslogfil where chunk = 1 and sysmaster:bitval(flags,"0x02")>0; execute function task("checkpoint"); {**** Drop the current logical log in the rootdbs ****} select task("drop log", number) from sysmaster:syslogfil where chunk = 1; execute function task("alter plog","physdbs","49 MB"); execute function task("checkpoint"); Chapter 7. The SQL administration API 173 Tip: This script may be a useful template to edit and customize with the values relevant to your own system, and to incorporate into an installation script. Other equivalent scripts are in Appendix A, “SQL administration commands and scripts” on page 377. 7.3.2 SQL tracing example This section provides an example that demonstrates how the SQL tracing commands of the SQL adminstration API might be used. Configuring tracing SQL tracing has a number of controls. First, tracing may be globally on or off. If tracing is globally off, then no traces are collected for any session. If tracing is globally on, then tracing is collected for sessions that meet the conditions that are configured. You may configure tracing based on the user name, the session ID, the database, or a combination of these methods. Any session meeting any of the conditions is traced. Example 7-4 shows an example in which tracing is set up to collect all the SQL for either user tom (regardless of which database) or any user connected to the sysmaster database. Example 7-4 SQL tracing controls [informix@localhost redbook]$ dbaccess -e sysadmin ts Database selected. execute function task("set sql tracing on", "1000", "2000", "high", "user"); (expression) SQL Tracing ON: ntraces=1000, size=102360, level=High, mode=User. 1 row(s) retrieved. execute function task("set sql tracing database add", "sysmaster"); (expression) SQL Trace is tracing databases [ sysmaster ] 1 row(s) retrieved. execute function task("set sql tracing user add", "tom"); (expression) SQL User Trace already has tom in list. 1 row(s) retrieved. execute function task("set sql tracing info"); 174 Embedding IBM Informix (expression) SQL Tracing ON: ntraces=1000, size=102360, level=High, mode=User. 1 row(s) retrieved. Database closed. You can perform the same work using OAT more easily. OAT presents all the choices on a single page so you can select exactly what you want without having to remember any commands or order of commands. Figure 7-1 shows the OAT window for configuring tracing. In this example, all the actions on two specific databases are traced for all users. Figure 7-1 SQL tracing configuration in OAT Examining traced queries The traced data is stored in a set of tables in the sysmaster database. Those tables are: syssqltrace: The base data of each traced statement. syssqltrace_info: The overall configuration of level, size, time started, and memory used. Chapter 7. The SQL administration API 175 syssqltrace_iter: Data on each iterator in each query plan if the tracing level is medium or high syssqltrace_hvar: Data on each host variable in each statement if the tracing level is high. Example 7-5 shows one example of how you might use the traced data. Example 7-5 A query for the longest-running SQL statements $ dbaccess -e sysmaster longqueries Database selected. select first 5 sql_sid as session , sql_runtime as duration , substr(sql_statement,1,40) as statement from sysmaster:syssqltrace order by sql_runtime desc ; session 89 89 88 89 89 duration statement 0.064787255639 0.043707045113 0.042659015038 0.006860947368 0.000529503759 select first 5 * from catalog order by s update catalog set stock_num = stock_num Database 'stores' update stock set stock_num = stock_num + Database 'stores' 5 row(s) retrieved. Database closed. $ 7.3.3 Incorporating SQL into shell scripts There are several ways you can run examples (such as the system setup in Example 7-3 on page 172) from within a shell script: Save the SQL to a file and call dbaccess directly using the following command: dbaccess sysadmin system_setup.sql Include the SQL statements directly as part of the script and redirect them into dbaccess. This way allows more flexibility for the shell script to dynamically generate values that might depend on the installation criteria. 176 Embedding IBM Informix Calling SQL statements from shell scripts can be as simple as sending one statement at a time to the dbaccess command: echo select tabname from systables where tabid \> 100|dbaccess sysadmin Example 7-6 is an abbreviated version of a shell script that runs the same system setup SQL statements. Example 7-6 Calling SQL statements directly from a UNIX shell script #!/bin/sh dbaccess sysadmin <<EOF create table dbspaces ( type varchar(255), dbspace varchar(255), path varchar(255), offset varchar(255), size varchar(255) ); ... execute function task("checkpoint"); EOF If you need to run SQL statements from a Windows batch file, you can pipe multiple SQL statements to dbaccess (Example 7-7). A carat at the end of each line in a Windows batch file is a control character indicating that the command has not ended, and that it continues on the next line. Example 7-7 Calling SQL statements from a Windows batch file echo create table dbspaces ^ (^ type varchar(255), ^ dbspace varchar(255), ^ path varchar(255), ^ offset varchar(255), ^ size varchar(255) ^ ); ^ ... execute function task(“checkpoint”) | dbaccess sysadmin Chapter 7. The SQL administration API 177 7.4 Programming examples The SQL administration API can be called from any programming language for which Informix Version 11 (or later) drivers exist. This section provides some programming examples written in Java: “Adding a dbspace to an Informix instance” on page 178 “A general purpose task() calling program” on page 180 In each case, the methods used can be adapted to other programming languages. For PHP examples, a good source is the Open Admin Tool for Informix (OAT). After it is installed, the PHP source code is easy to view and provides a standard reference for Informix administration programming in PHP. In these examples, the Informix connection parameters are treated as class variables to make them easy to present as stand-alone example programs. 7.4.1 Adding a dbspace to an Informix instance Example 7-8 shows a Java program to add a dbspace to an Informix instance. The program checks its command-line arguments to get the dbspace name, chunk path, and size. It then makes a connection to the sysadmin database and constructs a string to pass to the create dbspace command of the task() function. The task() function is called and the status message is returned to the command line. The SQL statement that is generated is also printed to the command line. Example 7-8 Java program to add a dbspace to an Informix instance: addDBS.java // Example program to add a dbspace to an Informix instance import java.sql.*; public class addDBS { // edit and put your private static String private static String private static String private static String own Informix connection settings here user = "informix"; pswd = "mypassword"; machine = "mymachine"; port = "9089"; // an INFORMIXSERVER value is needed for the connection URL // only if using the Informix JDBC driver // private static String ifxserver = “myifxserver”; public static void main(String[] args) { Connection conn = null; // check for no arguments or a question mark to trigger usage if (args.length < 3 || args[0].indexOf('?') != -1) { System.out.println("Usage: addDBS dbsName dbsPath dbsSize"); 178 Embedding IBM Informix return; } // construct a URL to connect to the sysadmin database // use this URL if using the JDBC (SQLI) Informix driver // String url = "jdbc:informix-sqli://" + machine + ":" + port + // "/sysadmin:" + "INFORMIXSERVER=” + ifxserver"; // Use this URL if using the (DRDA) IBM JCC driver String url = "jdbc:db2://" + machine + ":" + port + "/sysadmin"; // get a connection conn = getConn(url, user, pswd); if (conn == null) return; // get the new // and form a String taskStr args[1] + dbspace details from the command line string to pass to the task() function = "\"create dbspace\",\"" + args[0] + "\",\"" + "\", \"" + args[2] + "\""; // call task() and return the reply String reply = callTask(conn, taskStr); System.out.println(reply); } // get a connection to the data server public static Connection getConn(String url, String user, String pswd) { Connection conn = null; try { //Class.forName("com.informix.jdbc.IfxDriver"); Class.forName("com.ibm.db2.jcc.DB2Driver"); } catch (Exception ex) { System.out.println(ex.toString()); return null; } try { conn = DriverManager.getConnection(url, user, pswd); } catch (SQLException ex) { System.out.println(ex.toString()); return null; } return conn; } // call the task() routine and display the results public static String callTask(Connection conn, String taskArgs) { String reply = null; String sqlStr = "select task(" + taskArgs + ") from sysmaster:sysdual"; // print out the called SQL statement System.out.println("SQL: " + sqlStr); try { Statement stmt = conn.createStatement(); ResultSet rs = stmt.executeQuery(sqlStr); if (rs.next()) reply = rs.getString(1) + "\n"; rs.close(); stmt.close(); conn.close(); } catch(SQLException ex) { reply = "Error: \"" + ex.getMessage() + "\" calling task\n."; Chapter 7. The SQL administration API 179 } return reply; } } This example was written for the Java Common Client (JCC) JDBC driver, which is supplied with the IBM Common Client and Data Server driver packages. For a simple JDBC program, the only difference between one written for the Informix JDBC driver and the common client driver is the code used to load the driver and to connect to the database. Alternative driver loading and database connection lines for the Informix JDBC driver are provided in this example in a commented out form. To build this example program and subsequent Java examples, set your CLASSPATH to the location of the JDBC driver you are using, as in the following example: export CLASSPATH=/work/informix/java/db2jcc.jar Make sure a Java development kit is installed and in your path and run the following command: javac addDBS.java Example 7-9 is a test run of the program to create a 50 MB dbspace using the file path /top/dbs1. Example 7-9 Test run of the program to add a dbspace bash-2.02$ javac addDBS.java bash-2.02$ java addDBS dbs1 /tmp/dbs1 50MB SQL: select task("create dbspace","dbs1","/tmp/dbs1", "50MB") from sysmaster:sysdual Space 'dbs1' added. 7.4.2 A general purpose task() calling program Example 7-10 is an example of the flexibility of the task() and admin() functions. It is a general purpose program to call the task() function with any values passed on the command line. Example 7-10 A Java program to send commands to the task routine: callTask.java // Example program to call the SQL adminstration API task routine import java.sql.*; public class callTask { // edit and put your own Informix connection settings here private static String user = "informix"; 180 Embedding IBM Informix private static String pswd = "mypasswd"; private static String machine = "mymachine"; private static String port = "9089"; public static void main(String[] args) { Connection conn = null; // check for no arguments or a question mark to trigger usage if (args.length < 1 || args[0].indexOf('?') != -1) { System.out.println( "Usage: callTask \"command\" [arg1] [arg2] .."); return; } // construct the task string based on the command line arguments String taskStr = "\"" + args[0] + "\""; for (int i = 1; i < args.length; i++) taskStr += ",\"" + args[i] + "\""; // contruct a URL to connect to the sysadmin database // use this URL if using the JDBC (SQLI) Informix driver // String url = "jdbc:informix-sqli://" + machine + ":" + port + // "/sysadmin:" + "INFORMIXSERVER=myserver"; // Use this URL if using the (DRDA) IBM JCC driver String url = "jdbc:db2://" + machine + ":" + port + "/sysadmin"; // get a connection conn = getConn(url, user, pswd); if (conn == null) return; // call task() and return the reply String reply = callTask(conn, taskStr); System.out.println(reply); } ... } The purpose of this example is to demonstrate that it can be easy and straightforward to generate SQL statements dynamically that include calls to the SQL adminstration API routines. In the example, the catalyst() and gotten() methods from Example 7-8 on page 178 are re-used and do not need to be re-printed. As for the previous example, this program also prints the generated SQL statement to the command line. Example 7-11 shows a test compilation of the program, followed by some examples of calling it, to issue a checkpoint, to check extents, and to create a dbspace. Example 7-11 Test compilation bash-2.02$ javac callTask.java bash-2.02$ java callTask checkpoint SQL: select task("checkpoint") from sysmaster:sysdual Checkpoint Completed bash-2.02$ java callTask "check extents" Chapter 7. The SQL administration API 181 SQL: select task("check extents") from sysmaster:sysdual Validating extents for Space 'rootdbs' ... Validation of extents for Space 'rootdbs' succeeded Validating extents for Space 'datadbs' ... Validation of extents for Space 'datadbs' succeeded Validating extents for Space 'docspace' ... Validation of extents for Space 'docspace' failed check_extents error, errno=-1 Validating extents for Space 'dbs1' ... Validation of extents for Space 'dbs1' succeeded bash-2.02$ java callTask "create dbspace" dbs2 /tmp/dbs2 50MB SQL: select task("create dbspace","dbs2","/tmp/dbs2","50MB") from sysmaster:sysdual Space 'dbs2' added. 7.5 Further reading The following sources are suggested for further information about the SQL administration API, and for programming examples in PHP: IBM developerWorks article Use the Informix Dynamic Server scheduler and SQL API, available at the following website: http://www.ibm.com/developerworks/db2/library/techarticle/dm-0709sim pson/ IBM developerWorks article Build plug-ins for the IBM Open Admin Tool for Informix Dynamic Server, available at the following website: http://www.ibm.com/developerworks/db2/library/techarticle/dm-0808von bargen/ Open Admin Tool for Informix, available at the following website: https://www14.software.ibm.com/webapp/iwm/web/reg/download.do?lang=e n_US&cp=UTF-8&S_PKG=dl&source=swg-informixfpd Informix Dynamic Server 11: Advanced Functionality for Modern Business, SG24-7465 Customizing the Informix Dynamic Server for Your Environment, SG24-7522 182 Embedding IBM Informix 8 Chapter 8. Memory and storage management In this chapter, we discuss the ways main memory and other storage are used by the IBM Informix data server and how you manage those resources. You have to consider many factors to choose the amount of memory and disk storage you will use for various purposes. Some of these choices include how large a buffer for data will be used, how many distinct dbspaces will be used, which tables or indexes will be in each dbspace, the page size of each dbspace, and how much temporary space will be configured. The Informix data server has more than one way to create and manage the dbspaces, logs, and backups that require disk storage space. You may choose to explicitly declare the disk space and use, or you may choose to let the DBMS create and expand spaces as they are required. We discuss these choices and why each might be appropriate. The Informix data server uses memory for many purposes. We describe the uses that most affect the amount of memory that is used. We also discuss ways to handle the problems that arise when more memory is required. © Copyright IBM Corp. 2011. All rights reserved. 183 8.1 Memory management The Informix data server uses memory for many purposes. Major uses include buffers for the data and index pages, locks, buffers for the logs, memory for each session’s query processing, and database locks. This memory is organized into a set of shared memory segments used by all the virtual processors (VP). In addition, each virtual processor might have a small amount of memory that is not shared. The aggregate size of all these memory requirements might become quite large, and you need to ensure that these requirements do not interfere with other processing being done on the system. The next sections describe what is in each segment and how you may control the amount of memory used for various purposes. The term segment in these descriptions refers to how the data server uses the memory. Each of these segments may be made up of more than one shared memory segment as viewed by the operating system. You can use the onstat -g seg command to see the number and size of the underlying shared memory segments being used and how much free space is available. You can use the onstat -g mem command to see how the data server is using the allocated memory. The same information is available in the sysmaster database or in a system report in the Open Admin Tool (OAT). Example 8-1 shows the onstat report and Example 8-2 shows a query to retrieve some of the same data with a SQL query. Example 8-1 onstat -g seg [dsnoke@localhost ~]$ onstat -g seg IBM Informix Dynamic Server Version 11.70.FC1 Segment Summary: id key 6324267 52a04801 6357036 52a04802 Total: - addr 44000000 4acd4000 - size 114114560 375914496 490029056 -- On-Line -- Up 00:52:56 -- 478544 Kbytes ovhd 1770496 4406944 - (* segment locked in memory) Example 8-2 Query to get shared memory usage $ dbaccess -e sysmaster shmsegs Database selected. SELECT 184 HEX(seg_osshmkey) AS key, CASE seg_class Embedding IBM Informix class R V - blkused 27858 11906 39764 blkfree 2 79870 79872 WHEN 1 THEN "R" WHEN 2 THEN "V" WHEN 3 THEN "M" END::char(1) as type, seg_size::int as size, seg_blkused::int as used, seg_blkfree::int as free FROM sysmaster:syssegments ORDER BY seg_class; key type 0x52AD4801 R 0x52AD4802 V size used free 35061760 107479040 8543 3396 17 22844 2 row(s) retrieved. Database closed. 8.1.1 The shared memory resident segment The resident shared memory segment is allocated when the data server begins execution and is not altered unless the data server is stopped and restarted. The primary factor in the size of this segment is the buffer pools for data and index pages. This memory space is configured using the BUFFERPOOLS parameter in the onconfig file. The log buffers are also in this segment, and their sizes are declared using the PHYSBUFF and LOGBUFF parameters in the configuration file. The rest of the resident segment is fixed allocations for the data that controls the basic data server execution. There are no configuration parameters that significantly alter the space used for this purpose. 8.1.2 The shared memory virtual segments The virtual shared memory segment varies in size based on a number of configuration parameters. The SHMVIRTSIZE configuration parameter determines the initial size of the virtual segment. If more memory is needed, the space is expanded in units of SHMADD KB up to a total of SHMTOTAL KB for all the shared memory segments. Thus, the report from onstat or the query in Example 8-2 on page 184 may show more than one segment in class “V”. The data server uses all those segments as though they were one large segment. If you want to have more memory allocated before the current segments are completely full, you can use the SHMVIRT_ALLOCSEG configuration parameter to declare a threshold at which more memory should be acquired. Chapter 8. Memory and storage management 185 The value can be either a percentage of the existing shared memory that is used or an amount of space remaining. This task is fully described in IBM Informix Administrator’s Reference, SC27-3530. 8.1.3 The shared memory messaging segments If you use shared memory connections for client programs on the same system as the data server, you will have an additional class of shared memory segments. These are the memory segments used for passing SQL statements and data between the program and the data server, and they are labeled as message segments. They appear in the onstat or query output as class M. There is nothing you can do to affect the size of the message segments. The data server determines the size of this segment based on the number of DBSERVERNAME or DBSERVERALIAS entries that use the ipcshm protocol and the maximum number of connections specified in the NETTYPE parameter for each of them. 8.1.4 Releasing unused memory If the memory is no longer needed, you can release any unused virtual segment space using the onmode -F command or the SQL adminstration API. You might want to perform this task this periodically, once a day for example, to make that memory available for other programs. This task can be easily automated by constructing a task in the sysadmin database. 8.2 Low Memory Manager A typical requirement for embedded Informix based applications is to be able to control the memory usage of the database server in a way to avoid any kind of memory related error messages or issues. The Low Memory Manager (LMM) is directed at the embedded applications that have memory limitations. When in use, it maintains a targeted amount of memory either specified by the $ONCONFIG parameter SHMTOTAL, license restriction, or based on the amount of physical memory available at time of server instantiation. Important: The Low Memory Manager is available starting with Informix Version 11.70.xC2 and Version 11.50.xC8, respectively. 186 Embedding IBM Informix 8.2.1 How the Low Memory Manager works The Low Memory Manager functionality is provided by a set of internal and external functions used to throttle the application by killing sessions and reconfiguring the Informix server to use less memory. Some of the functions are customizable by the DBA. After each memory allocation that requires additional blocks from the global pool, the server checks the remaining memory left. If it crosses the LMM START THRESHOLD, the Low Memory Manager functionality will be triggered. The Informix database server allocates memory from a single global pool into individual pools. The global pool is essentially the remaining memory across the virtual segments. The global pool grows when a new memory segment is added and shrinks when onmode -F is employed. One can view the pools using onstat -g mem. Whenever a memory allocation from the global pool occurs, Informix tracks the remaining memory in the global pool. The server will keep adding memory segments until the server reaches the SHMTOTAL threshold, at which point the Low Memory Manager can be invoked. Even after the server has exceeded the SHMTOTAL restriction, the server might request additional segments if the application keeps requesting memory faster than the Low Memory Manager can free it up. Should that be the case, the server will ignore SHMADD and restrict any additional segments to be 16 MB in size. These additional segments will have residency turned OFF. Also, for each additional segment added, the LMM START and LMM STOP THRESHOLDs will be doubled. The goal of the Low Memory Manager is to maintain the memory used by the server at the SHMTOTAL level. The server will continue to employ the Low Memory Manager until the amount of used memory by the Informix instance goes below the LMM START THRESHOLD based on the SHMTOTAL restriction. To better understand the LMM’s behavior, let us look at an example. Example 8-3 shows an example values and thresholds of LMM related parameters. Example 8-3 LMM example values and thresholds SHMTOTAL=1000000 (1000Mb or 1Gb) LMM START THRESHOLD=20000 (20 Mb) LMM STOP THRESHOLD=40000 (40 Mb) SHMADD=100000 (100Mb) Chapter 8. Memory and storage management 187 Based on the example values and thresholds in Example 8-3 on page 187, we assume that the current amount of Informix memory allocated is 950 MB. The server needs more memory, so it adds another 100 MB segment (because that is what SHMADD is configured to), so now the server has 1050 MB of memory allocated to it. The server exceeded SHMTOTAL by 50 MB. There are 100 MB of remaining memory that could be used by the server, but in reality, because SHMTOTAL is set and the Low Memory Manager is on, Informix will attempt to maintain the 1000 MB restriction. Informix just added a 100 MB segment, for a total of 950 MB with a 1000 MB SHMTOTAL restriction. As memory is depleted from the global pool and the used memory goes to 980 MB (SHMTOTAL = 1000 MB - LMM START THRESHOLD = 20 MB), the Low Memory Mgr thread wakes up and starts processing. When the Low Memory Mgr thread wakes up, it first decides if killing sessions should be done implicitly before calling the LowMemoryManager SPL function. For those DBAs who want to have more control over which sessions get killed, they can customize the LowMemoryManager SPL to avoid the implicit calls and employ whatever policies are desired. To decide which session will be killed by the LMM, it calculates the current memory usage for each session and it also considers the configurable minimum actual idle time of each session. By default, only user sessions can be killed by the LMM. The DBA might override that behavior to also include Informix system sessions. 8.2.2 Configuring, using, and monitoring Low Memory Manager The configuration of the Low Memory Manager is a combination of entries in the $ONCONFIG file and the SQL adminstration API functions. SHMTOTAL SHMTOTAL is an $ONCONFIG parameter for restricting the amount of memory the Informix server can allocate. For the Informix Ultimate edition, when the Low Memory Manager is enabled, SHMTOTAL is set according to the following policy: If SHMTOTAL is 0 (meaning unlimited), the Informix server will set SHMTOTAL to 95% of the remaining physical memory on the computer. If SHMTOTAL is not 0, the Informix server will adhere to the SHMTOTAL restriction. 188 Embedding IBM Informix For all other Informix editions that have restrictions on memory usage: If SHMTOTAL is 0, SHMTOTAL is set to the maximum memory usage based on the license. If SHMTOTAL is not 0, SHMTOTAL must first adhere to the license restriction and if it does, the Informix server will adhere to the SHMTOTAL restriction. When calculating the total amount of memory applied to the SHMTOTAL restriction, Informix includes the resident, virtual, and message segments. Any extension segments are not included. Enabling the Low Memory Manager The enable function starts the Low Memory Manager and updates its threshold settings, which are kept in the ph_threshold table. It makes sure that all subsequent invocations of the Informix server will start the Low Memory Manager. To enable the Low Memory Manager, run the enable function as follows: EXECUTE "LMM "LMM "LMM FUNCTION task("scheduler lmm enable", START THRESHOLD", "value", STOP THESHOLD", "value", IDLE TIME", "value"); Disabling the Low Memory Manager The disable function stops the current and subsequent invocations of the Low Memory Manager. To disable LMM, run the function as follows: EXECUTE FUNCTION task("scheduler lmm disable"); Starting the Low Memory Manager The start function invokes the Low Memory Manager: EXECUTE FUNCTION task("scheduler lmm start"); Stopping the Low Memory Manager The stop function stops the Low Memory Manager. It can be restarted with either the start or enable function or the next time the Informix server is booted. EXECUTE FUNCTION task("scheduler lmm stop"); Setting or modifying the Low Memory Manager control values The LMM relies on three configurable control values: LMM START THRESHOLD, LMM STOP THRESHOLD, and LMM IDLE TIME. All values can be modified through entries in the ph_threshold table in the sysadmin database. Chapter 8. Memory and storage management 189 Note: All updates to the LMM control values in the ph_threshold table will only affect the next invocation of the Low Memory Manger. Think of the LMM START THRESHOLD and LMM STOP THRESHOLD as similar to the least recently used (LRU) cleaning configuration parameters. The server will start killing sessions and reducing the memory footprint at the START threshold and continue trying to kill sessions off until it reaches the STOP threshold. LMM START THRESHOLD This value represents the amount of memory remaining before SHMTOTAL is exceeded. When a memory request causes the remaining memory to fall below this amount, the Low Memory Manager is awakened. It can be expressed as a percentage (1-50) or as a fixed value not exceeded 50% of SHMTOTAL. To set the value, use the following command: UPDATE ph_threshold SET value=<your LMM START THRESHHOLD value> WHERE name="LMM START THRESHOLD"; LMM STOP THRESHOLD This value represents the amount of memory remaining before the Low Memory Manager stops looking for ways to reduce the memory usage. It can be expressed as a percentage (1-50) or as a fixed value that does not exceed 50% of SHMTOTAL. To set the value, use the following command: UPDATE ph_threshold SET value=<your LMM STOP THRESHOLD value> WHERE name="LMM STOP THRESHOLD"; LMM IDLE TIME This value represents the minimum amount of time a session has done no work. This is not the amount of time between network messages; it is the amount of time since a thread belonging to that session has actually run. This value is expressed in seconds. To set the value, use the following command: UPDATE ph_threshold SET value=<your LMM IDLE TIME value> WHERE name=" LMM IDLE TIME"; How to monitor the Low Memory Manager The LMM can be easily monitored by using the new onstat -g lmm command and by checking the LMM related entries in the Informix online message log file. 190 Embedding IBM Informix 8.3 Storage provisioning and management Every Informix data server instance includes at least one, typically at least two, dbspaces. A dbspace is made up of one or more chunks. The instance may also have one or more smart blobspaces (sbspaces). Sbspaces are used to hold large objects (CLOB or BLOB data types). Each instance of the Informix data server also has a set of disk space called the storage pool. This set of storage may be explicitly allocated and not expandable, or it may be dynamically allocated and expandable, or it may be a mixture of the two (explicitly allocated but expandable, for example.) In this section, we describe the various ways to allocate and manage your disk space. First, we discuss the basic planning questions, and then discuss the storage pool and how chunks may be expanded. Those are two separate but related topics. You may use either one way by itself or mix the two ways. We then discuss the major options for managing space both with and without a storage pool, as well as with and without automatic chunk expansion. Lastly, we discuss how to reorganize data, either manually or automatically, to avoid too much unused or wasted space in each storage space. Note: No single approach is likely to be right for your installation. You might want to consider a mix of techniques. Appendix A, “SQL administration commands and scripts” on page 377 contains the SQL statements and other commands to fully provision an instance. This chapter contains sections of that example with explanations. 8.3.1 Requirements and planning You should know what tables of each type are required by the application and have some idea of how large each one will be. With those estimates, you can determine approximately how much disk space will be required for each purpose (tables, indexes, temporary tables, external files, database backups, log archives, and file to load or unload data.) A rough rule of thumb is that you should have about three times as much disk space as you have data, which allows for all those other uses of space, including the software. Knowing some estimated size for each table, you should consider which tables you want to place in the same storage space and which you want to ensure are in separate storage spaces. Tables that use different pages sizes must be in separate dbspaces. Chapter 8. Memory and storage management 191 You might also consider grouping small tables into one space with a unique page size so that those tables do not interfere with the buffering of data from larger tables. You also should consider the rate of change for each table and whether or not (or how often) the table should be re-organized. The Informix data server reuses the space from deleted rows automatically. No administration is required to make that happen. Even so, you may want to periodically re-organize volatile tables to ensure that the best use is made of the total storage pool. 8.3.2 The storage pool The storage pool is a set of directories, files, devices, or logical volumes that may be used by the Informix data server to build storage spaces: regular or temporary dbspaces, regular or temporary smart blobspaces (sbspaces), or blobspaces. Each distinct item (directory, file, device, or volume) is an entry in the storage pool, which allows you to declare the space you want to use for the database without having to allocate the space to any specific storage space. Adding and removing space to or from the storage pool The storage pool is empty when the data server begins execution. You may add or drop entries whenever you want. However, only the informix user or a member of the DBSA group is allowed to perform this function. Example 8-4 shows two examples of how to add and drop entries using the SQL adminstration API. Both a directory and a file are added to the pool. Figure 8-1 on page 194 shows part of the OAT window to perform the same functions. Example 8-4 Creating a storage pool and storage spaces $ dbaccess -e sysadmin bldinstance Database selected. select task("create dbspace", "physdbs", "C:\IFMXDATA\ifx1170\dbspaces\physdbs", 50176, 0) as plog from sysmaster:sysdual; plog Space 'physdbs' added. 1 row(s) retrieved. select task("create dbspace", "logdbs", "C:\IFMXDATA\ifx1170\dbspaces\logdbs", 61440, 0) as llog from sysmaster:sysdual; llog Space 'logdbs' added. 1 row(s) retrieved. 192 Embedding IBM Informix select task("modify chunk extendable", "1") as expandroot from sysmaster:sysdual; expandroot Chunk 1 is now extendable. 1 row(s) retrieved. execute function task ("storagepool add", "/ifmxdata/ifx1170/pool1", "0", "1000 MB", "150 MB", "2"); (expression) Succeeded: Space added to storage pool 1 row(s) retrieved. execute function task ("storagepool add", "/ifmxdata/ifx1170/pool2", "0", "0", "150 MB", "1"); (expression) Succeeded: Space added to storage pool EXECUTE FUNCTION task("create dbspace from storagepool", "dbdbspace", "155 MB", "0"); (expression) Space 'dbdbspace' added. Chunk 4 is now extendable. 1 row(s) retrieved. EXECUTE FUNCTION task("create dbspace from storagepool", "tbldbs", "155 MB", "0"); (expression) Space 'tbldbs' added. Chunk 5 is now extendable. 1 row(s) retrieved. EXECUTE FUNCTION task("create dbspace from storagepool", "idxdbs", "155 MB", "0"); (expression) Space 'idxdbs' added. Chunk 6 is now extendable. 1 row(s) retrieved. EXECUTE FUNCTION task("create sbspace from storagepool", "s9_sbspc", "94 MB", "0"); (expression) Space 's9_sbspc' added. 1 row(s) retrieved. EXECUTE FUNCTION task("create tempdbspace from storagepool", "tempdbs", "61 MB", "0"); (expression) Space 'tempdbs' added. Chunk 8 is now extendable. 1 row(s) retrieved. Chapter 8. Memory and storage management 193 Note: All the parameters to the task or admin functions are quoted strings. You may use either single or double quotes, but even numeric parameters are quoted strings. Figure 8-1 Adding a storage pool entry The last parameter in the function calls is the priority of the entry. When the data server needs space from the pool, the highest priority entries with enough unallocated space are used. If no entry has enough space, an error is returned. This mean you need to have a good estimate for the total space you need, even if you do not know the breakdown among storage spaces exactly. Example 8-4 on page 192 demonstrates several of the commands for automating storage management. The example begins with a new instance having only a root dbspace. The root dbspace is marked as extendable. Entries are added to a storage pool. One entry is a file, the other is a directory Storage spaces of various types (standard, temporary, and sbspace) are added, both from the storage pool and in specific files. Note that the spaces built from the pool are marked as extendable by default. You can change that later if you want by using either OAT or the SQL adminstration API. In the example, two styles of SQL are used. One uses a select statement while the other uses a simple execute procedure statement. Neither is better than the other. 194 Embedding IBM Informix Modifying storage pool entries You may add or remove space from individual entries in the storage pool using either OAT or the SQL adminstration API. You do not have to remove and re-add an entry to change its size or other properties. Figure 8-2 shows the OAT window for making changes. Figure 8-2 Modifying storage pool entries 8.3.3 Extendable chunks In addition to the storage pool, if SP_AUTOEXPAND is set to 1, you may declare any of the chunks to be extendable. This means the data server will be able to change the size of a dbspace without having to add another chunk. Not all chunks start out being expandable. Chunks created with onspaces are not extendable unless you modify them. Chunks created from the storage pool are defined as extendable, and they remain that way unless you modify them. In Example 8-4 on page 192, the root chunk is modified to be extendable. You can do the same things with OAT in the storage panels. Example 8-5 is an onstat -d report. Notice that the chunk flags for the extendable chunks have an “E” flag. Example 8-5 onstat -d showing extendable chunks $ onstat -d IBM Informix Dynamic Server Version 11.70.TC1 Dbspaces address 0E374820 0EC15080 0EB5D840 number 1 2 3 flags 0x70001 0x70001 0x60001 fchunk 1 2 3 nchunks 1 1 1 -- On-Line -- Up 00:23:20 -- 139200 Kbytes pgsize 4096 4096 4096 flags N BA N BA N BA owner informix informix informix name rootdbs physdbs logdbs Chapter 8. Memory and storage management 195 0EB5DCE8 4 0x60001 0EB738A0 5 0x60001 0EB73D48 6 0x60001 0EB99018 7 0x68001 0EBA59F8 8 0x42001 8 active, 2047 maximum 4 5 6 7 8 1 1 1 1 1 4096 4096 4096 4096 4096 Chunks address chunk/dbs offset size free 0E374990 1 1 0 25600 20310 C:\IFMXDATA\ifx1170\dbspaces\rootdbs 0EB5D278 2 2 0 12544 203 C:\IFMXDATA\ifx1170\dbspaces\physdbs 0EB5D9B0 3 3 0 15360 1483 C:\IFMXDATA\ifx1170\dbspaces\logdbs 0EB732D8 4 4 0 39680 39627 /ifmxdata/ifx1170/pool2\ifx1170_dbdbspace_p_1 0EB73A10 5 5 0 39680 39627 /ifmxdata/ifx1170/pool2\ifx1170_tbldbs_p_1 0EBA1AB0 6 6 0 39680 39627 /ifmxdata/ifx1170/pool2\ifx1170_idxdbs_p_1 0EBA1C90 7 7 0 38400 22400 /ifmxdata/ifx1170/pool2\ifx1170_s9_sbspc_p_1 Metadata 1611 15371 0EBA5B68 8 8 0 38400 38347 /ifmxdata/ifx1170/pool2\ifx1170_tempdbs_p_1 8 active, 32766 maximum N BA N BA N BA N SBA N TBA bpages informix informix informix informix informix dbdbspace tbldbs idxdbs s9_sbspc tempdbs flags pathname PO-BED PO-B-D PO-B-D PO-BED PO-BED PO-BED 22400 POSB-D 1611 PO-BED NOTE: The values in the "size" and "free" columns for DBspace chunks are displayed in terms of "pgsize" of the DBspace to which they belong. Expanded chunk capacity mode: always 8.3.4 Fully automatic storage management With the two building blocks of a storage pool and extendable chunks, you can configure the Informix data server to automatically select the storage for each dbspace. The data server can also monitor the free space and add space as necessary. You configure the space in the storage pool and decide which spaces, if any, are expandable. You also configure the amount of space added in an expansion and how much free space remains before space is added. The data server works within those parameters, doing as much or little as you choose. Example 8-4 on page 192 shows a simple example. In this case, we add a directory and a file to the storage pool, and then create a set of dbspaces from the storage pool. That same example shows how to mark chunks as extendable and set the parameters that control the extension. Note that these chunks (dbspace always have at least one chunk) start out as extendable. Chunks may be modified to be not extendable also. We discuss how to manually extend chunks in 8.3.6, “Semi-automatic storage management” on page 198. 196 Embedding IBM Informix Figure 8-3 shows the OAT window for performing the same operations. You may choose to use this technique in lieu of using onspaces to create your dbspaces. You may give up a bit of control over exactly where each space is located, but this avoids having to estimate precise table and index sizes before your create storage spaces. Figure 8-3 Storage pool management 8.3.5 Parameters for controlling chunk extension Three configuration parameters control whether extension is permitted, and if it is, when it gets done and how long query processing will wait for it to complete: SP_AUTOEXPAND: This parameter determines whether or not any chunk is ever extended. The value of 0 disables the feature, and the value of 1 enables the feature. SP_THRESHOLD: This parameter defines when extension occurs. This may be either a number of kilobytes or a percentage of the space that is free. When the free space is less than the threshold, the chunk is expanded by whatever size is given for the extend size for the chunk. Chapter 8. Memory and storage management 197 Threshold values may be: – 0: No automatic extension is done. The mon_low_storage sensor is disabled. – 1 to 50: A percentage of the chunk that is free. If less space is free, then the chunk is extended. – Greater than 1000: A size in kilobytes of free space that must exist. If less space is free, then the chunk is extended. – Values between 50 and 1000 are ignored and treated as zero. SP_WAITTIME: This parameter defines how long, in seconds, a thread will wait for an extension before returning an “out of space” error to the client program. All three of these parameters may be changed using the modify_sp_values command in the admin or task functions. 8.3.6 Semi-automatic storage management If you do not want to let the data server manage all the space, you may elect to perform some of the work manually. You can create your dbspaces explicitly (not from the storage pool), and then you can choose to make them extendable or not. We discuss the case of spaces that are not in the storage pool and not extendable in 8.3.7, “Manual storage management” on page 199. To create dbspaces outside the storage pool, you can use either the onspaces command or the SQL adminstration API. The SQL for doing this is slightly different from the SQL for creating spaces in the storage pool. In this case, you have to specify the path to the device, file, or volume, something you do not do if you use the storage pool. After you have a dbspace, you may choose to mark its chunks as expandable. If you do, then you also specify the amount of free space remaining before an expansion and the size of the expansion. This technique allows you create spaces with the initial size and location to meet your initial requirements, but you will not have to constantly monitor activity and choose when or how to extend storage spaces. 198 Embedding IBM Informix 8.3.7 Manual storage management If you prefer not to let the data server do any of the work, you can use either onspaces, the SQL adminstration API, or OAT to set up the initial dbspaces and add chunks as necessary to hold the data. If you do this, you may need to monitor the space with onstat, OAT, or queries against the sysmaster database, and you may have to execute additional commands or OAT actions to add chunks as dbspaces fill up. You may also choose to write a custom sensor and task to automate the work. The Informix data server scheduler provides a means to execute a SQL statement (often a stored procedure execution) on whatever schedule you like. A sensor could monitor the free space and build a list of spaces that need to be expanded. A separate task could then perform the expansion for each space in the list. You might even create a table to specify the location and amount of space to add for each space you are monitoring. This manual approach may be useful if there are specialized criteria for expanding the database. For example, if you know that you will be adding or removing large amounts of data but not when, then you may want to do the work manually only when you know it is necessary 8.3.8 Deferring extent allocation When a table is created, the first extent is created by default. If a solution has optional modules, there may be tables in the database that are not used by every installation. To avoid wasting space for the initial extents of unused tables, you may choose to create the tables with deferred extent allocation. If you do, then the first extent is allocated only when the first row is inserted into the table. The tables with deferred allocation are in the database catalog tables, but there are no pages allocated to hold data unless real data is present. To have deferred extent allocation, your CREATE TABLE statement must not include any EXTENT SIZE, NEXT SIZE, or IN <dbspace> clauses. If any of those are present, they will be honored, and then space will be allocated. This means all the tables with deferred allocation will be placed in the dbspace where the database is created. 8.3.9 Reclaiming unused storage space As a solution is used, you may find it desirable to “defragment” the data. For the Informix data server, this means taking some or all of a number of actions to move rows, coalesce extents, and release unused space back to the server. The following sections discuss one example of performing these actions. Chapter 8. Memory and storage management 199 Note: The commands to do these tasks are part of the SQL adminstration API. There is no command-line utility to accomplish them. There is no single comprehensive command to take all these actions. You will have to use at least two, possibly more, commands to accomplish the task. Repacking the rows in extents The repack command moves the rows of a table so that there are no empty spaces between rows on a page. The result is that the space used by the table is all in the first extents, with the unused space in the last extents. Shrinking (removing) unused space at the end of a dbspace Shrinking is the process of removing the empty extents at the end of a table, making that space available for use in other tables within the same dbspace. This does not make the space available outside of the dbspace in which the table resides. Coalescing (defragmenting) extents in a table or index After repacking and shrinking, a table may still leave a number of extents, and those extents may not be contiguous. Defragmenting is the process of moving the data so that it is in a minimum number of extents. One extent is optimal, but storage space may not permit that. However, minimizing the number of extents usually improves performance. Note: Defragmenting, by itself, will rarely make a noticeable improvement in performance. However, it does make the data server more efficient. Example 8-6 shows a sample SQL sequence to completely reclaim unused space in a table by repacking the table, releasing the unused extents, and then combining the remaining extents. Notice that the form of the arguments to the defragment command is different from the repack or shrink commands. Also notice the terse value returned by these commands. You will need to use oncheck or an equivalent query to discover how many, if any pages were released. Example 8-6 Reclaiming unused space in a table $ dbaccess -e sysadmin reclaim Database selected. execute function task ("table repack shrink", "customer", "stores", "informix"); 200 Embedding IBM Informix (expression) Succeeded: table repack shrink stores:informix.customer 1 row(s) retrieved. execute function task ("defragment", "stores:informix.customer" ); (expression) OK 1 row(s) retrieved. Database closed. $ Note: The only way to defragment extents is using the SQL adminstration API. There is no equivalent command-line program. Chapter 8. Memory and storage management 201 202 Embedding IBM Informix 9 Chapter 9. Automating management through tasks and sensors In this chapter, we describe scheduling tasks and collecting information with sensors. We include details on all the support tables, and how to define the different types of tasks. The tasks and sensors provided with IBM Informix are also described. The details of how the components work together will enable the reader to better understand them, get the most benefit from using these capabilities, and make Informix more invisible to the embedded system user. All this means that users will get more benefit from using Informix, without additional work or administrative requirements on their part. © Copyright IBM Corp. 2011. All rights reserved. 203 9.1 A brief overview of tasks and sensors Informix Version 11 includes multiple features that facilitate the administration and management of the database server. These features are in addition to such capabilities as the alarm program, which has been discussed and described in Chapter 6, “IBM Informix configuration for embeddability” on page 147. As you can see in Figure 9-1, the core of the functionality is a scheduler that provides an accurate stopwatch, which allows you to define specific time points at which you may run a predefined set of operations. A set of operations is referred to as a task. There are two main types of tasks: Tasks Sensors User Defined Routines SQL Admin API Task(s) ? Sensor(s) Scheduler Figure 9-1 Tasks and sensors high-level view Tasks are defined as either SQL statements or procedures (SQL or otherwise). When defining a task, you have the choice of taking advantage of the SQL adminstration API, as described in Chapter 7, “The SQL administration API” on page 167, or you can use the database extensions that are included in Informix or are custom-developed for a specific purpose in the target environment, which is discussed in Chapter 6, “IBM Informix configuration for embeddability” on page 147. All these components fit together to facilitate the management of Informix, and can be used to facilitate the implementation of business applications. 204 Embedding IBM Informix The components described in this chapter include the Scheduler and the various types of tasks and sensors. We also explain how the support structures around these capabilities work together. 9.2 The Scheduler The Scheduler is an administrative tool that enables the database server to run database functions and procedures at either predefined times or as determined internally by the server. It is the foundation of all the functionality described in the remaining sections of this chapter. The Scheduler is a foundational capability that is basically invisible to everyone, and operates based on the definition of tasks. 9.3 Tasks and sensors A task is one or more operations that are run to achieve a specific goal. Informix defines four types of tasks: Task A set of operations that may or may not look at specific data before deciding what must be done. An example would be a task that performs a backup of logical logs once an hour. Startup task A task that runs only once, after the database server is first brought up. Sensor A task that takes some readings and saves them for future analysis. A simple sensor can collect the number of active connections every five minutes and store the result in a table that can be used to graph usage over time. Startup sensor A sensor that runs only once, after the database server is first brought up. Performing a backup of logical logs every hour is an alternative to using the alarm program, which does the same thing. The task is easier to implement, but assumes that its execution frequency is adequate for the level of activity on the system. With these simple mechanisms, it is possible to automate many administrative and monitoring tasks. Chapter 9. Automating management through tasks and sensors 205 9.4 Supporting database and tables To support the execution of tasks, Informix defines a new system database called sysadmin. This database contains six primary tables to support tasks and sensors. See Figure 9-2 for an illustration. The next sections describe the six sysadmin tables in detail. ph_version ph_group ph_threshold ph_task ph_alert ph_run Figure 9-2 Task and sensors support tables ph_alert Tasks may store alerts in the ph_alert table. These alerts can then be processed through other tasks, or through the use of administrative tools, such as the Open Admin Tool (OAT) for Informix. For more information, see 9.4.1, “The ph_alert table” on page 208. ph_group Groups are defined in ph_group. New groups can be added as needed. For more information, see 9.4.2, “The ph_group table” on page 210. ph_run Information about the execution of a task is stored in ph_run. This table keeps track of the execution of tasks and sensors by collecting statistics on the execution. For more information, see 9.4.3, “The ph_run table” on page 211. 206 Embedding IBM Informix ph_task The main table is ph_task, which contains the definition of tasks and sensors. For organizational purposes, a task is assigned to a group. By default, tasks are assigned to the MISC group. For more information, see 9.4.4, “The ph_task table” on page 212. ph_threshold A task can use parameters, which are stored in ph_threshold, to impact its execution. This provides flexibility, allowing the parameters to be changed without having to redefine the task. For more information, see 9.4.5, “The ph_threshold table” on page 214. ph_version The ph_version table is used to ensure the integrity of the other tables. In addition to the tables, a few views (for example, ph_config and ph_alerts) are created on the table. For more information, see 9.4.6, “The ph_version table” on page 214. ph_alerts and ph_config ph_alerts and pg_config are views to simplify access to the tables data. ph_alerts is a view on ph_alert, ph_run, and ph_task. ph_config is a view on ph_threshold. Sensors need a place to store the values they collect. For this reason, you see several additional tables in sysadmin. Section 9.5, “Predefined tasks and sensors” on page 215 describes the support tables for sensors and tasks. Chapter 9. Automating management through tasks and sensors 207 If you want to create tasks that generate alerts, it is useful to get the details of the relationships between the tables. For example, you need to know which columns are referenced between tables. Figure 9-3 provides this information. ph_task ph_alert alert_task_id alert_task_seq tk_id tk_name tk_group ph_run run_task_id run_task_seq ph_threshold ph_group task_name group_name Figure 9-3 ph_ tables relationships 9.4.1 The ph_alert table The alert table keeps track of alerts inserted by Informix and certain monitoring tasks, such as the predefined task check_backup. See 9.5, “Predefined tasks and sensors” on page 215. The alerts inserted by Informix occur when the event happens, similar to a call to the alarm program, as discussed in Chapter 6, “IBM Informix configuration for embeddability” on page 147. The alarms, inserted by tasks, occur during a scheduled task execution. Table 9-1 shows the definition of the ph_alert table. Table 9-1 ph_alert table columns description 208 Column Type Description id serial Alert unique identifier. alert_task_id integer ID of the task that created the alert. alert_task_seq integer Identifies which invocation of a task created the alert. Embedding IBM Informix Column Type Description alert_type char(8) Type of alert. Its meaning changes depending on the alert_color: Green (G), Yellow (Y), or Red (R): Informational Status message (G) Important status message (Y) Requires action (R) Warning Handled warning (G) Future event requiring action (Y) Imminent failure requiring immediate action (R) Error Self-corrected failure (G) Self corrected failure requiring investigation (Y) Failure requiring DBA action (R) alert_color char(15) Green, yellow, or red. See alert_type in this table. alert_time datetime year to second Time the alert was generated. alert_state char(15) Indicates the current alert state of the object: NEW The alert was newly added and no other action has occurred on this alert. IGNORED The alert was acknowledged by the DBA and no action was taken. ACKNOWLEDGED The alert has been acknowledged by the DBA. ADDRESSED The alert has been addressed by the DBA. alert_state_changed datetime year to second The last time the state was changed. alert_object_type char(15) The type of object: SERVER, DATABASE, TABLE, INDEX, DBSPACE, CHUNK, USER, SQL_STATEMENT, or MISC. alert_object_name varchar(255) The name of the object described in the alert_object_type variable. Chapter 9. Automating management through tasks and sensors 209 Column Type Description alert_message lvarchar Message. alert_action_dbs lvarchar(256) Name of the database to use when running the alert_action. alert_action lvarchar Corrective Action. This is an SQL script that can be run by the user or tool, or it will be NULL if no action is available. This script must comply with all multi-statement prepare rules. Through ph_alert, it is possible to keep track of alerts and update their state as actions are taken. The OAT for Informix takes advantage of this capability. The ph_alert table is cleaned once a day, after 2:00 a.m., by the predefined task Alert Cleanup. The default is to remove any alarms defined in the ph_threshold table that is older than 15 days. 9.4.2 The ph_group table The ph_group table is used to define groups to which that task belongs. It is for organizational purposes only. For example, the OAT for Informix allows you to display the tasks belonging to all groups or to a particular group. When the system includes a large number of tasks, the use of groups can make it more manageable. Table 9-2 shows the column definitions for ph_group. Table 9-2 ph_group table columns description Column Type Description group_id serial Unique group identifier group_name varchar(129) Unique group name group_description lvarchar Group description By default, a new task is assigned to the MISC group. The other groups available are as follows: 210 BACKUP CPU DISK INDEXES MEMORY MISC NETWORK Embedding IBM Informix PERFORMANCE SERVER TABLES USER You can create your own groups as required. 9.4.3 The ph_run table The ph_run table contains information about the result of the execution of tasks, and is shown in Table 9-3. Table 9-3 ph_run table columns description Column Type Description run_id serial Unique ID generated during execution. run_task_id integer ID of the task run out of the ph_task table. run_task_seq integer Sequence number of the task execution. run_retcode integer Return code or SQLcode from the UDR or SQL statement. run_time datetime year to second Time this task was run, in seconds. run_duration float Time in seconds it took to run this job. run_ztime integer Time onstat -z was last run, in seconds since Jan. 1, 1970. run_btime integer Time when server started, in seconds since Jan. 1, 1970. run_mtime integer Time the task was run, in seconds since Jan. 1, 1970. The entries in ph_table are affected by the cleanup of the ph_alert table. If an alert is removed from the ph_alert table, the ph_run entry referenced by that alert is also removed. Chapter 9. Automating management through tasks and sensors 211 9.4.4 The ph_task table The ph_task table contains information about which SQL object must be run, and when it should be run. Table 9-4 describes the columns of that table. Table 9-4 ph_task table columns description 212 Column Type Description tk_id serial Unique task ID. tk_name char(36) Unique task name. tk_description lvarchar Task description. tk_type char(18) Type of task: TASK Runs a task that does not collect data. SENSOR A task that collects data. STARTUP SENSOR Runs only when the server starts STARTUP MONITOR Runs only when the server starts. tk_sequence integer Current data collection number. System updated; do not modify. tk_result_table lvarchar Result table name. Note: The tk_result_table column is used only by sensors and the content matches the table created in tk_create. When the tk_delete interval is exceeded, data is deleted from tk_result_table. tk_create lvarchar The CREATE TABLE statement to run. Note: The tk_create column is used only by sensors, and, as necessary, is created to contain any data a sensor might store. tk_dbs varchar(250) Database in which to run the task. It must be a logged database. tk_execute lvarchar The SQL object to run. tk_delete interval day(2) to second Deletes data older than this interval. tk_start_time datetime hour to second Starting time of this task. Embedding IBM Informix Column Type Description tk_stop_time datetime hour to second Time of day this task should stop running. tk_frequency interval day(2) to second How often this task runs or the delay before running the startup tasks and sensors. tk_next_execution datetime year to second Next time this task should be run. tk_total_executions integer Total number of times this task was run. tk_total_time float Total CPU execution time of all the runs of this task. tk_Monday boolean Indicates if the task is enabled for this day of the week. tk_Tuesday boolean Indicates if the task is enabled for this day of the week. tk_Wednesday boolean Indicates if the task is enabled for this day of the week. tk_Thursday boolean Indicates if the task is enabled for this day of the week. tk_Friday boolean Indicates if the task is enabled for this day of the week. tk_Saturday boolean Indicates if the task is enabled for this day of the week. tk_Sunday boolean Indicates if the task is enabled for this day of the week. tk_attributes integer Flagss system updated; do not modify. tk_group varchar(129) Group name. tk_enable boolean Indicates whether or not the task is enabled. If the value of tk_enabled equals FALSE, the task is not scheduled for execution. tk_priority integer Job priority, on a scale of 0–5. If there are several jobs to run simultaneously, the job with the highest priority runs first. The default is 0. The creation of tasks and sensors are described in 9.6, “Defining tasks” on page 217. Chapter 9. Automating management through tasks and sensors 213 9.4.5 The ph_threshold table The ph_threshold table is used to pass parameters to a task. This way, the parameters can be changed without having to recreate the SQL object (statements or procedures). Table 9-5 shows the column descriptions for ph_threshold. Table 9-5 ph_threshold table columns description Column Type Description id serial Alert ID. name varchar(254) Name of the threshold. task_name char(36) Task name associated with the threshold. value lvarchar Value of the threshold. value_type varchar(254) The data type of the value column: STRING NUMERIC NUMERIC, MAX, MIN This is currently only informational. description lvarchar Description of the threshold. 9.4.6 The ph_version table The ph_version table is used to make sure the support tables have not been modified. This table is for Informix internal use only. For this reason, we do not describe it further in this book. 214 Embedding IBM Informix 9.5 Predefined tasks and sensors Informix Version 11 comes with predefined tasks and sensors. They are used to collect information from the system and to automate tasks such as updating table statistics. Table 9-6 describes the current set of tasks that come with Informix Version 11. New tasks may appear in future releases and updates of Informix. Table 9-6 Predefined tasks Task Description add_storage [task] Add storage. Alert Cleanup [task] Remove all old alert entries from ph_alert. auto_crsd [task] Automatic Compress/Repack/Shrink and Defrag (the default is disabled). autoreg exe [task] Register a database extension on first use. autoreg migrate-console [startup sensor] Internal task used in upgrades. autoreg vp [task] Create a VP on first use. auto_tune_cpu_vps [startup task] Automatically allocate additional CPU VPs at system start. (the default is disabled). Auto Update Statistics Evaluation [task] Evaluate which columns and tables should have the statistics and distributions refreshed. Auto Update Statistics Refresh [task] Refreshes the statistics and distributions that were recommended by the evaluator. bad_index_alert [task] Find indices marked as bad and create alerts (the default is disabled). check_backup [task] Check to ensure a backup has been taken of the data server. check_for_ipa [task] Find tables with outstanding in place alters (the default is disabled). idle_user_timeout [task] Terminate idle users (the default is disabled). ifx_ha_monitor_log_replay_task [task] Monitor HA secondary log replay position. Job Results Cleanup [task] Remove all old job results entries from the system. Chapter 9. Automating management through tasks and sensors 215 Task Description Job Runner [task] Run server tasks in background with a private dbWorker thread (the default is disabled). mon_checkpoint [sensor] Track the checkpoint information. mon_command_history [task] Monitor how much data is kept in the command history table. mon_config [sensor] Collect information about database server's configuration file (onconfig). Only modified parameters are collected. mon_config_startup [startup sensor] Collect information about database servers configuration file (onconfig). This will only collect parameters that have changed. mon_low_storage [task] Monitor storage and add space when necessary. mon_memory_system [sensor] Server memory consumption. mon_profile [sensor] Collect the general profile information. mon_sysenv [startup sensor] Track the database servers startup environment. mon_table_names [sensor] Collect table names from the system. mon_table_profile [sensor] Collect SQL profile information by table/fragment; index information is excluded from this collection. mon_users [sensor] Collect information about each user. mon_vps [sensor] Process time of the Virtual Processors. post_alarm_message [task] System function to post alerts. refresh_tabl_stats [task] System function to refresh table statistics (the default is disabled). Because many of the tasks are sensors, several additional tables are created. They include eleven monitoring tables starting with “mon_”, and three tables related to the update statistics tasks. You can disable any task that you do not want to run by setting the tk_enable column for a specific task definition to false. 216 Embedding IBM Informix 9.6 Defining tasks Before you create any of the four types of tasks, you need to clearly define what processing is required, and only then is it possible to decide how the solution will be implemented. The processing choices are as follows: SQL statement SPL procedure C or Java function After you determine the processing, it should be simple to decide if it is a startup task, a task, a startup sensor, or a sensor. The following sections go into more details about these options. 9.6.1 SQL statement In addition to the standard context of an SQL statement, a task execution includes two additional variables that can be used to differentiate a specific execution. The variables are as follows: $DATA_TASK_ID The task ID for this task. $DATA_SEQ_ID The number of times this task has been run, or its sequence number. These two variables correspond to the pk_task.tk_id and ph_task.tk_total_executions fields. $DATA_SEQ_ID is also used in the ph_run table to identify a specific execution of a task. SQL statements are appropriate for both tasks and sensors. A task would likely use a DELETE or possibly an UPDATE statement, and a sensor would use an INSERT statement. An example of a task using an SQL statement is the mon_command_history task, which uses the statement shown in Example 9-1. Example 9-1 Task as an SQL statement delete from command_history where cmd_exec_time < ( select current - value::INTERVAL DAY to SECOND from ph_threshold where name = 'COMMAND HISTORY RETENTION' ) Chapter 9. Automating management through tasks and sensors 217 This statement also takes advantage of a dynamic parameter extracted from the ph_threshold table. The command removes all the rows that are older than the prescribed value. An example of an SQL statement used for a sensor is the mon_profile predefined sensor that runs the statement shown in Example 9-2. Example 9-2 Sensor as an SQL statement insert into mon_prof select $DATA_SEQ_ID, number, value from sysmaster:sysshmhdr where name != 'unused' 9.6.2 SPL stored procedure An SPL stored procedure is appropriate when multiple operations need to be run. In theory, a procedure is not supposed to return a value. Rather, a function should be used. For historical reasons, an SPL stored procedure can return a value. An example of a SPL stored procedure task would be the Alert Cleanup task that uses an SPL function to remove entries from both ph_alert and ph_run. This function is shown in Example 9-3. Example 9-3 Alert Cleanup function CREATE FUNCTION AlertCleanup(task_id INTEGER, ID INTEGER) RETURNING INTEGER DEFINE cur_run_id LIKE ph_run.run_id; DEFINE cur_id LIKE ph_alert.id; DEFINE count INTEGER; LET count =0; FOREACH SELECT id, run_id INTO cur_id, cur_run_id FROM ph_alert, ph_run WHERE ph_alert.alert_task_id = ph_run.run_task_id AND ph_alert.alert_task_seq = ph_run.run_task_seq AND alert_time < ( SELECT current - value::INTERVAL DAY to SECOND FROM ph_threshold WHERE name = 'ALERT HISTORY RETENTION' ) DELETE FROM ph_run where run_id = cur_run_id; DELETE FROM ph_alert where id = cur_id; 218 Embedding IBM Informix LET count = count + 1; END FOREACH RETURN count; END FUNCTION; The function signature for Alert Cleanup takes two arguments and returns an integer value. The integer return value is stored in the ph_run table in the run_retcode column. The $DATA_TASK_ID and $DATA_SEQ_ID environment variables are not available for procedures, but are passed as arguments to the stored procedure as first and second arguments. In the FOREACH loop, this procedure uses the ph_threshold table to get a parameter that identifies how old a row has to be to be removed. Multiple threshold values can be used if needed. 9.6.3 C or Java functions Because Informix supports C and Java functions and procedures, it is possible to use them as tasks or sensors. In this case, the functions take the same arguments as SPL procedures, but are written in a different language. Example 9-4 is an example of a C function declaration. Example 9-4 C function declaration mi_integer my_task(mi_integer tid, mi_integer seqid) { mi_integer result; . . . return(result); } After the function is compiled into a shared library, it requires an SQL declaration to make it available in the server. This is similar to what was discussed in Chapter 6, “IBM Informix configuration for embeddability” on page 147. Chapter 9. Automating management through tasks and sensors 219 Example 9-5 shows how the function creation statement might look. Example 9-5 SQL function creation for a “C” UDR CREATE FUNCTION my_task(int, int) RETURNING int WITH (NOT VARIANT) EXTERNAL NAME $INFORMIXDIR/extend/mycode/mytasks.bld(my_task) LANGUAGE C; A Java function follows a similar pattern. It is first created as a static function and put into a JAR file. The function declaration is shown in Example 9-6. Example 9-6 Java function import java.lang.*; import java.sql.*; public class MyClass{ public static int myTask(int tid, intseqid) { . . . return(ret); } } After the class is wrapped into a JAR file, a function creation statement makes it available to the database server environment (Example 9-7). Example 9-7 SQL function creation for a Java UDR EXECUTE PROCEDURE install_jar( "file:. . ./MyClass.jar", "myclass_jar"); CREATE FUNCTION mytask(int, int) RETURNING int WITH(not variant) EXTERNAL NAME 'myclass_jar:MyClass.myTask(int, int)' LANGUAGE JAVA; The install_jar procedure makes the jar file available in the server using a reference name. The CREATE FUNCTION can use that name in the EXTERNAL NAME section to identify the JAR file, followed by the class and method names, and the argument types. The use of Java in the server requires some changes in the database server configuration file. These parameters are already included in the onconfig file and should only need to be uncommented. Describing the use of Java in the server is beyond the scope of this book. 220 Embedding IBM Informix Because tasks and sensors are likely to rely on SQL statements, it would be simpler to write the task itself as an SPL stored procedure or function, and make use of user-defined routines inside the procedure to add processing beyond the capabilities of SPL. The differences in definitions of the four types of tasks are small. For example, a task definition can be considered a subset of a sensor. The following sections discuss the definition of tasks. 9.6.4 Defining a task Defining a task in the database server is done by inserting a row in the ph_task table. Optionally, you can create a group in ph_group to identify a set of tasks. By default, a task is put in the MISC group. You can add groups to the ph_group table to accommodate the organization of your tasks. Example 9-8 shows the addition of the MyGroup group to the ph_group table. Example 9-8 Creation of a group INSERT INTO ph_group VALUES(0, “MyGroup”, “Group for my own tasks”); If the specific task uses parameters to determine the details of the processing, one or more rows can also be inserted in ph_threshold. A task is expected to do some processing, such as table maintenance. Because it does not store any results anywhere, not all the columns of the ph_task table are needed. Furthermore, many of the columns have default values that are appropriate for most declarations. For example, the defaults indicate that the task can run any day of the week and is enabled for execution. The default values are listed in Table 9-7. Table 9-7 ph_task default values Column name Default values tk_type SENSOR tk_dbs sysadmin tk_delete INTERVAL(0 1:00:00) day to second tk_start_time DATETIME(08:00:00) hour to second tk_stop_time DATETIME(19:00:00) hour to second tk_frequency INTERVAL(1 0:00:00) day to second Chapter 9. Automating management through tasks and sensors 221 Column name Default values tk_next_execution CURRENT year to second tk_total_execution 0 tk_total_time 0.0 tk_Monday T tk_Tuesday T tk_Wednesday T tk_Thursday T tk_Friday T tk_Saturday T tk_Sunday T tk_attributes 0 tk_group MISC tk_enable T tk_priority 0 Example 9-9 shows the creation of a task that can be useful to automate a mundane database administration task. Example 9-9 Task creation INSERT INTO ph_task ( tk_name, tk_type, tk_group, tk_description, tk_execute, tk_start_time, tk_stop_time, tk_frequency ) VALUES ( "Release Memory", "TASK", "PERFORMANCE", "Attempt to release memory and unused memory segments.", 222 Embedding IBM Informix "EXECUTE FUNCTION admin('onmode','F')", DATETIME(3:00:00) HOUR TO SECOND, NULL, INTERVAL ( 1 ) DAY TO DAY ); In this definition, the following default values are changed: tk_type changed to TASK tk_group changed to PERFORMANCE (must exist in ph_group) tk_start_time changed to 3:00am tk_stop_time is set to NULL, effectively removing it The tk_frequency is also set, but its value is the same as the default. The task action is defined in the tk_execute column. This command tells Informix to release unused shared memory segments and drain user’s memory pool(s). The tasks executes once a day at 3:00 am. 9.6.5 Defining a startup task A startup task is similar to a task except that it runs only once after the database server is first started. For this reason, columns such as tk_start_time and tk_stop_time do not mean anything in this context. The only significant column is tk_frequency. Its value represents the amount of time to wait after the server is brought up before the task runs. If tk_frequency is set to NULL, the startup task runs one minute after the server is started. The default value for tk_frequency is one day. 9.6.6 Defining a sensor A sensor is a task that reads some values and saves them in a results table for future analysis. A simple sensor can collect the number of active connections every five minutes and store the result in a table that can then be used to graph the usage over time. The basic assumption about sensors is that they use a table to save the results of their work. Everything said about tasks earlier applies to sensors, but a sensor definition includes additional information that requires the use of additional columns: tk_result_table The name of the table where the sensor puts its results. Chapter 9. Automating management through tasks and sensors 223 tk_create The CREATE TABLE statement for the result table. tk_delete The amount of time the rows stay in the result table. If the table identified in tk_result_table does not exist, the scheduler will run the command stored in the tk_create column before running the sensor. The tk_delete column determines how long a row stays in the table. Because it is defined as an interval, how do the rows get removed from the table? The result table must include a column called ID, which is defined as an integer. When inserted into the result table, the ID column must be set to the $DATA_SEQ_ID value. This is the iteration number of the execution of the sensor. Figure 9-4 illustrates the relationships between the ph_task, ph_run, and result tables that allow for the removal of rows. ph_task tk_id tk_name tk_group tk_result_table tk_delete ... ph_run run_task_id run_task_seq run_time ... <result_table> .ID .. Figure 9-4 Relationships used to removed rows in result tables 224 Embedding IBM Informix The removal of rows from the result table can be accomplished with a statement that looks like Example 9-10. Example 9-10 Statement removing rows from the result table DELETE FROM <result_table> WHERE ID in (SELECT run_task_seq FROM ph_task, ph_run WHERE tk_result_table = <result_table> AND tk_id = run_task_id AND run_time < CURRENT - tk_delete ) With these differences in mind, the creation of a sensor is similar to the creation of a task. Example 9-11 shows an INSERT statement that defines a new sensor. Example 9-11 Sensor definition INSERT INTO ph_task ( tk_name, tk_type, tk_group, tk_description, tk_result_table, tk_create, tk_execute, tk_stop_time, tk_start_time, tk_frequency, tk_delete ) VALUES ( "mon_vps", "SENSOR", "CPU", "Process time of the Virtual Processors", "mon_vps", "create table mon_vps (ID integer, vpid smallint, num_ready smallint, class integer, usecs_user float, usecs_sys float)", "insert into mon_vps select $DATA_SEQ_ID, vpid, num_ready, class, usecs_user, usecs_sys FROM sysmaster:sysvplst", NULL, NULL, INTERVAL ( 4 ) HOUR TO HOUR, INTERVAL ( 15 ) DAY TO DAY ); Chapter 9. Automating management through tasks and sensors 225 In this definition, the result creation statement includes a column called ID. As part of the definition, the rows are kept for 15 days, as set in the tk_delete column, shown in 9.6.1, “SQL statement” on page 217, as the last column in the INSERT statement. 9.6.7 Defining a startup sensor A startup sensor is similar to a startup task except that it is expected to put results in a results table. A startup sensor uses the same fields as a sensor, but the timing columns are not needed except for tk_frequency, which indicates how long to wait after the server is brought up before running the sensor. Example 9-12 shows the definition of a startup sensor. Example 9-12 Startup sensor INSERT INTO ph_task ( tk_name, tk_type, tk_group, tk_description, tk_result_table, tk_create, tk_execute, tk_start_time, tk_stop_time, tk_delete, tk_frequency, tk_next_execution ) VALUES ( "mon_config_startup", "STARTUP SENSOR", "SERVER", "Collect information about database servers configuration file (onconfig). This will only collect paramaters which have changed.", "mon_config", "create table mon_config (ID integer, config_id integer, config_value lvarchar(1024)); create view mon_onconfig as select ID ID, cf_name name, config_value value from mon_config, sysmaster:sysconfig where mon_config.config_id = sysmaster:sysconfig.cf_id;", "onconfig_save_diffs", NULL, NULL, INTERVAL ( 99 ) DAY TO DAY, NULL, 226 Embedding IBM Informix NULL ); 9.6.8 Generating alerts Another part of the tasks and sensors management capabilities is the ability to generate alerts and store them in the ph_alert table. Any task or sensor can include logic to insert into the ph_alert table. This table includes multiple column constraints and default values, which are described in Table 9-8. Table 9-8 ph_alert column constraints and default values Column name Constraint or default values alert_type Must be one of the following values: INFO, WARNING, or ERROR. The default is INFO. alert_color Must be one of the following values: GREEN, YELLOW, or RED. The default is GREEN. alert_time The default is CURRENT year to second. alert_state Must be one of the following values: NEW, ADDRESSED, ACKNOWLEDGED, or IGNORED. The default is NEW. alert_state_changed The default is CURRENT year to second. alert_object_type Must be one of the following values: SERVER, DATABASE, ‘TABLE’, INDEX, CHUNK, USER, SQL, MISC, or ALARM. The default is MISC. alert_action_dbs The default is sysadmin. Part of the design of the ph_* tables is tied to the creation of the OAT for the Informix. This explains some of the decisions made in the definition of the tables. For example, the alert_color column in the ph_alert table follows the convention used in OAT about the severity of the alert. It is used to provide a quick view of the alerts in a code that was popularized by the United States Homeland Security Department. Other fields allow for the manipulation of the alert, such as changing its state and running a corrective action. Example 9-13 shows an INSERT statement into the ph_alert table. It represents an alert about backups. Example 9-13 Creation of an alert INSERT INTO ph_alert (ID, alert_task_id,alert_task_seq,alert_type, Chapter 9. Automating management through tasks and sensors 227 alert_color, alert_object_type, alert_object_name, alert_message,alert_action) VALUES (0,task_id, task_seq, "WARNING", "red", "SERVER",dbspace_name, "Dbspace ["||trim(dbspace_name)|| "] has never had a level 0 backup. Recommend taking a level 0 backup immediately." , NULL ); 9.6.9 Testing a task or sensor You could test your tasks by executing the script independently of the task and, after you are satisfied, you can then create a task around it. You might still want to make sure that the execution is done properly when that script is in the form of a task. For example, if you misspell the name of the database where the task is supposed to execute, you get an error. It is possible to update the time of the execution in the task definition to get it to execute almost immediately. This is awkward and can introduce additional errors about the timing of the execution for production purposes. Informix provide a function that allows you to execute a specific task immediately. The function is defined in the sysadmin database and is called exectask. This function takes either a task name (tk_name) or a task ID (tk_id) as argument. Example 9-14 shows the function signatures. Example 9-14 exectask function signatures exectask(lvarchar) exectask(integer) There are other signatures available and there is also an additional function called exectask_async with the same signatures. Exectask_async is discussed in 9.8.4, “Running a job” on page 233, in the context of background jobs. 9.6.10 Tasks and sensors tricks The use of tasks and sensors is straightforward. However, there can be creative ways of using them. Another important point is the fact that there are triggers defined on the ph_task table. It includes an INSERT trigger, an UPDATE trigger, and a DELETE trigger. This can provide the opportunity for near real-time communication between tasks. 228 Embedding IBM Informix It is possible to have a task or sensor do work and, depending on the result of performing data analysis, update the execution time of a specific task to run almost immediately, separately from the currently running task. The advantage of this approach is that you can better modularize the design of the tasks and still get the appropriate action taken when desired. It is possible to have a task insert a new task in the ph_task table that is scheduled for immediate execution. It can be used in conjunction with the alarm program, described in Chapter 6, “IBM Informix configuration for embeddability” on page 147, where the alarm program action can be to update the task execution time to get it to process the alarm immediately. Tasks and sensor provide basic capabilities. The action is left to you, where you can be creative in using them to solve your business problems. 9.7 Using tasks for embedded systems As discussed previously, Informix comes with a set of predefined tasks and sensors that focus on system monitoring and administration. However, more tasks and sensors can be added to improve on the autonomic processing of the database server. Some of these tasks need to have specific information about the environment to be able to take action. For this reason, they cannot be provided as predefined tasks. An example is the system space monitoring that can add a chunk to a dbspace, based on the space available. The task would also have to generate an alert if there happens to be no other space available to allocate. Another example would be the automation of backups. The application can decide what to do with the backup files at its discretion, without having to ask the users to go and run a backup manually. A task can go as far as monitoring the space left in the file system that stores the backups, and generate alerts if the space is getting low. This leads to another use of tasks and sensors, and that is for application tables monitoring and administration. If an application uses data based on a 15-month rolling window, there is a need to remove old fragments and add new ones. A task can be defined to run monthly. This task would, for example, detach an old fragment, and attach a new empty fragment for the following month. It can then back up the detached fragment before removing it from the system, freeing space for a future month. Tasks and sensors should be part of the overall design of an embedded application to minimize or eliminate any work that is not directly related to the application. Chapter 9. Automating management through tasks and sensors 229 There can be sensors that monitor the growth of tables to determine when new hardware might be required. The same applies to the number of users connected to the application and the resource use. Tasks and sensors can generate alerts in the ph_alert table, making it a single focus point to determine what is going on at the application level. This has the additional advantage of being accessible through OAT as an overall monitoring strategy for the system. Tasks and sensors are additional Informix capabilities that make it more invisible and resilient. Integrating tasks and sensors in the overall application design will improve the customer experience, and increase user satisfaction. 9.8 The job runner If you went over the predefined tasks and sensors, you probably noticed two tasks: Job Runner Job Results Cleanup They indicate a new capability in the Informix server. Informix Version 11.70 added a facility to create a job that can be executed in the background without the need for an active connection. The job also collects the result of the execution so it can be reviewed later. For example, you may have an application that needs to load a large amount of data into the database through the external table interface. Instead of having the application wait for the load to complete, the application could start a background job and check for the result later. The application can then be more responsive to the user without having to use multi-threading and multiple database connections. A job would be one or more SQL commands (SQL statement, stored procedure, or function) that are executed sequentially. This provides the flexibility required for complex business processing. Two new tables have been added to the scheduler system to support the job runner: ph_bg_jobs This table contains the definition of the commands included in a job. ph_bg_jobs_results This table includes the return codes of the commands from a job and some execution statistics. 230 Embedding IBM Informix In addition to these tables, there is a sequence (ph_bg_jobs_seq) that is used to provide a unique job identifier. 9.8.1 The ph_bg_jobs table The ph_bg_jobs table includes the definition of the commands that are part of jobs. You can see the complete table definition in Table 9-9. Table 9-9 ph_bg_jobs table columns description Column Type Description ph_bg_id serial Unique identifier ph_bg_name varchar(255) Job name ph_bg_job_id integer Job ID ph_bg_type varchar(255) Job group, default “MISC” ph_bg_sequence smallint Job command order of execution ph_bg_flags integer Job flags, default 0, not currently used ph_bg_stop_on_error boolean Stop job execution on any error, default ‘f’ ph_bg_database varchar(255) Database used for the job execution ph_bg_cmd lvarchar(30000) Command to execute The ph_bg_id is a unique value obtained from the ph_bg_jobs_seq sequence. Multiple entries belonging to the same job will have the same ph_bg_id value. The ph_bg_type column allows you to group jobs under a common name. This is useful for the management of a large number of jobs. The ph_bg_cmd column includes the commands that you want to execute. Multiple statements should be separated with a semicolon. 9.8.2 The ph_bg_jobs_results table The ph_bg_jobs_results receives the result of the execution of each part of a job. It also contains information about the identity of the task that executed the job, the task ID, and the specific execution sequence of that task. This way, you can tie the job execution of each step with the information included in the ph_run table for the overall execution of the job. Chapter 9. Automating management through tasks and sensors 231 Table 9-10 shows the definition of ph_bg_jobs_results. Table 9-10 ph_bg_jobs_results table columns description Column Type Description ph_bgr_id serial Unique identifier ph_bgr_bg_id integer Job entry unique identifier ph_bgr_tk_id integer Task ID (from ph_task) ph_bgr_tk_sequence integer Task sequence value ph_bgr_starttime datetime year to second Start time for this statement ph_bgr_stoptime datetime year to second Stop time for this statement ph_bgr_retcode integer Primary return code ph_bgr_retcode2 integer Secondary return code ph_bgr_retmsg lvarchar(30000) message returned The ph_bgr_retmsg column contains either the error message of the execution of the command or its return value. For example, it could be the result of a select statement. The result is limited to 30,000 bytes. The use of the ph_bg_jobs_results table is further discussed in 9.8.5, “Checking the execution results” on page 234. 9.8.3 Creating a job Creating job is similar to creating a task, except that we insert the job into the ph_bg_jobs table. Another difference from tasks is that a job may have multiple entries that are executed in sequence, according to the value in the ph_bg_sequence column. Example 9-15 shows the creation of a simple job containing two entries. Example 9-15 Creation of an background job with one entry INSERT INTO ph_bg_jobs ( ph_bg_name, ph_bg_job_id, ph_bg_type, ph_bg_sequence, ph_bg_stop_on_error, ph_bg_database, ph_bg_cmd) VALUES( "load_to_ext_customer", ph_bg_jobs_seq.nextval, "LOAD", 10, 'f', 'stores_demo', 'create external table ext_customer sameas customer using (datafiles ("disk:/tmp/extcustomer"))'); 232 Embedding IBM Informix INSERT INTO ph_bg_jobs ( ph_bg_name, ph_bg_job_id, ph_bg_type, ph_bg_sequence, ph_bg_stop_on_error, ph_bg_database, ph_bg_cmd) VALUES( "load_to_ext_customer", ph_bg_jobs_seq.currval, "LOAD", 20, 'f', 'stores_demo', 'insert into ext_customer select customer.* from customer'); ); You should note the use of the sequence (ph_bg_jobs_seq) where the first entry asks for the next available value and the second entry asks for the current value. This ensures that both entries have the same value. Another interesting value is the ph_bg_sequence column. In our example, we use values 10 and 20. This is a best practice to follow. If for any reason you need to insert one or more intermediary steps, you do not need to recreate the entire job, because you left some space for that eventuality. 9.8.4 Running a job Jobs do not include scheduling information tasks. To execute a job, you have the following choices: Execute a job synchronously. You can use the exectask function to execute a job. To execute the load_to_ext_customer job shown in Example 9-15 on page 232, you can use either: EXECUTE FUNCTION exectask(“Job Runner”, “load_to_ext_customer”); or EXECUTE FUNCTION exectask(19, “load_to_ext_customer”); The number 19 corresponds to the tk_id of “Job Runner” from the ph_task table. The function waits for the completion of the task or job and returns a status code. Execute a job asynchronously. You can execute a job using the exectask_async function. It does the same thing as the exectask function, except that it does not wait for the completion of the task. For example, you can then use either: EXECUTE FUNCTION exectask_async(“Job Runner”, “load_to_ext_customer”); or EXECUTE FUNCTION exectask_async(19, “load_to_ext_customer”); Chapter 9. Automating management through tasks and sensors 233 Execute a job from a scheduled task. You can use a task to schedule the execution of a job. This seems similar to simply creating a task, but it gives you better control of a task executing a stored procedure. By scheduling a task, you better control what happens when different sections of the job fail. This way, you make better decisions about completing the task instead of failing on the first error. The task would then simply execute an exectask_async command. 9.8.5 Checking the execution results The result of the execution of each step of a job is stored in the ph_bg_jobs_results table. Because the table includes the unique job step ID from the ph_bg_jobs table, you can get a more comprehensive output by using both tables, as shown in Example 9-16. Example 9-16 Getting a comprehensive result SELECT ph_bg_name, ph_bg_sequence, ph_bg_cmd::lvarchar, ph_bgr_starttime, ph_bgr_stoptime, ph_bgr_retcode, ph_bgr_retcode2, ph_bgr_retmsg FROM ph_bg_jobs, ph_bg_jobs_results WHERE ph_bg_id = ph_bgr_bg_id AND ph_bg_name = “load_to_ext_customer” ORDER BY ph_bgr_id; Note that the ph_bg_cmd column is cast from an LVARCHAR(30000) to an LVARCHAR. This cast reduces the size of this column to 2048 bytes. You could do the same for the ph_bgr_retmsg column. At least one cast is required to reduce the overall maximum size of the resulting projection to below 32768 bytes. Example 9-17 shows a possible result of the statement. Note that the output has been formatted for readability. Example 9-17 Execution result Column name ---------------ph_bg_name ph_bg_sequence (expression) ph_bgr_starttime ph_bgr_stoptime ph_bgr_retcode ph_bgr_retcode2 234 Embedding IBM Informix Value ------------------------------------------------------------load_to_ext_customer 10 create external table ext_customer sameas customer using (datafiles ("disk:/tmp/extcustomer")) 2010-09-28 17:57:52 2010-09-28 17:57:52 -310 0 ph_bgr_retmsg Table (informix.ext_customer) already exists in the database. ph_bg_name load_to_ext_customer ph_bg_sequence 20 (expression) insert into ext_customer select customer.* from customer ph_bgr_starttime 2010-09-28 17:57:52 ph_bgr_stoptime 2010-09-28 17:57:53 ph_bgr_retcode 0 ph_bgr_retcode2 0 ph_bgr_retmsg - You could also retrieve information about the overall job execution by matching the ph_bgr_tk_id and ph_bgr_tk_sequence with the ph_run table columns run_task_id and run_task_seq. This gives you complete visibility of the overall execution of a job. Chapter 9. Automating management through tasks and sensors 235 236 Embedding IBM Informix 10 Chapter 10. Administration of an embedded IBM Informix system In this chapter, we describe and discuss some of the key issues and considerations to be aware of and prepared for after deploying Informix embedded in application software or in an appliance solution. How to deal with these events depends on how deeply embedded the DBMS is in the application or system. For systems in which the DBMS is deeply embedded, the programming to deal with these events is usually done before deployment. For less deeply embedded systems, a DBA may deal with these events as they occur. In either case, the topics are described here because the events in question occur after the system is in use. When using Informix as an embeddable database, there is little post-deployment effort required. Both the Informix product and the software that embeds Informix have been configured and programmed proactively to protect themselves from potential issues that should be avoided. In addition, they are configured to reactively and automatically respond to specific events if they should occur in the future. This ensures that the entire system will run smoothly and in a self-sufficient way, with zero or near-zero administration overhead. © Copyright IBM Corp. 2011. All rights reserved. 237 In this chapter, we provide you with a series of key considerations, available features, examples, and best practices to embed Informix in your application or appliance. As examples, you can modify Informix in the following manner: Use less disk space, by using the minimum footprint for your needs. Make it invisible to your users, from the moment you install and configure the data server. Make it more secure, through the mechanisms available. Enable it to detect and respond to the various events in the life of a database system. This is done by using a variety of mechanisms, including configuration, sensors and tasks, and the alarm program. Enable it to tune performance and make adjustments based on your system needs and resources. This is usually done using the autonomic configuration parameters, such as AUTO_AIOVPS. Enable it to monitor, alert, and collect information as needed for diagnostics and support. This is usually done using either the built-in sensors or those you create for specific purposes. Depending on how these tasks were set in Informix and in the rest of your solution before it was deployed, and depending on how deeply-embedded Informix is in your system, the post-deployment maintenance effort will vary. Regardless, that work should not cause downtime, particularly if there are few or no onsite DBAs. 10.1 Applying lessons learned after deployment Using your solution with Informix gives you insight about new automation challenges and self-repair settings that you might want to add to the software in a future release. As in any software implementation, after the system has been deployed, the daily usage and feedback from users, the maintenance and support tasks, and the unexpected events provide new knowledge and perspectives that you can use to make enhancements and innovations to the embedded system. For example, you might face situations that your system was not prepared to deal with before, and now, after deployment, you learned a way to deal with them and fix them. You can incorporate them as internal business logic code, best practices, pre-built settings, or menu options in future releases of the solution. 238 Embedding IBM Informix Finally, as the products that compose your application or appliance evolve, there will be easier and better ways to produce new versions of the embedded solution. 10.2 Basic concepts for automating administration Administrative tasks can be automated in various ways: Shell programs (on UNIX or Linux) or batch scripts (on Windows) can be run periodically using CRON or AT. These programs can check for various conditions in the database or DBMS and take appropriate actions. For example, a program can check how much space remains in each dbspace by querying sysmaster:syschunks and sysmaster:sysdbspaces. If a dbspace is nearing capacity, a chunk can be added by using onspaces. These scripts often use sed, awk, grep, PERL, and other utilities to interpret the results of various onstat reports or query results. Use the ALARMPROGRAM to handle certain conditions. IBM Informix Dynamic Server Administrator's Reference, G229-6360-01 contains details about how the ALARMPROGRAM script is invoked. You may choose to change or replace that script with a script or program written to meet your particular requirements. The standard alarmprogram.bat (or alarmprogram.sh on UNIX or Linux) script includes basic tasks, such as backing up full logical log files. The standard script does not remove old log archives. You may want to add logic to remove files that were created before the last database backup. Create sensors, tasks, and stored procedures to handle certain conditions. For example, you may choose to install a sensor to record the free space in each dbspace and a task to check those results periodically. This task can add a chunk to any dbspaces that are nearly full. The most appropriate technique for a system is difficult to determine. Most tasks can be done by using any of the techniques. So, the choice may be based, as an example, on how familiar the developers are with the Informix data server or shell programming. Choosing what task should be automated depends on how deeply the Informix instance is embedded. If Informix is invisibly embedded, then there may be no point in automating many tasks. For example, the system may not have any extra disk space. In that case, checking to see if the dbspaces are filling up might not be useful because no remedial action is possible. A more practical approach might be to handle the error in the application. Chapter 10. Administration of an embedded IBM Informix system 239 Similarly, if a database backup cannot be restored, there is no point in taking a backup. Deeply embedded DBMS instances often employ this technique. This does mean that the application and system must be designed to be robust. If the system does have extra disk space, you may choose to monitor the space and add chunks as the database grows. In that case, you might choose to have a table in some database (sysadmin, perhaps) to specify the size of a new chunk for each dbspace. You might also include that logic in a task, or you might always add chunks of one size to every dbspace. The best option depends on the application and how it is used. For a system using Informix integrated in an application, and when a DBA is available, the Open Admin Tool (OAT) may be useful for database administration. A DBA can use OAT to monitor things and take action. But in this case, automated monitors may be useful so that the DBA does not have to check too often. Using OAT for administration is too large a topic to be included here. For more information about OAT, see the following website: http://www.openadmintool.org/ The website has both a discussion of the tool and directions for downloading the software. 10.3 Typical post-deployment tasks In this section, we give you an idea about some of the kinds of tasks that can take place in the post-deployment phase of embedded systems. Consider the following possible situations you may find yourself in, after your solution embedded Informix has been up and running for a while: Having to stop and restart an Informix instance to apply a tested Informix upgrade or Fix Pack, without changing your application software release or restarting your appliance. Responding to events that neither your software or Informix were configured to manage the way you require. You need to deal with those situations as they occur. For example, the password for the informix user might have expired or changed. Monitoring or gathering statistics about the data server that your existing software is not currently delivering. Adding space if the data gathered exceeds what the allocated space can hold. 240 Embedding IBM Informix Refusing to accept more data if space is not available, or removing old data to make room for new data. Ensuring backups are performed (if backups are required), logs are archived as they fill (if that is required), and removing any log files that are no longer required. These are common tasks directly related to the embedded Informix database. The following tasks are common post-deployment tasks that are related to the entire embedded system: Upgrading the version or applying a fix to the system at any level (hardware, operating system, application software, or database). Applying a configuration change at any level. Performing a maintenance or support task to ensure performance, and prevent, work around, or resolve a situation with which the system does not currently proactively or reactively solve. 10.3.1 Limiting and securing interfaces around Informix After deploying an embedded Informix-based system, you might need to perform some planned and unplanned maintenance, administration, or monitoring tasks. The difference in embedded systems is that you are challenged to perform these activities in a way that is the least invasive possible and by using the available interfaces to the Informix data server that are available, depending on how deeply embedded (invisible or deeply embedded, integrated, or included) the Informix data server is in your software application or appliance. In some cases, you might not have access to an operating system command prompt to run Informix commands, or to the HTTP port of the Open Admin Tool to perform remote web-based administration of your Informix data server. In deeply embedded systems, where the Informix database is hidden inside the solution, there will be limited or no interfaces and tools to access Informix. Embedded systems secure their components, such as the database, to restrict their usage and to protect them from unwanted access, hackers, and unexpected errors, or from reliability issues caused by external usage. It is possible that the only path to interact with Informix data server will be by including a script or a program with your software to handle the post-deployment activity. Chapter 10. Administration of an embedded IBM Informix system 241 Table 10-1 shows some of the interfaces to the Informix database server that you might want to secure and to which you might want to restrict access during and after deployment, so that only the minimum remain securely open for post-deployment types of activities. Table 10-1 Interfaces to access Informix Interface with Informix Considerations Examples Data server components Install only the server features that are really needed for your system. Informix server features besides the base server, such as Database Server Extensions, Global Language Support, Backup and Restore, Demos, Data-Loading Utilities, and Administrative Utilities Informix client drivers Choose only the drivers required for the solution. Native CLI, ESQL/C, ODBC, OLE DB, .Net, JDBC, JCC, PHP, and Ruby-on-Rails. Command prompts Limit the ability to access and use an OS command prompt to run Informix data server commands. Operating system prompt and shells Informix environment variables settings GUIs These are commonly the first elements you disable after deploying embedded systems. Informix GUI tools, such as SetNet32 or Server Instance Manager, in Informix Program Groups Operating system's GUI tools, such as X Window System based interfaces in UNIX/Linux or Windows GUI tools Third-party tools to locally or remotely administer Informix, such as IBM Data Studio, AGS Server Studio / Sentinel, the operating system, or any other component around Informix Informix-based services ports Other ports, protocols and services Configure the data server only with the protocols, ports, and services that you require for your solution. Limit the access to other ports, protocols, and processes that are related to Informix through the network or web/application servers 242 Embedding IBM Informix Informix client/server protocols and ports, such as TCP/IP, SHM, STR, DRDA, IPX/SPX HTTP access to remote web-based administrative tools for Informix, such as Open Admin Tool (OAT) or Informix Server Administrator (ISA) TELNET, SSH, PING, RSH, RLOGIN, HTTP, HTTPS, FTP Remote Desktop/Terminal Services, VPN, dial-up access Trusted relationships, such as hosts.equiv, .rhosts O/S-based Client/Server protocols, such as TCP/IP, NetBIOS, IPX/SPX, File sharing To limit access and secure these interfaces, and make them invisible to your users, you need to configure the hardware, operating system, firewall, network, web servers, and application servers. Also, use the Informix modular installation (the Deployment Wizard) and the Informix connectivity settings to protect the embedded components. The idea is to restrict their access and usage to the components available through your particular solution or application, without leaving any open doors that might lead to unauthorized access, inappropriate usage, opportunity for hackers, or downtime. You may need to leave a few doors available through secured-access for maintenance, support, and administrative tasks after deployment. 10.3.2 New security options in the Informix data server In the most recent release, new choices for managing connection authentication and privileges were added. First, you can map user IDs that are not present on the system to specific user IDs that do exist. Second, you can define trusted contexts so that properly trusted programs, such as application servers, can declare which user ID should be used for determining privileges for any SQL statement. We will describe each option in turn. Non-OS users As described in Chapter 3, “Preparing to embed IBM Informix” on page 35, you may use LDAP or other external authentication so that a local account is not required for each DBMS user. The details about how to set up LDAP or some equivalent service are beyond the scope of this book. Chapter 10. Administration of an embedded IBM Informix system 243 Mapped users You may choose to map some user IDs to some other user ID. Figure 10-1 shows the OAT window of any existing mapped users. In this case, user dick is a local user, but user tom is not. You can create mapped users using OAT or the GRANT ACCESS SQL statement. Figure 10-1 OAT window for mapped users 244 Embedding IBM Informix Trusted contexts Trusted contexts are introduced in 3.3.2, “Security issues” on page 40. You create them using the CREATE TRUSTED CONTEXT SQL statement or using OAT. The OAT window for performing this task is shown in Figure 10-2. In this case, connections from the zulu host by the dick user ID are trusted. Figure 10-2 OAT window for trusted context Be careful to restrict the user IDs that are trusted. In general, do not use a trusted user ID for general work, because that connection may execute SQL using any user ID, including the informix user. 10.3.3 Starting and stopping the DBMS There are a number of situations in which an Informix instance may have to be stopped or started. How you proceed in these different situations depends on the specific use of the instance and how deeply it is embedded. For example, if the DBMS is integrated with an application that is not constantly used, the DBMS may be stopped when the application is not used. On the other hand, an Informix instance invisibly embedded in a door control system may never be stopped or started. The following sections describe how to start and stop Informix instances both automatically and manually. Chapter 10. Administration of an embedded IBM Informix system 245 Preventing unintended instance initialization The Informix data server sets a “lock” to prevent anyone from inadvertently re-initializing the instance. When the data server starts, if the disk location defined by the ROOTPATH parameter appears to contain a valid instance, then the data server uses that instance. When the oninit -i command is used for a new instance, there is no valid data there, and new data must be established. However, if oninit -i is used a second time, the data server uses the FULL_DISK_INIT configuration parameter to decide whether or not the re-initialization should be honored. If the value is zero, then the oninit -i command will fail. To re-initialize an Informix data server instance, you must edit the configuration to set FULL_DISK_INIT to a value of 1. Only then will the instance overwrite the data in the root dbspace. 10.3.4 Automatic startup and shutdown In embedded systems, it is important that whenever you reboot the appliance or hardware, the Informix data server comes back online as part of the operating system (OS) startup sequence. You also want to gracefully shut down the data sever down when the OS is being shut down. To perform this task, you need to create a script that can do both tasks (start and stop), depending on the action that was called for (pass it either as a start or stop action as an input parameter). The OS should be configured so it can seamlessly call the script along with the right action according to the OS event that is occurring. For example, the OS should call the script with the start parameter as part of the OS startup sequence, and with the stop parameter as part of the OS shutdown sequence. Different operating systems have different methods for adding automatic startup and shutdown of services. We suggest consulting the documentation for the platform on which you are deploying the embedded system. Startup and shutdown on Linux or UNIX In this section, we illustrate how you can set up a script that will be called automatically to start Informix at Linux startup time, and will be called automatically to stop Informix at the time the operating system is shutting down. 246 Embedding IBM Informix The following steps show how this can be done on Red Hat Linux. A similar procedure can be done for SUSE Linux (SLES 10). 1. As root, create a shell script like the one in the following snippet code, named informix in this particular example, and place it under the /etc/init.d directory: cp /home/mydirectory/informix /etc/init.d/informix chmod +x /etc/init.d/informix Make sure that the script has the following characteristics: – Has run permissions for both the informix and root users. – Has the right code for both the starting and stopping of Informix. It takes, as a parameter, the task you want to perform (start, if you want to start Informix, and stop, if you want to shut down Informix) and performs the appropriate action. – Sets the right shell and environment variables before calling any Informix command. – Has the following comment line to support the chkconfig utility. You need to specify the necessary Linux init runlevels at which you want the script to be called, and the numbers you desire to use as prefix to the script name to identify the startup (S) and shutdown/kill (K) links to the script that will be created by chkconfig in the proper Linux directories. # chkconfig: runlevels numberS numberK In the command above: • runlevels are the OS init runlevels (with no separation between them) for which you want the script to be set up. Runlevels go from 0 through 6. In Example 10-1 on page 249, we set the script to run for init levels 2, 3, and 5. • numberS is the number that startup script S will have: S<numberS><myScriptName> In Example 10-1 on page 249, we use prefix S90 to identify the links to the script inside the Linux startup directories used by init levels 2, 3, and 5. • numberK is the number that kill script K will have: K<numberK><myScriptName> In Example 10-1 on page 249, we use prefix K90 to identify the links to our script inside the Linux shutdown directories used by init levels 2, 3, and 5. # chkconfig: 235 90 90 Chapter 10. Administration of an embedded IBM Informix system 247 In this example, we have links to our script that are named S90informix under the different startup directories used by the init levels 2, 3, and 5 on Red Hat Linux. In addition, we also have links named K90informix that point to our script created by chkconfig in the different shutdown or kill directories used by the init levels 2, 3, and 5 on Red Hat Linux. Note: On Red Hat Linux, the startup (S) and kill (K) daemon scripts (symbolic links to the script) for the different OS runlevels 0 through 6 are automatically added by the chkconfig utility under the /etc/rc[0-6].d directories. On SUSE Linux, these S and K scripts go under the /etc/init.d/rc[0-6].d directories. The chkconfig utility is used to support activation and deactivation of services at different init runlevels, so it can be used to support the deployment of startup and shutdown scripts on Linux systems. However, not all the Linux distributions have chkconfig. The init runlevels of a UNIX-based system refer to the different modes (commonly 0 through 6) of operation in a UNIX-based computer. The convention is that the computer enters init runlevel 0 when it halts, and runlevel 6 when it reboots. The intermediate runlevels (1–5) differ in which drives are mounted, which network services are started, and the particular UNIX or Linux flavor being used. For further details about the specific init runlevels that apply to your own system, consult your OS manual. Note: We suggest using the chkconfig utility when it is available, which makes it easy to place, activate, and deactivate startup and shutdown scripts on Linux systems at different desired init runlevels. For UNIX-based systems that are not Linux or for Linux systems that do not have the chkconfig utility installed, refer to the discussion later in this section about other methods and similar utilities that can be used to place and activate startup and shutdown scripts so they are automatically called by the OS at the different init runlevels. 248 Embedding IBM Informix The script in Example 10-1 is a proof-of-concept, designed for Red Hat Linux, to enable the automatic startup and shutdown of Informix at init runlevels 2, 3, and 5 using the chkconfig utility. It can also work on SUSE Linux to enable the script at init runlevels 3 and 5. You may need to make changes to the environment variables and customize the messages and error checking for the desired behavior. For other distributions of Linux and other UNIX-based systems, you can use this sample script as an example, making appropriate changes for your own environment. Example 10-1 Sample startup and shutdown script #!/bin/sh # File: informix # Purpose: Startup and Shutdown of Informix server # Based on a shell script by Marco Greco (IBM) # Comments to support chkconfig on RedHat Linux at levels 2,3,5 # Startup (S) and Kill (K) scripts names under /etc/rc<level>.d # directory will be named S90informix and K90informix # # chkconfig: 235 90 90 # Description: Automatic start up and shutdown of Informix export export export export INFORMIXDIR=/opt/IBM/informix/11 PATH=$INFORMIXDIR/bin:$PATH INFORMIXSERVER=ids11_tcp ONCONFIG=onconfig.ids11 if [ $# -lt 1 ] then echo "Usage: $0 {start|stop}" else case "$1" in start) if [ `$INFORMIXDIR/bin/onstat 2>&- | grep -c initialized` -ne 0 ] then echo -n "Starting Informix instance... " $INFORMIXDIR/bin/oninit echo "done" fi ;; stop) if [ `$INFORMIXDIR/bin/onstat 2>&- | grep -c initialized` -eq 0 ] then echo -n "Shutting down Informix instance... " $INFORMIXDIR/bin/onmode -ky echo "done" fi ;; *) Chapter 10. Administration of an embedded IBM Informix system 249 echo "Usage: $0 {start|stop}" ;; esac fi exit 0 2. Test that the script works as expected. Try both the start and the stop options by passing the argument start for starting and stop for stopping Informix. Run the script as the root user and make sure the script does what is supposed to do in both cases. This script should start the Informix server and close the terminal window: . /etc/init.d/informix start This script should shut down the Informix server and close the terminal window: . /etc/init.d/informix stop Note: Precede the execution of the shell script with the dot (.) in the command line, as shown in both examples, so that no child processes are spawned for the script execution. 3. The code for the informix script (in Example 10-1 on page 249) supports the chkconfig function, so the script will be automatically added into the /etc/inittab file of the Linux system without having to edit any other system file or manually add links to the rc directories that apply for the different O/S runlevels. To add the informix script into inittab to respond to init levels of 2, 3, and 5 (as was documented in the comments for chkconfig in the script), run the following /sbin/chkconfig command: chkconfig --add informix Then, to verify that the informix was added to these levels 2, 3, and 5 as requested, we ran the following command: chkconfig --list informix On RHEL, the command’s output should show that the informix script/service is running for init runlevels 2, 3 and 5: informix 0:off 1:off 2:on 3:on 4:off 5:on 6:off We should now find S<numberS>informix (for example, S90informix) and K<numberK>informix (for example, K90informix) symbolic links pointing to the /etc/init.d/informix script under the different /etc/rc<runlevel>.d directories. 250 Embedding IBM Informix On SLES, run the following command to add the informix script above so it is called to start Informix when the operating system reaches runlevel 5: chkconfig --add informix 35 chkconfig --list informix informix 0:off 1:off 2:off 3:on 4:off 5:on 6:off On Debian and Ubuntu distributions of Linux, the equivalent command to the Red Hat and SUSE chkconfig command would be update-rc.d. See 12.4.6, “Preparing your Informix virtual appliance for re-distribution” on page 335 for information about how to automatically start up an Informix instance during system boot on Ubuntu 8. Another method (the traditional way) is to perform the manual steps that commands such as chkconfig do for you automatically. With the manual approach, start adding the script (as a symbolic link) to the different directories that represent the different Start (S) and Shutdown/Kill (K) daemons at the different, required init runlevels [0–6]. For example, scripts for runlevel 2 go under rc2.d. For runlevel 3, they go under rc3.d, and so on. For example: ln -s /etc/init.d/informix /etc/rc3.d/S600informix ln -s /etc/init.d/informix /etc/rc2.d/K600informix Consult the appropriate documentation for the specifics for your UNIX, Linux, or Mac OS version and distribution when you include a script as part of the startup and shutdown sequences. You are now ready to test the setup. 4. Reboot the machine and verify that after the operating system has been restarted that the Informix instance is in online mode. As root user, you can try a command such as either of the following commands: init runlevel shutdown -r +runlevel In the above commands, the following variables are: – runlevel [0-6] represents the runlevel you tell the OS to reach upon initialization. – r causes a reboot to occur after the shutdown is completed. For example: shutdown -r +5 For further information about Initialization of the OS and the different runlevels, consult the appropriate OS documentation. You can also consult the man pages for init, reboot, and shutdown. Chapter 10. Administration of an embedded IBM Informix system 251 Startup on Windows There are a variety of factors that might cause a system hosting Informix to be shut down. A shutdown of the system will inherently cause stoppage of the Informix data server service and termination of its processes. Depending on the user requirements, the application embedding Informix may need to have the data server brought back online after a system startup. It is important that the data server be successfully brought back online to ensure proper functioning. This section addresses how to configure an Informix service in an embedded environment so that it is automatically started. Using the Windows ChangeServiceConfig() function This Windows API function allows you to set the configuration properties of a Windows service. See Example 10-2 for a sample program that can be used to modify the Informix service so that it is automatically started when the system restarts. It also includes a sample C function that changes the settings of a service. In particular, it changes the service startup type to automatic so that the service is started during system startup. Example 10-2 Starting Informix using Windows ChangeServiceConfig() function DWORD ChangeIDSServiceConfig(LPCTSTR svcName) { SC_HANDLE schSCMgr, schSvc; DWORD err = 0; //Get handle to service control manager database schSCMgr = OpenSCManager( NULL, //computer name. NULL - local computer NULL, //name of SCMD. Set this value to NULL SC_MANAGER_ALL_ACCESS); //access level for the SCMD //If service control mgr database cannot be opened, give error if (schSCMgr == NULL) { //Handle error as desired } //Open Informix service for which configuration property is to be set/modified //OpenService() returns a handle to the specified service schSvc = OpenService( schSCMgr, //handle to SCMD svcName, //service name SERVICE_CHANGE_CONFIG); //access level for opened service //If service cannot be opened, give error if (schSvc == NULL) { //Handle error as desired } //Change service configuration properties. //NULL parameter indicates that the existing setting will be used if (!ChangeServiceConfig( schSvc, //Service handle SERVICE_NO_CHANGE, //Type of service. 252 Embedding IBM Informix SERVICE_AUTO_START, //**START property for service**. AUTOMATIC SERVICE_ERROR_NORMAL, //error severity NULL, //path to service executable. NULL, //load ordering group for service. NULL, //service tag identification. NULL, //array of services on which ‘svcName’ is dependent NULL, //service account. E.g. informix. NULL, //service account password. NULL)) //service display name. { err = GetLastError(); //Handle error as desired } CloseServiceHandle(schSvc); CloseServiceHandle(schSCMgr); return err; } Using the Windows sc utility The Windows Resource Kit provides the sc utility, which can be used to perform several administrative tasks on Windows services. If the Windows Resource Kit is installed on the target machine, the sc command can be used to change the startup type of your Informix service. The following command shows how Informix service settings can be changed so that the service is automatically started during system startup: sc config <service_name> start= auto In the above example, <service_name> refers to the Informix service name. Important: Changing the service startup properties does not start the service. 10.3.5 Manual startup and shutdown Starting and stopping an Informix instance manually is easier than starting and stopping it automatically or programmatically. In this section, we briefly describe how these types of tasks can be done. Windows startup Starting or stopping Informix on Windows is usually done by using the control panel. Informix is designed to function as a Windows service, so using the services control panel is the proper approach. If you use a command prompt, that window must remain open for as long as the Informix instance is active. If the command window is closed, the Informix instance will terminate. Chapter 10. Administration of an embedded IBM Informix system 253 Figure 10-3 on page 255 shows the services control panel (you can open it by selecting Start Control Panel Administrative Tools Services). This example shows several Informix instances. The Action menu on the tool bar has the choice to start or stop the selected service. Notice that there is an associated service called the IBM Informix Dynamic Server Message Service (In the figure, this is the fourth item from the top). This service will be started automatically if it is not already running when an Informix instance is started. However, this service is not stopped automatically; that must be done separately by stopping the Informix instance, but leave it running if any Informix instance is still active. 254 Embedding IBM Informix Figure 10-3 The services control window and menu for starting or stopping an Informix instance For an invisibly embedded system, using the control panel may not be feasible because there is likely no one to perform the task. In this situation, Informix can be started and stopped using a script. For an integrated system, scripting may be used to include starting and stopping the DBMS in the administrative tool of the application. The goal is to be able to manage the DBMS without requiring an operator to take specific actions. Chapter 10. Administration of an embedded IBM Informix system 255 In this section, we describe how to start and stop the DBMS by using the control panel, as well as how to start and stop the DBMS programmatically. Example 10-3 shows starting the DBMS from a command prompt. The key parameter is the service name, that is, the Informix instance name, which is the DBSERVERNAME in the configuration file. Example 10-3 Starting Informix from the Windows command prompt $ net start ifx1170 The Informix IDS - ifx1170 service is starting..... The Informix IDS - ifx1170 service was started successfully. $ onstat IBM Informix Dynamic Server Version 11.70.TC1 139200 Kbytes -- On-Line -- Up 00:00:16 -- $ Another option for starting Informix is the starts program that is included in the Informix installation in INFORMIXDIR\bin. However, starts can be used to start Informix, but it cannot be used to stop it. To stop Informix from a script, net stop is the best choice. However, starts does allow options that net start does not allow. For example, the starts ids1150 -jy command is possible, but there is no way to perform a similar command using net start. The starts program usage is described in IBM Informix Dynamic Server Administrator's Guide, G229-6359-01. 256 Embedding IBM Informix Starts does not display any text to show that the service has started. The only response is that it returns to the command prompt. In addition, net start or net stop displays text, as shown in Figure 10-4. Figure 10-4 Starting Informix on Linux or UNIX Windows shutdown Stopping an Informix instance from the command prompt is done by running the net stop <servicename> command. Linux/UNIX startup On Linux or UNIX, Informix is started and stopped from a terminal window, or the console prompt. The command’s details are in IBM Informix Dynamic Server Administrator's Guide, G229-6359, but examples are provided in this section. Figure 10-4 shows the verbose form of starting Informix. If the -v option is not used, then none of the output will be seen. Using the verbose form from the command prompt provides evidence of what happened if the instance should fail to start. If the instance is started from a script, then the -v option should not be included if the process is not being observed. Chapter 10. Administration of an embedded IBM Informix system 257 Linux/UNIX shutdown Figure 10-5 shows the correct sequence for stopping an instance. Be aware that the order of the commands matters: 1. The instance is changed from multi-user mode to quiescent mode. 2. The logical log is changed to the next log. 3. If logs are automatically archived, then that activity will be done at this point. 4. A checkpoint is taken. This means that any changed data is flushed to disk so that there is less recovery to perform when the instance is restarted. 5. The instance is stopped. Figure 10-5 Stopping Informix on UNIX or Linux Note: You may choose to use the $INFORMIXDIR/bin/shutdown.sh (or shutdown.bat on Windows) instead. This script will run an onmode -ky command, wait for a period of time you specify, and if the data server is still running, take more drastic actions. The server processes will be killed and the shared memory released. 10.4 The informix user password expires or changes Prior to deployment, you need to have designed and set up the security mechanisms for the embedded system. As part of this task, you should have considered things such as authentication, authorization, and Industry-based Security Standards and Regulatory Compliance to use for the Informix database. Outside of Informix, you need to have taken care of securing the other elements that make up the solution or appliance, including the operating system, files, interfaces, and access to the server or appliance and to the application. When it comes to authentication, you should have worked on deciding and setting the authentication method and policies that are used in the system. For example: The authentication method Operating system password-based, NIS, Kerberos, PAM, and LDAP 258 Embedding IBM Informix The location of the users Local, Domain, and Network/Active Directory Policies and settings, including but not limited to the following functions: – – – – – – User rights and groups User privileges Network and data encryption Network security files and trusted relationships Preventing password expiration Preventing password change request upon first login In addition to the authentication design and settings, you also need to determine how the system would be set up for authorization. You have to design and configure the system to protect itself from unauthorized access to database objects and limit the privileges of the users to the database. Informix provides two mechanisms to configure authorization levels: Discretionary access control (DAC) Roles, user permissions, and privileges on database objects and operations Mandatory access control (MAC) Label-based access control (LBAC) Finally, depending on the industry where the solution is placed, you might be required to set your configuration according to industry standards, compliances, and auditing features in the system under the regulations that apply to the particular solution. Security is a complex subject. To review the Informix security features, see Chapter 2, “Embeddability basics” on page 13. For further details, see Security and Compliance Solutions for IBM Informix Dynamic Server, SG24-7556. There is one particular event that can occur in an embedded system that can be troublesome. Therefore, you must have a plan to prevent it from happening. That event is that the password for the informix user either expires or changes. If you have not yet deployed the solution, or if you are still in the process of redesigning the security features of the solution for a future release, then you should refer to the security discussions in the previous chapters of this book. If for some reason the embedded solution has already been deployed and the informix password has expired or was changed, see 10.4.1, “The informix user password has expired” on page 260 for suggestions about how to deal with those events. Chapter 10. Administration of an embedded IBM Informix system 259 10.4.1 The informix user password has expired If the password for the informix user has already expired, it will be necessary to change it. You can do this by deploying a script or program outside or inside the application to call a command or API function to interface with the authentication facility and provide a new valid password for informix. Here are some ideas to consider when you rely on simple authentication at the operating system level. When changing the password for the informix user, you should comply with the company security policies in terms of password rules on the environments where the system can be deployed. Note: You do not need to restart the Informix process or service after you change the informix password. You are changing the password primarily to prevent connection errors. Windows: Using the net user command As administrator, you can place and run a batch program that calls net user to change the informix password. The following code is an example of the usage for a local informix user: net user informix new_password The following code is an example of the usage for a domain-based informix user: net user informix new_password /DOMAIN In the examples above, new_password is the new valid password for the informix user that replaces the expired one. The net user command, when called this way, will not ask you to enter the old password or to reenter the new password. If you need further information about the net user command, you will need to consult the Microsoft Windows documentation. After changing the password on the domain controller, you might need to synchronize the user accounts database on the primary domain controller (PDC) and the backup domain controller (BDC) servers by running the following command: net accounts /sync /domain 260 Embedding IBM Informix Changing passwords on UNIX, Linux, or Mac OS One rudimentary method to change the informix password on UNIX, Linux, or Mac OS is to use a shell script to manually change the value of the password field on the line that corresponds to the informix user, in either of the following two files, depending on the particular case: If using non-encrypted passwords, change /etc/passwd. – Change the /etc/passwd file to replace the non-encrypted password of the informix user. – If under the /etc/passwd you notice that the password field for the informix user is “x”, this means that the real password, in its encrypted form, can be found in /etc/shadow. – The format of this file is (one line per user): username:password:UID:groupID:comment:homedir:shell_or_login_command In the example above, password is the non-encrypted password (plain text) for the user username. If using encrypted passwords: Change /etc/shadow. – Change the /etc/shadow file to replace the encrypted-version of the informix password. – Use the crypt function to generate the encoded version of the new desired password. – The format of this file is (one line per user): username:password:UID:groupID:comment:homedir:shell_or_login_command In the example above, password is the encrypted password (encoded with crypt) for the user username. Another method would be to place a shell script and run it as root, calling the passwd command for the informix user in a non-interactive or silent way. This method is preferred over manually changing the passwd/shadow files because it minimizes the risks of corrupting these files. If you need to change the informix password on several machines, you have to apply the change individually on each server, unless you are using NIC/AFS, which will ease this task because it replicates the password change to all the participating machines. Chapter 10. Administration of an embedded IBM Informix system 261 In Example 10-4, there is a snippet of code that performs the change. Because the passwd command prompts you twice to enter the new password, there is some processing going on to provide the stdin input through UNIX pipes. There are other ways to perform this task that are quite similar. The code below is one way (not necessarily the best for your system) to perform this password change. This sample shell script takes one input parameter, the new password for the informix user, and will provide that input twice to the passwd command. Example 10-4 Sample code snippet: chgifmxpwd.sh #!/bin/sh echo "Changing password for Informix user... " ( sleep 2 ; echo $1 ; sleep 2 ; echo $1 ) | passwd Informix > /tmp/chgifmxpwd.out 2>&1 echo "Ended processing. Check /tmp/chgifmxpwd.out for results." The following code is an example of how to call this shell script passing the new password (informixpwd in this case) for the informix user: chgifmxpwd.sh informixpwd The resulting messages for calling this script are as follows: Changing password for Informix user... Ended processing. Check /tmp/chgifmxpwd.out for results. 10.4.2 The informix use password has been changed When the Informix password has been changed at the OS or the authentication facility levels, there might still be some additional work to do for the changes to take effect across all the elements of the system. Table 10-2 lists some possible tasks that might need to be performed after changing the informix password at the OS or the authentication facility levels. Table 10-2 Additional possible tasks If you do this: Then you may need to: Hard code the password in any connection string or URL (typical in JDBC and SQLJ applications). Change the connection string or URL used in the application code to reflect the new password for the informix user. This applies to any connectivity information supplied through commands, scripts, files, data sources, connection strings/URLs, values inside database tables, setNet32 (Windows registry entries), the web.cnf file in Web Datablade or Web Feature Service applications, and so on. 262 Embedding IBM Informix If you do this: Then you may need to: Have an RS server in an Informix cluster environment and specified the secondary server password. Change the secondary server password again by running the following command: onmode -d change RSS rss_servername password Use encrypted passwords in Informix. Modify the Encrypted Password File by using the onpassword utility. Change the encrypted password in column values inside the database by using the set encryption password SQL statement, and pass the new user password. Have Informix on Windows. Use the ixpasswd.exe utility to change the informix password in all Windows services having informix as logon account, or change all the Windows services using the informix account to now use the Local System Account instead. Manage the informix account in a centralized entity. Re-synchronize the Windows Domain Controllers, and make sure the NIS/ASF replicates the change, or use the right method in the authentication facility to synchronize the change at all levels. Want to prevent the informix password from expiring or want to automatically handle password changes in your system. Make the changes that apply in your system to automatically avoid or deal with the situation in the future, by either turning off the password aging for the informix user (if that does not mean going against security policies), or configuring the system to automatically prevent and handle passwords expirations. In this next section, we explain in more detail how to use the Informix utility ixpasswd.exe, available for Windows, to change the informix password in all the Windows services using informix as the startup logon account. Windows: Using the Informix utility ixpasswd.exe You can use the Informix utility ixpasswd.exe, available on Windows, to change the logon password for all services whose logon user is informix to the new informix password. The following command is an example of the usage of the ixpasswd utility: ixpasswd [-y new_password] In the above code, new_password is the password that should be set in all the Windows services using informix as the logon account. Chapter 10. Administration of an embedded IBM Informix system 263 If you are logged on locally and run ixpasswd, it changes the password for services that log on as the local informix user. If you are logged on domain and run ixpasswd, it changes the password for services that log on as domain\informix. If you are placing and running a batch program to perform this change in an automated way, then you can use snippet code in Example 10-5 as a reference. Notes: The ixpasswd utility does not change the informix password on the Windows side. It changes the password in the startup information used by all the services where informix is used as the logon account. So, ixpasswd can be run after the informix password is changed. The -y option prevents the ixpasswd.exe utility from prompting you to enter the new password for the informix user; hence, we need to provide this password on the command line. The ixpasswd command does not require the Informix environment variables to be set before called, as it will operate at the Windows services level. The ixpasswd utility does not restart all the services that use the informix account, but it is not really necessary to perform this action. In Example 10-5, we illustrate a batch program that takes the new password set for the informix account on Windows, and updates all the Windows services using the informix account to have that new password. Example 10-5 changeInformixPwd.bat @if not defined _echo echo off setlocal set errorflag=0 if "%1" == "" goto numparam ixpasswd -y %1 > nul if "%errorflag%" NEQ "0" goto errexit :end echo Successfully changed the Informix password for all the Services exit /b 0 :errexit echo Failed changed the Informix password for the Services!!! exit /b 1 264 Embedding IBM Informix :numparam echo Incorrect Syntax. Usage: changeInformixPwd new_password exit /b 2 Here is an example of how that batch program would be called, passing the new password (informixpwd in this case) for the informix user: changeInformixPwd.bat informixpwd This command successfully changes the Informix password for all the services. 10.4.3 Preventing informix password expiration in the future After you have solved the issue of having the informix password expired (by changing it to a new compliant password), you probably also want to put in place a mechanism to prevent this same situation from happening again in the future. You should start considering the definitive solution for this type of situation before deploying the next release of your embedded system. Depending on factors such as the security policies in place at the company where the system will be deployed, you can determine which alternative would work the best for that environment. Here are some alternatives to prevent or deal with Informix password aging in the future. Windows environments In this section, we discuss two alternatives for the Windows environment. Local System Account Starting with Informix Version 11.50, you can install Informix on Windows as the Local System Account (LSA). Consider using the LSA as the log-on user for Informix Windows services. The LSA can be the most practical account to use for an embedded Informix system on Windows because it is part of the Administrators group. As such, it contains the advanced user rights required by the Informix services, and it does not require password maintenance. In addition, the LSA does not require any password, so you do not need to worry about updating the password at all the Windows services associated to Informix every time the informix password expires, or if it regularly changes to enforce a company security policy. Chapter 10. Administration of an embedded IBM Informix system 265 At the time you are deploying your Informix embedded solution, this option is available for the Informix custom installation only: If you are using the GUI setup program of the Informix Deployment Wizard, there is an option in the Custom Installation where you can indicate that you want to use the Local System Account instead of the Informix account for the Windows services, as shown in Figure 10-6. Figure 10-6 Sample of services startup account Note: If you choose not to create an informix user account at all, Enterprise Replication between Dynamic Server on UNIX and Informix on Windows will not work. You need the Informix user and the Informix-Admin group on the Windows system side to perform this action. If performing a silent unattended installation of Informix, there are two options to consider using with the Local System User Account on Windows: – Use the -system option of the setup.exe installer program. Note that this argument for setup causes the informix user creation to be bypassed. The following command is an example of calling the installer with the -system option: setup.exe -s -f1"C:\TEMP\server.ini" -f2"C:\TEMP\server.log" -system – If you use a copy of the full response file template server.ini file provided on the installation media, you can edit the file to enable this silent-installation option there: Start database server as Local System User=1 Do not set the user informix account to 0. 266 Embedding IBM Informix See Chapter 4, “Installation strategies” on page 63 and Chapter 5, “Deployment” on page 95 for more details about the Informix installation options. After the Informix embedded solution has been deployed and is running, you can use a batch program or shell script to change the logon credentials of the Informix-related services on Windows if you want them to use the Local System Account instead of the Informix account. You can use the Service Control tool (sc.exe) with the following options: sc.exe config service_name obj= AccountName password= Password In the above command, the variables are as follows: Service_name is the Informix-based service for which you want to change the Log-On account. AccountName will be LocalSystem, which means the Local System Account will be the new account. Password will be blank (no password is required for the Local System Account). In the following example, we show the command line and the resulting output used to make the Windows service for the Informix instance ol_demo start using the Local System Account: sc config "ol_demo" obj= "LocalSystem" password= "" The resulting output is as follows: [SC] ChangeServiceConfig SUCCESS As another option, you can create a Windows program that calls a Windows service function, such as ChangeServiceConfig, to change the credentials of the Informix-related services. A sample of such a program is the snippet we show of Visual C++ code for ChangeIDSServiceConfig in “Using the Windows ChangeServiceConfig() function” on page 252. ChangeIDSServiceConfig receives the service name as an input parameter (for example, ol_demo, which is the instance name we used or INFORMIXSERVER). This way, calling the ChangeServiceConfig method changes the service to run under the Local System Account, as shown in Example 10-6. Example 10-6 Change Informix Service Config DWORD ChangeIDSServiceConfig(LPCTSTR svcName) { … //Change service configuration properties. //NULL parameter indicates that the existing setting will used if (!ChangeServiceConfig( Chapter 10. Administration of an embedded IBM Informix system 267 schSvc, //Service handle SERVICE_NO_CHANGE, //Type of service. SERVICE_NO_CHANGE, //start property for service with handle schSvc SERVICE_NO_CHANGE, //error severity NULL, //path to service executable. NULL, //load ordering group for service. NULL, //service tag identification. NULL, //array of services on which 'svcName' is dependent "LocalSystem", //service account. E.g. informix or LocalSystem "", //service account password NULL)) //service display name. { err = GetLastError(); //Handle error as desired } … For further details about how to change the user and password credentials for Windows services, consult the appropriate Microsoft documentation. The net user command with /expires:never option If it is not a violation of your company security policies, another alternative would be to set the informix password to never expire. To perform this action, you can use the /expires:never option so you do not have to confront the password aging issue in the future. To use this option for a local informix user, perform the following command: net user informix new_password /EXPIRES:NEVER To use this option for a domain-based informix user, perform the following command: net user informix new_password /EXPIRES:NEVER /DOMAIN In the above commands, new_password is the new valid password for the informix user. UNIX, Linux, or Mac OS Here, again, if it is not a violation of your company security policies, another way to prevent a user password from expiring, and therefore not requiring the user to regularly change their password, is by using the passwd command with the -x option, which sets the maximum number of days the password will remain valid. If you set it to -1, the password will never expire. 268 Embedding IBM Informix Use the following command to turn off password aging for the informix user: passwd -x -1 informix This command must be run as root. For more information, consult the appropriate user manual pages for your environment about the use of passwd, /etc/passwd, and /etc/shadow, and review the password security policies that apply for your system. Any platform Schedule a task or daemon to change the Informix password when it is about to expire. Finally, if required by your security policies, if it were necessary to request the users to regularly change their passwords, it is suggested that you automate this process as much as possible. This is especially important for those operating system users that cannot be managed directly by the people, such as those who are controlled by your embedded solution. Examples of such users would be the informix user and any common or centralized account that your application uses to connect to the database server. Based on the aging time set for these users at the operating system level, you might need to use scripts or program code in your solution to be started to alert a user that their expiration date is near. In the case of the users password, your system can alert these users about the expiration date and allow them to use a menu or command option in the software to change their passwords. In the case of users such as informix or an invisible or common login used underneath the public eye, you might want to either have an administrative menu option or a command line to allow you, as the administrator, to be warned about the expiration date and to give you the option to change the password. Another alternative would be to let the system automatically change the passwords as they are about to expire and to notify the administrators about the new passwords used for these invisible accounts. This method would need a password generator function that meets the company password security policies. Depending on the operating system and also on the authentication method you use, you will have different ways to set (according to your password policies) and retrieve these values. For example: The minimum number of days for you to start being notified that the password is going to expire. The maximum number of days the password will be valid, assuming that after reaching this number the password will be expired. Chapter 10. Administration of an embedded IBM Informix system 269 You can then decide when to start alerting the users about an expiring password so they can go ahead and change their passwords in advance. For those critical users, you can decide when you will actually let the system automatically take action and change the passwords to prevent errors in the system because nobody took action on time. To automate the schedule of password expiration notification and password changing tasks, you can use the CRON facilities in UNIX-based environments, and the AT command in a Windows environment, for scheduling complex job scripts or batch programs. Note that to use the AT command, the Schedule service needs to be up running. 10.5 Backups and log archives Section 3.3.3, “Managing backups and log archives” on page 43 introduced the capabilities for performing database backups. In this section, we show how to perform backups if they are necessary. We also discuss how to archive logical log files as they fill up, and how to avoid filling up disk space with files that are no longer needed. 10.5.1 Automating database backups with ontape The ontape command has a relatively simple command syntax, and there are command options so that you do not have to provide any additional input beyond the command and its parameters. A straightforward shell program or batch file can be constructed to take the backup. That script can be scheduled to run using AT or CRON. This automation assumes that the TAPEDEV and LTAPEDEV configuration parameters are set to directories rather than specific devices or files. This configuration option allows the DBMS to create any files that are needed without any external intervention. The ONTAPE_PREFIX configuration parameter provides some control over the file names. Consult IBM Informix Dynamic Server Administrator's Reference, G229-6360 and IBM Informix Dynamic Server Administrator’s Guide, G251-2267 for details about those parameters. The ontape command for a full backup (also known as a level zero backup) and its results are shown in Example 10-7. Example 10-7 Automating ontape backups export INFORMIXDIR=/opt/IBM/informix export INFORMIXSERVER=sevenoaks export PATH=$INFORMIXDIR/bin:${PATH} 270 Embedding IBM Informix ontape -s -L 0 The following is the output from that backup script. C:\IFMXDATA\backups>ontape -s -L 0 10 percent done. 20 percent done. 100 percent done. File created: c:\ifmxdata\backups\IBM-5AEA059BC79_11_L0 Please label this tape as number 1 in the arc tape sequence. This tape contains the following logical logs: 68 Program over. Informix creates a file in the directory named by TAPEDEV with a file name constructed from either the prefix provided by ONTAPE_PREFIX or from the host name and instance name. In either case, the last part of the file name is L0, identifying the file as a level 0 backup. Similarly, incremental backup (level1 or level 2) files end in L1 or L2. 10.5.2 Automating backups with onbar While onbar has a different command syntax from ontape, the concepts for using onbar are the same as for ontape, that is, the choice of when to do backups, how long to retain backup images, and so on, are all the same decisions. The onbar command differs from ontape in that onbar works in concert with a storage manager, often the IBM Tivoli Storage Manager (TSM). Installing and configuring the storage manager is beyond the scope of this book. Consult the installation guide and manuals for the storage manager you are using. Additionally, onbar differs from ontape in that onbar allows you to back up one or more dbspaces without capturing the data from the entire instance. The details of partial backups are also beyond the scope of this book. Chapter 10. Administration of an embedded IBM Informix system 271 The onbar command is similar to ontape when it comes to doing complete instance backups and restorations. Example 10-8 shows the onbar equivalent of the automation shown in Example 10-7 on page 270. Before this task will work, the storage manager must be ready to accept data. Example 10-8 Script for automating onbar backups export INFORMIXDIR=/opt/IBM/informix export INFORMIXSERVER=ifx1170 export PATH=$INFORMIXDIR/bin:${PATH} onbar -b -w 10.5.3 Exporting a database with dbexport Both ontape and onbar copy the data in an internal format, which not readable by other programs. If you need to create a more portable copy of the database, you should consider exporting the data with dbexport. The dbexport command does two things: It creates a SQL script to recreate all the tables, indexes, user-defined routines (stored procedures), granted permissions, and current statistics. It creates a file of data for each table. This file is a text file, easily read by many programs. Example 10-9 shows how to copy the data from a database using dbexport. In this example, the default directory, stores.exp, is used. The directory name is the database name with the “.exp” suffix. In that directory, the stores.sql file contains the SQL statements to recreate everything, and the other files are the data from each table. Example 10-9 Exporting a database with dbexport $ dbexport -q stores dbexport completed $ ls stores.exp call_00106.unl cust_00107.unl items00104.unl order00101.unl stock00103.unlcatal00108.unl custo00100.unl manuf00102.unl state00105.unl stores.sql $ 272 Embedding IBM Informix 10.5.4 Unloading data from tables Yet another alternative is to unload the data using onunload or the UNLOAD verb in dbaccess. Neither of these utilities guarantee any data consistency, and therefore that are usually used when no one is actively using the database. UNLOAD creates a text file of data. The onunload command copies the data pages in their internal format. Example 10-10 shows a simple case of copying data with onunload. This example unloads one table. A similar command is needed for each table you want to unload. Although the command is for unloading, the data is copied, not removed. Example 10-10 Copying data with onunload $ onunload -t catalog.unl stores:catalog Please mount tape and press Return to continue ... Please label this as tape number 1 in the tape sequence. 10.5.5 Moving data to external tables Finally, you may choose to simply use SQL to copy the data to external tables. External tables are files treated by the data server as tables. This copy can be performed by using a insert into <externaltable> select * from <dbtable>; statement. A separate statement is used for each table, and each table’s data resides in a separate file. 10.5.6 Automating log archives In addition to full backups, you must also back up (or archive) the logical log files as they fill up. As logical log files fill up, the data there must be copied (archived) to other files before the logical log files can be reused. Unless that is done, the system will enter a wait state when all the log files are full. It is easy to automate log archives using ALARMPROGRAM, which is a shell program (on Linux or UNIX) or a batch file (on Windows). A few changes in that file cause it to be invoked when a log file fills up, and it responds by archiving the data to a file in the directory specified by LTAPEDEV. This may be the same directory that is used for the backups (TAPEDEV), but that is not required. Chapter 10. Administration of an embedded IBM Informix system 273 The changes to ALARMPROGRAM so you can perform log archiving are described in IBM Informix Dynamic Server Administrator's Reference, G229-6360. Briefly, you should ensure the following items are true: LTAPEDEV is set to the path of the directory in which Informix creates the log archive files. The BACKUP variable in the alarmprogram.bat or alarmprogram.sh script is set to YES. The default is NO and must be changed to enable automatic log archiving. An alternative technique is to set the ALARMPROGRAM to the log_full.sh or log_full.bat files. However, although this is correct for log archiving, it eliminates the possibility of using ALARMPROGRAM to handle other events. 10.5.7 Restoring archived data This section discusses a few examples of restoring a database. There are so many possible examples that it is impossible to cover all of them in this book. For more details, refer to IBM Informix Backup and Restore Guide, G251-2269. Typically, a database is restored to recover the data lost due to some error. A common error is the mechanical failure of a disk drive. In that case, there is no way to continue to use the failed device. The Informix data server distinguishes between three kinds of restoring data: cold, warm, and mixed. A cold restore recreates critical dbspaces such as the root dbspace or spaces for the log files. A cold restore must be done with the data server shut down. A warm restore is the recovery of non-critical dbspaces and may be done while the data server is online. Naturally, the tables in dbspaces being restored are not available for use, but tables in other dbspaces are fully available. A mixed restore is a cold restore followed by a warm restore. This allows a data server instance to be recreated and used before all of the tables of all the databases are fully replaced. Restoring data with ontape or onbar The ontape and onbar commands both provide all three forms (cold, warm, and mixed) of restoring data. You must be sure that the archive used as the source of data is accessible to the restoring program, which might require loading the file(s) from tape or archival storage before beginning the recovery. 274 Embedding IBM Informix The ontape command uses the TAPEDEV and LTAPEDEV configuration parameters as the source of data to be restored. The onbar command uses the storage manager to find the relevant data. Both utilities also distinguish two patterns of restoring. One is a physical restore and the other is a logical restore. A physical, always done while the data server is offline, restores the data from the one or more archives (full or incremental) and any log file entries created during those archives. The restore then ends. A logical restore follows a physical restore, replaying any logical logs since the last archive, which means a physical restore recreates a consistent database, but may not recover the data to its most current form. This action is useful if application errors have corrupted data. You may be able to recover to some prior point before the corruption happened. Both ontape and onbar are capable of restoring a subset of the dbspaces of an instance. In both cases, you can specify a list of storage spaces to restore. There are numerous other options for both ontape and onbar. Refer to IBM Informix Backup and Restore Guide, G251-2269 for full details. Restoring data with archecker The archecker command is able to recover selected tables or parts of tables from a database archive, which allows you to restore only some tables, or only certain rows of selected tables. For more details, refer to The IBM Informix Backup and Restore Guide, G251-2269. Note that archecker is also capable of restoring data from a backup of one database to some other database and, possibly, some other table in another database. Reloading with dbimport, load files, or external tables If you unloaded the table data with dbimport, onunload, or some other method, then a reload is simply the reverse process. The dbimport command recreates and reloads a database saved with dbexport. Similarly, onload loads files created with onunload. If you used external tables and a SQL script, then you reload with SQL statements that reverse that process. In any of these techniques, you should take care to update the statistics for the tables that were restored. Also, update the statistics for any stored procedures that refer to the reloaded tables. Chapter 10. Administration of an embedded IBM Informix system 275 10.5.8 Removing unnecessary files In this section, we discuss log file maintenance. Discarding log files As the logs are archived, their files consume disk space, and if they are not periodically pruned, will eventually fill up the file system. To prevent this situation from occurring, a shell script (on Linux or UNIX) can be scheduled to run periodically to remove log archives older than the newest full backup. Performing this task minimizes the disk space used for backups and log archives. The shell program for this purpose is shown in Example 10-11. This command identifies the newest file that has a name that matches a level 0 backup. Any log archives (identified by the characters Log in the name) older than the backup file are deleted. This can be simplified if the backup images and log archives are in the same directory. This example assumes the host name as the first part of the backup image file name. It should be adjusted if the IFX_ONTAPE_FILE_PREFIX variable is used to name the files. Example 10-11 Removing old log archive files # Get log archive directory logdir=`onstat -c | grep LTAPEDEV | awk '{print $2}'` # Get archive directory arcdir=`onstat -c | grep TAPEDEV | awk '{print $2}'` # Remove logs older than the most recent level 0 archive find $logdir -name "`hostname`_0*" ! -newer $arcdir`hostname`_0_L0 -exec rm -vf '{}' \; You may choose to use a separate program, similar in nature to this one, to do that work on a different schedule if you want to retain more than a single backup file. There are many plausible policies about what to retain and for how long. Adjust the script to meet your requirements. A note on using /dev/null to log archives If you set the LTAPEDEV parameter to /dev/null or NUL (for Linux/UNIX or Windows respectively), the logical logs are not archived and are made available for reuse as soon as they fill up. If you can tolerate the loss of data since the last full backup, then this is a simple way to handle log archiving. Important: Data will be lost if you have to recover from the last full backup, and any work since that backup will be lost. 276 Embedding IBM Informix Pruning the Informix message log The file specified in the MSGPATH configuration file grows monotonically, and unless you periodically remove the older entries, the file will consume as much space as the file system allows. You need to decide, for each Informix instance, how long you want or must retain the message log entries. An easy but extreme way to reduce the size of the file is to simply remove and recreate it. This action removes all the current file contents. If you want to retain some of the file contents, then you should copy the file to some other location before removing the file from its original location, and then re-create the file. The copy can then be edited to remove whatever part should be discarded. 10.6 Handling excess data In addition to backups and log archiving, another common problem with database systems is that you cannot always correctly estimate how much data will be held in the database. A DBA or automated monitor should determine how full the dbspaces are and take action before they fill up. The action may be to add space to the database, to remove old or excess data, or to refuse to accept any more data. Which action to use is a policy choice for the system designer (for an invisibly embedded instance), the application designer, or the application administrator. This design breaks the task into two tasks: Monitoring the space Adding chunks These two tasks can be combined into a single task, but this two-part design was chosen to make the discussion simple and clear, and to allow the two tasks to be scheduled separately. This separation is similar to the way the automatic statistics updates are performed. Neither design is superior. Your choice should be based on your specific requirements and programming style. 10.6.1 Monitoring how much space is used In this section, we provide an example of automating the task of monitoring how much space remains in each dbspace. It also describes how to add space when the remaining space drops below a defined threshold. Chapter 10. Administration of an embedded IBM Informix system 277 Note: With the introduction of automatic storage management, the Informix data server will, if configured to do so, monitor free space and extend or add chunks so dbspace are not completely filled up. This discussion is about doing this task without using the built-in management. Chapter 9, “Automating management through tasks and sensors” on page 203 discusses automatic storage management in detail. The query in Example 10-12 calculates how full each regular dbspace is. However, it ignores temporary dbspaces and blobspaces. The query can be modified to handle blobspaces, and temporary spaces can also be included if that is desired. Because the space used in temporary spaces usually fluctuates markedly, it may be unwise to monitor them this way, as the results can be misleading. Example 10-12 Calculating the space used in each dbspace select substr(a.name,1,30) as dbspace , ((sum(b.nfree)/sum(b.chksize))*100)::int from sysdbspaces a , syschunks b where a.dbsnum = b.dbsnum and a.is_temp = 0 and a.is_blobspace = 0 and a.is_sbspace= 0 group by a.name; To use this data to decide when to add space and how much to add, we define the query in a sensor. See Chapter 9, “Automating management through tasks and sensors” on page 203 for background information about sensors. In addition to the data collected by the sensor, we define a table to hold the threshold at which to add space and how much space to add for each dbspace. That way, the space for each dbspace can be handled appropriately rather than having to choose a single chunk size for all dbspaces. Example 10-13 shows the DDL and sample data for this table. This table does not include rows for spaces, such as those used for the logical logs, that are not expected to grow. The dbspaces that are included will have space added when the free space drops below the specified level. In each case, 100 MB will be added. However, you may want to have different size chunks added for some dbspaces. Example 10-13 Control table for managing dbspace expansion create table newchunks ( dbsname varchar(128) , threshold integer 278 Embedding IBM Informix , nextsize char(30) , next path varchar(100) ); insert into newchunks values ( "hdr", 20, "100 MB", "/opt/IBM/informix/spaces"); insert into newchunks values ( "mast", 5, "100 MB", "/opt/IBM/informix/spaces"); insert into newchunks values ( "basedbs", 25, "100 MB" "/opt/IBM/informix/spaces"); Note: This table is in the sysadmin database. The table must be created by the informix user or some user with permission to create tables in that database. 10.6.2 Adding space to a dbspace before it fills With the control table and sensor in place, the final step is to have a task that will examine the sensor data and act on it according to what is in the newchunks table. Example 10-14 shows a stored procedure to accomplish that task. This procedure uses the sensor data and the policy data in the newchunks table to selectively add space. Example 10-14 Stored procedure for adding chunks as dbspace fills up create procedure addspace () returning integer; define define define define define spacename addstatus chunkpath touchcmd nextsize char(30); integer; char(150); char(16); char(16); let addstatus = 0; let chunkpath = ' '; FOREACH select dbsname , nextpath || "/" || spacename || "." || id , nextsize into spacename , chunkpath , nextsize from mon_dbspaces where pctfree < 10 and id = (select max(id) from mon_dbspaces) Chapter 10. Administration of an embedded IBM Informix system 279 let touchcmd = "touch " || chunkpath; system (touchcmd); select admin('add chunk', spacename, chunkpath, nextsize, 0) into addstatus from sysmaster:sysdual; if then end if addstatus < 0 EXIT FOREACH; END FOREACH return addstatus; end procedure; This design collects data for all the dbspaces, but you can alter it to collect data only for those spaces that you choose to expand. Further, the new chunks table can be expanded to include the path of the directory in which to add chunks for each space, and the file name to use. The design in the example uses a fixed directory path and file naming scheme. Note: The procedure first creates the file for each new chunk, because Informix does not create files if they do not already exist. Example 10-15 shows the sensor and task definitions. Some of the values have been split over multiple lines to improve readability. See Chapter 9, “Automating management through tasks and sensors” on page 203 for a more detailed discussion about that topic. In this particular example, the sensor runs every hour, the data is retained for only three days, and the task checks every hour to see if additional space is necessary. If space is added, the command_history table will record what was done. The interval for checking should be chosen based on the expected rate of data growth. If little data is added, then an hourly check may be too often. But, if data is rapidly added, then an hourly check may not be often enough. Details about how to balance the initial space allocations against adding chunks is beyond the scope of this book. Example 10-15 Sensor and task definitions INSERT INTO ph_task ( tk_name, tk_type, tk_group, tk_description, tk_result_table, tk_create, tk_execute, tk_start_time, tk_stop_time, tk_delete, tk_frequency, tk_next_execution 280 Embedding IBM Informix ) VALUES ( "mon_dbspaces", "SENSOR", "TABLES", "Collect information about how full each dbspace is" "mon_dbspaces", "create table mon_dbspaces (id integer, dbsname varchar(128), pctfree integer,)); "insert into mon_dbspaces select $DATA_SEQ_ID , substr(a.name,1,30) as dbspace , ((sum(b.nfree)/sum(b.chksize))*100)::int as pct_free from sysdbspaces a , syschunks b where a.dbsnum = b.dbsnum and a.is_temp = 0 and a.is_blobspace = 0 and a.is_sbspace= 0 group by a.name order by dbspace ;", NULL, NULL, NULL, INTERVAL ( 1 ) HOUR TO HOUR, DATETIME(01:00:00) HOUR TO SECOND ); INSERT INTO ph_task ( tk_name, tk_type, tk_group, tk_description, tk_execute, tk_start_time, tk_stop_time, tk_frequency ) VALUES ( "add chunks", "TASK", "TABLES", "Add space to dbspaces that are nearly full", "addspace", DATETIME(01:15:00) HOUR TO SECOND, NULL, INTERVAL ( 1 ) HOUR TO HOUR ); Chapter 10. Administration of an embedded IBM Informix system 281 10.6.3 Removing old or unnecessary data Rather than expanding the database as it fills up, you may choose to remove data that is no longer needed. Whether or not this is a proper course of action depends on the design of the application and the requirements of the system. If the Informix instance is integrated with an application, then the application provider may make the decision rather than leaving it to their customers to decide. However, many application providers prefer to let their customers make this kind of decision. If you are making the choice, you need to determine how long various kinds of data must be retained. In the United States, for example, financial records are normally kept for at least seven years because that is the amount of time for which the tax authorities may ask for data to support tax filings. Similarly, health care regulations stipulate how long different kinds of data must be held. After the requirements for holding data are understood, it may be possible to delete old data from the database with SQL statements. But a more prudent course of action may be to remove the data to some other place, such as a different database or set of files. Unloading to files allows them to then be encrypted, compressed, and moved to offline storage. For an invisibly embedded Informix instance, the application design may allow old data (where old is decided by the application design) to be deleted from the database. In this case, the process can be automated using a task that is run weekly, quarterly, or at some other appropriate interval. Which of these options, if any, is appropriate can only be determined by the system user (for an integrated application) or system designer (for an invisibly embedded instance.) 10.6.4 Rejecting additional data if the database is full Another alternative for handling data growth is to disallow additional sessions if the database is full. This choice is probably not a good one unless the Informix instance is invisibly embedded, because this choice will render the application almost useless. However, if the database is invisibly embedded, then data growth beyond the configured capacity may mean the customer must purchase a larger system or contact the application provider to correct the problem. A way to enforce the constraint that no new connections are allowed is to install a public sysdbopen procedure to check the state of the database during each attempt to establish a connection. Example 10-16 shows a sample procedure. Example 10-16 A sysdbopen with checks for free data space CREATE PROCEDURE developer.sysdbopen() DEFINE val LVARCHAR; 282 Embedding IBM Informix DEFINE ret LVARCHAR; DEFINE name LVARCHAR; DEFINE freespace integer FOREACH SELECT TRIM(hostname) INTO name FROM sysmaster:syssessions WHERE sid = DBINFO('sessionid') LET val = GetHostAddr(name); IF "192.168" <> SUBSTRING(val FROM 1 FOR 7) THEN RAISE EXCEPTION -746, 0, "Not allowed in the database from your subnet"; END IF END FOREACH select max(freespace) into freespace from sysadmin:mon_dbspaces where id = max(id); IF freespace < 10 THEN RAISE EXCEPTION -746, 0, "Not enough space for new data"; END IF END PROCEDURE; Note: The check on free space must carefully exclude spaces, such as the physical log, that are normally full. 10.7 When bad things happen In rare situations, the Informix data server may stop due to some error or event that cannot be handled gracefully. To provide IBM Support with the data they need to determine what happened, you need to collect certain data immediately when the error occurs. Informix uses $INFORMIXDIR/bin/ifxcollect to perform the necessary work. The ifxcollect command can collect data for a variety of problems, and you must specify what you want. Example 10-17 shows the options that are available. If a problem occurs, you should use ifxcollect with the options that best describe your problem. For example, if the Informix data server should crash, use ifxcollect -c af -s general. Another example is that if the problem is that users are not able to connect to the data server, then use ifxcollect -c connection -s failure. Example 10-17 ifxcollect usage ifxcollect: <options> General Options -r <Num Times to repeat Collection> -d <Seconds for dealy between Collection> Chapter 10. Administration of an embedded IBM Informix system 283 -y - Answer yes to all prompts -V Version Information -version Extended Version Information FTP Options -f - FTP the data collection -e <Email Address> -p <PMR Number> -m <Machine to ftp to> -l <Directory Location for ftp> -u <Username for ftp> -w <Password for ftp> Example FTP -f -e [email protected] -p 9999.999.999 -f -e [email protected] -f -m machine -l /tmp -u username -w password Collection Options -c ids -s general General Collector For All Informix Family Products -c af -s general General Collector For Assertion Failures -c er -s general Collect general information For ER -c er -s init Collect information For ER Initialize Issues -c performance -s general Collect general information for performance Issues -c performance -s cpu Collect information for cpu utilization issues -c onbar -s archive_failure Collect information for onbar archive failures. -c onbar -s restore_failure Collect information for onbar restore failures. -c ontape -s archive_failure Collect information for ontape archive failures. -c ontape -s restore_failure Collect information for ontape restore failures. -c connection -s failure Collect information for connetion failures. -c connection -s hang Collect information for connetion hangs. -c cust -s prof Customer profile The ifxcollect command creates an archive in $INFORMIXDIR/isa/data each time you execute ifxcollect. The file name includes the time stamp when the program was used. 284 Embedding IBM Informix Note: The informix user or a member of the DBSA group are the only users who may execute ifxcollect. 10.8 Upgrading software and migrating systems This section discusses methods for upgrading the Informix software and for migrating the software to another hardware system. Software upgrades are discussed in Chapter 3, “Preparing to embed IBM Informix” on page 35. We discuss moving an Informix instance to another system in this section. Both the programs discussed in this chapter are fully described in the IBM Informix Embeddability Guide, SC27-3258. 10.9 The deployment utility (ifxdeploy) To move or copy an instance to some other system, you need to create a file containing all the pieces: configuration files (onconfig, sqlhosts, and so on), and the database (storage space definitions and contents.) You perform this task by using the ifxdeploy command. The ifxdeploy command collects the software, configuration files, storage space definitions, and data into a snapshot file. That file can then be deployed onto any system with the same architecture and operating system. This is an easy technique for creating multiple identical Informix instances without having to install software, configure it, and rebuild the database. All those tasks are done in a single step from a single data file. 10.10 Cloning instances with ifxclone Alternatively, if you want to create another instance from a running instance, you use the ifxclone command. The ifxclone command does not copy the software, but it does copy the data and configuration. Thus, ifxclone may not be appropriate for installing a solution at multiple different customers. It may be appropriate to move to a newer hardware system, however. Chapter 10. Administration of an embedded IBM Informix system 285 10.11 Summary In this chapter, we discussed issues that will commonly occur in an embedded systems environment. Examples were provided for monitoring and managing disk space, taking backups, archiving logical log files, and removing old or unnecessary files and data. These are the types of issues an application designer or DBA will have to consider. These techniques can be applied to almost any installation to reduce the amount of work required by the DBAs. Planning the use of any embedded Informix instance requires considering all of these issues, and making choices about how each will be handled. In this chapter, we have discussed a few of the ways to deal with each of these items. 286 Embedding IBM Informix 11 Chapter 11. Embedding high availability IBM Informix configurations Informix provides a wide variety of robust high availability data replication and clustering solutions. These configurations are well-known in the industry for their reliability, scalability, and flexibility. The chapter provides a quick overview of the various high-availability configurations available with Informix and discuss some of the strategies as to how they can be applied within embedded applications. © Copyright IBM Corp. 2011. All rights reserved. 287 11.1 High Availability Data Replication and Enterprise Replication Historically, Informix has supported High Availability Data Replication (HDR) and Enterprise Replication (ER) configurations, which are described as follows: In a typical HDR configuration, an HDR secondary server maintains a backup copy of the entire primary server through synchronous or asynchronous data replication. Applications can access the HDR secondary server quickly if the primary server fails. ER implements asynchronous data replication between IBM Informix database servers. The significant benefit of an ER configuration is that network and target database server outages are tolerated. In the event of a database server or network failure, the local database server continues to service local users. The local database server stores replicated transactions in persistent storage until the target server becomes available. ER on the source database server captures transactions to be replicated by reading the logical log, storing the transactions, and reliably transmitting each transaction as replication data to the target servers. ER ensures that all data reaches the appropriate server efficiently with minimum amount of copying and sending data. Informix Version 11.50 added the capability of defining Informix clusters (continuous availability), which extended the HDR functionality by allowing remote stand-alone secondary (RSS) servers, shared disk secondary (SDS) servers, and the Connection Manager (CM), which are described as follows: RSS servers are full copies of the primary, but they are maintained asynchronously, as opposed to the synchronous nature of communication between the primary and the HDR secondary regardless of its replication mode. RSS instances are deployed to expand the real-time failover capability and to provide promotable redundancy in an HDR configuration. A RSS server cannot be promoted to an HDR primary server directly. It must first become an HDR secondary and then become a primary if needed. RSS servers should be considered as disaster recovery instances and not high-availability instances. SDS servers are one or more instances that provide redundancy, failover options, and use the same network-mounted disk logical unit numbers (LUNs). SDS servers provide increased availability and scalability without the need to maintain multiple copies of the database. Connection Manager is a program that automatically manages and directs client connection requests based on redirection rules called as service level agreements (SLAs). 288 Embedding IBM Informix The CM’s configuration file allows configuration for automatic failover and load balancing. If the CM detects that the primary server has failed, and no action is taken by the primary server to reconnect during the ensuing timeout period, the most appropriate secondary server is converted to the primary server. The CM connects to each server in the cluster and gathers statistics regarding the type of the server, unused workload capacity, and the current state of the server. From this information, the CM can redirect the client connection to the server with the least amount of activity. Informix Version 11.70 adds a multitude of new features that emphasize ease-of-use with Informix. Considering the high availability aspect, it extends the feature set with flexible grid. A grid is a named set of interconnected replication servers for propagating commands from an authorized server to the rest of the database servers in the set. The grid that you define distributes SQL commands to the replication servers in the grid. A grid can be useful if you have multiple replication servers and you need to perform the same tasks on every replication server. The following types of tasks are easily run through the grid: Administrating servers: Adding chunks, removing logical logs, or changing configuration parameter settings Updating the database schema: Altering tables or adding tables Running or creating stored procedures or user-defined routines Updating data;: Purging old data or updating values based on conditions Maintaining replication: Enabling replication when creating a table, and altering a replication definition when altering a replicated table With Informix Version 11.70, it is also possible to: Upgrade a high availability cluster without any downtime and to easily generate schema information about the database for migration. Set up clusters, ER domains, and administrate them all through a grid quickly and easily. Replicate tables without primary keys and prevent log wrapping on replication servers. Run a DDL statement on secondary servers, and transactions that you start on secondary servers run to completion even if the primary server goes down. The application that embeds the Informix database server can easily administrate all of the above high availability configurations with SQL Administration API commands. Chapter 11. Embedding high availability IBM Informix configurations 289 The topic of high availability in Informix has been discussed in multiple books: Informix Dynamic Server 11: Extending Availability and Replication, SG24-7488 Informix Dynamic Server 11: Advanced Functionality for Modern Business, SG24-7465 Informix Dynamic Server V10: Superior Data Replication for Availability and Distribution, SG24-7319 Informix Dynamic Server V10 . . . Extended Functionality for Modern Business, SG24-7299 11.2 Maximizing availability Depending on the business needs for the application, Informix can be configured to maximize availability accordingly. Typically, these needs can be summarized under the following objectives: Protect the system from database server failures. Protect the system from site failures. Provide multilevel site failure protection. 11.2.1 Protecting the system from database server failures This configuration uses a shared disk secondary server that shares the same disk space with the primary database server. This is the most ideal configuration for an application that embeds Informix. The advantages are: Very high availability: The database is in sync with the primary as the SDS server shares the same disk with the primary server. If the primary server fails, the secondary server can take over quickly. No need to change applications: Client connections to primary or secondary server are automatically switched in the event of database server failure. The disadvantages are: The SDS runs on the same hardware as the primary server. The primary and secondary servers require the same hardware, operating system, and version of the database server product. If the SDS instance is running on different hardware, then the SDS’s hardware must be able to can handle the same load as the primary server. If the secondary server is too small, it might impact the performance on the primary. 290 Embedding IBM Informix No data redundancy: The SDS does not maintain a copy of the data. Use SAN devices for disk storage. 11.2.2 Protecting the system from site failure This configuration uses a secondary server that maintains a copy of the database server and the data, such as an HDR secondary server. You can also use RSS and ER. The advantages are: Very high availability: Applications can access the secondary server quickly if they cannot connect to a primary server. Data is replicated synchronously. Increased scalability. No need to change applications. The disadvantages are: The secondary server might be on the same site as the primary. Requires an exact replica of the data, including table and database schemas. Primary and secondary servers require the same hardware, operating system, and version of the database server product. 11.2.3 Providing multilevel site failure protection This configuration uses a secondary server that is geographically distant from the primary server and that is updated asynchronously from the primary server, that is, it uses one or more remote stand-alone secondary servers. You can also use ER in combination with HDR configuration to cover multiple sites. The advantages are: Very high availability: Applications can access this server quickly if they cannot connect to a primary server. Data is replicated asynchronously. Increased scalability. No need to change applications. The disadvantage is that Multiple Connection Managers (CM) are needed in a comprehensive ER with HDR configuration. Chapter 11. Embedding high availability IBM Informix configurations 291 11.3 Maximizing scalability Depending on the growing needs of an application, Informix database servers can scale easily and dynamically balance workloads to ensure optimal use of resources. Typically, the various high availability configurations in Informix are used to address the following objectives: Balance workload to optimize use of resources. Increase capacity periodically. Disperse processing geographically with increased reporting capacity. 11.3.1 Balancing workload to optimize use of resources If your application can differentiate amongst the various workloads for the embedded Informix database server, it is a best practice to configure workload balancing when you create or modify a service level agreement in the Connection Manager’s configuration. Informix gathers information from each server in a cluster and automatically connects the client application to the server that has the least amount of activity. You can also create groups within a cluster that are specific to certain types of applications, such as those for online transaction processing (OLTP) or warehousing. Applications can choose to connect to the specific group for optimized performance of each type of query. 11.3.2 Increasing capacity periodically If your business environment experiences peak periods, you might need to periodically increase capacity. You can increase capacity by adding a remote stand-alone secondary server. That type of secondary server maintains a complete copy of the data, with updates transmitted asynchronously from the primary server over secure network connections. If the amount of data is very large and making multiple copies of it is difficult, use shared-disk secondary servers instead of remote stand-alone secondary servers. You can use high-availability data replication (HDR) secondary servers if you want to increase capacity only for reporting (read-only) workloads. 11.3.3 Dispersing processing geographically with increased reporting capacity Applications with embedded Informix instances in various locations might want to use local servers for processing local requests instead of relying on a single, centralized server. 292 Embedding IBM Informix In that case, you can set up a network of Enterprise Replication servers. Target database server outages are tolerated. If there is a database server or network failure, the local database server continues to service local users. The local database server stores replicated transactions in persistent storage until the remote server becomes available. ER on the source server captures transactions to be replicated by reading the logical log, storing the transactions, and reliably transmitting each transaction as replication data to the target servers. Some of the advantages of configuring ER are: The database servers can be in another building, another town, or another country. The database servers can be on different hardware, different operating systems, and different versions of the database server product. A subset of the data can be replicated (asynchronous with log-based replication). You could also add SDS servers to assist the replication servers, using multiple Connection Managers for automatic client redirection. Use one or more RSS servers to provide distant backup support, improve reporting performance, or enhance availability over unstable networks. 11.4 Dynamically modifying configuration parameters for a replication server You can alter the settings for Enterprise Replication configuration parameters and environment variables on a replication server while replication is active. The cdr add onconfig command adds an additional value. This option is available only for configuration parameters and environment variables that allow multiple values. The cdr change onconfig command replaces the existing value. This option is available for all Enterprise Replication configuration parameters and environment variables. The cdr remove onconfig command removes a specific value. This option is available only for configuration parameters and environment variables that allow multiple values. Chapter 11. Embedding high availability IBM Informix configurations 293 The commands change configuration parameters in the onconf file. To update the environment variables, use the CDR_ENV configuration parameter. You can view the setting of Enterprise Replication configuration parameters and environment variables with the onstat -g cdr config command. 11.5 The ifxclone command Informix Version 11.70 introduced a brand new command, ifxclone, that can be used to clone a database server with minimum setup or configuration, or to quickly add a new node to an existing ER domain. Successfully cloning a server might still require some post-configuration steps to achieve a better running system. You must run the ifxclone command from the target server. Here are the command-line options for the ifxclone command: -h -S -I -P -t -i -p -d --help --source=<name> --sourceIP=<IP> --sourcePort=<port> --target=<name> --targetIP=<IP> --targetPort=<port> --disposition=[RSS|ER] # # # # # # # # -s -c -L --size=[tiny|small|medium|large] --configParm="PARAMETER=VALUE" --useLocal # # # -T --trusted # Display this output Name of the source node IP address of source node Port number of source server Name of target server IP address of target server Port number of target server Clone disposition (default:standard) Configuration size Configuration override Use the local config and sqlhost No userid/password required To run the ifxclone command on a UNIX computer, you must run the command on the target server as the root user, informix user, or as a member of the informix group. You must also be a DBSA on the source server. To run the ifxclone command on a Windows computer, you must run the command on the target server as a member of the local administrators group. You must also be a DBSA on the source server and you must belong to the Informix-Admin group on the source server. The ifxclone command uses the onconfig and sqlhosts configuration files from the source server to configure the target server. The ifxclone command also configures some additional configuration settings, but only those required to configure the clone server. 294 Embedding IBM Informix The ifxclone command is not meant to configure all of the possible configuration options, but rather to provide enough configuration options to clone the source server. You need to have the following prerequisites in place before cloning a server: Hardware and software requirements for the servers are generally the same as those for HDR secondary servers. Both the source and target servers must be part of a trusted network environment. If the disposition of the target server is specified as ER or RSS, then you must provide users with connection permission to the sysadmin database on the source server. By default, connection permission to the sysadmin database is limited to the informix user. Only one server clone process can occur at a time. Do not start cloning a second server until the first clone process has completed running. The source server must have the ENABLE_SNAPSHOT_COPY configuration parameter set to 1 in the onconfig file. Archive operations, such as ontape and onbar commands, are not allowed while cloning a server. Perform your data archive activities before cloning a server. The following environment variables must be set on the target server before cloning a server: – – – – INFORMIXDIR INFORMIXSERVER INFORMIXSQLHOSTS ONCONFIG The following configuration parameter values must be identical on both the source and target servers: – – – – – – – – – – – – – DRAUTO DRINTERVAL DRTIMEOUT LOGBUFF LOGFILES LOGSIZE LTAPEBLK LTAPESIZE ROOTNAME ROOTSIZE PHYSBUFF PHYSFILE STACKSIZE Chapter 11. Embedding high availability IBM Informix configurations 295 – TAPEBLK – TAPESIZE You need to make sure that the following prerequisites are in place before attempting to clone an ER server: The source server (that is, the server that is being cloned) must have ER configured and active. For configuration parameters that specify directory names, the directory names must exist on the destination server. For example, if the CDR_LOG_STAGING_DIR configuration parameter is set to a directory name on the source server then the directory must also exist on the destination server. If ATS or RIS is enabled on the primary server, then the appropriate ATS or RIS directories must exist. If the directories do not exist, then ATS/RIS spooling will fail. If the source server has the CDR_SERIAL configuration parameter set, then you must set the value for CDR_SERIAL to a different value on the server to be cloned. The value of CDR_SERIAL must be different on all replication servers. You can specify a unique value for the CDR_SERIAL configuration parameter by using the --configParm (-c) parameter with the ifxclone command. The clock on the new ER clone must be appropriately synchronized. The source server (that is, the server being cloned) must not have any stopped or suspended replicates, and it cannot have any shadow replicates defined. Avoid performing ER administrative tasks that change the set of replicates on which the target server participates while the ifxclone command is running. As an example, suppose you have five ER servers named S1, S2, S3, S4, and S5 currently configured as root servers in an ER domain. You would like to add a new server, S6, on a new computer named machine6, and you want it to have the same data as server S3. Perform the following steps: 1. Install and configure the Informix database software on machine6. You can use the ifxdeploy command to deploy a pre-configured database server instance. The -clone command-line option to the ifxdeploy command can also be used to deploy a clone of the source database server. 296 Embedding IBM Informix 2. Copy the sqlhosts file from server S3 to server S6 and modify it to add entries for the new server. For example, assuming the ER group name for the new server is g_S6 and the ID is 60, the sqlhosts file lines would look like the following: g_S6 S6 group onsoctcp machine6 service6 0=60 g=g_S6 3. Add the two lines from the previous step in the sqlhosts files on to all of the other five servers (S1 through S5). 4. Copy the onconfig file from server S3 to server S6 and change the DBSERVERNAME configuration parameter to S6. Do not modify any storage or chunk parameters except for the path information. 5. On server S6 (machine6), provision chunk paths and other storage to the same sizes as server S3. Ensure that S6 has adequate memory and disk space resources. 6. Run the following command as the informix user, enter the user name informix, and then enter the password for the informix user when prompted: ifxclone -L -S S3 -I machine3 -P service3 -t S6 -i machine6 -p service6 -d ER 7. Monitor the server logs of servers S6 and S3. When the cloning process is complete, you can check the status of servers by running the following command on servers S3 and S6: cdr list server You should see the new ER server g_S6 connected to all of the other five servers. In addition, ER node g_S6 will now participate in all replicates in which ER node g_S3 participates. Chapter 11. Embedding high availability IBM Informix configurations 297 298 Embedding IBM Informix 12 Chapter 12. IBM Informix appliances Pre-packaged and ready to run software appliances can be helpful in supporting the easy deployment of pre-configured database-based applications. You can use hardware virtualization to use existing resources more efficiently, and hardware virtualization can be also used as a foundation for software that is used for service offerings. Due to its near zero administration and embeddability capabilities, Informix is well-suited as the basis for any type of virtual and physical appliances. In this chapter, we discuss the following topics: The basics of Informix-based appliances and potential use cases Considerations for an Informix virtual appliance base image Creating an Informix/Linux virtual appliance base image from start to finish Creating an Informix/Linux virtual appliance that can run from an USB memory stick Creating an Informix/Windows-based appliance from start to finish The IBM Software Assembly Toolkit offering to package a physical appliance The no cost Informix Developer Edition virtual appliance © Copyright IBM Corp. 2011. All rights reserved. 299 12.1 Informix-based appliances: The basics The term appliance has been around for a long time and is often associated with household machinery using electricity or some other type of energy. Over the last few years, that term has been used also to describe pre-configured, self-contained software solutions, which are called software appliances. Furthermore, due to the increasing popularity of hardware consolidation, software as a service offering, plus major improvements in the area of virtualization technologies, so-called virtual software appliances have become more visible and available in the marketplace. 12.1.1 Use cases for an Informix-based appliance The idea behind designing an Informix-based appliance is to create a self-contained, pre-configured, and pre-tuned application environment with well-defined and potentially limited functionality that does not require any (or requires few) additional setup and configuration steps in the deployment phase. Optimally, the user of an appliance would only know about its offered functionality and external interfaces. Its internal implementation can be completely hidden from the outside, and basically resembles a black box solution. Some appliances might be more open and support more user customization and interaction, such as in the case of a developer-focused appliance, which should motivate users to focus on the development process in a given environment without the hurdles of a complex initial product installation. The following list is a collection of potential use cases for an Informix-based appliance: Demo environment An Informix virtual appliance can be a great foundation for delivering a complex scenario for demonstration purposes. An independent software vendor (ISV) would be able to create a no cost demonstration setup of an application with only the subset of functionality allowed as part of the demonstration agreement for potential customers. Most of the widely used virtualization technologies allow the demonstration to be run on a wide range of operating systems, if the operating system on which the demonstration is based is specific. That way, a Linux or Windows-based appliance can be run, for example, on Apple Mac OS X. 300 Embedding IBM Informix High Availability/Scalability/Grid Node For customers who might be using server consolidation and virtualization techniques (such as VMware ESX), it can be easy to add multiple pre-configured Informix-based high availability (HA) nodes dynamically. You can create and provide a VMware-based Informix High Availability Data Replication (HDR) or a Shared Disk Secondary (SDS) node dynamically, to provide better availability and temporary scalability in peak load situations. Specialized, Informix-based application services Common use cases of virtual appliances include specialized services such as web application server-based solutions, mail servers, content servers of any kind, and more. An Informix-based virtual appliance would be a robust and scalable foundation for such a service and can be used as a perfect, commercial replacement for other LAMP (open source software bundle) like appliances in the market. Pre-packaged ISV solutions ISVs might consider creating a real appliance based upon IBM Software Assembly Toolkit, and bundle their application with a common installer that allows a one-step application, and an Informix deployment that can include a web application server, such as IBM WebSphere Express. Throughout the following sections, we focus on the steps required to build a simple, Informix-based virtual appliance from start to finish. We then describe its functionality. 12.1.2 The Informix virtual appliance demo base image The purpose of the simple Informix demo virtual appliance is to introduce the requirements and the steps to create a simple, but re-usable, base image that can be later extended to fulfill specific requirements. That image is built based on the following assumptions: Linux is the guest operating system. Informix Version 11.70 is used. (We use the no cost Informix Developer Edition.) The Open Admin Tool for Informix should be pre-installed to allow remote and graphical administration of Informix. Informix Client SDK 3.50 is used. There is one single Informix demonstration instance that automatically starts during bootup of the appliance. PHP 5 and the PDO_Informix driver are installed to support the Open Admin tool. Chapter 12. IBM Informix appliances 301 Apache 2 (or any equivalent HTTP server) serves the Open Admin Tool. There are some scripts to display and acknowledge license information. There are some appliance reset scripts to enable resetting the appliance to its original state for re-distribution. (Optional) A lightweight GUI environment for the guest OS is used. (Optional) Some add-on scripts to set up a simple Informix Version 11.70 Mach 11 demo cluster are available. In 12.6, “Creating an Informix/Windows-based appliance” on page 356, we describe the steps to create a simple, Windows-based virtual appliance. 12.2 Considerations for an Informix appliance base image Before describing the steps required to create actual Informix virtual appliances, we start with a discussion about the components needed to start the creation of such a virtual image. 12.2.1 Choosing a suitable Linux distribution There are many good and powerful Linux distributions on the market these days. Each has its strengths and can be used as the foundation for an Informix-based appliance. We suggest that you choose a distribution that provides the required functionality and tools for your final appliance solution. Some of the available Linux distributions might follow a conservative approach in updating its components to the newest versions to ensure the stability and quality of the overall system. Before you make a choice, double check the version level of the key components that your appliance might require. Another factor in making a decision is the level of support of those distributions for Informix and any additional IBM or third-party components you might want to include with your appliance. For the latest updates about which Linux distributions are supported in combination with Informix, visit the following website: http://www.ibm.com/software/data/informix/linux/ids.html 302 Embedding IBM Informix As part of the preparation for this book, and based on ongoing Informix appliance projects in the IBM Information Management team, we have successfully used the following Linux distributions to create Informix-based appliances: SUSE Linux Enterprise Server (SLES) 11 SP2 Ubuntu 10.04 LTS Small footprint Linux distributions Due to the increased demand for Linux-based appliances, some Linux distributions are now also available, or will soon be available, as special low footprint and JeOS editions. Those editions provide a low footprint base installation, and the appliance developer can choose which additional components to install. This way, the overall footprint of an appliance installation can be fine-tuned. We used and tested Ubuntu Server Edition JeOS 10.04 as our JeOS Linux distribution during the development of this book. There are additional JeOS Linux distributions available: SUSE Linux Enterprise Server 11 SP1 JeOS LimeJeOS (based on the openSUSE project) Red Hat Appliance Operating System (AOS) To summarize, Linux is a good foundation on which to build an Informix appliance. The JeOS editions of the major Linux distributions act as a better basis due to their initial low footprint requirements. In addition, you have the choice between the commercial and no cost versions of Linux, which allows flexible re-distribution and license models of the final appliances. 12.2.2 Choosing a suitable Windows edition Informix Version 11.70 has been certified to run on the following Windows editions (32-bit and 64-bit versions): Windows XP (except Home Edition) Windows 2003 Windows Vista Windows Server 2008 Windows 7 Windows has a proven track record as a good foundation for an Informix-based application environment. However, Windows is considered to be a little resource intensive when it comes to items such as installation footprint and memory requirements. Chapter 12. IBM Informix appliances 303 With the introduction of Windows Server 2008, Microsoft offers a new installation option called Server Core. This is a minimal installation of Server 2008 designed for installing specific roles, such as DHCP server, DNS, and Media Server. The standard desktop is gone and in its place is a blank screen and a command window. In Linux terms, think of it as a JeOS. You can administrate a Server Core machine using the command line. There are many new and enhanced commands available in Server 2008 to facilitate command-line administration. You may also administer a Server Core machine graphically from another machine through the Microsoft Management Console (MMC). The idea is that these core machines will be used for specific predefined server roles, with all extraneous features removed, which allows for a smaller footprint, better performance, and improved security. If you are considering using Windows as the foundation for an Informix-based appliance, you should look into the Server Core option of Windows Server 2008. As of the writing of this book, Windows Server 2008 is supported with Informix Version 11.70. Note: One thing to consider if you choose Windows for an appliance is potential Windows licensing issues. Each Windows-based appliance will need its own valid license of Windows Server 2008 or whatever Windows edition is used. 12.2.3 Choosing a virtualization technology The next step in creating a virtual Informix-based appliance is to choose a virtualization technology that matches the appliance requirements. There are two virtualization solutions that are relevant in this book: VMware VMware, Inc. describes itself as one of the leaders in virtualization solutions. It delivers robust solutions ranging from desktop virtualization (VMware Workstation) to complex server virtualization, such as VMware vSphere and VMware Server. Due to the availability of a no cost product for the desktop (VMware Player), it is well suited to be used as the virtualization foundation for appliances distributed to a broader audience. VMware as a host is also supported on all major platforms, such as Windows, Linux, and Mac OS X (VMware Fusion). In order to use a VMware-based image, one of the VMware products needs to be installed on the hosting platform. 304 Embedding IBM Informix QEMU QEMU is a fast and no cost processor emulator written by Fabrice Bellard. It has been released under the GNU General Public License. The QEMU source code is available. In addition, there are pre-compiled versions available for Linux, Windows, Mac OS X, and OpenSolaris. One of the advantages of QEMU, in addition to being no cost, is that it does not require a local installation on the host operating system. This installation process independence makes QEMU a interesting choice for virtual appliances and should be non-invasive (from an installation point of view) on the host system. In addition to the virtualization technologies relevant to this book, there are additional choices that can be relevant while creating an Informix-based appliance: Xen Xen is a popular virtualization technology on the Linux platform. It has been released under GNU GPL license. Unlike VMware, Xen uses para-virtualization, which requires a special port on the guest operation system, but in return delivers high performance. Informix has been successfully tested under Linux-based Xen environments. Microsoft Virtual PC Microsoft Virtual PC is a virtualization offering and is focused on supporting the virtualization of Windows-based environments as the guest operating system. It only runs on specific Windows-based host operating systems. Due to its platform limitations, it cannot be used for Linux-based appliances, but may be a good choice for Windows Server 2008-based solutions. In the following sections, we focus on VMware Workstation/Player and QEMU as the virtualization technology that we use to create our Informix-based appliance images. Chapter 12. IBM Informix appliances 305 12.3 The Informix Developer Edition virtual appliance For an easier way to test and develop with Informix, try the no cost Informix Developer Edition virtual appliance. Figure 12-1 shows the “Welcome to the Informix Developer Edition Virtual Appliance” window. Figure 12-1 Informix Developer virtual appliance window This Informix Developer Edition virtual appliance was developed with several goals in mind: Provide a easy introduction to the Informix database server. Have all the necessary products pre-installed to make it easy to start application development with the most recent Informix release. Be a starting point for independent software developers to create their own Informix-based virtual appliances that can be deployed on commercial versions of the Informix virtual appliance. 306 Embedding IBM Informix Have an Informix-based demo environment to showcase the new features of the most current Informix versions and to be a base for third-party application demos. Be an environment for customers and business partners to test the new Informix superior cluster support and global availability capabilities called Mach 11. At the time of the writing of this book, the Informix Developer Edition virtual appliance was available for download and as part of a special Informix discovery DVD. 12.3.1 System requirements and pre-installed software The Informix Version 11.70 and SLES11-based virtual appliance requires either VMware Workstation 6.x (or later) or VMware Player 2.0.3, 2.5, or later to be installed on your host machine. You can obtain VMware Player at the following website: http://www.vmware.com/download/player/download.html The recommended amount of VMware Player memory allocation is 768 MB. The virtual appliance provides a pre-configured, compressed virtual disk of 12 GB (maximum size), mounted as /. The virtual appliance also comes with a compressed 8 GB virtual disk mounted as /data. These disks will grow as needed during use of the virtual appliance. The following products are pre-installed, pre-configured, and ready to run. Refer to the welcome window for version details about the included components. IBM Informix Version 11.70 IBM Informix Client SDK 3.70 IBM Informix JDBC Driver 3.70 IBM Informix Spatial DataBlade 8.21 IBM Informix Web DataBlade 4.13 IBM Data Server Driver for JDBC/SQLJ IBM Data Server Driver for ODBC/CLI IBM Open Admin Tool for Informix 2.70 IBM Data Studio 2.2 AGS Server Studio & Sentinel 8.0 The Eclipse C/C++, PHP, and Ruby on Rails plug-ins are not included. Chapter 12. IBM Informix appliances 307 System user accounts and passwords Three user accounts are predefined: The informix user (password informix) This is a dedicated Informix database administrator (DBA) account. The developer use (password developer) This is a regular, non-privileged user account. The root user (password root) This is a privileged SUSE Linux administration account. The su or su – command lets you temporarily obtain root (super user) permissions. To switch between the three user accounts, use the su - username command. For example, to start or stop one of the Informix demonstration instances as the informix user, invoke a subshell as the informix user by running su - informix. Then run the appropriate scripts to create, start, stop, or remove Informix demonstration instances. When finished, exit the subshell using the exit command. 12.3.2 Installing and running the Informix virtual appliance Perform the following steps to install the virtual appliance for the first time: 1. Save the self-extracting appliance archive .exe and two .jar files into a folder. 2. Run the .exe file to extract the archive. 3. Double-click the IInformixVA-11.70.UC1-DE-SLES11-x86_*.vmx file to start the virtual appliance. 4. Press Ctrl+G to control the virtual machine. To return to controlling your own computer, press Ctrl+Alt. 5. Log in the first time as the root user using the password root. 6. Accept the IBM software license agreements. Press the Tab key to navigate among the setting fields, and press the Enter key to complete the setting. 7. After the initial bootup and configuration sequence, the operating system completes initialization and presents the user with a login prompt. Enter developer in the Username field, and enter developer when prompted for the password. 308 Embedding IBM Informix 12.3.3 First steps in the Informix Developer Edition virtual appliance To get started quickly with Informix Version 11.70 software development, a special folder (/opt/IBM/informix/FirstSteps) was created that contains topic-specific subfolders. The subfolders contain topic-specific labs and demos. Notice the symbolic link to the FirstSteps folder on your GNOME desktop. Developers who would like to get used to Informix Version 11.70 and its use of the SQL language should look at the Informix Detective Game, located in the /opt/IBM/informix/FirstSteps/IDS_Detective_Game folder. In each subfolder, you will find a README file with a brief introduction to the objective of that demo or lab. As part of your development activities with Informix Version 11.70, you need to run SQL language scripts either interactively or as command scripts. The standard tool that comes with each Informix installation is called dbaccess. You can either use that tool by running the dbaccess command in a terminal window, or by double-clicking the dbaccess icon on the GNOME desktop. Other options for working interactively with SQL are provided in IBM Data Studio and the Open Admin Tool for Informix. The Informix Version 11.70 single-instance demo (pre-configured) The demo Informix instance (demo_on) includes two pre-configured demonstration databases, called stores and idsgame. The Informix demo_on instance starts automatically during startup and shuts down automatically each time the virtual appliance is stopped or started. You need the following commands only if you need to re-create the demo_on instance or if you need to set the environment variables manually. To create and remove the demo instance, run one of the scripts listed in Table 12-1 as the informix user. Table 12-1 Demo scripts Demo instance command script Description createDemo Re-creates the demo instance. removeDemo Deletes all database files associated with the demo instance. startDemo Starts the demo instance. stopDemo Stops the demo instance. To set the environment variables for the demo_on instance, run the setDemo command script (located in $INFORMIXDIR/bin folder) either as the developer user or as the informix user. Chapter 12. IBM Informix appliances 309 The script sets the correct environment variables for the demonstration instance and connects to the location where the server log and dbspaces reside. Hint: In addition to the basic configuration, the demo_on instance also provides these helpful enhancements for your development activities: A default temporary dbspace, called tempdbs (10 MB) A default and system smart blob space, called sbspace (50 MB) One external space to support the Basic Text Search (BTS) extension, bts_extspace (located in $INFORMIXDIR/demo/server/bts_extspace) One bts virtual processor (VP) to use the BTS extension One idsxmlvp virtual processor (VP) to enable additional built-in XML capabilities in Informix Version 11.70 One jvp virtual processor to enable Java user-defined routines in Informix 12.3.4 The Informix Version 11.70 demonstration cluster environment You can create a demonstration cluster environment that is separate from the demonstration instance. Important: To use the cluster demonstration, you must run the createCluster script at least once as the informix user. After creating the cluster demonstration, you can start and stop the cluster instances as the informix user by using the startCluster and stopCluster scripts. The cluster environment does not start automatically after a reboot, unlike the demo_on instance. To create, remove, start, or stop the demo cluster as the informix user, use one of the commands listed in Example 12-2 on page 326. Table 12-2 Demo cluster commands 310 Cluster instance command scripts Description createC1Cluster Creates and starts an Informix Version 11.70 demonstration cluster. removeC1Cluster Stops the demonstration cluster and removes all database files associated with the cluster instances. Embedding IBM Informix Cluster instance command scripts Description startC1Cluster Starts a previously created demonstration cluster. stopC1Cluster Stops a running Informix demonstration cluster. To set the environment variables for each instance in the demo cluster, run the command scripts (located in the $INFORMIXDIR/bin folder) listed in Example 12-3 on page 327, either as the developer user or as the informix user. Table 12-3 Demo cluster environment commands Environment setup scripts Description . setC1primary Sets the environment variables for the primary instance (cheetah2). . setC1sds1 Sets the environment for the sds1 instance. . setC1sds2 Sets the environment for the sds2 instance. . setC1hdr Sets the environment for the hdrsrv instance. . setC1rss1 Sets the environment for the rss1 instance. . setC1rss2 Sets the environment for the rss2 instance. Web-based demos for the Informix Version 11.70 demo cluster Important: Before you can use the following demos, you need to run the createCluster command as the informix user. A few simple PHP-based web pages demonstrate some of the new capabilities of Informix Version 11.70, and specifically the new availability features. An overview of those web pages can be found at: http://localhost/clusterDemo/ Some web pages explicitly connect to a specific server, for example, if you would like to test or demonstrate the ability of clients to update secondary servers. Some web pages connect through a predefined service-level agreement (for example, oltp, webapp, and report). The DBSERVER column (labeled INFORMIXSERVER) is included in the predefined SELECT statements to show which server the Connection Manager is using. Chapter 12. IBM Informix appliances 311 12.3.5 Informix Developer Edition virtual appliance configuration tips The following are keyboard layouts and settings for GNOME desktop (X11). To adjust the keyboard layout in the GNOME desktop, perform the following steps: 1. Click the Computer menu (on the lower left of the desktop) and select YaST. 2. You will be prompted for the user root password. In the YaST Control Center System Group section, click the Keyboard Layout applet. 3. While in the Keyboard Properties window, select your keyboard layout and type from the provided drop-down menus. Network configuration The Informix/SLES11 VMware image has been configured with two network connections. The first network connection (eth0) uses host-only networking, which means that the SUSE instance can be accessed from your host operating system using a predefined, fixed IP address. The SUSE server, named informixva, is configured with a static IP address of 192.168.179.100. A second network connection (eth1) is configured. It uses the NAT protocol to access the Internet from the SUSE server. This connection is useful if you need to download components to update your image. If the image still does not connect to the SUSE server, it can mean that your VMware Workstation or VMware Player has been set up to use a different subnet for host-only networking. Consult the following sections for troubleshooting. Adjusting the VMware Workstation To adjust the VMware Workstation subnet settings, perform the following steps: 1. Select Edit Virtual Network Editor. 2. Find and select VMware Network Adapter VMnet1. 3. Adjust the Subnet IP setting to 192.168.179.0 (Subnet mask: 255.255.255.0). 4. Click the OK button. 5. Restart the VMware image. Using a different network adapter in VMware Workstation If you cannot modify the VMnet1 settings, you can either modify an unassigned VMware Host Virtual Adapter or add a new VMware Host Virtual Adapter. 312 Embedding IBM Informix To modify an unassigned adapter in VMware Workstation, perform the following steps: 1. Select Edit Virtual Network Editor. 2. Select an unassigned VMware Network Adapter. 3. Configure the new adapter as previously described for the VMnet1 adapter based on your requirements. 4. Make sure that you checked the Connect a host virtual adapter to this network check box and the Use local DHCP service to distribute IP address to VMs check box. If you are using VMware Player, you need to locate and run the vmnetcfg.exe file in the VMware Player installation directory to apply the changes previously mentioned in the VMware Workstation section. How to exchange data between host and guest OS The Informix/SUSE virtual appliance is configured to allow easy access from the host operating system to exchange data and to allow remote access to the virtual appliance itself. Telnet and FTP support You can use telnet or ftp to access a remote host, but you cannot telnet or ftp into the virtual appliance unless you first install and configure the telnet or ftp services. The virtual appliance supports two Ethernet cards. You can either use the fixed IP address 192.168.179.100 or the dynamic IP address that has been assigned by the SUSE DHCP client. Tip: To determine the dynamic IP address, run the ipconfig eth1 command from a terminal window and find the inet addr value. Shared folder access VMware supports the concept of a shared folder that can be accessed from the SUSE virtual appliance and the host operating system. The shared folder is initially disabled. To enable sharing, select VM Settings Options Shared Folders and select one of the following radio buttons: Always enabled Enabled until next power off or suspend The current appliance setup points to the host operating system folder (for example, C:\Temp on Windows). Chapter 12. IBM Informix appliances 313 If the host operating system folder does not exist on your host machine, you must create it. From within the Informix/SUSE virtual appliance, shared directories are accessed using /mnt/hgfs. For example, if you create C:\Temp and share the folder as Temp, you can access files from the Informix/SUSE virtual appliance using /mnt/hgfs/Temp. Important: To use the shared folder functionality, you might have to enable the feature. For VMware Workstation, select VM Settings Options Shared Folders and change the default option from Disabled to Always Enabled. For VMware Player, select Virtual Machine Virtual Machine Settings Options Shared Folders and change the default option from Disabled to Always Enabled. The shared folder can be accessed after the image is restarted. The shared folder option has been successfully tested with VMware Workstation 6.x and 7.x and VMware Player 2.0.3 and 3.x. Cutting and pasting between the host OS and the appliance (GUI mode only) The virtual appliance comes with the most current VMware Tools pre-installed, and it optionally supports the cut-and-paste exchange of data between host OS applications and appliance applications in most environments. However, the cut-and-paste functionality does not always work with the virtual appliance (at the time of the writing of this book, we have not yet determined why). From GUI (GNOME) mode, run the vmware-toolbox command in a terminal window. While that command is running (it can be minimized if required), you can cut and paste data between the host and the virtual appliance in both directions. The vmware-toolbox command should normally start automatically after login to the GUI (GNOME) mode. 12.4 How to create an Informix/Linux-based virtual appliance In this section, we describe the steps to create an Informix-based appliance from start to finish, with a focus on Linux as the appliance guest operating system. In 12.6, “Creating an Informix/Windows-based appliance” on page 356, we describe the steps to build an Informix/Windows base image as well. For this book’s Informix/Linux appliance, we use Ubuntu 10.04 JeOS. This Linux distribution was selected because it is available at not cost, it is currently popular, and Informix is fully supported on it. 314 Embedding IBM Informix In addition, we use VMware Workstation 7 as the virtualization technology. In 12.5, “An USB memory stick-based Informix/Linux appliance” on page 345, we use QEMU as the virtualization environment to create an Informix appliance on a USB memory stick. 12.4.1 Initial setup of the Ubuntu JeOS VMware image Since the release of Ubuntu 8.10, Ubuntu JeOS has been included with the standard Ubuntu Server Edition. Note: Although Ubuntu JeOS is not being officially used anymore and it now refers to a minimal installation of Ubuntu Server, we use that term throughout this book to distinguish the minimal Ubuntu installation from a regular, full-fledged Ubuntu Server installation. The term “Just enough OS” or JeOS is also a widely known synonym for small footprint OS editions/installations. You should download the most recent released copy of Ubuntu’s Server Edition from the following website: http://releases.ubuntu.com/ As of the writing of this book, the most current Ubuntu Server release (10.4.1 LTS) can be found at the following website: http://releases.ubuntu.com/lucid/ The actual file you should download is ubuntu-10.04.1-server-i386.iso. After downloading this file, continue to create a new VMware virtual image. Creating a new VMware virtual image and virtual disk To create a new VMware virtual image and virtual disk, perform the following steps: 1. Start VMware Workstation (we used version 7) and select File New Virtual Machine. 2. In the “Welcome to the New Virtual Configuration Wizard” window, select Custom and click Next. 3. In the “Choose the Virtual Machine Hardware Compatibility” window, choose the appropriate hardware compatibility. If your appliance also runs in the VMware Server or ESX server, you might have to choose Workstation 5. Otherwise, choose Workstation 6.5-7.x, and click Next. 4. In the “Guest Operating System Installation” window, select I will install the operating system later and click Next. Chapter 12. IBM Informix appliances 315 5. In the next window, choose Linux as the guest operating system, Ubuntu as the version, and click Next. 6. Name the virtual machine. In our case, we used the name “Informix Linux Demo Appliance.” Choose a location (a folder) in which the virtual machine files will be stored (we used C:\Redbook_2010_VM) and click Next. 7. Choose the number of processors (for the demo appliance, we elected to use one virtual processor with one core per processor) and click Next. 8. On the “Memory for the Virtual Machine” window, select the minimum amount of RAM your appliance might need. Because Linux is typically resource efficient and our demo appliance does not require much memory, we set it to 768 MB. Click Next. 9. Select the network type. We chose the NAT protocol, because it will provide us with an easy access to the host OS and to any network connection (such as the Internet) that is connected to the host. This step will add a virtual Ethernet card to the virtual machine. Throughout this exercise, we add network cards, which allow us to provide a fixed IP address, in addition to any dynamic IP address that is being provided, through the NAT protocol Ethernet card. But for now, choose the NAT option, and click Next. 10.On the “Select I/O Adapter Types” window, click Next. 11.On the “Select a Disk” window, create a new virtual disk. Choose that option and click Next. 12.The disk type can be either IDE or SCSI. Select SCSI and click Next. 13.On the “Specify Disk Capacity” window, choose the desired maximum size of your virtual disk. We left ours at 8 GB. Ensure that the Allocate all disk space now check box is cleared and click Next. Tip: If you are planning to re-distribute your virtual appliance to a broader audience, consider selecting the Split disk into multiple files option. This option supports the installation of the VMware disk files on a Windows FAT formatted drive. 14.On the “Specify Disk File” window, provide a name for the virtual disk file (for the demo appliance, we used Ubuntu.vmdk) and click Next. 15.Finally, on the “Ready to Create Virtual Machine” window, click Finish. 316 Embedding IBM Informix Performing the initial boot from the ISO image We are ready to perform the actual installation of the Ubuntu 10.04.1 JeOS from the downloaded Ubuntu Server Edition ISO image. To mount the ISO image as a virtual CD drive in your VMware image, perform the following steps: 1. From the VMware main menu, select VM Settings. On the Hardware tab (Figure 12-2), select CD-ROM. Check the Connect at power on check box in the Device status section. 2. Select the Use ISO image radio button in the Connection section. Click Browse and enter the full path to the previously downloaded Ubuntu Server Edition ISO image. Figure 12-2 Virtual Machine Settings (define the ISO image as a virtual CD-ROM) 3. (Optional) While in the “Virtual Machine Settings” window, you can delete the unnecessary Floppy drive. Select Floppy, click Remove, and click OK. 4. Start the virtual machine to trigger the Ubuntu boot and installation process. From the Informix Linux Demo Appliance tab, select the Power on this virtual machine option in the Commands section. Chapter 12. IBM Informix appliances 317 5. In the Ubuntu Server Edition boot menu window, select the boot process language. We select English as the default. On the next boot menu window, first use the F4 function key and then select the Install a minimal system mode. Now choose Install Ubuntu Server from the main installation menu. You then select the language and the country for the installation process. We select English as the language and United States as the country. Adjust those settings to your locale. You can change those settings after the installation process has finished. 6. Choose the keyboard layout. We selected a German keyboard layout. After the successful selection of a keyboard layout, the installation process proceeds with some hardware detection and network pre-configuration. Eventually, you are asked to provide a host name. We accept the suggested default host name of ubuntu and press Enter to proceed. 7. Enter your local time zone, and press Enter to continue. 8. On the “Partition disks” window, we select Guided - use entire disk and press Enter. 9. Select the one virtual SCSI disk to be partitioned and press Enter. 318 Embedding IBM Informix 10.A warning will display on the “Partition disks” window (Figure 12-3) that all of the partitions will be destroyed. Click Yes. Figure 12-3 The Partition disks confirmation window When you press Enter, the virtual disk will be partitioned and formatted. The installer copies the Ubuntu JeOS base system on to the new virtual disk. This process might take a long time. 11.Create your first user account. Because you are creating an Informix-based appliance, create the Informix DBA account. As the full name for the new user, you can choose any descriptive name. For our demo appliance, we choose Informix DBA. Press Enter to continue. 12.In the next window, choose the actual user name. We enter informix. Press Enter to continue. 13.Define the initial password for the newly created informix user. Because it is a demo environment, we keep it simple and choose informix as the password. Press Enter. Chapter 12. IBM Informix appliances 319 14.Enter network-related information to configure the Ubuntu package manager. The package manager is required later to install additional components. Enter the required information and press Enter. The system verifies the external Ubuntu package resources. 15.In the “Select and install software” window, you can choose how Ubuntu is applying updates to the system. If your appliance has access to an Ubuntu update server, you might want to choose Install security updates automatically. For our demo appliance, we choose No automatic updates. 16.On the next window, skip the package selection and continue. 17.When the verification process is finished, you will see the “Finish the installation” window (Figure 12-4), allowing you to define your clock as UTC or local time based. We click No and use the local time of the host OS. Figure 12-4 Finishing the Ubuntu JeOS installation 320 Embedding IBM Informix 18.On the final installation window, you are prompted to remove the installation media. In this case, we need to deactivate the Ubuntu ISO install image. Select VM Settings and click the CD-ROM entry. Either clear the Connected and the Connected at power on check boxes, or select the Use physical drive option. Click OK. 19.In the “Finish the installation” window, click Enter to continue. The newly installed Ubuntu system reboots. After the reboot, you are greeted by a login prompt, as shown in Figure 12-5. You might want to log in as the informix user with the defined password (in this case, informix). Figure 12-5 First Ubuntu reboot after the installation procedure Chapter 12. IBM Informix appliances 321 After installing Ubuntu JeOS, we suggest running an update, and potentially an upgrade, on the installed components of the JeOS install. To trigger the update or upgrade process, run the following commands: sudo apt-get update sudo apt-get upgrade sudo apt-get clean Note: You have to be connected to the Internet before running the commands. The sudo command allows you to run commands with user root permissions. The first time you use the sudo command, you will be asked to provide the password of the user who is running the sudo command. In our demo appliance, it is the informix user password. We are now ready to customize the basic appliance image before proceeding with the product installations. 12.4.2 Basic customization of the Ubuntu JeOS image We now have a base installation of a clean Ubuntu JeOS image (the installation footprint is about 720 MB). Some basic customization can be applied, such as installing the VMware Tools and setting up the final network configuration. Installing VMware tools VMware Tools provide the base image with enhanced capabilities, such as automatically mounting host OS file system folders from within the appliance, which can be helpful for exchanging files between the appliance (the guest OS) and the host OS. It also provides the ability to copy and paste functionality between a GUI-enabled Ubuntu JeOS and the host OS. VMware Tools provides enhanced device drivers to increase the appliance performance if it is being run in a VMware context. To install VMware Tools, perform the following steps 1. Install a suitable base build environment that will allow you to compile some VMware Tools modules. To do so, run the following commands: sudo aptitude install build-essential linux-headers-$(uname -r) sudo aptitude install psmisc This component installation will take a few minutes to complete. 322 Embedding IBM Informix 2. Mount the virtual VMware Tools CD-ROM by selecting VM Install VMware Tools from the VMware Workstation main menu. This action adds the virtual VMware tools CD, as a CD-ROM drive, to the virtual machine. To make the CD available to the Ubuntu JeOS image, run the following commands: sudo mkdir /media/cdrom sudo mount /dev/cdrom /media/cdrom 3. Create a temporary VMware Tools build folder in the /tmp directory: mkdir /tmp/VMwareTools cd /tmp/VMwareTools 4. Extract the VMware Tools compressed package into the VMwareTools folder. tar xvfz /media/cdrom/VMwareTools*.tar.gz 5. Initiate the VMware Tools build/install process by running the following commands: cd vmware-tools-distrib sudo ./vmware-install.pl Note: Accept all of the provided defaults of the vmware-install.pl script. Activating the VMware shared folder feature Because VMware tools has been successfully installed, turn on the helpful shared folder feature. That feature allows you to exchange files between the Informix appliance and the host OS, for, as an example, installation purposes. Perform the following steps to activate the shared folder feature: 1. Select VM Settings... Options Tab Shared Folders in the main menu of VMware Workstation. 2. In the “Folder Sharing” section, select Always enabled, and in the Folders section, add at least one folder to be shared by clicking Add.... Chapter 12. IBM Informix appliances 323 3. In the “Add Shared Folder Wizard” window (Figure 12-6), provide a name for the shared folder. Note: The name is also being used as the Ubuntu JeOS folder name and the full path name to a host folder. In our demo appliance, we use temp as the name and C:\temp as the host folder. Click Next. Figure 12-6 Adding a new host OS shared folder 4. On the final wizard window, check the Enable this share check box and click Finish. 5. Click Finish, and click OK to leave the Virtual Machine Settings. The shared folder should be mounted and visible in the appliance as a subfolder in the /mnt/hgfs directory. To verify that the shared folder has been mounted, run the ls /mnt/hgfs/temp command. You can now exchange files between the appliance and the host OS. Adding an additional static IP address to the virtual appliance The current base image of the Informix/Ubuntu JeOS demo virtual appliance already has one DHCP-based network configured. We use the NAT protocol to allow easy access of external networks, such as the Internet. Because we are using a dynamic IP address, that address can change during the bootup of the appliance. 324 Embedding IBM Informix To connect to the appliance through a predefined, static IP address that does not change during each boot process, we are add and configure an additional network card to the base appliance. To do this task, perform the following steps: 1. Make sure that the current appliance image has been shut down by running the sudo shutdown -h now command. 2. When the appliance is shut down, add an additional network card to the VMware configuration by selecting VM Settings... Add... Network Adapter. Click Next. 3. On the “Network Adapter Type Wizard” window, select Host-only, click Finish, and then OK. In this step, you should determine which network has been assigned to the VMware Workstation Host-only virtual network adaptor. To determine this configuration, from the VMware Workstation main menu, select Edit Virtual Network Editor..., as shown in Figure 12-7. Figure 12-7 The VMware Virtual Network Editor Chapter 12. IBM Informix appliances 325 4. Select the VMnet1 entry from the list of virtual networks. Take note of the assigned Subnet IP address at the bottom of the editor window. In this case, it is 192.168.179.0. This means, in the case of this demo appliance, the appliance can have a static IP address in the range of 192.168.179.1–192.168.179.254. Clear Use local DHCP service to distribute IP address to VMs. Make sure that Connect a host virtual adapter to this network is checked. Click OK. Tip: If your final appliance should get a specific static IP address in a specific address range, adjust the subnet mask for the Host-only network card (typically labeled VMnet1 through the VMware Workstation Virtual Network Editor). 5. Boot the appliance base image again to configure the newly added network card. There are different ways to configure network cards in the different Linux distributions. In a base Ubuntu JeOS installation, perform the following steps to set up a static IP address: 1. Log in as the informix user. 2. As the root user, open the /etc/network/interfaces file in an editor. For example, if you choose to use the UNIX Visual Editor, you can edit the file by running the sudo vi /etc/network/interfaces command. 3. While in the editor, add the lines in Example 12-1 to the /etc/network/interfaces file. Example 12-1 Additions to /etc/network/interfaces # The secondary network interface auto eth1 iface eth1 inet static address 192.168.179.111 netmask 255.255.255.0 network 192.168.179.0 broadcast 192.168.179.255 The overall /etc/network/interfaces file should now appear as shown in Example 12-2. Example 12-2 The complete modified /etc/network/interfaces file # This file describes the network interfaces available on your system # and how to activate them. For more information, see interfaces(5). # The loopback network interface 326 Embedding IBM Informix auto lo iface lo inet loopback # The primary network interface auto eth0 iface eth0 inet dhcp # The secondary network interface auto eth1 iface eth1 inet static address 192.168.179.111 netmask 255.255.255.0 network 192.168.179.100 broadcast 192.168.179.255 4. Associate the appliance host name with the fixed IP address. This task can be achieved by editing the /etc/hosts file. 5. Edit the /etc/hosts file (for example, if you are using the UNIX Visual Editor, you can use the sudo vi /etc/hosts command) and change the IP address of the entry that has the line with the current host name (in this case, ubuntu or ubuntu.localdomain). The new IP address for ubuntu is the IP address defined in the /etc/network/interfaces file. In our demo appliance, the IP address is 192.168.179.111. The final /etc/hosts file should appear as shown in Example 12-3. Example 12-3 The edited /etc/hosts file 127.0.0.1 192.168.179.111 localhost ubuntu.localdomain ubuntu # The following lines are desirable for IPv6 capable hosts ::1 ip6-localhost ip6-loopback fe00::0 ip6-localnet ff00::0 ip6-mcastprefix ff02::1 ip6-allnodes ff02::2 ip6-allrouters ff02::3 ip6-allhosts 6. Reboot to activate the new network settings. To trigger the reboot, run a sudo reboot command. After a successful reboot and login, you should be able to successfully ping ubuntu. Tip: At this point, make a backup copy of the base appliance VMware files, in case you would like to apply a different customization to the base image. Before making a backup copy of the VMware files, shut down the image using the sudo shutdown -h now command. Chapter 12. IBM Informix appliances 327 12.4.3 (Optional) Adding a graphical (GUI) desktop environment Depending on the functional requirements of your Informix-based appliance, you might want to add a graphical (GUI) desktop. A typical “black box” appliance likely will not require a GUI, but an appliance that supports an interactive Windows-based application might need it. Ubuntu supports different graphical environments with different installation footprints and target audiences. Table 12-4 lists four major Ubuntu desktop environments. However, there are many more derivatives available based on specific requirements. Table 12-4 Graphical environments Desktop package name Description Installation footprint ubuntu-desktop A full fledged GNOME-based Ubuntu desktop. It is also the default Ubuntu Desktop environment. 2176 MB kubuntu-desktop Another complete Ubuntu desktop based on the KDE environment. 1518 MB xubuntu-desktop This is a lightweight, Xfce-based desktop environment primarily used with GNOME applications. 1476 MB lubuntu-desktop A fairly new, lightweight desktop using the LXDE (Lightweight X11 Desktop Environment). 920 MB To add a GUI desktop, while keeping resource requirements low, we suggest that you look at the xubuntu-desktop environment. To install it, run the following commands from within the Informix appliance base image: sudo apt-get update sudo apt-get install xubuntu-desktop sudo apt-get clean 328 Embedding IBM Informix Answer Yes to all of the questions about adding/installing additional components. The network-based installation of the xubuntu-desktop will take a while. An example of the output is shown in Figure 12-8. Figure 12-8 Output of the sudo apt-get install xubuntu-desktop command The sudo apt-get clean command removes temporary installation files from the disk. Important: After a successful installation of the xubuntu-desktop package, you should reconfigure the VMware Tools installation to obtain an optimized X11 driver for the virtualized VMware graphics card. To do so, run the sudo vmware-config-tools.pl command before rebooting the image. After re-configuring the VMware Tools environment and rebooting the image, you will be greeted by the xubuntu default login panel. Chapter 12. IBM Informix appliances 329 Tip: A complete xubuntu-desktop installation requires about 1.4 GB of additional disk space. If you prefer a basic, small footprint GUI, refer to “Alternative: Installing an extremely small footprint GUI”. Alternative: Installing an extremely small footprint GUI While installing one of the predefined GUI environments for Ubuntu is convenient and easy, an extremely small footprint, lightweight graphical desktop might be preferred. To accomplish this task, we install a subset of the xubuntu-desktop, but with enough functionality to address most requirements for a GUI-based Informix appliance. Although there are a few more steps involved than installing a full GUI, it is not difficult. The following customization steps are based on the Ubuntu JeOS image as described in 12.4.1, “Initial setup of the Ubuntu JeOS VMware image” on page 315 and 12.4.2, “Basic customization of the Ubuntu JeOS image” on page 322. 1. The small footprint version of the appliance GUI is based on the popular Xfce4 desktop and related applications. To install that GUI, run the following commands: sudo apt-get update sudo apt-get install xorg xfce4 This step installs the X11 foundation components, plus the basic Xfce4 desktop environment. Both packages have an installation footprint of about 335 MB. 2. Run the following commands: sudo apt-get install xfce4-terminal sudo apt-get install xfce4-xkb-plugin These packages provide a terminal window and a small application that allows a simple change of the keyboard layout while in GUI mode. The added install footprint is about 8.4 MB. 3. Activate the GUI through the startx shell command. As soon as you leave the GUI you are returned to the console window. This action can be helpful if there is only an occasional need for the GUI. There is now a basic GUI environment setup ready to be used. If you prefer a complete GUI experience for your Informix appliance, including a GUI login window, run the following commands: sudo apt-get install gdm sudo apt-get install xfce4-artwork 330 Embedding IBM Informix When you have successfully installed the two packages above (with an added footprint of about 10 MB), initiate a reboot of your image by running the sudo reboot command. After a successful reboot, you are greeted by a GUI login window. We have now installed a basic GUI with an overall installation footprint of only 345 MB. You might want to customize your desktop environment by adding some packages. Table 12-5 shows some packages, listed with their package name and installation footprint size. To install one of those packages, run sudo apt-get install <package_name>. Table 12-5 Some additional and optional Xfce4 packages Package name Purpose Installation footprint syna2ptic GUI-based package installer. To run after installation, run sudo synaptic. 33.3 MB firefox Firefox web browser. 73.8 MB mousepad A simple GUI Text Editor. 901 KB evince-gtk A PDF viewer (also supports Postscript, TIFF, dvi, and djvu). 11.8 MB tango-icon-theme Desktop icons. 10.8 MB For more Xfce4-related packages, which are also part of the xubuntu-desktop installation, see the following website: http://packages.ubuntu.com/de/lucid/xubuntu-desktop Tip: Do not forget to run the apt-get clean command after the successful installation of the Xfce4 GUI packages to eliminate unnecessary installation files that might use some precious space in your appliance. 12.4.4 Installing Informix Version 11.70 and Client SDK on Ubuntu Version 10.04 In this section, we discuss how to install the IBM Informix core products, Informix Version 11.70 and the Informix Client SDK (CSDK), as part of the Informix virtual appliance image. This section discusses the standard Informix product installation and assumes an understanding of the Informix and Client SDK install process described in either the Linux/UNIX installation guides or one of the Informix Version 11 related books. Chapter 12. IBM Informix appliances 331 Preparing the appliance image for the Informix installation Prepare the Ubuntu JeOS base image for a standard Informix and CSDK installation by performing the following steps: 1. The CSDK sub-component of the Informix installer bundle requires the rpm package installer tool. Install it as part of the Ubuntu JeOS image by running the following command: sudo apt-get install rpm 2. Answer all questions with Y. To initialize the rpm command, run the following commands (the mkdir command might not be necessary): sudo mkdir -p /var/lib/rpm sudo rpm --initdb 3. In addition to the rpm command, Informix on Ubuntu 10.04 requires some additional packages. To install them, run the following commands: sudo apt-get install bc libaio1 pdksh Continue with the Informix and Client SDK installation. Installing Informix and the Client SDK The following high level steps need to be performed to install a standard Informix and Client SDK installation on non-GUI Ubuntu JeOS: 1. Extract the Informix bundle tar file into a temporary directory (for example, /tmp/informix_install). 2. In the temporary directory, locate the ids_install script and run it, as the root user, using the sudo ./ids_install command. You might be prompted to provide your password again to authorize the use of sudo. 3. To launch the Informix GUI installer, execute the sudo ./ids_install -i swing command. 4. The additional installer questions and steps are not discussed here, because they are not Ubuntu-specific. 332 Embedding IBM Informix Tips: You might want to answer the installer question “Do you want to create an Informix demonstration database server instance?” with Yes to automatically install and initialize the included ol_informix1170 instance to verify your Informix installation. You have the option to choose a custom installation and select only the required Informix and CSDK components to optimize the footprint size of the Informix installation. Refer to IBM Informix Installation Guide for UNIX, Linux, and Mac OS X, GC27-3537 for more details about the available Informix and Client SDK subcomponents and their installation footprint impact. 5. After the successful installation of Informix and the CSDK, add the essential Informix specific environment variables ($INFORMIXDIR, $ONCONFIG, $INFORMIXSQLHOSTS, add $INFORMIXDIR/bin to $PATH variable, and so on) to the .bashrc file of each user who wants to use the Informix and Client SDK tools. Tip: In the following sections, we refer to the Informix demo instance ol_informix1170 to demonstrate techniques that will be helpful when creating an Informix/Linux appliance. Make sure you create the Informix demo instance during the installation process. 12.4.5 Installing and configuring the Open Admin Tool for Informix The information in “Installing OAT on Ubuntu 10.04” assumes that Informix Version 11.70 and the CSDK have already been installed, as described in 12.4.4, “Installing Informix Version 11.70 and Client SDK on Ubuntu Version 10.04” on page 331. Installing OAT on Ubuntu 10.04 To install OAT on Ubuntu, perform the following steps: 1. Download the most recent version of OAT from the following website: http://www.openadmintool.org/ Save it to a temporary folder (for example, /tmp/oat_install) on your Ubuntu-based appliance. Chapter 12. IBM Informix appliances 333 Note: You might be re-directed to an IBM website that requires an IBM ID to download the requested file(s). If you do not have an IBM ID, you can create one at that point. Although there are different options that are available to install OAT on Linux (for example, through a one click installer), locate and download the Informix Open Admin Tool TAR file. 2. Ensure that the following Ubuntu packages are installed to install OAT (and the required PDO_Informix PHP driver). Run the following commands from a terminal window (or use the Synaptic package installer): sudo apt-get install apache2 sudo apt-get install php5 php5-dev php5-sqlite php5-gd sudo apt-get install php-pear php-soap libapache2-mod-php5 3. Download the latest version of the PDO_Informix driver from the following website: http://pecl.php.net/package/PDO_INFORMIX 4. Extract this file into a temporary folder (for example, /tmp). Run the following commands in a terminal window: cd /tmp wget http://pecl.php.net/get/PDO_INFORMIX-1.2.6.tgz tar xvzf PDO_INFORMIX-1.2.6.tgz 5. Compile and install the PDO_Informix driver. Run the following commands from within a terminal or console window to do so: export INFORMIXDIR=/opt/IBM/informix export PATH=$INFORMIXDIR/bin:$PATH cd /tmp/PDO_INFORMIX-1.2.6 phpize sudo -s ln –s /usr/include/php5/ /usr/include/php exit ./configure make sudo make install 6. Enable the PDO_Informix driver for the Apache2 web server. To do so, create a new file, as user root, called pdo_informix.ini in the /etc/php5/conf.d directory by adding the following single line (extension=pdo_informix.so): sudo vi /etc/php5/conf.d/pdo_informix.ini i extension=pdo_informix.so :wq 334 Embedding IBM Informix Verify the successful installation of the PDO_Informix driver by running the php5 -m command. The PDO_Informix PHP5 module should be listed. 7. Extract the OAT tar file (downloaded in step 1) into an Apache2 accessible document directory by using the following command: sudo -s mkdir /var/www/openadmin cd /var/www/openadmin tar xvf /tmp/oatidsV2.70_100810.tar chmod -R 777 * exit 8. Modify the Apache2 configuration files to support OAT. In the /etc/php5/apache2/php.ini file, change (as the root user) the following parameter to a minimum of 256 MB: memory_limit = 256M In the /etc/init.d/apache2 file, add (as the root user) the INFORMIXDIR variable (or any additional required Informix environment variables) to the following environment: ENV="env -i LANG=C PATH=/usr/local/bin:/usr/bin:/bin INFORMIXDIR=/opt/IBM/informix" 9. Restart Apache2 using the sudo /etc/init.d/apache2 restart command. 10.Perform the initial OAT configuration by navigating to http://localhost/openadmin/install in a web browser. 11.During the first startup of OAT, download and install the Adobe® Flash Player plug-in for the web browser (for example, Mozilla Firefox). We now have all the basic Informix components (including the simple ol_informix1170 instance) for the Informix/Ubuntu appliance installed and configured. In 12.4.6, “Preparing your Informix virtual appliance for re-distribution” on page 335, we focus on some basic techniques to prepare the appliance for re-distribution. 12.4.6 Preparing your Informix virtual appliance for re-distribution From an Informix perspective, the basic appliance is now set up. The following subsections introduce techniques about how to prepare the final appliance for re-distribution. This section introduces some concepts and best practices, but will not be all inclusive. Chapter 12. IBM Informix appliances 335 Enhancing the accessibility of the appliance A virtual software appliance often runs in a “black box” mode. Therefore, it will be helpful to provide additional means of connectivity. As described in 12.4.2, “Basic customization of the Ubuntu JeOS image” on page 322, we suggest that you provide a fixed IP address as the home phone number of the appliance. If you need ftp and telnet access to the appliance, run the following commands to allow ftp and telnet access from the outside and provide ftp and telnet access to the outside: sudo apt-get install pure-ftpd ftp sudo apt-get install telnetd telnet sudo apt-get clean Automatically starting up an Informix instance during system boot A software appliance should be robust, and perhaps provide sophisticated high availability features such as those available through the Informix Version 11.70 Mach 11 and Flexible Grid feature set. One simple, but important, requirement is the automatic startup of an Informix instance during the operating system boot process. Linux in general, and specifically the Ubuntu distribution, relies on the concept of so-called init.d scripts. Those command scripts, located in the /etc/init.d directory, run either during startup or shutdown. The command scripts are linked to the related /etc/rc?.d/ directories, depending on the different run levels of the Linux OS. To display the current run level of Ubuntu, run the runlevel command from within a terminal or console window. For more details about the init.d and runlevel concepts of Ubuntu, see the specific Ubuntu documentation. Assuming that we want to automatically start our simple ol_informix1170 demo Informix instance in our just created base appliance, perform the following steps: 1. As the root user, create a new file called /etc/init.d/informixDemo that contains the content shown in Example 12-4. You might have to customize the Informix-specific variables, such as INFORMIXDIR, INFORMIXSQLHOSTS, and INFORMIXSERVER, based on your specific requirements. To edit that file as the root user, run the sudo vi /etc/init.d/informixDemo command. Example 12-4 The informixDemo init.d command script #!/bin/sh INFORMIXSERVER=ol_informix1170 INFORMIXDIR="/opt/IBM/informix" ONCONFIG=onconfig.ol_informix1170 INFORMIXSQLHOSTS="/opt/IBM/informix/etc/sqlhosts.ol_informix1170" PATH=${INFORMIXDIR}/bin:${PATH} 336 Embedding IBM Informix export INFORMIXSERVER INFORMIXDIR ONCONFIG INFORMIXSQLHOSTS PATH if [ $# -lt 1 ] then echo "Usage: $0 {start|stop}" else case "$1" in 'start') if [ `$INFORMIXDIR/bin/onstat 2>&- | grep -c On-Line` -ne 1 ] then rm -f /INFORMIXTMP/* rm -f /opt/IBM/informix/demo/server/online*.log rm -f /opt/IBM/informix/tmp/* echo -n "Starting Informix V11.70..." $INFORMIXDIR/bin/oninit echo "done" fi ;; 'stop') if [ `$INFORMIXDIR/bin/onstat 2>&- | grep -c On-Line` -eq 1 ] then echo -n "Shutting down Informix V11.70..." $INFORMIXDIR/bin/onmode -ky echo "done" fi ;; *) echo "Usage: $0 {start|stop}" ;; esac fi 2. Set the correct execute permissions for the newly created script by executing the sudo chmod a+x /etc/init.d/informixDemo command. 3. Run a quick test with that script and run the /etc/init.d/informixDemo start command to start the Informix instance, and /etc/init.d/informixDemo stop to stop the Informix instance. 4. Create the necessary symbolic links to the desired /etc/rc?.d directories based on the required run levels in which you want Informix to be up and running: sudo sudo sudo sudo sudo sudo ln ln ln ln ln ln -s -s -s -s -s -s /etc/init.d/informixDemo /etc/init.d/informixDemo /etc/init.d/informixDemo /etc/init.d/informixDemo /etc/init.d/informixDemo /etc/init.d/informixDemo /etc/rc0.d/K91informixDemo /etc/rc2.d/S30informixDemo /etc/rc3.d/S30informixDemo /etc/rc4.d/S30informixDemo /etc/rc5.d/S30informixDemo /etc/rc6.d/K91informixDemo 5. Reboot the Ubuntu appliance to test the automatic startup of the instance. Chapter 12. IBM Informix appliances 337 Creating a simple appliance reset script Before re-distributing the final appliance, you need to reset some files, delete temporary files, and trigger the display of license information during the initial appliance boot process. This can be done by creating a simple reset script. Create an installation directory for this reset script and additional scripts and license files that might be required. For our purposes, create an installation directory for the reset script called /opt/IBM/UbuntuVM, and related sub-directories: sudo sudo sudo sudo mkdir mkdir mkdir mkdir /opt/IBM/UbuntuVM /opt/IBM/UbuntuVM/bin /opt/IBM/UbuntuVM/etc /opt/IBM/UbuntuVM/license_files Before creating a simple reset script, we need to define its functional requirements. For example, it should: Remove any leftover installation files by running sudo apt-get clean. Shut down any running Informix instances. Clean up the command history. Clean up any other temporary files associated with the Informix installation, including possible shared memory dumps and assertion failure files. Clean up some Ubuntu-specific network files to avoid issues during the initial boot up phase. See “Informix/Ubuntu virtual appliance tips and tricks section” on page 343 for more details. Prepare the system for the first bootup by the appliance user. Optionally, temporarily turn off the GUI login manager (gdm) to force the display of license information about the console window. Shut down the system. Now you can create the actual script, called /opt/IBM/UbuntuVM/bin/resetVM.sh, as the root user, by running the sudo vi /opt/IBM/UbuntuVM/bin/resetVM.sh command. Enter the content shown in Example 12-5. Example 12-5 Example resetVM.sh script # Trigger the execution of the inital_config script # (see one of the next sections for details) sudo rm -f /opt/IBM/UbuntuVM/etc/initial_config_done # Cleanup network card entries to ensure a correct # network configuration sudo sed -i -e '6,$d' /etc/udev/rules.d/70-persistent-net.rules # Cleanup any apt-get install remains sudo apt-get clean 338 Embedding IBM Informix # Cleanup command history history -c # Cleanup Informix Informix related files (feel free to add more) rm -f /opt/IBM/informix/tmp/*.log rm -f /opt/IBM/informix/demo/server/*.log rm -f /opt/IBM/informix/tmp/af.* rm -f /home/informix/.xsession-errors rm -f /home/informix/.serverauth.* rm -rf /tmp/* # # # # # # Optional: Disable GDM for very first bootup This is only required if your appliance boots into a GUI login mode Uncomment if required. Take a look at the related initial_config script file (located in /opt/IBM/UbuntuVM/bin). See the section “First login-only script execution” on page 340 for related details. sudo /bin/rm -f /etc/rc2.d/S30gdm # Shutdown now sleep 10 sudo shutdown -h now Run the resetVM.sh script each time you plan to finalize the appliance for re-distribution. Creating a script to display and accept license information It is likely that a software appliance contains applications that require a certain license agreement to be displayed and acknowledged before the appliance can be used by the user. There are several ways of displaying license information (for example, by using customized shell scripts or custom applications). On Ubuntu, we use the /usr/bin/whiptail command, which allows the display of text and dialog boxes from within shell scripts to interact with the user. Normally, whiptail should be automatically installed as part of the Ubuntu JeOS installation. To make sure that its installed, run the sudo apt-get install whiptail command. Chapter 12. IBM Informix appliances 339 As part of the appliance toolbox, we now create a simple shell script (called display_license) to display and acknowledge a license file (or multiple license files). To achieve that objective, create a new empty file called /opt/IBM/UbuntuVM/bin/display_license as the root user using the sudo vi /opt/IBM/UbuntuVM/bin/display_license command and enter the content shown in Example 12-6. See the comment lines in that script for additional details. Example 12-6 Content of a basic display_license shell script #! /bin/sh # Set the title of your license agreement dialog and acceptance box BACKTITLE10="Your Product License Agreement Acceptance" BACKTITLE11="Your Product License Agreement" # Set the location of your license file LICFILE11="/opt/IBM/UbuntuVM/licenses/your_product_license" # Display your license agreement. # The user needs to select OK to proceed /usr/bin/whiptail --backtitle "${BACKTITLE11}" --textbox ${LICFILE11} 20 74 --scrolltext # Now ask the user if he accepts the previously displayed license # agreement. If not, the script automatically calls the resetVM.sh # script and the user has to start over (re-boot) again. /usr/bin/whiptail --backtitle "${BACKTITLE10}" --yesno "I understand and accept Your License Agreement." 12 50 || sudo /opt/IBM/UbuntuVM/bin/resetVM.sh # Feel free to repeat the steps above to be able to display # and acknowledge multiple license files We now have all of the basic scripts in place. Now how you can force the execution of those scripts only during the first login of a designated appliance user (for example, the informix user). First login-only script execution If you are going to re-distribute the Informix-based appliance, you likely want to force the user to go through some initial configuration and setup. This might include the display and acknowledgment of license information, the opportunity to configure language settings plus keyboard layouts, and to allow the customization of additional aspects of the Informix-based appliance. In our demo appliance, we accomplish such a desired behavior by customizing the default startup file of the bash login shell, named .bashrc, which is located in the home directory of each user. 340 Embedding IBM Informix In our example, the designated user who has to log in the first time the appliance boots should be the informix user. So the file to be customized is called /home/informix/.bashrc. Edit the /home/informix/.bashrc file and add the lines as found in Example 12-7. Example 12-7 .bashrc customization to run the initial_config script # # # # # # The following four lines, added to end of a user’s .bashrc file do the following: 1. Check if the initial_config script has been already run once 2. If not, execute the script initial_config 3. Create the empty file initial_config_done to prevent the future execution of the initial_config script if [ ! -e /opt/IBM/UbuntuVM/etc/initial_config_done ]; then /opt/IBM/UbuntuVM/bin/initial_config sudo touch /opt/IBM/UbuntuVM/etc/initial_config_done fi We now only need to create a simple /opt/IBM/UbuntuVM/bin/initial_config shell script as the root user: sudo vi /opt/IBM/UbuntuVM/bin/initial_config Add the lines from Example 12-8. Add any of your own specific code. Example 12-8 Simple initial_config script # Configure keyboard layout for the console window only! # The keyboard layout for a GUI desktop needs to be defined while # within the GUI environment sudo dpkg-reconfigure console-setup # Clear screen clear # Display Your License information /opt/IBM/UbuntuVM/bin/display_license # # # # # # # Optional: If you are providing a GUI login, then your resetVM.sh script removed that symbolic link to force a console window display of e.g. your license information. To reactivate the GUI login uncomment the following three lines. sudo ln -s /etc/init.d/gdm /etc/rc2.d/S30gdm clear sudo /etc/init.d/gdm start Chapter 12. IBM Informix appliances 341 Shrinking the VMware virtual disks To create an appliance image with a small footprint for distribution (for example, by download), shrink the virtual disk images by using the vmware-toolbox command, as the root user, which is part of the VMware tools (see “Installing VMware tools” on page 322 for details about the VMware tools setup). To shrink the virtual disks, run the sudo vmware-toolbox command from within a terminal window while in GUI mode (console mode is not supported for vmware-toolbox). Select the Shrink tab from the “VMware Tools Properties” window. In the Shrink tab, select the partition you want to shrink (for example, /). This is shown in Figure 12-9. Figure 12-9 Using vmware-toolbox to shrink the virtual disks Consideration: At the time of the writing of this book, the vmware-toolbox command is not able to shrink a Linux ext4 file system (default on Ubuntu), so there will not be any shrinkable file system displayed. Alternatively, you can use the vmware-diskmanger command, which comes as part of the VMware installation on the host OS. 342 Embedding IBM Informix Tip: Before performing the final distribution of the appliance image, consider using a file compression utility to package or compress everything with a file compression utility, such as WinZIP, PKZIP, WinRAR, compress, or tar to reduce the footprint. 12.4.7 Informix/Ubuntu virtual appliance tips and tricks section In this section, we document miscellaneous topics related to the Informix/Ubuntu virtual appliance. Automatic MAC address generation for the initial startup If a VMware-based virtual appliance is copied (or distributed) to a different location, VMware normally displays a dialog box (Figure 12-10) asking if the virtual machine may have been moved or copied. I copied it If you select I copied it, VMware generates a new unique universal identifier and also a new unique MAC address, which can be important if you plan to let users use multiple instances of an Informix appliance in the same network. I moved it If you select I moved it, the original UUID and MAC address are retained. Figure 12-10 VMware startup dialog box after copying a virtual image Chapter 12. IBM Informix appliances 343 If you would like to force the automatic generation of a new MAC address/UUID without displaying the VMware dialog box, edit the appliance.vmx file and delete the lines that start with the following content: ethernet?.addressType = uuid.location = uuid.bios = ethernet?.generatedAddress = ethernet?.generatedAddressOffset = The next time the appliance is started, it automatically generates those entries without displaying the dialog box. Ensuring the correct network card configuration Ubuntu uses the Linux 2.6 kernel udev device discovery and configuration technology to automatically discover recently added devices, such as network cards. If you are allowing dynamic MAC address generation as part of your VMware-based Informix appliance, you have to make sure that the udev process works correctly. One important Linux udev-related file that should be cleaned up before an Ubuntu-based appliance is re-distributed is /etc/udev/rules.d/70-persistent-net.rules. Example 12-9 shows the typical content of that file in a working Ubuntu appliance with two existing network cards (eth0 and eth1). Example 12-9 /etc/udev/rules.d/70-persistent-net.rules sample file # # # # # This file was automatically generated by the /lib/udev/write_net_rules program, run by the persistent-net-generator.rules rules file. You can modify it, as long as you keep each rule on a single line, and change only the value of the NAME= key. # PCI device 0x1022:0x2000 (pcnet32) SUBSYSTEM=="net", ACTION=="add", DRIVERS=="?*", ATTR{address}=="00:0c:29:90:d3:20", ATTR{dev_id}=="0x0", ATTR{type}=="1", KERNEL=="eth*", NAME="eth0" # PCI device 0x1022:0x2000 (vmxnet) SUBSYSTEM=="net", ACTION=="add", DRIVERS=="?*", ATTR{address}=="00:0c:29:90:d3:2a", ATTR{dev_id}=="0x0", ATTR{type}=="1", KERNEL=="eth*", NAME="eth1" 344 Embedding IBM Informix Important: Before you re-distribute your Informix/Ubuntu virtual appliance, be sure that all lines starting with SUBSYSTEM==net, or all lines below the first five comment lines at the top, are deleted. If you forget to delete those lines, the Ubuntu udev subsystem will discover the network cards with a new MAC address and assume that those networks cards are additional cards to the already existing ones. The new cards will then be named eth2 and eth3, which will lead to a non-functional network setup in your appliance. Tip: The resetVM.sh script, as described in “Creating a simple appliance reset script” on page 338, already deletes the entries in the 70-persistent-net.rules file. 12.5 An USB memory stick-based Informix/Linux appliance Sometimes it can be helpful to have an ultra portable version of an Informix-based virtual appliance that can be used for demo purposes, or serve as a real application foundation. There is, in fact, a USB memory stick-based Informix demo virtual appliance that has been created to show the capabilities of the recently released Informix Version 11 versions during IBM customer and business events. That setup had been used to demonstrate an Informix Version 11 high availability cluster based on up to three USB memory sticks that communicate with each other. Due to the way the demo has been presented to the audience (by covering the unused memory sticks in the presenters trouser pockets), it earned the nickname “cluster in my trousers”. The author of that demo has developed a guide on re-creating a USB-based Informix virtual appliance from start to finish, and has documented those steps in the following sections. 12.5.1 Which building blocks to choose In general, the process of creating an USB memory stick-based Informix virtual appliance is the same as creating a full-fledged VMware-based virtual appliance, as described in 12.4, “How to create an Informix/Linux-based virtual appliance” on page 314. There are minor differences in the choice of the building blocks. Chapter 12. IBM Informix appliances 345 QEMU as the VM for the USB memory stick virtual appliance The major difference is the type of virtual machine we use for this setup. We want to have a virtual environment that is self contained and does not require a prior installation on the target host machine. In addition, virtual machine should at least be available on the Windows and the Linux platform (for the host environment). After doing some research, we found QEMU, an open source VM that supports a broad range of host and guest operating systems, with the advantage that it can be run without prior installation on the host platform. The current version of QEMU for Windows and its documentation can be found at the following website: http://homepage3.nifty.com/takeda-toshiya/qemu/index.html There are binary distributions of QEMU available for Linux/Intel, Windows, Mac OS X, and OpenSolaris. The QEMU project home page can be found at the following website: http://www.qemu.org Another advantage of QEMU is its support for compressed virtual disks in its own format, called qcow2, which can be helpful to achieve Informix/Linux virtual appliances with extremely low footprints. Ubuntu JeOS as the QEMU guest OS The original Informix11 To Go memory stick virtual appliance was based on the Debian Linux distribution. Because Ubuntu is based on Debian, and we already described the appliance build steps based on Ubuntu, we keep Ubuntu JeOS as the foundation for the USB memory stick virtual appliance. That way, we need only to document, in this section, the building steps that are different from the full-fledged Informix/Ubuntu appliance on VMware. 12.5.2 Creating a QEMU-based Informix virtual appliance We start with a brief overview of the steps that are required to create a QEMU-based virtual appliance. We then go into more detail. 1. Download and install the current QEMU release into a project folder. 2. Create an empty QEMU virtual disk in qcow2 format. 3. Download the latest Ubuntu JeOS release and install it in the QEMU VM, as a non-GUI version for lowest footprint requirements. 4. Ensure PHP5 and Apache2 are installed and configured. 5. Install and configure Informix Version 11.70 and the CSDK. 6. Download and install the PDO_Informix driver for PHP5. 346 Embedding IBM Informix 7. Create and configure the required init.d scripts for Informix and Apache2. 8. Download, install, and configure the Open Admin Tool for Informix. Steps 4 - 8 are similar to the VMware-based virtual appliance. Therefore, we will not describe it again. Note: Unlike VMware, QEMU does not support anything similar to VMware tools to allow, for example, cut and paste actions between the guest OS and the host OS. QEMU supports a simplified concept of a shared folder, which can be used to exchange data between the host OS and the QEMU-hosted guest OS. In the following sections, we assume that the Windows platform is the target host OS. Therefore, some of the steps are Windows-specific. In general, the setup steps should be applicable for a Linux-based host, but this has not been tested. Downloading and extracting QEMU You should be able to download the latest Windows binary version of QEMU from one of the following website(s): http://homepage3.nifty.com/takeda-toshiya/qemu http://www.h7.dion.ne.jp/~qemu-win/ At the time of writing of this book, the latest QEMU for Windows seems to be Version 0.13.0. After downloading the QEMU Windows version, extract the compressed archive into a project folder (for example, C:\PortableInformix). You might want to rename the extracted folder name qemu-0.13.0-windows to something more simple, such as qemu. This can make the steps easier to follow. Optional: To accelerate the execution of QEMU on Windows, consider downloading the QEMU accelerator for Windows (called Kqemu) from one of the websites previously listed. Create at least one additional subfolder for the QEMU disk images relative to the C:\PortableInformix folder, for example, C:\PortableInformix\images. Creating an empty QEMU drive (qcow2 format) Create an empty virtual drive usable for QEMU in the compressed qcow2 format. Open a Windows command-line window and run the following qemu-img.exe command (in the qemu subfolder) to create an empty 2 GB (or larger) qcow2 (which allows compression) QEMU disk image: qemu-img.exe create -f qcow2 ..\images\informix.img 2GB Chapter 12. IBM Informix appliances 347 The newly created file is small because the required space is only allocated as required. This is shown in Figure 12-11. Tip: A 2 GB primary disk image should be sufficient to operate Ubuntu JeOS, Informix, the Client SDK, and OAT. For the actual installation of Informix and the Client SDK, a larger disk image (for example, 4 GB) is better to maintain the temporary installation files. Alternatively, you could create a second disk image that is only being mounted and used for installation purposes. Figure 12-11 Creating an empty QEMU virtual disk image Installing a basic Ubuntu JeOS in the QEMU VM We use the same Ubuntu Server ISO file (ubuntu-10.04.1-server-i386.iso) from 12.4.1, “Initial setup of the Ubuntu JeOS VMware image” on page 315 for the QEMU installation. Copy the ISO file to, for example, the images subfolder in C:\PortableInformix. Create, in the C:\PortableInformix folder, an install.bat file that contains the two commands (those are two command lines, not four) shown in Example 12-10: Example 12-10 The contents of the install.bat file. cd qemu qemu.exe -L . -m 512 -localtime -hda ../images/informix.img -cdrom ../images/ubuntu-10.04.1-server-i386.iso -net nic,vlan=0,macaddr=52:54:00:12:34:56 -net user,vlan=0 -no-acpi -boot d 348 Embedding IBM Informix The two commands start the QEMU VM with one network card preconfigured (with access to the host connected networks) and boot from the Ubuntu Server ISO image. By double-clicking the install.bat file, or by running that file from within a Windows command-line window, start the Ubuntu boot/install process. Choose a language setting, press F4 to select Install a minimal system, and choose the Install Ubuntu Server main menu option. See the Ubuntu JeOS installation instructions in “Performing the initial boot from the ISO image” on page 317. However, you might choose to ignore any (if not all) VMware specifics in that section. When the Ubuntu JeOS installation is finished, create another file in the C:\PortableInformix folder called start.bat using the commands shown in Example 12-11 (these are two commands, not three). Example 12-11 Content of the start.bat file cd qemu qemu.exe -L . -m 512 -localtime -hda ../images/informix.img -net nic,vlan=0,macaddr=52:54:00:12:34:56 -net user,vlan=0 -no-acpi -redir tcp:6000::80 This start.bat file is used to start the QEMU-based Informix/Ubuntu virtual appliance. If you see the error message from the Ubuntu install process FATAL: Could not read the boot disk, close the QEMU window and re-start the image through the new start.bat command file. As soon as you get the login prompt, log in as the informix user with password informix (or whatever password you defined during the installation process), as shown in Figure 12-12. Figure 12-12 First login after the initial boot of the newly installed Ubuntu JeOS Chapter 12. IBM Informix appliances 349 As with the Ubuntu installation on VMware, the first three commands run should be as follows: sudo apt-get update sudo apt-get upgrade sudo apt-get clean The first two commands make sure that your newly installed Ubuntu JeOS has the latest updates or upgrades in place. Your host machine should be connected to the Internet in order make the execution of the commands successful. The last command will clean up any leftover temporary installation files. Verifying that PHP5 and Apache2 are installed and configured Ensure that the following Ubuntu packages are installed to install the OAT for Informix (and the required PDO_Informix PHP driver). Run the following commands from within the console window: sudo sudo sudo sudo apt-get apt-get apt-get apt-get install apache2 install php5 php5-dev php5-sqlite php5-gd install php-pear php-soap libc6 libapache2-mod-php5 clean Verify that the Apache2 web server is up and running and accessible from the outside (the host OS). To perform this task, start a web browser on the host and open the following URL: http://localhost:6000 The start.bat command file has the QEMU command-line option -redir tcp:6000::80. This option redirects all requests to the host port 6000 (or whatever host port you use locally) to the QEMU guest OS port 80 (the port on which the Apache web server is listening). 350 Embedding IBM Informix If everything works correctly, you see a simple HTML page that says “It works!”, as shown in Figure 12-13. Figure 12-13 Accessing the QEMU guest OS web server from the host OS Installing and configuring Informix Version 11.70 and the Client SDK This process is almost identical to the installation process of the VMware-based virtual appliance. If you install the Informix product set the standard way, enable a simple shared folder concept in the QEMU. To do this, shut down the newly installed Ubuntu JeOS first by running the sudo shutdown -h now command. When the system has halted, perform the following steps: 1. Create the C:\PortableInformix\transfer folder. 2. Add the following QEMU command-line option to the start.bat file: -hdb fat:../transfer This option enables the ./transfer folder as a virtual shared disk. Put the Informix product installation files into the transfer folder and restart the QEMU image with the start.bat command script file. In the QEMU Ubuntu JeOS, you should be able to mount that shared folder by running the following commands: sudo mkdir /mnt/fat sudo mount /dev/sdb1 /mnt/fat You can now access the files located in the Windows transfer folder through the /mnt/fat directory in the Ubuntu environment. Chapter 12. IBM Informix appliances 351 Caution: Access to the QEMU shared folder is read-only from within the guest OS. There can be additional limitations, such as maximum file size and sub-folder support. Be sure you are aware of any limitations. Installing PDO_Informix and OAT and creating the required init.d scripts Use the standard installation approach described in “Installing OAT on Ubuntu 10.04” on page 333. To enable the correct autostart of the installed Informix instance(s), refer to “Automatically starting up an Informix instance during system boot” on page 336. Those steps are the same for the QEMU install. External SQL applications and QEMU If you want to enable easy access to the Informix instances on your QEMU Informix/Ubuntu virtual appliance, you can use the port redirection command-line option of QEMU. For each Informix port, add an additional -redir tcp:... option to the end of the QEMU command line in the start.bat file. To access the demo_on demo Informix instance, add the -redir tcp:6001::9088 option to the end of the list of QEMU command-line options. In addition, add the following line, as the root user, to the /etc/hosts file in the Ubuntu guest host: 10.0.2.15 ubuntu Delete the following line from the /etc/hosts file: 127.0.1.1 ubuntu Restart your Informix instance after those changes. If you would like to access, for example, the ol_informix1170 demo instance from outside of the QEMU guest OS, use the following parameters: 352 INFORMIXSERVER: ol_informix1170 HOSTNAME: localhost PORT: 6001 USER: informix PASSWORD: informix Embedding IBM Informix Autostarting an Informix/Ubuntu image from an USB memory stick To autostart the QEMU-based Informix/Ubuntu virtual appliance as soon as the USB memory stick is inserted into a USB port, perform the following steps: 1. In the C:\PortableInformix folder, create a copy of the start.bat file and name it autorun.bat. Clean up the autorun.bat file and remove any QEMU command-line options that are not required for deployment (for example, the -hdb fat:../transfer option). 2. Create a new file in the same folder, called autorun.inf, with the following contents: [autorun] open=autorun.bat label=Informix V11.70 Demo action=Start Informix V11.70 Demo 3. Set the attributes read-only and hidden on the autorun.inf file. 4. Copy the content of the C:\PortableInformix folder to the root directory of the USB memory stick. Tip: Do not copy the transfer sub-folder or any unnecessary images from the images sub-folder to the memory stick, to minimize space usage. You should now be able to autostart the QEMU image. Windows autoplay Issues: If you are planning to deploy the Ubuntu/QEMU-based image through a USB memory stick, you might notice that Windows sometimes refuses to start the external USB stick automatically. If this happens, download Autofix.exe from Microsoft. You may download the autofix.exe file from the following website: http://www.microsoft.com/downloads/details.aspx?FamilyID=C680A7B6-E8FA-45C4A171-1B389CFACDAD&displaylang=en Re-compressing the QEMU disk image file Even though the QEMU qcow2 disk format supports compression (and encryption), which can be handy if the appliance should be put, for example, on a memory stick, you might want to recompress an existing image before redistribution to make it smaller. To recompress an existing image, run the qemu-img.exe convert –c <old_image> -O qcow2 <compressed_image> command from a Windows command line while in the C:\PortableInformix\qemu folder. Chapter 12. IBM Informix appliances 353 The compression gains can be sometimes impressive. See Figure 12-14 for an example before and after comparison. Figure 12-14 The positive effect of recompressing a QEMU virtual disk Adding a stand-alone external web browser Here we create a self-contained and portable Informix virtual appliance setup on a USB memory stick. It includes an external web browser to access a web-based application and the Open Admin Tool for Informix. To perform this task, look at FirefoxPortable, which is a special, self-contained version of Firefox that does not require any prior product installation and is well-suited for USB memory sticks. The portable Firefox browser can be found at the following website: http://portableapps.com/apps/internet/firefox_portable You can also create, as an example, a FirefoxPortable sub-folder in the C:\PortableInformix directory and add the following line to the autorun.bat (or start.bat) file to open an HTML file on the host: START FirefoxPortable\FirefoxPortable.exe your_page.html Tip: By default, Firefox (including the portable version) blocks several nonstandard ports due to security concerns. To unblock some of the QEMU redirected ports, perform the following steps: 1. Enter about:config in the Firefox address bar. 2. Right-click and choose New String. Enter the name network.security.ports.banned.override and the values for your re-directed ports (6000 and 6001, as examples). 354 Embedding IBM Informix Improving the network connectivity to the QEMU VM If you need an improved network connection between the host machine and the QEMU guest operating system, consider installing and configuring TAP. TAP is a virtual network kernel driver that simulates an Ethernet card and allows an easy QEMU/host network setup. TAP drivers are available for most of the QEMU-supported host operating systems, such as Linux and Windows. The following steps detail how to install a TAP driver on Windows XP, and how to configure QEMU to use that driver: 1. Download the OpenVPN installation package for Windows, which contains the TAP-Win32 adapter, from the following website: http://openvpn.net/release/openvpn-2.1.3-install.exe 2. Install the TAP-Win32 adapter by running the openvpn-2.1.3-install.exe executable. During the installation process, clear all components except for the TAP-Win32 adapter. 3. Configure the just installed driver (on, for example, Windows XP). Select Start Control Panel Network Connections. You see a TAP-Win32 Adapter, with a name similar to “Local Area Connection 3”. Right-click the adapter and rename it to informix-tap. Right-click again and select Properties. Select Internet Protocol (TCP/IP) from the list and click Properties. Set the IP address and subnet mask of the new TAP device. For the QEMU setup, we use an IP of 10.0.3.10 and a subnet mask of 255.255.255.0. The other fields can be ignored. Note: The command-line tool, netsh, can do many of these same functions. For example, the netsh interface ip set address informix-tap static 10.0.3.10 255.255.255.0 command sets the IP and subnet for informix-tap. This setting is persistent across Windows reboots. 4. Add the following two options to the QEMU command line in the start.bat file: -net nic,vlan=1,macaddr=52:54:00:12:34:57 -net tap,vlan=1,ifname=informix-tap 5. Boot up your Ubuntu/QEMU image and log in as the informix user. Add the following lines to the /etc/network/interfaces file (through the sudo command): auto eth1 iface eth1 inet static address 10.0.3.11 netmask 255.255.255.0 Chapter 12. IBM Informix appliances 355 6. Shut down and restart the QEMU/Ubuntu image. After the reboot, you should be able to access the Ubuntu guest OS, for example, through one of the following commands. Ensure you have installed the necessary Ubuntu telnet and ftp packages (see “Enhancing the accessibility of the appliance” on page 336). telnet 10.0.3.11 ftp 10.0.3.11 You can use any external web browser to access the Ubuntu-based web server with the following URL: http://10.0.3.11 Increasing the QEMU performance with Kqemu If you are planning to run the QEMU-based virtual appliance more often, we suggest that you install the Kqemu accelerator, the Windows version of which can be downloaded from the following website: http://www.h6.dion.ne.jp/~kazuw/qemu-win/Kqemu-1.3.0pre11-install.exe Run the Kqemu-1.3.0pre11-install.exe file once on each system where it is required. The installation is not invasive and does not require a reboot of the machine. Check the latest Kqemu and QEMU documentation, because the most recent QEMU versions might not be compatible with Kqemu anymore. 12.6 Creating an Informix/Windows-based appliance In this section, we describe how to create an Informix-based appliance by using VMware Workstation 6.5 as the virtualization technology and Microsoft Server 2008 Core Edition as the appliance guest operating system. As of the writing of this book, Microsoft allows only certified resellers to package and distribute Windows, which prevents Microsoft customers and channel partners from distributing appliances based on Windows applications. Check with your Microsoft representative for the applicable license terms. 12.6.1 Initial setup of the Windows Server 2008 Core VMware image In this section, we discuss the initial setup of the Windows Server 2008 Core VMware image. Download the Windows Server 2008 Enterprise 60-day Trial Edition from Microsoft from the following website: http://www.microsoft.com/windowsserver2008/en/us/try-it.aspx 356 Embedding IBM Informix Download Windows Server 2008 Enterprise Trial Edition from the following website: http://www.microsoft.com/downloads/details.aspx?FamilyId=13C7300E-935C-415A-A79 C-538E933D5424&displaylang=en The name of the actual file to download is 6001.18000.080118-1840_x86fre_Server_en-us-KRMSFRE_EN_DVD.iso. After downloading this file, proceed to “Creating a new VMware virtual image and virtual disk”. Creating a new VMware virtual image and virtual disk Perform the following steps to create a new VMware virtual image and virtual disk: 1. Start VMware Workstation (we used Version 6.5) and select File New Virtual Machine. The “Welcome to the New Virtual Machine Wizard” window opens. 2. Select Custom and click Next. The “Choose the Virtual Machine Hardware Compatibility” window opens (Figure 12-15). Figure 12-15 Choose the Virtual Machine Hardware Compatibility Chapter 12. IBM Informix appliances 357 3. Choose the hardware compatibility. If your appliance also runs in VMware Server or ESX server, choose Workstation 5. Otherwise, choose Workstation 6, and click Next. The “Guest Operating System Installation” window opens (Figure 12-16). Figure 12-16 Guest Operating System Installation window 4. Click Browse and select the path where you have downloaded the Windows Server 2008 ISO Image. Alternatively, you can also burn the ISO image to a DVD and select the DVD drive here. We select the latter option and use drive ‘F:’. 358 Embedding IBM Informix Click Next and the “Easy Install Information” window opens (Figure 12-17). Figure 12-17 Easy Install Information window 5. Enter the Windows Server 2008 product key. The easy installation feature enables you to perform an unattended installation of Windows Server 2008. You can also have VMware create an additional user account with administrative privileges. For example, we create a user SystemAdmin with password informix. The SystemAdmin user performs all Windows system administration tasks. The default Administrator and Guest users are created normally by the Windows setup process. These user names should not be specified in this window. Click Next. The “Name the Virtual Machine” window opens. Chapter 12. IBM Informix appliances 359 6. Name this virtual machine Informix Windows Demo Appliance. Choose a folder location where this virtual appliance will be created. We specify C:\Redbook_2008_WinVM as the folder location, as shown in Figure 12-18. Figure 12-18 Name the Virtual Machine window Click Next. The “Processor Configuration” window opens. 7. Specify the number of processors for this virtual machine. For this demo appliance, we selected one processor. Click Next. The “Memory for the Virtual Machine” window opens (Figure 12-19). Figure 12-19 Memory for the Virtual Machine window 360 Embedding IBM Informix 8. Select the minimum amount of memory this virtual appliance might need. We set it to 768 MB for the demo appliance. This size can be adjusted given the physical RAM available. It can be changed later as well. Click Next. The “Network Type” window opens (Figure 12-20). Figure 12-20 Network Type window 9. Select Use network address translation (NAT). It provides an easy access to the host OS, and to any network connection (such as the Internet) connected to the host. This step adds a virtual Ethernet card to the virtual machine. Later, we add another network card that allows us to provide a fixed IP address in addition to any dynamic IP address that is being provided through the NAT protocol Ethernet card. Click Next. Chapter 12. IBM Informix appliances 361 The “Select I/O Adapter Types” window opens (Figure 12-21). Figure 12-21 Select I/O Adapter Types window 10.Accept the default choice LSI Logic and click Next. The “Select a Disk” window opens (Figure 12-22). Figure 12-22 Select a Disk window 362 Embedding IBM Informix 11.Select the Create a new virtual disk radio button and click Next. The “Select a Disk Type” window opens (Figure 12-23). Figure 12-23 Select a Disk Type window 12.The disk type can be either IDE or SCSI. Select SCSI and click Next. The “Specify Disk Capacity” window opens (Figure 12-24). Figure 12-24 Specify Disk Capacity window Chapter 12. IBM Informix appliances 363 13.Choose the desired maximum size of your virtual disk. We leave it at 8 or 16 GB for now. Leave the Allocate all disk space now check box clear. If you are planning to redistribute the virtual appliance to a broader audience, you might want to select the Split disk into 2 GB files radio button, which supports VMware disk files on a Windows FAT partition. Click Next. The “Specify Disk File” window opens (Figure 12-25). Figure 12-25 Specify Disk File window 364 Embedding IBM Informix 14.Provide a name for the virtual disk file. For the demo appliance, we left the name as Informix Windows Demo Appliance.vmdk. Click Next. The “Ready to Crate Virtual Machine” window opens (Figure 12-26). Figure 12-26 Ready to Create Virtual Machine window 15.Click Customize Hardware, and remove the unnecessary floppy device. Ensure that the information for the New CD/DVD (IDE) device is correct. Click OK. The “Ready to Create Virtual Machine” window opens. 16.Click Finish to trigger the Windows Server 2008 Enterprise (Server Core) installation for this virtual machine. Initial boot and Windows Server 2008 (Server Core) installation VMware will power up the newly created virtual machine. Perform the following steps: 1. The VMware Easy Installation makes the Windows Server 2008 installation process quick. If you did not choose to enter the Windows product key earlier, the installation will prompt for it again. However, if you choose to skip it now, you will start the 60-day trial evaluation period for Windows Server 2008. Click Next. The “Select the edition of Windows that you purchased” window opens. 2. Choose Windows Server 2008 Enterprise (Server Core Installation) and click Next. The “Installing Windows...” window opens and the installation begins. The installation progress is shown in the virtual machine. The virtual machine restarts several times as the installation proceeds. After it is complete, you see the usual Windows login window. Chapter 12. IBM Informix appliances 365 3. Set a valid password for Administrator. From the VM menu in VMware Workstation, select Send Ctrl+Alt+Del and log in as Administrator. The default password for Administrator is blank. You will be asked to change that password immediately. Set the password to p@ssw0rd. You will be logged into the Windows Server 2008 Enterprise (Server Core) as Administrator with a single Command Prompt window on the screen and no desktop. VMware then starts installing VMware Tools automatically in this newly created virtual machine. The virtual machine will be restarted again to complete the update process. To install or reinstall VMware Tools manually in the Guest OS, choose the appropriate option from the VM menu in VMware Workstation. 4. Log in as the SystemAdmin user, which you had asked VMware Workstation to create for performing all administrative tasks in this virtual machine. The password for SystemAdmin was set to informix. You can now enable Shared Folders in VMware Tools. This feature is useful and allows you to share folders from the host OS to the virtual machine. This is shown in Figure 12-27. Figure 12-27 Enable Shared Folders with VMware Tools 366 Embedding IBM Informix 5. In VMware Workstation, go to the VM menu and select Settings, and click the Options tab. Select Shared Folders from the list and click the Always enabled radio button. For ease of use, check the Map as a network drive in Windows guests check box. This assigns a drive letter to the shared folders. 6. Click Add to start the Add Shared Folder Wizard. For this demo appliance, C:\TEMP was specified as the folder to be shared from the host. The corresponding name for this folder in the guest is TEMP. Click Next. The “Specify Shared Folder Attributes” window opens. 7. Accept the default choice (Enable this share) and click Finish. Click OK to accept the changes on the Virtual Machine Settings window. Return to the guest OS to do some basic configuration, as shown in Figure 12-28. You can see that Z:\TEMP is visible in the virtual machine. The access permissions on the host folder govern which users from the appliance can modify the files. Figure 12-28 Basic Windows Server 2008 configuration The command prompt window in Server 2008 Core Edition is the DOS-like prompt where the system setup and administration commands are issued. 8. Issue the control timedate.cpl command to confirm the time and date in the virtual image. Typically, VMware Tools usually synchronizes the time and date with the host OS. 9. Verify the internationalization and keyboard settings with the control intl.cpl command. In this example, the default setting of English US is accepted. Chapter 12. IBM Informix appliances 367 10.Verify the host name of the virtual machine. Use the netdom command to rename the virtual machine host name to Informix-WINVM, as shown in the following example: netdom rename computer %COMPUTERNAME% /newname:IDS-WINVM 11.Restart the virtual machine with the shutdown command, as shown in the following example: shutdown /r /t 10 /c “Changed Server Hostname to IDS-WINVM” Network configuration in the IBM Informix Windows appliance The netsh command is a powerful command to configure network-related settings in Windows Server 2008 (Server Core) Edition. By default, this virtual appliance is configured with one DHCP-based Ethernet adapter, and the NAT protocol has been used for easy access to external networks, such as the Internet. Due to DHCP, the network address for the virtual appliance is subject to change across restarts. Perform the following steps to configure the network in the IBM Informix Windows appliance: 1. To see the current network interfaces in the Windows appliance, run the netsh interface ipv4 show interfaces command. 2. Add an Ethernet adapter and configure a predefined static IP address for this virtual appliance. This allows you to connect to the appliance consistently over the network without changing any client configuration. 3. Shut down the appliance completely with the shutdown command, as shown in the following example: shutdown /s /t 10 /c “Add an Ethernet adapter with static address” 4. Go to VM and select Settings. By default, the Hardware tab is selected. Click Add and select Network Adapter. The “Network Hardware Type” window opens. 368 Embedding IBM Informix 5. Select Host-only, as shown in Figure 12-29, and click Finish. Figure 12-29 Network hardware type We now must determine which network has been assigned to the VMware Workstation Host-only virtual network adapter. 6. In VMware Workstation, select Edit and click Virtual Network Editor. Select the Host Virtual Network Mapping tab. Click the right arrow (>) next to VMNet1 and select Subnet.... Note the IP address and the subnet mask. In this example, the IP address is 192.168.72.0 and the subnet mask is 255.255.255.0, which means that the appliance can have a static address in the range 192.168.72.1 to 192.168.72.254. If the appliance needs to have a specific static address outside of this range, then you need to adjust the subnet mask for the host-only (typically, VMNet1) accordingly. Otherwise, click Cancel. Chapter 12. IBM Informix appliances 369 7. Power on the virtual machine again and configure the new networking adapter, as shown in Figure 12-30. Click Power on this virtual machine and log in as SystemAdmin to get back to the Windows Server 2008 (Server Core) Command Prompt. Figure 12-30 Configuring the network adapter 8. Issue the netsh interface ipv4 show interfaces command to list the network interfaces in the virtual machine. The new network connection has the name Local Area Connection 2 for the Host-only adapter. Assign 192.168.72.111 as the static IP address to this connection. 9. Run the following command to configure the new network interface: netsh interface ipv4 set address "Local Area Connection 2" static 192.168.72.111 255.255.255.0 192.168.72.100 1 10.Issue the ipconfig command to confirm that the above values have been set correctly. The output should appear similar to Example 12-12. Example 12-12 Confirmong the network interface settings Ethernet adapter Local Area Connection Connection-specific DNS Suffix . : Link-local IPv6 Address . . . . . : IPv4 Address. . . . . . . . . . . : Subnet Mask . . . . . . . . . . . : Default Gateway . . . . . . . . . : 2: fe80::940a:c501:c383:3468%6 192.168.72.111 255.255.255.0 192.168.72.100 11.Add this information to the C:\WINDOWS\System32\drivers\etc\hosts file. Use Notepad to edit this file and add the following line: 192.168.72.111 IDS-WINVM 12.Restart the virtual appliance to activate the new network settings with a command similar to the following one: shutdown /r /t 10 /c “Configured Host-only Network Adapter” 370 Embedding IBM Informix After a successful restart and login, you should be able to ping IDS-WINVM, as shown in Example 12-13. Example 12-13 Pinging IDS-WINVM C:\Users\SystemAdmin>ping IDS-WINVM Pinging IDS-WINVM [192.168.72.111] with 32 bytes of data: Reply from 192.168.72.111: bytes=32 time=14ms TTL=128 Reply from 192.168.72.111: bytes=32 time<1ms TTL=128 Reply from 192.168.72.111: bytes=32 time<1ms TTL=128 Reply from 192.168.72.111: bytes=32 time<1ms TTL=128 Ping statistics for 192.168.72.111: Packets: Sent = 4, Received = 4, Lost = 0 (0% loss), Approximate round trip times in milli-seconds: Minimum = 0ms, Maximum = 14ms, Average = 3ms If the Host OS is connected to the Internet, then you should be able to ping any server on the Internet as well. The commands to do this task are shown in Example 12-14. Example 12-14 Pinging an Internet server C:\Users\SystemAdmin>ping www.google.com Pinging www.l.google.com [74.125.95.147] with 32 bytes of data: Reply from 74.125.95.147: bytes=32 time=37ms TTL=128 Reply from 74.125.95.147: bytes=32 time=110ms TTL=128 Reply from 74.125.95.147: bytes=32 time=133ms TTL=128 Reply from 74.125.95.147: bytes=32 time=54ms TTL=128 Ping statistics for 74.125.95.147: Packets: Sent = 4, Received = 4, Lost = 0 (0% loss), Approximate round trip times in milli-seconds: Minimum = 37ms, Maximum = 133ms, Average = 83ms Back up the appliance VMware files in C:\Redbook_2008_WinVM at this point. Before backing up, shut down the appliance with the shutdown /s /t 10 /c "Base Appliance Backup#1" command. Chapter 12. IBM Informix appliances 371 12.7 IBM Software Assembly Toolkit and real Informix appliances The IBM Software Assembly Toolkit is designed specifically for solution providers who need to deliver a total solution to their customers. The toolkit provides an open platform that you can use to integrate custom applications, products, and services with middleware components to create and distribute a total business solution as a single deliverable. To provide a total business solution as a single deliverable, it simplifies the process of deploying a solution and to minimize solution configuration errors. The IBM Software Assembly Toolkit provides flexible, easy-to-use packaging and deployment tools for creating and distributing complete solutions across multiple platforms. IBM Software Assembly Toolkit can be used as a great foundation to build real, not virtual, Informix-based software appliances that can be easily deployed at a customer site. It supports the following operating systems: Windows Linux IBM System i5/OS® (OS/400®) Solaris HP-UX AIX 12.7.1 IBM Software Assembly Toolkit components The following sections contain brief descriptions of the IBM Software Assembly Toolkit components. It does not include IBM middleware. If you want to create solutions that use IBM middleware, you must obtain it from IBM. IBM Software Assembly Toolkit developer The IBM Software Assembly Toolkit developer is a standard development environment that is built on Eclipse-based technology that you can use to package and prepare a complete business solution for deployment on target computers. 372 Embedding IBM Informix Figure 12-31 illustrates an overview of the IBM Software Assembly Toolkit developer. Figure 12-31 IBM Software Assembly Toolkit developer overview The IBM Software Assembly Toolkit offers a complete solution, including integrated installation and configuration. The IBM Software Assembly Toolkit developer features wizards that help you create different types of deployment accelerators quickly and easily. A deployment accelerator is an IBM Software Assembly Toolkit developer project that uses metadata to define the way an application or solution is installed and configured on the target computer. An application deployment accelerator helps to install an application on one or more target computers while exposing the fewest possible number of installation parameters to the user. A solution deployment accelerator could contain a deployment accelerator for IBM HTTP Server targeted to one operating system, an Informix database application targeted to a second operating system, and an IBM WebSphere Application Server application to a third operating system. The IBM Software Assembly Toolkit developer contains the following wizards that can be used to easily create deployment accelerators for specific program types: Databases Lotus Domino® applications PHP applications WebSphere applications Custom applications Chapter 12. IBM Informix appliances 373 Note: A custom application is any type of application, program, script, or system command that does not fall into one of the previous categories. The only requirement is that the application can be executed by issuing a system command. In addition, deployment accelerators that are intended for use with specific IBM middleware products can be acquired separately and combined easily into a reusable solution that contains in your own applications and services. IBM Software Assembly Toolkit is an economical and flexible tool that enables you to choose only those products required for your particular solution. Deployment wizard Figure 12-32 shows the IBM Software Assembly Toolkit deployment wizard that is an easy-to-use tool for deploying solutions. Figure 12-32 The IBM Software Assembly Toolkit Deployment wizard The deployment wizard helps you deliver a solution to target computers. The deployment wizard offers an interface that helps you deploy a solution task-by-task. For example, you can select individual applications in a solution and deploy them on an as-needed basis. You can also use the deployment wizard to deploy solutions to remote computers. You can also start the deployment wizard and deploy a solution directly from one or more CDs or DVDs. The IBM Software Assembly Toolkit developer provides an export function that creates CD images in such a “solution launcher” format. 374 Embedding IBM Informix 12.7.2 IBM Software Assembly Toolkit usage scenario The best way to understand IBM Software Assembly Toolkit is to examine a typical usage scenario. The scenario simplifies integration and deployment of a full solution with your application. Scenario: Integration and deployment of a full solution This scenario (shown in Figure 12-33) provides a high level, end-to-end composite view of all the basic steps to create a complete solution. Figure 12-33 IBM Software Assembly Toolkit end-to-end scenario Chapter 12. IBM Informix appliances 375 Example: Delivering an integrated Informix based HA solution This example depicts an integrated Informix based HA solution. IBM Software Assembly Toolkit basically supports a simple install of all components required to deploy the whole setup at a customer site, as shown in Figure 12-34. Figure 12-34 Delivering an integrated Informix HA solution with IBM Software Assembly Toolkit 12.7.3 Summary Designed to reduce the time to value for solution providers and their customers, the IBM Software Assembly Toolkit provides the functions that let you deliver easy-to-deploy solutions with a single installation of all IBM middleware, plus your application, that can be deployed locally on one system or remotely on one or more systems. 376 Embedding IBM Informix A Appendix A. SQL administration commands and scripts This appendix includes a full set of SQL adminstration API commands and an example about using those commands to configure an instance. © Copyright IBM Corp. 2011. All rights reserved. 377 SQL adminstration API commands The SQL adminstration API commands can be categorized as follows: Compression – compress Configuration – – – – onmode and wf onmode and wm set onconfig memory set onconfig permanent Data, partition, and extent management – – – – – check data check extents check partition drop blobspace print partition Enterprise replication – cdr High availability configuration management and configuration – – – – – – – – – – – – ha ha ha ha ha ha ha ha ha ha ha ha make primary rss rss add rss delete sds clear sds set set idxauto set ipl set primary set secondary set standard set timeout Listen thread management – start listen – stop listen – restart listen Logging management – add log – alter logmode 378 Embedding IBM Informix – alter plog – set sbspace logging Memory control – add memory Mirroring control – start mirroring – stop mirroring – add mirror Parallel database query (PDQ) configuration – set dataskip Server mode controls – – – – – – – – – – – – – – – – – – – – onmode and c onmode and a onmode and C onmode and d onmode and D onmode and e onmode and F onmode and j onmode and l onmode and m onmode and M onmode and n onmode and O onmode and p onmode and Q onmode and r onmode and S onmode and W onmode and Y onmode and Z Space management – – – – – – – – – add chunk create chunk create tempdbspace create blobspace create sbspace create dbspace drop dbspace drop sbspace drop tempdbspace Appendix A. SQL administration commands and scripts 379 – – – – – – – drop chunk repack shrink alter chunk rename space clean sbspace set chunk Storage provisioning – – – – – – – – – – – – – – – – – – – – – add bufferpool storagepool add storagepool delete storagepool modify create blobspace from storagepool create chunk from storagepool create dbspace from storagepool create sbspace from storagepool create tempdbspace from storagepool drop tempdbspace to storagepool drop chunk to storagepool drop sbspace to storagepool drop dbspace to storagepool drop blobspace to storagepool set sbspace accesstime set sbspace avg_lo_size modify chunk extend modify chunk extendable modify chunk extendable off modify space expand modify space sp_sizes SQL tracing – – – – – set set set set set sql sql sql sql sql tracing tracing database tracing session tracing user user tracing Miscellaneous commands – – – – – 380 archive fake checkpoint reset sysadmin scheduler print error Embedding IBM Informix Script to build an instance Example A-1 shows the sequence of SQL and ontape commands used to create the storage pool, storage spaces, and log files for an IBM Informix instance. This is just one example. Many other SQL or command sequences are possible. All of these actions except creating the storage pool entries can also be done using onspaces, onparams, and ontape. In that case, none of the storage spaces could be automatically allocated or expanded. Note: Before the original logical logs can be dropped, they must be archived. That is the purpose of the ontape -a command midway throughout the script. If the LTAPEDEV parameter had been NUL (or /dev/null), then this would not have been required. However, the logs would then not be available for a recovery. Example A-1 Building an instance $ dbaccess -e sysadmin bldinstance Database selected. select task("create dbspace", "physdbs", "C:\IFMXDATA\ifx1170\dbspaces\physdbs", 50176, 0) as plog from sysmaster:sysdual; plog Space 'physdbs' added. 1 row(s) retrieved. select task("create dbspace", "logdbs", "C:\IFMXDATA\ifx1170\dbspaces\logdbs", 61440, 0) as llog from sysmaster:sysdual; llog Space 'logdbs' added. 1 row(s) retrieved. select task("modify chunk extendable", "1") as expandroot from sysmaster:sysdual; expandroot Chunk 1 is now extendable. 1 row(s) retrieved. execute function task ("storagepool add", "/ifmxdata/ifx1170/pool1", "0", "1000 MB", "150 MB", "2"); (expression) Succeeded: Space added to storage pool Appendix A. SQL administration commands and scripts 381 1 row(s) retrieved. execute function task ("storagepool add", "/ifmxdata/ifx1170/pool2", "0", "0", "150 MB", "1"); (expression) Succeeded: Space added to storage pool 1 row(s) retrieved. EXECUTE FUNCTION task("create dbspace from storagepool", "dbdbspace", "155 MB", "0"); (expression) Space 'dbdbspace' added. Chunk 4 is now extendable. 1 row(s) retrieved. EXECUTE FUNCTION task("create dbspace from storagepool", "tbldbs", "155 MB", "0"); (expression) Space 'tbldbs' added. Chunk 5 is now extendable. 1 row(s) retrieved. EXECUTE FUNCTION task("create dbspace from storagepool", "idxdbs", "155 MB", "0"); (expression) Space 'idxdbs' added. Chunk 6 is now extendable. 1 row(s) retrieved. EXECUTE FUNCTION task("create sbspace from storagepool", "s9_sbspc", "94 MB", "0"); (expression) Space 's9_sbspc' added. 1 row(s) retrieved. EXECUTE FUNCTION task("create tempdbspace from storagepool", "tempdbs", "61 MB", "0"); (expression) Space 'tempdbs' added. Chunk 8 is now extendable. 1 row(s) retrieved. select task("alter plog", "physdbs", "49152")as updcfg from sysmaster:sysdual; updcfg 382 Successfully altered physical log.\n** WARNING ** Because the physical log has been modified, a level 0 archive must be taken of the following spaces before an incremental archive wil l be permitted for them: physdbs (see Dynamic Server Administrator's manual) Embedding IBM Informix 1 row(s) retrieved. select task("add log", "logdbs", "9216", "6")as mvlog from sysmaster:sysdual; mvlog Added 6 Logical Log(s) to dbspace logdbs. 1 row(s) retrieved. select task("onmode", "l")as addlog from sysmaster:sysdual; addlog Log switch complete 1 row(s) retrieved. select task("onmode", "l")as addlog from sysmaster:sysdual; addlog Log switch complete 1 row(s) retrieved. select task("onmode", "l")as addlog from sysmaster:sysdual; addlog Log switch complete 1 row(s) retrieved. select task("onmode", "l")as addlog from sysmaster:sysdual; addlog Log switch complete 1 row(s) retrieved. select task("onmode", "l")as addlog from sysmaster:sysdual; addlog Log switch complete 1 row(s) retrieved. select task("onmode", "l")as addlog from sysmaster:sysdual; addlog Log switch complete 1 row(s) retrieved. Appendix A. SQL administration commands and scripts 383 select task("onmode", "c")as chkpt from sysmaster:sysdual; chkpt Checkpoint Completed 1 row(s) retrieved. Database closed. $$ ontape -a Performing automatic backup of logical logs. File created: /panther/logbackups\IBM-1F3E4A9186F_87_Log0000000001 File created: /panther/logbackups\IBM-1F3E4A9186F_87_Log0000000002 File created: /panther/logbackups\IBM-1F3E4A9186F_87_Log0000000003 File created: /panther/logbackups\IBM-1F3E4A9186F_87_Log0000000004 File created: /panther/logbackups\IBM-1F3E4A9186F_87_Log0000000005 File created: /panther/logbackups\IBM-1F3E4A9186F_87_Log0000000006 File created: /panther/logbackups\IBM-1F3E4A9186F_87_Log0000000007 File created: /panther/logbackups\IBM-1F3E4A9186F_87_Log0000000008 Do you want to back up the current logical log? (y/n) y File created: /panther/logbackups\IBM-1F3E4A9186F_87_Log0000000009 Program over. $ dbaccess -e sysadmin droplogs Database selected. select task("drop log", "1")as droplog from sysmaster:sysdual; droplog Dropped Logical Log 1. 1 row(s) retrieved. select task("drop log", "2")as droplog from sysmaster:sysdual; droplog Dropped Logical Log 2. 1 row(s) retrieved. select task("drop log", "3")as droplog from sysmaster:sysdual; droplog Dropped Logical Log 3. 1 row(s) retrieved. select task("drop log", "4")as droplog from sysmaster:sysdual; droplog 384 Dropped Logical Log 4. Embedding IBM Informix 1 row(s) retrieved. select task("drop log", "5")as droplog from sysmaster:sysdual; droplog Dropped Logical Log 5. 1 row(s) retrieved. select task("drop log", "6")as droplog from sysmaster:sysdual; droplog Dropped Logical Log 6. 1 row(s) retrieved. Database closed. $ Appendix A. SQL administration commands and scripts 385 386 Embedding IBM Informix B Appendix B. IBM Informix Version 11.50 installation and configuring client connectivity This appendix serves as a reference for users that want to embed Informix Version 11.50. The majority of the content in this appendix has been preserved from the previous version of this book. In this appendix, we discuss Informix Version 11.50 installation and post-deployment considerations, such as configuring client connectivity. © Copyright IBM Corp. 2011. All rights reserved. 387 Informix Version 11.50 installation Although the concept of installation is similar between Informix Version 11.50 and Informix Version 11.70, the procedures are completely different. The command-line options for configuring the installation process is different between the two versions. This section covers the procedure for installing Informix Version 11.50. Technical installation requirements A typical installation of Informix without other products requires a minimum of approximately 430 MB of disk space for a full installation. The disk space required for an IBM Informix Client Software Development Kit (Client SDK) or Informix Connect installation can vary between 105 MB and 180 MB disk space depending on the system and the chosen setup. Throughout this appendix, you learn how to customize those footprint requirements down to a low level, which can be suitable for deeply embedding Informix in applications that only need specific and well defined Informix server functionality. Installing Informix Version 11.50 on Windows requires that your system has at least 128 MB of RAM (however, 256 MB is recommended). The stated memory requirement does not account for the possible usage of other applications already on your system. If you have other applications running on your system, you need to account for system memory accordingly. You must also be logged in as a member of the Administrator group when installing on Windows. On UNIX or Linux, you must be logged in as the root user and ensure that you have Java Runtime Version 1.4.2 or higher. Before starting the installation, be sure that you have the correct Informix media for the operating system on which you want to install Informix. Interactive installations methods The following interactive installation methods for Informix server and the Client SDK are available on UNIX and Linux. 388 Embedding IBM Informix Launchpad The ids_install command launches a user interface that can be used to install the Informix server and one or more products that are bundled with it. You can select which products are installed, and the appropriate installation applications are launched sequentially. If you prefer, you can run an installation command in silent mode. For a simple and easy approach, the default configuration file for silent installation (included with the installation media) can be used. The launchpad also provides quick links to the release notes, the Dynamic Server Installation Guide, and the IBM Informix Information Center. Installation scripts The installserver, installcon, and installclientsdk command scripts start installation applications that can be used to install and configure individual products. These commands can be run in silent mode. Typical and custom installation options A typical setup uses existing defaults, while a custom setup lets you exclude unnecessary product features to enable a minimal installation footprint. The custom installation option in combination with the Informix deployment Wizard allow granular configuration of the database footprint. GUI or console mode installation The GUI mode is the default mode on Windows, while the console mode is the default on UNIX or Linux. Note that console mode installation is not supported on Windows. To execute the installer in GUI mode on UNIX or Linux, use the -gui option, as shown in the following examples: install_ids -gui installserver -gui Appendix B. IBM Informix Version 11.50 installation and configuring client connectivity 389 Custom installations and the Deployment Wizard To minimize the installation footprint, you need to perform the installation in custom mode and use the deployment wizard to select the features. Figure B-1 shows the window where you select the installation type. Figure B-1 Custom installation selection window 390 Embedding IBM Informix Figure B-2 shows the feature selection window where you can customize the installation footprint. Figure B-2 Features in the Informix deployment wizard The installation footprint of Informix (just the server, without the Client SDK) can vary from about 279 MB for a complete installation to about 89 MB (measured on a 32-bit Linux or Intel-based system). Silent installation When the required information is provided in the response file, the installer uses the response file as the source of its input. This input takes the place of the information supplied in the graphical or console interface. The response file inputs are acquired by running an installation and recording it. Recording a Windows response file Recording a response file requires launching the installer/uninstaller from the command line in graphical (interactive) mode and passing the -r or /r option. Enter the input information into the windows and the input will be recorded in the response file. See the following commands as an example: setup.exe -r Appendix B. IBM Informix Version 11.50 installation and configuring client connectivity 391 The following command creates the response file called setup.iss in the Windows folder of the system: setup.exe -r -f1”C:\TEMP\myResponseFile.ini” This command includes the option of specifying the name and location of the response file to be recorded. You can use the optional -f1 command-line option with the path to response file. The syntax for the command has no space between -f1 and C:\TEMP\myResponseFile.ini. You can specify a name other than setup.iss for the response file. A response can also be recorded while the installation/uninstallation is being logged, as shown in the following example: setup.exe -r -f1”C:\TEMP\myResponseFile.ini” -f2”C:\TEMP\myLog.log” In this example, logging is done by C:\TEMP\myLog.log. Performing a silent installation on Windows After a response file has been created, it can be used to install Informix across different machines. To accomplish this task, you need to launch the Informix installer application in silent mode using the -s or /s command-line option. In addition, the absolute path of the response file can be passed using the -f1 command-line option. This is further illustrated in the following examples: setup.exe -s This command launches the Informix installer in silent (unattended) mode. By default, an installer application log file will be created in the same directory as setup.exe and will be called setup.log if no log file path is specified. As with the setup.exe -r command, if no response file is specified, the installer attempts to use setup.iss from the directory in which setup.exe resides. To specify another location for the installer log file, use the -f2 command-line option and pass an absolute path for the preferred location of the log file. setup.exe -s -f2"C:\TEMP\myLog.log" This command launches the Informix installation application in silent mode and writes the installer log to C:\TEMP\myLog.log. setup.exe -s -f1"C:\TEMP\myResponseFile.ini" -f2"C:\TEMP\myLog.log" This command launches the installer in silent mode using C:\TEMP\myResponseFile.ini as the response file from which installer input is to be gathered and generates the installer log in C:\TEMP\myLog.log. 392 Embedding IBM Informix If a response file cannot be located, the installer application exits and the following error code will appear in the log file: ResultCode=-5 A full list of Windows silent installation error codes are shown in Table B-1. Table B-1 Informix silent installation error codes Code Description 0 Success. -3 Required data not found in the response file. -5 Response file does not exist. -6 Cannot write to the response file. -7 Unable to write to the log file. -8 Invalid path to the Install Shield Silent response file. -9 Not a valid list type (string or number). -10 Data type is not valid. -11 Unknown error during setup. -51 Cannot create the specified folder. -52 Cannot access the specified file or folder. -53 Invalid option selected. Uninstalling After an application is installed, you want the capability to remove the application files and other entries made by the application when they are no longer needed. The uninstaller can be launched interactively using one of the following three methods: Modify the installation by selecting Start All Programs IDS. Use setup.exe from the Informix media CD/media download content. Use the Add or Remove Programs function under the Control Panel. If the uninstaller is launched using the first or second methods, select the Remove radio button to uninstall. Appendix B. IBM Informix Version 11.50 installation and configuring client connectivity 393 You can choose to uninstall a specific installation of Informix. This function is useful in situations where you have multiple Informix installations on a single Windows machine. To invoke the uninstaller for a specific installation on Windows, use the -path command-line option with setup.exe. This option takes the desired installation directory as a parameter, as shown in the following example: setup.exe -s -path C:\informix -f1"C:\TEMP\uninst.ini" -f2"C:\TEMP\uninst_log.log" In this example, maintenance for the Informix installation in C:\informix will be launched in silent mode. If an uninstallation response file had been recorded in C:\TEMP\uninst.ini, the installation will be uninstalled. The uninstallation will be logged in C:\TEMP\uninst_log.log. Modifying a Windows response file To modify a response file, open the response file with an editor of your choice (for example, Notepad). The response file contains some entries that can be modified and some that should not be modified. Therefore, care should be taken when modifying this file. Entries in the Windows response file that can be modified are shown in Table B-2. Table B-2 Windows silent installation response file entries 394 Sample response file entry Description Accept License Agreement=0 This entry can be either 1 or 0. 1: Indicates that the License agreement has been accepted. 0: Indicates that the License Agreement has been declined. Set this value to 1 if you have read and want to accept the License Agreement. szDir=C:\TEMP\myInstallatio n Informix installation directory. User=<Machine>\informix User account information for the installation. For example, provided that your system is on a domain and you have opted to install in a domain, specify which domain to install Informix. You must have domain administrator privileges to install Informix on a domain. Embedding IBM Informix Sample response file entry Description Install in Domain=0 This entry can be either 1 or 0. 1: Indicates that the installation is to be done on the domain. 0: Indicates that the installation will done on the local machine. Start database server as a Local System User=0 This entry allows users to start the Informix server using the local system user account instead of starting the Informix server using the informix user account. While administrative privilege is needed to install Informix, the informix user account will not be needed to work with Informix Do not create user informix account=0 This entry can be either 1 or 0. 1: Indicates you do not want the informix user created. 0: Indicates that you want informix user created. Password=<Informix Password> If you have opted for the informix user to be created, the value of this entry is the informix user password. Confirm Password=<Confirm Password> If you have opted for the informix user to be created, this value of this entry is the informix user password. Enable Role Separation=0 This entry can be either 1 or 0. 1: Enables role separation. If you enable role separation, you can assign certain database administrative tasks to existing users and groups. 0: Indicates that role separation is not enabled. DBSA Group Account=Informix-Admin If role separation is enabled, this entry reflects the group account that is assigned the Database System Administrator role. DBSSO Group Account=ix_dbsso If role separation is enabled, this entry reflects the group account that is assigned the Database System Security Officer role. DBSSO User Account=DBSSO If role separation is enabled, this entry reflects the user account that is assigned the Database System Security Officer role. DBSSO Password=<DBSSO Password> If role separation is enabled, this entry holds the password for the Database System Security Officer user account. Appendix B. IBM Informix Version 11.50 installation and configuring client connectivity 395 396 Sample response file entry Description Confirm DBSSO Password=<Confirm DBSSO Password> Use this entry to confirm the password for the Database System Security Officer user account. AAO Group Account=ix_aao If role separation is enabled, this entry reflects the group account that is assigned the Auditing Analysis Officer role. AAO User Account=AAO If role separation is enabled, this entry reflects the group account that is assigned the Auditing Analysis officer role. AAO Password=<AAO Password> If role separation is enabled, this entry holds the password for the Auditing Analysis Officer user account. Confirm AAO Password=<Confirm AAO Password> Use this entry to confirm the password for the Auditing Analysis Officer user account. Informix Users Group Account=ix_users If role separation is enabled, this entry holds the group account for database users. Server Name=ol_svr_custom This entry holds the database server name. Service Name=svc_custom This entry holds the database service name. The service name has an associated port number, as indicated in the System’s services file. Port=9088 The port number through which a database connection will be established. Server number=2 A unique server number identifying the server instance. The max server number is 255. Initialize Server=1 This entry can be either 1 or 0. 1: Indicates that a database instance will be created and initialized automatically by the installer. 0: Indicates that a database instance will not be created and initialized by the installer. Enable DRDA Support=0 This entry indicates whether DRDA is enabled to facilitate communication of the Informix database server and applications across different platforms. Server Alias=ol_svr_custom_drda The server alias if DRDA is enabled. DRDA Port=9089 The DRDA port number. Embedding IBM Informix Sample response file entry Description DBSpace Name=ol_svr_custom The name for the Informix server data storage location. Primary Data Location=C: The Informix server data storage location drive. Mirror Data Location (optional)=' ' the mirror location for Informix data storage. Size (MB)=200 The initial size for Informix data storage. SBSpace Name=sbspace The name for smart large object storage location. SBSpace Primary Data Location=C: The smart large object storage location drive. SBSpace Mirror Data Location (optional)=' ' The mirror location for smart large object data storage. SBSpace Size (MB)=200 The initial size for smart large object storage. The response file for repairing, modifying, or uninstalling Informix can also be modified to reflect desired inputs. Recording a UNIX response file A response file can be used when performing a silent installation on UNIX operating systems. To record an Informix server product response file, launch the installer contained in the SERVER directory using the -record command-line option, as shown in the following example: installserver -record /tmp/inst.ini As the example suggests, this command must be invoked from the directory containing the installserver script. An alternative option is to call the installation command with the absolute path to the installation script if you want to run it from a specific directory, as shown in the following example: media_location/SERVER/installserver -record /tmp/inst.ini These commands launch the installer and create a response file in /tmp/inst.ini when the installer exits. For a response to be created, the installation must be run to completion, that is, if the installation is terminated prematurely, a response file will not be created. The following command shows an example: installserver -record /tmp/myResponseFile.ini -log /tmp/myLog.log Appendix B. IBM Informix Version 11.50 installation and configuring client connectivity 397 This command launches the installer and creates a response file in /tmp/myResponseFile.ini and an installer log file is created in /tmp/myLog.log. Similarly, uninstallation on UNIX platforms can be performed using a response file or using the default values in the uninstaller. To record an uninstall response file, launch the uninstaller in interactive mode with the option to record and the location of the response file to be recorded. To record a response file on UNIX, run the following command: java -jar uninstall_ids1150/uninstall.jar -swing -options -record /tmp/uninst.ini This command launches the uninstaller in graphical mode and creates a response file in /tmp/uninst.ini. Performing a silent installation on UNIX To perform a silent installation without a response file, run the following command: installserver -silent The command as presented will not successfully install Informix because the license agreement in the installer is not accepted by default. To install Informix silently without using a response file, run the following command: installserver -acceptlicense=yes -silent If you run the installserver command without the absolute path to the script, you need to be positioned in the current directory containing the script. Also, as an alternative, you can run installserver from another directory if you indicate the complete path to the installserver script. As an example, the following command is a valid way to call the script: media_location/SERVER/installserver -silent -acceptlicense=yes The default installation directory is the value of the $INFORMIXDIR environment variable. If $INFORMIXDIR is not set, Informix will be installed in /opt/IBM/informix. See Table B-3 on page 399 for the default installer entries. To use a recorded response file, launch the installer and use the -silent command-line option and the response file, as shown in the following command: installserver -silent -options /tmp/inst.ini 398 Embedding IBM Informix This command launches the installer in silent mode using the response file located in /tmp/inst.ini. Because a response file is used in the example, the license agreement must be accepted in the response file for installation to proceed. Uninstalling To perform an uninstallation, you must be logged in as the root user to launch the Informix uninstaller. Just as with the silent installation, a response file can be used for the uninstallation, but it is not always needed. If a response file is not used, all features will be uninstalled. See the following command to run the uninstaller in silent mode without a response file. From $INFORMIXDIR, run the following command: java -jar uninstall_ids1150/uninstall.jar -silent The following command is for running the uninstaller in silent mode using a response file. From $INFORMIXDIR, run the following command: java -jar uninstall_ids1150/uninstall.jar -silent -options /tmp/uninst.ini This command launches the uninstaller in silent mode using the response file located in /tmp/uninst.ini. Modifying a UNIX response file Table B-3 shows the entries in a sample (default) UNIX response file. Entries in the tables have different types based on the value expected. For example, there are Boolean types, string types, and integer types. Table B-3 UNIX silent installation response file entries Sample response file entry Description -G licenseAccepted=false -P installLocation="/opt/IBM/informix" True: Indicates that the License Agreement has been accepted. False: Indicates that the License Agreement has been declined. The Informix Installation directory. If the $INFORMIXDIR environment variable is set, the default Informix installation directory will be the value of $INFORMIXDIR. Appendix B. IBM Informix Version 11.50 installation and configuring client connectivity 399 Sample response file entry Description -W setupTypes.selectedSetupTypeId=typic al Installation setup type. This entry can either be typical or custom. Custom: Allows user to select desired features from the feature list (Deployment Wizard). Typical: Installs all Informix features. Modifying the feature entries will have no effect. -P IDS-CORE.active=true The core database server for basic DBA operations. It does not include optional extensions, libraries, or utilities. Setting this entry to “true” indicates that this feature will be enabled (installed). -P serverfeature.active=true Database server extensions and DBA tools and programming extensions. Set the value to true to install this feature. -P IDS-KRAKATOA.active=true This feature is used for writing user-defined routines for Informix in Java. Set the value to true to install this feature. -P IDS-BLADE.active=true This feature includes Informix built-in DataBlade modules. Set the value to true to install this feature. -P IDS-CONVREV.active=true This feature is for conversion and reversion support. This framework is required for migrating to and from other versions of Informix. Set the value to true to install this feature. -P IDS-XMLPUB.active=true This feature is used to publish SQL queries as XML. Set the value to true to install this feature. -P IDS-GLS.active=true The Global Language Support feature is used to support languages, cultural conventions, and code sets. This feature is not needed if the default locale uses American English. Set the value to true to install this feature. -P IDS-WESTEURO.active=true This feature includes locales for Danish, Dutch, English, Finnish, French, German, Icelandic, Italian, Norwegian, Portuguese, Spanish, and Swedish. Set the value to true to install this feature. -P IDS-EASTEURO.active=true This feature includes locales for Czech, Polish, Russian, and Slovak. Set the value to true to install this feature. -P IDS-CHINESE.active=true This feature includes traditional Chinese and simplified Chinese locales. Set the value to true to install this feature. -P IDS-JAPANESE.active=true This feature includes Japanese locales. Set the value to true to install this feature. 400 Embedding IBM Informix Sample response file entry Description -P IDS-KOREAN.active=true This feature includes Korean locales. Set the value to true to install this feature. -P IDS-PACIFIC.active=true This feature includes Thai locales. Set the value to true to install this feature. -P backuprestorefeature.active=true Utilities for backing up and restoring database server data. Set the value to true to install this feature. -P IDS-ONBAR.active=true This feature includes the means to customize backup and restore operations and checks storage-manager. This feature will install the onbar script, which is an editable shell script that starts the onbar-driver. Set the value to true to install this feature. -P IDS-TSM.active=true For implementing XBSA functions that use Tivoli Storage Manager with onbar. Set the value to true to install this feature. -P IDS-ISM.active=true Informix Storage Manager is used for managing external storage devices and media that contain backups. Set the value to true to install this feature. -P IDS-ARCHECKER.active=true For verifying backups and restoring portions of a database, a table, a portion of a table, or a set of tables. Set the value to true to install this feature. -P IDS-DEMO.active=true This feature installs demonstration databases and examples. Set the value to true to install this feature. -P dataloadutilitiesfeature.active=true For efficient loading and unloading data in certain configurations. Set the value to true to install this feature. -P IDS-ONUNLOAD-ONLOAD.active=true For BINARY unloading and loading data into a database. Set the value to true to install this feature. -P IDS-DBLOAD.active=true For loading data into databases or tables that Informix products created. Use the dbload utility to transfer data from one or more text files into one or more existing tables. Set the value to true to install this feature. -P IDS-HPL.active=true The High Performance Loader feature is used for loading and unloading large quantities of data efficiently to or from a database. Set the value to true to install this feature. -P IDS-ER.active=true The enterprise replication feature is used for replicating data between Informix database servers. Set the value to true to install this feature. Appendix B. IBM Informix Version 11.50 installation and configuring client connectivity 401 Sample response file entry Description -P adminutilitiesfeature.active=true Additional administrative utility feature sets. Set the value to true to install this feature. -P IDS-PERF.active=true For monitoring performance using the ON-Monitor and onperf utilities. Set the value to true to install this feature. -P IDS-MONITOR.active=true This is the miscellaneous monitoring utilities feature. It can be used for displaying the logical log by using the onlog utility or managing the database server with SNMP by using the onsnmp utility. Set the value to true to install this feature. -P IDS-AUDIT.active=true Auditing utilities feature for administering audit masks, trails, and other auditing information about the database server by using the onaudit and onshowaudit utilities. Set the value to true to install this feature. -P IDS-DBATOOLS.active=true Database Import and Export utilities used for unloading a database into text files, creating and populating a database from those text files, or unloading a database schema into a text file. Set the value to true to install this feature. -W rolesepenable.roleSep="off" This entry used to enable or disable role separation. If you enable role separation, you can assign certain database administrative tasks to existing users and groups. Set the value to on to enable role separation. -W rolesep.dbsso_g="informix" This entry holds the group that is assigned the Database System Security Officer role. If using a group other than informix, ensure that the group is present on the system. -W rolesep.aao_g="informix" This entry holds the group that is assigned the Auditing Analysis Officer role. If using a group other than informix, ensure that the group is present on the system. -W rolesep.user_g="" This entry holds the group account for database users. The value of this entry must be an existing group on the system. -W demoinput.CreateDemo="nocreate" 402 Embedding IBM Informix create: Indicates a demonstration database server is created during installation. The demonstration database contains a working Informix instance of the packaged demo databases. nocreate: Indicates that the demonstration database serveris not created by the installer. Sample response file entry Description -W demoinput2.preonconfig="no" This entry indicates whether or not to use a pre-existing configuration file. If you have a configuration that has been modified to suit your needs, indicate that you want to use it by setting the value of this entry to yes. If the value of this entry is set to yes a valid file must be provided in the following entry. -W demoinput3.onconfig="" Provide the path to the configuration file to be used for your demonstration database server. This entry is only used if the value of the preceding entry is set to yes. -W demoinput4.ServerName="demo_on" Server name for the demonstration database server. -W demoinput4.ServerAlias="" Server alias for the demonstration database server if DRDA is desired. -W demoinput4.ServerNumber="0" Server number for the demonstration database server. The server number should be an integer between 0 and 255. -W demoinput4.rootpath= "demo/server/online_root" The full path to the storage area of the root dbspace for the Informix demonstration database server. If it is left set as provided in this table, the root dbspace will be created in $INFORMIXDIR/demo/server/online_root. -W demoinput4.rootsize=200000 The size (KB) of the root dbspace for the Informix demonstration database server. -W demoinput4.bufferpool="size=2k,buffe rs=1000,lrus=8,lru_min_dirty=50, lru_max_dirty=60" The non-default buffer pool information for the Informix demonstration database server. -W demoinput4.numcpuvps=1 The number of CPU VPSs to configure for the Informix demonstration database server. -W TermSel.TermSelection="skip" The terminal to be launched after a successful installation and creation of a demonstration database server. Valid values are as follows: xterm dterm other skip Enter skip to ignore launching a terminal for your demo database. If any of the other values is provided. ensure that your system is configured to launch the desires terminal. Appendix B. IBM Informix Version 11.50 installation and configuring client connectivity 403 Sample response file entry Description -W ManualSel.otherTermInput="/usr/bin/x term" The user preferred terminal to be launched. The value of this entry will be the full path to the desired terminal application. The value of the preceding entry must be set to other for this entry to take effect. Use the # (pound symbol) to precede a comment in the response file. If any of the response file entries are removed or deactivated (by commenting them out), the default installer value will be used. For example, if -P installLocation=”<install_location>” is removed from the response file, the value of the $INFORMIXDIR environment variable will be used as the default value for the installation location. If $INFORMIXDIR is not set in the environment, /opt/IBM/informix will be used as the default installation location. For users embedding Informix, to install Informix in the preferred location, if using the installer, set $INFORMIXDIR in the application launching the installer and make sure that the line setting the install location of Informix server in the response file is deactivated (by commenting it out) or removed. Setting $INFORMIXDIR in the application launching the Informix installer ensures that the installer (launched as a sub-process to the application) inherits its environment and consequently inherits the value of $INFORMIXDIR. For more information about default response files, see the product documentation at the following locations: For UNIX and Linux, see the following website: http://publib.boulder.ibm.com/infocenter/idshelp/v115/index.jsp?topic=/com. ibm.igul.doc/ids_in_051x.htm For Mac OS X, see the following website: http://publib.boulder.ibm.com/infocenter/idshelp/v115/index.jsp?topic=/com. ibm.igul.doc/ids_in_063x.htm Installing multiple copies of Informix Let us assume that you are embedding the Informix database server in an application, but different groups of clients need different Informix configurations. In such situations, you might want to install multiple copies of Informix server with the different configurations on your template machine. 404 Embedding IBM Informix The installation of multiple copies of Informix is described for the following two environments: UNIX-based platforms If running in silent mode, prior to running the installer, ensure that you pick unique values for Server Name, Server Number, and Rootpath in the response file. These values must not have been used by another installation. See Table B-3 on page 399 for the default installer values. If running the installer in interactive mode, you will be prompted for values that require uniqueness. Windows As of Informix Version 11.50.xC2, you can use the Informix installer to install multiple copies of Informix on a single machine. In addition to installing multiple copies of Informix on a single Windows machine, you can create several instances per installation. To install multiple copies of Informix in interactive mode, from the Informix media, run setup.exe as you would for first-time installation. If there are existing installations of the same Informix version installed using the Informix installer, you will be presented with a window similar to the one in Figure B-3. Figure B-3 Detected installations window Appendix B. IBM Informix Version 11.50 installation and configuring client connectivity 405 To perform a subsequent installation in silent mode, run setup.exe with the -multiple command-line option along with the silent installation command-line options shown in the following command: setup.exe -multiple -s -f1”C:\TEMP\myResponseFile.ini” This command launches the installer in silent mode using the response file C:\TEMP\myResponseFile.ini. Client applications Client applications allow connectivity and facilitate using client APIs to write applications for Informix. The silent installation procedure for the client applications in Informix Version 11.50 is described below. Installing Client SDK and Informix Connect on Windows Client SDK and Informix Connect are packaged with Informix in <media_dir>\CSDK and <media_dir>\ICONNECT, where <media_dir> is the top directory containing Informix and other packaged applications. To perform silent installation, run the command shown in Example B-1 from <media_dir>\CSDK or <media_dir>\ICONNECT, depending on the product you want to install. Example B-1 Client SDK and Informix Connect silent installation using msiexec.exe msiexec.exe /i “C:\tmp\CSDK\IBM Informix Client-SDK.msi” /qn INSTALLDIR=C:\tmp\CSDK_Installation /L*v C:\tmp\log.txt In this command, the Client SDK installer is launched to install Client SDK in silent mode, indicated by /qn, into C:\tmp\CSDK_Installation. The installation is performed using the msi package C:\tmp\CSDK\IBM Informix Client-SDK.msi. /L*v C:\tmp\log.txt indicates that the verbose installation log will be written into C:\tmp\log.txt. If INSTALLDIR is not specified on the command line, Client SDK will be installed in <SYSTEM_DRIVE>\Program Files\IBM\Informix\Client-SDK, and Informix Connect will be installed in <SYSTEM_DRIVE>\Program Files\IBM\Informix\Connect. 406 Embedding IBM Informix In addition to using the .msi file to launch the installer, you can also use setup.exe to launch the installer in silent mode, as shown in Example B-2. Example B-2 Client SDK/Informix Connect silent installation using setup.exe setup.exe /s /v”INSTALLDIR=”C:\tmp\CONNECT_Installation” /qn /L*v ”C:\tmp\log.txt”” This command launches the Informix Connect installer in silent mode using setup.exe /s, indicating that the initialization dialog should be hidden. /v indicates that the parameters enclosed in the quotation marks should be passed to msiexec.exe. Example shows the msiexec.exe invoked with command-line options for the same installation scenario. Example B-3 Client SDK/Informix Connect silent uninstallation using msiexec.exe and msi package msiexec.exe /x “C:\tmp\CSDK\IBM Informix Client-SDK.msi” /qn /L*v C:\tmp\log.txt Uninstalling Client SDK and Informix Connect on Windows Client SDK and Informix Connect can be uninstalled in silent mode using either setup.exe or Windows msiexec.exe. Example shows the silent uninstallation of Client SDK and Informix Connect. The command can be invoked with the full path to the msi package, or with the product Global Unique Identifier (GUID). To uninstall Client SDK and Informix Connect silently using the product GUID, use the command shown in Example B-4. Example B-4 Client SDK 3.50 silent uninstallation using msiexec.exe and product GUID msiexec.exe /x {A56F9ADF-51FE-48C5-9EF5-97B87F87A210} /qn /L*v C:\tmp\log.txt Using the product GUID for uninstallation can be useful in embedded situations where the msi package may not be accessible for uninstallation and accessing the Add/Remove Programs list will require interaction to access the uninstaller. The GUID in Example B-4 is specific for Client SDK 3.50. To perform a similar uninstallation for Informix Connect 3.50 in silent mode using the product GUID, run the command in Example B-5. Example B-5 Informix Connect 3.50 silent uninstallation using msiexec.exe and product GUID msiexec.exe /x {6F3FC441-AD7E-4585-9472-99B5A3848C49} /qn /L*v C:\tmp\log.txt Appendix B. IBM Informix Version 11.50 installation and configuring client connectivity 407 Installing Client SDK and Informix Connect on UNIX The Client SDK/Informix Connect installers are Java-based, and the media includes launchers for the installers called installclientsdk (for Client SDK) and installconn (for Informix Connect). The launchers require Java Runtime 1.4.2 or later. These launchers perform preliminary checks on the system to ensure that the system path contains a valid Java Runtime version, and extracts a bundled Java Virtual Machine (JVM) if a valid Java Runtime version is not found on the system. The launcher also enforces that the installer is run as root user and that there is sufficient space to extract the bundled JVM if needed. To use the Client SDK and Informix Connect launcher, ensure that you are in the same directory as the launcher. The following command shows how to launch the Informix Connect installer in silent mode: installconn -silent -acceptlicense=yes In the example, -acceptlicense=yes indicates that the license agreement is accepted and the installation will proceed with the default installer entries. By default, all Client SDK and Informix Connect features will be installed. If the $INFORMIXDIR environment variable is set, the product will be installed in $INFORMIXDIR; otherwise, it will be installed in the current directory. To enable or disable any of the three features contained in Client SDK and Informix Connect, use these command-line options as desired: -P clientfeature.active=true (to enable the client feature) -P clientfeature.active=false (to disable the client feature) -P messagefeature.active=true (to enable the message feature) -P messagefeature.active=false (to disable the message feature) -P glsfeature.active=true (to enable the gls feature) -P glsfeature.active=false (to disable the gls feature) The following code is an example of a full command: installconn -silent -acceptlicense=yes -P glsfeature.active=false This command installs Informix Connect in silent mode with the license agreement accepted and the gls feature disabled, and therefore the gls feature will not be installed. Because the client feature and the message feature are enabled by default, they will be installed. The installation can also be performed using the logging option by including -log <log_file> on the command line, as shown in the following command: installclientsdk -silent -acceptlicense=yes -log /opt/tmp/csdk.log 408 Embedding IBM Informix This command installs Client SDK in silent mode, accepting the license agreement, and creating an installation log in /opt/tmp/csdk.log. Uninstalling Client SDK and Informix Connect on UNIX Installation of Client SDK and Informix Connect on UNIX systems places an uninstallation directory in the installation directory. The directory is called uninstall_csdk for Client SDK and uninstall_conn for Informix Connect. To uninstall Client SDK and Informix Connect on UNIX in silent mode, from the installation directory, run the following command: java -jar uninstall_csdk/uninstall.jar -silent For Informix Connect, the uninstallation directory name should be uninstall_conn. The command can also be invoked using a logging option for the different event types, as shown in Table B-4. For example, to launch the Client SDK uninstaller logging error events in /opt/tmp/csdk_uninst.log, you can run a command similar to the following: java -jar uninstall_csdk/uninstall.jar -silent -log !”/opt/tmp/csdk_uninst.log” @err Table B-4 Installation and uninstallation event arguments and descriptions Event argument Event description err Logs error messages wrn Logs warning messages dbg Logs debug events ALL Logs all events IBM Informix Java Database Connectivity (JDBC) Driver IBM Informix JDBC Driver facilitates client connection to the Informix server in a Java environment. Applications developed in Java can use the JDBC Driver to connect to Informix, and retrieve, query, and update (if permitted) data in an Informix database. The JDBC Driver also facilitates writing User Defined Routines (UDRs) for the database. The JDBC Driver meets Javasoft JDBC specifications, Java data types, and Informix data type compatibility. The JDBC Driver installer depends on the presence of Java Runtime Version 1.4.2 or later. Appendix B. IBM Informix Version 11.50 installation and configuring client connectivity 409 Silent installation of IBM Informix JDBC Driver The installer for the JDBC Driver is Java-based. Therefore, the silent installation procedure is generic across Windows and UNIX platforms. In the Informix media package, the JDBC media is in a directory named JDBC. It contains the setup.jar file, which is the executable jar file needed for installation. To launch the installer, run the following command: java -cp setup.jar run -silent -P product.installLocation=C:\tmp\JDBC_Driver This command launches the JDBC Driver installer in silent mode and installs in C:\tmp\JDBC_Driver. The -P product.installLocation=C:\tmp\JDBC_Driver parameter sets the installation location to C:\tmp\JDBC_Driver. If the installation location is not set on the command line, JDBC Driver is installed in the default location. The default installation location on Windows is C:\Program Files\IBM\Informix_JDBC_Driver, and the default installation location on UNIX systems is /opt/IBM/Informix_JDBC_Driver. The application can also be installed with several logging options, with each option logging a specific event type. Table B-4 on page 409 shows event arguments and descriptions for logging purposes. The following command shows the installation of JDBC Driver in silent mode, logging all events during installation: java -jar setup.jar -silent -P product.installLocation=/opt/tmp/JDBC_Driver -log !”/opt/tmp/jdbc.log” @ALL Uninstallation of IBM Informix JDBC Driver After the JDBC Driver has been installed, the uninstallation directory, created in the installation directory during installation, contains the uninstall.jar executable file for uninstallation. The uninstall.jar executable file can be used to launch an uninstallation in silent mode. To launch the uninstaller in silent mode, run the following command: java -jar $INFORMIXDIR/_uninst/uninstall.jar run -silent This command launches the JDBC Driver uninstaller in silent mode using the jar executable installed along with the application. The $INFORMIXDIR parameter in the command above is the installation location of JDBC Driver. The command can be launched using a logging option, as shown in the following command: java -jar $INFORMIXDIR/_uninst/uninstall.jar -silent -log !"/opt/tmp/jdbc.log" @err 410 Embedding IBM Informix This example launches the uninstaller for the JDBC Driver in silent mode and logs error messages, denoted by @err on the command line, in /opt/tmp/jdbc.log. Additional Informix installation procedures In addition to the standard Informix installation procedure, there are other options that should be considered for an application that uses an embedded Informix database server instance. This section discusses the following additional installation scenarios: The Informix Lightweight Installer for Windows Informix installation on Mac OS X The Informix Lightweight Installer for Windows The Informix Lightweight Installer has been designed to help with embedding Informix on Windows platforms by allowing a pre-configured Informix database instance to be deployed through a simple command-line interface. The Lightweight Installer is a command-line utility designed to be called programmatically, or from a script, as part of an application installation. It completely supports silent Informix deployment. Editing the onconfig file yields the most granularity in configuring an Informix instance. Important: Prior to Informix Version 11.50.xC2, the Lightweight Installer was available at no cost, and as such was not provided or supported by IBM. The file, lwt_install.exe, can be downloaded from the following website: http://www.iiug.org/software/index_MISC.html From Informix Version 11.50.xC2 onward, it is called ifxdeploy. It is installed as part of Informix database server installation and is located in INFORMIXDIR/bin/ifxdeploy. Informix installation on Mac OS X This section highlights and focuses on the steps required to launch the installation application for Informix Version 11.50 on Mac OS X. Appendix B. IBM Informix Version 11.50 installation and configuring client connectivity 411 Installation prior to Informix Version 11.50.xC3 Installation of Informix on Mac OS X, prior to Informix Version 11.50.xC3 was only supported through a graphical installation interface. If you received the media from a download site, the Informix product bundle will contain a disk image file called iif.11.50.F<release>.macosx64.dmg, where <release> denotes the fix pack release. Open this file to uncompress it. The package is called iif.11.50.F<release>.macosx64.pkg, and includes the Informix product suite. The product suite, shown in Figure B-4, includes the Informix server product and the client products. You are allowed to pick which products you want to install from the suite during installation. Figure B-4 Informix Version 11.50.xC2 product suite on Mac OS X If installing from a CD, the package is directly available as presented in Figure B-4. As of Informix Version 11.50.xC3, the capability of launching a specific product installer in the Informix product suite is not available on Mac OS X. To launch installation on Mac OS X, perform the following steps: 1. Double-click the installer package to launch the installer. The naming convention for the package is as follows, where F indicates that the Mac OS X media is a 64-bit media: iif.<major_version>.<minor_version>.F<release>.macosx64.pkg For example, Informix Version 11.50.xC1 package is called iif.11.50.FC1.macosx64.pkg and the Informix Version 11.50.xC2 package is called iif.11.50.FC2.macosx64.pkg. 412 Embedding IBM Informix 2. Enter a computer administrator password when you are prompted for one, as shown in Figure B-5. Figure B-5 Administrative user password prompt on Mac OS X 3. Enter the home directory and password for the informix user account if you are prompted for these credentials Important: Store the password in a secure location. The installer does not prompt for the credentials if the informix user is already present on the machine. 4. Follow the installation steps as directed through the installer prompts. Note: Silent installation is not supported on Mac OS X prior to Informix Version 11.50.xC3. Kernel parameters on Mac OS X can be modified to control system resource usage. The kernel parameter settings are maintained in the /etc/sysctl.conf file and can only be modified by the root user. Informix server requires certain minimum settings on Mac OS X in order for the server to start and function appropriately. During installation, two of the kernel parameters in etc/sysctl.con are checked and modified if necessary. The parameters are as follows: kern.sysv.shmmax=314572800 kern.sysv.shmall=76800 The values of these parameters reflect the minimum settings. Lowering these values further may cause Informix server initialization failure. Appendix B. IBM Informix Version 11.50 installation and configuring client connectivity 413 For more information about kernel parameters settings, see the following website: http://publib.boulder.ibm.com/infocenter/idshelp/v115/index.jsp?topic=/com.ibm. relnotes.doc/ids_1150xc2/ids_machnotes.html Installation as of Informix Version 11.50.xC3 No change has been introduced to the graphical mode installation of Informix Version 11.50.xC3. However, a new templates folder has been added to the image file for silent installation support. Figure B-6 shows the content extracted from the iif.11.50.FC3.macosx64.dmg image file. Figure B-6 Informix Version 11.50.xC3 product suite on Mac OS X The capability of silent installation was not available in Informix on Mac OS X prior to Informix Version 11.50.xC3. This significant change to the Mac OS X installer better facilitates embedding Informix. Although launching the installer of an individual product in the product suite is not fully supported, you can launch the product suite installer and select which products you want to install. See “Installation prior to Informix Version 11.50.xC3” on page 412 for the steps to run the Informix installer on Mac OS X in graphical mode. Note: If installing in silent mode, selectively picking features for each product in the product suite response file will have no effect. As long as the product is selected, all features of the product will be installed. This is a known problem and has been addressed in later versions of Informix. To perform a silent installation of Informix Version 11.50.xC3, after the content of the image file has been extracted, perform the following steps as the root user: 1. Double-click the templates folder shown in Figure B-6. 2. Copy the bundle.ini template response file to the home directory. 414 Embedding IBM Informix 3. Modify bundle.ini in your home directory to suit your needs. Remember to accept the license agreement in the response file (refer to Table B-3 on page 399). 4. From the directory containing iif.11.50.FC3.macosx64.pkg, run the following command, where / is the root partition in which $INFORMIXDIR (the Informix installation directory) will be located: installer -pkg iif.11.50.FC3.macosx64.pkg -target / Uninstallation Uninstallation of Informix can only be launched from the command line. You can uninstall in graphical mode or console mode. Installer and uninstaller commands have to be run with administrative privileges. To run the uninstaller application, precede the uninstaller application launcher with sudo on Mac. By default, sudo allows you to run an application as the root user. The uninstallation application launcher for each product is located in $INFORMIXDIR, where $INFORMIXDIR is the installation directory. For example, to uninstall the Informix server, from $INFORMIXDIR, run the following command: sudo uninstallserver -console This command launches the Informix uninstaller in console mode. Follow the instructions and proceed with uninstallation. See “Interactive installations methods” on page 388, and “Silent installation” on page 391 for more examples. To uninstall Client SDK, from $INFORMIXDIR, run the following command: sudo java -jar uninstall_csk/uninstall.jar -swing This command launches the Client SDK uninstaller in graphical mode. Informix Version 11.50 script-based invisible deployment Invisible deployment is where Informix is deployed without the impact of the installer application. Appendix B. IBM Informix Version 11.50 installation and configuring client connectivity 415 Using a deployment script on UNIX The procedures in this section show how to perform an invisible deployment prior to the availability of the Informix deployment utility on UNIX in Informix Version 11.50.xC6. Prior to deployment, Informix has to be installed, using the installer, and the server instance has to be configured to suit your preferences. Make an archive of the configured server (including all logged dbspaces) and use a deployment script to unarchive the application files and the dbspaces on the target machine. After the files are unarchived, perform the necessary steps to get the server up and running. To start a new instance or to start a deployed instance of Informix, perform the following steps: 1. Set the necessary Informix environment variables: – $INFORMIXDIR to the directory of the Informix server application files – $INFORMIXSERVER to the name of the server instance – $ONCONFIG to the configuration file that will be used to start Informix – $PATH to include $INFORMIXDIR/bin – $INFORMIXSQLHOSTS to the full path of the sqlhosts file The last variable is optional. The default is $INFORMIXDIR/etc/sqlhosts. Therefore, if the file name is sqlhosts, this environment variable does not need to be set. If you want to use the server in a different language or locale other than the default (U.S. English), set the following variables: – $CLIENT_LOCALE to the preferred client application locale – $DB_LOCALE to the preferred database locale – $DBLANG to the subdirectory of $INFORMIXDIR that contains the language-specific message files – $SERVER_LOCALE to the server locale for read-write operations on OS files 2. Create a sqlhosts file to reflect connectivity information. Also, if you want to create a port alias (service name) for the port number in your sqlhosts file, update the /etc/services file. 3. Construct the configuration file with the following parameters to the preferred values. One approach is to make a copy of $INFORMIXDIR/etc/onconfig.std and update the value of the parameters. 416 Embedding IBM Informix Note: The following list is non-exhaustive. – DBSERVERNAME: <server name> – SERVERNUM: <server number> This parameter can be any number between 0 and 255, but it must be unique, that is, two server instances cannot have the same server number. – ROOTNAME: <root storage location name> – ROOTPATH: <full path to the root storage device> – ROOTSIZE: <size of storage location> (in KB) Additionally, other configuration parameters can be updated as desired. 4. Run the oninit -y or oninit -iy command to start the server. The first command is used if the disk space is already initialized and you want to initialize shared memory for the server. Use the second command if you are starting the Informix server for the first time or if you want to discard your existing data. The second command initializes the disk space. Important: Initializing the disk space will erase any existing data in that disk space. Example B-6 is a proof-of-concept of a script-based Informix server deployment. The script must be run as the root user. It assumes that the system meets all the Informix server deployment prerequisites and that the presence of the informix user and group have been ensured, but it does not perform error checking or handling. If you are using a deployment script, it is best practice to include the necessary error checking and handling. Example B-6 deploy.sh: Sample script to deploy Informix on UNIX #!/bin/sh #ensure that the system has all the prerequisites for Informix functionality #Note: informix user and group has to be present on the machine #Usage if [ "x$1" = "x-help" ] ; then echo "Usage: `basename $0` <archive> <onconfig_file> <portnum> <protocol> <rootpath>" echo "<archive> - full path to the archived IDS files" echo "<onconfig_file> - full path to configuration file" echo "<portnum> - port number for Informix server instance" Appendix B. IBM Informix Version 11.50 installation and configuring client connectivity 417 echo "<protocol> - socket protocol to be used by instance" echo "<rootpath> - full path to existing rootpath. It can be a location outside of \$INFORMIXDIR or within the archive. If it is within the archive, pass the full path to it in the form it will be when unarchived." exit 1 fi CURRDIR=`pwd` HOSTNAME=`hostname` oninit_cmd="oninit -y" #if $INFORMIXDIR is set, use it. Otherwise, create a new directory and set to $INFORMIXDIR if [ -z "$INFORMIXDIR" ] ; then if [ ! -d "${CURRDIR}/ids1150" ] ; then mkdir $CURRDIR/ids1150 fi export INFORMIXDIR=$CURRDIR/ids1150 fi ARCHIVE=$1 ONCONFIG_LOC=$2 PORT=$3 PROTOCOL=$4 EXISTING_ROOTPATH=$5 #get the server name and rootpath from the configuration file. INFORMIXSERVER=`grep ^ DBSERVERNAME $ONCONFIG_LOC | sed 's/DBSERVERNAME[[:space:]]*//'` ROOTPATH=`grep ^ROOTPATH $ONCONFIG_LOC | sed 's/ROOTPATH[[:space:]]*//'` #deploy IDS application files unzip -d $INFORMIXDIR -q $ARCHIVE cd $INFORMIXDIR if [ ! -f $ROOTPATH ] ; then touch $ROOTPATH fi cd $INFORMIXDIR/gskit ./installgskit #copy configuration file to $INFORMIXDIR/etc/onconfig.<SERVER_NAME> cp $ONCONFIG_LOC $INFORMIXDIR/etc/onconfig.$INFORMIXSERVER #Get size of existing dbspace in MB rootsizeB=`ls -l "${EXISTING_ROOTPATH}" | awk '{ print $5 }'` rootsizeKB=`expr $rootsizeB / 1024` #escape ONCONFIG location so that it can be passed to sed command ONCONFIG_LOC_esc=`echo $ONCONFIG_LOC | sed "s:[]\[\/]:\\\\\\&:g"` 418 Embedding IBM Informix #sed command to modify the rootsize in your configuration file. config_mod="sed -i -e \"/^ROOTSIZE/ c ROOTSIZE\ $rootsizeKB\" ${ONCONFIG_LOC_esc}" eval $config_mod #check for presence of files lists and run installation script to set properties for deployed files if [ ! -f "${INFORMIXDIR}/etc/Glsfiles.installed" ] || [ ! -f "${INFORMIXDIR}/etc/Messagefiles.installed" ] || [ ! -f "${INFORMIXDIR}/etc/IIFfiles.installed" ] ; then echo "One or more files list is absent in your archive" exit 1 else cd $INFORMIXDIR $INFORMIXDIR/etc/install $INFORMIXDIR/etc/Glsfiles.installed NOCHK DOBRAND DOUPGRADE ismp informix informix informix informix $INFORMIXDIR/etc/install $INFORMIXDIR/etc/Messagefiles.installed NOCHK DOBRAND DOUPGRADE ismp informix informix informix informix $INFORMIXDIR/etc/install $INFORMIXDIR/etc/IIFfiles.installed NOCHK DOBRAND DOUPGRADE ismp informix informix informix informix fi ONCONFIG=onconfig.$INFORMIXSERVER INFORMIXSQLHOSTS="$INFORMIXDIR/etc/sqlhosts.$INFORMIXSERVER" PATH=${INFORMIXDIR}/bin:${PATH} export INFORMIXSERVER INFORMIXDIR ONCONFIG INFORMIXSQLHOSTS PATH #create sqlhosts file echo "$INFORMIXSERVER $PROTOCOL $HOSTNAME $PORT">$INFORMIXSQLHOSTS #Copy pacakged dbspace into new preferred location cp ${EXISTING_ROOTPATH} ${ROOTPATH} #change the ownership and group for dbspace and config file to informix chown -R informix $ROOTPATH $INFORMIXDIR/etc/$ONCONFIG chgrp -R informix $ROOTPATH $INFORMIXDIR/etc/$ONCONFIG #run the oninit command. eval $oninit_cmd The script takes, as arguments, an archive (the required root dbspace for the server instance), the location of the configuration file to be used for the deployed server, the desired port number, the connection protocol to be used, and the full path to the root data space to be used for the deployed server. For example: deploy.sh <archive> <onconfig_file> <portnum> <protocol> <rootpath> Appendix B. IBM Informix Version 11.50 installation and configuring client connectivity 419 Where: <archive> is the archived Informix server files. Provide the full path if the archive is not in the current directory. <onconfig_file> is the full path to the configuration file you will be using for installation. <portnum> is the port number to be used by the Informix server instance. <protocol> is the socket connection protocol to be used by the instance. for example, olsoctcp, olsocssl, or drsoctcp. <rootpath> is the full path to the dbspace to be deployed. It can be outside of $INFORMIXDIR or packaged in the archive. If it is in the archive, provide the full path in the form it will be in when unarchived. If you are using this script, be mindful of the assumptions made by the script and modify it to suit your exact deployment requirements. Lightweight Installer on Windows After an Informix server has been installed and configured, archive the instance using an archiving application of choice. After the server has been archived, it can be deployed as required using the Lightweight Installer. The Lightweight Installer creates the following items on the target system: Informix service The informix user account (if not present) The informix user account is only created if Informix is not being deployed using the local system user option. Informix server registry keys Environment batch files associated with the instance Empty root dbspace storage device if not present Important: In Informix Version 11.50 xC1 and 11.50.xC2, the Lightweight installer was available at no cost, and as such was not provided, or supported, by IBM. The file, lwt_install.exe, can be downloaded from the following website: http://www.iiug.org/software/index_MISC.html 420 Embedding IBM Informix Using the Lightweight Installer on a template machine Perform the following steps to use the Lightweight Installer on a template machine: 1. Install Informix server on the template machine and set up instances. 2. Configure the instance through your configuration file to meet the desired need. 3. Create the database, tables, and load data. 4. Archive the instance. Be sure to include the configured dbspace(s) in the archive. You can use an archiving tool of your choice. Using the lightweight installer on the target machine You can deploy the archived server with a host of options depending on your needs. Prior to deploying Informix server onto the target system, ensure the following circumstances are true: $INFORMIXDIR is set to the preferred location in which you want the server unarchived. $INFORMIXSERVER is set to the preferred name of the server instance name. For locales other than the default (US English), set the following variables: – $CLIENT_LOCALE to the preferred client application locale – $DB_LOCALE to preferred database locale – $DBLANG to the subdirectory of $INFORMIXDIR that contains the language-specific message files – $SERVER_LOCALE to the server locale for read-write operations on OS file The options for the Lightweight Installer and corresponding descriptions are listed in Table B-5. Table B-5 Description of Lightweight Installer usage Option Description -f <archive> Specify the full/relative path to the location of the archive. -force Overwrite existing environment variables/configuration settings and create new ones at deployment time. -installdrive <DRIVE> Specify the drive in which the IFMXDATA directory is created. The IFMXDATA directory contains the data space directory (the default is C:). Appendix B. IBM Informix Version 11.50 installation and configuring client connectivity 421 Option Description -log <logfile> Send progress messages to the file specified by <logfile>. -p <password> The Informix user password used to create Informix service. -port <portnum> The SQLHOSTS service port for the server instance. The default is 9088. -protocol <protocol> Specify protocol for database connectivity. The default is olsoctcp. -servernum <num> Specify the server number for the instance. The default is 0. -silent Actions are performed in silent mode, that is, there is no console interaction. Progress will be logged if the -log argument is specified. -system Create the Informix service as the local system user. -unzip <command> Specify the command to expand the Informix server archive. If this command is not specified, the Lightweight Installer utility assumes that the 7-zip application is present on the target machine and will attempt to use it to expand the archive. The default is 7-zip. -verbose Verbose mode. -wow6432 Used to redirect registry access to the 32-bit registry view. Use this option when deploying a 32-bit server onto a 64 bit machine. -y Do not prompt for confirmation. The following code is an example of how the syntax for the Lightweight Installer would appear when executing the install command: lwt_install [-f <archive>] [-p password|-system] [-l <logfile>] [-silent] [-wow6432] [-port <portnum>] [-protocol <protocol>] [-servernum <num>] [-unzip <command>] [-verbose] [-force] [-y] 422 Embedding IBM Informix Examples of deploying Informix In the remainder of this section, we show examples of deploying Informix in specific situations. In Example B-7, C:\myarchive\archive.zip is the archive containing the Informix server application files (and dbspaces if needed) and mypassword is the password to be used to create the Informix service.The usage example assumes the presence of the 7-zip archiving application. The informix user account is created on the machine if it not present. THe default values for server number and port number are used. See Table B-5 on page 421 for the default values. Example B-7 Lightweight deployment - using defaults set INFORMIXDIR=C:\informix set INFORMIXSERVER=myserver lwt_install.exe -f C:\myarchive\archive.zip -p mypassword Example B-8 shows the use of the Lightweight Installer with some non-default values. The usage explicitly specifies the port number for Informix service, and the server number. The -y option is used to deactivate prompts and to ensure no command-line interaction. These options allow for a completely non-interactive deployment. Example B-8 Lightweight deployment: Non-defaults set INFORMIXDIR=C:\informix set INFORMIXSERVER=myserver lwt_install.exe -f C:\myarchive\archive.zip -p mypassword -silent -log C:\myLog.log -y -port 9088 -servernum 2 Example B-7 and Example B-8 assume the presence of the 7-zip archiving application on the system and attempt to use it to extract archive.zip. Therefore, if you will be running the Lightweight Installer in the same manner, you must ensure that 7-zip is present on the target system. However, you are also able to specify a preferred archiving application, as shown in Example B-9. Example B-9 Lightweight deployment: Specifying a preferred archiving application set INFORMIXDIR=C:\informix set INFORMIXSERVER=myserver lwt_install.exe -unzip "C:\myunzip\unzip.exe C:\myarchive\archive.zip" -system Appendix B. IBM Informix Version 11.50 installation and configuring client connectivity 423 The -unzip option is followed by the command to extract archive.zip, in double quotes, in the same manner it would be run on the command line. For example, if the archive was named archive.tar, the -unzip option could also have taken the following form: -unzip "C:\mytar\tar.exe xvf C:\myarchive\archive.tar" See Example B-10 for illustration of creating a new instance as part of deployment. Tip: If you require different configuration parameters for your new instance, you can edit the configuration file prior to running the command in Example B-10. Example B-10 Lightweight deployment: Creating a (new) instance set INFORMIXDIR=C:\informix set INFORMIXSERVER=myserver2 lwt_install.exe -silent -y -port 9090 -servernum 3 -log C:\myLog.log In this example, the Lightweight Installer utility is used to create an instance. After the server has been deployed and an instance created, there will be an environment batch file created in $INFORMIXDIR called $INFORMIXSERVER.cmd, where $INFORMIXDIR is the directory in which the server is deployed and $INFORMIXSERVER is the server name. The Lightweight Installer creates an Informix service with the same name as $INFORMIXSERVER. To start the Informix service by initializing the disk space and shared memory, run the following command: starts <server_name> -iy If you want to start the Informix service by only initializing shared memory, run the following command: starts <server_name> -y Important: Initializing disk space will cause any existing data on the disk space to be lost. 424 Embedding IBM Informix Setting up a database using dbaccess Dbaccess is a server-side utility that provides an environment in which you can work with the database server. Dbaccess is located in $INFORMIXDIR/bin. It can be used to create a database, create tables, and load data into the database. The dbaccess utility can take SQL statements directly from the command line or can be used through an interactive menu. You can also use dbaccess to run a file that contains SQL statements. The following steps show how to perform the tasks of creating and updating databases using dbaccess. Perform them in an environment with the server instance environment variables set. A command file to set server instance environment variables is located in $INFORMIXDIR/<server_name>.cmd. 1. Create a database by running the following command: echo CREATE DATABASE <database_name> IN <dbspace_name> WITH LOG | dbaccess 2. Create a table by running the following command: dbaccess <database_name> <tables_sql> In the example above, <tables_sql> is the file containing the SQL statements to create tables 3. Load the data by running the following command: dbaccess <database_name> <load_sql> In the example above, <load_sql> is the file containing the SQL statements to load data into your database. These steps show how dbaccess can take SQL statements directly from a command line and also how it can run a file. Having dbaccess run a file is useful because several SQL statements can be added to the file. Setting up the environment for ODBC The Open Database Connectivity (ODBC) Driver is a set of libraries that enable a universal means of accessing databases, regardless of the vendor. As an SQL standard, ODBC is shipped with Informix. Client SDK includes the OBDC driver as part of the development kit for Informix. To set up ODBC, the environment variables need to be set. Appendix B. IBM Informix Version 11.50 installation and configuring client connectivity 425 Setting up the environment for ODBC on Windows On the template machine, create a client configuration file using the setnet32 application. To create a client configuration file, perform the following steps: 1. Install Client SDK. After installation, launch the setnet32 application from the IBM Informix Client-SDK start menu entry. Alternatively, you can launch it from $INFORMIXDIR\bin\setnet32.exe, where $INFORMIXDIR is the Client SDK installation location. 2. Configure the client environment by using the setnet32 application. 3. From the Environment tab, click Save to File and select where you want the configuration file to be saved. The configuration file will be saved with a .nfx extension. After you have created the configuration file, it can be deployed along with the application. On the target machine, run the setnet32 application, using the client configuration file you created. Assuming that the client configuration file is called config.nfx, and it is in the same location as setnet32.exe, from the directory containing both files, you can run the following command: setnet32 -l config.nfx Add the location of the include files to the include path so that it can be used by the compiler. The include files are located in $INFORMIXDIR\incl\cli. If not set, $INFORMIXDIR/etc/sqlhosts is used as the sqlhosts file. Setting up the environment for ODBC on UNIX On UNIX systems, the necessary environment variables can be set in a script. A sample environment setup file is provided in $INFORMIXDIR/etc/setup.odbc. The variables required by ODBC are as follows: INFORMIXDIR: Client SDK installation location. PATH: Include $INFORMIXDIR/bin in the PATH variable. INFORMIXSERVER: The name of the server instance. INFORMIXSQLHOSTS: The full path to the sqlhosts file. If this variable is not specified, $INFORMIXDIR/etc/sqlhosts will be used as the sqlhosts file. LD_LIBRARY_PATH: Update this variable with ${INFORMIXDIR}/lib, ${INFORMIXDIR}/lib/cli, and ${INFORMIXDIR}/lib/esql. ODBCINI: The location of the odbc.ini file. This variable is optional. If it is not set, the home directory will be used as the default location for the odbc.ini file. 426 Embedding IBM Informix For more information about Informix ODBC, see IBM Informix ODBC Driver Programmer’s Manual, G229-6383. Setting up and connecting to Informix server using JDBC The Informix application suite comes with a JDBC driver that allows Java applications to connect and perform database operations. JDBC ensures a standard way for Java applications to access databases. Therefore, a Java application does not need to know what type of database it is accessing as long as it has the correct JDBC driver. The JDBC driver contains Java archives (JAR files) that include APIs for JDBC application development. The necessary JAR files need to be added to the CLASSPATH variable in order for Java to locate and use the necessary class libraries. Prior to running your JDBC application, perform the following steps: 1. Add the full path of ifxjdbc.jar to the CLASSPATH. For locale support, add the ifxlang.jar as well. – On UNIX, run the following command: export CLASSPATH=<jdbc_dir>/lib/ifxjdbc.jar:<jdbc_dir>/lib/ifxlang.jar:$CLASSPA TH – On Windows, run the following command: set CLASSPATH=<jdbc_dir>\lib\ifxjdbc.jar;c:\jdbcdriv\lib\ifxlang.jar;%CLASSP ATH% In the example above, <jdbc_dir> is the JDBC installation directory. 2. Add the directory in which the ifxjdbc.jar contents are unarchived. If needed, add locale support as well. – On UNIX, run the following command: cd <jdbc_dir>/lib jar xvf ifxjdbc.jar jar xvf ifxlang.jar export CLASSPATH=<jdbc_dir>/lib:$CLASSPATH – On Windows, run the following command: cd <jdbc_dir>\lib jar xvf ifxjdbc.jar jar xvf ifxlang.jar set CLASSPATH=c:\jdbcdriv\lib;%CLASSPATH% Appendix B. IBM Informix Version 11.50 installation and configuring client connectivity 427 Where <jdbc_dir>/lib is the directory in which the contents of ifxjdbc.jar and ifxlang.jar are unarchived. Example B-11 shows sample code that shows how to write a JDBC application. The example shows a simple operation of connecting to a database and running a query. Example B-11 A simple JDBC application import java.sql.*; public class InformixJDBCTest { public static void main(String[] args) throws Exception { // This statement is used to load the JDBC driver Class.forName("com.informix.jdbc.IfxDriver"); // The address of the database server to connect to String connectionURLString = "jdbc:informix-sqli://host1:9088/mydatabase:INFORMIXSERVER=myserver"; Connection c = DriverManager.getConnection( connectionURLString, “myusername”, “mypassword”); Statement stmt = c.CreateStatement(); //Execute query //Data is returned into ResultSet object. //Use the ResultSet class methods to retrieve data. ResultSet rs = stmt.executeQuery("SELECT * from myTable"); //DO SOMETHING WITH RETRIEVED DATA c.commit(); rs.close(); stmt.close(); c.close(); } } In Example B-11, the application loads a JDBC driver, connects to an Informix database, and runs a query on the database. Class.forName(com.informix.jdbc.IfxDriver) This statement is used to load the Informix JDBC Driver, which was obtained by installing the Informix JDBC Driver product. String connectionURLString = "jdbc:informix-sqli://host1:9088/mydatabase:INFORMIXSERVER=myserver" 428 Embedding IBM Informix This statement is the connection information string for the database server. It includes the host name host1 (this can also be an IP address), the port number 9088 (this can also be a port alias, or service name), the name of the database mydatabase, and the server instance name represented by INFORMIXSERVER=myserver, where myserver is the actual name of the server instance. DriverManager.getConnection( connectionURLString, "myusername", "mypassword") This statement is used to establish a connection to the database with the provided URL. The getConnection() method can take several parameters. The form provided in this example takes the URL string, the user name, and the password to establish a connection. The getConnection() method returns a connection object. c.CreateStatement() This statement returns a Statement object. stmt.executeQuery("SELECT * from myTable") This statement is used to execute a query. The result of the query is returned in a ResultSet object. rs.close(), stmt.close(), and c.close() These statements are used to close the ResultSet, Statement, and Connection, respectively. Because Example B-11 on page 428 is meant as an illustration, it does not include error checking and handling. When writing your own JDBC application, include the necessary checks and error handling. JDBC is a Javasoft specification. You can find more information about the API documentation by visiting http://java.sun.com. Appendix B. IBM Informix Version 11.50 installation and configuring client connectivity 429 430 Embedding IBM Informix C Appendix C. Event classes and event IDs This appendix provides a complete list of the event classes and event IDs. You can find additional information about even classes and IDs in IBM Informix Administrator’s Guide, SC27-3526. The event IDs are specific events within an event class. The event ID number has the following format: eventID = (eventClass * 1000) + sequenceNumber The event class is always part of the event ID. For this reason, Table C-2 on page 434 does not include the event class. © Copyright IBM Corp. 2011. All rights reserved. 431 Event classes Informix divides the events into classes to make it easier to address a type of event. These classes and their generic messages are listed in Table C-1. Table C-1 Event classes 432 Event class Event class message 1 Table failure: 'dbname:”owner”.tabnamev. 2 Index failure: 'dbname:”owner”.tabname:idxname'. 3 Blob failure: 'dbname:”owner”.tabname'. 4 Chunk is offline, mirror is active: chunk_number. 5 Dbspace is offline: 'dbspace_name'. 6 Internal subsystem failure: 'message'. 7 Database server initialization failure. 8 N/A. 9 Physical recovery failure. 10 Logical recovery failure. 11 Cannot open chunk: 'path name'. 12 Cannot open dbspace: 'dbspace_name'. 13 Performance improvement possible. 14 Database failure. 'dbname'. 15 High-Availability Data-Replication failure. 16 Backup completed: 'dbspace_list'. 17 Backup aborted: 'dbspace_list'. 18 Log backup completed: log_number. 19 Log backup aborted: log_number. 20 Logical logs are full—backup is needed. 21 Database server resource overflow: 'resource_name'. 22 Long transaction detected. 23 Logical log 'number' complete. Embedding IBM Informix Event class Event class message 24 Unable to allocate memory. 25 Internal subsystem initialized: 'message' (starts the optical subsystem). 26 Dynamically added log file logid. 27 Log file required. 28 No space for log file. 29 Internal subsystem: subsystem. 30 DDR subsystem notification. 31 ER stable storage pager sbspace is full. 32 ER: error detected in grouper sub component. 33 ER: error detected in data sync sub component. 34 ER: error detected in queue management sub component. 35 ER: error detected in global catalog sub component. 36 ER: enterprise replication network interface sub component notification. 37 ER: error detected while recovering Enterprise Replication. 38 ER: resource allocation problem detected. 39 Notify IBM Informix Technical Support. 40 RSS alarm. 41 SDS alarm. 42 Event occurred. 43 Connection Manager alarm. 44 DBSpace is full: dbspace_name. 45 partition 'partition_name': no more extents. 46 partition 'partition_name': no more pages. 47 CDR is shutting down due to internal error: failure. 48 ATS or RIS files spooled to disk. 49 to 70 A replication state change event has happened. 71 ER: Network connection disconnected. Appendix C. Event classes and event IDs 433 Event class Event class message 72 Audit trail is switched to a new file. 73 Enterprise replication NIF connection terminated. 74 Enterprise replication recovery failed 75 ER: the logical log replay position is not valid. Restart ER with the cdr cleanstart command, and then synchronize the data with the cdr check --repair command. 76 - 77 A replication state change event has happened. 78 The storage pool is empty. 79 Dynamically added chunk chunk_name to space. Table C-2 includes the severity of the event. As we saw in Chapter 6, “IBM Informix configuration for embeddability” on page 147, the severity is a severity level that ranges from “1” (an event that is not noteworthy) to “5” (a fatal condition). Table C-2 Event IDs 434 Event ID Severity Event ID message 1001 3 Page allocation error on 'object'. 1002 3 Row allocation error on 'object'. 1003 3 Slot allocation error for 'object'. 1004 3 An internal error prevented the database server from finding the next possible data page in this tblspace. 1005 3 Dropping wrong TBLSpace, requested tblspace_name != actual tblspace_name. 1006 3 An internal error which may have been caused due to data corruption prevented the database server from altering the bitmap pages for this partition. 1007 3 An internal error which may have been caused due to corrupted bitmap pages as the database server is still in the process of converting them. 1008 3 An internal error which may have been caused due to unconverted bitmap pages. 1009 4 Page Check Error in object. Embedding IBM Informix Event ID Severity Event ID message 1010 4 Bad rowid rowid. 1011 3 Closing TBLSpace tblspace_name. 1012 3 Cannot recreate index index_name for partnum partition_number, iserrno = error_number. 1013 3 An internal error occurred while the database server was trying to initialize the type of set read operation. 1014 3 An internal error occurred while the database server was trying to read records from the tblspace's pages. 1015 3 An internal error occurred while the database server was trying to read the current record. 1016 3 An internal error occurred while the database server was trying to initialize the set read buffer. 1017 3 An internal error occurred while the database server was trying to set the new mode on the bitmap page. 1018 3 An internal error occurred while the database server was attempting to convert bitmap pages to the correct format. 1019 3 An internal error occurred while the database server was trying to modify the bitmap pages during a light append operation. 1020 3 An internal error occurred while the database server was trying to perform a light scan operation. 1021 3 An internal error occurred while the database server was trying to perform a light scan I/O operation. 1022 3 An internal error was reported by the database server when it tried to validate a light append buffer. 1023 3 An internal error was reported by the database server when it tried to write the next record to the page in the light append buffer. 1024 4 An internal error was reported by the database server when it tried to open a light append for a tblspace. 1025 4 An internal error was reported by the database server when it tried to load the first bitmap page for a light append operation. 1026 4 An internal error was reported by the database server when it tried to write the cached bitmap pages for a light append operation. Appendix C. Event classes and event IDs 435 436 Event ID Severity Event ID message 1027 2 An internal deadlock condition was caught by the Lock Manager in the database server. 1028 2 An internal deadlock condition was caught by the Lock Manager in the database server. 1029 4 An internal error was reported by the database server when it tried to map the logical page number in the tblspace to its physical location in the chunk. 1030 3 An internal error was reported by the database server when it tried to allocate the alter information. 1031 3 An internal error was reported by the database server when it tried to prepare the list of operations to be performed on a compressed row. 1032 3 An internal error was reported by the database server when it tried to insert an operation in the list of operations based on the offset in the row where the new operation points to. 1033 3 An internal error was reported by the database server when it detected an inconsistency with the operation list. 1034 3 An internal error was reported by the database server when it tried to free the partition header page. 1035 3 or 4 An internal error was reported by the database server when it tried to validate the partition header page. 1036 3 An internal error was reported by the database server when it tried to update the special columns list during an alter table command processing. 1037 3 An internal error was reported by the database server when it tried to log the completion of the alter and remove the associated version information from the tblspace's header page. 1038 3 An internal error was reported by the database server when it detected an buffer inconsistency. 1039 3 An internal error was reported by the database server when it tried to construct a forwarded row into a single tuple. 1040 3 An internal error was reported by the database server when it tried to read the data from a partition into the set read buffer. 1041 3 An internal error was reported by the database server when it tried to read the data row for a given rowid. Embedding IBM Informix Event ID Severity Event ID message 1042 3 An internal error was reported by the database server when it tried to alter the row in memory to the latest schema. 1043 3 An internal error was reported by the database server when it tried to undo the alter of a bitmap page. 1044 3 An internal error was reported by the database server when it tried to undo the addition of special column descriptors from the tblspace's header page. 1045 3 An internal error was reported by the database server when it tried to undo the addition of the new version to a partition. 1046 3 An internal error was reported by the database server when it tried to allocate the file descriptor for a partnum. 1047 3 An internal error was reported by the database server when it tried to free the file descriptor for a partnum. 1048 3 Error updating table record. 2001 3 or 4 Fragid fragment_id, Rowid rowid not found for delete in partnum partition_number. 2002 3 An internal error was raised due to an inconsistency in the index which is preventing the database server to position on the first record in that index. 2003 3 An internal error was raised due to an inconsistency in the index which is preventing the database server to read ahead pages in that index. 2004 4 Page Check Error in object. 2005 3 An internal error occurred during batched index read because the database server had an invalid index key item. 2006 3 index_page log record too large to fit into the logical log buffer. Recommended minimum value for LOGBUFF is number. 2007 3 Comparison based on locale 'locale_name' failed. 2008 3 Comparison failed. 2009 4 An internal error occurred while the database server was trying to add a new item to the index. 2010 4 An internal error was raised due to an inconsistency in the index which is preventing the database server to position at the correct item in the index. Appendix C. Event classes and event IDs 437 438 Event ID Severity Event ID message 2011 3 Cannot drop index index_name for partnum partition_number, iserrno = error_number. 2012 3 An internal error occurred while the database server was trying to mark an index key descriptor as bad. 2013 4 An internal error occurred while the database server was trying to delete an item from the index. 3001 3 tb_sockid in blob descriptor is corrupted. Current table is 'dbname:"owner".tabname'. 3002 3 Incorrect BLOB stamps. 3003 4 BLOB Page Check error at dbspace_name. 3004 3 An internal error occurred while trying to read a blob from a table. 3005 3 An internal error occurred while trying to copy a blob from a table. 4001 4 I/O error, error_number Chunk 'chunk_number' -- Offline. 4002 3 or 4 An internal error occurred during physical I/O because the chunk was not opened. 4003 3 I/O error, error_number Chunk 'chunk_number' -- Offline (sanity). 4004 3 Chunk failed sanity check. 4005 3 Mirror Chunk chunk_number added to space 'space_number'. Perform manual recovery. 5001 4 Chunk chunk_number is being taken OFFLINE. 5002 4 WARNING! Chunk chunk_number is being taken OFFLINE for testing. 6016 3 Pool not freed. pool name:pool_name, address:address. 6017 4 CDR Grouper FanOut thread is aborting. 6018 4 CDR Pager: Paging File full: Waiting for additional space in CDR_QDATA_SBSPACE. 6019 4 An internal error was reported by the database server during reversion when it was unable to drop a system catalog table. Embedding IBM Informix Event ID Severity Event ID message 6020 4 An internal error was reported by the database server during reversion when it was unable to modify a system catalog table. 6021 3 An internal error was reported by the database server during conversion when it found some indices in the old format. 6022 3 An internal error was reported by the database server when it checks for any new in-place alter pending in the current server during reversion. 6023 3 Cannot open index 'dbname:index_name', iserrno = error_number. 6024 3 Cannot drop index 'dbname:index_name', iserrno = error_number. 6025 3 Cannot open table 'dbname:table_name', iserrno = error_number. 6026 3 Cannot drop table 'dbname:table_name', iserrno = error_number. 6027 3 An error was reported by the database server when it tried to drop the sysmaster database during reversion. 6028 3 Optical Subsystem STARTUP Error. 6029 2 Unable to initiate communications with the Optical Subsystem. 6030 3 Invalid or missing name for Subsystem Staging BLOBspace. 6031 2 Optical Subsystem is running. 6032 2 Optical Subsystem is not running. 6033 5 Cache read error. 6034 3 Could not start remote server. 6035 3 An error was reported by the database server during the handling of audit trail files. 6036 3 Archive on dbspaces_list ABORTED. 6037 3 Waiting on BLOBSpace to appear for Logical Recovery. 6038 3 An internal error reported by the database server. Users may need to look at the specific message which accompanies with this ID. 6039 3 Wrong page for cleaning deleted items. Appendix C. Event classes and event IDs 439 440 Event ID Severity Event ID message 6040 3 Buffer in wrong state for cleaning deleted items. 6041 5 or 3 An internal error was detected by the Buffer Manager in the database server. 6042 5 or 2 An internal error was reported by the database server when it detected an inconsistency with the internal buffer queues. 6043 3 Internal filep error. 6044 3 An internal error was corrected automatically by the database server when it tried to save the log buffer into a system log buffer. 6045 5 Logical logging error for 'object' in 'space'. 6046 4 Page Check Error in object. 6047 3 Errors occurred while recreating indexes. 6049 5 Lock types lock_type and lock_type should never be merged. 6050 5 An internal error was reported by the database server when it detected some corruption in the lock free list chain. 6051 3 ERROR - NO 'waitfor' locks in Critical Section!!! 6052 3 Internal Tblspace error. 6053 3 Session does not have exclusive access to partition partition_name. Request to drop the partition ignored. 6054 3 Error building 'sysmaster' database. 6055 3 Setread error on SMI Table, partnum partition_number. 6056 3 Comparison based on locale 'locale_name' failed. 6057 2 DBSPACETEMP internal list not initialized, using default. 6058 3 A data source accessed using a gateway (gateway_name) might be in an inconsistent state. 6059 3 Prepared participant site site_name not responding. 6060 5 Thread exited with number buffers held. 6061 3 An internal error was automatically corrected by the database server when it detected that the undo log for the transaction was not applicable. 6062 5 Internal Error - Freeing transaction entry that still holds locks! Embedding IBM Informix Event ID Severity Event ID message 6063 3 User thread not on TX wait list. 6064 3 Due to a heuristic decision, the work done on behalf of the specified transaction branch might have been heuristically completed or committed or rolled back or partially committed and partially rolled back. 6065 3 Errors occurred while recreating indexes. 6066 3 An internal error is reported by the database server when it has checked all sites to see if a heuristic rollback was the reason for the failure. 6067 5 A fatal internal error (Recursive exception) has caused the database server processes to terminate unexpectedly. 6068 5 A fatal internal error (Internal exception) has caused the database server processes to terminate unexpectedly. 6069 5 A fatal internal error (Master daemon died) has caused the database server processes to terminate unexpectedly. 6070 5 A fatal internal error (VP died) has caused the database server processes to terminate unexpectedly. 6071 5 ERROR:cannot fork secondary Server thread (MACH11 Shutdown). 6072 3 Generic unique event ID when the server failed to fork a new thread. 6073 3 An error was reported by the database server when it could not initialize GLS for starting a session. 6074 3 WARNING: mt_aio_wait: errno == EINVAL. 6075 5 A fatal internal error (KAIO) has caused the database server processes to terminate unexpectedly. 6100 Generic event for when the database server implicitly raises an assert warning. 6300 Generic event for when the database server implicitly raises an assert failure. 6500 Generic event for when the database server terminates unexpectedly due to an internal error condition. Appendix C. Event classes and event IDs 441 442 Event ID Severity Event ID message 7001 3 TABLOCKS log record too large to fit into the logical log buffer. Recommended minimum value for LOGBUFF is size. I-STAR(C) begins prepare log record too large to fit into the logical log buffer. Recommended minimum value for LOGBUFF is size. Partition blob log record too large to fit into the logical log buffer. Recommended minimum value for LOGBUFF is size. Alter table special column desc log record too large to fit into the logical log buffer. Recommended minimum value for LOGBUFF is size. 7002 4 Unable to extend number reserved pages for checkpoint in ROOT chunk. Unable to extend number reserved pages for log in ROOT chunk. 7003 4 An internal error occurred during conversion. Users may need to take a look at the specific messages for further action. 7004 4 An internal error occurred while trying to convert the database tblspace. 7005 4 An internal error occurred while trying to convert blob free map pages. 7006 4 Cannot Open Logical Log. 7007 4 Logical Log File not found. 7008 3 WARNING! LTXHWM is set to 100%. This long transaction high water mark will never be reached. Transactions will not be aborted automatically by the server, regardless of their length. 7009 4 A Physical or Logical Restore is active. 7010 4 root_dbspace has not been physically recovered. 7011 4 dbspace has not been physically recovered. 7012 4 dbspace not recovered from same archive backup as dbspace. 7013 4 Log log_number not found. 7014 4 Logical restore cannot be skipped. Perform a logical restore. 7015 4 Cannot change to On-Line or Quiescent mode. 7016 4 Cannot Open Primary Chunk 'chunk_number'. 7017 4 The chunk 'chunk_number' must have owner-ID "owner_id" and group-ID "group_id". Embedding IBM Informix Event ID Severity Event ID message 7018 4 The chunk 'chunk_number' must have READ/WRITE permissions for owner and group (660). 7019 4 Memory allocation error. 7020 4 The chunk 'chunk_number' will not fit in the space specified. 7021 4 device_name: write failed, file system is full. 7022 3 An error occurred while the database server was creating the SMI database. 7023 4 Unable to create boot strap config file - 'file_name'. 7024 3 'sysmaster' database will not be built/checked. 7025 3 WARNING! Physical Log size size is too small. Physical Log overflows may occur during peak activity. Recommended minimum Physical Log size is number times maximum concurrent user threads. 7026 3 WARNING! Logical log layout may cause __ISN__ to get into a locked state. Recommended smallest logical log size is number times maximum concurrent user threads. 7027 3 WARNING! Buffer pool size may cause __ISN__ to get into a locked state. Recommended minimum buffer pool size is number times maximum concurrent user threads. 7028 3 Checkpoint log record may not fit into the logical log buffer. Recommended minimum value for LOGBUFF is size. 7029 3 Temp transaction not NULL. 9001 4 Physical log recovery error. 10001 3 or 4 Rollback error error_number. 10002 4 Logical Recovery ABORTED. 10003 4 Log record (log_subsystem:log_type) in log log_number, offset log_position was not rolled back. 10004 3 Logical Logging error for 'log_subsystem:log_type' in 'object'. 10005 4 An internal error occurred while trying to apply the log records during logical log recovery. 10006 3 or 4 An internal error occurred when the database server tried to find the file descriptor for the tblspace. Appendix C. Event classes and event IDs 443 444 Event ID Severity Event ID message 11001 3 Cannot Open Mirror Chunk 'chunk_number', errno = error_number. 11002 3 Cannot Open Primary Chunk 'chunk_number', errno = error_number. 12001 3 ERROR: DBspace dbspace_name not found among table table_name fragments. 13001 2 The number of configured CPU poll threads exceeds number of CPU VPs specified in 'VPCLASS cpu'. NETTYPE 'protocol' poll threads started on NET VPs. 13002 2 Transaction table overflow due to parallel recovery. 14001 3 ''dbname'' - Error error_number during logging mode change. 15001 3 DR: Turned off on secondary server. 15002 3 DR: Turned off on primary server. 15003 3 DR: Cannot connect to secondary server. 15004 3 DR: Received connection request from remote server when DR is not Off. [Local type: type, Current state: state] [Remote type: type] 15005 3 DR: Received connection request before physical recovery completed. 15006 3 DR: Local and Remote server type or last change (LC) incompatible. [Local type: type, LC: type] [Remote type: type, LC: type] 16001 2 Archive on dbspace_list completed without being recorded. 16002 2 Archive on dbspace_list Completed with number corrupted pages detected. 16003 2 Archive on dbspace_list Completed. 17001 4 Archive detects that page chunk_number:page_offset is corrupt. 17002 3 Page %d:%d of partition partition_number not archived. 18001 2 Logical Log log_number - Backup Completed. 19001 3 Logical Log log_number - Backup Aborted message. Embedding IBM Informix Event ID Severity Event ID message 20001 3 Logical Log Files are Full -- Backup is Needed. 20002 3 Waiting for Next Logical Log File to be Freed. 20003 3 Logical Log Files are almost Full -- Backup is Needed. In a data replication scenario, this could block failure-recovery of the paired server. 21001 3 Archive arcbu_next_tbuf() – Buffer Overflow. 21002 3 Archive tcp_logbu_hdr() – Buffer Overflow. 21003 3 Archive tcp_logbu_trl() – Buffer Overflow. 21004 2 or 5 Physical log file overflow. 21005 3 Lock table overflow - user ID %d, session ID %d. 21006 5 Logical log buffer overflow detected. 21007 3 Llog logbu_logfile() – Buffer Overflow. 21008 3 Llog logbu_bpage() – Buffer Overflow. 21009 3 Unable to allocate a user thread for user ID user_ID. 21010 3 Unable to allocate a transaction for user ID user_ID, session ID session_ID. 22001 3 Blocking on XA transaction, tx transaction_number, till it is cleaned up. 22002 3 Continuing Long Transaction (for COMMIT): tx:. 22003 3 Aborting Long Transaction: tx:. 23001 3 Logical Log log_number Complete, time stamp: time stamp. 24001 3 Generic unique event ID when the server failed to allocate memory for starting a new thread. 24002 3 Warning: unable to allocate requested big buffer of size size. 24003 3 The database server tried to allocate a shared memory virtual segment before it was actually needed, in accordance with the setting of the SHMVIRT_ALLOCSEG configuration parameter - but the segment could not be added. The next failure message will be printed in 30 minutes. 24004 3 Out of message shared memory. 24005 3 Out of message shared memory. Appendix C. Event classes and event IDs 445 446 Event ID Severity Event ID message 24006 3 Out of virtual shared memory. 24007 3 No memory available for page cleaners. 24008 3 kysearch(): Memory allocation error. 24009 3 Lock table overflow - user ID user_ID, session ID session_ID. 24010 3 Unable to allocate a user thread for user ID user_ID. 24011 3 Unable to allocate a transaction for user ID user_ID, session ID session_ID. 25001 2 Optical Subsystem is running. 26001 3 Dynamically added log file logid to DBspace dbspace_name. 27001 4 ALERT: The oldest logical log (log_number) contains records from an open transaction (transaction_number). Logical logging will remain blocked until a log file is added. Add the log file using the onparams -a command, using the -i (insert) option. For example: onparams -a -d dbspace -s size -i Then complete the transaction as soon as possible. 28001 4 ALERT: Because the oldest logical log (log_number) contains records from an open transaction (transaction_number), the server is attempting to dynamically add a log file. But there is no space available. Add a DBspace or chunk, and then complete the transaction as soon as possible. 28002 4 Warning - Enterprise Replication is attempting to dynamically add a log file. But there is no space available. The replay position may overrun. 29001 2 Skipped existing audit trail files file_name to file_name. 30002 3 DDR Log Snooping - Catchup phase started, userthreads blocked. 30003 3 DDR Log Snooping - Catchup phase completed, userthreads unblocked. 30004 4 WARNING: The replay position was overrun, data may not be replicated. 30005 3 CDR DDR: Log staging disk space usage reached its allowed configured maximum size size (KB). Temporarily disabling log staging. Embedding IBM Informix Event ID Severity Event ID message 30006 3 CDR: Created staging file filename for log unique ID unique_log_id. 30007 2 CDR: Completed processing log unique ID unique_log_id. Deleted log staging file filename. 30008 2 CDR: Deleted all staging files from log staging directory. 31001 4 CDR Pager: Paging File full: Waiting for additional space in sbspace_name. 31002 4 CDR QUEUER: Send Queue space is FULL - waiting for space in sbspace_name. CDR QUEUER: Send Queue space is FULL - waiting for space in CDR_QDATA_SBSPACE. 31003 4 CDR QUEUER: Send Queue space is FULL - waiting for space in CDR_QHDR_DBSPACE. 32002 4 CDR Grouper Fanout thread is aborting. 32003 4 CDR Grouper Evaluator thread is aborting. 32004 4 CDR: Could not copy transaction at log ID log_unique_id position log_position. Skipped. 32005 4 CDR: Paging error detected. 32006 4 CDR Grouper: Local participant (participant_name) stopped for the replicate replicate_name (or exclusive replicate set), table (database:owner.table). Data may be out of sync. If the replicated column definition was modified, then perform the alter operation at all the replicate participants, remaster the replicate definition, and then restart the replicate (or exclusive replicate set) definition for the local participant with the data sync option (-S). 32007 3 CDR CDR_subcomponent_name: Could not apply undo properly. SKIPPING TRANSACTION. TX Begin Time: datetime TX Restart Log Id: log_id TX Restart Log Position: log_position TX Commit Time: datetime TX End Log Id: log_id TX End Log Position: log_position 33001 2 Received aborted transaction, no data to spool. 33002 4 CDR DS thread_name thread is aborting. Appendix C. Event classes and event IDs 447 448 Event ID Severity Event ID message 34001 3 CDR CDR_subcomponent_name: bad replicate ID replicate_id. 35001 3 CDR GC peer request failed: command: command_string, error error_code, CDR server CDR_server_ID. 35002 3 CDR GC peer processing failed: command: command_string, error error_code, CDR server CDR_server_ID. 35004 3 CDR: Could not drop delete table. SQL code sql_error_code, ISAM code isam_error_code. Table 'database:table'. Drop the table manually. 36001 3 Enterprise Replication: Connection to servergroupname closed. Reason: connection request received from an unknown server. 37001 3 CDR CDR_subcomponent_name: bad replicate ID replicate_id. 38001 2 CDR CDR_subcomponent_name memory allocation failed (reason). 39001 4 Log corruption detected or read error occurred while snooping logs. 39002 4 CDR: Unexpected log record type record_type for subsystem subsystem passed to DDR. 40001 3 RSS server_name added. 40002 3 Password for RSS Source server_name changed. 40003 3 RSS server_name deleted. 40004 3 RSS server_name log replay position is falling too far behind RSS Source. 40005 3 RSS server_name is not acknowledging log transmission. 40006 3 Error receiving a buffer from RSS server_name - shutting down. 41001 3 ERROR: Removing SDS Node server_name has timed out removing. 42001 1 Event occurred. 43001 3 CM:Session for Connection manager name terminated abnormally. Embedding IBM Informix Event ID Severity Event ID message 44001 3 WARNING: dbspace_type dbspace_name is full. 45001 3 Partition 'partition_name': No more extents. 46001 3 Partition 'partition_name: No more pages. 47001 4 CDR is shutting down due to internal error: Memory allocation failed. 47005 4 CDR is shutting down due to an internal error. 47006 4 CDR DDR: Shutting down ER to avoid a DDRBLOCK situation. 48001 3 file name|file name. 49001 3 Enterprise Replication is started on server server_name. 50001 3 Enterprise Replication is stopped on server server_name. 51001 3 Enterprise Replication is suspended on server server_name. 52001 3 Enterprise Replication is resumed on server server_name. 53001 3 Server server_name is connected. 54001 3 Server server_name is disconnected. 55001 3 Replication is suspended on replicate replicate_name on server server_name. 56001 3 Replication is suspended on replicate set replicateset_name on server server_name. 57001 3 Replication is resumed on replicate replicate_name on server server_name. 58001 3 Replication is resumed on replicate set replicateset_name on server server_name. 59001 3 Replication is started on replicate replicate_name on server server_name. 60001 3 Replication is started on replicate set replicateset_name on server server_name. 61001 3 Replication is stopped on replicate replicate_name on server server_name. 62001 3 Replication is stopped on replicate set replicateset_name on server server_name. Appendix C. Event classes and event IDs 449 450 Event ID Severity Event ID message 63001 3 Replication attribute is modified on replicate replicate_name on server server_name. 64001 3 Replication attribute is modified on replicate set replicateset_name on server server_name. 65001 3 Change in replicate replicate_name on server server_name: operation action, node[s] participant_name. 66001 3 Change in replicateset replicateset_name on server server_name: operation action, member[s] replicate_name. 67001 3 Server server_name is deleted. 68001 3 Replicate replicate_name is deleted on server server_name. 69001 3 Replicate set replicateset_name is deleted on server server_name. 70001 3 Server server_name is modified. 71001 3 Network connection was dropped from the server server_name to the server server_name. Connection closed due to Enterprise Replication administrative activity. 71002 3 Network connection was dropped from the server server_name to the server server_name. Connection closed due to the idle timeout set for the replication server. 71003 3 Network connection was dropped from the server server_name to the server server_name. Connection unexpectedly closed for an unknown reason. 72001 2 Audit trail switched to file_name. 73001 3 Enterprise Replication: Connection to server_name closed. Reason: CDR server server_name not found. 74001 3 Server name/ID mismatch in sqlhosts file while recovery, recovered name = server_name, ID = ID, current name = server_name, ID = ID 75001 4 The replay position (logical log ID log_number and log position log_position) has been overwritten. 75002 4 The replay position (logical log ID log_number and log position log_position) is later than the current position. 76001 3 Server server_name is disabled. 77001 3 Server server_name is enabled. Embedding IBM Informix Event ID Severity Event ID message 78001 3 Warning: The storage pool is out of space. 79001 3 Dynamically added chunk chunk_name to space 'space_name'. Path: path, offset offset_number kilobytes Size: size kilobytes Appendix C. Event classes and event IDs 451 452 Embedding IBM Informix Glossary access control list The list of principals that have explicit permission (to publish, to subscribe to, and to request persistent delivery of a publication message) against a topic in the topic tree. The ACLs define the implementation of topic-based security. ACL See access control list. aggregate Pre-calculated and pre-stored summaries, kept in the data warehouse to improve query performance. aggregation An attribute-level transformation that reduces the level of detail of available data. For example, having a Total Quantity by Category of Items rather than the individual quantity of each item in the category. application programming interface An interface provided by a software product that enables programs to request services. asynchronous messaging A method of communication between programs in which a program places a message on a message queue, and proceeds with its own processing without waiting for a reply to its message. attribute A field in a dimension table. binary large object A block of bytes of data (for example, the body of a message) that has no discernible meaning, but is treated as one solid entity that cannot be interpreted. BLOB See binary large object. commit An operation that applies all the changes made during the current unit of recovery or unit of work. After the operation is complete, a new unit of recovery or unit of work begins. © Copyright IBM Corp. 2011. All rights reserved. composite key A key in a fact table that is the concatenation of the foreign keys in the dimension tables. computer A device that accepts information (in the form of digitalized data) and manipulates it for some result based on a program or sequence of instructions about how the data is to be processed. configuration The collection of brokers, their execution groups, the message flows and sets that are assigned to them, and the topics and associated access control specifications. Continuous Data Replication See Enterprise Replication. data append A data loading technique where new data is added to the database, leaving the existing data unaltered. data cleansing A process of data manipulation and transformation to eliminate variations and inconsistencies in data content. Typically, this is to improve the quality, consistency, and usability of the data. data definition language An SQL statement that creates or modifies the structure of a table or database, for example, CREATE TABLE, DROP TABLE, ALTER TABLE, or CREATE DATABASE. data federation The process of enabling data from multiple heterogeneous data sources to appear as though it is contained in a single relational database. Can also be referred to “distributed access.” data manipulation language An INSERT, UPDATE, DELETE, or SELECT SQL statement. 453 data mart An implementation of a data warehouse, typically with a smaller and more tightly restricted scope, such as for a department or workgroup. It can be independent, or derived from another data warehouse environment. distributed application In message queuing, a set of application programs that can each be connected to a different queue manager, but that collectively constitute a single application. DML See data manipulation language. data mining A mode of data analysis that has a focus on the discovery of new information, such as unknown facts, data relationships, or data patterns. data partition A segment of a database that can be accessed and operated on independently, even though it is part of a larger data structure. data refresh A data loading technique where all the data in a database is completely replaced with a new set of data. data warehouse A specialized data environment developed, structured, and used specifically for decision support and informational applications. It is subject-oriented rather than application-oriented. Data is integrated, non-volatile, and time variant. database partition Part of a database that consists of its own data, indexes, configuration files, and transaction logs. DataBlades Program modules that provide extended capabilities for IBM Informix databases and are tightly integrated with the DBMS. DB Connect Enables connection to several relational database systems and the transfer of data from these database systems into the SAP Business Information Warehouse. drill-down Iterative analysis, exploring facts at more detailed levels of the dimension hierarchies. dynamic SQL SQL that is interpreted during execution of the statement. embedded database A database that works exclusively with a single application or appliance. engine A program that performs a core or essential function for other programs. A database engine performs database functions on behalf of the database user programs. enrichment The creation of derived data. An attribute-level transformation performed by some type of algorithm to create one or more new (derived) attributes. Enterprise Replication An asynchronous, log-based tool for replicating data between IBM Informix Dynamic Server database servers. extenders These are program modules that provide extended capabilities for DB2 and are tightly integrated with DB2. FACTS A collection of measures, and the information to interpret those measures in a given context. DDL See data definition language. debugger A facility on the Message Flows view in the Control Center that enables message flows to be visually debugged. deploy To make operational the configuration and topology of the broker domain. dimension Data that further qualifies or describes a measure, such as amounts or durations. 454 Embedding IBM Informix federation Providing a unified interface to diverse data. gateway A means to access a heterogeneous data source. It can use native access or ODBC technology. grain The fundamental lowest level of data represented in a dimensional fact table. instance A particular realization of a computer process. Relative to the database, the realization of a complete database environment. Java Database Connectivity An application programming interface that has the same characteristics as ODBC, but is specifically designed for use by Java database applications. Java Development Kit A software package used to write, compile, debug, and run Java applets and applications. Glossary 455 456 Embedding IBM Informix Abbreviations and acronyms ACS access control system DBM database manager ADK Archive Development Kit DBMS API application programming interface database management system DCE distributed computing environment DCM Dynamic Coserver Management DCOM Distributed Component Object Model DDL data definition language DES Data Encryption Standard DIMID Dimension Identifier DLL dynamic link library DML data manipulation language DMS database managed space DPF data partitioning facility DRDA Distributed Relational Database Architecture DSA Dynamic Scalable Architecture DSN data source name DSS decision support system EAI Enterprise Application Integration AQR automatic query rewrite AR access register ARM automatic restart manager ART access register translation ASCII American Standard Code for Information Interchange AST application summary table AUS Auto Update Statistics BLOB binary large object BW Business Information Warehouse (SAP) CCMS Computing Center Management System CDR Continuous Data Replication CFG configuration CLI call-level interface CLOB character large object CLP command-line processor CLR continuous log recovery CORBA Common Object Request Broker Architecture EBCDIC Extended Binary Coded Decimal Interchange Code CPU central processing unit EDA enterprise data architecture CS Cursor Stability EDU engine dispatchable unit DaaS Data as a Service EGL DAS DB2 Administration Server Enterprise Generation Language DB database EGM Enterprise Gateway Manager DB2 II DB2 Information Integrator EJB Enterprise JavaBean DB2 UDB DB2 Universal Database™ ER Enterprise Replication database administrator ERP Enterprise Resource Planning DBA © Copyright IBM Corp. 2011. All rights reserved. 457 ESE Enterprise Server Edition JDBC Java Database Connectivity ETL Extract, Transform, and Load JDK Java Development Kit FP Fix Pack JE Java Edition FTP File Transfer Protocol JMS Java Message Service Gb Gigabits JRE Java Runtime Environment GB Gigabytes JVM Java Virtual Machine GLS Global Language Support KB kilobyte (1024 bytes) GUI graphical user interface LBAC Label Based Access Control HADR High Availability Disaster Recovery LDAP Lightweight Directory Access Protocol HDR High Availability Data Replication LPAR logical partition LRU Least Recently Used HPL High Performance Loader LUN logical unit number I/O input/output LV logical volume IBM International Business Machines Corporation Mb megabits IBM International Business Machines Corporation MB megabytes MDC multidimensional clustering massively parallel processing ID identifier MPP IDE Integrated Development Environment MQI message queuing interface MQT materialized query table IDS IBM Informix Dynamic Server MRM message repository manager II Information Integrator MTK IMS™ Information Management System DB2 Migration Toolkit for Informix NPI non-partitioning index ISA Informix Server Administrator OAT Open Admin Tool ISAM Indexed Sequential Access Method ODBC Open Database Connectivity ODS operational data store ISM Informix Storage Manager OEM ISV independent software vendor Original Equipment Manufacturer IT information technology OLAP online analytical processing ITR internal throughput rate OLE object linking and embedding ITSO International Technical Support Organization OLTP online transaction processing ORDBMS IX index Object Relational Database Management System J2EE Java 2 Platform Enterprise Edition OS operating system PAM JAR Java Archive Pluggable Authentication Module 458 Embedding IBM Informix PDS partitioned data set TS table space PHP hypertext preprossor UDB Universal Database PIB parallel index build UDF user defined function PSA persistent staging area UDR user defined routine RBA relative byte address URL Uniform Resource Locator RBAC Role Based Access Control VG RBW red brick warehouse volume group (RAID disk terminology) RDBMS Relational Database Management System VII Virtual Index Interface VLDB very large database RHEL Red Hat Enterprise Linux VP virtual processor RID record identifier VSAM RR repeatable read virtual sequential access method RS read stability VTI Virtual Table Interface Relational Sequential Access Method WFS Web Feature Service WSDL Web Services Definition Language RSAM RSS Remote Standalone Secondary WWW World Wide Web RTO Recovery Time Objective XBSA SA systems administrator X-Open Backup and Restore APIs SCB session control block XML Extensible Markup Language SDK Software Developers Kit XPS SDS Shared Disk Secondary Informix Extended Parallel Server SID surrogate identifier SLES SUSE Linux Enterprise Server SMIT Systems Management Interface Tool SMP symmetric multiprocessing SMS System Managed Space SOA service-oriented architecture SOAP Simple Object Access Protocol SPL stored procedure language SQL structured query SSJE Server Studio Java Edition TCB thread control block TMU table management utility Abbreviations and acronyms 459 460 Embedding IBM Informix Related publications The publications listed in this section are considered particularly suitable for a more detailed discussion of the topics covered in this book. IBM Redbooks For information about ordering these publications, see “How to get Redbooks” on page 462. Note that some of the documents referenced here might be available in softcopy only. Customizing the Informix Dynamic Server for Your Environment, SG24-7522 Informix Dynamic Server 11: Advanced Functionality for Modern Business, SG24-7465 Informix Dynamic Server 11: Extending Availability and Replication, SG24-7488 Informix Dynamic Server V10 . . . Extended Functionality for Modern Business, SG24-7299 Informix Dynamic Server V10: Superior Data Replication for Availability and Distribution, SG24-7319 Other publications These publications are also relevant as further information sources: IBM Informix Administrator’s Guide, SC27-3526 IBM Informix Administrator’s Reference, SC27-3530 IBM Informix Backup and Restore Guide, SC27-3542 IBM Informix Database Extensions User’s Guide, G229-6362 IBM Informix Dynamic Server Administrator's Guide, G229-6359-01 IBM Informix Dynamic Server Administrator's Reference, G229-6360-01 IBM Informix Embeddability Guide, SC27-3258 IBM Informix GLS User's Guide, SC27-3551 IBM Informix Guide to SQL: Syntax, SC27-3532 © Copyright IBM Corp. 2011. All rights reserved. 461 IBM Informix Installation Guide for UNIX, Linux, and Mac OS X, GC27-3537 IBM Informix Installation Guide for Windows, GC27-3540 IBM Informix JDBC Driver Programmer's Guide, SC27-3554 IBM Informix ODBC Driver Programmer’s Manual, SC27-3553 IBM Informix Performance Guide, SC27-3544 Online resources These websites are also relevant as further information sources: IBM developerWorks article Build plug-ins for the IBM Open Admin Tool for Informix Dynamic Server, available at the following website: http://www.ibm.com/developerworks/db2/library/techarticle/dm-0808von bargen/ IBM developerWorks article Use the Informix Dynamic Server scheduler and SQL API, available at the following website: http://www.ibm.com/developerworks/db2/library/techarticle/dm-0709sim pson/ Open Admin Tool for Informix, available at the following website: https://www14.software.ibm.com/webapp/iwm/web/reg/download.do?lang=e n_US&cp=UTF-8&S_PKG=dl&source=swg-informixfpd Using the new Deployment Wizard in IBM Informix Cheetah, available at the following website: http://www.ibm.com/developerworks/db2/library/techarticle/dm-0704mat hur/index.html/ How to get Redbooks You can search for, view, or download Redbooks, Redpapers, Technotes, draft publications and Additional materials, as well as order hardcopy Redbooks publications, at this website: ibm.com/redbooks 462 Embedding IBM Informix Help from IBM IBM Support and downloads ibm.com/support IBM Global Services ibm.com/services Related publications 463 464 Embedding IBM Informix Index A abstract data type 38 active connection 113 ad-hoc query 41 admin() function 169 administration admin() function 168 and types of embedding 6 automating 239–240 autonomic parameter 148 embedded Informix system 237 included 8 integrated 7 low administration requirements of a data server 21 managing backups 45 OAT 301 post-deployment 241 requirements of embedded database 5 Scheduler 205 SQL adminstration API commands 170 task() function 168 administrative interface 46 alarm program 158 custom 161 event class 160 Apache2 verifying installation 350 API embedded database requirement 5 appliance reset script 338 application development Informix Developer Edition 306 application management 40 application table 229 archecker utility 73 architecture 9, 13, 15, 50 scalability of Informix architecture 27 archived Informix instance 98 archiving 8, 46, 273, 276, 286, 423 array 253, 268 authorities 282 auto update statistics 154 © Copyright IBM Corp. 2011. All rights reserved. auto update statistics evaluation 155 auto update statistics refresh 155 auto_aiovps 148 auto_stat_mode 149 automatic chunk expansion 191 automating log archive 273 autonomic parameter 148–150 autonomic storage management 10 availability 1, 311 B backup 270–272, 276 alarm program 158 automating 270–271, 273 managing backup 43 onmode 171 ontape 152 post-deployment task 241 security 21 backup domain controller 260 basic text search 72 Basic Text Search extension 310 binary large object 156, 453 BlackBerry 2 blobspace 192 B-tree 39 buffer 184 buffer pool 149 buffered log 44 bufferpools parameter 185 bundle response file 20 business solution 372 C C 157, 242 creating function 29 tasks and sensors 219 call-level interface See CLI cdr_env configuration parameter 294 ChangeServiceConfig() starting an embedded system 252 character large object 465 See CLOB checkpoints 148 chkconfig utility 247–248 chunk 191 CLI 242 client connection request 288 CLOB 156, 457 CLOB (character large object) 457 CLR 457 cluster environment 263 communication protocol support 26 compress operation 23 compression 114 configuration 28, 48, 54, 154, 226, 252, 256, 267, 310, 325, 335, 368, 419 automation 270 autonomic parameter 148 changing a value 23 disk usage 15 editing 424 embeddability 147 Informix Developer Edition 312 nonautonomic parameter 151 predefined tasks and sensors 215 redistributing the Informix-based appliance 340 reducing installed footprint of Informix 19 script-based Informix deployment 420 using a deployment script on UNIX 416–417 Windows Server 2008 installation 367 configuration file 122, 216, 220 configuration option 67 configuration parameter 98 drauto 295 drinterval 295 drtimeout 295 logbuff 295 logfiles 295 logsize 295 ltapeblk 295 ltapesize 295 physbuff 295 physfile 295 rootname 295 rootsize 295 stacksize 295 tapeblk 296 tapesize 296 Configuration Wizard creating an Informix/Linux-based virtual appli- 466 Embedding IBM Informix ance 315 connect privilege 120 connection authentication 243 connection protocol 108 connection string 262 console mode 63 consolidation 3 continuous log recovery See CLR CRM 9 CSDK (client software development kit) 307 installing on a QEMU-based virtual appliance 351 installing on non_GUI Ubuntu JeOS 332 installing the Informix way 331 response file 20 custom installation 333 customer relationship management See CRM D DaaS (Data as a Service) 2 DAC (discretionary access control) 259 data adding space 280 exchanging data between host and guest OS 313 rejecting 282 removing 282 data definition language See DDL data distribution 154 data movement 162 data replication Informix stability 26 Data Server Driver JDBC/SQLJ 307 ODBC/CLI 307 data space 139 Data Studio 1.1.2 pre-installed with Informix Version 11.50 307 data type 37, 162, 191 extensibility support 29 database backup 191 database object 41, 259 database operation 156 database server 96 alarm parameter 161 application set processing 36 autonomic parameter 148–150 connectivity 41, 156, 252, 425 DBMS function 162 Express Runtime component 372 interface 242 multiple DBMSs 39 nonautonomic parameter 153 scheduler 205 security 241, 269 shared system 49 tasks and sensors 204 database service 2–3, 5–6 DataBlade 37, 307 DB Scheduler scheduling task 25 dbaccessdemo 60 dbload 73 DBMS (database management system) 8, 45, 237, 239, 270 starting and stopping 245 DBSA group 192 dbservername 59, 256 using a deployment script on UNIX 417 dbservername configuration parameter 297 dbspace 191 adding space 279, 281 adding to an Informix instance 178 creating 169 monitoring remaining space 277–278 DDL 278, 454 decryption 156 deep embedding 7 defined 17 default role 42 deferred extent 199 defragment command 200 defragmenting 200 delete 217–218, 225, 228 demo environment potential use cases for an Informix-based appliance 300 deployment 48, 243, 353, 421, 423 DBMS 237 defined 17 post-deployment 241 pre-configured database-based application 299 security 258 deployment assistant 98 deployment defaults of lightweight deployment 423 deployment utility 63, 98 deployment wizard 19, 243, 266 small footprint installation 18 disaster-recovery instance 288 display environment variable 120 distributed queries 40 distributed relational database architecture See DRDA DRDA 26, 179, 242, 403, 457 drop 149 DSA 27, 457 dynamic allocation 150 dynamic scalable architecture See DSA DYNAMIC_LOGS configuration parameter 44 E Eclipse 307 Eclipse-based technology 372 embeddability 122 embedded application 2, 11, 38 embedded data server 2, 5, 17–18, 25 embedded database 2, 4–5, 7, 17, 40 embedded environment 1, 151 embedded instance 46 embedded system 4, 11, 14, 27, 35, 45, 50, 155, 203, 237, 240–242, 246, 265, 286 automatic startup and shutdown 246 Linux startup and shutdown 261 startup and shutdown of an embedded system 253 UNIX startup and shutdown 246 embedding 1–3, 6–7, 9–10, 13–15, 25, 164, 240, 252 deep embedding defined 17 feature 18 enable_snapshot_copy configuration parameter 295 encryption 41, 156, 263 Informix support 18 environment variable 60, 219, 242, 247, 264, 311, 333, 335 informixdir 295 informixserver 295 informixsqlhosts 295 Lightweight Installer 421 onconfig 295 Index 467 ER (enterprise replication) and Informix user account 266 Informix stability 26 ER domains 289 Express Runtime usage scenario 375 extensibility 17 extensibility support 29 extent 50 external file 191 extraction 109 F failover 288 FirefoxPortable 354 flexible grid 289 fragmentation 50 full_disk_init configuration parameter 246 functional index 38 G grant access SQL statement 244 graphical installer 97 graphical mode 63 grid 289 group by 39 GUI 242, 266, 330–332, 338–339, 341–342, 346 cutting and pasting between host OS and the appliance 314 Informix virtual appliance Redbooks demo base image 302 H HA 2, 8, 10, 215, 287, 336 use cases for an Informix-based appliance 301 HDR 458 Informix stability 26 hierarchical 37 hierarchical node data type 72 high availability See HA high availability data replication See HDR high-availability instances 288 high-performance loader 73 host name 157, 271 HTML 351, 354 468 Embedding IBM Informix HTTP 242 I IBM Common Client and Data Server 180 IBM WebSphere 37 use cases for an Informix-based appliance 301 ids_install command 67 ifx_ontape_file_prefix 276 ifxdeploy utility 296 index 53, 154 index page 184 Informix architecture explained 14 Lightweight Installer 422 Informix Detective Game getting started with Informix Developer Edition 309 Informix Developer Edition 306 getting started 309 Informix JDBC driver 178, 180 Informix platform availability matrix 27 Informix Server Administrator 242 Informix Storage Manager 74 Informix/Ubuntu tips and tricks 343 init level 248 INSERT 157, 217, 221–222, 225–228, 280 installation footprint 56, 330, 333 installclientsdk 67, 89 installconnect 67, 89 Instance Configuration Wizard 27 integrated 97 integrated deployment compared to invisible deployment 326 integration 375 interactive installation 20, 63 installation script 67 typical 67 invisible deployment 98 iPhone 2 IPX/SPX 242 ixpasswd utility 264 J Java 10, 167, 178, 180, 217, 219–220 creating functions in 29 tasks and sensors 219 user-defined routine 310 Java Common Client 180 Java Database Connectivity See JDBC JDBC 10, 49, 179–181, 242, 262 application development 427 driver 178, 180, 428 JDBC Driver 3.50 307 L label based access control See LBAC large object locator 37 launchpad interactive installation 67 LBAC 259, 458 ld_library_path 426 level 0 archive 47 level 1 archive 46 level 2 archive 46 license information scripts 339 Lightweight Installer 420 usage option 421 LimeJeOS 303 Linux 11, 15, 28, 36, 60, 70, 75, 152–153, 239, 242, 250, 257, 273, 276, 300, 331, 333–334, 336, 345–346, 355 choosing a suitable Linux distribution 302 creating an Informix/Linux-based appliance 299, 314–315 Informix virtual appliance Redbooks demo base image 301 startup and shutdown of an embedded system 257 load 149, 180, 253, 268, 301, 425, 428 load balancing 289 local database server 288 local user 288 locks 184 defined 150 log archive 191 logical log 25, 46, 152, 159, 172–173, 205, 271, 276, 278, 288 logical unit number 288 LTAPEDEV configuration parameter 275 M MAC 259 mandatory access control See MAC mapped user 42 memory 4–5, 11, 14–15, 18, 39, 50, 150, 154, 216, 299, 303, 315–316, 338, 346, 353, 361 memory utilization 39 message segment 186 Microsoft Virtual PC choosing a virtualization technology 305 modify_sp_values command 198 mon_low_storage 198 monitoring 15, 36, 76, 205, 208, 216, 229, 241, 277, 286 MQ messaging 37 MSGPATH 153 multiple residency 49 N near real-time 228 network client connection port 49 network configuration Informix Developer Edition 312 Ubuntu 322 Windows 368 Node DataBlade 37 nonautonomic parameter 151–153 non-interactive deployment 97 non-OS user 43 O OAT 153, 167, 178, 182, 206, 210, 227, 230, 240–242, 307, 309, 334–335, 347, 352, 462 adding a stand-alone external web browser 354 classic installation 333 Informix virtual appliance Redbooks demo base image 301 installing 333 ODBC 242, 458 ODBCINI setting up ODBC on UNIX 426 OLE DB 242 onbar 74, 272, 295 automating backup 271 oncheck 49, 53, 55, 57, 167 onconf file 294 onconfig 48, 59, 61, 158, 216, 220, 226, 249, 333, 336, 418–419 parameters 24 using a deployment script on UNIX 416 Index 469 onconfig file 185 online defragmentation 10 online transaction processing 292 onload 73 onmode 25, 61, 148–149, 151–152, 167, 173, 249, 263, 337 setting onconfig parameter 24 trap 171 onspaces 25, 54, 57, 239 onstat 60, 211, 239, 249, 276, 337 onstat -g mem command 184 onstat -g seg command 184 onstatt 167 ontape 54, 57, 152, 270 automating backups 270 ontape_prefix configuration parameter 270 onunload 73 Open Admin Tool See OAT open database connectivity See ODBC OpenVPN installing a TAP driver 355 optimizer statistics 154 optimizing data storage 10 P package 180, 330–331, 350, 356 page 148, 158, 302, 351 parallelism 27 partitioning 50 password issue 258, 260–263, 265, 267, 269–270, 395 PDC 260 performance 1–2, 5, 10, 14–15, 36, 38–40, 50, 74, 148, 151, 154–155, 162, 238, 241, 305, 356, 462 PERL 239 permission 43 ph_alert table column constraints 227 ph_bg_jobs table 231 ph_run table 211 ph_task table 212 default values 221 ph_threshold table 214 ph_version table 214 PHP 167, 178, 182, 242, 307, 311, 334, 350 470 Embedding IBM Informix Informix virtual appliance Redbooks demo base image 301 PHP5 verifying installation 350 pluggable authentication module 42 primary 4, 327 primary domain controller See PDC primary server 288 privilege 156, 359 privileges check 43 process 15, 36, 39, 155, 167, 242, 252 programming language 178 Q QEMU choosing a virtualization technology 305 creating an empty QEMU drive 347 creating an Informix virtual appliance 346 improving network connectivity 355 increasing performance with Kqemu 356 installling basic Ubuntu JeOS 348 latest version 347 recompressing 353 unblocking re-directed port 354 USB memory stick virtual appliance 346 query optimizer 154 queue 149 R real-time 228 recovery 5, 8–9, 11, 46, 151, 258 recovery time objective See RTO Red Hat Appliance Operating System 303 Redbooks Web site 462 Contact us xix remote stand-alone secondary server See RSS repack command 200 repack operation 23 replication 2, 41, 48, 263 replication mode 288 resident shared 185 response file 17, 63, 99, 266 defined 17 silent installation 20 restore 54, 152, 242 roles 259 rollback 150 RSS 263, 288, 459 RTO 151, 459 rto_server_restart 151 R-tree 38–39 Ruby on Rails 307 S sbspaces 192 scalability 14, 27, 96 scalability node use cases for an Informix-based appliance 301 Scheduler 205 schema 149 SDK 407 Informix virtual appliance Redbooks demo base image 301 installing as part of the Informix appliance image 331 SDS use cases for an Informix-based appliance 301 search 37 secondary 26, 215, 263, 311, 326 secondary server 288 security 14, 40–41, 258–259, 263, 265, 268–269, 354 embedded data server 21 segment 184 SELECT 39, 153, 162, 164, 173, 218, 225, 283, 311, 428 self tuning 148 self-tuning feature 22 sensors 239 server 28, 50, 52, 56, 171, 182, 216, 239, 242, 254, 257, 270, 274, 306, 315, 337, 356, 358–359, 365–368, 396, 403, 461–462 connection 180 server configuration 99 Server Core Windows Server 2008 install option 304 server instance 98 server response file 20 service level agreements 288 service-oriented architecture See SOA SET ROLE SQL statement 42 shared disk secondary server 288 See SDS shared library 164, 219 shared memory 14–15 shared memory segment 184 shared-memory buffers 149 sharing 242, 313 shmtotal 188 shmvirt_allocseg configuration parameter 185 shmvirtsize configuration parameter 185 shrink commands 200 shrink operation 23 shrinking 200 silent installation 5, 10, 20, 48, 66, 96, 414 defined 17 Deployment Wizard 19 silent mode 407 Lightweight Installer 422 small footprint installation 18 smart blobspace 191–192 snapshot 97 snapshot reduction 116 SOA 2 software appliance defined 15 software developers kit See SDK SP_AUTOEXPAND 143, 197 SP_THRESHOLD 143, 197 SP_WAITTIME 143 Spatial DataBlade 8.21 pre-installed with Informix Version 11.50 307 SPL 36, 149, 155, 217–218 procedure 218–219, 221 routine 149 SQL 10, 25, 38, 54, 154, 161, 164, 178–181, 204, 210–212, 216, 227, 263, 282 administration 21 connection property 155 declaration 219 incorporating into shell script 177 interface onmode trap 171 object 214 QEMU 352 setting up a database using dbaccess 425 statement 153, 162, 217, 221 SQL adminstration API 167, 195 calling task() function 181 dynamic configuration 25 Index 471 explained 25 further reading 182 minimizing installation footprint 54 programming example 178–181 scheduler command 171 scheduling task 25 scripting example 172, 176 sqlhosts file 60, 419 SQLHOSTS service port for server instance 422 SQLJ 262 startup sensor 226 startup task 226 statistics 37, 147, 206, 215–216, 371 storage manager 271 storage pool 142, 191–192 storage provisioning 10 storage space 139 stored procedure 239 stored procedure language 218 See SPL structured query language See SQL sudo command 322 support table 203 SUSE Linux 247–248, 303 creating Informix-based appliance 303 syntax 155, 265, 270–271, 461 sysadmin database 206 sysalarmprogram 154 sysdbclose 147, 155–157 sysdbopen 147, 156–157, 164, 282 sysdbopen() procedure 42 syssqltrace 175 syssqltrace_hvar 176 syssqltrace_info 175 syssqltrace_iter 176 T table 10, 41, 51, 53, 149, 154, 167, 172, 206, 208, 214, 216, 224, 227, 262, 279 table fragments 40 tapedev 59, 152, 270–271, 273, 276 tar file 332, 334–335 task() function 169 tasks and sensors 10, 51, 203–204, 213, 216–217, 221, 229–230 for embedded systems 229 generating alerts 227 472 Embedding IBM Informix predefined 215–216 support table 206–214 tricks 228 TCO 2 TCP/IP 242, 355 template 266 temporary dbspaces 192 temporary table 191 terminology 13 threshold 185 total cost of ownership See TCO transaction 22, 26, 38, 148, 150, 156 transactional control 43 trigger 25, 228, 338 troubleshooting 312 trusted client 43 trusted context 43 tuning 8, 17 typical installation 67 U Ubuntu 8.04 JeOS 303 activating VMware shared folders as part of creating an Informix/Linux-based appliance 323 adding a GUI as part of a creating a Informix/Linux-based appliance 328 adding an additional static IP address as part of creating an Informix/Linux-based appliance 324 as QEMU guest OS 346 creating an Informix/Linux virtual appliance 314 customization as part of creating an Informix/Linux-based appliance 322 installing 317–319, 321 installing in QEMU 348 installing small footprint GUI 330 installing VMware tools 322 updating 322 UDR 157, 163, 211, 220–221, 310 scheduling task 25 unattended installation 63, 69 UNIX 10, 20, 159, 177, 246, 268 alarm program 158 password issue 270 UPDATE 154, 217, 228 update statistics 215 user defined routine See UDR user-defined aggregate 37 user-defined functions extensibility support 29 V view 41, 207 VII 29 extensibility support 29 virtual appliance 3–4, 11, 28–29, 299–300, 306, 312–313, 335, 346, 349, 351–354, 356, 360–361, 364, 368, 370 creating 302, 314 defined 15 virtual index interface See VII virtual machine 4, 28, 323, 360–361, 365–368, 370 virtual processor 310 See VP virtual segment 185 virtual shared memory segment 185 virtual table interface 29 virtualization 3, 29, 299–300, 356 choosing a virtualization technology 304 virtualization technology 304–305 VMware 11, 28, 312, 322, 325, 327, 346, 349–351, 356, 358–359, 364–367, 369, 371 adding a new chapter 312 adjusting 312 choosing a virtualization technology 304 creating an Informix/Linux-based appliance 315 creating an Informix/Windows-based appliance 357 Informix Version 11.50 system requirements 307 obtaining an X11 driver 329 shrinking virtual disks 342 use cases for an Informix-based appliance 301 VP 14–15, 148, 184, 216, 225 architecture scalability 27 creating an Informix/Linux-based virtual appliance 316 self-tuning 22 VTI (virtual table interface) extensibility support 29 351, 355, 358–359, 364–365, 367 alarm scripts 158 automatic startup of embedded systems 252 autoplay issues with Ubuntu/QEMU 353 choosing a suitable Windows edition 303 creating an Informix/Windows-based appliance 299, 302, 356 licensing issue 304 password issue 260, 263, 265 sc command 253 Windows Server 2008 304 creating an Informix/Windows-based appliance 365 initial setup 356 X Xen choosing a virtualization technology 305 Xfce 4 pakages evince-gtk 331 mousepad 331 syna2ptic 331 tango-icon-theme 331 Xfce4 optional install package 331 XML 37 additional capabilities in Informix Version 11.50 310 Y YaST 312 W Windows 10, 15, 36, 152–153, 159, 177, 239, 242, 262–263, 265, 267–268, 273, 276, 300, 328, 347, Index 473 474 Embedding IBM Informix Embedding IBM Informix (1.0” spine) 0.875”<->1.498” 460 <-> 788 pages Back cover ® Embedding IBM Informix ® A full function, high performance, and highly available relational DBMS A small footprint and scalable to fit your environment Low administrative requirements In this IBM Redbooks publication, we discuss and describe the capabilities for embedding Informix into applications and software. We introduce the technological architecture and describe several of the functions and features that support Informix as a robust and powerful embeddable DBMS. Many of these features are unique in the industry today, enabling clients to create a business advantage. INTERNATIONAL TECHNICAL SUPPORT ORGANIZATION The Informix database server can support the requirements of an embeddable DBMS, and is doing so for many companies today. The low administration requirements of the Informix database server enable clients to deploy thousands of Informix instances, embedded in applications in locations where there are no technical resources to support the database. The real requirement is for applications with embedded databases that require little or no administration, take minimum storage resources, have excellent performance, and are highly reliable. BUILDING TECHNICAL INFORMATION BASED ON PRACTICAL EXPERIENCE As a mature and reliable DBMS, the Informix database server works well with small, growing, and large databases, and meets the key requirements for embedded databases, which include the ability to execute without needing any configuration or other DBA administrative activities, and the flexibility to work on all of the platforms commonly used in the marketplace today. IBM Redbooks are developed by the IBM International Technical Support Organization. Experts from IBM, Customers and Partners from around the world create timely technical information based on realistic scenarios. Specific recommendations are provided to help you implement IT solutions more effectively in your environment. For more information: ibm.com/redbooks SG24-7666-01 ISBN 0738435155