1
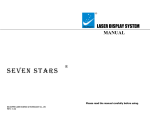
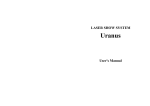
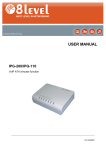
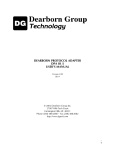
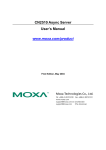
LS-1W Animation Laser RGB DMX 152.897 Instruction Manual (Before using,please read the user manual carefully.) This is product integrates many advanced technologies like optics, electronics, digital graphic processing, especially designed for dancing halls and DISCO. According to music rhythms, built-in beam program can be activated; if using smoke, light curtain wall and time tunnel can be formed to create a colorful and fantastic laser world. NOTICE The best temperature range of using laser:20~35℃. Do not reflect to the eye directly in case of hurting. Do not use the laser over AC220V~240V and please make sure reliable grounding. Do not turn on and turn off frequently; this will affect the laser’s normal life. Based on the working character of solid state laser, please try not to work for a long time. If the laser works continuously for three hours, please turn off the laser 15 minutes. After the laser is cold, start to turn on again. Do not use hands to touch the lens in case it will affect the effects. If there appears breakdown, please ask experts to repair; do not remove the laser yourself. Attention:Destroy the laser or tear up the warranty label artificially, it’s all beyond warranty scope. Please read the warranty rules. Animation Laser (without PC interface) Front panel and rear panel schemes (According to different models, the panel will be different.) ○,1 light outlet ○,2 Fan ○,3 power supply ○,4 Sound control sensitivity knob ○,5 DMX XLR ○,6 power socket ○,7 Address code switch ○,8 sound control MIC 1. Operating Instructions DIPSWITCH CHART FUNCTION #1 #2 #3 #4 #5 #6 #7 #8 #9 #10 X X X X X X X X X x SOUND ACTIVE 1 X X X X X X X x x AUTO MODE 1 1 x x x x x x x x Animatiom Sound control Auto working Animation 1.1 Single user mode: 1.1.1 Use dip switch to set operating mode(See the table below). Set the operating mode according to clients’ requirement: SOUND ACTIVE or AUTO MODE. 1.1.2 Connect the power supply, and the lamp start to project laser light. 1.1.3 When in SOUND ACTIVE mode,adjust sound control sensitivity, and adjust the sound control sensitivity knob according to the surrounding’s sound strength. In the front panel when the blue indicator flashes to indicate the sound activation, the system is in sound active program; when in Auto mode, the system is in Auto-working program. 1.2 Scanner master & slave synchronous mode: The switching method of Master & slave synchronous mode Master: sound activation( switch 0 in address code) or auto mode( switch 1in address code) or animation mode( switch 1,2 in address code) Master ( sound activation, auto, animation mode) Slave: switch 2 or switch 3 1.1 Set working mode. Set a laser in Master& Slave mode(MASTER: SOUND/AUTO), and other lasers are all set in Slave mode. 1.2 Connect the line. Use XLR-XLR line to connect the XLR output of the master to the XLR input of the first slave, and then connect the XLR output of the first slave to the XLR input of the second slave. Do like this until all the slaves are connected. 1.3 Connect the power supply, and the lamp start to project laser light. And the slave beam is synchronous with master. 1.4 When in SOUND ACTIVE mode,adjust sound control sensitivity, and adjust the sound control sensitivity knob according to the surrounding’s sound strength. In the front panel when the blue indicator flashes to indicate the sound activation, the system is in sound active program; when in Auto mode, the system is in Auto-working program. DMX mode switching method: When in DMX mode, the DMX controller controls the laser, and the corresponding function of every channel is shown in attachment. The DMX address code is in the attached address table. First to ninth: starting address The tenth: sound control/ DMX functions change OFF:sound control ON: DMX signal control . Animation Laser (with PC interface) 1. Front panel and rear panel schemes (According to different models, the panel will be different.) ○,1 light outlet ○,2 ○,3 power supply ○,4PC interface (ILDA/DB-25) Fan ○,5 Sound control sensitivity knob ○,6 ○,7 power socket ○,8 ○,9 sound control MIC DMX XLR Address code switch 2.The operating method of lasers with PC interface is the same as that of lasers without PC interface. So I will not repeat here. And now let’s introduce how to use PC interface. Please connect the lines as following. Lasers can connect the ILDA output software like Phoenix, Pangolin and Ishow. Attention: After connecting, the laser will not be controlled by its own program. After connecting software, users can edit pictures, animation, characters freely. Lasers with SD card can also edit pictures, animation, characters and so on. Please refer to the user manual of lasers with SD card and CD. DMX512 Controller connecting lasers: IN x OUT N………. DMX Console(Sending end) Laser 3 ……………….. laser1(Receiving end) Laser 2 For example, If the laser has 11 channels, the address is set as: 000000001 000001100 000010111 ………… 1.Connection Method: DMX Console---------Laser Every machine is connected in series like serial installation. Many people thought signal is serial but DMX signal is collateral. All the receiving ends are connected in parallel in DMX control. If address code isn’t differentiated, we can’t differentiate sending ends. As long as the sending ends are differentiated, it can form different and regular effects. Therefore, the address switch in our laser can set address, and then DMX console can tell the difference. How to set the address can be shown at 3. (Attention: the terminal should connect with 120 Resistor to avoid signal disturbing. 2. Address allocation: DMX 512 supports 512 channels. If every laser has 16 channels, so is can connect 32 pieces of lasers. Usually, RGB LED has 3 channels, so DMX 512 console can connect 170 pieces of LED in every line. 3. How to set address code switch: Address code setting: In the binary system, the first has 0 and 1 numerical value, and it corresponds with Switch “OFF” and “ON”. When calculating, meet 2 into, as shown below: LOOP ADDR First laser BINARY 1 000000001 = Second laser 12 000001100 = Third laser 23 000010111= Forth laser USAGE OF DIP SWITCH 34 000100010= Common abnormal phenomena & failure elimination 1. In the sound activation mode, beam effects don’t change with music. Elimination method: Rotate right (Sensitivity control) knob until you obtain satisfactory effects. When in DMX512 mode, push-and-pull controlling rob doesn’t work. Elimination method: First check whether DMX 512 controller can work normally and whether the signal lines are connected correctly; and then check whether the first channel push rob of the laser is in the controlling (the numerical value is between 192-255). 3. The laser doesn’t react. Elimination method: First check whether the fan can rotate, then check whether the power supply is connected and the fuse is broken.。 4. The laser doesn’t shine enough. Elimination method: The laser need preheat time, so please preheat 5-10 minutes before using; please check whether the lens is dirty and use soft cotton swab with absolute alcohol to clean the lens. Form I The international standard DMX 512 Signal suitable for laser with 7 channels. The detailed control function is shown below: Form 1 Channel CH1 Function Mode Value Description 0~49 Close, laser OFF 50~99 Static patterns of DMX mode 100~149 Dynamic patterns of DMX mode 150~199 Sound active mode 200~255 AUTO mode CH2 Pattern selection 0~255 52 static/dynamic patterns CH3 Position-X 0~255 Adjust position-X CH4 Position-Y 0~255 Adjust position-Y CH5 Scanning speed 0~255 0 is speedy, 255 is slow Dynamic pattens CH6 0 is speedy, 255 is slow, has ten 0~255 play speed CH7 Static pattern size grade speed 0~255 0 is small, 255 is big Adopting international standard DMX512 Signal suitable for lasers with11 channels, the detailed control function is shown below: Form 2 DMX512 value 0~51 52~103 1control mode 104~155 156~206 207-255 0~15 16~25 2 blanking and 26~135 light-free 136~245 246~255 3 picture changing 0~255 4 speed 0~255 Control function sound control (3-10 channels don’t work) Auto mode(3-10 channels don’t work) Animation mode Manual mode,sound control start Auto mode, auto start Light free No blanking Water-flow effect, closer to 135, water flow quickly. Flashing effect, closer to 245, it flashes more quickly. Fixed blanking 128gobos(0~255) 12 level speed(0-255)/23=(0-11) 0~63 64~127 5reversing 128~191 192~255 0~63 64~127 6rotating/plotting 128~191 192~255 0~63 7horizontal/vertica 64~127 128~191 lmoving 192~255 8Level stretching 0~63 64-255 0~63 9vertical 64-255 stretching No reversing Horizontal reversing Vertical reversing Horizontal & vertical reversing No rotating and no plotting Rotating Plotting Rotating and plotting No moving Horizontal moving Vertical moving Horizontal & vertical moving No stretching Horizontal stretching No stretching Vertical stretching 10magnifying and 0~85 86-169 narrowing 170-255 (0~255)/21 11Gradually draw No magnifying and no narrowing Magnify and narrow from small to large Magnify and narrow from large to small 13 level speed(0-255)/21 <0-12> the speed is quicker, the draw is quicker. Form 3 DMX Address form