1
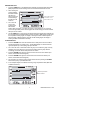
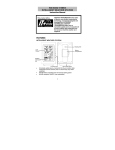
Getting Started
POWER
1. The RH520 runs on battery power or AC adaptor (4.5VDC 300mA). Battery power
consists of three (3) ‘AA’ batteries. See the Battery Replacement section of this manual
when changing/installing the batteries. Note: Batteries and adaptor are supplied.
2. Plug the AC adaptor in the AC adaptor jack shown in the Description section. The
batteries will act as battery back-up in the event of an AC power failure.
3. Once the batteries are installed or the adaptor properly connected, the RH520 will
begin displaying.
4. In the unlikely event that the AC power AND the battery back-up fails, the RH520 will
require a “Programming Reset” to reset the display. Press the RESET button located
inside the battery compartment. “Reset” clears all settings. Time, Date and the logging
interval need to be entered. The measurement data and alarm history, however, will
still be retained in the non-volatile memory.
5. The 5-segment battery life indicator allows the user to track the status of the battery.
When all 5-segments are dark, the battery is fully charged. Segments switch off as the
battery ages. When the battery indicator has only one segment left the batteries must
be replaced immediately.
NOTE: Always set the date and time immediately after batteries have been installed or
after the RESET button has been pressed.
MOUNTING THE RH520
The RH520 can be used in the following ways:
1. Placed on a table top where the swivel keypad is employed as the table stand
2. Wall mounted using the rear mounting holes
MEASUREMENT PROBE
The probe is attached to the meter with a 1 meter cable and can be used in two ways:
Stored in the RH520 probe cradle or simply held in hand
PUSH-BUTTON LOCK-OUT SECURITY FEATURE
The RH520 can be secured from tampering by having its push-buttons locked.
1. Press for approx. 1 second and release the UP, DOWN, LEFT, and SET arrow buttons
simultaneously to lock-out the push-buttons.
Note: The security lock out can only be performed from the main view screen. If a
scroll key or the time button was pressed prior to setting up the lock-out, the user must
scroll back to the main screen.
2. Press for approx. 1 second and release the UP, DOWN, LEFT, and SET arrow buttons
simultaneously to restore the operation of the push-buttons
7
Model RH520 Version 2.7 7/05