1
NextG
007GTi
PRO
USB-Yagi
TurboTenna
Jan 18
2015
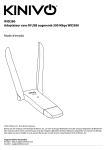
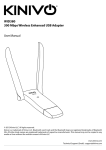
This manual walks though the steps of setting up the USB-Yagi Plug & Play WiFi
antenna from quick start followed by detailed explanation of what each
parameter does. It talks about the STATION mode for accessing a remote
hotspot, and using the USB-Yagi as a local ACCESS POINT for sharing the
Internet with other WiFi computer clients
Instruction
Manual
Version 0.215.7
NextG 007GTi PRO USB-Yagi Instruction Manual
Copyright© by danets Datacom Network Ltd. all rights reserved.
No part of this publication may be reproduced, transmitted, transcribed, stored in a retrieval system, or
translated into any language or computer language, in any form or by any means, electronic,
mechanical, magnetic, optical, chemical, manual or otherwise, without the prior written permission of
this Company .This company makes no representations or warranties, either expressed or implied, with
respect to the contents hereof and specifically disclaims any warranties, merchantability or fitness for
any particular purpose. Any software described in this manual is sold or licensed "as is". Should the
programs prove defective following their purchase, the buyer (and not this company, its distributor, or
its dealer) assumes the entire cost of all necessary servicing, repair, and any incidental or consequential
damages resulting from any defect in the software. Further, this company reserves the right to revise
this publication and to make changes from time to time in the contents hereof without obligation to
notify any person of such revision or changes. The software and specifications are subject to change
without notice. Please visit our web site www.danets.com for the update. All rights reserved including all
brand and product names mentioned in this manual are trademarks and/or registered trademarks of
their respective holders
Linux Open Source Code
Certain danets products include software code developed by third parties, software code is subject to
the GNU General Public License ("GPL") or GNU Lesser General Public License ("LGPL"). Please see the
GNU (www.gnu.org) and LPGL(www.gnu.org) Websites to view the terms of each license. The GPL Code
and LGPL Code used in danets products are distributed without any warranty and are subject to the
copyrights of their authors. For details, see the GPL Code and LGPL Code licenses. You can download
the firmware-files at http://www.danets.com under "Support" page.
© 2015 by danets Datacom Network Ltd. All rights reserved.
DN-WLAN-035
Page 2
NextG 007GTi PRO USB-Yagi Instruction Manual
Table of Contents
1. PACKING LIST .................................................................................................................................................................... 4
2. QUICK START ..................................................................................................................................................................... 5
2.1 INSTALLATION AND DEVICE CONNECTION ............................................................................................................................. 5
2.2 CHOICE OF LOCATION ............................................................................................................................................................... 5
2.3 ADJUSTMENT ............................................................................................................................................................................ 6
3. SCANNING THE WIFI SIGNAL – A QUICK GUIDE ............................................................................................... 7
3.1 MEDIATEK WIRELESS UTILITY (MEDIATEK) OR WINDOWS ZERO CONFIGURATION (WZC) ................. 7
3.2 WORKING WITH WINDOWS ZERO CONFIGURATION (WZC) ............................................................................................ 8
3.2.1 Configuration of NIC by using WZC under Windows 7 and VISTA ....................................................... 8
3.2.2 Configuration of NIC by using WZC under Windows XP .......................................................................... 9
3.3 WORKING WITH MEDIATEK ................................................................................................................................................. 13
4. ADVANCED MEDIATEK FEATURES ON WINDOWS 8 AND 7 .................................................................... 15
4.1 TURN ON/OFF RF................................................................................................................................................................. 15
4.2 SECURITY ................................................................................................................................................................................. 15
4.3 SIGNAL STRENGTH ................................................................................................................................................................. 15
4.4 SITE SURVEY........................................................................................................................................................................... 16
4.5 LINK INFORMATION ................................................................................................................................................................. 16
4.6 PROFILE .................................................................................................................................................................................... 17
4.6.1 Example to Add a PROFILE with encryption ................................................................................................. 18
4.6.2 Example to Add a PROFILE without encryption .......................................................................................... 19
4.6.3 Example to setup an Ad-Hoc wireless connection .................................................................................... 20
PC1:............................................................................................................................................................................................ 21
PC2:............................................................................................................................................................................................ 22
5. APPLE MAC OS X DRIVER INSTALLATION ......................................................................................................... 25
5.1
5.2
5.3
5.4
LOCATE THE DRIVER IN THE CD-ROM ............................................................................................................................... 25
MAC OS X DRIVER INSTALLATION.................................................................................................................................... 25
RUNNING THE WIRELESS UTILITY ...................................................................................................................................... 29
SITE SURVEY.......................................................................................................................................................................... 30
5.4.1 Connecting to a Wireless Network................................................................................................................. 30
5.4.2 Keying in the Authentication\ Encription Password ............................................................................... 31
APPENDIX I ............................................................................................................................................................................. 33
© 2015 by danets Datacom Network Ltd. All rights reserved.
DN-WLAN-035
Page 3
NextG 007GTi PRO USB-Yagi Instruction Manual
1. Packing List
Installation of the USB-Yagi is straight forward. As soon as you open up the box, you will be able to find
the following items:
A USB-Yagi High Power Plug & Play antenna with a tripod
A USB2.0 extender cable
A CD-ROM software drivers for Windows 8/7/VISTA/XP, Linux and MAC OS X
An installation guide
If you plan to build the Universal WiFi Repeater using the +35dBm NextG USB-Yagi Plug & Play
Antenna, you could purchase the USB-Omni kit online from the link below.
http://www.danets.com/turbotenna/UsbOmniApRepeater.php
Add the Power RF Amplifier Kit from the link below if extra horse power is required.
http://www.danets.com/turbotenna/PowerAmpKit.php
© 2015 by danets Datacom Network Ltd. All rights reserved.
DN-WLAN-035
Page 4
NextG 007GTi PRO USB-Yagi Instruction Manual
2. Quick Start
2.1 Installation and Device Connection
Install the CD-ROM software driver before you plug in the USB-Yagi antenna to you PC or laptop
computer. This avoids the antenna being recognized by another existing WiFi software driver which
might not be fully compatible with the antenna’s original software driver.
Before making any device and cable connection to the computer, you have to install the CD software
driver and utility from fresh.
Your CD should have the most current software version. Otherwise, you could obtain the latest software
driver and utility in the link below.
For Apple MAC OS X 10.8 Mountain Lion
http://www.danets.com/download/RTUSB_D2870-4.2.6.0_UI-4.0.8.0_2012_09_28.dmg
For Windows 7 and VISTA
http://www.danets.com/support/Windows7DriverMediatek.exe
For Windows 8
http://www.danets.com/support/Windows8DriverMediatek.exe
For Windows XP
http://www.danets.com/support/WindowsXpDriverMediatek.exe
Insert the CD-ROM into the CD/DVD drive of your computer.
As soon as the AutoPlay window appears, double click “SETUP.EXE” to install the software driver. If the
AutoPlay window does not pop up, you could also go to the CD/DVD drive under “My Computer” and
double click the SETUP icon.
Reboot your computer.
Once completed, you could plug in the USB-Yagi antenna to any spare USB port of your computer using
the USB2.0 cable supplied in the kit.
2.2 Choice of Location
You may either setup the antenna on a table or a tall wooden book shelf near the ceiling. Extend the legs
of the tripod to maintain stability. Never put the antenna on a metal cabinet or behind a metal structure.
If you intend to setup the antenna outdoor such as roof top, balconies, poles or towers, be sure to install
an arrestor for lightning protection.
Once you have chosen the location, make sure that your RF cable is long enough to each your wireless
router or WLAN client adapter device. Point the antenna in the direction of the signal source.
© 2015 by danets Datacom Network Ltd. All rights reserved.
DN-WLAN-035
Page 5
NextG 007GTi PRO USB-Yagi Instruction Manual
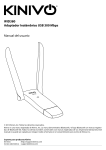
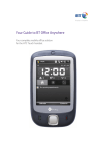
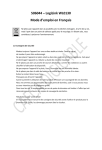
2.3 Adjustment
Ideally the antenna should be pointing at the signal source whitout any
obstructions. If there is a wall getting in the way, try to veer the antenna in
other directions until you find the sweet spot with the best signal strength.
Because the antenna has linear polarization, you may find that you get a
better signal by rotating it slightly clockwise or anti-clockwise on the tripod
along its cylindrical axis.
Since the RF cable is pretty rigid, special attention is required for connecting
the RP-SMA end of the cable to the Repeater in order not to break off the
connector from the Repeater’s casing.
Cable tie is recommended to fix the cable before fitting it in the Repeater.
Figure 1 Rotate to change the
angle of polarization for optimal
signal reception.
© 2015 by danets Datacom Network Ltd. All rights reserved.
DN-WLAN-035
Page 6
NextG 007GTi PRO USB-Yagi Instruction Manual
3. Scanning the WiFi Signal – A Quick Guide
3.1 MEDIATEK WIRELESS UTILITY (Mediatek) OR WINDOWS ZERO
CONFIGURATION (WZC)
As the title suggests, two types of wireless utilities are possible. The Windows Zero Configuration
provides the basic wireless networking configuration whose user interface is consistent across various
Windows Operating Systems from XP, VISTA to Windows 7; and the more sophisticated Mediatek
Wireless Utility (Mediatek) with the WPA supplicant functionality.
As soon as Windows starts, you could invoke the Mediatek Wireless Utility from the “All Programs”
Start Menu (see above) so that the Mediatek icon appears at the lower right hand corner of the
computer screen.
Mediatek
Or you may setup the network connection using the Windows Network and Sharing Center (also known
as Windows Zero Configuration, WZC). Windows 7 is used for the purpose of illustration.
Mediatek works in parallel with WZC. When WZC is active, Mediatek provides only the monitoring
function, such as showing the link stats, network status, statistic counters, advance feature status,
WMM status and WPS status. It won’t interfere with WZC’s configuration or profile functions.
© 2015 by danets Datacom Network Ltd. All rights reserved.
DN-WLAN-035
Page 7
NextG 007GTi PRO USB-Yagi Instruction Manual
3.2 Working with Windows Zero Configuration (WZC)
Go to Section 3.3 if you want to use Mediatek instead.
3.2.1 Configuration of NIC by using WZC under Windows 7 and VISTA
When WZC is activated, you could attempt to connect to one of the wireless networks picked up by the
antenna. If the wireless network is encrypted, a pop-up box will appear prompting you to key in its
security password.
© 2015 by danets Datacom Network Ltd. All rights reserved.
DN-WLAN-035
Page 8
NextG 007GTi PRO USB-Yagi Instruction Manual
3.2.2 Configuration of NIC by using WZC under Windows XP
Before you connect to any wireless network, the status prompt pops up like this:
Right click the Network Connection icon in the task bar, and select “View Available Wireless Networks:
A new window pops up showing the list of Access Points (or APs) available for connection.
You may either double click the SSID or highlight it with the mouse pointer followed by clicking “Connect
Anyway”.
© 2015 by danets Datacom Network Ltd. All rights reserved.
DN-WLAN-035
Page 9
NextG 007GTi PRO USB-Yagi Instruction Manual
© 2015 by danets Datacom Network Ltd. All rights reserved.
DN-WLAN-035
Page 10
NextG 007GTi PRO USB-Yagi Instruction Manual
If you want to update the AP attributes, click “Change Advanced Settings”, then chose the “Wireless
Networks”.
© 2015 by danets Datacom Network Ltd. All rights reserved.
DN-WLAN-035
Page 11
NextG 007GTi PRO USB-Yagi Instruction Manual
Double click “Properties” to check the Wireless network key or enter the security password.
Wireless connection is successful if the Wireless network key is authenticated.
© 2015 by danets Datacom Network Ltd. All rights reserved.
DN-WLAN-035
Page 12
NextG 007GTi PRO USB-Yagi Instruction Manual
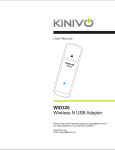
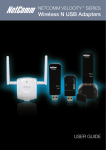
3.3 Working with Mediatek
When Mediatek is active, a small Mediatek icon appears at the lower right hand corner of the screen.
Double click on it to bring up the Mediatek main window.
Click on the Site Survey icon
to bring up a list of AP(s) picked up by the antenna. Each row contains
the AP, network type, channel used, wireless mode, security status and signal strength.
Simply highlight the AP and click
“Connect”. If the AP is encrypted, you’ll be asked to enter the
password for authentication as shown in the following pictures.
© 2015 by danets Datacom Network Ltd. All rights reserved.
DN-WLAN-035
Page 13
NextG 007GTi PRO USB-Yagi Instruction Manual
Once connected, a small tick appears on the left of the AP, and the Mediatek icon becomes
.
How does the Mediatek icon represent the various network statuses? Here are the clues:
Connected and signal strength is Good.
Connected and signal strength is Normal.
Not Connected.
Wireless NIC not detected.
Connected but signal strength is Weak.
© 2015 by danets Datacom Network Ltd. All rights reserved.
DN-WLAN-035
Page 14
NextG 007GTi PRO USB-Yagi Instruction Manual
4. Advanced Mediatek Features on Windows 8 and 7
4.1 Turn On/Off RF
It is a toggle switch to turn on and off the antenna. When the RF is off, no wireless transmission and
reception will take place.
4.2 Security
It is an indicator whether the wireless network is secured (lock closed) or unsecured (lock open).
4.3 Signal Strength
A five bar indicator of the signal strength. It shows the signal strength in terms of percentage when the
mouse is over the signal strength icon.
© 2015 by danets Datacom Network Ltd. All rights reserved.
DN-WLAN-035
Page 15
NextG 007GTi PRO USB-Yagi Instruction Manual
4.4 Site Survey
A list of APs picked up by the antenna.
To connect to an AP, simply highlight it, followed by clicking the
“Connect” button.
If the intended network has encryption other than “None”, the RaUL will bring up the security page that
allows the user to enter the password to complete the connection.
The AP information is shown at the bottom of the “Site Survey” window.
4.5 Link Information
The Link Information consists of the instantaneous Link Status, Throughput and Statistics of the
antenna.
© 2015 by danets Datacom Network Ltd. All rights reserved.
DN-WLAN-035
Page 16
NextG 007GTi PRO USB-Yagi Instruction Manual
4.6 Profile
A profile is a place to save your favorite wireless networks for one-click connection.
© 2015 by danets Datacom Network Ltd. All rights reserved.
DN-WLAN-035
Page 17
NextG 007GTi PRO USB-Yagi Instruction Manual
Profile Key
Add “+”
Delete “-“
Edit
Import
Export
Add WPS Profile
About
Help
Descriptions
Create a new profile
Remove a highlighted profile
Edit a highlighted profile
Pull up a bunch of saved profiles from your disk in the format of *.prof;
where * is a filename
Save a profile to your disk in the format of *.prof
Connect the antenna to the AP using either the Push-Button Configuration
(PBC) or PIN Numeric Code. See Appendix I for Wi-Fi Protected Setup (WPS)
Shows the Mediatek version and the MAC address of the antenna. The MAC
address refers to the unique ID of the wifi adapter of your laptop and the
USB-Yagi antenna.
HTML Quick Reference
4.6.1 Example to Add a PROFILE with encryption
Click “Add” under PROFILE. PROF1 is a default profile name. You may key in a different profile name to
replace it. Next, choose “Infrastructure – Connect to AP” for picking up the WiFi signal from a wireless
router;
Or, choose “Ad Hoc – Connect to other computers” for setting up a wireless link with another computer
without going through a wireless router. See 4.6.3 for a brief tutorial.
Click
to setup the wireless security.
© 2015 by danets Datacom Network Ltd. All rights reserved.
DN-WLAN-035
Page 18
NextG 007GTi PRO USB-Yagi Instruction Manual
Click
to enter the wireless security password in the box.
Click
to exit the profile setup.
4.6.2 Example to Add a PROFILE without encryption
Click “Add” under PROFILE.
The Add Profile page will then pop up. The default Profile Name is PROF1 but you may change to a
different name such as PROF2. Now move the mouse to the “SSID” pull-down menu and select the
wireless router from an active list of SSID(s) within range.
© 2015 by danets Datacom Network Ltd. All rights reserved.
DN-WLAN-035
Page 19
NextG 007GTi PRO USB-Yagi Instruction Manual
Click
to setup no password encryption, Choose “Open” under the Authentication pull-down menu
and “None” under Encryption.
BTOpenzone is one of the SSIDs within range in this example. Although it is a public WiFi hotspot with an
open WiFi authentication to which anybody is able to connect, further username and password
authentication (technically known as 802.1x authentication) on its web page is required before you
could actually get on the Internet.
Click
and PROF2 shows up in the Profile List.
Technically speaking, you should be able to connect to an unsecured WiFi signal within range and get on
the Internet unless it is a hotspot with 802.1x authentication as in the case of the above BTOpenzone
example; or the wireless router has a white list of MAC addresses. A MAC address is a unique ID of
every network adapter. Some smart users maintain such a white list in their wireless routers and yet
leave the security open. If the MAC address of your antenna is not one of those in the white list, you’ll
then be denied the right to access the Internet.
4.6.3 Example to setup an Ad-Hoc wireless connection
Infrastructure is a common mode that we use to connect to a wireless router. Ad-Hoc, on the other
hand, is the other way to setup a direct wireless connection between two computers for file and
resource sharing.
Here’s how it works.
© 2015 by danets Datacom Network Ltd. All rights reserved.
DN-WLAN-035
Page 20
NextG 007GTi PRO USB-Yagi Instruction Manual
Let’s define your computer as PC1 with the NextG USB-Yagi antenna and PC2 is another WiFi enabled
computer.
Both the computers as configured as follows,
PC1:
1. Just right-click “My Computer” and click Properties.
2. Select the “Computer Name” tab and click the “Change” button.
3. Change the computer name to whatever you want, here we name it PC1. Change the workgroup to
WG. (You may use a workgroup name other than WG but it should be the same in both computers)
4. Click OK.
Go to Start > My Computer > My Network Places > Network Connections.
Right click on your wireless adapter and select Properties. Go to the Wireless Network Tab and click on
the Advanced button. Select Computer to Computer (Ad hoc) networking option.
If you get a window with an SSID box, you can specify the network name in it, in our example we use
XNET.
Now go to your Wireless Adapter >> Properties >> Wireless Networks and click Add Preferred
Networks.
Enter the settings as follows:
Network name (SSID) : XNET
Network Authentication : Open
Data Encryption : Disabled
Also, do tick the – This is a computer-to-computer (ad hoc) network, wireless access points are not
used option if it isn’t already done.
© 2015 by danets Datacom Network Ltd. All rights reserved.
DN-WLAN-035
Page 21
NextG 007GTi PRO USB-Yagi Instruction Manual
To automatically connect to the network, select the Connection tab and tick on the Connect
automatically when in range option.
Now, to configure the TCP/IP connection settings,
1. Goto “Control Panel” >> “Network connections”
2. Right-click on your Wireless Adapter and click “Properties”. In the “General” tab, select “Internet
Protocol (TCP/IP)”. Click the “Properties” button.
3. Set the Values
IP Address – 192.168.0.1
Subnet Mask – 255.255.255.0
Default Gateway – 192.168.0.2
4. Click OK and you are done for PC1.
PC2:
1. Just right-click “My Computer” and click Properties.
2. Select the “Computer Name” tab and click the “Change” button.
3. Change the computer name to PC2. Change the workgroup to WG. (The workgroup name should be
the same in both computers)
4. Click OK.
Go to Start > My Computer > My Network Places > Network Connections.
Right click on your wireless adapter and select Properties. Go to the Wireless Network Tab and click on
the Advanced button. Select Computer to Computer (Ad hoc) networking option.
If you get a window with an SSID box, you can specify the network name in it, in our example we use
XNET.
Now go to your Wireless Adapter >> Properties >> Wireless Networks and click Add Preferred
Networks.
© 2015 by danets Datacom Network Ltd. All rights reserved.
DN-WLAN-035
Page 22
NextG 007GTi PRO USB-Yagi Instruction Manual
Enter the settings as follows:
Network name (SSID) : XNET
Network Authentication : Open
Data Encryption : Disabled
Also, do tick the – This is a computer-to-computer (ad hoc) network, wireless access points are not
used option if it isn’t already done.
To automatically connect to the network, select the Connection tab and tick on the Connect
automatically when in range option.
Now, to configure the TCP/IP connection settings,
1. Goto “Control Panel” >> “Network connections”
2. Right-click on your Wireless Adapter and click “Properties”. In the “General” tab, select “Internet
Protocol (TCP/IP)”. Click the “Properties” button.
3. Set the Values
IP Address – 192.168.0.2
Subnet Mask – 255.255.255.0
Default Gateway – 192.168.0.1
4. Click OK and you are all set with PC2 as well.
© 2015 by danets Datacom Network Ltd. All rights reserved.
DN-WLAN-035
Page 23
NextG 007GTi PRO USB-Yagi Instruction Manual
You are almost done now.
Just open the Wireless network settings and click on View Available Wireless Networks. Select your
network and you are connected.
Note :
1. The settings mentioned may vary in case of different adapters. But most of them should be similar to
the above settings.
2. Your adapter should be compatible with WZC – Windows Zero Configuration.
© 2015 by danets Datacom Network Ltd. All rights reserved.
DN-WLAN-035
Page 24
NextG 007GTi PRO USB-Yagi Instruction Manual
5. Apple MAC OS X Driver Installation
5.1 Locate the driver in the CD-ROM
The CD-ROM that comes with the kit is a mini DISC. If your Apple computer reads the standard size
DISC, you might either make a DISC conversion, or download the latest driver on the link below.
For Apple MAC OS X 10.8 Mountain Lion
http://www.danets.com/download/RTUSB_D2870-4.2.6.0_UI-4.0.8.0_2012_09_28.dmg
For DISC conversion, you just need to copy all the files under the mini DISC directory below to a
standard size DISC.
Your CD-ROM Drive:\Other Drivers\Mac OS X 10.4 10.5 10.6 10.7 10.8
5.2 MAC OS X Driver Installation
The driver installation is illustrated using a MacBook PRO running the OS X 10.8 Mountain Lion. If you
are currently running a previous OS X version, you could still follow the forthcoming steps that might be
slight different or upgrade your OX to 10.8 straightaway.
Once you have inserted the DISC into the CD-ROM or downloaded the driver in your computer, open the
driver folder that contains the three files shown below.
Right-click your mouse on the file “USBWireless-Install.pkg”, then choose “Open With” and click on
“Installer (default)”.
© 2015 by danets Datacom Network Ltd. All rights reserved.
DN-WLAN-035
Page 25
NextG 007GTi PRO USB-Yagi Instruction Manual
When “Welcome to the Mediatek Wireless Utility Installer” pops up, click on “Continue”.
The next screen indicates that it will take up 8.5 MB of your hard disk space. Click on “Install”.
© 2015 by danets Datacom Network Ltd. All rights reserved.
DN-WLAN-035
Page 26
NextG 007GTi PRO USB-Yagi Instruction Manual
Enter your system admin password to “Install Software”.
A warning message box pops up indicating that a computer restart is necessary after finishing up the
driver installation. Please close all your applications in progress before proceeding to click on “Continue
Installation”.
© 2015 by danets Datacom Network Ltd. All rights reserved.
DN-WLAN-035
Page 27
NextG 007GTi PRO USB-Yagi Instruction Manual
Click on “Install” for running the package scripts.
© 2015 by danets Datacom Network Ltd. All rights reserved.
DN-WLAN-035
Page 28
NextG 007GTi PRO USB-Yagi Instruction Manual
Click on “Restart” after the installation is successfully finished.
5.3 Running the Wireless Utility
You should be able to locate the “Ralink” (or “Mediatek”) icon at the top right hand bar of your computer.
Click on it and choose “Open Wireless Utility…”.
The Ralink (or Mediatek) Wireless Utility consist of several options, namely “Profile”, “Link Status”, “Site
Survey”, “Statistics” “Advanced”, “WPS”, “About”.
The most important option is “Site Survey”, as it instructs the USB-Yagi TurboTenna to scan and display
the wireless networks in your vicinity from which you may choose to connect.
© 2015 by danets Datacom Network Ltd. All rights reserved.
DN-WLAN-035
Page 29
NextG 007GTi PRO USB-Yagi Instruction Manual
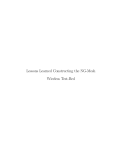
5.4 Site Survey
Click on “Site Survey” on the top bar. It then displays the list of wireless networks after the scan.
SSID = the name of the wireless network picked up by the USB-Yagi TurboTenna.
BSSID = the MAC address of the wireless network. A MAC address is a unique birth mark of a network.
Signal = the signal strength in percentage.
Channel = the channel of the wireless network. If there are many wireless networks sharing the same
channel, there is a fair chance of interference and you should choose the one with the
strongest signal level. Otherwise change the wireless network to another channel if you are
able to do so.
Authentication = either OPEN, or the security protocol that includes the popular WEP, WAP, WAP2 and
802.1x
Encryption = NONE, TKIP, AES and TKIP+AES
Network Type = Infrastructure or Ad Hoc. The former is the Access Point mode whereas the latter is
peer to peer.
5.4.1 Connecting to a Wireless Network
Suppose that the wireless network we intend to connect in this example is KC1, simply move the mouse
over it and click on “CONNECT”.
© 2015 by danets Datacom Network Ltd. All rights reserved.
DN-WLAN-035
Page 30
NextG 007GTi PRO USB-Yagi Instruction Manual
5.4.2 Keying in the Authentication\ Encription Password
© 2015 by danets Datacom Network Ltd. All rights reserved.
DN-WLAN-035
Page 31
NextG 007GTi PRO USB-Yagi Instruction Manual
If KC1 is not an OPEN wireless network, you have to enter the password in the “WPA Pre-Shared Key”
box in order to connect to it. The green handshake icon pops up once the connected is authenticated
successully.
© 2015 by danets Datacom Network Ltd. All rights reserved.
DN-WLAN-035
Page 32
NextG 007GTi PRO USB-Yagi Instruction Manual
Appendix I
************
Wi-Fi Protected Setup (WPS) is a standard for easy and secure establishment of a wireless home
network, created by the Wi-Fi Alliance and officially launched on January 8, 2007.
The goal of the WPS protocol is to simplify the process of configuring security on wireless networks, and
so it was first named 'Wi-Fi Simple Config'. The protocol is meant to allow home users who know little of
wireless security and may be intimidated by the available security options to configure Wi-Fi Protected
Access, which is supported by all Wi-Fi certified devices.
The standard achieves its goal by putting much emphasis into usability and security, and the concept is
implemented through four usage models that enable a user to establish a home network.
So, to add a new device to the Network the user can have up to the following two choices:
PIN Method, in which a PIN (Personal Identification Number) has to be read from either a sticker on the
new wireless client device (STA) or a display, if there is one, and entered at the "representant" of the
Network, either the wireless access point (AP) or a Registrar of the Network, cf below the Protocol
Architecture.
This is the mandatory baseline model, every Wi-Fi Protected Setup certified product must support it.
PBC Method, in which the user simply has to push a button, either an actual or virtual one, on both the
AP (or a Registrar of the Network) and the new wireless client device (STA).
Support of this model is mandatory for APs and optional for STAs.
This page addresses the common scenario involving an Infrastructure Network. The support of ad hoc
networks (IBSS) are not supported by WPS.
The WPS information contains the authentication type, encryption type, config methods, device
password ID, selected registrar, state, version, AP setup locked, UUID-E and RF bands.
Authentication Type - There are three types of authentication modes supported by RaConfig: OPEN,
SHARED, WPA-PSK and WPA system.
Encryption Type – For OPEN and SHARED authentication mode, the selection of encryption type are
NONE, WEP. For WPA, WPA2, WPA-PSK and WPA2-PSK authentication mode, the encryption type
supports both TKIP AND AES.
Config Methods – This corresponds to the methods the AP supports as an Enrollee for adding external
Registrars.
Value
0x0001
0x0002
0x0004
0x0008
0x0010
0x0020
0x0040
0x0080
0x0100
Hardward Interface
USBA (Flash Drive)
Ethernet
Label
Display
External NFC Token
Integrated NFC Token
NFC Interface
Push Button
Keypad
© 2015 by danets Datacom Network Ltd. All rights reserved.
DN-WLAN-035
Page 33
NextG 007GTi PRO USB-Yagi Instruction Manual
Device Password ID – This indicates the method or indentifies password that the selected Registrar
intends to use. AP in PBC mode must indicate 0x0004 within two minutes.
Value
0x0000
0x0001
0x0002
0x0003
0x0004
0x0005
0x0006-0x000F
Description
Default (PIN)
User-specified
Rekey
Display
Push Button (PBC)
Registrar-specified
Reserved
Selected Registrar – This indicates if the user has recently activated a Registrar to add an Enrollee. The
values are “TRUE” and “FALSE”.
State – The current configuration state on AP. The values are “Un-configured” and “Configured”.
Version – WPS specified version.
AP Setup Locked – This indicate if the AP has entered a setup locked state.
UUID-E – The universally unique identifier (UUID) element generated by the Enrollee, a 16 bytes value.
RF Bands – This indicates all RF bands available on the AP. A dual-band AP must provide it. The values
are “2.4GHz” and “5GHz”.
************
© 2015 by danets Datacom Network Ltd. All rights reserved.
DN-WLAN-035
Page 34
NextG 007GTi PRO USB-Yagi Instruction Manual
End of Manual.
© 2015 by danets Datacom Network Ltd. All rights reserved.
DN-WLAN-035
Page 35