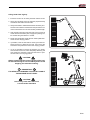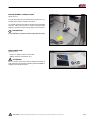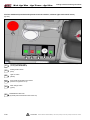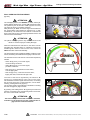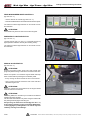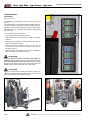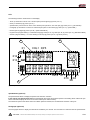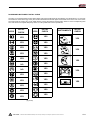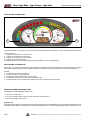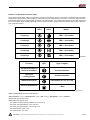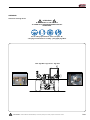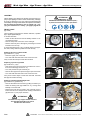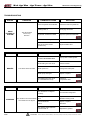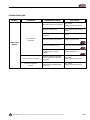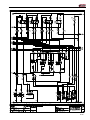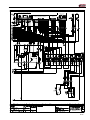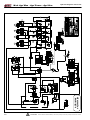
1
AXH1148/UK
Agri - INGLESE
OPERATION AND
MAINTENANCE MANUAL
Agri Max - Agri Power - Agri Star
Servizio Assistenza Tecnica - Via E. Majorana, 2-4 - 42027 Montecchio Emilia (RE) ITALY
Tel. +39 0522 869611 - Fax S.A.T. +39 0522 869744
www.dieci.com - E-mail: [email protected]
Via E. Majorana, 2-4
42027 Montecchio Emilia (RE) ITALY
Tel. +39 0522 869611 Fax +39 0522 869744
www.dieci.com - E-mail: [email protected]
ATTENTION: ALWAYS KEEP A COPY OF THIS MANUAL
ON THE MACHINE AT THE OPERATOR’S DISPOSAL
EVERY TELESCOPIC LIFT IS ACCOMPANIED BY A COPY OF THIS MANUAL, A COPY OF THE ENGINE
USE AND MAINTENANCE MANUAL DRAWN-UP BY THE MANUFACTURER OF THE SAME AND A COPY
OF THE USE AND MAINTENANCE MANUAL RELATIVE TO EVERY DEVICE AND ALL EQUIPMENT WITH
WHICH THIS VEHICLE IS SUPPLIED.
THESE MANUALS ARE WRITTEN BY THE RESPECT PRODUCT SUPPLIERS, OR REPRODUCED ACCURATELY AND IN FULL BY DIECI WITH THEIR SPECIFIC AUTHORISATION. THEY MAY INCLUDE ADDITIONAL SPECIFICATIONS WRITTEN BY DIECI.
DIECI S.r.l. is not liable for damages caused
as a result of the use of non-original parts
UFF. ASSISTENZA E RICAMBI
Tel. ++ 39 0522-869611 - FAX ++ 39 0522-869744
Dieci s.r.l.
VIA E. MAJORANA, 2-4
42027 - MONTECCHIO E. (RE) - ITALY
TEL. ++39 0522-869611
FAX ++39 0522-869744
DEPARTAMENTO DE ASISTENCIA Y REPUESTOS
Tel. ++ 39 0522-869611 - FAX ++ 39 0522-869744
BUREAU ASSISTANCE ET PIÈCES DE RECHANGE
Tel. ++ 39 0522-869611 - FAX ++ 39 0522-869744
SERVICE AND SPARE PARTS DEPARTMENT
Tel. ++ 39 0522-869611 - FAX ++ 39 0522-869744
e-mail: [email protected]
Cap. Soc. Int. Vers. € 10.000.000,00
Reg.Impr. R.E. N. 01283560686 - R.E.A. R.E. N. 204278
C.F. 01283560686 - P.I. 01682740350
Cod.AXH1148/UK
Translation of the
Original instructions
Original title:
Use and Maintenance Instructions
Dieci-07/2010
WARNING:
All the documentation supplied is an integral and essential part of the product and must be kept where it can be easily
accessed by every user. Users must carefully read the aforesaid documentation before starting to use the product.
Improper, incorrect or irrational use of the machine or its accessories is forbidden.
It is also forbidden to carry out any modifications that could alter the structure or function of the machine.
IT IS FORBIDDEN TO REPRODUCE ENTIRELY OR IN PART THE CONTENTS OF THIS MANUAL
AND RELATIVE MULTIMEDIA PRODUCT: Dieci S.r.l. SHALL SAFEGUARD THESE RIGHTS.
1 Dieci 2 Dieci 3 Uff.Tec 4 Devid 5 MTKeR 7 Digigraph 9 07/2010 10 AXH1148/UK
www.dieci.com
ATTENTION: A COPY OF THIS MANUAL MUST ALWAYS REMAIN ON THE VEHICLE AT THE OPERATOR'S DISPOSAL
Mod. Agri Max - Agri Power - Agri Star
CHAPTER “A”
INTRODUCTION, GUARANTEE, VEHICLE IDENTIFICATION
INTRODUCTION ..................................................................................................................................................... A/3
WARRANTY....................................................................................................................................A/4
VEHICLE IDENTIFICATION ............................................................................................................................... A/6
TELEHANDLER IDENTIFICATION .................................................................................................. A/7
CHAPTER “B”
SAFETY REGULATIONS
RECOGNISE SAFETY STANDARDS .........................................................................................................B/2
GENERAL WARNINGS......................................................................................................................................B/3
PROTECTIVE CLOTHING......................................................................................................................................B/4
INSPECT THE VEHICLE ...............................................................................................................................B/4
PREPARING FOR EMERGENCIES .........................................................................................................................B/5
DRIVE CAB...................................................................................................................................................B/6
DRIVING AUTHORISATIONS..................................................................................................................................B/7
STARTING THE VEHICLE ..........................................................................................................................B/7
OPERATING IN SAFETY.....................................................................................................................................B/8
HANDLING THE LOAD ........................................................................................................................B/12
PARKING THE VEHICLE.........................................................................................................................B/13
TEMPORARY STANDSTILL....................................................................................................................................B/13
ROAD TRAVEL ...........................................................................................................................................B/14
ROAD TRAVEL (INSTRUCTIONS)....................................................................................................................B/14
LIFTING THE VEHICLE ................................................................................................................................B/15
TRANSPORTING THE VEHICLE...........................................................................................................................B/15
ELECTROMAGNETIC INTERFERENCE...........................................................................................................B/16
VIBRATIONS ..........................................................................................................................................................B/16
CARRYING OUT MAINTENANCE IN SAFETY ................................................................................................B/16
STORAGE/PROLONGED INACTIVITY ..................................................................................B/19
PREPARATION AFTER PROLONGED INACTIVITY ..................................................................................B/19
CLEANING THE VEHICLE.................................................................................................................................B/19
CLEANING THE WINDOWS.........................................................................................B/20
CLEANING THE CAB ..................................................................................................................................B/20
SAFETY DECALS.........................................................................................................................B/20
VEHICLE FIRE PREVENTION ....................................................................................................B/21
BATTERIES .............................................................................................................................................................B/22
START-UP WITH AUXILIARY BATTERIES ........................................................................................................B/23
PROTECTION OF THE ELECTRIC PLANT .......................................................................................................B/24
TIGHTENING WHEEL NUTS..................................................................................................................................B/25
TYRES.........................................................................................................................................................B/25
STORAGE OF DANGEROUS LIQUIDS ..................................................................................................................B/27
CONTACT WITH DANGEROUS LIQUIDS..................................................................................................................B/27
DIESEL ..............................................................................................................................................................B/28
FEATURES OF THE RECOMMENDED FUEL .............................................................................B/28
CLEANING AND STORING DIESEL FUEL .......................................................................................................B/29
ECOLOGICAL CONSIDERATIONS ...............................................................................................B/30
WASTE DISPOSAL ................................................................................................................................B/30
CHECKING WIND SPEED ...........................................................................................................B/32
E VA L U AT I N G S U B S O I L C O N S I S T E N C Y . . . . . . . . . . . . . . . . . . . . . . . . . . . . . . . . . . . . . . . . . . . . . . . . . . . . . . . . . . . . . . . . . . . . B / 3 3
SAFETY DEVICES ................................................................................................................................B/34
DRIVE CAB...................................................................................................................................................B/37
ROPS-FOPS CAB ...........................................................................................................................................B/37
LOAD TABLES ...........................................................................................................................................B/38
USING LOAD TABLES AND BOOM INDICATORS .....................................................................B/38
HANDLING THE LOADS ........................................................................................................................B/42
SAFETY DECALS.........................................................................................................................B/46
Mod. Agri Max - Agri Power - Agri Star
CHAPTER C
USER INSTRUCTIONS AND GETTING TO KNOW THE VEHICLE
GENERAL WARNINGS......................................................................................................................................C/3
IDENTIFYING THE VEHICLE PARTS .........................................................................................................C/4
CAB COMPONENTS..........................................................................................................................................C/5
GETTING IN AND OUT OF THE DRIVER’S CAB......................................................................................................C/6
DOOR OPENING CONTROLS .........................................................................................................................C/6
DOOR OPENING INTERNAL CONTROLS ......................................................................................................C/6
OPENING THE DOOR WINDOW.............................................................................................................................C/7
REAR WINDOW............................................................................................................................................C/7
UPPER ROOF......................................................................................................................................C/7
REAR EMERGENCY EXIT ...................................................................................................................C/8
FRONT EMERGENCY EXIT ....................................................................................................................C/8
ENGINE BONNET OPENING LEVER....................................................................................................................C/9
MAX 180W SOCKET ................................................................................................................................................C/9
COURTESY COMPARTMENT .......................................................................................... .................................C/1
TECHNICAL DOCUMENTATION POCKET............................................................................................................C/10
LIGHTING INSIDE CAB.......................................................................................................................C/10
STEERING WHEEL (ADJUSTMENT) ............................................................................................................ C/11
SAFETY BELTS.....................................................................................................................................C/12
SEAT..................................................................................................................................................................C/13
IDENTIFYING THE CAB PARTS ............................................................................................C/15
CENTRAL DASHBOARD INDICATOR LIGHTS..............................................................................................................C/16
CENTRAL DASHBOARD - USE OF INSTRUMENTS ...........................................................................................C/17
IGNITION SWITCH ...........................................................................................................................C/23
PEDALS..................................................................................................................................................................C/24
MULTI-FUNCTION LEVER......................................................................................................C/25
FAST/SLOW GEAR SWITCH ................................................................................................................C/27
HYDRAULIC GEAR SWITCH (OPTIONAL)...................................................................................................C/28
PARKING BRAKE..............................................................................................................................C/30
SPIRIT LEVEL AND INCLINOMETER ..................................................................................................................C/31
BOOM CONTROL LEVER .............................................................................................................................C/32
JOYSTICK 3 IN 1 EXTENSION ON/OFF (STANDARD VERSION).............................................................................C/33
3 IN 1 PROPORTIONAL EXTENSION JOYSTICK (STANDARD VERSION)..................................................C/34
4 IN 1 PROPORTIONAL SERVICES PROPORTIONAL CONTROL JOYSTICK.......................................C/35
4 IN 1 PROPORTIONAL SERVICES PROPORTIONAL CONTROL JOYSTICK.......................................C/36
ANTI-TIPPING DEVICE ....................................................................................................................C/38
VEHICLE FUNCTIONS SELECTOR (OPTIONAL)...............................................................................................C/40
STANDARD STEERING SELECTOR ............................................................................................................C/41
ALIGNMENT (STANDARD)............................................................................................................C/41
STEERING SELECTOR (OPTIONAL) ............................................................................................................C/42
ALIGNMENT (STANDARD)............................................................................................................C/42
WHEELS ALIGNMENT INDICATOR CONSENT (OPTIONAL).................................................................C/43
REAR WINDSCREEN WIPER CONTROLS .......................................................................................C/44
EMERGENCY LIGHTS SELECTOR.....................................................................................................................C/44
MANUAL ACCELERATOR ..............................................................................................................................C/44
CAB INTERNAL AIR CIRCULATION ...................................................................................................................C/45
CAB INTERNAL AIR CIRCULATION ...................................................................................................................C/46
REVOLVING LIGHT SWITCH..................................................................................................................................C/48
CAB FRONT LIGHTS CONSENT (OPTIONAL) ..........................................................................................C/48
CAB REAR LIGHTS CONSENT (OPTIONAL) ..........................................................................................C/48
BOOM HEAD LIGHTS CONSENT (OPTIONAL) ..........................................................................................C/49
LEVELLING ...................................................................................................................................................C/51
FRONT DIFFERENTIAL AXLE (OPTIONAL)..............................................................C/51
BOOM HEAD SOLENOID VALVE (OPTIONAL) ..........................................................................................C/52
BOOM HEAD SOCKET (OPTIONAL) .............................................................................................................C/52
REAR HYDRAULIC SOCKETS (OPTIONAL).................................................................................................C/53
2-SPEED BOOM (OPTIONAL) ...........................................................................................................C/54
BOOM SUSPENSION (OPTIONAL) ..............................................................................................................C/54
DUMP BODY DESCENT (OPTIONAL)........................................................................................................................C/55
REVERSIBLE FAN (OPTIONAL) .................................................................................................................C/55
WATER HEATER (OPTIONAL).......................................................................................................................C/56
FRONT HOOK............................................................................................................................................C/58
TOWING HOOK .............................................................................................................................................C/59
ADJUSTABLE TOWING HOOK (OPTIONAL) .................................................................................................C/59
POWER TAKE-OFF (OPTIONAL) ........................................................................................................ ......C/60
THREE-POINT LIFTING DEVICE (OPTIONAL).............................................................................................C/61
THREE-POINT LIFTING REGULATION .........................................................................................................C/61
HYDRAULIC BRAKING SYSTEM FOR TRAILERS (ITALY TYPE) (OPTIONAL) ......................................C/62
HYDRAULIC BRAKING SYSTEM FOR TRAILERS (OPTIONAL) ..............................................................C/63
PNEUMATIC BRAKING SYSTEM FOR TRAILERS (OPTIONAL) ..............................................................C/64
VEHICLE TOWING.................................................................................................................................C/66
PUTTING THE VEHICLE IN NEUTRAL .................................................................................................................C/67
DISENGAGEMENT OF NEGATIVE BRAKE WITH ENGINE OFF (AGRI MAX 70.10)......................................C/69
CATALYTIC PURIFIER (OPTIONAL))............................................................................................................C/71
WATER DRIVEN PURIFIER (OPTIONAL) ..............................................................................................................C/71
CHAPTER “C”
USER INSTRUCTIONS AND GETTING TO KNOW THE VEHICLE
“CENTRAL DASHBOARD” INTEGRATED DEVICES
LCD .......................................................................................................................................................C/75
Speedometer; (optional)................................................................................................................................C/75
Hodograph (optional)...............................................................................................................................................C/75
BUTTONS.............................................................................................................................................................C/76
Changing display visualisation...................................................................................................................C/76
Clock regulation.............................................................................................................................................C/76
Dashboard instrument initial check .........................................................................................C/77
ANTI-TIPPING SYSTEM TEST .................................................................................................................C/78
GENERAL ALARM INDICATOR LIGHT........................................................................................................................C/78
Engine error...................................................................................................................................................C/78
Switch-on of dashboard indicator lights.......................................................................................C/79
SERVICE ...............................................................................................................................................................C/80
Mod. Agri Max - Agri Power - Agri Star
CHAPTER “D”
MAINTENANCE AND REGISTRATION
MAINTENANCE PRESCRIPTIONS............................................................................................................ D/3
INTRODUCTION .....................................................................................................................................................D/3
RUNNING IN PERIOD.......................................................................................................................................D/4
DECLARATION OF VIBRATORY EMISSIONS.......................................................................................................D/5
DECLARATION OF FIRST INSPECTION BY MANUFACTURER....................................................................D/5
IDENTIFYING THE VEHICLE PARTS .........................................................................................................D/6
MAINTENANCE AND REGISTRATION SCHEDULE ......................................................................................D/8
CAPACITY OF PARTS TO LUBRICATE ................................................................................................................ D/11
OIL COMPARISON TABLE ...........................................................................................................................D/13
BATTERY ISOLATOR SWITCH.................................................................................................................D/14
ENGINE BONNET OPENING ...........................................................................................................................D/15
UNDERSIDE PROTECTION REMOVAL.............................................................................................D/17
PEDALS..................................................................................................................................................................D/18
PARKING BRAKE..............................................................................................................................D/20
HYDRAULIC OIL LEVEL .............................................................................................................D/21
CHANGING HYDRAULIC OIL AND REPLACING FILTERS ...............................................................D/22
HYDRAULIC FILTER .............................................................................................................................................D/23
FUEL TANK ...............................................................................................................................D/24
WATER/OIL/INTERCOOLER RADIATOR .......................................................................................................D/25
RADIATOR GRILL CLEANING .............................................................................................................................D/25
COOLING LIQUID LEVEL CHECK ......................................................................................D/26
COOLING LIQUID LEVEL CHECK ......................................................................................D/27
CYLINDERS BLOCK VALVES ..................................................................................................................D/32
REDUCER - Oil change ...................................................................................................................................D/36
FRONT/REAR DIFFERENTIAL AXLES - Oil change .................................................................D/38
PLANETARY REDUCTION GEAR - Oil change........................................................................................................D/40
TELESCOPIC BOOM BLOCKS .....................................................................................................................D/42
GREASING...................................................................................................................................................D/42
BOOM EXTERNAL CHAINS ..............................................................................................................................D/43
DETERMINING WEAR DUE TO EXTENSION ...........................................................................................D/44
CONTROL, CLEANING, LUBRICATION..........................................................................................................D/44
GREASING NIPPLES.........................................................................................................................D/45
REAR TRANSMISSION SHAFT ............................................................................................................D/47
DIFFERENTIAL AXLE ................................................................................................................................................C/47
PLANETARY REDUCTION GEAR...................................................................................................................................D/47
FRONT TRANSMISSION SHAFT ............................................................................................................D/47
FUSES ...............................................................................................................................................................D/48
MAIN CONTROL UNIT ...................................................................................................................................D/48
LIGHTING ...................................................................................................................................................D/50
FRONT LIGHT.......................................................... ..............................................................................................D/50
REAR LIGHT ..........................................................................................................................................................D/51
WORK LIGHT........................................................... ..............................................................................................D/51
DUAL REFLECTOR WORKING LIGHT ..........................................................................................................D/51
PRELOADS AND COUPLING TORQUE TABLE OF CLASS 1 NUTS AND BOLTS.........................................D/52
PRELOADS AND COUPLING TORQUE TABLE OF CLASS 2 NUTS AND BOLTS.........................................D/53
COUPLING TORQUE TABLES REGARDING THE HYDRAULIC FITTINGS.....................................D/54
TROUBLESHOOTING ...............................................................................................................D/55
INSTRUCTIONS FOR DRAWING-UP THE CONTROL REGISTER ................................................................D/58
OBLIGATIONS AND METHODS OF MAKING CLAIMS TO THE I.S.P.E.S.L. ................................D/58
PERIODICAL INSPECTIONS AND METHODS OF RECORDING ............................................................D/58
VEHICLE DETAILS ........................................................................................................................D/59
RECORDING ROUTINE VERIFICATIONS AND MAINTENANCE INTERVENTIONS.......................................... D/61
CHAPTER "E"
ELECTRICAL DIAGRAMS AND CIRCUITS
CHAPTER “F”
HYDRAULIC PLANT
CHAPTER “G”
TECHNICAL SHEETS
CHAPTER “H”
ANALYTIC INDEX
Mod. Agri Max - Agri Power - Agri Star
Dear customer,
Congratulations and thank-you for choosing a
machine.
This handbook has been written so that you can appreciate the qualities of this machine to the full.
It is advisable to read this handbook in its entirety before using the machine for the first time.
It contains information, advice and important warnings for use, which will help you to exploit the technical advantages
machine fully.
of your
You will discover its specifications and special features, as well as find essential information regarding maintenance
machine.
and care to ensure safe use and an extended lifetime of your
The personnel, who will be at your assistance, wish you ALL THE BEST, certain that this handbook will prove an
invaluable aid to fully appreciating your new machine.
Best regards,
The Sales Management
INTRODUCTION
VEHICLE IDENTIFICATION
WARRANTY
A
A/1
Mod. Agri Max - Agri Power - Agri Star
Introduction - Warranty
Vehicle Identification
BEFORE COMMISSIONING THE VEHICLE, THE OPERATOR MUST
THOROUGHLY READ THIS MANUAL IN ORDER TO COMPLETELY
UNDERSTAND FUNCTIONING OF THE TELESCOPIC LIFT AND
BE SUITABLY PREPARED FOR ITS USE.
USE OF THE VEHICLE DIFFERENT TO THAT DESCRIBED IN
THIS MANUAL IS PROHIBITED AND RELIEVES dieci FROM ANY
LIABILITY FOR INJURY/DAMAGE CAUSED TO PERSONS, ANIMALS
AND OBJECTS.
DURING USE OF THE VEHICLE, SCRUPULOUSLY FOLLOW THE
RESPECTIVE DIAGRAMS OF THE ACCESSORY MOUNTED.
A/2
INTRODUCTION
The purpose of this manual is to provide the Operator with
efficient and safe instructions on the use and maintenance
of the telehandler.
Following these instructions carefully will allow you to obtain,
full efficiency and a long working life from your vehicle, and
will help to make your work considerably easier.
This Use and Maintenance manual is provided by the Dealer
upon delivery of the vehicle, in order to make sure that these
instructions are read and correctly understood. Should you
have trouble understanding any part of this manual, do not
hesitate to contact your nearest Dealer for clarification, as it
is of utmost importance that the operation and maintenance
guidelines be fully understood and carefully observed. Routine maintenance should be carried out regularly, keeping a
record of the vehicle's working hours.
Left side
Use only original spare parts when spare parts are required.
Local Dealers can supply original spare parts as well as advice and instructions for their installation and use. The use
of non-original spare parts may cause damage to other parts
of the vehicle. Customers are advised to purchase all spare
parts required only from an authorised Agent or Dealer.
Should the vehicle be destined for use in particularly severe
conditions (for example on argillaceous or muddy terrain),
we advise consulting your nearest dealer for specific instructions. Failure to observe these instructions may result in the
vehicle's guarantee being voided.
This manual has been published for worldwide distribution
and the availability of certain equipment referred to as being
essential or available on request may vary according to the
geographical location in which the vehicle is being used. All
details about the equipment available in your area can be
obtained from your nearest Distributor or Dealer.
Front view
For manufacturing requirements, the standard production vehicles may differ in some details stated in this
manual. The Company reserves the right to make modifications without forewarning.
As a result of continuous technical improvements introduced, as well as updating and publication timetables,
the data included in this manual may be subject to change at any time and should not be considered binding.
In some illustrations, the panels or covers have been removed in order to make the figure clearer. Never use the
vehicle without these panels or protective coverings.
The left and right positions indicated in this manual
refer to the vehicle as viewed from its back looking towards the front, or rather, the view of the operator when
sitting in the driver's seat.
View from above
A/3
Mod. Agri Max - Agri Power - Agri Star
Introduction - Warranty
Vehicle Identification
WARRANTY
WARRANTY:
TERM, STARTING DATE AND ACTIVATION
WARRANTY:
VALIDITY
Warranty: term
Warranty in countries with a customer service organisation
DIECI S.r.l. (hereinafter referred to as DIECI), guarantees its
products for 12 months from delivery date to the end customer,
but not exceeding 18 months from the date the machine left
the manufacturer's factory (in sales to distributors or dealers).
- The warranty covers the replacement or repair of faulty
parts that have been proven defective in terms of material, manufacture and/or assembly.
- DIECI reserves the right to judge whether to repair or to
replace defective parts.
- DIECI shall respond to claims using the means and methods it deems most appropriate.
Warranty: starting date
The guarantee is valid from the date the machine is forwarded from the factory (sale to distributors or dealers).
When delivery is handled by the distributor or dealer, DIECI
reserves the right to verify that the warranty starting date
corresponds to the shipping or delivery date on the product
transport document and/or the invoice date and may ask to
see the original copies of these documents.
Warranty: activation
The warranty is activated automatically from the date the machine is forwarded from the factory (sale to distributors or dealers).
DIECI shall be responsible for:
- The materials used.
- Labour.
- Travel and accommodation expenses.
The customer shall be responsible for:
- Packing and shipping costs for spare parts
- Any other possible expenses not listed under those for
which DIECI is liable.
Warranty in countries without a customer service organisation
- The warranty consists exclusively of the free supply (ex works from the DIECI factory), of replacements for parts which
can no longer be used because proven to be made of faulty material or due to faulty manufacture and/or assembly.
Examination of replaced faulty parts
- Before acknowledging the warranty, DIECI may ask for
any faulty parts replaced during repairs to be returned
(DIECI shall cover shipping costs).
Additional warranty for repairs and replacement parts
- Any repairs carried out whether covered by the warranty
or not, and any spare parts replaced during repairs, are
guaranteed for 3 months from the date of repair or installation if the original guarantee has expired.
A/4
WARRANTY:
REQUEST FOR REPAIRS UNDER GUARANTEE
REASONS FOR NON-EFFECT, NON-ACKNOWLEDGEMENT OR TERMINATION OF THE WARRANTY
Warranty: reporting a fault or a faulty part
Warranty: non-acknowledgement
- The fault must be reported by the end user, dealer, distributor, retailer or by an authorised repair shop and must
be sent directly to the DIECI customer service, within 8
days of the occurrence of the malfunction.
The report must include a clear description of the fault and
exact machine specifications (type, model and serial number).
The specifications can be found on the machine in the positions indicated in the USE AND MAINTENANCE MANUAL.
The warranty is not acknowledged:
Compulsory machine immobilisation
- If there is a risk that the fault may jeopardise safety and accident prevention or may cause further damage, it is forbidden to use the machine until it has been repaired and tested.
Warranty: exclusion from the warranty
The following conditions and parts are not covered by the warranty:
- Components subject to wear or deterioration due to prolonged use: the clutch, belts, brake pads, sliding blocks,
rollers, oils and fluids, filters, etc.
- Electrical systems and components.
- Damage caused by the weather, natural disasters, acts
of vandalism, etc.
- Any other malfunction not due to an ascertained original
fault or for which DIECI cannot be held liable.
- If the fault is not reported in the prescribed way and within the established expiry.
- If there is a failure to return any faulty parts replaced during repairs to DIECI as requested.
- If the machine is not immobilised; the warranty shall not
be acknowledged for any damage caused by the failure
to comply with this requirement.
Warranty: termination
The guarantee is terminated:
- If the purchaser does not fulfil payment obligations according to contract.
- If any damage is caused by carelessness, negligence, or
by any use that does not comply with the specifications
in the use and maintenance manual (incorrect manoeuvres, overloading, use of incorrect fuel, poor maintenance*, failure to use warning signals, etc.).
- If the malfunction is due to applications, attachments,
modifications or repair work not authorised by DIECI or
carried out using faulty spare parts. (For this reason, we
recommend always using original spare parts).
* For "recommended routine maintenance" refer to the USE AND MAINTENANCE MANUAL.
The following parts are also not covered by this warranty; they are
covered by the warranty provided by the relative manufacturers:
Final terms
-
-
-
-
- In case of non-effect, non-acknowledgement and termination of the warranty, the purchaser shall in no circumstance be granted annulment of the contract, payment of
damages, or an extension of the warranty.
Diesel engine
Axles and reduction gears
Pumps and hydraulic engines
Tyres.
Application of the aforesaid warranties shall be managed by DIECI.
- Any warranty conditions other than those listed above
must be agreed in writing and signed by both parties.
Any modification made to the machine requires a new test to verify conformity with directive 98/37 “CE”;this
procedure also applies in the case of repairs with non-original spare parts.
In case of any disputes, the Court of Reggio Emilia ITALY- shall be recognised as the competent authority.
A/5
Mod. Agri Max - Agri Power - Agri Star
Introduction - Warranty
Vehicle Identification
IDENTIFYING YOUR MACHINE
MACHINE MODELS
- The Manufacturer offers a range of similar machines with different technical specifications and performances.
- When consulting any table or diagram in this manual or on the machine itself, always refer to the model code number for
your machine.
Agri Max, Agri Power, Agri Star. TELEHANDLERS
LIABILITY
- The machines are manufactured in compliance with the EEC regulations in effect when the machine was made available for purchase.
- Failure to observe the use and safety regulations or using the machine in less than perfect working condition may cause
an accident punishable by law.
- The Manufacturer shall not be held liable for any damage to persons, things or animals caused by improper use of this
machine or by any unauthorised structural modification, application or transformation.
- The Manufacturer reserves the right to carry out any possible modifications to the machine for technical or commercial reasons without notice.
A/6
IDENTIFYING THE TELEHANDLER
The machine can be identified by the serial number punch
marked on the front of the chassis and inside the cab. In
addition to this, the engine has its own serial number punch
marked on its block.
To ensure prompt and efficient service when ordering spare
parts or when requesting information or technical explanations, always give the engine and chassis serial number.
Chassis serial number ...........................................................
Engine serial number ...........................................................
Cab serial number ......................................................
Gear box serial number ............................................................
Differential axles serial number ..............................................
..................................................................
Type
of
vehicle
Agri Max, Agri Power, Agri Star
................................................
Owner/ Operator ........................................................
Address of Dealer or agent ....................................................
..........................................................................................
Delivery date ...................................................................
Warranty expiry date ...............................................................
NOTE:
The telehandlers commercially known as Agri Max, Agri
Power, Agri Star are stamped with a type-approval code
(see the first four numbers stamped on the chassis)
Engine serial number
Axle serial numbers
Fundamental data - cab plate
Gear serial number
A/7
Mod. Agri Max - Agri Power - Agri Star
Introduction - Warranty
Vehicle Identification
A/8
SAFETY REGULATIONS
B
B/1
Mod. Agri Max - Agri Power - Agri Star
Introduction - Warranty
ACKNOWLEDGING SAFETY REGULATIONS
This is the “POTENTIAL HAZARD WARNING” SYMBOL.
Wherever this symbol appears "
" appears, on the vehicle or in this manual, you must take care against potential damage or injury
to the vehicle, other equipment, or people. Follow all recommended precautions and observe regulations for safe use and maintenance.
UNDERSTANDING WARNING NOTICES
In this manual certain terms are used to indicate different level of risk, including:
- DANGER Indicates a situation of potential danger for the vehicle’s operator or
other people directly involved in its operation.
- ATTENTION Indicates a situation of imminent danger which, if not averted, may cause damage to the vehicle and to
the safety of the operator or others directly involved.
- IMPORTANT indicates a situation of imminent danger which, if not averted, may cause damage to the vehicle.
- PROHIBITED indicates strictly prohibited actions or things that are dangerous to personnel
The above-mentioned words are always accompanied by the corresponding potential hazard warning symbol.
- NOTE -
indicates an additional explanation for a given piece of information.
Carefully read the safety regulations given and follow all recommended precautions in order to avoid potential risks and safeguard your health and safety.
The "potential hazard” symbol and the "warning notices" have been included to highlight situations that DIECI feels are of particular importance.
However, this manual must be read completely and understood. If in doubt, contact the nearest agent or dealer.
B/2
GENERAL WARNINGS
This vehicle has been designed and constructed for use as a
self-propelled vehicle, including an operator's driving seat, with
tyres, intended for use on asphalt or natural surfaces and on
rough ground. The vehicle consists of a main support structure
aimed at supporting the extendible arm. Forks or other attachments approved by DIECI can be mounted on the boom head.
In used normally, the vehicle lifts and places down loads through the extension/withdrawal and raising/lowering of the boom.
If the vehicle is used for purposes different than those
for which it was designed, DIECI cannot be held responsible for damage to things, the vehicle itself, or for injury to persons caused by such improper use.
Use of the vehicle for purposes different than those described in this manual is strictly forbidden All functions
and procedures concerning the operation and mounting
of the vehicle's attachments that are not described in
this manual are strictly forbidden.
The User’s Manual and the parts catalogue are an integral
part of the vehicle and must remain with it even when it is sold
to a new owner. The manual, in the user’s language, must be
carefully stored aboard the vehicle at all times for quick reference. If the manual becomes creased, damaged or can
no longer be easily read, it should be replaced immediately.
The instructions for use, maintenance and repair described
in this handbook must be followed if the vehicle is to be considered as being operated in accordance with the manufacturer’s intended uses.
This vehicle must be used, assisted or repaired only
by persons that have received training in advance on
the vehicle and on its safety regulations, in addition to
being authorised to use the vehicle itself.
All of the procedures or maintenance operations not
described in this manual are prohibited must only be
carried out by authorised workshops.
DIECI is not liable for damage resulting from operations performed instinctively, as a reflex, while in a state panic, or in the
event of malfunctioning, accidents, etc. during use of the vehicle.
DIECI is not liable for behaviour foreseeable on the part of
certain categories of people, including: apprentices, adolescents, disabled persons, personnel in training.
DIECI vehicles cannot be used for betting, competitions or
personal use.
Read all of the safety stickers on the vehicle and observe
all regulations printed on these stickers before starting up,
running or refuelling the vehicle or before carrying out maintenance work. Clean the stickers if they are covered by dirt,
cement or other deposits. Do not remove these stickers for
any reason. Promptly replace any stickers which may be damaged, lost or illegible.
To guarantee your safety and that of others, do not modify the
structure or adjust the various vehicle components (Hydraulic
pressure, calibration of load limiters, engine rotation, assembly of additional attachments, etc.). The same holds true for
the deactivation or modification of safety systems. In such
cases, the manufacturer shall be absolved from all liability.
Periodic inspections must be carried out in order to maintain
the vehicle's "compliance status."
Take all necessary safety precautions to prevent potential
risks when carrying out operations or procedures that are
not explicitly recommended or allowed for in this manual.
Do not carry out or engage in operations or actions expressly prohibited in this manual.
If in doubt, contact the nearest agent or dealer.
The user must always observe the general safety regulations as well as those for accident prevention, such as traffic
rules if the vehicle is used on public roads.
Any arbitrary modification made to the vehicle will relieve
DIECI from all liability for damage or injury resulting from
such modification.
Everything possible has been done during the design and
construction phases of this vehicle to make your job as safe
as possible. Due caution, however, is indispensable and there is no better rule to prevent accidents.
DIECI is not liable for damage caused by negligent use of
this vehicle even if said damage is not a result of intentional
improper use of the vehicle.
B/3
Mod. Agri Max - Agri Power - Agri Star
PROTECTIVE CLOTHING
Introduction - Warranty
INSPECTING THE MACHINE
- Always wear garments that are appropriate for the job
you have to accomplish. Do not wear loose clothing, ties,
chains, belts or other accessories that may become tangled in the control levers or other parts of the machine.
- Do not wear jewellery or metallic accessories that could
cause injury if they become entangled or if the wearer is
subjected to electric current.
- Tie back any long hair protruding from your safety helmet
to ensure it does not become tangled in the machinery.
- The operator must wear suitable protective clothing to
provide adequate accident prevention depending on the
type of work or site.
- CAUTION -
- DANGER -
Inspect the machine every day or every shift.
Carefully check the machine before resuming work.
Before starting to use the machine, the operator must ask
the safety or site manager about possible risks and the type
of protective clothing to wear.
- Ensure the tyres are suitable for the type of terrain.
There are tyres for working on sand, earth, farmland, snow,
etc. Consult your agent or dealer for more information.
- CAUTION The operator must always have the following:
•
•
•
•
•
•
•
•
Safety helmet;
Safety shoes;
Safety goggles or face shield;
Safety gloves;
Ear defenders;
Reflective clothing;
Waterproof clothing;
Respirator or respiratory filter;
- CAUTION If you discover any malfunctions (abnormal noise, vibrations, odour, instrument errors, smoke, oil leaks, etc.) or
if the machine does not comply with safety regulations,
stop using the machine and immediately inform their
safety manager.
- IT IS FORBIDDEN for the driver to carry out any repairs
or adjustments unless he or she has been specifically
trained to do so. The driver must keep the machine in
perfect working condition if entrusted to do so.
- CAUTION Before starting work, ensure the machine is fully efficient to guarantee maximum efficiency and compliance
with all safety regulations.
- To carry out the checks listed below, consult the chapter
about maintenance in this manual.
- Carry out the functional checks and inspections listed below.
- There are various types of safety garments of all sizes
available on the market. Always use the most appropriate model for the type of application and ensure the
garments fit properly.
- Safety clothing must be considered personal; do not
wear other people's safety clothing.
- Safety clothing must always be complete and in good
condition. A ruined garment no longer guarantees adequate protection. Do not wear garments that are worn;
replace with new garments before you start working.
- Prolonged exposure to loud noise can damage your hearing or may cause loss of hearing. Always protect your
hearing by wearing ear defenders or earplugs to protect
yourself from excessive and tiresome noise.
- Do not listen to the radio or music through headphones
to while using the machine. The operator must always
pay the utmost attention.
B/4
Parking brake efficiency.
Engine oil level (check and top up if necessary).
Hydraulic oil level (check and top up if necessary).
Clogged air filter indicator (check and clean if necessary).
Tyre condition and pressure (check).
Fuel level.
Signalling and warning devices (check).
Steering efficiency.
Service brake efficiency.
Nuts and bolt torque.
Lights.
Direction indicators.
Hazard warning lights.
Switches.
Pilot lamps.
Windshield wipers.
Reversing alarm.
If the machine is not used for a long time, it must be checked more thoroughly than usual.
Check the machine is clean
PREPARING FOR EMERGENCIES
Clean all windows, lights and rear-view mirrors.
Remove any mud or waste.
Remove any rubbish or dirt from inside the cab, especially around the pedals and controls.
Clean the engine, articulated joints and the radiator.
Remove any excess grease.
Ensure the footboard and the handle are clean and dry.
Clean all safety stickers and manoeuvring indications.
Replace them if they are illegible or missing.
- You must always be prepared in case of a fire or accident.
Check for damage
Ensure there are no damaged or missing parts.
Ensure all articulated pins are fastened properly.
Ensure there are no cracks or other damage to the windows.
Ensure there are no oil, fuel or coolant leaks underneath
the machine.
Ensure the wheel bolts are properly tightened.
Check every safety device.
Ensure the ROPS/FOPS structure is not damaged.
Ensure the seat belt and relevant attachments are not
damaged or excessively worn.
- CAUTION If there are any malfunctions, contact one of the Manufacturer’s Authorised Repair Centres.
- PROHIBITION IT IS FORBIDDEN TO START OPERATING THE MACHINE UNLESS IT IS IN PERFECT CONDITION.
- CAUTION Always keep a first aid kit and fire extinguisher on
hand (not supplied by the manufacturer).
- Carry out regular inspections to ensure the first aid kit is
complete and if necessary, replace any missing items.
- Carefully read the instructions on the extinguisher to ensure it is used properly.
- Carry out regular inspections and maintenance to ensure the extinguisher is always ready for use.
- Establish a list of priorities with the safety or works manager to be able to cope with fires and accidents.
- If there is an accident, seek medical attention immediately.
- Ensure all emergency telephone numbers for doctors,
ambulances, hospitals and the fire brigade are clearly
visible near the telephone.
Adjustments
- Check the steering wheel and driver's seat adjustment to
ensure it is possible to reach all driving controls comfortably. Adjust the rear-view mirrors so that it is possible to
see the rear of the machine properly when sitting correctly.
B/5
Mod. Agri Max - Agri Power - Agri Star
Introduction - Warranty
DRIVER’S CAB
- Use available footsteps and handles to reach the driver's seat.
- CAUTION - Always face the vehicle when getting in or out of it, maintain contact with the vehicle in three points at all times,
using the handles and steps provided.
- Never use controls for purposes different than those for which
they were created for (Ex.: get on or off the vehicle from the
fork lift instead of from the footboard, hang clothing, etc.)
- Never jump down from the vehicle.
- Never get on or off a moving vehicle. Never jump on or
off the vehicle.
- If the vehicle begins to move without an operator inside
the cab, do not jump on the vehicle to try to stop it.
Only use the machine if the seat is adjusted properly.
An incorrect seat adjustment can quickly tire the operator and force him or her to accomplish incorrect manoeuvres; it can alter the driver's perception of the controls and external objects; it can compromise sensitivity
when carrying out manoeuvres.
- The seat must be adjusted according to the height and
weight of the driver.
- The driver should be able to press the pedals down completely and operate the control levers correctly while keeping
his/her back leaning well up against the back of the seat.
- Never get on or off the vehicle while holding equipment.
- Always keep footboards, steps and handles clean and
make sure they are not slippery.
- Do not put any suction cups on the windows. The suction cups act as lenses and can cause fires.
- Do not use cell phones in the operator's cab during vehicle operation.
- Never bring dangerous items such as inflammable or
explosive objects, in the driving cab.
- DANGER Always fasten your seatbelt correctly before operating the machine.
- The belt is correctly adjusted when it fits snugly around
your waist.
- DANGER -
- When working in areas where there is a risk of falling,
bouncing or interference from objects capable of hitting
the operator or entering the cab, mount suitable safety
panels to protect the operator. Always close windows.
Always ensure that bystanders are at a safe distance
and cannot be hit by bouncing or falling objects.
The machine cab is strong enough to support the weight
of the machine should it tip over (ROPS); therefore, it
is essential that the driver remains firmly fastened in
the seat thanks to the seat-belt to prevent him/her from
falling out and possibly getting crushed.
- Before starting the machine, carefully check the belt, buckle
and fastenings. If any parts are damaged or worn, replace
the seat belt or the component before using the machine.
- If the cab window on the telescopic boom side should
break, risk of contact between the operator and the boom
exists. Immediately stop operation and replace glass.
- Always remain seated with the seat belt correctly fastened while using the machine to reduce the risk of injury
if you have an accident.
- PROHIBITED -
- After a serious accident, replace the seat belts even if
they do not appear damaged.
Operating the vehicle with arms, legs or any body part
out of the driver's seat is STRICTLY PROHIBITED.
- DANGER Do not carry passengers on the machine.
- DANGER The operator must always remain seated in the normal
driving position.
B/6
AUTHORISATION TO DRIVE THE MACHINE
- CAUTION Comply with the legislation in effect in the country
where the machine is used.
- CAUTION Only qualified and specifically trained staff may use
the machine.
The machine may only be driven by people authorised
to do so by the plant/site manager in charge of the premises where the machine is used.
- The user must always be able to produce the authorisation while using the machine.
- The driver may not allow any another person to drive the
machine.
- Any use of the machine must also comply with good
working standards.
STARTING THE MACHINE
- Regardless of the driver’s experience, before starting
the machine, take time to become familiar with the location and function of every control and instrument.
- Never drive the machine with wet or greasy hands or shoes.
- DANGER Before starting the engine, ensure all the control levers are
in neutral, the parking brake is engaged, the engine bonnet
is closed and that no one is standing near the machine.
- DANGER The machine may only be started or manoeuvred if the
driver is sitting in the driver’s seat with the seat belt
properly adjusted and fastened.
The operator must always be in control of the machine.
- Use the audible alarm or other signals to warn anyone in
attendance before starting the vehicle.
- The vehicle could move and cause unwanted damage if
it is started up without following the correct procedure.
- Never start the engine or touch the levers if a danger
sign is displayed inside the cab.
- Never start the engine by short-circuiting the terminals
on the starting motor.
- If you use auxiliary batteries, beware because the gas in the
auxiliary batteries could explode causing serious damage.
- When starting with auxiliary batteries, follow the instructions in the paragraph “STARTING WITH AUXILIARY
BATTERIES”. Any errors while carrying out the procedure can cause serious damage to the electrical/electronic
systems, sudden machine movements, battery explosion, as well as damage to things and injury to people.
- Observe the control instruments immediately after starting the engine, after the engine has warmed up and at
regular intervals during use to rapidly identify and solve
any malfunctions.
B/7
Mod. Agri Max - Agri Power - Agri Star
Introduction - Warranty
SAFE OPERATION OF THE VEHICLE
- DANGER DO NOT USE THE VEHICLE IF YOU ARE UNDER THE
EFFECT OF ALCOHOL, DRUGS OR IF YOU HAVE TAKEN MEDICATION THAT MAY MAKE YOU DROWSY OR
ALTER YOUR REFLEXES.
- DANGER DO NOT CARRY PASSENGERS ON THE VEHICLE OR
IN THE DRIVER'S CAB OR ON ANY OTHER PART OF
THE TELEHANDLER OR ON ANY OTHER MOUNTED
ATTACHMENTS EXCEPT ON THE PASSENGER CONVEYING BASKET.
- DANGER CHECK THE CORRECT POSITION OF THE REAR VIEW
MIRRORS. PAY ATTENTION AS THE PERCEPTION OF
OBJECTS' POSITIONS THROUGH THE REAR VIEW MIRRORS MAY NOT BE EXACTLY AS THEY ARE; THEY MAY
SEEM FURTHER AWAY OR NEARER THAN THEY ARE IN
REALITY. DESPITE THE USE OF REAR VIEW MIRRORS,
BLIND SPOTS MAY BE PRESENT AND THE OPERATOR
MAY NOT ABLE TO SEE CERTAIN POINTS WELL.
ALWAYS WORK WITH MAXIMUM CARE.
- While the vehicle is running, always keep light signals on.
These serve to warn people that the vehicle is about to move.
- Inspect the work zone before beginning operation.
- Inspect the ground and the conditions of the land at the
work site; ensure safe conditions before operating the vehicle. Do not use in places at risk for landslides or rock falling.
- Take due precautions to prevent that any unauthorised
persons from entering the working area.
- When moving through or operating in shallow water or soft
ground, verify the shape and the conditions of the land,
the depth and speed of water flow beginning operation.
- Do not drive with foot on the brake pedal or with the parking brake engaged.
- Continually evaluate the stopping distance required.
- Do not drive at high speeds.
- Always look in the forward direction and maintain good
road visibility. Frequently use the side view mirrors and
check their conditions, cleanliness and position regularly.
- Keep windows, mirrors and lights clean and in good condition.
- Verify that bonnets and the door are closed before beginning operation.
B/8
- When working in a congested area, always use the required signals; during operations that require the use of
more than vehicle, use signals known by all personnel.
Designate one person to signal and coordinate the work
zone. Make sure that everyone follows the directions given by the person in charge of signalling.
- When working conditions require an operator on the
ground, he/she must use hand signals in compliance
with local regulations.
- When working alongside excavations or on the edge of
the road or soft ground, keep at a safe distance as they
vehicle may overturn. Designate a person on the ground
to be in charge of signalling. have another person present
on the ground. Remember that after strong rains, the use
of explosives or an earthquake, the ground is more fragile.
- Operation on steep sloping roads can cause overturning
or sliding. Take proper precautions.
- Always move in a straight line to go up or down a slope. Moving crosswise or along the slope is extremely dangerous.
- When working on slopes, the vehicle risks losing balance
and overturning when working attachments are activated. Always remain in a stable position, do not utilise attachments.
- Drive slowly on grass, leaves or wet steel slabs. Even
when operating on slight inclines the vehicle may slip,
lose balance or overturn.
- When working on the upper part or inside buildings or
other structures, ensure stability before beginning operations. The risk of collapse exists and can cause serious
injuries or damage.
- Do not use the vehicle’s force of impact to carry out
tasks. These vehicles have not been designed for said
use, therefore, such use may cause vehicle overturning,
damage, the breakage of components and attachments,
and serious personal injury.
- ATTENTION Snow can hide obstacles and objects, and cover holes,
dug-out areas and ditches.
Proceed with caution when working in snowy conditions.
Operation of the vehicle if the quantity of snow does not
allow for clear distinction of obstacles and possible dangers along the path IS STRICTLY PROHIBITED.
- Take care when clearing snow and do not venture off the
main road; that which is hidden at the sides of the road may
cause vehicle overturning or damage to various components.
- Surfaces covered by snow or ice are extremely dangerous. Operate with caution, reducing vehicle speed as
much as possible and engaging levers slowly.
- Avoid obstacles.
- When lifting a load, ensure that nothing and no one hampers the movement and avoid false manoeuvres.
- Never leave the motor running when no operator is present.
- Never leave the key in the vehicle when it is unattended.
- ATTENTION Never leave the vehicle in the parked position with
a raised load.
- Dust, rain, fog etc. may reduce visibility. If visibility is limited, reduce speed and use appropriate lighting.
- Operate with caution. If the vehicle should sink into the
snow, it may overturn or remain buried. Do not venture
from the road and avoid remaining entrapped or buried
under heaps of snow.
- Extra care should be taken, when working on icy terrain.
Should the temperature rise, the ice could melt and the
ground could become slippery.
- Use caution in the presence of electrical cables, ditches,
or freshly excavated or worked ground.
- Make sure not to cause risk to others in the area when
backing up the vehicle.
- Always check the space around the vehicle before carrying out any manoeuvres.
- Make sure there is no one in the vehicle’s trajectory or in
work zone.
- Designate someone on the ground to supervise manoeuvres if the operator's field of vision is obstructed. Always
maintain visual contact with the person on the ground.
- ATTENTION Do not attempt to carry out operations which exceed the
vehicles capacity.
- ATTENTION Do not lift loads exceeding the capacity of the vehicle or
accessories and do not increase the size any counterbalance regardless of the artifice utilised.
B/9
Mod. Agri Max - Agri Power - Agri Star
Introduction - Warranty
- The vehicles are equipped with a special lighting system
for transfers. If working at night or in a tunnel, adequate
external lighting must be used.
- Never lift a load using only a fork.
- Do not lift, move or rotate the attachment above any person. If loads fall or bangs occur, damage may result.
- D o not authorise people to come near to or pass underneath a load.
- During operation in certain conditions, particles of material may be ejected. In such conditions, it is a good idea
to wear protective goggles and clear the area of those
people not in possession of such goggles.
- Pay careful attention to crumbling walls, landslides, falling material or objects that may break the cab window and hit the driver.
- Never operate the vehicle under an overhang as this
could give way and fall onto the vehicle.
- Do not excessively weigh down the vehicle or transport
loads that may fall out or overturn.
- The simultaneous use of two vehicles to manage heavy
or bulky loads is very dangerous and requires certain
special precautionary measures. Such a manoeuvre may
only be performed in very special cases and in the presence of person in charge of load transport.
- Do not operate near flammable material.
- ATTENTION When manoeuvring the vehicle, pay attention to bulky parts
above the vehicle. There are parts that jut out from the cab.
- The vehicle is equipped with a protective cab against falling objecting (FOPS). Use of a safety helmet is required
if there is a risk of falling objects.
- Do not use the trolley at night, or in dark or scarcely lit conditions unless the vehicle is equipped with working lights (optional) for additional information, contact your local dealer.
- ATTENTION Do not get onto the cargo load without having checked
that it is correctly positioned and anchored, that the vehicle to which it is connected (van, truck etc.) is not able
to move, that the deck is able to support the total weight
of the vehicle and its load, that the width of the deck is
appropriate for that of the vehicle.
- Pay particular attention to loading docks, to trenches, scaffolding, to land that has been recently excavated or filled.
- ATTENTION If operating close to overhead electrical lines, check
that the safety distance between the vehicle and the
electrical line is sufficient.
Consult your local electric company. In any case, do not
work at a distance of less than 5 metres from the electrical
lines Damp ground may increase the risk of electrocution.
- ATTENTION Operating or parking the vehicle too close to electrical
cables leads to increased risk of being struck by lightning or being seriously injured.
DIECI strongly recommends that safety rules applied
on-site comply with current local regulations regarding
all types of work performed near electric power lines.
- Designate someone on the ground to signal when the
vehicle is too close to power lines.
- Do not allow anyone near the vehicle when operating in
the vicinity of power lines. Wear rubber shoes and gloves as a precaution against possible emergencies. Cover the seat with a rubber piece of fabric and take care
to not touch the chassis with any unprotected body parts.
- Should the vehicle collide with an electrical cable, the
operator, to avoid electrocution, must never abandon the
driver's cab until he/she is certain that the electrical power supply has been properly disconnected.
- When driving on roads or slopes pay close attention to the
engine’s RPM. A high engine RPM may result in mechanical
damage. Always maintain control of RPMs and engine speed.
- Driving on side sloping roads may cause overturning or
sliding. Take proper precautions.
- Do not leave the vehicle loaded on a slope exceeding
15%, even when the parking brake is engaged.
B/10
- To prevent damaging hydraulic connections when changing an attachment, stop the engine and wait a minute to
remove pressure from the circuit. Always clean connectors
before their reinsertion.
- Check the cleanliness, protection and the conditions of rapid detachment connections in attachment circuits daily.
- ATTENTION Operators who note that the vehicle is not operating properly or that is does not conform to safety regulations
must immediately inform the construction site manager.
- PROHIBITED Operators are PROHIBITED from carrying out repair or
adjustment work unless they have been trained to do
so. Only the person charged to do so should carry out
maintenance work on the vehicle.
- PROHIBITED Attempting to start up the vehicle by pushing or pulling
on it is STRICTLY PROHIBITED. This may cause serious
damage to people and/or the vehicle.
- If operating the vehicle at low temperatures (-10°C),
empty and refill the tank using lubricants, fuel or cooling
liquids suitable for such temperatures.
- ATTENTION Before each use, check that attachments have been properly mounted and secured on their corresponding supports.
- ATTENTION Prior to each use, check that the cab safety system has
been set in compliance with the mounted attachment.
- Instructions supplied by the anti-tipping system must be
considered valid for vehicles in standard working conditions, on flat, even ground and with properly functioning
and correctly calibrated instruments. Regardless, limit values displayed on the load tables must never be exceeded.
- Never bring equipment near open flames.
- Never lift a load harnessed with a single fork or table.
- Make sure the vehicle is level before lifting the boom
when operating on sloping ground.
- When moving on longitudinal slopes:
Drive and brake delicately.
When moving without loads
turn forks or attachments downstream.
When moving with loads
turn forks or attachments upstream.
- ATTENTION The use of the vehicle in protected environments such as refineries or explosive atmospheres is STRICTLY PROHIBITED.
Special optional equipment is available for use in these
types of locations. Contact your agent or dealer.
-
Ensure that service brakes and horn are working properly.
Slow down before turning.
Maintain control of the vehicle and its speed in all situations.
Do not drive in reverse for long distances.
Brake slowly, avoid abrupt braking.
Hydraulic steering is very sensitive to steering wheel movements. Steer slowly and avoid any sudden movements.
- The speed of vehicles with loads must never exceed 10
Km/h (5Km/h beyond 50% of the allowable load).
- Load transport on the road is forbidden and attachments
mounted on the vehicle must be equipped with special prescribed attachments or must be removed.
- PROHIBITED Carrying people on or lifting people up with the vehicle
is STRICTLY PROHIBITED unless the vehicle is equipped for said purpose and has a special certificate of
conformity regarding the transport of people.
- Carefully follow loading programme instructions.
B/11
Mod. Agri Max - Agri Power - Agri Star
LOAD HANDLING
- ATTENTION Always adhere to safety regulations; always transport balanced, properly arranged loads to prevent overturning.
- Always fully insert forks under loads and bring them to
the transport position (forks at 300 mm from the ground
and slanted backwards, boom completely retracted).
- Always check that the pallets, boxes, etc. are in good
condition and suitable for the type of load to be lifted.
- Manoeuvre the fork lift with the boom raised only in
exceptional circumstances. In these circumstances,
operate with due prudence, reduce speed as much as
possible and brake delicately. Make sure that visibility
is always sufficient. If necessary, ask an operator on the
ground to guide operations.
- During handling operations, reduce speed as much as
possible and brake delicately.
- Do not manoeuvre loads while the vehicle is moving.
- ATTENTION A load can only be handled in low gears "i" and "ii"
(first and second).
- Before turning, slow down as much as possible, and monitor the load.
- Handle loads with care, at low speed and without sudden or
skipping movements, above all if carrying at great heights.
- Do not change direction sharply or at a high speed.
- ATTENTION If the vehicle overturns, the operator
should not attempt to exit the driver’s cab
during the accident. ALWAYS FASTEN SEAT BELTS
WHEN DRIVING THE VEHICLE. ALWAYS KEEP seatbelts fastened whenever inside the cab.
- Always use the parking brake when setting down or lifting a load on a slope.
- Always ensure good visibility in the work area, including
direct vision and visibility using rear view mirrors in order
to check for the presence of people, animals, obstacles,
holes and changes in slope etc.
- If visibility on the right side is limited during boom operation, before lifting, ensure that the work area is clear and
make note of the position of any possible obstacles and
irregularities in the terrain.
- Visibility is compromised when transporting circular loads in reverse; this operation must only be carried out
for brief distances and there should be a worker on the
ground to monitor all manoeuvres,
- Always ensure good visibility (clean windows, clean and
properly working headlights etc.)
B/12
Introduction - Warranty
- ATTENTION The standard illumination of the telescopic loader is not
suitable in working conditions with poor visibility or for
use at night. There are several ways to improve visibility in poor lighting conditions.
Contact your local DIECI dealer.
- Lifting or transporting a load that exceeds the nominal
capacity or the vehicle or accessory is PROHIBITED.
- ATTENTION BEFORE LIFTING LOADS, OPERATORS MUST BE FAMILIAR WITH THE WEIGHT OF THE LOAD AND ITS CENTRE OF GRAVITY.
- Load tables are valid for centres of gravity that are 500
mm from the heels of the forks. Contact your dealer for information regarding centres of gravity at greater distances.
- Pay CAREFUL ATTENTION during the transport of
loads with a variable centre of gravity (e.g. liquids). Operate with caution in order to limit such variations and to
prevent the risk of vehicle overturning.
- Pay ATTENTION regarding the risk of limbs being crushed during manual fork adjustment operations.
PARKING THE VEHICLE
- Always park on flat, even and level ground where there
is no risk of falling masses, landslides or flooding.
- Lower outriggers to the ground (if present)
- Retract the boom completely and lower it to the ground.
- Engage the parking brake
- Move the “direction” lever to position "N".
- Run the engine for a minimum of 60 seconds before
switching off in order to cool the engine down.
- Turn the key to the halt engine position.
- Remove the key from the ignition.
- Block the hydraulic controls using the devices provided
(when present).
- Close and lock windows using the specially provided
handles.
- Close and lock the cab door.
- Place wedges under the wheels.
- Make sure that the vehicle is parked so that it does not
block traffic and at least 3 metres away from railway tracks.
TEMPORARY HALT
Gradually release the accelerator pedal.
Bring the vehicle to a halt on flat ground.
Engage the parking brake
Move the “direction” lever to position "N".
While the vehicle is being run-in (50 h) do not keep the
diesel engine at minimum revs for too long.
- ATTENTION IF THE OPERATOR MUST ABANDON THE DRIVER'S
SEAT, HE/SHE SHOULD FOLLOW THE INSTRUCTIONS
PROVIDED IN THE PARAGRAPH REGARDING "PARKING THE VEHICLE".
B/13
Mod. Agri Max - Agri Power - Agri Star
ROAD TRAVEL
- In some countries it is mandatory to place wedges under
the tyres when the vehicle is stopped.
- ATTENTION BEFORE THE VEHICLE IS TRANSFERRED TO THE
ROAD MAKE SURE YOU ARE ACTING IN COMPLIANCE
WITH THE RULES AND REGULATIONS PERTINENT IN
THE COUNTRY OF USE.
THE OBLIGATIONS FOR ROAD TRAVEL ARE GIVEN IN
THE VEHICLE REGISTRATION DOCUMENT.
- Dimmed headlights should be used during day hours
and on roads where use of visual signals and lighting
devices is not mandatory.
- Ensure correct operation and cleaning of headlights, directional lights and windscreen wipers.
- ATTENTION ENSURE CORRECT POSITIONING OF
REAR VIEW MIRRORS.
PAY ATTENTION AS THE PERCEPTION OF OBJECTS'
POSITIONS THROUGH THE REAR VIEW MIRRORS MAY
NOT BE EXACTLY AS THEY ARE; THEY MAY SEEM FURTHER AWAY OR NEARER THAN THEY ARE IN REALITY.
ROAD TRAVEL (INSTRUCTIONS)
- Use the levelling control switch to level the vehicle‘s
chassis in relation to the axles (if present).
- Ensure that all outriggers have been perfectly retracted
and raised (if present).
- Close the telescopic boom completely. Lower the main
boom completely and raise it slightly (300 mm from
ground).
- Make sure the lights are functioning properly before
driving the vehicle on roads. Check that the ‘slow vehicle’ revolving indicator light is installed and operational.
Keep it activated during both day and night use.
- Carry out the wheel timing. IT IS MANDATORY to set
steering as shown in the vehicle handbook and to block
the selection lever using the relevant device. In Italy set
the 4 wheel steering mode; on public roads do not use
crosswise steering or 2 wheel steering.
- Ensure that the fuel quantity is sufficient.
- Mount all attachments provided for road driving in compliance with the country where operating.
- Install a overhanging load signal panel on the boom
head before the entering onto the road.
- Always evaluate the itinerary to be covered, taking into
consideration suspended structures (e.g. bridges, underpasses) that could be damaged by the vehicle.
B/14
Introduction - Warranty
- Make sure that the vehicle complies with local regulations regarding number plates when travelling on roads
during both day and night.
- ATTENTION TRANSFER WITH EQUIPMENT FIXED TO THE FORK
HOLDING PLATE IS NOT ALLOWED EXCEPT THOSE ACCEPTED BY THE LEGAL AUTHORITY OF THE
COUNTRY WHERE THE VEHICLE OPERATES.
- ATTENTION OPERATING THE VEHICLE ON THE ROAD WHEN IT IS
CARRYING A LOAD IS PROHIBITED.
HOISTING THE MACHINE
TRANSPORTING THE MACHINE
- Disassemble any attachments from the machine.
- Before transporting the machine, ensure that the rules
and regulations of every area the machine will travel
through are complied with.
- Completely retract and lower the boom.
- When the machine is in position, engage the parking
brake and position the gear selector in neutral "N".
- Close the windows and lock the door of the cab.
- Ensure that the hoisting mechanism has a suitable capacity for the weight of the machine before attempting to
hoist it. The weight of the machine is displayed on a plate.
- Disassemble any attachments from the machine.
- Completely retract and lower the boom.
- Before loading the machine onto the means of transport,
ensure there is no grease, ice or other slippery substances on the machine or the ramp.
- Ensure the brake is engaged on the tractor and the trailer.
-Ensure the safety instructions regarding the transport
platform have been applied correctly before loading the
machine and that the driver of the means of transport is
informed about the overall dimensions and weight of the
telescopic handler.
- Load and unload the machine on solid and level ground.
- Check the overall dimensions for the maximum and minimum heights above ground and the permitted weight.
Check the authorised soil contact pressure for the
platform compared to the machine.
- Always ensure the devices used to anchor the machine
(cables, chains, wedges, etc.) are in good condition; ensure they are not worn, broken or twisted.
- Check the capacity of the anchors before hoisting the
machine.
- Check the overall dimensions of the machine.
- Use the hoisting points illustrated in the figure and marked on the machine with the appropriate symbols.
- Before hoisting the machine, ensure there are no unauthorised people in the surrounding area.
- Bear in mind the location of the centre of gravity of the
telehandler.
- Load the machine on the means of transport (ensure the
ramps are correctly and safely positioned).
- Load the machine parallel to the platform.
- Manoeuvre the machine with caution onto the means of
transport.
- When the machine is in a safe position, engage the parking brake and position the gear selector in neutral "N".
- Place wedges under the front and rear of the tyres on the
machine. Anchor the machine to the means of transport
with cables or chains. Tighten the cables and/or chains.
- Close the windows and lock the door of the cab.
- Slowly hoist the machine with the utmost care.
- Use the anchor points illustrated in the figure and marked on the machine with the appropriate symbols.
- Always ensure the devices used to anchor the machine
(cables, chains, wedges, etc.) are in good condition and
that the capacity of the means of transport is suitable for
the weight to handle.
- CAUTION Carefully comply with all the steps described above to
ensure the machine is transported safely.
B/15
Mod. Agri Max - Agri Power - Agri Star
Introduction - Warranty
ELECTROMAGNETIC INTERFERENCE
CARRYING OUT MAINTENANCE WORK SAFELY
- Some machines can be equipped with electronic components whose function can be influenced by electromagnetic interferences from other appliances that are not
part of the machine. These interferences can be considered a danger to people.
- Do not leave tools or other items lying around the
workplace. Clean up any traces of grease, oil or other
substances that could be slippery. Always keep the workplace clean and tidy so you can work safely.
- If any auxiliary equipment is installed, the user must
check whether the installation causes any interference
at all with the instruments on the vehicle; if it does, the
user must get rid of the interference.
It is of the utmost importance to pay particular attention to
mobile equipment, such as radio equipment (telephones)
which must be installed by specialised technicians and feature external antennas.
In general, bear in mind that any additional electrical equipment installed must comply with Directive EMC EEC/89/336
and feature the “CE” mark.
VIBRATIONS
Take into account the following recommendations to reduce
the operator’s exposure to vibrations:
- Always use tools that are suitable for the type of job to
carry out.
- The driver’s seat must be correctly adjusted according to
individual requirements. Inspect and if necessary repair
the seat suspensions and adjustment mechanisms.
- For the sake of safety, place rags soaked in grease and/
or other inflammable materials in a safe container.
- Only use tools that are suitable for the tasks to carry out
and ensure they are used properly. The use of damaged, poor quality, defective, random or unsuitable tools
can cause serious injury.
- Never hit the machine or any part of the machine with
hammers or other tools, splinters or rebounding tools
can cause injury.
- It is possible to slip or fall on a machine covered in mud,
oil etc. This will also make it more difficult to carry out a
visual analysis of machine components during inspections or maintenance work. Carefully clean the machine
before every intervention.
Do the following before carrying out any maintenance on the
machine:
Park the machine on flat and solid ground.
Completely retract and lower the boom.
Leave the boom raised and apply the safety rod if the
maintenance work requires the boom to be raised.
Allow the engine to idle for some 60 seconds to cool it down.
- Ensure that the machine is kept efficient and carry out
machine maintenance as prescribed by the manual.
Turn the ignition key to the engine off position.
- Steer, accelerate, brake, change gear and move attachments smoothly.
Release any residual pressure in the hydraulic system
by repeatedly acting on the hydraulic distribution levers
while the engine is switched off.
- When in transit, adjust the speed of the machine to minimise
vibrations. Reduce speed to avoid jolts. Transport the machine if there is a considerable distance between work sites.
- Keep the workplace in good condition, remove stones
and obstacles, fill depressions or holes, etc.
- To avoid back problems, only use the machine if you are in
good health. Take breaks to reduce the amount of time spent
sitting in the same position. Never jump out of the cab or off
the machine. Avoid repeatedly handling and lifting loads.
Remove the key from the ignition.
Apply a "Maintenance in Progress" notice on the door of
the cab and inside the cab on the joysticks.
Apply barriers and spacers to prevent unauthorised staff
from approaching the machine.
Disconnect the battery cut-off switch.
Leave the engine to cool down.
- Ensure you are familiar with the maintenance procedures before starting work.
- Keep the work area clean and dry.
- Do not lubricate parts or carry out any maintenance work
when the machine is moving.
B/16
- Do not carry out any maintenance while the engine is running. If it is necessary to carry out maintenance work while
the engine is running, seek the assistance of at least two
workers and proceed as follows:
One person must remain seated in the driver’s seat, ready
to switch off the engine at any moment. All the workers must
continually maintain contact with each other.
Take the utmost care to avoid being trapped by components
while working near the fan, fan belt or other rotating parts.
Do not touch any levers or pedal controls. If it is necessary to
act on any lever or pedal, always tell the others to keep at a
safe distance.
Do not drop or insert any tools or other objects in rotating
machine parts; the parts can break or fly into the air.
- If it is necessary to go underneath the attachment or the
machine to carry out maintenance work or to service parts,
firmly support the attachment and the machine with blocks
and supports solid enough to support the weight.
- CAUTION ENTRAPMENT IN MOVING PARTS CAN CAUSE DAMAGE. TO PREVENT ACCIDENTS, ENSURE NO PARTS OF
YOUR BODY, HAIR OR CLOTHING CAN BECOME TANGLED IN MOVING PARTS.
- Place any attachments removed from the machine in a safe
place, where they cannot fall. Adopt the due precautions to ensure that unauthorised people cannot enter the storage area.
- Do not place metallic parts on the battery.
- Any welding must be carried out by a qualified welder and
in a place with adequate equipment. While carrying out any
welding, there is a danger of gas leaks, fires and electric
shock; therefore ensure such work is not carried out by unqualified personnel.
- Disconnect the wires from the battery before acting on the electrical system or before doing any arc welding on the machine.
- When carrying out electric welding, connect the ground terminal of the welding machine as near as possible to the area
to be welded, to prevent the electric current from passing
through ball bearings, articulated joints, hydraulic cylinders
or reciprocal sliding parts. If welding is carried out near the
oil or fuel tank, drain them beforehand.
- DANGER ENGINE EXHAUST GASES ARE TOXIC AND CAN BE
HAZARDOUS FOR YOUR HEALTH.
- DANGER THE MACHINE MUST BE PLACED OUTDOORS WHILE
THE ENGINE IS RUNNING.
ONLY PLACE THE MACHINE INDOORS IF THE LOCATION IS ADEQUATELY VENTILATED AND THE MACHINE
IS EQUIPPED WITH FILTERS.
- CAUTION IF YOU NEED TO WORK UNDER ANY RAISED MOBILE
PARTS, (BOOMS, SHOVELS, ETC.) BLOCK THE PARTS
WITH SPACERS PLACED ON THE CYLINDER RODS OR
PLACE THE PARTS ON ADEQUATELY SIZED SUPPORTS.
B/17
Mod. Agri Max - Agri Power - Agri Star
- Replace any worn or broken components.
- Eliminate any accumulations of grease, oil or deposits.
- After the machine has been used, the engine coolant will
be hot and pressurised. Any contact with hot water and/
or steam may cause serious burns.
- Avoid any possible injury caused by hot water jets. Do
not remove the radiator cap until the engine has cooled
down. To open, unscrew the cap as far as possible. Before removing the cap, release any pressure.
- To prevent burns caused by oil or other red hot parts
while checking or unloading, allow the oil to cool down
(you should be able to touch the cap with your hand) before starting work. Even when the oil has cooled down,
unscrew the cap very gently to release the inside pressure before removing.
Introduction - Warranty
- Use a piece of cardboard to check for any leaks; ensure your
hands and body are protected against pressurised fluids.
- Any fluids injected under the skin must be removed surgically. If there is an accident, seek medical attention immediately.
- Do attempt to loosen fittings, hoses or hydraulic components while the circuit is pressurised.
- Never touch the coolant in the air conditioner. If the
coolant in the air conditioner squirts into the eyes, it can
cause blindness; if it touches the skin, it can cause freezing phenomena.
- Cleaning with compressed air poses the risk of serious
injury caused by flying particles. Always wear safety goggles, a dust mask, gloves and other safety equipment.
- CAUTION CHANGING THE ADJUSTMENT AND/OR DISASSEMBLING BALANCING VALVES AND SAFETY VALVES CAN
BE DANGEROUS.
ONE OF THE AFOREMENTIONED VALVES CAN ONLY
BE DISASSEMBLED IF THE RELATIVE JACK IS AT A
STANDSTILL AND IF THERE IS NO PRESSURE IN THE
HYDRAULIC CIRCUIT.
THIS OPERATION CAN ONLY BE CARRIED OUT BY AUTHORISED PERSONNEL.
- CAUTION BEWARE OF BURNS; THE ENGINE OIL OF THE REDUCTION GEARS AND THE HYDRAULIC SYSTEM, AS WELL
AS THE PIPES, ENGINE AND OTHER COMPONENTS
BECOME VERY HOT WHEN THE MACHINE IS IN USE.
WAIT UNTIL ALL PARTS COOL DOWN BEFORE STARTING ANY MAINTENANCE OR REPAIR WORK.
- Fluids such as fuel or hydraulic oil under pressure can
penetrate the skin and eyes causing serious injuries.
Avoid these risks while carrying out repairs or maintenance on the machine.
- Discharge any pressure (using the hydraulic levers of
the distributors) before disconnecting or repairing pipes
or hydraulic parts.
- Do attempt to loosen fittings, hoses or hydraulic components while the circuit is pressurised.
- Before restarting the engine, ensure that all fittings have
been properly tightened.
B/18
- Only use the lubricants indicated by DIECI, never use
used lubricants.
STORINGTHEMACHINE/PROLONGEDINACTIVITY
CLEANING YOUR MACHINE
Before a long period of inactivity, observe a number of precautions, such as:
- Switch off the engine, remove the key from the ignition
and wait for the various components to cool down.
Clean the machine.
Touch up the paintwork where necessary to prevent rust.
Lubricate all the lubricators.
Check whether there are any worn or damaged parts on
the machine and replace them as necessary.
Drain the oil from the engine and replace with new oil.
Clean the fuel system and change the filter cartridges.
Empty the usual fuel from the tank and replace with ten litres
of special fuel for long periods of inactivity. Allow the engine to
run for ten minutes so the new solution is distributed evenly.
Drain the coolant from the radiator and the cylinder block
and refill with a solution of antifreeze and water.
Store any equipment.
Realign the turret.
- Wear appropriate protective clothing (gloves, mask,
overalls, etc.)
- Do not use inflammable liquids, acids or products that
may chemically corrode machine components.
- Do not clean moving or hot parts; allow the parts to cool
because they could be damaged by abrupt changes in
temperature.
- To clean the exterior of the machine and the engine compartment, use a power washer bearing in mind the following:
Ensure the filler caps are closed properly (radiator, oil
tank, fuel tank, etc.)
Protect control units and connectors from water seepage.
Do not use water temperatures or pressures over 80°C
and 100 bar respectively.
Completely lower the boom.
Do not hold the power washer nozzle less than 40 cm
from the surface you are washing.
Remove the battery and store in a warm, dry place. Recharge the battery regularly.
Do not concentrate the jet in just one place, wash using
large strokes.
Raise the machine onto stands to take the weight off the tyres.
The interior of the machine is delicate and must never be
cleaned with a power washer.
Cover the exhaust opening.
Cover the exposed rods on the hydraulic cylinders with a
light layer of grease.
Close and lock all windows.
Lock the door.
GETTING THE MACHINE READY AFTER A LONG
PERIOD OF INACTIVITY
Inflate the tyres to the correct pressure.
Remove the stands from under the axles.
Fill the fuel tank.
Check the level of the coolant in the radiator.
Check the various oil levels.
- If any water accidentally falls on the electrical system, the
machine will not function correctly. Do not use water or steam to clean the electrical system, sensors or connectors.
- To repair any small defects on the bodywork, ask your
DIECI dealer for tins of touch up paint. Ensure all the
stickers are present; replace any stickers that are lost or
removed while cleaning.
Assemble a fully charged battery.
Remove the cover from the exhaust pipe.
Remove the layer of grease from the uncovered cylinder rods.
Switch on the engine and ensure all controls are working properly.
Leave the engine to idle without any load for a few minutes.
Ensure the braking system is working properly.
B/19
Mod. Agri Max - Agri Power - Agri Star
CLEANING THE WINDOWS
- The cab windows, headlamps and rear-view mirrors
must be washed frequently with soapy water.
- After you have cleaned these components, dry carefully.
Do not leave any stains or halos that may limit or distort
the operator's view.
CLEANING THE CAB
- Clean the soft upholstery in the cab with a cloth that has
been immerged in a solution of water and detergent and
then tightly squeezed.
- Clean the driver ’s seat and the floor with a vacuum
cleaner and/or a stiff brush. If necessary, use a damp
cloth to remove any stubborn stains.
- CAUTION DO NOT USE JETS OF WATER INSIDE THE CAB.
- Clean the seat-belts with a sponge dipped in hot soapy
water and simply leave them to dry.
- The fabric seats should be cleaned with a stiff brush or vacuum cleaner. Plastic seats should be cleaned with a damp cloth.
SAFETY STICKERS
- Consult the summary table in the chapter “MAINTENANCE” for the inspection schedule.
- Replace any Danger, Caution, Hazard or instruction
stickers that are illegible or missing.
- Read all the safety warnings on the machine and comply
with their contents before starting, running, refuelling or
carrying out maintenance work. Clean said warnings if
covered in mud, cement or other deposits. Do not remove
for any reason. If damaged, lost or illegible, replace immediately. Orders must be placed using the same process
as for spare parts (ensure you include the model and serial number of the machine when you place your order).
- The location and code numbers of the safety stickers are illustrated in chapter "B – SAFETY STANDARDS" in this manual.
B/20
Introduction - Warranty
FIRE PREVENTION
- CAUTION Stop the machine immediately if an alarm lights up in
the cab. Contact your DIECI service centre and do not
operate the machine until the fault has been repaired.
- Before every work cycle, ensure there are no leaks from
the machine; fuel, oil, grease or lubricants in general can
start fires and cause serious injury.
- Regularly check there are no loose or missing clamps,
no twisted hoses or hoses that are rubbing together.
- Do not bend any pipes under pressure. Never install damaged pipes.
- Remove inflammable materials such as fuel, oil, grease,
waste, deposits, accumulated dust or any other components that can start a fire.
- Avoid short circuits; they can cause fires.
- Regularly clean and secure all electrical connections. Before every work shift, ensure there are no twisted, hardened
or damaged electricity cables. If there is a malfunction, do
not start the machine and contact a DIECI service centre.
- Regularly check the ignition switch. A fault when stopping the engine will obstruct the work of the fire brigade.
- CAUTION IF A FIRE DEVELOPS, IMMEDIATELY ABANDON THE
MACHINE AND FIND A SAFE PLACE; IF POSSIBLE TURN
THE IGNITION TO "0" (ENGINE AND INSTRUMENTS OFF)
BEFORE ABANDONING THE MACHINE.
- CAUTION ONLY ATTEMPT TO PUT OUT THE START OF A MODEST
FIRE IF YOU HAVE AN EFFICIENT FIRE EXTINGUISHER
AVAILABLE.
- CAUTION IF THE FIRE DIRECTLY INVOLVES THE OIL OR FUEL
TANK, ABANDON THE MACHINE IMMEDIATELY; THE
MACHINE COULD EXPLODE.
- When cleaning parts with oil, use non-inflammable oil.
Diesel and petrol fuel can catch fire. Do not use.
- Do not weld or use a cutting torch to cut pipes that contain inflammable liquids.
- When checking the level of fuel, oil, battery electrolyte,
windscreen wiper liquid or coolant, always use an explosion proof light source. If other types of lighting are
used, there is a risk of explosion.
B/21
Mod. Agri Max - Agri Power - Agri Star
BATTERIES
Introduction - Warranty
- Do not overturn or tilt the battery to avoid acid leakage.
- Charge the battery in a well-ventilated place and ALWAYS disconnect the power supply before disconnecting the terminals.
- Always use a voltmeter or a densimeter to check the
battery charge. Use a torch to check the electrolyte
level, never a naked flame. Never place anything metallic between the terminals to check the battery charge.
- CAUTION TO AVOID BATTERY EXPLOSIONS, KEEP SPARKS,
NAKED FLAMES AND CIGARETTES FAR FROM THE
TOP OF BATTERIES BECAUSE THESE CAN PRODUCE
HIGHLY INFLAMMABLE GASES.
- DO NOT generate any sparks with the wire terminals
while recharging the battery or while starting the engine
with an auxiliary battery.
- Ensure the caps and air vents are correctly assembled
and firmly tightened.
- Clean the upper part of the battery, ensure the clamps are
firmly assembled and cover with a thin layer of Vaseline.
- If the battery freezes, put in a warm place to defrost. Do
not use and do not charge; it could explode.
- In normal conditions, the battery is kept charged by the machine alternator. If the battery is completely flat through prolonged lack of use or because its lifetime is over, the alternator will no longer be able to keep it charged. The battery
must be replaced and recharged using a battery charger.
Charging instructions
- CAUTION THE BATTERY CONTAINS SULPHURIC ACID ELECTROLYTE, A CORROSIVE SUBSTANCE THAT MUST BE
HANDLED WITH THE UTMOST CAUTION BECAUSE IT
CAN CAUSE POISONING AND SERIOUS BURNS.
KEEP OUT OF REACH OF CHILDREN.
AVOID CONTACT WITH THE SKIN OR EYES.
1. If possible remove the caps.
2. Check the electrolyte level.
3. Clean the poles.
4. Ensure the room is sufficiently ventilated.
5. Limit the charge current to a maximum 1/10 of the battery capacity (Ah).
6. Connect the battery to the charger.
7. Connect the charger to the power supply mains.
- CAUTION WEAR PROTECTIVE CLOTHING AND SAFETY GLOVES
AND GOGGLES. IN CASE OF CONTACT WITH THE
EYES OR SKIN, RINSE IMMEDIATELY WITH ABUNDANT
WATER AND CONSULT A DOCTOR. IF SWALLOWED,
CONSULT A DOCTOR.
8. Switch on the charger.
9. The battery temperature must not exceed 55 °C.
10.When the battery has finished charging, disconnect the
battery charger.
11.Disconnect the charger from the power supply mains.
12. Disconnect the battery from the charger.
13. Check the electrolyte level.
14. Reinstall the caps.
B/22
- Do not charge damaged batteries. Danger of explosion.
- Do not charge a hot battery. Danger of explosion.
- A battery is completely charged if at a constant temperature, the density of the electrolyte and the measured
voltage at the poles does not increase within 2 hours.
- Every charge is as good as the general condition of the
battery. This means that the charge of an old battery will not
achieve the same lifetime and efficiency as a new battery.
- The most straightforward charge method is the constant
power charge.
- When charging is over, the charger voltage increases
and creates gasification. It is advisable to use straightforward chargers with minimum current control and a timer
to switch the charger off.
- If the battery has a low electrolyte level, top up to the minimum
level (just above the limit of the plates) and then charge. After
ending the charge, fill to the maximum level (to avoid leaks).
Do not overcharge because:
a) It is a waste of energy that causes water disassociation.
b) It produces a loss of active mass due to the deterioration
of the electrodes.
c) It creates a danger of explosion.
- If the sulphated batteries are charged without a voltage
limit, they will reach boiling point and overheat.
- Charge old batteries with the utmost caution (they will
probably be sulphated batteries). Even at 13.8 Volt, there is the risk of an increase in temperature.
- CAUTION All these procedures must be carried out by competent
and trained staff.
- CAUTION Batteries contain substances that are particularly hazardous
pollutants and must not be disposed of in the environment.
Uncharged, old, damaged, etc. batteries must be disposed of appropriately.
Low maintenance batteries
Low maintenance batteries are designed to avoid maintenance during ordinary and normal battery use. If the battery
is flat, check the electrolyte level and follow the instructions
in the paragraph “BATTERY”. Please consult the supplier or
manufacturer for technical specifications.
Maintenance-free batteries
These types of battery do not require any maintenance.
When the battery is flat, it must be replaced. Please consult
the supplier or manufacturer for technical specifications.
STARTING UP WITH AUXILIARY BATTERIES
- CAUTION Two adequately trained and qualified people are required to start the engine using an auxiliary battery.
Any mistakes during this procedure can cause serious
damage to the machine, things and people.
- When starting the engine from another machine, connect the batteries in parallel. When connecting the cables, avoid contact between the positive cable “+” and
the negative cable “-“.
- Ensure you are wearing appropriate protective clothing
before carrying out any procedures.
- Take care to avoid contact between the machine to be
started up and the machine that has to supply the power,
to avoid sparks and consequently explosions caused by
the hydrogen produced by the batteries. If the battery
explodes, it could cause serious damage and injury.
- Ensure you never accidentally switch the starting cables and connect first the ground lead (-) and lastly the positive voltage lead (+).
- Use great care when removing the starting cables; ensure that when the cables are disconnected from the
battery they do not touch other parts of the machine to
prevent hydrogen explosions.
- CAUTION THE CABLES AND THE CLIPS MUST BE SIZED ACCORDING TO THE POWER CHARGE TO BE TRANSFERRED.
THE CAPACITY OF THE BATTERY USED TO START THE
MACHINE MUST BE GREATER OR AT LEAST EQUAL TO
THE CAPACITY OF THE BATTERY ON THE MACHINE.
- CAUTION ENSURE THE CABLES AND CLIPS ARE NOT CORRODED OR DAMAGED.
ENSURE THE CLIPS GRIP THE TERMINALS FIRMLY.
- CAUTION TAKE THE UTMOST CARE DURING THE VARIOUS PROCEDURES, DIRECT OR INDIRECT CONTACT WITH LIVE PARTS
CAN CAUSE INJURY AND SOMETIMES EVEN DEATH.
- CAUTION WHEN THE ENGINE IS STARTED, THE OPERATOR
MUST BE SEATED IN THE DRIVER’S SEAT TO ENSURE
THE MACHINE IS UNDER HIS OR HER CONTROL.
- CAUTION DO NOT CARRY OUT ANY MAINTENANCE OR ATTEMPT
TO RECOVER MAINTENANCE-FREE BATTERIES.
B/23
Mod. Agri Max - Agri Power - Agri Star
Connecting the cables and starting the engine
1. Ensure the ignition key is in position “O”.
2. Connect the positive poles “+” on the two batteries “A”.
3. Connect the cable on the negative terminal “-“ of the charged
battery to the ground block on the machine to be started up “B”.
4. Start up the engine of the machine that is working properly
and rev up the engine.
5. Start the engine of the machine that has broken down.
Introduction - Warranty
ELECTRICAL SYSTEM OVERLOAD PROTECTION
- CAUTION Burnt fuses must be replaced with another fuse of the
same type.
Other types of repairs are forbidden, even if temporary.
- Do not connect or remove terminals, fuses or connectors
while the machine is running or being electrically powered.
- CAUTION Removing the cables
With the engine running, remove the cables in the reverse
order in which they were connected.
1. Disconnect the negative cable (-) from the ground block on
the started engine and then from battery “B”.
2. Disconnect the positive cable “+” first from the battery used
to start up and then from the battery of the machine with the
flat battery. “A”.
Any work on the electrical system must be carried out
while the machine is disconnected from the power supply.
Do not restore the power supply until the work has been
completed and all covers and protection devices have
been reassembled.
- Act on the battery cut-out to disconnect the power supply to the machine.
- Also disconnect the power supply by acting on the battery cut-out before replacing the battery.
- If a connector is damaged or no longer enters its housing,
replace immediately to avoid short circuits, sparks, etc.
- CAUTION -
Charged
battery
Flat
battery
Engine block
to start
Damaged, pinched or burnt cables must be replaced immediately even if the damage only concerns the sheath
or external insulation.
- Never connect or disconnect the charge circuit (including battery connections) while the engine is running.
- Never short circuit at the ground (earth) any charge
components.
- Do not use an auxiliary battery with a rated voltage above 12 Volts.
- CAUTION ALL THESE PROCEDURES MUST BE CARRIED OUT BY
COMPETENT AND TRAINED STAFF.
- Always ensure the polarity is correct when installing batteries or using an auxiliary battery to start up using jump
cables. Comply with the instructions in the use and maintenance manual when starting the machine with jump cables. Connect positive to positive and negative to negative.
- Always disconnect the negative cable from the batteries
before carrying out any arc welding on the machine or
any attachments connected to it.
- Position the welder ground terminal as close as possible
to the area to weld.
- CAUTION If the welding needs to be carried out near an electrical
module, the module must be removed from the machine.
Ensure this procedure is carried out by qualified and
authorised personnel.
- Ensure the welder cables are not above, near or cross
any electrical cables or electronic components while
welding is being carried out.
B/24
TIGHTENING WHEEL NUTS
- Tighten nuts in accordance with the schedule provided in
the maintenance table
- When tightening the wheel nuts, torque should be as follows:
Wheel stud 18
Wheel stud 22
kgm 50
kgm 60
- Always tighten the nuts positioned opposite each other,
not consecutively.
- After having remounted the wheel, tighten the nuts
between the wheel and axles. Check that nuts are tightened each day until torque has stablised.
- ATTENTION THE NUMBER OF AXLE STUDS MUST CORRESPOND
TO THE NUMBER OF TIGHTENED NUTS.THEREFORE
ALL NUTS MUST BE MOUNTED IN ON EACH TYRE;
OTHERWISE THE VEHICLE WILL NOT OPERATE.
- In the event of tyre replacement, the vehicle or the lifted side can be set back on the ground only with tyres
mounted and properly tightened.
Tyre pressure table
MISURA PNEUMATICO
TYRES DIMENSIONS
DIMENSION DES PNEUS
DIMENSION DE LOS NEUMATICOS
REIFENMASS
CARATTERISTICHE
DETAILS
CARATTERISTIQUES
CARACTERISTICAS
EIGENSHAFTEN
BAR
10,5 R18
10PR
3,75
12,5 R18
10PR
3,0
12,5 R18
12PR
3,0
12,5 R20
12PR
3,5
18 R19,5
16PR
4,5
16/70 R20
14PR
3,5
18 R22,5
16PR
4,5
405/70R20 (16/70-20)
14PR
3,5
405/70R20 (16/70R20)
152J
6,0
405/70R24 (16/70-24)
14PR
4,0
405/70R24 (16/70R24)
152J
5,0
445/65R22,5 (18R22,5)
169F
8,0
445/65 R22,5
168A8
8,5
14.00 R24
16PR
3,75
17.5L R24
16PR
4,0
445/70R24 (17.5LR24)
151G
4,1
500/70R24 (19.5LR24)
164A8
4,0
- ATTENTION -
- Check the size of the tyres installed and the ply number
to ensure they are inflated to the correct pressure.
NUT TIGHTENING MUST BE CARRIED OUT FIRST WITH THE
VEHICLE, OR PARTS OF IT, LIFTED FROM THE GROUND,
AND THEN WITH THE VEHICLE ON THE GROUND.
- To ensure maximum efficiency do not use tyres with
more than 80% wear.
- Only use original DIECI nuts to tighten the wheels.
Should even just a single nut be lost, contact the DIECI
service centre.
- ATTENTION -
TYRES
- ATTENTION UPON RECEIPT OF THE VEHICLE,
CHECK TYRE AIR PRESSURE.
Inflating or working on tyres can be dangerous. Whenever possible, have specialised personnel intervene on
or install tyres. To prevent serious or fatal injury, follow
the safety precautions described below.
- Vehicle tyres are very heavy. Handle with care and ensure that, once stored, they cannot fall and injure anyone.
- Never attempt to repair a tyre on a public road or motorway.
- Make sure that the car jack is positioned on a solid, flat
surface.
- Check tyre pressure every 100 hours and every two weeks. Pressure should be checked when the tyres are cold.
- Make sure that the jack is suitable to support the weight
of the vehicle.
- Before each use, verify that the sides of the tyres are not damaged.
- Use jack tripods or other locking devices suitable for
supporting the vehicle while repairing tyres.
- ATTENTION -
- Never place any part of your body under the vehicle.
TYRES THAT ARE TORN OR ARE EXCESSIVELY WORN
SHOULD BE REPLACED IMMEDIATELY.
- Never start up the vehicle while it is on the jack.
- Keep all oils, grease and corrosive liquids far from the
tyres to prevent any damage to the rubber.
- Make sure that the rim is clean, and that there is no rust
or damage. Do not weld, braze, repair or use a damaged
rim in any way.
- Tyre pressure must be kept at the level indicated in the
table. The tyre pressure given corresponds to the recommendations of the manufacturer, and should therefore be respected as far as possible.
- Never hit a tyre with a rim or hammer.
B/25
Mod. Agri Max - Agri Power - Agri Star
Introduction - Warranty
Replacing a tyre on the road
- When a tyre must replaced along the road, proceed as follows:
If possible, park the vehicle on flat, even ground.
Engage the parking brake.
Switch off the engine.
Engage emergency lights.
Put wedges under tyres opposite from the tyre to be replaced
in order to block the vehicle from moving in both directions.
Loosen the bolts of the tyre to be replaced.
Place the jack under the half-box of the axle, as close as
possible to the tyre.
Lift the tyre until it comes off the ground; position the safety support under the axle.
Completely unscrew the bolts from the tyre and remove them.
Remove the tyre with "push and pull" rotating movements.
- ATTENTION -
Insert the new tyre on the hub.
WHEN MOUNTING A NEW OR REPAIRED TYRE, USE AN
ADAPTER FOR THE SPRING VALVE WITH A DISTANCE
MANOMETER WHICH ALLOWS THE OPERATOR TO
KEEP AWAY FROM THE TYRE DURING INFLATION.
USE A SAFETY FENCE SYSTEM.
Manually screw in bolts. Lubricate them with grease if
necessary. Tighten bolts securely with a torque wrench.
- Do not inflate a tyre unless the rim is mounted on the vehicle or secured so that it will not move in the event that
the tyre or rim should suddenly break.
Re-tighten bolts to the tyre securely with a torque wrench.
- Never inflate tyres in excess of the pressure indicated
by DIECI. If the heel does not settle on the rim when this
pressure level is reached, deflate the tyre and lubricate
with a soapy water solution, then inflate again. Do not
use oil or grease. Inflation exceeding the permitted level
on unsettled heels can cause heel or rim breakage with
an explosive force that can cause serious injury.
- PROHIBITED DO NOT MOUNT INFLATED TYRES WITH POLYURETHANE
FOAM UNLESS AUTHORISED BY THE MANUFACTURER.
- Do not re-inflate a tyre which has completely turned or
that is very deflated until it has been properly inspected
by a qualified technician.
- After having remounted the wheel, tighten the nuts
between the wheel and axles. Check that nuts are tightened each day until torque has stablised.
B/26
Remove the safety support and lower the telehandler
with the jack.
STORING DANGEROUS FLUIDS
- Handle fuels carefully; they are highly inflammable. If
fuel is ignited, there may be an explosion and/or fire.
- Beware of the fumes and vapours produced by chemical
products. Do not inhale.
- Do not inhale combustion fumes.
- CAUTION All fuels, the majority of lubricants and some types of
antifreeze are inflammable.
- All inflammable fluids must be stored in special containers and the contents clearly indicated. The containers
must be airtight.
- CAUTION All fluids must be stored out of reach of children and
unauthorised personnel.
- Different fluids must not be mixed together.
- CAUTION All chemical products are generally toxic; avoid contact
with the skin and eyes by wearing suitable protective
clothing. Do not swallow.
- Ensure these chemical products are not dispersed in the
soil, sewers or surface water. If necessary, inform the
competent local authorities.
- In case of fire, use carbon dioxide, dry chemical powder,
foam, water mist, sand or earth. Use jets of water to cool
surfaces exposed to the fire.
- Ensure the storage containers do not leak inflammable
fluids (fuel, oil, grease, lubricants in general).
CONTACT WITH DANGEROUS FLUIDS
- Avoid contact with the skin or eyes.
- Wear appropriate protective clothing.
- In case of contact with the eyes, rinse immediately with
plenty of water for a few minutes holding the eyelids
open and then consult a doctor.
- In case of contact with the skin, wash the area carefully
with soap and water, remove any contaminated clothing,
and if the skin tends to be dry, apply a moisturising cream.
- In case of inhalation, leave the contaminated area and
reach a well-ventilated location. Consult a doctor in case
of respiratory problems.
- If swallowed, consult a doctor. Show the doctor the label
or the container. Do not provoke vomiting to avoid the
risk of inhaling the product through the respiratory tract.
- CAUTION Store inflammable fluids in an especially reserved, well-ventilated storeroom, far from heat sources, sparks and flames.
Keep containers closed and indoors.
There must be no other substances inside the inflammable fluids storeroom (e.g. food). - Always fill the tank in the open air.
B/27
Mod. Agri Max - Agri Power - Agri Star
Introduction - Warranty
DIESEL
RECOMMENDED FUEL SPECIFICATIONS
- Before handling fuel, filling the tank, etc., comply with
the following rules:
To ensure good performance, use a high quality fuel. The
recommended fuel specifications are given below.
Never mix other types of fuel with diesel, such as petrol
or alcohol.
- CAUTION IT IS FORBIDDEN TO REFUEL WITH THE ENGINE
SWITCHED ON.
Clean the area around the fuel cap. Fill the fuel tank at
the end of every day to reduce condensation during the
work break.
Water and sediment must be removed before they reach
the engine.
Cetane number
Viscosity Density Sulphur Distillation 45 minimum.
2/4.5 centistokes at 40°C.
0.8201860 kg/litre at 15°C
Sulphur 0.20% in weight, maximum.
85% at 350°C.
Cetane number
The cetane number indicates the ignition capacity.
Fuel with a lower cetane number may cause ignition problems when the engine is cold and could affect combustion.
Do not use antifreeze to remove water from the diesel fuel.
Do not rely on the filter to remove water from the diesel fuel.
Never leave the fuel cap off and always lock. If you lose
the original cap, replace with an original spare part. Not
just any cap will fit.
Keep an eye on the fuel pump nozzle while filling the tank.
Viscosity
The viscosity value indicates the flow resistance; engine
performance can be affected if the viscosity value is not within the limits.
Density
A lower density reduces engine power, higher density
increases engine power and the smokiness of the exhaust fumes.
Sulphur
A high sulphur level wears out the engine and creates pollution.
Distillation
- CAUTION DO NOT SMOKE DURING THE AFORESAID OPERATIONS.
Distillation indicates the mixture of different hydrocarbons in
the fuel. A high proportion of light hydrocarbons might affect
the combustion specifications.
Do not use a flame to inspect the fuel tank.
Do not fill the tank completely. Leave room for the fuel to
expand and immediately clean any spillage.
Before carrying out any welds on the tank or any components
in close contact with the tank, ensure there is no fuel inside.
If there are any fuel leaks due to breakages, stop the leak
as soon as possible and contact a DIECI service centre.
- CAUTION AVOID INHALING DIESEL VAPOURS; THEY ARE
CARCINOGENIC AND A HEALTH HAZARD.
B/28
Fuel for low temperatures
If the engine needs to be used at temperatures below 0°C,
special winter fuels can be used. These fuels have a lower
degree of viscosity and restrict the formation of paraffin in
the fuel. The formation of paraffin prevents the fuel from
passing through the filter.
CLEANING AND STORING DIESEL FUEL
It is essential the fuel is kept clean.
6. Fuel barrels (see the figure below) must be stored under cover to prevent water seepage. The barrels should also be tilted slightly, to allow any water to drain off the upper rim. The
fuel barrels must not be stored for too long before being used.
The advice given below will help to maintain the quality of the fuel.
1. Never use zinc containers.
2. Never clean the inside of fuel containers or fuel system
components with cloths that may leave deposits.
3. The capacity of the fuel storage tank must ensure that
the intervals between one refuelling and the next are not
too long. A capacity of 3,000 litres is sufficient for an average sized company.
4. The storage tank (see the figure below) must be covered
and placed on a support high enough to exploit the force
of gravity when refuelling the machine. A tank to collect
any spillage must be located below. It should also be
equipped with a manhole to allow access for cleaning.
7. If the barrels are kept in the open, the cap must be tightly
closed to prevent water seepage.
8. After refilling the fuel tank or barrels, it is advisable to
leave the fuel to stand for at least two hours so that any
water or impurities can deposit before the fuel is used.
5. The delivery tap must be larger at the bottom to trap any
deposits; it should also be equipped with a removable filter. The tank must be tilted by 40 mm per metre towards
the sediment drain plug.
B/29
Mod. Agri Max - Agri Power - Agri Star
ECOLOGICAL CONSIDERATIONS
Introduction - Warranty
WASTE DISPOSAL
- CAUTION A few helpful recommendations are listed below. Find
out about the current standards and legislation in effect
in your country.
Ask suppliers of lubricating oils, fuels, antifreeze products, detergents, etc. for information on the effects of
these products on people and the environment and the
regulations to be observed when using, storing and disposing of them.
- Do not refill tanks using unsuitable jerry cans or pressurised refuelling systems as they can cause leaks and
loss of significant amounts of liquid.
- Modern lubricating oils contain additives.
Do not burn contaminated fuel oils and/or oils used in
conventional heating systems.
- Do not spill exhausted engine coolants, engine and
transmission lubricating oils, hydraulic oil, brake oil etc.
while pouring or draining them. Store safely until it is
time to dispose of them in compliance with current legislation or local regulations.
- Modern antifreeze fluids and their solutions (e.g.
antifreeze and other additives) should be replaced every
two years. Ensure they do not soak into the soil. They
must be collected and disposed of appropriately.
- Do not work directly on the air conditioning system (optional). Do not open the air conditioning system. It contains gas that must not be released into the atmosphere.
Contact your dealer or an expert who has the equipment
required to refill the system.
- Immediately repair any leak or fault in the cooling or engine hydraulic systems.
- Do not increase the pressure in a pressurised system,
the components may explode.
B/30
- Waste material should not be scattered in the environment but disposed of appropriately. Used lubricants,
batteries, greasy rags, brake pads, etc. must be handed
over to specialised companies authorised to dispose of
pollutant waste.
- Improper waste disposal is a threat to the environment.
Potentially hazardous waste includes lubricants, fuel,
coolant, filters and batteries.
- Do not dispose of waste on the ground, in sewers or waterbeds.
- Contact your local authority or waste collection centre for
information on how to recycle or dispose of waste properly.
B/31
Mod. Agri Max - Agri Power - Agri Star
Introduction - Warranty
CHECKING THE WIND SPEED
- Variations in wind speed can cause several inconveniences such as loss of machine stability, load oscillation, and
a reduction in visibility due to blowing dust, leaves, etc.
- Other unfavourable factors affecting machine use include:
Site location; the aerodynamic effect of buildings, trees
and other structures increase the wind speed.
The height of the extended boom; the higher the boom,
the higher the wind speed.
Load dimensions; the larger the area occupied by the
load, the more it is affected by the force of the wind.
- CAUTION DIECI telehandlers can be used in wind speeds up to
45 Km/h equal to 12.5 m/s (no. 6 of the Beaufort scale)
measured at ground level.
- CAUTION -
At a temperature of 10°C, in winds with a speed of 32
Km/h, the sensation of exposed body parts is a temperature of 0°C; the higher you are the higher the wind
speed and the colder you will feel.
- CAUTION If there is a fresh breeze (fig. 1/B n. 5 in the Beaufort Scale), never
raise loads with a surface area greater than one square metre.
Below is a graph of the Beaufort scale (fig.1/B) to give an indication of the wind speed at which you can work and when
to suspend work if certain values are exceeded.
THE BEAUFORT WIND SCALE
No
(fig.1/B)
B/32
DESCRIPTION
CONDITIONS
SPEED m/s
0
Calm
Smoke rises vertically
0 - 0,2
1
Light air
Direction of wind shown by smoke drift
0,3 - 1,5
2
Light breeze
1,6 - 3
3
Gentle breeze
4
Moderate breeze
5
Fresh breeze
6
Strong breeze
7
Near gale
Wind felt on face; leaves rustle;
ordinary vanes moved by wind.
Leaves and small twigs in constant motion;
wind extends light flag
Raises dust and loose paper;
small branches are moved.
Small trees in leaf begin to sway;
crested wavelets form on inland waters.
Large branches in motion. Whistling heard in
overhead wires. Umbrella use becomes difficult
Whole trees in motion.
Effort needed to walk against the wind
8
Gale
Breaks twigs off trees; generally impedes progress.
17 - 21
9
Severe gale
Slight structural damage occurs
(chimney-pots and slates removed)
21 - 24
3-5
5-8
8 - 11
11 - 14
14 - 17
EVALUATE THE CONSISTENCY OF THE GROUND
The ground on which the telehandler is positioned must be
able to support the machine and its maximum load.
- CAUTION If the ground under the telehandler collapses,
the machine may roll over.
- Comply with the following indications to avoid overturning the machine:
Ask your employer (works manager, construction assistant) if there may be any hidden cavities below the stabilisers (pipelines, wells, old cisterns, basement ceilings,
manure pits, etc.)
The operator must evaluate the consistency of the
ground, using the tables and graphs provided. In case
of doubt, consult the civil engineer present on the site
or seek the advice of an external engineer.
Depending on the type of ground and its geomorphologic
characteristics, the subsoil can only support a limited
quantity of stress. The table in fig.3/B indicates the allowed
surface pressure underneath the telehandler stabilisers.
On the basis of the “Maximum pressure exercised on the
ground by the stabiliser feet” Table (fig.2/B) and the data
extracted from the table in fig.3/B, “Allowed surface pressure on varying ground types”, it is possible to deduct the
necessary support surface (increased support bases).
Type of ground,
geomorphologic
specifications
Allowed surface
pressure
Kg/cm2 N/mm2
Loose,
non-compacted ground
Generally not
solid, requires
special measures
Limey, peaty,
pasty ground
Coherent, soft ground
Incoherent, well compacted
ground, sand, gravel
Coherent
ground
Solid
Semi solid
Hard
Rock, concrete, road surface
suitable for the transit of
heavy goods vehicles
2.0
0.2
1.0
2.0
4.0
0.1
0.2
0.4
Over 10.0
Over 1,0
(fig. 3/B) Allowed surface pressure on varying ground types
Maximum
load
bearing
capacity
Allowed surface pressure
Necessary support surface
- CAUTION Always seek the advice of a civil engineer for the most
reliable and exact evaluation possible of the ground
where you intend to work and the dimensions of the
support plates.
(fig. 4/B) Dimension of the support surface compared
to the geomorphic characteristics of the ground
- CAUTION On request, DIECI can provide enlarged base supports.
EXTENSION
(mt)
PRESSURE
(kg/cm)
7 mt
8 mt
9 mt
10 mt
11 mt
12 mt
13 mt
14 mt
16 mt
17 mt
10 kg/cm2
10 kg/cm2
10 kg/cm2
10 kg/cm2
10 kg/cm2
10 kg/cm2
10 kg/cm2
10 kg/cm2
10 kg/cm2
10 kg/cm2
Support surface specifications
Foot of the escarpment
Distance “a” from the foot of the escarpment must
adequate in terms of height "h" of the escarpment.
If the subsoil is good:
In case of doubt:
(fig. 2/B) “Maximum pressure exercised on the ground by the stabiliser feet” Table
(fig. 5/B) Machine positioned on an escarpment
B/33
Mod. Agri Max - Agri Power - Agri Star
Introduction - Warranty
SAFETY DEVICES
The vehicle is equipped with certain safety devices (Proximity, Micro-switches, and Load monitoring devices) which safeguard
its use from incorrect manoeuvres or from carelessness.
Safety device housing inside the cab
D
H
E
F C
G
A
(fig.7/B)
I
B
A
Seat micro switch (fig.7/B)
F
Alarm return key selector
anti-tipping device (fig.7/B)
B
Hand grip micro switch
boom joystick (fig.7/B)
G
Parking brake (fig.7/B)
C
Vehicle functions selector key (fig.7/B)
H
Mushroom-shaped emergency button (fig.7/B)
D
Load monitoring system (fig.7/B)
E
Anti-tipping device selector key (fig.7/B)
B/34
I
Spirit level (fig.7/B)
Vehicle safety device housing
Cab emergency exit (REAR cab window).
(fig.8/B,pos."1")
1
(fig.8/B)
Cab emergency exit (FRONT cab window).
(fig.9/B, pos."1")
1
(fig.9/B)
B/35
Mod. Agri Max - Agri Power - Agri Star
Introduction - Warranty
Valve block in all hydraulic cylinders.
(fig.10/B Pos."1")
1
(fig.10/B)
1
boom support spacer.
(fig.11/B Pos."1", fig.12/B)
- ATTENTION:
1
The boom support spacer must only be used during routine
maintenance operations. When carrying out maintenance
work on the boom raising cylinder or on the related block
valve, the boom must be supported by a suitable raising mechanism (Minimum capacity 3 tons).
- ATTENTION:
(fig.11/B)
To insert the spacer, proceed as follows:
- Completely close the boom extensions
(fig.11/B)
- Raise the boom the minimum height necessary to mount
the spacer to the rod;
- Lock the spacer (fig.12/B Pos."1") with the hooks
(fig.12/B Pos."2").
2
1
(fig.12/B)
B/36
2
DRIVER’S CAB
(fig.13/B Pos.”1”)
All vehicles are equipped with a driver cab that also acts as
a safety cell for the operator.
1
- ATTENTION THE CAB IS A SAFETY COMPONENT AND THEREFORE MUST ALWAYS BE KEPT ACCORDING TO PROPER
CONDITIONS FOR USE.
-PROHIBITED IT IS PROHIBITED to modify,
perforate or alter the cab structure in any way.
If the cab is tampered with the guarantee is automatically
voided and the manufacturer is relieved of all liability.
DO NOT weld or mechanically connect components to
the cab’s chassis.
In case you need to replace attachment bolts, only use
elements of the same class of resistance.
Never connect chains or ropes to the cab for towing purposes.
In the event of vehicle overturning, do not attempt to exit
from the cab during the accident.
(fig.13/B)
- ATTENTION REMAIN INSIDE THE CAB WITH SEAT-BELT
FASTENED FOR BEST PROTECTION.
ROPS-FOPS CAB
(fig.13/B - Pos. "1")
The vehicle is equipped with a ROPS and FOPS-approved
cab. The operator is therefore protected against overturning
and falling objects, as prescribed for traxcavators. During use,
it is compulsory the use of safety seat belts to prevent the
driver's impact with the cab inner structures. The rear window
may be used as emergency exit. Opening the window completely during use of the vehicle IS STRICTLY PROHIBITED,
due to possible shearing hazards between boom and chassis
- ATTENTION IF THE CAB SHOWS VISUAL DAMAGE, IT MUST BE REPLACED; CONTACT AN AUTHORISED SERVICE CENTRE OR AUTHORISED WORKSHOP OF DIECI.
B/37
Mod. Agri Max - Agri Power - Agri Star
Introduction - Warranty
LOAD TABLES
- ATTENTION CHECK THE LOAD TABLES FOR YOUR VEHICLE IN CHAPTER "H”, TECHNICAL SHEETS
The Safe Working Load (SWL) of these vehicles depends on the extension and angle of the boom.
This vehicle is equipped with an anti-tipping device.
For further information on the safe load indicator see the relevant paragraph (in chapter "C" Getting to Know Your Vehicle,
Anti-tipping device").
The load table located inside the cab illustrates the safe working capacities in relation to the various positions of the boom.
The boom extension is marked by letters: "A" "B" "C" "D", etc.
The load table illustrates the maximum height and extension achievable without exceeding the safe load. The telehandler is also
equipped with its own load table. The load table is calculated with standard forks.
When certain attachments are fitted on the vehicle the further Load Tables are supplied.
The load table indicated is for reference purposes only.
Before lifting or positioning modes, consult the relative tables in the book at the side of the steering wheel, or consult chapter "h"
(vehicle technical sheets) in this manual.
- ATTENTION The limits given in the load Tables refer to the vehicle at a halt. Do not lift or extend the boom when the vehicle is in motion. Retract the boom completely and lower it as far as possible before moving the vehicle with a load.
Check which boom attachment has been mounted on the vehicle and then consult the relevant load table.
USING THE LOAD TABLES AND BOOM INDICATORS
- ATTENTION For your safety and the safety of the vehicle, follow information described below.
- ATTENTION The limits indicated in the load tables refer to the stopped vehicle on wheels or outriggers
(if present) on levelled, solid ground.
Do not lift or extend the boom when the vehicle is in motion.
Retract the boom completely and lower it as far as possible before moving the vehicle with a load.
Check which boom attachment has been mounted on the vehicle and then consult the relevant load table.
Before proceeding to lift or put down a load, it is essential that you know how much it weighs.
Make sure the centre of gravity of the load does not exceed 500 mm measured from the heels of the forks.
- ATTENTION The centre of gravity of the load may not necessarily be at the centre, you have to therefore work out its position.
B/38
When the weight to be handled is known, consult the load table (chapter “h“ vehicle technical sheets ) and identify the section
indicating the weight immediately above.
Example:
in the load table given as an example (fig.15/B), the weight of the load is 2,5 tons; go to the section with the 2,7 tons. (fig.15/B Pos.“A“).
The left-hand border (fig.15/B Pos.“B“) and the upper border (fig.15/B Pos.“C“) of this segment indicate the stability limits of the
vehicle relative to the considered load. Do not slant or extend the boom beyond the indicated limits. (fig.15/B Pos.“B-C“).
After insertion of forks from under the load and before lifting them, check indicator values of boom angle (fig.16/B Pos.“1“) and
extension (fig.17/B Pos.“1“).
1
C
(fig.16/B)
B
1
A
(fig.15/B)
(fig.17/B)
As seen on the table, the lines start from the graduated scale for the angling and extension of the boom and cross the section
of the table. Check where the relevant lines for the parameters considered cross. If the cross point is within the maximum load
section or to the right (known load weight), the load is within the safety limits.
If the lines cross above or to the left of the section, do not make any attempt to lift the load. Retract the boom.
If, even with the boom completely retracted, the angular and extension values of the boom intersect outside of the maximum
load section, do not attempt to lift the load.
When the load is on the forks, retract the boom before lifting or lowering it. This will reduce the risk of the vehicle becoming unstable.
When the load is raised (for example, on a scaffolding) it should be let go (raise it) before retracting the boom completely.
Before depositing a load, check the load table to determine the maximum distance of the vehicle from the point of unloading.
It should be possible to deposit the load without intersecting the limits indicated to the left or above the maximum load section.
B/39
Mod. Agri Max - Agri Power - Agri Star
Introduction - Warranty
Note-book with essential data
(Fig.18/B - Pos."1")
1
- A : cover page
- B : gear change page
- C : tyre inflation pressure page
- D : main safety regulation page
- E : driving on roads page
- F : symbol key (front)
- G : symbol key (back)
- H : load charts
- ATTENTION -
CARATTERISTICHE
DETAILS
CARATTERISTIQUES
CARACTERISTICAS
EIGENSHAFTEN
BAR
10,5-18
10PR
3,75
12,5 -18
10PR
3,0
12,5-18
12PR
3,0
12,5-20
12PR
3,5
18-19,5
16PR
4,5
16/70-20
14PR
3,5
18-22,5
16PR
4,5
405/70-20 (16/70-20)
14PR
3,5
405/70R20 (16/70R20)
152J
6,0
405/70-24 (16/70-24)
14PR
4,0
405/70R24 (16/70R24)
152J
5,0
445/65-22,5 (18-22,5)
163A8 (16PR)
4,5
445/65R22,5
168A8
445/65R22,5
169F
8,0
14.00-24
16PR
3,75
17.5LR24
16PR
4,0
B: speed selection
C: tyre inflation pressure
LEGENDA SIMBOLI
SYMBOLS KEY
LÉGENDES SYMBOLES
LEYENDA SÍMBOLOS
ZEICHENERKLÄRUNG
LEGENDA SIMBOLI
SYMBOLS KEY
LÉGENDES SYMBOLES
LEYENDA SÍMBOLOS
ZEICHENERKLÄRUNG
8,5
AGRIM AX 45.8
Stabilizzatori abbassati
Stabilizzatori alzati
Stabilizers lowered
Stabilizers raised
Jib (Measurements)
Jib (Measurements)
Stabilisateurs abaissés
Stabilisateurs relevés
Potence (Dimensions)
Potence (Dimensions)
Estabilizadores bajados
Estabilizadores subidos
Plumin (Medidas)
Plumin (Medidas)
Abgesenkte Stabilisatoren
Angehobene Stabilisatoren
Gittermastverlängerung (Maße)
Gittermastverlängerung (Maße)
In Rotazione continua
In Rotazione non continua
Continuous rotation
Non-continuous rotation
Cestello Trilaterale fisso
Cestello Frontale fisso
Three-sided fixed basket
Front fixed basket
En rotation non continue
En Rotación no continua
Bei kontinuierlicher Drehung
bei nicht kontinuierlicher Drehung
Posizione frontale
Front position
Position frontale
Posición frontal
Frontale Position
Vietato lavorare su pneumatici
Do not work on tyres
Interdiction de travailler sur pneumatiques
Prohibido trabajar con la máquina apoyada sólo en los neumáticos
Das Ausführen von Arbeiten auf Reifen ist verboten
Divieto di manovra con macchina non livellata
Do not manoeuvre if the machine is not level
Manœuvres interdites quand la machine n'est pas nivelée
Prohibido maniobrar con la máquina no nivelada
Die Maschine darf nur nachAusgleichung der Bodenunebenheiten bewegt werden
Nacelle Trilatérale Fixe
Nacelle Frontale Fixe
Cesta Trilateral Fija
Cesta Frontal Fija
Dreiseitiger Arbeitskorb, fest
Frontaler Arbeitskorb, fest
Cestello Trilaterale Estensibile
Cestello Frontale Estensibile
Extendable three-sided basket
Extendable front Basket
NacelleTrilatérale Extensible
Nacelle Frontale Extensible
Cesta Trilateral Extensible
Cesta Frontal Extensible
Dreiseitiger Arbeitskorb, ausziehbar
Frontaler Arbeitskorb, ausziehbar
Argano (Portata)
Gancio per piastra portaforche
Winch (Capacity)
Fork-carrying plate hook
Treuil (Capacitè)
Crochet pour plaque porte-fourches
Cabrestante (Capacidad)
Gancho para placa portahorquillas
Winde (Kapazität)
Haken für Gabelträgerplatte
Posacentine
8
MAX 4,5 ton
7,90
7
6
Coloca - cimbras
5
B
3,5
A
40°
4
30°
3
20°
Bogenausbau
1
Maximum admitted force on the ground
2,7
50°
2
Pressione massima esercitabile sul terreno
70°
60°
Centering handlers
Pose - charpente
AXB1421
Braccetto con gancio (Misure)
Prolunga a traliccio (Misure)
4,5
En rotation continue
En Rotación continua
D: main safety regulations
10°
2,7
3,5
A : cover
MISURA PNEUMATICO
TYRES DIMENSIONS
DIMENSION DES PNEUS
DIMENSION DE LOS NEUMATICOS
REIFENMASS
1,6
3
(fig.18/B)
2,2
Tables illustrated are only an indication and may not correspond to those found inside the note pad in the cab.
Pression maximum à exercer au sol
Presión máxima aplicable sobre el suelo
0
Max. auf den Untergrund auszuübender Druck
-1
m
AXB 1367
E : Road circulation
B/40
F: symbol key
5
4,45
4
3
2
1
0
AXB 1367
G: symbol key (back)
H: load chart
B/41
Mod. Agri Max - Agri Power - Agri Star
LOAD HANDLING
Picking a load up from the ground
1. Slowly approach the load to be lifted with the boom completely retracted and the forks horizontally positioned at
the height of the lifting position.
Keep forks raised just enough to avoid contact with the ground.
2. Bring forks under load to be lifted until contact is made
with the fork holding plate. Engage the parking brake
and move the gear selector to neutral.
3. Slightly lift up the load and tilt the fork holding plate backwards, bringing it to the transport position.
- ATTENTION Always respect the load's centre of gravity, slant the
forks just enough to ensure stability and prevent
load loss during braking.
- ATTENTION Never transport a load with the boom
raised and/or extended
B/42
Introduction - Warranty
Lifting loads from high up
1. Ensure the forks can be easily inserted under the load.
2. Slowly and cautiously drive the machine perpendicularly
towards the load with horizontal forks.
3. Always remember to maintain the distance necessary to insert the forks under the load between the pile and the machine. Extend the boom over the shortest possible length.
4. After inserting the forks under the load so that contact is
made with the fork holder plate, engage the parking brake and shift the gear selector to neutral.
5. Raise the load slightly and tilt the fork holder plate backwards into the carrying position.
6. If possible, lower the load without moving the machine.
Raise the boom to distance the load, then retract the
extensions and position the load in the carrying position.
7. If it is not possible to reverse the machine very slowly
and with the utmost care, after adequately distancing the
load, retract the extensions and lower the boom to position the load in the carrying position.
- CAUTION Always comply with the centre of gravity of the load,
tilt the forks enough to ensure stability and to avoid
dropping the load when braking.
- PROHIBITION IT IS STRICTLY FORBIDDEN TO PICK UP A LOAD IF
THE MACHINE IS NOT LEVEL.
- CAUTION Never carry loads while the boom
is raised and/or extended.
B/43
Mod. Agri Max - Agri Power - Agri Star
Placing loads in high places
1. Place the load in the carrying position in front of the pile.
2. Raise and extend the boom until the load is above the
pile. If necessary, advance the machine towards the pile
very slowly and with the utmost care.
3. Engage the parking brake and shift the gear selector to neutral,
4. Position the load horizontally and place on top of the pile, lower and retract the extensions to position the load correctly.
5. Release the forks by alternately retracting the extensions
and raising the boom; if possible reverse the machine
very slowly and with the utmost care.
- CAUTION Always comply with the centre of gravity of the load,
tilt the forks enough to ensure stability and to avoid
dropping the load when braking.
- PROHIBITION IT IS STRICTLY FORBIDDEN TO PICK UP A LOAD IF
THE MACHINE IS NOT LEVEL.
- CAUTION Never carry loads while the boom
is raised and/or extended.
B/44
Introduction - Warranty
Picking up round-shaped loads
- Tilt the forks forward and detract the telescopic boom. At
the same time, place the forks under the load, and turn
the fork holding plate backwards in order to slide the
load. If necessary, secure the load with wedges.
- ATTENTION Always respect the load's centre of gravity, slant the
forks just enough to ensure stability and prevent
load loss during braking.
- ATTENTION Never transport a load with the boom
raised and/or extended
B/45
Mod. Agri Max - Agri Power - Agri Star
Introduction - Warranty
SAFETY STICKERS
Safety stickers have been applied to the machine in the indicated positions. The aim of the safety stickers is to provide a guide
for your and others’ safety. Before using the machine, check the contents and position of the stickers by walking around the machine with this manual in your hands. Re-examine the stickers with every operator who is to use the machine.
- Ensure you fully acknowledge where they are located and understand their contents.
- To ensure the stickers are easy to read and comprehend, check they are in the correct position and that they are always
kept clean. IT IS STRICTLY FORBIDDEN to clean the signs on the machine with solvents or petrol; the stickers may become unstuck. Additional stickers to the warning and safety stickers must always be treated in the same way.
- If the stickers deteriorate, become damaged or are lost, replace them because they must be legible and understood correctly. Orders for stickers must be placed using the same process as for spare parts (ensure you include the model and
serial number of the machine when you place your order).
AXA1764
- In case of doubt, please consult your agent or dealer.
AXA 1492
DEXTRON 2
AXA 1506
AXA1163
B/46
BAR 4,5
BAR 4,5
BAR 4,5
BAR 4,5
B/47
Mod. Agri Max - Agri Power - Agri Star
Introduction - Warranty
safety stickers and their location
Located in the cab on the right hand side window
(fig.28/B):
- DANGER:
Keep all persons at a safe distance from the vehicle when
starting loading operations.
(fig.28/B)
- DANGER:
When carrying out maintenance work, block all hydraulic
cylinders using safety locks.
- DANGER:
Keep all persons at a safe distance.
- DANGER:
Do not open or remove the safety panels while the engine is running.
- DANGER:
Wait until all moving parts have come to a halt.
- DANGER:
Switch off the engine and remove the key before starting
maintenance work.
- DANGER:
Check the work zone and keep far away from power supplies.
On the engine compartment radiator(fig.29/B)
- DANGER:
Steam and hot water under high pressure. Protect the face.
Remove the cap with due caution.
On the side of the intercooler radiator (fig.30/B)
(fig.29/B)
(fig.30/B)
(fig.31B)
(fig.32/B)
- DANGER:
Risk of burns.
- DANGER:
Keep all persons at a safe distance.
On the side of the intercooler radiator (fig.31/B)
- DANGER:
Do not open or remove the safety panels while the engine is running.
- DANGER:
Wait until all moving parts have come to a halt.
On the side of the intercooler radiator (fig.32/B)
- DANGER:
Do not open; wait until all moving parts have come to a stop.
B/48
Stickers for use and maintenance
On the rear window (fig.34/B)
Indicates the direction of clip extraction hindering total opening of the window
On the rear window (fig.35/B)
Indicates the emergency exit
(fig.34/B)
Under the steering wheel (fig.36/B)
(fig.35/B)
AXA 1492
Indicates the obligation to fasten seat-belts when using the vehicle.
DEXTRON 2
On the side of the brake oil tank (fig.37/B)
Indicates the type of oil used in the brake system.
AXA 1506
(fig.36/B)
(fig.37/B)
(fig.38/B)
(fig.39/B)
(fig.40/B)
(fig.41/B)
(fig.42/B)
(fig.43/B)
On the chassis (fig.38/B)
Shows the 4 places where the vehicle can be anchored if it
should need to be lifted.
Under the chassis (fig.39/B)
Shows the 4 places where the vehicle can be towed or anchored for transportation.
On the parts not to be stepped on (fig.40/B)
- DANGER:
Keep off "danger of breakage".
On the fuel tank (fig.41/B)
Type of fuel to be used.
On the side of the hydraulic oil tank (fig.42/B)
Indicator for hydraulic oil level.
On the side of the hydraulic oil tank (fig.43/B)
Marks the cap to top up the hydraulic oil.
Outside the engine bonnet (fig.44/B)
BAR 4,5
On the 4 fenders (fig.45/B)
Indicates the recommended tyre pressure.
(fig.44/B)
(fig.45/B)
B/49
Mod. Agri Max - Agri Power - Agri Star
B/50
Introduction - Warranty
GETTING TO KNOW
AND USING THE VEHICLE
C
- CAUTION: - Read the SAFETY REGULATIONS (in this manual) carefully for the safety of all personnel and the machine.
C/1
Mod. Agri Max - Agri Power - Agri Star
Getting to Know and Using the Vehicle
Every modification made to the vehicle leads to a new
verification of conformity with the 2006/42 Machinery
Directive “
“ this procedure is also valid in the case
of repairs with non-original spare parts.
IT IS PROHIBITED TO OPERATE IF THIS MANUAL
HAS NOT BEEN READ AND UNDERSTOOD.
THE OPERATOR IS REQUIRED TO LEARN THE LOCATION AND FUNCTION OF
ALL INSTRUMENTS AND CONTROLS, INDEPENDENT OF HIS OR HER EXPERIENCE IN THE FIELD, BEFORE OPERATING THE VEHICLE.
THE IMAGES, DESCRIPTIONS, MEASUREMENTS, GIVEN IN THIS CHAPTER
REFER TO STANDARD VEHICLES.
YOUR VEHICLE CAN BE SET-UP WITH OPTIONAL CONTROLS AND ACCESSORIES ON REQUEST.
ALL FUNCTIONS, PROCEDURES, INHERENT THE USE AND SET-UP OF VEHICLE EQUIPMENT, NOT DESCRIBED IN THIS MANUAL, ARE PROHIBITED.
USE OF THE VEHICLE DIFFERENT TO THAT DESCRIBED
IN THIS MANUAL IS PROHIBITED.
IT IS MANDATORY TO HAVE READ AND LEARNED CHAPTER “B“ (SAFETY
STANDARDS) BEFORE READING CHAPTER “C” AND USING THE VEHICLE.
C/2
- CAUTION: - Read the SAFETY REGULATIONS (in this manual) carefully for the safety of all personnel and the machine.
GENERAL WARNINGS
- ATTENTION:
The operator must only operate vehicle and its commands
when properly seated in the driver’s seat.
- ATTENTION:
The telehandler described in this manual cannot be used in
closed spaces or anywhere where there might be explosive
gases. To operate in closed spaces, the Manufacturer must
be contacted so that the necessary modifications can be
made to the vehicle.
- ATTENTION:
Working on a slope may be dangerous. The conditions of
the terrain may vary according to climatic conditions (e.g.
rain, snow, ice). Therefore, pay careful attention to the conditions of the terrain on which the vehicle is being used; the
use of low speeds is recommended.
- ATTENTION:
When transporting a load on a gradient, the load should be
kept up gradient with respect to the vehicle in order to increase its stability. Before mounting ramps or trailers with the vehicle, remove any mud, ice or oil which may cause accidents.
- ATTENTION:
Proceed with due caution on loose, wet or muddy surfaces.
- ATTENTION:
Lack of efficient or clear communication may cause serious
accidents. If you are working with others, make sure any
hand signals you intend to use are understood by everybody. Since work sites are often very noisy, do not rely on
verbal communication.
- prohibition:
It is prohibited to use the vehicle’s moveable hydraulic
parts to lift people, with exception of the uses for which the
vehicle is intended.
- ATTENTION:
Before operating the moveable hydraulic parts of the vehicle, ensure the surrounding area is clear.
- ATTENTION:
The vehicle should be used exclusively by competent, authorised personnel who have thoroughly read this manual.
If the vehicle is to be used on roads, the operator must have
a valid, category B driver’s license, or higher in accordance
with Italian law.
- ATTENTION:
Do not use the vehicle if you are under the effect of alcohol,
drugs or if you have taken medication that may make you
drowsy or alter your reflexes.
- ATTENTION:
Before operating the vehicle or before carrying out complicated or dangerous manoeuvres, it is essential that you practice in an empty, unobstructed part of the site.
- ATTENTION:
Clear, simple symbols are located near all controls for convenience purposes and to make them easier to understand
for the operator.
- ATTENTION:
When diagonal steering has been selected, always proceed
at a low speed.
- ATTENTION:
Should any potentially hazardous parts be damaged, stop
the vehicle immediately. Do not resume operation of the vehicle until the problem has been resolved.
- ATTENTION:
Tyres which are over inflated or overheated may explode:
Follow the instructions provided in this manual for correct
tyre inflation. Do not weld or cut the rims; repair work should
only be carried out by a qualified tyre repair shop.
- ATTENTION:
The boom should not be left raised for an extended period of
time. This may cause the displacement of boom extensions;
retract extensions at least once a day.
- CAUTION: - Read the SAFETY REGULATIONS (in this manual) carefully for the safety of all personnel and the machine.
C/3
Mod. Agri Max - Agri Power - Agri Star
Getting to Know and Using the Vehicle
IDENTIFYING VEHICLE PARTS
Right side of vehicle
1
2
3
8
9
4
6
5
6
7
7
1. Cab
2. Telescopic boom
3. Right rear view mirror
4. Right front light
5. Attachment holding plate
6. Epicycloidal reduction gear
7. Wheel
8. Engine bonnet
9. Right rear light
Left side of vehicle
1
9
7
10
8
2
3
5
1. Cab
2. Left rear light
3. Epicycloidal reduction gear
4. Fuel tank
5. Wheel
C/4
4
3
5
6
6. Cab steps
7. Attachment holding plate
8. Left front light
9. Telescopic boom
10. Left rear view mirror.
- CAUTION: - Read the SAFETY REGULATIONS (in this manual) carefully for the safety of all personnel and the machine.
1
3
5
2
6
9
4
15 16
14
10
11
8
12
13
7
19
17
20
21
18
Cab components
1. Upper roof.
2. Front windscreen wipers.
3. Front window.
4. Rear window / emergency exit.
5. Rear windscreen wiper.
6. Revolving light outlet.
7. Cab door /external view)
8. External opening/closure handle
9. Door upper window.
10. Cab internal ventilation intake
11. Cab door (internal view)
12. Door opening/closure handle
13. Courtesy compartment
14. Spirit level
15. Boom movements joystick
16. Attachment control joystick (if present)
17. Ceiling lighting inside cab.
18. Steering selection lever
19. Seat
20. Windscreen washer liquid tank.
21. Technical documentation pocket
- CAUTION: - Read the SAFETY REGULATIONS (in this manual) carefully for the safety of all personnel and the machine.
C/5
Mod. Agri Max - Agri Power - Agri Star
Getting to Know and Using the Vehicle
GETTING IN AND OUT OF THE DRIVER’S CAB
Before entering the cab, make sure that your hands and
shoes are clean and dry to prevent slipping and falling.
Only use the handles provided (fig.1/C Pos.”1”, “2”, “3”,”4”)
to climb into the cab; do not use controls or steering wheel
located on the inside. Always face the cab when getting in or
out of the vehicle
1
2
- ATTENTION:
Only get in and out of the cab when the vehicle is stopped
and the parking brake is engaged. Do not carry out maintenance on a moving vehicle.
- ATTENTION:
The “4” ascent step(fig.1/C) is only present in models with
high cab.
3
4
(fig.1/C)
DOOR OPENING CONTROLS
The cab door is equipped with an external locking handle
(fig.2/C Pos.”1”).
To open the door:
- Insert the key into the lock (fig.2/C Pos.”2”) and turn
clockwise/anti-clockwise to engage/disengage the lock.
- Pull the handle (fig.2/C Pos.”3”) toward you to unhook
the door with the lock disengaged.
1
NOTE:
The door will not open if the door handle is pushed when the
lock is engaged.
- PROHIBITED IT IS PROHIBITED
to operate with the vehicle when
the cab door is open.
2
(fig.2/C)
3
INTERNAL DOOR OPENING CONTROLS
- Press the button on the handle to release the door
(fig.2/C Pos.”4”).
- Push the door outwards to complete opening.
4
- ATTENTION:
Before pushing the door outward, make sure that the surrounding area is free of obstacles. Accompany the door with
hand when opening.
C/6
- CAUTION: - Read the SAFETY REGULATIONS (in this manual) carefully for the safety of all personnel and the machine.
OPENING THE DOOR WINDOW
(fig.3/C Pos.”1”)
- Press the selector switch in “A” (fig.3/C) to lower the
glass.
A
1
- Press the selector switch in “B” (fig.3/C) to raise the glass.
- ATTENTION:
B
Before opening or closing the window, verify that the surrounding area is free of obstacles.
(fig.3/C)
REAR WINDOW
(fig.4/C Pos.”1” )
- Turn the handle to open (fig.14/C Pos.”2”) and push the
window outward.
1
The window will remain in the open position by the handle itself.
- ATTENTION:
In the event the handle no longer blocks the window in the
open position, replace it as soon as possible; risk of crushing.
Upper roof.
2
(fig.4/C)
(fig.5/C Pos.”1” )
To open the roof, grip the handles (fig.5/C Pos.”2” and “3”)
and push them up using a circular motion (fig.5/C Pos.”4”).
The rotated handles will hold the window open. Do the opposite to close the roof.
2
- ATTENTION:
In the event the handles should not hold the window open,
replace them as soon as possible; risk of crushing.
4
3
1
(fig.5/C)
- CAUTION: - Read the SAFETY REGULATIONS (in this manual) carefully for the safety of all personnel and the machine.
C/7
Mod. Agri Max - Agri Power - Agri Star
Getting to Know and Using the Vehicle
REAR EMERGENCY EXIT
(Fig.6/C pos.”1”)
1
The emergency exit is identified and marked on the rear
window.
- In case the window must be opened completely, slide
out the locking pin (fig.6 /C Pos.”2”) and push the window outward.
The pin must be kept in position as shown during normal
working operations.
- prohibition:
Opening the window completely during use of the vehicle IS
STRICTLY PROHIBITED, due to possible shearing hazards
between boom and chassis
The rear window is found near the telescopic boom.
2
(fig.6/C)
- ATTENTION:
use CARE when opening and/or removing windows as
they may chip or shatter, creating risk of injury to the
operator in the cab and to those in the surrounding
area. Take proper precautions and use accident prevention equipment (goggles, gloves, helmet, etc.).
FRONT EMERGENCY EXIT
(fig.7/C pos.”1”)
A
The emergency exit is identified and marked on the front
window.
1
A
- In case the window must be opened completely, slide out
the locking pin (fig.7/C Pos.”2”) ANTICLOCKWISE and
push the window outward. The knobs are positioned inside
the cab at the sides of the front window (fig.7/C Pos.”A”).
- Turn the knobs CLOCKWISE TO TIGHTEN THEM.
- ATTENTION:
During normal work operations, the window must always be
completely fastened and resting on the cab. In these conditions, opening, even partial, is NOT allowed.
The front window is found near the telescopic boom.
(fig.7/C)
- ATTENTION:
use CARE when opening and/or removing windows as
they may chip or shatter, creating risk of injury to the
operator in the cab and to those in the surrounding
area. Take proper precautions and use accident prevention equipment (goggles, gloves, helmet, etc.).
C/8
2
(fig.7/C)
- CAUTION: - Read the SAFETY REGULATIONS (in this manual) carefully for the safety of all personnel and the machine.
ENGINE BONNET OPENING LEVER
(fig.8/C Pos.”1”)
To open the engine bonnet, pull the lever (fig.8/C Pos.”1”)
towards the front of the vehicle, until it clicks.
1
To re-insert the block, just close the engine bonnet with slight
pressure. Always check that it is closed correctly before
starting to operate or before moving away from the vehicle.
- prohibition:
it is prohibited to operate with the engine bonnet open.
(fig.8/C)
MAX POWER 180W
(fig.9/C Pos.”1”)
- Power 12v 180w for direct current users
(battery chargers, cell phones, etc.).
- ATTENTION:
1
Do not connect users with nominal voltage exceeding 12
volts and power consumption exceeding 180W. DANGER of
damage to the electrical system.
(fig.9/C)
- CAUTION: - Read the SAFETY REGULATIONS (in this manual) carefully for the safety of all personnel and the machine.
C/9
Mod. Agri Max - Agri Power - Agri Star
Getting to Know and Using the Vehicle
COURTESY COMPARTMENT
(fig.10/C Pos.”1”,”3”,”4”, fig.11/C Pos.”5”)
The courtesy compartment (fig.11/C Pos.”5”) is optional.
TECHNICAL DOCUMENTATION POCKET
1
(fig.10/C Pos.”2”)
Technical documents must be kept in their pocket (fig.10/C Pos.”2”).
The use and maintenance manual and the parts catalogue
must always be available inside the vehicle for quick reference.
2
- ATTENTION:
The User’s Manual and the parts catalogue are an integral
part of the vehicle and must remain with it even when it is
sold to a new owner. The manual must be carefully kept aboard the vehicle for a quick reference and it must be written in
the operator’s language. If the manual is creased, partially
damaged or is not legible, replace it immediately. (fig.10/C)
3
2
(fig.10/C)
4
5
Interior cab lighting
(fig.11/C)
(fig.12/C Pos.”1”)
To switch the light on inside the cab, act on the ceiling light,
pressing one of the ends. In the central position (neutral) the
lighting is off.
1
(fig.12/C)
C/10
- CAUTION: - Read the SAFETY REGULATIONS (in this manual) carefully for the safety of all personnel and the machine.
STEERING WHEEL (adjustment)
(Fig.15/C)
To adjust the steering wheel:
- Turn lever “1” (fig.15/C) downwards to release movements (fig.16/C).
- Push or pull the steering wheel to reach the desired position (fig.18/C).
- Push the steering wheel down or pull it up in order to reach the desired height (fig.19/C).
1
- Turn the handle (fig.17/C) up to block the steering wheel
in its actual position. For correct Screw in with force.
(fig.15/C)
- ATTENTION:
The steering wheel is correctly adjusted when the operator,
with his/her back resting against the back of the seat, is able
to take hold of the furthest part of the steering wheel with
his/her elbows slightly bent.
(fig.16/C)
(fig.17/C)
(fig.18/C)
(fig.19/C)
- CAUTION: - Read the SAFETY REGULATIONS (in this manual) carefully for the safety of all personnel and the machine.
C/11
Mod. Agri Max - Agri Power - Agri Star
Getting to Know and Using the Vehicle
SAFETY BELTS
1
(fig.20/C)
2
To fasten seat-belts:
1. Slide the tab (1) into the buckle (2) (tab.”A”).
“A”
2. Make sure it has been clicked in properly, then fit the belt
around your body and adjust (tab.”B”).
- ATTENTION:
The belt is correctly adjusted when it fits tightly
around the waist (Fig.21/C).
“B”
To unfasten the seat-belt: (”C”):
1. Press the red button (3) on the buckle (2).
2. Slide the tab out (1).
1
- ATTENTION:
Drive the vehicle only with the seat belt properly fastened
and adjusted. Driving with the seat-belt unfastened, increases the risk of accidents.
2
“C”
3
- ATTENTION:
(fig.20/C)
Do not use damaged or warn seat belts.
Do not use seat belts installed on vehicles that have been
involved in accidents. Worn, damaged or weak the seat
belts may break or give in during a collision, causing serious
injury to the operator.
(fig.21/C)
C/12
- CAUTION: - Read the SAFETY REGULATIONS (in this manual) carefully for the safety of all personnel and the machine.
SEAT
(fig.22/C)
Dieci supplies different seat models depending on client
requirements. The vehicle is equipped with a safety system
called “man in” which uses an electrical micro switch in the
driver’s seat. This micro switch is located inside the seat cushion (fig.22/C Pos.”A”).
A
A
The engine can only be started if the operator is properly
seated in the driver’s seat and the forward/reverse lever is in
the neutral “N” position.
(fig.22/C)
Seat adjustment
(fig.23/C)
A
The seat can be adjusted to different positions:
A - Lock/unlock springing (horizontal/vertical) (fig.23/C).
B - Adjustment of pneumatic springs (optional) (fig.23/C).
C - Manual spring adjustment (optional) (fig.23/C).
D - Longitudinal seat positioning (fig.24/C).
E - Adjustment of backrest inclination (fig.24/C).
- To unlock springs (horizontal/vertical) bring lever “A”
(fig.23/C) toward the front of the vehicle. Bring lever “A”
(fig.23/C) toward the rear of the vehicle to lock springs.
- To adjust the pneumatic spring rate, pull pin “B” (fig.
23/C) to let out pressure and soften suspension.
Push pin ”B” (fig.23/C) to increase pressure and harden
suspension.
- Manual adjustment of the spring rate is obtained by rotating lever “C” (fig. 23/C) toward the symbol “+” printed on
it to harden suspension.
Turn lever ”C” (fig.23/C) toward the symbol “-” printed on
it to soften suspension.
(fig.23/C)
C
- For longitudinal seat adjustment, move lever “D”
(fig.24/C) toward the left side of the vehicle by sliding
along the runners.
Release the lever when the desired position has been reached.
Move slightly in order to make sure that the locking pin
is positioned correctly in its housing.
B
- CAUTION: - Read the SAFETY REGULATIONS (in this manual) carefully for the safety of all personnel and the machine.
C/13
Mod. Agri Max - Agri Power - Agri Star
Getting to Know and Using the Vehicle
- To adjust backrest inclination, move lever “E” (fig.24/C)
and push back on the backrest. The backrest will automatically adapt to the Operator’s body.
- ATTENTION:
The seat has been correctly positioned when the operator is
able to push the brake pedal completely down with his/her
back firmly against the backrest.
D
E
(fig.24/C)
C/14
- CAUTION: - Read the SAFETY REGULATIONS (in this manual) carefully for the safety of all personnel and the machine.
IDENTIFYING THE CAB PARTS
(fig.26/C)
11
14
17
1
3
12
13
5
4
8
9
7
10
6
15
16
2
1.
2.
3.
4.
5.
6.
7.
8.
9.
Dashboard with front air-vents
Dashboard with rear air-vents
Adjustable steering shaft
Left dashboard
Right dashboard
Upper dashboard
Lever dashboard/Joysticks
“INCHING” pedal
Brake pedal
10.
11.
12.
13.
14.
15.
16.
17.
Accelerator pedal
Steering wheel
Gear lever
Multi-function lever
central dashboard
Seat
Right rear dashboard
Upper ashboard
- CAUTION: - Read the SAFETY REGULATIONS (in this manual) carefully for the safety of all personnel and the machine.
(fig.26/C)
C/15
Mod. Agri Max - Agri Power - Agri Star
Getting to Know and Using the Vehicle
CENTRAL DASHBOARDINDICATOR LIGHTS
(fig.27/C)
(fig.27/C)
Full beam headlights indicator light
(Blue)
Wheels alignment indicator consent
(Yellow)
Direction indicator lights
(Green)
Rear axle alignment indicator consent
(Yellow)
Spark plug pre-heating indicator light
(Yellow)
Slow gear
(Yellow)
Air filter obstructed light
(Red)
Fast gear
(Yellow)
Hydrostatic oil filter indicator light
(Red)
Rear axle block engagement light
(Yellow)
Engine oil pressure indicator light
(Red)
Parking brake and low brake fluid level
indicator light
(Red)
Generator indicator light
(Red)
Drive oil temperature light.
(Red)
Insufficient pressure in the brake accumulator
indicator light (Red)
Outriggers lowered correctly light
(Green)
Parking brake light - Parking brake
(Red)
Fuel level indicator instrument
General alarm indicator
(Red)
Water temperature indicator
A
Mechanical gear engaged indicator light
(Green)
Forward gear indicator light
(Green)
2
Fast speed engaged light
(Green)
Reverse gear indicator light
(Green)
C/16
- CAUTION: - Read the SAFETY REGULATIONS (in this manual) carefully for the safety of all personnel and the machine.
CENTRAL DASHBOARD - INSTRUMENT USE
(fig.28/C)
(fig.28/C)
Engine water temperature instrument
Engine rev counter
Fuel level indicator
instrument
Engine rev counter
This instrument indicates the number of RPMs the engine is
carrying out in that moment.
Instrument
for load monitoring
LCD
Load monitoring instrument
The device detects the stability of the vehicle.
Engine water temperature instrument
During normal use, the temperature hand moves from the
lower part of the instrument (right red mark), stopping when
having reached the first fourth of the scale. This is the optimal condition for engine operation. If the temperature should
rise excessively, almost reaching the maximum level (upper
red mark), stop the engine and verify the cause. When the
red indicator light switches on, the maximum temperature
alarm is signalled. Operate at low RPMs (max 1500) in order
to avoid damaging the cool engine. Avoid abrupt manoeuvres
and acceleration until the right red mark has been passed.
Fuel level indicator instrument
The instrument hand indicates the quantity of diesel present
in the tank at any given moment. The maximum quantity is
marked by the position of the hand on the left side. The hand
will move down progressively, passing over a red mark which
indicates minimum level (reserve), indicated by the same
yellow light. When the hand completely stops (right side
limit switch), the fuel tank is empty. To avoid damaging the
engine, always keep the pointer above the minimum level.
LCD
The LCD contains the clock, the hour meter displaying hours of
use of the vehicle, the vehicle toeing state “N” (neutral),1st, 2nd,
3rd, 4th gear engaged.
- CAUTION: - Read the SAFETY REGULATIONS (in this manual) carefully for the safety of all personnel and the machine.
C/17
Mod. Agri Max - Agri Power - Agri Star
Getting to Know and Using the Vehicle
left front dashboard (standard and optional electrical switches, indicator lights and control levers)
(fig.29/C)
E6
C1
C2
C1
C2
Parking brakes switch
(Red)
C3
Light on switch
(Green)
C4
Servo brake accumulator manometer.
(Present on Agri Max 70.10)
C5
Gear change switch
(green)
C/18
C4
C5
(fig.29/C)
Outriggers up/down switch
(Green) (NOT AVAILABLE)
E6
C3
EMERGENCY BUTTON
(hydraulic plant and thermal motor switch off)
- CAUTION: - Read the SAFETY REGULATIONS (in this manual) carefully for the safety of all personnel and the machine.
right dashboard (standard and optional electrical switches, indicator lights and control levers)
(fig.30/C)
(fig.30/C)
C1
Left outrigger foot up/down switch
(Green) (NOT AVAILABLE)
S1
Steering selector (Optional)
C2
Right outrigger feet up/down switch
(Green) (NOT AVAILABLE)
S2
Thermal motor starter key/selector
C3
Front axle levelling switch (optional)
(Yellow)
S3
Anti-tipping device key/selector
(Yellow Key)
C4
Wheels alignment indicator consent (optional)
(Yellow)
S4
Alarm return key/selector
(Red Key)
C5
Optional
(Available)
S5
Vehicle functions selector/key (optional)
(Grey Key)
C6
Additional pump switch
(telehandler double speed) (optional) (Green)
- CAUTION: - Read the SAFETY REGULATIONS (in this manual) carefully for the safety of all personnel and the machine.
C/19
Mod. Agri Max - Agri Power - Agri Star
Getting to Know and Using the Vehicle
upper dashboard (standard and optional electrical switches, indicator lights and control levers)
(fig.31/C)
(fig.31/C)
C1
Trailer Switch (optional)
(Green)
C2
Rear solenoid valve switch (optional)
(Green)
C3
PTO “Power take-off” switch (optional)
(Green)
C4
Optional
(Available)
C5
Boom head solenoid valve switch (optional)
(Blue)
C6
Boom suspension consent (optional)
(Green)
C7
Boom head 12v electric socket switch (optional)
(Blue)
C8
Fan inversion switch (optional)
(Green)
C/20
- CAUTION: - Read the SAFETY REGULATIONS (in this manual) carefully for the safety of all personnel and the machine.
roof dashboard (standard and optional electrical switches, indicator lights and control levers)
(fig.32/C)
(fig.32/C)
C1
Front work lights switch (optional)
(Green)
C2
Revolving light switch
(Yellow)
C3
Boom head work lights switch (optional)
(Green)
C4
Rear work lights switch (optional)
(Green)
C5
Rear window windscreen wiper/washer
(Green)
- CAUTION: - Read the SAFETY REGULATIONS (in this manual) carefully for the safety of all personnel and the machine.
C/21
Mod. Agri Max - Agri Power - Agri Star
Getting to Know and Using the Vehicle
emergency button
(fig.33/C Pos.”1”)
The vehicle is equipped with an emergency stop device that allows to avoid situations of imminent danger or danger in progress.
By pressing the emergency button (fig.33/C Pos.”1”) the
thermal motor switches off and the vehicle stops.
The emergency stop device is released by turning the
“mushroom-head” clockwise. Turning the button authorises
vehicle re-start.
1
- ATTENTION The button must be used in the case of:
- Emergency, to switch the thermal motor off and the vehicle in situations of imminent danger or danger in progress.
- Maintenance, for safety to prevent accidental ignition of
the vehicle during routine or extraordinary maintenance
interventions.
- ATTENTION If the engine cannot be started, check that an emergency button has not been pressed (fig.33/C Pos.”1”). If
pressed, contact the Safety Manager to make sure there is
no maintenance in progress, malfunctioning of the vehicle or
dangerous situations.
C/22
(fig.33/C)
- CAUTION: - Read the SAFETY REGULATIONS (in this manual) carefully for the safety of all personnel and the machine.
IGNITION SWITCH
(fig.34/C)
The ignition switch, with the key, allows you to:
- Switch on the instruments.
- Switch on the diesel engine.
- Disengagement of the parking brake in automatic, with
diesel engine running (fig.34/C Pos.”1”).
- Automatic engagement of the parking brake, with diesel
engine off (fig.34/C Pos.”0”).
E
Conditions for start-up
Start-up can only occur if:
- The operator is correctly seated in the driver’s seat.
- The gear selector is in the “N”, or neutral, position.
Switching on instruments
Turn the key to position “1” (fig.34/C) to power the electrical/
electronic instruments.
When the dashboard is switched on, a check will be carried
out on the instruments with all the indicator lights switched
on and emission of an acoustic signal.
These will remain on until the engine is switched on:
- Battery indicator light
- Engine oil pressure indicator light
(fig.34/C)
0
Other indicator lights may remain lit depending on the
functions activated.
1
When the engine is running, the indicator lights signalling
faults/malfunctions should go off and only those referring to
active functions should remain switched on. If this is not the
case, consult the “maintenance” chapter of this manual and
contact a dieci service centre.
2
Start-up
- Turn the key to position “1” (fig.34/C) to power the instruments.
- Turn the key to position “2” (fig.34/C) and keep it there
for a few seconds in order to start-up.
- Once the engine has been started, release the key.
In the engine does not start within 5 seconds, try again at
regular 15 second intervals to avoid overloading the starter.
During the first few minutes of use, keep transfer and load
lifting speed low in order to heat up the engine and hydraulic
oil. Operate at low RPMs (max 1500), avoiding sharp manoeuvres and accelerations until the temperature has risen.
- ATTENTION:
Bring the engine to a high number of RPMs before high temperature and pressure can cause any serious damage to the
engine or the hydraulic system.
- ATTENTION:
With the motor started, the automatic parking brake disengages. Before starting up the vehicle, always verify that the
parking brake has been manually engaged using its switch.
To release the parking brake when the engine is stopped,
refer to the paragraph, “towing the vehicle”.
ATTENTION
If the engine cannot be started, check that an emergency button has not been pressed (fig.34/C Pos.”E”). If
pressed, contact the Safety Manager to make sure there is
no maintenance in progress, malfunctioning of the vehicle or
dangerous situations.
If the engine does not start, consult the “maintenance”
chapter of this manual and contact a dieci service centre.
- CAUTION: - Read the SAFETY REGULATIONS (in this manual) carefully for the safety of all personnel and the machine.
C/23
Mod. Agri Max - Agri Power - Agri Star
Getting to Know and Using the Vehicle
PEDALS
accelerator pedal
(fig.36/C Pos.”1”)
Press down the accelerator pedal to increase engine RPMs
and release it to decrease RPMs. The pedal operates directly on the engine injection pump.
The maximum speed of the vehicle changes of variation of the inflation pressure variation, the measurement and wear of the tyres.
3
service brake pedal
(fig.36/C Pos.”2”)
Press the service pedal to slow down or stop the vehicle.
The pedal acts directly on the service brakes inside the
differential axles. When the brake pedal is pushed, the rear
stop lights switch on. The lights remain switched on until the
pedal is released.
2
1
Periodically check that both lights are working.
(fig.36/C)
- ATTENTION:
In the event of limited use of the pedal, periodically check
that it is working properly. Contact a dieci service centre in
the event of a problem.
“INCHING” pedal
(fig.36/C Pos.”3”)
The pedal allows for slow, precise movements forward even
when the engine is running at a high RPM. It acts directly on
the hydrostatic transmission.
The vehicle stops, remaining partially braked, when the pedal is fully pressed down.
- ATTENTION:
Do not press the “inching” pedal at high speeds, the vehicle will brake sharply and the diesel engine could go
into overrevving.
C/24
- CAUTION: - Read the SAFETY REGULATIONS (in this manual) carefully for the safety of all personnel and the machine.
MULTIFUNCTION LEVER
Direction indicators
- Pull the lever towards the rear of the vehicle to signal a
curve to the right (fig.38/C Pos.”R”).
- Push the lever towards the front of the vehicle to signal
a curve to the left (fig.38/C Pos.”L”).
The indicators only function when the instruments are powered. An indicator light on the central dashboard signals the
activation of the direction indicators.
function buttons
- The middle button on the handle activates the front windscreen wipers (fig.39/C Pos.”2”).
- The button located at the far end of the handle activates
the horn (fig.39/C Pos.”3”).
D
C
1
L
Front windscreen wiper switch-on
Turning the knob “1” (fig. 38/C) the front windscreen wiper.
The symbols on the knob (fig.38/C Pos.”C”) indicate, with
an arrow, (fig.38/C Pos.”D”) that the windscreen wiper is:
0 Off
I - Slow
II - Fast
R
(fig.38/C)
2
Full beam headlights on
Full beam headlight (fig.39/C Pos.”C”) is activated.
3
- Pull lever up for individual flashes.
- Pull the lever down for continuous use.
E
(fig.39/C)
- CAUTION: - Read the SAFETY REGULATIONS (in this manual) carefully for the safety of all personnel and the machine.
C/25
Mod. Agri Max - Agri Power - Agri Star
Getting to Know and Using the Vehicle
FORWARD/REVERSE GEAR SELECTION LEVER
This lever (fig.41/C) allows to change direction. On the dashboard, the indicator lights that indicate the direction in which
the vehicle is travelling light up (fig. 42/C pos. “F-R”). If the indicator lights are switched off, the vehicle is in neutral. If the
lever is kept in the intermediate position, the gear is in neutral.
- ATTENTION:
To engage the FORWARD/ REVERSE gear, move the lever upwards. This movement protects the lever from accidental manoeuvres.
- Moving the lever towards the front of the vehicle
(fig.41/C) the FORWARD gear is engaged and the indicator light “F” (fig.42/ C) lights up.
- Moving the lever towards the rear of the vehicle
(fig.41/C) , the reverse gear is engaged and indicator
light “R” (fig.42/ C) lights up. When the reverse gear is
engaged, an acoustic alarm is triggered.
F
- ATTENTION Lever movements are not active when:
- The parking brake is engaged.
1
- The operator is not seated correctly in the driver’s seat.
F
- ATTENTION Load handling
can be carried out only in “low” gear.
procedure for changing direction
- Reduce engine speed to a minimum and bring the vehicle to a halt.
- Select the new direction.
N
2
R
R
(fig.41/C)
- ATTENTION:
Direction reversal is not permitted at speeds exceeding 2 km/h.
If the forward/reverse gear selector is moved to a position
other than neutral when the parking brake is engaged, the
transmission will not work.
F
R
(fig.42/C)
C/26
- CAUTION: - Read the SAFETY REGULATIONS (in this manual) carefully for the safety of all personnel and the machine.
FAST/SLOW GEAR SWITCH
(fig.44/C Pos.”A-B”)
A
The two-speed mechanical selector is operated (fig.44/C
Pos.”1”) using the selector.
To change gears:
- bring the vehicle to a complete stop,
1
- Press and hold down the “inching” pedal,
- Hold the switch downward (fig.44/C Pos.”B”) for a few
seconds to engage the FAST gear. The indicator light
(fig. 45/C Pos. “2”) signals engagement.
- Hold the switch upward (fig.44/C Pos.”A”) for a few seconds to engage the SLOW gear. The indicator light
(fig. 45/C Pos. “1”) signals engagement.
B
(fig.44/C)
- ATTENTION:
1
Insert SLOW gear to operate in the construction yard.
Insert the FAST gear for long transfers without a load, in
unobstructed places, with good visibility with flat land without
danger of pedestrian crossings.
2
- ATTENTION:
Do not change gears when the vehicle is in motion.
- ATTENTION:
Hold down the “inching” pedal until the selected gear’s corresponding indicator light switches on.
(fig.45/C)
- CAUTION: - Read the SAFETY REGULATIONS (in this manual) carefully for the safety of all personnel and the machine.
C/27
Mod. Agri Max - Agri Power - Agri Star
Getting to Know and Using the Vehicle
HYDRAULIC GEAR SWITCH (OPTIONAL)
(fig.46/C Pos.”1”)
1
The rotary function of the “forward/reverse” lever allows the
hydraulic gear change.
2
To change gears:
- bring the vehicle to a complete stop,
- Press and hold down the “inching” pedal,
- Turn the lever “1”(fig.46/C) taking symbol “2” to the
arrow (fig.46/C Pos.”2”) to engage the FAST gear. The
indicator light (fig. 47/C Pos. “2”) signals engagement.
- Turn the lever “1”(fig.46/C) taking symbol “1” to the arrow
(fig.46/C Pos.”2”) to engage the SLOW gear. The indicator
light (fig. 47/C Pos. “2”) SWITCH-OFF signals engagement.
(fig.46/C)
- ATTENTION:
1
The indicator light “1” (fig.47/C) signals that the mechanical
gear is engaged.
A
2
2
- ATTENTION:
Insert SLOW gear to operate in the construction yard.
Insert the FAST gear for long transfers without a load, in
unobstructed places, with good visibility with flat land without
danger of pedestrian crossings.
- ATTENTION:
Do not change gears when the vehicle is in motion.
- ATTENTION:
Hold down the “inching” pedal until the selected gear’s corresponding indicator light switches on.
C/28
(fig.47/C)
- CAUTION: - Read the SAFETY REGULATIONS (in this manual) carefully for the safety of all personnel and the machine.
Servo brake accumulator manometer
(Present on Agri Max 70.10)
(fig.48/C Pos.”1”)
The manometer (fig.48/C Pos.”1”) allows to keep servo
brake pressure monitored. In the event of anomalies and
malfunctioning, the pressure could drop. The pressure must
never drop below 18 bar. In the event of low pressure (below
18 bar) stop the vehicle and contact the dieci authorised
workshop to eliminate the defect.
prohibition
1
it is PROHIBITED to operate with
servo brake accumulator pressure below 18 bar.
(fig.48/C)
- CAUTION: - Read the SAFETY REGULATIONS (in this manual) carefully for the safety of all personnel and the machine.
C/29
Mod. Agri Max - Agri Power - Agri Star
Getting to Know and Using the Vehicle
PARKING BRAKE
The parking brake must be engaged whenever the operator
leaves the vehicle, whether the engine be switched off or on,
and even in the event of only momentary stops or any time
the vehicle is working at a halt with the outriggers lowered
(if present). The brake is automatically engaged when the
engine is switched off.
When switch “A” (fig.49/C) is pressed, the parking brake
is engaged. The indicator warning light on the push button
and the central dashboard (fig.50/C Pos.”1”) indicate proper
engagement of the parking brake. When the parking brake
is engaged, the vehicle cannot move and the hydrostatic
transmission is disengaged.
To ensure the parking brake is working properly, contact
an authorised dieci workshop.
(fig.49/C)
A
- ATTENTION Id indicator light “2” should switch on (fig.50/C)
the parking brake is blocked.
Do not advance with the vehicle.
Consult the “D Maintenance” chapter in this manual.
If the indicator light should remain on, contact a
dieci after-sales centre.
1
- ATTENTION:
2
In the event the parking brake fails do not use the vehicle.
- ATTENTION:
Unauthorised modifications of the rear axle ratio, the vehicle
weight, or wheel and tyre dimensions may compromise proper functioning of the parking brake.
(fig.50/C)
C/30
- CAUTION: - Read the SAFETY REGULATIONS (in this manual) carefully for the safety of all personnel and the machine.
SPIRIT LEVEL AND INCLINOMETER
(Fig.51/C)
1
The spirit level (fig.51/C Pos.”1”) is situated in the centre of
the dashboard. Used to check the correct transversal levelling of the vehicle.
For safe operation, the air bubble must be in the centre; with
maximum approximation margin of 2° to the right or left.
The inclination exceeds 2° when the air bubble is
completely outside of the two margins “A” and “B” (fig.52/C).
The vehicle can mount two types of spirit level, standard
(fig.52/C) or optionals (fig.53/C).
Reference grading is present in the optional level. The inclination exceeds 2° when the air bubble is completely outside
of the two degrees (fig.53/C pos.”A”).
(fig.51/C)
prohibition
it is PROHIBITED to operate with inclination
transversal exceeding 2°.
A B
(fig.52/C)
A
A
(fig.53/C)
- CAUTION: - Read the SAFETY REGULATIONS (in this manual) carefully for the safety of all personnel and the machine.
C/31
Mod. Agri Max - Agri Power - Agri Star
Getting to Know and Using the Vehicle
BOOM CONTROL LEVER
(fig.54/C Pos.”1”)
This lever is found to the right of the operator (fig.54/C
Pos.”1”). It is used to manoeuvre the boom and its extremities.
- ATTENTION:
1
Before using the boom make sure that the surrounding area
is free. Make sure that the loads to be raised correspond
with the capacity diagrams of the vehicle.
- ATTENTION:
The instructions refer to the standard version at the time of
printing. In there are special options or following technical
updates, lever movements may correspond to different controls. For this reason, always refer to instructions present
inside the driver’s cab.
- ATTENTION:
(fig.54/C)
The Manufacturer offers a range of levers (Joysticks)
for boom movement with different technical specifications and those different than the standard version (see
following pages).
C/32
- CAUTION: - Read the SAFETY REGULATIONS (in this manual) carefully for the safety of all personnel and the machine.
Joystick 3 in 1 extension ON/OFF
(standard version)
(fig.55/C)
Before each manoeuvre, press and hold down the
“man in” control lever ““A” (fig.55/C).
Lowering
Raising
Boom manoeuvre:
- Pull joystick “b”(fig.55/C) backward to raise the boom.
- Push the lever “C”(fig.55/C) forward to extend the boom.
- Push the lever “C” (fig.55/C) backward to retract the boom.
swivelling support attachment:
Retract
boom
Boom extension:
Extension
boom
- Push joystick “b”(fig.55/C) forward to lower the boom.
- Move the joystick to the right “b” (fig.55/C) to swing the
support attachment downward.
- Move the joystick to the left “b” (fig.55/C) to swing the
support attachment upward.
Swivelling
upwards
Swivelling
downwards
(fig.55/C)
Service control lever
With 3 in 1 distributor installed, the vehicle is equipped with
a second Joystick (fig.56/C pos.”A”) to control the services.
To make movements:
- Grip the Joystick “A” (fig.56/C),
- Press and hold button “B” (fig.56/C)
- Move Joystick “A” to the right/left (fig.56/C).
- ATTENTION:
before starting to operate the vehicle, check the functions and movements of the services Joystick “A”
(fig.56/C). To check these functions, go to an area free
of any obstacles to allow the movements to be checked
without risk of damaging objects, people or animals.
(fig.56/C)
- CAUTION: - Read the SAFETY REGULATIONS (in this manual) carefully for the safety of all personnel and the machine.
C/33
Mod. Agri Max - Agri Power - Agri Star
Getting to Know and Using the Vehicle
3 in 1 Proportional Extension Joystick
(standard version)
(fig.57/C)
Before each manoeuvre, press and hold down the “man in”
control lever ““A” (fig.57/C).
Boom manoeuvre:
- Pull joystick “1”(fig.57/C) backward towards letter “B2”
(fig.57/C), to raise the boom.
- Push joystick “1”(fig.57/C) forward towards letter “B1”
(fig.57/C), to lower the boom.
Raising
Lowering
B1
B2
A
Boom extension:
- Push the roller “C”(fig.57/C) forward towards the letter
“C1”to extend the boom.
- Push roller “C” (fig.57/C) backward towards letter “C2” to
retract the boom.
1
NOTE: the extension or retraction speed will be proportional
to the movement of roller “C” (fig.57/C).
swivelling support attachment:
- Move joystick “1” (fig.57/C) right toward letter “D2” to
swivel the support attachment downward.
C
Retract
boom
NOTE: with 3 in 1 distributor installed, the vehicle is equipped
with a second Joystick (fig.56/C pos.”A”) to control the services. For use, consult the “Services control lever” paragraph.
C1
Extension
boom
- Move joystick “1” (fig.57/C) left toward letter “D1” to
swing the support attachment upward.
C2
Swivelling
upwards
Swivelling
downwards
D2
D1
1
(fig.57/C)
C/34
- CAUTION: - Read the SAFETY REGULATIONS (in this manual) carefully for the safety of all personnel and the machine.
4 in 1 Proportional Control Extension Joystick
Proportional services
(fig.58/C)
Before each manoeuvre, press and hold down the “man in”
control lever “A” (fig.58/C).
Boom manoeuvre:
- Pull joystick “1” (fig.58/C) backward towards letter “B2”
(fig.58/C), to raise the boom.
- Push joystick “1” (fig.58/C) forward towards letter “B1”
(fig.58/C), to lower the boom.
Boom extension:
Raising
Lowering
B1
B2
A
- Push the roller “C”(fig.58/C) forward towards the letter
“C1”to extend the boom.
- Push roller “C” (fig.58/C) backward towards letter “C2” to
retract the boom.
1
Note: the extension or retraction speed will be proportional
to the movement of roller “C” (fig.58/C).
swivelling support attachment:
- Push roller “E” (fig.58/C) backward towards letter “E2” to
extend the services.
NOTE: when an electro-hydraulic attachment is installed,
roller “E” is used to control service movements in accordance with the corresponding attachment manual.
The speed of the services movement will be proportional to
the movement of roller “E”.
Extension
boom
- Push roller “E” (fig.58/C) forward, towards letter “E1” to
extend the services.
Retract
boom
Service controls:
E
C
E2
C2
Swivelling
upwards
- ATTENTION:
before operating the vehicle, ensure that service roller
“E” is working properly.
Work in an area free of any obstacles to allow so that
movements can be checked without risk of damaging
things, other people or animals.
E1
C1
Service
- Move the joystick to the left towards the letter D1,
(fig.58/C) to swing the support attachment upward.
Service
- Move joystick “1” (fig.58/C) right toward letter “D2” to
swivel the support attachment downward.
Swivelling
downwards
D2
D1
1
(fig.58/C)
- CAUTION: - Read the SAFETY REGULATIONS (in this manual) carefully for the safety of all personnel and the machine.
C/35
Mod. Agri Max - Agri Power - Agri Star
Getting to Know and Using the Vehicle
4 in 1 Proportional Control Extension Joystick
Proportional services
(fig.59/C)
Before each manoeuvre, press and hold down the “man in”
control lever “A” (fig.59/C).
Boom manoeuvre:
- Pull joystick “1”(fig.59/C) backward towards letter “B2”
(fig.59/C), to raise the boom.
- Push joystick “1”(fig.59/C) forward towards letter “B1”
(fig.59/C), to lower the boom.
Boom extension:
A
Raising
B1
B2
Lowering
- Push the roller “C”(fig.59/C) forward towards the letter
“C1”to extend the boom.
1
- Push roller “C” (fig.59/C) backward towards letter “C2” to
retract the boom.
Note: the extension or retraction speed will be proportional
to the movement of roller “C” (fig.59/C).
swivelling support attachment:
- Move the joystick “1” to the right towards the letter“d2”,
(fig.59/C) to swing the support attachment downward.
- Move the joystick “1” to the left towards the letter“d2”,
(fig.59/C) to swing the support attachment upward.
NOTE: when an electro-hydraulic attachment is installed,
roller “E” is used to control service movements in accordance with the corresponding attachment manual.
The speed of the services will be proportional to the movement of roller “E”.
Service
E2
C2
Swivelling
upwards
- ATTENTION:
before operating the vehicle, ensure that service roller
“E” is working properly.
Work in an area free of any obstacles to allow so that
movements can be checked without risk of damaging
things, other people or animals.
E
C
Service
- Push roller “E” (fig.59/C) backward towards letter “E2” to
extend the services.
Extension
boom
- Push roller “E” (fig.59/C) forward, towards letter “E1” to
extend the services.
Retract
boom
Service controls:
E1
C1
Swivelling
downwards
D1
D2
1
(fig.59/C)
C/36
- CAUTION: - Read the SAFETY REGULATIONS (in this manual) carefully for the safety of all personnel and the machine.
- CAUTION: - Read the SAFETY REGULATIONS (in this manual) carefully for the safety of all personnel and the machine.
C/37
Mod. Agri Max - Agri Power - Agri Star
Getting to Know and Using the Vehicle
ROLL-OVER PROTECTION DEVICE
(fig.60/C)
- ATTENTION The “anti-tipping” device must ALWAYS be active, and the yellow key selector (fig.60/C Pos.”1”) set to “ON” (fig.60/C Pos.”b”).
The yellow key can be turned to “Off” (fig.60/C Pos.”A”)
only when the boom is completely retracted.
With yellow key at “OFF” an acoustic signal is activated and
the “general alarm” light switches on (fig.62/C Pos.”1”) both
intermittently. The instrument will continue to indicate the
state of the load but will no anti-tipping limitation device will
intervene due to deactivation.
- ATTENTION -
A
B
1
A
B
2
(fig.60/C)
The yellow “anti-tipping device” key must not be left on the
vehicle. It must be kept by the Safety Manager
When the instruments are switched on, the device runs an
automatic test. All LEDs switch on, indicators move and an
audible signal is heard. If this is not the case, contact the
dieci after-sales network immediately.
B
A
C
The device detects the longitudinal stability conditions of the
vehicle, measuring the residual load weighing on the rear axis.
The instrument has a scale of three colours that respectively
indicate:
- Green “A”(fig.61/C), no acoustic signal;
normal working conditions
C1
D
- Yellow “b”(fig.61/C), no acoustic signal;
pre-alarm conditions.
- Red “C”(fig.61/C), intermittent acoustic alarm;
Load at tipping limit
- Red “C1”(fig.61/C), continuous acoustic alarm;
tipping limit load, instrument full high scale.
(fig.61/C)
The state of the load is signalled by the indicator “d”
(fig.61/C) in correspondence of the colour on the scale.
The intermittent acoustic signal that intervenes, on reaching
the red zone “C”(fig.61/C) of the instrument, can be deactivated by pressing button “E” (fig.62/C).
The acoustic signal is automatically re-enabled on reaching
the Red “C1”(fig.61/C) high full scale.
1
By pressing and holding button “E” (fig.62/C),the instrument
performs a functioning test, repositioning itself on the indication of the current state of the load.
E
- ATTENTION The test must be performed with vehicle at a standstill,
unloaded, on flat horizontal ground, parking brake engaged, boom closed and lowered.
C/38
(fig.62/C)
- CAUTION: - Read the SAFETY REGULATIONS (in this manual) carefully for the safety of all personnel and the machine.
In correspondence of the full high scale of the red part “C1”
(fig.61/C), the alarm return selector is activated (fig.60/C
Pos.”2”); the selector is the spring type.
When the load limit is reached (fig.61/C Pos.”C1”), the device blocks all vehicle movements.
In these conditions:
- Rotate the red key (fig.60/C Pos.”2”) to position “B”
(fig.60/C) and keep it in this position.
- Retract or raise the boom, bringing the boom back to a
safe position (see capacity diagram).
- Once the safety zone has been reached, the alarm will
stop, the selector can be released.
- ATTENTION By turning the alarm return selector (fig.60/C
Pos.”2”) to position “B” (fig.60/C) the antitipping
systems are deactivated
it is mandatory to consult the load diagram (found in
the cab regarding use and maintenance) before carrying
out any manoeuvre. Using the inclinometer and the letters on the boom, the exact position of the boom can
be determined. Do make any pejorative movements in
these conditions or vehicle stability may be COMPROMISED causing overturning.
these operations can only be performed by
qualified personnel that has been authorised by
the Safety Manager.
- CAUTION: - Read the SAFETY REGULATIONS (in this manual) carefully for the safety of all personnel and the machine.
C/39
Mod. Agri Max - Agri Power - Agri Star
Getting to Know and Using the Vehicle
VEHICLE FUNCTIONS SELECTOR (OPTIONAL)
(fig.63/C pos.”1”)
The vehicle possesses a “vehicle functions selector”
(fig.63/C Pos.”1”) which must ALWAYS be set on the attachment to be used.
The selection categories are:
• Handling objects (fork lift mode)
(fig.63/C Pos.”B” forks symbol)
Other accessories:
Forks, buckets, mixing bucket, ladles.
• Handling objects (crane mode)
(fig.63/C Pos.”C” winch symbol)
Other accessories:
plate with lifting hook, winches, hoists, extension trestles, winches with extension trestles.
(fig.63/C)
• Handling persons (elevation platform mode)
(fig.63/C Pos.”A” basket symbol)
Other accessories:
all man baskets.
B
The attachments applicable to the vehicles in question refer
to the dieci price list.
A
C
Select the attachment by turning the key. The selector is the
type of key that provides the Safety Manager with the possibility of removing the key after having selected the tool, not
allowing anyone else to use the selector.
- ATTENTION:
The selection of the “elevation platform mode” for lifting persons excludes the possibility of selecting steering different
from that set.
1
- ATTENTION:
only use of dieci original attachments is allowed. dieci declines all responsibility for damage to the vehicle, people or things
in cases where original attachments have not been used.
- ATTENTION:
Mounting attachments different that those approved by dieci is prohibited.
prohibition
It is prohibited to use the vehicle with different attachments
from those selected using the “vehicle functions selector”.
- ATTENTION THE BASKET CAN BE USED ROM THE CAB BY SETTING THE “VEHICLE FUNCTION SELECTOR” ON “FORKS” (FIG.63/C POS.”B”) ONLY TO TAKE THE BASKET
TO THE GROUND IN THE EVENT THE OPERATOR IS
FEELING ILL OR HAS BEEN HURT.
C/40
- CAUTION: - Read the SAFETY REGULATIONS (in this manual) carefully for the safety of all personnel and the machine.
STANDARD STEERING SELECTOR
(fig.64/C Pos.”1”)
By moving the lever (fig.64/C Pos.”1”) 3 types of steering
are obtained:
1
1 Normal steering (fig.65/C Pos.”B”)
This type of steering allows for FRONT steering only.
To activate front steering, move lever “1” (fig.64/C) to position “b” (fig.65/C) shown on the functions sticker.
2
2 Beam steering (fig.65/C Pos.”A”)
This type of steering allows for maximum right steering
to the right and the left.
To activate beam steering, move lever “1” (fig.64/C) to
position “A” (fig.65/C) shown on the functions sticker.
3 Crab steering (fig.65/C Pos.”C”)
This type of steering allows for crab steering, front and
rear parallel wheels (sideways movement of vehicle).
To activate crab steering, move lever “1” (fig.64/C) to position “C” (fig.65/C) shown on the functions sticker.
(fig.64/C)
- ATTENTION -
A
Steering selection is done when the vehicle is stopped.
- ATTENTION:
For road travel it is MANDATORY to position the steering control selector in Position “A” (fig.65/C) blocked using the relevant
retainer (fig.64/C Pos.”2”); (“normal” front only steering mode).
- ATTENTION:
Before selecting a new steering type, align the wheels as
explained in the procedure below. Wheel alignment must
also be performed with the vehicle at a standstill.
B
Alignment (standard)
1. Position the lever “1” (fig.64/C)in the position marked
with “A” (fig.65/C) on the functions sticker of steering.
2. Turn the steering wheel, until the rear wheels have been
completely straightened.
3. Position the lever “1” (fig.64/C) on the position marked
with “B” (fig.65/C) on the functions sticker of steering .
C
4. Turn the steering wheel, until the front wheels have been
completely straightened.
5. At this point, the front and rear wheels are aligned and
the desired steering type can be selected.
- ATTENTION:
(fig.65/C)
Periodically it is advisable to align the wheels (8-10 hours)
depending on the continued use of the vehicle.
- CAUTION: - Read the SAFETY REGULATIONS (in this manual) carefully for the safety of all personnel and the machine.
C/41
Mod. Agri Max - Agri Power - Agri Star
Getting to Know and Using the Vehicle
STEERING SELECTOR (OPTIONAL)
(Fig.66/C Pos.”1”)
By turning the selector (fig.66/C Pos.”1”) 3 types of steering:
1
1 Normal steering (fig.67/C Pos.”A”)
This type of steering allows for front steering only.
To activate front steering, turn selector “1” (fig.66/C) to
position “A” (fig.67/C) shown on the functions sticker.
2 Beam steering (fig.67/C Pos.”B”)
This type of steering allows for maximum right steering
to the right and the left.
To activate beam steering, turn selector “1” (fig.66/C)
to position “b” (fig.67/C) shown on the functions sticker.
3 Crab steering (fig.67/C Pos.”C”)
This type of steering allows for crab steering, front and
rear parallel wheels (sideways movement of vehicle).
To activate crab steering, move lever “1” (fig.66/C) to position “C” (fig.67/C) shown on the functions sticker.
(fig.66/C)
2
- ATTENTION Steering selection is done when the vehicle is stopped.
- ATTENTION:
For road travel it is mandatory to position the steering control
selector in Position “A” (fig.67/C) blocked using the relevant
retainer (fig.67/C Pos.”2”); (“normal” front only steering mode).
1
- ATTENTION:
Before selecting a new steering type, align the wheels as
explained in the procedure below. Wheel alignment must
also be performed with the vehicle at a standstill.
A
Alignment (standard)
1. Position the lever “1” (fig.67/C)in the position marked
with “B” (fig.67/C) on the functions sticker of steering.
2. Turn the steering wheel, until the rear wheels have been
completely straightened.
B
C
(fig.67/C)
3. Position the lever “1” (fig.67/C)in the position marked
with “A” (fig.67/C) on the functions sticker of steering .
4. Turn the steering wheel, until the front wheels have been
completely straightened.
5. At this point, the front and rear wheels are aligned and
the desired steering type can be selected.
- ATTENTION:
Periodically it is advisable to align the wheels (8-10 hours)
depending on the continued use of the vehicle.
C/42
- CAUTION: - Read the SAFETY REGULATIONS (in this manual) carefully for the safety of all personnel and the machine.
WHEELS ALIGNMENT INDICATOR CONSENT
(OPTIONAL)
(fig.68/C Pos.”1”)
The dashboard indicator lights (fig.69/C Pos.”1-2”) indicate
the alignment of the wheels and chassis. To enable the function, act on switch “1” (fig.68/C).
Front wheel alignment:
- Press and hold the switch on side “A” (fig.68/C).
- Turn the steering wheel to move the front wheels.
- The switch-on of indicator light “1” (fig.69/C ) signals that
the front wheels are aligned with the chassis.
Rear wheel alignment:
- Press and hold the switch on side “B” (fig.68/C).
- Turn the steering wheel to move the front wheels.
- The switch-on of indicator light “2” (fig.69/C ) signals that
the front wheels are aligned with the chassis.
(fig.68/C)
B
A
1
1
2
(fig.69/C)
- CAUTION: - Read the SAFETY REGULATIONS (in this manual) carefully for the safety of all personnel and the machine.
C/43
Mod. Agri Max - Agri Power - Agri Star
Getting to Know and Using the Vehicle
REAR WINDSCREEN WIPER CONTROLS
(fig.70/C Pos.”1”)
- Use the selector to activate (fig.70/C Pos.”1”).
- Press and hold the selector to activate rear windscreen wipers.
The selector indicator light switches on to indicate successful activation.
1
- ATTENTION:
Worn blades may obstruct vision and scratch the glass.
(fig.70/C)
EMERGENCY LIGHTS SELECTOR
(fig.71/C Pos.”1”)
1
Use the selector (fig.71/C Pos.”1”) to activate emergency
lights (direction indicators are fully lit in flashing mode).
The selector indicator light switches on to indicate successful activation.
(fig.71/C)
MANUAL ACCELERATOR
(fig.72/C Pos.”1”)
- ATTENTION:
Engage the parking brake (Pag.C/30) and neutral gear
(Pag.C/26) before acting on the lever to increase motor revs.
Allows the operator to accelerate engine RPMs and keep
them constant without pressing the accelerator pedal.
- Act by moving the lever towards the front of the vehicle
- Act by moving the lever toward the rear of the vehicle to
decrease engine revs.
1
- ATTENTION:
When the vehicle must be switched off, the engine RPMs
must be reduced to a minimum.
- ATTENTION:
Increasing RPMs, the vehicle may move without accelerator
pedal having been pressed.
Use the manual accelerator only when using the vehicle with
the parking brake engaged and idle gear.
(fig.72/C)
Always bring the manual accelerator(fig.72/C Pos.”1”)
to the starting position (engine at minimum RPMs) before disengaging the parking brake. The vehicle may start
suddenly, causing risk of damage.
C/44
- CAUTION: - Read the SAFETY REGULATIONS (in this manual) carefully for the safety of all personnel and the machine.
INTERNAL CAB VENTILATION
To activate ventilation, turn knob “1”.
(fig.73/C).
2
1
The clicks indicate, respectively:
0 - Off
1 - First speed
2 - Second speed
3 - Third speed
- To open the air vents (fig.74/C, fig.75/C,fig.76/C) press
down on one side of the vent and adjust the air flow direction with the tabs or turning the vent itself.
(fig.73/C)
- To close the vents, push the tabs until they are in a horizontal closed position.
- To regulate the front air flow, act on the vents “1”
(fig.74/C) and ”2” (fig.75/C).
- To regulate the lower air flow, act on the vents “1”
(fig.75/C).
- To regulate the rear air flow, act on the vents “1”
(fig.76/C).
Air temperature adjustment
To adjust the temperature of the air coming from the vents,
turn the knob (fig.73/C Pos.”A”).
Turning the knob clockwise (in the red part of the scale) the
temperature increases. Turning the knob anti-clockwise (in
the blue part of the scale) the temperature decreases until it
is near the external temperature.
1
1
(fig.74/C)
2
1
(fig.76/C)
1
1
2
(fig.75/C)
- CAUTION: - Read the SAFETY REGULATIONS (in this manual) carefully for the safety of all personnel and the machine.
C/45
Mod. Agri Max - Agri Power - Agri Star
Getting to Know and Using the Vehicle
AIR RECIRCULATION INSIDE THE CAB
(fig.80/C Pos.”1”)
- Take the knob to position “A” (fig.80/C) to enable air recirculation inside the cab.
- Take the knob to position “B” (fig.80/C) to disable air
recirculation inside the cab and allow the ventilation system to take in air from the outside.
B
A
1
NOTE:
The lever acts on the “suction” of air by the ventilation system. The flow of the air and the temperature must always
be controlled by the ventilation system inside the cab.
(fig.80/C)
C/46
- CAUTION: - Read the SAFETY REGULATIONS (in this manual) carefully for the safety of all personnel and the machine.
AIR CONDITIONING
(OPTIONAL)
1
System operation:
1. Check that all doors and windows are closed.
2
2. Ensure that the heater is switched off, turning the lever
towards the “blue” part of the scale.
3. With the engine on, switch on the air conditioning by pressing the switch (fig.81/C Pos.”1”) taking it to position “I”.
4. Act on the fan (fig.81/C Pos.”2”) to select the air flow.
(fig.81/C)
5. Open and adjust vents to obtain ideal cooling with regard
to environment temperature. Increase or decrease fan
speed to obtain desired conditions.
6. Turning the knob anti-clockwise (in the red part of the scale)
the temperature increases. Turning the knob anti-clockwise
(in the blue part of the scale) the temperature decreases.
1
- ATTENTION:
Switch on the air conditioning every 15 days, even in the
colder months, with the engine running at minimum (without
accelerating). In this way, the moveable parts like the compressor and the general system can be lubricated.
- ATTENTION:
Keep the condenser clean to keep the conditioning system
working efficiently (fig.82/C Pos.”1”).
- ATTENTION:
DO NOT loosen any of air conditioning system’s tubes in
order to reach the condenser, because skin contact with coolant can cause freezing.
- ATTENTION:
(fig.82/C)
consult chapter “d” for system cleaning and maintenance.
- CAUTION: - Read the SAFETY REGULATIONS (in this manual) carefully for the safety of all personnel and the machine.
C/47
Mod. Agri Max - Agri Power - Agri Star
Getting to Know and Using the Vehicle
REVOLVING LIGHT SWITCH
1
(fig.83/C Pos.”1”)
The revolving light must always be positioned above the driver’s cab (fig.83/C Pos. “1”) and must always be in operation
both at the work site and when driving on roads.
- Position the revolving light on the driver’s cab (fig.83/C
Pos.”1”).
- Plug the power plug in the socket at the rear of the cab
(fig.83/C Pos.”2”).
- To switch on the revolving light push the button ”B” (fig.84/C).
The indicator light on the same switch indicates start-up.
2
- ATTENTION:
The vehicle can only mount lights supplied by dieci and in
compliance with the Standards in force in the country of use.
Danger of damage to the electrical system.
(fig.83/C)
- ATTENTION:
Do not connect users with nominal voltage exceeding 12
volts and power consumption exceeding 180W.
Danger of damage to the electrical system.
FRONT CAB LIGHTS SWITCH (OPTIONAL)
A
(Fig.84/C Pos.”A”)
B
C
D
Use the switch (fig.84/C Pos.”A”) to turn on the front cab
working lights (fig.85/C Pos.”1”). The indicator light switches
on to indicate successful activation.
- ATTENTION:
The vehicle can only mount lights supplied by DIECI. Danger of damage to the electrical system.
(fig.84/C)
REAR CAB LIGHTS SWITCH (OPTIONAL)
(fig.84/C Pos.”D”)
Use the switch (fig.84/C Pos.”d”) to turn on the rear cab working lights (fig.85/C Pos.”2”). The indicator light switches on
to indicate successful activation.
1
2
- ATTENTION:
The vehicle can only mount lights supplied by DIECI. Danger of damage to the electrical system.
(fig.85/C)
C/48
- CAUTION: - Read the SAFETY REGULATIONS (in this manual) carefully for the safety of all personnel and the machine.
BOOM HEAD LIGHTS CONSENT
(OPTIONAL)
C
(fig.86/C Pos.”C”)
Use the relevant switch (fig.86/C Pos.”C”) to turn on the
boom head light (fig.87/C Pos.”1”). The indicator light
switches on to indicate successful activation.
Two work lights, one on the right side and the other on the
left side of the boom, can be installed upon client request.
- ATTENTION:
The vehicle can only mount lights supplied by dieci. Danger of damage to the electrical system.
(fig.86/C)
1
(fig.87/C)
- CAUTION: - Read the SAFETY REGULATIONS (in this manual) carefully for the safety of all personnel and the machine.
C/49
Mod. Agri Max - Agri Power - Agri Star
C/50
Getting to Know and Using the Vehicle
- CAUTION: - Read the SAFETY REGULATIONS (in this manual) carefully for the safety of all personnel and the machine.
LEVELLNG
FRONT DIFFERENTIAL AXLE
(OPTIONAL)
Using levelling of the front differential axle it is possible to
align the vehicle with the horizontal work surface. Always
check correct levelling using the spirit level in the cab
(fig.96/C Pos.“1“).
The correct sequence to be used for levelling is the following:
1. Place any load on the ground.
2. Lower and completely retract the telescopic boom.
3. Level the vehicle by acting on the relative switch:
- Press the selector in part “A” (fig.95/C)
to level the vehicle to the left (fig.98/C).
- Press the selector in part “B” (fig.95/C)
to level the vehicle to the right (fig.97/C).
prohibition
(fig.95/C)
it is PROHIBITED to operate with transversal
inclination exceeding 2°.
(see page C/31)
B
A
1
(fig.97/C) (Levelling right part of the vehicle)
(fig.96/C)
(fig.98/C) (Levelling left part of the vehicle)
- CAUTION: - Read the SAFETY REGULATIONS (in this manual) carefully for the safety of all personnel and the machine.
C/51
Mod. Agri Max - Agri Power - Agri Star
Getting to Know and Using the Vehicle
BOOM HEAD SOLENOID VALVE
(OPTIONAL)
(fig.102/C Pos.”1”)
The switch (fig.101/C Pos.”1”) is only installed in the presence of the boom head solenoid valve (fig.102/C Pos.”1”).
When using the solenoid valve it is possible to have divided
hydraulic controls on the boom head.
- Activate the switch (fig.101/C Pos.”A”) to power the solenoid valve, which will deviate oil flow. The indicator light
on the same switch indicates start-up.
The selector (fig.101/C Pos.”1”) is used parallel to normal
service controls. First, choose the selector where oil flow
will deviate from, then carry out manoeuvres with the routine
service controls.
BOOM HEAD SOLENOID VALVE
(OPTIONAL)
1
(fig.101/C Pos.”2”)
The switch (fig.101/C Pos.”2”) is only installed in the presence of the boom head socket (fig.102/C Pos.”2”). In presence
of the socket, but not its switch, this is only used to power
the boom head solenoid valve.
To use the socket:
2
- Remove any plug inserted in the socket (fig.102/C Pos.”4”)
and insert it into the socket-holder (fig.102/C Pos.”3”).
- Insert the user plug into the boom head socket (fig.102/C
Pos.”2”).
- Activate the switch (fig.101/C Pos.”2”) to power the plug
and user connected. The indicator light on the same
switch indicates start-up.
(fig.101/C)
- ATTENTION:
On connection of the user, before starting work operations,
in a safe place check that all controls function correctly and
perform the desired manoeuvres/operations.
3
4
- ATTENTION:
Do not connect users with nominal voltage exceeding 12
volts and amperage over 3A.
Danger of damage to the electrical system.
2
1
(fig.102/C)
C/52
- CAUTION: - Read the SAFETY REGULATIONS (in this manual) carefully for the safety of all personnel and the machine.
REAR HYDRAULIC SOCKETS (OPTIONAL)
(fig.106/C Pos.”1”)
Located at the rear of the vehicle (fig.106/C Pos.”1”).
- Press the relative switch to deviate oil to the rear hydraulic sockets (fig.103/C Pos.”1”). The indicator light on the
same switch indicates start-up.
1
The rear hydraulic sockets operate using
the Joystick service controls in the cab.
Note: The switch can have 2 or 3 positions in relation to set-up.
3
- ATTENTION:
On connection of the user, before starting work operations,
in a safe place check that all controls function correctly and
perform the desired manoeuvres/operations.
(fig.103/C)
“Continuous oil” function
The function allows to select and maintain the volume of oil
transiting in the hydraulic sockets constant, without acting
constantly on the Joystick selector.
1
- Press the relative switch to deviate oil to the rear hydraulic sockets (fig.103/C Pos.”1”).
2
- Select the volume of oil to keep constant through the
Joystick Roller (fig.104/C Pos.”1”)
- Press the “Power take-off” selector (fig.103/C Pos.”3”) to
enable the “continuous oil” function.
The flashing LED on the Joystick (fig.104/C Pos.”2”) indicates activation.
(fig.104/C)
1
(fig.105/C)
- To disable the function, intervene on the “Power take-off”
switch (fig.103/C Pos.”3”).
To make other operations/movements with the Joystick, in
“Continuous oil” mode, active:
1
- Press the “man in” button (fig.105/C Pos.”1”).
- Moving the joystick to make the desired operation.
Operating in this way, the above-mentioned function remains active.
- ATTENTION:
Movement of the joystick, without intervention on the roller
“1” (fig.105/C), with “continuous oil” function enabled leads
to the temporary disconnection of the function itself.
- ATTENTION:
With “Continuous oil” function enabled, do not move away
from the driver’s cab.
(fig.106/C)
- CAUTION: - Read the SAFETY REGULATIONS (in this manual) carefully for the safety of all personnel and the machine.
C/53
Mod. Agri Max - Agri Power - Agri Star
Getting to Know and Using the Vehicle
2-SPEED BOOM
(OPTIONAL)
The dual speed of the boom allows the operator to increase
boom movements speed.
Activate dual speed using the switch (fig.108/C pos.”1”). Switch
on of the indicator light on the same switch indicates running.
1
When the 180 bar pressure has been exceeded, the second
speed will deactivate automatically.
(fig.108/C)
BOOM SUSPENSION
(OPTIONAL)
Boom suspension allows the operator to carry out movements with the vehicle without feeling the strong oscillations
and jumps caused by the boom, in the event that the ground
is not perfectly flat.
Use the relevant switch to engage boom suspension
(fig.110/C Pos.”1”). The indicator light on the same switch
indicates start-up.
Boom suspension is activated only if the boom is in the horizontal position.
Boom suspension is deactivated automatically by pressing
the “man in” button on the joystick.
Suspension can also be used during the transport of loads
with the boom in the transport position (completely retracted
and in a horizontal position).
- ATTENTION:
The presence of boom suspension does not cause an increase in the speed of vehicle transport or movement. Speed must
always be proportional to the ground, to the area of use and
to climatic conditions. The vehicle must always be used with
caution. Always refer to instructions detailed in chapter “B”.
1
- ATTENTION:
Boom suspension is a device which helps increase vehicle
comfort but does not increase vehicle safety features.
(fig.110/C)
C/54
- CAUTION: - Read the SAFETY REGULATIONS (in this manual) carefully for the safety of all personnel and the machine.
DUMP BODY LOWERING
(OPTIONAL)
The dump body lowering switch controls the solenoid valve
which causes the closure of the dump body lifting cylinder
connected to the rear hydraulic socket.
1
Activate dump body lowering using the relevant switch
(fig.111/C pos.”1”). The indicator light on the same switch
indicates start-up.
- ATTENTION:
Before moving the vehicle with the dump body:
- Verify its correct operation (brake system, signalling system, hydraulic system).
- Verify that the dump body conforms to all laws relevant
in country where the vehicle is being used.
- ATTENTION:
When handling the dump body (lifting, lowering, moving),
verify that no one is nearby. RISK of being crushed.
REVERSIBLE FAN
(OPTIONAL)
Activate reversible fan using the relevant button (fig.111/C
pos.”2”). The cleaning cycle is activated automatically by
pressing the switch, which must not be held. Reversal takes
place automatically without having to switch off the vehicle.
The fan remains in the “cleaning” position (engine reversed)
for a pre-set amount of time determined by the manufacturer.
2
(fig.111/C)
- ATTENTION:
The presence of fan reversal does not prevent operators from
carrying out fan, radiator or engine compartment cleaning, in
accordance with the required routine maintenance schedule.
- CAUTION: - Read the SAFETY REGULATIONS (in this manual) carefully for the safety of all personnel and the machine.
C/55
Mod. Agri Max - Agri Power - Agri Star
WATER HEATER
(OPTIONAL)
(fig.112/C Pos.”1”)
Located at the rear of the bonnet.
Getting to Know and Using the Vehicle
1
- ATTENTION:
Before switching on the water heater, carry out the operations included in Chapter B “STOPPING UPON COMPLETION OF WORK”
System operation:
1. Plug in connector “A” into socket “B” located in the rear
part of the engine bonnet (fig.113/C).
(fig.112/C)
2. Insert plug “C” into the electric socket (fig.113/C).
The heater is connected to its own control unit and maintains engine water at a temperature higher than the external
temperature (in cold climates).
In the event of malfunction contact a dieci service centre.
- ATTENTION:
A
B
Verify the good conditions of the power supply cable before
starting up the device.
- ATTENTION:
Do not use the water heater with the engine on and while
the vehicle is moving.
- ATTENTION:
Remove water heater power supply before switching on and
moving the vehicle.
C/56
C
(fig.113/C)
- CAUTION: - Read the SAFETY REGULATIONS (in this manual) carefully for the safety of all personnel and the machine.
- CAUTION: - Read the SAFETY REGULATIONS (in this manual) carefully for the safety of all personnel and the machine.
C/57
Mod. Agri Max - Agri Power - Agri Star
Getting to Know and Using the Vehicle
FRONT HOOK
(fig.120/C Pos.”A”)
If located at the front of the vehicle, it can have different load
capacities depending on client needs.
To check the capacity of the front hook, consult the vehicle
registration document.
A
Capacity is limited for each vehicle by the authorised circulating weight, by the towing weight and by the vertical strain
of the towing pin. This information is detailed in the vehicle
registration document.
1
3
2
The front hook clip (fig.120/C Pos.”1”) has been properly
positioned and locked when the guide pin is in position “3”
(fig.120/C) and is locked by its cotter pin “2” (fig.120/C).
(fig.120/C)
C/58
- CAUTION: - Read the SAFETY REGULATIONS (in this manual) carefully for the safety of all personnel and the machine.
TOWING HOOK
(fig.121/C Pos.”A”)
If located at the rear of the vehicle, it can have different load
capacities depending on client needs.
Consult the vehicle registration document to verify rear hook
load capacity.
A
Capacity is limited for each vehicle by the authorised circulating weight, by the towing weight and by the vertical strain
of the towing pin. This information is detailed in the vehicle
registration document.
1
Only “Agricultural Tractors” are permitted to driving on the
road with a trailer.
Verify proper locking pin position before moving the vehicle
with the trailer.
The rear hook clip (fig.121/C Pos.”1”) has been properly
positioned and locked when it goes through both parts of the
hook (fig.122/C) and is locked by its cotter pin “1” (fig.122/C).
(fig.121/C)
- ATTENTION:
Before moving the vehicle with the trailer:
- Ensure that the brake and signalling systems are functioning properly.
1
- Verify that the trailer conforms to regulations in force in
the country where the vehicle is being used.
- Make sure that the cotter pin is properly inserted inside
the pin (fig.122/C Pos.”1”).
(fig.122/C)
ADJUSTABLE TOWING HOOK
(OPTIONAL)
2
(fig.124/C Pos.”A”)
Located at the rear of the vehicle.
To adjust hook height:
1
1. Grip the pin (fig.123/C Pos.”1”) keeping i pulled towards
yourself.
2. Lift the handle with safety lock (fig.123/C Pos.”2”). In these conditions the hook is free to move in its own guides.
3. Lower or raise the hook accompanying it via the handle
(fig.123/C Pos.”2”).
4. When the desired position has been reached, release
the pin (fig.123/C Pos.”1”); check that the pin returns to
its house, release the safety handle (fig.123/C Pos.”2”).
(fig.123/C)
3
5. Insert the protection (fig.124/C Pos.”3”) taking it to horizontal position.
- ATTENTION:
A
To use the “adjustable towing hook” the prescriptions are the
same as in the “Towing hook” paragraph.
(fig.124/C)
- CAUTION: - Read the SAFETY REGULATIONS (in this manual) carefully for the safety of all personnel and the machine.
C/59
Mod. Agri Max - Agri Power - Agri Star
Getting to Know and Using the Vehicle
POWER TAKEOFF
(OPTIONAL)
(fig.131/C pos.”1”)
To activate the power take-off, act on its switch (fig.130/G
pos.”1”).
The indicator light on the relevant switch will signal start-up.
The PTO pump has hydraulic connections that are independent from the rest of the vehicle hydraulic plant. Before
activating the PTO, check that the hydraulic supply pipes
are connected.
If this is not the case, act as follows:
1
- Stop the vehicle on a flat, level surface.
- Switch off the engine and remove the key from the dashboard.
- Discharge the pressure from the hydraulic plant by moving the Joystick in the cab.
- Insert the pump hydraulic pumps of the PTO in
the hydraulic connections on the rear of the vehicle
(fig.132/C pos.”2”).
- Once the pump is connected to the plant, it is possible to
start the vehicle and activate the PTO.
- ATTENTION:
When the switch has been inserted the PTO starts immediately. Before starting the PTO, insert the Cardan shaft.
Stay at a safe distance from the same. Before starting
the PTO, check that no-one is in the vicinity ofthe same, the
Cardan shaft and the mechanical user of the socket.
- ATTENTION:
If the PTO should undergo stress greater than nominal, supplied by the manufacturer, automatic disconnection takes
place, with blocking of the revolving motion.
(fig.130/C)
2
1
(fig.132/C)
C/60
(fig.131/C)
- CAUTION: - Read the SAFETY REGULATIONS (in this manual) carefully for the safety of all personnel and the machine.
THREE-POINT LIFTING DEVICE
(OPTIONAL)
(fig.134/C)
Act on the relevant lever to activate the three-point lifting device (fig.133/C pos.”1”).
1
Acting on the lever, the lateral arms start to move (fig.134/C
pos.”1-2”).
Before use, regulate the lateral arms (fig.134/C pos.”1-2”),
the chains (fig.134/C pos.”3”) and the central arm (fig.134/C
pos.”4”) according to the type of use and tool to be connected.
The central arm (fig.134/C pos.”4”) must always be connected correctly to the user.
(fig.133/C)
4
- ATTENTION:
Before use, check that no-one is in the vicinity of the vehicle,
the three-point lifting device and the user.
2
1
3
3
(fig.134/C)
C
Regulation of the 3-point lifting device
For regulation of the lifting unit, proceed as follows:
2
- To regulate opening of the lateral arms, act on the chains
loosening/tightening the junction pin (fig.135/C pos.”1”).
- To regulate the height of the arms tighten/loosen the
fixing rod (fig.135/C pos.”2”) forcing the lever (fig.135/C
pos.”B”) and blocking the rod in the position using the
lock-nut (fig.135/C pos.”C”).
B
- ATTENTION:
Before use, check that all cotters are present in the pins that
make up the 3-point lifting device (fig.135/C pos.”A”). Also
insert the cotters on the pins that will connect the tool to use
to the 3-point lifting device. DO NOT use the lifting device if
all cotters and retainer/safety pins ARE NOT present.
A
(fig.135/C)
- CAUTION: - Read the SAFETY REGULATIONS (in this manual) carefully for the safety of all personnel and the machine.
1
C/61
Mod. Agri Max - Agri Power - Agri Star
Getting to Know and Using the Vehicle
HYDRAULIC BRAKING
SYSTEM FOR TRAILERS (ITALIAN TYPE)
(OPTIONAL)
A
The indicator light (fig.140/C pos.”A”) signals low braking
system pressure.
Connect the trailer’s hydraulic braking system to that of the
vehicle using the hydraulic socket (fig.141/C pos.”1”). If not
being used, the socket must be suitably protected by its
hydraulic socket cover (fig.141/C pos.”2”).
- ATTENTION:
Do not move the vehicle until the indicator light has switched
off, as the trailer may not brake properly.
- ATTENTION:
(fig.140/C)
Verify that all connections are attached properly and that
the trailer brakes regularly before moving the vehicle.
Do not move the vehicle with the trailer attached in the event
of malfunctions.
1
- ATTENTION:
Before inserting the hydraulic part, connect the trailer to the
towing hook (fig.142/C pos.”A”).
The trailer brake act under pressure. The vehicle hydraulic circuit supplies constant pressure to the trailer braking
system. This pressure is modulated by means of the brake
pump. The trailer is freed from the brakes and can move
when the brake system of the trailer is connected to the
vehicle. The hydraulic braking valve (fig.143/C pos.”A”),
located at the rear of the vehicle, is equipped with a lever
(fig.143/C pos.”B”) to put pressure on the braking system.
2
(fig.141/C)
- The system is not under pressure when the lever is in
position “0” (fig.143/C).If connected, the trailer is braked.
- The system is under pressure when the lever is in position
“1” (fig.143/C). If connected, the trailer is free to move.
A
The lever must be used to insert the trailer parking/emergency brake. The trailer is braked when the lever is set to
position “0” (fig.143/C).
(fig.142/C)
- ATTENTION:
In the event that the trailer is not to be used, set the lever to
position “0” (fig.143/C) to prevent the system from remaining
under pressure. Keeping the system under pressure causes
an unnecessary loss of engine power, leading to higher consumption and unnecessary heating of hydraulic oil.
- ATTENTION:
The trailer parking / emergency brake must be engaged in
the same way as the parking brake of the vehicle.
1
0
B
0
A
1
(fig.143/C)
C/62
- CAUTION: - Read the SAFETY REGULATIONS (in this manual) carefully for the safety of all personnel and the machine.
HYDRAULIC BRAKING SYSTEM FOR TRAILERS
(OPTIONAL)
A
The trailer brake act under pressure. The vehicle hydraulic circuit supplies constant pressure to the trailer braking system.
This pressure is modulated by means of the brake pump.
The indicator light (fig.144/C pos.”A”) signals low braking
system pressure.
Connect the trailer’s hydraulic braking system to that of the
vehicle using the hydraulic socket (fig.145/C pos.”1”). If not
being used, the socket must be suitably protected by its
hydraulic socket cover (fig.145/C pos.”2”).
- ATTENTION:
Do not move the vehicle until the indicator light has switched
off, as the trailer may not brake properly.
(fig.144/C)
- ATTENTION:
1
Verify that all connections are attached properly and that
the trailer brakes regularly before moving the vehicle. Do
not move the vehicle with the trailer attached in the event of
malfunctions.
2
- ATTENTION:
Connect the trailer to the towing hook (fig.146/C pos.”A”)
before inserting the hydraulic part. (fig.145/C)
- ATTENTION:
When the trailer is disconnected, use caution to prevent it
from moving in an uncontrolled manner.
(fig.145/C)
A
(fig.146/C)
- CAUTION: - Read the SAFETY REGULATIONS (in this manual) carefully for the safety of all personnel and the machine.
C/63
Mod. Agri Max - Agri Power - Agri Star
Getting to Know and Using the Vehicle
HYDRAULIC BRAKING
PNEUMATICS FOR TRAILERS
(OPTIONAL)
A
The indicator light (fig.150/C pos.”A”) signals low braking
system pressure.
- ATTENTION:
Do not move the vehicle until the indicator light has switched
off, as the trailer may not brake properly.
The vehicle may be equipped with one of two desired types
of pneumatic attachments (fig.11/C pos.”1”, fig.152C pos.”12”). For ensure correct use, connect the attachment’s pneumatic system to that of the vehicle using its fittings.
(fig.150/C)
- ATTENTION:
Verify that all connections are attached properly and that the
trailer brakes regularly before moving the vehicle. Do not
move the vehicle with the trailer attached in the event of
malfunctions.
1
1
- ATTENTION:
Connect the trailer to the towing hook (fig.153/C pos.”A”)
before inserting the hydraulic part.
2
(fig.151/C)
(fig.152/C)
A
(fig.153/C)
C/64
- CAUTION: - Read the SAFETY REGULATIONS (in this manual) carefully for the safety of all personnel and the machine.
- CAUTION: - Read the SAFETY REGULATIONS (in this manual) carefully for the safety of all personnel and the machine.
C/65
Mod. Agri Max - Agri Power - Agri Star
Getting to Know and Using the Vehicle
The vehicle may only be towed in an emergency and at low
speed (max 4 km/hour) and for short distances (max 500
m). Only the anchorage points indicated in figure “160/C”
can be used for the front side and figure “161/C” for the rear
side. The anchorage points are present on both sides, left
and right, and must both be connected for correct towing.
AXA 1432
TOWING THE VEHICLE
The operations to be carried out are as follows:
- Put the gear in neutral.
- Disengage the negative parking brake
- Connect the towing bracket between the towing vehicle
and the broken down vehicle.
- ATTENTION Never try to start up the vehicle
by towing or pushing.
(fig.160/C) Front anchorage point
With engine off the gear could be engaged. If it is not possible to start the engine to engage the neutral gear “N”, take
the gear to neutral manually following the indications given
in the “Putting the gear in neutral” chapter (Page C/67).
AXA 1432
With engine off, the steering servo-control does not work.
If the engine cannot be kept running, during towing keep in
mind that it will be much more difficult to operate the steering wheel. When the vehicle has been started, position the
gearbox in neutral (idle) before starting towing.
The parking brake is engaged with the engine switched off.
If the engine cannot be kept running during vehicle towing,
disengage the parking brake manually, following the instructions given in paragraph “Disengagement of Parking Brake
with engine switched off” (Page C/68-C/69).
- ATTENTION:
With engine running during towing, remain seated in the
driver’s seat to prevent the parking brake from engaging
automatically.
The towing bracket must be connected to the vehicle towing setups marked by corresponding symbols (fig.160/C, fig.161/C).
(fig.161/C) Rear anchorage point
- ATTENTION:
The vehicle MUST be towed with a towing bracket. The
towing bracket must be able to support a towing weight
of 10,000 Kg.
Do not tow the vehicle on public roads and for long distances. If possible, keep the yellow flashing lights and emergency lights on.
Do not tow the vehicle on a slope.
C/66
- ATTENTION -
Do not stand between the towing vehicle and
the towed vehicle.
- ATTENTION -
have the operations described
above performed by expert staff.
- CAUTION: - Read the SAFETY REGULATIONS (in this manual) carefully for the safety of all personnel and the machine.
Putting the gear in neutral
Operating Description
- Switch off the engine.
- Turn the lever (fig. 162/C Pos. “1”) of the hydraulic valve
towards the vehicle cab, bringing it to the closed position. The valve is located under the vehicle, in the centre
near the reducer.
1
- Position the gear selector pin (fig. 163/C Pos. “1”) in
neutral, using a screwdriver.
- ATTENTION:
(fig.162/C)
Before towing the vehicle, switch on the dashboard and if
possible, ensure that the forward and reverse gear indicator
lights are off.
- ATTENTION:
1
Once the towing operations have been completed, reopen
the valve, bringing it back to its original position.
To insert the gear, use the switch provided as described in
paragraph “Fast/slow Gear Switch” (pag.C/27).
(fig.163/C)
(fig.164/C)
fast gear engaged
(fig.165/C)
neutral
(fig.166/C)
slow gear engaged
- CAUTION: - Read the SAFETY REGULATIONS (in this manual) carefully for the safety of all personnel and the machine.
C/67
Mod. Agri Max - Agri Power - Agri Star
Getting to Know and Using the Vehicle
disengaging the negative parking brake with the
engine stopped (Agri Max, Agri Power, Agri Star)
1. Position a screwdriver as in the figure (fig.170/C).
2. Use a rubber mallet to strike the handle of the screwdriver.
3. Now the parking brake is disengaged and will re-engage
automatically on engine start-up.
In these conditions it is possible to tow the vehicle.
4. To put the brake back into operational conditions, just
start the engine.
- ATTENTION once towing operations are complete bring
everything back to its original position.
Do not use the vehicle with the negative parking
brake disengaged.
have the operations described above performed
by expert staff
(fig.170/C)
(fig.171/C) Parking brake ENGAGED
(fig.172/C) Parking brake DISENGAGED
C/68
- CAUTION: - Read the SAFETY REGULATIONS (in this manual) carefully for the safety of all personnel and the machine.
disengagementofnegativebrakewithengineswitchedoff
(Agri Max 70.10)
Operating Description
1
1
- Loosen the lock nuts located on both sides of the central
body of the front axle (fig.173/C Pos.”2”).
2
2
- Tighten the screws (fig.173/C Pos.”1”) until resistance
is encountered note the number of turns made in order
to bring the crews back to their original position once
towing operations have been completed.
2
2
1
1
- Tighten the screws another 1.5 turns.
The brake will be unlocked. Once towing operations are
complete bring everything back to its original position.
- ATTENTION:
It is very IMPORTANT that the screws be re-tightened
using the same number of turns used to loosen them.
- ATTENTION -
once towing operations are complete bring
everything back to its original position.
Do not use the vehicle with the negative parking
brake disengaged.
have the operations described above performed
by expert staff
(fig.173/C)
- CAUTION: - Read the SAFETY REGULATIONS (in this manual) carefully for the safety of all personnel and the machine.
C/69
Mod. Agri Max - Agri Power - Agri Star
C/70
Getting to Know and Using the Vehicle
- CAUTION: - Read the SAFETY REGULATIONS (in this manual) carefully for the safety of all personnel and the machine.
CATALYTIC PURIFIER
(OPTIONAL)
(fig.180/C)
duration
As the catalyst is not actively involved in the chemical reaction it provokes, its life is theoretically unlimited. However, due
to certain conditions such as: engines not perfectly tuned,
vehicle vibrations and the abrasive effect of fumes on the support, the life of the catalyst may be shortened. In reality, the
duration of the catalytic purifier is about 10000 work hours.
Maintenance
The catalyst is activated by the high temperature of the fumes which also prevents any particles from depositing on
the honeycomb; less maintenance is, consequently, needed. It is advisable to clean the purifier every 500 working
hours. Remove the catalyst and place it in a container with
hot soapy water, making sure it is completely emerged. Leave it to soak for 5 hours, then wait for it dry completely (a
gentle jet of compressed air could possibly be used to speed
up drying) and remount.
(fig.180/C)
WATER DRIVEN PURIFIER
(OPTIONAL)
(fig.181/C)
The water driven purifier is manufactured entirely in stainless steel with titanium and is resistant to high temperatures
and to corrosive sulphurous compounds which are present
in the exhaust fumes.
It consists of a horizontal cylindrical body (sized according to engine power) which makes up the water tank, two
mounting brackets and a cylindrical tower located on the
upper part of the water tank that contains the separator.
The gases are directed through an entry tube to the interior
part of the purifier and then passed to the water. The carbonaceous particles become heavier upon contact with the water and fall to the bottom of the water tank. The gases are
then directed towards the separator which recovers the carbonaceous particles that have not fused with the water. The
white smoke emitted from the exhaust is simply water vapour.
Maintenance
Maintenance of the water driven purifier is EXTREMELY
IMPORTANT and the water must be changed every 8 working hours. The tank must be emptied using the spherical
drain valve and clean water must be added through the loading and level cock.
(fig.181/C)
The black sludge which comes out when changing the water is
proof of the purifier’s effectiveness. Every 300 working hours
the purifier must be cleaned: drain the water and clean the
inside for a few minutes using a pressurised jet. dieci also
provides the additive TAM which, if added to the water at every change, helps to keep the purifier clean. TAM also improves
the performance of the purifier: it neutralises sulphuric acids.
- CAUTION: - Read the SAFETY REGULATIONS (in this manual) carefully for the safety of all personnel and the machine.
C/71
Mod. Agri Max - Agri Power - Agri Star
C/72
Getting to Know and Using the Vehicle
- CAUTION: - Read the SAFETY REGULATIONS (in this manual) carefully for the safety of all personnel and the machine.
GETTING TO KNOW
AND USING THE VEHICLE
integrated devices
“central dashboard”
- CAUTION: - Read the SAFETY REGULATIONS (in this manual) carefully for the safety of all personnel and the machine.
C/73
Mod. Agri Max - Agri Power - Agri Star
Knowing and using the vehicle
Integrated devices
Every modification made to the vehicle leads to a new
verification of conformity with the 98/37 Machinery Directive “ “ this procedure is also valid in the case of
repairs with non-original spare parts.
IT IS PROHIBITED TO OPERATE IF THIS MANUAL HAS NOT BEEN
READ AND UNDERSTOOD.
THE OPERATOR IS REQUIRED TO LEARN THE LOCATION AND FUNCTION OF
ALL INSTRUMENTS AND CONTROLS, INDEPENDENT OF HIS OR HER EXPERIENCE IN THE FIELD, BEFORE OPERATING THE VEHICLE.
THE IMAGES, DESCRIPTIONS, MEASUREMENTS, GIVEN IN THIS CHAPTER
REFER TO STANDARD VEHICLES.
YOUR VEHICLE CAN BE SET-UP WITH OPTIONAL CONTROLS AND ACCESSORIES ON REQUEST.
ALL FUNCTIONS, PROCEDURES, INHERENT THE USE AND SET-UP OF VEHICLE EQUIPMENT, NOT DESCRIBED IN THIS MANUAL, ARE PROHIBITED.
USE OF THE VEHICLE DIFFERENT TO THAT DESCRIBED
IN THIS MANUAL IS PROHIBITED.
IT IS MANDATORY TO HAVE READ AND LEARNED CHAPTER “B“ (SAFETY
STANDARDS) BEFORE READING CHAPTER “C” AND USING THE VEHICLE.
C/74
- CAUTION: - Read the SAFETY REGULATIONS (in this manual) carefully for the safety of all personnel and the machine.
LCD
The following functions will be shown on the display:
- Timer (6 characters of which one a decimal point plus hourglass) (fig.100/C pos.”C”).
- Clock (4 characters) (fig.100/C pos.”A”).
- Speedometer (3 characters of which one a decimal point plus km/h, m/h and mph) (fig.100/C pos.”C”). (OPTIONAL)
- Hodograph (6 characters of which one a decimal point plus km and miles) (fig.100/C pos.”C”). (OPTIONAL)
- Neutral gear engaged (fig.100/C pos.”B”). (NOT AVAILABLE)
- Engine errors (Large E flashing + 3 characters at top) (fig.100/C pos.”A”, fig.100/C pos.”B”, fig.100/C pos.”C”). (NOT AVAILABLE)
- Service (Large S flashing + n° hours missing to service) (fig.100/C pos.”A”, fig.100/C pos.”B”)
B
A
X1
X14
X13
COL1 DP5
RPM 1
2
3
4
5
AM
11
X12
C
12
9
8
7
6
Vkmip/h
DP9 X11 X9 X7 X5
X10 X6
X8
(fig.100/C)
speedometer (optional)
The speedometer allows to display the speed of the vehicle in real time.
In the vehicle with Vario System drive the speedometer shows the advancement speed on exceeding 3km/h. With lower speed the instrument displays the hours of use of the vehicle (Hour meter function).
The maximum speed of the vehicle varies on inflation pressure variation, the measurement and wear of the tyres.
Hodograph (optional)
The hodograph allows to display the kilometres travelled by the vehicle. The instrument is combined with the speedometer.
- CAUTION: - Read the SAFETY REGULATIONS (in this manual) carefully for the safety of all personnel and the machine.
C/75
Mod. Agri Max - Agri Power - Agri Star
Knowing and using the vehicle
Integrated devices
2
1
(fig.101/C)
buttons
There are two integrated buttons on the panel:
- Button “1” (fig.101/C) temporarily prevents the acoustic signal (buzzer) of the anti-tipping system, anti-tipping system test.
- Button “2” (fig.101/C) changes the display.
Changing display visualisation
By pressing key ”2” (fig.101/C) display visualisation is changed cyclically following the logic below:
1. Timer and clock.
2. Speed and clock.
3. Hodograph and clock.
4. Timer and clock.
The normal visualisation of the display will be Clock and Hour counter. In the case of installation of the speedometer, the display will automatically pass to the Clock and Speed display.
Clock regulation
To regulate the clock:
- Switch off the dashboard.
- Press key “2” (fig.101/C) and hold it down.
- Switch the dashboard on
- Hold key “2” down (fig.101/C) for 1.5 seconds for the duration of the “check”.
- Now you are in “Regulation” mode
With minutes characters flashing, press:
- key “1” (fig.101/C) to increase the character.
- key “2” (fig.101/C) to confirm the selection.
With hours characters flashing, press:
- key “1” (fig.101/C) to increase the character.
- key “2” (fig.101/C) to confirm the selection.
The calibration check has ended and the instrument starts to work normally (excluding the initial check).
C/76
- CAUTION: - Read the SAFETY REGULATIONS (in this manual) carefully for the safety of all personnel and the machine.
DASHBOARD INSTRUMENT INITIAL CHECK
On switch-on, the panel switches some indicator lights, the buzzer and all segments of the display on for the duration of 1.5. seconds.
The tables are shown below (fig.102/C) that contain all dashboard indicator lights and their behaviour at the time of the check.
The instruments (fig.103/C) carry out an initial check by moving the pointers and temporary switch-on of the corresponding LED.
The LCD carries out complete temporary switch-on of all symbols that can be represented.
LEDS
INITIAL
CHECK
LEDS
INITIAL
CHECK
YES
YES
YES
YES
YES
YES
YES
YES
YES
YES
NO
YES
NO
YES
YES
YES
YES
YES
YES
2
YES
INITIAL
CHECK
YES
YES
YES
YES
I
YES
CELL
YES
YES
A
INSTRUMENTS
YES
(fig.103/C)
YES
(fig.102/C)
- CAUTION: - Read the SAFETY REGULATIONS (in this manual) carefully for the safety of all personnel and the machine.
C/77
Mod. Agri Max - Agri Power - Agri Star
Knowing and using the vehicle
Integrated devices
ANTI-TIPPING SYSTEM TEST
2
1
(fig.104/C)
Press and hold button “1”(fig.104/C) for 2 seconds, during normal functioning of the instrument, to carry out the anti-tipping system test.
The test consists in:
1. Indicator in start position 1st Green sector.
2. Indicator in end position 2nd Red sector.
3. Indicator in start position 1st Green sector.
4. Indicator in current work position.
The angular speed of the index during the test is 240 angular degrees in 2 sec. (120 degrees/sec).
ANTI-TIPPING SYSTEM MUTE
Press button “1” (fig.104/C) to suspend the acoustic signal due to an alarm of the anti-tipping system. In the alarm zone (start of 1st Red
sector start of 2nd Red sector) the acoustic signal must always be activated even if key “1” has been previously pressed (fig.104/C).
Example:
1. The indicator enters the 1st Red zone.
2. The buzzer starts to ring intermittently.
3. Pressing the last key suspends the acoustic signal.
4. The indicator continues to rise and enters the 2nd Red zone.
5. The buzzer starts to ring continuously. Pressing the last key suspends the acoustic signal.
GENERAL ALARM INDICATOR LIGHT
The emergency indicator light/general alarm occur:
- in the event of engine error
- if one of the indicator lights indicated in the table below should switch on
- in the event of engine overrevving
Engine error
The engine has an electronic control unit that communicates directly with the central dashboard. The anomalies are signalled by the general alarm indicator light accompanied by the acoustic signal with duration of 1.5 seconds and the display of the error code on the LCD.
C/78
- CAUTION: - Read the SAFETY REGULATIONS (in this manual) carefully for the safety of all personnel and the machine.
Switch-on of dashboard indicator lights
Some signal indicator lights, which are particularly important for the duration and use of the same in complete safety have been
coupled to the general alarm indicator light (fig.105/C) with acoustic signal lasting 1.5 seconds. The acoustic signal functions
only with the engine running. The signalling of alarms by the indicator light “1” (fig.105/C) has precedence over other signals that
this communicates. Other anomaly signal lights have not been coupled to the general alarm indicator light and have their own
type of signal (fig.106/C).
LED 1
LED 2
Buzzer
Coupling 1
YES ( 1.5 seconds)
Coupling 2
YES ( 1.5 seconds)
Coupling 3
YES ( 1.5 seconds)
Coupling 4
YES ( 1.5 seconds)
Coupling 5
YES ( 1.5 seconds)
Function
LED
(fig.105/C)
Type of signal
Insufficient pressure
in the accumulator
fixed accumulator
Failure of
parking brake
fixed accumulator
Brake fluid low level
Intermittent (0.5”on, 0.5”off)
Drive oil temperature
* Note
(fig.105/C)
* Note: fixed (Vehicle with Power Shift Gearbox)
* Note: Fixed on < -20°C < Intermittent on < 20°C < Off > 105°C > Intermittent > 115°C > Fixed on
(Vehicle with Vario System Drive)
* Note: With Vario System drive
- The vehicle functions regularly between 20°C and 105°C.
- The power descends between -20°C and 20°C
- The power descends between -105°C and 115°C
- The vehicle blocks below -20°C
- The vehicle blocks over 115°C
- CAUTION: - Read the SAFETY REGULATIONS (in this manual) carefully for the safety of all personnel and the machine.
C/79
Mod. Agri Max - Agri Power - Agri Star
Knowing and using the vehicle
Integrated devices
SERVICE
On reaching the SERVICE on the LCD, the letter “S” will be shown (fig.109/C pos.”2”) with the hours corresponding (fig.109/C
pos.”1”) to the SERVICE.
Display will only occur on switch-on of the dashboard for a time of 10 seconds with letter “S” flashing.
RPM
AM
1
2
Vkmip/h
(fig.109/C)
The hour count is managed from the panel.
Every 300 hours the letter “S” (flashing) must always be shown at every switch-on along with the service interval reached (e.g.
300,600,900 ….) as shown in the table.
The service message will deactivate automatically after 20 hours have passed from display of the voucher.
C/80
- CAUTION: - Read the SAFETY REGULATIONS (in this manual) carefully for the safety of all personnel and the machine.
MAINTENANCE
AND
REGISTRATION
D
- CAUTION: - Read the SAFETY REGULATIONS (in this manual) carefully for the safety of all personnel and the machine.
D/1
Mod. Agri Max - Agri Power - Agri Star
Maintenance and Registering
Every modification made to the vehicle leads to a new verification of conformity with the 2006/42 Machinery Directive “
“THIS
APPLIES EVEN IN CASES OF repair WORK COMPLETED
WITH NON ORIGINAL PARTS.
ALL PROCEDURES OR MAINTENANCE OPERATIONS NOT DESCRIBED IN
THIS MANUAL MUST BE PERFORMED BY AUTHORISED WORKSHOPS AND
BY QUALIFIED STAFF.
ONLY THE FOLLOWING CHECKS CAN BE PERFORMED BY THE OPERATOR:
CHECKING LIQUID LEVELS, CLEANING THE AIR FILTER, CHECKING TYRE
PRESSURE. THESE OPERATIONS MUST BE PERFORMED IN COMPLIANCE
WITH SAFETY STANDARDS AS DESCRIBED IN THIS MANUAL.
THE KNURLED PLATES (BULB PLATES) AND THE CAB FLOOR ARE THE ONLY
PARTS OF THE VEHICLE THAT CAN BE STEPPED ON. USE A LADDER (SUITABLE FOR THE PURPOSE INTENDED) FOR MAINTENANCE PARTS THAT CANNOT BE REACHED FROM THE GROUND.
IT IS MANDATORY TO HAVE READ AND LEARNED CHAPTERS “B“ AND “C”
(SAFETY STANDARDS/TO KNOW AND USE THE VEHICLE) BEFORE READING
CHAPTER “D”.
IT IS PROHIBITED TO START TO SERVICE THE VEHICLE IF THIS CHAPTER
HAS NOT BEEN READ AND UNDERSTOOD.
D/2
- CAUTION: - Read the SAFETY REGULATIONS (in this manual) carefully for the safety of all personnel and the machine.
MAINTENANCE PRESCRIPTIONS
INTRODUCTION
Owner/ Operator Assistance
This vehicle has been designed and built to provide maximum performance, savings and facilitate its operation in
various working conditions. Before delivery, the vehicle was
tested both by the Manufacturer and by the Dealer to ensure
its maximum condition. To preserve these conditions and
guarantee problem-free operation, it is important to carry out
the routine maintenance operations described in this manual
at an authorised dieci dealer in accordance with the maintenance schedule provided.
Make note of this important data before contacting your
service centre, in order to obtain maximised service assistance from your Dealer.
1 - Specify your name, address and telephone number.
2 - Provide the model and chassis serial number of the
vehicle.
3 - Indicate the purchase date and working hours.
4 - Explain the type of malfunction.
Maintenance
This section of the Manual provides all the maintenance
prescriptions necessary for maintaining the dieci vehicle in
perfect working condition.
This chapter also provides information on carrying out the
various adjustments necessary to keep the vehicle tuned.
The vehicle must receive regular routine maintenance in
order to give the best results. It is recommended that all services be carried out as prescribed in the service schedule
suggested by dieci. Remember that it is the owner’s and/or
users responsibility to keep the vehicle in safe working condition and suitable to be driven on public and private roads.
Maintenance or adjustment operations not described in this
chapter or in the rest of the manual must be carried out by
qualified personnel respecting the conditions of safety in
order to guarantee their safety and the safety of others. Only
dieci Dealer maintenance staff have been trained to carry
out said interventions and only they have the special equipment and tools necessary to guarantee maximum safety,
precision and efficiency.
Only dieci Dealers have access to dieci client service
resources. Moreover, Dealers are able to offer a variety of
programmes concerning guarantee, fixed rate maintenance
and safety checks including weight tests, in compliance with
both legal and insurance requirements.
Protect the environment
It is illegal to pollute sewers, water sources or soil. Use only
authorised dumping grounds centres, including the areas
designated by the local authorities or workshops equipped
with the necessary tools for the disposal of used oils. If in
doubt, contact your local authority for relevant instructions.
- ATTENTION IT IS MANDATORY TO HAVE READ AND LEARNED
CHAPTERS “B“-“C” (SAFETY STANDARDS/TO KNOW
AND USE THE VEHICLE) BEFORE READING CHAPTER
“D” AND SERVICING THE VEHICLE.
Spaces for registering periodic inspections can be found at
the end of this Manual. These allow operators to plan interventions and register them in chronological order. After each
inspection, the Dealer must insert the date of intervention, a
signature and the Dealer stamp in the space.
Proper vehicle maintenance not only improves the vehicle
reliability but it also preserves vehicle value over time.
- CAUTION: - Read the SAFETY REGULATIONS (in this manual) carefully for the safety of all personnel and the machine.
D/3
Mod. Agri Max - Agri Power - Agri Star
Maintenance and Registering
RUNNING IN PERIOD
The operations indicated below must be carried out only
once when the indicated time period has elapsed after the
new vehicle has been put into service. After this adhere to
the intervals specified in the general maintenance schedule.
After 10 hours of work:
• Check for and eliminate any leaks.
• Check and tighten all hydraulic connections and nuts
and bolts.
After 50 hours of work:
• Check for and eliminate any leaks.
• Check and tighten all hydraulic connections and nuts
and bolts.
After 250 hours of work:
• Change engine oil.
• Replace engine oil cartridge.
• Change mazut cartridge.
• Replace oil filter.
- ATTENTION IF THE VEHICLE IS DESTINED FOR USE IN CRITICAL
CONDITIONS (DUST, MUD, SAND), MAINTENANCE INTERVALS RE REDUCED BY 50%.
- ATTENTION CHECK THE HOUR COUNTER EVERY DAY TO CHECK IF
MAINTENANCE OPERATIONS MUST BE PERFORMED.
D/4
- CAUTION: - Read the SAFETY REGULATIONS (in this manual) carefully for the safety of all personnel and the machine.
DECLARATION OF VIBRATORY EMISSIONS
The declared vibration emission value complies with standard EN 12096
Agri Max
Agri Power
1) vibration values on the seat
1) vibration values on the seat
Vibratory emission value measured as = 1.8 m/s2
Uncertainty K = 0.5 m/s2
Vibratory emission value measured as = 1.8 m/s2
Uncertainty K = 0.5 m/s2
Values determined subject to standard EN 13059
Values determined subject to standard EN 13059
2) vibration values on the steering wheel
2) vibration values on the steering wheel
Vibratory emission value measured as = 4.5 m/s2
Uncertainty K = 2.2 m/s2
Vibratory emission value measured as = 4.5 m/s2
Uncertainty K = 2.2 m/s2
Values determined subject to standard EN 13059
Values determined subject to standard EN 13059
Agri Star
1) vibration values on the seat
Vibratory emission value measured as = 1.8 m/s2
Uncertainty K = 0.5 m/s2
Values determined subject to standard EN 13059
2) vibration values on the steering wheel
Vibratory emission value measured as = 4.5 m/s2
Uncertainty K = 2.2 m/s2
Values determined subject to standard EN 13059
DECLARATION OF FIRST INSPECTION BY
MANUFACTURER
DIECI S.r.l. declares that every vehicle produced in its factories undergoes static and dynamic inspections before being
placed on the market in order to verify proper operation and
compliance with all relative European directives. After inspections are performed, a CE certificate is issued that corresponds to the vehicle inspected and its supplied attachments.
Every CE-marked dieci product is supplied with its own certificate, which must be kept by the vehicle’s legitimate owner
in accordance with the law.
- CAUTION: - Read the SAFETY REGULATIONS (in this manual) carefully for the safety of all personnel and the machine.
D/5
Mod. Agri Max - Agri Power - Agri Star
Maintenance and Registering
IDENTIFYING THE VEHICLE PARTS
Right side of vehicle
1
2
3
8
9
4
6
10
7
1. Cab
2. Telescopic boom
3. Right rear view mirror
4. Right front light
5. Attachment holding plate
5
6
7
6. Epicycloidal reduction gear
7. Wheel
8. Engine bonnet
9. Right rear light
10. Battery isolator switch
Left side of vehicle
1
9
7
10
8
3
5
1. Cab
2. Left rear light
3. Epicycloidal reduction gear
4. Fuel tank
5. Wheel
6. Cab steps
D/6
11
12
2
4
3
5
6
7. Attachment holding plate
8. Left front light
9. Telescopic boom
10. Left rear view mirror.
11. Hydrostatic oil filter
12. Hydraulic oil tank
- CAUTION: - Read the SAFETY REGULATIONS (in this manual) carefully for the safety of all personnel and the machine.
IDENTIFYING THE VEHICLE PARTS
Rear view
2
1
1. Battery
2. Air conditioned condenser
Side view
7
6
1
2
3
9
4
8
5
1. Engine air filter
2. Diesel Engine
3. Water/oil radiator
4. Intercooler Radiator
5. Battery isolator switch
6. Engine bonnet support rod
7. Engine bonnet
8. Engine control unit/Engine fuse
9. Cooling fan
- CAUTION: - Read the SAFETY REGULATIONS (in this manual) carefully for the safety of all personnel and the machine.
D/7
Mod. Agri Max - Agri Power - Agri Star
Maintenance and Registering
MAINTENANCE and REGISTRATION SCHEDULE
Maintenance operations to be carried out are listed on the left; the graph details the time period in hours and the approximate
position of the part to be serviced. The asterisk (*) indicates maintenance in the event of the vehicle’s use in special conditions.
*
Check engine oil level.
Air filter cleaning.
Check radiator water level.
Check that the radiator is not
clogged.
Check hydraulic oil level
After
10 hours
Check for leaks on hydraulic circuit tubes
Boom joint pin lubrication.
Lubrication of feet pins and swivelling jack head.
Lubrication of feet pins and lifting
jack head.
Lubrication of feet pins and levelling jack head.
Lubrication of front and rear articulated pins (PIVOT).
Lubrication of rear axle oscillation
bushing (if present).
Lubrication of front axle oscillation
bushing (if present).
Lubrication of cross and Cardan
transmission shafts.
Lubrication of boom sliders.
Lubrication of internal boom tubes
Lubrication of boom rollers and
chains.
After
50 hours
D/8
- CAUTION: - Read the SAFETY REGULATIONS (in this manual) carefully for the safety of all personnel and the machine.
MAINTENANCE and REGISTRATION SCHEDULE
Maintenance operations to be carried out are listed on the left; the graph details the time period in hours and the approximate
position of the part to be serviced. The asterisk (*) indicates maintenance in the event of the vehicle’s use in special conditions.
Air filter cleaning.
Grease differential axle.
Check tyre pressure.
Check that all nuts and bolts are tight.
Check brake oil level.
Check boom chain extension
and conditions.
Check stickers.
Every
100hours
Replace engine oil.
Replace engine oil filter. Replace
air filter.
*
Check battery electrolyte level.
Check electric system.
Check alternator belt
Tighten wheel nuts.
Replace fuel filter.
Replace cab filter.
Tighten boom sliders.
Check chain tension.
Every
250hours
- CAUTION: - Read the SAFETY REGULATIONS (in this manual) carefully for the safety of all personnel and the machine.
D/9
Mod. Agri Max - Agri Power - Agri Star
Maintenance and Registering
MAINTENANCE and REGISTRATION SCHEDULE
Maintenance operations to be carried out are listed on the left; the graph details the time period in hours and the approximate
position of the part to be serviced. The asterisk (*) indicates maintenance in the event of the vehicle’s use in special conditions.
Every
500 hours
Empty fuel tank.
Cleaning fuel tank filters
Clean fuel injection pump filter.
Check epicycloidal reduction gear
oil level.
Check differential sump oil level
Check gear oil level
Replace hydraulic system oil.
Replace external hydraulic oil filters
Cleaning of hydraulic oil tank filters.
Parking brake registration.
Replace engine air filter.
Every
1000 hours
Check boom chain
Replace cooling liquid.
Replace oil in differential sump.
Replace oil level in epicycloidal
reduction gears.
Replace gear oil
Replace brake oil.
D/10
- CAUTION: - Read the SAFETY REGULATIONS (in this manual) carefully for the safety of all personnel and the machine.
CAPACITY OF PARTS TO LUBRICATE
Agri max 45.8
UNIT DESCRIPTION
ENGINE OIL
FRONT WHEEL REDUCERS OIL
REAR WHEEL REDUCERS OIL
FRONT AXLE DIFFERENTIAL OIL
REAR AXLE DIFFERENTIAL OIL
GEAR BOX OIL
HYDRAULIC PLANT OIL
BRAKING CIRCUIT OIL
REFRIGERANT LIQUID
DIESEL FOR GREASE
TRACTION
Agri max 70.10
CAPACITY
10.00 lt
1.00 lt
1.00 lt
7.40 lt
7.60 lt
1.50 lt
170lt
1.2 lt
7.0 lt
105 lt
4 Kg
Agri Power 30.7
UNIT DESCRIPTION
ENGINE OIL
FRONT WHEEL REDUCERS OIL
REAR WHEEL REDUCERS OIL
FRONT AXLE DIFFERENTIAL OIL
REAR AXLE DIFFERENTIAL OIL
GEAR BOX OIL
HYDRAULIC PLANT OIL
BRAKING CIRCUIT OIL
REFRIGERANT LIQUID
DIESEL FOR GREASE
TRACTION
UNIT DESCRIPTION
ENGINE OIL
FRONT WHEEL REDUCERS OIL
REAR WHEEL REDUCERS OIL
FRONT AXLE DIFFERENTIAL OIL
REAR AXLE DIFFERENTIAL OIL
GEAR BOX OIL
HYDRAULIC PLANT OIL
BRAKING CIRCUIT OIL
REFRIGERANT LIQUID
DIESEL FOR GREASE
TRACTION
CAPACITY
10.00 lt
1.00 lt
1.00 lt
7.40 lt
7.60 lt
1.50 lt
170lt
1.2 lt
7.0 lt
105 lt
4 Kg
Agri Power 30.8
CAPACITY
10.00 lt
1.00 lt
1.00 lt
7.40 lt
7.60 lt
1.50 lt
170lt
1.2 lt
7.0 lt
105 lt
4 Kg
UNIT DESCRIPTION
ENGINE OIL
FRONT WHEEL REDUCERS OIL
REAR WHEEL REDUCERS OIL
FRONT AXLE DIFFERENTIAL OIL
REAR AXLE DIFFERENTIAL OIL
GEAR BOX OIL
HYDRAULIC PLANT OIL
BRAKING CIRCUIT OIL
REFRIGERANT LIQUID
DIESEL FOR GREASE
TRACTION
CAPACITY
10.00 lt
1.00 lt
1.00 lt
7.40 lt
7.60 lt
1.50 lt
170lt
1.2 lt
7.0 lt
105 lt
4 Kg
Agri Power 30.9
UNIT DESCRIPTION
ENGINE OIL
FRONT WHEEL REDUCERS OIL
REAR WHEEL REDUCERS OIL
FRONT AXLE DIFFERENTIAL OIL
REAR AXLE DIFFERENTIAL OIL
GEAR BOX OIL
HYDRAULIC PLANT OIL
BRAKING CIRCUIT OIL
REFRIGERANT LIQUID
DIESEL FOR GREASE
TRACTION
CAPACITY
10.00 lt
1.00 lt
1.00 lt
7.40 lt
7.60 lt
1.50 lt
170lt
1.2 lt
7.0 lt
105 lt
4 Kg
- CAUTION: - Read the SAFETY REGULATIONS (in this manual) carefully for the safety of all personnel and the machine.
D/11
Mod. Agri Max - Agri Power - Agri Star
Maintenance and Registering
CAPACITY OF PARTS TO LUBRICATE
AGRi star 37.7
UNIT DESCRIPTION
ENGINE OIL
FRONT WHEEL REDUCERS OIL
REAR WHEEL REDUCERS OIL
FRONT AXLE DIFFERENTIAL OIL
REAR AXLE DIFFERENTIAL OIL
GEAR BOX OIL
HYDRAULIC PLANT OIL
BRAKING CIRCUIT OIL
REFRIGERANT LIQUID
DIESEL FOR GREASE
TRACTION
AGRi star 37.8
CAPACITY
10.00 lt
1.00 lt
1.00 lt
7.40 lt
7.60 lt
1.50 lt
170lt
1.2 lt
7.0 lt
105 lt
4 Kg
AGRi star 38.10
UNIT DESCRIPTION
ENGINE OIL
FRONT WHEEL REDUCERS OIL
REAR WHEEL REDUCERS OIL
FRONT AXLE DIFFERENTIAL OIL
REAR AXLE DIFFERENTIAL OIL
GEAR BOX OIL
HYDRAULIC PLANT OIL
BRAKING CIRCUIT OIL
REFRIGERANT LIQUID
DIESEL FOR GREASE
TRACTION
D/12
UNIT DESCRIPTION
ENGINE OIL
FRONT WHEEL REDUCERS OIL
REAR WHEEL REDUCERS OIL
FRONT AXLE DIFFERENTIAL OIL
REAR AXLE DIFFERENTIAL OIL
GEAR BOX OIL
HYDRAULIC PLANT OIL
BRAKING CIRCUIT OIL
REFRIGERANT LIQUID
DIESEL FOR GREASE
TRACTION
CAPACITY
10.00 lt
1.00 lt
1.00 lt
7.40 lt
7.60 lt
1.50 lt
170lt
1.2 lt
7.0 lt
105 lt
4 Kg
AGRi star 35.10
CAPACITY
10.00 lt
1.00 lt
1.00 lt
7.40 lt
7.60 lt
1.50 lt
170lt
1.2 lt
7.0 lt
105 lt
4 Kg
UNIT DESCRIPTION
ENGINE OIL
FRONT WHEEL REDUCERS OIL
REAR WHEEL REDUCERS OIL
FRONT AXLE DIFFERENTIAL OIL
REAR AXLE DIFFERENTIAL OIL
GEAR BOX OIL
HYDRAULIC PLANT OIL
BRAKING CIRCUIT OIL
REFRIGERANT LIQUID
DIESEL FOR GREASE
TRACTION
CAPACITY
10.00 lt
1.00 lt
1.00 lt
7.40 lt
7.60 lt
1.50 lt
170lt
1.2 lt
7.0 lt
105 lt
4 Kg
- CAUTION: - Read the SAFETY REGULATIONS (in this manual) carefully for the safety of all personnel and the machine.
OIL COMPARISON TABLE
ENGINE OIL
HYDRAULIC OIL
AXLE OIL
BRAKES AND
INCHING OIL
RADIATOR
GREASE
AGIP
SIGMA TURBO
ARNICA/46
DEXRON 2 EXTRA PERMANENT
GR
MU/EP2
CHEVRON
DELO 450 15W40
EP HYDRAULIC 46
DEXRON 2
ANTIFREEZER
DURALITH
EP2
ESSO
ESSOLUBE XT 201
INVAROL EP46
SIGIL GREEN
BEACON
EP2
IP
TAURUS TURBO
15W40
HJDRUS
DEXRON FLUID 2
ANTIFREEZER
ATHESIA EP
GREASE2
MOBIL
DELVAC SUPER
1300
HJDRO NV46
ATF 220
ANTIFREEZER
MOBILUX 2
Q8
T700 SAE 15W40
HAENDEL 46
AUTO 14
ANTIFREEZER
SUPER
GREASE G2
SHELL
RIMULDA D
TELLUS T46
ATF DEXRON 2
ANTIFREEZER
SUPER
GREASE G2
ROLOIL
DOLOMITI SUPER
HD TURBO 15W40
LI/46
HIDROMATIC DEX ROL FLUID
LITEX
EP/2
TEXACO
URSA SUPER TD
RANDO HD Z 46
DEXRON 2
ANTIFREEZER
MULTIFAK
EP2
TOTAL
RUBIA XT
EQUIVIS ZS/46
DEXRON 2
ANTIFREEZER
MULTIS
EP2
TORQUE FLUID 62 ATF DEXRON 2
1 - MOBILFLUID 422
2 - MOBILFLUID 424
3 - MOBILUBE 85W/90 LS
4 - MOBILAND 20W/40
1 - DONAX TD
2 - LS 90
3 - SPIRAX HD
1 - DA
2 - JID
- ATTENTION -
- PROHIBITED -
FOR CONSUMPTION QUANTITIES OF THE
PRODUCTS SEE “CAPACITY OF PARTS TO
LUBRICATE IN CHAPTER “G” (VEHICLE TECHNICAL DATA AND TECHNICAL FEATURES)
DO NOT USE
SYNTHETIC-BASED OIL
Dieci DECLINES ALL LIABILITY IF OILS DIFFERENT TO THOSE RECOMMENDED ARE USED.
- CAUTION: - Read the SAFETY REGULATIONS (in this manual) carefully for the safety of all personnel and the machine.
D/13
Mod. Agri Max - Agri Power - Agri Star
Maintenance and Registering
BATTERY ISOLATOR SWITCH
(fig.1/D Pos.”1”)
The battery isolator switch is in the hole of the engine bonnet lateral sheet steel.
Its function is to cut off power to the electrical system, opening the circuit on the negative pole.
1
- Turn the handle, bringing it to a position in which its long
side is perpendicular to the ground in order to open the
circuit and cut out electrical power (fig.2/D Pos.”2”).
- Turn the handle moving it back to start position (fig.1/D
Pos.”1”) to reset starting conditions and close the circuit.
- ATTENTION the battery isolator switch must be used only with
the vehicle off.
(fig.1/D)
Routine work position - Closed circuit
- ATTENTION Use the battery isolator switch to open the electrical circuit each time the vehicle is serviced.
2
(fig.2/D)
D/14
Maintenance position - Open circuit
- CAUTION: - Read the SAFETY REGULATIONS (in this manual) carefully for the safety of all personnel and the machine.
OPENING THE ENGINE BONNET
(fig.4/D)
- prohibition:
it is PROHIBITED to open the engine bonnet with the diesel engine running. Before opening the bonnet, switch the engine off and remove the ignition key, hang up a sign in the cab
that reads “maintenance work under way”, disconnect the battery by acting on the “battery isolator switch” see page D/16.
1
To open the engine bonnet, pull the lever (fig.3/C Pos.”1”)
towards the front of the vehicle, until it clicks.
To re-insert the block, just close the engine bonnet with slight
pressure. Always check that it is closed correctly before
starting to operate or before moving away from the vehicle.
- prohibition:
it IS prohibited TO OPERATE with the engine bonnet open.
To insert the locking rod (fig. 4/D Pos.”2”):
(fig.3/D)
- Push the bonnet up by hand and support it.
- Grip the support rod with the other hand (fig.4/D Pos.”2”) situated on the engine bonnet lateral guard (fig.4/D Pos.”3”).
- Take the rod inside the opening lock (fig.4/D Pos.”1”).
- Leave the bonnet gradually to check that the rod is correctly inserted as does not become unhooked.
1
2
- ATTENTION:
Before leaving the bonnet, always check that the support
rod holds the bonnet open safely.
Be careful not to injure the hands.
To close the bonnet:
- Hold the bonnet up with one hand
- Put the rod in its seat (fig.4/D Pos.”3”) accompanying it
with the other hand.
- Accompany the bonnet down to lower.
- Apply a slight pressure on the bonnet at end run to insert
the closure lock.
- ATTENTION:
Once the lock is disengaged, take due care not to cause the
sudden fall of the bonnet, risk of crushing.
3
(fig.4/D)
- ATTENTION:
Do not underestimate the weight or overall dimensions of
the bonnet.
- PROHIBITED IT IS PROHIBITED
to operate with the bonnet open.
Once maintenance operations have been completed the
the bonnet must always be closed and locked.
- CAUTION: - Read the SAFETY REGULATIONS (in this manual) carefully for the safety of all personnel and the machine.
D/15
Mod. Agri Max - Agri Power - Agri Star
Maintenance and Registering
ENGINE
FOR ENGINE, FUEL FILTER MAINTENANCE ETC. CAREFULLY FOLLOW THE MANUFACTURER’S INSTRUCTIONS
PROVIDED IN THE SPECIALLY INCLUDED HANDBOOK.
THE ENGINE USE AND MAINTENANCE HANDBOOK IS
AN INTEGRAL PART OF THE DOCUMENTATION SUPPLIED WITH THE VEHICLE.
IT MUST ALWAYS BE KEPT IN THE CAB.
(fig.5/D)
D/16
- CAUTION: - Read the SAFETY REGULATIONS (in this manual) carefully for the safety of all personnel and the machine.
UNDERSIDE PROTECTION REMOVAL
To perform the maintenance interventions listed below, the
vehicle underside protection must be temporarily removed
from the vehicle.
- ATTENTION IT IS MANDATORY TO USE
INDIVIDUAL PROTECTION DEVICES (I.P.D.)
to perform maintenance/control operations.
A
(fig.6/D)
The underside protections protect the bottom of the vehicle
and the mechanics applied from any blows, collisions, dirt.
The vehicle has two underside protections:
- Chassis Front Underside Protection (fig.6/D Pos.”A”)
- Engine Underside Protection (fig.6/D Pos.”C”)
B
Remove the chassis front underside protection (fig.6/D Pos.”A”)
to perform the following maintenance:
- Lubrication of cross and Cardan transmission shafts
- Check gear oil level
- Replace gear oil
(fig.7/D)
Engine Underside Protection (fig.6/D Pos.”B”)
to perform the following maintenance:
- Replace Diesel engine oil
- Replace Diesel engine oil filter
- Replace Diesel engine fuel filter
- ATTENTION:
Remove the underside protection only after having:
-
Take the vehicle onto firm and level ground.
Retracted and lowered the boom
Position cylinders in transport mode.
S witched the engine off and removed the ignition key.
Positioned a plate in the cab indicating “maintenance in
progress”.
- Disconnect the battery by acting on the “battery isolator
switch” see page D/16.
- ATTENTION:
Remove the guards and underside protection with care, taking all of the precautions necessary in order to prevent damage and/or injury. Once maintenance operations have been
completed, remount the guards and underside protections.
- ATTENTION:
For the safety specifications, refer to chapter “B”, “Carrying out maintenance in safety ” paragraph page b/16
- CAUTION: - Read the SAFETY REGULATIONS (in this manual) carefully for the safety of all personnel and the machine.
D/17
Mod. Agri Max - Agri Power - Agri Star
Maintenance and Registering
PEDALS
Accelerator
(fig.10/D Pos.”1”)
The accelerator is a cable type accelerator, and as such it
does not require routine maintenance.
2
brakes
(fig.10/D Pos.”2”)
Hydraulic brakes do not require registration.
1
(fig.10/D)
Check the reservoir found in the front of the cab under the
guard (fig.11/D Pos.”1”) regularly. Oil must always be level;
or rather the reservoir must always be full.
The intermittent switch-on of the indicator light on the dashboard (fig.11/D Pos.”2”), indicates the low level in the
reservoir. On switch-on of the indicator light, immediately
interrupt the work operations and top up the reservoir, taking
the oil to the correct level.
2
1
Before re-starting the work operations, make sure that the
light on the dashboard is off and brake a few times at low
speed (2km/h) for a brief tract (10m) in order to check regular functioning.
(fig.11/D)
D/18
- CAUTION: - Read the SAFETY REGULATIONS (in this manual) carefully for the safety of all personnel and the machine.
- ATTENTION -
1
IT IS MANDATORY TO USE
INDIVIDUAL PROTECTION DEVICES (I.P.D.)
to perform maintenance/control operations.
2
To top up:
- Take the vehicle onto firm and level ground.
- Retract the boom completely and lower it.
- Position cylinders in transport mode.
- Switch the engine off and remove the ignition key.
- P osition a plate in the cab indicating “maintenance in
progress”.
- Disconnect the battery by acting on the “battery isolator
switch” see page D/16.
- Unscrew tank cap (fig.12/D Pos.”1”), turning it anti-clockwise.
- Check that oil is level. If it is not, fill the reservoir
(fig.12/D Pos.”2”).
- S crew on the tank cap, turning it clockwise. Do not
tighten it too much.
- Clean any spillage.
A slight lowering of the level is due to normal consumption
of brake pads.
If the brake pedal seems too ‘elastic’, contact your dieci dealer to have this fault corrected.
- ATTENTION:
(fig.12/D)
attention
Id indicator light “2” should switch on (fig.11/C)
the parking brake is blocked.
- PROHIBITED it is PROHIBITED
to operate when brake oil is not level.
The brakes could function
irregularly, creating a risk of accidents.
Do not press the brake pedal until top-up has been completed.
Check that the tank has been closed before acting on the pedal.
- ATTENTION:
Periodically check the condition of all brake pipes and tubes.
If the level is drastically reduced there is a system leak.
Contact your dieci dealer to replace all damaged, corroded
or worn tubes.
- ATTENTION:
Always use the recommended type of oil, as indicated in the
lubrication table.
This type of oil can ruin coated surfaces and plastic dashboard parts.
For the safety specifications, refer to chapter “B”,
“Carrying out maintenance in safety ” paragraph page b/16
“INCHING” pedal
(fig.13/D pos.”3”)
The pedal does not require any regulation because it is in
direct contact with the inching valve.
3
(fig.13/D)
- CAUTION: - Read the SAFETY REGULATIONS (in this manual) carefully for the safety of all personnel and the machine.
D/19
Mod. Agri Max - Agri Power - Agri Star
Maintenance and Registering
PARKING BRAKE
(fig.15/D pos.”1”)
The electrically controlled parking brake does not need routine maintenance.
- ATTENTION:
In the event the parking brake fails do not use the vehicle.
If the brake is not efficient, inform the dieci Dealer in order
to eliminate the defect.
Unauthorised modifications of the rear axle ratio, the vehicle
weight, or wheel and tyre dimensions may compromise proper functioning of the parking brake.
1
(fig.15/D)
- ATTENTION If the indicator light “2” switches on (fig.16/C)
the parking brake is blocked.
Do not advance with the vehicle.
consult the “brakes“ paragraph (page D/20)
in this manual to top-up the brakes oil.
2
If the indicator light should remain
on, contact a dieci after-sales centre.
(fig.16/C)
D/20
- CAUTION: - Read the SAFETY REGULATIONS (in this manual) carefully for the safety of all personnel and the machine.
HYDRAULIC OIL LEVEL
(fig.17/D Pos.”2”)
The hydraulic oil tank is located under the driver cab
(fig.17/D Pos.”1”). The level can be checked through the
transparent cap (fig.17/D Pos.”2”) positioned on the side of
the tank itself, near to the steps.
The level is correct when the oil can be seen through the
transparent cap (fig.17/D Pos.”2”) with all vehicle cylinders
in transport position.
To correctly check the level:
- Park the vehicle on a level and compact surface.
- Retract the boom completely and lower it.
- Position cylinders in transport mode.
- Switch off the engine.
- Check the oil level using the transparent indicator.
1
(fig.17/D)
2
- ATTENTION IT IS MANDATORY TO USE
INDIVIDUAL PROTECTION DEVICES (I.P.D.)
to perform maintenance/control operations.
If the oil is not level, carry out the following operations:
- Park the vehicle on a level and compact surface.
- Retract the boom completely and lower it.
- Position cylinders in transport mode.
- Switch off the engine and remove the ignition key, hang up
a sign in the cab that reads “maintenance work under way”.
- Disconnect the battery by acting on the “battery isolator
switch” see page D/16.
- Remove the rubber mat inside the driver cab (fig.18/D
Pos.”1”).
- Remove the lower guard located under the rubber mat
(fig.18/D Pos.”2”)
- Remove the rubber caps from the slots in the lower floor
(fig.19/D Pos.”1”).
- Remove both tank filling caps (fig.19/D Pos.”2”).
- Pour the oil recommended by dieci from one of the two
filling holes (fig.19/D Pos.”2”).
Top up the quantity necessary to bring it back to level.
- On completion of the top-up operation, tighten the topup caps and re-position as in initial condition.
Routine maintenance should be carried out at the prescribed intervals.
1
(fig.18/D)
2
1
- ATTENTION:
1
For the safety specifications, refer to chapter “B”, “Carrying out maintenance in safety ” paragraph page b/16
- ATTENTION:
(fig.19/D)
When topping up, do not exceed level and immediately clean any spillage.
- CAUTION: - Read the SAFETY REGULATIONS (in this manual) carefully for the safety of all personnel and the machine.
2
D/21
Mod. Agri Max - Agri Power - Agri Star
Maintenance and Registering
CHANGINGHYDRAULICOILANDREPLACINGFILTERS
Inside the tank there are two mesh filters are present inside
the tank. These prevent any hazardous particles from entering the hydraulic system.
The replacement of hydraulic oil and internal tank filters
must always be carried out in order. It is not possible to
service only one of the two components.
- ATTENTION IT IS MANDATORY TO USE
INDIVIDUAL PROTECTION DEVICES (I.P.D.)
to perform maintenance/control operations.
1
(fig.21/D)
3
2
For correct oil change:
-
Park the vehicle on a level and compact surface.
Retract the boom completely and lower it.
Position cylinders in transport mode.
Switch off the engine and remove the ignition key, hang up
a sign in the cab that reads “maintenance work under way”.
Disconnect the battery by acting on the “battery isolator
switch” see page D/16.
Place a suitable capacity container under the drain plug
(fig.21/D Pos.”3”) positioned under the oil tank.
Remove the rubber mat inside the driver cab (fig.22/D
Pos.”1”).
Remove the lower guard located under the rubber mat
(fig.22/D Pos.”2”)
Remove the rubber caps from the slots in the lower cab
(fig.23/D Pos.”1”).
Unscrew the drain plug (fig.22/D Pos.”3”) to allow the oil
to flow out.
Remove the filling cap (fig.23/D Pos.”2”) to accelerate
emptying.
On completion, replace the filters inside the tank.
Reinsert the drain plug (fig.21/D Pos.”3”).
Fill up the tank to level via its filler cap (fig.23/D Pos.”2”).
Once the tank has been filled, tighten the filler cap .
Start up the vehicle and move hydraulic cylinders to discharge any air bubbles.
Check the hydraulic oil level again and top up if necessary.
On completion of the replacement and top-up operations, tighten the tip-up caps and re-position everything
as in the initial condition.
1
(fig.22/D)
2
1
- ATTENTION:
(fig.23/D)
- ATTENTION:
To change the oil and replace the filters, contact a dieci
after-sales centre.
D/22
2
1
For the safety specifications, refer to chapter “B”, “Carrying out maintenance in safety ” paragraph page b/16
ATTENTION
Waste oil is potentially harmful
to the environment
and must be disposed of appropriately.
- CAUTION: - Read the SAFETY REGULATIONS (in this manual) carefully for the safety of all personnel and the machine.
HYDRAULIC FILTER
(fig.24/D pos.”1”)
- ATTENTION IT IS MANDATORY TO USE
INDIVIDUAL PROTECTION DEVICES (I.P.D.)
to perform maintenance/control operations.
1
Operate as follows to correctly replace:
1. Park the vehicle on a level and compact surface.
2. Retract the boom completely and lower it.
3. Switch off the engine and remove the ignition key, hang up
a sign in the cab that reads “maintenance work under way”.
4. Disconnect the battery by acting on the “battery isolator
switch” see page D/16.
(fig.24/D)
5. Place a container under the filter to collect any oil that
may come out during replacement.
6 Remove the protective guard (fig.25/D Pos”1”).
7. Remove the filter cartridge, unscrewing it using a ribbon
spanner (fig.26/D).
8. Clean the filter support with a clean cloth which will not
leave felt, making sure the old sealing ring is removed.
9. Take the new dieci-approved filter. Lubricate with the
same oil as used on the oil seal gasket.
10. Screw in the filter using only your hands, taking care to
set the lubricated oil gasket in its proper position.
1
11. Switch on the vehicle and make sure there are no leaks.
- ATTENTION:
On conclusion of the operations, re-mount the protection
guard (fig.25/D pos.”1”).
- ATTENTION:
Waste oil is potentially harmful for the environment and
must be disposed of appropriately.
(fig.25/D)
- ATTENTION:
To replace the filterscontact a dieci after-sales centre.
- ATTENTION:
For the safety specifications, refer to chapter “b”, “Carrying out maintenance in safety ” paragraph page b/16.
(fig.26/D)
- CAUTION: - Read the SAFETY REGULATIONS (in this manual) carefully for the safety of all personnel and the machine.
D/23
Mod. Agri Max - Agri Power - Agri Star
Maintenance and Registering
FUEL TANK
(fig.29/D Pos.”1”)
cleaning
- ATTENTION IT IS MANDATORY TO USE
INDIVIDUAL PROTECTION DEVICES (I.P.D.)
to perform maintenance/control operations.
1
2
For correct cleaning:
1. Park the vehicle on a level and compact surface.
2. Switch off the engine and remove the ignition key, hang up
a sign in the cab that reads “maintenance work under way”.
(fig.29/D)
3. Disconnect the battery by acting on the “battery isolator
switch” see page D/16.
4. Place a container of suitable capacity under the drain
plugs (fig.29/D Pos.”3”) to collect fuel that may leak out
during cleaning.
5. Unscrew the tank’s filler cap (fig.29/D Pos.”2”).
6. Unscrew the tank’s drain cap, situated under the cap
(fig.29/D Pos.”3”)
7. Let fuel drain, then top up ten litres of clean fuel through
the top up opening to eliminate any residual impurities.
3
8. Re-insert the drain cap and tighten it securely.
9. Top up the tank with clean fuel and replace cap.
- ATTENTION:
For the safety specifications, refer to chapter “b”, “Carrying out maintenance in safety ” paragraph page b/16.
- ATTENTION Fuel is highly inflammable.
Do not smoke or approach
with an open flame during these operations.
risk of fire or explosion.
- ATTENTION Waste fuel is potentially harmful
for the environment and must be disposed
of appropriately.
- ATTENTION to clean and drain the diesel tank, contact a dieci
after-sales centre.
D/24
- CAUTION: - Read the SAFETY REGULATIONS (in this manual) carefully for the safety of all personnel and the machine.
WATER RADIATOR/OIL/INTERCOOLER
- ATTENTION THESE OPERATIONS MUST BE CARRIED OUT WHEN
THE ENGINE IS OFF AND COLD.
For specifications regarding safety
refer to chapter “b”, paragraph
“Carrying out maintenance in safety ” page b/16.
Radiator grill cleaning
A
- ATTENTION IT IS MANDATORY TO USE
INDIVIDUAL PROTECTION DEVICES (I.P.D.)
to perform maintenance/control operations.
B
(fig.36/D)
Radiator grills (fig.37/D Pos.”1”,”2”,”3”) and air recirculation
networks (fig.36/D Pos.”A-B”) must be kept as clean as
possible to allow for maximum heat exchange between the
radiator and the circulating air. To remove impurities, use a
low pressure air jet directing it from the inside towards the
outside. Then pass the jet of air on the inner parts covered
with dirt. If dirt is particularly compact, soften it with a low
pressure water jet before using the air. Remove guards “1”
and “2” (fig.41/D) to ease removal of the dirt from the radiators and engine bonnet, preventing it accumulating in the
bottom. Position a container under the guard and under the
engine underside protection in order to collect the dirt and
prevent it being dispersed on the ground.
1
2
- ATTENTION:
Consult the engine operation and maintenance handbook
before using jets of air or water.
(fig.37/D)
- ATTENTION:
3
Heat exchange flaps are very delicate. Do not use rags or
brushes to clean them. Jets of water and air must be directed perpendicularly to the surface of the radiator.
- CAUTION: - Read the SAFETY REGULATIONS (in this manual) carefully for the safety of all personnel and the machine.
D/25
Mod. Agri Max - Agri Power - Agri Star
Maintenance and Registering
cooling liquid level check
During normal vehicle use, the water level should be at 3 cm
under the radiator cap (fig.38/D Pos.”1”).
1
- ATTENTION IT IS MANDATORY TO USE
INDIVIDUAL PROTECTION DEVICES (I.P.D.)
to perform maintenance/control operations.
(fig.38/D)
Verification of the correct level of cooling liquid must be carried out as follows:
1. Park the vehicle on a level and compact surface.
2. Switch off the engine and remove the ignition key, hang up
a sign in the cab that reads “maintenance work under way”.
3. Disconnect the battery by acting on the “battery isolator
switch” see page D/16.
4. Wait for the engine to cool.
5. Slowly turn the radiator ca (fig.38/D Pos.”1”) anti-clockwise until reaching the safety pin.
6. Discharge residual steam.
7. Remove the cap.
8. Check the coolant level. If necessary, top up using a mixture of water and antifreeze.
9. To reinsert the cap follow these steps in the opposite order.
- ATTENTION:
If frequent top ups are necessary in normal working conditions, verify that there are no cooling system leaks. Contact
a dieci after-sales centre if problems arise.
- ATTENTION Always use demineralised water to fill the cooling system. Hard water causes deposits and premature aging
of the system.
D/26
- CAUTION: - Read the SAFETY REGULATIONS (in this manual) carefully for the safety of all personnel and the machine.
Replacing cooling liquid
- ATTENTION -
1
IT IS MANDATORY TO USE
INDIVIDUAL PROTECTION DEVICES (I.P.D.)
to perform maintenance/control operations.
For correct replacement of cooling liquid:
1. Park the vehicle on a level and compact surface.
2. Switch off the engine and remove the ignition key, hang up
a sign in the cab that reads “maintenance work under way”.
3. Disconnect the battery by acting on the “battery isolator
switch” see page D/16.
4. Wait for the engine to cool.
5. Place a container under the radiator to collect any cooling liquid which may come out during replacement.
6. Remove the cleaning/inspection guards (fig.41/D,
pos.”1-2”) in order to ease draining of the liquid and access the sleeves.
7. Remove the sleeve (fig.42/D, pos.”1”) to allow water to
flow away from the radiator
8. Remove the filling plug (fig.40/D, pos.”1”) to accelerate
emptying.
9. Allow the cooling circuit to drain completely.
10. Check the conditions of the sleeves and their fastenings.
Replace them if necessary.
11. Rinse the radiator with clean water, pouring it in the top
up cap (fig.40/D Pos.”1”), making it drain through the sleeve inlet (fig.42/D Pos.”1”). If necessary, add a detergent
product to the clean water.
12.When cleaning has been completed, close the drain orifice, re-inserting the sleeve (fig.42/D Pos.”1”).
13.Fill up the cooling system from the cap (fig.40/D Pos.”1”)
up to level (3 cm below the radiator cap) with the previously prepared cooling liquid.
14.Close the cap (fig.40/D Pos.”1”) and switch the engine
on allowing it to tick over for a few minutes.
15.Make sure that there are no leaks, check the level and, if
necessary, add more liquid.
(fig.40/D)
1
2
(fig.41/D)
- ATTENTION:
Waste coolant is potentially harmful to the environment and
must be disposed of appropriately.
- ATTENTION Always use demineralised water to fill the cooling system. Hard
water causes deposits and premature aging of the system.
The radiator must always be filled with a distilled water and
anti-freeze solution in order to prevent corrosions and freezing of the water in the system.
(fig.42/D)
THE MIXTURE PERCENTAGES
CAN BE FOUND ON ANTIFREEZE CONTAINERS.
- ATTENTION to change the refrigerant liquid
contact a dieci after-sales centre.
- CAUTION: - Read the SAFETY REGULATIONS (in this manual) carefully for the safety of all personnel and the machine.
1
D/27
Mod. Agri Max - Agri Power - Agri Star
Maintenance and Registering
ENGINE AIR FILTER
(fig.44/D Pos.1)
1
Indications/Control/Replacement
- ATTENTION THESE OPERATIONS MUST BE CARRIED OUT WHEN
THE ENGINE IS OFF AND COLD.
For the safety specifications, refer to chapter “B”, “Carrying out maintenance in safety ” paragraph page b/16
An air filter in poor conditions can cause a reduction in power, excessive fuel consumption and shorten engine life.
Filter clogging is signalled by an optical indicator (fig.44/D
Pos.”2”).
When the indicator is blocked in the red position, maintenance or replacement must be performed because it is clogged.
After the due interventions have been performed, press the
head of the same to take it into the rest position. On indication of the clogging signal, it is possible to operate for no
longer than one hour.
The filter is cleaned using compressed air, maximum 3 Bar
at a distance not shorter than 150mm paying great attention
not to damage the filtering element.
Use a wet cloth which will not leave residue to clean the box
and sheet steel cover.
During assembly of the filter, the valve (fig.44/D Pos.”3”)
must always be positioned in the lowest part possible with
respect to the filter. If this is not the case, the expulsion functionality is compromised, reducing the lifespan of the filter.
3
(fig.44/D)
2
- PROHIBITED IT IS PROHIBITED
to operate without engine air filter.
The engine suctions in air continuously during use.
Dust that enters into circulation can cause serious
system damage.
- ATTENTION:
Periodically check the state of the dust discharge valve and
replace it if deteriorated.
- ATTENTION:
Clean filters only when the indicator light signals clogging or
at scheduled maintenance intervals. Unnecessary, frequent
cleaning exposes components to handling damage which
can allow dust and dirt to pass into the filtering phases, causing damage to the engine.
- ATTENTION:
If the filtering elements come into contact with liquids of any
type, they must be replaced.
Regularly check the suction sleeves and replace them immediately if worn or damaged. Regularly check that bolts and
clamps are properly tightened. No air should be allowed to
enter the engine without having first passed through the filter.
D/28
- CAUTION: - Read the SAFETY REGULATIONS (in this manual) carefully for the safety of all personnel and the machine.
Replace engine air filter.
- ATTENTION IT IS MANDATORY TO USE
INDIVIDUAL PROTECTION DEVICES (I.P.D.)
to perform maintenance/control operations.
2
1
(fig.45/D)
1. Turn knob “1” (Fig.45/D) anti-clockwise and remove the
lid “2” (Fig.45/D).
2. Export the knob “3” (Fig.46/D) by screwing it anticlockwise in order to extract the pre-filter ”4” (Fig.47/D).
3. Extract the prefilter “4” (Fig.47/D).
4. Remove the filter “7” (Fig.49/D) from the body by loosening
the bolt ”5” (Fig.48/D) with a wrench as in figure, paying attention not to loose or damage the washer “6” (Fig.48/D).
5. Clean and replace the filters and re-mount everything
carrying out the same operations in the opposite order,
taking care not to tighten the bolts and knobs excessively.
3
(fig.46/D)
- ATTENTION:
Do not operate with an improperly assembled or damaged filter.
4
- ATTENTION:
For the complete efficiency of the filter, it is advised to operate with the filter complete with all parts and components.
All worn parts should be replaced as quickly as possible.
(fig.47/D)
- ATTENTION:
6
These operations must be carried out by competent, trained
personnel.
5
- ATTENTION:
To reduce the maintenance of the engine air filter, contact a dieci after-sales centre.
Replacing the engine air filter sealing ring
(fig.50/D Pos.1)
(fig.48/D)
A sealing ring is present in the lid in order to prevent draughts of air. Due to atmospheric agents, the rubber of which
it is composed, tends to deteriorate, meaning it must be
replaced when cracks appear. Use a small flat screwdriver
to remove it. To insert the new gasket, rest this in its seat
and insert it exerting slight pressure. The sealing ring will be
taken exactly into its seat, remounting the lid.
- ATTENTION:
7
(fig.49/D)
Do not use screwdrivers or other pointed tools that can damage the sealing ring during insertion.
- PROHIBITED It is PROHIBITED to use the vehicle
with engine air filter without sealing ring.
1
(fig.50/D)
- CAUTION: - Read the SAFETY REGULATIONS (in this manual) carefully for the safety of all personnel and the machine.
D/29
Mod. Agri Max - Agri Power - Agri Star
Maintenance and Registering
CAB VENTILATION FILTER
(fig.56/D Pos.”1”)
Routine maintenance should be carried out at the prescribed
intervals.
On changing the cab ventilation filter, clean the intake pipe (fig.56/D
Pos.”2”) using a jet of air from the inside of the cab to the outside.
The cab filter should be replaced every 250 working hours.
Clean the air intake grill (fig.57/D Pos.”1”) at the end of every working day using a jet of air.
1
- ATTENTION IT IS MANDATORY TO USE
INDIVIDUAL PROTECTION DEVICES (I.P.D.)
to perform maintenance/control operations.
(fig.55/D)
Below find the correct sequence of replacement operations:
1
1. Park the vehicle on a level surface.
2. Completely retract and lower the boom.
3. Switch the engine off and remove the ignition key.
Position a plate in the cab indicating “maintenance in
progress”.
4. Remove the guard, in the left of the seat (fig.55/D
Pos.”1”), by unscrewing the fastening screws.
5. Remove the worn filter and insert the new one (fig.56/D
Pos.”1”).
6. Reassemble the guard.
7. Restart the engine with the fan moving to verify that the
operation is correct.
- ATTENTION:
2
(fig.56/D)
Do not clean the clogged filter with air or water and re-use.
At the end of its life, the filter loses determined features
which cannot be restored.
- important:
In the event of vehicle use in particularly dust rich environments (haylofts, etc.); the filter life is reduced by 100 hours.
If the ventilation system malfunctions check for filter clogging.
1
In the event that malfunctions persist even after filter replacement, contact a dieci service centre.
- ATTENTION:
Do not use the vehicle without a cab filter. Dust that
enters the cab can cause health risks for the operator and
ventilation system malfunction.
- ATTENTION:
For replacement of the engine air filter, contact a dieci
after-sales centre.
(fig.57/D)
D/30
- CAUTION: - Read the SAFETY REGULATIONS (in this manual) carefully for the safety of all personnel and the machine.
AIR CONDITIONING (OPTIONAL)
1
C
Cleaning the system
- ATTENTION IT IS MANDATORY TO USE
INDIVIDUAL PROTECTION DEVICES (I.P.D.)
to perform maintenance/control operations.
1. Park the vehicle on a level and compact surface.
2. Switch off the engine and remove the ignition key, hang up
a sign in the cab that reads “maintenance work under way”.
3. Disconnect the battery by acting on the “battery isolator
switch” see page D/16.
4. Wait for the engine to cool.
5 Remove the protective guard (fig.58/D Pos”1”).
6. Clean the condenser (fig.59/D Pos”1”), directing the
compressed air, at a maximum pressure of 7 bar, through the radiant mass, from the side opposite the normal
air flow. Jets of air must be directed perpendicularly to
the surface of the radiator.
7. Be careful not to damage radiator flaps.
8. After cleaning, replace the condenser.
(fig.58/D)
2
C
1
For the safety specifications, refer to chapter “b”, “Carrying out maintenance in safety ” paragraph page b/16.
- ATTENTION:
(fig.59/D)
Should the conditioning system not work properly, immediately inspect the condenser.
check the gas load every year using the relevant cocks
(fig.60/D Pos”2”).
- ATTENTION:
Replace the radiator filter (fig.59/D Pos”2”) every 2 years.
Its breakage could cause serious damage to the conditioning system and cause the introduction of particles into the
air that are harmful to the operator’s health. Turn on the air
conditioning for two minutes every 15 days, even during the
winter. In this way, the moveable parts like the compressor
and the system in general can be lubricated. DO NOT loosen any air conditioning system tubes. Contact between the
skin and coolant can cause freezing.
2
1
- ATTENTION:
for the maintenance of the air conditioning system, contact a dieci after-sales centre.
Compressor belt tension
1. Park the vehicle on a level and compact surface.
2. Switch off the engine and remove the ignition key, hang up
a sign in the cab that reads “maintenance work under way”.
3. Disconnect the battery by acting on the “battery isolator
switch” see page page D/16.
4. Wait for the engine to cool.
5. Check the tension of the compressor belt (fig.60 Pos.”1”)
every 500 hours.
(fig.60/D)
ATTENTION
Compressor belt tension
must be checked in a dieci after-sales centre.
- CAUTION: - Read the SAFETY REGULATIONS (in this manual) carefully for the safety of all personnel and the machine.
D/31
Mod. Agri Max - Agri Power - Agri Star
Maintenance and Registering
CYLINDER BLOCK VALVES
Cylinder block valves hinder uncontrolled movement of the
cylinder pistons in case of lacking hydraulic or bursting pressure of a flexible pipe.
The valves are directly mounted on the cylinders.
Verifying proper operation of cylinder non return valves
- ATTENTION:
Do not allow anybody near the vehicle while these checks
are being carried out.
- ATTENTION:
One movement at a time should be checked during verifications.
- ATTENTION:
In the event of malfunction, do not use the vehicle until
it has been repaired.
Contact a dieci after-sales centre.
A) Boom raising cylinders: (fig.64/D)
1. Start up the engine. Make sure that the parking brake is
engaged and the transmission in neutral.
2. Lift the boom to a 45° angle.
3. When the engine is running at 1400 RPMs, engage the
control lever to lower the boom. During boom movement
stop the engine. The boom must slow down and stop as
the engine slows down and stops.
If the boom continues to move even after the motor stops,
the boom raising cylinders are faulty. Repair the defect as
quickly as possible, contact a dieci service centre.
(fig.64/D)
(Boom lifting cylinder block valve)
D/32
- CAUTION: - Read the SAFETY REGULATIONS (in this manual) carefully for the safety of all personnel and the machine.
b) boom extension cylinder: (fig.65/D)
1. Start up the engine. Make sure that the parking brake is
engaged and the transmission in neutral.
2. Raise the boom and extend it completely.
3. When the engine is running at 1400 RPMs, engage the
control lever to retract the boom. During boom movement stop the engine. The boom must slow down and
stop as the engine slows down and stops.
If the boom continues to move even after the engine is
switched off, the block valve is faulty. Repair the defect as
quickly as possible, contact a dieci service centre.
(fig.65/D)
(Boom internal extension cylinder block valve)
c) Fork swivel cylinder: (fig.66/D)
1. Start up the engine; pick up a load using the forks
(example a load bricks or some hay bales). Tilt the forks
completely backwards.
2. Engage the parking brake and put the transmission in
neutral.
3. Lift the boom off the ground just enough necessary to
allow the forward inclination of the forks.
4. When the engine is running at 1400 RPMs, engage the
control lever to tilt the forks forward. During the fork movement stop the engine. Movement of the swivel must slow
down and then stop as the engine slows down and stops.
If the forks continue to lower or move after the engine is
switched off, the block valve is faulty.
Repair the defect as quickly as possible, contact a dieci
service centre.
(fig.66/D)
(Boom internal extension cylinder block valve)
- CAUTION: - Read the SAFETY REGULATIONS (in this manual) carefully for the safety of all personnel and the machine.
D/33
Mod. Agri Max - Agri Power - Agri Star
Maintenance and Registering
D) levelling cylinders: (fig.67/D)
1. Position the vehicle on a perfectly horizontal surface.
2. Make sure that the parking brake is engaged and the
transmission in neutral.
3. Lift the boom to about 15 cm from the ground and level
the vehicle in a way that the frame is perfectly parallel to
the surface (check the spirit level on the right dashboard).
4. Check that, without intervening on the levelling control,
the vehicle keeps this position also after prolonged use.
In the event of offset of the cylinder rod, without operator
intervention, the lock valve is faulty. Repair the defect as
quickly as possible, contact a dieci service centre.
- ATTENTION:
Do not level the vehicle with boom lifted and extended.
(fig.67/D)
(Levelling cylinder lock valve)
D/34
- CAUTION: - Read the SAFETY REGULATIONS (in this manual) carefully for the safety of all personnel and the machine.
- CAUTION: - Read the SAFETY REGULATIONS (in this manual) carefully for the safety of all personnel and the machine.
D/35
Mod. Agri Max - Agri Power - Agri Star
Maintenance and Registering
REDUCER
Changing the oil
(fig.71/D)
- ATTENTION IT IS MANDATORY TO USE
INDIVIDUAL PROTECTION DEVICES (I.P.D.)
to perform maintenance/control operations.
F
G
1. Stop the vehicle on a flat, level surface with differential
oil still hot.
2. Switch off the engine and remove the ignition key, hang up
a sign in the cab that reads “maintenance work under way”.
3. Disconnect the battery by acting on the “battery isolator
switch” see page D/16.
(fig.71/D)
4. Place a container under the drain plugs to collect any oil
which may come out during replacement.
5. Remove the drain plug (fig.71/D Pos.”G”) and the load/level plug (fig.71/D Pos.”F”) to carry out a complete drainage.
6. Allow the oil to completely drain out.
7. Replace the drain plugs and tighten them securely.
8. Pour an approved type of clean oil into the loading/level
plug (fig.71/D Pos.”F”).
9. The level is correct when oil comes out from the loading/
level plug (fig.71/D Pos.”F”).
10. Check for any leaks coming from the drain plugs.
11. Replace the load/level cap and tighten it securely.
- ATTENTION:
The underside protection must be removed for this operation.
Consult the “Underside removal” paragraph.
For the safety specifications, refer to chapter “b”, “Carrying out maintenance in safety ” paragraph page b/16.
- ATTENTION:
to change the oil, contact a dieci after-sales centre.
D/36
- CAUTION: - Read the SAFETY REGULATIONS (in this manual) carefully for the safety of all personnel and the machine.
key
REDUCER
E
Oil level cap
F
Drain plug and oil level
G
Drain cap
H
Vent cap
M
Oil cap
H
F
G
H
(fig.72/D)
- CAUTION: - Read the SAFETY REGULATIONS (in this manual) carefully for the safety of all personnel and the machine.
D/37
Mod. Agri Max - Agri Power - Agri Star
Maintenance and Registering
FRONT/REAR DIFFERENTIAL AXLES
Changing the oil
(fig.75/D)
- ATTENTION IT IS MANDATORY TO USE
INDIVIDUAL PROTECTION DEVICES (I.P.D.)
to perform maintenance/control operations.
1. Stop the vehicle on a flat, level surface with differential
oil still hot.
2. Switch off the engine and remove the ignition key, hang up
a sign in the cab that reads “maintenance work under way”.
3. Disconnect the battery by acting on the “battery isolator
switch” see page D/16.
(fig.75/D)
4. Place a container under the drain plugs to collect any oil
which may come out during replacement.
5. Remove the drain plug (fig.76/D Pos.”G”) and the load/level plug (fig.76/D Pos.”F”) to carry out a complete drainage.
6. Allow the oil to completely drain out.
7. Replace the drain plugs and tighten them securely.
8. Pour an approved type of clean oil into the loading/level
plug (fig.76/D Pos.”F”).
9. The level is correct when oil comes out from the loading/
level plug (fig.76/D Pos.”F”).
10. Check for any leaks coming from the drain plugs.
11. Replace the load/level cap and tighten it securely.
For the safety specifications, refer to chapter “b”, “ Carrying out maintenance in safety ” paragraph page b/16.
- ATTENTION:
to change the oil, contact a dieci after-sales centre.
D/38
- CAUTION: - Read the SAFETY REGULATIONS (in this manual) carefully for the safety of all personnel and the machine.
key
DIFFERENTIAL AXLE
E
Oil level cap
F
Drain plug and oil level
G
Drain cap
H
Vent cap
M
Oil cap
H
H
M
F
E
G
(fig.76/D)
- CAUTION: - Read the SAFETY REGULATIONS (in this manual) carefully for the safety of all personnel and the machine.
D/39
Mod. Agri Max - Agri Power - Agri Star
Maintenance and Registering
EPICYCICLIC REDUCTION GEAR
Changing the oil
(fig.81/D - fig.82/D - fig.83/D)
1
- ATTENTION IT IS MANDATORY TO USE
INDIVIDUAL PROTECTION DEVICES (I.P.D.)
to perform maintenance/control operations.
1. Stop the vehicle on a flat, level surface with differential
oil still hot.
2. Switch off the engine and remove the ignition key, hang up
a sign in the cab that reads “maintenance work under way”.
3. Disconnect the battery by acting on the “battery isolator
switch” see page D/16.
(fig.81/D)
4. Place a container under the drain plugs to collect any oil
which may come out during replacement.
5. Turn the wheel hub (fig.81/D Pos.”1”) so that the inlet (fig.82/D Pos.”M”) is moved to the lower position
(fig.82/D) and then remove the oil cap.
6. Allow the oil to completely drain out.
M
M
7. Turn the wheel hub so that the inlet (fig.83/D Pos.”M”) is
moved to the middle position (fig.83/D).
8. Fill the reduction gear to level via the inlet (fig.83/D).
9. The level is correct when oil comes out from the oil cap.
10.Replace the epicycloidal reduction gear cap and tighten
it securely.
(fig.82/D)
(fig.83/D)
11.Repeat all the operations for each of the four reducer units.
For the safety specifications, refer to chapter “b”, “Carrying out maintenance in safety ” paragraph page b/16.
- ATTENTION:
to change the oil, contact a dieci after-sales centre.
D/40
- CAUTION: - Read the SAFETY REGULATIONS (in this manual) carefully for the safety of all personnel and the machine.
key
DIFFERENTIAL AXLE
H
E
Oil level cap
F
Drain plug and oil level
G
Drain cap
H
Vent cap
M
Oil cap
H
M
(fig.84/D)
- CAUTION: - Read the SAFETY REGULATIONS (in this manual) carefully for the safety of all personnel and the machine.
D/41
Mod. Agri Max - Agri Power - Agri Star
Maintenance and Registering
BOOM SLIDING BLOCKS
Lubricating
(fig.88/D)
- ATTENTION IT IS MANDATORY TO USE
INDIVIDUAL PROTECTION DEVICES (I.P.D.)
to perform maintenance/control operations.
- ATTENTION During the visual check phase and spreading the grease, the vehicle must be off and the key removed from
the cab to prevent accidental manoeuvres.
For specifications regarding safety
refer to chapter “b”, paragraph
“Carrying out maintenance in safety” page b/16.
Boom sliding blocks must be kept lubricated to prevent deterioration as much as possible and keep movements smooth.
Extend the boom completely and examine its surface.
In the event that the layer of grease is thin or presents impurities (sand, dust, shavings, etc.) proceed as follows:
- Stop the vehicle on a flat, level surface.
- Extend the boom completely in a horizontal position.
- Switch off the engine and remove the ignition key, hang up
a sign in the cab that reads “maintenance work under way”.
- Disconnect the battery by acting on the “battery isolator
switch” see page D/16.
- With the boom completely extended horizontally, remove the
layer of grease from the extension surfaces using a cloth.
- U se a brush to spread a layer of an approved type of
grease on all sides of the telescopic boom.
- M ove the boom several times to distribute the grease
evenly.
- Remove any excess grease.
- ATTENTION:
Should the vehicle be used in particularly severe conditions
or very dusty environments lubricate more frequently.
- ATTENTION:
Only use lubricants indicated in dieci tables. Different lubricants may cause serious damage to sliding surfaces.
Sliding block wear
Consult the Summary Table at the start of the chapter for
servicing intervals. Sliding block wear can cause oscillations
and play between extensions causing a loss of accuracy in
movements and the risk of load loss.
The more difficult the working conditions, the greater the
wear and tear on the vehicle. Telescopic boom sliding block
maintenance must be carried out by an authorised workshop.
(fig.88/D)
D/42
- CAUTION: - Read the SAFETY REGULATIONS (in this manual) carefully for the safety of all personnel and the machine.
OUTER BOOM CHAINS
(fig.89/D)
Lubrication
Lubrication allows the operator to:
- Interpose liquid between contact surfaces to diminish
wear and prevent seizure.
- Protect chains from rust.
- Reduce noise between the surfaces subject to collisions.
Lubrication must be carried out:
- Longitudinally, in an area where joints are only slightly
strained to favour lubrication penetration.
- Crosswise, between the plates to facilitate oil penetration in joints.
Oil viscosity must be suitable to the surrounding temperature. Viscosity which is too low favours lubrication withdrawal
and viscosity which is too high hinders lubricants from penetrating joints. For proper viscosity, refer to the table at the
side (fig.90/D).
(fig.89/D)
- ATTENTION IT IS MANDATORY TO USE
INDIVIDUAL PROTECTION DEVICES (I.P.D.)
to perform maintenance/control operations.
- ATTENTION:
In the event of special applications or use in adverse conditions, consult a dieci service centre.
- PROHIBITED IT IS PROHIBITED
to lubricate the chains using grease.
Checking for Wear
At prescribed intervals, verify:
- The installation geometry.
- The condition of the chain in order to analyse traces of
friction that may indicate incorrect installation geometry.
Wear on the side plate profile due to contact with pulleys
and guiding systems. Wear on the sides of the external
plates and on the pin heads due to contact with pulley
flanges or with any guiding devices.
- 15 < T< 0
Between 15 and 32
0 < T< 50
Between 46 and 150
50 < T< 80
Between 220 and 320
Ro
diamlleer
ter
External link
Bushing
Roller
Internal plate
Connecting link
Interna
width l
- Wear of Fleyer raising chain plates.
The chains must be replaced when wear due to lengthening exceeds 2%. When the chain is replaced IT IS MANDATORY also to replace the respective rollers.
Recommended viscosity
ISO VG (Cst)
(fig.90/D) Chain oil viscosity table
- Wear on chain joints both due to direct measurement of
its length with measurement instrument or a control scale, and visually.
- ATTENTION -
Temperature (C°)
Internal link
Pitch
Pin
External plate
(fig.91/D) Components of a standard chain
- CAUTION: - Read the SAFETY REGULATIONS (in this manual) carefully for the safety of all personnel and the machine.
D/43
Mod. Agri Max - Agri Power - Agri Star
Determining wear due to extension
Maintenance and Registering
AL4
AL5
AL6
AL8
AL10
AL12
AL14
AL16
Fleyer chains
- Verify the type of chain installed, indicated on its external
plate. If it cannot be read, contact a dieci service centre.
BL4
BL5
BL6
BL8
BL10
BL12
BL14
BL16
Fleyer chains
1/2”
5/8”
3/4”
1”
- I dentify the pitch of the chain on the table (fig.92/D).
(e.g. Fleyer AL8/BL8 Chain Pitch 1”/25.40mm) and multiply it by 10.
12,70
15,87
19,05 25,40
1 1/4” 1 1/2” 1 3/4”
31,75
38,10
44,45
2”
Inch pitch
50,80
Mm pitch
(fig.92/D)
- Measure 10 pitches of the chain to be verified (fig.93/D).
Pitch
- If the measurement exceeds 2% of the pitch indicated in
the table multiplied by ten, the chain should be considered worn and must be replaced.
Pitch
2% of the measurement = [Measurement: 100 ] x 2
- ATTENTION:
(fig.93/D)
Measurements must be taken at several points as wearing
may not be uniform. The chain must also be tight. Measurements can be carried out with a bore or a ruler divided into
millimetres (fig.94/D).
- ATTENTION -
Check, cleaning, lubrication
- Stop the vehicle on a flat, level surface.
- Position the vehicle on outrigger feet (if present).
IT IS MANDATORY TO USE
INDIVIDUAL PROTECTION DEVICES (I.P.D.)
to perform maintenance/control operations.
- E xtend the telescopic boom completely in a horizontal
position.
- Switch off the engine and remove the ignition key, hang up
a sign in the cab that reads “maintenance work under way”.
- C lean the chains to eliminate surface impurities with a
clean cloth that will not leave residue.
- F orcefully brush chains to remove impurities, using a
hard nylon brush and clean fuel. Then blow with compressed air.
- C arefully examine the chains as described in the “checking for wear” paragraph .
- L ightly lubricate the chains with a brush soaked in oil
(see paragraph entitled “lubrication”).
- Remove excess oil from the entire surface of the chains
using a clean cloth.
- Move the boom several times to distribute the oil evenly.
(fig.94/D)
- ATTENTION:
In case of chain replacement, contact a dieci service centre.
- ATTENTION Chains can be made fragile by hydrogen.
Operating in acidic
environments is STRICTLY PROHIBITED.
Operate for as little time as possible when in oxidative
or corrosive environments.
D/44
- CAUTION: - Read the SAFETY REGULATIONS (in this manual) carefully for the safety of all personnel and the machine.
GREASING
transverse levelling device
- ATTENTION is mandatory to use the I.P.D.
to carry out the maintenance/control
operations.
For the safety specifications, refer to chapter “B”,
“Carrying out maintenance in safety ” paragraph page b/16.
mod. Agri Max - Agri Power - Agri Star
- CAUTION: - Read the SAFETY REGULATIONS (in this manual) carefully for the safety of all personnel and the machine.
D/45
Mod. Agri Max - Agri Power - Agri Star
Maintenance and Registering
GREASING NIPPLES
- ATTENTION -
One/two/three extension booms
The references of the greasing nipples of the booms with two
extensions are the same as the booms with three extensions.
IT IS MANDATORY TO USE
INDIVIDUAL PROTECTION DEVICES (I.P.D.)
to perform maintenance/control operations.
For the safety specifications, refer to chapter “b”, “Carrying out maintenance in safety ” paragraph page b/16.
(fig.96/D)
(fig.97/D)
D/46
- CAUTION: - Read the SAFETY REGULATIONS (in this manual) carefully for the safety of all personnel and the machine.
GREASING
- ATTENTION -
Transmission shafts and differential axles
- ATTENTION:
The underside protection must be removed for this operation.
Consult the “Underside removal” paragraph.
IT IS MANDATORY TO USE
INDIVIDUAL PROTECTION DEVICES (I.P.D.)
to perform maintenance/control operations.
For the safety specifications, refer to chapter “b”, “Carrying out maintenance in safety ” paragraph page b/16.
Front transmission shaft
Rear transmission shaft
Differential axle
Epicycloidal reduction gear
(fig.98/D)
- CAUTION: - Read the SAFETY REGULATIONS (in this manual) carefully for the safety of all personnel and the machine.
D/47
Mod. Agri Max - Agri Power - Agri Star
Maintenance and Registering
FUSES
main control unit
(fig.100/D Pos.”1”)
The general electric circuit is protected by fuses located on
the general circuit board (fig.100/D Pos.”1”).
Access the electronic card by removing the left plastic under
the dashboard, removing its screws.
In the event of an electrical malfunction, fuse conditions
must be verified as the first troubleshooting operation. Fuses
must be removed with special pliers.
1
To replace a fuse, remove it from its housing using special
pliers and replace it with another fuse of equal class, quality
and amperage.
- ATTENTION IT IS MANDATORY TO USE
INDIVIDUAL PROTECTION DEVICES (I.P.D.)
to perform maintenance/control operations.
(fig.100/D)
For the safety specifications, refer to chapter “b”, “Carrying out maintenance in safety ” paragraph page b/16.
- ATTENTION:
Before removing the plastic from under the dashboard:
- Stop the vehicle on a flat, level surface.
- Switch off the engine and remove the ignition key, hang up
a sign in the cab that reads “maintenance work under way”.
- Disconnect the battery by acting on the “battery isolator
switch” see page D/16 cut off electrical power to the vehicle using the battery isolator.
- ATTENTION:
Do not attempt to repair fuses.
D/48
- CAUTION: - Read the SAFETY REGULATIONS (in this manual) carefully for the safety of all personnel and the machine.
engine control unit
(fig.101/D Pos.”1”)
Engine electrical circuits and connected components are protected by a fuse control unit located within the engine compartment (fig.101/D Pos.”1”). Remove the box cover to access
the fuses. In the event of an electrical malfunction fuse conditions must be verified as the first troubleshooting operation.
1
To replace a fuse, remove it from its housing using special
pliers and replace it with another fuse of equal class, quality
and amperage. All other operations must be carried out by
qualified, authorised personnel only.
- ATTENTION IT IS MANDATORY TO USE
INDIVIDUAL PROTECTION DEVICES (I.P.D.)
to perform maintenance/control operations.
(fig.101/D)
For the safety specifications, refer to chapter “b”,“Carrying
out maintenance in safety ” paragraph page b/16.
- ATTENTION:
Before accessing the engine compartment:
- Stop the vehicle on a flat, level surface.
- Switch off the engine and remove the ignition key, hang up
a sign in the cab that reads “maintenance work under way”.
- Disconnect the battery by acting on the “battery isolator
switch” see page D/16 cut off electrical power to the vehicle using the battery isolator.
- ATTENTION:
Do not attempt to repair fuses.
- ATTENTION The main fuse of the vehicle
is located onside the engine control unit.
- CAUTION: - Read the SAFETY REGULATIONS (in this manual) carefully for the safety of all personnel and the machine.
D/49
Mod. Agri Max - Agri Power - Agri Star
Maintenance and Registering
LIGHTING
Vehicle lighting must always be efficient and functioning properly. Proper lighting function must be checked daily. If the lighting body is damaged in any way, replace the damaged part
immediately. Burnt light bulbs should be replaced immediately.
For the safety specifications, refer to chapter “b”, “Carrying out maintenance in safety ” paragraph page b/16.
- ATTENTION IT IS MANDATORY TO USE
INDIVIDUAL PROTECTION DEVICES (I.P.D.)
to perform maintenance/control operations.
FRONT LIGHT
(fig.105/D)
The front light is composed of a direction indicator, a position
light, dipped light/headlight.
1
To access the bulbs:
- Switch off the vehicle and use the battery isolator to cutout electrical power.
- Remove the power connection of the rear light.
- Remove the front part of the light by loosening its screws
located in the rear cap.
To close the light back up, carry out these steps in the opposite order, being careful to position the seal correctly.
(fig.105/D)
(fig.106/D)
Replacing direction indicator bulbs
(fig.106/D Pos.”1”) (21w)
2
- Press the upper part of the bulb.
- Turn and hold down the bulb to free it from the lock.
Carry out the same steps to insert the new bulb.
Replacing a position light bulb
(fig.107/D Pos.”1”) (4w)
- Take hold of the rear part where the electrical connections are located (fig.107/D Pos.”2”).
1
- Turn and pull the rear part towards you.
- Remove the support and press the upper part of the bulb.
- Turn and hold down the bulb to free it from the lock.
Carry out the same steps to insert the new bulb. Reinsert
the support inside its housing.
(fig.107/D)
Replacing a dipped light/headlight bulb
(fig.108/D Pos.”1”)(60/55w H4)
- Remove the electrical connector by pulling it towards you.
- Raise the locking tabs (fig.108/D Pos.”2”), moving them
laterally to free the bulb.
- Replace the bulb and proceed in the opposite order to
lock and reconnect it. Respect bulb closing mechanisms
(fig.85/D Pos.”3”) for proper insertion.
C
3
3
2
- ATTENTION The bulbs are very fragile. Handle with care
2
1
The dipped beam bulbs must not be
handled with bare hands.
3
(fig.108/D)
D/50
- CAUTION: - Read the SAFETY REGULATIONS (in this manual) carefully for the safety of all personnel and the machine.
REAR LIGHT
4
(fig.109/D)
The rear light is composed of a reverse light (21W) (fig.109/D
Pos.”1”), rear red light (5W) (fig.109/D Pos.”2”), a stop light
(21W) (fig.109/D Pos.”3”), and a direction indicator (21W).
(fig.109/D Pos.”4”), rear fog (21W) (fig.109/D Pos.”5”).
3
To access the bulbs:
5
2
1
- Switch off the vehicle and use the battery isolator to cutout electrical power.
- Remove the power connection of the rear light.
- Remove the front part of the light by loosening its screws
located on the cap.
- ATTENTION:
(fig.109/D)
To close the light back up, carry out these steps in the opposite order, being careful to position the seal correctly.
Replacing the rear light bulb.
- Press the upper part of the bulb.
- Turn and hold down the bulb to free it from the lock.
2
Carry out the same steps in the opposite order to insert a
new bulb.
1
WORKING LIGHT
(fig.110/D)
Replacing bulbs
(Fig.112/D Pos.”1”) (special bulb)
- Switch off the vehicle and use the battery isolator to cutout electrical power.
(fig.110/D)
(fig.111/D)
- Remove the power connection of the rear light (fig.111/D
Pos.”1”).
- Press the connector grip on the light (fig. 111/D Pos.”2”).
- Turn and hold the grip down, to release it.
1
Carry out the same steps in the opposite order to insert a
new bulb.
(fig.112/D)
DUAL REFLECTOR WORKING LIGHT
2
(fig.113/D)
Replacing bulbs
(fig.114/D Pos.”1”) (Type 21w H3)
2
- Switch off the vehicle and use the battery isolator to cutout electrical power.
- Remove the screws on the front part of the light.
- Remove the power supply connectors from the bulbs
(fig.114/D Pos.”2”).
(fig.113/D)
- Move the locking tabs, bringing them towards the inside
to release them (fig.114/D Pos.”3”).
Carry out the same steps in the opposite order to insert
a new bulb. Treat the bulb closing mechanisms with care
(fig.114/D Pos.”4”) for proper insertion.
- CAUTION: - Read the SAFETY REGULATIONS (in this manual) carefully for the safety of all personnel and the machine.
3
3
1
4
4
(fig.114/D)
D/51
Mod. Agri Max - Agri Power - Agri Star
Maintenance and Registering
M
D/52
friction factor
PRELOAD AND TIGHTENING TORQUE TABLE
FOR CLASS 1 NUTS AND BOLTS
4.8
fine pitch nut and bolt classes
5.8
6.8
8.8
10.9
preload tightening preload
torque
N
Nm
N
tightening
torque
Nm
preload tightening preload tightening
torque
torque
N
Nm
N
Nm
12.9
preload tightening preload tightening
torque
torque
N
Nm
N
Nm
M8
0.10
0.14
9798.1
9079.5
10.87
13.53
12247.6
11349.4
13.59
16.91
14697.1
13619.3
16.31
20.29
19596.1
18159.1
21.75
27.05
27557.1
25536.2
30.58
38.04
33068.5
30643.4
36.70
45.65
M10
0.10
0.14
15296.9
14175.0
21.13
26.27
19121.1
17718.8
26.41
32.84
22945.3
21262.6
31.69
39.41
30593.8
28350.1
42.25
52.55
43022.5
39867.3
59.42
73.89
51627.0
47840.8
71.30
88.67
M12
0.10
0.14
22020.7
20405.8
35.83
44.53
27525.9
25507.2
44.79
55.66
33031.0
30608.7
53.75
66.79
44041.4
40811.6
71.67
89.06
61933.2
57391.3
100.78
125.24
74319.8
68869.5
120.94
150.29
M14
0.10
0.14
31610.0
29345.9
59.04
73.92
39512.5
36682.4
73.80
92.40
47415.0
44018.9
88.57
110.89
63220.0
58691.9
118.09
147.85
88903.1
82535.4
166.06
207.91
106683.7
99042.5
199.27
249.49
M16
0.10
0.14
42581.3
39587.8
89.78
113.06
53226.6
49484.7
112.23
141.32
63871.9
59381.6
134.67
169.59
85162.5
79175.5
179.56
226.12
119759.8
111340.6
252.51
317.98
143711.8
133608.7
303.02
381.57
M18
0.10
0.14
51457.2
47751.7
124.03
155.02
64321.5
59689.6
155.03
193.78
77185.8
71627.5
186.04
232.53
102914.4
95503.3
248.06
310.05
144723.3
134301.6
348.83
436.00
173668.0
161161.9
418.59
523.20
M20
0.10
0.14
65534.1
60886.2
173.72
218.17
81917.7
76107.8
217.16
272.71
98301.2
91329.3
260.59
327.26
131068.3
121772.4
347.45
436.34
184314.8
171242.5
488.60
613.61
221177.8
205491.0
586.32
736.33
M22
0.10
0.14
81220.8
75533.9
236.88
298.75
101526.0
94417.4
296.10
373.43
121831.2
113300.9
355.32
448.12
162441.5
151067.8
473.76
597.49
228433.4
212439.1
666.23
840.22
274120.1 799.48
254927.0 1008.27
M24
0.10
0.14
98515.6
91693.3
308.56
390.33
123144.5
114616.6
385.70
487.92
147773.4
137539.9
462.84
585.50
197031.1
183386.5
617.12
780.67
277075.0 867.83 332490.0 1041.40
257887.3 1097.82 309464.8 1317.38
- CAUTION: - Read the SAFETY REGULATIONS (in this manual) carefully for the safety of all personnel and the machine.
M
friction factor
PRELOAD AND TIGHTENING TORQUE TABLE
FOR CLASS 2 NUTS AND BOLTS
large pitch nut and bolt classes
4.8
5.8
6.8
preload tightening preload
torque
N
Nm
N
tightening
torque
Nm
8.8
preload tightening preload tightening
torque
torque
N
Nm
N
Nm
10.9
12.9
preload tightening preload tightening
torque
torque
N
Nm
N
Nm
M6
0.10
0.14
4874.7
4499.1
4.24
5.19
6093.4
5623.9
5.30
6.48
7312.1
6748.6
6.35
7.78
9749.4
8998.2
8.47
10.37
13710.1
12653.7
11.92
14.59
16452.2
15184.4
14.30
17.51
M7
0.10
0.14
7134.5
6599.6
6.97
8.60
8918.2
8249.5
8.71
10.76
10701.8
9899.4
10.45
12.90
14269.1
13199.2
13.94
17.21
20065.9
18561.4
19.60
24.20
24079.1
22273.6
23.52
29.04
M8
0.10
0.14
8947.1
8265.6
10.20
12.54
11183.9
10332.0
12.75
15.67
13420.7
12398.4
15.30
18.80
17894.2
16531.2
20.41
25.07
25163.7
23247.0
28.70
35.26
30196.5
27896.5
34.44
42.31
M10
0.10
0.14
14244.5
13167.4
20.11
24.76
17805.6
16459.2
25.14
30.95
21366.8
19751.1
30.16
31.14
28489.0
26334.8
40.22
49.52
40062.7
37033.3
56.56
69.64
48075.3
44439.9
67.87
83.56
M12
0.10
0.14
20766.6
19204.0
34.43
42.42
25958.3
24005.0
43.03
53.03
31149.9
28806.0
51.64
63.63
41533.2
38408.0
68.86
84.84
58406.1
54011.2
96.83
119.31
70087.3
64813.5
116.20
143.17
M14
0.10
0.14
28389.9
26261.2
54.77
67.56
35487.4
32826.5
68.46
84.45
42584.9
39391.8
82.15
101.34
56779.8
52522.4
109.53
135.13
79846.6
73859.6
154.03
190.02
95816.0
88631.5
184.84
228.03
M16
0.10
0.14
39242.1
36364.2
85.14
105.80
49052.7
45455.3
106.43
132.26
58863.2
54546.3
127.72
158.71
78484.3
72728.5
170.29
211.61
110368.5
102274.4
239.47
297.58
132442.2
122729.3
287.36
357.09
M18
0.10
0.14
47533.0
43986.1
117.48
145.16
59416.3
54982.7
146.85
181.45
71299.6
65979.2
176.22
217.74
95066.1
87972.3
234.96
290.32
133686.7
123711.0
330.41
402.26
160424.1
148453.2
396.49
489.92
M20
0.10
0.14
61238.0
56747.1
166.08
206.39
76547.5
70933.9
207.61
257.98
91857.0
85120.6
249.13
309.58
122476.0
113494.2
332.17
412.78
172231.9
159601.2
467.11
580.47
206678.2
191521.5
560.54
696.56
M22
0.10
0.14
76305.2
70791.9
227.22
283.79
95381.5
88489.8
284.02
352.74
114457.8
106187.8
340.82
425.69
152610.4
141583.7
454.43
567.58
214608.3
199102.1
639.05
798.16
257530.0
238922.5
766.85
957.80
M24
0.10
0.14
88232.4
81761.8
287.16
356.84
110290.5
102202.2
358.94
446.05
132348.6
122642.7
430.73
535.26
176464.9
163523.6
574.31
713.68
248153.7
229955.1
807.63
1003.61
297784.4 969.15
275946.1 1204.33
- CAUTION: - Read the SAFETY REGULATIONS (in this manual) carefully for the safety of all personnel and the machine.
D/53
Mod. Agri Max - Agri Power - Agri Star
Maintenance and Registering
TORQUE TABLE FOR HYDRAULIC FITTINGS
60° oval insert - BSP thread
THREAD
N.m
1/18-28
1/4-19
3/8-19
1/2-14
5/8-14
3/4-14
1”-11
1”1/4-11
1”1/2-11
12-14
14-16
25-28
45-60
55-70
90-110
120-140
170-190
200-245
60° oval insert - METRIC thread
THREAD
10x1
12x1,5
14x1,5
16x1,5
18x1,5
22x1,5
26x1,5
28x1,5
30x1,5
N.m
12-14
13-15
15-18
25-28
27-30
50-60
60-75
80-100
110-130
DIN FITTINGS SERIES / RANGE “L”
THREAD
12x1,5
14x1,5
16x1,5
18x1,5
22x1,5
26x1,5
30x2
36x1,5
45x1,5
52x1,5
N.m
13-15
15-18
25-28
27-30
50-60
30-75
85-105
120-140
170-190
190-230
DIN FITTINGS SERIES / RANGE “S”
THREAD
14x1,5
16x1,5
18x1,5
20x1,5
22x1,5
24x1,5
30x2
36x2
42x2
52x2
N.m
15-18
25-28
27-30
43-54
50-62
60-75
90-110
125-145
170-190
200-245
D/54
- CAUTION: - Read the SAFETY REGULATIONS (in this manual) carefully for the safety of all personnel and the machine.
TROUBLESHOOTING
- ATTENTION:
Troubleshooting interventions should only be carried out by qualified personnel.
Do not carry out troubleshooting interventions if the “User Instructions” and “Safety Regulations” of the vehicle have not been
read and understood.
This symbol
workshop.
GROUP
ENGINE
GROUP
means that the problem can NOT be resolved without the assistance of an authorised DIECI Service
PROBLEM
The vehicle will not start
PROBLEM
The vehicle does
move in any
direction.
DRIVE
HYDRAULIC
SYSTEM
The vehicle loses speed
PROBABLE CAUSE
SOLUTION
Direction lever is engaged.
Put the lever in neutral
No fuel
Fill up the tank
Battery dead
Recharge the battery or replace it
Burnt out fuse
Change the fuse
Others
Consult the engine
Use and
Maintenance book
PROBABLE CAUSE
SOLUTION
The sensor incorporated in the
seat does not detect the driver’s
presence
Sit down correctly
The forward/reverse lever is not
engaged (indicator off)
Insert the lever in the desired
position
Slow/fast speed switch (indicator light off)
Press the switch
Rear axle blocked (optional)
Release the axle.
Hydraulic oil suction
filter blocked.
Remove the oil filter and replace it
Hydrostatic transmission
failure
Inching pedal anomaly
Cont. from
page D/56
- CAUTION: - Read the SAFETY REGULATIONS (in this manual) carefully for the safety of all personnel and the machine.
Repair or replace the transmission
Check the pedal return spring
Check distributor position
D/55
Mod. Agri Max - Agri Power - Agri Star
Maintenance and Registering
TROUBLESHOOTING
GROUP
DRIVE
HYDRAULIC
SYSTEM
GROUP
BRAKES
GROUP
STEERING
D/56
PROBLEM
The vehicle does
move in any
direction.
PROBLEM
The vehicle does not brake
PROBLEM
The vehicle moves transversally
The wheels are not aligned
PROBABLE CAUSE
SOLUTION
Level of hydraulic oil insufficient
Check the level of hydraulic oil
Parking brake on
Disengage the brake
Hydrostatic transmission failure
Repair or replace the transmission
Electric circuit damaged
Repair the circuit
The slide valve under
the car has been closed
(vehicle tow)
Open the slide valve
PROBABLE CAUSE
SOLUTION
There is no oil in the brake oil tank
Top-up tank or bleed system
Fluid leaking from the circuit
Check for leaks
Brake pads worn
Change the brake pads
Brake pump damaged
Repair or replace
Unsuitable fluid in the circuit
or in the differential sump
Check oil
comparison table
PROBABLE CAUSE
SOLUTION
The wheels are not aligned
correctly
Proceed with realignment.
Steering selection
error
Reposition the lever in
different steering mode
Control distributor
failure
Repair or replace
distributor
The steering wheel hydraulic
cylinders leak oil.
Replace the gaskets
- CAUTION: - Read the SAFETY REGULATIONS (in this manual) carefully for the safety of all personnel and the machine.
TROUBLESHOOTING
GROUP
PROBLEM
PROBABLE CAUSE
SOLUTION
The safety systems are activated
See chapter
“Getting to know the vehicle”
Electrical system failure
Check fuses and the electrical
system
Hydraulic oil level in tank
insufficient
Top up
Relevant hydraulic pump failure
Repair or replace pump
Distributor calibrated too low
Check and retract the distributor
Internal leakage of raising
cylinders.
Replace the gaskets
The boom does not extend
The safety systems are activated
(Indicator light and acoustic alarm
functioning)
See chapter
“Getting to know the vehicle”
The boom cannot be
lowered
The safety systems are activated
(Indicator light and acoustic alarm
functioning)
See chapter
“Getting to know the vehicle”
The vehicle will
not lift load
TELESCOPIC
BOOM
- CAUTION: - Read the SAFETY REGULATIONS (in this manual) carefully for the safety of all personnel and the machine.
D/57
Mod. Agri Max - Agri Power - Agri Star
Maintenance and Registering
HOW TO COMPLETE THE SERVICE REGISTER
The “SERVICE REGISTER” must be completed in compliance with the Essential Safety Requirement 4.4.2.b of Enclosure I of Machine Directive EC/98/37, to prove that all machine inspection and service activities concerning safety have been carried out correctly.
Together with every activity concerning the life and use of the machine (replacement of parts, services, malfunctions, etc.)
the Service Register must also include information regarding all the quarterly and yearly inspections provided for by law, including those indicated in the “Maintenance” section and “Attachments” chapter of this Manual.
The name of the service engineer and the date the job was carried must also be clearly indicated.
You are recommended to complete, up-date and keep this Service Register with care throughout the entire life of the machine.
The following pages have been left free to ease creation of your own Service Register.
OBLIGATIONS AND HOW TO FORWARD STATEMENTS TO I.S.P.E.S.L. (SUPREME INSTITUTE FOR
ACCIDENT PREVENTION AND SAFETY IN THE WORKPLACE)
The Italian Ministerial Decree dated 12/09/1959, under Title II – Article 7, states that the employers and users of engine-driven
lifting equipment having capacities greater than 200 kg and personnel platforms, are obliged to inform the competent authority (currently I.S.P.E.S.L. - the Supreme Institute For Accident Prevention And Safety In The Workplace in Italy) when the
machine is commissioned, specifying the place of installation of the machine so that this authority may make an initial inspection.
This fulfilment is confirmed by Article 11 – section 3 of Italian Presidential Decree 459 dated 24/07/1996, a national law that
transposes Machine Directive EC/98/37.
The statement to the Supreme Institute for Accident Prevention and Safety in the Workplace is made by enclosing a copy
of the EC Statement of Conformity of the machine, with reference to Enclosure IIA of Italian PRESIDENTIAL DECREE
459/96 – Machine Directive EC/98/37.
The original statements (EC Statement of Conformity – Enclosure IIA or Manufacturer’s Statement –Enclosure IIB) must be kept by the client.
The statement shall be forwarded to the Supreme Institute for Accident Prevention and Safety in the Workplace by registered
post with advice of receipt.
The Supreme Institute For Accident Prevention And Safety In The Workplace will then inform the local surveillance authority
(A.S.L. in Italy) that the machine is in use; this authority is then in charge of the subsequent yearly inspections.
SCHEDULED INSPECTIONS AND REGISTRATION METHOD
The employer or user of the machine must ensure the machine is inspected regularly pursuant to the law
(Italian Presidential Decree 547 dated 27/4/55; Italian Ministerial Decree 12/9/59 and Italian Decree Law 626 dated 19/9/94).
He or she must also comply with the maintenance and inspection schedule described in this Use and Maintenance Manual.
Inspections and scheduled tests, together with maintenance work must be carried out by especially employed experts, or by
a workshop authorised by the manufacturer, DIECI S.r.l.
The employer/user of the machine must record the results of the tests and inspections in the Service Register, or ask specifically trained personnel to record them.
The scheduled tests and inspections that must be recorded in the “Service Register” are:
a) Quarterly inspections that involve the operation and/or efficiency of ropes/chains according to Article 179 of Italian Presidential Decree 547 dated 27/4/55.
b) Yearly inspections that involve the operation and the preservation of the machine in terms of safety (yearly tests, corrosion inspections, calibration tests, etc.) according to Article 194 of Italian Presidential Decree 547 dated 27/4/55.
The law foresees administrative fines for those who fail to carry out quarterly and yearly inspections.
The Service Register, in which the inspections are recorded, must be shown on request to the inspectors in charge of ensuring that the current laws are observed.
After the yearly inspection has been carried out, the A.S.L. inspector issues an acceptance report or prescribes the action necessary to fulfil legal requirements. The user is obliged to store the inspection report with the Service Register.
If the local surveillance authority (A.S.L. in Italy) should fail to make the yearly inspection, you are in any event recommended to have the yearly inspection carried out by a qualified engineer and record the results in the Service Register.
The evaluations of the inspections must be registered in the reserved pages below, indicating the outcome of the inspection,
the date, the signature and any comments by the inspector.
If not enough pages have been reserved within this manual to contain all the notes concerning the life of the machine, use
additional sheets of paper, remembering to complete them in the same manner.
D/58
- CAUTION: - Read the SAFETY REGULATIONS (in this manual) carefully for the safety of all personnel and the machine.
MACHINE DETAILS
Manufacturer: Dieci S.r.l.
Model: ...................................................................................... serial number ................................................ Year ..........................
Attachment................................................................... serial number ................................................ Year .....................................
Max. capacity [kg]: ............................................................................................................................................................................
Attachment ................................................................... serial number ................................................ Year .....................................
Max. capacity [kg]: ..............................................................................................................................................................................
Attachment................................................................... serial number ................................................ Year .....................................
Max. capacity [kg]: ............................................................................................................................................................................
Owner: ...................................................................................................................................................................................................
Machine commissioning date: .............................................................................................................................................
FOR FURTHER CONTROLS OR REPORTS TO THE COMPETENT AUTHORITIES, PLEASE REFER
TO THE LOCAL LEGISLATION IN FORCE IN THE COUNTRY WHERE THE MACHINE IS USED.
- CAUTION: - Read the SAFETY REGULATIONS (in this manual) carefully for the safety of all personnel and the machine.
D/59
Mod. Agri Max - Agri Power - Agri Star
D/60
Maintenance and Registering
- CAUTION: - Read the SAFETY REGULATIONS (in this manual) carefully for the safety of all personnel and the machine.
RECORD OF SCHEDULED INSPECTIONS
AND MAINTENANCE WORK
50 h
REGULAR MAINTENANCE
Job
Job accomplished
SPECIAL MAINTENANCE
Machine
working hours
Job description
check hydraulic plant pipe leaks
Lubrication of boom articulation pin
Lubrication of feet pins/head swivel jack
Lubrication of feet pins/head raising jack
Lubrication of feet pins/head levelling jack
Lubrication of front/rear wheel articulation pins
Lubrication of front/rear axle oscillation bushing
Lubrication of cross and Cardan transmission shafts
Lubrication of internal boom tubes
Lubrication of boom rollers and chains
Date
Signature
100 h
REGULAR MAINTENANCE
Job
Job accomplished
Date
Signature
SPECIAL MAINTENANCE
Machine
working hours
Job description
Air filter cleaning Lubrication of differential axles checking tyre pressure A general check of nuts and bolts tightness check brake oil level check boom chain extension and conditions check safety stickers Date
Signature
Date
Signature
- CAUTION -
- CAUTION -
The maintenance work in bold type is considered
fundamental by DIECI for people’s safety.
Maintenance must be carried out by qualified personnel
who must sign the scheduled maintenance report.
- CAUTION: - Read the SAFETY REGULATIONS (in this manual) carefully for the safety of all personnel and the machine.
D/61
Mod. Agri Max - Agri Power - Agri Star
D/62
Maintenance and Registering
- CAUTION: - Read the SAFETY REGULATIONS (in this manual) carefully for the safety of all personnel and the machine.
250h
REGULAR MAINTENANCE
Job
Job accomplished
SPECIAL MAINTENANCE
Machine
working hours
Job description
Replace engine oil filter
Engine oil filter replacement
Check battery electrolyte level
Check electrical system
Check alternator belt
Tighten wheel nuts
Replace fuel filter
Replace cab filter
Tighten boom sliders
boom check chain tension
Date
Signature
500 h
REGULAR MAINTENANCE
Job
Job accomplished
Date
Signature
SPECIAL MAINTENANCE
Machine
working hours
Job description
Fuel tank discharge Cleaning fuel tank filters Clean fuel injection pump filter
Check differential sump oil level Check epicycloidal reduction gear oil level
Check gear oil level Replace hydraulic system oil
Replace external hydraulic oil filters
Cleaning of hydraulic oil tank filters
Parking brake registration Replace engine air filter. Date
Signature
Date
Signature
- CAUTION -
- CAUTION -
The maintenance work in bold type is considered
fundamental by DIECI for people’s safety.
Maintenance must be carried out by qualified personnel
who must sign the scheduled maintenance report.
- CAUTION: - Read the SAFETY REGULATIONS (in this manual) carefully for the safety of all personnel and the machine.
D/63
Mod. Agri Max - Agri Power - Agri Star
D/64
Maintenance and Registering
- CAUTION: - Read the SAFETY REGULATIONS (in this manual) carefully for the safety of all personnel and the machine.
1000h
REGULAR MAINTENANCE
Job
SPECIAL MAINTENANCE
Machine
working hours
Job description
Job accomplished
Replacing cooling liquid Replace differential sump oil Replace oil in epicycloidal reduction gears Replace gear oil Replace brake oil check boom chain
Date
Signature
h
REGULAR MAINTENANCE
Job
Job accomplished
Date
Date
Signature
Signature
SPECIAL MAINTENANCE
Machine
working hours
Job description
Date
Signature
- CAUTION -
- CAUTION -
The maintenance work in bold type is considered
fundamental by DIECI for people’s safety.
Maintenance must be carried out by qualified personnel
who must sign the scheduled maintenance report.
- CAUTION: - Read the SAFETY REGULATIONS (in this manual) carefully for the safety of all personnel and the machine.
D/65
Mod. Agri Max - Agri Power - Agri Star
D/66
Maintenance and Registering
- CAUTION: - Read the SAFETY REGULATIONS (in this manual) carefully for the safety of all personnel and the machine.
h
REGULAR MAINTENANCE
Job
Signature
Job
Job accomplished
Date
Date
h
REGULAR MAINTENANCE
Signature
Machine
working hours
Job description
Job accomplished
Date
SPECIAL MAINTENANCE
Signature
SPECIAL MAINTENANCE
Machine
working hours
Job description
Date
Signature
- CAUTION -
- CAUTION -
The tables must be completed clearly using
the spaces provided.
Maintenance must be carried out by qualified personnel
who must sign the scheduled maintenance report.
- CAUTION: - Read the SAFETY REGULATIONS (in this manual) carefully for the safety of all personnel and the machine.
D/67
Mod. Agri Max - Agri Power - Agri Star
D/68
Maintenance and Registering
- CAUTION: - Read the SAFETY REGULATIONS (in this manual) carefully for the safety of all personnel and the machine.
h
REGULAR MAINTENANCE
Job
Signature
Job
Job accomplished
Date
Date
h
REGULAR MAINTENANCE
Signature
Machine
working hours
Job description
Job accomplished
Date
SPECIAL MAINTENANCE
Signature
SPECIAL MAINTENANCE
Machine
working hours
Job description
Date
Signature
- CAUTION -
- CAUTION -
The tables must be completed clearly using
the spaces provided.
Maintenance must be carried out by qualified personnel
who must sign the scheduled maintenance report.
- CAUTION: - Read the SAFETY REGULATIONS (in this manual) carefully for the safety of all personnel and the machine.
D/69
Mod. Agri Max - Agri Power - Agri Star
D/70
Maintenance and Registering
- CAUTION: - Read the SAFETY REGULATIONS (in this manual) carefully for the safety of all personnel and the machine.
h
REGULAR MAINTENANCE
Job
Signature
Job
Job accomplished
Date
Date
h
REGULAR MAINTENANCE
Signature
Machine
working hours
Job description
Job accomplished
Date
SPECIAL MAINTENANCE
Signature
SPECIAL MAINTENANCE
Machine
working hours
Job description
Date
Signature
- CAUTION -
- CAUTION -
The tables must be completed clearly using
the spaces provided.
Maintenance must be carried out by qualified personnel
who must sign the scheduled maintenance report.
- CAUTION: - Read the SAFETY REGULATIONS (in this manual) carefully for the safety of all personnel and the machine.
D/71
Mod. Agri Max - Agri Power - Agri Star
D/72
Maintenance and Registering
- CAUTION: - Read the SAFETY REGULATIONS (in this manual) carefully for the safety of all personnel and the machine.
ELECTRICAL
E
CIRCUITS
E
E/1
Mod. Agri Max - Agri Power - Agri Star
E/2
Electrical diagrams and circuits
BASIC SYSTEM KEY – DRAWING No. E25800-049
NAME
A149 A150 A151 A565 B130 B138 B139 B182 B205 B503 B504 B512 B513
B534
B535
B537 B538 B544 B545 B546 B550
B554 B557
B558 B559 B560 B561 E102
E103
E104
E118
E127
E147
E522
E524
E526
E551
E526
E548
E551
F1
F2
F3
F4
F5
F6
F7
F8
F9
F10
F11
DESCRIPTION
SHEET
Left speaker
Right speaker
Radio
Pre-heating control box.
Seat micro switch
Micro inching ~
Stop lights micro switch
A/C thermal contact
Conditioner pressure switch
Horn
Front outrigger micro switch Left
Fuel level sensor
Hydraulic oil filter pressure switch
Gear engaged micro switch
2nd gear pressure switch
Water thermistor
Engine oil pressure switch
Lifting/exten. sensor
Optional sensor
Water thermal contact
Front outrigger micro switch Right
Negative brake pressure switch
Load cell n°2
Front axle sensor aligned
Load cell n°1
Rear axle sensor aligned
Filter thermistor
Right front work light
Right rear work light
Left front work light
Left rear work light
Revolving light
Ceiling light
Right rear light
Plate light
left frontlight
Right front light
Left front light
Right rear light
Right front light
Fuse +15 outrigger button
Fuse +15 radio and antenna
Buzzer and reverse light fuse
Fuse +15 transmission + relay K9
Fuse +15 boom head solenoid valve. Boom head socket and positive set-up Centring handler
Fuse +15 basket positive, +12V from ARB OK (pow.supp. Joystick)
Fuse +15 pneumatic seat
Fuse +15 inching micro switch and drive micro switch
Fuse +15 axle block
Fuse +15 Lighting switches and warning
Fuse +15 light switch (full and dipped bean switch) and stop lights
E/3
Mod. Agri Max - Agri Power - Agri Star
Electrical diagrams and circuits
BASIC SYSTEM KEY – DRAWING No. E25800-049
NAME
F12
F13
F14
F15
F16
F17
F18
F19
F1G
F20
F21
F22
F23
F24
F25
F26
F27
F28
F29
F2G
F30
F31
F32
F33
F34
F35
F36
F3G
F4G
F128
F174
G1
G529
H502
HA1
K1
K2
K3
K4
K5
K6
K7
K8
K9
K10
K11
K12
K13
K14
E/4
DESCRIPTION
SHEET
Fuse +15 boom sensors, axle align sensors and negative brake pressure switch
Fuse + 15 PTO, rear solenoid valves and trailer
Fuse + 15 position lights left front and right rear lights
Fuse + 15 position lights right front and left rear lights
Fuse +30 full beam head lights
Fuse +30 horn
Fuse +30 dipped beam head lights
Fuse +15 front windscreen wiper and front pump
Alternator fuse
Fuse +15 rear windscreen wiper and rear pump
Fuse +15 2nd pump and arm suspension
Fuse + 15 front work lights
Fuse + 15 rear work lights
Fuse +15 radiator solenoid valve + fan inversion
Fuse +15 heating fan speed selector switch
Fuse +15 KEY power supply Start gear
Fuse +15 KEY seat micro switch, int. seat timer (int. Negative brake), anti-tip relay, engine start and stop
Fuse +30 lights switch (pos lights), lights switch (flashing+ horn) and warning
Fuse +30 revolving light
Filter pre-heating fuse (optional)
Fuse +30 radio and ceiling light
Fuse +30 arm work lights switch
Fuse +30 current socket
Fuse +15 steering
Fuse +15 electric windscreen winder
Fuse +15 KEY equipment and basket selector switch (basket not inserted)
Fuse +15 KEY ALGA AGRI + SAR
Filter pre-heating fuse (optional)
Start-up fuse
Optional power supply fuse
Evaporator relay fuse
BATTERY
ALTERNATOR
Reverse buzzer
Instrument alarm buzzer
Full beam headlights relay
Horn relay
Drive disconnection relay
Buzzer and reverse light relay
Start switch relay with gear in neutral
Seat micro switch timer
Dipped beam headlights relay
Optional anti-tipping relay
Fast gear relay
Safety reverse relay
Start consent from cab relay with operator sitting
Optional relay
Optional sensor relay
Axle block relay
BASIC SYSTEM KEY – DRAWING No. E25800-049
NAME
K15
K16
K17
K18
K19
K20
K21
K153
K159
K160
K161
K162
K163
K164
K173
K530
K531
K547
M112
M117
M122
M129
M133
M152
M179
M520
M555
P101
R510
R533
S1
S105
S106
S108
S109
S110
S111
S113
S114
S115
S116
S120
S121
S126
S131
S132
S136
S137
S140
DESCRIPTION
SHEET
Safety forward gear relay
Start anti-repeat control unit
Anti-tipping relay
Lifting/exten. sensor relay
Axle release relay
Micro inching relay
Intermittence
Services relay
Engine stop relay from basket
Services relay
Int. relay 2nd pump
UP + low boom relay
Windscreen winder relay
Windscreen winder relay
Evaporator electric fan relay
Starting relay
Filter pre-heating relay
Heat starter relay
Front windscreen wiper motor
Windscreen washer front pump
Rear windscreen wiper
Heating motor
Evaporator electric fan
Pneumatic seat
Window winder motor
Starter Motor
A/C compressor
ALGA with SAR instrument
Resistance
Filter pre-heating resistance
BATTERY ISOLATOR SWITCH
Outriggers consent button
Rear work lights switch
Warning Switch
Levelling button
Mechanical gear change button
Boom head solenoid valve switch
Left front outrigger
Right front outrigger
Revolving light switch
ARB exclusion stable key
Rear windscreen wiper/washer switch
Parking brake switch
Fan speed selector
Rear solenoid valve switch
Trailer button
Wheels alignment button
Start gear
Guide lights switch
E/5
Mod. Agri Max - Agri Power - Agri Star
Electrical diagrams and circuits
BASIC SYSTEM KEY – DRAWING No. E25800-049
NAME
DESCRIPTION
S141
Starting control board
S142
Axle block switch
S143
Radio control switch
S144
2nd pump switch
S145
A/C switch
S146
Manoeuvre restore unstable key
S148
Front work lights switch
S156
PTO switch
S169
Boom suspension switch
S170
Boom head socket switch
S171
Fan inversion button
S180
Window winder button
S192
Brake oil level sensor
S202
Steering selector
S203
Lights switch
S204
Mushroom-shaped emergency button
S206
Boom work lights switch
W177 Radio antenna
X165
Current socket
Y507
Right outrigger descent solenoid valve
Y508
Right outrigger ascent solenoid valve
Y509
Left outrigger descent solenoid valve
Y514
Outriggers general solenoid valve
Y515
Right outrigger ascent solenoid valve
Y516
1st mechanical gear solenoid valve
Y518
Left levelling solenoid valve
Y519
Right levelling solenoid valve
Y521
2nd mechanical gear solenoid valve
Y523
Parking brake Ev.
Y527
2nd mechanical gear Forward gear
Y528
2nd mechanical gear Reverse
Y536
Engine stop
Y632
Hydraulic fast gear solenoid valve
X7
CONTROL UNIT CONNECTOR FUSES AND RELAY
X8
CONTROL UNIT CONNECTOR FUSES AND RELAY
X13
CONTROL UNIT CONNECTOR FUSES AND RELAY
X14
CONTROL UNIT CONNECTOR FUSES AND RELAY
X20
CONTROL UNIT CONNECTOR FUSES AND RELAY
X22
CONTROL UNIT CONNECTOR FUSES AND RELAY
X26
CONTROL UNIT CONNECTOR FUSES AND RELAY
X99
CONTROL UNIT CONNECTOR FUSES AND RELAY
X123
SAR CALIBRATION CONNECTOR
X124
INTERFACE CONNECTOR L. RIGHT DASHBOARD - L. DRIVER POSITION
X125
INTERFACE CONNECTOR L. CAB ROOF - L. DRIVER POSITION
X134.p DO NOT CONNECT CONNECTOR WITH X134.s
X134.s DO NOT CONNECT CONNECTOR WITH X134.p
X135
INTERFACE CONNECTOR L. DASHBOARD OX - L. DRIVER POSITION
X154.p BASKET INTERFACE CONNECTOR
X154.s BASKET COUNTERFIGURE CONNECTOR
E/6
SHEET
WIRE COLOURS
A
B
C
G
H
L
M
N
R
S
V
Z
SKY BLUE
WHITE
ORANGE
YELLOW
GREY
DARK BLUE
BROWN
BLACK
RED
PINK
GREEN
PURPLE
NOTE:
WIRES WITH TWO COLOURS ARE INDICATED BY COMBINING THE SYMBOLS ABOVE, FOR EXAMPLE:
G/V - YELLOW/GREEN (HORIZONTAL STRIPES)
Y-G- YELLOW-GREEN (VERTICAL STRIPES)
E/7
Mod. Agri Max - Agri Power - Agri Star
Electrical diagrams and circuits
SAR
CALIBRATION
CELL
CELL
CELL
CELL
D + electric fan
Electric fan start
Electric fan lott.
Electric fan indicator light
CELL
CELL
Electric fan relay s.
Feed-back term.
Earth
Cond. thermistor
PRE-HEATING CONTROL BOX
Valid certified
copy only
10
E/8
CELL
CELL
CELL
CELL
LOAD CELL 1
LOAD CELL 2
Valid certified
copy only
10
E/9
Mod. Agri Max - Agri Power - Agri Star
Electrical diagrams and circuits
OUTRIGGERS CONSENT
BUTTON
Valid certified
copy only
10
E/10
Stop lights
Pos. lights Left
Earth
Left arrow
Right arrow
Pos. lights Right
WINDSCREEN WASHER
HORN
TRAILER SOCKET
Valid certified
copy only
10
E/11
Mod. Agri Max - Agri Power - Agri Star
Electrical diagrams and circuits
Valid certified
copy only
10
E/12
INTERRUTTORE EV. SOLENOID VALVE SWITCH
DO NOT CONNECT
JOYSTICK
HYDRAULIC
MANIPULATOR
Valid certified
copy only
10
E/13
Mod. Agri Max - Agri Power - Agri Star
Electrical diagrams and circuits
Valid certified
copy only
10
E/14
AXLE BLOCK
OPTIONAL
Valid certified
copy only
10
E/15
RADIO
RADIO
RADIO
RADIO
RADIO
RADIO
RADIO
RADIO
Mod. Agri Max - Agri Power - Agri Star
Electrical diagrams and circuits
OPTIONAL
POWER SUPPLIES
Valid certified
copy only
10
E/16
BASKET LINE INTERFACE CONNECTOR
INTERFACCIA SEL.
INTERFACE
BASKET LINE INTERFACE CONNECTOR
CENTERING HANDLER
SET-UP
Valid certified
copy only
10
E/17
Mod. Agri Max - Agri Power - Agri Star
E/18
Electrical diagrams and circuits
hydraulic circuit
F
- CAUTION: - Read the SAFETY REGULATIONS (in this manual) carefully for the safety of all personnel and the machine.
F/1
Mod. Agri Max - Agri Power - Agri Star
F/2
Hydraulic Diagrams and Circuits
- CAUTION: - Read the SAFETY REGULATIONS (in this manual) carefully for the safety of all personnel and the machine.
Every modification made to the vehicle leads to a new
verification of conformity with the 2006/42 Machinery
“ this procedure is also valid in the case
Directive “
of repairs with non-original spare parts.
IT IS PROHIBITED TO OPERATE IF THIS MANUALHAS NOT BEEN READ AND UNDERSTOOD.
Any arbitrary modification made to the vehicle will absolve DIECI from
all liability FOR DAMAGE or injury resulting from such modification.
To guarantee your safety and that of others, do not modify the
structure or adjust the various vehicle components by yourself
(Hydraulic pressure, calibration of limiting devices, engine rotation, ASSEMBLY OF ADDITIONAL ATTACHMENTS ETC.). THE SAME HOLDS TRUE
FOR THE DEACTIVATION OR MODIFICATION OF SAFETY SYSTEMS. IN SUCH CASES, THE MANUFACTURER SHALL BE ABSOLVED FROM ALL LIABILITY.
THE IMAGES, DESCRIPTIONS, MEASUREMENTS, GIVEN IN THIS CHAPTER REFER TO STANDARD VEHICLES.
Upon request, your vehicle can be fitted
with optional controls and attachments.
ALL FUNCTIONS, PROCEDURES, INHERENT THE USE AND SET-UP OF VEHICLE
EQUIPMENT, NOT DESCRIBED IN THIS MANUAL, ARE PROHIBITED.
Use of the vehicle for purposes different than those described in
this manual is strictly forbidden.
It is mandatory to have read and learned chapter “b“ (Safety Standards) before reading chapter “c” and using the vehicle.
- CAUTION: - Read the SAFETY REGULATIONS (in this manual) carefully for the safety of all personnel and the machine.
F/3
Hydraulic Diagrams and Circuits
E
D
F/4
AGRI MAX
HA20-080A200
Z
B
A
G
F
C
H
S
T
U
I
O
P
L
Q
M
V
N
R
Mod. Agri Max - Agri Power - Agri Star
- CAUTION: - Read the SAFETY REGULATIONS (in this manual) carefully for the safety of all personnel and the machine.
- CAUTION: - Read the SAFETY REGULATIONS (in this manual) carefully for the safety of all personnel and the machine.
F/5
1. pump
2. heat exchanger valve
3. priority valve
4. power steering
5. steering distributor
6. boom distributor
7. lifting piston
8. lock valve
9. swivel cylinder
10.compensation cylinder
11.lock valve
12.Extension cylinder
13.lock valve
14.boom head socket
15.non-return valve
16.heat exchanger
17.hydrostatic pump
18.hydrostatic motor
19.Hydrostatic oil filter
20.inching valve
21.negative brake valve
22.speed change valve
23.front outriggers
24.outrigger valve
25.levelling cylinder
26.levelling valve
27.fan hydraulic engine
28.accumulator
29.manometer
30.non-return valve
z - only in some models
v - Levelling
u - Levelling
t - Cooling fan
s - Front outriggers
r - Extension
q - Attachment
p - Swivelling
o - Lifting
n - cylinder guide
m - Swivel
l - Compensation
i - Lifting
h - Rear steering
g - Brakes pump
E - Back axle
E - Rear brake
d - Front axle
c - Front brake
b - Front steering
a - Negative Brake
AGRI MAX - HA20-08A200
Hydraulic plant key
Hydraulic Diagrams and Circuits
F
D
F/6
HA20-080A201
AGRI POWER
B
A
G
E
C
H
S
T
U
I
O
P
L
Q
M
V
N
R
Mod. Agri Max - Agri Power - Agri Star
- CAUTION: - Read the SAFETY REGULATIONS (in this manual) carefully for the safety of all personnel and the machine.
- CAUTION: - Read the SAFETY REGULATIONS (in this manual) carefully for the safety of all personnel and the machine.
F/7
1. pump
2. heat exchanger valve
3. priority valve
4. power steering
5. steering distributor
6. boom distributor
7. lifting piston
8. lock valve
9. swivel cylinder
10.compensation cylinder
11.lock valve
12.Extension cylinder
13.lock valve
14.boom head socket
15.non-return valve
16.heat exchanger
17.hydrostatic pump
18.hydrostatic motor
19.Hydrostatic oil filter
20.inching valve
21.negative brake valve
22.speed change valve
23.front outriggers
24.outrigger valve
25.levelling cylinder
26.levelling valve
27.fan hydraulic engine
v - Levelling
u - Levelling
t - Cooling fan
s - Front outriggers
r - Extension
q - Attachment
p - Swivelling
o - Lifting
n - cylinder guide
m - Swivel
l - Compensation
i - Lifting
h - Rear steering
g - Brakes pump
E - Back axle
E - Rear brake
d - Front axle
c - Front brake
b - Front steering
a - Negative Brake
AGRI POWER - HA20-08A201
Hydraulic plant key
Hydraulic Diagrams and Circuits
F/8
AGRI STAR
HA20-080A202
D
B
A
C
G
E
F
R
S
T
H
N
O
I
P
L
U
M
Q
Mod. Agri Max - Agri Power - Agri Star
- CAUTION: - Read the SAFETY REGULATIONS (in this manual) carefully for the safety of all personnel and the machine.
- CAUTION: - Read the SAFETY REGULATIONS (in this manual) carefully for the safety of all personnel and the machine.
F/9
1. pump
2. heat exchanger valve
3. priority valve
4. power steering
5. steering distributor
6. boom distributor
7. lifting piston
8. lock valve
9. swivel cylinder
10.compensation cylinder
11.lock valve
12.Extension cylinder
13.lock valve
14.boom head socket
15.non-return valve
16.heat exchanger
17.hydrostatic pump
18.hydrostatic motor
19.Hydrostatic oil filter
20.nching valve
21.negative brake valve
22.speed change valve
23.front outriggers
24.outrigger valve
25.levelling cylinder
26.levelling valve
27.fan hydraulic engine
U - levelling
t - levelling
s - cooling fan
R - front outriggers
q - extension
P - attachment
o - Swivelling
n - Lifting
M - cylinder guide
L - swivel
I - compensation
H - lifting
g - brakes pump
f - rear steering
E - back axle
D - front axle
C - front brake
B - front steering
A - negative brake
AGRI STAR - HA20-08A202
Hydraulic Plant Key
Mod. Agri Max - Agri Power - Agri Star
F/10
Hydraulic Diagrams and Circuits
- CAUTION: - Read the SAFETY REGULATIONS (in this manual) carefully for the safety of all personnel and the machine.
TECHNICAL DATA
and
TECHNICAL SPECIFICATIONS
G
G/1
Mod. Agri Max - Agri Power - Agri Star
Technical data
Agri Max
DIMENSIONS
45.8
70.10
A/A*
B
C
D
E/E*
F
G
H/H*
I
L
M
N
O
440/480*
440/N.A.
1480
1630
2600
2950
860
1330
4000/4050*
4820/N.A.
4940
5910
940
940
2460/2500*
2490/N.A.
1910
1920
2310
2360
4080
4730
1260
1700
3920
4400
A* - E* - H* = Measurements referring to optional wheels
Measurements expressed in millimetres
G
H/H*
A/A*
B
C
E/E*
D
I
L
F
A* - E* - H* = Measurements referring to optional wheels
G/2
O
N
M
PERFORMANCE
45.8
70.10
0D[LPXPFDSDFLW\NJ
4.500
7.000
0D[LPXPOLIWLQJKHLJKWP
7,90
9,65
0D[LPXPKRUL]RQWDORXWUHDFKP
4,45
5,40
2XWUHDFKDWPD[LPXPKHLJKWP
0,30
0,70
)RUNVZLYHOOLQJDQJOH
134°
134°
3XOORXWIRUFHGD1
5.700
5.700
7RZLQJIRUFHGD1
7.300
7.300
0D[LPXPFOLPEDQJOH
40%
40%
7RWDOZHLJKWHPSW\NJ
8.700
11.300
0D[VSHHGNPK
30
30
2QUHTXHVW.PK
BOOM
45.8
70.10
/LIWLQJ
15,5 / 11,3
20,7 / 15,1
'HVFHQW
10,6 / 7,7
13,6 / 9,9
([WHQVLRQ
8,1 / 5,9
14,2 / 10,4
5HWUDFWLRQ
4,5 / 3,3
5,6 / 4,1
)RUZDUGVZLYHOOLQJ
3,9 / 2,8
6,4 / 4,6
5HYHUVHVZLYHOOLQJ
2,4 / 1,8
Times: empty / with speed supplement
(in seconds)
A
2,8 / 2,0
3DWHQWHGFRPSHQVDWLRQV\VWHP
ENGINE
Iveco NEF
74 Kw
Iveco NEF
93 Kw
0RGHO
Iveco NEF
Iveco NEF
0D[LPXPSRZHUN:KS
74 (101)
93 (127)
2200
2200
5HYROXWLRQVSHUPLQXWHUSP
2SHUDWLRQ
VWURNHGLHVHO
,QMHFWLRQ
'LUHFWPHFKDQLFDO
$& :HEDVWR +HDWHU 'LJLWDO VSHHGRPHWHU :DWHU +HDWHU 'ULYHU
V VHDW ZLWK
SQHXPDWLF VXVSHQVLRQ /LJKW RQ ERRP KHDG 4XLFN FRXSOLQJ IRU DFFHVVRULHV
5DGLR$QWLWKHIWV\VWHP*ODVVSURWHFWLRQ
)RUDGGLWLRQDOFXVWRPL]DWLRQVFRQWDFWWKHDUHDGHDOHU
YHUWLFDOLQOLQH
1XPEHUDQGDUUDQJHPHQWRIF\OLQGHUV
OPTIONALS AND ACCESSORIES
4485
4485
DRIVE
6SHFLILFFRQVXPSWLRQDWUSPJN:K 230
230
+\GURVWDWLFGULYHZLWKYDULDEOHGLVSODFHPHQWSXPS
(QJLQHVL]HFP
$IWHUFRROHU7XUERFRPSUHVVRU
/LTXLGFRROLQJV\VWHP
+\GUDXOLFHQJLQHZLWKDXWRPDWLFDGMXVWPHQW
(OHFWULFDOK\GUDXOLFLQYHUVLRQ
,QFKLQJSHGDOIRUFRQWUROOHGDGYDQFHPHQW
HYDRAULIC PLANT
6HUYRFRQWUROOHGVSHHGJHDUER[
*HDUSXPSZLWKFDSDFLW\DWPD[VSHHG
OW·
0D[RSHUDWLRQDOSUHVVXUH
EDU
'LVWULEXWRUFRQWUROZLWKMR\VWLFN
LQ
DEVICES AS PER STANDARD
$QWLWLSSLQJGHYLFHZLWKSHMRUDWLYHPRYHPHQWEORFN
+\GUDXOLFVRFNHWIRUDQ\DFFHVVRULHVRQWKHERRPKHDG
DIFFERENTIAL AXLES
6RXQGSURRIFORVHGFDE5236)236DSSURYHGZLWKKHDWHU
6WHHULQJD[OHVZLWKSODQHWDU\UHGXFWLRQJHDUV
6HOIEORFNLQJIURQWD[OHGLIIHUHQWLDOOLPLWHGVOLS
6WHHULQJW\SHVZKHHOVWUDQVYHUVDOZKHHOV
(OHFWULFZLQGRZZLQGHU
)URQWD[OHULJLGOHYHOOLQJXSRQUHTXHVW
%DFND[OHRVFLOODWLQJ
2LOEDWKVHUYLFHEUDNLQJRQWKHZKHHOVZLWKGRXEOHK\GUDXOLFSODQWDQG
VHUYREUDNH
7\SHDSSURYDODVDGULYLQJDJULFXOWXUDOPDFKLQH
0DFKLQHLVQRWVXLWDEOHIRUWRZLQJWUDLOHUVRQSXEOLFURDGVDQGURDGVIRUSXEOLFXVH
1HJDWLYHDFWLRQSDUNLQJEUDNH
REFUELLING (Litres)
TYPE-APPROVAL
TYRES
45.8
70.10
+\GUDXOLFSODQWWRWDO
155
160
7\UHV
16/70x20”
18/22.5”
)XHOWDQN
105
105
$OWHUQDWLYH
405/70x24”
/
45.8
70.10
G/3
Mod. Agri Max - Agri Power - Agri Star
Technical data
Agri Power
DIMENSIONS
30.7
30.8
30.9
A/A*
B
C
D
E/E*
F
G
H/H*
I
L
M
N
O
440/480*
440/480*
440/480*
1180
1480
1970
2600
2600
2600
860
860
860
4000/4050*
4000/4050*
4000/4050*
4640
4940
5430
ely,
no
r to
the
ater
rills
g a
940
940
940
2460/2500*
2460/2500*
2460/2500*
1910
1910
1910
2310
2310
2310
3930
4080
4420
1260
1260
1260
3920
3920
3920
A* - E* - H* = Measurements referring to optional wheels
Measurements expressed in millimetres
G
H/H*
B
C
E/E*
em,
the
D
I
L
F
and
A* - E* - H* = Measurements referring to optional wheels
us
st is
city
the
e to
and
G/4
N
M
A/A*
O
PERFORMANCE
30.7
30.8
30.9
0D[LPXPFDSDFLW\NJ
3.000
3.000
3.000
0D[LPXPOLIWLQJKHLJKWP
7,30
7,90
8,80
0D[LPXPKRUL]RQWDORXWUHDFKP
3,85
4,45
5,35
2XWUHDFKDWPD[LPXPKHLJKWP
0,00
0,30
0,50
)RUNVZLYHOOLQJDQJOH
134°
134°
134°
3XOORXWIRUFHGD1
5.700
5.700
5.700
7RZLQJIRUFHGD1
7.300
7.300
7.300
0D[LPXPFOLPEDQJOH
40%
40%
40%
7RWDOZHLJKWHPSW\NJ
7.700
8.000
8.300
30
30
0D[VSHHGNPK
30
2QUHTXHVW.PK
BOOM
30.7
30.8
30.9
/LIWLQJ
11,8
11,8
11,8
'HVFHQW
6,9
6,9
6,9
([WHQVLRQ
6,1
8,1
10,5
5HWUDFWLRQ
3,0
4,5
4,6
)RUZDUGVZLYHOOLQJ
3,9
3,9
3,9
5HYHUVHVZLYHOOLQJ
2,4
2,4
2,4
Times empty
(in seconds)
3DWHQWHGFRPSHQVDWLRQV\VWHP
ENGINE
Iveco NEF
74 Kw
Iveco NEF
93 Kw
0RGHO
Iveco NEF
Iveco NEF
0D[LPXPSRZHUN:KS
74 (101)
93 (127)
2200
2200
5HYROXWLRQVSHUPLQXWHUSP
2SHUDWLRQ
VWURNHGLHVHO
,QMHFWLRQ
'LUHFWPHFKDQLFDO
OPTIONALS AND ACCESSORIES
$& :HEDVWR +HDWHU 'LJLWDO VSHHGRPHWHU :DWHU +HDWHU 'ULYHU
V VHDW ZLWK
SQHXPDWLF VXVSHQVLRQ /LJKW RQ ERRP KHDG 4XLFN FRXSOLQJ IRU DFFHVVRULHV
5DGLR$QWLWKHIWV\VWHP*ODVVSURWHFWLRQ
)RUDGGLWLRQDOFXVWRPL]DWLRQVFRQWDFWWKHDUHDGHDOHU
YHUWLFDOLQOLQH
1XPEHUDQGDUUDQJHPHQWRIF\OLQGHUV
4485
4485
DRIVE
6SHFLILFFRQVXPSWLRQDWUSPJN:K 230
230
+\GURVWDWLFGULYHZLWKYDULDEOHGLVSODFHPHQWSXPS
(QJLQHVL]HFP
$IWHUFRROHU7XUERFRPSUHVVRU
+\GUDXOLFHQJLQHZLWKDXWRPDWLFDGMXVWPHQW
/LTXLGFRROLQJV\VWHP
(OHFWULFDOK\GUDXOLFLQYHUVLRQ
,QFKLQJSHGDOIRUFRQWUROOHGDGYDQFHPHQW
HYDRAULIC PLANT
*HDUSXPSZLWKFDSDFLW\DWPD[VSHHG
0D[RSHUDWLRQDOSUHVVXUH
'LVWULEXWRUFRQWUROZLWKMR\VWLFN
6HUYRFRQWUROOHGVSHHGJHDUER[
OW·
EDU
LQ
DEVICES AS PER STANDARD
$QWLWLSSLQJGHYLFHZLWKSHMRUDWLYHPRYHPHQWEORFN
+\GUDXOLFVRFNHWIRUDQ\DFFHVVRULHVRQWKHERRPKHDG
DIFFERENTIAL AXLES
6RXQGSURRIFORVHGFDE5236)236DSSURYHGZLWKKHDWHU
6WHHULQJD[OHVZLWKSODQHWDU\UHGXFWLRQJHDUV
6HOIEORFNLQJIURQWD[OHGLIIHUHQWLDOOLPLWHGVOLS
6WHHULQJW\SHVZKHHOVWUDQVYHUVDOZKHHOV
(OHFWULFZLQGRZZLQGHU
)URQWD[OHULJLGOHYHOOLQJXSRQUHTXHVW
%DFND[OHRVFLOODWLQJ
2LOEDWKVHUYLFHEUDNLQJRQWKHZKHHOVZLWKGRXEOHK\GUDXOLFSODQWDQG
VHUYREUDNH
TYPE-APPROVAL
7\SHDSSURYDODVDGULYLQJDJULFXOWXUDOPDFKLQH
0DFKLQHLVQRWVXLWDEOHIRUWRZLQJWUDLOHUVRQSXEOLFURDGVDQGURDGVIRUSXEOLFXVH
1HJDWLYHDFWLRQSDUNLQJEUDNH
TYRES
REFUELLING (Litres)
+\GUDXOLFSODQWWRWDO
155
7\UHV
16/70x20”
)XHOWDQN
105
$OWHUQDWLYH
16/70x24”
G/5
Mod. Agri Max - Agri Power - Agri Star
Technical data
Agri Star
DIMENSIONS
37.7
37.8
35.10
38.10
A/A*
B
C
D
E/E*
F
G
H/H*
I
L
M
N
O
440/480*
440/480*
440/480*
440/480*
1380
1680
1380
1380
2600
2600
2600
2600
970
970
970
970
4110/4160*
4110/4160*
4110/4160*
4110/4160*
4950
5250
4950
4950
940
940
940
2290/2340*
2290/2340*
2290/2340*
1780
1780
1780
1780
2220
2220
2220
2220
4810
5060
4810
4810
1240
1240
1240
1240
3840
3840
3840
3840
A* - E* - H* = Measurements referring to optional wheels
Measurements expressed in millimetres
G
M
H/H*
A/A*
B
C
E/E*
F
em,
the
D
I
L
and
A* - E* - H* = Measurements referring to optional wheels
us
st is
city
the
e to
and
G/6
N
ely,
no
r to
the
ater
rills
g a
940
2290/2340*
O
PERFORMANCE
37.7
37.8
35.10
38.10
Maximum capacity (kg)
3.700
3.700
3.500
3.800
Maximum lifting height (m)
7,35
7,93
9,75
9,75
Maximum horizontal outreach (m)
4,00
4,60
6,50
6,45
Outreach at maximum height (m)
0,20
0,35
0,84
0,84
Fork swivelling angle
130°
130°
130°
130°
Pull-out force (daN)
5.700
5.700
5.700
5.700
Towing force (daN)
7.300
7.300
7.300
7.300
Maximum climb angle
40%
40%
40%
40%
Total weight empty (kg)
7.200
7.850
7.600
7.800
Max speed (km/h)
30
BOOM
30
30
(On request 40 Km/h)
30
37.7
37.8
35.10
38.10
Lifting
10,2
11,8
10,2
10,8
Descent
5,3
6,9
5,3
6,9
Extension
7,3
8,9
10,1
10,1
Retraction
4,1
5,4
7,0
7,0
Forward swivelling
3,7
3,9
3,9
3,9
Reverse swivelling
2,4
2,4
2,4
2,4
Times empty
(in seconds)
Patented compensation system
ENGINE
Iveco NEF
74 Kw
Iveco NEF
93 Kw
Model:
Iveco NEF
Iveco NEF
Maximum power kW (hp):
74 (101)
93 (127)
2200
2200
Revolutions per minute (rpm):
A/C; Webasto Heater; Digital speedometer; Water Heater; Driver's seat with
pneumatic suspension; Light on boom head; Quick coupling for accessories;
Radio; Anti-theft system; Glass protection.
(For additional customizations, contact the area dealer)
4 stroke diesel
Operation:
Injection:
Direct mechanical
Number and arrangement of cylinders:
4, vertical in line
Engine size (cm3):
OPTIONALS AND ACCESSORIES
DRIVE
4485
4485
Specific consumption at 2200 rpm (g/kWh): 230
230
Hydrostatic drive with variable displacement pump.
Hydraulic engine with automatic adjustment.
Electrical - hydraulic inversion.
Inching pedal for controlled advancement.
Servocontrolled 2-speed gearbox.
Aftercooler Turbo compressor
Liquid cooling system
HYDRAULIC PLANT
DEVICES AS PER STANDARD
Gear pump with capacity at max. speed:
Anti-tipping device with pejorative movement block.
Max operational pressure:
Distributor control with joystick:
110 lt/1’
230 bar
3 in 1
Hydraulic socket for any accessories on the boom head.
Soundproof closed cab, ROPS-FOPS approved, with heater.
Self-blocking front axle differential (limited slip 45%).
Electric window winder.
DIFFERENTIAL AXLES
TOWING CAPACITY (upon request)
Steering axles: 2, with planetary reduction gears
Negative action parking brake.
Trailer without brakes (ton):
Mechanical braking (ton):
Hydraulic/pneumatic braking (ton):
74 kW engine
93 kW engine
Including 40 km/h speed
REFUELLING (Litres)
TYRES
Steering types: 4 wheels / transversal / 2 wheels
Front axle: rigid
Back axle: oscillating
Oil bath service braking on the front axle with servo brake
Hydraulic plant (total)
Fuel tank
140
95
Tyres
Alternative
3
5
17.5
20
16/70x20”
405/70x24”
G/7
Mod. Agri Max - Agri Power - Agri Star
G/8
Technical data
ALPHABETICAL INDEX
2-speed boom (optional) ...........................................................................................................c/54
3 in 1 proportional extension joystick (standard version) ............................................................c/34
3-point lifting device (optional) .........................................................................................................c/61
4 in 1 proportional control extension joystick proportional services .......................................c/35
4 in 1 proportional control extension joystick proportional services .......................................c/36
"A"
adjustable towing hook (optional) .................................................................................................c/59
Alignment (standard)............................................................................................................C/41
Alignment (standard)............................................................................................................C/42
anti-tipping device ...................................................................................................................c/38
anti-tipping system test .................................................................................................................c/78
"B"
batteries ............................................................................................................................................................. b/22
battery isolator switch .........................................................................................................................d/14
boom control lever .............................................................................................................................c/32
boom head lights consent (optional)................................................................................................c/49
boom head socket (optional) ................................................................................................................c/52
boom head solenoid valve (optional) ............................................................................................c/52
boom sliding blocks ......................................................................................................................d/42
boom suspension (optional) ..............................................................................................................c/54
buttons .............................................................................................................................................................c/76
"C"
cab components..........................................................................................................................................c/5
cab internal air circulation ...................................................................................................................c/45
cab internal air circulation device ...................................................................................................................c/46
cab rear lights consent (optional).......................................................................................c/48
capacity of parts to lubricate................................................................................................................ d/11
carrying out maintenance in safety ................................................................................................b/16
catalytic purifier (optional)............................................................................................................c/71
central dashboard - Use of instruments...........................................................................................c/17
central dashboard indicator lights...............................................................................................c/16
changing display visualisation ....................................................................................................c/76
changing hydraulic oil and replacing filters........................................................................................d/22
Check, cleaning,lubrication..........................................................................................................d/44
checking wind speed ...........................................................................................................b/32
cleaning and storing diesel fuel....................................................................................................... b/29
cleaning the driver's cab ..................................................................................................................................b/20
cleaning the windows...............................................................................................................................................b/20
cleaning the windows................................................................................................................................. b/19
clock regulation ................................................................................................................................c/76
consenso Cab front lights (optional)..........................................................................................c/48
contact with dangerous liquids.............................................................................................................. b/27
cooling liquid level check......................................................................................d/26
courtesy compartment..................................................................................................................c/10
cylinders block valves ..................................................................................................................d/32
"D"
dashboard instrument initial check .........................................................................................c/77
declaration of first inspection by manufacturer ...................................................................d/5
declaration of vibratory emissions ..........................................................................................................d/5
determining wear due to extension ...........................................................................................d/44
diesel.............................................................................................................................................................. b/28
differential axle.....................................................................................................................................d/47
disengagement of negative brake with engine off (agri max 70.10)......................................c/69
door opening controls.........................................................................................................................c/6
Mod. Agri Max - Agri Power - Agri Star
ALPHABETICAL INDEX
driver’s cab................................................................................................................................................... b/6
driver’s cab................................................................................................................................................. b/37
Driving authorisations.................................................................................................................................. B/7
dual reflector working light ..........................................................................................................d/51
dump body descent (optional)........................................................................................................................c/55
"E"
ecological considerations...............................................................................................b/30
ecording periodic inspections and maintenance work performed ..................d/61
electrical system protection ....................................................................................................... b/24
electromagnetic interference...........................................................................................................b/16
emergency lights selector.....................................................................................................................c/44
Engine bonnet opening ...........................................................................................................................d/15
engine bonnet opening lever....................................................................................................................c/9
engine error.......................................................................................................................................c/78
epicycloidal reduction gear ..............................................................................................................................d/47
e va l u at i n g s u b s o i l c o n s i s t e n c y . . . . . . . . . . . . . . . . . . . . . . . . . . . . . . . . . . . . . . . . . . . . . . . . . . . . . . . . . . . . . . . . . . . . b / 3 3
external boom chains..............................................................................................................................d/43
"F"
fast/slow gear switch................................................................................................................c/27
fire prevention.................................................................................................... b/21
front differential axle (optional)..........................................................................................c/51
front emergency exit ....................................................................................................................c/8
front hook............................................................................................................................................c/58
front light ...............................................................................................................................................d/50
Front transmission shaft ............................................................................................................d/47
front/rear differential axles - Oil change ..............................................................d/38
fuel tank ...............................................................................................................................d/24
fuses ...............................................................................................................................................................d/48
"G"
Gancio anteriore.............................................................................................................................................C/58
Gancio di traino...............................................................................................................................................C/59
Gancio di traino regolabile (optional)..................................................................................................C/59
GARANZIA................................................................................................................................................................A/4
GASOLiO................................................................................................................................................................B/28
GENERALITA’ DELLA MACCHINA.........................................................................................................................D/59
"H"
hodograph (optional)....................................................................................................................................c/75
hydraulic braking system for trailers (Italy type) (optional) ......................................c/62
hydraulic braking system for trailers (optional) .............................................................c/63
hydraulic filter ........................................................................................................................................................d/23
hydraulic gear switch (optional)...................................................................................................c/28
hydraulic oil level .................................................................................................................................d/21
"I"
identifying the cab parts............................................................................................c/15
identifying the vehicle parts .........................................................................................................c/4
identifying the vehicle parts.........................................................................................................d/6
ignition switch...........................................................................................................................c/23
inspecting the vehicle ............................................................................................................................... b/4
instructions for drawing-up the control register ................................................................d/58
interior cab lighting.....................................................................................................................c/10
Internal door opening controls.....................................................................................................c/6
introduction ..................................................................................................................................................... a/3
introduction.....................................................................................................................................................d/3
"J"
Joystick 3 in 1 extension on/off (standard version) ..............................................................................c/33
"L"
LCD .......................................................................................................................................................c/75
levelling ...................................................................................................................................................c/51
lifting the vehicle ................................................................................................................................ b/15
lighting ...................................................................................................................................................d/50
load handling ........................................................................................................................b/12
load tables ........................................................................................................................................... b/38
loads handling ............................................................................................................................... b/42
"M"
main control unit...................................................................................................................................d/48
maintenance and registration schedule......................................................................................d/8
maintenance prescriptions.............................................................................................................d/3
Manual accelerator ..............................................................................................................................C/44
max 180w socket .................................................................................................................................................c/9
multi-function lever ........................................................................................................................................c/25
"N"
"O"
obligations and methods of making claims to the i.s.p.e.s.l...............................................d/58
oil comparison table ...........................................................................................................................d/13
Opening the door window.............................................................................................................................c/7
Operating in safety .....................................................................................................................................b/8
"P"
parking brake..............................................................................................................................c/30
parking brake..............................................................................................................................d/20
parking the vehicle......................................................................................................................... b/13
pedals..................................................................................................................................................................c/24
pedals..................................................................................................................................................................d/18
periodical inspections and methods of recording ..........................................................................d/58
planetary reduction gear - oil change ...................................................................................................d/40
pneumatic braking system for trailers ...............................................................................c/64
power take-off (optional) ............................................................................................................................c/60
Preload and torque table for class 1 nuts and bolts ...........................................d/52
Preload and torque table for class 2 nuts and bolts ...........................................d/53
preparation after prolonged inactivity .................................................................................. b/19
preparing for emergencies ......................................................................................................................... b/5
protective clothing ...................................................................................................................................... b/4
putting the vehicle in neutral .................................................................................................................c/67
"Q"
"R"
radiator grill cleaning .............................................................................................................................d/25
rear emergency exit .................................................................................................................c/8
rear hydraulic sockets (optional)................................................................................................c/53
rear light ................................................................................................................................................d/51
Rear transmission shaft ............................................................................................................d/47
rear window............................................................................................................................................c/7
rear windscreen wiper controls.......................................................................................c/44
recognise safety standards......................................................................................................... b/2
recommended fuel specifications.............................................................................b/28
reducer - Gear box oil ...............................................................................................................................d/36
regulation of the 3-point lifting device ....................................................................................................c/61
replace cooling liquid ........................................................................................................d/27
reversible fan (optional) .................................................................................................................c/55
Mod. Agri Max - Agri Power - Agri Star
ALPHABETICAL INDEX
revolving light switch......................................................................................................................................c/48
road travel (instructions).................................................................................................................... b/14
road travel ........................................................................................................................................... b/14
ropsfops cab ........................................................................................................................................... b/37
running in period.......................................................................................................................................d/4
"S"
safety stickers ......................................................................................................................... b/20
safety stickers ......................................................................................................................... b/46
safety stickers........................................................................................................................ b/34
seat belt.....................................................................................................................................c/12
seat..................................................................................................................................................................c/13
service ...............................................................................................................................................................c/80
speedometer (optional) .................................................................................................................................c/75
spirit level and inclinometer ..................................................................................................................c/31
standard steering selector .............................................................................................................c/41
Starting the vehicle ..........................................................................................................................b/7
Start-up with auxiliary batteries ........................................................................................................ B/23
steering selector (optional) ............................................................................................................c/42
steering wheel (adjustment) .............................................................................................................c/11
storage of dangerous liquids ..................................................................................................................b/27
storage/prolonged inactivity ........................................................................................... b/19
Switch-on of dashboard indicator lights...................................................................................c/79
"T"
technical documentation pocket..........................................................................................................c/10
telehandler identification .................................................................................................. a/7
temporary halt.................................................................................................................................... b/13
tightening wheel nuts..................................................................................................................................b/25
to r q u e ta b l e f o r h y d r a u l i c f i t t i n g s . . . . . . . . . . . . . . . . . . . . . . . . . . . . . . . . . . . . . . . . . . . . . . . . . . . . . . . . . . . . . d / 5 4
towing hook .............................................................................................................................................c/59
towing the vehicle.................................................................................................................................c/66
transporting the vehicle........................................................................................................................... b/15
troubleshooting................................................................................................................................................d/55
tyres......................................................................................................................................................... b/25
"U"
underside removal................................................................................................................................d/17
Upper roof......................................................................................................................................c/7
using load tables and boom indicators ..................................................................... b/38
"V"
vehicle details ........................................................................................................................d/59
vehicle functions selector (optional)...............................................................................................c/40
vehicle Identification.............................................................................................................................. a/6
vibrations ..........................................................................................................................................................b/16
"W"
warranty .............................................................................................................................................................. a/4
waste disposal ................................................................................................................................ b/30
Water driven purifier (optional) ..............................................................................................................c/71
water heater (optional).......................................................................................................................c/56
water/oil/intercooler radiator .....................................................................................................d/25
wheels alignment indicator consent (optional) ..................................................................................c/43
work light ................................................................................................................................................d/51
AXH1117/IT
MANUALE DI USO E
MANUTENZIONE
Piattaforma Portapersone
Servizio Assistenza Tecnica - Via E. Majorana, 2-4 - 42027 Montecchio Emilia (RE) ITALY
Tel. +39 0522 869611 - Fax S.A.T. +39 0522 869744
www.dieci.com - E-mail: [email protected]
Via E. Majorana, 2-4
42027 Montecchio Emilia (RE) ITALY
Tel. +39 0522 869611 Fax +39 0522 869744
www.dieci.com - E-mail: [email protected]
ATTENZIONE: UNA COPIA DEL PRESENTE MANUALE DEVE SEMPRE
RIMANERE SULLA MACCHINA A DISPOSIZIONE DELL'OPERATORE