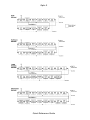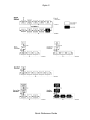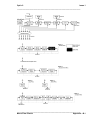
1
Optic 2 User Manual ATAS International B.V. Veldhoven The Netherlands Disclaimer ATAS International B.V. makes no representations or warranties with respect to the contents or use of this manual and specifically disclaims any express or implied warranties of merchantability or fitness for any particular purpose. Further, ATAS International B.V.reserves the right to revise this manual and to make changes to its content, at any time, without obligation to notify any person or entity of such revisions or changes. Copyright No part of this manual may be reproduced or transmitted in any form or by any means, electronic or mechanical, including photocopying and recording, for any purpose other than the purchaser's personal use without the written consent of the copyright holder. © ATAS International B.V., April 1996. All rights reserved. ATAS International B.V. De Run 4441 5503 LS Veldhoven The Netherlands Telephone: Facsimile: +31 (0)40 254 95 31 +31 (0)40 254 97 79 Optic 2 ® is a registered trademark of ATAS International B.V.. Document Number: 146008 Revision History: Issue Date 1 04/06/1996 2 Description First Edition Second Edition Optic 2 Issue 1 _______________________________________________ Contents Page EC Declaration of Conformity About This Manual Contents 1 Warnings and Cautions 1.1 1.2 Warnings Cautions 2 Introduction 2.1 2.2 2.3 2.4 2.4.1 2.4.2 2.4.3 Improved Performance Improved Flexibility Compatibility Control Unit Keypad Display Rear Connector Panel 2.4.3.1 2.4.3.2 2.4.3.3 2.4.3.4 Serial Port Connector Auto-sampler Connector Chromatograph Connector Auxiliary Connector 2.4.4 2.4.5 2.5 2.6 2.7 2.7.1 2.7.2 2.7.3 2.7.4 2.7.5 2.8 2.9 2.10 Pneumatics Needle Valves and Vents System Overview 2.7 Remote Control Method Menus Split Method Menu Splitless Method Menu Large Volume Method Menu Desorption Method Menu Expert Method Menu Optic 2-200 Optic 2-300 Technical Specification 3 Installation 3.1 3.1.1 Installation Mounting the Injector 3.1.1.1 3.1.1.2 Location Installation 3.1.2 Gas Control Installation 3.1.2.1 3.1.2.2 3.1.2.3 Split Line Carrier Gas Line Septum Purge Line i ii iii 1.1 1.1 1.1 2.1 2.1 2.1 2.1 2.1 2.1 2.2 2.2 2.4 2.4 2.4 2.5 2.6 2.6 2.7 2.7 2.8 2.8 2.8 2.9 2.9 2.9 2.10 2.10 3.1 3.1 3.1 3.1 3.1 3.2 3.3 3.3 3.3 3.1.2.4 Cooling Air Line 3.1.3 3.1.4 Logic Connections Liner and Column Installation 3.1.4.1 3.1.4.2 Liner Installation Column Installation 3.3 3.4 3.4 3.4 3.5 _______________________________________________ Contents Page iii Optic 2 Issue 1 _______________________________________________ Page 4 Configure Menu 4.1 4.1.1 4.1.2 Access the Configure Menu Password Name Password Control 4.2 4.1.2.1 Change Password 4.2 4.1.3 Maximum Temperature 4.1.4 GC Ready Input 4.1.5 GC Ready Output 4.1.6 Contrast Control 4.1.7 Pressure Units 4.1.8 Reset Parameters 4.3 4.2 Exit the Configure Menu 5 Standby Menu 5.1 5.1.6 5.2 Access the Standby Menu 5.1 Standby Time Standby Temperature Standby Split State Standby Carrier Pressure Standby Auxiliary Pressure 5.3 Access the Software Version Number Exit the Standby Menu 6 Method Menu 6.1 6.2 6.3 6.4 6.4.1 6.4.2 6.4.3 6.4.4 6.4.5 6.4.6 6.4.7 6.4.8 Method Rules Method Statements Access the Method Menu Split Menu Access the Split Method Menu Method Name Equilibration Time Initial Temperature Ramp Rate Final Temperature End Time Transfer Pressure 6.4 Transfer Time Initial Run Pressure Final Run Pressure Exit the Split Method Menu Splitless Menu Access the Splitless Method Menu Method Name Equilibration Time Initial Temperature Ramp Rate 5.1.1 5.1.2 5.1.3 5.1.4 5.1.5 6.4.9 6.4.10 6.4.11 6.4.12 6.5 6.5.1 6.5.2 6.5.3 6.5.4 6.5.5 4.1 4.1 4.1 4.2 4.2 4.3 4.3 4.3 4.3 5.1 5.1 5.1 5.2 5.2 5.3 5.3 6.1 6.1 6.2 6.2 6.2 6.3 6.3 6.3 6.3 6.4 6.4 6.4 6.5 6.5 6.5 6.5 6.6 6.6 6.6 6.7 6.7 6.7 _______________________________________________ Page iv Contents Optic 2 Issue 1 _______________________________________________ 6.5.6 6.5.7 6.5.8 6.5.9 Final Temperature End Time Splitless Time Transfer Pressure 6.8 6.7 6.8 6.8 Page 6.5.10 6.5.11 6.5.12 6.5.13 6.6 6.6.1 6.6.2 6.6.3 6.6.4 6.6.5 6.6.6 6.6.7 6.6.8 6.6.9 6.6.10 6.6.11 6.6.12 6.6.13 6.6.14 6.6.15 6.6.16 6.7 6.7.1 6.7.2 6.7.3 6.7.4 6.7.5 6.7.6 6.7.7 6.7.8 6.7.9 6.7.10 6.7.11 6.7.12 6.7.13 6.7.14 6.7.15 6.7.16 6.7.17 6.8 6.8.1 6.8.2 6.8.3 6.8.4 6.8.5 6.8.6 Transfer Time Initial Run Pressure Final Run Pressure Exit the Splitless Method Menu Large Volume Menu Access the Large Volume Method Menu Method Name Equilibration Time Initial Temperature Vent Time Ramp Rate Final Temperature End Time Split Open Time Purge Pressure Transfer Pressure 6.13 Transfer Time Initial Run Pressure Final Run Pressure Solvent Monitor Threshold Exit the Large Volume Method Menu Desorption Menu Access the Desorption Method Menu Method Name Equilibration Time Initial Temperature Ramp Rate Final Temperature End Time Split Mode Sample Sweep Pressure Sample Sweep Time Desorption Pressure Desorption Time Transfer Pressure 6.19 Transfer Time Initial Run Pressure Final Run Pressure Exit the Desorption Method Menu Expert Menu Access the Expert Method Menu Method Name Equilibration Time Initial Temperature Initial Time Ramp Sub-Menu 6.9 6.9 6.9 6.9 6.10 6.10 6.10 6.11 6.11 6.11 6.12 6.12 6.12 6.12 6.13 6.13 6.14 6.14 6.14 6.14 6.15 6.15 6.15 6.16 6.16 6.16 6.17 6.17 6.17 6.17 6.18 6.18 6.18 6.19 6.19 6.19 6.20 6.21 6.21 6.21 6.22 6.22 6.22 6.23 _______________________________________________ Contents Page v Optic 2 Issue 1 _______________________________________________ 6.8.6.1 6.8.6.2 6.8.6.3 6.8.6.4 Ramp Rate (1 to 4) ISO Temperature (1 to 4) ISO Time (1 to 4) Exit the Ramp Sub-Menu 6.8.7 Split Valve Sub-Menu 6.8.7.1 6.8.7.2 6.8.7.3 6.8.7.4 6.8.7.5 6.8.7.6 Initial State State (1) Time (1) State (2) Time (2) Exit the Split Valve Sub-Menu 6.8.8 Auxiliary Control Sub-Menu 6.8.8.1 6.8.8.2 6.8.8.3 Initial State Time (1 to 8) Exit the Auxiliary Control Sub-Menu 6.8.9 Carrier Gas Pressure Control Sub-Menu 6.8.9.1 6.8.9.2 6.8.9.3 6.8.9.4 Start Pressure Time End Pressure Exit the Carrier Gas Pressure Control Sub-Menu 6.8.10 6.27 Auxiliary Gas Pressure Control Sub-Menu 6.8.10.1 6.8.10.2 6.8.10.3 6.8.10.4 Start Pressure Time End Pressure Exit the Auxiliary Gas Pressure Control Sub-Menu 6.9 Exit the Method Menu 7 Sequence Menu 7.1 7.2 7.3 Access the Sequence Menu Set Up a Sequence Exit the Sequence Menu 8 Copy Menu 8.1 8.2 8.3 Access the Copy Menu Copy a Method Exit the Copy Menu 9 Delete Menu 9.1 9.2 9.3 Access the Delete Menu Delete a Method Exit the Delete Menu 10 Performing a Method 10.1 10.1.1 10.2 10.2.1 10.2.2 10.2.3 10.3 Run a Method Loading a Method Displays Optic 2 Optic 2-200 Optic 2-300 End of Method 6.23 6.23 6.23 6.24 Page 6.24 6.24 6.24 6.24 6.25 6.25 6.25 6.25 6.26 6.26 6.26 6.26 6.27 6.27 6.27 6.27 6.28 6.28 6.28 6.28 6.28 7.1 7.1 7.1 7.1 8.1 8.1 8.1 8.2 9.1 9.1 9.1 9.1 10.1 10.1 10.2 10.2 10.2 10.2 10.2 10.3 _______________________________________________ Page vi Contents Optic 2 Issue 1 _______________________________________________ 11 Fault Diagnosis 11.1 Warnings 11.1.1 11.1.2 11.2 11.2.1 11.2.2 11.3 11.3.1 11.3.2 11.3.3 11.3.4 11.4 Ramp Rate Carrier Gas Faults Thermocouple Fault Temperature Fault Troubleshooting No Power Injector Does Not Heat Injector Slow to Heat Injector Slow to Cool Injector Power Lead 11.1 11.1 11.1 11.1 11.1 11.2 11.2 11.2 11.2 11.2 11.2 12 Maintenance 12.1 12.2 Routine Maintenance Servicing 12.1 12.1 12.1 13 Spares and Accessories 13.1 13.2 13.3 13.4 13.5 Injector Liners Consumables Spares Interface Cables Accessories and Upgrades 13.1 Installation Kits (includes Interface Cables) 11.1 11.1 Page 13.6 13.1 13.1 13.1 13.1 13.1 13.2 List of Illustrations Figure 2.1 Figure 2.2 Figure 2.3 Figure 2.4 Figure 10.1 Display and Keypad Rear Connector Panel Pneumatics Needle Valves and Vents State Transition Diagram 2.2 2.3 2.6 2.6 10.1 Appendices A B C D E F Method Profiles Menu Flow Charts Default Parameters Injector Diagram Rear Panel Pin Connections Method Sheets A1 - A5 B1 - B3 C1 - C5 D1 E1 - E2 F1 - F7 _______________________________________________ Contents Page vii Optic 2 Quick Reference Guide Optic 2 Quick Reference Guide Optic 2 Quick Reference Guide Optic 2 OPTIMISATION ROUTINE FOR RAPID OR AT-ONCE LARGE VOLUME INJECTION 1. OBTAIN A REFERENCE CHROMATOGRAM Either from previous work, or by using an on-column injection of a 1µl standard solution, obtain a reference chromatogram for comparison purposes. 2. CHECK THE LINER PACKING IS INERT WITH RESPECT TO THE SAMPLE Fit a packed liner and inject 1µl of the standard in the cold splitless mode. Compare the results with the reference chromatogram. Differences between the two chromatograms can indicate nonoptimised splitless transfer conditions. For example: If the peak areas tend to be smaller than the reference chromatogram, the Optic temperature could be too low, or, the splitless time is too short: If some of the peaks are smaller or absent, when compared to the reference chromatogram, the liner packing may not be inert to all of the analytes of interest. 3. DETERMINE THE LIQUID CAPACITY OF THE LINER (VMAX) Without turning off the carrier gas, remove the column from the injector and inject 150µl of solvent. Look for solvent droplets at the injector outlet. Progressively reduce the amount injected until no droplets are observed. This volume is VMAX. 4. DETERMINE THE SOLVENT ELIMINATION TIME Reconnect the column to the injector. Set the column temperature to 20°C above the injector temperature. Set the detector to minimum sensitivity. Set the vent flow to 200cm3/min. Rapidly inject a volume of pure solvent equal to the volume to be used in large volume injection (do not exceed 90% VMAX). Measure the peak width of the solvent in seconds. 5. LARGE VOLUME INJECTION OF STANDARD Dilute the standard by a factor equal to the number of µl to be used in the large volume injection, using clean solvent. Set the vent time to the solvent elimination time. Set the detector sensitivity to that used to obtain the reference chromatogram. Inject the selected volume of dilute standard (do not exceed 90% VMAX). Compare the chromatogram obtained with the reference chromatogram. 6. FINE TUNING If the chromatogram from the large volume injection looks like the reference chromatogram, no further optimisation is required. If volatile components are lost, reduce the vent time in steps of 35%. 7. HINTS Do not be tempted to take short-cuts. Set the vent flow to 200cm3/min. Set the split flow to 50cm3/min. Set the initial temperature in the range 30-40°C below the solvent boiling point. Set the final temperature to 50°C above the elution temperature of the latest running peak. Set the ramp rate to 4°C/min. VMAX is usually 80-125µl. Solvent elimination time is usually 30-50 seconds. Polar solvents have larger elimination times. Quick Reference Guide Optic 2 When using GC-MS, the rise in source pressure can be used to determine the solvent elimination time. Quick Reference Guide Optic 2 Issue 1 _______________________________________________ 1 Warnings and Cautions This section explains the warnings and cautions that should be observed when installing or operating the Optic 2. Safety information is covered at relevant points throughout the manual. Please read this manual in its entirety before installing or operating the instrument. Should any point remain unclear, contact your supplier for assistance before proceeding. Optic 2 is designed for installation and use in a laboratory environment by suitably trained personnel. 1.1 Warnings Optic 2 is intended for use in laboratories which are equipped to enable analytical chemistry to be performed without risk. In particular, provision must be made for the storage of solvents in flame-proof cabinets and personnel must wear protective clothing and eye protection at all times. Both the Optic 2 and the host GC must be disconnected from the mains power supply until installation of the equipment is complete. There are potentially hazardous voltages present inside the Optic 2 control unit. Switch off the control unit and disconnect the mains power supply before removing the control unit cover. The injector unit is supplied with a plated safety cover. This prevents contact with potentially hazardous electrical supplies and hot surfaces. This cover MUST be in place at all times when the Optic 2 is switched on. The operation of the injector requires that it heats rapidly to high temperatures. Parts of the injector may remain hot for some time after the unit is switched off. Care must be taken when working in the area of the injector. It is especially important to ensure that the injector is cool (below 60°C) and switched off before changing injector liners. Most organic solvents are toxic to some degree and substantial amounts of solvent vapour may emerge from the split, vent and purge ports. It is highly recommended that this effluent be ducted to a fume hood, or that active carbon traps are fitted to the outlets. 1.2 Cautions The Optic 2 gas controls are not designed for operation with explosive, corrosive or toxic gases. It is important that a good connection is made between the injector power cable (the flat copper lead) and the injector. A bad connection can result in poor operation and the connection becoming excessively hot. Ensure that the cooling air pipe is clamped securely in place and does not contact the central body of the injector or the injector power cable. _______________________________________________ Warnings and Cautions Page 1.1 Optic 2 Issue 1 _______________________________________________ When leak testing connections, ensure that a suitable electronic leak detector, (such as the Ai Leakseaker 196), or a 50/50 solution of iso-propanol and water is used. Under no circumstances should a soap solution or similar be used. The injector control box must not be switched on with the injector disconnected. Serious damage to the instrument may be caused. _______________________________________________ Page 1.2 Warnings and Cautions Optic 2 Issue 1 _______________________________________________ 2 Introduction Until now, Gas Chromatographs (GCs) have been fitted with injectors which are simple in design and very limited in the options that they offer. For many years, sample injection has been the weakest part of chromatographic system, imposing severe limitations in it's ability to deliver high quality results. Optic 2 is the world's most advanced injection system and is designed to combine excellent performance with a dramatic improvement in analytical flexibility. 2.1 Improved Performance The Optic 2, when correctly set up, offers complete absence of sample discrimination. Reproducibility is comparable to on-column injection, but offers excellent tolerance of "dirty" samples. Thermal degradation is less severe than with conventional hot split and splitless injectors and the analyst has much greater control over the way in which the sample is treated. 2.2 Improved Flexibility The Optic 2 can be used for hot split, hot splitless, cold split, cold splitless and oncolumn injection. It is also able to offer injection modes which have no parallel where traditional injectors are concerned. Facilities such as large volume sampling, thermal desorption and pyrolysis are standard features. Optic 2 offers far greater control over the fate of the sample in the injector than normal systems. When the sample is injected, the analyst can select the temperature and, if the equipment is an Optic 2-200, can also select the injector pressure. It is even possible to inject under static gas flow conditions. Consequently, it is possible to conceive many novel approaches to sample injection. 2.3 Compatibility Optic 2 is designed to be compatible with most popular makes and models of GC and GC-MS. Once installed, Optic 2 should be fully compatible with the auto-sampler. Please contact your local Optic 2 distributor if you have any questions concerning compatibility. 2.4 Control Unit 2.4.1 Keypad The Optic 2 has a multi-functional keypad mounted on the front panel of the unit. The eight keys allow the user to interface with the user-friendly software to configure and perform the various functions of the Optic 2. A diagram of the keypad is shown in Figure 2.1. _______________________________________________ Introduction Page 2.1 Optic 2 Issue 1 _______________________________________________ Figure 2.1 Display and Keypad 2.4.2 Display Information is presented to the user via a 2-line, 20-digit display, mounted above the keypad. A typical display example is shown in Figure 2.1. 2.4.3 Rear Connector Panel The Rear Connector Panel provides connections for the interface with the host GC and the main power supplies. A diagram of the panel is shown in Figure 2.2. The six couplings, located at the top of the panel, provide inlet and outlet connections for "Carrier Gas" and Auxiliary Gas" controls. These are optional and are used only on the Optic 2-200 and Optic 2-300 instruments. The "Carrier In" coupling is connected to the carrier gas supply. The "Carrier Out", "Septum Purge" and "Split" couplings are connected to the corresponding pipes on the injector. The "Aux In" and "Aux Out" couplings are used on the Optic 2-300 for connection to the second channel of gas pressure controls. The "Thermometer" connections are used for the injector temperature sensor. The "Air In" port of the "Cooling Gas Valve" is used for connection to the cooling air supply for the injector. The "To Injector" port should be connected to the cooling pipe of the injector, using the plastic tubing supplied. _______________________________________________ Page 2.2 Introduction Optic 2 Issue 1 _______________________________________________ Figure 2.2 Rear Connector Panel Four connectors provide connections for Serial, Auto-sampler, Chromatograph and Auxiliary interfaces. The pin allocations for the connectors are shown in the following sub-sections. _______________________________________________ Introduction Page 2.3 Optic 2 Issue 1 _______________________________________________ 2.4.3.1 Serial Port Connector A 9-way, female, D-type connector. The function and pin connections are compatible with an IBM PC serial port. Pin 2 Pin 3 Pin 4 Pin 5 Pin 6 TxD RxD DTR 0V DSR 2.4.3.2 Auto-sampler Connector A 15-way, female, D-type connector, (mainly used when a non-standard Auto-sampler is fitted to the GC). Optic Ready Output Type: Normally open relay contacts, closed when the instrument is in the Ready state. Function : Signal to other parts of the system that the Optic (and devices "upstream" in the Ready chain) are ready for an injection. Pins: 1 and 2 Relay contacts. Run Input Type: Function: Pins: External contact closure. When the connections are shorted the Optic goes into the Run state. 5 System reference voltage (ground). 6 Logic input pulled up internally to +5V via resistor network. 2.4.3.3 Chromatograph Connector A 25-way, male, D-type connector. Run Output Type: A relay contact closure for one second when the Run state is entered. Function: Run signal which is output at the end of the initial isothermal period. Pins: 21 and 22 Relay contacts. Integrator Run Output Type: A relay contact closure for one second when the Run state is entered. Function: Run signal which is output at the end of the initial isothermal period. Pins: 23 and 24 Relay contacts. GC Ready Output This signal is output to the GC to indicate the ready state of the Optic. Type: Relay contacts asserted when the instrument is in the Ready state. Normally Open, Normally Closed, Disabled Open or Disabled Closed, selected through configuration menu. Function: Signal to other parts of the system that the Optic (and devices "upstream" in the Ready chain) are ready for an injection. Pins: 19 and 20 Relay contacts. GC Ready Input This signal is received from the GC. _______________________________________________ Page 2.4 Introduction Optic 2 Issue 1 _______________________________________________ Type: be Function: satisfied active. Pins: Run Input Type: Function: Pins: External contact closure or contact open on Ready, or disabled. This will selectable through the configuration menu. The default setting is disabled. When a Ready signal is received no action is taken until the Optic is ready and the equilibration time has passed. When all these conditions are the Optic enters the Ready state and the Ready output becomes 3 System reference voltage (ground). 4 Logic input pulled up internally to +5V via resistor network. External contact closure. When the connections are shorted the Optic goes into the Run state. 9 System reference voltage (ground). 10 Logic input pulled up internally to +5V via resistor network. 2.4.3.4 Auxiliary Connector A 25-way, female, D-type connector. Splitless Valve Type: Drive to solenoid valve. Function: Controlled by software. Provides the drive to switch the splitless solenoid as required. Pins: 1 Connected to output 24V supply see note at end. 2 Connected to relay or open collector drive, rated to 30V, 250mA max. Auxiliary Output Functions 1 to 5 Type: Normally open relays (rated to 30V, 250mA) under software control for external devices. Function: Control of additional solenoid valves or other external devices. Pins: 4 and 5 Connected to relay 1 contacts. 7 and 8 Connected to relay 2 contacts. 10 and 11 Connected to relay 3 contacts. 14 and 15 Connected to relay 4 contacts. 17 and 18 Connected to relay 5 contacts. 20 and 21 Connected to output 24V supply. 22 and 23 Connected to output 5V supply. 24 and 25 Connected to 0V return. 5V supply This is a voltage of 5V nominal, relative to system ground. The current available is limited to approximately 100mA. 24V supply This is a voltage of 24V nominal, relative to system ground. The current available is limited to 250mA. This supply is protected by the 250mA fuse located on the rear panel. 2.4.4 Pneumatics (Optic 2-200 and Optic 2-300) _______________________________________________ Introduction Page 2.5 Optic 2 Issue 1 _______________________________________________ Figure 2.3 shows a schematic diagram of the Optic 2 pneumatic controls. Figure 2.3 Pneumatics 2.4.5 Needle Valves and Vents The needle valves and vents are located on the lower front panel of the instrument, as illustrated in Figure 2.4. The septum purge flow is set by the "Purge" needle valve and can be monitored using the port above the needle valve. The split line flow is set in the same way, using the "Split" needle valve and port when the split setting is "Split", and the "Vent" needle valve and port when the split setting is "Vent". Figure 2.4 Needle Valves and Vents 2.5 System Overview _______________________________________________ Page 2.6 Introduction Optic 2 Issue 1 _______________________________________________ Operation of the Optic 2 is controlled by a menu structure. When power is applied to the Optic 2, a system initialisation sequence is performed. During this time the LCD display will read: Initialising. On completion of the initialisation sequence, the Top Level Menu is displayed. The Top Level Menu contains the following options: : Standby Menu : Method Menu : Sequence Menu : Copy Menu : Delete Menu : Configure Menu Use the Left or Right arrow key to select a menu option from the Top Level Menu. To gain access to the required menu, press the Menu Enter key. 2.6 Remote Control A user can configure the Optic 2 to be controlled by a Personal Computer (PC). To enable this facility: 1. Switch power on to the Optic 2 with the Function key held down. The Control Remote window is displayed. To change back to local control, switch the Optic 2 off and then start up as normal. 2.7 Method Menus Optic 2 offers many different ways to introduce all kinds of samples into the GC. To combine flexibility with a user-friendly interface, five different method menus are available. Split, Splitless, Large Volume and Desorption methods are designed to give simplified method entry and editing for the most commonly used sample introduction modes. In contrast, the Expert method menu gives the analyst flexibility to design injection techniques to suit special requirements. Up to 20 different methods can be set up at any one time. Note: Appendix - F contains blank Method Sheets which can be photocopied for recording the parameters set in a customised method. 2.7.1 Split Method Menu Optic 2 can be used as a conventional hot split injector or for cold split injection. In virtually all cases, better results will be obtained using the cold split approach. This _______________________________________________ Introduction Page 2.7 Optic 2 Issue 1 _______________________________________________ means starting with the injector cold, (i.e. below the boiling point of the solvent) and temperature programming the injector to a temperature usually 50°C above the maximum elution temperature of the sample. This gains the following advantages: : Syringe needle discrimination is eliminated, thus ensuring that the fraction of the sample which enters the column is truly representative of the sample as a whole. : The milder temperature regime experienced by the sample reduces thermal degradation (especially when lower injector programming rates are used). : Better detection limits are obtained for late running components. : Better run-to-run reproducibility. 2.7.2 Splitless Method Menu Optic 2 can be used for conventional hot splitless injection or for the cold equivalent. In virtually all cases, better results will be obtained using the cold injection technique for identical reasons to those described above. The quality of results obtained should be comparable to on-column injection an all respects but with the added advantage of preventing involatile and particulate matter from reaching the column. Consequentially, cold splitless injection is better suited to the analysis of "dirty" samples. 2.7.3 Large Volume Method Menu In the past, gas chromatographers have been used to injecting samples of no more than 2ml into the GC. Since split/splitless injectors generally have an internal capacity of approximately 2ml, and 1ml of solvent gives rise to approximately 1ml of vapour, the total amount of sample that can be injected into a split or splitless injector is around 2m l. When an injection is made into a temperature programmable injector, the evaporation of the solvent is a controllable process and therefore restrictions on the volume of solvent that can be injected are much less severe. Optic 2's large volume method is designed to implement the "Rapid" large volume technique. This enables injections up to 100ml to be made routinely and with a minimum of optimisation. The technique is compatible with most auto-samplers and is very robust, making it suitable for routine applications. Other large volume sampling techniques, such as speed programmed injection, may also be accommodated. In large volume injection, the sample is introduced with the injector at near ambient temperature. The solvent is allowed to evaporate into the carrier stream and pass out through the split vent. At an appropriate point, the split vent is closed and the injector heated. The sample is then transferred to the column. Simple optimisation of the parameters enables components with a very wide range of volatility to be analysed by this technique. The advantages to be gained from this method are very significant: : An improvement in detection limits of up to 100 times that of conventional splitless injection. _______________________________________________ Page 2.8 Introduction Optic 2 Issue 1 _______________________________________________ : Much greater flexibility in design of sample preparation procedures. : Opportunities to couple on-line with sample preparation accessories (such as automated solid phase extraction instruments). 2.7.4 Desorption Method Menu The Optic 2 can be used for the thermal desorption of both solid samples and adsorption tubes. When analysing gas phase samples, the samples can be collected off-line using an Optic liner, packed with a suitable sorbent. Alternatively, on-line analysis is possible with the sample being introduced into the liner while it is still within the injector. The desorption method gives a sequence of operations which is designed to enable the best results to be easily obtained. Thermal desorption using the Optic 2 is distinguished from conventional thermal desorption by the way the adsorption tube is closely coupled to the column. This gives the following advantages: : The analysis of very active components is possible since the opportunities for adsorptive losses are greatly reduced. : The analysis of components with a very high boiling point (such as polymer additives) is possible. : The very short time-cycle associated with the desorption enables results to be obtained rapidly. 2.7.5 Expert Method Menu The four modes of operation described above are designed to cover the most common ways in which Optic 2 will be used. The Expert mode is designed to cater for the many other possibilities. In the expert mode, four ramp temperature programmes and four segment pressure profiles can be set. In addition, five external channels of time events can be programmed and the split valve can be programmed to change state up to eight times in any sequence. Pressure control of an auxiliary gas supply channel is also possible. 2.8 Optic 2 - 200 Optic 2 - 200 offers all of the advantages of the Optic 2 with the additional benefit of electronic programming of the carrier gas pressure. The gas controls resident within the Optic 2 - 200 are designed to enable the fullest advantage to be taken of the equipment's analytical capabilities. Pressure programming gives the following advantages: : During the transfer of the sample from the injector to the column, an elevated pressure can be set in order to speed the transfer. This can give sharper peaks and will also assist in the reduction of thermal degradation. _______________________________________________ Introduction Page 2.9 Optic 2 Issue 1 _______________________________________________ : A linear pressure programme may be set with a higher pressure at the end of the analysis. This can give shorter analysis times and improved peak shapes for later running components. : In large volume sampling, the pressure in the injector during solvent elimination can be set independently. : In desorption applications, desorption of the sample can take place under static or dynamic flow conditions. In addition Optic 2 - 200 offers the following features: : A sensor in the split line enables the progress of solvent elimination to be monitored and, if desired, closure of the split valve can be automated. : A separate control enables the vent flow (during solvent elimination) to be set independent of the split flow. 2.9 Optic 2 - 300 Optic 2 - 300 offers all of the advantages of the Optic 2 - 200 and includes a second independent channel of pressure programming which is accessible via the Expert method menu. 2.10 Technical Specification Operating Ranges: Air Cooling: Liquid CO2 Cooling: 35°C to 600°C at an ambient temperature of 25°C and a GC oven temperature of 35°C. -50°C to 600°C at an ambient temperature of 25°C and a GC oven temperature of 35°C. Ambient Temperature Range: 10°C to 40°C. Mains Power: For use with 220/240V ±10%, 50 Hz, or 110/120V ±10%, 60 Hz. Power Consumption: 250VA. Gas Supplies: Carrier & Auxiliary; Helium, Nitrogen or Argon at a pressure between 30 and 100psi. Optic Cooling; Moisture and oil free air at a pressure between 60 and 80psi. _______________________________________________ Page 2.10 Introduction Optic 2 Issue 1 _______________________________________________ 3 Installation This section should be read carefully, in conjunction with any specific instructions supplied with the installation kit. Should you intend to install Optic 2 onto an instrument for which a specific installation kit is unavailable, please follow these instructions with particular care. 3.1 Installation The installation of Optic 2 to an existing GC can be considered as four separate tasks: : Installation of the injector into the chromatograph oven. : Connection of the injector to the gas controls. : Electrical connections. : Installation of an appropriate liner and column. WARNING: It is important that both the Optic 2 and the host GC are disconnected from the mains supply until the installation is complete. 3.1.1 Mounting the Injector To achieve the best results from Optic 2, the injector should be installed directly into the oven insulation, rather than into an injector block. Fitting Optic 2 in this way ensures that it cools rapidly to a start temperature. 3.1.1.1 Location If Optic 2 is to be used for manual injection only, it can be fitted anywhere on the top of the oven away from the injector and detector blocks. The most convenient location is one that aligns with an existing hole in the column oven's inner skin. If Optic 2 is to be used with an auto-sampler, extra care is needed in deciding upon the location. In many cases the removal or relocation of an existing injector block will be required. Ensure that the new injector is aligned in all three axis such that its septum cap is coincident with that of the standard injector. Note: The removal of an injector block entails the removal of the injector heater and temperature sensor. Some GCs will treat the absence of the sensor as a fault. In such cases a resistor has to be fitted in place of the sensor, (refer to the installation kit for details), and the GC's injector control must be switched off at all times. For correct operation, the Optic 2 injector base plate must be electrically grounded via the GC. The completed installation should be checked by a competent person before use. 3.1.1.2 Installation 1. Determine the location for the Optic 2 and if necessary remove or relocate the existing injector. _______________________________________________ Installation Page 3.1 Optic 2 Issue 1 _______________________________________________ 2. Locate the injector cooling block and undo the retaining screw and nut. 3. Screw the injector body to the mounting plate provided in the installation kit and offer up the assembly to its intended location. 4. Uncoil the split line (insulated with fibre-glass sleeving) and form the pipe to follow the route intended. Do the same for the carrier gas inlet line, the septum purge line and the injector power lead. Note: With the pipes pointing towards the rear of the GC, the pipe on the left is the septum purge line . 5. on Screw the Optic 2 to its mounting plate and screw the mounting plate in place the GC's oven top. 6. Inside the column oven, pack mineral wool insulation tightly around the injector in order to ensure that hot air from the oven cannot leak out around the newly installed injector. 7. Replace the cooling air pipe and clamp it into place with the cooling block. Caution: Ensure that the cooling air pipe is clamped securely and that it does not contact the central body of the injector. 8. Push the white plastic cooling air supply pipe onto the free end of the cooling air pipe. 9. Connect the injector thermocouple to the rear panel of the Optic 2. 10. Connect the control box and the host GC to the mains power supply. 11. Ensure that the end of the sleeved split line is not in contact with anything. 12. Fit the plated safety cover and screw it into position. 3.1.2 Gas Control Installation Note: This section is not applicable to the installation of an Optic 2-200 or Optic 2300. Optic 2 is compatible with the carrier gas controls supplied with many modern capillary gas chromatographs. However, the full functionality of the injector might not be available in some cases. The installation of Optic 2 with the existing gas controls is a simple case of substituting Optic 2 in place of the standard injector. This is achieved by either cutting the pipes which join the standard injector to the gas controls or by replacing the original gas control components for the Optic 2 gas lines. If the latter option is taken it is necessary to ensure that the appropriate gas fittings are available. The Optic 2 interface kit includes fittings for connection to 1/16" pipes. 3.1.2.1 Split Line _______________________________________________ Page 3.2 Installation Optic 2 Issue 1 _______________________________________________ The split line is sleeved with braided insulation. When Optic 2 is switched on, the split line is electrically live (2V AC). While this does not represent a risk of electric shock, it is important, for correct operation of the injector, that the split line is electrically isolated from the rest of the chromatograph. A 1/16" nylon Swagelok coupling is provided for this purpose. 1. Determine the required length of the split line. Using a sharp blade, cut the insulation around the pipe and remove the unwanted insulation. 2. Cut the pipe to the required length using a tube cutter. 3. Insert the pipe into one end of the nylon coupling as far as possible and tighten the fitting. The braided insulation should butt up against the fitting leaving no uninsulated pipe exposed. 4. Connect the free end of the nylon coupling to the 1/16" split line from the host chromatograph. 3.1.2.2 Carrier Gas Line The carrier gas inlet pipe and septum purge outlet pipe are located side by side on the injector top assembly. Note: It is important to correctly identify these two pipes. With the top assembly in place on the injector and the pipes pointing towards the rear of the GC, the carrier gas inlet pipe is the pipe on the right. 1. Join the carrier gas line from the host GC to the Optic 2 injector, using a 1/16" Swagelok coupling, 3.1.2.3 Septum Purge Line In most operating modes the use of a septum purge offers no advantage. This facility should only be used if it is intended to operate Optic 2 as a hot isothermal injector, for split or splitless injection. 1. To use the septum purge facility, join the Optic 2 septum purge line to the existing septum purge control within the host GC, using a 1/16" Swagelok coupling. In this case the purge control should be shut off when not required. 2. If it is decided not to use the septum purge, the tube can be blanked off at the end using a 1/16" Swagelok coupling and a blanking cap. 3.1.2.4 Cooling Air Line Caution: When replacing or adjusting the cooling pipe, ensure that the unit is switched off. Before switching on ensure that no part of the cooling pipe is in contact with either the body of the injector or the power conductor which connects the power cable to the top of the injector. For optimum cooling efficiency, Optic 2 requires a supply of compressed air at 80psi. A lower pressure supply can be used, but the speed of cool down will suffer accordingly. _______________________________________________ Installation Page 3.3 Optic 2 Issue 1 _______________________________________________ While analytical grade air is not needed, if air is supplied from a compressor or air line, the air supply should be filtered to be free of moisture, oil and particulates. 1. Connect the air supply directly to the solenoid valve mounted on the rear panel of the control unit. 2. Push the white plastic pipe, which emerges from the top of the solenoid valve, onto the 1/16" stainless steel stub pipe. Note: The cooling arrangement works on the principle of entraining a large volume of ambient air in a jet of compressed air emerging from the end of the tube. In some instances, the installation can result in the injector being enclosed (e.g. under an auto-sampler plate) and may not represent the most effective cooling arrangement. In these cases, the crimped tube should be replaced with a longer pipe, without a restriction, which reaches close to the bottom of the body of the injector. This will allow a higher flow rate of compressed air to cool the injector. 3.1.3 Logic Connections Optic 2 has a full range of external logic functions which permit control to be integrated with the host GC system. These functions are accessible via a 25-way D-type connector on the rear connection panel of the control box. Instructions for the configuration of these functions is given in the installation guide of the host GC. 3.1.4 Liner and Column Installation The way in which the column should be installed and the type of injection port liner required, depends upon the role that the Optic 2 is to perform. 3.1.4.1 Liner Installation A liner is installed in the injector prior to delivery. To change the liner, the following procedure should be adopted. Caution: During this operation, care should be taken not to stress the septum purge and carrier gas pipe lines. 1. Cool the injector to below 60°C. 2. Switch off the Optic 2. 3. Remove the plated safety cover from the injector. 4. Unscrew the black nylon-coated nut which joins the injector top assembly to the injector body and lift the top assembly to one side. Care should be taken not to lose the flat PTFE insulating washer. 5. Lift out the existing liner with the "O" ring in place. 6. Insert the new liner and "O" ring. 7. Replace the top assembly and tighten the black nylon-coated nut to "finger tight". Care should be taken to ensure that the flat PTFE insulating washer is fitted correctly. _______________________________________________ Page 3.4 Installation Optic 2 Issue 1 _______________________________________________ 8. Replace the plated safety cover and screw it into position. 9. Switch power on to the Optic 2. Caution: When installation is complete, all connections should be leak tested with an electronic leak detector, (such as the Ai Leakseaker 196), or a 50/50 solution of iso-propanol and water. Under no circumstances should a soap solution or similar be used. 3.1.4.2 Column Installation 1. the Fit a ferrule, of an appropriate internal diameter for the column to be used, to nut at the base of the injector. 2. If standard Pyrex, quartz or thermal desorption liners are being used, insert the tip of the column to a depth of 21mm. 3. If fritted liners are being used, insert the column until the tip touches the underside of the frit and then withdraw the column approximately 2mm. 4. and On-column liners are fitted with the restriction towards the top of the injector the column introduced into the injector until the column tip engages in the bottom of the restriction. 5. Tighten the nut at the base of the injector until the column is retained within the injector. Care must be taken not to tighten the base nut excessively. Caution: When installation is complete, all connections should be leak tested with an electronic leak detector, (such as the Ai Leakseaker 196), or a 50/50 solution of iso-propanol and water. Under no circumstances should a soap solution or similar be used. _______________________________________________ Installation Page 3.5 Optic 2 Issue 1 _______________________________________________ 4 Configure Menu The Configure Menu is used to set the following functions and parameters: : Password Name : Password Control : Maximum Temperature : GC Ready Input : GC Ready Output : Contrast Control : Pressure Units : Reset Parameters 4.1 Access the Configure Menu To access the Configure Menu: 1. Switch power on and wait for the system Initialisation sequence to complete. 2. Use the Left or Right arrow key to select the Configure Menu. 3. Press the Menu Enter button. 4. If the system is protected by Password Control, enter the password, as described below, and press the Function Key. If the password is correct, access is granted to the first option in the Method Menu. If the password is incorrect, a prompt is displayed to re-enter the password. 5. Use the Left or Right arrow key to select the option required. 4.1.1 Password Name The Password Name option defines the characters used in the password to gain access to the system. To enter a password carry out the following sequence: 1. Press the Function key. The flashing cursor is placed on the first position. 2. Use the Up and Down arrow keys to scroll through the alpha-numeric characters to select the first character in the password. 3. Use the Right arrow key to move the flashing cursor to the next position and repeat step 2. _______________________________________________ Configure Menu Page 4.1 Optic 2 Issue 1 _______________________________________________ 4. Left Repeat step 3 for the remaining two positions. If a mistake is made, use the or Right arrow key to move to the required position and repeat step 2. 5. When the password is correct, press the Function key to store the password. 4.1.2 Password Control The Password Control option enables or disables the password protection for the system. To enable password protection: 1. Use the Up or Down arrow key to change the parameter to "Yes". To disable password protection: 1. Use the Up or Down arrow key to change the parameter to "No". 4.1.2.1 Change Password If the password has to be changed, (it may have been lost or forgotten), carry out the following sequence: 1. Switch power on to the Optic 2 with the Menu Enter key held down. 2. Enter the new password using the sequence described in Section 4.1.1. 4.1.3 Maximum Temperature The Maximum Temperature option sets the maximum temperature permissible for the injector. The range is between "-50°C" and "600°C", with the default setting at "600° C". To change the Maximum Temperature: 1. Use the Up or Down arrow key to move to the required temperature. Single presses of an arrow key change the current setting in steps of 1°C. Continuous pressure on an arrow key changes the current temperature in steps of 10°C. 4.1.4 GC Ready Input The GC Ready Input option sets the type of signal Optic 2 must receive to indicate that the GC is ready for an injection. If this option is set to "Disabled", Optic 2 does not wait for the GC before going to the "Ready" state. In all other cases, the Optic 2 waits for the GC Ready Relay output to be in the appropriate state before going to the "Ready" state. Refer to the instructions provided with the installation kit for more information. To change the GC Ready Input option: 1. Use the Up or Down arrow key to select the parameter required, either "Disabled", "Open When Ready" or "Closed When Ready". _______________________________________________ Page 4.2 Configure Menu Optic 2 Issue 1 _______________________________________________ 4.1.5 GC Ready Output The GC Ready Output option sets the type of signal Optic 2 sends to the GC to indicate when the Optic 2 is ready for an injection. The signal is sent via a pair of relay contacts. The best setting depends upon the type of GC and the system configuration, refer to the instructions provided with the installation kit for more information. In general, the Optic 2 should be a slave to the host GC, ie. the GC Start Output starts the Optic 2 run. In this case the GC Ready Output should be enabled in either "Closed When Ready" or "Open When Ready" as appropriate and the GC Ready Input should be disabled. When the Optic 2 is to be the master device, ie. the Optic 2 Run Output starts the GC, then the GC Ready Output should be disabled and the GC Ready Input should be enabled in either "Open When Ready" or "Closed When Ready" as appropriate. To change the GC Ready Output option: 1. Use the Up or Down arrow key to select the parameter required, either "Closed When Ready", "Open When Ready", "Disabled Closed" or "Disabled Open". 4.1.6 Contrast Control The Contrast Control option allows the user to alter the contrast of the LCD display. To change the Contrast Control option: 1. Use the Up key to increase, or the Down key to decrease, the contrast of the LCD display. 4.1.7 Pressure Units The Pressure Units option allows the user to change the units of measurement for the gas pressure throughout the system. To change the Pressure Units option: 1. Use the Up or Down key to select the required unit of measurement. The options are "bar", "PSI" or "kPa". When this setting is changed, all of the pressure values are automatically converted by Optic 2. 4.1.8 Reset Parameters Selecting this option resets all of the instrument settings to the factory default values. This option can be used to return the instrument to a known configuration. Note: A list of the factory default values is given in Appendix - C 4.2 Exit the Configure Menu To exit the Configure Menu and return to the Top Level Menu: 1. Press the Menu Exit key. _______________________________________________ Configure Menu Page 4.3 Optic 2 Issue 1 _______________________________________________ 5 Standby Menu The Standby Menu is used to set the following functions and parameters: : Standby Time : Standby Temperature : Standby Split State : Standby Carrier Pressure (Optic 2-200 and Optic 2-300) : Standby Auxiliary Pressure (Optic 2-300) : Access the Software Version Number 5.1 Access the Standby Menu To access the Standby Menu: 1. Switch power on and wait for the system Initialisation sequence to complete. 2. Use the Left or Right arrow key to select the Standby Menu. 3. Press the Menu Enter button. 4. If the system is protected by Password Control, enter the password, as described in Section 4.1.1 and press the Function Key. If the password is correct, access is granted to the first option in the Method Menu. If the password is incorrect, a prompt is displayed to re-enter the password. 5. Use the Left or Right arrow key to select the option required. 5.1.1 Standby Time The Standby Time option defines the length of time that Optic 2 remains in the "Ready" state after which it will default to the standby settings. The range available is between "Off", (never goes to standby) and "20:00 (Min:Sec)", with the default setting at "Off". To change the Standby Time option: 1. Use the Up or Down arrow key to move to the required time. Single presses of an arrow key change the current setting in steps of 1 second. Continuous pressure on an arrow key changes the current setting in steps of 10 seconds. 5.1.2 Standby Temperature The Standby Temperature option defines the temperature of the injector in the standby state. The range available is between "-50°C" and "600°C", with the default setting at "30°C". To change the Standby Temperature: _______________________________________________ Standby Menu Page 5.1 Optic 2 Issue 1 _______________________________________________ 1. Use the Up or Down arrow key to move to the required temperature. Single presses of an arrow key change the current setting in steps of 1°C. Continuous pressure on an arrow keys changes the current temperature in steps of 5°C. When the user exits the Standby Menu, the temperature of the injector is adjusted to the new value. If the Function key is pressed while "Standby Temperature" is displayed, the window changes to "Temperature Now" and the actual temperature of the injector is displayed. To return to the "Standby Temperature" window, press the Function key. Note: The Standby Temperature setting must be less than the maximum temperature set in the Configure Menu. 5.1.3 Standby Split State The Standby Split State option defines the state of the split valve. The options are between, "Closed Open" (Optic 2), or "Splitless Split Vent" (Optic 2-200 and Optic 2-300), with the default values of "Closed" (Optic 2), and "Splitless " (Optic 2-200 and Optic 2-300), To change the Standby Split State option: 1. Use the Up or Down arrow key to move to the required state. The split valve is exercised whenever a new selection is made. 5.1.4 Standby Carrier Pressure This option is available if you have an Optic 2-200 or Optic 2-300. The Standby Pressure option allows the user to set the level of the standby carrier gas pressure. The range available is between "0.00 bar / 0.0 PSI / 0kPa" and "7.0 bar / 101 PSI / 700kPa", with the default setting at "0.01 bar / 0.1 PSI / 1 kPa". To change the Standby Pressure option: 1. Use the Up or Down arrow key to move to the required pressure. Single presses of an arrow key change the current setting in steps of "0.01 bar / 0.1 PSI / 1kPa". Continuous pressure on an arrow key changes the current setting in steps of "0.10 bar / 1.0 PSI / 10kPa". When the user exits the Standby Menu, the pressure is adjusted to the new standby carrier gas pressure setting. If the Function key is pressed while "Standby Pressure" is displayed, the window changes to "Pressure Now" and the actual pressure of the standby carrier gas is displayed. To return to the "Standby Pressure" window, press the Function key. 5.1.5 Standby Auxiliary Pressure This option is available if you have an Optic 2-300. _______________________________________________ Page 5.2 Standby Menu Optic 2 Issue 1 _______________________________________________ The Standby Auxiliary Pressure option allows the user to set the level of the standby auxiliary gas pressure. The range available is between "0.00 bar / 0.0 PSI / 0kPa" and "7.0 bar / 101 PSI / 700kPa", with the default setting at "0.01 bar / 0.1 PSI / 1 kPa". To change the Standby Auxiliary Pressure option: 1. Use the Up or Down arrow key to move to the required pressure. Single presses of an arrow key change the current setting in steps of "0.01 bar / 0.1 PSI / 1kPa". Continuous pressure on an arrow key changes the current setting in steps of "0.10 bar / 1.0 PSI / 10kPa". When the user exits the Standby Menu, the pressure is adjusted to the new standby auxiliary gas pressure setting. If the Function key is pressed while "Standby Aux Pressure" is displayed, the window changes to "Aux Pressure Now" and the actual pressure of the standby auxiliary gas is displayed. To return to the "Standby Aux Pressure" window, press the Function key. 5.1.6 Access the Software Version Number This option allows the user to view the version number of the software in current use. To view the current software version number: 1. Ensure that the display reads "Standby Menu". 2. Press the Function key. The display shows the current software version. To return to the Standby Menu. 1. Press the Function key. 5.2 Exit the Standby Menu To exit the Standby Menu and return to the Top Level Menu: 1. Press the Menu Exit key. _______________________________________________ Standby Menu Page 5.3 Optic 2 Issue 1 _______________________________________________ 6 Method Menu The Method Menu is used to access the following options: : Split Menu : Splitless Menu : Large Volume Menu : Desorption Menu : Expert Menu 6.1 Method Rules When parameters are set in a method, the following rules apply to their values or states: : Initial Temperature £ Maximum Temperature (set in Configure Menu). : Final Temperature £ Maximum Temperature. : Final Temperature ³ Initial Temperature. : Final Run Pressure ³ Initial Run Pressure. : Initial Run Pressure £ Transfer Pressure. : Split Open Time > Vent Close Time. : Ramp Temperature (Ramp 1) ³ Initial Temperature. : Ramp Temperature (Ramp N) ³ Ramp Temperature (Ramp N-1). : ISO Temperature (Ramp N) £ Maximum Temperature. : A ramp rate must be set in order for the ramp to be executed during a method run. : Split Valve Time (2) ³ Split Valve Time (1). : Auxiliary Time (N) ³ Auxiliary Time (N-1). : Carrier Gas End Pressure ³ Carrier Gas Start Pressure. : Auxiliary Gas End Pressure ³ Auxiliary Gas Start Pressure. Note: If any of the method rules are violated, a warning message is displayed for two seconds. The user will be unable to exit the menu until the violation is corrected. 6.2 Method Statements All parameters referring to "Times" are referenced from 0 (Run output set). _______________________________________________ Method Menu Page 6.1 Optic 2 Issue 1 _______________________________________________ 6.3 Access the Method Menu To access the Method Menu: 1. Switch power on and wait for the system Initialisation sequence to complete. 2. Use the Left or Right arrow key to select the Method Menu. 3. Press the Menu Enter button. 4. If the system is protected by Password Control, enter the password, as described in Section 4.1.1 and press the Function Key. If the password is correct, access is granted to the first option in the Method Menu. If the password is incorrect, a prompt is displayed to re-enter the password. 5. The display shows "Injection Mode" and "Split". The first window in all method menus is the Injection Mode window. Use the Up or Down arrow key to select the menu required. 6.4 Split Menu The Split Method Menu is used to set the following functions and parameters: : Method Name : Equilibration Time : Initial Temperature : Ramp Rate : Final Temperature : End Time : Transfer Pressure (Optic 2-200) : Transfer Time (Optic 2-200) : Initial Run Pressure (Optic 2-200) : Final Run Pressure (Optic 2-200) A graphical representation of these parameters is given in Appendix - A. 6.4.1 Access the Split Method Menu To access the Split Method Menu: 1. Ensure that the display shows "Injection Mode" and "Split". _______________________________________________ Page 6.2 Method Menu Optic 2 Issue 1 _______________________________________________ 2. Use the Left or Right arrow key to select the required parameter. 6.4.2 Method Name The Method Name window allows the user to store a customised split method under a name of the user's choice. To enter a Method Name: 1. Press the Function key. The flashing cursor is placed on the first position. 2. Use the Up and Down arrow keys to scroll through the alpha-numeric characters to select the first character in the name. 3. Use the Right arrow key to move the flashing cursor to the next position and repeat step 2. 4. use Repeat step 3 for the remaining characters in the name. If a mistake is made, the Left or Right arrow key to move to the required position and repeat step 2. 5. When all characters are correct, press the Function key to store the name. 6.4.3 Equilibration Time The Equilibration Time allows the user to provide for improved temperature and pressure stability prior to Optic 2 entering the "Ready" state. The Equilibration Time option defines the time between the temperature and pressure stabilising and the Optic 2 entering the "Ready" state. The range available is between "0:00 (Min:Sec)" and "10:00 (Min:Sec)", with the default setting at "0:00 (Min:Sec)". To change the Equilibration Time option: 1. Use the Up or Down arrow key to move to the required time. Steps are in increments of "00:30 (Min:Sec)". 6.4.4 Initial Temperature The Initial Temperature option defines the injector temperature at the start of the method run. The range available is between "-50°C" and "600°C", with the default setting at "35°C". To change the Initial Temperature option: 1. Use the Up or Down arrow key to move to the required temperature. Single presses of an arrow key change the current setting in steps of 1°C. Continuous pressure on an arrow key changes the current temperature in steps of 5°C. 6.4.5 Ramp Rate The Ramp Rate option defines the rate of increase of injector temperature. The range available is between "0°C/s" and "16°C/s", with the default setting at "0°C/s". To change the Ramp Rate option: _______________________________________________ Method Menu Page 6.3 Optic 2 Issue 1 _______________________________________________ 1. Use the Up or Down arrow key to move to the required setting. Steps are in increments of 1°C/s. 6.4.6 Final Temperature The Final Temperature option defines the injector temperature at the end of the temperature ramp. The range available is between "-50°C" and "600°C", with the default setting at "36°C". To change the Final Temperature option: 1. Use the Up or Down arrow key to move to the required temperature. Single presses of an arrow key change the current setting in steps of 1°C. Continuous pressure on an arrow key changes the current temperature in steps of 5°C. 6.4.7 End Time The End Time option defines the time between the start and end of the GC method run. This should be set to the total run-time for the GC analysis in order for the cooling of the injector and resetting of pressure parameter to coincide with the GC run end. The range is between "0:00 (Min:Sec)" and "120:00 (Min:Sec) and Infinite (Infinity)", with the default setting at "0:20 (Min:Sec)". To change the End Time option: 1. Use the Up or Down arrow key to move to the required time. Single presses of an arrow key change the current setting in steps of "0:10 (Min:Sec)". Continuous pressure on an arrow key changes the current setting in steps of "00:30 (Min:Sec)". Note: The following options apply only to the Optic 2-200 and Optic 2-300. 6.4.8 Transfer Pressure The Transfer Pressure option defines the pressure in the injector at the start of the method run. This enables the user to set the pressure which is applied to the sample to transfer it from the injector onto the column, (higher pressures give a faster transfer). The range available is between "0.00 bar / 0.0 PSI / 0kPa" and "7.0 bar / 101 PSI / 700kPa", with the default setting at "0.01 bar / 0.1 PSI / 1 kPa". To change the Transfer Pressure option: 1. Use the Up or Down arrow key to move to the required pressure. Single presses of an arrow key change the current setting in steps of "0.01 bar / 0.1 PSI / 1kPa". Continuous pressure on an arrow key changes the current setting in steps of "0.10 bar / 1.0 PSI / 10kPa". 6.4.9 Transfer Time _______________________________________________ Page 6.4 Method Menu Optic 2 Issue 1 _______________________________________________ The Transfer Time option defines the time that the transfer pressure is maintained after the start of the method run. The range available is between "0:00 (Min:Sec)" and "10:00 (Min:Sec) ", with the default setting at "0:20 (Min:Sec)". To change the Transfer Time option: 1. Use the Up or Down arrow key to move to the required time. Single presses of an arrow key change the current setting in steps of "0:01 (Min:Sec)". Continuous pressure on an arrow key changes the current setting in steps of "00:10 (Min:Sec)". 6.4.10 Initial Run Pressure The Initial Run Pressure option defines the pressure that the carrier gas is set to after the transfer time has elapsed, this represents the inlet pressure set to use at the start of the operation. The range available is between "0.00 bar / 0.0 PSI / 0kPa" and "7.00 bar / 101.0 PSI / 700kPa", with the default setting at "0.02 bar / 0.2 PSI / 2 kPa". To change the Initial Run Pressure option: 1. Use the Up or Down arrow key to move to the required pressure. Single presses of an arrow key change the current setting in steps of "0.01 bar / 0.1 PSI / 1kPa". Continuous pressure on an arrow key changes the current setting in steps of "0.10 bar / 1.0 PSI / 10kPa". 6.4.11 Final Run Pressure The Final Run Pressure option defines the carrier gas pressure at the end of the method run. The range available is between "0.00 bar / 0.0 PSI / 0kPa" and "7.00 bar / 101.0 PSI / 700kPa", with the default setting at "0.02 bar / 0.2 PSI / 2 kPa". To change the Final Run Pressure option: 1. Use the Up or Down arrow key to move to the required pressure. Single presses of an arrow key change the current setting in steps of "0.01 bar / 0.1 PSI / 1kPa". Continuous pressure on an arrow key changes the current setting in steps of "0.10 bar / 1.0 PSI / 10kPa". 6.4.12 Exit the Split Method Menu To exit the Split Method Menu and return to the Method Menu. 1. Press the Menu Exit key. 6.5 Splitless Menu The Splitless Method Menu is used to set the following functions and parameters: : Method Name : Equilibration Time : Initial Temperature _______________________________________________ Method Menu Page 6.5 Optic 2 Issue 1 _______________________________________________ : Ramp Rate : Final Temperature : End Time : Splitless Time : Transfer Pressure (Optic 2-200) : Transfer Time (Optic 2-200) : Initial Run Pressure (Optic 2-200) : Final Run Pressure (Optic 2-200) A graphical representation of these parameters is given in Appendix - A. 6.5.1 Access the Splitless Method Menu To access the Splitless Method Menu: 1. Ensure that the display shows "Injection Mode" and "Splitless". 2. Use the Left or Right arrow key to select the required parameter. 6.5.2 Method Name The Method Name window allows the user to store a customised splitless method under a name of the user's choice. To enter a Method Name: 1. Press the Function key. The flashing cursor is placed on the first position. 2. Use the Up and Down arrow keys to scroll through the alpha-numeric characters to select the first character in the name. 3. Use the Right arrow key to move the flashing cursor to the next position and repeat step 2. 4. use Repeat step 3 for the remaining characters in the name. If a mistake is made, the Left or Right arrow key to move to the required position and repeat step 2. 5. When all characters are correct, press the Function key to store the name. 6.5.3 Equilibration Time The Equilibration Time allows the user to provide for improved temperature and pressure stability prior to Optic 2 entering the "Ready" state. _______________________________________________ Page 6.6 Method Menu Optic 2 Issue 1 _______________________________________________ The Equilibration Time option defines the time between the temperature and pressure stabilising and the Optic 2 entering the "Ready" state. The range available is between "0:00 (Min:Sec)" and "10:00 (Min:Sec)", with the default setting at "0:00 (Min:Sec)". To change the Equilibration Time option: 1. Use the Up or Down arrow key to move to the required time. Steps are in increments of "00:30 (Min:Sec)". 6.5.4 Initial Temperature The Initial Temperature option defines the injector temperature at the start of the method run. The range available is between "-50°C" and "600°C", with the default setting at "35°C". To change the Initial Temperature option: 1. Use the Up or Down arrow key to move to the required temperature. Single presses of an arrow key change the current setting in steps of 1°C. Continuous pressure on an arrow key changes the current temperature in steps of 5°C. 6.5.5 Ramp Rate The Ramp Rate option defines the rate of increase of injector temperature. The range available is between "0°C/s" and "16°C/s", with the default setting at "0°C/s". To change the Ramp Rate option: 1. Use the Up or Down arrow key to move to the required setting. Steps are in increments of 1°C/s. 6.5.6 Final Temperature The Final Temperature option defines the injector temperature at the end of the method run. The range is between "-50°C" and "600°C", with the default setting at "36 °C". To change the Final Temperature option: 1. Use the Up or Down arrow key to move to the required temperature. Single presses of an arrow key change the current setting in steps of 1°C. Continuous pressure on an arrow key changes the current temperature in steps of 5°C. 6.5.7 End Time The End Time option defines the time between the start and end of the GC method run. This should be set to the total run-time for the GC analysis in order for the cooling of the injector and resetting of pressure parameter to coincide with the GC run end. The range is between "0:00 (Min:Sec)" and "120:00 (Min:Sec) and Infinite (Infinity)", with the default setting at "0:20 (Min:Sec)". To change the End Time option: 1. Use the Up or Down arrow key to move to the required time. Single presses of an arrow key change the current setting in steps of "0:10 (Min:Sec)". _______________________________________________ Method Menu Page 6.7 Optic 2 Issue 1 _______________________________________________ Continuous pressure on an arrow key changes the current setting in steps of "00:30 (Min:Sec)". 6.5.8 Splitless Time The Splitless Time option defines the period of time after the start of the method before the split line is opened. When setting this parameter, the time taken for the injector to reach its final temperature must be taken into account. Typically, splitless times will be longer than for a corresponding iso-thermal splitless injection by an amount relating to the rise-time of the injector temperature. The range available is between "0:00 (Min:Sec)" and "10:00 (Min:Sec)", with the default setting at "01:00 (Min:Sec)". To change the Splitless Time option: 1. Use the Up or Down arrow key to move to the required time. Single presses of an arrow key change the current setting in steps of "0:01 (Min:Sec)". Continuous pressure on an arrow key changes the current setting in steps of "00:10 (Min:Sec)". Note: The following options apply only to the Optic 2-200 and Optic 2-300. 6.5.9 Transfer Pressure The Transfer Pressure option defines the pressure in the injector at the start of the method run. This enables the user to set the pressure which is applied to the sample to transfer it from the injector onto the column, (higher pressures give a faster transfer). The range available is between "0.00 bar / 0.0 PSI / 0kPa" and "7.0 bar / 101 PSI / 700kPa", with the default setting at "0.01 bar / 0.1 PSI / 1 kPa". To change the Transfer Pressure option: 1. Use the Up or Down arrow key to move to the required pressure. Single presses of an arrow key change the current setting in steps of "0.01 bar / 0.1 PSI / 1kPa". Continuous pressure on an arrow key changes the current setting in steps of "0.10 bar / 1.0 PSI / 10kPa". 6.5.10 Transfer Time The Transfer Time option defines the time that the transfer pressure is maintained after the start of the method run. The range available is between "0:00 (Min:Sec)" and "10:00 (Min:Sec) ", with the default setting at "0:20 (Min:Sec)". To change the Transfer Time option: 1. Use the Up or Down arrow key to move to the required time. Single presses of an arrow key change the current setting in steps of "0:01 (Min:Sec)". Continuous pressure on an arrow key changes the current setting in steps of "00:10 (Min:Sec)". _______________________________________________ Page 6.8 Method Menu Optic 2 Issue 1 _______________________________________________ Note: Setting a Transfer Time, shorter than the Splitless Time will increase the time taken for the Initial Run Pressure to be attained. 6.5.11 Initial Run Pressure The Initial Run Pressure option defines the pressure that the carrier gas is set to after the transfer time has elapsed, this represents the inlet pressure set to use at the start of the chromatographic operation. The range is between "0.00 bar / 0.0 PSI / 0kPa" and "7.00 bar / 101.0 PSI / 700kPa", with the default setting at "0.02 bar / 0.2 PSI / 2 kPa". To change the Initial Run Pressure option: 1. Use the Up or Down arrow key to move to the required pressure. Single presses of an arrow key change the current setting in steps of "0.01 bar / 0.1 PSI / 1kPa". Continuous pressure on an arrow key changes the current setting in steps of "0.10 bar / 1.0 PSI / 10kPa". 6.5.12 Final Run Pressure The Final Run Pressure option defines the carrier gas pressure at the end of the method run. The range available is between "0.00 bar / 0.0 PSI / 0kPa" and "7.00 bar / 101.0 PSI / 700kPa", with the default setting at "0.02 bar / 0.2 PSI / 2 kPa". To change the Final Run Pressure option: 1. Use the Up or Down arrow key to move to the required pressure. Single presses of an arrow key change the current setting in steps of "0.01 bar / 0.1 PSI / 1kPa". Continuous pressure on an arrow key changes the current setting in steps of "0.10 bar / 1.0 PSI / 10kPa". 6.5.13 Exit the Splitless Method Menu To exit the Splitless Method Menu and return to the Method Menu. 1. Press the Menu Exit key. _______________________________________________ Method Menu Page 6.9 Optic 2 Issue 1 _______________________________________________ 6.6 Large Volume Menu The Large Volume Method Menu is used to set the following functions and parameters: : Method Name : Equilibration Time : Initial Temperature : Vent Time : Ramp Rate : Final Temperature : End Time : Split Open Time : Purge Pressure (Optic 2-200) : Transfer Pressure (Optic 2-200) : Transfer Time (Optic 2-200) : Initial Run Pressure (Optic 2-200) : Final Run Pressure (Optic 2-200) : Solvent Monitor Threshold (Optic 2-200) A graphical representation of these parameters is given in Appendix - A. Note: There is a fixed 10 second delay, after the "Vent Time", before the start of the ramp. This improves the transfer of volatile components onto the column. 6.6.1 Access the Large Volume Method Menu To access the Large Volume Method Menu: 1. Ensure that the display shows "Injection Mode" and "Large Volume". 2. Use the Left or Right arrow key to select the required parameter. 6.6.2 Method Name The Method Name window allows the user to store a customised large volume method under a name of the user's choice. To enter a Method Name: _______________________________________________ Page 6.10 Method Menu Optic 2 Issue 1 _______________________________________________ 1. Press the Function key. The flashing cursor is placed on the first position. 2. Use the Up and Down arrow keys to scroll through the alpha-numeric characters to select the first character in the name. 3. Use the Right arrow key to move the flashing cursor to the next position and repeat step 2. 4. use Repeat step 3 for the remaining characters in the name. If a mistake is made, the Left or Right arrow key to move to the required position and repeat step 2. 5. When all characters are correct, press the Function key to store the name. 6.6.3 Equilibration Time The Equilibration Time allows the user to provide for improved temperature and pressure stability prior to Optic 2 entering the "Ready" state. The Equilibration Time option defines the time between the temperature and pressure stabilising and the Optic 2 entering the "Ready" state. The range available is between "0:00 (Min:Sec)" and "10:00 (Min:Sec)", with the default setting at "0:00 (Min:Sec)". To change the Equilibration Time option: 1. Use the Up or Down arrow key to move to the required time. Steps are in increments of "00:30 (Min:Sec)". 6.6.4 Initial Temperature The Initial Temperature option defines the injector temperature at the start of the method run. The range available is between "-50°C" and "600°C", with the default setting at "35°C". To change the Initial Temperature option: 1. Use the Up or Down arrow key to move to the required temperature. Single presses of an arrow key change the current setting in steps of 1°C. Continuous pressure on an arrow key changes the current temperature in steps of 5°C. 6.6.5 Vent Time The Vent Time option defines the time period that the initial temperature and pressure are maintained. This period is provided for solvent elimination. The range is between "0:00 (Min:Sec)" and "10:00 (Min:Sec)", with the default setting at "0:30 (Min:Sec)". To change the Vent Time option: 1. Use the Up or Down arrow key to move to the required time. Single presses of an arrow key change the current setting in steps of "0:01 (Min:Sec)". Continuous pressure on an arrow key changes the current setting in steps of "00:10 (Min:Sec)". Note: At the end of the "Vent Time", the split valve closes and, after a 10 second delay, the injector starts to ramp and the "Run Output" signal is given. 6.6.6 Ramp Rate _______________________________________________ Method Menu Page 6.11 Optic 2 Issue 1 _______________________________________________ The Ramp Rate option defines the rate of increase of injector temperature. The range available is between "0°C/s" and "16°C/s", with the default setting at "0°C/s". To change the Ramp Rate option: 1. Use the Up or Down arrow key to move to the required setting. Steps are in increments of 1°C/s. 6.6.7 Final Temperature The Final Temperature option defines the injector temperature at the end of the method run. The range is between "-50°C" and "600°C", with the default setting at "36 °C". To change the Final Temperature option: 1. Use the Up or Down arrow key to move to the required temperature. Single presses of an arrow key change the current setting in steps of 1°C. Continuous pressure on an arrow key changes the current temperature in steps of 5°C. 6.6.8 End Time The End Time option defines the time between the start and end of the GC method run. This should be set to the total run-time for the GC analysis in order for the cooling of the injector and resetting of pressure parameter to coincide with the GC run end. The range is between "0:00 (Min:Sec)" and "120:00 (Min:Sec) and Infinite (Infinity)", with the default setting at "0:15 (Min:Sec)". To change the End Time option: 1. Use the Up or Down arrow key to move to the required time. Single presses of an arrow key change the current setting in steps of "0:10 (Min:Sec)". Continuous pressure on an arrow key changes the current setting in steps of "01:00 (Min:Sec)". 6.6.9 Split Open Time The Split Open Time option defines the period of time after the start of the method before the split line is opened. When setting this parameter, the time taken for the injector to reach its final temperature must be taken into account. Typically, splitless times will be longer than for a corresponding iso-thermal splitless injection by an amount relating to the rise-time of the injector temperature. The range available is between "0:00 (Min:Sec)" and "10:00 (Min:Sec)", with the default setting at "00:00 (Min:Sec)". To change the Split Open Time option: 1. Use the Up or Down arrow key to move to the required time. Single presses of an arrow key change the current setting in steps of "0:01 (Min:Sec)". Continuous pressure on an arrow keys changes the current setting in steps of "00:10 (Min:Sec)". _______________________________________________ Page 6.12 Method Menu Optic 2 Issue 1 _______________________________________________ Note: The following options apply only to the Optic 2-200 and Optic 2-300. 6.6.10 Purge Pressure The Purge Pressure option defines the pressure during the Initial Time, while the solvent is eliminated through the vent line. The range is between "0.00 bar / 0.0 PSI / 0kPa" and "7.0 bar / 101 PSI / 700kPa", with the default setting at "0.01 bar / 0.1 PSI / 1 kPa". To change the Purge Pressure option: 1. Use the Up or Down arrow key to move to the required pressure. Single presses of an arrow key change the current setting in steps of "0.01 bar / 0.1 PSI / 1kPa". Continuous pressure on an arrow key changes the current setting in steps of "0.10 bar / 1.0 PSI / 10kPa". 6.6.11 Transfer Pressure The Transfer Pressure option defines the pressure in the injector at the start of the method run. This enables the user to set the pressure which is applied to the sample to transfer it from the injector onto the column, (higher pressures give a faster transfer). The range is between "0.00 bar / 0.0 PSI / 0kPa" and "7.0 bar / 101 PSI / 700kPa", with the default setting at "0.01 bar / 0.1 PSI / 1 kPa". To change the Transfer Pressure option: 1. Use the Up or Down arrow key to move to the required pressure. Single presses of an arrow key change the current setting in steps of "0.01 bar / 0.1 PSI / 1kPa". Continuous pressure on an arrow key changes the current setting in steps of "0.10 bar / 1.0 PSI / 10kPa". 6.6.12 Transfer Time The Transfer Time option defines the time that the transfer pressure is maintained after the start of the method run. The range available is between "0:00 (Min:Sec)" and "10:00 (Min:Sec) ", with the default setting at "0:20 (Min:Sec)". To change the Transfer Time option: 1. Use the Up or Down arrow key to move to the required time. Single presses of an arrow key change the current setting in steps of "0:01 (Min:Sec)". Continuous pressure on an arrow key changes the current setting in steps of "00:10 (Min:Sec)". Note: Setting a Transfer Time, shorter than the Split Open Time will increase the time taken for the Initial Run Pressure to be attained. 6.6.13 Initial Run Pressure The Initial Run Pressure option defines the pressure that the carrier gas is set to after the transfer time has elapsed, this represents the inlet pressure set to use at the start of the chromatographic operation. The range is between "0.00 bar / 0.0 PSI / 0kPa" _______________________________________________ Method Menu Page 6.13 Optic 2 Issue 1 _______________________________________________ and "7.00 bar / 101.0 PSI / 700kPa", with the default setting at "0.02 bar / 0.2 PSI / 2 kPa". To change the Initial Run Pressure option: 1. Use the Up or Down arrow key to move to the required pressure. Single presses of an arrow key change the current setting in steps of "0.01 bar / 0.1 PSI / 1kPa". Continuous pressure on an arrow key changes the current setting in steps of "0.10 bar / 1.0 PSI / 10kPa". 6.6.14 Final Run Pressure The Final Run Pressure option defines the carrier gas pressure at the end of the method run. The range is between "0.00 bar / 0.0 PSI / 0kPa" and "7.00 bar / 101.0 PSI / 700kPa", with the default setting at "0.02 bar / 0.2 PSI / 2 kPa". To change the Final Run Pressure option: 1. Use the Up or Down arrow key to move to the required pressure. Single presses of an arrow key change the current setting in steps of "0.01 bar / 0.1 PSI / 1kPa". Continuous pressure on an arrow key changes the current setting in steps of "0.10 bar / 1.0 PSI / 10kPa". 6.6.15 Solvent Monitor Threshold The Solvent Monitor Threshold is the value used to automatically determine the solvent elimination time. This parameter sets the threshold for a sensor that monitors the presence of solvent in the split line. The sensor reading, (displayed during this phase of the run), must rise above the threshold during injection. The run starts when the reading falls back below the threshold. The range is between "0" and "700", with the default setting at "0". To change the Solvent Monitor Threshold option: 1. Use the Up or Down arrow key to move to the required setting. Steps are in increments of "1". Note: When using this facility with manual injections, (Large Volume with "Vent Time" set to "Auto"), press the Run key, then inject the sample. The run will automatically start when the solvent has been eliminated. 6.6.16 Exit the Large Volume Method Menu To exit the Large Volume Method Menu and return to the Method Menu. 1. Press the Menu Exit key _______________________________________________ Page 6.14 Method Menu Optic 2 Issue 1 _______________________________________________ 6.7 Desorption Menu The Desorption Method Menu is used to set the following functions and parameters: : Method Name : Equilibration Time : Initial Temperature : Ramp Rate : Final Temperature : End Time : Split Mode : Sample Sweep Pressure (Optic 2-200) : Sample Sweep Time (Optic 2-200) : Desorption Pressure (Optic 2-200) : Desorption Time (Optic 2-200) : Transfer Pressure (Optic 2-200) : Transfer Time (Optic 2-200) : Initial Run Pressure (Optic 2-200) : Final Run Pressure (Optic 2-200) A graphical representation of these parameters is given in Appendix - A. 6.7.1 Access the Desorption Method Menu To access the Desorption Method Menu: 1. Ensure that the display shows "Injection Mode" and "Desorption". 2. Use the Left or Right arrow key to select the required parameter. 6.7.2 Method Name The Method Name window allows the user to store a customised desorption method under a name of the user's choice. To enter a Method Name: 1. Press the Function key. The flashing cursor is placed on the first position. 2. Use the Up and Down arrow keys to scroll through the alpha-numeric characters to select the first character in the name. _______________________________________________ Method Menu Page 6.15 Optic 2 Issue 1 _______________________________________________ 3. Use the Right arrow key to move the flashing cursor to the next position and repeat step 2. 4. use Repeat step 3 for the remaining characters in the name. If a mistake is made, the Left or Right arrow key to move to the required position and repeat step 2. 5. When all characters are correct, press the Function key to store the name. 6.7.3 Equilibration Time The Equilibration Time allows the user to provide for improved temperature and pressure stability prior to Optic 2 entering the "Ready" state. The Equilibration Time option defines the time between the temperature and pressure stabilising and the Optic 2 entering the "Ready" state. The range available is between "0:00 (Min:Sec)" and "10:00 (Min:Sec)", with the default setting at "0:00 (Min:Sec)". To change the Equilibration Time option: 1. Use the Up or Down arrow key to move to the required time. Steps are in increments of "00:30 (Min:Sec)". 6.7.4 Initial Temperature The Initial Temperature option defines the injector temperature at the start of the method run. The range available is between "-50°C" and "600°C", with the default setting at "35°C". To change the Initial Temperature option: 1. Use the Up or Down arrow key to move to the required temperature. Single presses of an arrow key change the current setting in steps of 1°C. Continuous pressure on an arrow key changes the current temperature in steps of 5°C. 6.7.5 Ramp Rate The Ramp Rate option defines the rate of increase of injector temperature. The range available is between "0°C/s" and "16°C/s", with the default setting at "0°C/s". To change the Ramp Rate option: 1. Use the Up or Down arrow key to move to the required setting. Steps are in increments of 1°C/s. 6.7.6 Final Temperature The Final Temperature option defines the injector temperature at the end of the temperature ramp. The range available is between "-50°C" and "600°C", with the default setting at "36°C". _______________________________________________ Page 6.16 Method Menu Optic 2 Issue 1 _______________________________________________ To change the Final Temperature option: 1. Use the Up or Down arrow key to move to the required temperature. Single presses of an arrow key change the current setting in steps of 1°C. Continuous pressure on an arrow key changes the current temperature in steps of 5°C. 6.7.7 End Time The End Time option defines the time between the start and end of the GC method run. This should be set to the total run-time for the GC analysis in order for the cooling of the injector and resetting of pressure parameter to coincide with the GC run end. The range is between "0:00 (Min:Sec)" and "120:00 (Min:Sec) and Infinite (Infinity)", with the default setting at "0:20 (Min:Sec)". To change the End Time option: 1. Use the Up or Down arrow key to move to the required time. Single presses of an arrow key change the current setting in steps of "0:10 (Min:Sec)". Continuous pressure on an arrow key changes the current setting in steps of "00:30 (Min:Sec)". 6.7.8 Split Mode The Split Mode option defines the state of the split valve. The options are between, "Closed Open" (Optic 2) and "Splitless Split Vent" (Optic 2-200 and Optic 2300), with the default position set to "Closed" (Optic 2) and "Splitless" (Optic 2-200 and Optic 2-300). To change the Split Mode option: 1. Use the Up or Down arrow key to move to the required state. Note: The valve is held in this state for the duration of the run. It is usually an advantage to operate with the valve in the split state and the split flow approximately the same as the column flow. Note: The following options apply only to the Optic 2-200 and Optic 2-300. 6.7.9 Sample Sweep Pressure The Sample Sweep Pressure option defines the carrier gas pressure during the time that the sample is being swept with carrier gas prior to desorption. The range available is between "0.00 bar / 0.0 PSI / 0kPa" and "7.0 bar / 101 PSI / 700kPa", with the default setting at "0.01 bar / 0.1 PSI / 1 kPa". To change the Sample Sweep Pressure option: 1. Use the Up or Down arrow key to move to the required pressure. Single presses of an arrow key change the current setting in steps of "0.01 bar / 0.1 PSI / 1kPa". Continuous pressure on an arrow key changes the current setting in steps of "0.10 bar / 1.0 PSI / 10kPa". 6.7.10 Sample Sweep Time _______________________________________________ Method Menu Page 6.17 Optic 2 Issue 1 _______________________________________________ The Sample Sweep Time option defines the time that the sample is swept with carrier gas prior to desorption in order to eliminate air from the injector. The range is between "0:00 (Min:Sec)" and "10:00 (Min:Sec)", with the default setting at "0:15 (Min:Sec)". To change the Sample Sweep Time option: 1. Use the Up or Down arrow key to move to the required time. Single presses of an arrow key change the current setting in steps of "0:01 (Min:Sec)". Continuous pressure on an arrow key changes the current setting in steps of "00:10 (Min:Sec)". 6.7.11 Desorption Pressure The Desorption Pressure option defines the carrier gas pressure applied while the sample is being desorbed. In many cases it is beneficial to desorbe the sample with desorption pressure set to zero (ie. under static flow conditions). The range is between "0.00 bar / 0.0 PSI / 0kPa" and "7.0 bar / 101 PSI / 700kPa", with the default setting at "0.01 bar / 0.1 PSI / 1 kPa". To change the Desorption Pressure option: 1. Use the Up or Down arrow key to move to the required pressure. Single presses of an arrow key change the current setting in steps of "0.01 bar / 0.1 PSI / 1kPa". Continuous pressure on an arrow key changes the current setting in steps of "0.10 bar / 1.0 PSI / 10kPa". 6.7.12 Desorption Time The Desorption Time option defines the time that the desorption pressure is maintained after the injector begins to heat. This will usually be about 30 seconds after the injector reaches the maximum temperature. The range available is between "0:00 (Min:Sec)" and "10:00 (Min:Sec)", with the default setting at "1:00 (Min:Sec)". To change the Desorption Time option: 1. Use the Up or Down arrow key to move to the required time. Single presses of an arrow key change the current setting in steps of "0:01 (Min:Sec)". Continuous pressure on an arrow key changes the current setting in steps of "00:10 (Min:Sec)". 6.7.13 Transfer Pressure The Transfer Pressure option defines the pressure in the injector at the start of the method run. This enables the user to set the pressure which is applied to the sample to transfer it from the injector onto the column, (higher pressures give a faster transfer). The range available is between "0.00 bar / 0.0 PSI / 0kPa" and "7.0 bar / 101 PSI / 700kPa", with the default setting at "0.01 bar / 0.1 PSI / 1 kPa". To change the Transfer Pressure option: _______________________________________________ Page 6.18 Method Menu Optic 2 Issue 1 _______________________________________________ 1. Use the Up or Down arrow key to move to the required pressure. Single presses of an arrow key change the current setting in steps of "0.01 bar / 0.1 PSI / 1kPa". Continuous pressure on an arrow key changes the current setting in steps of "0.10 bar / 1.0 PSI / 10kPa". 6.7.14 Transfer Time The Transfer Time option defines the time that the transfer pressure is maintained after the start of the method run. The range available is between "0:00 (Min:Sec)" and "10:00 (Min:Sec) ", with the default setting at "0:20 (Min:Sec)". To change the Transfer Time option: 1. Use the Up or Down arrow key to move to the required time. Single presses of an arrow key change the current setting in steps of "0:01 (Min:Sec)". Continuous pressure on an arrow key changes the current setting in steps of "00:10 (Min:Sec)". 6.7.15 Initial Run Pressure The Initial Run Pressure option defines the pressure that the carrier gas is set to after the transfer time has elapsed, this represents the inlet pressure set to use at the start of the chromatographic operation. The range is between "0.00 bar / 0.0 PSI / 0kPa" and "7.00 bar / 101.0 PSI / 700kPa", with the default setting at "0.02 bar / 0.2 PSI / 2 kPa". To change the Initial Run Pressure option: 1. Use the Up or Down arrow key to move to the required pressure. Single presses of an arrow key change the current setting in steps of "0.01 bar / 1.0 PSI / 1kPa". Continuous pressure on an arrow key changes the current setting in steps of "0.10 bar / 1.0 PSI / 10kPa". 6.7.16 Final Run Pressure The Final Run Pressure option defines the carrier gas pressure at the end of the method run. The range is between "0.00 bar / 0.0 PSI / 0kPa" and "7.00 bar / 101.0 PSI / 700kPa", with the default setting at "0.02 bar / 0.2 PSI / 2 kPa". To change the Final Run Pressure option: 1. Use the Up or Down arrow key to move to the required pressure. Single presses of an arrow key change the current setting in steps of "0.01 bar / 1.0 PSI / 1kPa". Continuous pressure on an arrow key changes the current setting in steps of "0.10 bar / 1.0 PSI / 10kPa". 6.7.17 Exit the Desorption Method Menu To exit the Desorption Method Menu and return to the Method Menu. 1. Press the Menu Exit key _______________________________________________ Method Menu Page 6.19 Optic 2 Issue 1 _______________________________________________ _______________________________________________ Page 6.20 Method Menu Optic 2 Issue 1 _______________________________________________ 6.8 Expert Menu The Expert Method Menu is used to set the following functions and parameters: : Method Name : Equilibration Time : Initial Temperature : Initial Time : Ramp Sub-Menu 9 9 9 9 Ramp 1 (Up to Ramp 4) Ramp Rate ISO Temperature ISO Time : Split Valve Sub-Menu 9 9 9 9 9 Initial State (Up to Aux 5) Split State 1 Split Time 1 Split State 2 Split Time 2 : Auxiliary Control Sub-Menu 9 9 9 Initial State (Up to 4) Time 1 Time 2 etc. up to Time 8 : Carrier Gas Pressure Sub-Menu (Optic 2-200) 9 9 9 Start Pressure (Up to 4) Time End Pressure : Auxiliary Gas Pressure Sub-Menu (Optic 2-300) 9 9 9 Start Pressure Time End Pressure A graphical representation of these parameters is given in Appendix - A. 6.8.1 Access the Expert Method Menu To access the Expert Method Menu: 1. Ensure that the display shows "Injection Mode" and "Expert". 2. Use the Left or Right arrow key to select the required parameter. 6.8.2 Method Name The Method Name window allows the user to store a customised expert method under a name of the user's choice. To enter a Method Name: 1. Press the Function key. The flashing cursor is placed on the first position. _______________________________________________ Method Menu Page 6.21 Optic 2 Issue 1 _______________________________________________ 2. Use the Up and Down arrow keys to scroll through the alpha-numeric characters to select the first character in the name. 3. Use the Right arrow key to move the flashing cursor to the next position and repeat step 2. 4. use Repeat step 3 for the remaining characters in the name. If a mistake is made, the Left or Right arrow key to move to the required position and repeat step 2. 5. When all characters are correct, press the Function key to store the name. 6.8.3 Equilibration Time The Equilibration Time allows the user to provide for improved temperature and pressure stability prior to Optic 2 entering the "Ready" state. The Equilibration Time option defines the time between the temperature and pressure stabilising and the Optic 2 entering the "Ready" state. The range available is between "0:00 (Min:Sec)" and "10:00 (Min:Sec)", with the default setting at "0:00 (Min:Sec)". To change the Equilibration Time option: 1. Use the Up or Down arrow key to move to the required time. Steps are in increments of "00:30 (Min:Sec)". 6.8.4 Initial Temperature The Initial Temperature option defines the injector temperature at the start of the method run. The range available is between "-50°C" and "600°C", with the default setting at "35°C". To change the Initial Temperature option: 1. Use the Up or Down arrow key to move to the required temperature. Single presses of an arrow key change the current setting in steps of 1°C. Continuous pressure on an arrow key changes the current temperature in steps of 5°C. 6.8.5 Initial Time The Initial Time option defines the time period that the initial temperature and pressure are maintained. This period may be used for solvent elimination. The range is between "0:00 (Min:Sec)" and "10:00 (Min:Sec)", with the default setting at "0:30 (Min:Sec)". To change the Initial Time option: 1. Use the Up or Down arrow key to move to the required time. Single presses of an arrow key change the current setting in steps of "0:01 (Min:Sec)". Continuous pressure on an arrow key changes the current setting in steps of "00:10 (Min:Sec)". 6.8.6 Ramp Sub-Menu The Ramp Sub-Menu allows the user to set individual parameters for up to four ramps. Each ramp sequence contains the same three events, "Ramp Rate", "ISO _______________________________________________ Page 6.22 Method Menu Optic 2 Issue 1 _______________________________________________ Temperature" and "ISO Time". The ramp sequences should be selected in turn, from this level, ie. Ramp 1 is selected and edited then return to this menu and select Ramp 2, etc. To enter the Ramp Sub-Menu: 1. Press the Up or Down arrow key to select the required ramp sequence. 2. Press the Menu Enter key. 3. Press the Left or Right arrow keys to select the ramp parameters. 6.8.6.1 Ramp Rate (1 to 4) The Ramp Rate option defines the rate of increase of injector temperature. The range available is between "0°C/s" and "16°C/s", with the default setting at "End of Sequence". The display shows "End of Sequence", when there are no further ramps available. To change the Ramp Rate option: 1. Use the Up or Down arrow key to move to the required setting. Steps are in increments of 1°C/s. 6.8.6.2 ISO Temperature (1 to 4) The ISO Temperature option defines the temperature of the next iso-thermal step in the temperature sequence. The range available is between "-50°C" and "600°C", with the default setting at "20°C". To change the ISO Temperature option: 1. Use the Up or Down arrow key to move to the required temperature. Single presses of an arrow key change the current setting in steps of 1°C. Continuous pressure on an arrow keys changes the current temperature in steps of 5°C. 6.8.6.3 ISO Time (1 to 4) The ISO Time option defines the time that the previous iso-thermal temperature is maintained. The range available is between "0:00 (Min:Sec)" and "100:00 (Min:Sec)", with the default setting at "0:00 (Min:Sec)". To change the ISO Time option: 1. Use the Up or Down arrow key to move to the required time. Single presses of an arrow key change the current setting in steps of "0:01 (Min:Sec)". Continuous pressure on an arrow key changes the current setting in steps of "00:10 (Min:Sec)". 6.8.6.4 Exit the Ramp Sub-Menu To exit the Ramp Sub-Menu and return to the Expert Menu. 1. Press the Menu Exit key. _______________________________________________ Method Menu Page 6.23 Optic 2 Issue 1 _______________________________________________ 6.8.7 Split Valve Sub-Menu The Split Valve Sub-Menu allows the user to set individual parameters for two states of the valve, not including the initial state. Each state consists of the same two events, "Valve State" and "Valve Time". To enter the Split Valve Sub-Menu: 1. Press the Menu Enter key. 2. Press the Left or Right arrow keys to select the required parameters. 6.8.7.1 Initial State The Initial State option defines the state of the split valve when the instrument is initialised on loading the method. The options are, "Closed Open " (Optic 2) or "Splitless Split Vent " (Optic 2-200 and Optic 2-300), with the default setting at "Closed" (Optic 2) or "Splitless " (Optic 2-200 and Optic 2-300). To change the Initial State option: 1. Use the Up or Down arrow key to move to the required state. 6.8.7.2 State (1) The State (1) option defines the state of the split valve at a predefined time. The options are, "Closed Open " (Optic 2) or "Splitless Split Vent " (Optic 2-200 and Optic 2-300), with the default setting at "Closed" (Optic 2) or "Splitless " (Optic 2200 and Optic 2-300). To change the Split Valve State (1) option: 1. Use the Up or Down arrow key to move to the required state. 6.8.7.3 Time (1) The Time (1) option defines the time that the split valve assumes a predefined state. The range available is between "0:00 (Min:Sec)" and "10:00 (Min:Sec)", with the default setting at "0:00 (Min:Sec)". To change the Time (1) option: 1. Use the Up or Down arrow key to move to the required time. Single presses of an arrow key change the current setting in steps of "0:01 (Min:Sec)". Continuous pressure on an arrow key changes the current setting in steps of "00:10 (Min:Sec)". 6.8.7.4 State (2) The State (2) option defines the state of the split valve at a predefined time. The options are, "Closed Open " (Optic 2) or "Splitless Open Vent " (Optic 2-200 and Optic 2-300), with the default setting at "Closed" (Optic 2) or "Splitless " (Optic 2200 and Optic 2-300). _______________________________________________ Page 6.24 Method Menu Optic 2 Issue 1 _______________________________________________ To change the Split Valve State (2) option: 1. Use the Up or Down arrow key to move to the required state. 6.8.7.5 Time (2) The Time (2) option defines the time that the split valve assumes a predefined state. The range available is between "0:00 (Min:Sec)" and "10:00 (Min:Sec)", with the default setting at "0:00 (Min:Sec)". To change the Time (2) option: 1. Use the Up or Down arrow key to move to the required time. Single presses of an arrow key change the current setting in steps of "0:01 (Min:Sec)". Continuous pressure on an arrow key changes the current setting in steps of "00:10 (Min:Sec)". 6.8.7.6 Exit the Split Valve Sub-Menu To exit the Split Valve Sub-Menu and return to the Expert Menu. 1. Press the Menu Exit key. 6.8.8 Auxiliary Control Sub-Menu The Auxiliary Control Sub-Menu allows the user to set individual parameters for up to five auxiliary control relays, which may be used for the control of external devices. Each relay can be individually named and programmed to act on up to eight events. These events are available on the "Aux" port located on the rear connector panel, (for more information on the "Aux" port, refer to Section 2). To enter the Auxiliary Control Sub-Menu: 1. Press the Up or Down arrow key to select the required auxiliary relay. The user can now enter a name for the selected relay. To enter a name carry out the following procedure: a. position. Press the Function key. The flashing cursor is placed on the first b. Use the Up and Down arrow keys to scroll through the alpha-numeric characters to select the first character in the name. c. Use the Right arrow key to move the flashing cursor to the next position and repeat step b. d. Repeat step c for the remaining characters in the name. If a mistake is made, use the Left or Right arrow key to move to the required position and repeat step b. e. When all characters are correct, press the Function key to store the name. 2. Press the Menu Enter key. _______________________________________________ Method Menu Page 6.25 Optic 2 Issue 1 _______________________________________________ 3. Press the Left or Right arrow keys to select the required parameters. 6.8.8.1 Initial State The Initial State option defines the state of the auxiliary relay when the instrument is initialised on loading the method. The options are, "Closed Open", with the default setting at "Closed" To change the Initial State option: 1. Use the Up or Down arrow key to move to the required state. 6.8.8.2 Time (1 to 8) The Time option defines the time that must elapse, since the run output signal was set, before the state of the relay is inverted. The range available is between "0:00 (Min:Sec)" and "120:00 (Min:Sec)", with the default setting at "0:00 (Min:Sec)". To change the Time option: 1. Use the Up or Down arrow key to move to the required time. Single presses of an arrow key change the current setting in steps of "0:01 (Min:Sec)". Continuous pressure on an arrow key changes the current setting in steps of "01:00 (Min:Sec)". 6.8.8.3 Exit the Auxiliary Control Sub-Menu To exit the Auxiliary Control Sub-Menu and return to the Expert Menu. 1. Press the Menu Exit key. Note: The following options apply only to the Optic 2-200 and Optic 2-300. 6.8.9 Carrier Gas Pressure Control Sub-Menu The Carrier Gas Pressure Control Sub-Menu allows the user to set individual parameters for up to four events. Each event contains the same three parameters, "Start Pressure", "Time" and "End Pressure". To enter the Carrier Gas Pressure Control Sub-Menu: 1. Press the Up or Down arrow key to select the required event. 2. Press the Menu Enter key. 6.8.9.1 Start Pressure The Start Pressure option defines the level of carrier gas pressure at the start of the event. The range available is between "0.00 bar / 0.0 PSI / 0kPa" and "7.0 bar / 101 PSI / 700kPa", with the default setting at "0.01 bar / 0.1 PSI / 1 kPa". To change the Start Pressure option: 1. Use the Up or Down arrow key to move to the required pressure. Single presses of an arrow key change the current setting in steps of "0.01 bar / 0.1 _______________________________________________ Page 6.26 Method Menu Optic 2 Issue 1 _______________________________________________ PSI / 1kPa". Continuous pressure on an arrow key changes the current setting in steps of "0.10 bar / 1.0 PSI / 10kPa". 6.8.9.2 Time The Time option defines the time that a linear pressure ramp is maintained, from the start pressure to the end pressure. The range available is between "0:00 (Min:Sec)" and "120:00 (Min:Sec)", with the default setting at "0:00 (Min:Sec)". To change the Time option: 1. Use the Up or Down arrow key to move to the required time. Single presses of an arrow key change the current setting in steps of "0:01 (Min:Sec)". Continuous pressure on an arrow key changes the current setting in steps of "01:00 (Min:Sec)". 6.8.9.3 End Pressure The End Pressure option defines the level of carrier gas pressure at the end of the event. The range available is between "0.00 bar / 0.0 PSI / 0kPa" and "7.0 bar / 101 PSI / 700kPa", with the default setting at "0.01 bar / 0.1 PSI / 1 kPa". To change the End Pressure option: 1. Use the Up or Down arrow key to move to the required pressure. Single presses of an arrow key change the current setting in steps of "0.01 bar / 0.1 PSI / 1kPa". Continuous pressure on an arrow key changes the current setting in steps of "0.10 bar / 1.0 PSI / 10kPa". 6.8.9.4 Exit the Carrier Gas Pressure Control Sub-Menu To exit the Carrier Gas Pressure Control Sub-Menu and return to the Expert Menu. 1. Press the Menu Exit key. Note: The following options apply only to the Optic 2-300. 6.8.10 Auxiliary Gas Pressure Control Sub-Menu The Auxiliary Gas Pressure Control Sub-Menu allows the user to set individual parameters for up to four events. Each event contains the same three parameters, "Start Pressure", "Time" and "End Pressure". To enter the Auxiliary Gas Pressure Control Sub-Menu: 1. Press the Up or Down arrow key to select the required event. 2. Press the Menu Enter key. 6.8.10.1 Start Pressure The Start Pressure option defines the level of carrier gas pressure at the start of the event. The range is between "0.00 bar / 0.0 PSI / 0kPa" and "7.0 bar / 101 PSI / 700kPa", with the default setting at "0.01 bar / 0.1 PSI / 1 kPa". To change the Start Pressure option: 1. Use the Up or Down arrow key to move to the required pressure. Single presses of an arrow key change the current setting in steps of "0.01 bar / 0.1 _______________________________________________ Method Menu Page 6.27 Optic 2 Issue 1 _______________________________________________ PSI / 1kPa". Continuous pressure on an arrow key changes the current setting in steps of "0.10 bar / 1.0 PSI / 10kPa". 6.8.10.2 Time The Time option defines the time that a linear pressure ramp is maintained, from the start pressure to the end pressure. The range available is between "0:00 (Min:Sec)" and "120:00 (Min:Sec)", with the default setting at "0:00 (Min:Sec)". To change the Time option: 1. Use the Up or Down arrow key to move to the required time. Single presses of an arrow key change the current setting in steps of "0:01 (Min:Sec)". Continuous pressure on an arrow key changes the current setting in steps of "01:00 (Min:Sec)". 6.8.10.3 End Pressure The End Pressure option defines the level of carrier gas pressure at the end of the event. The range is between "0.00 bar / 0.0 PSI / 0kPa" and "7.0 bar / 101 PSI / 700kPa", with the default setting at "0.01 bar / 0.1 PSI / 1 kPa". To change the End Pressure option: 1. Use the Up or Down arrow key to move to the required pressure. Single presses of an arrow key change the current setting in steps of "0.01 bar / 0.1 PSI / 1kPa". Continuous pressure on an arrow key changes the current setting in steps of "0.10 bar / 1.0 PSI / 10kPa". 6.8.10.4 Exit the Auxiliary Gas Pressure Control Sub-Menu To exit the Auxiliary Gas Pressure Control Sub-Menu and return to the Expert Menu. 1. Press the Menu Exit key. 6.9 Exit the Method Menu To exit the Method Menu and return to the Top Level Menu: 1. Press the Menu Exit key. _______________________________________________ Page 6.28 Method Menu Optic 2 Issue 1 _______________________________________________ 7 Sequence Menu The Sequence Menu allows the user to configure the Optic 2 to run a number of methods in a set sequence. The maximum number of methods allowed in any sequence is five. Each method, within the sequence, can be configured to run up to five times. 7.1 Access the Sequence Menu To access the Sequence Menu: 1. Switch power on and wait for the system Initialisation sequence to complete. 2. Use the Left or Right arrow key to select the Sequence Menu. 3. Press the Menu Enter button. 4. If the system is protected by Password Control, enter the password as described in Section 4.1.1. If the password is correct, access is gained to the first option in the Standby Menu. If the password is incorrect, a prompt is displayed to reenter the password. 5. Press the Function key. 6. The first "Method" window is displayed. 7.2 Set Up a Sequence To set up a sequence of methods: 1. Use the Up or Down arrow key to move to the method that is to be first in the sequence. The range is from the first method (***01***) through to the last method (***20***) and "Sequence End". The default setting is "Sequence End". Steps are in increments of 1. 2. Use the Left or Right arrow key to move to the "Execute Method" window. 3. be Use the Up or Down arrow key to select the number of times the method is to run. The range is from 1 to 5, with the default value set to 1. Steps are in increments of 1. 4. Use the Left or Right arrow key to move to the next the "Method" window. 5. Repeat steps 1 to 4 until the required sequence is complete. 6. At the "Method" window, select "Sequence End". 7.3 Exit the Sequence Menu To exit the Sequence Menu and return to the Top Level Menu. 1. Press the Menu Exit key. _______________________________________________ Sequence Menu Page 7.1 Optic 2 Issue 1 _______________________________________________ 8 Copy Menu The Copy Menu allows the user to copy one method to another. When a method is copied, all data is transferred to the new method except for the method name. 8.1 Access the Copy Menu To access the Copy Menu: 1. Switch power on and wait for the system Initialisation sequence to complete. 2. Use the Left or Right arrow key to select the Copy Menu. 3. Use the Up or Down key to select the method to be copied. 4. Press the Menu Enter button. 5. If the system is protected by Password Control, enter the password as described in Section 4.1.1. If the password is correct, access is gained to the first option in the Standby Menu. If the password is incorrect, a prompt is displayed to reenter the password. 6. Press the Function key. 8.2 Copy a Method To copy the selected method: 1. Use the Up or Down arrow key to move to the destination method. The display shows: ****NN**** (where "NN" defines the destination method number). To edit the name of the destination method, carry out the following procedure: a. position. Press the Function key. The flashing cursor is placed on the first b. Use the Up and Down arrow keys to scroll through the alpha-numeric characters to select the first character in the name. c. Use the Right arrow key to move the flashing cursor to the next position and repeat step b. d. Repeat step c for the remaining characters in the name. If a mistake is made, use the Left or Right arrow key to move to the required position and repeat step b. e. When all characters are correct, press the Function key to store the name. 2. Press the Menu Enter button. The selected method is copied to the destination method and a confirmation message is displayed for two seconds. _______________________________________________ Copy Menu Page 8.1 Optic II Issue 1 _______________________________________________ 8.3 Exit the Copy Menu To exit the Copy Menu and return to the Top Level Menu. 1. Press the Menu Exit key. _______________________________________________ Page 8.2 Copy Menu Optic 2 Issue 1 _______________________________________________ 9 Delete Menu The Delete Menu allows the user to delete a method. When a method is deleted, all the current parameters in the method are reset to their default values. 9.1 Access the Delete Menu To access the Delete Menu: 1. Switch power on and wait for the system Initialisation sequence to complete. 2. Use the Left or Right arrow key to select the Delete Menu. 3. Use the Up or Down key to select the method to be deleted. 4. Press the Menu Enter button. 5. If the system is protected by Password Control, enter the password as described in Section 4.1.1. If the password is correct, access is gained to the first option in the Standby Menu. If the password is incorrect, a prompt is displayed to reenter the password. 6. Press the Function key. 7. The "Delete Confirmation" window is displayed. 9.2 Delete a Method To delete the selected method: 1. Use the Up or Down arrow key to select "Yes". 2. Press the Menu Enter button. The selected method is deleted and a confirmation message is displayed for two seconds. 9.3 Exit the Delete Menu To exit the Delete Menu and return to the Top Level Menu. 1. Press the Menu Exit key. _______________________________________________ Delete Menu Page 9.1 Optic 2 Issue 1 _______________________________________________ 10 Performing a Method Figure 10.1, illustrates the stages that Optic 2 goes through as it prepares to run a method. Figure 10.1 State Transition Diagram 10.1 Run a Method To run a method carry out the following sequence: 1. Switch power on and wait for the system Initialisation sequence to complete. 2. Use the Left or Right arrow key to select the Method Menu. 3. Use the Up or Down arrow key to select the method to be run. 4. Press the Function key. 5. When the "Ready" message is displayed, press the Run / End key. 10.1.1 Loading the Method _______________________________________________ Performing a Method Page 10.1 Optic 2 Issue 1 _______________________________________________ In Programme Mode, the temperature and pressure are maintained at the levels set in the Standby Menu. When the Function key is pressed, after a method has been selected, the instrument initialises to the temperature and pressure parameters of the selected method. During loading stages of the method, the action of certain keys changes the condition and display of the instrument, as shown below. Stage Key Condition Display Initialising Function Revert to Standby conditions Method Ready Function Revert to Standby conditions Method Ready Down arrow Temperature set to 35°C. Carrier Gas Off Carrier Gas Pressure set to 0.1bar Auxiliary Gas Pressure set to 0.1bar (In order to allow safe handling of injector for thermal desorption). Carrier Gas Off Function Revert to Standby conditions Method Carrier Gas Off Up arrow Revert to Initial Temperature and Pressure of Method. Initialising Note: When operating in the Large Volume mode, it is important to first press the Run key and then inject the sample. 10.2 Displays The displays presented, during a run, are different between Optic 2, Optic 2-200 and Optic 2-300. 10.2.1 Optic 2 The user can choose between the following displays: "Temperature", "Method" or "Valve State". To select a display, press the Function key until the display required is shown. 10.2.2 Optic 2-200 The user can choose between the following displays: "Temperature", "Method", "Valve State" or "Carrier Gas Pressure". To select a display, press the Function key until the display required is shown. 10.2.3 Optic 2-300 The user can choose between the following displays: "Temperature", "Method", "Valve State", "Carrier Gas Pressure" or "Auxiliary Gas Pressure". To select a display, press the Function key until the display required is shown. 10.3 End of Method _______________________________________________ Page 10.2 Performing a Method Optic 2 Issue 1 _______________________________________________ When the method has been completed, the display shows "Initialising". The display remains until the initial temperature and pressure conditions are established, at which point the display changes to "Ready". The temperature and gas settings are maintained at their initial levels for the duration of the "Standby" period defined in the Standby Menu. When this period has elapsed, the instrument reverts to the standby conditions and the display shows "Method". If the "Standby" parameter in the Configure Menu is set to "Off", the initial conditions of the method are maintained until the next press of the Run / End key. _______________________________________________ Performing a Method Page 10.3 Optic 2 Issue 1 _______________________________________________ 11 Fault Diagnosis This section details the warning and fault conditions on the Optic 2 and the states within the software which they are valid. 11.1 Warnings Warnings are only detected after a method has been selected and loaded. Warnings are displayed until canceled, by pressing the Menu Enter key, and are not re-enabled until the instrument is switched off and back on again. 11.1.1 Ramp Rate The Ramp Rate warning is enabled and valid when a ramp temperature output is being performed and the ramp temperature is more than 50°C above or below the set point, (75°C above or below a set point above 450°C). On detection of this condition the display reads: "Warning : Ramp Rate". 11.1.2 Carrier Gas The Carrier Gas warning is enabled and valid when the carrier gas pressure is at zero. On detection of this condition the display reads: "Warning : Carrier Gas". 11.2 Faults Fault conditions on the Optic 2 are non-recoverable. To clear a fault condition the instrument must be switched off, the fault rectified and the instrument switched back on again. 11.2.1 Thermocouple Fault The thermocouple fault occurs when the thermocouple fails, the thermocouple cable is disconnected, or if the GC is not earthed. The condition is flagged up by a hardware interrupt. On detection of the fault the display reads: "Fault : Thermocouple". The heater output is disabled to put the instrument in a safe condition. The instrument must be switched off and the fault rectified. 11.2.2 Temperature Fault The temperature fault occurs should the current injector temperature be 50°C, or higher, above the maximum temperature set in the Configure Menu, and rising. On detection of the fault the display reads: "Fault : Temperature". The heater output is disabled to put the instrument in a safe condition. The instrument must be switched off and the fault rectified. 11.3 Troubleshooting _______________________________________________ Fault Diagnosis Page 11.1 Optic 2 Issue 1 _______________________________________________ Should any difficulty arise with the installation or operation of the Optic 2, check the following symptoms before contacting your supplier. 11.3.1 No Power If the instrument fails to power up, check the following: 1. Is the power lead fully inserted into the power socket? 2. Is the mains fuse intact (UK only)? 3. Is the fuse, located in the instrument power socket, intact? 11.3.2 Injector Does Not Heat If the instrument powers up but the injector does not heat up, check the following: 1. Is the internal fuse blown? 2. Is the power lead to the injector damaged? 3. Is there a high resistance contact between the injector power lead and the injector? (Refer to 11.4). 11.3.3 Injector Slow to Heat If the display temperature takes an excessive time to reach the set temperature, check the following: 1. Is there a high resistance contact between the injector power lead and the injector? (Refer to 11.4). 11.3.4 Injector Slow to Cool If the injector takes an excessive time to cool to the initial temperature set in the method, check the following: 1. Is the cooling air supply pressure set to 80 PSI? 11.4 Injector Power Lead If there is a high resistance contact between the injector power lead and the injector, carry out the following procedure: 1. Ensure that power to the instrument is switched Off. 2. Remove the power lead and inspect the connectors. Any pitting or discoloration can be removed by careful use of very fine emery-cloth. 3. Clean the connectors and reconnect them securely to the injector. _______________________________________________ Page 11.2 Fault Diagnosis Optic 2 Issue 1 _______________________________________________ 12 Maintenance This section provides information on routine and preventive maintenance and servicing for the Optic 2. 12.1 Routine Maintenance No special recommendations need to be applied regarding routine maintenance, other than that which should be standard, good chromatographic practice, as follows: 1. The septum should be changed regularly. 2. The liner should be inspected periodically and, if found to be contaminated, should be re-packed or replaced as appropriate. 12.2 Servicing The Optic 2 is not designed to be user-serviced other than the trouble shooting recommendations contained in Section 11. If a fault occurs that can not be rectified by following the recommendations in Section 11, contact your local agent for advice. _______________________________________________ Maintenance Page 12.1 Optic 2 Issue 1 _______________________________________________ 13 Spares and Accessories 13.1 Injector Liners Standard Pyrex Liner Quartz Liner Double Neck Liner 0.32mm On Column Liner 0.53mm On Column Liner 0.32mm Packed On Column Liner 0.53mm Packed On Column Liner Fritted Pyrex Liner Liner Blanking Cap 126225 126226 126227 126228 126229 126230 126231 126232 146193 Pack Size 20 10 10 5 5 5 5 10 2 13.2 Consumables Septa Liner "O" Rings 0.32mm Graphite Ferrules 0.53mm Graphite Ferrules Silanized Glass Wool 146190 126151 126152 126153 7/2814 50 50 10 10 25g 146191 126155 7/3298 146178 10 5 1 126025 126018 126054 7/2900 7/2757 1 1 1 1 13.3 Spares Top Boss Insulator Injector Nut Nylon Coupling Standard Septum Cap 1 Clamp Nut Insulator Top Clamp Nut Top Boss Braze Assembly Needle Valve Solenoid Valve 1 Electronic Pressure Regulator 1 Pressure Sensor 1/8 - 1/16 PTFE Ferrules In-Line Particulate Filter Replacement Element for Particulate Filter 7/3803 7/1336 146492 7/3846 7/3847 1 10 1 1 146141 146142 146143 146144 146189 146189 1 1 1 1 1 1 146168 146184 1 1 13.4 Interface Cables HP5890 Varian 3300/3400 Carlo Erba 8000 HP6890 Ai General Purpose 13.5 Accessories and Upgrades Liquid CO2 Coolant / Trapping Kit Electronic Carrier Gas Control _______________________________________________ Spares and Accessories Page 13.1 Optic 2 Issue 1 _______________________________________________ Electronic Auxiliary Gas Control VOC Sparger Kit 146185 136500 1 1 13.6 Installation Kits (includes Interface Cables) HP5890 Varian 3300/3400 Carlo Erba 8000 HP6890 Ai 92, 93, 94, 95 General Purpose 146121 146122 146123 146125 146126 146127 1 1 1 1 1 1 _______________________________________________ Page 13.2 Spares and Accessories Optic 2 Issue 1 _____________________________________________________ Figure A.1 Split Method Profile _____________________________________________________ Method Profiles Appendix - A.1 Optic 2 Issue 1 _____________________________________________________ Figure A.2 Splitless Method Profile _____________________________________________________ Method Profiles Appendix - A.2 Optic 2 Issue 1 _____________________________________________________ Figure A.3 Large Volume Method Profile _____________________________________________________ Method Profiles Appendix - A.3 Optic 2 Issue 1 _____________________________________________________ Figure A.4 Desorption Method Profile _____________________________________________________ Method Profiles Appendix - A.4 Optic 2 Issue 1 _____________________________________________________ Figure A.5 Expert Method Profile _____________________________________________________ Method Profiles Appendix - A.5 Optic 2 Issue 1 _______________________________________________ _______________________________________________ Menu Flow Charts Appendix - B.1 Optic 2 Issue 1 _______________________________________________ _______________________________________________ Appendix - B.2 Menu Flow Charts Optic 2 Issue 1 _______________________________________________ _______________________________________________ Menu Flow Charts Appendix - B.3 Optic 2 Issue 1 _______________________________________________ Default Parameters (Optic 2) Standby Menu Standby Time Standby Temperature Standby Split Valve Off 30°C Open Sequence Menu Method 1 Execute Method 1 Method 2 Execute Method 2 Method 3 Execute Method 3 Method 4 Execute Method 4 Method 5 Execute Method 5 End of Sequence 1 Times End of Sequence 1 Times End of Sequence 1 Times End of Sequence 1 Times End of Sequence 1 Times Configure Menu Password Name Password Control Maximum Temperature GC Ready Input GC Ready Output Contrast Pressure Units Clear Parameters **** No 600°C Disabled Closed when ready 20 Bar No Split Method Method Name Equilibration Time Initial Temperature Ramp Rate Final Temperature End Time ***01*** 0:00 M:S 35°C 0°C/S 36°C 0:20 M:S Splitless Method Method Name Equilibration Time Initial Temperature Ramp Rate Final Temperature End Time Splitless Time ***01*** 0:00 M:S 35°C 0°C/S 36°C 0:20 M:S 1:00 M:S Large Volume Method _______________________________________________ Default Parameters Appendix - C.1 Optic 2 Issue 1 _______________________________________________ Method Name Equilibration Time Initial Temperature Vent Time Ramp Rate Final Temperature End Time Split Open Time ***01*** 0:00 M:S 35°C 0:30 M:S 0°C/S 36°C 0:20 M:S 0:00 M:S Desorption Method Method Name Equilibration Time Initial Temperature Ramp Rate Final Temperature End Time Split Mode ***01*** 0:00 M:S 35°C 0°C/S 36°C 0:20 M:S Open Expert Method Method Name Equilibration Time Initial Temperature Initial Time ***01*** 0:00 M:S 35°C 0:30 M:S Ramp Sub-Menu Ramp Rate ISO Temperature ISO Time End of Sequence 20°C 0:00 M:S Split Valve Sub-Menu Initial State Split State 1 Time 1 : Open Split State 2 Time 2 : Open Open Open 0:00 M:S Open 0:00 M:S Aux Sub-Menu ***01*** Init State ***01*** Time 1 ***01*** Time 2 ***01*** Time 3 ***01*** Time 4 ***01*** Time 5 ***01*** Time 6 ***01*** Time 7 ***01*** Time 8 Open Closed 0:00 M:S Open 0:00 M:S Closed 0:00 M:S Open 0:00 M:S Closed 0:00 M:S Open 0:00 M:S Closed 0:00 M:S Open 0:00 M:S Default Parameters (Optic 2-200 and 2-300) Standby Menu _______________________________________________ Appendix - C.2 Default Parameters Optic 2 Issue 1 _______________________________________________ Standby Time Standby Temperature Standby Split Valve Standby C : Pressure Standby A : Pressure Off 30°C Splitless 0.01 Bar 0.01 Bar Sequence Menu Method 1 Execute Method 1 Method 2 Execute Method 2 Method 3 Execute Method 3 Method 4 Execute Method 4 Method 5 Execute Method 5 End of Sequence 1 Times End of Sequence 1 Times End of Sequence 1 Times End of Sequence 1 Times End of Sequence 1 Times Configure Menu Password Name Password Control Maximum Temperature GC Ready Input GC Ready Output Contrast Pressure Units Clear Parameters **** No 600°C Disabled Closed when ready 20 Bar No Split Method Method Name Equilibration Time Initial Temperature Ramp Rate Final Temperature End Time Transfer Pressure Transfer Time Initial Pressure Final Pressure ***01*** 0:00 M:S 35°C 0°C/S 36°C 0:20 M:S 0.10 Bar 0:20 M:S 0.02 Bar 0.02 Bar Splitless Method Method Name Equilibration Time Initial Temperature Ramp Rate Final Temperature End Time ***01*** 0:00 M:S 35°C 0°C/S 36°C 0:20 M:S _______________________________________________ Default Parameters Appendix - C.3 Optic 2 Issue 1 _______________________________________________ Splitless Time Transfer Pressure Transfer Time Initial Pressure Final Pressure 1:00 M:S 0.10 Bar 0:20 M:S 0.02 Bar 0.02 Bar Large Volume Method Method Name Equilibration Time Initial Temperature Vent Time Ramp Rate Final Temperature End Time Split Open Time Purge Pressure Transfer Pressure Transfer Time Initial Pressure Final Pressure Solvent Threshold ***01*** 0:00 M:S 35°C 0:30 M:S 0°C/S 36°C 0:20 M:S 0:00 M:S 0.02 Bar 0.10 Bar 0:20 M:S 0.02 Bar 0.02 Bar 0 Desorption Method Method Name Equilibration Time Initial Temperature Ramp Rate Final Temperature End Time Split Mode Sweep Pressure Sweep Time Desorption Pressure Desorption Time Transfer Pressure Transfer Time Initial Pressure Final Pressure ***01*** 0:00 M:S 35°C 0°C/S 36°C 0:20 M:S Splitless 0.02 Bar 0:15 M:S 0.00 Bar 1:00 M:S 0.10 Bar 0:20 M:S 0.02 Bar 0.02 Bar Expert Method Method Name Equilibration Time Initial Temperature Initial Time ***01*** 0:00 M:S 35°C 0:30 M:S Ramp Sub-Menu Ramp Rate ISO Temperature End of Sequence 20°C _______________________________________________ Appendix - C.4 Default Parameters Optic 2 Issue 1 _______________________________________________ ISO Time 0:00 M:S Split Valve Sub-Menu Initial State Split State 1 Time 1 : Splitless Split State 2 Time 2 : Splitless Splitless Splitless 0:00 M:S Splitless 0:00 M:S Aux Sub-Menu ***01*** Init State ***01*** Time 1 ***01*** Time 2 ***01*** Time 3 ***01*** Time 4 ***01*** Time 5 ***01*** Time 6 ***01*** Time 7 ***01*** Time 8 Open Closed 0:00 M:S Open 0:00 M:S Closed 0:00 M:S Open 0:00 M:S Closed 0:00 M:S Open 0:00 M:S Closed 0:00 M:S Open 0:00 M:S Carrier Gas Pressure Sub-Menu Start Pressure Time End Pressure 0.00Bar 0:00 M:S 0.00Bar Auxiliary Gas Pressure Sub-Menu (Optic 2-300) Start Pressure 0.00Bar Time 0:00 M:S End Pressure 0.00Bar _______________________________________________ Default Parameters Appendix - C.5 Optic 2 Issue 1 _______________________________________________ _______________________________________________ Injector Diagram Appendix - D.1 Optic 2 Issue 1 _______________________________________________ Rear Panel Pin Connections Note: All pins that are not listed in the following tables, are not connected. Serial Port Connector A 9-way, female, D-type connector. The function and pin connections are compatible with an IBM PC serial port. Pin 2 3 4 5 6 Function TxD RxD DTR 0V DSR Autosampler Connector A 15-way, female, D-type connector. Pin 1 2 5 6 Function Optic Ready Output, Relay Optic Ready Output, Relay 0V Run Input, Logic Chromatograph Connector A 25-way, male, D-type connector. Pin 3 4 9 10 19 20 21 22 23 24 Function 0V Ready Input, Logic 0v Run Input, Logic Optic Ready Output, Relay Optic Ready Output, Relay Run Output, Relay Run Output, Relay Integrator Run Output, Relay Integrator Run Output, Relay Colour (8 Core) Green (8 Core) Yellow (8 Core) Grey (8 Core) Orange (8 Core) White (8 Core) Violet (8 Core) Red (8 Core) Black (2 Core) Red (2 Core) Black Auxiliary Connector _______________________________________________ Rear Panel Pin Connections Appendix - E.1 Optic 2 Issue 1 _______________________________________________ A 25-way, female, D-type connector. Pin 1 2 4 5 7 8 10 11 14 15 17 18 20 21 22 23 24 25 Function +24V to Splitless Solenoid Open Collector Drive to Splitless Solenoid Relay 1 contacts Relay 1 contacts Relay 2 contacts Relay 2 contacts Relay 3 contacts Relay 3 contacts Relay 4 contacts Relay 4 contacts Relay 5 contacts Relay 5 contacts +24V Supply +24V Supply +5V Supply +5V Supply 0V 0V _______________________________________________ Appendix - E.2 Rear Panel Connections Optic 2 Issue 1 _______________________________________________ SPLIT MODE METHOD NAME Equilibration Time Initial Temperature Ramp Rate Final Temperature End Time * Transfer Pressure * Transfer Time * Initial Run Pressure * Final Run Pressure M:S °C °C/Sec °C M:S M:S * Applicable to Optic 2-200 and 2-300 _______________________________________________ Method Sheets Appendix - F.1 Optic 2 Issue 1 _______________________________________________ SPLITLESS MODE METHOD NAME Equilibration Time Initial Temperature Ramp Rate Final Temperature End Time Splitless Time * Transfer Pressure * Transfer Time * Initial Run Pressure * Final Run Pressure M:S °C °C/Sec °C M:S M:S M:S * Applicable to Optic 2-200 and 2-300 _______________________________________________ Method Sheets Appendix - F.2 Optic 2 Issue 1 _______________________________________________ LARGE VOLUME MODE METHOD NAME Equilibration Time Initial Temperature Vent Time Ramp Rate Final Temperature End Time Split Open * Purge Pressure * Transfer Pressure * Transfer Time * Initial Run Pressure * Final Run Pressure * Solvent Threshold M:S °C M:S °C/Sec °C M:S M:S M:S * Applicable to Optic 2-200 and 2-300 _______________________________________________ Method Sheets Appendix - F.3 Optic 2 Issue 1 _______________________________________________ DESORPTION MODE METHOD NAME Equilibration Time Initial Temperature Ramp Rate Final Temperature End Time Split Mode * Sample Sweep Pressure * Sample Sweep Time * Desorp Pressure * Desorp Time * Transfer Pressure * Transfer Time * Initial Run Pressure * Final Run Pressure M:S °C °C/Sec °C M:S M:S M:S M:S * Applicable to Optic 2-200 and 2-300 EXPERT MODE _______________________________________________ Method Sheets Appendix - F.4 Optic 2 Issue 1 _______________________________________________ METHOD NAME Equilibration Time Initial Temperature M:S °C RAMP 1 Ramp Rate Temperature End Time °C/Sec °C M:S RAMP 2 Ramp Rate Temperature End Time °C/Sec °C M:S RAMP 3 Ramp Rate Temperature End Time °C/Sec °C M:S RAMP 4 Ramp Rate Temperature End Time °C/Sec °C M:S Initial State Time 1 State 1 Time 2 State 2 AUX 1 Initial State Time 1 Time 2 Time 3 Time 4 Time 5 Time 6 Time 7 Time 8 AUX 2 Initial State Time 1 Time 2 Time 3 Time 4 M:S M:S M:S M:S M:S M:S M:S M:S M:S M:S M:S M:S M:S M:S _______________________________________________ Method Sheets Appendix - F.5 Optic 2 Issue 1 _______________________________________________ Time 5 Time 6 Time 7 Time 8 M:S M:S M:S M:S AUX 3 Initial State Time 1 Time 2 Time 3 Time 4 Time 5 Time 6 Time 7 Time 8 M:S M:S M:S M:S M:S M:S M:S M:S AUX 4 Initial State Time 1 Time 2 Time 3 Time 4 Time 5 Time 6 Time 7 Time 8 M:S M:S M:S M:S M:S M:S M:S M:S AUX 5 Initial State Time 1 Time 2 Time 3 Time 4 Time 5 Time 6 Time 7 Time 8 M:S M:S M:S M:S M:S M:S M:S M:S * CARRIER GAS 1 Start Pressure Time End Pressure M:S _______________________________________________ Method Sheets Appendix - F.6 Optic 2 Issue 1 _______________________________________________ * CARRIER GAS 2 Start Pressure Time End Pressure * CARRIER GAS 3 Start Pressure Time End Pressure * CARRIER GAS 4 Start Pressure Time End Pressure M:S M:S M:S * Applicable to Optic 2-200 and 2-300 # AUX GAS 1 Start Pressure Time End Pressure # AUX GAS 2 Start Pressure Time End Pressure # AUX GAS 3 Start Pressure Time End Pressure # AUX GAS 4 Start Pressure Time End Pressure M:S M:S M:S M:S # Applicable to Optic 2-300 _______________________________________________ Method Sheets Appendix - F.7 Optic 2 Issue 1 _____________________________________________________ Figure A.1 Split Method Profile _____________________________________________________ Method Profiles Appendix - A.1 Optic 2 Issue 1 _____________________________________________________ Figure A.2 Splitless Method Profile _____________________________________________________ Method Profiles Appendix - A.2 Optic 2 Issue 1 _____________________________________________________ Figure A.3 Large Volume Method Profile _____________________________________________________ Method Profiles Appendix - A.3 Optic 2 Issue 1 _____________________________________________________ Figure A.4 Desorption Method Profile _____________________________________________________ Method Profiles Appendix - A.4 Optic 2 Issue 1 _____________________________________________________ Figure A.5 Expert Method Profile _____________________________________________________ Method Profiles Appendix - A.5