1
XMLPDF Library
.NET Programmers Guide
Version 5.5.7 16 November 2006
Produced with XMLPDF 5.5.7M
www.xmlpdf.com
XMLPDF 5.5.7 Programmers Guide
November 2006
Contents
1
Introduction
1.1
1.2
1.3
1.4
1.5
2
Why create PDF files ? 1
Why use PDF instead of HTML ? 1
Development Environments 1
Do I need to know about the PDF file format ?
About this manual 1
Features
2.1
2.2
2.3
2.4
2.5
2.6
2.7
2.8
2.9
2.10
2
Document templates
Text Formatting 2
Fonts 2
Images 2
Pagination 3
Tables 3
Merging Data 3
Styles 3
Links 3
Sequences 3
3
Installation
4
Usage
4.1
4.2
4.3
4.4
4.5
4.6
5
2
4
5
Introduction 5
Hello world XML file
API 5
XML Validation 7
Versions 7
License File 7
C# Example
5.1
5.2
1
5
9
C# Code 9
Step by Step
9
6
Visual Basic Example
7
ASP.NET Example
8
ASP.NET Virtual Directories
9
XML Characters and Entities
9.1
9.2
15
Escaping XML Characters
Using XML Entities 18
10 Units of Measurement
10.1
10.2
10.3
10.4
10.5
12
19
Units 19
Page sizes 20
Custom page sizes 20
Page orientation 20
Margins 20
www.xmlpdf.com
16
17
17
1
XMLPDF 5.5.7 Programmers Guide
10.6
11 Fonts
11.1
11.2
11.3
11.4
11.5
November 2006
Default values
22
Basics 22
Changing fonts 22
Line height or leading
TrueType fonts 23
Unicode fonts 24
12 Document Structure
12.1
12.2
12.3
12.4
12.5
12.6
12.7
12.8
12.9
15 Colors
15.1
15.2
15.3
15.4
16 Tables
16.1
16.2
16.3
25
32
Basics 32
Horizontal alignment 32
Vertical alignment 32
Text color 33
Underline and strikethrough 33
Space after 33
Space before 33
Forcing space before 34
Indent left 34
Indent right 34
Kerning 34
Keep together 34
Keep spaces 34
Leading 35
Rise 35
Non Breaking Space 35
Changing Text Formatting 35
14 Page Numbering
14.1
14.2
14.3
23
Basics 25
XML encoding 25
Document element 26
Fonts element 26
Images element 26
Content elements 27
Formatting elements 31
New page element 31
Dynamic Attributes 31
13 Text Formatting
13.1
13.2
13.3
13.4
13.5
13.6
13.7
13.8
13.9
13.10
13.11
13.12
13.13
13.14
13.15
13.16
13.17
21
37
Basics 37
Breaks 37
Grouping 37
38
Basics 38
Predefined Colors 38
Custom Colors 38
CMYK Colors 38
39
Basics 39
Column widths
Borders 40
39
www.xmlpdf.com
XMLPDF 5.5.7 Programmers Guide
16.4
16.5
16.6
16.7
16.8
16.9
16.10
16.11
November 2006
Rounded Corners 41
Line styles 41
Border colors 42
Cell padding 42
Nested tables 42
Row height 43
Newspaper layout 44
Other attributes 46
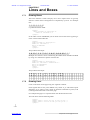
17 Lines and Boxes
17.1
17.2
Drawing Boxes 48
Drawing Lines 48
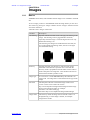
18 Images
18.1
18.2
18.3
18.4
18.5
19 Styles
19.1
48
49
Basics 49
Image Size 51
Image Resolution 52
Merging the file-name value 52
Using Scalable Vector Graphics 52
55
Basics 55
20 Document Security
20.1
20.2
20.3
Passwords 56
Restrictions 56
Example 56
21 Error Handling
21.1
21.2
21.3
21.4
21.5
23 Links
23.1
23.2
58
Basics 58
Logging to File 58
Logging to A Stream 58
Logging to System.Diagnostics.Trace 59
Logging to Multiple Destinations 59
22 Merging Data
22.1
22.2
22.3
22.4
60
Basics 60
Conditional processing 60
Merging Fields from XML using XPath expressions
Integration with ADO.NET 67
69
Basics 69
Merging the URL Value 70
24 Positioning Output
24.1
24.2
56
71
Absolute Positioning 71
Relative Positioning 71
25 Creating a Table of Contents
25.1
25.2
72
Creating a Table Of Contents 72
Table Of Contents Page Layout 73
www.xmlpdf.com
61
XMLPDF 5.5.7 Programmers Guide
November 2006
26 Reference
26.1
26.2
26.3
26.4
26.5
26.6
26.7
26.8
26.9
26.10
26.11
26.12
26.13
26.14
26.15
26.16
26.17
26.18
26.19
26.20
26.21
26.22
26.23
26.24
26.25
26.26
26.27
26.28
26.29
26.30
26.31
26.32
26.33
26.34
26.35
26.36
26.37
26.38
26.39
26.40
26.41
26.42
75
<auto-sequence-get> 75
<auto-sequence-get-name> 75
<auto-sequence-inc> 76
<begin-page-number-group> 77
<boxes> 77
<block> 79
<br> 80
<cell> 81
<condition> 82
<conditions> 82
<data> 82
<define-sequence> 82
<document> 84
<forward-reference> 85
<font> 85
<fonts> 85
<graphic> 86
<header> 86
<image> 87
<images> 88
<if> 88
<ifnot> 88
<info> 89
<link> 89
<merge> 89
<new-page> 90
<next-page> 90
<page-footer> 90
<page-header> 90
<page-number> 91
<restore> 91
<row> 92
<sequence-get> 93
<segment> 93
<show-image> 94
<set> 96
<space> 96
<span> 96
<style> 97
<table> 99
<watermark> 100
<xref> 101
www.xmlpdf.com
XMLPDF 5.5.7 Programmers Guide
November 2006
1: Introduction
CHAPTER 1
Introduction
This is the user manual for the XMLPDF library. The XMLPDF library creates
PDF documents dynamically from Java and .NET programming environments.
1.1
Why create PDF files ?
Industry standard Portable Document Format (PDF) files provide a convenient
way to distribute documents and forms. PDF files are platform-independent, so
someone viewing your document will see exactly the same thing on different
operating systems such as Windows and Linux. PDF documents provide precise
control over formatting and alignment and produce the same output on all
printers.
Most web browsers support PDF files through integration with Adobe Acrobat.
With XMLPDF you can create PDF files dynamically and stream them directly
to the browser from your application without requiring they be saved to disk.
1.2
Why use PDF instead of HTML ?
PDF files are used instead of HTML for the following reasons:
♦ Consistent output. When a user prints a PDF document they get what they
expect. When they print an HTML page what they get depends on which
browser version they are running and how it interacts with the printer driver.
♦ Correct fonts. XMLDPF allows you to embed fonts into a document so that
the document will print with the fonts specified, not the fonts which happen to
be installed on the users machine.
♦ Security. PDF documents are much more difficult for a user to alter than
HTML or Word documents.
♦ Precision formatting. Using PDF allows you to specify exactly the widths
of table columns so the document looks the same on all systems.
1.3
Development Environments
The .NET version of XMLPDF is developed in C# and delivered as a single
assembly called xmlpdf.dll. This can be used as an application-specific
assembly.
The Java version of XMLPDF is developed in Java 1.2 and delivered as a single
jar called xmlpdf-1.0.jar. This can be used with JDK/JRE versions 1.2 and 1.3.
1.4
Do I need to know about the PDF file format ?
No. The complexities of the PDF format are completely hidden.
1.5
About this manual
This manual was produced using XMLPDF version 5.5.7M. Body text is in
Times Roman 10/13, headings are Helvetica 12. A subset of Garamond and of
Arial is embedded to demonstrate Unicode fonts.
Acrobat users can press Ctrl-Alt-F to see a list of all the fonts in this document.
www.xmlpdf.com
xmlpdf user manual page 1 of 101
XMLPDF 5.5.7 Programmers Guide
November 2006
2: Features
CHAPTER 2
Features
2.1
Document templates
XMLPDF allows you to define the format of a PDF document in XML and
generate the document dynamically, including populating fields in the document
template from another source such as a database.
2.2
Text Formatting
XMLPDF has powerful text formatting features including:
2.3
Alignment
Text can be left aligned, right aligned, centered and justified.
Formatting
Text can be displayed in bold, italic,underline
Text can be displayed in superscript and subscript.
Kerning
Text is automatically kerned so that where fonts support it the
gap between characters changes for each character pair. This
results in text which looks more professional and is easier to
read.
Pagination
Text and tables are automatically split at page boundaries.
Widow / Orphan control is provided so that a single line is never
left at the bottom or top of a page.
Fonts
All PDF viewers support 14 standard fonts defined by Adobe. These include
Helvetica, Courier, Times, ZapfDingbats and Symbol, plus bold, italic and
bold-italic versions of Helvetica, Courier and Times. XMLPDF fully supports
these fonts.
TrueType fonts are also fully supported. These fonts are embedded in the
document. Adobe recommend that TrueType fonts should always be embedded.
Unicode TrueType fonts are fully supported allowing display of all Unicode
characters supported by the font.
When TrueType font files are embedded in documents, XMLPDF creates a
subset of the font so that only information from the TrueType font file which is
actually needed is included in the PDF. Data relating to characters not used in the
PDF document is discarded. This means you can use large font files and still get
small PDF documents.
See Section 11, "Fonts" for more information.
2.4
Images
PNG, GIF and JPEG images can be included in files produced using XMLPDF.
XMLPDF supports scaling images to fit page sizes and scaling to fit inside table
cells.
Images can be positioned anywhere in the document including in headers and
footers.
See Section 18, "Images" for more information.
www.xmlpdf.com
xmlpdf user manual page 2 of 101
XMLPDF 5.5.7 Programmers Guide
2.5
November 2006
2: Features
Pagination
Text blocks and tables are automatically split at page boundaries. Table headers
can be automatically repeated where a table is split.
Automatic numbering of pages and headings is supported including 'page X of
Y'.
2.6
Tables
XMLPDF supports extensive table formatting functionality. Tables contain cells
which in turn can contain text, images, graphics or other tables.
Table headers can be repeated automatically when tables are split by page
breaks.
See Section 16, "Tables" for more information.
2.7
Merging Data
XMLPDF is designed for creating document templates in XML and then
merging in data from a database. Data is presented to the document generation
process as XML, so it can originate from databases, existing XML files, or any
other source from which XML can be created.
Any amount of data can be merged from single fields to entire tables.
See Section 22, "Merging Data" for more information.
2.8
Styles
A style can be defined and then automatically applied to text or images making it
simple to provide all the elements of a PDF document with a consistent look. It
is easy to change the look of an entire document by changing a single style.
See Section 19, "Styles" for more information.
2.9
Links
HTTP hyperlinks can be placed in the PDF file so that users can click and open a
browser window at the linked address. Click on the www.xmlpdf.com to see this
in action.
See Section 23, "Links" for more information.
2.10
Sequences
Numbered sequences can be automatically allocated and displayed with
alphabetic, numeric or roman numeral formats.
www.xmlpdf.com
xmlpdf user manual page 3 of 101
XMLPDF 5.5.7 Programmers Guide
November 2006
3: Installation
CHAPTER 3
Installation
This chapter contains instructions on installing the XMLPDF library for the
.NET development environment.
The XMLPDF library is distributed as a Windows Installer file. Run this
installer to install the XMLPDF DLL's and a sample application written in Visual
Basic.NET. The source code for this sample program is included.
The installation include two DLLs. XMLPDF.DLL is compiled using the 1.0
Framework SDK, XMLPDF11.DLL is compiled using the 1.1 Framework SDK.
Once you have downloaded the DLL you can either reference it from projects
within Visual Studio by right-clicking on the project and selecting 'Add
reference' or you can install it in the shared assembly area using the appropriate
.NET utility.
The examples which follow in the usage section detail how to create references
to the DLL.
www.xmlpdf.com
xmlpdf user manual page 4 of 101
XMLPDF 5.5.7 Programmers Guide
November 2006
4: Usage
CHAPTER 4
Usage
4.1
Introduction
This section describes how to use XMLPDF to generate a PDF file. Examples
are included for generation of a file from Visual Basic, C# and from an ASP
page.
4.2
Hello world XML file
The simplest example using XMLPDF is the HelloWorld.xml file which contains
this:
<document>
<block>
Hello World
</block>
</document>
This is all the XML necessary to create a PDF file. All features of the PDF such
as page size, font, font size etc. are set to default values.
This file is used in all the examples which follow.
4.3
API
All documents are created using the generated method of the PDFDocument
object.
Different arguments are used to distinguish the different generate methods as
detailed here:
4.3.1
XML File to PDF File
public void generate( String templateFileName, String pdfFileName )
templateFileName is the name of the file on disk which contains the template
XML.
pdfFileName is the name of the file where the PDF file will be created. If this
file already exists it is overwritten.
Use this method to generate a PDF file from an XML template where both files
are disk-based and no data is merged.
4.3.2
XML File to PDF File, Data in File
public void generate( String templateFileName, String pdfFileName, String
dataFileName )
templateFileName is the name of the file on disk which contains the template
XML.
pdfFileName is the name of the file where the PDF file will be created. If this
file already exists it is overwritten.
dataFileName is the name of the file where XML data to be merged into the
template is stored.
Use this method to generate a PDF file from an XML template merging data
from a third file, where all files are disk-based.
4.3.3
XML Document to PDF Stream
public void generate( XmlDocument templateDoc, Stream pdfStream )
www.xmlpdf.com
xmlpdf user manual page 5 of 101
XMLPDF 5.5.7 Programmers Guide
November 2006
4: Usage
templateDoc is a System.Xml.XmlDocument object.
pdfStream is the name of the stream where the PDF file will be written. The
PDF is written to the stream at its current position. The stream is not closed.
Use this call if you are already creating your XML using an XmlDocument
object.
4.3.4
XML File to PDF Stream
public void generate( String templateFileName, System.IO.Stream pdfStream )
templateFileName is the name of the file on disk which contains the template
XML.
pdfStream is the name of the stream where the PDF file will be written. The
PDF is written to the stream at its current position. The stream is not closed.
Use this method to generate a PDF document to a stream, from from an XML
template without merging data. The stream can be valid stream including a
MemoryStream or Response.OutputStream.
4.3.5
XML File to PDF Stream, Data in String
public void generate( String templateFileName, System.IO.Stream pdfStream,
String data )
templateFileName is the name of the file on disk which contains the template
XML.
pdfStream is the name of the stream where the PDF file will be written. The
PDF is written to the stream at its current position. The stream is not closed.
data is a string containing the XML data elements to be merged into the template
XML.
Use this method to generate a PDF document to a stream, reading the template
from disk and merging data from memory. The stream can be valid stream
including a MemoryStream or Response.OutputStream.
4.3.6
XML Stream to PDF Stream
public void generate( System.IO.Stream templateStream, System.IO.Stream
pdfStream )
templateStream is a stream which contains the XML template.
pdfStream is the name of the stream where the PDF file will be written. The
PDF is written to the stream at its current position. The stream is not closed.
Use this method to generate a PDF document to a stream, reading the template
XML from another stream. The output stream can be valid stream including a
MemoryStream or Response.OutputStream.
This method allows you to create the template XML in memory and not have to
save it to file first.
As an aside, to create a Stream of XML in memory you can use code like this:
Dim Xml As New StringBuilder()
Xml.Append("<document><block>")
Xml.Append("Hello World")
Xml.Append("</block></document>")
Dim stream As New MemoryStream( ASCIIEncoding.ASCII.GetBytes(
Xml.ToString() ) )
www.xmlpdf.com
xmlpdf user manual page 6 of 101
XMLPDF 5.5.7 Programmers Guide
4.3.7
November 2006
4: Usage
XML Stream to PDF Stream, Data in String
public void generate( System.IO.Stream templateStream, System.IO.Stream
pdfStream, String data )
templateStream is a stream which contains the XML template.
pdfStream is the name of the stream where the PDF file will be written. The
PDF is written to the stream at its current position. The stream is not closed.
data is a string containing the XML data elements to be merged into the template
XML.
Use this method to generate a PDF document to a stream, reading the template
XML from another stream while merging data from a string The output stream
can be valid stream including a MemoryStream or Response.OutputStream.
This method allows you to create the template XML in memory and not have to
save it to file first.
4.3.8
Retrieving count of pages created
public int getPagesCreated()
This method returns the number of physical pages created in the PDF document.
It should only be called after one of the generate() methods described above has
been called.
4.4
XML Validation
To use a DTD for validating the XML you must explictly enable validation for
each document. This is done by setting the ValidationType property on the
document to one of the values in the System.Xml.ValidationType enumeration,
for example:
PDFDocument doc = new PDFDocument();
doc.ValidationType
= System.Xml.ValidationType.DTD;
The default value is System.Xml.None, in which case no validation is done.
4.5
Versions
Pressing control-D in the Acrobat Reader displays the Document Summary
dialog box. The Producer value indicates the version of XMLPDF used to create
the PDF file. This will be a release number such as 1.1.5 plus the letter J for the
Java version of XMLPDF or M for the .NET version.
4.6
License File
Non-evaluation versions of XMLPDF require a license file to run. This file is
distributed to all licensed users and must be placed in a location where XMLPDF
can open the file. For most applications placing the file in the directory from
which the application is started is all that is required.
If the license file is not found by default, to tell XMLPDF where the license file
is located you can set a property on the xmlpdf.licensing.Generator object as
shown here.
PDFDocument doc = new PDFDocument();
xmlpdf.licensing.Generator.LicenseFileLocation
= @"d:\xmlpdf\testlic\xmlpdf.lic";
Where "d:\xmlpdf\testlic\xmlpdf.lic" should be changed to the location of the
license file on your system.
www.xmlpdf.com
xmlpdf user manual page 7 of 101
XMLPDF 5.5.7 Programmers Guide
November 2006
4: Usage
Doing this overrides the default file location. We suggest that your program load
the actual location from a configuration file or the registry to make you
application more flexible. We have not configured a registry setting because
some users will run XMLPDF under the ASPNET account which by default does
not have registry access.
www.xmlpdf.com
xmlpdf user manual page 8 of 101
XMLPDF 5.5.7 Programmers Guide
November 2006
5: C# Example
CHAPTER 5
C# Example
5.1
C# Code
A simple C# program for calling the XMLPDF library to create the PDF file
looks like this:
using System;
using xmlpdf;
public class Create {
public static void main( string[] args ) {
PDFDocument doc = new PDFDocument();
doc.generate( args[0], args[1] );
}
}
This program takes as command line arguments two file names, first the name of
the XML file and then the name of the PDF file.
This program is executed with a command such as:
Create HelloWorld.xml HelloWorld.pdf
Assuming the system is installed correctly this will create the file
HelloWorld.pdf.
5.2
Step by Step
The steps involved in creating the above program are shown here:
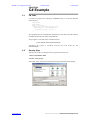
1 Start Visual Studio .NET
2 Create a new project
Select File | New | Project from the menu to bring up the New Project dialog:
www.xmlpdf.com
xmlpdf user manual page 9 of 101
XMLPDF 5.5.7 Programmers Guide
November 2006
5: C# Example
In the Templates box select 'Console Application', enter 'TextXMLPDF' in the
Name text box, and enter a suitable directory in the Location text box. This
should look like this:
Press OK to create the project.
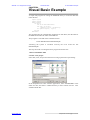
3 Reference the XMLPDF DLL
In the Solution Explorer window right click on the References branch and select
'Add Reference'. This brings up the Add Reference dialog:
Click on Browse and navigate to the xmlpdf.dll.
Click OK.
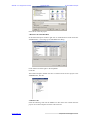
The Solution Explorer should now show a reference from the new project to the
XMLPDF DLL, like this:
4 Add the Code
Paste the following code into the Class1.cs file which was created when the
project was created. Replace all of the code in the file.
www.xmlpdf.com
xmlpdf user manual page 10 of 101
XMLPDF 5.5.7 Programmers Guide
November 2006
5: C# Example
using System;
using xmlpdf;
public class Create {
public static void main( string[] args ) {
PDFDocument doc = new PDFDocument();
doc.generate( args[0], args[1] );
}
}
5 Compile
Select Build | Build Solution from the menu to compile the project
6 Run
Either configure the command-line arguments using the Project | Properties
dialog or execute the program from the command line like this:
testxmlpdf helloworld.xml helloworld.pdf
This will create the file helloworld.pdf
www.xmlpdf.com
xmlpdf user manual page 11 of 101
XMLPDF 5.5.7 Programmers Guide
November 2006
6: Visual Basic Example
CHAPTER 6
Visual Basic Example
A simple VB program for calling the XMLPDF library to create the PDF file
looks like this:
Imports System
Imports xmlpdf
Module Module1
Sub Main()
Dim doc As New PDFDocument()
Dim args() As String =
Command().Split(" ".ToCharArray)
doc.generate(args(0), args(1))
End Sub
End Module
This program takes as command line arguments two file names, first the name of
the XML file and then the name of the PDF file.
This program is executed with a command such as:
Create HelloWorld.xml HelloWorld.pdf
Assuming the system is installed correctly this will create the file
HelloWorld.pdf.
The steps involved in creating the above program are shown here:
1 Start Visual Studio .NET
2 Create a new project
Select File | New | Project from the menu to bring up the New Project dialog:
In the Templates box select 'Console Application', enter 'TextXMLPDF' in the
Name text box, and enter a suitable directory in the Location text box. This
should look like this:
www.xmlpdf.com
xmlpdf user manual page 12 of 101
XMLPDF 5.5.7 Programmers Guide
November 2006
6: Visual Basic Example
Press OK to create the project.
3 Reference the XMLPDF DLL
In the Solution Explorer window right click on the References branch and select
'Add Reference'. This brings up the Add Reference dialog:
Click on Browse and navigate to the xmlpdf.dll.
Click OK.
The Solution Explorer should now show a reference from the new project to the
XMLPDF DLL, like this:
4 Add the Code
Paste the following code into the Module1.vb file which was created when the
project was created. Replace all of the code in the file.
www.xmlpdf.com
xmlpdf user manual page 13 of 101
XMLPDF 5.5.7 Programmers Guide
November 2006
6: Visual Basic Example
Imports System
Imports xmlpdf
Module Module1
Sub Main()
Dim doc As New PDFDocument()
Dim args() As String =
Command().Split(" ".ToCharArray)
doc.generate(args(0), args(1))
End Sub
End Module
5 Compile
Select Build | Build Solution from the menu to compile the project
6 Run
Either configure the command-line arguments using the Project | Properties
dialog or execute the program from the command line like this:
vbconsole helloworld.xml helloworld.pdf
This will create the file helloworld.pdf
www.xmlpdf.com
xmlpdf user manual page 14 of 101
XMLPDF 5.5.7 Programmers Guide
November 2006
7: ASP.NET Example
CHAPTER 7
ASP.NET Example
The following is the code for a web page which will read the file 'hello.xml' and
return the PDF file to the browser.
<%@ Page Language="C#"%>
<%@ Import NameSpace='System.IO' %>
<%@ Import NameSpace='System.Net' %>
<%@ Import NameSpace='xmlpdf' %>
<%
PDFDocument doc = new PDFDocument();
Response.Clear();
Response.ContentType = "application/pdf";
string template = @"d:\xmlpdf\hello.xml";
MemoryStream memory = new MemoryStream();
doc.generate( template, memory );
Response.AddHeader( "content-length",
System.Convert.ToString( memory.Length ) );
Response.BinaryWrite( memory.ToArray() );
Response.Flush();
Response.End();
%>
The following are the key things to note in this code:
Response.ContentType sets the MIME type of the content so the browser knows
to start Acrobat to handle the returned file.
The PDF is generated into a System.IO.MemoryStream object on the server.
This is done so that we can obtain the number of bytes to be returned to the
client. This is used when we call Response.AddHeader to set the length of the
content.
Response.BinaryWrite() copies the PDF bytes to the client browser.
While it is possible to pass the Response.OutputStream object directly to the
generate call (as the second parameter) this is not reliable when the PDF file size
is very small.
www.xmlpdf.com
xmlpdf user manual page 15 of 101
XMLPDF 5.5.7 Programmers Guide
November 2006
8: ASP.NET Virtual Directories
CHAPTER 8
ASP.NET Virtual Directories
<font> and <image> elements have a directory attribute which enables you
to define the paths to your font and image files as relative paths, so that the same
XML template files will work both standalone and when running in an ASP.NET
server.
To use relative directories define the directory attribute on a font or image
element like this:
<font file-name='fonts\arial.ttf' directory='$base'/>
When the XML is parsed to create the PDF file the value of the attribute
directory='$base'
will
be
translated
as
described
in
Section 12.9, "Dynamic Attributes".
When using this template outside an ASP.NET server set the $base variable to '.',
like this:
PDFDocument doc = new PDFDocument();
doc.setAttributeTranslation( "$base", "." );
This will make the final path to the font file '.\fonts\arial.ttf' and XMLPDF will
try to load the font from this directory relative to your current directory.
When running the same template in a ASP.NET server, set the $base variable to
the server's virtual directory like this:
PDFDocument doc = new PDFDocument();
doc.setAttributeTranslation( "$base", Server.MapPath(".") );
This will make the final path to the font file something like
'c:\inetpub\wwwroot\webapplication1\fonts\arial.ttf' and XMLPDF will try to
load the font from this directory.
www.xmlpdf.com
xmlpdf user manual page 16 of 101
XMLPDF 5.5.7 Programmers Guide
November 2006
9: XML Characters and Entities
CHAPTER 9
XML Characters and Entities
9.1
Escaping XML Characters
This section describes how to use special XML characters in XML.
In order to use some characters in XML you need to escape them so as not to
confuse the XML parser. These characters are:
&
ampersand
'
single quote
"
double quote
<
less than
>
greater than
There are two appraches to escaping text in XML, either (a) replace each special
character with its entity value, or (b) enclose all text in a CDATA section.
Given the text string
Smith & Jones
we can either:
(a) replace just the ampersand, to get:
Smith & Jones
(b) enclose the whole string in a CDATA to get:
<![CDATA[Smith & Jones]]>
When using approach (a) the special characters should be replaced with the
values from this table:
Character
Name
Use
&
ampersand
&
'
single quote
'
"
double quote
"
<
less than
<
>
greater than
>
For more information on XML refer to:
http://www.w3.org/row/1998/REC-xml-19980210
www.xmlpdf.com
xmlpdf user manual page 17 of 101
XMLPDF 5.5.7 Programmers Guide
9.2
November 2006
9: XML Characters and Entities
Using XML Entities
This section describes how to use XML entities.
XML entities can be defined in the DOCTYPE declaration at the start of the
XML template file. This example defines two entities 'deg', which has a Unicode
value of 176 and 'euro' which has a Unicode value of 8364, being the symbols for
degree and euro.
<?xml version="1.0" encoding="utf-8" ?>
<!DOCTYPE document [
<!ENTITY deg '°'>
<!ENTITY euro '€'>
<!ENTITY nbsp ' '>
]>
<document>
...
These entities can then be placed in the template XML like this:
<block>The degree symbol is °</block>
which results in this output:
The degree symbol is °.
Note that this only works if the font you are using actually contains the symbol
you wish to display. For instance if the current font is zapfdingbats (which does
not have the degree symbol) you will see a different character, like this:
<block>
The degree symbol is <span font-name='zapfdingbats'>°</span>
</block>
The degree symbol is ⑤.
www.xmlpdf.com
xmlpdf user manual page 18 of 101
XMLPDF 5.5.7 Programmers Guide
November 2006
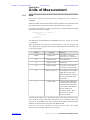
10: Units of Measurement
CHAPTER 10
Units of Measurement
10.1
Units
This section describes the format used for defining the size of objects in
XMLPDF.
Within the XML used to define a PDF document elements have attributes which
describe the size and format of the object. Many attributes are numeric.
For example the height of a page in the document is defined using the height
attribute as shown in this example:
<document height='700' width='500'>
<block>
Hello World
</block>
</document>
The default unit of measurement for XMLPDF is the point. A point is 1/72 inch
or 0.3528 mm.
When defining the size of an area of the document (i.e. any size except a font
size) values can be expressed with the units immediately after the number with
no intervening spaces.
Format
Example
Meaning
(blank)
height='10.5'
cm
height='10.5cm'
10.5 centimeters
in
height='10.5in'
10.5 inches
pts
height='10.5pts'
10.5 points, i.e. the same as
10.5 with no units specified.
%
widths='30%,70%'
a percentage of the available
width. This is used only to
define the width of a cell in a
table as a proportion of the
table width.
*
widths='200,*'
rest of available width. This
is used only to set the width
of the last column in a table
to the width of the table less
the total width of all
preceding columns. This
works only for the last
column in a table.
10.5 points, i.e. 10.5/72
inches or 10.5 * 0.3528 mm
Note that if cell widths are not specified for tables, space will be allocated evenly
to all columns. Actual width of text and images is not considered. This is the
opposite of what HTML does but in keeping with making PDF documents
maintain the same format when printed with different data.
Font sizes are always expressed in points with no units. This means
font-size='10.5' will make the font size 10.5 points.
www.xmlpdf.com
xmlpdf user manual page 19 of 101
XMLPDF 5.5.7 Programmers Guide
10.2
November 2006
10: Units of Measurement
Page sizes
The size of the page in the PDF document is set using the page-size attribute on
the <document> element.
Valid values for the page-size are:
Page Size
Width (mm)
Height (mm)
Width
(points)
Height
(points)
A3
420
297
1191
842
A4
210
297
596
842
A5
148
210
420
842
LETTER
216
279
612
792
LEGAL
216
356
612
1008
TABLOID
279
432
790
1224
EXECUTIVE
190
254
539
720
The default page size is A4.
Assuming you want a page which is LEGAL size you would do this:
<document page-size='legal'>
<block>
Hello World
</block>
</document>
10.3
Custom page sizes
Custom page sizes can be set using the height and width attributes on the
<document> element.
To get a page which is 10cm wide by 20 cm high you would do this:
<document height='20cm' width='10cm'>
<block>
Hello World
</block>
</document>
10.4
Page orientation
Page orientation is set using the orientation attribute on the <document> element.
By default the orientation is portrait.
An example of a landscape document is:
<document orientation='landscape'>
<block>
Hello World
</block>
</document>
The page orientation can be changed within the document using the <next-page>
element. See Section 26.27, "<next-page>"
10.5
Margins
Page margins are set using the following attributes on the <document> element:
♦ margin-left
♦ margin-right
♦ margin-top
♦ margin-bottom
www.xmlpdf.com
xmlpdf user manual page 20 of 101
XMLPDF 5.5.7 Programmers Guide
November 2006
10: Units of Measurement
Each of these sets the amount of space between the edge of the page and the
edge of the content.
All of these attributes have a default value of 36 points or ½ an inch.
The page margins can be changed within the document using the <next-page>
element. See Section 26.27, "<next-page>"
10.6
Default values
The default values for a document are:
Attribute
Default Value
align
left
font-name
times
font-size
12/14
kern
true
margin-left
36
margin-right
36
margin-top
36
margin-bottom 36
page-size
www.xmlpdf.com
A4
xmlpdf user manual page 21 of 101
XMLPDF 5.5.7 Programmers Guide
November 2006
11: Fonts
CHAPTER 11
Fonts
11.1
Basics
Adobe Acrobat and the PDF format support a set of fonts called Type 1 Fonts.
The names of these fonts as used by XMLPDF are:
courier
courier-bold
courier-italic
courier-bold-italic
helvetica
helvetica-bold
helvetica-italic
helvetica-bold-italic
times
times-bold
times-italic
times-bold-italic
symbol
zapfdingbats
These fonts (or suitable substitution fonts) are guaranteed to be available to the
viewer application on all platforms.
Although technically the sloped versions of the Times font is italic and the
Helvetica and Courier fonts are oblique for simplicity they are all named ending
with '-italic' in XMLPDF.
The characters used in the font (technically the glyphs) are independent of the
font size. A specific size and font face are defined by using both the font-name
and font-size attributes.
The following XML will produce a document printed in 12 point Helvetica:
<document font-name='helvetica' font-size='12'>
<block>
Hello World
</block>
</document>
Font settings are inherited, in that a single font-name and font-size can be
defined for an element such as a table and all objects contained within that table
will be displayed using that font.
11.2
Changing fonts
To change the font face or font size used during a block of text use the <span>
element. Conceptually the current text characteristics are stored on a stack. The
<span> element pushes new values onto the stack and these become the current
values until the </span> end element is encountered, at which point the values
used before the opening <span> are restored.
For example to print a sentence with only the word Hello in bold using Helvetica
the document would look like this:
<document font-name='helvetica' font-size='12'>
<block>
For example to print a sentence
with only the word
<span font-name='helvetica-bold'>
Hello</span> in
bold using Helvetica the document
would look like this:
</block>
</document>
This would result in the following output:
For example to print a sentence with only the word Hello
in bold using Helvetica the document would look like
this:
www.xmlpdf.com
xmlpdf user manual page 22 of 101
XMLPDF 5.5.7 Programmers Guide
11.3
November 2006
11: Fonts
Line height or leading
The leading is the vertical distance between the baselines of adjacent lines of
text.
The leading can be set with the leading attribute. The leading is always defined
using points without any units specified, so leading='15' selects a leading of 15
points.
Setting the leading to less than the font size will cause the lines of text to overlap
so this is generally not a useful thing to do.
The leading can also be set using the font-size attribute. This is done by
separating the font size and the leading values with a slash, so to use font size 15
and leading 18 throughout a document you do this:
<document font-name='helvetica' font-size='15/18'>
<block>
Hello World
</block>
</document>
The leading defaults to the font-size plus 2 points.
11.4
TrueType fonts
Adobe Acrobat and the PDF format support TrueType fonts, which are fonts
provided as separate font files.
In a Windows NT environment TrueType fonts are in the directory \winnt\fonts.
Each font is held in a separate font file with a name like 'Arial.ttf'. You can view
fonts by using Control Panel | Fonts and opening a font file to see what is in it.
Note that different styles of a font i.e. bold, bold-italic etc. are different font files
and must be referenced as separate fonts.
Adobe recommend that TrueType fonts be embedded.
The following XML will produce a document printed in 12 point Arial.
<document>
<fonts>
<font font-name='arial'
font-file='arial.ttf'
type='truetype' />
</fonts>
<block font-name='arial' font-size='12'>
Hello World
</block>
</document>
To use a TrueType font you have to tell XMLPDF about the font before you can
use it. This is done by placing a <font> element into the <fonts> element near the
start of the document.
www.xmlpdf.com
xmlpdf user manual page 23 of 101
XMLPDF 5.5.7 Programmers Guide
November 2006
11: Fonts
Attributes of the <font> element are:
Attribute
Description
Example
font-name
The name of the font as used
in this document. This name
is used in text elements to
make the text use that font.
font-name='arial-narrow'
font-file
The full path of the file which
contains the fonts.
font-file='d:\winntx\fonts\arial.t
tf'
unicode
Tells XMLPDF that the font
unicode='true'
contains (and you want to use)
characters above U+00FF.
See unicode fonts for notes on
Unicode fonts.
Each TrueType font is read into memory and cached the first time it is used. This
means that if XMLPDF is used in a web server or application server only
minimal resources are used to hold TrueType fonts and they are read from disk
and parsed only once.
11.5
Unicode fonts
Unicode TrueType fonts are TrueType fonts which contain glyphs for character
codes greater than ASCII 255 or U+00FF. These are supported in XMLPDF
from release 1.1.
To use a Unicode font you must specify the type to be 'truetype' (like any other
TrueType font) and set the 'unicode' attribute on the <font> element to 'true'.
Always remember to set the encoding processing instruction of your XML to the
correct one for the actual encoding of the document. This is done at the start of
the XML like this:
<?xml version='1.0' encoding='UTF-8'?>
For more information on encoding check out www.unicode.org.
Unicode fonts are always embedded in the document. A subset of the font is
created which contains only the characters which actually appear in the
document. This means that the size of the font file does not affect the size of the
PDF - only the number of distinct glyphs appearing in the PDF does. For
example if you use the font 'arialuni.ttf' which is 24 megabytes in size, but only
use a few hundred different characters in your document, the PDF file will still
be less than 100K in size.
www.xmlpdf.com
xmlpdf user manual page 24 of 101
XMLPDF 5.5.7 Programmers Guide
November 2006
12: Document Structure
CHAPTER 12
Document Structure
12.1
Basics
This chapter describes the overall structure of an XMLPDF document template.
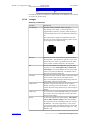
A typical document looks like this:
<?xml version='1.0' encoding='UTF-8'?>
<document>
<fonts>
<font font-name='arial'
font-file='arial.ttf'
type='truetype' />
</fonts>
<images>
<image file-name="dolphins.png"
image-name="dol"/>
</images>
<table padding-all='2' widths='30%,70%'>
<row>
<cell>
<show-image image-name='dol'/>
</cell>
<cell>
<show-image image-name='dol'/>
</cell>
</row>
</table>
<block font-name='arial' font-size='12'>
Hello World
</block>
</document>
12.2
XML encoding
The first line in the document is the XML processing instruction:
<?xml version='1.0' encoding='UTF-8'?>
This is only necessary if the document contains any Unicode characters. The
encoding specified must match the actual encoding of the document.
www.xmlpdf.com
xmlpdf user manual page 25 of 101
XMLPDF 5.5.7 Programmers Guide
12.3
November 2006
12: Document Structure
Document element
After the XML processing instruction comes the <document> element. This is
the top-level element and contains the whole document. Attributes of the
document element set overall characteristics of the document such as the page
size and the page margins. The following table summarises these attributes:
12.4
Attribute
Description
color-space
The defaults to 'rgb'. If you set it to 'cmyk' you can
create a CMYK PDF file suitable for printing by a
professional printer. This requires that only CMYK
images are used in creating the document, XMLPDF
does not currently support converting images from
RGB to CMYK at runtime.
info-title
Sets the PDF document title which is displayed in the
document summary dialog box in Adobe Acrobat.
info-author
Sets the PDF document author which is displayed in the
document summary dialog box in Adobe Acrobat.
info-subject
Sets the PDF document subject which is displayed in
the document summary dialog box in Adobe Acrobat.
margin-left
Sets the left margin for the whole document.
margin-right
Sets the right margin for the whole document.
margin-top
Sets the top margin for the whole document.
margin-bottom
Sets the bottom margin for the whole document.
page-mode
Controls the way in which Acrobat will open the
document. With page-mode='bookmarks' Acrobat will
display the bookmarks window on the left of the
document. With page-mode='thumbs' Acrobat will
display the thumbnails window on the left of the
document. With page-mode = 'fullscreen' Acrobat will
open the document in full screen mode with no toolbars
or menus.
page-size
Sets the size of the page for the whole document. See
Section 10.2, "Page sizes" for details on page sizes.
Fonts element
...
<fonts>
<font font-name='arial'
font-file='d:\winntx\fonts\arial.ttf'
type='truetype' />
</fonts>
...
The <fonts> element is used to hold <font> elements for any TrueType fonts
used in the document. If no TrueType fonts are used the fonts element is not
required. See Section 11, "Fonts" for a description of these elements.
12.5
Images element
The <images> element is used to hold <images> elements for any images (PNG
or JPEG files) used in the document. If no images are used the images is not
required. See Section 18, "Images" for a description of these elements.
www.xmlpdf.com
xmlpdf user manual page 26 of 101
XMLPDF 5.5.7 Programmers Guide
12.6
November 2006
12: Document Structure
Content elements
After the font and image elements the document content appears. The content of
the document is included in <table>, <block> and <show-image> elements.
Each of these elements can appear any number of times in any order. These
elements are explained in the following sections.
Processing instructions are elements such as <style>, <page-header>,
<page-footer>, <sequence> and <auto-sequence> elements. Each of these
elements can appear any number of times in any order. These elements are
explained in the following sections.
12.6.1
Block element
The <block> element is used to place a block of text in the PDF document. The
block used to create this sentence looks like this:
<block>The <block> element is used to place a block of text in
the PDF document.
The block used to create this sentence looks like this:</block>
The following attributes affect the way the text in the block appears. These are
explain in more detail in Section 13, "Text Formatting".
www.xmlpdf.com
Attribute
Description
align
Specifies the text alignment to use for this block. This
specifies the alignment of text within the block, not the
alignment of the block on the page. Alignment of the
block on the page is specified using the block-align
attribute as stated below. See
Section 13.2, "Horizontal alignment"
block-align
Specifies how a block which is less than 100% of the
page width is aligned on the page. This can be 'left',
'right' or 'center'.
class
Specifies the class of this block so that styles which
match the class will automatically be applied. See
Section 19, "Styles".
font-name
Specifies the font face of this block. See
Section 11, "Fonts".
font-size
Specifies the font size in points of this block. See
Section 11, "Fonts".
indent-left
Specifies the left indentation of the text. Indentation is
the amount of space between the margin of the page
and the edge of the text, image or table. The distance
from the left edge of the page to the content is the
margin-left value from the document element plus the
indent-left value of the block.
indent-right
Specifies the right indentation of the text. Indentation
is the amount of space between the margin of the page
and the edge of the text, image or table. The distance
from the right edge of the page to the content is the
margin-right value from the document element plus the
indent-right value of the block.
xmlpdf user manual page 27 of 101
XMLPDF 5.5.7 Programmers Guide
12.6.2
November 2006
12: Document Structure
Attribute
Description
keep-together
If set to 'true' will prevent the block being split if it
appears near the end of a page and will not fit. If
keep-together is 'false' (the default) the block will be
split over two pages if it does not fit in the available
space at the end of the page. If keep-together is 'true'
the block will not be split and will be moved
completely to the start of the next page.
keep-with-next
If set to 'true' will keep the block on the same page as
the next block level element. If necessary a page break
will be inserted to keep the block and the following
block or table together.
space-before
Sets the amount of white space which appears before
the content of the block.
space-after
Sets the amount of white space which appears after the
content of the block. The space between two blocks is
the space-after of the first block plus the space-before
of the second block.
space-required
Sets the amount of space which must be present on the
page for the block to be output. If that amount of space
is not available the whole block is moved to the next
page. This is useful to prevent headers being output by
themselves at the bottom of the page.
width
Specifies the width of the block. This can be a fixed
amount such as '12cm' or a percentage of the page
width, such as '80%'. If the block is less than 100% of
the page width it is aligned using the block-align
attribute.
Table element
The <table> element is used to place a table in the PDF document. A table can
contain text or images or other tables. It may or may not have borders.
All of the attributes described in the preceding section on the block element
can also be applied to the table element.
The following additional elements affect the way the table appears. These are
explained in detail in section Section 16, "Tables".
www.xmlpdf.com
Attribute
Description
widths
Sets the widths of columns.
border-width-all
border-width-inner
border-width-outer
border-width-top
border-width-bottom
border-width-left
border-width-right
Sets the widths of table, row and cell borders.
xmlpdf user manual page 28 of 101
XMLPDF 5.5.7 Programmers Guide
12.6.3
November 2006
12: Document Structure
Attribute
Description
border-color-all
border-color-inner
border-color-outer
border-color-top
border-color-bottom
border-color-left
border-color-right
Sets the color of table, row and cell borders. See
Section 15, "Colors"
padding-all
padding-inner
padding-outer
padding-top
padding-bottom
padding-left
padding-right
Sets cell padding. Padding is the amount of space
between the border of a cell and the text or image in it.
Show-image element
The <show-image> element is used to place an image in the PDF document. This
places the image into the flow of the document in a way similar to a table or
block element. Images can also be placed in tables using the <show-image>
element inside a cell element. This is described in section Section 18, "Images".
All of the attributes described in the preceding section on the block element
can also be applied to the table element.
The following additional elements affect the way the image appears. These are
explained in detail in section Section 18, "Images".
12.6.4
Attribute
Description
image-name
Specifies which image to display. The image must
have previously been defined using an image element at
the start of the XML document.
Page-header element
The <page-header> element is used to set the page header which will appear in
the PDF document from that point on.
The page header is conceptually the same as a table in that it has rows and cells.
The page header for this document looks like this:
<page-header space-after="1cm" indent-left="-2.75cm"
indent-right="1.5cm">
<row>
<cell align="left" font-name="helvetica"
font-size="8" text-color="blue">
XMLPDF
<info field="version" flags="independent"></info>
User Manual
</cell>
<cell align="middle" font-name="helvetica"
font-size="8" text-color="blue">
<info field="date" flags="MMMMM yyyy"></info>
</cell>
<cell align="right" font-name="helvetica"
font-size="8" text-color="blue">
<auto-sequence-get level="1"/>:
<auto-sequence-get-name level="1"/>
</cell>
</row>
</page-header>
www.xmlpdf.com
xmlpdf user manual page 29 of 101
XMLPDF 5.5.7 Programmers Guide
November 2006
12: Document Structure
The page header is automatically repeated at the start of each page after it is
defined. This means that you should place the page-header element before a
new-page element if you want the header to appear on the page after the
new-page element.
To change the page header simply insert another page-header element into the
document XML. The page header will be changed from that point on.
A page header can be defined for a limited range of page numbers. This is done
using the first-page and last-page attributes of the page-header element.
For example to create a page header which did not appear on the first page we
would set the first-page attribute to 2, like this:
<page-header first-page='2'>
<row>
<cell>
Not on page 2
</cell>
</row>
</page-header>
Or to define a page header which appeared only one pages 2, 3 and 4 we would
do this:
<page-header first-page='2' last-page='4'>
<row>
<cell>
Not on page 2
</cell>
</row>
</page-header>
12.6.5
Page-footer element
The <page-footer> element is used to set the page footer which will appear in the
PDF document from that point on.
The page footer is conceptually the same as a table in that it has rows and cells.
The page footer for this document looks like this:
<page-footer indent-left='-2.75cm' indent-right='1.5cm'>
<row>
<cell align='left' font-name='helvetica' font-size='8'
text-color='blue'>
<link url='http://www.xmlpdf.com'>
www.xmlpdf.com<
/link>
</cell>
<cell border-width-top='0.01' align='right'
font-size='8' font-name='helvetica'>
xmlpdf user manual
page <page-number/> of
<forward-reference name='total-pages'/>
</cell>
</row>
</page-footer>
The page footer is automatically repeated at the end of each page after it is
defined.
To change the page footer simply insert another page-footer element into the
document XML. The page footer will be changed from that point on.
A page footer can be defined for a limited range of page numbers. This is done
using the first-page and last-page attributes of the page-footer element.
For example to create a page footer which did not appear on the first page we
would set the first-page attribute to 2, like this:
www.xmlpdf.com
xmlpdf user manual page 30 of 101
XMLPDF 5.5.7 Programmers Guide
November 2006
12: Document Structure
<page-footer first-page='2'>
<row>
<cell>
Not on page 2
</cell>
</row>
</page-footer>
Or to define a page footer which appeared only one pages 2, 3 and 4 we would
do this:
<page-footer first-page='2' last-page='4'>
<row>
<cell>
Not on page 2
</cell>
</row>
</page-footer>
12.7
Formatting elements
This section details the elements which are not used to insert content but to
define formatting.
12.8
New page element
The <new-page> element is used force a page break in the PDF output. Its only
attribute (which is optional) is the 'next-page-number' attribute which can be
used to set the page number of the next page. For example to set the page
number of the next page to 1 you would do the following:
...
<new-page next-page-number='1' />
...
If you change the page number using the next-page-number attribute and then
show the total pages in the document in the footer (as is done in this manual) the
total pages figure will still be correct.
12.9
Dynamic Attributes
Its is possible to programatically change the value of XML attributes at runtime.
Assuming you want to change the value of the orientation attribute at runtime:
(a) change your document template xml to prefix the orientation value with a '$'
character like this:
<document orientation='$orientation' margin-left='1cm'
margin-right='1cm' font-name='helvetica' font-size='9' >
(b) in the calling program do this to set the value of the orientation variable:
// assuming
// PDFDocument doc = new PDFDocument();
doc.setAttributeTranslation( "$orientation", "landscape" );
// or doc.setAttributeTranslation( "$orientation", "portrait" );
When the PDF is produced, if the program finds an attribute with a value starting
with '$' it looks up the list of translations defined with setAttributeTranslation()
calls and changes the value to the one you have defined.
www.xmlpdf.com
xmlpdf user manual page 31 of 101
XMLPDF 5.5.7 Programmers Guide
November 2006
13: Text Formatting
CHAPTER 13
Text Formatting
13.1
Basics
Text is inserted into a document using the <block> element, as shown here:
<document>
<fonts>
<font font-name='arial'
font-file='arial.ttf'
type='truetype' />
</fonts>
<block font-name='arial' font-size='12'>
Hello World
</block>
</document>
The attributes which affect how text is displayed are listed here with an example
for each attribute.
13.2
Horizontal alignment
Text is aligned horizontally using the align attribute. To align a block to the
right you use align='right', as shown here:
<document>
<block align='right' font-size='12'>
Hello World
</block>
</document>
Possible values of align are:
left
right
middle
center
justified
The values 'center' and 'middle' do the same thing.
13.3
Vertical alignment
Text is vertically aligned using the vertical-align attribute. This only
applies to the content of cells in tables. To align a block at the center of the cell
you use align='middle', as shown here:
<table border-width-all='.01' indent-left='3cm'
indent-right='3cm' padding-all='2'>
<row vertical-align='middle'>
<cell>one</cell>
<cell>this cell has many words so is
higher than the cell on the left</cell>
</row>
</table>
And the resulting table looks like this:
one
this cell has many words so
is higher than the cell on
the left
Possible values of vertical-align are:
top
bottom
middle
www.xmlpdf.com
xmlpdf user manual page 32 of 101
XMLPDF 5.5.7 Programmers Guide
November 2006
13: Text Formatting
center
The values 'center' and 'middle' do the same thing.
13.4
Text color
By default text is black. Text color can be changed using the text-color
attribute.
The value of the text-color attribute is one of the standard colors or a custom
hexadecimal value. See Section 15, "Colors"
For example to make a block or word appear blue you would set
text-color='blue', as in:
<block text-color='blue'>
this appears in blue
</block>
which produces this:
this appears in blue
13.5
Underline and strikethrough
Underline and strikethrough effects are done using the decoration attribute.
This can be set to the value 'underline' or 'strikethrough'.
This text is underlined and goes onto the next line to show how underlining will
follow the format of the text.
This text is struck through and goes onto the next line to show how strikethrough
will follow the format of the text.
You can specify more than one decoration by separating values with a space i.e.
decoration='underline strikethrough' will give both effects like this
The color of the decoration line is specified using the underline-color or
strikethrough-color attributes. This has underline-color set to 'red'.
The underline-color and strikethough-color values default to the current
text-color value, so the following text has decoration='strikethrough' and
text-color ='blue', so the line through the text defaults to the text color of blue,
like this.
13.6
Space after
This is used to insert blank space after a block of text, as in:
<document font-name='helvetica' font-size='15/18'>
<block space-after='3cm'>
Hello World
</block>
</document>
13.7
Space before
This is used to insert blank space before a block of text, as in:
<document font-name='helvetica' font-size='15/18'>
<block space-before='3cm'>
Hello World
</block>
</document>
www.xmlpdf.com
xmlpdf user manual page 33 of 101
XMLPDF 5.5.7 Programmers Guide
13.8
November 2006
13: Text Formatting
Forcing space before
The space-before and space-after attributes control the amount of blank space
before a block of text or table. By default the space-before attribute is ignored at
the start of a page. This is because space-before is usually used to separate text
from the previous item on the page, and at the start of a new page there is no
previous item. If you really want blank space at the start of a page, you can force
XMLPDF to obey the space-before attribute by setting force-space-before to
'true'. This is done for instance on the cover page of this document to insert
blank space before the 'XMLPDF Library' header.
13.9
Indent left
The indent-left attribute is used to change the amount of space between the
left margin of the page and the start of the content.
This block has indent-left set to 3cm
This block has indent-left set to 6cm
13.10
Indent right
The indent-right attribute is used to change the amount of space between
the right margin of the page and the end of the content.
This block has indent-right set to 6cm and is
longer so we can see the edge.
This block has both indent-left and
indent-right set to 4cm and is longer so we
can see the edge.
13.11
Kerning
Kerning is the process of moving some characters closer to each other in order to
improve appearance. By default kerning is turned on. Which characters are
moved depends entirely on the font used.
The following block has kerning on (the default)
AWAWAWA ACACACAA
The next block has kern='false' and so the line displayed is slightly longer than
the one above.
AWAWAWA ACACACAA
13.12
Keep together
When the end of page is reached XMLPDF will attempt to insert as much of the
current block of text as fits into the page. If you do not want the text or table
split, set keep-together='true' so that all of the block is moved to the next page. If
the entire block does not fit on one page it will still be split.
13.13
Keep spaces
When XML is entered it typically is formatted to be readable and looks
something like this:
<document>
<block>
Hello World
</block>
</document>
www.xmlpdf.com
xmlpdf user manual page 34 of 101
XMLPDF 5.5.7 Programmers Guide
November 2006
13: Text Formatting
Note the large amount of white space around each line, particularly before the
word 'Hello'. By default this is trimmed off during processing so that only the
text 'Hello World' actually appears in the document. To retain space at the start
of the line use keep-spaces='true'. This is in fact done on the preceding XML
sample to preserve the indentation.
13.14
Leading
Leading is the vertical distance between the baselines of adjacent lines of text.
The leading can be set with the leading attribute. The leading is always defined
using points without any units specified, so leading='15' selects a leading of 15
points.
Setting the leading to less than the font size will cause the lines of text to overlap
so this is not generally a useful thing to do.
The leading can also be set using the font-size attribute. This is done by
separating the font size and the leading values with a slash, so to use font size 15
and leading 18 throughout a document you do this:
<document font-name='helvetica' font-size='15/18'>
<block>
Hello World
</block>
</document>
13.15
Rise
This is used to display subscript and superscript text.
The word superscript has rise='5' set.
The word subscript has rise='-5' set.
13.16
Non Breaking Space
As with HTML, a non-breaking space character, ASCII code 160, can be inserted
into XML to create a space where normal XML processing would remove it.
This is useful to create two spaces together.
The syntax for this is:
<document font-name='helvetica' font-size='15/18'>
<block>
Hello  World
</block>
</document>
That example puts two spaces between the words Hello and World, like this:
Hello World
13.17
Changing Text Formatting
The <span> element can be used within a <block> or <cell> element to change
the formatting of text which is within the span element.
The following example has the word 'large' in 20 point font with a span element.
This word will be larger and after the end of the span element the previous font
size will be restored.
<block>
This is in 12 point. This is in
<span font-size='20'>20pt</span>
back to 12 point
</block>
This produces the following in the PDF document.
www.xmlpdf.com
xmlpdf user manual page 35 of 101
XMLPDF 5.5.7 Programmers Guide
November 2006
This is in 12 point. This is in
www.xmlpdf.com
20pt
13: Text Formatting
back to 12 point
xmlpdf user manual page 36 of 101
XMLPDF 5.5.7 Programmers Guide
November 2006
14: Page Numbering
CHAPTER 14
Page Numbering
14.1
Basics
Pages are numbered automatically starting from 1. To insert the number of the
current page into the document, use the <page-number> element as shown here:
<document>
<block>
Hello World, this is page number <page-number/>
</block>
</document>
The total number of pages in the document is inserted using the
<forward-reference> element like this:
<document>
<block>
page number <page-number/> of
<forward-reference name="total-pages"/>
</block>
</document>
14.2
Breaks
Use the <new-page> element to create a page break. The page break is inserted
immediately where the new-page element is found. To change the page number
or orientation of the page following the break, use a next-page element.
14.3
Grouping
You can group pages into groups, with each group having its own page number
sequence. Each group of pages is identified by a unique name. A group is
created using the <begin-page-number-group> element, which creates a named
group which contains all the pages until the next begin-page-number-group
element is encountered.
Each group has its own total number of pages in the group, which is inserted
using the <forward-reference> element like this:
<document>
<begin-page-number-group group-name='s1'/>
<block>
section 1 page number <page-number/>
of <forward-reference group-name="group-pages"/>
</block>
<new-page/>
<block>
section 1 page number <page-number/>
of <forward-reference group-name="group-pages"/>
</block>
<new-page next-page-number='1'/>
<begin-page-number-group group-name='s2'/>
<block>
section 2 page number <page-number/>
of <forward-reference group-name="group-pages"/>
</block>
</document>
Page grouping is useful if you want to generate many documents such as invoices
into a single PDF file. It enables you restart the page number sequence for each
invoice so the first page of each invoice will be number 1.
www.xmlpdf.com
xmlpdf user manual page 37 of 101
XMLPDF 5.5.7 Programmers Guide
November 2006
15: Colors
CHAPTER 15
Colors
15.1
Basics
By default text appears as black print on a white background.
The color of text can be changed with the text-color attribute. The background
color of table cells can be changed with the fill-color attribute.
The value of the text-color and fill-color attribute is either a predefined color or a
custom hexadecimal value.
15.2
Predefined Colors
The predefined colors are:
white
black
yellow
blue
lightgray
red
green
gray
pink
magenta
darkgray
orange
cyan
For example to make a block or word appear blue you would set
text-color='blue', as in:
<block text-color='blue'>
this appears in blue
</block>
which produces this:
this appears in blue
15.3
Custom Colors
Colors can be defined using the same notation as HTML where a color is set to a
value starting with a # character, as in fill-color='#FF3344'.
The hex value consists of three parts. Each two character pair represents a hex
value from 0 to 255. The first pair specifies the value for red, the next pair for
green and the last pair for blue.
For example this:
<block text-color='#008899'>
this appears in blue
</block>
which produces this:
this appears in a strange light green color
15.4
CMYK Colors
CMYK colors are defined using four values, one each for the C, M, Y and K
components of the color. For CMYK colors to be used the document must be
declared as using the CMYK color space, like this:
<document color-space='cmyk' ....
A CMYK color is used like this:
<block text-color='cmyk(0.7,0.3,0.3,0.4)'>hello</block>
This creates a color with C=0.7, M=0.3, Y=0.3 and K=0.4.
www.xmlpdf.com
xmlpdf user manual page 38 of 101
XMLPDF 5.5.7 Programmers Guide
November 2006
16: Tables
CHAPTER 16
Tables
16.1
Basics
Tables have a similar structure in XML to tables in HTML. A <table> element
contains one or more <row> elements and each <row> element contains one or
more <cell> elements. In addition a table can contain a <header> element which
is itself a table and defines a header which is repeated each time a table is split
by a page break.
Tables are automatically paginated. Unlike HTML columns widths are not
calculated based on the width of cell contents. To do this would mean each copy
of a form would look different depending on the data in it, something which
contradicts the design goal of producing the same output under all
circumstances.
A simple table looks like this:
<document>
<table>
<row>
<cell>
this is cell 1
</cell>
<cell>
this is cell 2
</cell>
</row>
</table>
</document>
Note that in this case column widths are not specified. In the absence of a widths
attribute each column will be allocated an even amount of space across the table.
16.2
Column widths
If column widths are not specified each column gets an even share of the
available space. Column widths can be specified with the widths attribute on
the <table> element.
Column widths can be specified as percentages. The following XML creates a
table with one row and two cells in that row. The first cell is 25% of the width of
the table, the second cell is 75%.:
<document
<table widths='25%,75%' border-width-all='0.01'
border-color-all='blue'>
<row>
<cell>
this is cell 1
</cell>
<cell>
this is cell 2
</cell>
</row>
</table>
</document>
This produces a table like this:
this is cell 1
www.xmlpdf.com
this is cell 2
xmlpdf user manual page 39 of 101
XMLPDF 5.5.7 Programmers Guide
November 2006
16: Tables
Column widths can be specified as absolute units such as points, inches or
centimeters. The following XML creates a table with one row and two cells in
that row. The first cell is 200 points wide, the second is 4cm wide.
<document
<table widths='200,4cm' border-width-all='0.01'
border-color-all='blue'>
<row>
<cell>
this is cell 1
</cell>
<cell>
this is cell 2
</cell>
</row>
</table>
</document>
This produces a table looking like this:
this is cell 1
this is cell 2
Where absolute column widths are used the overall width of the table is
determined by summing the width of the columns. Where only percentage
column widths are used the width of the table is the width of the available space
less factors such as indentation.
The width of the last column in a table can be specified using the * character.
This allocates all remaining space to that column. The following XML creates a
table with one row and two cells in that row. The first cell is 200 pts wide, the
second is all remaining space.
<document
<table widths='225,*' border-width-all='0.01'
border-color-all='blue'>
<row>
<cell>
this is cell 1
</cell>
<cell>
this is cell 2
</cell>
</row>
</table>
</document>
This produces a table looking like this:
this is cell 1
16.3
this is cell 2
Borders
By default tables have no borders. A border is defined by using one of the
following elements.
border-width-all
border-width-inner
border-width-outer
border-width-top
border-width-bottom
border-width-left
border-width-right
The value of the border-width-XXX element defines the width of the border in
points, for example border-width-outer='1' will put a 1 point border around the
outside of a table, row or cell. Note that the resolution of the output device may
be as low as 300 dpi so values below 1/300 of a point or 0.03 will produce a line
which may not be visible on some devices.
Each element can be set on the table, header, row or cell element, for example:
www.xmlpdf.com
xmlpdf user manual page 40 of 101
XMLPDF 5.5.7 Programmers Guide
November 2006
16: Tables
To print borders on all of the table use the border-with-all attribute
on the table element.
To print borders on all sides of a single row use the border-with-all
attribute on the row element.
To print a border on just the bottom of one cell use
border-width-bottom on that cell.
16.4
Rounded Corners
A cell (not a table or row) can have borders with rounded corners. This is done
by defining corners='round' on the cell element and specifying the radius
of the curve using the corner-radius attribute.
The following example shows a cell with rounded borders which contains a
nested table with other text in:
Name:
Address:
The XML for this is:
<table width='70%' block-align='center'>
<row>
<cell corners='round' border-width-all='0.001' corner-radius='6'
padding-all='4' border-color-all='green' fill-color='#eeee33'>
<table widths='15%,80%,*'>
<row>
<cell>Name:</cell>
<cell border-width-bottom='.01'/>
<cell/>
</row>
<row>
<cell>Address:</cell>
<cell border-width-bottom='.01'/>
<cell/>
</row>
</table>
</cell>
</row>
</table>
16.5
Line styles
By default border lines are solid. The style of a border can be changed using the
following attributes:
border-style-all
border-style-inner
border-style-outer
border-style-top
border-style-bottom
border-style-left
border-style-right
The value of the border-style-XXX element defines the style to use for that
border.
Valid styles are 'solid', 'dashed' and 'dotted', with 'solid' being the default.
This table has solid borders
solid
This table has dotted borders
dotted
www.xmlpdf.com
xmlpdf user manual page 41 of 101
XMLPDF 5.5.7 Programmers Guide
November 2006
16: Tables
This table has dashed borders
dashed
Dotted and dashed borders can also be curved. Here is the example from the
previous section using dashed borders.
Name:
Address:
16.6
Border colors
By default border colors are black. The color of a border can be changed using
the following attributes:
border-color-all
border-color-inner
border-color-outer
border-color-top
border-color-bottom
border-color-left
border-color-right
The value of the border-color-XXX element defines the color to use for that
border. For possible values see Section 15, "Colors".
16.7
Cell padding
Padding is the space inside a cell between the cell border and the contents of the
cell.
This table has a cell which contains some text. There is no padding.
Padding is the space inside a cell between the cell border
and the contents of the cell.
This table has the attribute padding-all='4' so the space between the cell border
and its content is greater than in the previous example.
Padding is the space inside a cell between the cell
border and the contents of the cell.
Padding can be set on table, row, and cell elements using any of the attributes:
padding-all padding-toppadding-bottom
padding-leftpadding-right
This example has only the padding-left value set to 4.
Padding is the space inside a cell between the cell border
and the contents of the cell.
16.8
Nested tables
A table can be inserted into a cell of another table. The following shows a table
with two rows each with two cells. The bottom right cell contains another table
with 3 rows of 3 cells.
a
b
c
1
2
3
4
5
6
The XML for this is shown here:
www.xmlpdf.com
xmlpdf user manual page 42 of 101
XMLPDF 5.5.7 Programmers Guide
November 2006
16: Tables
<table border-width-all='.01'>
<row>
<cell>a</cell>
<cell>b</cell>
</row>
<row>
<cell>c</cell>
<cell auto-pad='false'>
<table border-width-all='.01'>
<row>
<cell>1</cell>
<cell>2</cell>
<cell>3</cell>
</row>
<row>
<cell>4</cell>
<cell>5</cell>
<cell>6</cell>
</row>
</table>
</cell>
</row>
</table>
Note the way in which the borders of the nested table are merged with the
borders of the cell containing the nested table. This is done because the padding
between the borders of the nested cell and the table it contains is zero. To
separate the borders so that the borders of the nested table are distinct set the
padding attribute on the cell which contains the nested table.
With padding around the nested table the XML looks like this:
<table border-width-all='.01'>
<row>
<cell>a</cell>
<cell>b</cell>
</row>
<row>
<cell>c</cell>
<cell padding-all='4'>
<table border-width-all='.01'>
<row>
<cell>1</cell>
<cell>2</cell>
<cell>3</cell>
</row>
<row>
<cell>4</cell>
<cell>5</cell>
<cell>6</cell>
</row>
</table>
</cell>
</row>
</table>
With padding around the nested table the resulting table looks like this:
a
b
c
16.9
1
2
3
4
5
6
Row height
The height of a row in a table is calculated from the height of the highest cell in
that row. The following table has one cell with one word, and a second cell with
several words. The cell with several words is higher and the smaller cell is
expanded in height to match the height of the higher cell.
one
www.xmlpdf.com
this cell has many words so
is higher than the cell on
the left
xmlpdf user manual page 43 of 101
XMLPDF 5.5.7 Programmers Guide
November 2006
16: Tables
The XML for this is:
<table border-width-all='.1' indent-left='3cm'
indent-right='3cm' padding-all='2'>
<row>
<cell>one</cell>
<cell>this cell has many words so is higher
than the cell on the left</cell>
</row>
</table>
16.10
Newspaper layout
By adding the attribute layout='newspaper' to the table element you can change
the layout to be like a newspaper, in that a table with multiple columns fills the
left hand column from top to bottom, then the next column from top to bottom
and so on until all columns are filled.
A table which has this formatting should have all cells contained in one row
element. The number of columns in the table is determined from the widths
attribute.
For example if we have a table five cells, containing A, B, C, D, E, and we have
two columns, when we apply newspaper formatting we get the cells laid out like
this:
A
D
B
E
C
The same effect works for nested newspaper tables, so if we have an outer table
with one row holding two cells, the first column of the outer table can have a
normal layout table in and the second can have a newspaper layout table, like
this:
Normal Table
Newspaper Table
A
B
A
D
C
D
B
E
E
C
When a newspaper layout table is split over more than one page the columns
cells fill the first page completely then start to fill the second page, as shown
here:
Newspaper Layout table split over two pages
www.xmlpdf.com
A
D
B
E
C
F
xmlpdf user manual page 44 of 101
XMLPDF 5.5.7 Programmers Guide
November 2006
16: Tables
Newspaper Layout table split over two pages
G
V
H
W
I
X
J
Y
K
Z
L
0
M
1
N
2
O
3
P
4
Q
5
R
6
S
7
T
8
U
9
The following example shows splitting a table which contains two nested tables,
one a normal layout table and the other a newspaper layout table:
Normal Table
www.xmlpdf.com
Newspaper Table
A
B
A
E
C
D
B
F
E
F
C
G
G
H
D
H
xmlpdf user manual page 45 of 101
XMLPDF 5.5.7 Programmers Guide
November 2006
16: Tables
Normal Table
Newspaper Table
I
J
I
W
K
L
J
X
M
N
K
Y
O
P
L
Z
Q
R
M
0
S
T
N
1
U
V
O
2
W
X
P
3
Y
Z
Q
4
0
1
R
5
2
3
S
6
4
5
T
7
6
7
U
8
8
9
V
9
See http://www.xmlpdf.com/articles-newspaper.html for an example.
16.11
Other attributes
vertical-align='[top|bottom|middle|center]'
We can set the vertical alignment of cell contents using the vertical-align
attribute. Valid values for this are top, bottom, middle and center, of which the
last two are the same. If we add vertical alignment to the previous example we
get:
<table border-width-all='.1' indent-left='3cm'
indent-right='3cm' padding-all='2'>
<row vertical-align='middle'>
<cell>one</cell>
<cell>this cell has many words so is
higher than the cell on the left</cell>
</row>
</table>
And the resulting table looks like this:
www.xmlpdf.com
xmlpdf user manual page 46 of 101
XMLPDF 5.5.7 Programmers Guide
November 2006
one
www.xmlpdf.com
16: Tables
this cell has many words so
is higher than the cell on
the left
xmlpdf user manual page 47 of 101
XMLPDF 5.5.7 Programmers Guide
November 2006
17: Lines and Boxes
CHAPTER 17
Lines and Boxes
17.1
Drawing Boxes
The boxes element is used to display one or more square boxes as typically
found on a form which is designed to be completed by a person. For example
this:
is produced with this XML:
<graphic>
<boxes box-width='12' box-height='12'
number='8' line-width='1'/>
</graphic>
In the .NET version of XMLPDF you can insert text into the boxes by placing it
in the <boxes>element like this:
<graphic>
<boxes box-width='12' box-height='12'
number='22' line-width='1'>
THIS IS IN THE BOXES
</boxes>
</graphic>
This produces this output:
T H I S
I S
I N
T H E
B O X E S
Multiple rows of boxes can be created using the number-down attribute and filled
by using <br/> elements to split the lines like this:
<graphic>
<boxes box-width='12' box-height='12'
number='30' line-width='1' number-down='2'>
THIS IS IN LINE ONE<br/>
THIS IS IN LINE TWO
</boxes>
</graphic>
This produces this output:
T H I S
T H I S
17.2
I S
I S
I N
I N
L I N E
L I N E
O N E
T WO
Drawing Lines
Lines can be drawn on the page using the <segment> element.
Each segment has an start point defined in by values x1,y1 and and end point
defined by x2,y2. These x and y values are absolute coordinates in points, with
0,0 being at the bottom left corner of the page.
For example this page as a crop mark drawn near the bottom left corner.
This was drawn with the following XML:
<graphic>
<segment width='1' x1='90' x2='110' y1='100' y2='100' />
<segment width='1' x1='100' x2='100' y1='110' y2='90' />
</graphic>
www.xmlpdf.com
xmlpdf user manual page 48 of 101
XMLPDF 5.5.7 Programmers Guide
November 2006
18: Images
CHAPTER 18
Images
18.1
Basics
XMLPDF allows PNG, GIF and JPEG format images to be included in the PDF
file.
To use a image you have to tell XMLPDF about the image before you can use it.
This is done by placing an <image> element into the <images> element near the
start of the document.
Attributes of the <image> element are:
www.xmlpdf.com
Attribute
Description
anti-aliasing
Specifies whether the PDF reader will apply anti-aliasing to the
image. Anti-aliasing removes jagged borders and lines,
especially when the image is viewed at high zoom levels. By
default anti-aliasing is on.
The following two images are loaded from the same file, the
one on the left has anti-aliasing='false', the one on the right
uses the default setting.
directory
Specifies the name of a directory in which to look for the
named file. This attribute is optional. If it is used then the
directory name is prepended to the file-name value in order to
make a full path to the image file. This should not be used of
the file-name attribute specifies a URL.
image-type
As of version 1.8 of the XMLPDF library this attribute is no
longer used. The image file is read to determine the type of the
image.
file-name
The full path of the file in which the image resides. From
version 3.0 this can be a full URL such as
http://www.xmlpdf.com/images/download.gif with the image
being retrieved from the URL, for example
file-name='/usr/xman/clouds.jpg'
file-name='http://www.xmlpdf.com/images/download.gif'
image-name
The name by which the image will be referred to when it is
displayed using a <show-image> element, for example:
image-name='clouds'
xmlpdf user manual page 49 of 101
XMLPDF 5.5.7 Programmers Guide
November 2006
18: Images
Attribute
Description
quality
A value which defines the image quality. This applies only to
JPEG and SVG images. This value changes the compression
level of the image when it is stored in the PDF file. The value
ranges from 1 to 100, with 1 giving lowest quality and highest
compression and 100 giving the highest quality and largest
image size. The default is 100.
An image is loaded from disk when the <image> element is processed by
XMLPDF. To display the image it must be named in a <show-image> element as
shown in the following example.
<document>
<images>
<image file-name="dolphins.png"
image-name="dol"/>
</images>
<table padding-all='2' widths='30%,70%'>
<row>
<cell>
<show-image image-name='dol'/>
</cell>
<cell>
<show-image image-name='dol'/>
</cell>
</row>
</table>
</document>
This XML produces a PDF file like this:
An image can be displayed any number of times using a single image element
and multiple show-image elements.
A show-image element can be used both inside a document element to display
the image inline like a text block or inside a cell element to display the image
inside a table.
www.xmlpdf.com
xmlpdf user manual page 50 of 101
XMLPDF 5.5.7 Programmers Guide
18.2
November 2006
18: Images
Image Size
Images displayed within a table will be scaled to fit the cell width. Images in the
main body of the document can be resized using the scale-width and scale-height
attributes.
The above example shows an image at its default size. Here it has
indent-left='5cm' and ident-right='5cm', so the image is scaled to fit the width
available:
and here it has scale-width='100' so the image is scaled and the aspect ratio is
preserved:
and with scale-width='100' and scale-height='200' so the image is scaled and the
aspect ratio is not preserved:
Within a table the image can be horizontally aligned to left, right or center by
using the align attribute on the cell element (not the show-image element) of the
cell which contains the image.
The following shows a small image aligned left, center and right in a table.
www.xmlpdf.com
xmlpdf user manual page 51 of 101
XMLPDF 5.5.7 Programmers Guide
November 2006
18: Images
If some text is used to make the left hand column higher, we can also do vertical
positioning of the image. Here it is shown with top, center and bottom vertical
alignment.
some text to make
the height of the
table higher than
the height of the
small image so we
can demonstrate
vertical positioning
of images
18.3
Image Resolution
Images resolution is the number of pixels in the image per unit of physical
measurement, usually expressed in terms of dots per inch or DPI. Images with
higher DPI are clearer and crisper when printed, but take up more room in the
PDF file.
For JPEG and SVG images, you can specify the DPI using the dpi attribute on
the <image> element, like this:
<document>
<images>
<image file-name="dolphins.jpg" dpi='300'
image-name="dol"/>
</images>
<table padding-all='2' >
<row>
<cell>
<show-image image-name='dol'/>
</cell>
</row>
</table>
</document>
Specifying a lower DPI enables you to reduce the PDF document size.
18.4
Merging the file-name value
An alternate syntax can be used to provide the value for the file-name attribute.
By using a separate nested <file-name> element it becomes possible to merge the
value of the file-name attribute from the data XML. The <file-name> element
should contain only characters and which will be treated as if they had been
specified for the file-name attribute.
<document>
<image image-name='im1'>
<file-name>
<merge root='invoice-itr' xpath='linkTC'/>
</file-name>
</image>
<show-image image-name='im1'/>
</document>
18.5
Using Scalable Vector Graphics
XMLPDF for .NET version 3.8.2 and higher provides support for including SVG
images into the PDF document.
www.xmlpdf.com
xmlpdf user manual page 52 of 101
XMLPDF 5.5.7 Programmers Guide
November 2006
18: Images
Scalable Vector Graphics is a standard XML vocabulary used to define an image.
XMLPDF uses the Sharp Vector Graphics (SVG#) library for SVG support.
Currently version 0.30 is supported.
Support for SVG is an optional feature. XMLPDF will run without SVG# being
installed. To activate SVG support download and install SVG# and set the
SVGDIR enviornment variable as described below.
In version 0.3 of SVG# these files are located in the build subdirectory and are
called:
SharpVectorCss.dll
SharpVectorObjectModel.dll
SharpVectorRenderingEngine.dll
SharpVectorScripting.dll
SharpVectorXml.dll
SharpZipLib.dll
If you have problems getting SVG# integration to work try setting the logging
level to Level.INFO (see previous chapters for more information on error
handling).
You should see messages logged similar to this (when things go wrong):
info:Loading image file from file:butterfly.svg
info:Failed to load optional assembly from
d:\xmlpdf\cs2\testit\bin\release\SharpVectorCss.dll
info:Optional SVG support is disabled
Or like this (when things go well):
info:Loading image file from file:butterfly.svg
info:Loaded optional SVG assemblies ok
These messages will tell you where XMLPDF is looking for the SVG# DLLs.
Set the environment variable SVGDIR to the directory which contains the SVG#
files and XMLPDF will load them from this directory.
For instance if you have SVG# installed in d:\SharpVectorGraphics then the
DLLs will be in d:\SharpVectorGraphics\build and you can set SVGDIR like
this:
set SVGDIR=d:\SharpVectorGraphics\build
SVG images are used in the same manner as other types of images in XMLPDF.
The image is defined using an <image> element and then placed on the page
using a <show-image> element.
For example to create a PDF file containing the image butterfly.svg you create an
XML template file something like this:
<?xml version="1.0" encoding="UTF-8" ?>
<document>
<image image-name='butterfly' file-name='butterfly.svg'/>
<show-image image-name='butterfly'/>
</document>
That's all the XML necessary to convert an SVG image into a PDF.
SVG images are treated the same as any other image in XMLPDF. They can be
inserted into tables and scaled using the scale-width and scale-height operators.
Also like other images the file-name attribute specified can be a URL, so you can
load images directly from the web, like this:
www.xmlpdf.com
xmlpdf user manual page 53 of 101
XMLPDF 5.5.7 Programmers Guide
November 2006
18: Images
<?xml version="1.0" encoding="UTF-8" ?>
<document>
<image image-name='skew'
file-name='http://www.croczilla.com/svg/skew01.xml'/>
<show-image image-name='skew'/>
</document>
www.xmlpdf.com
xmlpdf user manual page 54 of 101
XMLPDF 5.5.7 Programmers Guide
November 2006
19: Styles
CHAPTER 19
Styles
19.1
Basics
XMLPDF supports the creation of styles which define attributes to be applied to
all elements which match the style name.
A style defines a set of attributes and their values plus a name which is used to
determine which elements the style applies to. This is a sample style:
<style name='block' font-name='times' font-size='12'
space-after='.25cm' align='justify' indent-left='1cm'/>
This style is used throughout this document.
As each element is loaded from the document template XML the type of the
element is compared with the names of all defined styles. In the case of the
example above any element of type <block> will automatically get the attributes
shown on the style.
If the name attribute of the <style> element is a simple word the style applies to
any element of the named type. If the name starts with a '.', as in name='.h1' it
applies to any element of any type which has its class set to the same name
without the '.'.
For example the style
<style name='.code' font-name='courier' />
can be applied to a block element by giving the block the associated class, as in:
<block class='code'>some code </block>
www.xmlpdf.com
xmlpdf user manual page 55 of 101
XMLPDF 5.5.7 Programmers Guide
November 2006
20: Document Security
CHAPTER 20
Document Security
20.1
Passwords
You can limit access to the PDF document by providing a password. PDF
supports two distinct passwords, the user password and the owner password.
The 'user' who knows only the user password has limited rights to print, modify,
or paste from the document. The 'owner' who knows the owner password owns
the document and can do anything to it.
If set, the user password must be entered in Acrobat Reader in order to open the
document. Once open, what the user can do is limited by the restrictions placed
on the document when it was created. These restictions are described below.
The user password is set using the user-password attribute on the <document>
element.
If set, the owner password can be entered by the user to perform functions which
are restricted, such as printing or modifying the document. The owner password
is set using the owner-password attribute on the <document> element.
If both passwords are set and are different then when opening the document in
Acrobat Reader the user will be prompted for a password. At this point the user
can enter the user password and get limited access to the document or enter the
owner password and get full access to the document.
If both passwords are set and are identical then when opening the document in
Acrobat Reader the user will be prompted for a password. At this point the user
can enter the password and get full access to the document, because they have
entered the owner password.
If only the owner password is set then a password is not required to open the
document with restrictions applied. The owner password can be used after
opening to bypass the restrictions set when the document was created.
If only the user password is set then that password is required to open the
document, but all restrictions can be bypassed because no password is required
to become the owner of the document.
20.2
Restrictions
To prevent users printing the document set the deny-print attribute to true on the
document element.
To prevent users modifying the document set the deny-modify attribute to true
on the document element.
To prevent users copying content from the document using cut and paste set the
deny-extract attribute to true on the document element.
20.3
Example
The following example creates a document which cannot be printed by a normal
user. No user-password is specified so anyone can open the document. Someone
knowing the owner password (own) can take ownership of the document and
remove all restrictions.
www.xmlpdf.com
xmlpdf user manual page 56 of 101
XMLPDF 5.5.7 Programmers Guide
November 2006
20: Document Security
<document deny-print='true' owner-password='own'>
<images>
<image file-name="dolphins.png"
image-name="dol"/>
</images>
<table padding-all='2' widths='30%,70%'>
<row>
<cell>
<show-image image-name='dol'/>
</cell>
<cell>
<show-image image-name='dol'/>
</cell>
</row>
</table>
</document>
www.xmlpdf.com
xmlpdf user manual page 57 of 101
XMLPDF 5.5.7 Programmers Guide
November 2006
21: Error Handling
CHAPTER 21
Error Handling
21.1
Basics
The XMLPDF library associates an error handler with the library as a whole.
Generally this error handler will log a message and not throw an exception.
The XMLPDF Logger object is a singleton which is retrieved using a call to the
xmlpdf.logging.Logger.getLogger() method.
The default error handler writes messages to the console. Messages are displayed
in various circumstances including:
♦ when an invalid attribute is found.
♦ when a reference is made to a font or image file which cannot be found.
♦ when an formatting error occurs, such as defining the widths of columns in
table which exceed the available width.
To change the level of information logged you can set the level on the logging
object to one of the values defined in the xmlpdf.logging.Level object. Possible
levels of logging which can be set are:
SEVERE WARNING INFO CONFIG FINE FINER FINEST
For example to set the logger to log only messages which are SEVERE or worse
do this:
using System;
using xmlpdf;
using xmlpdf.logging;
public class Create {
static void Main( string[] args ) {
PDFDocument doc = new PDFDocument();
Logger.getLogger().setLevel( Level.SEVERE );
21.2
Logging to File
To log messages to a file, create an xmlpdf.logging.FileHandler object and then
tell the logger to log to this object. This example logs to the file 'log.txt', but any
valid file name can be used.
using System;
using xmlpdf;
using xmlpdf.logging;
public class Create {
static void Main( string[] args ) {
Logger.getLogger()
.setLevel( Level.SEVERE )
.clearHandlers()
.addHandler(
new FileHandler("log.txt") );
The FileHandler object synchronises access to the log file.
If you omit the clearHandlers() call shown in the above example log records will
be written to the default console handler and to the file handler as well so you
can see error messages on the console and they are also stored in the file.
21.3
Logging to A Stream
XMLPDF can log messages to a stream created by the caller. The stream is any
object which implements the System.IO.Stream interface.
To log messages to a stream, create an xmlpdf.logging.StreamHandler object and
then tell the logger to log to this object. This example logs to a MemoryStream,
but any valid stream can be used.
www.xmlpdf.com
xmlpdf user manual page 58 of 101
XMLPDF 5.5.7 Programmers Guide
November 2006
21: Error Handling
using System;
using System.IO;
using xmlpdf;
using xmlpdf.logging;
public class Create {
static void Main( string[] args ) {
Logger.getLogger().clearHandlers();
MemoryStream ms = new MemoryStream();
StreamHandler h = new StreamHandler();
Logger.getLogger().addHandler( h )
If you omit the clearHandlers() call shown in the above example log records will
be written to the default console handler and to the stream handler as well.
21.4
Logging to System.Diagnostics.Trace
XMLPDF can log messages to the System.Diagnostics.Trace object.
To log messages to the trace object, create a xmlpdf.logging.TraceHandler object
and then tell the logger to log to this object.
using System;
using xmlpdf;
using xmlpdf.loggging;
public class Create {
static void Main( string[] args ) {
Logger.getLogger().clearHandlers();
Logger.getLogger().addHandler(
new TraceHandler() );
When running in the Visual Studio IDE messages will be logged to the Output
window, and when running executables messages will be written to the output
debug stream where they can be read using a utility like Debug View.
21.5
Logging to Multiple Destinations
Errors can be logged to any number of handlers. The following example logs to
a file called "xmlpdf.log" and to a memory stream and to the console. Logging to
the console is done by not removing the default handler with a call to
clearHandlers().
using System;
using System.IO;
using xmlpdf;
using xmlpdf.logging;
public class Create {
static void Main( string[] args ) {
MemoryStream ms = new MemoryStream();
Logger.getLogger()
.addHandler( new StreamHandler( ms ) )
.addHandler( new FileHandler("xmlpdf.log") );
www.xmlpdf.com
xmlpdf user manual page 59 of 101
XMLPDF 5.5.7 Programmers Guide
November 2006
22: Merging Data
CHAPTER 22
Merging Data
22.1
Basics
XMLPDF is designed to allow creation of a document template in XML and then
generation of PDF files based on merging data into the template. This is
designed to be done on a web or application server which serves dynamically
created PDF files to a browser.
Within the document XML use the <merge> element and set the
source-element-name attribute of this element to the name of an element in the
data XML. Whatever is in the named element in the data XML will be
substituted into the document XML as if it were in the document XML in place
of the <merge> element.
Example
Given data XML like this:
<data>
<source-element name='cust-name'>
john smith
</source-element>
<source-element name='cust-age'>
123
</source-element>
</data>
and given document XML like this:
<document>
<block>
The customer's name is
<merge source-element-name='cust-name'/>
<br/>
The customer's age is
<merge source-element-name='cust-age'/>
</block>
</document>
This produces the following output in the PDF file:
The customer's name is john smith
The customer's age is 123
There is no limitation to what elements can be merged from the data XML. It is
common usage to define a <table> element in the document XML and then
merge multiple rows from a single <source-element> element in the data XML.
22.2
Conditional processing
Within the document XML you can use <if> and <ifnot> elements to control
which parts of the document XML appear in the PDF file. This is typically used
when you don't know until the PDF is generated how much information you may
have. For instance if you know the customer name you might print it, otherwise
you might just print 'Dear Sir/Madam'. The conditional processing built into
XMLPDF lets you defer these decisions until the PDF is generated.
The values of each condition (either true or false) is defined in the data XML.
Each condition is defined in a <condition> element within a single <conditions>
element like this:
www.xmlpdf.com
xmlpdf user manual page 60 of 101
XMLPDF 5.5.7 Programmers Guide
November 2006
22: Merging Data
<data>
<conditions>
<condition name='cust-known' value='false'/>
</conditions>
<source-element name='cust-name'>
john smith
</source-element>
<source-element name='cust-age>
123
</source-element>
</data>
Each condition must have a unique name and a value which must be 'true' or
'false'.
Within the document XML you can determine if a part of the document will be
included by placing it inside a <if> element, as shown here:
<document>
<block>
Dear
<if condition='cust-known'>
<merge source-element-name='cust-name'/>
</if>
<ifnot condition='cust-known'>
Sir/Madam
</ifnot>
</block>
</document>
This produces output like this:
Dear Sir/Madam
Changing the value of the cust-known condition in the data XML, so the data
XML looks like this:
<data>
<conditions>
<condition name='cust-known' value='true'/>
</conditions>
<source-element name='cust-name'>
john smith
</source-element>
<source-element name='cust-age>
123
</source-element>
</data>
produces output like this:
Dear john smith
22.3
Merging Fields from XML using XPath expressions
This section describes how to:
- merge values contained in the data XML into the document template using
XPath expressions;
- iterate over collections of XML elements in the data XML;
- use nested <foreach> elements to iterate over XML nodes;
- use XPath expressions to select a subset a collection of XML nodes.
This articles describes how to use XPath expressions to get values from the data
XML merged into the PDF file created based on an XML document template.
The data XML used in this article is contained in the file coursedata.xml
22.3.1
Selecting the Value of a Single Node
To merge a single value from the data XML use the xpath attribute of the
<merge> element. In this example the XPath expression specified by the xpath
attribute is evaluated from the root node of the data XML. The expression must
return a single value.
www.xmlpdf.com
xmlpdf user manual page 61 of 101
XMLPDF 5.5.7 Programmers Guide
November 2006
22: Merging Data
The coursedata.xml file specifies a value for the term start date like this:
<coursedata>
<term-start>10 August 2003</term-start>
...
</coursedata>
To select this value and merge it into the PDF use the template coursedate.xml.
This template contains a <merge> element which defines an XPath expression to
merge the required data value, like this:
<merge xpath='/coursedata/term-start'/>
XMLPDF applies this XPath expression to the data XML and returns the single
value '10 August 2003' which is inserted into the PDF file, like coursedate.pdf.
If no node is found which matches the XPath expression an error message will be
produced similar to the following:
No node found which matches XPath expression /coursedata/term-start2
See the previous chapters for information on how to set the error logging level
and log errors to file.
22.3.2
More Complex Expressions
Any XPath expression which returns a single node can be used in the xpath
attribute of a <merge> element.
XMLPDF for .NET passes the expression and the data to the
XmlDocument.SelectSingleNode() method so any XPath expression which is
accepted by this method will work.
XMLPDF for Java passes the expression and the data to the
XPathAPI.selectNodeIterator() method so any XPath expression which is
accepted by this method will work.
The coursedata.xml file specifies the names of tutors like this:
<coursedata>
<tutor term='1'>A Stone</tutor>
<tutor term='2'>A Rock</tutor>
</coursedata>
We can use an XPath expression to select the name of the tutor for term 1. To
select this value and merge it into the PDF use the template coursetutor.xml.
This template contains a <merge> element which defines an XPath expression to
merge the required data value, like this:
<merge xpath="/coursedata/tutor[@term='1']"/>
XMLPDF applies this XPath expression to the data XML and returns the single
value 'A Stone' which is inserted into the PDF file, like coursetutor.pdf.
22.3.3
Looping
XMLPDF can iterate over a group of XML nodes using the <foreach> element.
The xpath attribute of the <foreach> element should specify an XPath expression
which returns a list of one or more nodes.
The coursedata.xml file specifies the data for two courses like this:
www.xmlpdf.com
xmlpdf user manual page 62 of 101
XMLPDF 5.5.7 Programmers Guide
November 2006
22: Merging Data
<coursedata>
...
<course>
<code>COMP 101</code>
<name>Introduction to Computer Science</name>
...
</course>
<course>
<code>WELL 401</code>
<name>Advanced Welding</name>
...
</course>
</coursedata>
The <foreach> element has these attributes:
The iterator attribute specifies a unique identifier which is then used by <merge>
elements within the <foreach> element. <merge> elements within the <foreach>
element can optionally specify the name of an iterator to be the root node from
which the xpath value of the <merge> element is applied.
To list all the courses we use the template courselist.xml
This template contains the following elements:
(a) A <foreach> element to loop over the courses, like this:
<foreach iterator='course-itr' xpath='/coursedata/course'>
...
</foreach>
This creates an iterator which applies to the list of nodes identified by the XPath
expression '/coursedata/course'.
(b) A <merge> element to get the value of the <code> element within the node
list associated with the iterator 'course-itr':
<merge root='course-itr' xpath='code'/>
The root attribute tells XMLPDF to apply the XPath expression (specified by the
xpath attribute) to the current node in the course-itr list of nodes. If this was not
specified the XPath expression would be applied from the top node in the data
XML.
XMLPDF applies the XPath expression specified on the <foreach> element to
get a list of XML nodes from the data XML. Then the XPath expression of any
<merge> elements within the <foreach> element are evaluated once for each
node in the list. This creates courselist.pdf.
22.3.4
Nested Loops
XMLPDF can iterate over a group of XML nodes using the <foreach> element.
Within that loop we can specify an inner loop, either over an unrelated list of
records or over a list which depends on the outer list.
The coursedata.xml file specifies a list of courses and for each course specifies a
list of students taking the course, like this:
www.xmlpdf.com
xmlpdf user manual page 63 of 101
XMLPDF 5.5.7 Programmers Guide
November 2006
22: Merging Data
<coursedata>
...
<course>
<code>COMP 101</code>
<name>Introduction to Computer Science</name>
...
<students>
<student number='10101' name='M Jones' age='30'/>
<student number='20202' name='K Jackson' age='20'/>
<student number='30303' name='Wilbur Fish' age='40'/>
</students>
</course>
<course>
...
</course>
</coursedata>
We can expand on the previous looping example to add an inner loop which
iterates over the students who are taking each course.
To list all the students by course we use the template coursestudents.xml
In addition to the <foreach> loop seen in the previous example this template
contains the a nested <foreach> element to loop over the students, like this:
<foreach iterator='course-itr' xpath='/coursedata/course'>
<block>
Course code <merge root='course-itr' xpath='code'/>
Name: <merge root='course-itr' xpath='name'/>
</block>
<foreach iterator='student-itr' root='course-itr'
xpath='students/student'>
<block indent-left='6cm'>
Student Name: <merge root='student-itr' xpath='@name'/>
</block>
</foreach>
</foreach>
The inner <foreach> element specifies the root attribute root='course-itr'. This
makes XMLPDF apply the xpath attribute based on the current node in the
'course-itr' iterator. If the root attribute is not specified the XPath expression is
applied from the root node in the data XML (which does give you the ability to
loop over another unrelated collection of records).
XMLPDF applies the XPath expression specified on the outer <foreach> element
to get a list of course XML nodes from the data XML. Then the XPath
expression from the inner <foreach> is evaluated to get a list of students for that
course. This creates coursestudents.pdf.
22.3.5
Using Selection with <foreach>
It is possible to select a subset of the nodes in an XML element using the XPath
expression on the <foreach> element.
The coursedata.xml file specifies a list of courses and for each course specifies a
list of students taking the course, like this:
<coursedata>
...
<course>
<code>COMP 101</code>
<name>Introduction to Computer Science</name>
...
<students>
<student number='10101' name='M Jones' age='30'/>
<student number='20202' name='K Jackson' age='20'/>
<student number='30303' name='Wilbur Fish' age='40'/>
</students>
</course>
<course>
...
</course>
</coursedata>
www.xmlpdf.com
xmlpdf user manual page 64 of 101
XMLPDF 5.5.7 Programmers Guide
November 2006
22: Merging Data
If we wanted to include in the PDF file only students who were age 30 or more
we use an XPath expression like this:
<foreach iterator='course-itr' xpath='/coursedata/course'>
<block>
Course code <merge root='course-itr' xpath='code'/>
Name: <merge root='course-itr' xpath='name'/>
</block>
<foreach iterator='student-itr' root='course-itr'
xpath='students/student[@age >= 30]'>
<block indent-left='6cm'>
Student Name: <merge root='student-itr' xpath='@name'/>
</block>
</foreach>
</foreach>
The XPath expression 'students/student[@age >= 30]' will result in a collection
of XML nodes which contains only students with an age attribute greater than or
equal to 30.
To list all the students 30 or older by course we use the template
coursestudents30.xml. This produces the a PDF file coursestudents30.pdf
containing only older students.
22.3.6
XPath Functions
XMLPDF lets you perform calculations using XPath expressions such as
'sum(item/@qty)' to calculate values for insertion into the PDF file.
The following example uses some data about customers and orders (orders.xml)
and the template orderlist.xml to produce a list of orders by customer, with
sub-totals for each order and customer.
The template uses nested <foreach> elements to list the items on each order for
each customer.
After the <foreach> element which lists the items on each order we have a row in
the table which displays totals for that order. The total cost of the order is
calculated using this element:
<merge root='order-itr' xpath='sum(item/@qty)'/>
The xpath attribute specifies an XPath expression which invokes the XPath 'sum'
function. This sums the 'qty' attribute of all item nodes under the current record
of the 'order-itr' iterator. The result of this calculation is converted to a string and
inserted into the PDF document. The XPath expression is passed to the .NET or
Java XPath processor, so any value XPath expression will work here.
The final result is orderlist.pdf.
22.3.7
Conditions
This requires .NET version 3.9.6 or Java version 3.9.
XMLPDF lets you use the <if> and <ifnot> elements in conjuction with XPath
expressions to determine at the time the PDF document is created whether or not
to include some parts of the template XML.
The template courseif.xml is used in conjuction with coursedata.xml. It contains
this XML, to conditionally include some text if the student is aged 30 years or
older:
<if xpath='@age >= 30' root='student-itr'>
(over 29)
</if>
The expression '@age >= 30' is evaluated for each student and if the condition is
true then the text '(over 29)' is included in the document.
This creates the PDF file courseif.pdf.
www.xmlpdf.com
xmlpdf user manual page 65 of 101
XMLPDF 5.5.7 Programmers Guide
November 2006
22: Merging Data
Any valid XPath test can be used in the xpath attribute, for example to test if the
age attribute is present just use an @ and the attribute name like this:
<if xpath='@age' root='student-itr'>
age is present
</if>
22.3.8
Formatting Merged Values
This is currently only in .NET version 4.0.3 and above.
A value merged into the PDF file using a <merge> element can be formatted
before insertion into the PDF. This is done using the format and format-type
attributes.
Within XMLPDF formatting is done using the StringBuilder.AppendFormat()
method. The value returned by the XPath expression is converted to the type
specified by the format-type attribute (which defaults to 'string') and then passed
to the AppendFormat method.
The format attribute specifies the formatting of the values returned from the
XPath expression. This follows the standard .NET formatting rules.
The valid values of the format-type attribute are: 'string', 'date', 'double', 'integer'.
Note that .NET formatting requires that the format match the type. Specifying a
numeric format like '##.##' with a string type will not automatically convert the
string to a number and so will not work.
Examples:
Date Formatting:
Given a date such as '2003-01-12T14:07:41.277' we can format it as dd/mm/yyyy
like this:
<merge xpath="/coursedata/term-start"
format='{0:dd/mm/yyyy}' format-type='date'/>
Number Formatting:
Given a number such as '100.20' can format it to 5 decimal places like this:
<merge xpath="/coursedata/term-start" format='{0:###.####0}'
format-type='double'/>
Hexadecimal Formatting:
Given a number such as '34' can format it as hex like this:
<merge xpath="/coursedata/integer" format='0x{0:x}'
format-type='integer'/>
22.3.9
Merging Image File Names
This is currently only in .NET version 4.7 and above.
It is possible to merge image file names from the data XML using a nested
<file-name> element like this:
<document>
<image image-name='im1'>
<file-name>
<merge xpath='data/image/@name'/>
</file-name>
</image>
<show-image image-name='im1'/>
</document>
In this example the image-name attribute of the image element is set to the name
attribute of the image element in the data XML.
www.xmlpdf.com
xmlpdf user manual page 66 of 101
XMLPDF 5.5.7 Programmers Guide
November 2006
22: Merging Data
An example of data XML which would work with this template is:
<data>
<image name='clouds.jpg'/>
</data>
22.4
Integration with ADO.NET
This section describes how iterate over a .NET DataTable object to insert values
from database records into the PDF file.
A DataTable object represents data extracted from a database. The DataTable is
created using a SqlDataAdapter object. XMLPDF is able to iterate over the
DataTable using the <foreach> element and to extract individual fields from the
DataTable using the <merge> merthod.
22.4.1
Creating the DataTable
The following code shows a method which creates and returns a DataTable. The
table returned is the 'sales' table from the 'pubs' database which is part of the
SQL Server default installation.
using System;
using System.Text;
using System.IO;
using System.Diagnostics;
using System.Collections;
// recordset related
using System.Data;
using System.Data.SqlClient;
public DataTable RetrieveRowsWithDataTable() {
string CONNECTIONSTRING
= "server=(local);Integrated Security=SSPI;database=pubs";
SqlConnection conn = null;
try {
conn = new SqlConnection(CONNECTIONSTRING);
SqlCommand cmd = new SqlCommand("select * from sales", conn);
cmd.CommandType = CommandType.Text;
SqlDataAdapter da = new SqlDataAdapter( cmd );
DataTable dt = new DataTable("sales");
da.Fill(dt);
return dt;
}
finally {
if( conn != null ) {
conn.Close();
}
}
}
22.4.2
Creating the PDF File
The following code calls the RetrieveRowsWithDataTable method and creates
the PDF file:
PDFDocument doc = new PDFDocument();
DataTable reader = RetrieveRowsWithDataTable();
doc.addNamedObject( "sales_datatable", reader );
doc.generate( "testrecordset.xml", "testrecordset.pdf" );
The source code for this article is in file testrecordset.cs. The file is called
testrecordset.cs_, you will need to rename it to testrecord.cs.
The key thing in this code is the call to doc.addNamedObject(). This associates a
logical name 'sales_datatable' with the recordset.
Within the template XML in file testrecordset.xml this name is used in the
<foreach> tag to tell XMLPDF which object to iterate over.
The full content of the XML template is:
www.xmlpdf.com
xmlpdf user manual page 67 of 101
XMLPDF 5.5.7 Programmers Guide
November 2006
22: Merging Data
<?xml version="1.0" encoding="utf-8" ?>
<document>
<table space-before='1cm' width='40%'
block-align='center' border-width-all='.1'
widths='20%,30%,*' padding-all='2'>
<header widths='20%,30%,*' padding-all='2'>
<row background-gray="90">
<cell>Store</cell>
<cell align='center'>Date</cell>
<cell align='right'>Quantity</cell>
</row>
</header>
<foreach iterator='itr' list='sales_datatable'>
<row>
<cell><merge method='itr.stor_id'/></cell>
<cell align='center'><merge method='itr.ord_date'
format="dd/mm/yyyy"/></cell>
<cell align='right'><merge method='itr.qty'
format='N'/></cell>
</row>
</foreach>
</table>
</document>
Key things to note in the template XML are:
(a) the <foreach> element has a 'list' attribute which has a value equal to the
logical name given to the recordset in the call to doc.addNamedObject()
(b) the <merge> element has a 'method' attribute which has a value which is the
name of the iterator (in this case 'itr') followed by a '.' followed by the field name
in the recordset.
(c) the 'format' attribute of the <merge> element is passed to a call to
System.Text.StringBuilder.AppendFormat(), so any value which is a valid format
string for this method can be specified.
This produces testrecordset.pdf showing all the records in the database.
www.xmlpdf.com
xmlpdf user manual page 68 of 101
XMLPDF 5.5.7 Programmers Guide
November 2006
23: Links
CHAPTER 23
Links
23.1
Basics
XMLPDF supports URL's in the PDF document so that when the user clicks on
the link their browser is started and the linked web page is retrieved.
For example click on www.xmlpdf.com to go to the XMLPDF web site.
A sample document with one link looks like this:
<document>
<style name='link' decoration='underline'/>
<block>
The link is <link url='http://www.sun.com'>
The Sun Site</link>
</block>
</document>
Note the use of the style named 'link' which is automatically applied to all link
elements and makes them underlined. The example creates a link which looks
like this:
The link is The Sun Site
The attributes of the <link> element are:
Attribute
Description
url
This indicates which web site or file will be displayed
when the user clicks on the link. Links to web pages
should start with http:// as shown in the example above.
Mailto links are implemented like this:
<link
url='mailto:[email protected]'>[email protected]</link
>
url-show-border
Setting url-show-border='true' will draw a box around
the URL, which is useful for showing where the hit
region is when you are developing the document.
A link with a border looks like this:
<document>
<style name='link' decoration='underline'/>
<block>
The link is
<link url='http://www.sun.com'
url-show-border='true'>
The Sun Site
</link>
</block>
</document>
to display the link inside a border like this:
The link is The Sun Site
A link can also refer to a local file. To do this set the url attribute to the file
name. For instance to link to the local file 'unicode.pdf' you would do this:
<document>
<block>
The link is
<link url='unicode.pdf'>
unicode.pdf
</link>
</block>
</document>
www.xmlpdf.com
xmlpdf user manual page 69 of 101
XMLPDF 5.5.7 Programmers Guide
23.2
November 2006
23: Links
Merging the URL Value
An alternate syntax can be used to provide the value for the url attribute. By
using a separate nested <url> element it becomes possible to merge the value of
the url attribute from the data XML. The <url> element should contain only
characters and which will be treated as if they had been specified for the url
attribute.
<document>
<block>
The link is
<link>
<url><merge root='invoice-itr' xpath='linkTC'/>.</url>
information
</link>
</block>
</document>
This example will create a link with the text 'information' and when clicked will
go to whatever value is returned from the <merge> operation.
www.xmlpdf.com
xmlpdf user manual page 70 of 101
XMLPDF 5.5.7 Programmers Guide
November 2006
24: Positioning Output
CHAPTER 24
Positioning Output
24.1
(480,750)
Absolute Positioning
Any block element, such as a <block>, <table> or <show-image> element can be
positioned at an absolute location on the page using the following attributes:
Attribute
Description
ax
The absolute x location on the page in points of the top
left corner of the block.
ay
The absolute y location on the page in points of the top
left corner of the block.
Using the following XML we can position the image at location 480, 750, where
the units are points (at 72 points per inch) and the bottom left corner of the page
is location (0,0) and the top right is (595,841) so x=480 y=750 is in the top right
quarter of the page.
<show-image image-name='ferret' scale-width='50' ax='480' ay='750'/>
Absolutely positioned elements are outside the normal flow of the document and
so are not paginated. You are responsible for making sure they fit on the page.
24.2
Relative Positioning
Any block element, such as a <block>, <table> or <show-image> element can be
positioned relative to another block element using the following attributes:
Attribute
Description
rx
The relative x location on the page in points of the top
left corner of the block.
ry
The relative y location on the page in points of the top
left corner of the block.
relative-to
The name given to the block which we are relative to
using the relative-name attribute on that other block.
For example this block of text has the attribute relative-name='101'. We can
position the image to the left of this block using XML. Setting ry='0' means the
image will be at the same height on the page as the text, and setting rx='-72' will
positioning the image one inch (72 points) to the left of the text.
The XML for positioning the image looks like this:
<show-image relative-to='101' ry='0' rx='-72'
image-name='ferret' scale-width='50' />
By using relative positioning the image will be located adjacent to the named
block regardless of where that block appears in the document.
Relatively positioned elements are outside the normal flow of the document and
so are not paginated. You are responsible for making sure they fit on the page.
www.xmlpdf.com
xmlpdf user manual page 71 of 101
XMLPDF 5.5.7 Programmers Guide
November 2006
25: Creating a Table of Contents
CHAPTER 25
Creating a Table of Contents
25.1
Creating a Table Of Contents
A table of contents is created using the <toc> element. This element creates a set
of pages which contain the table of contents.
A lists of items which will appear in the table of content is created from all the
auto-sequence-get-name elements which have outline="true" specified. So any
item which appears in the bookmarks will also appear in the table of contents.
Internally XMLPDF creates a collection of these items and the table of contents
is created by iterating over this collection using a <foreach> element.
For example if we have the following content:
<auto-sequence-inc level="1" name="Introduction"/>
<auto-sequence-get-name level="1" outline="true">
<block>the introduction text</block>
<auto-sequence-inc level="1" name="Advanced"/>
<auto-sequence-get-name level="1" outline="true">
<block>the advanced text</block>
This creates two outline entries and two entries in the table of contents collection
which is called 'contents'. We can then iterate over this collection to output the
table of contents in the same way we can iterate over any other collection of
objects. Each entry in the collection has the following fields:
www.xmlpdf.com
number
the number of the outline entry which created this table of
contents entry, such as 1.2
text
the text of the outline entry which created this table of contents
entry
page
the page number the outline entry which created this table of
contents entry appears on
contents
the collection of lower level table of contents entries, created
from outline entries which are children of the current entry.
xmlpdf user manual page 72 of 101
XMLPDF 5.5.7 Programmers Guide
November 2006
25: Creating a Table of Contents
Given this collection of entries we can use XML like this to iterate over the
collection and create the table of contents:
<toc>
<-- insert some text before the table of contents itself -->
<block indent-left='-2.5cm' font-name="helvetica" font-size="24"
align="center">Contents</block>
<-- create a table -->
<table widths='5%,10%,*' width='85%' block-align='center'>
<-- iterate over the top level elements -->
<foreach list='contents' iterator='itr'>
<-- create a row for each element -->
<row padding-top='12' padding-bottom='6'
destination-page='itr.page'>
<-- a cell for the element number -->
<cell>
<merge method='itr.number'/>
</cell>
<-- a cell for the element text and page number -->
<cell font-size='10' colspan='2'>
<span font-name='helvetica-bold'>
<merge method='itr.text'/></span>
<merge method='itr.page'/>
</cell>
</row>
<-- iterate over the child elements -->
<foreach list='itr.contents' iterator='level2'>
<row destination-page='level2.page' >
<cell/>
<cell>
<merge method='level2.number'/>
</cell>
<cell>
<merge method='level2.text'/>
<merge
method='level2.page'/>
</cell>
</row>
</foreach>
</foreach>
</table>
</toc>
The XML above will create a two-level table of contents. If we wanted another
levels we could have another nested foreach element contained within the second
foreach loop.
25.2
Table Of Contents Page Layout
The toc element can contain page-header and page-footer elements to define the
page header and footer for the table of content pages. This allows you to have
different headers and footers on the table of contents pages. The table of contents
pages in this manual have the following elements to create their page headers and
footers:
www.xmlpdf.com
xmlpdf user manual page 73 of 101
XMLPDF 5.5.7 Programmers Guide
November 2006
25: Creating a Table of Contents
<toc>
<page-header space-after="1cm" indent-left="-2.75cm"
indent-right="1.5cm">
<row>
<cell align="left" font-name="helvetica" font-size="8"
text-color="blue">
XMLPDF <info field="version" flags="independent"/>
Programmers Guide
</cell>
<cell align="right" font-name="helvetica" font-size="8"
text-color="blue">
<info field="date" flags="MMMMM yyyy"></info>
</cell>
</row>
</page-header>
<page-footer space-before="0.5cm" indent-left="-2.75cm"
indent-right="1.5cm">
<row>
<cell align="middle" font-name="gara" font-size="10">
<link url="http://www.xmlpdf.com">www.xmlpdf.com</link>
</cell>
</row>
</page-footer>
...
www.xmlpdf.com
xmlpdf user manual page 74 of 101
XMLPDF 5.5.7 Programmers Guide
November 2006
26: Reference
CHAPTER 26
Reference
26.1
<auto-sequence-get>
Summary of attributes
Attribute
Description
level
The level of the hierarchy for which to retrieve the
number.
XMLPDF automatically maintains a document outline which is used to number
headings and subheadings and to generate the outline which Acrobat displays on
the left side of the screen. Use of this feature is optional. Each heading in the
document is created using an auto-sequence-inc element which (a) defines the
heading for a given level in the outline hierarchy and (b) increments the current
heading number for the level specified.
The <auto-sequence-get> element retrieves the current heading number (not
name) for the specified level. Use the auto-sequence-get-name element to
retrieve the heading text for a speficied level.
For example at the start of the document we might call the first chapter
'Introduction'. Because this is a chapter level heading its level attribute will be 1.
Below the Introduction we want a second level header called 'Overview'. This is
done as follows:
...
<auto-sequence-inc level='1' name='Introduction'/>
<auto-sequence-inc level='2' name='Overview/>
...
This creates a hierarchy like this:
1 Introduction
1.1 Overview
Having set the title for the current level of the outline we can retrieve its number
and insert it into the document using the auto-sequence-get element. Specifying
the level attribute on the element determines which heading number is inserted
into document.
For instance the element <auto-sequence-get level='1'/> would insert the string
'1' into the document. If we change the level to '2', as in <auto-sequence-get
level='2'/> we would insert the string '1.1' into the document. The maximum
level is 10.
26.2
<auto-sequence-get-name>
Summary of attributes
www.xmlpdf.com
Attribute
Description
level
The level of the hierarchy from which to retrieve the
name.
uid
The unique identifier which can then be used to
generate a cross reference to this heading by using the
Section 26.42, "<xref>" element.
outline
The should be set to 'true' if you want the heading
retrieved to appear in the document outline.
xmlpdf user manual page 75 of 101
XMLPDF 5.5.7 Programmers Guide
November 2006
26: Reference
XMLPDF automatically maintains a document outline which is used to number
headings and subheadings and to generate the outline which Acrobat displays on
the left side of the screen. Use of this feature is optional. Each heading in the
document is created using an auto-sequence-inc element which defines the
heading at a given level in the outline hierarchy and increments the current
heading number at the level specified.
The auto-sequence-get element retrieves the current heading name (not number)
for the specificied level.
For example at the start of the document we might call the first chapter
'Introduction'. Because this is a chapter level heading its level attribute will be 1.
Below the Introduction we want a second level header called 'Overview'. This is
done as follows:
...
<auto-sequence-inc level='1' name='Introduction'/>
<auto-sequence-inc level='2' name='Overview/>
...
This creates a hierarchy like this:
1 Introduction
1.1 Overview
Having set the title for the current level of the outline we can retrieve it and insert
it into the document using the auto-sequence-get-name element. Specifying the
level attribute on the element determines which heading is inserted into
document.
For instance the element <auto-sequence-get-name level='1'/> would insert the
string 'Introduction' into the document. If we change the level to '2', as in
<auto-sequence-get-name level='2'/> we would insert the string 'Overview' into
the document.
The auto-sequence-get-name element has an attribute called uid which is used to
specify a unique identifier for this heading when it appears in the document.
This uid can then be used to create a cross reference in the document using the
xref element. See Section 26.42, "<xref>".
26.3
<auto-sequence-inc>
Summary of attributes
Attribute
Description
level
The level of the hierarchy for which to set the name and
increment the counter.
name
The title to be given to this level in the hierarchy.
XMLPDF automatically maintains a document outline which is used to number
headings and subheadings and to generate the outline which Acrobat displays on
the left side of the screen. Use of this feature is optional. Each heading in the
document is created using an auto-sequence-inc element which defines the
heading at a given level in the outline hierarchy and increments the current
heading number at the level specified.
After each heading is defined it becomes the current heading for that level until a
new heading is defined. The auto-sequence-get and auto-sequence-get-name
elements are used to retrieve the current heading number and name.
www.xmlpdf.com
xmlpdf user manual page 76 of 101
XMLPDF 5.5.7 Programmers Guide
November 2006
26: Reference
For example at the start of the document we might call the first chapter
'Introduction'. Because this is a chapter level heading its level attribute will be 1.
Below the Introduction we want a second level header called 'Overview'. This is
done as follows:
...
<auto-sequence-inc level='1' name='Introduction'/>
<auto-sequence-inc level='2' name='Overview/>
...
This creates a hierarchy like this:
1 Introduction
1.1 Overview
26.4
<begin-page-number-group>
Summary of attributes
Attribute
Description
group-name
unique name for this group.
This element starts a new group of page numbers. This resets the page number
to 1 and sets the counter retrieved by the forward-reference element to 1.
See Section 14, "Page Numbering" for more information.
26.5
<boxes>
Summary of attributes
Attribute
Description
box-height
Height of boxes.
box-width
Width of each individual box
number
The number of boxes.
number-down
The number of rows of boxes.
The boxes element is used to display one or more square boxes as typically
found on a form which is designed to be completed by a person.
For example this:
is produced with this XML:
<graphic>
<boxes box-width='12' box-height='12'
number='8' line-width='1'/>
</graphic>
Using XMLPDF you can insert text into the boxes by placing it in the
<boxes>element like this:
<graphic>
<boxes box-width='12' box-height='12'
number='22' line-width='1'>
THIS IS IN THE BOXES
</boxes>
</graphic>
This produces this output:
T H I S
I S
I N
T H E
B O X E S
Multiple rows of boxes can be created using the number-down attribute and filled
by using <br/> elements to split the lines like this:
www.xmlpdf.com
xmlpdf user manual page 77 of 101
XMLPDF 5.5.7 Programmers Guide
November 2006
26: Reference
<graphic>
<boxes box-width='12' box-height='12'
number='30' line-width='1' number-down='2'>
THIS IS IN LINE ONE<br/>
THIS IS IN LINE TWO
</boxes>
</graphic>
This produces this output:
T H I S
T H I S
www.xmlpdf.com
I S
I S
I N
I N
L I N E
L I N E
O N E
T WO
xmlpdf user manual page 78 of 101
XMLPDF 5.5.7 Programmers Guide
26.6
November 2006
26: Reference
<block>
Summary of attributes
Attribute
Description
www.xmlpdf.com
align
Specifies the text alignment to use for this block. This
specifies the alignment of text within the block, not the
alignment of the block on the page. Alignment of the
block on the page is specified using the block-align
attribute as stated below. See horizontal alignment
block-align
Specifies how a block which is less than 100% of the
page width wide is aligned on the page. This can be
'left', 'right' or 'center'.
class
Specifies the class of this block so that styles which
match the class will automatically be applied. See
Section 19, "Styles"
font-name
Specifies the font face of this block. See
Section 11, "Fonts"
font-size
Specifies the font size of this block. See
Section 11, "Fonts"
indent-left
Specifies the left indentation of the text. Indentation is
the amount of space between the margin of the page
and the edge of the text, image or table. The distance
from the left edge of the page to the content is the
left-margin value from the document element plus the
indent-left value of the block.
indent-right
Specifies the right indentation of the text. Indentation
is the amount of space between the margin of the page
and the edge of the text, image or table. The distance
from the right edge of the page to the content is the
right-margin value from the document element plus the
indent-right value of the block.
keep-together
If set to 'true' will prevent the block being split if it
appears near the end of a page and will not fit. If
keep-together is 'false' (the default) the block will be
split over two pages if it does not fit in the available
space at the end of the page. If keep-together is 'true'
the block will not be split and will be moved
completely to the start of the next page.
keep-with-next
If set to 'true' will keep the block on the same page as
the next block level element. If necessary a page break
will be inserted to keep the block and the following
block or table together.
space-before
Sets the amount of white space which appears before
the content of the block.
space-after
Sets the amount of white space which appears after the
content of the block. The space between two blocks is
the space-after of the first block plus the space-before
of the second block.
space-required
Sets the amount of space which must be present on the
page for the block to be output. If that amount of space
is not available the whole block is moved to the next
page. This is useful to prevent headers being output by
themselves at the bottom of the page.
xmlpdf user manual page 79 of 101
XMLPDF 5.5.7 Programmers Guide
November 2006
26: Reference
Attribute
Description
width
Specifies the width of the block. This can be a fixed
amount such as '12cm' or a percentage of the page
width, such as '80%'. If the block is less than 100% of
the page width it is aligned using the block-align
attribute.
The <block> element is used to place a block of text in the PDF document. The
block used to create this sentence looks like this:
<block>The <block> element is used to place a block of text in
the PDF document.
The block used to create this sentence looks like this:</block>
26.7
<br>
This element is used within a block element or cell element to create a line
break. For example to separate to lines in a block use XML like this:
...
<block>
this is line 1<br/><br/>this is line 2
</block>
This produces a line break like this:
this is line 1
this is line 2
There are no attributes on the br element.
www.xmlpdf.com
xmlpdf user manual page 80 of 101
XMLPDF 5.5.7 Programmers Guide
26.8
November 2006
26: Reference
<cell>
Summary of attributes
Attribute
Description
align
Specifies the text alignment for text which appears
inside the cell. See
Section 13.2, "Horizontal alignment"
background-gray
Specifies gray shading which appears in the
background of the cell. This is expressed as a
percentage between 0 and 100, as in
background-gray='20'. Smaller numbers are darker.
The following nested table shows columns with
background-gray values of 20, 40 and 60 respectively.
20
40
60
border-color-all
border-color-inner
border-color-outer
border-color-top
border-color-bottom
border-color-left
border-color-right
Sets the color of cell borders. If colors are not
specified on the cell element they will be inherited from
the row and table elements containing the cell.
border-width-all
border-width-inner
border-width-outer
border-width-top
border-width-bottom
border-width-left
border-width-right
Sets the widths of cell borders. If widths are not
specified on the cell element they will be inherited from
the row and table elements containing the cell.
class
Specifies the class of this cell so that styles which
match the class will automatically be applied. See
Section 19, "Styles"
colspan
Specifies the number of columns in the table this cell is
wide. This defaults to 1.
fill-color
Specifies background color of the cell. See
Section 15, "Colors".
The following nested table shows columns with
fill-color values of 'red' and 'blue' respectively.
red
www.xmlpdf.com
blue
font-name
Specifies the font face of this cell. See
Section 11, "Fonts"
font-size
Specifies the font size of this cell. See
Section 11, "Fonts"
min-height
Specifies the minimum height of the cell.
padding-all
padding-inner
padding-outer
padding-top
padding-bottom
padding-left
padding-right
Sets cell padding. Padding is the amount of space
between the border of a cell and the text or image in it.
rowspan
Specifies the number of rows in the table this cell is
high. This defaults to 1.
xmlpdf user manual page 81 of 101
XMLPDF 5.5.7 Programmers Guide
November 2006
26: Reference
Attribute
Description
text-color
Specifies the foreground color of text the cell. See
Section 15, "Colors".
The following nested table shows columns with
fill-color values of 'red' and 'blue' and
text-color='white'.
red
blue
A cell can contain text, images a graphic, or nested table.
See Section 16, "Tables" and Section 18, "Images" for examples of how to place
text, tables and images inside cells.
26.9
<condition>
Summary of attributes
Attribute
Description
name
Specifies the name of the condition. Conditions are
named so they can be referred to by name in <if>
elements. See Section 22.2, "Conditional processing"
value
Specifies the value of the condition. This must be 'true'
or 'false'. See Section 22.2, "Conditional processing"
Conditions are used when merging data XML to include or exclude parts of the
document template.
Conditions are defined in the data XML using condition elements and the
template XML uses if and ifnot elements to surround parts of the template XML.
As the PDF document is created the if and ifnot elements in the template XML
are compared with the conditions in the data XML and parts of the document
include or excluded as appropriate.
See Section 22, "Merging Data".
26.10
<conditions>
This element is a container for <condition> elements. It should appear only in
data XML and not in document template XML.
See Section 22.2, "Conditional processing" for an example of this element.
This element has no attributes.
26.11
<data>
This element is a container for data to be merged in the data XML used in the
merging process. It is the outermost element in the data XML and should appear
only in data XML and not in document template XML.
See Section 22.2, "Conditional processing" for an example of this element.
This element has no attributes.
26.12
www.xmlpdf.com
<define-sequence>
xmlpdf user manual page 82 of 101
XMLPDF 5.5.7 Programmers Guide
November 2006
26: Reference
Summary of attributes
Attribute
Description
format
Specifies the format of the sequence. When a
sequence-get element is used to retrieve the current
value of the sequence and insert it into the document it
can be retrieved as either alphabetic, numeric or roman
numeral format. Sequence formats and the first two
values in each format are:
alpha
a
b
alpha-upper
A
B
roman
I
II
roman-lower
i
ii
numeric
1
2
name
Specifies the name of the sequence. This is used in
<sequence-get> elements to retrieve the current value
of the sequence and insert it into the document. See
Section 26.33, "<sequence-get>".
prefix
Specifies a string which is prepended to the sequence
number when it is retrieved using the sequence-get
element. The following shows some examples using
prefix and suffix.
suffix=')'
a)
b)
prefix='('
(a
(b
prefix='(' suffix=')'(a)
suffix
(b)
Specifies a string which is appended to the sequence
number when it is retrieved using the sequence-get
element. See above for some examples using prefix and
suffix.
A sequence is a source for a list of numbers. It provides a simple way of
numbering paragraphs in a document or items in a list.
Using a sequence is a two-stage process:
First a sequence is created using a <define-sequence> element and then the
current value of the sequence can be inserted into the document using a
<sequence-get> element.
Each time the sequence-get element is used the associate value is increments.
For example to define a sequence of roman numerals and then display the first
five values we do this:
<define-sequence name='s1' format='roman-lower'/>
<sequence-get name='s1'/><br/>
<sequence-get name='s1'/><br/>
<sequence-get name='s1'/><br/>
<sequence-get name='s1'/><br/>
<sequence-get name='s1'/><br/>
www.xmlpdf.com
xmlpdf user manual page 83 of 101
XMLPDF 5.5.7 Programmers Guide
November 2006
26: Reference
This produces the following output: i
ii
iii
iv
v
26.13
<document>
Summary of attributes
Attribute
Description
deny-print
When set to true prevents printing of the document
without the owner password. See
Section 20, "Document Security" for details.
deny-extract
When set to true prevents cutting text or graphics from
the document without the owner password. See
Section 20, "Document Security" for details.
deny-modify
When set to true prevents modifying the document
without the owner password. See
Section 20, "Document Security" for details.
info-title
Sets the PDF document title which is displayed in the
document summary dialog box in Adobe Acrobat.
info-author
Sets the PDF document author which is displayed in the
document summary dialog box in Adobe Acrobat.
info-subject
Sets the PDF document subject which is displayed in
the document summary dialog box in Adobe Acrobat.
margin-left
Sets the left margin for the whole document.
margin-right
Sets the right margin for the whole document.
margin-top
Sets the top margin for the whole document.
margin-bottom
Sets the bottom margin for the whole document.
orientation
Sets the page orientation for the document. If specified
this must be 'landscape' or 'portrait'. The default value
is 'portrait'. The page orientation can be changed later
using the Section 26.27, "<next-page>"<next-page>
element.
owner-password
Sets the password required to take ownership of the
document. See Section 20, "Document Security" for
details.
page-size
Sets the size of the page for the whole document. See
Section 10.2, "Page sizes" for details.
user-password
Sets the password required (if any) to open the
document with limited access. See
Section 20, "Document Security" for details.
The <document> element is the outermost element in the document template
XML. This is the top-level element and contains the whole document.
Attributes of the document element set overall characteristics of the document
such as the page size and the page margins.
www.xmlpdf.com
xmlpdf user manual page 84 of 101
XMLPDF 5.5.7 Programmers Guide
26.14
November 2006
26: Reference
<forward-reference>
Summary of attributes
Attribute
Description
name
Curently this must be 'total-pages' or 'group-pages'
To display the total pages in the document in the page footer do this:
<page-footer indent-left='-2.75cm' indent-right='1.5cm'>
<row>
<cell align='left' font-name='helvetica' font-size='8'
text-color='blue'>
<link url='http://www.xmlpdf.com'>
www.xmlpdf.com<
/link>
</cell>
<cell border-width-top='0.01' align='right'
font-size='8' font-name='helvetica'>
xmlpdf user manual
page <page-number/> of
<forward-reference name='total-pages'/>
</cell>
</row>
</page-footer>
This will print 'Page 1 of n' at the bottom of each page, where n is the total
number of pages in the document.
If you are using page grouping as described in Section 14, "Page Numbering"
you set the name attribute to 'group-pages' to get the total number of pages in the
current page group.
26.15
<font>
Summary of attributes
Attribute
Description
font-name
The name by which the font will be known in the
document. This is used when specifying the font to be
used on block and other elements which contain text.
For the standard Adobe fonts this must be one of the
values show in the standard font names table. For
TrueType fonts this can be any value assigned by the
writer of the XML.
directory
Specifies the name of a directory in which to look for
the named file. This attribute is optional. If it is used
then the directory name is prepended to the font-file
value in order to make a full path to the font file.
font-file
Specifies the path of the font file.
unicode
If the font contains (and you want to use) characters
above U+00FF specify unicode='true' so that XMLPDF
will correctly process the font. Characters used from a
Unicode fonts are always embedded in the document .
To use a TrueType font you have to tell XMLPDF about the font before you can
use it. This is done by placing a <font> element into the <fonts> element near the
start of the document.
26.16
<fonts>
This element is a container for <font> elements and should appear only in
document template XML.
See Section 11, "Fonts" for an example of this element.
www.xmlpdf.com
xmlpdf user manual page 85 of 101
XMLPDF 5.5.7 Programmers Guide
November 2006
26: Reference
This element has no attributes.
26.17
<graphic>
This element is a container for <boxes> and <segment> elements and should
appear only in document template XML.
See Section 26.5, "<boxes>" for an example of this element.
This element has no attributes.
26.18
<header>
Summary of attributes
Attribute
Description
widths
Sets the widths of columns.
border-width-all
border-width-inner
border-width-outer
border-width-top
border-width-bottom
border-width-left
border-width-right
Sets the widths of the header border.
border-color-all
border-color-inner
border-color-outer
border-color-top
border-color-bottom
border-color-left
border-color-right
Sets the color of header border. See
Section 15, "Colors"
padding-all
padding-inner
padding-outer
padding-top
padding-bottom
padding-left
padding-right
Sets cell padding. Padding is the amount of space
between the border of a cell and the text or image in it.
The header element is used to define a table header. It must appear inside a
<table> element.
The header element is very similar to a <table> element. It contains <row>
elements which in turn contain <cell> elements.
The table header is repeated at each time the table is broken by a page break.
This is an example of a header element.
<table border-width-all='.1' indent-left='3cm'
indent-right='3cm' padding-all='2'>
<header fill-color='blue'>
<row>
<cell>header one</cell>
<cell>header two</cell>
</row>
</header>
<row>
<cell>one</cell>
<cell>two</cell>
</row>
</table>
www.xmlpdf.com
xmlpdf user manual page 86 of 101
XMLPDF 5.5.7 Programmers Guide
November 2006
This produces the following table:
header one
one
26: Reference
header two
two
Note that the number of columns in a table header can be different to the number
of columns in the table body.
26.19
<image>
Summary of attributes
www.xmlpdf.com
Attribute
Description
anti-aliasing
Specifies whether the PDF reader will apply
anti-aliasing to the image. Anti-aliasing removes
jagged borders and lines, especially when the image is
viewed at high zoom levels. By default anti-aliasing is
on.
The following two images are loaded from the same
file, the one on the left has anti-aliasing='false', the one
on the right uses the default setting.
directory
Specifies the name of a directory in which to look for
the named file. This attribute is optional. If it is used
then the directory name is prepended to the file-name
value in order to make a full path to the image file.
dpi
A value which defines the image dots per inch value,
typically 72 or 300. This applies only to JPEG and
SVG images. This value changes the size of the image
when it is stored in the PDF file. The default value is
the value stored in the image file.
file-name
Specifies the name of the file which contains the image.
From version 3.0 this can be a full URL such as
http://www.xmlpdf.com/images/download.gif with the
image being retrieved from the URL.
image-name
Specifies a logical name which is used to uniquely
identify the image within the document. This value is
used on the show-image element to say which image to
display.
image-type
As of version 1.8 of the XMLPDF library this attribute
is no longer used. The image file is read to determine
the type of the image.
quality
A value which defines the image quality. This applies
only to JPEG and SVG images. This value changes
the compression level of the image when it is stored in
the PDF file. The value ranges from 1 to 100, with 1
giving lowest quality and highest compression and 100
giving the highest quality and largest image size. The
default is 100.
xmlpdf user manual page 87 of 101
XMLPDF 5.5.7 Programmers Guide
November 2006
26: Reference
The <image> element must occur inside an <images> element before the image
is referenced by a <show-image> element.
See Section 18, "Images" for examples on how to include an image in the
document.
PNG, GIF and JPEG formats are supported by XMLPDF. Interlaced or
transparent versions of these formats are not supported.
26.20
<images>
This element is a container for <image> elements and should appear only in
document template XML.
See Section 18, "Images" for an example of this element.
This element has no attributes.
26.21
<if>
Summary of attributes
Attribute
Description
condition
Specifies the name of condition which is tested to see if
the content of this element should be included in the
PDF file.
The if element is used to control what parts of a document should be included in
the PDF file at the time of generation. This allows you to include or exclude
parts of the document template XML depending on data values specified in the
data XML.
The if element contains other block level elements such as <table>, <block> and
other <if> elements.
See Section 22.2, "Conditional processing" for an example of this element.
26.22
<ifnot>
Summary of attributes
Attribute
Description
condition
Specifies the name of condition which is tested to see if
the content of this element should be included in the
PDF file.
The ifnot element is used to control what parts of a document should be included
in the PDF file at the time of generation. This allows you to include or exclude
parts of the document template XML depending on data values specified in the
data XML.
The ifnot element contains other block level elements such as <table>, <block>
and other <if> elements.
See Section 22.2, "Conditional processing" for an example of this element.
www.xmlpdf.com
xmlpdf user manual page 88 of 101
XMLPDF 5.5.7 Programmers Guide
26.23
November 2006
26: Reference
<info>
Summary of attributes
Attribute
Description
field
The field to insert into the document. Current valid
values are 'version' to insert the current XMLPDF
version and 'date' to insert the date.
flags
When field='date', this can be used to specifiy the date
format. This can be any value specified for the
java.text.SimpleDateFormat class. See examples
below.
This element is replaced in the PDF file by the field specified.
Examples of date formatting are:
26.24
Field
Flags
Result
date
yyyy.MM.dd G 'at' hh:mm:ss z
2003.05.29 G at 11:44:20 +12
date
EEE, MMM d, ''yy
EEE, May 29, 03
date
h:mm a
11:44 a
date
hh 'o''clock' a, zzzz
11 oclock a, +12:00
date
K:mm a, z
K:44 a, +12
<link>
Summary of attributes
Attribute
Description
url
Specifies the URL this link points to. This can be
either a hyperlink such as 'http://www.xmlpdf.com' or a
mailto link such as 'mailto:[email protected]'
The link element is used to insert a hyperlink into the PDF document. When the
user clicks on the link their browser will be launched and will go to the specified
url.
Click on the www.xmlpdf.com link at the bottom left of this page to see how this
works.
The link element contains text which appears in the document. This text is
independent of the url attribute. For example the link at the bottom of this page
is created with the following XML:
<link url='http://www.xmlpdf.com'>
www.xmlpdf.com
</link>
26.25
<merge>
Summary of attributes
Attribute
Description
source-element-name
Specifies the name of the element to be merged from
the data XML.
This element is used to include an element from the data XML into the PDF
document.
The value of the source-element-name attribute must match the name of a
<source-element> element in the data XML.
www.xmlpdf.com
xmlpdf user manual page 89 of 101
XMLPDF 5.5.7 Programmers Guide
November 2006
26: Reference
The merge element is replaced completely by the contents of the source-element
element from the data XML. The source-element element can contain any
amount of XML, for instance the document XML might contain a table element
and the header for the table, and all of the rows might be merged from the data
XML with a single merge element.
See Section 22, "Merging Data" for an example of merging data.
26.26
<new-page>
Summary of attributes
Attribute
Description
next-page-number
Specifies the number of the next page. This is optional.
This element causes an immediate page break in the PDF document.
Setting the next-page-number attribute will change the page number of the
following page. This is used in this manual to make the second physical page be
page number 1 instead of 2.
The total number of pages in the document retrieved by the
forward reference element is also adjusted.
26.27
<next-page>
Summary of attributes
Attribute
Description
orientation
Specifies the orientation of the next page and all
following pages until another <next-page> element is
found. This attribute is optional. If it appears its value
must be 'portrait'or 'landscape'.
margin-left
Sets the left margin for the next and following pages.
margin-right
Sets the right margin for the next and following pages.
margin-top
Sets the top margin for the next and following pages.
margin-bottom
Sets the bottom margin for the next and following
pages.
This element sets parameters for the next page. It does not cause a page break,
this is done using the <new-page> element.
26.28
<page-footer>
The page-footer element defines a table which is repeated at the end of each page
from the point at which it appears.
The page footer can be changed at any point by putting another page-footer
element in the XML.
The page-footer element has the same attributes and contents as a <table>
element. See Section 26.40, "<table>" for more details.
In addition to the normal table attributes the first-page and last-page attributes
can also be used to limit the range of pages on which this page footer will be
displayed.
26.29
<page-header>
The page-header element defines a table which is repeated at the start of each
page from the point at which it appears.
www.xmlpdf.com
xmlpdf user manual page 90 of 101
XMLPDF 5.5.7 Programmers Guide
November 2006
26: Reference
The page header can be changed at any point by putting another page-header
element in the XML.
The page-header element has the same attributes and contents as a <table>
element. See Section 26.40, "<table>" for more details.
In addition to the normal table attributes the first-page and last-page attributes
can also be used to limit the range of pages on which this page header will be
displayed.
26.30
<page-number>
This element is used to insert the current page number into the document. For
instance the following XML:
<block>
This is page <page-number/>
</block>
Produces this output:
This is page 91
This element has no attributes.
26.31
<restore>
This element is used to restore the values of text formatting attributes such as
font-size and font-name which have been changed using a <set> element.
See Section 11.2, "Changing fonts" for an example of this.
This element has no attributes.
www.xmlpdf.com
xmlpdf user manual page 91 of 101
XMLPDF 5.5.7 Programmers Guide
26.32
November 2006
26: Reference
<row>
Summary of attributes
Attribute
Description
align
Specifies the text alignment for text which appears
inside cells which are in this row. See
Section 13.2, "Horizontal alignment"
background-gray
Specifies gray shading which appears in the
background all cells in the row. This is expressed as a
percentage between 0 and 100, as in
background-gray='20'. Smaller numbers are darker.
The following nested table shows columns with
background-gray values of 20, 40 and 60 respectively.
20
40
60
border-color-all
border-color-inner
border-color-outer
border-color-top
border-color-bottom
border-color-left
border-color-right
Sets the color of row borders. These colors are
inherited by cells in the row. If colors are not specified
on the row element they will be inherited from the table
element containing the row.
border-width-all
border-width-inner
border-width-outer
border-width-top
border-width-bottom
border-width-left
border-width-right
Sets the widths of row borders. If border widths are not
specified on the row element they will be inherited
from table element containing the row.
class
Specifies the class of this row so that styles which
match the class will automatically be applied. See
Section 19, "Styles"
fill-color
Specifies background color of the row. See
Section 15, "Colors".
The following nested table shows columns with
fill-color values of 'red' and 'blue' respectively.
red
blue
font-name
Specifies the font face of this row. See
Section 11, "Fonts"
font-size
Specifies the font size of this row. See
Section 11, "Fonts"
padding-all
padding-inner
padding-outer
padding-top
padding-bottom
padding-left
padding-right
Sets cell padding for cells in this row. Padding is the
amount of space between the border of a cell and the
text or image in it.
text-color
Specifies the foreground color of text of cells in the
row. See Section 15, "Colors".
The following nested table shows columns with
fill-color values of 'red' and 'blue' and
text-color='white'.
www.xmlpdf.com
xmlpdf user manual page 92 of 101
XMLPDF 5.5.7 Programmers Guide
November 2006
Attribute
26: Reference
Description
red
blue
Rows are used in <table>, <header>, <page-header> and <page-footer>
elements. Rows contain cells which contain text or images. See
Section 26.8, "<cell>".
Any attribute set on a row will be inherited by the cells in that row unless
overridden by an attribute specified on the cell itself.
26.33
<sequence-get>
Summary of attributes
Attribute
Description
name
Specifies the name of the sequence to get the value
from.
This element is used to get current value of a sequence defined by a
define-sequence element as described in Section 26.12, "<define-sequence>".
This gets the current value of the element and inserts it into the document. The
sequence value is also incremented.
26.34
<segment>
Summary of attributes
Attribute
Description
x1
x coordinate of start point of line
x2
x coordinate of end point of line
y1
y coordinate of start point of line
y2
y coordinate of end point of line
width
width of the line segment in points
Lines can be drawn on the page using the <segment> element.
Each segment has an start point defined in by values x1,y1 and and end point
defined by x2,y2. These x and y values are absolute coordinates in points, with
0,0 being at the bottom left corner of the page.
For example this page as a crop mark drawn near the bottom left corner.
This was drawn with the following XML:
<graphic>
<segment width='1' x1='90' x2='110' y1='100' y2='100' />
<segment width='1' x1='100' x2='100' y1='110' y2='90' />
</graphic>
www.xmlpdf.com
xmlpdf user manual page 93 of 101
XMLPDF 5.5.7 Programmers Guide
26.35
November 2006
26: Reference
<show-image>
Summary of attributes
Attribute
Description
align
Specifies the text alignment to use for this block. See
Section 13.2, "Horizontal alignment"
class
Specifies the class of this block so that styles which
match the class will automatically be applied. See
Section 19, "Styles"
image-name
Specifies the name of the image to insert at this point in
the document.
indent-left
Specifies the left indentation of the text. Indentation is
the amount of space between the margin of the page
and the edge of the text, image or table. The distance
from the left edge of the page to the content is the
left-margin value from the document element plus the
indent-left value of the block.
indent-right
Specifies the right indentation of the text. Indentation
is the amount of space between the margin of the page
and the edge of the text, image or table. The distance
from the right edge of the page to the content is the
right-margin value from the document element plus the
indent-right value of the block.
scale-width
Specifies the width of the image. This is optional and is
used to change the default size of the image. If only
one of scale-width and scale-height are used the aspect
ratio of the image is preserved.
scale-height
Specifies the height of the image. This is optional and
is used to change the default size of the image. If only
one of scale-width and scale-height are used the aspect
ratio of the image is preserved.
space-before
Sets the amount of white space which appears before
the content of the block.
space-after
Sets the amount of white space which appears after the
content of the block. The space between two blocks is
the space-after of the first block plus the space-before
of the second block.
space-required
Sets the amount of space which must be present on the
page for the block to be output. If that amount of space
is not available the whole block is moved to the next
page. This is useful to prevent headers being output by
themselves at the bottom of the page.
Images are included in the document using an image element as described in
Section 18, "Images" and Section 26.19, "<image>". They can then be displayed
at a given point by using a show-image element with the name attribute
corresponding to the name given on the image element.
An image can be displayed any number of times using a single image element
and multiple show-image elements.
A show-image element can be used both inside a document element to display
the image inline like a text block or inside a cell element to display the image
inside a table.
www.xmlpdf.com
xmlpdf user manual page 94 of 101
XMLPDF 5.5.7 Programmers Guide
November 2006
26: Reference
Images displayed within a table will be scaled to fit the cell width. Images in the
main body of the document can be resized using the scale-width and scale-height
attributes.
The following example shows an image at its default size:
and with indent-left='5cm' and ident-right='5cm', so the image is scaled to fit the
width available:
and with scale-width='100' so the image is scaled and the aspect ratio is
preserved:
and with scale-width='100' and scale-height='200' so the image is scaled and the
aspect ratio is not preserved:
www.xmlpdf.com
xmlpdf user manual page 95 of 101
XMLPDF 5.5.7 Programmers Guide
26.36
November 2006
26: Reference
<set>
Any attribute which can be applied to text can be used with this element.
This element is used to change the formatting of text within a block or cell
element. The change specified is applied to all text which follows the set
element until a restore element (see Section 26.31, "<restore>") is found which
sets the text attributes back to the value they had before the set element. Set and
restore elements work on stack based approach to multiple set elements can be
used and matched with multiple restore elements.
Given the following XML:
<document font-name='helvetica' font-size='12'>
<block>
Hello World this is XMLPDF
</block>
</document>
We can change the word 'World' to a courier by inserting set and restore elements
around the word as shown here:
<document font-name='helvetica' font-size='12'>
<block>
Hello
<set font-name='courier'/>World<restore/>
this is XMLPDF
</block>
</document>
This changes the output from this:
Hello World this is XMLPDF
to this:
Hello World this is XMLPDF
Any attribute which applies to text can be specified on the set element.
26.37
<space>
This element has no attributes or content.
This element is used to insert a space character into the PDF document where
normal XML processing might remove the space. See Space Handling for a
discussion of space handling.
26.38
<span>
Any attribute which can be applied to text can be used with this element.
www.xmlpdf.com
xmlpdf user manual page 96 of 101
XMLPDF 5.5.7 Programmers Guide
November 2006
26: Reference
This element is used to change the formatting of text within a block or cell
element. The change specified is applied to all text contained within span
element.
Given the following XML:
<document font-name='helvetica' font-size='12'>
<block>
Hello World this is XMLPDF
</block>
</document>
We can change the word 'World' to a courier by enclosing it in a span element as
shown here:
<document font-name='helvetica' font-size='12'>
<block>
Hello
<span font-name='courier'>World</span>
this is XMLPDF
</block>
</document>
This changes the output from this:
Hello World this is XMLPDF
to this:
Hello World this is XMLPDF
Any attribute which applies to text can be specified on the set element. Span
elements can be nested inside other span elements.
26.39
<style>
Summary of attributes
Attribute
Description
name
Specifies the name of the style. See below.
Any other attribute can be specified on a style. These attributes are then applied
to any element which matches the style.
A style element is used to define a set of attributes which can then be
automatically be applied to elements. This means the default formatting of text
can be defined in a single place in the document and applied automatically. This
manual has styles defined for text, text in cells, code examples and heading. This
gives the manual a consistent appearance and makes it simple to change the
whole document.
Styles which have a name which is the same as the name of a element (i.e. a
name such as 'block') are automatically applied to all elements of that type which
follow in the document. See Section 19, "Styles"
For example this manual uses the following style:
<style name='xref' text-color='blue'/>
to make all cross references created with <xref> elements appear block, like this
one: See Section 19, "Styles"
Styles which have a name which begins with a '. character, such as name='.code'
are applied to all elements which have class attribute of the matching name
without the '.'
For example this manual uses the following style:
www.xmlpdf.com
xmlpdf user manual page 97 of 101
XMLPDF 5.5.7 Programmers Guide
November 2006
26: Reference
<style name='.h1' font-name='helvetica-bold'
font-size='14' space-before='.5cm'
space-after='.5cm' />
to make all elements with a class='h1' appear in 14 point helvetica.
It is also possible to combine the two notations. To create a style which applied
to all blocks (i.e. name='block') which have a class of 'code' (i.e. name='.code')
create the style with the name='block.code'.
Attributes applied by a style are overridden by attributes which are defined on
the element the style is being applied to.
www.xmlpdf.com
xmlpdf user manual page 98 of 101
XMLPDF 5.5.7 Programmers Guide
26.40
November 2006
26: Reference
<table>
Summary of attributes
Attribute
Description
www.xmlpdf.com
align
Specifies the text alignment to use for this table. This
specifies the default alignment of text within the table,
not the alignment of the table on the page. Alignment
of the table on the page is specified using the
block-align attribute as stated below. See
Section 13.2, "Horizontal alignment"
block-align
Specifies how a table which is less than 100% of the
page width is aligned on the page. This can be 'left',
'right' or 'center'.
class
Specifies the class of this block so that styles which
match the class will automatically be applied. See
Section 19, "Styles".
font-name
Specifies the font face of this block. See
Section 11, "Fonts".
font-size
Specifies the font size in points of this block. See
Section 11, "Fonts".
indent-left
Specifies the left indentation of the text. Indentation is
the amount of space between the margin of the page
and the edge of the text, image or table. The distance
from the left edge of the page to the content is the
left-margin value from the document element plus the
indent-left value of the block.
indent-right
Specifies the right indentation of the text. Indentation
is the amount of space between the margin of the page
and the edge of the text, image or table. The distance
from the right edge of the page to the content is the
right-margin value from the document element plus the
indent-right value of the block.
keep-together
If set to 'true' will prevent the block being split if it
appears near the end of a page and will not fit. If
keep-together is 'false' (the default) the block will be
split over two pages if it does not fit in the available
space at the end of the page. If keep-together is 'true'
the block will not be split and will be moved
completely to the start of the next page.
keep-with-next
If set to 'true' will keep the block on the same page as
the next block level element. If necessary a page break
will be inserted to keep the block and the following
block or table together.
layout
If set to 'newspaper' will format cells like a newspaper,
with cells going down one column from top to bottom
then going down the next column from top to bottom
until all columns are filled.
space-before
Sets the amount of white space which appears before
the content of the block.
space-after
Sets the amount of white space which appears after the
content of the block. The space between two blocks is
the space-after of the first block plus the space-before
of the second block.
xmlpdf user manual page 99 of 101
XMLPDF 5.5.7 Programmers Guide
November 2006
26: Reference
Attribute
Description
space-required
Sets the amount of space which must be present on the
page for the block to be output. If that amount of space
is not available the whole block is moved to the next
page. This is useful to prevent headers being output by
themselves at the bottom of the page.
width
Specifies the width of the table. This can be a fixed
amount such as '12cm' or a percentage of the page
width, such as '80%'. If the table is less than 100% of
the page width it is aligned using the block-align
attribute.
widths
Sets the widths of columns.
border-width-all
border-width-inner
border-width-outer
border-width-top
border-width-bottom
border-width-left
border-width-right
Sets the widths of table, row and cell borders.
border-color-all
border-color-inner
border-color-outer
border-color-top
border-color-bottom
border-color-left
border-color-right
Sets the color of table, row and cell borders. See
Section 15, "Colors"
padding-all
padding-inner
padding-outer
padding-top
padding-bottom
padding-left
padding-right
Sets cell padding. Padding is the amount of space
between the border of a cell and the text or image in it.
How to use the table element is described in detail in Section 16, "Tables"
26.41
<watermark>
The watermark element creates an image which is repeated on every page.
The <watermark> element is a type of <table> element and so can have all the
attributes of a <table> element, as listed in Section 26.40, "<table>"
The table defined by the <watermark> element will be placed on every page
following the element. The watermark will be placed in the center of the page.
To move the watermark to a different position use the absolute-x and absolute-y
attributes as described in Section 26.40, "<table>"
An example of the watermark is:
<watermark>
<row>
<cell>
<show-image image-name='draft'
priority='-100'/>
</cell>
</row>
</watermark>
www.xmlpdf.com
xmlpdf user manual page 100 of 101
XMLPDF 5.5.7 Programmers Guide
November 2006
26: Reference
In the above example the priority attribute is used to make sure the watermark
appears behind any content.
26.42
<xref>
Summary of attributes
Attribute
Description
uid
Unique identifier which must match a uid attribute from
an auto-sequence-get-name element as described in
Section 26.2, "<auto-sequence-get-name>"
text
Optional value which will appear as the text of the link
in the document. If this is not specified the outline
header referred to by the uid value will be inserted into
the document.
This is used to create a cross reference to an outline entry. The outline entry
must have a unique uid value and the xref element then has the uid of the outline
entry it refers to.
This document has an outline entry called 'tables'. We can create a cross
reference to this entry using this XML:
See <xref uid='tables'/>
which gives the following result: See Section 16, "Tables"
or we can override the text displayed like this:
See <xref uid='tables' text='section on tables'/>
which gives the following result: See section on tables
www.xmlpdf.com
xmlpdf user manual page 101 of 101