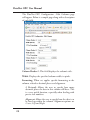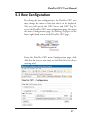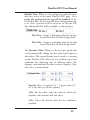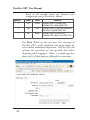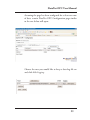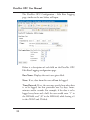
1
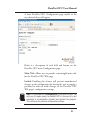
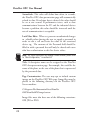
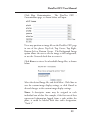
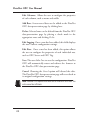
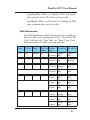
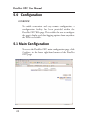
DataNet OPC User Manual
5.0 Configuration
OVERVIEW
To enable convenient and easy remote configuration, a
configuration facility has been provided within the
DataNet OPC Web page. This enables the user to configure
the page’s display and data-logging options from anywhere
the Web is accessible.
5.1 Main Configuration
To access the DataNet OPC main configuration page, click
Configure, in the lower right-hand corner of the DataNet
OPC page:
20
DataNet OPC User Manual
A main DataNet OPC Configuration page similar to the
one shown below will appear:
Below is a description of each field and button on the
DataNet OPC main Configuration page:
Main Title: Allows user to provide a meaningful main title
for the DataNet OPC Web page.
Locked: Enabling this feature will prevent unauthorized
changes to the configuration by forcing the user to supply a
password in order to make changes to the DataNet OPC
Web page’s configuration settings.
Note: This password is unrecoverable in the event of loss. The
only way to regain access to DataNet OPC in the event of a lost
password is to completely uninstall and reinstall the program.
This will clear the previous configuration settings.
21
DataNet OPC User Manual
Autorefresh: This value will define how often, in seconds,
the DataNet OPC data-presentation page will automatically
refresh its data. If real-time data is desired, this value should
be set at one second. If performance issues, such as slow
communications between the PC and the industrial devices
become a problem, this value should be increased until the
rate of communication is acceptable.
Lock Value Edits: When set, prevents unauthorized changes
to editable values forcing the user to supply a password in
order to edit a cell and write the value to the associated
device tag. The contents of the Password field should be
filled in with a password that will only be shared with users
who have authorization to edit live device values.
Note: For more information on making a value editable, please refer
to “Row Configuration,” in section 5.3.
Title: A descriptive name can be assigned to the DataNet
OPC data-presentation page. For example, this could be the
name of the plant, or the area of the plant that is represented
by the presented data.
Page Customization: The user may opt to include custom
images on the DataNet OPC Web page. Image files must be
placed in the following directory on the DataNet OPC
Server machine:
C:\Program Files\AutomationDirect\DataNet
OPC\DataNetOPC\images\custom
Image files must also have one of the following extensions:
GIF, JPG or PNG.
22
DataNet OPC User Manual
Click Page Customization. The DataNet OPC Customization page, as shown below, will open.
Users may position an image file on the DataNet OPC page
in one of five places: Top Left, Top Center, Top Right,
Bottom Left or Bottom Center. The Background Image
option allows the user to tile the image as the background,
or use the Centered check box to center it.
Click Browse to view a list of available Image files, as shown
below:
Select the desired Image file, and click Select. Click Save to
save the custom image display settings, or click Cancel to
discard changes to the custom image display settings.
Name: A descriptive name may be assigned to each
individual row of data. For example, if the first row of data
represented information logged from a tank within the
plant, it could be labeled with that tank’s designation,
"Tank 1."
23
DataNet OPC User Manual
Edit Columns: Allows the user to configure the properties
of each column, such as name and width.
Add Row: A new row of data can be added to the DataNet
OPC data-presentation page by clicking here.
Delete: Selected rows can be deleted from the DataNet OPC
data-presentation page by placing a check mark in the
appropriate rows and clicking Delete.
Edit Logging: Once a row has been added, this field displays
the row’s current configuration settings.
Edit Row: Once a row has been added, this option allows
the user to configure the properties of each individual row,
such as OPC Server and OPC Tag.
Save: The user clicks Save to save the configuration. DataNet
OPC will automatically restart and redirect the browser to
the DataNet OPC data-presentation page.
Cancel: Choosing the Cancel option will discard the edits.
The DataNet OPC data-presentation page will revert back to
its original configuration settings.
Note: DataNet OPC requires that each cell be filled with OPC data. The
cells cannot be left blank.
24
DataNet OPC User Manual
5.2 Column Configuration
DataNet OPC displays data in an easy-to-read table format.
Each cell displays a different piece of data from the OPC
Server. By editing the column configurations, the DataNet
OPC user can change the table’s appearance by creating a
label, or specifying the width, number of decimals and
alignment of the chosen column. To access the column
configuration page, first open the main Configuration page,
by clicking Configure in the lower right-hand corner of the
DataNet OPC page:
From main Configuration page, click Edit Columns:
25
DataNet OPC User Manual
The DataNet OPC Configuration - Edit Columns page
will appear. Below is a sample page along with a description
of each field.
Column Header #: This field displays the column’s title.
Width: Displays the specified column width, in pixels.
Formatting: When set, applies specific formatting to the
column, related to decimal places and alignment.
# Decimals: Allows the user to specify how many
decimals places the data in this column will have. This
is a very useful function, especially when dealing with
precise real numbers.
Alignment: Allows the user to specify how the data is to
be lined up within the column. Alignment options are
Center, Left and Right.
26
DataNet OPC User Manual
5.3 Row Configuration
By editing the row configurations, the DataNet OPC user
may change the source of the data that is to be displayed.
The user will specify the OPC Server and OPC Tag. To
access the DataNet OPC row configuration page, first open
the main Configuration page, by clicking Configure in the
lower right-hand corner of the DataNet OPC page:
From the DataNet OPC main Configuration page, click
Add Row (to create a new row), or click Edit Row (to edit an
existing row):
27
DataNet OPC User Manual
The DataNet OPC Configuration - Edit Row page will
appear. Below is a sample page along with a description of
each field.
Below is a description of the fields in the DataNet OPC
row configuration page.
Row Name: The user-specified row label is displayed.
OPC Server: Using the drop-down menu, the user will
specify which OPC Server to use as the source for
displaying data in this cell.
OPC Tag: Here, the user will input the OPC Tag item to
display from the specified OPC Server.
Browse: This function allows the user to browse
through all available OPC Tags for the specified OPC
Server.
28
DataNet OPC User Manual
Editable Value: When set, this cell may be edited by users
who have access to the main DataNet OPC page. As a
result, the associated device tag will be modified. If the
Lock Value Edits check box in the main Configuration page
is set, then a password will be necessary to edit the cell.
Two additional fields will be available, as shown below:
Min Value: Assigns a minimum value for the data
entered into this cell while being edited.
Max Value: Assigns a maximum value for the data
entered into this cell while being edited.
Use Dynamic Colors: When set, the user may specify that
a cell automatically change the font color based upon its
data values. This control feature may be used as a warning
system. DataNet OPC allows the user to define up to four
conditions for displaying data in different colors. The
dynamic color function has three sections: Equality, Value
and Color, as shown below:
Equality: Select “is equal to (=),” “is greater than (>),”
or “is less than (<)” for the equality.
Value: For the value, input the value for which the
dynamic color function will take effect.
Color: Select the desired color for the conditions
specified.
29
DataNet OPC User Manual
Based on the example above, the dynamic color
configuration can be described as follows:
Value
100
Color
Yellow
>
100
Red
<
100
Black
Equality
=
Function
Displays data in a yellow font
whenever the value equals 100
Displays data in a red font whenever
the value is greater than 100
Displays data in a black font
whenever the value is less than 100
Use Math: When set, the user may take advantage of
DataNet OPC’s useful calculation tool, which allows the
user to define mathematical operations. DataNet OPC will
perform the operations on the specified data before
displaying and/or logging it. Below, is a sample page that
shows the Use Math function, followed by instructions.
30
DataNet OPC User Manual
Note: The Use Math tool cannot be utilized if the Editable Value
check box is set.
Instructions: To use the DataNet OPC calculating tool,
first select the desired OPC Tag by searching through
the Server’s tags using Browse. Next, input the desired
formula using the buttons provided on the Web form.
To enter the OPC Tag (data set) into the equation, click
the OPC button in the lower right-hand section of the
onscreen keypad. To enter a numerical value, use the
numbers provided in the top row of the keypad. Choose
from the mathematical functions available in the
bottom row. When finished, click Save.
Example: Suppose you had a device that reads data in
meters, and for data display and logging, you wanted to
convert this to feet. To configure DataNet OPC to carry
out the conversion automatically, first click the OPC
button. Then, click the * button to multiply. Next, click
3.28 on the keypad. Refer to prior page for image
showing this looks like in the Use Math function field,
in the Edit Row configuration page . Finish by clicking
the Save button.
31
DataNet OPC User Manual
5.4 Row-Logging Configuration
In addition to displaying data conveniently on a Web page,
DataNet OPC also enables the user to log data into a text
file for archival purposes. The user is able to specify which
sets of data will be logged, and at what time interval. The
software also comes complete with a useful trigger
command option, which allows the user to specify that data
be logged only at certain times or under certain conditions.
Note: Logging options are configured for each individual row; not
for the entire table.
To configure the row-logging function, first open the main
Configuration page, by clicking Configure in the lower
right-hand corner of the DataNet OPC page:
32
DataNet OPC User Manual
Assuming the page has been configured for at least one row
of data, a main DataNet OPC Configuration page similar
to the one below will open:
Choose the row you would like to keep a data-log file on
and click Edit Logging:
33
DataNet OPC User Manual
The DataNet OPC Configuration - Edit Row Logging
page, similar to the one below, will open.
Below is a description of each field on the DataNet OPC
Edit Row Logging configuration page.
Row Name: Displays the row’s user-given label.
None: If set, data from this row will not be logged.
Timed Interval: If set, the user may specify how often data
is to be logged, for that particular row, by days, hours,
minutes and/or seconds. For example, if the data is to be
logged every hour and a half, the user would enter “1” in
the HH field, and “30” in the MM field, while leaving a 0
in the DDDD and SS fields.
34
DataNet OPC User Manual
Trigger: If set, the user may control the DataNet OPC’s
trigger command option, by specifying that data be logged
only at certain times or under certain conditions. Using the
OPC Server and Trigger fields, the user will locate the
correct OPC server and related tag, and specify the trigger
which will command data logging to take place. The trigger
must consist of a data change from 0 to 1 in order to
activate data logging. Once data has been logged, the
trigger will reset to 0 to notify the device that logging has
successfully occurred. This feature is especially useful if the
user needs data to be logged only under certain conditions,
such as whenever a shift has ended, or when a conveyor belt
is empty.
Data Logging Options: This section allows the DataNet
OPC user to configure how the actual text files will be
handled during the data-logging process.
New Data File Cycle: Specifies how often the
DataNet OPC Server will create a new file for the
PLC data. Information may be logged into one
large file or several smaller files. The following
options are available: Daily, 2 Shifts, 3 Shifts,
Monthly, Yearly and Never (one file). The user
may specify that all logged data be kept in a single
file by selecting “Never (one file)."
Start Time or Shift 2 Start Time:
• When the New Data File Cycle is set to “Daily,”
then a field labeled “Start Time” will be available.
The time entered into the Start Time field indicates
at what time on a daily basis a new data log file will
be created.
35
DataNet OPC User Manual
• When the New Data File Cycle is set to “2
Shifts” or “3 Shifts,” then a field labeled “Shift 2
Start Time” is available. The user will specify the
start time of the 2nd shift and is used to calculate
the start times of any other shifts, with each shift
lasting 12 hours for the “2 Shifts” option and 8
hours for the “3 Shifts” option. For more details
on this field, refer to the Shift Information chart
on Page 37.
Field Separator: In this field, the user will choose to use
either commas or tabs to separate individual fields.
Archive: The user may choose to create and store an
archived ZIP file on a daily, monthly or yearly basis.
When archiving on a daily, monthly or yearly basis, the
user may also specify the location in which to create the
ZIP file.
If the Local Folder option is set, then the user will
enter a local path on the DataNet OPC Server.
If the FTP Folder option is set, then the user will
fill in the FTP Folder, User Name and Password
fields.
The user also may opt to never archive the
log files by choosing “None.”
Delete: The user may specify how often, if ever, to delete
the log files. Log files may be deleted on a daily,
monthly or yearly basis. The user may also opt to never
delete the log files by choosing “None.”
36
DataNet OPC User Manual
Log Date/Time: When set, DataNet OPC will log the
date and time for the PLC data in the data file.
Log Headers: When set, DataNet OPC will log the Web
page column headers in the data file.
Shift Information
The Shift Information table below provides five examples to
illustrate how each combination of the “New Data File
Cycle” field and the “Start Time” or “Shift 2 Start Time”
field determines each shift’s start and end time.
Example New Data
Number File Cycle
(1)
Daily
Start Time Shift 2
(Today)
Start Time
(Today)
Midnight n/a
(2)
Daily
Noon
n/a
1
Noon
(24 hours) Today
11:59 AM
Tomorrow
(3)
2 Shifts
n/a
8:00 AM
1
8:00 PM
(12 hours) Yesterday
7:59 AM
Today
2
8:00 AM
(12 hours) Today
7:59 PM
Today
1
(8 hours)
Midnight
Today
7:59 AM
Today
2
(8 hours)
8:00 AM
Today
3:59 PM
Today
3
(8 hours)
4:00 PM
Today
11:59 PM
Today
1
(8 hours)
10:00 PM
Yesterday
5:59 AM
Today
2
(8 hours)
6:00 AM
Today
1:59 PM
Today
3
(8 hours)
2:00 PM
Today
9:59 PM
Today
(4)
(5)
3 Shifts
3 Shifts
n/a
n/a
8:00 AM
6:00 AM
Shift # and
Duration
(hours)
1
(24 hours)
Shift Start
Shift End
Time and Day Time and Day
Midnight
Today
11:59 PM
Today
37