1
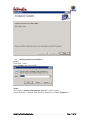
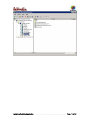
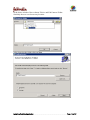
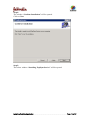
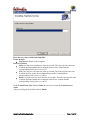
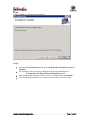
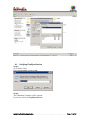
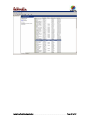
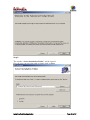
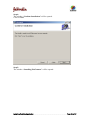
APPS-FABINDIA OVERSEAS PVT.RETAIL-FPP
USER MANUAL
Installing Fopl Erp Application
Version 1.0
13th April, 2009
Submitted to
Prepared By
Wipro Limited
Document Details
Project Name
APPS-FABINDIA OVERSEAS PVT.RETAILFPP
Account
Fabindia
Current Version
List of Contributors
Wipro and Fabindia
Customer Contact Information
Prepared By
Krishna Mohan K
Software Engineer
Wipro
Reviewed By
Approved by/Date
A Ravi Sankar
Revision History
Version
Date
1.0
13th April, 2009
Description of
Change
Reason for change
Affected Sections
Initial Version
Copyright Acknowledgment
Any registered names, trademarks and logos used in this document remain the property
of the owning respective companies or organizations concerned.
Disclaimer
The documentation is prepared based on the specifications and requirements specified or
disclosed to Wipro Limited by Fabindia.
Installing Fopl Erp Application
Page 2 of 27
TABLE OF CONTENTS
1
INTRODUCTION......................................................................................................................... 4
2
PRE-REQUISITES ....................................................................................................................... 4
3
FOPLSERVERSETUP. ................................................................................................................ 5
3.1
4
FOPLSYNCSERVICESETUP .................................................................................................. 12
4.1
5
VERIFYING FOPLSERVER INSTALLATION ............................................................................. 10
VERIFYING FOPLSYNCSERVICE ........................................................................................... 19
FOPLSMARTCLIENTSETUP ................................................................................................. 21
5.1
VERIFYING FOPLSMARTCLIENTSETUP ................................................................................. 26
Installing Fopl Erp Application
Page 3 of 27
1 Introduction
This document will take the users through stepwise procedure in installing the Fopl
Erp application.
2
Pre-Requisites
1. IIS should be installed
2. .Net Framework 3.5 should be installed
3. SQL Server 2005 should be installed.
4. First IIS has to be enabled, and then .Net Framework 3.5 should be installed.
5. If .Net Framework 3.5 is installed before IIS, then Foplservice may not run. In
such case we need to run a command in command prompt.
C:\WINNT\Microsoft.NET\Framework\v2.0.50727\aspnet_regiis –i
6. After installing FOPLServer Go to IIS and browse the Service1.svc file (Not a
pre-requisite should be checked after installing FoplServerSetup)
The user should be able to see the below page.
Instead of this if it is redirecting to any other page, then remove that redirect
url.
Installing Fopl Erp Application
Page 4 of 27
3 FoplServerSetup.
Fopl Server Set up:
Step 1:
Double click on FoplServerSetup exe file
Click on Run
Step 2:
Installing Fopl Erp Application
Page 5 of 27
The window “Welcome to the FoplServer Setup Wizard” will be opened.
Click on Next
Step 3:
The window “confirm Installation” will be opened.
To confirm the installation click on Next
Installing Fopl Erp Application
Page 6 of 27
Step 4:
The window “Installing FoplServer” will be opened.
Here the user can see different fields like:
Installing Fopl Erp Application
Page 7 of 27
Server Name: Server name means Database Server Name (Database server name
will be the <computer name>/<Instance Name>
for example: FabIndia/SQLExpress).
Database Name: The name of the Database to which the application is
connecting.
User Name: User name for connecting to the database.
Password: Password for connecting to the Database
After providing the details click on Next.
“Please Confirm” window will be opened.
Click on Yes to continue
Step 5:
After clicking on yes the user can see the below window:
Here the user can see three different entities namely:
MRW
SRC and
STORE
For example if user wants to set up the machine as MRW Server.
Then follow below procedure:
Installing Fopl Erp Application
Page 8 of 27
Select MRW and then Select MRW Code dropdown and select the MRW
Code.(For example I’m selecting MRW3)
Finally after selecting click on Finish
Step 6:
The below window “Installation Complete” will be opened.
The Installation is complete and the user can click on Close, to complete the
installation
Installing Fopl Erp Application
Page 9 of 27
3.1
Verifying FoplServer Installation
Step 1:
Goto Start -> Run
Enter inetmgr and click on OK.
Step 2:
The window “Internet Information Services” will be opened.
Under Web sites-> Default Web Site there should be our folder FoplServer
Installing Fopl Erp Application
Page 10 of 27
Installing Fopl Erp Application
Page 11 of 27
4 FoplSyncServiceSetup
Step 1:
Double Click on FoplSyncServiceSetup EXE file.
Click on Run
Step 2:
The window “Welcome to the FoplSyncService Setup Wizard” will be opened.
Click on Next
Installing Fopl Erp Application
Page 12 of 27
Step 3:
The below window “Select Installation Folder” will be opened.
Here the user can select the path where the FoplSyncService has to be installed by
clicking on Browse.
Installing Fopl Erp Application
Page 13 of 27
In the below window I have chosen E drive and FabConnect Folder.
Similarly the user can choose any location.
After choosing the folder click on Next
Installing Fopl Erp Application
Page 14 of 27
Step 4:
The window “Confirm Installation” will be opened.
Click on Next
Step 5:
The below window “Installing FoplSyncService” will be opened.
Installing Fopl Erp Application
Page 15 of 27
Here the user can see different fields like:
Entity Details:
Fopl Server: Name of the computer
Interval Updates:
Data: here the user can enter the time in seconds. The time specifies the time
in which the Data updates has to happen between the Central and the
corresponding entity (store, src, mrw).
File: here the user can enter the time in seconds. The time specifies the time
in which the File update has to happen between the Central and the
corresponding entity (store, src, mrw).
Batch: here the user can enter the time in seconds. The time specifies the time
in which the Batch update has to happen between the Central and the
corresponding entity (store, src, mrw).
In the Central Data Sync Server Name the user has to enter the Central Server
name.
After providing all the details click on Finish.
Installing Fopl Erp Application
Page 16 of 27
If the server is not able to communicate with the central server then you will get
the below message
If you want to continue then click on yes, installation will be completed.
Note: Once the installation is completed, we need to manually enter the
Central Server name in FoplDataSyncConfig file in the below node.
<endpoint address="net.tcp:// <Central Server
name>:57166/FoplDataSyncService" />
Installing Fopl Erp Application
Page 17 of 27
Step 6:
Click on Close to complete the installation.
Step 7:
After Installing FoplSyncService go to the path where FoplSyncService is
installed.
For Example if the user has not changed the path, then default path is
C:\Program Files\Wipro Infotech\FoplSyncService
After navigating to that path, the user can see a folder named “download”.
Give full sharing permission to everyone for that folder as shown below.
Installing Fopl Erp Application
Page 18 of 27
4.1 Verifying FoplSyncService
Step 1:
Go to Start-> Run
Enter services.msc and press ok.
Step 2:
The “Services” window will be opened.
In services search for FoplSyncService.
Installing Fopl Erp Application
Page 19 of 27
Installing Fopl Erp Application
Page 20 of 27
5
FoplSmartClientSetup
Step 1:
Double click on FoplSmartClientSetup EXE File.
Click on Run.
Step 2:
The below window “Welcome to the FabConnect Setup Wizard” will be opened.
Click on Next.
Installing Fopl Erp Application
Page 21 of 27
Step 3:
The window “Select Installation Folder” will be opened.
Here the user can select the path or simply click on Next.
Installing Fopl Erp Application
Page 22 of 27
Step 4:
The window “Confirm Installation” will be opened.
Click on Next
Step 5:
The window “Installing FabConnect” will be opened.
Installing Fopl Erp Application
Page 23 of 27
Here the user has to enter the Fopl Server Name.
Fopl Server Name is the name of the Server where the application is installed.
After entering the Fopl Server Name click on Next.
Installing Fopl Erp Application
Page 24 of 27
Step 6:
POS Configuration is enabled for Stores and disabled for SRC/MRW. Need to select
the till codes for stores, if POS configuration is not required then tick the checkbox
then till codes will be diabled and you can continue the installation. Click on Finish to
continue the installation
Step 7:
Click on Close to complete the installation.
Installing Fopl Erp Application
Page 25 of 27
5.1
Verifying FoplSmartClientSetup
After Successful installation of FoplSmartClientSetup, we can see the FabConnect
Short cut image.
Double click on it.
Installing Fopl Erp Application
Page 26 of 27
The Login window will be opened.
Enter the credentials and use the application.
Installing Fopl Erp Application
Page 27 of 27