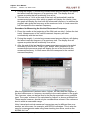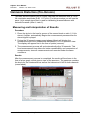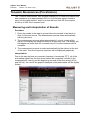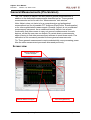
1
Adjust+: User Manual
File:
Author:
Revision:
Usermanual.doc
ProgTec GmbH / Dr. Feickert Analogue
Version 1.5, 2012-12-04
User Manual
www.adjust-plus.com
www.feickert.com
© 2012 Dr. Feickert Analogue / ProgTec GmbH
www.progtec.ch
Page 1 of 68
Adjust+: User Manual
Revision:
Version 1.5, 2012-12-04
Copyright © 2008-2012 Dr. Feickert Analogue / ProgTec GmbH. All rights
reserved.
Windows® is a registered trademark of Microsoft Corporation.
All brands and trademarks mentioned in this book are registered to the owners
respectively and should be regarded accordingly.
Any changes or distribution of information given in this document is prohibited if
there is no authorization given by the owner of copyright.
Distribution of this documentation or any part of this documentation in written or
digital form for commercial use is prohibited without permission by the owner of
copyright.
This documentation makes no claim of being complete. The author neither
claims the documentation to be free of errors nor that the contents match your
application. Furthermore the author doesn’t give a warranty for the correctness
of the contents of this documentation as long as there is no grossly negligent or
deliberate conduct. Any and all parts or this document are subject to change
without prior notice.
© 2012 Dr. Feickert Analogue / ProgTec GmbH
Page 2 of 68
Adjust+: User Manual
Revision:
Version 1.5, 2012-12-04
Table of Contents
TABLE OF CONTENTS...................................................................................................................................... 3
INSTALLATION .................................................................................................................................................. 5
SYSTEM REQUIREMENTS ..................................................................................................................................... 5
SETUP / INSTALLATION ....................................................................................................................................... 5
Setup .............................................................................................................................................................. 5
LICENSING .......................................................................................................................................................... 8
Upgrade to "Pro" .......................................................................................................................................... 9
CONTROLS ........................................................................................................................................................ 10
MAIN WINDOW ................................................................................................................................................. 10
CONFIGURATION............................................................................................................................................ 11
AUDIO HARDWARE (SOUND CARD) .................................................................................................................. 11
Configuration under Windows®................................................................................................................... 11
Connecting a Turntable to Your Computer ................................................................................................. 13
Configuration Within Adjust+ ..................................................................................................................... 13
Adjusting Input Signal ................................................................................................................................. 14
Calibration of Inputs ................................................................................................................................... 17
Special Settings for Creative® SB Surround 5.1 (USB) Æ aka "Live! 24-Bit External" in the United States
..................................................................................................................................................................... 18
USER INFO ........................................................................................................................................................ 19
AZIMUTH-SETUP – OR - GET IT PERPENDICULAR! ............................................................................. 20
A DEEPER LOOK INTO..... ................................................................................................................................... 20
HOW TO?........................................................................................................................................................... 21
WHAT FOR?....................................................................................................................................................... 26
WHY THIS WAY? ............................................................................................................................................... 27
DISCUSSION OF RESULTS ................................................................................................................................... 28
a) DENON DL-103...................................................................................................................................... 28
b) DENON DL-103R ................................................................................................................................... 29
c) EMT JSD-6.............................................................................................................................................. 29
d) RESON Aciore......................................................................................................................................... 30
e) LYRA Dorian ........................................................................................................................................... 31
f) Lyra Skala ................................................................................................................................................ 31
g) ORTOFON Vinyl Master Silver .............................................................................................................. 32
h) ORTOFON Venice .................................................................................................................................. 32
i) ZYX R100 YATRA..................................................................................................................................... 33
j) ZYX Ayame............................................................................................................................................... 33
k) Goldring 1006 ......................................................................................................................................... 34
FINAL CONCLUSION........................................................................................................................................... 34
QUICK SETUP ASSISTANCE ............................................................................................................................... 35
SPEED ANALYSIS............................................................................................................................................. 36
DISPLAY OF FREQUENCY AND RPM.................................................................................................................. 36
WOW & FLUTTER ANALYSIS ............................................................................................................................ 37
Evaluation ................................................................................................................................................... 37
Visualization of the speed chart................................................................................................................... 37
FREQUENCY RESPONSE ............................................................................................................................... 39
SINE-SWEEP METHOD ........................................................................................................................................ 39
Accuracy...................................................................................................................................................... 40
PINK NOISE METHOD (PRO-VERSION) .............................................................................................................. 40
CALIBRATION (PRO-VERSION) ......................................................................................................................... 41
Linearity of Measuring Process .................................................................................................................. 41
Capturing a Calibration Curve ................................................................................................................... 42
© 2012 Dr. Feickert Analogue / ProgTec GmbH
Page 3 of 68
Adjust+: User Manual
Revision:
Version 1.5, 2012-12-04
Standard Calibration................................................................................................................................... 43
RESONANCE FREQUENCY (FRES) ................................................................................................................ 44
FIRST, SOME THEORY... .................................................................................................................................... 44
MEASURING AND INTERPRETATION OF RESULTS .............................................................................................. 44
HARMONIC DISTORTION (PRO-VERSION).............................................................................................. 46
MEASURING AND INTERPRETATION OF RESULTS .............................................................................................. 46
Procedure .................................................................................................................................................... 46
Results ......................................................................................................................................................... 46
TONEARM RESONANCES (PRO-VERSION) .............................................................................................. 48
MEASURING AND INTERPRETATION OF RESULTS .............................................................................................. 48
Procedure .................................................................................................................................................... 48
Interpretation............................................................................................................................................... 48
GENERAL MEASUREMENTS (PRO-VERSION) ........................................................................................ 50
SCREEN VIEW .................................................................................................................................................... 50
DIFFERENTIAL INPUT ........................................................................................................................................ 51
FFT................................................................................................................................................................... 51
Settings ........................................................................................................................................................ 51
Display......................................................................................................................................................... 52
Peak-Hold.................................................................................................................................................... 52
NOISE ANALYSIS ............................................................................................................................................... 53
Configuration .............................................................................................................................................. 53
Recording .................................................................................................................................................... 54
Analysis ....................................................................................................................................................... 54
FREQUENCY ANALYSIS ..................................................................................................................................... 55
Current frequency and phase shifts ............................................................................................................. 55
Recording .................................................................................................................................................... 55
Analysis ....................................................................................................................................................... 55
GENERAL FUNCTIONS .................................................................................................................................. 58
INPUT SCOPE ..................................................................................................................................................... 58
Zoom............................................................................................................................................................ 58
Unzoom........................................................................................................................................................ 58
Input freeze .................................................................................................................................................. 58
SAVE RESULTS TO FILE ..................................................................................................................................... 58
PRINT AND EXPORT REPORTS ........................................................................................................................... 59
Printer ......................................................................................................................................................... 59
Export to PDF ............................................................................................................................................. 59
Branded Logo on Report-Header (Pro-Version)......................................................................................... 60
RESULT INFORMATION ...................................................................................................................................... 60
EXPORTING GRAPHICS AND CURVES................................................................................................................. 61
INFO SCREENS ................................................................................................................................................... 61
ZOOMING RESULT GRAPHICS ............................................................................................................................ 62
Zoom-in ....................................................................................................................................................... 62
Zoom-out ..................................................................................................................................................... 62
CHANGE LANGUAGES ....................................................................................................................................... 62
OFFLINE ANALYSIS WITH WAV FILES (PRO-VERSION) .................................................................................... 62
Recording of input signal ............................................................................................................................ 62
Playback of recorded files ........................................................................................................................... 63
APPENDIX.......................................................................................................................................................... 64
AUDIO TRACKS ON ADJUST+ CD ...................................................................................................................... 64
LICENSE AGREEMENT ......................................................................................................................................... 65
© 2012 Dr. Feickert Analogue / ProgTec GmbH
Page 4 of 68
Adjust+: User Manual
Revision:
Version 1.5, 2012-12-04
Installation
System Requirements
Operating System:
Windows XP SP3 Home/Pro, Windows Vista™ 32/64
Home/Pro/Ultimate, Windows 7 Home/Pro/Ultimate
32/64, Windows 8 32/64
Processor:
Intel® Pentium® 4 with 2 GHz or AMD® Athlon® 2000+
recommended: Dual Core Processor
Sound Card:
HD Audio with 24Bit / 96kHz sample-rate
Recommended: additional internal sound adapter
(PCI) or external sound card (USB 2)
RAM:
1GB
Graphics:
resolution of at least 1024x768 pixels (1024x600 in
Netbook mode)
Hard Drive:
30 MB free space on hard drive
Misc.:
1 free USB 2.0 port for connecting the USB stick
containing the application’s license info.
Adobe® Reader® required to display instructions
Setup / Installation
Adjust+ can easily be installed with the installer on the CD and can easily be
uninstalled.
Setup
1. Insert Install-CD into your CD-Rom drive.
2. If AUTOSTART is activated on your computer, the startup program will start
automatically. If AUTOSTART is not activated, please open the CD/DVDdrive with the installation CD with Windows® Explorer and double-click on
"ApSetupStarter.exe":
3. The startup-program automatically selects the correct language settings of
your computer given by the operating system. Language settings can also
be changed manually.
© 2012 Dr. Feickert Analogue / ProgTec GmbH
Page 5 of 68
Adjust+: User Manual
Revision:
Version 1.5, 2012-12-04
4. If you do not have Adobe Reader installed, it is recommended to do this
now. Note: Adobe Reader is necessary to view User Manual.
5. Start installation by selecting the first radio button:
Click on "Next"
6. Read the license agreement carefully and confirm by clicking on the
checkbox.
If you disagree with this license agreement cancel the installation by clicking
on “Cancel.”
7. Choose the installation directory for the program files. In most cases the
recommended directory is ok for installation:
© 2012 Dr. Feickert Analogue / ProgTec GmbH
Page 6 of 68
Adjust+: User Manual
Revision:
Version 1.5, 2012-12-04
8. Choose file folder in “Program Files” in which Adjust should be placed in the
START menu. You can also choose which users will have access to
Adjust+:
© 2012 Dr. Feickert Analogue / ProgTec GmbH
Page 7 of 68
Adjust+: User Manual
Revision:
Version 1.5, 2012-12-04
9. Click on "Next" to start the actual installation:
10. After successful installation and before starting the application, please plug
the USB stick containing the program's license into a free USB 2.0 port of
your computer.
Licensing
Included in the scope of delivery you get an USB Flash-Drive (USB Memory
Stick) with preinstalled license for Adjust+ (Æ USB Key).
Note: In order to use Adjust+, the USB stick MUST be plugged into one of
the USB connectors of the computer you want to run Adjust+ with.
USB key licensing offers the following advantages to the customer:
•
Adjust+ can be installed on numerous computers (but can be run on the
computer with plugged in license stick only).
•
License migration to other computers now is possible with ease.
•
In case you need to reinstall the OS (Operating System), license is not
invalidated anymore.
The USB Key must be plugged prior to start of Adjust+. In case the key is not
plugged-in, you will get an error message and Adjust+ only displays the info
screen.
In case of plugging the USB-Key after starting Adjust+ you need to restart the
software – „on runtime“ plugging is not supported by the software. The USB Key
needs must not be removed during operation.
After plugging the USB Key, the OS will take a few seconds to bind the USB
stick. In case of first time plugging, typically Windows® installs the necessary
drivers. This may take some additional time. After successful installation,
Windows® typically signals completion. All drivers necessary to run the USB
stick come along with Windows® OS.
After Windows® has assigned a drive letter to the USB stick, Adjust+ is able to
read the license information. Drive letter is of no importance.
© 2012 Dr. Feickert Analogue / ProgTec GmbH
Page 8 of 68
Adjust+: User Manual
Revision:
Version 1.5, 2012-12-04
CAUTION: The shipped USB Key is a USB Flash Drive, which is handled as a
removable drive within Windows®. Never ever delete any data from this USB
drive and never ever perform any formatting on it! Deleting automatically
invalidates the license information of Adjust+!
Upgrade to "Pro"
In case you have purchased the "Home"-Version of Adjust+, you can easily
upgrade to "Pro" without having to replace the USB Key. To do so, please
perform the following steps:
1. Order an upgrade license (e.g. online at http://shop.adjustplus.biz).
2. Launch Adjust+ and switch to tasks screen "Configuration". There, click on
tab "application info".
3. Click on button "License Info…". A new dialog window pops up with current
license information stored on your USB-Key:
4. Please send the number given under "USB License ID" together with the
upgrade product key to [email protected]. To avoid mistakes in
retyping the "USB License ID" number we recommend to use the
copy&paste button on the right hand side of the number. You can safely
paste the information into your mail.
5. We return an upgrade key by e-mail (Key Token). Having this information,
please open the license information dialog again and click on "upgrade...".
The following dialog box will pop up:
Please enter the upgrade key number provided into the appropriate text field
("Upgrade Key") and click on "OK". Upgrade takes some seconds and after
completion you will get a confirmation message. Then, please relaunch Adjust+.
Now you have full "Pro" functionality!
© 2012 Dr. Feickert Analogue / ProgTec GmbH
Page 9 of 68
Adjust+: User Manual
Revision:
Version 1.5, 2012-12-04
Controls
Main Window
task window
input scope
task toolbar
task selection
© 2012 Dr. Feickert Analogue / ProgTec GmbH
cycle control
Page 10 of 68
Adjust+: User Manual
Revision:
Version 1.5, 2012-12-04
Configuration
Audio Hardware (Sound Card)
Configuration under Windows®
Proper audio-configuration in Windows is the basis for perfect interaction of
your sound interface with Adjust+. Possible and necessary configuration
parameters may vary from installation to installation depending on your
hardware configuration.
The sound interface typically used by Adjust+ is the standard sound interface
used by Windows. You can check this in Settings under "Sounds und Audio
Devices" (Windows XP):
Notice: for automatic calibration of the input port you need to connect the
optional loopback cable to the output of your standard sound interface (please
see below).
In most cases sound cards have more than one input (e.g. Line-In and Mic) for
recording. In this case you have to choose the correct input manually in the
Audio-Mixer or the active input is detected automatically by the software driver
of the sound card itself.
See the following example of what this looks like in Vista™:
© 2012 Dr. Feickert Analogue / ProgTec GmbH
Page 11 of 68
Adjust+: User Manual
Revision:
Version 1.5, 2012-12-04
On Windows 8, you get to he dialog shown above by typing the keys
"Windows+X" (which opens the tools menu) and then choosing "Settings".
Important Notes:
•
If you are able to or need to select the input in the mixer that is to be used,
do not select “what you hear” (or similar), rather select direct input (i.e. LineIn). “What you hear” not just what the signal coming from the Line-In itself,
rather it is the signal that is sent to the PC speakers, which consists of the
Line-In together with all of the additional sounds and interferences of your
system. The following is an example of the correct settings for Creative®
Sound Blaster® X-FItm Xtreme Audio (the Line-In on the right is selected) :
•
Other applications may interfere with and change mixer settings. Programs
such as Skype® can completely change settings.
It is therefore recommended that you end all programs which actively use
the sound card (particularly Skype® ) and that you check for correct mixer
settings every time that you use Adjust+.
© 2012 Dr. Feickert Analogue / ProgTec GmbH
Page 12 of 68
Adjust+: User Manual
Revision:
•
Version 1.5, 2012-12-04
Make sure to turn off all sound-effects in your sound card settings (for
example: CMSS or Crystalizer in Creative® ). Sound-effects can have a large
impact on the input signal--Adjust+, however, relies on a pure input signal.
You can change your sound card settings by going to the Control Panel in
Windows (for Creative®, in "Audio Console").
Connecting a Turntable to Your Computer
Connect the output of your Phono-Preamplifier directly to your PC. Alternatively,
you can also use the Recording Line-Out (Tape out), depending on your
turntable. Make sure that the amplifier does not introduce non-linearities into the
connection, as this can have negative influence, for example, when measuring
frequency response.
Please do not use the Microphone inpuut on your sound card. Use the input for
Line-in instead.
Microphones produce a significantly weaker output signal than Line-In devices
and as a result most microphone inputs have a higher sensitivity (input
amplifier). Connecting a Line-In (i.e. Phono-Preamplifier) device to microphone
input could result to a rapid over-amplification of the input signal and will
interfere with the accuracy of measurements. There are also sound cards which
have a combined Mic/Line-In input, and in this case this would be the input to
be used.
In either case, the input signal should be checked for proper amplification and
for over-amplification (see below).
Configuration Within Adjust+
When Adjust+ is started for the first time, a dialogue boy will appear for
selecting the desired sound card:
Here the hardware that is installed on your computer accordingly will appear.
In all installations the entry "Default" (Æ "Standard") will appear. This entry is a
placeholder for the sound card that is selected in the Control Panel for
recording.
© 2012 Dr. Feickert Analogue / ProgTec GmbH
Page 13 of 68
Adjust+: User Manual
Revision:
Version 1.5, 2012-12-04
If you choose “Default,“ then Adjust+ will use the sound card that is selected in
Sounds and Audio Devices in the Control Panel. A different audio device than
what is selected in Sounds and Audio Devices can also be chosen, enabling
you to use a different (or additional) device for Adjust+.
Please note that the selections only affect the inputs, and not the outputs (Æ
Calibration)
The sound card configuration for Adjust+ is accessed through the task window
“Configuration” under the tab “General”:
Here you can change the sound card settings (just as in the first start-up of the
program) by clicking on the button marked "...".
Alternatively, sampling of the inputs can be set to a lower frequency and a lower
bit rate can also be selected. The preferred setting, however, is of 24Bit at 96
kHz.
Please note: you will only achieve optimal results with the 24 Bit at 96 kHz
setting. While other selections are provided, the results attained are not
comparable to those at 24 Bit at 96 kHz.
Adjusting Input Signal
After successfully connecting the Phono-linkage to the PC and after having
correctly configured the sound card through Windows and through Adjust+, the
input signal must be optimally leveled.
Please note that the effective level of the signal that is fed into the sound card is
dependent on the output voltage of the cartridge as well as the amplification of
the Phono-Preamplifier. As a result, the balance of the input level must be
checked and, if necessary, adjusted.
Procedure (Values apply for 24 Bit fidelity):
1. First double check the connections as well as the sound card configuration
2. Put the Adjust+ Test Record on Side 1 and play track Nr. 2 (1 kHz stereo
0dB). All other tracks on this Test Record are cut with the same (or lower)
level as this signal.
© 2012 Dr. Feickert Analogue / ProgTec GmbH
Page 14 of 68
Adjust+: User Manual
Revision:
Version 1.5, 2012-12-04
3. You should then see a nicely formed sine wave signal on the input
oscilloscope:
4. In the mixer, adjust the input level of the Line-In with the bar, so that the
maximum value of the sine wave achieves an approximate value of
5,000,000 (5 Million).
Hint: In case you have many different cartridges and/or Phono-Preamplifiers,
you don’t have to adjust the balance every time. Find a “compromised
setting” with a cartridge with a relatively high output voltage. A value of
approximately 3,000,000 to 6,000,000 is always acceptable.
Beginning with version 1.50 of Adjust+, there's a new tab “Input Volume”
integrated into the task window “Configuration”. There you can adjust the input
level using the slider (see arrow).
Please make sure you selected "Default" or the correct input. The slider is
disabled if the selection doesn't match!
Following you find examples of how to adjust the input signal level using the
Windows® control panel. This may be necessary if the integrated slider doesn't
work properly.
Here is a sample screenshot of the level adjustment of an external Creative®
Sound Blaster® Surround 5.1 (USB) in Windows Vista™ (aka "Live! 24-Bit
External" in the United States):
© 2012 Dr. Feickert Analogue / ProgTec GmbH
Page 15 of 68
Adjust+: User Manual
Revision:
Version 1.5, 2012-12-04
In the Control Panel open “Audio“ , select the tab “Recording“ and double click
on the input to be set up. In the dialogue box appearing switch to the tab
“Levels”. Using the sliding bar the level of the “Line-In/Mic” can be adjusted.
For another example, see below for a screenshot of the level adjustment with
an external Creative® Sound Blaster® Surround 5.1 (USB) in Windows XP (aka
"Live! 24-Bit External" in the United States):
Open the Control Panel and select “Sounds and Audio Devices,“ select the
“Audio“ tab and click on “Volume” in the section under “Recording…”. In the
dialogue box that pops up you can adjust the volume by moving the sliding bar.
Possible problems:
© 2012 Dr. Feickert Analogue / ProgTec GmbH
Page 16 of 68
Adjust+: User Manual
Revision:
Version 1.5, 2012-12-04
•
Values above 8,000,000 can lead to clipping (cutting off peaks) and thus to
invalid measurement results.
•
If the signal peaks are still being clipped, even with the correct balancing
(approx. 5 Million), there is probably a voltage related over-modulation of the
sound card input.
Æ If the connection is to the Mic input, and the sound card has an
alternative input, connect the Phono-cable to the alternative input.
Æ If the connection is to the Mic input and the sound card does not have a
Line-In input, deactivate the optional microphone amplifier in the mixer.
Æ If you have a customizable Phono-Preamplifier, you can try to reduce the
amplification there.
Æ If the above solutions do not apply to your set-up, your only option is to
somehow weaken the input level, for example, by using resistors.
Calibration of Inputs
Note: A Loopback Cable (not included) is required to carry out the calibration
process described in the following steps.
Many sound cards will pose two potential issues:
•
Signal delay between the two input channels (left/right).Signal delay rarely
occurs, but can occur with many sound cards
•
Level difference between the two input channels (left/right). A small
difference in the levels between the left and right channels is common with
most sound cards, but normally exists in a relatively small range of +/0.2dB.
Both of the above mentioned effects can have a minimal impact on
measurement results, but using a loopback cable in the calibration process can
also help compensate for these effects.
During the calibration process Adjust+ sends a sine wave signal to the to the
sound card’s Line-Out, which combines both output channels and
simultaneously reads this signal. In carrying out this calibration process the
differences in timing and in the levels can be determined.
Important: In order for the calibration process to function correctly, the output of
the sound card, in which the 2 poled plug (mono) of the loopback cable is
inserted, must be configured as a standard output in the Sounds and Audio
Devices settings in the Windows Control Panel.
Procedure:
1. In the window “Configuration“ select the “Input Calibration“ tab.
2. Connect the Loopback-Cable to the Line-In and Line-Out ports of the sound
card. If there are multiple Line-Out ports, the “Front” channel should be
used.
3. Click on the button “Do Calibration...” and confirm in the following pop up
window.
© 2012 Dr. Feickert Analogue / ProgTec GmbH
Page 17 of 68
Adjust+: User Manual
Revision:
Version 1.5, 2012-12-04
4. Now the actual calibration begins, which only lasts a few seconds. During
this time a sine wave should be visible in the Input-Oscilloscope. If a sign
wave does not appear, then either the loopback cable is connected to the
wrong port, or the configurations in the control panel are not correct.
5. After completing the calibration process, a dialogue box will appear with the
results of any detected signal delay:
6. The calibration process is successful if the number of “Slopes detected“ is
around 3500. In this case you may apply the detected values. In order to
activate the calibration, click on the check box ("Compensate Channel Input
Delay"):
The calibration will then immediately take effect without restarting the
program. The results detected are saved and can be activated or
deactivated optionally by clicking on the checkbox.
7. A dialogue box showing the difference in channel levels becomes visible
after closing the confirmation dialogue box:
In order to activate the calibration, click on the check box (“Compensate
Level-Difference”). The calibration will then immediately take effect without
restarting the program. The results detected are saved and can be activated
or deactivated optionally by clicking on the checkbox.
Special Settings for Creative® SB Surround 5.1 (USB) Æ aka "Live! 24-Bit
External" in the United States
If you are using an external Creative® Sound Blaster® Surround®, make sure
that the green LED labelled “CMSS“ on the front of the device is not on.
If the LED is on, this feature can be turned off by button to the left of the LED.
This feature can be re-activated by re-installing the driver.
© 2012 Dr. Feickert Analogue / ProgTec GmbH
Page 18 of 68
Adjust+: User Manual
Revision:
Version 1.5, 2012-12-04
User Info
In the task window “Configuration” under the tab “Default User Info” you can
enter the details for your personal information and for your set-up. These will
then be included in further tasks carried out with the software:
© 2012 Dr. Feickert Analogue / ProgTec GmbH
Page 19 of 68
Adjust+: User Manual
Revision:
Version 1.5, 2012-12-04
Azimuth-Setup – or - get it perpendicular!
When it comes to cartridge alignment one of the very often asked questions is
about the azimuth. What’s that? Azimuth describes the geometrical tracking
position of the stylus in the grooves of the record.
A deeper look into.....
The cutter head writes its information into the vinyl-acetate or copper master in
a V-shaped groove of 90° angle. And this is what is the master for the records
produced later on. The stylus of the cartridge should losslessly follow this
engraved information. And this is why the geometry of the reading device – the
stylus – should be as accurately aligned to the grooves as possible....
Any chance to get this done? Well, a rule of thumb commonly spread
throughout the world is: „Place a mirror under the stylus, lower the
tonearm on the mirror surface and have a look from the front. Then
turn the cartridge so that the catridge body is in perfect alignment
with its mirror image“. So far so good. But is it the real position that
you are looking for?
Let’s first look at the geometrical facts:
2°
30 µm
elliptic shape stylus (FG-II)
straight line -> perpendicular
dotted line -> 2° CCW tilt
µm
12
µm
ra
diu
s
5
us
di
ra
µm
70
2°
µm
conical stylus
straight line -> perpendicular
dotted line -> 2° CCW tilt
6,3
15
µm
ra
di
us
30 µm
As you can easily see on the picture above the stylus contact area correlates
with the position of the stylus. BUT – as important is the fact that the generator
of the cartridge also is off the ideal working position. This means that additional
voltage is generated from one channel by the other – in other words:
CROSSTALK!
© 2012 Dr. Feickert Analogue / ProgTec GmbH
Page 20 of 68
Adjust+: User Manual
Revision:
Version 1.5, 2012-12-04
The crucial question now is: Is there any deviation of the stylus in correlation to
the body of the cartridge?
The bad news is – in most cases YES! The good news is – we can measure
and compensate this.....
How to?
When you launch Adjust+ you will see this window
Please read the information given on this task and/or press the Close button.
What is the procedure like? Well, we don’t know the position of the stylus within
the cartridge body when we buy a brand new cartridge. One can guess or better
measure. How to? Best is to do it like a scientist does - SYSTEMATICALLY!
The procedure is pretty simple and will not take much more longer than half an
hour. First you need to look at your tonearm carefully and find out how the
azimuth can be changed. Lucky guy you are if you can find a little grub screw
on your tonearm that allows you to twist the tonarm in a defined way.... Some
tonearms offer screws on the headshell that can be carefully loosened and let
you twist the headshell. So this is the first thing you have to find out. If it is not
abvious how to do it please reffer to your tonearm manufacturer’s manual.
Once it is clear how to alter the azimuth you can start. Let’s have a look how
this can work out on a Kuzma tonearm. On the first picture you can see the
three screws used to adjust azimuth on a KUZMA 4Point. The Kuzma offers a
very nice way to tweak the HTA (azimuth). Once the HTA is adjusted properly
you can fix the tubing with the two grub screws on the top – simple, easy and
very effective.
© 2012 Dr. Feickert Analogue / ProgTec GmbH
Page 21 of 68
Adjust+: User Manual
Revision:
Version 1.5, 2012-12-04
Ok, the initial position you will have if you never have changed anything looks
on a Kuzma like this. There are marks on the tubing that indicate tilt of the
tubing vs. the bearing assembly of the tonearm. This can be very helpfull.
So the first thing we should do now is to find out if the tonearm is level or not.
So we have to place the supplied spirit level on a reference point on the
tonearm we have to choose. Why do so? Well, bear in mind that we want to
© 2012 Dr. Feickert Analogue / ProgTec GmbH
Page 22 of 68
Adjust+: User Manual
Revision:
Version 1.5, 2012-12-04
make a series of measurements that should be reproducable. So once we have
found a perfect setting for azimuth we want to be able to find it again with ease.
Therefore we have to take care that this chosen reference point perfectly
correlates with the tilt of the headshell / arm tubing or whatever can be turned
on your tonearm. In most cases this will be the headshell. And this is the point
of our focus. In general we highly appreciate if you try to place the spirit level a
couple of times to make sure you always achieve the same results;)
So on the KUZMA it will look like this (left hand standard, right hand enhanced
spirit level)
So everything seems to be ok. Typically we start to turn the cartridge
counterclockwise (CCW) and set at 2°, which translates into +2°. The opposite
direction is clockwise (CW) and goes to the extreme value of –2° (the software
offers to visualize up to +/-2.5°). The enhanced spirit level offers a wider range
of measuring as you can see on the photo. Only in a few cases it is necessary
to set beyond theese two extreme positions....
Having chosen one of the two extreme positions it’s time to start measuring.
Short hint: Mind your cartridge is not capable of handling unlimited high tracking
forces. Please remove the spirit level from the tonearm before you start
measuring! Also never put the spirit level on the headshell as long as the
cartridge is not in armrest position! Also take care you don’t kill the cartridge by
heading the cantilever in case the spirit level accidentally falls down.... Another
messy thing could be the spirit level falls down on the record and causes
scratches. Please take care of your equipment!
© 2012 Dr. Feickert Analogue / ProgTec GmbH
Page 23 of 68
Adjust+: User Manual
Revision:
Version 1.5, 2012-12-04
Play track 2 on face A (as shown above) and the software detects the test
signal automatically and data recording starts.
First it measures stereo balance between the two channels. Then it detects
crosstalk and phase response from left to right channel on track 3 and on track
4 it records crosstalk and phase information from right to left. End of data
recording again is detected automatically. But you can stop data recording
pressing the „Finish Cycle“ button.
© 2012 Dr. Feickert Analogue / ProgTec GmbH
Page 24 of 68
Adjust+: User Manual
Revision:
Version 1.5, 2012-12-04
When the end of the track is detected a window pops up asking you for the
value of the azimuth you had set.
We recommend to measure in steps of 0.5° but to speed up the whole
procedure you can also choose 1° steps. The first case leads to more accurate
results and resolves the optimum value of azimuth better than the latter. So you
have to repeat this procedure at least 5 times or 9 times worst case.
But how do we get the information we want? Pretty simple by pressing the
button „Measurement Charts“ right hand of the „Acrobat“ button. A new window
will pop up and shows the recorded data in a plot of phase response (plot on
top) and crosstalk levels (plot on bottom).
Ok, now we can see what we have obtained but what do those figures mean?
We can see that on the plot on top the phase reponse curves intersect at
around +0.5° (0.5° CCW). Also you can see that at exactly the same 0.5° the
© 2012 Dr. Feickert Analogue / ProgTec GmbH
Page 25 of 68
Adjust+: User Manual
Revision:
Version 1.5, 2012-12-04
crosstalk curves cross each other as well showing perfectly symmetrical
crosstalk. That’s the information we are looking for. The only thing you have to
do is to set HTA at 0.5° CCW and there you go.
You easily can extend your series of measuring to find perfect position saving
the resluts marking the „undefined“ check box in the pop up window.
What for?
The answer is pretty simple. Just have a look again at the first picture showing
stylus geometry within the groove of the record.
Elliptic stylus (and their derivatives):
•
The elliptic shape of the stylus causes that if tilt the contact area with the
vinyl is not the same on both sides of the groove. This means that you
have different pressure applied from the stylus to the vinyl on left and
right channel. It is obvious that this fact leads to higher wear on the vinyl
on the channel with lesser contact... Not only that: Much more you get
much more higher amount of crosstalk, higher distortions and less
trackability.
Conical stylus:
•
The conical shape has an advantage over the elliptical shape. It is the
fact that even if being heavily out of position contact area of both
channels always is the same. This means that trackability and distortions
are not that heavily depending on perfect position of the stylus. But this is
the only good news. The contact area with the vinyl is far less and
resolution of high frequency is heavily limited especially towards the end
of the record where the engraved wavelength of high frequencies is
getting shorter and the radius of the stylus is no more small compared to
the length of the wave train...
•
Also it is obvious that as a result out of the smaller contact area the
applied force to track the information needs to be higher. This leads to
higher pressure and more wear.
© 2012 Dr. Feickert Analogue / ProgTec GmbH
Page 26 of 68
Adjust+: User Manual
Revision:
Version 1.5, 2012-12-04
Why this way?
You may ask yourself if there is no easier way to get the job done. Well, there
are tips out there telling you that azimuth can be adjusted using a multimeter.
Sure in some cases this might work. But only if your cartridges shows an
intersection in crosstalk exactly at the phase crossing point. Let’s have a look at
the following series of 3 graphs:
Despite theese plots are a little small we immediately can see the three curves
of the phase response are nearly identical. Ok? Well, the only difference we see
is that the intersection points are different in height. Left hand they intersect at
60°, center is around 80° and right hand it is 90°. Now we look at the crosstalk
plots and yes, they look completely different. Left hand we have an intersection,
middle – ahm, hard to say, and right hand? Forget it... So this must have been
different cartridges! No, bad news. It is always the same cartridge we
measured. The only difference from one series to the next was – VTA!
So the multimeter method will never ever give you a result with the settings on
the right hand side and with the settings chosen on the middle you also
will
only fool yourself. To give a little more information: The difference in VTA from
left to right was as listed
•
Left – VTA set that cartridge is level with record surface
•
Middle – VTA + 3mm
•
Right – VTA + 4mm
What’s the conclusion out of this? It clearly shows that the multimeter technique
brilliantly can misguide you and we easily could show other types of cartridges
that show similar behaviour.
© 2012 Dr. Feickert Analogue / ProgTec GmbH
Page 27 of 68
Adjust+: User Manual
Revision:
Version 1.5, 2012-12-04
Discussion of results
With the information already given we can start interpreting results. This chapter
shall show you how to get the information you are looking for
a) DENON DL-103.
Let’s look at the plot. Phase response intersects at +0.8° (CCW) with 110°,
crosstalk at +0.5°. Well, we recommend to choose +0.8° as the human ear
reacts more on the phase response than on the small gap in crosstalk levels of
2 dB. You can clearly see the large phase response deviation at „optical“
perpendicular position of about 70°. This will affect focus and imaging in a
negative way.
We have another DL-103 that gives results like that
Do we need to say more? At +1.4° (CCW) you gain an additional 7 dB in
channel separation. Intersection is at 110° phase angle.
© 2012 Dr. Feickert Analogue / ProgTec GmbH
Page 28 of 68
Adjust+: User Manual
Revision:
Version 1.5, 2012-12-04
b) DENON DL-103R
We have different 103R but we want to show you the most extraordinary one
This is what we call the perfectly manufactured and adjusted cartridge in terms
of azimuth. Intersection occurs at +0.1° giving a stunning 43 dB of channel
separation on both channels at 1 kHz. Also phase response indicates to set at
+0.25° - perfect!
c) EMT JSD-6
We have two different cartridges of the JSD6 (#3343 and #3344) that show
similar behaviour in phase response.
© 2012 Dr. Feickert Analogue / ProgTec GmbH
Page 29 of 68
Adjust+: User Manual
Revision:
Version 1.5, 2012-12-04
The first plot shows the azimuth to be +1.7° (CCW) off, the latter plot shows
+0.8°. Unfortunately the crosstalk balance between channels in the first case is
13 dB off assuming you adjust the cartridge in „optical“ upright position! As
phases do not differ that much in the region from 0° up to +2° on those
cartridges we recommend to adjust for balanced crosstalk levels: +1.1° in the
first and +0.75° in the latter case.
d) RESON Aciore
The RESON Aciore is a mid priced cartridge with a Fritz Gyger S stylus. As can
easily be read from the results the only usefull position of azimuth is –1.5°
(CW). Crosstalk balance from factory is 12 dB off....
© 2012 Dr. Feickert Analogue / ProgTec GmbH
Page 30 of 68
Adjust+: User Manual
Revision:
Version 1.5, 2012-12-04
e) LYRA Dorian
Guess which point to choose? +1! (CCW). From factory crosstalk balance is 11
dB off.
f) Lyra Skala
We have different Lyra Skala cartridges that show similar phase response. One
example we want to show you:
As you can see from the crosstalk levels you have an area from –1° (CW) up to
+0.8° (CCW) where it is hard to guess what to do. In this case the only valuable
information you can get from the phase response indicating to set at +0.25°
(CCW).
© 2012 Dr. Feickert Analogue / ProgTec GmbH
Page 31 of 68
Adjust+: User Manual
Revision:
Version 1.5, 2012-12-04
g) ORTOFON Vinyl Master Silver
A budget priced cartridge offering a perfect 34 dB of crosstalk attenuation if
adjusted correctly. In this case the situation is clear. Perfect azimuth you have
at +0.8° (CCW).
h) ORTOFON Venice
One of the higher priced cartridges from ORTOFON. Phase intersection
correlates with channel crosstalk balance offering 36 dB of crosstalk attenuation
at –1.4° (CW).
© 2012 Dr. Feickert Analogue / ProgTec GmbH
Page 32 of 68
Adjust+: User Manual
Revision:
Version 1.5, 2012-12-04
i) ZYX R100 YATRA
One can easily see that this cartridge is largely off azimuth. You get an
additional 10 dB of channel separation for free placing it at +2° (CCW). Phase
response is in nice correlation to this value.
j) ZYX Ayame
This cartridge is +0.5° off in azimuth. You can choose either phase or crosstalk
intersection. The points do match.
© 2012 Dr. Feickert Analogue / ProgTec GmbH
Page 33 of 68
Adjust+: User Manual
Revision:
Version 1.5, 2012-12-04
k) Goldring 1006
One can easily see that phase response shows two points where the curves
intersect. One cannot get valuable information from the phase response on that
cartridge. BUT: You can get perfect crosstalk balance close to the first phase
intersection at –0.8°.
Final conclusion
We can distinguish between three cases
1. phase response and crosstalk correlate and show intersection
2. crosstalk doesn’t show intersection but phase response does
3. phase response either does or doesn’t show intersection but crosstalk
does
In the first case the situation is clear. Typically intersection appears at similar
HTA positions.
In the second case one should choose the intersection point of the phases.
The latter case forces you to forget about phase response and you should
choose the crosstalk intersection point.
A fourth case has to be mentioned as well. Remember the curves obtained with
the EMTs. In case that phase difference between the two channels is small but
crosstalk level differ significantyl we suggest to look for balanced crosstalk level
and forget about the phase information.
© 2012 Dr. Feickert Analogue / ProgTec GmbH
Page 34 of 68
Adjust+: User Manual
Revision:
Version 1.5, 2012-12-04
Quick Setup Assistance
Due to their construction specific properties, different cartridges will have
significantly different characteristics. As a result, there are no simple or widely
applicable adjustment instructions. However, the settings for some popular
cartridges can be selected, which will speed up the optimization process. While
this Quick Setup Assistance can help even the most advanced user, it does not
replace the complete measurement process for cartridges with different angles.
You can activate the Quick Setup Assistance by selecting the corresponding
checkbox:
With the Quick Setup Assistance activated, Adjust+ will suggest the optimal
azimuth angle with an arrow.
© 2012 Dr. Feickert Analogue / ProgTec GmbH
Page 35 of 68
Adjust+: User Manual
Revision:
Version 1.5, 2012-12-04
Speed Analysis
Display of Frequency and RPM
The task window “Speed“ allows you to measure the speed of your turntable.
You can also adjust for correct speed, given your turntable has pitch control.
With Adjust+ speed can be set more precisely than with any strobe disk kit
available in the market. This task runs with the 3150 Hz test tone on face A,
track 1 of the test record. It can be used for either 331/3 or 45 RPM. For the
latter the frequency read is 4252 Hz.
The values for both - Hz and RPM - are shown in the task window. At the top of
the task view, Adjust+ is showing an animated indicator (moving bar) visualizing
the current speed value and its deviation from the average.
The rectangular area showing the symmetrical color gradient is covering a
range of +/- 1% of the current nominal speed (which is determined
automatically). For better orientation there are two fixed vertical limit bars at
±0.2% deviation to help interpreting the current speed. The black vertical
moving bar is updated in real time. At 3150 Hz it is positioned exactly in the
middle indicating nominal speed of 331/ RPM (additionally supported by the
arrow heads at the top and at the bottom).
As an additional help interpreting the speed deviation, the area crossed by the
moving bar over the last 2 seconds is shaded light gray.
© 2012 Dr. Feickert Analogue / ProgTec GmbH
Page 36 of 68
Adjust+: User Manual
Revision:
Version 1.5, 2012-12-04
Procedure:
1. Start the turntable at 331/3 RPM.
2. Play track 1 on side 1. The moving bar in the graphical indicator should be
walking around the middle reading 3150Hz (at 331/3 RPM) or a value as
close as possible. Due to unavoidable speed fluctuations the moving bar
should not to be expected in a fixed position.
3. Switch the record player to 45 RPM and play the same track again (3150
Hz). Æ The display should read 4252 Hz (at 45 RPM) or a value as close to
this as possible.
Wow & Flutter Analysis
At 331/3 RPM you can perform a speed analysis.
When Adjust+ detects 3150Hz it automatically starts speed analysis. This
analysis records the current deviations of the test signal over a 30 seconds
period. It then computes the deviation results according to DIN IEC 386
(formerly DIN 45507). The values are given in offset from 3150 Hz and the ±
deviation in % (e.g. ±0.07%) as well as in Hz. The measuring cycle is started
automatically and ends after 30 seconds (cycle length given by DIN/IEC). In
case of signal loss during the measuring cycle, the recording is aborted and the
data is being discarded. The automatic analysis of wow & flutter only starts
once (will do repeatedly in case of signal loss during the cycle) - if you wish to
repeat this process the previous values must be deleted by using the “RESET”
button.
Evaluation
The computation is done using two methods defined by DIN IEC 386: method
"2 Sigma" and method "dynamic" (Pro version only). Additionally the raw
minimum and maximum values of the speed recorded during the cycle are
displayed ("Max Deviation (raw)"). The results are shown in the table at the
bottom of the task view.
Please note: most vinyl records are not perfectly centered. You will often see
periodical fluctuations of speed at an interval of 1.8 seconds. This is exactly the
time for one revolution at 331/3 RPM. In order to mask these effects, the
recorded data is filtered using a steep 0.55Hz notch filter (results beneath
"Filtered at 0.55Hz"). But please bear in mind that problems with the turntable
bearing probably may also cause similar fluctuation patterns at 0.55Hz. These
are also attenuated by the notch filter. Both values – filtered and unfiltered - are
displayed.
You can also print/generate a report of the wow & flutter results.
Visualization of the speed chart
By pushing the toolbar button at the bottom, you can open the dialog window
showing the graphical speed chart:
© 2012 Dr. Feickert Analogue / ProgTec GmbH
Page 37 of 68
Adjust+: User Manual
Revision:
Version 1.5, 2012-12-04
Using the check boxes at the bottom, you can switch between filtered and
unfiltered data. In addition, you can add lines showing the calculated
symmetrical wow & flutter values according to IEC 386 for "2 Sigma" and
"dynamic" (Pro version only). The legend at the top right is naming the data
shown in the chart.
© 2012 Dr. Feickert Analogue / ProgTec GmbH
Page 38 of 68
Adjust+: User Manual
Revision:
Version 1.5, 2012-12-04
Frequency Response
The task window “Frequency Response“ displays the frequency response of audio
playback.
Sine-sweep method
The common method for measuring frequency response uses a sine-sweep
signal, which runs a constant level of 20 Hz to 20 kHz over a logarithmic time
scale.
The measuring process takes about 2 minutes.
Procedure:
1. Switch to the task window “Frequency Response.“
2. Place the record on side two and place the stylus in the lead-in groove
before the first track. The recording process starts automatically with a pilot
tone.
3. During the two minute recording process Adjust+ will display the measured
levels in a spectrum view. The display will not yet show the frequency
response curve as a whole, rather first in points (crosses). Over the course
of the measuring process the points will slowly constitute the full depiction of
the curve.
4. The pilot tone at the end of track 1 will automatically end the measurement
process and the frequency response will be displayed in the task window.
© 2012 Dr. Feickert Analogue / ProgTec GmbH
Page 39 of 68
Adjust+: User Manual
Revision:
Version 1.5, 2012-12-04
Note: The final curves are averaged in relation to the mean value and are
independent from the absolute levels of the system. The mean value over the
whole curve is redefined to be 0 dB. This way different cartridges can be
compared to one another much more easier.
In addition to the frequency response measurement, Adjust+ also gives the
maximum difference (minimum-maximum) in frequency response levels in dB
for the audio band from 35 Hz to 18 kHz.
Accuracy
Adjust+’s standard measuring capabilities are pre-calibrated to take system
inherent errors into account. In the standard version of Adjust+ linearity of the
phono-cable and the sound card used are not taken into account in this precalibration.
In the “Pro” version Adjust+ can be calibrated better to your individual system
with help of the calibration tone located in the Audio folder on the installation
CD. This can be done in two ways (see below):
Pink Noise Method (Pro-Version)
The “Pro“ version of Adjust+ has the capability to additionally measure
frequency response with a pink noise signal.
The test record also contains tracks which contain pink noise signals. Since the
energy distribution of pink noise is not linear over frequency, Adjust+ linearizes
this energy distribution with a calculation to compensate for these deviations
from linearity.
Procedure:
1. Switch to the task window "Frequency Response“
2. Activate the checkbox for the compensation for pink noise:
3. Place the record on side 1 and put the cartridge to the lead-in groove before
track 8 (large free space approximately in the middle of side 1).
4. When you hear the tone and see it in the oscilloscope, manually begin a
measurement cycle by clicking on the button "Start Cycle":
5. The measurement cycle will take 50 seconds, after which the cycle will
automatically stop. During the recording process Adjust+ displays the
measured levels in a spectrum view. The display will not yet show the
frequency response curve as a whole, rather first in points (crosses). Over
the course of the measurement process the points will slowly constitute the
full depiction of the curve based on the measured intensities.
Note: measuring with pink noise by default leads to more ripple in the frequency
response compared to results obtained with a sine sweep. The additional ripple
caused by this method is in the range of 1dB.
© 2012 Dr. Feickert Analogue / ProgTec GmbH
Page 40 of 68
Adjust+: User Manual
Revision:
Version 1.5, 2012-12-04
Calibration (Pro-Version)
The “Pro“ version of Adjust+ allows you to measure only a specific device, so
that the frequency response of your cartridge is measured isolated from any
influence of the Phono-Preamplifier .
If a calibration curve has been set, Adjust+ can automatically adjust the
frequency response. Since the means of measuring sine-sweep and pink noise
are different, Adjust+ conducts separate measurements for both.
The calibration takes place in two steps:
•
Calibration of the maximum level with a CD-Player as well as the test tone
on the installation CD. This calibration checks the input of the sound card,
but - if needed - also can be used to calibrate a connected amplifier (if, for
example, the tape-out port must be used).
•
Calibration of the entire phono-set-up begins with (and includes) the phonostage. This calibration also requires the test tone included on the installation
CD, but also additionally requires an Inverse-RIAA (not included) to feed the
dampened and distorted RIAA-signal from the CD-Player into the phonostage.
Note: for this calibration process the CD-Player that is to be used needs to be
one with a reasonable linearity. For most high-end CD-Players, though, this
should not be an issue.
Linearity of Measuring Process
Please note that the measurement of frequency response of the sine-sweep
with the calibration deactivated will drop off with high frequencies, regardless of
linearity of the devices used.
This level drop at higher frequencies is is due to the logarithmic frequency
response characteristics of the sweep, which greatly speeds up the rate of the
frequency increase with high frequencies. As a result, Adjust+ (and the sound
card) has less time to ascertain a single frequency band, which appears as a
small (but visible) reduction of the level with high frequencies.
This systematically reproducible error in measurement is completely
compensated for by the program, as well as by standard calibration included in
the software, as well as by the calibration steps carried out by the user.
Note: For the calibration process to be successful the test tones on the CD must
be identical to those on the test record, otherwise the calibration process will not
be effective. You can assure the accuracy of the calibration process by only
using the test tone included on the CD provided with the Adjust+ software.
© 2012 Dr. Feickert Analogue / ProgTec GmbH
Page 41 of 68
Adjust+: User Manual
Revision:
Version 1.5, 2012-12-04
Capturing a Calibration Curve
The process of measuring a reference curve for sine-sweep and for pink noise
are more or less identical, only the test tones on the CD are different.
Note: The following calibration processes pose essentially no risk, but
nevertheless, please note that we are not responsible for any damages that
may occur to your devices.
Procedure:
•
In Adjust+ switch to the task window “Frequency Response.”
•
Choose the desired measurement selection (Pink Noise / sine-sweep) by
activating or deactivating the corresponding check box.
•
Right click in the field where the curve is displayed and choose "Clear
Calibration…" from the selections. When prompted to confirm (prompt also
includes reference to the type of measurement) select "yes." The check box
“Calibrated“ in the status box must be deactivated:
The old measurement does not necessarily have to be deleted, but this way
the new reference curve can be generated unprocessed .
•
Now connect the CD-Player either to the sound card/amplifier or, in order to
include the phono-preamp, or to the input of an inverse-RIAA (not included).
If using an inverse-RIAA, connect the opposite end of the cable leading out
of the Inverse RIAA to the input of the phono-amp. Make sure to use the
correct output of the i-RIAA with the corresponding level attenuation for MC
or for MM inputs.
Note: Never connect the CD-Player directly to the input of your phono-stage!
•
Insert the Adjust+ CD in the CD-Player. You can find the track list on the CD
itself (as PDF) or in the appendix of this manual.
•
Choose the track that corresponds to the desired calibration (Pink Noise or
sine-sweep). Both tones are arranged on the CD in two different formats:
one for full modulation (0dB) and one that is attenuated (20dB). The
attenuated tones are meant to help assure that the CD-Player does not
overload the input of your preamplifier. Make sure to avoid over-modulating
the preamplifier by checking the input oscilloscope for the strength of the
incoming signal. Either lower the modulation with the mixer or choose the
alternate track with the attenuated tone.
•
Start the CD-Player and manually begin the measuring process in Adjust+.
The measurement of the frequency band will then be carried out.
•
Save the results as a file. This is not absolutely necessary, but if at any time
you should happen to delete the calibration settings, you can simply use
these results to revert back to these calibration settings.
•
Right click in the field where the reference curve is displayed and choose
"Use as Calibration…" from the selections. Confirm this in the following
prompt (which also includes information on the measurements taken) by
selecting "yes". The checkbox “Calibrated“ must be activated in the status
field:
© 2012 Dr. Feickert Analogue / ProgTec GmbH
Page 42 of 68
Adjust+: User Manual
Revision:
Version 1.5, 2012-12-04
The calibration for the chosen method is now activated.
•
To double check this new calibration, simply run a new and different
calibration process. The frequency band obtained through the second
calibration process should roughly correspond to that of the previous one.
You can also use other reference measurements saved as files for the
calibration process. To do this, open the corresponding file and select the
method (Noise/Sweep) and as described above, use the curve depicted for
calibration.
Adjust+ always stores the raw data from measurements, which you can also
use for calibration. The characteristics of any calibration curve will always be
displayed on the screen.
Standard Calibration
Adjust+ comes with standard calibration settings which corrects for inherent
system inaccuracies (sweep-acceleration). You can reject the calibration
settings laid out above by right clicking the in field where the curve is depicted
and select “Reset Calibration to Default...” from the selections provided.
© 2012 Dr. Feickert Analogue / ProgTec GmbH
Page 43 of 68
Adjust+: User Manual
Revision:
Version 1.5, 2012-12-04
Resonance Frequency (fres)
First, Some Theory...
Every tone arm with a cartridge installed is essentially an inert spring pendulum.
Inertia is given by the effective mass (also known as dynamic mass) of the tone
arm. The spring constant is determined by the compliance–the flexibility of the
cartridge’s cantilever damper.
Usually the compliance of the needle can be found in the documentation
coming along with the cartridge. The documentation often is inaccurate, so that
for example a DENON DL-103 is rated (for historical reasons) at a compliance
of 5x10⁻⁶ µm/mN. In addition, determining a tone arm’s effective mass is kind of
a nightmare and can not be easily accomplished. According to the approach
used in calculating the effective mass, differences of two decimal places may
occur.
Measuring and Interpretation of Results
Theory aside, measuring the resonant frequency is a dependable way of finding
the effective mass. In order to do this the tone arm/cartridge that is to be
measured needs to be stimulated, which is accomplished by a sine-sweep on
the test record with a frequency range of 3 to 40 Hertz. You should be able to
observe the cartridge beginning to oscillate in the groove at approximately when
the resonant frequency is reached. This rise in resonance will be detected by
the software and displayed in a task window after the measurement is
completed. If the cartridge vibrates such that it actually jumps, then the
balancing will need to be adjusted. Adding an additional .5 grams should be
sufficient for the purpose of carrying out this measurement, and when applied
for a brief period of time should not result in any damage.
In the analogue world a resonant frequency in the range of 8-12 Hz is
acceptable. With a resonant frequency in this range, you can lower the chance
of damaging your record player or records by reaching the resonant frequency
of your tone arm, which might arise from stimulation from audio signals or
subsonic sounds. If you aim for results in this range, you shouldn’t have to
worry about this.
In the case of a resonant frequency that is below this range, then you have too
light of a cartridge installed on too heavy of a tone arm.
If your resonant frequency is above this range, then you have too heavy of a
cartridge installed on too light of a tone arm, in which case you should be able
to remedy this by adding weight to the tone arm. In either case (resonant
frequency below or above the given range) the tone arm and cartridge are
mismatched, and you should consider if you have the right cartridge for your
setup.
Procedure for Measuring the Lateral Resonant Frequency:
1. Place stylus at the beginning of the fourth track on face A (before the second
to last track). Measurement of the lateral resonant frequency will start
automatically with the test tone.
© 2012 Dr. Feickert Analogue / ProgTec GmbH
Page 44 of 68
Adjust+: User Manual
Revision:
Version 1.5, 2012-12-04
2. During the roughly 1 minute long measurement process Adjust+ will display
the lateral resonant frequency in a spectrum view. The display first will
appear as points that will eventually form a line.
3. The test tone of 1 kHz at the end of the track will automatically end the
measurement process, after which a graphic will display the results. Here
the graph will display the level with the measured frequency. In addition the
program also gives the frequency at the maximum level. In most cases this
will correspond to the resonant frequency.
Procedure for Measuring the Vertical Resonance Frequency:
1. Place the needle at the beginning of the fifth track on side 1 (before the last
track). Measurement of the vertical resonant frequency will start
automatically with the test tone.
2. During the roughly 1 minute long measurement process Adjust+ will display
the lateral resonant frequency in a spectrum view. The display first will
appear as points that will eventually form a line.
3. After the end of the last track the measurement process has to be ended
manually by click on the “Finish Cycle” button. After completion of the
measurement process a graph will display the run of the level with the
measured frequency. In most cases this will correspond to the vertical
resonant frequency
After the measurement has been taken, Adjust+ will calculate the degrees of
the level differences vs. frequency according to the results shown in the graph.
This, however, does not always lead to the results expected in every possible
case. The mean “reference” line calculated by Adjust+ is shown as dotted line .
These results, however, should only be considered as relevant if the reference
level is within a reasonable range.
Note: Lateral and vertical resonance frequencies may be different from one
another, as is the case, for example, with DECCA cartridges. This is also the
case for measurements made using linear tracking tone arms, such as the
KUZMA Air Line®.
© 2012 Dr. Feickert Analogue / ProgTec GmbH
Page 45 of 68
Adjust+: User Manual
Revision:
Version 1.5, 2012-12-04
Harmonic Distortion (Pro-Version)
This task window enables you to roughly calculate the distortion level at 1 kHz
full modulation amplitude (0 dB, 11.3 cm/s). For this procedure you will use the
same 1 kHz stereo signal that is used for calibrating channel balance with
Azimuth/Crosstalk (face A, track 2).
Measuring and Interpretation of Results
Procedure
1. Place the stylus in the lead in groove of the second track on side 1 (1 kHz
stereo). Adjust+ automatically begins the measurement process when the
stereo signal is played.
2. During the 30 second measurement phase Adjust+ will display the
measured levels of the fundamental oscillations 1f-5f in a spectrum view.
The display will appear first in the form of points (crosses).
3. The measurement process will end automatically after 30 seconds. This
fixed measurement time allows for better reproducibility and comparison of
measurements, since all measurements are recorded under the same
conditions.
Results
After the measurement process is completed, the results will be shown in the
form of a bar graph, which gives a view of the spectrum. The spectrum contains
the levels for the fundamental as well as the harmonics k2-k5 for both channels
(cross-faded):
© 2012 Dr. Feickert Analogue / ProgTec GmbH
Page 46 of 68
Adjust+: User Manual
Revision:
Version 1.5, 2012-12-04
Furthermore the following values are given numerically, separated by channels:
•
Level of 2xf (1st Harmonic, 2 kHz) relative to the level of the fundamental
frequency; in dB as well as a percentage
•
Level of 3xf (2nd Harmonic, 3 kHz) relative to the fundamental frequency; in
dB as well as a percentage
•
Total Harmonic Distortion (THD), relative to fundamental frequency
© 2012 Dr. Feickert Analogue / ProgTec GmbH
Page 47 of 68
Adjust+: User Manual
Revision:
Version 1.5, 2012-12-04
Tonearm Resonances (Pro-Version)
The “Tonearm Resonances” task window enables you to measure possible tone
arm resonance up to approximately 500 Hz. A sine-sweep signal is used to
carry out this measurement, which is a tone that runs from 30 Hz at approx.
8 Hz/s up to 500 Hz at constant level.
Measuring and Interpretation of Results
Procedure
1. Place the needle in the lead-in groove before the second to last track on
Side 2 of the test record. The measurement process starts automatically
with the pilot tone.
2. The measurement process takes approximately 1 minute, during which
Adjust+ will display the measured levels in a spectrum view. The display will
first appear as points that will eventually form a line after measurement is
complete.
3. The measurement process is ended automatically by the silence at the end
of the track. Then the frequency response will be displayed graphically
Interpretation
Due to the way the tone arm resonant frequency is measured (FFT), all of the
sine-sweep signal from the test record cannot be completely included in the
measurements—leaving out the beginning and end of the sine-sweep (30 Hz
and 500 Hz). As a result the graphic displayed in the task window will be slightly
limited:
© 2012 Dr. Feickert Analogue / ProgTec GmbH
Page 48 of 68
Adjust+: User Manual
Revision:
Version 1.5, 2012-12-04
Any possible resonances in the form of > 1dB can be seen in the graph.
This way, even relatively small resonance peaks are able to be seen in the
results depicted in the graph. These results are measured in high resolution and
with only minimal filtering. As a result there is a certain waviness of the course
of the curve around1 dB, which is normal.
This waviness also occurs in the small scaling of the y-axis in relation to the
frequency band measurement.
© 2012 Dr. Feickert Analogue / ProgTec GmbH
Page 49 of 68
Adjust+: User Manual
Revision:
Version 1.5, 2012-12-04
General Measurements (Pro-Version)
The "Pro" Version of Adjust+ can also perform general measurements in
addition to the dedicated measurements described so far. These general
measurements can be found in the “Measurements” task window.
Note: Adjust+ does not claim to be a comprehensive and professional
measurement tool for all possible FFT-Analyses (Fast Fourier Transformation)
or for other sophisticated measurements. Likewise, Adjust+ is not a calibrated
measurement instrument. As an additional benefit, Adjust+ has a basic
functionality that allows users to carry out general measurements for audio
devices, so that the user can use Adjust+ for certain basic measurements,
without having to find other measurement software to meet these needs. Fine
calibration is not necessarily needed for these general measurements.
Tip: These general measurements require substantially more processing power
than the other measurement processes discussed previously.
Screen view
Field for Settings and
Online-Analysis
Channel Difference Signal
© 2012 Dr. Feickert Analogue / ProgTec GmbH
FFT-View (Spectrum)
Page 50 of 68
Adjust+: User Manual
Revision:
Version 1.5, 2012-12-04
Differential Input
The oscilloscope shows the difference in signals and these are shown as “left
channel minus right channel.”
The differential input can also be superimposed on to the FFT-display.
Note: The differential input signal can be helpful in sampling stereo signals that
are equal on both channels.
FFT
The frequency spectrum of the input signal is displayed in the FFT graph. The
FFT view can be configured with different parameters (see further below). The
following input signals can be displayed in the FFT graph:
•
•
•
•
Left channel only
Right channel only
Both right and left channels
Difference in signals (left minus right)
Note: A more in-depth introduction into the basics of FFT goes beyond the
scope of this technical manual. For more information see technical literature on
FFT.
Settings
The properties for FFT can be configured for different parameters. To set these
parameters go to “Settings” in the right hand field in the FFT task window:
The configuration view will then appear:
Window Function:
Gives the choice between different types of FFT
windows.
Alpha Parameter:
Optional Alpha-Parameter for FFT window function
"Blackman" and "Kaiser". The standard value is 1.
Order:
Order of the FFT, adjustable values between 10 und 20.
The FFT results produce 2Order-1 Bins, i.e. the given
frequency range (0-48kHz at 96kSamples/s) will be
divided into this number of discrete Frequency-Bins (Æ
© 2012 Dr. Feickert Analogue / ProgTec GmbH
Page 51 of 68
Adjust+: User Manual
Revision:
Version 1.5, 2012-12-04
resolution of FFT).
for example: an Order of 15 results in 214 (Æ 16384)
Bins, which corresponds to a Bin-Band of 2.93Hz.
Note: Selecting a high order massively increases
processing demands on your computer. Choosing an
Order > 15 can also seriously impact Adjust+’s reaction
speed and should only be selected if your computers
processing power is sufficient. Such a high resolution will
not normally be necessary.
Scaling Value
Axis:
The value axis (Y) can be automatically or manually
scaled.
Scaling Frequency
Axis
The Frequency axis (X) can be automatically or
manually scaled
A very specific frequency range can be selected through
manual scaling (for example 900Hz - 1100Hz)
Note: When manually scaling the X axis, the Y axis
should also be manually scaled. If the X axis is manually
scaled, and the Y axis is automatically scaled, the
results will not be displayed as desired, as the automatic
scaling of the Y axis is always in relation to the overall
result.
Display
To select the channels click on "Analysis":
Here you can select the channels that will be displayed in the FFT window:
The channel(s) chosen will be displayed in the FFT window as in the example
below:
Peak-Hold
The FFT display also has a Peak-Hold-Function. This function displays an
indicator for each frequency range (Bin). The indicator remains at the highest
point reached of each frequency band.
This function can be activated by selecting the checkbox “Peak Hold”. Clicking
on the button “Reset” will erase the previously recorded peak indicators.
© 2012 Dr. Feickert Analogue / ProgTec GmbH
Page 52 of 68
Adjust+: User Manual
Revision:
Version 1.5, 2012-12-04
Noise Analysis
Besides simultaneous display of the frequency spectrum (FFT) you can achieve
results on noise and distortion by clicking the correponding check box.
You can get current results as well as accumulated recorded results over the
time. Activation and current display of the results can be done on the right hand
side of the program window at “Noise Analysis”:
All values given in dB and dBFS resp. (in case of negative values).
Available results are as listed:
THD:
Total Harmonic Distortion
SNR:
Signal-to-Noise Ratio
AvgNoise:
Average Noise in spectrum
Noise Floor:
Integrated Noise Floor, equivalent to: Fundamental minus
SNR
Note: Noise analysis makes use of a separate FFT algorithm to obtain results.
This FFT has to (must) be configured separate.
Configuration
As mentioned the “FFT” of noise analysis must be configured in its own
dialogue. You can get the corresponding by clicking on
within tasks-toolbox:
You will see the following dialogue:
Settings of this FFT are identical to the normal FFT settings for the display.
Cycle time for data recording affects recording of multiple discrete
measurements over time (see following chapter).
© 2012 Dr. Feickert Analogue / ProgTec GmbH
Page 53 of 68
Adjust+: User Manual
Revision:
Version 1.5, 2012-12-04
Recording
The results of the noise analysis can be recorded vs. time and can be displayed
graphically as gradients. This is the key to visualize operation parameters over
a long period of time, e.g. a complete side of a record being cut with a single
signal.
Recording starts when the “record” button is pressed:
until you press this button again.
. Recording proceeds
Note: If you switch to another task during recording (e.g. „frequency response“)
recording immediately stops. Recording doesn’t proceed in background.
Analysis
Recorded data can either be displayed during recording or once you have
finished recording in the “results” dialogue. To open this window press on
the task toolbox.
in
Then choose the “noise stats” card on the top end of the window that was
popping up:
In the panel on the right hand side of the window you can choose which of the
parameters recorded is being displayed. Scaling is done automatically and
hence it is useful to display the different parameters separately.
In the lower section you can see the average of all parameters recorded for
each channel for the recording time.
Note: as written before this view can be displayed already during measuring
cycle. You can refresh by pressing “F5” key on your keyboard or check the box
on the lower left corner or activate an autorefresh (each one second) by
pressing “strg+F5”.
© 2012 Dr. Feickert Analogue / ProgTec GmbH
Page 54 of 68
Adjust+: User Manual
Revision:
Version 1.5, 2012-12-04
Frequency Analysis
Current frequency and phase shifts
Adjust+ detects frequencies of sine waves by an adaptive shoulder detection
algorithm. This algorithm eliminates unwanted low frequency signals (rumble).
The currently detected frequency is being displayed for each channel in the
lower part of the measuring window:
In addition to frequency Adjust+ also detects the current phase shift between
that two channels. Doing so the software compensates possible channels
delays (ref. calibration).
Recording
In measuring noise stats the software also records frequency over time. This
offers new possibilities in wow & flutter analysis over a longer period of time.
Recoring starts when you press the "Record" button in the toolbox:
Recording stops when you press the same button again.
.
Analysis
You can visualize your results during recording or after end of the measuring
cycle within the results dialogue. This dialogue is shown when pressing the
corresponding button in the toolbox:
.
Then use flag „Frequency“ on the upper edge of the window:
As you can see the band-stop filter also is available in this task. Pressing the
check box gives the following result:
© 2012 Dr. Feickert Analogue / ProgTec GmbH
Page 55 of 68
Adjust+: User Manual
Revision:
Version 1.5, 2012-12-04
Excentricity and warp artifacts of the record are filtered and the test signal is
sharpened. As a sideeffect it also smoothes the errors of the platter in centric
run and warp. Therefore you carefully have to read the numbers from this
measurement taking in regard the platters’ accuracy optically!
Frequency analysis covers:
Frequency over
time:
(upper curve)
In the upper graphics you can see the plot of frequency
vs. time. The mean value is shown by an auxiliary line.
The area of weighted wow & flutter is marked by a
band of light grey colour (see below).
Note: this kind of recording gives an integral value over
the complete system (record player and test record).
Unfortunately it is nearly impossible to produce a test
record that is free of warps and has absolute lateral
truth. These errors affect recorded data and may give
worse values than the system really has. But this is
inherent to the system and cannot be avoided when
using a test record.
Histogram:
(lower curve)
The lower graphics is a histogram that shows incidence
of discrete frequencies vs. the frequency.
In the case of a statistical (ideal) distribution of the
recorded data the curve should inscribe a Gaussian
error distribution curve. Each shape that shows
significant anomalies is an indicator of systematic
errors.
As a guide the software calculates the theoretical curve
with the data given out of the root mean square.
© 2012 Dr. Feickert Analogue / ProgTec GmbH
Page 56 of 68
Adjust+: User Manual
Revision:
Version 1.5, 2012-12-04
Analysis:
The value of the weighted frequency deviation (sigma)
given is calculated from all discrete frequency values
recorded in both channels.
Additionally the mean frequency as well as the
maximum deviation is displayed for each channel.
current frequency:
The large frequency display shows the current
frequency weighted over the last couple of seconds.
This is not the mean frequency of the complete
recording.
Via this display you can adjust correct speed of your
turntable without using task “speed”.
Imperfect lateral and vertical truth result in periodic distribution of measured
frequency vs. time with a cycle duration of 1,8s (corresponding to one revolution
of the record spinning at 331/3 rpm). These artifacts now can be eliminated by
using the band stop filter.
© 2012 Dr. Feickert Analogue / ProgTec GmbH
Page 57 of 68
Adjust+: User Manual
Revision:
Version 1.5, 2012-12-04
General Functions
Input Scope
In the top section of the Adjust+ main window you have a input scope that is
displayed in all tasks of the software:
The X-axis shows the sample numbers and the Y-axis is an integer value of the
corresponding sample. Sample range with a resolution of 24 bit is -8.388.608 to
+8.388.607.
The scope has an autorefresh and usually shows the current input data. Adjust+
detects when there is no input signal and stops displaying so that it seems that
the software has frozen the display. This is not the case and is a feature of the
software.
Zoom
Via the mouse you can zoom into any area of the scope.
Procedure:
1. Click with the left mouse button at the point of the upper left corner of the
area you want to zoom in.
2. Keep the left mouse button pressed and move the mouse to the lower right
corner of the area you want to zoom in.
3. Release the left mouse button and the scope will zoom into the wanted area.
Note: in zoom mode the autorefresh still is active.
Unzoom
Press "*" (asterisk) either on numeric part of the keaboard or normal and the
scope will unzoom and fall back into normal display mode with full range.
Input freeze
In case you need to have a serious look at the input signal you can freeze it by
clicking on key "F8". Unfreeze it by clicking again on key "F8".
Caution: don’t forget to unfreeze as otherwise measuring doesn’t work.
Save Results to File
In most of the task screens you can save your recorded data to a file and reload
it later. Please use the corresponding button in the toolbox:
When saving to a file Adjust+ suggests a filename that is based on the
timestamp of the current task you are running.
© 2012 Dr. Feickert Analogue / ProgTec GmbH
Page 58 of 68
Adjust+: User Manual
Revision:
Version 1.5, 2012-12-04
It is possible to save data from different tasks into one single file. You can easily
save azimuth, frequency response and resonance measurements into one
single file at one time.
On the other hand you can only save one result of a certain measurement into
one file. Different results have to be stored in different files. Whenever you store
newer results into the same file the old values will be overwritten.
Print and Export Reports
In most task screens the results generated can either be printed to a printer or
results may be exported to PDF. This can easily be done by clicking on the
corresponding buttons within the toolbox :
Printer
Clicking the print button opens a dialogue that shows a preview of the report:
This report is printed when you press the print button within this preview. In
case you didn’t choose a specific printer before the output will be printed to the
standard printer of Windows®.
Note: You can choose another printer for output if you click on
on print.
before click
Export to PDF
Besides the direct output to a printer Adjust+ support streaming of the data to a
PDF file. These files can easily be displayed with the Adobe® Reader® and can
be printed from there.
© 2012 Dr. Feickert Analogue / ProgTec GmbH
Page 59 of 68
Adjust+: User Manual
Revision:
Version 1.5, 2012-12-04
For PDF export no additional software needs to be installed on your computer
as Adjust+ has a complete PDF export interface integrated.
Branded Logo on Report-Header (Pro-Version)
In “Pro” version you have the possibility to use your own logo that is to be
displayed and printed in the header of all reports generated by Adjust+:
Application is easy:
Save your logo in GIF format into a file with the name "LogoRptHdr.gif" within
the program directory of "AdjustPlus.exe" (typically "C:\Program
Files\DFA\AdjustPlus"). This logo will be scaled obtaining original proportions
(height/width) so that optimum height is achieved.
Note: please take care that resolution of the file is not too high as this will slow
down printing of the report. A resolution of 300 pixels vertically is sufficient to
achieve satisfying results.
Tipp: If you need more space from the lines printed in the report you can easily
get this by adding additional white borders to your graphics at the top, left
or/and right hand side.
Result Information
All reports contain an info header that offers the possibility to make a
documentation on your setup used in the certain task. You can easily change or
type in your information by pressing within the toolbox on:
You will get a form and can type in your information:
© 2012 Dr. Feickert Analogue / ProgTec GmbH
Page 60 of 68
Adjust+: User Manual
Revision:
Version 1.5, 2012-12-04
You can type in any information that should be printed out in the report later on.
Result infos belongs to the certain task and will be stored in the same file
together with the results generated. This result info can be useful in case you
build up a result database for later comparison.
In case you haven’t typed in any information into a specific task or haven’t
loaded a file with information yet, Adjust+ automatically copies the standard
information from the configuration dialogue that was typed in in the user info
tab.
Tip: When running multiple tasks for one cartridge or setup (e.g. azimuth,
frequency response and resonance frequency) you can use the button “Use for
all tasks” to copy the information into all info headers of the different tasks.
In case you want to overwrite the information with the default text from the
configuration click on button “Load Info Defaults”.
Exporting Graphics and Curves
Most of the graphics can be exported as metafile or bitmap via clipboard and
can be used within other program such as word processors.
Exporting a graphic screen is done by clicking the right mouse button over the
wanted picture. Choose the wanted format from within the context menu.
Info Screens
After Adjust+ is installed on your computer you have info screens for most tasks
by default. This shall give you some aid and help you to get familiar in short
time with the tasks of the software.
In case you don’t want those info screens to be displayed anymore you can
activate the checkbox “Don’t show again” within the info screen. This is an
individual setting for each task and doesn’t have global effect within the
software.
Info screens can easily be reactivated in case you need them from within the
configuration task. Click on button “Reset Displaying Task Information Screens”
and the screens are displayed in all task as per default.
Within the task screens you can get the info screen by clicking
on the right hand side.
© 2012 Dr. Feickert Analogue / ProgTec GmbH
in the toolbox
Page 61 of 68
Adjust+: User Manual
Revision:
Version 1.5, 2012-12-04
Zooming Result Graphics
In general you can zoom into all result graphics within the program.
Zoom-in
Procedure:
4. Click with the left mouse button at the point of the upper left corner of the
area you want to zoom in.
5. Keep the left mouse button pressed and move the mouse to the lower right
corner of the area you want to zoom in.
6. Release the left mouse button and the display will zoom into the wanted
area.
Note: Keeping right mouse button pressed moves the zoomed section. The
context menu will pop up but this has no effect in general.
Zoom-out
Dragging with the left mouse button within any graphics from right lower corner
to left upper corner restores original display range.
Change Languages
Adjust+ can be switched between different languages. This affects the user
interface. In the lower part of the main window you can find a drop down list that
shows all currently available languages:
Note: currently there are only german and english texts available. Other
languages can be implemented any time later on.
Offline Analysis with WAV Files (Pro-Version)
"Pro" version of Adjust+ offers a recording function that streams input data into
a WAV file with the current audio format chosen within the configuration. By
default this is 24 Bit at 96 kHz.
Recording of input signal
You can start recording by pressing function key "F7" or when you click into the
corresponding checkbox:
A “Save as” dialogue pops up where you can specify the filename you want.
Adjust+ by default suggests a filename based on date and time of recording.
© 2012 Dr. Feickert Analogue / ProgTec GmbH
Page 62 of 68
Adjust+: User Manual
Revision:
Version 1.5, 2012-12-04
Note: recording starts with immediate effect when pressing on “Save” within the
dialogue box.
As long as recording proceeds the checkbox is marked.
You can immediately stop recording by pressing on function key “F7” or
unmarking the corresponding checkbox within the program window in the lower
left corner.
Note: 24Bit/96kHz generates large files. As a rule of thumb you get 33
megabytes each 60 seconds of recording.
Playback of recorded files
Recorded data can be used as source for Adjust+ instead of a realtime signal.
To handle WAV files you can find the “Source” area of the window on the lower
end of the main window:
The two radiobuttons "Line/Mic" and "WAV" switch between the two operating
modes (either sound card or WAV file). In case you check the “WAV” box the
buttons on the right hand side will be activated.
Clicking on “...” opens the file selection dialogue. “Play” starts playback and
“Pause” stops playback of the file.
Note: WAV files will be played back at double speed depending on the
configuration settings. This is not a bug and doesn’t affect results in any way.
© 2012 Dr. Feickert Analogue / ProgTec GmbH
Page 63 of 68
Adjust+: User Manual
Revision:
Version 1.5, 2012-12-04
Appendix
Audio tracks on Adjust+ CD
1)
2)
3)
4)
5)
6)
7)
8)
9)
10)
11)
12)
13)
14)
15)
16)
17)
18)
19)
20)
21)
22)
23)
24)
Pink Noise stereo -20dB
Pink Noise Left -20dB
Pink Noise Right -20dB
Pilot Tone 1kHz -20dB
Sinus Sweep 20Hz to 20kHz log -20dB
Pilot Tone 1kHz -20dB
Sinus Sweep 20Hz to 20kHz Left log -20db
Pilot Tone 1kHz -20dB
Sinus Sweep 20Hz to 20kHz Right log -20db
Sinus 1kHz stereo -20dB
Sinus 1kHz Left -20dB
Sinus 1kHz Right -20dB
Pink Noise stereo 0dB
Pink Noise Left 0dB
Pink Noise Right 0dB
Pilot Tone 1kHz -20dB
Sinus Sweep 20Hz to 20kHz log 0dB
Pilot Tone 1kHz -20dB
Sinus Sweep 20Hz to 20kHz Left log 0db
Pilot Tone 1kHz -20dB
Sinus Sweep 20Hz to 20kHz Right log 0db
Sinus 1kHz stereo 0dB
Sinus 1kHz Left 0dB
Sinus 1kHz Right 0dB
© 2012 Dr. Feickert Analogue / ProgTec GmbH
00:59
00:29
00:29
00:04
02:01
00:04
02:01
00:04
02:01
01:00
00:30
00:30
00:59
00:29
00:29
00:04
02:01
00:04
02:01
00:04
02:01
01:00
00:30
00:30
Page 64 of 68
Adjust+: User Manual
Revision:
Version 1.5, 2012-12-04
License Agreement
PLEASE READ THE FOLLOWING SOFTWARE LICENSE AGREEMENT FOR SOFTWARE
PRODUCED BY
DR. FEICKERT ANALOGUE (HEREINAFTER REFERRED TO AS “LICENSOR”)
CAREFULLY. BY CLICKING “ACCEPT,” OR BY INSTALLING THIS SOFTWARE
YOU (“HEREINAFTER REFERRED TO AS LICENSEE”),
AS AN INDIVIDUAL OR LEGAL ENTITY, ARE ENTERING INTO A CONTRACT AND
RECOGNIZE THIS SOFTWARE LICENSE AGREEMENT TO BE BINDING. IF YOU DO NOT
ACCEPT ALL CONDITIONS AND REQUIREMENTS OF THIS SOFTWARE LICENSE
AGREEMENT, CLICK ON THE “I DO NOT AGREE” BUTTON AND CANCEL THE
INSTALLATION OF THIS SOFTWARE. (IF YOU DO NOT AGREE TO THE TERMS AND
CONDITIONS OF THIS SOFTWARE LICENSE AGREEMENT, YOU MAY RETURN THE
PRODUCT TO THE VENDOR FOR A FULL REFUND OF THE SALES PRICE.)
Non-exclusive Software License Agreement (Single-User and Network version) with
Activation Key Mode
§1
Subject Matter of the Contract
1. The software which is installed by this set-up program is protected by copyright.
2. If the licensor himself does not hold trademark rights in part or in full, then the licensor has the
right to use them or transfer them to third parties.
3. The software is not being sold; rather its use is being licensed. In purchasing this software the
licensee only acquires possession of the physical disk, the packaging as well as the written
materials included.
§2
Extent of Concessions Granted by this License
1. This license allows you the use of one copy of this software on one individual computer under
the conditions that it is only used on one single computer at all times. The use of software
means that the software is either loaded in the temporary memory (i.e. RAM) of a computer, or
stored on a permanent disk (i.e. hard drive, CD-ROM). If you have acquired multiple license
copies for the software, you are only ever allowed to have as many copies in use, for which
you have acquired licenses. You do not need any additional license for a copy of the software
which is installed on a storage medium that is accessible by network (i.e. server). Should the
number of expected software users become greater than the number of acquired licenses that
you have acquired, you must take the proper steps to make sure that the number of persons
who simultaneously use the software never becomes greater than the number of licensees.
2. The licensee is entitled to make copies of the software, in particular back-up copies, as long
as this is in accordance with fair use of the software.
© 2012 Dr. Feickert Analogue / ProgTec GmbH
Page 65 of 68
Adjust+: User Manual
Revision:
Version 1.5, 2012-12-04
3. As long as the licensee has obtained a license packet from the licensor, the licensee is
entitled to make copies commensurate with the number of the acquired licenses and to use
these in accordance with the rules of this license agreement.
§3
Product Activation
If you would like to use this software on a sustained basis, you must activate it by requesting an
activation key from the software’s producer, which will activate this software. Should any
changes occur with your hardware you must repeat the activation process with a new activation
key.
The producer of this software is obligated to cooperate in the activation of this software with
anyone who is in possession of an original data carrier. This requirement shall be excluded if
the software producer can verify that the person who is requesting an activation key is not
justified in using the software in connection with the appropriate hardware.
The software producer is nonetheless entitled to refuse cooperation in the activation of this
software, as long as the licensor uses the technology of activation for the protection of the
software, and if a period of five years has passed since the delivery of the software which
requires activation.
The providing of personal information is not generally required for activation. If the producer of
this software requires personal information for activation, the software producer is obligated not
to give this information to third parties, and not to use it for purposes of advertisement
§4
Limitations of this License
1. The written material that is included with this software is protected by copyright. It may not be
duplicated or disseminated.
2. The right to use this software may be transferred to third parties only with the licensor’s written
consent and under the conditions set forth in this contract.
3. The licensee is not permitted to transfer or otherwise make available the software or the
included written material to a third party without the written consent of the licensor.
4. The use of this software on multiple computers without multiple licenses will be prosecuted.
5. The licensee is not permitted to decompile, to disassemble or to reverse-engineer this
software.
6. This software is licensed as a single product. The licensee is not permitted to separate the
components of the software in order to use them on more than one computer.
7. The licensee is not permitted to rent or to lease this software.
8. The software, together with the included test-record, is to be considered a functional unit.
There are no guarantees for functions carried out with other test-records.
© 2012 Dr. Feickert Analogue / ProgTec GmbH
Page 66 of 68
Adjust+: User Manual
Revision:
§5
Version 1.5, 2012-12-04
Breach of Contract and Termination
1. The licensor is entitled to immediately cancel this license agreement any time that the licensee
violates a regulation of this contract.
2. The licensor will hold the licensee liable for any damages that the licensor may incur through a
breach of this contract.
§6
Updates and Modifications
1. The licensor is permitted, but not obligated, to produce updates for this software.
2. The licensor may require a fee for updates.
3. The licensor is not obligated to make updates available to licensees who have returned
previous updates or who have not paid the update fee.
§7
Warranty and Guarantee
1. The licensor guarantees that this software will essentially function in a manner according to
the description of the software laid out in the accompanying technical manual for a period of
twelve months from the date of purchase. If the licensee is a consumer as defined in the
German Bürgerliches Gesetzbuch (Civil Code of Germany), then the duration of the warranty
shall last for two years.
2. The licensor makes explicit that, due to the state of technology, it is not possible to produce
completely error-free computer software.
3. If a defect becomes apparent, then a written notice of defect and the manner in which it
appeared are to be recorded (i.e. error code and indication of process during which the defect
was discovered), so that the defect can be reviewed and so that the conditions under which
the defect occurred are able to be ruled out.
4. If the notice of defect turns out to be justified, the licensee shall give the licensor an
appropriate period of time for rectification of the defect The licensee shall inform the licensor
the kind of rectification that is desired – improvement of the delivered product or replacement
of a new, defect-free product. The licensor is, however, entitled to refuse the desired
rectification of the defect can if this can only be carried out with disproportionate costs to the
licensor, and if the other kind of rectification of defect does not pose any considerable
disadvantage for the licensee. The licensor can also completely refuse the rectification of
defect(s), if they are only able to be remedied by disproportionate costs to the licensor.
5. For rectification of the defect the licensor shall be granted two attempts to remedy the same
defect, or defects that are connected to the defect, during the appropriate period of time set by
the licensee. After the second failed rectification of defects the licensee is able to withdraw
from the contract or to reduce the licensing fee. The right to withdraw from the contract or to
reduce the licensing fee can also be exercised if the licensee does not expect the licensor to
be able to rectify the defects within the time allotted by the licensee. If the rectification of the
defect has been refused in the context of the terms set out above, then the licensee has the
right to immediately either withdraw from the contract, or to impose a reduction in the licensing
fee. Withdrawal due to an insubstantial defect or error is excluded.
© 2012 Dr. Feickert Analogue / ProgTec GmbH
Page 67 of 68
Adjust+: User Manual
Revision:
Version 1.5, 2012-12-04
6. If the licensee makes claims against the licensor under warranty, and it turns out that either
there is no defect or that a defect is not covered under the warranty provided by the licensor,
then the licensee, insofar as he has acted in a deliberate or negligent manner, shall be
obligated to compensate the licensor for any costs that may occur.
7. There is no guarantee that this software is intended for the purposes of the user, or that this
software will be compatible with any other of the user’s software.
8. The supply of technical manuals and documentation above and beyond the written material /
program descriptions and the user guidance and / or Online-Help, or instructions, will only be
possible if this is explicitly arranged in writing between the two parties. In the case of such an
agreement the specifications, including the content, language and scope of the technical
manual and / or documentation that is to be delivered need not be expressed, if the delivery of
a brief set of instructions suffices, unless it be the case that both parties have arranged
detailed specifications in writing. The delivery of an instruction manual in the English language
is allowed, if the object of this contract has not yet been completely localised for the current
market. The same applies if the object of this contract is generally only available in an English
language version.
9. Above and beyond this guarantee the licensor is liable, according to legal regulations, only in
the case of deliberate and gross negligence for a period of time up to one year after the
delivery of the software. The licensor is only liable for negligence if an essential contractual
obligation (cardinal obligation) is breached, or in the case of delay or impossibility. In the case
of liability due to negligence, liability will be limited to foreseeable or typical damages.
According to product liability laws and German data protection laws, liability in the case of
failure to carry out guaranteed provisions of this contract, because of malice, for personal
damages, and / or defects of title, remains unaffected. Should claims of liability against the
licensor be made, contributory negligence of the licensee shall also be considered, in
particular in the case of insufficient reporting of errors or insufficient data security. Insufficient
data security exists particularly when the user fails to take appropriate security measures,
commensurate with the state of the art of technology, against outside interference, in
particular against computer viruses and other phenomenon, that pose a threat to individual
files or to the database as a whole.
10. The licensor is not liable for any damages that may occur through the use of this software.
§8
Other
1. The place of jurisdiction for all disputes of this contract, as long as is legally permissible, is
Freiburg im Breisgau, Baden-Württemberg, Germany.
2. Should any parts of this contract become partially or completely ineffective, this does not
affect the validity of the rest of the contract. Moreover, the parties obligate themselves to
replace ineffective provisions with ones that are in the next best interest of the economically
intended. Changes in the contract must be made in writing; the same applies for the rescission
of this clause.
(Revised: April 15th, 2008)
Dr. Feickert Analogue
© 2012 Dr. Feickert Analogue / ProgTec GmbH
Page 68 of 68