1
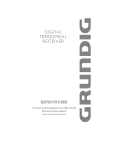
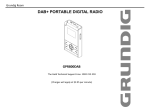
DAB+ MICRO SYSTEM WITH DOCK FOR IPHONE GMSX900DABIP Toll Free Warranty and Service: 1800 509 394 The Gold Technical Support Line: 1902 215 259 (Charges will apply at $2.95 per minute for gold technical support only) 1 Introduction Thank you for buying this GRUNDIG product, which is designed to give you many years of trouble-free service. You may already be familiar with using a similar unit, but please take the time to read these instructions. Safety is important Your safety is very important. Please therefore, ensure you read the “Safety Instructions” before you operate this unit. Warranty In the unlikely event that your product fails to work normally, please call one of our qualified service engineers on either of the below toll free phone numbers to discuss any issues directly. Australia. GRUNDIG Warranty: 1800 509 394 New Zealand GRUNDIG Warranty: 0800 450 259 2 Safety Instructions Ensure that you read all of the safety instructions before operating this unit. Safety Considerations Ensure that the power cable and other connected cables are protected and are positioned so that they are not likely to be walked on, pinched or damaged. Do not position the unit in areas where it may experience humid or damp conditions. Do not allow the unit to get wet. You must keep it away from dripping or splashing water. Never allow children to insert foreign objects into the holes or slots on the unit. Do not cover the ventilation holes with items such as tablecloths or curtains, etc. This may cause the unit to overheat. No naked flame sources, such as candles, should be placed on or near the unit. Do not place objects filled with liquids, such as vases or jugs, on or near the unit. Do not place the unit in a closed cabinet without proper ventilation. Cleaning Disconnect the unit from the mains supply before cleaning. Do not use any liquids or aerosol cleaners, as this may damage the unit. Use a dry, soft, dust free cloth. Servicing There are no user serviceable parts in this unit. When servicing, refer to qualified service technician. Consult your retailer if you are ever in doubt about the installation/operation/safety of the product. 3 Contents Safety Instructions …..…………………………………………………………………………….…………….... 3 Contents …..……..…..……………………………………………………………..…………….…………….... 4 Your DAB+ Micro System……………………………………………………………………….…………….... 5 Your DAB+ Micro System – Remote Control……………………………………..…………….……………... 8 Using DAB+ Radio….……………………………………………………….……………...…………………….. 10 Using FM Radio ………………………………………………….……………….……………...……………… 12 Using iPod……….………………………………...……………………………….……………...……………… 14 Using Aux-In...……………………..…………..……………………………………….……………...…………. 15 System Setup…………………………………………………………………….……………...……………….. 15 Product Specifications…………………………………………………………….……………...……………….. 19 Troubleshooting………………………………………………………………….……………...……………….. 20 Warranty…………………………………………………………………….……………...……………………… 21 4 Your DAB+ Micro System Carefully remove your DAB+ Micro System from the box. You may wish to keep the packaging for future use. In the Box Inside the box you will find: DAB+ Micro System (Main Unit) Power Adapter Remote Control iPod/iPhone docking cradles x 5pcs Stripped Speaker cable x 2sets (20cm and 200cm length) User Guide Positioning your DAB+ Radio Place your DAB+ Receiver on a flat and stable surface. Make sure it is not subject to vibrations or movement. Avoid the following locations: Where it will be close to heat radiating sources Where humidity is high and/or there will be poor ventilation Where it will be dusty Where it will be damp or a possibility of water dripping or splashing onto the unit. Adjusting the Antenna The aerial should be extended to ensure good reception in both DAB+ and FM radio modes. It may be necessary to alter the position of the DAB+ Radio and /or aerial to achieve the best signal. Using Headphones To listen to your DAB+ Radio via Headphones, you will require headphones with a 3.5 mm diameter stereo plug (not included). The Headphone Socket is located on the back of the unit. Plug the Headphone Jack into the Headphone socket and the speaker sound will automatically turn off once the headphones are plugged in. Please Note: The Headphone Socket is disabled in iPod Mode. This means to listen to your iPod or iPhone the Headphone Jack should be connected to the input on your iPod or iPhone. Turning the Unit On/Off Connect the power adaptor to the DC jack on the back of the unit. Then insert the power adaptor into the desired wall outlet. Press and hold the Volume Knob to turn on the unit. To turn off the unit press and hold the Volume Knob again. 5 Your DAB+ Micro System 1. Volume Knob 9. 17. Optical Output 2. LCD Display 10. 18. Composite Video Output 3. Preset Button 11. 19. Audio Output (R/L) 4. < Button 12. Mode Button 20. Headphone Output 5. Select Button 13. F-Type Antenna 21. Auxiliary Input 6. > Button 14. Speaker Jacks 22. DC Input 7. Menu Button 15. Speaker Jacks 8. Info Button 16. USB Input Rewind Button Play/Pause Button Fast Forward Button 6 Your DAB+ Micro System Icon Function Press the Volume Knob to turn the unit on or off. To change the volume level, turn the Volume Knob up or down. PRESET < > SELECT Press the Preset Button to access your favourite DAB+ or FM stations quickly. Press the Navigation Buttons to scroll through the menu options, station list or other settings. Press the Select Button to select or confirm menu options, settings or stations. MENU Press the Menu Button to enter the Main Menu for the current mode. Press again to return to play display. INFO Press the Info Button to view the information about the station or track playing. Press again to cycle through further information. Press the Rewind Button in iPod mode, to skip backwards to the previous track (or to the beginning of the song currently playing) in the current playlist. Press the Play/Pause Button in iPod mode, to start or to pause play. Press the Fast Forward Button in iPod mode, to skip forwards to the following track in the current playlist. MODE ANTENNA SPEAKER JACKS USB INPUT AUX IN 12V DC IN OPTICAL OUTPUT COMPOSITE VIDEO OUTPUT AUDIO OUTPUT (R/L) HEADPHONE OUTPUT Press the Mode Button to switch between iPod, Auxiliary Input, DAB+ and FM Radio modes. It is recommended that you extended the antenna to ensure that you get the best possible reception. The Speaker Jacks are where you connect the speaker cables to the unit. You will receive two cables to so you can design the distance between the main unit and your speakers. The USB Input allows for your Trio Micro System Software to be upgraded when and if required. The Auxiliary Input allows you to connect any external audio device like and MP3 Player to the unit via a 3.5 mm Auxiliary Cable. The DC Input is where you connect your power adaptor to the unit. The Optical Output allows you to connect the unit to your Hi-Fi system to obtain great digital good sound quality. The Composite Video Output allows you to connect the unit to your TV to watch movies from your iPod/iPhone on your TV. The Audio Output allows you to connect the unit to your TV to watch movies from your iPod/iPhone on your TV. The Headphone Output allows you to connect your Headphones for private listening. 7 Your DAB+ Micro System – Remote Control Icon Function Press the Standby Button to turn the on or off. Press the Mute Button to mute the sound (this will completely turn of the unit sound). Press again to turn sound back on. DAB+ Press the DAB+ Button to enter the DAB+ Digital Radio mode. FM Press the FM Button to enter the FM radio mode. Press the +/- Buttons to change the volume. Press the </> Buttons to scroll through the menu options. Press the OK Button to confirm menu options and settings. iPod Press the iPod Button to enter the iPod mode. Aux In Press the AUX IN Button to enter the Auxiliary Input mode. Press the Info Button to view the station or track information. Press the Menu Button to enter the Main Menu. Press the Menu Button again to go back to the play display. Press the Rewind Button in iPod mode, to skip backwards to the previous track (or to the beginning of the song currently playing) in the current playlist. Press the Play/Pause Button in iPod mode, to start or pause play. Press the Fast Forward Button in iPod mode, to skip forwards to the following track in the current playlist. 8 Your DAB+ Micro System – Remote Control Press the Repeat Button to repeat play of the iPod. Press continually to scroll through repeat options. Press the Shuffle Button to select the shuffle option in iPod. Press the Snooze Button to activate the snooze function when the alarm goes off. Press the Mode Button to switch between iPod, Auxiliary Input, DAB+ and FM Radio modes. Shift Press the Shift Button to select the preset number you wish to play. For example to play preset 6, press the Shift Button first and then press the 1/6 Button to select. 1/6 2/7 3/8 4/9 5/10 Press the 1/6 Button to set or play preset numbers 1 or 6. Press the 2/7 Button to set or play preset numbers 2 or 7. Press the 3/8 Button to set or play preset numbers 3 or 8. Press the 4/9 Button to set or play preset numbers 4 or 9. Press the 5/10 Button to set or play preset numbers 5 or 10. 9 Using DAB+ DAB / DAB+ Radio Radio DAB+ Radio Mode Your DAB+ Radio will receive all DAB+ Digital Radio Stations (relevant to your location) and will display all DLS information broadcasted by the DAB+ Stations. To enter the DAB+ mode, press the Mode Button on the unit until the display shows DAB+ mode or press the DAB+ Button on the remote control. Scanning and Storing DAB+ Stations Your Grundig Trio DAB+ Digital Radio will automatically scan for all available DAB+ Digital Radio Stations. However it is recommended that every now and then you conduct a full scan to search for any new stations or to ensure you are receiving the best possible reception. To conduct a DAB+ Station Scan, press the Menu Button and then use the Navigation Buttons to scroll through the list to select Auto Scan or Manual Scan. An Auto Scan will automatically scan for all available stations and then store them in the Station List. A Manual Scan will allow you to search for a particular station‟s frequency and then store manually in the station list. To confirm either option, press the Select Button. Once a scan is complete, the radio will either play the first station stored in the station list or the last station played previously. To scroll through the station list, press the Menu Button then select station list by using the Navigation and Select Buttons. Once in the station list menu use the Navigation Buttons to scroll the list. If when you have stored your new station list and there are weak stations you wish to remove, press the Menu Button and then scroll through the options until Prune is displayed. Then press the Select Button to activate the Prune function. This will remove all unavailable/weak stations from the station list. 10 Using DAB+ Radio Using FM Radio Station Presets To store a Station Preset you must be playing the station you wish to set. Once you have tuned to this station, press and hold the <<|| and Preset Buttons on the unit, until the display shows Preset Store. Then you can either turn the Volume Knob to scroll through the preset selections or press the Shift and Numeric Buttons on the remote control to select the preset number you wish to store your favourite station to. To play/recall a preset station, press Preset Button briefly, then select the number either via the unit or remote control. Viewing information While you are listening to your DAB+ Radio, you may wish to view the broadcast station information such as; program name, track title and contact details. To view the station information, simply press the Info Button and the information we be displayed on the second line of the display. To scroll through the information provided by the broadcaster, press the Info Button, repeatedly to view the signal strength, program type, ensemble name, channel number/frequency, signal error rate, bit rate/ code, Time and Date. To return to the original display, press and hold the Info Button. 11 Using FM Radio FM Radio Mode Your FM Radio will receive all FM Radio Stations (relevant to your location) and will display RDS information depending on whether the broadcaster is currently broadcasting this type of information. To enter the FM mode, press the Mode Button on the unit until the display shows FM mode or press the FM Button on the remote control. Once in the FM Radio mode, the radio will show and play the radio frequency at the bottom of the display, as shown below. To automatically scan for a station you wish to listen to, press and hold the Navigation Buttons (< and >). The frequency displayed will start to change until the next station is found. Alternatively, you can manually scan for an FM frequency by just pressing the Navigation Buttons (< and >) and the frequency will change by 5 kHz with each press. Viewing information While you are listening to your FM Radio, you may wish to view the broadcast station information such as; program name, track title and contact details. Please note that RDS information in FM mode depends on whether the broadcaster is currently broadcasting information and may not always be the case. To view the station information, simply press the Info Button and the information we be displayed on the second line of the display. 12 Using FM Radio To scroll through the information provided by the broadcaster, press the Info Button, repeatedly to view the program type, ensemble name, Mono/Stereo, Time and Date. To return to the original display, press and hold the Info Button. FM Radio Settings Scan Setting In FM mode you may come across weak signals when you are scanning, to ensure you only pick up strong signals you can change the scan settings. In FM mode, press the Menu Button and then select scan settings, pressing select or ok to confirm. Then choose between ‘Strong Station’ or ‘All Station’, pressing ok or select to confirm. ‘Strong Station’ will provide you with only the strong signal stations and ‘All Station’ will provide you with all possible frequencies. Audio Setting In FM mode you can also choose your preferred Audio Settings to ensure you receive the best possible sound. Press the Menu Button and then select Audio setting, pressing select or ok to confirm. Then choose between ‘Stereo Allowed’ and ‘Forced Mono’, pressing ok or select to confirm. 13 Using iPod or iPhone Your Grundig Trio Micro System has a dock for your iPod or iPhone and allows you full control and charging capabilities while you listen to your favourite tunes. You can control either your iPod or iPhone through your keypad or remote control. Compatible models Marking 1 2 3 4 5 iPod Model iPod Nano 4th Gen iPod Nano 3rd Gen iPod 5th Gen Video (30GB); iPod Classic (80GB) iPod 5th Gen Video (60, 80GB); iPod Classic (160GB) iPhone 3G/3GS; iPod Touch 1st and 2nd Gen; iPhone 4 iPod mode 1. Select the correct iPod cradle for your model and insert it into the dock area. Make sure it clicks in. 2. Place your iPod into the dock cradle and click it in to sure it is connected firmly and will operate as outlined above. 3. Once it is connected your Trio Micro System will immediately switch to iPod mode and begin to play the last song listened to. 4. You will now be able to use either the keypad or remote control to make your selections. 5. You can use the Shuffle Button to play your songs at random or press the Repeat Button a song, album or playlist. 6. To play a video from your iPod you must connect the Trio Micro System to your TV or computer monitor using the Composite Video Output Sockets. 7. Once it has been connected, press play to play the video and you will be able to use the remote control or keypad as normal. 8. In iPod mode, press the Info Button repeatedly to view the track information including: artist, album, authentication status („Processing…‟, „Success‟ or „Failed‟), time and date. To return to original display press and hold the Info Button. Please Note: If authentication is taking longer than 30 seconds, try removing the iPod/iPhone and insert again. 14 Auxiliary Input Your Grundig Trio Micro System has an Auxiliary Input which allows you to connect your MP3 Player or any other Audio Output device. Aux In mode 1. Connect your external music device to the Auxiliary Input via the auxiliary cable make sure it is connected firmly. 2. Once your music device is connected to your Trio Micro System, press the Mode Button on the unit or Aux In Button on the remote to enter Aux In mode. You can just adjust the volume on front panel or remote. System Setup Setting the Time and Date When you turn on your Trio Micro System, the time and date will be updated automatically from your DAB+ signal. However, you can also set the time and date manually if you wish. To enter the Time Menu, press the MENU Button to enter the System Menu, then select the Time Menu option and press the Select Button to confirm. When you have entered the Time Menu, you will be asked to select either 12 or 24 hour time. Press the Select Button to select your desired option. Manually Setting the Time and Date To set the time manually, enter the Time Menu and then select the Time and Date option. Once in the time and date option you will be able to begin the manual update. Depending on the time format you have selected the time will show as hh:mm and will be flashing. Use the Navigation Buttons (< and >) to adjust the hours first. When you are happy with the selection, press the Select Button to confirm. Then the minute‟s section will flash. Use the Navigation Buttons (< and >) to adjust the minutes and press the Select Button to confirm when you are happy with the time. Once the time has been set the date will flash on the display. Follow the steps for setting the time to set the date. 15 System Setup Automatically Setting the Time and Date To set the time automatically, enter the Time Menu and then select the Auto Update. In the option you will be able to choose from; Auto Update from Any, Auto Update from DAB+ or Auto Update from FM. Once you have chosen you selected format, Select Button to confirm. Setting the Alarm Once you have set the time, you are now able to set the alarm. You are able to set two alarms on your Trio Micro System. Also you are to turn the alarm on and off in standby mode (when the unit is not on). To set the alarm, press the Menu Button and enter the System setting and then select Alarm. Once you are in the Alarm Menu you can select either Alarm 1 or Alarm 2. To set either Alarm press the Select Button to confirm you wish to set the Alarm and use the Navigation Buttons (< and >) to scroll through the desired options provided by your Trio Micro System. First you will be asked to set the Alarm to on, as shown below. Then you will be asked to set the alarm time and date; alarm duration time (this is how long the alarm will play for) you can choose between 15, 30, 45, 60 and 90 minutes; the alarm source including DAB+, FM, iPod or Buzzer, in DAB+ or FM mode you can select either last station listened or a station preset; the frequency of the alarm which will allow you to set it as either daily, once, weekends or weekdays and finally you will need to set the volume. Once the volume has been selected you will need to finally press the Select Button to confirm and the Alarm will be saved. The relevant Alarm icon will then be displayed in the top left corner until the Alarm is turned off. 16 At the set time, the alarm will sound, gradually building up to the set volume. When the alarm sounds, the System Setup corresponding icon will flash. For example when Alarm 1 sounds the Alarm 1 icon will flash. Snooze When the Alarm sounds and you would like to sleep for a little longer you can select a snooze time, which will allow you to snooze for a period of either, 5, 10, 15 or 30 minutes. Use the remote control to change the snooze time. Once the snooze time is over the alarm will sound again. You can select the snooze option as many times as you like. When snooze is selected the radio will return to standby mode and the alarm icon will flash while the snooze function counts down. To activate the snooze function you can either press the Snooze Button on the remote control or the Select Button on the keypad. Press Snooze Button on remote repeatedly until the time you wish to snooze is displayed as per above image. Setting the Backlight Level With your Trio Micro System you can change the backlight (display light) settings, to ensure that as bright or dull as you would like. In the backlight menu you set the Timeout time. This will be the amount of time the display will stray bright for and then fade out. You can select between; light always on, 10, 20, 30, 45, 60, 90, 120 and 180 seconds. The display has a backlight with three brightness settings, an ambient light sensor and adjustable timeout. There are three settings. You can adjust the On Backlight Level and the Dim Backlight Level, choosing between High, Mid and Low. To enter the Backlight Menu, press the Menu Button and then select the System Menu. Once in the System Menu you can scroll through to select the Backlight option. Press the Select Button to confirm. Then use the Navigation Buttons (< and >) and then Select Buttons to set the above options. 17 System Setup Conducting a Factory Reset If you have any issues with your Trio Micro System it is a good idea to conduct a factory reset. This will clear any settings which may affect the performance of you unit. But remember that a factory reset will delete all your settings including; time and date, preferences settings, DAB+ station list and presets. After a factory reset you will have to conduct a station scan to update the DAB+ Station list and reset and presets or preferred settings. To conduct a Factory Reset, press the Menu Button and then select the System Menu. Once in the System Menu you can scroll through to select the Factory Resent option. Press the Select Button to confirm. You will then need to select either Yes or No to double confirm you would like to set a Factory reset and press select again to confirm. SW Version The SW Version allows you to view the current software version being used by you Trio Micro System. To view, press the Menu Button and then select the System Menu. Once in the System Menu you can scroll through to select the SW Version option and press the Select Button to confirm. Software Update As Grundig continually tries to improve our products to ensure you receive the highest quality product possible, there may be software upgrades available for this unit from time to time. The SW Update Option in the System Menu will allow you to conduct upgrades when required. To upgrade your Trio Micro System, please follow the below instructions: 1. Visit www.grundig.net.au to see if there is any software upgrades available. 2. Download the software and instruction guide and follow he steps outlined. 3. Select yes in the software update options and then follow the prompts. 18 Product Specifications Model Number GMSX900DABIP Speaker Power 2 x 10W RMS Power supply AC 100V-240V, 50/60Hz, DC 12V/3A Bandwidth FM radio with RDS, tuning range from 87.5MHz to 108MHz DAB+ radio, tuning range from 174MHz to 240MHz Inputs Outputs USB jack for software upgrades Auxiliary audio input Composite video output Digital output via optical output (only DAB+ and FM modes) Accessories Dimensions IR remote control 5 iPod Cradles 420mm x 120mm x 150mm 19 Troubleshooting If a fault occurs, first check the points listed below before taking the radio for repair. If you are unable to solve a problem by following the below hints we suggest you consult you retailer or service professional. WARNING: Under no circumstances should you try to repair the unit yourself, as this would invalidate the warranty. PROBLEM No sound The buttons on the unit are not responding Radio poor reception iPod/iPhone is not charging POSSIBLE CAUSE Your headphones may be connected. The volume may have been set to low. Adjust the volume level of the radio. The power cord may not be connected correctly/firmly. Reconnect the power cord firmly. Ensure that the speaker cables are connected correctly. Electrostatic discharge or interference from other electrical equipment. Turn the unit off and disconnect the power cord. Wait for 5 – 10 seconds, then reconnect and turn the unit back on There is weak aerial signal or there may be interference from other electrical equipment. Reposition the aerial and the unit to receive the best reception possible. Ensure the aerial is connected. Keep the unit away from other electrical equipment, where interference is possible. Remove the iPod/iPhone from the docking port and check that you are using the correct cradle Reinsert the correct cradle and the iPod/iPhone securely. Make sure you hear it click into the unit. Make sure there are no obstacles between the unit and the remote control. Move closer to the unit. Replace the batteries. iPod/iPhone is not connected properly to the unit. Unable to operate the unit from the remote control SOLUTION Disconnect your Headphones from the unit. There may be obstacles in between the unit and the signal The batteries may be exhausted 20 Warranty Please keep your receipt as proof of purchase. This product is warranted for any defect in the materials or workmanship for one year after the original date of purchase. This product is for normal domestic and office use only. This warranty does not cover damage from misuse or neglect, accidental damage, vermin infestation, excessive voltages such as lightning or power surges or any alteration that affects the performance or reliability of the product. In the unlikely event that your product fails to work normally, please contact the GRUNDIG Warranty on 1800 509 394 (Australia) or 0800 450 259 (New Zealand) and have your receipt of purchase on hand. This warranty is subject to the following provisions: It is only valid within boundaries of the country of purchase The product must be correctly assembled and operated in accordance with the instructions contained in the manual This product must be used solely for domestic purposes The warranty does not cover accidental damage The warranty will be rendered invalid if the product is resold or has been damaged by inexpert repair The manufacturer disclaims any liability for incidental or consequential damaged This warranty is in addition to, and does not diminish, your statutory or legal rights. PO BOX 6287 Silverwater NSW 1811 www.grundig.net.au GRUNDIG Warranty: 1800 509 394 Australia GRUNDIG Warranty: 0800 450 259 New Zealand 21 PO BOX 6287 Silverwater NSW 1811 www.grundig.net.au 22