1
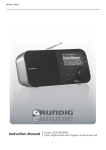
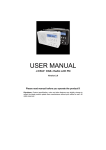
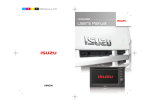
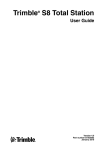
Grundig Roam
DAB+ PORTABLE DIGITAL RADIO
GPR800DAB
The Gold Technical Support Line: 1902 215 259
(Charges will apply at $2.95 per minute)
1
Grundig Roam
Introduction
Warranty
Thank you for buying this GRUNDIG product, which is
In the unlikely event that your product fails to work
designed to give you many years of trouble-free service.
normally, please call the below free phone numbers to
You may already be familiar with using a similar unit, but
discuss the problem with one of our qualified service
please take the time to read these instructions.
engineers.
Safety is important
Australia
Your safety and the safety of others is very important.
GRUNDIG Warranty: 1800 509 394
Therefore, please ensure you read the “Safety
New Zealand
Instructions carefully” before you operate this unit.
GRUNDIG Warranty: 0800 450 259
1
Grundig Roam
CONTENTS
Introduction…………………………………………. 1
Generation Operation……………………………… 15-16
Safety Instructions….……………………………… 3-5
Troubleshooting…………………………………….
17
Controls and Features…………………………….
6-8
Specification………………………………………..
18
Basic Operation…………………………………….
9
Warranty…………………………………………….
19
DAB+ Station List…………………………………..
10
FM Mode……………………………………………. 10-11
Store and Play Preset Stations…………………..
12
Setting Menu………………………………………..
13-14
2
Grundig Roam
Safety Instructions
provide several years of service. When the batteries can no
longer store sufficient energy to power your radio after
Ensure that you read all of these safety instructions
having been charged they should be replaced.
carefully, before operating this unit.
Replacement battery packs will be available from GRUNDIG.
Safety Considerations
The old battery pack should be recycled or disposed of in an
environmentally friendly way as prescribed by your local
•
Do not use the unit in humid or damp conditions.
•
Do not allow the radio to get wet. You must keep it
•
Do not cover the ventilation holes as this may cause
Do not use any liquids or aerosol cleaners, as this may
the unit to overheat.
damage the unit. Use a soft, dust free cloth.
No naked flame sources, such as candles or
Servicing
regulations.
Cleaning
away from dripping or splashing water.
•
•
cigarettes, should be used near the unit.
There are no user serviceable parts in the unit. When
Do not place any objects filled with liquids, such as
servicing, refer to qualified service person.
vases or jugs, on or near the unit.
Consult your retailer if you are ever in doubt about the
Battery Pack
installation/operation/safety of the product.
The battery pack which is built into your radio is designed to
3
Grundig Roam
What is DAB+
automatically and tunes-in all of the available stations in
your area.
DAB+ was developed in Europe by a consortium of
Scrolling Text
broadcasters and manufacturers. DAB+ uses digital
compression techniques to transform the source material,
Broadcasters can transmit text to your radio. This way you
i.e. music and speech, into better quality audio.
can read the name of the DJ, artist, song title or any other
Interference Free Reception
information they choose.
Analogue systems suffer from an effect called “multipath
DAB+ Coverage
distortion”. This is because waves do not behave in an
Check your local coverage at
orderly fashion, but bounce and reflect off buildings etc.
DAB+ sees this as an advantage and uses the directed
www.digitalradioplus.com.au, or alternatively text
and reflected signals to reinforce the end result, allowing
0409-DRPLUS to receive an SMS confirming whether you
for better service more of the time.
reside in a DAB+ broadcast area.
No Need to Re-tune
A single DAB+ frequency can be used to cover the whole
of the Australia, so solving many problems experienced
with the earlier analogue system. DAB+ scans
4
Grundig Roam
Getting Started
Using Headphones
Carefully remove your DAB+ Digital Radio from the box.
To listen to your DAB+ Digital Radio via Headphones, you will
We recommend keeping the packaging for future reference.
require headphones with a 3.5 mm diameter stereo plug
In the Box
(included). The Headphone Socket is located on the back of
Inside the box you will find:
the unit. Plug the Headphone Jack into the Headphone socket,
•
DAB+ Radio (Main Unit)
the speaker sound will automatically turn off once the
•
Headphones
headphones are plugged in.
•
User Guide
•
Plug Type Power Adaptor
•
USB Cable
51
Grundig Roam
CONTROLS AND FEATURES
FRONT VIEW
1. Antenna
2. Display Screen
3. Navigate Button
4. Preset Button
5. Mode Button
6. Info Button
7. Menu Button
6
Grundig Roam
SIDE VIEW
Rechargeable Battery
TOP VIEW
This unit includes a rechargeable Li-ion Polymer battery pack.
For most efficient use, please make sure you charge the unit
overnight before using. However if this is not possible then
charge for 4 hours prior to operation (this is the minimum time).
7. Volume Button
The Grundig Roam has a charge management circuit that
8. Standby Button
ensures that it is never over-charged. It will automatically stop
charging, when the battery is full.
9. Key-Lock Button
10. Headphone Socket
7
Grundig Roam
BOTTOM VIEW
BACK VIEW
SCREEN VIEW
11. Recharge Socket
12. Recharge Indicator
Light (The blue light
displays when the
unit is charging)
13. Loudspeaker
8
Grundig Roam
BASIC OPERATIONS
Adjusting the volume level
Press the
Press the
button to switch the radio on or off.
or
buttons on the side of radio to adjust the
Note: When you switch on your Roam Digital Radio for
volume level.
the first time, it will automatically scan and store all
Changing Stations
To change the radio station, press the MENU button and the
available DAB+ Stations. When the scan is complete the
‘station list’ will appear on the display. Press the Navigate Button
last radio station found will begin to play.
to confirm. Then push the Navigate Button left or right to scroll
Press the Navigation Buttons to browse through the radio
through the station list and find the station you want to listen to.
station list.
9
Grundig Roam
DAB+ STATION LIST
Station Scan
Tuning to a FM station
Manual Tuning
Note: For best results - place your radio in an area with
To manual search for a FM station move the Navigate Button
strong signal position. Press the Navigate Button
to the left or right to manually change the frequency by
backwards to return to the previous Menu, if required.
0.05MHz per step.
To search for new digital radio stations, press the Menu
Button and then use the Navigate Button to scroll through and
Auto Tuning
find ‘Full scan’. Then press the Navigate Button to confirm.
To conduct an auto scan in FM Mode push the Navigate
The radio will search for any new stations and update the
Button to the left or right to select Auto Scan from the Main
station list automatically.
Menu. Then press the Navigate Button to confirm. The radio
will automatically search for the next available station and
FM MODE
begin to play.
To listen to FM stations on your ROAM Digital Radio, press the
Mode Button to select the FM option. To go back to DAB+,
press the Mode Button again.
10
Grundig Roam
Scan Setting
Audio Setting
To change the Scan Settings, press the Menu Button and
To change the Audio Settings, press the Menu Button and
scroll through the options to find the ‘Scan Setting’
scroll through the options to find the ‘Audio Setting’
Sub-Menu. Once found, press the Navigate Button to
confirm.
In the Scan Setting Sub-Menu, move the Navigate Button up
or down to select either Strong Stations Only (this will only
show the strong signal stations and remove weak stations) or
All Stations (this will display all possible stations). When you
Sub-Menu. Once found press the Navigate button to confirm.
In the Audio Setting Sub-Menu, move the Navigate Button up
or down to select either Stereo Allowed or Forced Mono.
When you have highlighted your selected option, press the
Navigate Button to confirm.
have highlighted your selected option, press the Navigate
Button to confirm.
Note: If you wish to go back to the previous Menu to
change any options, move the Navigate Button
downwards to go back.
11
Grundig Roam
Store and Play Preset Stations
Storing Preset Stations
Playing a Station Preset
You can store up to 40 of your favourite stations in both DAB+
To play a station preset, press the Mode Button to select
and FM mode.
either DAB+ or FM. Then press the Preset Button. ‘Preset
Storing a Station
Recall’ will be shown on the display and then you can use
the Navigate Button to select the preset number you want
To store a DAB+ or FM Station as a preset, select and
to play and press to confirm and play.
play the station you want to store. Then press & hold the
Navigate Button until ‘Preset Stored’ is displayed on the
screen. Use the Navigate Button to select the preset
number you want to store. If the chosen preset location
already contains a station, this will be shown on the
display. Press the Navigate Button to confirm and store
the preset.
12
Grundig Roam
Setting Menu
DAB MODE
FM MODE
Please refer to the Menu chart on the right. This shows
you the setting options provided to you in this radio. To
enter the Main Menu, press the Menu Button and the
first item you will see on your display will be ‘Station
list’. Move the Navigation Button in an upwards or
System
downwards motion to cycle through the following
options. To confirm press the Navigate Button.
13
Grundig Roam
DRC (Dynamic Range Control)
You can choose from Alphanumeric (this will display all
Setting the DRC allows you to set the compression level of the
stations in alphanumeric order) and Ensemble (this will list all
station being played.
active stations first).To access and change these settings,
Note: If you set the DRC to off, there will be no sound
press the Menu Button and then move the Navigation Button
compression. If you set the DRC to low, there will be little
upwards or downwards to select the ‘Station Order’ Menu.
compression and if you set the DRC to high, there will be
Press the Navigate Button to confirm and then select the
maximum compression placed on the station you are
setting in the Menu you which to set.
Trim
listening to.
Press the Menu Button and then move the Navigation Button
The Trim setting allows you to remove any non-receptive
upwards or downwards to select the ‘DRC’ Menu.
stations from your station list in DAB+ Mode. This will mean
Press the Navigate Button to confirm and then select the setting
only strong stations will be included in the DAB+ List.
in the Menu you which to set.
Station Order
To change the Trim setting, enter the Main Menu and use the
Navigate Button to scroll through the settings. Press the
You can change the station order that the DAB+ stations are
Navigate Button to confirm and select Trim option.
displayed in.
14
Grundig Roam
Backlight Settings
If you wish to change the backlight display, press the Menu
Button and then move the Navigation Button upwards or
downwards to select the ‘System’ Menu. Press the Navigate
Button to confirm and then select the ‘Backlight’ setting in the
Menu. Press the Navigate Button to confirm. Select from
‘High’ (this will set the backlight display to strong bright light),
‘Medium’ (this will set the backlight display to medium bright
light), and ‘low’ (this will set the backlight display to weak
light).
Language
If you wish to change the display language, press the Menu
Button and then move the Navigation Button upwards or
downwards to select the ‘System’ Menu. Press the Navigate
Button to confirm and then select the ‘Language’ setting in the
Menu. Press the Navigate Button to confirm. Then select the
language you wish to use and confirm.
SW Version
If you wish to view the radio software, press the Menu Button and
then move the Navigation Button upwards or downwards to
select the ‘System’ Menu. Press the Navigate Button to confirm
and then select the ‘SW Version’ setting in the Menu. Press the
Navigate Button to confirm and the information will be displayed.
15
Grundig Roam
Enable Key-lock
Factory Reset
When key-lock is enabled, the control buttons are deactivated
to avoid accidental operation in your bag etc.
Press and hold the
button on top of unit, until
‘Key-locked’ is displayed on the screen. The buttons will now
be locked. Press and hold the
button again and the lock
function will be disabled.
Information
To view the station information, press the INFO Button
Conducting a Factory Reset, will erase all unit settings, and will
return the unit back to the initial settings. The radio will
automatically run a full DAB+ scan and compile a new station list.
To activate the Factory Reset, press the Menu Button and then
move the Navigation Button upwards or downwards to select the
‘System’ Menu. Then select the “Factory Reset” option and select
Yes with the Navigation Button to confirm.
repeatedly and the information will be displayed in the second
line of the display.
16
Grundig Roam
Troubleshooting
If a fault occurs, first check the points listed below before taking the radio for repair. If you are unable to solve a problem by following the
below hints we suggest you consult you retailer or service professional.
WARNING: Under no circumstances should you try to repair the unit yourself, as this would invalidate the warranty.
PROBLEM
POSSIBLE CAUSE
SOLUTION
No Sound
Headphones may not be connected properly.
Reconnect your Headphones firmly.
The volume may have been set to low.
Adjust the Volume level of the radio.
The Buttons on the Unit
Electrostatic discharge or interference from
Turn the unit off and wait for 5 – 10 seconds
are not Responding
other electrical equipment.
and turn the unit back on
Radio Poor Reception
There is weak aerial signal or there may be
Keep the unit away from other electrical
interference from other electrical equipment.
equipment, where possible.
17
Grundig Roam
SPECIFICATIONS
Model number ………………….........
GPR800DAB
Power Supply…………………............
DC 3.7V (Built-in Rechargeable Battery)
Frequency range (DAB+) ………......... DAB+ (174-240MHz)
FM (87.5-108MHz)
Weight (incl. headphones) ……….......
48 grams
18
Grundig Roam
Warranty
Please keep your receipt as proof of purchase. This
In the unlikely event that your product fails to work
product is warranted for any defect in the materials or
normally, please contact the GRUNDIG Warranty on
workmanship for one year after the original date of
1800 509 394 (Australia) or 0800 450 259 (New
purchase. This product is for normal domestic and office
Zealand) and have your receipt of purchase on hand.
use only. This warranty does not cover damage from
This warranty is in addition to, and does not diminish,
misuse or neglect, accidental damage, vermin infestation,
your statutory or legal rights.
excessive voltages such as lightning or power surges or
any alteration that affects the performance or reliability of
PO BOX 6287
the product.
Silverwater NSW 1811
www.grundig.net.au
19
Grundig Roam
PO BOX 6287
Silverwater NSW 1811
www.grundig.net.au
20