1
Contents
Table of Contents
Preface
iii
Before you begin...
Please read this
About This Manual...
Comments?
iii
iv
1
Getting Started
1
Introduction
About RamFactor
RamFactor Installation
Into the Computer
1
1
2
3
2
AppleWorks Expander™
About the AppleWorks Expander disk
What You Will Need
Important Notes
AppleWorks Expander Instructions
About the New Features
5
5
6
7
8
12
3
AppleWorks for the Apple ][ Plus
Introduction
19
About the AppleWorks Expander...
19
Software Required
20
Minimum Hardware Required
20
Optional Hardware
20
Enhancing AppleWorks
20
Alternate AppleWorks Keyboard Commands 21
Lower Case Characters
21
Optional Shift Key Hardware Modification 22
4
19
___
Putting RamFactor to Work
Introduction
ProDOS RAMdisk
AutoCopy Instructions
DOS 3.3 RAMdisk
Copying Files to DOS 3.3 RAMdisk
Pascal 1.3 RAMdisk
CP/AM 5.1 RAMdisk
i
23
23
23
25
28
29
31
32
Contents
5
33
RamFactor Partition Manager
About the Partition Manager
Accessing the Partition Manager
Selecting a RAMdisk Partition
Configuring Partitions
Booting a Partition
Changing Partitions
33
33
34
34
37
37
RamFactor Technical Reference
Introduction
Adding Memory to RamFactor
Memory Chip Installation
RamFactor Diagnostic Program
Description of RamFactor
RamFactor Partition Manager Firmware
Using ProDOS
Using Pascal 1.3
Using DOS 3.3
Operating System Identification
RamFactor Hardware
Finding the RamFactor Card
Finding RamFactor’s Size
Protocol Converter
39
39
40
41
41
41
43
43
43
44
45
45
46
48
6
39
Appendices
A
RamFactor Battery Backup Option
53
RamFactor Memory Test
54
Copying Disks with Filer
55
Applied Engineering Technical Support
56
For More Information...
57
B
C
D
E
ii
Preface
Before You Begin...
PLEASE read this...
Using RamFactor is not difficult. You don’t have to be a programmer
or computer whiz, but you must have a basic understanding of the overall
operation of your computer system. Learning several new things at one
time can be very frustrating, so before jumping into this manual, please
read the owner’s manual that came with your computer and become
familiar with any software you wish to use with RamFactor. Everything
you need to know about using RamFactor should be in this manual. We
ask you to read it carefully and thoroughly. For additional sources of
information, please refer to Appendix B.
About This Manual...
This manual is included with the Applied Engineering RamFactor
peripheral accessory card. It explains what RamFactor is, how it can
enhance the performance of your software and computer system, and how
to install and use it. How you intend to use RamFactor will determine
which chapters you need to read. Use the chapter summary, below, to
decide which chapters are applicable to your needs.
Chapter 1:
Getting Started provides an overview of RamFactor
and the instructions for installing it in your computer.
Chapter 2:
AppleWorks Expander tells you how to use
RamFactor and the AppleWorks Expander disk to
enhance the performance of AppleWorks.
Chapter 3:
AppleWorks for the Apple ][ Plus is intended for
owners of Apple ] [ Plus computers and those who want
to enhance AppleWorks V1.2 or 1.3 for use with a //e or
IIGS. It covers the modifications required to allow
AppleWorks to run on the Apple II Plus and the
enhancements gained from the ] [ Plus modification.
Chapter 4:
Putting RamFactor to Work explains how to use
RamFactor as a RAMdisk, a solid state disk drive.
-
Chapter 5:
RamFactor Partition Manager tells you how to
divide RamFactor’s memory into separate work areas,
or partitions.
Chapter 6:
RamFactor Technical Reference tells you how to
install additional memory chips on your RamFactor card
and contains information about using the RamFactor
iii
Preface
diagnostic program. This chapter also contains
technical information required only by hard-core
programmers.
Appendix A:
RamCharger gives a brief overview of the
RamCharger™ Battery Backup Option available for
RamFactor.
Appendix B:
RamFactor Memory Test instructs you on how to
run the test included on the AW 2 Expander disk to
check the basic operation and hardware reliability of
your RamFactor card.
Appendix C:
Copying disks with Filer gives you step by step
instructions on how to use the Filer utility program to
make backup copies of your disks.
Appendix D:
Applied Engineering Technical Support
provides you with information on what to do if things
go wrong.
Appendix E:
For More Information is a list of recommended
books on topics related to your computer’s hardware
and software.
Comments?
We have tried to make this manual as informative, understandable,
and error-free as possible. If you have any comments or suggestions
regarding this manual or any other manual, we would be glad to here
from you.
Please address any comments or suggestions to:
Applied Engineering
P.O. Box 798
Carroliton, Texas 75006
Attention: Manager, Technical Publications
iv
Chapter 1
1: Getting Started
Introduction
This chapter does just what its title says, it gets you started. It
provides a brief introduction to RamFactor, tells you what you need to
install the RamFactor card in your computer, and then gives you the step
by step installation instructions. Please take a few moments to read this
chapter thoroughly before attempting the installation. The RamFactor card
and its many features are covered in greater detail later in the manual.
About RamFactor
RamFactor is a plug-in accessory card which expands the Random
Access Memory (RAM) capacity of your Apple ][, Apple ][ Plus, or
Apple lle personal computer. But, it is more than just a memory
expansion card! The RAM on the RamFactor card expands the
computer’s storage capacity by emulating a solid state disk drive, or
RAMdisk. In other words, the computer recognizes the RamFactor card
as a peripheral device, a disk drive, not as just more memory.
Special programs, permanently stored on the RamFactor card
(computer jargon: "firmware”), allow you to separate RamFactor’s
memory into individual ProDOS, DOS 3.3, CP/AM 5.1, and Pascal 1.3
work areas, or “partitions.” This allows you to very quickly exit from one
program (or operating system) and boot into another by simply selecting a
menu option. And without changing a single disk!
Although RamFactor’s expanded memory normally functions as a
RAMdisk, it can also be used to enhance the performance of certain
application programs specially written to take advantage of its extra RAM.
For example, AppleWorks 1.3 uses the memory to expand its Desktop
space.
What is a RAMdisk?
A conventional (mechanical) floppy or hard disk is a peripheral
mass storage device capable of storing information on a
recording medium, usually a magnetic disk. A RAMdisk uses
Random Access Memory to emulate such a peripheral device.
The conventional disk drive uses many moving mechanical
parts to store and retrieve it recorded information. Since the
RAMdisk has no moving parts, it can read and write files as
fast as the computer. Some larger disk-intensive programs,
such as AppleWorks, when loaded to and executed from a
RAMdisk, run appreciably faster.
1
Chapter 1
RamFactor Installation
This section tells you everything you need to know about installing
RamFactor in your computer. Here are some important points about
RamFactor’s hardware requirements:
RamFactor can be installed in an Apple IIGS, //e (standard or
enhanced), ][ Plus, Laser 128, or Franklin computer. (It cannot
be installed in the Apple //c, the //c has no slots.)
RamFactor does not function as an 80 column text card. If you
wish to run software written for 80 column display, you must
have an 80 column card installed in your computer.
◊ The Apple //e requires an 80 column text card or extended 80
column text card installed in its auxiliary slot. Of course, an Applied
Engineering RamWorks® auxiliary memory expansion/80
column card is recommended!
◊ Apple II, Apple ][ Plus, and Franklin Ace 1000 series
computers require an Applied Engineering ViewMaster 80 ( -or a
Videx-compatible 80 column card.)
◊ The Apple IIGS, Laser 128, and the Franklin Ace 2000
series computers have built-in extended 80 column display
circuits.
If you have more than 1.5 megabytes of RAM (including
RamFactor and auxiliary slot memory expansion cards) installed in
your system, Applied Engineering recommends that you protect
your Apple system from excessive heat build-up with a cooling
fan, such as the System Saver® from Kensington Microware.
These specially designed fans are available from many computer
dealers.
When the Apple power supply was originally designed, it was
capable of providing more than adequate power for the memory
and accessory cards available at the time. Newer expansion cards
with more memory and more features consume more power,
possibly taxing the Apple power supply to its limit.
If most of the slots in your computer contain expansion cards
or the system has a large amount of RAM, you may overload the
original power supply. The power supply has an internal
protection circuit which turns the power supply off for a second
and then turns it back on to check for the presence of the overload
condition. If your computer mysteriously reboots itself
intermittently or the power indicator light inside the computer
flashes, your system may require more power.
2
Chapter 1
Applied Engineering offers two solutions to the power users:
Solution 1:
RamCharger™ RamFactor Auxiliary Power
and Battery Back Up. This solution provides constant,
uninterruptable power to RamFactor, independent from the
Apple power supply. This way, information stored in
RamFactor is protected in the event of a power failure.
RamCharger also decreases the burden on the Apple power
supply. More details on the RamCharger option are given in
Appendix A.
Solution 2: Applied Engineering High Output power
supply. The Apple power supply is capable of a maximum
output of 35 Watts. (The Watt is a unit of power.) The High
Output supply, which installs in place of the original supply,
has an output rating of 77 Watts.
Into The Computer
Installing RamFactor in an Apple or Franklin Ace 1000 series
Computer
1. Switch the computers power switch to the OFF position, but
leave the power connector plugged in.
2. Remove the top cover of the computer.
3. Discharge any static electricity that may be on your body or
clothing by gently touching the power supply. This is very
important. Static electricity can seriously damage both the
card and the computer.
4. Remove the RamFactor from its anti-static bag. Do not touch
the gold edge connectors.
5. Insert the RainFactor’s gold edge connector in any expansion
slot except slot 3. If you have an Enhanced Apple //e and wish
to boot from the RamFactor card when a Control-Reset is
executed, install the RamFactor in slot 7. If you will be using
Pascal 1.3, install the RamFactor in slots 4, 5, or 6. Do not
attempt to install the RamFactor card in the auxiliary slot.
IIGS users can boot from the RamFactor in any slot by
accessing the Slots option in the Control Panel Menu and
setting the Startup option to the correct slot.
6. Replace the computer’s top cover. Installation is complete.
3
Chapter 1
Installing RamFactor in a Franklin Ace 2000 series
Computer:
1. Turn the power switch to the OFF position. Leave the
computer plugged in.
2. Remove the cover in accordance with the instructions provided
in your Franklin’s User’s Reference Manual.
3. Refer again to the User’s Reference Manual for instructions on
installing an expansion card in expansion slot S4/S7.
Configure the jumper-clip to emulate either slot 4 or 7.
4. Replace the cover. Installation is complete.
Installing RamFactor in a Laser 128 Computer:
1. Turn the power switch to the OFF position. Make sure the
POWER indicator light on the front panel is off. Leave the
computer plugged in.
2. Remove the RamFactor card from its protective anti-static bag.
Do not touch the gold edge connector.
3. The use of the Laser 128 two-slot expansion box is
recommended. Insert the gold edge connector into the desired
slot of the expansion box. If you wish to install RamFactor
directly into the Laser 128, position the RamFactor card
component side up and insert the gold edge connector into the
expansion slot on the left side of the Laser 128 computer. Be
very careful not to touch the exposed RamFactor card when
the computer’s power is on!
4. Installation is complete.
What Next?
You don’t have to test your RamFactor card, but if you’d like to,
Appendix B tells you how.
What you should read next in this manual depends on how you will
use RamFactor. You may stop right here if you will be only using
RamFactor to improve the performance of a program written specifically
for RamFactor or the Apple Memory Expansion Card. If you want to use
RamFactor and the AppleWorks Expander disk to enhance the
performance of AppleWorks, read Chapter 2. Or skip to Chapter 3 for
details on using RamFactor as a RAMdisk.
4
Chapter 2
2: The AW 2 Expander™ for RamFactor
About the AppleWorks Expander disk
AppleWorks is the best-selling program from Apple Computer that
combines a word processor program, data base program, and spreadsheet
program into one “integrated software package. Earlier versions of
AppleWorks, written for an Apple //e with only 128K of RAM, are
limited to an AppleWorks Desktop size of 55K. AppleWorks version 1.3
and 2.0 will automatically recognize the extra RAM available on
RamFactor and Gs-RAM and use this memory to expand the AppleWorks
Desktop size. This allows the AppleWorks user to create larger individual
Desktop files, but does little else to enhance performance. The AW 2
Expander takes care of the enhancements!
The AW 2 Expander modifies the AppleWorks 2.0 program to
recognize and use the additional memory provided by Applied
Engineering’s memory enhancement products. It will also add
enhancements to AppleWorks 1.3 and patch AppleWorks 1.2 through 2.0
so that it will run on an Apple ][ Plus. (1.3 users and ][ Plus users, refer
to the chapter, AppleWorks for the Apple ][ Plus for details.)
AppleWorks enhancements created by the AW 2 Expander include:
~ Increased Desktop Size (for RamWorks & Z-RAM products)
~ Up to 22,600 records in the Data Base (versus 6350 records)
~ Up to 22,600 lines in the Word Processor (versus 7250 lines)
~ Word Processor and Data Base Clipboard expanded to 2,042 lines
(versus 250)
~ Multiple disk file-saving capability
~
~
~
~
Printer Buffer (for RamWorks and Z-RAM products)
Print-file cache
Buffer size option (for IIGS)
Reserve RamFactor size for use as a RAMdisk (for RamFactor--see
note for RamWorks/Z-RAM in the About the New Features section)
~ On-screen time display option (with ProDOS clock)
~ Data Base time-stamp capability option (with ProDOS clock)
~ Expander options menu (accessible whenever AppleWorks is
booted)
5
Chapter 2
The AppleWorks 2 Expander is a menu driven utility program which
will automatically add the enhancements to your AppleWorks 2.0
STARTUP and PROGRAM disks. The AppleWorks Expander
modification is required only once. Even if you add memory to your
RamFactor you won’t need to run this utility again. After the
modification, AppleWorks will still function as before, except it will have
the added features.
Also contained on the AW 2 Expander disk are several test programs
you can run to verify the operation of your Æ memory expansion card
(e.g. RamFactor, RamWorks, GS-Ram or Z-RAM).
What you will need...
~
An Apple IIGS, //e or compatible computer system capable of
running an unmodified version of AppleWorks 2.0.
or
~
An Apple IIGS, //e or compatible computer system capable of
running an unmodified version of AppleWorks 3.1. (See
Chapter 5.)
or
~
AppleWorks 1.3 or 2.0 and an Apple II Plus (or compatible)
with a ViewMaster 80 (Videx-compatible 80 column card) in
slot 3, a 16K Language Card in slot 0 (or TransWarp
accelerator), and a RamFactor in any available slot. (See
Chapter 5.)
~
Backup copies of both your AppleWorks disks and your
AW 2 Expander disk. See Appendix C of this manual or
your Apple User’s Guide for information on making
BACKUP disks.
6
Chapter 2
____________________________________
IMPORTANT NOTES:
________________________
• We recommend that you use the AW 2 Expander to enhance AppleWorks 2.0
(or later). V2.0 is available from your authorized Apple dealer. If you have
AppleWorks 1.2 or 1.3, or if you are using an Apple ][ Plus, refer to the next
chapter, AppleWorks for the Apple][ Plus, for a list of features.
•
If you are using AppleWorks 1.3 with your RamFactor, the AW 2 Expander
will use the Apple][ Plus enhancements to modify it. This means that the
desktop will not be enlarged, nor will your maximum number of lines/records
be increased.
•
If you are using an Applied Engineering RamWorks card or a GS-RAM card
along with your RamFactor card, you can modify your AppleWorks 2.0 disks
with either the AW 2 Expander program provided with those boards or with
the AW 2 Expander for RamFactor program, but not with both. Both
programs are virtually identical and either program will work. AppleWorks
will automatically use your RamWorks (128k or larger) or GS-RAM card for
expanding the Desktop and leave the RamFactor memory free for use as a
RAMdisk.
•
If you are using V1.3 with your RamFactor and want to enlarge the desktop
and increase the maximum number of records and lines you will need the
RamFactor Expand program available from Applied Engineering sales.
•
Do not modify your ORIGINAL AppleWorks disks! (See Appendix C.)
•
Use this utility only on unmodified copies of AppleWorks STARTUP and
PROGRAM disks. Any patches to AppleWorks required by other programs,
such as Pinpoint or MacroWorks, should be made after the AppleWorks
Expansion. If you have an Applied Engineering TimeMaster card installed in
your computer, the AppleWorks Expander will install AppleWorks Time
Utilities option for time display and data base date stamping.
•
These instructions assume that you already know how to use AppleWorks.
The AW 2 Expander program uses the same screen displays and keyboard
input routines (“user interface”) as the AppleWorks program. If you need a
quick review, read Throughout AppleWorks in your Using AppleWorks
manual.
•
There is an AppleWorks Word-Processor file on the AW 2 Expander disk
entitled “READ .ME.” Please do so. This document will contain information
about any recent changes to the software or updates to the documentation.
•
If you plan to use the Printer Buffer option, you must have a printer interface
which supports Apple’s Pascal 1.1 protocol for status-checking. (Most
newer interfaces do support this standard.) For more information, please
refer to Printer Buffer Option in the section entitled About the New Features.
7
Chapter 2
AppleWorks 2 Expander Instructions
AppleWorks expansion is a two part process. First, you will use the AW
2 Expander utility to modify some of the program files on the
AppleWorks startup and program disks. Then, you will boot the
modified AppleWorks disk and add or change the limits on the enhanced
features by accessing a special options menu.
Part 1 Modifying the AppleWorks disks
-
This is how to use the AppleWorks Expander utility to modify the
AppleWorks STARTUP and PROGRAM disks:
1.
First, make copies of your original AppleWorks disks
and the AW 2 Expander disk.
Filer (provided on the AW 2 Expander disk) or the System Utilities
should be used for this purpose.
2. Boot the copy of the AW 2 Expander disk in your startup
drive.
3.
Select the option, “Execute AppleWorks
Enhancements.”
The Applied Engineering AW 2 Expander copyright screen will
then appear. Read each of the screens, pressing the space bar to
continue, until you reach the “Modify Startup” screen.
4.
Remove the AW 2 Expander disk and insert a copy of
the AppleWorks STARTUP disk in drive one as prompted.
Be sure the WRITE PROTECT tab has been removed from the
disk. As prompted at the bottom of the display screen, press the
space bar to continue or the ESC key to go back to the main menu.
The AW 2 Expander program expects to find the AppleWorks
Startup file, “APLWORKS.SYSTEM,” on the disk in drive one.
If, at this point, the program displays the following message:
Unable to find file.
AppleWorks to modify
Type
prefix
of
type, “AppleWorks” after the slash or enter the complete
ProDOS prefix of the AppleWorks STARTUP disk. If you have
copied the AppleWorks program to be modified into a ProDOS
subdirectory, enter the complete ProDOS pathname of the
subdirectory containing the AppleWorks files. Be sure to include
any slashes (/) for subdirectories. An example ProDOS prefix of
8
Chapter 2
an AppleWorks subdirectory on a Profile hard disk (with a volume
directory name of /PROFILE) might be:
/PROFILE/APPLE WORKS
5.
Press “Y”
When the program finds the AppleWorks disk, it will automatically
determine which version it is, 1.2, 1.3 or 2.0, and display a list of
the modifications it will make. Pressing “Y” in response to the
question, “Do you wish to continue?” will begin the modifications.
Pressing “N” will return you to the main menu.
6.
The message, “Working” will appear at the bottom of the
screen.
The modifications will be made very quickly.
7. Insert the PROGRAM disk and press the space bar.
After the STARTUP disk has been successfully modified, you will
be prompted to remove it from the disk drive and insert a copy
(write enabled) of the AppleWorks PROGRAM disk--unless all of
the AppleWorks startup and program files are contained in the
same directory (i.e. Disk 3.5 or hard disk). If the program and
startup files are on the same directory, no disk swapping is
necessary. The volume directory name of this disk must be the
same as the STARTUP disk. Press the space bar to continue.
8.
Boot the modified disk.
When the modification to the AppleWorks PROGRAM disk has
been completed, the message:
Modification
Successfully
Completed
appears on the screen. The program will beep the computer’s
speaker and exit to the ProDOS Quit code. The modified
AppleWorks disks can now be booted in the normal manner. Note
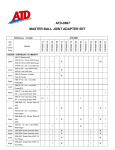
that the modified AppleWorks startup screen now shows an “A”
appended to the version number (ex: V2.OA). (If you used the ][
Plus patch, a "+"will be appended to the version number instead of
an “A. “) See the illustration on the next page.
9.
Make other modifications.
Any modifications required by other AppleWorks accessory
programs should be done at this time. (You may wish to make a
archive copies of the modified AppleWorks disks prior to any other
modifications.)
9
Chapter 2
AppleWorks Version Number
ApplwWorks
version number
(appended)
10. Copy to hard disk.
If you will be using the modified AppleWorks from a hard disk
drive, copy the modified AppleWorks files to the hard disk
according to the instructions provided with your hard disk file
management program.
11. Load AppleWorks onto your RamFactor.
If you want to load AppleWorks onto your RamFactor, here’s how:
~
~
~
~
Select Filer from the disk menu.
Select File Commands (“F”)
Select Copy Files (“C”)
Type in the AppleWorks disk pathname followed by an
equal sign (ex: /AppleWorks/=). The equal sign is a
wildcard command meaning, “copy all files.”
~ Type in the Pathname for your RamFactor followed by an
equal sign (ex: /Ram7/=).
~ Press the “Return” key. A list of the files being copied will
appear on the screen.
~ Copy is complete. The AppleWorks program can now be
run from your RamFactor.
The next very important step, explained in Part 2 of this
procedure, is to access the enhanced AppleWorks’ Getting
Started options menu and configure the program disk’s
parameter file with the desired expander options. (It s not as
difficult as it sounds.)
10
Chapter 2
Part 2 Set the AppleWorks enhancement options
-
1.
Boot the AppleWorks startup disk just like you normally
would.
(Notice that the Expander has appended an “A” (or a “+“) to the
AppleWorks version number near the lower right corner of the
startup screen
2.
Remove the startup disk and insert the program disk
when the startup disk has finished loading. DO NOT press
return. Press the ESCape key instead.
If you boot AppleWorks from a Disk 3.5 or a hard disk, press the
ESC key when you are prompted with: “Press the Space
Bar to continue."
Note: You do not need to access the Getting Started
options menu each time you boot AppleWorks. Use the
Getting Started menu to set the enhanced AppleWorks
options only.
The current enhancement options configuration will be read from
the parameter file (SEG.PR) on the AppleWorks program disk and
displayed in the Getting Started option menu. The configuration
shown below contains the default settings. These default settings
remain in effect until you change them and save the new
configuration back to the AppleWorks program disk.
The Getting Started options menu:
File: None
GETTING STARTED
======================================================================
Type number, or use arrows, then press Return
11
1113K Avail.
Chapter 2
3. Use the Up Arrow and Down Arrow keys to highlight
the option you want. Use the Return key to select a
highlighted option.
For more information on the options, refer to the section
entitled, About the New Features, in this chapter.
4. Save the new configuration back to the AppleWorks
program disk by selecting the menu option, “Save
Configuration,” after you have made the desired changes.
5. Choose the option, “Continue with
AppleWorks” to continue booting the AppleWorks
program.
If you did not save your new configuration, the new one will be
in effect only until you quit the AppleWorks program. The next
time you boot AppleWorks, it will use the previous (saved)
configuration.
About the New Features
The following paragraphs describe the new features of the Expanded
AppleWorks and the instructions for using them. Please read this section
very thoroughly.
Desktop Expansion
The Desktop-expansion (over 56K) feature already built into AppleWorks
2.0 requires one of the following cards:
RamFactor Card (Apple //e only)
Apple II Memory Expansion Card (Apple //e only)
GS-RAM or GS-RAM Plus (Apple IIGs only)
The built-in desktop expansion feature will automatically recognize and
use RamFactor and GS-RAM memory as increased Desktop space. The
AW 2 Expander enhancements allows you to partition that space for use
as RAMdisk. See description following.
The AW 2 Expander software allows AppleWorks to use RamWorks or
Z-RAM memory to expand the Desktop, enabling you to work with larger
Desktop files. It does not increase the maximum number of files (12) you
can have on the Desktop at one time. The Desktop expansion feature
requires a minimum of 192K of system memory (128K of auxiliary
memory).
12
Chapter 2
Additional Records and Lines
With sufficient memory, the maximum number of Word Processor lines
available with the unenhanced AppleWorks 2.0 is limited to 7,250; the
maximum number of data base records is 6,350. The enhanced version
expands the maximum number to just over 22,600 for both.
When a RamFactor, GS-RAM or GS-RAM Plus is used, the enhanced
AppleWorks automatically sets the number of lines and records to the
maximum (22,600) and any changes to the Maximum Records
/ Lines option will be ignored.
When a RamWorks or Z-RAM card is used, the Getting Started options
menu allows a choice of maximum lines and records. (The initial default
is 12,000) In order to achieve the extraordinary increase in the number of
lines and records, some Desktop space has to be sacrificed. As you set
the maximum lines and records, remember that each additional 1000
lines/records requires about 2K of memory (Desktop) space.
Clipboard Expansion
The standard AppleWorks clipboard is limited to only 250 lines of
information. The enhanced AppleWorks clipboard expansion increases
the clipboard size for the Word Processor and Data Base functions to
2,042 lines. Only clipboard activities within and originating from the
Spreadsheet function remain limited to 250 lines.
AppleWorks Auto-load Feature
Note: The Auto-Load and Preload features described below
require at least 190K of Desktop memory.
AppleWorks 2.0 has a built-in “Preload” feature which will automatically
find your memory expansion card and load the AppleWorks special
functions into memory. This greatly increases the speed of AppleWorks; it
does not have to access the external drive for the PROGRAM disk
information.
AppleWorks 1.3 and earlier did not have the Preload feature but the AW 2
Expander adds a feature to ill, referred to as “Auto-Load,” that performs
much like the Preload feature Apple has added to version 2.0.
AppleWorks 1.3 was designed for use with only 64K of additional
memory, so not all of the AppleWorks program functions are loaded into
memory during program startup; some functions, like displaying help
screens, adding files, or using the clipboard, are left on the disk and
retrieved only when they are needed. RamFactor allows you to “autoload” these functions into memory, minimizing the time consuming disk
13
Chapter 2
accesses and allowing you to move between Desktop files and
AppleWorks’ functions very quickly.
The Auto-Load feature loads the rest of the AppleWorks 1.3 program into
memory. This extends the AppleWorks startup time by about a minute.
The PROGRAM disk startup screen will display a counter indicating the
number of functions remaining to be loaded. (During the countdown it
may appear that the counter has skipped a function. This is because some
functions are relatively small and loaded faster than indicated by the
counter.) Pressing the Escape key during this count-down will stop the
loading of special functions and immediately display the AppleWorks
Main Menu. AppleWorks will access the functions in memory that were
loaded before the Escape key was pressed and access the PROGRAM
disk for those functions which had not been loaded.
The AppleWorks special functions are loaded into RamFactor’s memory,
but they don’t decrease the size of the available Desktop. Magic? Nope!
The functions are originally “hidden” in an unused portion of the
Desktop memory and as the files on the Desktop grow larger, the special
functions are individually “bumped” from memory to make room. If
AppleWorks can’t find a special function in memory it will go back to the
PROGRAM disk.
This brings up an interesting point about the convenience of using the
Auto-Load and Preload features to replace the AppleWorks PROGRAM
disk in drive one of a single disk system. If you have all of the program
functions Auto-Loaded (or Preloaded) in memory, you can first specify
drive one as the standard location of your data disk and then replace your
PROGRAM disk with your data disk. Keep your PROGRAM disk
handy, though. You’ll need to insert it whenever AppleWorks tries to
access something that has been bumped from memory. Please refer to
your AppleWorks Reference Manual for more details on the selection of a
standard location for your data disk.
Note: If you copy all AppleWorks STARTUP and PROGRAM
disk files to the RamFactor and execute the program from its
emulated RAMdisk, the AutoLoad/Preload feature is not
required. This method of executing AppleWorks can be tricky
and should not be attempted by those not familiar with
AppleWorks and Apple ProDOS. (PROfessional Disk
Operating System.)
The Preload feature for version 2.0 as well as the Auto-Load feature for
version 1.3 can be turned on or off with the Getting Started menu option,
Preload AppleWorks onto Memory. 2.0 users can use the
option to turn off the auto-load feature instead of pressing ESC while
AppleWorks is loading. Refer to the AppleWorks 2.0 user’s manual for
more information about the built-in Preload feature.
14
Chapter 2
Multiple Floppy Disk Files
Data storage problems arise when the size of a file on the Desktop exceeds
the amount of storage space on the data disk. A 5.25” floppy disk can
store only 135K of AppleWorks data. A 3.5” disk can hold 800K.
Using the modified AppleWorks, Desktop, files larger than the available
disk space will be segmented, or “split”, and saved in sections to two or
more disks. The following paragraphs explain how to use this feature to
save and load segmented Desktop files.
This seems to be a good time to remind you of Murphy’s Law:
Whatever can go wrong will go wrong.
Back up your Desktop files! A power failure will wipe out anything
currently on the Desktop! It’s always a good idea to have backup copies
of your working data disks, especially if you have large amounts of data
stored on them.
Saving Desktop Files to Disk
When saving a Desktop file which is larger than the data disk space
available, the enhanced AppleWorks will prompt the user with the
following message:
Segmented Desktop File...
Please insert NEXT disk with SAME VOLUME NAME
Note: If a previous version of the file already exists on the
disk, AppleWorks 2.0 will first ask you if you wish to delete
the old file. 1.0 through 1.3 will automatically delete the old
file before the new file is saved.
Remove the data disk from the current disk drive and replace it with the
next data disk. All segments of a given segmented Desktop file MUST be
saved on data disks having the same volume (disk) name as the primary
(first) data disk. There must be at least one block of free space on the first
data disk! If there isn’t, the “unable to begin” error message will be
displayed and you will have to delete a file on the disk or create a new
primary data disk. On subsequent data disks, each appended file segment
(sequential) will be automatically deleted before saving a new segment.
If you discover that you don’t have enough formatted blank disks with the
same volume name, don’t panic! Just use the AppleWorks Disk
Formatter utility under the “Other Activities” menu. First, press the ESC
key to stop saving the Desktop file and to return to the AW Main Menu.
Do not turn the computer off. Doing so will erase the Desktop file from
memory.
15
Chapter 2
Adding multiple-disk tiles to the Desktop
When adding multiple-disk, or segmented, files to the Desktop, the file
MUST be loaded from the data disks in the same sequence as it was
saved. AppleWorks will prompt the user to insert the NEXT data disk(s)
until the file is completely loaded.
If you list the files on disks that contain segmented files you will notice
that the first segment has the filename that you gave it. The next segment
(on the NEXT disk) will have a “.2” appended to the end of your
filename. The next disk in the sequence would have a “.3” appended to
the filename and so on. This is the way AppleWorks keeps track of the
segmented Desktop file sequence. You will probably want to label your
data disks in such a way that you too can keep track of the proper
sequence.
Printer Buffer Option (RamWorks and Z-RAM)
This feature is only available when the AppleWorks Desktop is expanded
using RamWorks or Z-RAM memory. It is not available when only a
RamFactor is used. The Apple IIGS has a built-in print buffer that you
can activate from the Apple IIGS control-panel menu. (The next section
describes Buffer Size Option for the Apple IIGS.)
If your RamWorks or Z-RAM has 256K or more memory, the Printer
Buffer option will automatically enable you to continue working with files
on the AppleWorks Desktop even while your printer is printing. With
sufficient memory, the buffer will support two printers printing at the
same time, each printing multiple files. The relative size of the print
buffer is determined by the amount of available Z-RAM or RamWorks
memory. It does not affect the size of the desktop.
Note: This feature will not work with all printer interfaces.
It was designed to work with all standard interfaces
supporting the Pascal 1.1 protocol for status checking. If
you cannot get this option to work, your interface does not
support this official protocol. The Apple //c serial ports
support this standard, but some serial-to parallel printerinterface converters do not. Contact the manufacturer of
your printer card or converter for details on upgrades.
As the Desktop file to be printed is being loaded to the buffer, the
message “Filling buffer. . .“ will appear on the screen and the
printer will begin printing. If the printer is printing an exceptionally large
file and the computer seems to be locked in the “Filling
buffer. .. "mode, it is probably caused by insufficient buffer space.
The AppleWorks Desktop will return as soon as there is enough space in
the buffer for the remainder of the print file.
16
Chapter 2
Pressing the ESC key while the print buffer is filling will cause
AppleWorks to stop sending the remainder of the print file to the buffer.
Sending an (-Control-C from the keyboard at any time while the printer
is printing will reinitialize (clear) the AppleWorks internal print buffer. If
your printer or printer interface has an internal print buffer of its own, the
printer may continue to print the remaining contents of its buffer even
after the AppleWorks buffer has been cleared.
Buffer Size Option (GS only)
The Buffer-Size option of the Getting Started option menu only affects the
size of the Apple IIGS’ internal print buffer. (Remember to activate the
computers print buffer by using the Apple IIGS control panel.) Since the
print buffer on the Apple IIGS is handled differently from the
RamWorks/Z-RAM print buffer, this feature has no effect when used on
an Apple //e or //c.
The Buffer-Size option of the enhanced AppleWorks Getting Started option
menu lets you allocate the amount of Apple IIGS memory space (up to
64K) to be used for the print buffer. With the Apple IIGS print buffer ON
and the Getting Started Buffer-Size option set to 0 K, the actual buffer size
will be determined by the amount of memory (2K or less) that the Apple
IIGS memory manager can allocate. Please refer to your Apple IIGS
Owner’s Guide for more information about the internal print buffer.
Print-File Cache
One small file (SEG.PR) on the AppleWorks program disk contains
special configuration information about such things as your printer
information, standard location of your data disk, and enhancement
options. The unmodified version of AppleWorks leaves this information
on the program disk and is not preloaded along with the program
overlays. Whenever AppleWorks needs information from this file it
prompts you to reinsert the AppleWorks program disk. The enhanced
version of AppleWorks loads this file into memory at startup and
eliminates the need for the program disk (until overlays are bumped from
memory). Only when you change the contents of this file (i.e.: add,
remove a printer, etc.) does the enhanced AppleWorks prompt you to
insert the program disk.
17
Chapter 2
Reserved RamFactor Size (RamFactor*)
This option allows RamFactor users to partition the desired amount of
RamFactor Memory for use as a RAMdisk. Otherwise, AppleWorks will
use all available memory to expand the desktop. Since the memory on
RamWorks and RamFactor are handled differently, this setting has no
effect when used with RamWorks.
*Note: We have also provided features with the
RamWorks and Z-RAM products that allow you to control
how the memory is used. Refer to the Partition and
ProDrive instructions in each manual.
Time Display/Data Base Time-Stamp Option
This option was designed to read the output of the Z-RAM Ultra clock,
Serial Pro clock, Apple IIGS internal clock, TimeMaster H.0., or any
other ProDOS compatible clock and replace the "Open-Apple-? for
Help” message in the bottom line of the AppleWorks screen with a
current date and time display. This option also allows the AppleWorks
user to enter the current date or time into a Data Base category by typing
the @ character as the only entry in that category. The category name
must contain either the word DATE or the word TIME but should not
contain both. For example, you should not use this feature in a category
named “Date and Time.”
The Getting Started options menu allows 12 hour or 24 hour time and
date display. How the date is displayed on the screen and stamped in the
Data Base is affected by the time display option selected.
The 12-hour (USA format) option displays the date as Month/Day/Year.
The 24-hour (French, German, and military format) option displays the
date as Day/Month/Year
The "AECLK.SYSTEM" file, required by the //c System Clock, Z-RAM
Ultra, and Serial Pro clocks, can be installed to the AppleWorks
STARTUP disk before or after using the AW 2 Expander. The
instructions for installing the AECLK.SYSTEM file are provided in the
appropriate Æ clock~Product user’s manual.
To use the internal clock of the Apple IIGS, the enhanced AppleWorks
must be run under ProDOS 8 or 16, not ProDOS 1.1.1. Refer to your
IIGS manual for details about the internal clock.
18
Chapter 3
3: Apple Works for the Apple ][ Plus!
Introduction
This chapter tells you what you need to modify and use AppleWorks on the Apple][
Plus computer. You should also refer to this chapter if you are using the AW 2 Expander
disk to add certain enhancements to AppleWorks V1.2 or 1.3 for use with your lle or
IIGS. The directions for an optional, easy to install “Shift Key” modification supported
by the modified AppleWorks program is also included in this chapter.
About the AppleWorks Expander and the ][ Plus
AppleWorks was originally written for the Apple //e, not the][ Plus. If you try to
boot the AppleWorks STARTUP disk in a][ Plus system, all you get is the error
message: “APPLEWORKS REQUIRES AN 80 COLUMN //E.” The AppleWorks
Expander is a menu driven utility program which will modify, or patch, your
AppleWorks STARTUP disk, enabling AppleWorks to run on the][ Plus. The
AppleWorks Expander will also make the necessary software modifications to
compensate for the differences between the Apple //e and the Apple ][ Plus. The version
of AppleWorks and the amount and type of memory you have in your Apple ] [ Plus
determine what features and options are available to you.
Here’s what the AppleWorks Expander can do for Apple ][ Plus users:
Enable AppleWorks 1.2, 1.3, or 2.0 to run on the Apple ][ Plus.
Note. The AW 2 Expander will modify AppleWorks 1.2 so that it will run on
a][ Plus but version 1.2 will not recognize the RamFactor’s memory and,
consequently, will not expand the desktop when used with a RamFactor.
Patch AppleWorks to support the ViewMaster, Videx or SuprTerm compatible
80 column display.
Support alternate keyboard commands to emulate Apple lle keys not available
on the Apple][ Plus keyboard.
Preload AppleWorks into memory* for improved AppleWorks speed; fewer
disk accesses (for versions 1.3 and 2.0 with a RamFactor).
Give AppleWorks multiple disk file-saving* capability.
Reserve RamFactor memory* for use as a RAMdisk (for V1.3 and 2.0).
Allow on-screen AppleWorks time display*. (Option for ProDOS compatible
clock cards.
Support Data Base time-stamp* (option).
*These features are also added to the 1.2 and 1.3 versions for use on a IIe or IIGS.
See About the New Features in the previous chapter for descriptions of these
enhancements
19
Chapter 3
SOFTWARE Required:
An Applied Engineering AW 2 Expander utility disk.
Warning: Use the AW 2 Expander only on backup COPIES of your AppleWorks
disks! Store your original disks in a safe place.
AppleWorks, version 1.2, 1.3, or 2.0. (See above for other versions.)
If you have access to a computer that will boot AppleWorks (//e, //c, or IIGS), the
version number is indicated on the AppleWorks Startup screen. See the illustration,
Apple Works Version Number. Version 2.0 is recommended. Contact your
Authorized Apple Dealer for an upgrade to the latest version.
Minimum HARDWARE Required:
An Apple ][ Plus with 64K of Random Access Memory (RAM). An Apple ][
won’t do! It has to be an Apple ][ Plus with Applesoft BASIC in ROM and 48K
of RAM on the main board.
Note: AppleWorks 2.0 will not support exponential functions in the
spreadsheet when used with a 64K machines. An Apple ][ Plus must have
either a TransWarp or an extra Pocket Rocket for exponential functions.
A 16K Language Card in slot 0. (See the note about TransWarp™’ below).
A ViewMaster or Videx compatible or SuprTerm compatible 80 column display
card in slot 3.
Note: to run AppleWorks version 1.2 you must use a ViewMaster 80.
A video monitor capable of displaying 80 column text.
At least one disk drive.
Optional Hardware:
RamFactor card in any available slot.
Applied Engineering’s TransWarp accelerator card in any available slot.
(Highly recommended! - The TransWarp card will increase the processing speed of
the computer and functions as the 16K language card.)
TimeMaster H.O. or any ProDOS compatible clock card.
Enhancing AppleWorks
Now that you know what you need, follow the step-by-step enhancement instructions in
the previous chapter called, AppleWorks Expander Instructions.
20
Chapter 3
Alternate AppleWorks Keyboard Commands
Since the Apple II Plus keyboard does not have the up arrow, down arrow, or openApple keys, these keys, which are required by AppleWorks, must be emulated through
the magic of software. To enter an Open-Apple command on the ][ Plus keyboard, press
and release the Esc key, then press the appropriate letter or number key. For example
A would be entered as Esc A; 4 would be Esc 4. Cursor positioning and other special
keys are described in the chart below. Control commands are entered by holding the
Control key down while pressing the appropriate letter key.
Apple //e Keyboard
Return
Cursor Up
Cursor Down
Cursor Right
Cursor Left
Tab
Escape
Delete
@
^
_
\
|
'
~
[
]
{
}
Apple I[ Plus Equivalent
Control M or Return
Control K
Control J
Control U or
Control H or
Control I
Esc Esc
Esc #
Esc "
Esc =
Esc Esc &
Esc !
Esc '
Esc $
Esc <
Esc >
Esc (
Esc )
Lower Case Characters
When the modified AppleWorks is booted it automatically enters lower-case mode.
To toggle this shift lock feature between upper and lower case use Control-A. (Press the
A key while holding the Control key down.)
21
Chapter 3
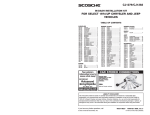
Optional Shift Key Hardware Modification
(For Rev 7 or later motherboard)
Using the modified AppleWorks with this one wire modification, the shift key
becomes a real shift key, eliminating the need to constantly toggle Control-A. The only
part required is readily available at your local Radio Shack® store. It is called a “Mini
Clip Lead” and the part number is 278-016.
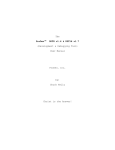
1. Turn the computer off and remove the top cover.
2. Connect one end of the mini-clip wire to pin 1 of the 74LS251
integrated circuit “chip,” which is just forward of the Game I/0
connector (toward the keyboard). See illustration 3-1.
3. Connect the other end of the mini-clip wire to pin 24 of the keyboard
encoder connector. This connector is a row of 25 parallel wires
extending between the keyboard and the keyboard encoder circuit card
suspended below it. Pin 1 of this connector is nearest the power
supply; pin 25 is nearest the right side of the computer. (...pin 24 is
second from the right.)
4. Replace the top cover, boot the modified AppleWorks, and shift!
Illustration 3-1 Location of the 74LS251 on the Apple ][ Plus main circuit board
Video Output
Jack
Game I/O
Port
74LS251
Pin 1
22
Chapter 4
4: Putting RamFactor to Work
Introduction
In the previous two chapters, RamFactor was used to enhance the
performance of AppleWorks 1.3 and 2.0 which were specially written to
take advantage of RamFactor’s extra memory. If you are using
AppleWorks 1.3 or 2.0 or an application program that automatically
utilizes RamFactor memory in this manner, then you probably have no
need for the information contained in this chapter. This chapter explains
how to use RamFactor as a RAMdisk. It will explain how to create a
RAMdisk in the operating system of your choice, how to copy files to the
RAMdisk, and how to execute programs from the RamFactor RAMdisk.
Although you don’t have to be an experienced programmer to use the
RAMdisk feature of RamFactor, you should have a working knowledge
of the applicable operating system.
Remember that a RAMdisk is a volatile data storage medium! If the
power is turned off, all information stored in the RAMdisk disappears.
Be careful how you use the RAMdisk feature. Back up your data often
and consider RamCharger™, the battery backup option for RamFactor.
(See Appendix A.)
How RamFactor emulates a solid-state RAMdisk depends on the
operating system booted into the computer. The following sections
describe how RamFactor is used with these different operating systems:
ProDOS, DOS 3.3, CP/AM 5.1, and Pascal 1.3.
WARNING: Don’t try to boot an unformatted RamFactor
RAMdisk using the PR# command! If you do, you’ll find
yourself in the RamFactor Partition Manager program.
Chapter 4 has the details on the accessing and using the
Partition Manager.
ProDOS RAMdisk
When a ProDOS based startup disk is booted, ProDOS automatically
recognizes the RamFactor card as a DATA disk with the volume name
/RAMs, where s is the number of the slot containing the RamFactor card.
You can store your data files in the ProDOS DATA disk or load programs
to it and run them, but you can’t start up from (boot) the DATA disk. To
create a PROGRAM RAMdisk, or one that can be booted, you must first
format the ProDOS RAMdisk.
23
Chapter 4
Formatting a ProDOS RAMdisk
Use Apple Computer’s FILER program to format the RAMdisk. For
your convenience, FILER is provided on the AppleWorks Expander disk.
If you’ve never used the FILER before, the instructions are in the
ProDOS User’s Manual or are available in the FILER’s tutorial HELP
screens. Here’s an outline of the FILER’s format procedure:
1. Boot the AppleWorks Expander disk; select the Exit to BASIC option from
the Main Menu.
2. At the Applesoft BASIC prompt ( ] ), use the ProDOS Dash command to
run the FILER program. Type: —FILER.
3. From the FILER main menu select option “V”; then “F” from the Volume
Commands menu.
4. Enter the number of the slot containing the RamFactor card. For the new
volume name enter: RAMS, where s is the RamFactor slot number. (- or
name it anything you like.)
5. Answer “Y” to the “DESTROY ‘RAMs’?(Y/N)” prompt. Your RamFactor
RAMdisk is formatted in less than a second.
6. Press the ESC key twice to return to the FILER main menu; press “Q” to
access the Quit and Load screen. Just press the Return key to get back to
the AppleWorks Expander Main Menu.
Copying files to a ProDOS RAMdisk.
Treat the ProDOS RAMdisk just like any other ProDOS volume.
Files can be copied to or from it by using a file-copy utility program, such
as Apple’s FILER, Central Point Software’s Copy II Plus (version 6.5 or
later), or Applied Engineering’s AUTOCOPY2. Do not use volume-copy
options to copy another disk to a RAMdisk use only the file-copy
options. Remember that you are copying the contents of one disk to
another; you are not duplicating a disk.
-
Note: Only files which are not copy-protected can be
copied to a ProDOS RAMdisk, although some copy
protection schemes will allow files to be copied from a
floppy disk to a hard disk or RAMdisk but not another
floppy disk.
Once PRODOS and the required system file (e.g. BASIC.SYSTEM)
are copied to the RAMdisk, it can be booted with the PR#s command,
where s is the number of the slot containing the RamFactor card. If
RamFactor is installed in slot 7 of an Enhanced Apple //e, the RAMdisk
can be booted using the Control-Open Apple-Reset method. Or if you
24
Chapter 4
have RamCharger, your Enhanced //e will be able to boot from the
RAMdisk upon power-up!
Any attempt to access or format a RamFactor RAMdisk that has
already been formatted under a different operating system will result in a
“WRITE PROTECT” error message. To clear the RAMdisk, remove
power from the RamFactor card. (i.e. turn the computer and battery backup
option switch OFF.)
AUTOCOPY Instructions
Included on the AppleWorks Expander disk is an Applesoft BASIC
utility program, AUTOCOPY2, which will allow you to copy all of the
files on one or more floppy disks (or hard disks) to a ProDOS RAMdisk.
The authors of AUTOCOPY2 tried to make the program as simple to use
as possible, but it does require you to have an elementary knowledge of
ProDOS commands and pathnames. The basics of pathnames,
directories, subdirectories, and filenames are explained in the ProDOS
User’s Manual.
Select the “Execute AutoCopy” option from the AppleWorks
Expander disk Main Menu. AUTOCOPY2 will display this prompt:
Enter name of volume directory to copy (<RETURN> to quit)
I
Carefully type the volume name of the floppy disk containing the files
you wish to copy. The leading ProDOS slash (/) delimiter is provided;
just enter the volume name character string. The ending delimiter is
optional. To correct an entry before the return key is pressed, use the left
arrow key to backspace over the error, and enter the correct characters.
Next you are prompted to enter the destination subdirectory:
Enter name of destination volume or subdirectory /
Again, the leading ProDOS slash (/) delimiter is provided; type the
desired volume or subdirectory name. if a destination subdirectory is
specified which does not already exist, AUTOCOPY2 will automatically
create it. The contents of any subdirectories encountered under the source
pathname will be copied to subdirectories created by AUTOCOPY2 under
the destination pathname.
The equal sign (=) can be used as a wildcard to substitute for the
trailing characters of a source filename character string. This is best
explained with the following example:
Enter name of volume directory to copy (<RETURN>to quit)
/PFS.FILE/FILE=
In this example, only the files with filenames beginning with “FILE”
on the /PFS.FILE volume would be copied to the destination.
25
Chapter 4
AUTOCOPY2 can also be executed from Applesoft BASIC. Program
execution can be from the immediate (BASIC prompt) or deferred (within
a BASIC program) mode.
IMPORTANT: If AUTOCOPY2 is to be copied to and
executed from another disk, it will be necessary to also copy
the GET.LEN file to that disk. GET.LEN must be under the
same directory as the AUTOCOPY2 program.
Customizing AUTOCOPY2
If you are familiar with the BASIC programming language, you will
be able to alter certain AUTOCOPY2 program statements (lines), allowing
the program to be used as an automatic (STARTUP) program, capable of
copying multiple volumes or pathnames to a RAMdisk.
The user options are conveniently contained in AUTOCOPY2
program lines 40 through 44, inclusive. The statements beginning with
line 45 are string array elements, containing the multiple source and
destination pathnames. The initial default option settings are shown in
Example 1 below and explained in the following paragraphs.
Example 1:
40
41
42
44
45
46
47
PROMPT = YES
ASKFILE = NO
EXITFILE$ = “"/?"
MULTIVOL = NO
MV$(0) = “/?“:MU$(0) = “I?”
MV$(1) = “/?“:MU$(1) = “I?”
MV$(2) = “/?“:MU$(2) = “I?”
Line 40 PROMPT = In the default state (YES) AUTOCOPY2 will
prompt you to insert the source disk and press return. If changed to
PROMPT = NO, the program will scan the system for the source
pathname and begin the copy process.
Line 41 ASKFILE = The default setting (NO) will cause
AUTOCOPY2 to automatically copy all files encountered under the source
pathname. Changing this option to YES, you will be asked to confirm each
file before it is copied. This allows selective copying of files when
desired.
Line 42 EXITFILE$ = This option allows you to name a file to be
executed upon completion of the copy process. The default (EX1TFILE$
= “/ ?”) will cause the program to display “COPY COMPLETE” when all
files have been copied, set the current prefix to the boot drive, and exit to
the BASIC prompt. The EXITFILE must be an executable program file
and should be specified by its COMPLETE pathname. The EXITFILE
routine will automatically insert the ProDOS DASH (—) command.
26
Chapter 4
Line 44 MULTIVOL = if MULTIVOL = NO the program uses
only the option parameters specified in program lines 40 through 42,
inclusive. The multiple source and destination pathnames described in the
next paragraph are ignored.
if MULTIVOL = YES the program will use the pathname string arrays
it finds beginning with line 45. Up to ten additional source (MV$) and
destination (MU$) string array elements may be created as required.
When the program encounters a source or destination array element which
contains “/?” it will prompt you for keyboard input for that element.
The equal-sign (=) can be used as a wildcard to substitute for the
trailing characters of a source character string, as shown in this example
program line:
45 MV$(0) = “/PFS.PLAN/PLAN&’:MU$(0) = “/RAM7/PFS”
Only the files with filenames beginning with “PLAN” on the
/PFS.PLAN volume would be copied to the /RAM7/PFS subdirectory.
The program lines shown in Example 2 will load the contents of the
AppleWorks startup and program disks to the /RAM7/APPLE WORKS/
subdirectory. Since line 40 is set to YES, AUTOCOPY2 will prompt you
twice to insert a volume with the name of /APPLEWORKS. (...the
AppleWorks STARTUP and PROGRAM volumes.) When all files have
been copied to the ProDrive, AUTOCOPY2 will execute the EXITHLE$
string in line 42.
Example 2:
40
41
42
44
45
46
PROMPT = YES
ASKFILE = NO
EXITFILE$ = “/RAM7/APPLEWORKS/APLWORKS.SYSTEM”
MULTIVOL = YES
MV$(O) = “/APPLEWORKS”:MU$(0) = “/RAM7/APPLEWORKS”
MV$(1) = “/APPLEWORKS”:MU$(1) = "/RAM7/APPLEWORKS”
The options specified in Example 3 tell the AUTOCOPY2 program to
automatically copy all files beginning with “FILE” on the /PFS.FILE
volume to the /RAM5/PFS subdirectory and prompt you for the next
source and destination pathnames. After all files have been copied, the
program will then execute the EXITFILE$. (FILE.SYSTEM is the
PFS:File startup program.)
27
Chapter 4
Example 3:
40 PROMPT = YES
41 ASKFILE = NO
42 EXITFILE$ = “/RAM5/PFS/FILE.SYSTEM”
44 MULTIVOL = YES
45 MV$(0) = “/PFS.FILE/FILE=":MU$(0) ="/RAM5/PFS”
46 MV$(1) = “/V:MU$(1) = “/?”
Note: PFS software is copy-protected. Program files can be copied to a ProDrive
and executed, but they are “keyed” to the PFS program master disk which must
be in the startup disk drive. See your PFS program user’s manual for more
information about executing programs from a hard disk or RAMdisk.
DOS 3.3 RAMdisk
Booting a DOS 3.3 disk does not automatically create a DOS 3.3 RamFactor
RAMdisk. You must first inform the operating system (DOS 3.3) that there is a
RamFactor card in the computer by using the IN#s command, where s is the number of
the slot containing the RamFactor card. This command links the RamFactor card to the
DOS 3.3 operating system in memory.
The number and sizes of the emulated DOS 3.3 volumes (disks) created by the
TN#s command depends on the amount of RAM available on the RamFactor card. Use
the chart, below, to determine the number and size of your DOS 3.3 RAMdisk volumes.
RamFactor
Memory Size
256K
512K
768K
1024K
Number of
Drives
1
1
1
2
Drive
Size
140K
400K
400K
400K
Maximum files
per Drive
105
217
217
217
These RAMdisk volumes are just like initialized DOS 3.3 DATA disks. They can
contain information, even programs, but they can’t be booted. To be a bootable startup
disk, a PROGRAM disk, the slot s, drive 1 RAMdisk must contain the DOS 3.3
operating system.
The DOS 3.3 operating system can be installed using the INSTALL DOS program
on side 2 of the AppleWorks Expander disk. Boot the back side of the AppleWorks
Expander disk in your startup drive and select the “Install DOS 3.3 to RamFactor”
option. The program automatically finds the RamFactor card and installs the DOS 3.3
“boot tracks.” (The INSTALL DOS program can also be executed from Applesoft
BASIC by
28
Chapter 4
typing BRUN INSTALL DOS at the BASIC prompt.) After DOS 3.3 is
installed, the RAMdisk can be booted just like any DOS 3.3 volume. Use
the PR#s command from the BASIC prompt. If you have an Enhanced
Apple //e and your RamFactor is in slot 7, use can use either PR#7 or
Control-Open Apple-Reset to reboot the DOS 3.3 RAMdisk. (Nonenhanced Apples will not boot from a RAMdisk card using the ControlOpen Apple-Reset method.)
If another standard DOS 3.3 startup disk is booted while the
RamFactor DOS 3.3 RAMdisk is active, the new operating system will
have to be linked to the RAMdisk with the IN#s command. Any attempt
to access or format a RamFactor RAMdisk that has already been formatted
under a different operating system will result in a ‘WRITE PROTECT”
error message. To clear the RAMdisk, remove power from the
RamFactor card. (i.e. turn the computer and battery backup option switch
OFF.)
When you use the INIT command with the modified DOS 3.3 in
memory, keep this in mind: The image of DOS written on the initialized
floppy disk will be the patched RAMdisk version DOS. The initialized
disk will be “tied” to the RamFactor card and its current slot. For the
floppy disk to successfully booted, the RamFactor card will have to be
installed in the same slot as when the disk was initialized.
Copying Files to the DOS 3.3 RAMdisk.
Standard (not copy-protected) DOS 3.3 files can be copied to the
RamFactor’s RAMdisk using the Apple File Developer program (FID).
The FID program is especially useful for transferring all types of DOS 3.3
files. For your convenience the FID program has been included on the
DOS 3.3 side of the AppleWorks Expander disk. FID can also be found
on the Apple DOS 3.3 System Master disk (FID is a binary program and
is executed by typing BRUN FID at the BASIC prompt.)
FID can be used in combination with a text file to create a turnkey file
copy utility program. This is a quick way to transfer a selected list of files
to a DOS 3.3 RAMdisk. The text file contains a list of commands used to
run the FID program, set up the source and destination disks, and list the
files to be copied. The EXEC command is used to start processing the
text file’s commands. See the DOS Users Manual for more information
on EXECuting text files.
An example EXEC (text) file, COPYM, is included on the DOS 3.3
side of the AppleWorks Expander disk. This sample file instructs the FID
program to copy certain files on the disk to the RAMdisk. To use this
sample file, boot the disk and select the “Copy Files to RamFactor”
option. This menu option will automatically link the RAMdisk to DOS
and EXECute the COPYM text file, which will copy INSTALL DOS and
FID to a RAMdisk. (COPYM is a sample text file; it assumes the
RamFactor is in slot 7 and the floppy disk interface is in slot 6.) This
29
Chapter 4
program can also be executed by typing EXEC COPYM from the
Applesoft BASIC prompt.
You must customize COPYM for every desired combination of source
and destination slots and drives. Customization is easy with any DOS 3.3
based word processor program which saves files to disk in text file format
(like DOS 3.3 AppleWriter). The text file listing, below, provides a line
by line description of the sample COPYM file. When creating an
EXECutable text file for FID, be sure that none of your filenames contain
any DOS 3.3 commands. (e.g. READIING.1; CATALOG LIST) Also
each line must end with a carriage return.
Text file:
Contents of
Comments
BRUN INSTALL DOS Installs the modified image of DOS 3.3
MON C,I,O
BRUN FID
1
6
1
7
1
INSTALL DOS
S
1
FID
S
9
CATALOG
on the RAMdisk.
Use this line to monitor the program
execution sequence on the screen.
Executes the FID program.
Select option 1 (Copy Files) from the FID
main menu.
Specify slot 6 as the source slot.
Specify drive 1 as the source drive
Specify slot 7 as the destination slot.
Specify drive 1 as the destination drive.
Filename of first file to copy.
Press any key to continue.
Select option 1 (Copy Files) from the FID
main menu.
Filename of next file to copy.
Press any key to continue.
Select option 9 (Quit) from the FID main
menu.
DOS command to list the directory of the
destination disk.
30
Chapter 4
Here’s another example text file. This one will copy all files on the
source disk to the destination disk:
Contents of
Text file:
BRUN INSTALL DOS
MON C,I,O
BRUN FID
1
6
1
7
1
N
Comments
Installs the modified image of DOS 3.3
on the RAMdisk.
Use this line to monitor the program
execution sequence on the screen.
Executes the FID program.
Select option 1 (Copy Files) from the FID
main menu.
Specify slot 6 as the source slot.
Specify drive 1 as the source drive
Specify slot 7 as the destination slot.
Specify drive 1 as the destination drive.
Wildcard character; copies all files on the
source disk.
Cancel individual file prompting.
After customizing your own COPYM text file, making a turnkey
startup disk is easy with the following ‘HELLO’ program:
10 REM Turnkey HELLO program
20 PRINT CHR$(4);”EXEC COPYM”
30 END
Pascal 1.3 RAMdisk
The Pascal 1.3 operating system automatically recognizes the
RamFactor card, when installed in slot 4, 5, or 6, as a Pascal volume with
the name RAMs, where s is the number of the slot containing the
RamFactor card. Programs written under Pascal 1.1 or 1.2 are not
compatible with RamFactor. Please contact your authorized Apple dealer
for possible upgrade information.
This RAMdisk volume can be used and accessed just like any other
Pascal 1.3 volume. To create a bootable Pascal RAMdisk, use the Pascal
FILER to determine the volume number of the RAMdisk and format it
using the FORMATTER program (APPLE 3). Then, using the FILER
again, copy SYSTEM.PASCAL and SYSTEM.APPLE to the RamFactor
volume.
31
Chapter 4
CP/AM 5.1 RAMdisk
To use RamFactor or a RamFactor partition as a CP/AM RAMdisk,
Applied Engineering’s Z-80 Plus co-processor card and the CP/AM 5.1
operating system are mandatory requirements. The previous version of
the operating system, CP/AM 4.0B, will not recognize the RamFactor
card.
All utility programs needed to create and use the RamFactor as a
CP/AM RAMdisk are supplied on the CP/AM 5.1 System Master disk and
full documentation is provided in the CP/AM 5.1 User’s Guide. These
products are included with the Z-80 Plus card, or can be purchased
separately from Applied Engineering.
32
Chapter 5
5: RamFactor Partition Manager
About the Partition Manager
The RamFactor Partition Manager (RPM) is actually a program
permanently stored in in ROM (Read Only Memory) on the RamFactor
card. This menu-driven program enables you to organize RamFactor’s
memory into multiple work areas, or partitions. From one to nine
partitions can be created, each partition functioning as an independent
RAMdisk. Each RAMdisk partition can be dedicated to one of the
operating systems supported by RamFactor. Be sure you’ve read the
Chapter 4, “Putting RamFactor to Work.” It tells you how to prepare
RAMdisk (the active partition) for data storage and make it a bootable
device.
Accessing the RamFactor Partition Manager (RPM) menus
To enter the RamFactor Partition Manager main menu, just type PR#s
from the Applesoft BASIC prompt. (s is the number of the slot
containing the RamFactor card.) Press Control-Reset to enter the
Applesoft BASIC mode, indicated by the left bracket (] ) prompt.
Before the RamFactor Partition Manager program can be initially
activated, the RamFactor RAMdisk must be CLEAR and unformatted. If
your RAMdisk is currently formatted, the PR#s command will cause the
computer to boot into the RAMdisk instead of the RPM program. The
easiest way to clear a RAMdisk is to turn the computer off momentarily
(about 5 seconds). Another way is to force the computer to access the
RPM program by using a special Monitor command. At the BASIC
prompt, type CALL —151 and press Return. This will place the
computer in Monitor command mode, indicated by the asterisk ( * )
prompt. Enter Cs10G and press Return. (s is the number of the slot
containing the RamFactor card.) This message will appear:
WARNING- INSTALLING PARTITIONS DESTROYS
THE DIRECTORY- GO AHEAD?
Press Y for yes or any key to abort and boot from another slot.
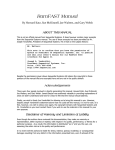
Once the RPM program is activated, the RPM main menu, shown in
Illustration 5-1, will allow you to select RamFactor partitions and
configure them to suit your needs.
33
Chapter 5
Illustration 5-1 RamFactor Partition Manager main men
Selecting a RAMdisk Partition
The currently selected partition is highlighted on the RPM main menu
by the inverse video bar. The arrow keys can be used to move the
highlight bar up or down to select a different partition. Pressing the Esc
(Escape) key will exit the RPM program and return to the operating
system (if any) previously loaded. The highlighted partition then becomes
the current, or active, partition.
Only one partition at a time can be active. The active partition
RAMdisk can be accessed without affecting the contents of the other
partitions and the inactive partitions are totally invisible to the system.
Configuring a RAMdisk Partition
Pressing the R key from the RPM main menu will display the
configuration options, shown in Illustration 5-2.
34
Chapter 5
Illustration 5-2 RPM partition configuration options
Naming a Partition
Selecting the N option will allow you to name the highlighted
partition. Each name, which can contain up to 16 characters, is stored in
RamFactor’s memory. The partition name has no meaning to the
partition’s operating system, it is just a label for your convenience. A
partition name can be erased by reselecting the N option, then pressing
Return.
Clearing a Partition
The C option will completely erase the previous contents of the selected
partition. A cleared partition is indicated by CLEAR in the status column
on the right side of the RPM screen.
Sizing the Partitions
Pressing the S key will enable you to change the size of the currently
selected CLEAR partition. To create more than one partition, you must
first change the size of the first partition. Any remaining available
memory will be added to the size of the next (numerically) partition.
Move the selection bar to the next partition, select the S option, and enter
the desired size. If you are re-configuring existing partitions, the
partitions to be changed must be cleared before they can be re-sized.
Remember that changing the size of an existing partition will affect the
size of the next partition, which will also need to be cleared prior to resizing.
35
Chapter 5
You may have noticed that the partitioned memory is 1K less than the
total amount of RamFactor memory. When a blank RamFactor is
accessed for the first time, all of the available RamFactor memory is
dedicated to one RAMdisk. Upon activating the RPM program, all of the
available RamFactor memory, except 1024 bytes (1K), is dedicated to the
first partition. Regardless of the amount RamFactor memory available,
1K is reserved for use by the RPM program. Notice in Illustration 5-1, a
one megabyte (1024K) RamFactor has 1023K of partitionable memory.
All other partitions are empty (0K) and CLEAR.
Partitions to be formatted under ProDOS and Pascal 1.3 can be set to
any size desired. The sizes allowed for DOS 3.3 partitions have certain
restrictions, shown in the chart, below. The number and storage capacity
of DOS 3.3 emulated drives depends on the the size of the partition.
Partition Size
DOS 3.3 Volumes
less than 140K
will not format for DOS
140K-279K
one 140K volume
280K-399K
two 140K volumes
400K-799K
one 400K volume
800K or more
two 400K volumes
The sample video screen shown in illustration 5-3 gives an example of
four partitions named, configured, and ready for formatting. Once the
desired changes have been made, press the Return key to accept the
changes and return to the main menu. Or press Esc to cancel any changes
and revert to the previous partition settings.
Illustration 5-3 Example partition configuration
36
Chapter 5
Booting a Partition
To boot from the active partition, its RAMdisk must contain a bootable
operating system and any required startup files. Please refer to Chapter 4,
Putting RamFactor to Work, for details on creating a bootable RAMdisk
partition.
Any bootable partition can be booted by accessing the RPM menu and
pressing the numeric key representing the desired partition. The partition
will boot automatically. Pressing the Return key from the main menu
will attempt to boot the highlighted partition. If a partition is not bootable,
RPM will prompt you for the slot number of your boot drive, as shown in
Illustration 5-4. Enter the slot number of a disk drive containing a
bootable disk and press Return.
Illustration 5-4 RPM unable to boot from partition selected
Note to Enhanced Apple //e Users: If RamFactor is
the first device in the boot sequence (e.g. slot 7) a ControlOpen Apple-Reset command will attempt to boot the
active partition, bypassing the RPM menu. If the current
partition is not bootable, the next device in the boot
sequence is accessed (e.g. slot 6).
Changing Partitions
To enter a different partition, you must reboot (PR#s) the RamFactor
Partition Manager, select the new partition, and boot the new partition or
37
Chapter 5
simply exit the RPM program. This can be compared to removing a
floppy disk from the boot drive and booting or accessing a different
program disk. Since the active partition must be deselected to select
another, files cannot be transferred directly from one partition to another.
Any attempt to access or format a partition formatted under an
operating system different from the one currently in memory will result in
a “WRITE PROTECTED’ error message. To reformat a partition it must
first be cleared, using RPM configuration menu option C, then formatted
under an active operating system.
IMPORTANT !
Any programs which use RamFactor memory directly to enhance
their performance must be executed from the first partition only.
AppleWorks 1.3 is such a program. It uses whatever RamFactor
memory is available in the first partition area to expand the
AppleWorks Desktop space.
38
Chapter 6
6:
RamFactor Technical Reference
Introduction
The first section of this chapter tells you how to add additional
memory chips to your RamFactor card and how to run the RamFactor
Diagnostic program. The next section deals with highly technical
information usually required only by advanced programmers or software
developers.
Adding Memory to RamFactor
The RamFactor card can contain up to 1024K (1 Megabyte) of
Random Access Memory. This memory is organized into four 256K
blocks, each block consisting of eight 256K RAM chips.
Selection of the proper RAM chips for RamFactor can be tricky.
There are several chip manufacturers and many different types and
specifications of chips available. RamFactor requires 256K x 1 dynamic
RAM (DRAM) chips with a speed specification of 150 nS (nanoseconds)
or faster. Another very important specification for RamFactor memory
chips is the “CAS before RAS” method of memory refresh.
You may be able to find memory chips with the proper specifications
at some computer or electronics-parts stores. But we recommend that you
purchase them from Applied Engineering. Applied Engineering receives
bulk-quantity discounts on purchases of memory chips and can often offer
them for less. Applied Engineering uses only the highest-quality memory
chips and warrants them for a full 5 years. (Most electronics-parts
vendors sell their chips “as-is.”) We will not warrant chips purchased
from other vendors. When you get ready for more memory, give Applied
Engineering a call. You’ll be assured of getting the right chips at the right
price. (214) 241-6060 Monday through Friday, 7 days a week.
Approved manufacturers and chips are:
Hitachi
HM50256-15
Mitsubishi
M5M4256P- 15
Fujitsu
MB8 1256-15
OKI
MSM41256A-15AS,’Rs
Intel
P21256-15
Samsung
KM41256-15
Micron Technologies
MT1259-15
Toshiba
TMM41257-15
39
Chapter 6
Memory Chip Installation
There is nothing complicated about installing RAM chips on the
RamFactor card. Just keep these basic guidelines in mind:
> Refer to Illustration 6-1. Fill the RamFactor RAM chip
blocks in order. In other words: If blocks A and B are
populated, fill C not D
> Handle the RAM chips very carefully. Avoid touching
the pins or bending them excessively.
> When inserting a chip, make sure the notch, or dot on
some brands of chips, is pointing UP, away from the
gold edge connector on the bottom of the card. See
illustration 6-1.
> Press down firmly on each chip. Make sure that ALL
pins are securely seated in the socket. Check closely for
bent pins.
>
Be careful! Applying power to a chip which has been
incorrectly installed can ruin the chip.
Illustration 6-1 RamFactor RAM chip blocks
40
Chapter 6
RamFactor Diagnostic Program
After installing chips to the RamFactor, you may want to test the card. Instructions for
testing the RamFactor card are in Appendix B of this manual.
WARNING: The RamFactor Diagnostic program is a
destructive memory test. It will erase anything stored in
RamFactor memory.
NOTE:
The remainder of this chapter is intended
for heavy-duty programmers interested in developing application
software for the RamFactor card.
Description of RamFactor
The RamFactor is a peripheral expansion card which functions
primarily as a mass storage device. It works with ProDOS, Pascal 1.3,
and DOS 3.3. RamFactor was designed to be totally compatible with
virtually all software written for the Apple II Memory Expansion Card. It
also provides some additional useful features not available on the Apple
card. These features include:
RamFactor Partition Manager firmware, which enables
RamFactor memory to be subdivided into partitions,
with each partition totally isolated from the others.
Expansion port for addressing additional memory
beyond the 1 Megabyte available on the main RamFactor
circuit card.
Connector for RamCharger™ an optional
uninterruptable power source for RamFactor RAM.
RamFactor Partition Manager Firmware
When a blank RamFactor is first accessed by either ProDOS or Pascal
1.3, the RamFactor firmware dedicates all of RamFactor’s RAM to that
operating system as a formatted data disk. The RamFactor Partition
Manager firmware remains inactive until called by a PR#s from BASIC or
a Cs l0G command from the Monitor. (This feature allows RamFactor to
be fully Apple II Memory Expansion Card compatible, until the RPM
firmware is called.) Once the RamFactor RAMdisk has been configured
41
Chapter 6
as a bootable device, the only way to access the RPM firmware is by the
Cs1OG command.
When an Enhanced Apple lle system is cold booted, the RamFactor
firmware (ROM) determines whether the card has been formatted and is
bootable. If it is bootable, it will boot into the appropriate operating
system. If not, the Apple ROM will continue with the slot search for the
next bootable device. Apples with non-enhanced firmware will not
support either the RamFactor or the Apple II Memory Expansion card as a
cold-bootable device.
Whenever a PR#s command is issued or execution starts at Cs00, the
RamFactor ROM again determines whether the card is bootable. If the
RAMdisk is bootable the ROM will boot into the appropriate operating
system. If a non-bootable RAMdisk is encountered, the ROM will enter
the RamFactor Partition Manager firmware. Since an unpartitioned,
bootable RamFactor RAMdisk will not allow access to the RPM firmware
using the PR#s command, use the Cs l0G command to force the activation
of the RPM firmware. But remember, this will cause the entire contents
of the RamFactor to be cleared.
Whenever the IN#s command is issued, the RamFactor ROM checks
for the presence of the DOS 3.3 operating system. If DOS 3.3 is not
found, the IN#s command has the same effect as the PR#s command.
That is, if a bootable non-DOS 3.3 RAMdisk is present, it will boot; if
not, it will access the RPM firmware. If DOS 3.3 is found, the RamFactor
firmware will patch the RWTS routine, allowing access to the RAMdisk.
By activating the RamFactor Partition Manager firmware, the card is
divided into nine partitions, with all of the available memory except 1024
bytes being in the first partition. The other eight partitions are initially
empty. The remaining 1024 bytes is reserved for use by the firmware.
For example, a one Megabyte RamFactor first accessed by ProDOS
would yield a 1024K RAMdisk. When the Partition Manager was called,
the first partition would then yield 1023K. Once the card has been
formatted into the nine partitions, access through DOS, ProDOS, or the
Protocol Converter will deal with the currently selected partition. Once
the RPM firmware has been accessed, recalling the RPM menu to select
another partition is accomplished via the PR#s command. The PR#s
command does not boot a bootable partition.
When the RamFactor Partition Manager is accessed, the firmware
downloads a program from the RamFactor firmware to regular Apple
RAM. The partition menu program uses memory from $800 to $EFF, so
any Applesoft program currently in RAM will be over-written. (Normally
you will be changing programs anyway, so this is not a problem. The
same thing happens when you use PR#s from a regular disk drive.)
42
Chapter 6
ProDOS
When you boot ProDOS or ProDOS-based applications, the currently
selected partition of the RamFactor card is automatically linked in as a
ProDOS RAMdisk with a volume directory name /RAMs. If you have
previously set up partitions on the RamFactor card, it will use the
currently selected partition. To make the ProDOS RAMdisk a bootable
device, it must first be formatted and loaded with the necessary startup
files, just like any ProDOS mass storage device.
Pascal 1.3
Pascal 1.3 automatically recognizes a blank RamFactor RAMdisk as a formatted Pascal
storage volume with the name RAMS, where s is the number of the slot containing the
RamFactor card. Pascal requires that the RamFactor be installed in slots 4, 5, or 6 only.
(Earlier versions of Pascal do not support the ProDOS block device protocol or the
Protocol Converter, required to interface with the RamFactor.)
The procedure for making the RamFactor RAMdisk a Pascal startup volume is the same
as for any other Pascal volume.
DOS 3.3
When RamFactor initializes a DOS partition, the size of the partition or
the amount of memory affects how the volumes will be established:
Partition Size
less than 140K
140K-279K
280K-399K
400K-799K
800K or more
DOS 3.3 Volumes
will not format for DOS
one 140K volume
two 140K volumes
one 400K volume
two 400K volumes
The first volume is accessible as Drive 1, the second as Drive 2. The smaller volumes are
exactly the same size as standard Apple floppy disks. These are 35 tracks, with 16 sectors
per track. Each sectors holds 256 bytes. This computes to 143,360 bytes, which is called
140K (where “K” stands for a multiplier of 1024). The larger volumes have 50 tracks
with 32 sectors per track, giving 400K bytes. In both cases, track 17 ($11) is used for the
catalog information. A small volume can catalog up to 105 files. A large volume can
catalog up to 217 files.
RamFactor initializes a DOS volume like a “data” disk. That is, there is no bootable DOS
image in tracks 0, 1, and 2. You can make any DOS partition bootable by selecting that
partition and using the binary program, INSTALL DOS, to copy the DOS image from
memory into the first 32 sectors of the current partition. In addition, a short boot routine is
written
43
Chapter 6
at the beginning of the very first sector. INSTALL DOS does not have
any effect on the previous contents of the rest of the partition, so any files
you had on the partition will still be there. INSTALL DOS assumes the
file name of the startup program will be “HELLO”.
Patches Made to DOS 3.3
When you boot standard DOS 3.3, it has no way of telling that your
RamFactor is present. You inform DOS 3.3 of the presence of a
RamFactor card in slot s with the command IN#s. When the IN#s
command is executed, RamFactor firmware installs a three-byte patch
inside DOS. This patch, placed at $BDl2-BD14, jumps to a special entry
point inside the RamFactor firmware whenever RWTS is called. The
patch was carefully designed so as not to conflict with the method used by
various hard disk systems to link to DOS 3.3 (such as Corvus and Sider).
Once the RamFactor patch is installed, all DOS commands may be
used with the DOS volumes in the current partition. You can switch to a
different partition by using the PR#s command, which brings up the
RamFactor partition menu.
Note that only one RamFactor card can be linked into DOS 3.3 at any
given time. However, if you have more than one card, you can use the
IN#s command to link any card just prior to accessing it. The IN#s
command has no other effect than patching the firmware link at $BDl2.
If for some reason you wish to remove the firmware link without rebooting DOS 3.3, you can do so by restoring the original contents of the
three bytes at $BD12-BD14. For example, the monitor command
“BD12:AA A0 0F” will do so. From inside Applesoft, you can POKE
the values:
POKE 48402,176
POKE 48403,160
POKE 48404,15
If you use the INIT command to initialize a floppy disk after installing the
RamFactor firmware link (with the IN#s command), the DOS image written
on the floppy disk will include the firmware link. This means that the
RamFactor card will have to be installed (and in the same slot) for that floppy
to successfully boot. (If you have a Sider Hard Disk, you may have already
discovered a similar fact about the Sider firmware link.)
Operating System Identification
The RamFactor firmware determines which operating system is in use
by examining the contents of location $BF00. This technique was chosen
to be compatible with the Apple Memory Expansion Card.
($BF00) = $00 -- Pascal
($BF00) = $4C -- ProDOS
($BF00) = $33 -- DOS 3.3
44
Chapter 6
RamFactor Hardware
The RamFactor card has five addressable registers, which are
addressed according to the slot number the card is in:
$C080+slot * 16
low byte of RAM address
$C081+slot * 16
middle byte of RAM address
$C082+slot * 16
high byte of RAM address
$C083+slot * 16
data at addressed location
$C08F+slot * 16
Firmware Bank Select
After power up or Control-Reset, the registers on the card are all in a
disabled state. They will be enabled by addressing any address in the
firmware page $Cs00-CsFF.
The three address bytes can be both written into and read from. If the
card has one Megabyte or less, reading the high address byte will always
return a value in the range $F0-FF. The top nybble can be any value
when you write it, but it will always be “F” when you read it. If the card
has more than one Megabyte of RAM, the top nybble will be a meaningful
part of the address.
When you read or write the data byte, the address automatically
increments. Some 6502 address modes cause two accesses at the same
location, which in this case can cause double incrementing. To avoid
double incrementing, use either absolute addressing, or an indexed form
with the base in a different page. For example, with the RamFactor in slot
4, you could use:
LDA $C0C3
absolute addressing
or
LDY #$C8
slot * 16 +$88
STA $BFFB,Y $C083-$88,Y
Whenever the lower or middle address byte changes from a value with
bit 7 = 1 to one with bit 7 = 0, the next higher byte is automatically
incremented. This means that you should always load the bytes in the
order low-middle-high, and always load all three of them. (Unless, of
course, you are sure of the previous contents and can be sure you will get
predictably correct results.)
Finding the RamFactor Card
A program can search the slots for a RamFactor card by looking for a
unique pattern in various firmware locations. The bytes at $Cs00-Cs07
are standard for both the Apple Memory Expansion Card and the
RamFactor card. They are:
$Cs00:C9 20 C9 00 C9 03 C9 00
45
Chapter 6
In addition, the byte at $CsFB on a card of this type has bit 0= 1.
For RamFactor, the whole byte = $01. The byte at $CsFA distinguishes
between the various brands of memory expansion cards. RamFactor has
$AE at this location.
Finding RamFactor’s Size
There are several ways a program can find out the size of the
RamFactor card, or the size of the current partition.
If you are using ProDOS, the ProDOS status call can be used. The
methods for finding the ProDOS firmware entry point, and for making a
status call, are explained on pages 112-115 of Apple’s “ProDOS
Technical Reference Manual” and on pages 6-6 through 6-11 of Quality
Software’s “Beneath Apple ProDOS”. Briefly, the firmware entry point
will be $Csxx, where s is the slot number and xx is the contents of $CsFF
in the firmware. Below is a subroutine which will jump into the ProDOS
firmware entry point. It assumes locations $0042-0047 have been
properly set up for a call to the ProDOS firmware.
CALL.FIRMWARE
GET SLOT *16
LDA $43
LSR
LSR
LSR
LSR
hi-byte = $Cslot
STA $01
LDY#0
STY $00
b-byte = $00
DEY
Y=$FF
LDA ($00),Y
Contents of $CsFF
STA $00
$00,0l is entry point
JMP ($00)
To read the status, you have to set up two page zero locations and call the
firmware entry point; the size of the partition will be returned in the X- and
Y-registers. The following code sets up the proper parameters for reading
status and then uses the CALL.FIRMWARE subroutine above to call the
ProDOS firmware on the RamFactor card. The example assumes the card is
in slot 4:
LDA #0
command code 0=
status
STA $42
WA #$40
slot# of RamFactor * 16
STA $43
JSR CALL.FIRMWARE
STY BLOCKS HI
# BLOCKS (HI-BYTE)
STX BLOCKS.LO # BLOCKS (LO-BYTE)
46
Chapter 6
Another method for determining the size of the current partition is to
examine the “screen-hole data after the card has been accessed. The
‘screen-holes” are locations Apple has reserved for use by the firmware
for each slot. There are 8 locations reserved for each slot:
$478+slot
$4F8+slot
$578+slot
$5F8±slot
$678+slot
$6F8+slot
$778+slot
$7F8±slot
RamFactor puts the current data for the partition size in two of the
screen holes:
$678+slot: # pages (hi-byte)
$6F8+slot: # pages (10-byte)
The number of pages divided by two is the number of blocks.
Another screen hole is set up with the size of the entire card. Location
$478+slot holds the number of blocks divided by 256 of the entire card.
Thus a value of 2 indicates there are 512 blocks, or 256K bytes.
The screen holes are only valid after accessing a partition. The
meaning of the other screen holes is as follows:
$4F8+slot: index to partition data
$578+slot: partition base address (hi-byte)
$5F8+slot: partition base address (mid-byte)
$778+slot: operating system code
$7F8+slot: operating system check code
The information on card size and partition size is also stored in the
RamFactor memory. Addresses 000000 through 0000FF are used for
this purpose. Valid data in the first four bytes indicates the RamFactor
memory has been partitioned. The first eight bytes are used for general
information. The next nine groups of 24 bytes each are used to describe
the partitions.
00: $AE
01: $F4
02: partition index (24 * part# 16)
03: partition index EOR $5A check code
04: # blocks / 256 in entire card
05-07: <<<reserved>>>
08-1F: partition 1 data
20-37: partition 2 data
-
C8-DF partition 9 data
E0-FF <<<reserved>>>
47
Chapter 6
The partition data is laid out like this within each group of 24 bytes:
Relative 00: base address (hi)
01: base address (mid)
02: size (hi)
03: size (mid)
04: operating system code
05: operating system check code
06-07: <<<reserved>>>
08-17: name of partition
Protocol Converter
Description of the Protocol Converter
The Protocol Converter is a set of assembly language routines which
turn the //c disk port into a multi-drop peripheral bus capable of
supporting up to 127 external I/O devices. The firmware in the Apple
Memory Expansion Card and RamFactor provide all the features of the
protocol converter for one 110 device, the memory card itself. The
interface card for using the UniDisk 3.5 in an Apple //e also supports a
Protocol Converter.
Apple warns against using the Protocol Converter and states, ‘using
the assembly-language protocol is fairly complicated.” Nevertheless, a
significant amount of the Apple firmware is used to implement the
Protocol Converter features. With this in mind let us proceed.
Using the Protocol Converter
In order to use the Protocol Converter firmware, you need first to find
it. The first step in finding it is to find which slot it is in. Cards with
Protocol Converter firmware can be identified by four bytes: $Cs0l =
$20, $Cs03 $00, $Cs05 = $03, and $Cs07 = $00. The first three bytes
in that list are the same for all disk drive controllers. The zero value at
$Cs07 distinguishes it as a disk controller PLUS a Protocol Converter.
The next step is to find the entry point in the firmware for Protocol
Converter calls. The byte a $CsFF is the key. That byte is the offset in
the firmware page for ProDOS calls. If $CsFF = $45, for example,
ProDOS device driver calls should take the form “JSR $Cs45”. To get
the address of the Protocol Converter entry point, add 3 to the ProDOS
entry point. In this example, “JSR $Cs48” would enter the Protocol
Converter firmware.
48
Chapter 6
A program to find the slot and build the address of the Protocol
Converter could look like this:
pcaddr .eq $O1,$02
find.pc
lda#O
sta pcaddr
ldx #$C7
.1
stx pcaddr+1
idy #7
.2
ida (pcaddr),y
cmp
beq .3
dex
cpx
bcs .1
sec
rts
.3
dey
dey
bpl .2
ida (pcaddr),y
dc
adc #3
sta pcaddr
rts
slot = 7 to 1 step -1
pc.slg,y
#$cl
try next slot
signal could not find pc
$CsFF
carry clear signals pc found
pc.sig .HS FF.20.FF.00.FF.03.FF.00
Once you have the address of the Protocol Converter firmware, you
can call it in a manner similar to ProDOS MLI calls. You must plug the
address of the Protocol Converter firmware into a “JSR” instruction,
which is immediately followed by a one-byte command and a two-byte
address.
The command number is a number from $00 to $09 which specifies
which action you want the Protocol Converter to take.
The address is the address of a parameter block, which provides
additional information for processing the command, or a place for the
information returned by the command.
After the Protocol Converter has finished processing your command,
it returns control to the next byte after the pointer to the parameter block.
If carry is clear, there was no error. If carry is set, the A-register contains
an error code.
49
Chapter 6
Since the FIND.PC program left the address in two page zero
locations, a JMP opcode ($4C) could be placed in front of the address to
make it into a JMP instruction. Then our calls to the Protocol Converter
would look like this:
callpc
.eq
jsr
bcs
lda
$00
(just before pcaddr)
find.pc
...
. ..no pc found
#$4C JMP opcode sta callpc
.other code
jsr callpc
.da #cmd,parameters
... ...more code
Apple warns programmers NOT to use any page zero locations when
calling the Protocol Converter firmware, saying that some page zero
locations are used by that firmware. They do not say which locations they
use, but investigations show that they use bytes in the range from $40 to
$4F. What they do with those is push them on the stack, put their own
data in them, and at the end restore the original contents from the stack.
They use a substantial amount of stack, as many as 35 bytes. (The
RamFactor firmware uses no more than 17 bytes of stack for Protocol
Converter calls, including the two used by your JSR.) It is recommended
that you can copy the PCADDR bytes up into your own program. You
could even plug them in to every JSR to the Protocol Converter. For
example:
jsr find.pc
bcs ...
... no pc found
lda pcaddr
sta callp+l
lda pcaddr-’-1
sta callpc+2
callpc
jsr callpc
.da #cmd,parameters
...
jmp * address filled in
Description of Protocol Converter
Commands
Apple defines ten commands for the Protocol Converter firmware.
These are not necessarily identical in function for all devices which use the
Protocol Converter. In fact, Apple’s memory card uses two of the
commands in a different way than Apple’s UniDisk 3.5 does. The
Protocol Converter firmware in the RamFactor functions exactly the same
way as that in the Apple Memory Expansion Card.
50
Chapter 6
The following chart summarizes the ten commands as implemented in
the RamFactor firmware.
Parameters:
cnxl
PC Status
$00
RAM Status $00
Read Block $01
Write Block $02
Format
$03
Control
$04
Init
$05
Read Bytes $08
Write Bytes $09
+0
cnt
3
3
3
3
1
3
1
4
4
Error Codes $01
$04
$11
$21
$2D
Command not $00-$05,$08, or $09
Wrong parameter count
Invalid Unit Number
Invalid Status or Control code
Block Number too large
o
o
o
+1
unit
0
1
1
1
1
0/1
0/1
1
1
+2
buf-lo
buf-lo
buf-lo
buf-lo
+5
+6
+3
+4
buf-hi
buf-hi
buf-hi
buf-hi
code
code
bik-lo bik-mi blk-hi
bllc-lo bik-mi bik-hi
+7
+8
buf-lo buf-hi code
buf-lo buf-hi cnt-lo cnt-hi adr-lo adr-mi adr-hi
buf-lo buf-hi cnt-lo cnt-hi adr-lo adr-mi adr-hi
PC Status (cmd $00, unit $00, code $00): reads the
status of the Protocol Converter itself into your buffer. The
status of the RamFactor is always 8 bytes, with the first byte =
$01 and all the others = $00. Also returns with $08 in the
X-register and $00 in the Y-register. This is of no value
except for compatibility with other devices supporting
Protocol Converter firmware.
RAM Status (cmd $00, unit $01, code $00 or $03):
reads the status of the RamFactor card into your buffer. Code
$00 will cause four bytes to be stored: the first is always
$F8, and the other three are the number of blocks in the
current partition (10, mid, hi order). (Y,X) will equal
($00,$04) when it is finished. Code $03 will cause 25 bytes
to be stored: the first four are the same as code $00 returned;
the next 17 are the name of the card in “ProDOS Volume
Name” format (length of name in first byte, ASCII characters
of name with hi-bit off, padded with blanks); and finally, four
zero bytes. The card name is “RAMCARD”. (Y,X) will
return ($00,$ 19) when finished. These responses are
identical to the response given by Apple’s Memory Expansion
Card, for compatibility reasons.
Read Block (cmd $01): reads the specified block from
the current RamFactor partition into your buffer. You can
read a block into a buffer in //e Auxiliary Memory by calling
the Protocol Converter with the RAMWRT soft-switch set to
AuxMem.
51
Chapter 6
o
Write Block (cmd $02): writes the specified block from
your buffer into the current RamFactor partition. If you are
careful and follow all the rules, you can write a block from a
buffer in //e Auxiliary Memory by calling the Protocol
Converter with the RAMRD soft-switch set to AuxMem.
You have to put the code that sets the RAMRD switch and
calls the Protocol Converter, along with its parameter block,
into page zero or one of motherboard RAM ($OO00-O1FF), or
in the language card RAM area. Or, you can have both
RAMRD and RAMWRT set for AuxMem and be executing a
program from within AuxMem.
o
Format (cmd $03): does nothing in a RamFactor card.
o
Control (cmd $04): does nothing in a RamFactor card. If
the code is not $00, you will get error code $21. The buffer
is never accessed.
o
Init (cmd $05): does nothing in a RamFactor card.
o
Open or Close (cmd $06 or $07): cause error code $01
in a RamFactor card. These commands only apply to
character-oriented devices, and RamFactor is a blockoriented device (so says Apple).
o
Read Bytes (cmd $08): reads a specified number of
bytes starting at a specified RamFactor address into your
buffer. The byte count may be as high as $FFFF, but this
would obviously wreak havoc inside your Apple. No checks
are made inside the protocol firmware for reasonableness of
the buffer address or the byte count, so be careful. The
RamFactor address may be as high as $7FFFFF. This
corresponds to a total of 8 megabytes, which is only half the
maximum capacity of a RamFactor card. Apple has arbitrarily
limited us to this maximum, because they use the top bit of
the card address to specify whether the buffer is in MainMem
(bit 23 =0) or AuxMem (bit 23 = 1). (Bit 23 of the address
is bit 7 of the last byte of the parameter block.)
o
Write Bytes (cmd $09): writes a specified number of
bytes from your buffer starting at a specified RamFactor
address. The details of byte count, buffer location, and
RamFactor address are the same as for the Read Bytes ($08)
command.
52
Appendix A
A:
RamCharger
—RamFactor Battery Backup Option
You have by now, no doubt, witnessed the impressive speed of the RamFactor card
when used as a RAMdisk. Remember that one of the major disadvantages of a
RAMdisk is its volatility. Even a brief power interruption will completely erase the
contents of a RAMdisk. The RamCharger Battery Backup Option eliminates this
disadvantage and turns the RamFactor into a non-volatile, bootable storage device. Not
only does the RamCharger protect the contents of RamFactors memory during
momentary power outages, it provides extended protection against loss of data during
long power failures.
RamCharger installation is simple. Plug the AC power cord into any grounded 120
volt wall socket (240v model available) and connect the RamFactor power cable to the
RamFactor’s power socket.
The RamCharger battery and charger are entirely contained within an attractive case
similar to the Disk II case. During normal operation, RamCharger charges its internal
battery and supplies power to the RamFactor memory chips. When the AC power to
RamCharger is interrupted, RamCharger instantly switches to battery power until the AC
power is restored. RamCharger’s heavy duty battery can maintain memory on a 1
megabyte RamFactor for over 5 hours. AC power will maintain RamFactor memory
indefinitely!
Attention IIGS and Enhanced //e Users: One of the features of the Apple IIGS and
Enhanced Apple //e enables it to boot from a RamFactor card. When you turn the
computer on, you can automatically boot into your favorite program in the wink of a eye.
In a //e, if the RamFactor card is installed in a slot numerically higher than the
first disk drive interface card (i.e. slot 7), the active bootable partition can be booted
just like a conventional disk drive.
In a IIGS, you can boot from the RamFactor in any slot (except 3) by setting
your startup slot in the Control Panel Menu. (See your Apple IIGS Owner’s Guide
for details.)
53
Appendix B
B:
RamFactor Memory Test
There are actually two different tests included with your RamFactor.
Use either RamFactor Memory Test to verify the basic operation and
hardware reliability of the RamFactor card. If you encounter problems
when running a program that you feel relate to RamFactor memory, these
tests are a good first step in diagnosing the problem.
DO NOT attempt to repair your RamFactor card! It could void your
warranty.
Test on AW 2 Expander disk: One test is included on the AW 2
Expander disk. To run this test program, turn the computer off, insert the
AW 2 disk or the AW 2 Expander disk in your startup drive, and turn the
computer on. When the main menu appears, select the “RamFactor
Memory Test” option. Select the appropriate option from the memorytest options menu. If you hold the Open Apple key down
momentarily while you select the memory test, it will execute a longer
more thorough memory test.
A graphic representation of the product being tested will appear on the
screen. The test indicates any defective RAM chips or empty RAM
sockets with a “xx” in the corresponding chip location on the graphic
display. After eight successful passes, the program displays the message
“Card Passed,” indicating that the circuitry on the card has passed. In
the lower left corner of the screen, a “pass indicator” will show how many
times the program has run the memory test. The program will repeat the
memory test indefinitely. Press any key to terminate the RAM test and
enter the 80 column and high-resolution display portion of the RamWorks
test.
Test in firmware: The other test is contained in the RamFactor’s
firmware. To run this test, while in BASIC, type call -151. Then
type, "Cs0AG” where s is equal to the slot containing your RamFactor.
To stop this test, press Control-Reset.
If the test passes and you still experience problems with your
program, the next step will be to eliminate the software as a possible
source of the problem. Try to run different software packages or another
copy of the program you are having problems with. Our experience
shows that a large majority of “program crashes” are not necessarily
caused by hardware failures but by software problems. Many software
publishers offer technical support for software related problems.
If the RamFactor Memory Test fails, turn the system off, insure that
all of the socketed memory chips and connectors are correctly and
securely seated. (Often, just reseating the chips and connectors has a
magical healing effect on a sick computer!) Turn the system on and run
the memory test again. If it still fails, refer to the Technical Support
section in this manual.
54
Appendix C
C:
Copying Disks with Filer
We have included Filer, a utility program, on the AW 2 Expander disk
to enable you to make backup copies of your disks that are not copy
protected. The instruction below tell you how to use Filer to copy from
disk to disk. See Chapter 2 for instructions on using Filer to copy
AppleWorks to your RamFactor.
1. Load Filer.
2. Select “Volume Commands” (v).
3. Select “Copy a Volume” (C). The settings default to a
two drive set up with your master in Slot 6 Drive 1 and
your copy disk in Slot 6, Drive 1. Adjust to your set up.
(If you only have one drive you can copy from S6, D1 to
S6, D1.)
4. Press return to accept the default settings or enter your
own.
5. Insert the master disk in your drive that you have set the
program to copy from. Insert a blank disk (it does not
need to be formatted) in the drive you have set the program
to copy to. The blank disk must have the write protect tabs
removed.
6. Press the Return key.
7. Name your volume. It will default to the name of the
master disk (ex: When copying AppleWorks, the volume
name will default to “/APPLEWORKS”). Hit return or
give it a different name.
8. When you press return, the copy program will begin
formatting the copy disk. Then the words “READING”
and “WRITING” will flash on and off the screen to
entertain you while you wait.
9. When the program is finished copying AppleWorks, it
sends the message, “COPY COMPLETE” to the screen.
10. Remove both disks. Put your master disk in a safe place
and label your copy disk. You will make your
modifications to the copy disk.
For additional help with the Filer program, contact your Apple
dealer.
55