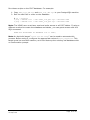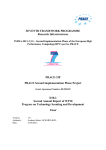
1
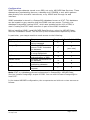
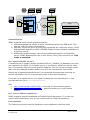
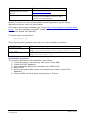
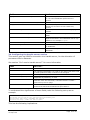
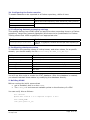
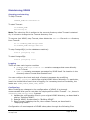
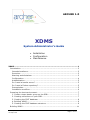
ARCHER 1.0
XDMS
System Administrator’s Guide
• Installation
• Configuration
• Maintenance
XDMS .......................................................................................................... 1
Introduction .............................................................................................. 3
Intended audience .................................................................................. 3
Overview............................................................................................... 3
Warning and disclaimer ........................................................................... 3
Configuration ......................................................................................... 4
Authentication........................................................................................ 5
Do I need a handle server? ...................................................................... 5
Do I need a Fedora repository?................................................................. 5
Prerequisites.......................................................................................... 5
Installation workflow............................................................................... 6
Preparing the host environment ................................................................... 7
1. Create a team leader group on the SRB ................................................. 7
2. Creating collections on your SRB........................................................... 7
3. Creating the ICAT database.................................................................. 8
4. Building XDMS.................................................................................... 9
5. Creating the ICAT database structure .................................................... 9
Building XDMS......................................................................................... 11
XDMS System Administrator’s Guide v1.0
30 Sept 2008
Page 1 of 24
Overview............................................................................................. 11
Prerequisites........................................................................................ 11
1. Obtaining the XDMS source code......................................................... 11
2. Configuring ddm-icat-applicationContext.xml ........................................ 11
3. Configuring xdms.properties............................................................... 12
3a. Configuring the SRB section.............................................................. 12
3b. Configuring the MyProxy section........................................................ 13
3c. Configuring the Shibboleth section ..................................................... 13
3d. Configuring the handle server section ................................................ 14
3e. Configuring the SMTP server section .................................................. 15
3f. Configuring the UQ Metadata Editor section ......................................... 15
3g. Configuring the tree panel titles and labels section............................... 15
3h. Configuring the Fedora section.......................................................... 16
3i. Configuring dataset packaging settings ............................................... 16
4. Configuring database entries .............................................................. 16
5. Building XDMS.................................................................................. 16
Deploying XDMS ...................................................................................... 18
Before you begin .................................................................................. 18
1. Deploying MDE ................................................................................. 18
2. Registering the JNDI resource for MDE................................................. 18
3. Deploying XDMS ............................................................................... 19
4. (Optional) Tweaking Tomcat............................................................... 19
5. Verifying.......................................................................................... 19
Troubleshooting ................................................................................... 19
Maintaining XDMS.................................................................................... 21
Stopping and starting............................................................................ 21
Logging............................................................................................... 21
Configuring.......................................................................................... 21
Stop Tomcat, redeploy the .war file, then restart Tomcat, as described in “. Error!
Bookmark not defined.
Installing custom schema templates........................................................ 22
Creating other groups ........................................................................... 23
Development status ................................................................................. 24
XDMS System Administrator’s Guide v1.0
30 Sept 2008
Page 2 of 24
Introduction
Intended audience
This guide is intended for system administrators who will be installing and
maintaining XDMS.
To install XDMS, basic familiarity with Linux, Apache Tomcat and PostgreSQL is
assumed.
Overview
XDMS is a web application that runs on an application server such as Tomcat,
allowing users to manage sets of data stored on an SRB (Storage Resource Broker).
The web-based front end (.jsp files), and the Java servlet back end (.jar files) are
packaged in a single .war file, which is deployed to the application server.
Configuration takes place through several files, including xdms.properties and
log4j.properties.
XDMS manages two kinds of metadata about the SRB data in a database called
ICAT. First, it implements the CCLRC Scientific Metadata Model 2 1 to store general
information about projects, experiments, datasets etc. Secondly, it stores
customisable domain-specific metadata.
A bundled metadata editor, MDE 2 , is used to edit this domain-specific metadata. It
is delivered as a Java web application that must be deployed in the same way. A
JNDI resource for MDE must also be registered on the application server, by adding
a line to conf/context.xml in the case of Tomcat.
Security is managed by creating users and groups on the SRB. Several methods of
authentication are supported, as described later in this section.
Warning and disclaimer
During testing of ARCHER 1.0, a number of defects were discovered. You should
carefully read the defects list and consider whether this version of XDMS meets
your needs.
Some of the most severe defects:
• The security model in XDMS ARCHER 1.0 is not suitable for a production
environment. You should assume that any user may view any other user’s
data, and possibly change it.
• Sometimes data may be lost although the user believes it has been saved.
• Not all business rules of data curation are fully respected: you should not
assume that every dataset has full metadata, or is safe from deletion or
modification by unauthorised users.
• Not all functionality needed by all user classes is fully implemented. Browsing
and auditing functions are particularly limited.
The full defects list is available at http://www.archer.edu.au/downloads.
1
2
http://epubs.cclrc.ac.uk/work-details?w=30324
http://www.itee.uq.edu.au/~eresearch/projects/archer/software.php
XDMS System Administrator’s Guide v1.0
30 Sept 2008
Page 3 of 24
Configuration
XDMS manages datasets stored on an SRB, set up by ARCHER Data Services. These
datasets are populated by Hermes, a desktop tool, DIMSIM, a tool which gathers
data directly from scientific instruments, or by XDMS itself through its web
interface.
XDMS metadata is stored in a PostgreSQL database known as ICAT. This database
can be located on any machine that the XDMS host can access. Typically, the
database PostgreSQL hosting MCAT, which was installed at the time of SRB, is
used. Creating the ICAT table structure is part of the XDMS installation.
Before installing XDMS, install ARCHER Data Services, using the ARCHER Data
Services Installation Guide. This will set up the infrastructure required by XDMS.
In particular, your target machine needs access to the following:
Service
SRB repository
PostgreSQL
Shibboleth server
MyProxy server
Handle server
Fedora repository
SMTP server
Purpose
Stores the datasets
being managed
Will host ICAT, which
stores CCLRC metadata
for datasets
Provides authentication
if using Shibboleth
Provides MyProxy
authentication to SRB
Provides permanent IDs
for datasets
Destination for
publishing datasets
Sends mail on user
request.
Required Installed in ADS
9
9
9
9
(see note)
8
9
8
9
8
8
8
8
9
8
Note: ICAT is a database schema implemented in PostgreSQL. ARCHER Data
Services installs PostgreSQL as part of SRB. You can use this same PostgreSQL to
host ICAT.
In the tested ARCHER configuration, the components are laid out on two servers as
follows:
XDMS System Administrator’s Guide v1.0
30 Sept 2008
Page 4 of 24
Handle
SMTP
LDAP
Fedora
MyProxy
Tomcat
XDMS
Browser
Key
PostgreSQL
MyProxy
cert
XDMS
MDE
SRB
MCAT
Archer data services
icat
Front server
External component
Back server
Authentication
XDMS supports three modes of authentication:
1. Username/password: Users must be maintained within the SRB itself. This
may be useful for short term testing.
2. MyProxy: Users are given a short-lived certificate by a MyProxy server, which
authenticates against an LDAP. ARCHER Data Services includes installation of
a MyProxy server.
3. Shibboleth (experimental): Users first authenticate against a Shibboleth
server. XDMS bounces the user to this server if they have not done so. This
mode is untested.
Do I need a handle server?
A handle server is used to assign permanent IDs or “handles” to datasets once they
are ingested into XDMS. If no handle server is configured, XDMS can still be used,
but no permanent IDs will be assigned to datasets. You can set up a handle server
later, but any datasets created before then will not retroactively receive IDs.
Setting up a registered handle server is a somewhat complex task involving an
annual registration fee. It is beyond the scope of this documentation.
If you do use a handle server, you need a private key corresponding to it. You
should place this file in /etc/grid-security/ .
See:
• http://www.handle.net/lhs.html - overview of local handle systems.
• http://www.handle.net/start.html - guide to setting up a local handle
system.
Do I need a Fedora repository?
XDMS supports exporting datasets to Fedora Digital Repository. If you do not
require this functionality, you do not need access to a Fedora repository.
Prerequisites
The following services must be installed on the installation machine itself:
XDMS System Administrator’s Guide v1.0
30 Sept 2008
Page 5 of 24
Service
Recommended
Java application server
supporting JSP 2.0, Servlet
spec 2.4
Java Development Kit
Apache Tomcat 5.5.25, but not Tomcat 6.
http://tomcat.apache.org/
J2SE JDK 5.0
(required to build XDMS from source. JRE is
sufficient for running XDMS.)
Apache Tomcat 5.5 is the recommended, tested application server. Other
application servers have not been tested.
If Tomcat is not already installed, get it from http://tomcat.apache.org/download55.cgi . The Yum package “tomcat5” is not recommended. It has not been
successfully tested with ARCHER.
To install these prerequisites:
yum install jdk
These environment variables must be set on the installation machine:
Variable
$CATALINA_HOME
$JAVA_HOME
Value
Tomcat installation directory.
E.g., /usr/local/archer/tomcat/apache-tomcat-5.5.26/
JDK installation directory.
E.g. /usr/java/jdk1.5.0_16/
Installation workflow
The overall workflow for the installation is as follows:
1. Create directories, user groups, and users on the SRB.
2. Create the ICAT database.
3. Use information gathered to configure the XDMS build
4. Build XDMS
5. Use the generated SQL scripts to complete the creation of the ICAT
database.
6. Deploy XDMS and third party components to Tomcat.
XDMS System Administrator’s Guide v1.0
30 Sept 2008
Page 6 of 24
Preparing the host environment
The host that will run XDMS must have an application server, access to a prepared
ICAT database, and access to a prepared SRB.
1. Create a team leader group on the SRB
In order to create any projects in XDMS, you need at least one user with a “team
leader” access profile. This profile can create or delete anything in XDMS, but
should not be confused with the concept of an SRB “superuser”.
XDMS profiles are mapped to SRB groups through a properties file, which you will
configure later.
Download mcatAdmin from the following address:
http://www.sdsc.edu/srb/index.php/Admin_Tool
mcatAdmin is a third-party SRB user and group administration tool.
Use it as follows:
1. Create a user group for “team leaders” who can create projects and user
groups. For example: “team_leaders” 3 .
2. Create a user in the newly-created group. For example, “team_leader”.
Note: If using MyProxy, you may wish to create this user in your LDAP instead.
Doing so is beyond the scope of this documentation.
2. Creating collections on your SRB
Next, you need to create the following collections.
1. Common project area: All validated project data will be stored in this
directory. Call it something like xdms-project. Give “all” access 4 to the user
you created in step 1.
2. Staging area: Tools that do not support XDMS natively will write to this
directory. Call it something like xdms-staging.
For each directory, make a note of the full name, including the SRB domain. For
example, “/myzone/home/xdms-project”.
3
4
The “team leader” role is implemented as the “owner” of the project area in SRB.
Navigate to the directory and click the “key” icon in the right toolbar.
XDMS System Administrator’s Guide v1.0
30 Sept 2008
Page 7 of 24
You can do this two ways:
Using inQ desktop tool:
InQ is a third-party SRB file management tool. Refer to the included help files for
full documentation. Note that the “Name” field on the initial connection screen
refers to the username of an SRB superuser.
Download inQ from the following address:
http://www.sdsc.edu/srb/index.php/InQ
You can find the full name of each directory by navigating to its parent directory,
selecting it in the right-hand pane, then right-clicking it and choosing “Copy path to
clipboard”.
Using command-line “S commands”
You can use the “S commands” that are installed with SRB to create these
directories directly on the SRB machine.
Command
Explanation
su – srb
Switch to the pre-defined SRB user, to
load the SRB environment.
Prepare “S commands”.
Create project directory
Give all rights on XDMS project dir to
team leader group.
Create staging area.
Give rights to staging area.
List directories and privileges to verify the
above steps.
Sinit
Smkdir xdms-project
Schmod a team-leader mydomain xdms-project
Smkdir xdms-staging
Schmod a team-leader mydomain xdms-staging
Sls –C
After XDMS is installed, you will create more users and groups.
3. Creating the ICAT database
XDMS stores metadata for the datasets it manages in a database structure known
as ICAT, which implements the CCLRC Scientific Metadata Model Version 2. 5
You must create the ICAT database into an existing PostgreSQ installation.
5
http://epubs.cclrc.ac.uk/work-details?w=30324
XDMS System Administrator’s Guide v1.0
30 Sept 2008
Page 8 of 24
If installing into SRB’s PostgreSQL
If you are installing ICAT into the PostgreSQL installed by SRB, you must
now change the security options. By default, they do not allow external
connections at all.
Edit /var/lib/psql/data/postgresql.conf. Modify the restrictions to at
least allow network connections from the XDMS machine. For example,
you could add this line:
listen_addresses = '*'
This would allow connections from any IP address.
For more information, see:
http://www.postgresql.org/docs/8.1/static/runtime-configconnection.html
If installing into a machine without PostgreSQL
You can install PostgreSQL as follows:
yum install postgresql
1. On the database machine, create a dedicated DB user for xdms to use,
called 6 xdms. For example:
createuser xdms --pwprompt
Enter password for new role:
Enter it again:
Shall the new role be a superuser? (y/n) n
Shall the new role be allowed to create databases? (y/n) n
Shall the new role be allowed to create more new roles? (y/n) n
2. Create a database called 7 icat, owned by the xdms user. For example:
su - postgres
createdb icat –O xdms
4. Building XDMS
Now that you have created the ICAT database, you have all the information
required to configure the XDMS build script. Follow the instructions in section
”Building XDMS” (p. 11), then return here to continue the installation.
5. Creating the ICAT database structure
The build process generates two SQL scripts in the dist/xdms/sql directory.
File
dist/xdms/sql/xdms_icat_ddl.sql
dist/xdms/sql/xdms_icat_dml.sql
Purpose
Creates the ICAT database table structure
Populates the ICAT database table structure
with values.
6
Again, this user can be called anything, but must be referred to in the configuration file. It
is not strictly necessary to create a dedicated user, but it is recommended.
7
Any name can be used. The choice of name must be reflected in the JDBC URL specified in
step Building XDMS.
XDMS System Administrator’s Guide v1.0
30 Sept 2008
Page 9 of 24
Run these scripts on the ICAT database. For example:
1. Copy xdms_icat_ddl.sql and xdms_icat_dml.sql to your PostgreSQL machine.
2. Run the two files in order on the database.
# su - postgres
$ psql --dbname icat --file xdms_icat_ddl.sql --username xdms
$ psql --dbname icat --file xdms_icat_dml.sql --username xdms
Note: The XDMS user must have read and write access to all ICAT tables. If using a
different method to create the database and tables, you can grant access with this
SQL command:
GRANT ALL PRIVILEGES ON DATABASE icat to xdms;
Note: An Ant build target “clean.icat.db.setup” can be used to automate this
process. Before using it, configure the appropriate values in user.properties. This
target must be used with caution, as it first destroys the existing icat database with
no confirmation prompt.
XDMS System Administrator’s Guide v1.0
30 Sept 2008
Page 10 of 24
Building XDMS
Overview
The process of building XDMS from source code includes first configuring several
property files. The end product is a single .war file which can be deployed with no
further configuration.
Prerequisites
As XDMS is Java-based, it can be built on any platform, including Windows. This
document assumes it is being built on a Unix environment, however.
Install these products on your build machine before commencing.
Product
Purpose
Source
Ant 1.7.1
Java JDK 1.5
Driving the build process
Compiling the source code
ant.apache.org
java.sun.com/javase/downloads/index.jsp
For example:
yum install ant jdk
1. Obtaining the XDMS source code
Download the source code bundle from http://www.archer.edu.au/downloads.
For example:
mkdir ~/xdms
cd ~/xdms
wget http://www.archer.edu.au/downloads/xdms-1.0.tar.gz
tar –xzf xdms-1.0.tar.gz
2. Configuring ddm-icat-applicationContext.xml
The Java Spring framework needs to be configured for the ICAT database you will
be using. If you have not created this database yet, follow the instructions in
“Preparing the host environment” (p. 7).
Edit the following section of src/java/ddm-icat-applicationContext.xml to point to
the ICAT database.
<?xml version="1.0" encoding="UTF-8"?>
<beans xmlns=http://www.springframework.org/schema/beans
...
<!-- ICAT Datasource -->
<bean id="dataSource"
class="org.springframework.jdbc.datasource.DriverManagerDataSource">
<property name="driverClassName" value="org.postgresql.Driver" />
<property name="url"
value="jdbc:postgresql://icat.uni.edu.au/icat" />
<property name="username" value="xdms" />
<property name="password" value="xxxxx" />
</bean>
Property name
Purpose
driverClassName
The Java class name of the JDBC driver for the database you are using. If
XDMS System Administrator’s Guide v1.0
30 Sept 2008
Page 11 of 24
Property name
url
username/password
Purpose
PostgreSQL, this does not need to be changed.
The complete JDBC url to connect to the ICAT database. Make sure the
trailing “/icat” refers to the actual name of the database you created.
The login and password of the dedicated user for the ICAT database, which
you set up earlier.
3. Configuring xdms.properties
The xdms.properties file controls almost all the configuration of XDMS. You should
now go through each section, configuring as appropriate.
Section
Modify this section…
SRB
Always
MyProxy
If using a MyProxy server for authentication.
Shibboleth
If using Shibboleth for authentication.
Handle Server
If using a Handle Server for storing dataset identifiers.
SMTP Server
Always, to allow XDMS to send mail.
UQ Metadata Editor
If using any metadata schemas other than default
crystallography ones.
Tree panel titles
Only for cosmetic purposes.
Fedora Repository
If using a Fedora repository to export data to.
Dataset Packaging
Only to tweak the treatment of large datafiles.
3a. Configuring the SRB section
Field
Set it to…
srb.host
Name of the machine hosting the SRB server
srb.port
Port to connect to the SRB server on. Typically 5544.
srb.resource
SRB Resource to use. Typically “demoResc” or
“<servername>Disk”.
srb.common.project.directory
The name of the common project directory on the SRB,
created earlier.
For example: /zone1/home/xdms-project
…directory.super.admin.group
The name of the user group for team leaders, created earlier.
For example: team_leaders
srb.scratch.area.directory
The name of the “staging area” directory, created earlier.
For example: /zone1/home/xdms-staging
srb.admin.email.id
The email address of a system administrator to send SRBrelated system administration messages to.
The following fields should not be modified unless you have specific access
requirements. Each field must be one of:
Access type
Meaning
read
User can view, but not modify the item.
write
User can view and modify, but not delete, the item.
delete
User can view, modify and delete the item.
The Team Leader profile implicitly has “delete” access to all items.
XDMS System Administrator’s Guide v1.0
30 Sept 2008
Page 12 of 24
Property
Controls
srb.prjt.admn.grp.perm
Access to projects for the Project Admin profile.
srb.prjt.team.grp.perm
Access to projects for the Team Member profile.
srb.expr.admn.grp.perm
Access to experiments for the Project Admin profile.
srb.expr.team.grp.perm
Access to experiments for the Team Member profile.
srb.dtst.admn.grp.perm
Access to dataset for the Project Admin profile.
srb.dtst.team.grp.perm
Access to dataset for the Team Member profile.
srb.dtfl.admn.grp.perm
Access to datafiles for the Project Admin profile.
srb.dtfl.team.grp.perm
Access to datafiles for the Team Member profile.
3b. Configuring the MyProxy section
XDMS supports MyProxy authentication. This requires two things:
• A MyProxy server running and accessible by XDMS.
• A host certificate for the MyProxy server installed on the XDMS machine
somewhere. It is recommended that you place this file in /etc/gridsecurity/certificates.
If MyProxy authentication is enabled, all other forms of authentication are disabled.
Field
Set it to…
apply.myproxy.security
“y” to enable MyProxy authentication.
myproxy.server.name
The name of your MyProxy host.
myproxy.server.port
The port the MyProxy server is listening on. 7512 by
default.
grid.security.certificate.myproxy
The path to a host certificate for the MyProxy server.
For example:
/etc/grid-security/certificates/2920cd2a.0
3c. Configuring the Shibboleth section
XDMS supports Shibboleth authentication in conjunction with, or as an alternative
to normal website login, in three modes as follows.
The Shibboleth functionality is untested and must be considered
experimental.
Mode Shibboleth
enabled
1
9
Web login
enabled
Behaviour
9
Users can authenticate through Shibboleth. If they
connect directly to the site while not authenticated, they
can login via the normal login screen.
2
9
8
Users authenticate with Shibboleth. If they attempt to
connect directly to the site while not authenticated, they
will be redirected to the configured Shibboleth login
screen.
3
8
9
Users can only authenticate through the normal login
screen.
XDMS System Administrator’s Guide v1.0
30 Sept 2008
Page 13 of 24
Field
Set it to…
apply.shibboleth.security
“y” for security modes 1 or 2, “n” for mode 3. If
“n”, the other Shibboleth parameters are
ignored.
allow.username.password.srb.login
“y” for mode 1, “n” for mode 2.
http.port.to.block
In mode 2, the port which the XDMS server is
running on, to bounce it from. Otherwise,
ignored.
shibboleth.login.url
In mode 2, the URL to redirect the login page
towards.
shibboleth.model.unique.id
An identifier for the university allocated by
MAMS.
shibboleth.model.unique.id.block.chars
Characters to remove from the unique ID.
Replaced characters are substituted with an “@”
character. For example: =+;<>-
shib.id.trim.length
Maximum length for ID.
grid.security.certificate
In modes 1 and 2, the security certificate used
for Shibboleth.
cert.provider
Web service that provides certificates for
Shibboleth.
3d. Configuring the handle server section
This section sets up XDMS’s connection to a handle server, for the allocation of
permanent IDs to datasets.
See section “Do I need a handle server?” for more information
Field
Set it to…
create.dataset.handle
“y” to enable use of handle server, otherwise “n”.
hdl.server.namespace
The registered namespace you wish to use. Once it has been used
for some production data, it should not be changed.
hdl.server.key.location
Path to private key used to access handle server.
hdl.server.key.passphrase
Passphrase of private key, if used.
hdl.resolver.url
The URL of the handle server’s front page. In other words, if you
paste this value into a browser, it should reach the “Handle
System Proxy Server” page.
hdl.base.url
The base URL that XDMS will be running as. This is used to
construct the URL that the handle will point back to.
To understand the significance of these fields, take the following set-up as an
example.
hdl.server.namespace=102.100.archer
hdl.server.key.location=/etc/grid-security/handlekey.bin
hdl.resolver.url= http://handles.uni.edu.au
hdl.base.url=http://xdms.uni.edu.au:8080/
This has the following implications.
XDMS System Administrator’s Guide v1.0
30 Sept 2008
Page 14 of 24
1. When a new dataset is created, it will be given a handle such as
102.100.archer/2FT95S7GB
2. The address of the dataset in XDMS can now be found by visiting
http://handles.uni.edu.au/102.100.archer/2FT95S7GB
3. This in turn redirects to
http://xdms.uni.edu.au:8080/xdms/viewDatasetDetails.action?request.hdlI
d=102.100.archer/2FT95S7GB
3e. Configuring the SMTP server section
XDMS uses an SMTP server for several features:
• When users click buttons such as “Email Dataset Identifier”.
• When exporting to Fedora has finished, a notification email is sent.
• When certain errors are encountered, an email is sent to the system
administrator.
Field
Set it to…
smtp.mail.server
The name of your mail host. It must not require a password.
3f. Configuring the UQ Metadata Editor section
This section forms the link between image types, dataset statuses, and the
metadata schemas that MDE uses to edit them. Each schema is an .xml file which
must be in the right directory of the MDE .war file. See “Maintenance” section for
details.
The default values point to schema files distributed in the XDMS source bundle, so
you do not need to change these values to get XDMS running.
Field
Set it to…
uq.mde.crystal.template
Schema for samples.
uq.mde.dataset.DataCollection.template
Schema for datasets with “Data Collection”
status.
uq.mde.dataset.Processing.template
Schema for datasets with “Processing” status.
uq.mde.dataset.Published.template
Schema for datasets with “Published” status.
uq.mde.dataset.Solution.template
Schema for datasets with “Solution” status.
uq.mde.datafile.img.template
Schema for .img datafiles.
uq.mde.datafile.mccd.template
Schema for .mccd datafiles.
uq.mde.datafile.osc.template
Schema for .osc datafiles.
3g. Configuring the tree panel titles and labels section
This section configures the labels of GUI elements.
Field
Defines…
project.panel.title
The title of the project area pane.
project.home.label
The name of the root node in the project area.
user.panel.title
The title of the personal area pane.
user.home.label
The name of the root node in the user’s personal area.
staging.panel.title
The title of the staging or “scratch” area pane, typically used by
DIMSIM or other non-authenticating tools.
staging.home.label
The name of the root node in the staging area.
XDMS System Administrator’s Guide v1.0
30 Sept 2008
Page 15 of 24
3h. Configuring the Fedora section
To enable datasets to be exported to a Fedora repository, define it here.
Field
Set it to…
fedora.url
URL for the Fedora repository. Must include the (HTTP) protocol.
fedora.username
Username and password to connect to repository.
fedora.password
3i. Configuring dataset packaging settings
This setting defines how XDMS splits up large files when exporting them to a Fedora
repository. Large files (several gigabytes) are known to be problematic for Fedora.
Testing shows that 1800 megabytes is an appropriate size.
Field
Set it to…
datasetpackage.splitsize
The size, in gigabytes, at which files are split when exporting to
Fedora.
4. Configuring database entries
To customise the possible values of lookup boxes, and other values, for a specific
domain, you should modify the file build/config/db/xdms_icat_dml.sql.
Table name
Contains…
STUDY_STATUS
Statuses of projects
INVESTIGATION_TYPE
Types of experiments
FACILITY_USER
Managers available to be selected for each project.
DATASET_TYPE
Types for the “Create a new Dataset folder” page.
DATASET_STATUS
Statuses also for this page.
DATAFILE_FORMAT
Not used.
TOPIC
Topics for the “Create an experiment folder” page.
You will use this script to create the ICAT database. After the database is created,
you should maintain these tables by modifying the database directly.
5. Building XDMS
Before running the build, ensure that:
• ant is installed, and is on the $PATH.
• The $JAVA_HOME environment variable points to the directory of a JDK.
You can verify this as follows:
ant -version
Apache Ant version 1.6.5 compiled on April 4 2007
echo $JAVA_HOME
/usr/java/jdk1.5.0_16/
XDMS System Administrator’s Guide v1.0
30 Sept 2008
Page 16 of 24
To run the build, run the default ant target, from within the root directory of the
XDMS source directory:
ant
This produces a new directory, dist, which contains a zip file. This zip file contains
the complete “distribution” of compiled Java classes and other files, configured for
your environment
Directory
Contains
doc/
User manual, developer manual, and javadoc source code documentation.
lib/
The xdms.war deployable application, and third party components to be
deployed.
META-INF/
sql/
Scripts to create the ICAT table structure, and to populate it with default
values.
src/
XDMS source code.
LICENSE
Full text of the GPL licence, under which XDMS is released.
README
Overview of the product and its directory structure.
XDMS System Administrator’s Guide v1.0
30 Sept 2008
Page 17 of 24
Deploying XDMS
To deploy XDMS, you will:
1. Copy the bundled metadata editor (MDE) .war file to the application server
2. Register a JNDI resource for MDE
3. Copy the XDMS .war file to the application server.
4. Optionally, configure Tomcat for large file uploads.
5. Restart Tomcat and verify that XDMS is running.
Before you begin
Ensure that the $CATALINA_HOME variable points to your Tomcat installation. For
example:
export CATALINA_HOME=/usr/tomcat/apache-tomcat-5.5.26
Stop Tomcat, if necessary.
$CATALINA_HOME/bin/shutdown.sh
If you wish to use a port other than 8080 for XDMS, edit
$CATALINA_HOME/conf/server.xml now.
1. Deploying MDE
The Metadata Editor (MDE) is a bundled Java servlet which must also be installed in
Tomcat.
First, copy the following files:
Copy file…
To…
"dist/xdms/lib/third party lib/uq mde/archer-servermetaservice.jar"
$CATALINA_HOME/common/lib
"dist/xdms/lib/third party lib/uq mde/org.json.jar"
$CATALINA_HOME/common/lib
"dist/xdms/lib/third party lib/uq mde/mde.war"
$TOMCAT_HOME/webapps
Note: The destination directory depends on the application server. In particular, Tomcat 5.5 uses
$CATALINA_HOME/common/lib whereas Tomcat 6.0 uses $CATALINA_HOME/lib.
# cp "dist/xdms/lib/third party lib/uq mde/archer-server-metaservice.jar"
$CATALINA_HOME/common/lib
# cp "dist/xdms/lib/third party lib/uq mde/org.json.jar"
$CATALINA_HOME/common/lib
# cp "dist/xdms/lib/third party lib/uq mde/mde.war" $CATALINA_HOME/webapps/
2. Registering the JNDI resource for MDE
In order for XDMS (and other applications) to be able to use MDE, it must be
registered as a JNDI resource.
For Tomcat, add the following <resource … /> tag to
$CATALINA_HOME/conf/context.xml .
<Context>
XDMS System Administrator’s Guide v1.0
30 Sept 2008
Page 18 of 24
...
<Resource name="bean/RecordBrokerFactory" auth="Container"
type="au.edu.archer.metadata.spi.MetadataServiceProvider"
factory="au.edu.archer.metadata.spi.recordbroker.RecordBrokerFactory"
/>
</Context>
3. Deploying XDMS
If your DBMS is not PostgreSQL, you need to obtain the (type 4) JDBC driver for it,
delivered as a .jar file. The JDBC driver for PostgreSQL is included.
JDBC drivers can be obtained from http://developers.sun.com/product/jdbc/drivers.
Proceed as follows:
Step
Example command
1.
cp "dist/xdms/lib/third party lib/jdbc
driver/postgresql-8.1-409.jdbc3.jar"
$CATALINA_HOME/common/lib/
Copy the JDBC driver file to
$CATALINA_HOME/common/lib.
If you are using PostgreSQL, use the
JDBC driver provided with XDMS in the
lib/third party lib/jdbc driver
directory of the build.
2.
3.
Copy dist/xdms.war to
$CATALINA_HOME/webapps.
Create this directory:
cp dist/xdms.war $CATALINA_HOME/webapps/
mkdir -p $CATALINA_HOME/webapps/mdelogs
$CATALINA_HOME/webapps/mdelogs
4.
Make the tomcat user the owner of it.
chown -R tomcat:tomcat
$CATALINA_HOME/webapps/mdelogs
4. (Optional) Tweaking Tomcat
To be able to upload and download large files (>20 mb) through the XDMS web
interface, set the following line in $CATALINA_HOME/bin/catalina.sh:
export JAVA_OPTS=$JAVA_OPTS" -Xms512m -Xmx1024m -XX:MaxPermSize=256m"
5. Verifying
Restart Tomcat.
# $CATALINA_HOME/bin/startup.sh
You can verify that XDMS is installed correctly by connecting to the web server on
the port it is configured for.
By default, this is http://localhost:8080/xdms/
You should see either the standard XDMS login screen, or be redirected to a
Shibboleth login screen, depending on how you configured XDMS.
Troubleshooting
If you receive an error page, consult the logs. See the section “Maintaining XDMS”
for more information.
XDMS System Administrator’s Guide v1.0
30 Sept 2008
Page 19 of 24
Testing in August-September 2008 revealed a number of defects. Consult the XDMS
Defects List for possible known problems.
One other source of problems is having the correct version of Jargon. Jargon is the
API that XDMS uses to talk to SRB. If the logs reveal unexpected problems
connecting to SRB, consider replacing the /webapps/xdms/WEBINF/lib/jargon_v2.0.1beta.jar file with a different version.
XDMS System Administrator’s Guide v1.0
30 Sept 2008
Page 20 of 24
Maintaining XDMS
Stopping and starting
To stop Tomcat:
$TOMCAT_HOME/bin/shutdown.sh
To start Tomcat:
cd $TOMCAT_HOME
bin/startup.sh
Note: The xdms.log file is written to the current directory when Tomcat is started.
So, it is best to change to the Tomcat directory first.
To remove just XDMS, stop Tomcat, then delete the xdms.war file and xdms directory
from Tomcat:
rm -rf $TOMCAT_HOME/webapps/xdms
rm $TOMCAT_HOME/webapps/xdms.war
To stop PostgreSQL (on the database machine):
service postgresql stop
To start PostgreSQL:
service postgresql start
Logging
There are two main logs to consider:
• $TOMCAT_HOME/logs/catalina.out contains messages that come directly
from Tomcat.
• xdms.log contains messages generated by XDMS itself. Its location is the
directory where Tomcat was started from.
You can configure the level and style of output messages by modifying
src/java/log4j.properties within the original XDMS source directory. In particular,
lower the thresholds of each kind of logging. In increasing levels of verbosity, the
levels are: FATAL, ERROR, WARN, INFO, DEBUG.
Configuring
When making any changes to the configuration of XDMS, it is strongly
recommended that you do not alter the deployed files within Tomcat – i.e., those in
$CATALINA_HOME/webapps/xdms. Instead:
1. Update the configuration files in your original XDMS directory, as described in
section “Building XDMS”.
2. Rebuild XDMS, as described in “Building XDMS”.
3. Stop Tomcat, redeploy the file, then restart Tomcat, as described in
“Deploying XDMS”.
Configuration of most aspects of XDMS takes place through the following files.
XDMS System Administrator’s Guide v1.0
30 Sept 2008
Page 21 of 24
Configuration file
WEB-INF/classes/xdms.properties
WEB-INF/classes/ddm-icatapplicationContext.xml
WEB-INF/classes/log4j.properties
What it controls
Locations of servers, authentication,
SRB, handle server, MDE templates.
Connection to ICAT database.
What to log, and where to log to.
Installing custom schema templates
By default, XDMS is configured for use in crystallography, and contains metadata
schemas appropriate for this domain. These schemas control the fields that appear
in the metadata editor (MDE) windows.
To use other schemas in MDE
1. Obtain schema files in both XML and MSS format.
2. Place the MSS files in the MDE .war file, under /test/data/schema
3. Place the XML files in the XDMS .war file, under /data/records
4. Re-deploy both the MDE and XDMS .war files.
See the MDE documentation for more details.
XDMS System Administrator’s Guide v1.0
30 Sept 2008
Page 22 of 24
Creating other groups
There are three profiles used by XDMS.
Profile name
Main purpose
Assigned
Specified in
Team leader
One group per XDMS
installation
One group per project
xdms.properties
Project admin
Create projects, assign
users, delete records.
Create experiments
Team member
Upload datafiles
One group per project
Project creation
page
Project creation
page
To assign a user a profile:
1. Create a group for the profile, if it does not already exist.
2. Add the user to the group.
3. Link the profile to the group, if needed, as specified in the above table.
If you are using MyProxy authentication, you should perform steps 1 and 2 in the
LDAP. The group and user changes will later be duplicated automatically in the SRB.
Otherwise, perform these steps in SRB, using mcatAdmin.
XDMS System Administrator’s Guide v1.0
30 Sept 2008
Page 23 of 24
Development status
The XDMS source code is released under the GNU General Public License. It was
developed by the ARCHER project 8 , and is undergoing further development by the
Monash e-Research Centre 9 . You can access the latest development versions of the
XDMS source code base at http://code.google.com/p/archer-xdms/.
“Javadoc” documentation is generated with each build into the jardm/api directory
inside the generated .war file and is also available at
http://www.archer.edu.au/downloads.
8
9
http://www.archer.edu.au
http://www.monash.edu.au/eresearch/
XDMS System Administrator’s Guide v1.0
30 Sept 2008
Page 24 of 24