1
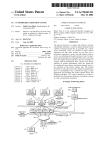
InsightPower Manager
Centralized UPS Management System
for Windows
User Manual
Table of Contents
Introduction ..................................................................................................................... 1
Features.................................................................................................................... 1
Overview........................................................................................................................... 2
Create an UPS Map........................................................................................................ 3
Connect to Database..................................................................................................... 6
Database Configuration ....................................................................................... 6
ODBC connection .................................................................................................. 6
InsightPower Manager Installation.................................................................... 6
InsightPower Manager Database Configuration............................................ 6
Restart System ....................................................................................................... 7
Initial Database ....................................................................................................... 7
Database Backup Plan.......................................................................................... 8
Remote Monitor ODBC Configuration.............................................................. 8
File Menu .......................................................................................................................... 9
Connect To Service ............................................................................................... 9
Auto-Load................................................................................................................. 9
Rename As............................................................................................................... 9
Generate Report ..................................................................................................... 9
Database................................................................................................................... 9
Login........................................................................................................................ 10
Change Password................................................................................................ 10
Access Management ........................................................................................... 10
Object Menu................................................................................................................... 11
Add Group.............................................................................................................. 11
Add SNMP Object................................................................................................. 11
Add Local Object.................................................................................................. 11
Lock Object............................................................................................................ 11
Cut............................................................................................................................ 11
Paste........................................................................................................................ 12
Management Menu....................................................................................................... 13
Connection............................................................................................................. 13
List/Tab Selection ................................................................................................ 13
Notification............................................................................................................. 13
Alarm Management.............................................................................................. 14
Historical Data Management ............................................................................. 14
Pause Reaction..................................................................................................... 14
Contactor................................................................................................................ 14
Send Notification From Service ....................................................................... 15
Send Notification From Monitor....................................................................... 15
Event Log ............................................................................................................... 15
Historical Parameters ......................................................................................... 15
Download UPS Event Log.................................................................................. 15
Control .................................................................................................................... 15
SNMP Batch Configuration ............................................................................... 16
Control Password Setup .................................................................................... 16
Introduction
Congratulations on your purchase of InsightPower Manager to manage your
Uninterruptible Power Supply (UPS), InsightPower Manager is designed to
communicate with the UPSs in the LAN or through the serial port to monitor all of
your UPSs.
InsightPower Manager provides detailed information about the UPS. It is easy to
install and program, yet has the necessary features to handle all of one’s power
requirements.
Features
z Monitoring and control remote UPSs through TCP/IP network(SNMP)
z
z
Monitoring and control local UPSs through serial cable(RS485/RS232)
Collect the information of all of your UPSs in one program
z
Client/Server design, multiple remote Monitor programs can connect to
a Service program.
z
z
Hierarchical design, easy to manage all of your UPSs intuitively
Batch configuration of SNMP devices
z
Notification: e-mail, network broadcast and audible alarm
z
Scheduled tests, shutdown/restarts of the UPS
z
Monitoring and display UPS parameters, such as: voltage, current,
frequency and loading, etc.
z
Able to generate all of the UPSs report during the specified period
z
Account and password configuration for multiple users
z
z
Supports database connection through ODBC
Able to save the users operation log, UPS event log and historical
parameters in database
1
Overview
InsightPower Manager is an all-around UPS management system. The UPS
information can be collected through the network(SNMP) or through the serial
port(RS485/RS232). The benefit is those UPSs have the same style of graphical
user interface and share the same alarm system; this would reduce your
management cost.
Network
InsightPower Manager
Service
SNMP
InsightPower Manager
Monitor
SNMP
RS232/485
SNMP
RS232/485
InsightPower Manager
Monitor
Through the network:
InsightPower Manager has the ability to communicate with the UPS through
SNMP protocol in the network.
Through the serial port:
In this case, your can cascade all of your 3 phase UPSs by a RS485 cable
then connect it to a RS485-to-RS232 translation box then connect it to the
PC.
2
Create an UPS Map
Here is an example for you to learn how to create a simple UPS map. The
sample map file is named PRACTICE.UMF. It includes a main map and 2 of
regional sub-maps. Each regional sub-map contains two or three local sub-maps.
Please load this file by selecting ‘Open’ from the ‘File’ menu.
Object table of PRACTICE
Home
World
Regional
Local
Sub maps
Sub maps
Object
Houston
Engineering
Los-Angeles
Sales
China
USA
To create a map file please follow the steps
Select ‘New’ from the ‘File’ menu to create a map file and name it ‘Main’.
Background
Although it’s not necessary to have a background for a group object but it is
recommended to do so. A suitable background would help you to manage
your system more quickly and intuitively.
1. Copy the image files to the \Images subdirectory of InsightPower
Manager installed directory.
2. Select ‘Background’ from the ‘Object’ menu.
3. Click on the ‘Browse’ button to choose a bitmap file then press the ‘OK’
button.
Add Group
The concept of group is similar to the directory in the file system. To add
group to a map, please follow the steps.
1. Select ‘Add Group’ from the ‘Object’ menu.
2. Input group title then press the ‘OK’ button.
3
Add SNMP Object
If the UPS has inserted a SNMP card then you have to add a SNMP object
to represent it.
1. Select ‘Add SNMP Object’ from the ‘Object’ menu.
2. Input UPS title, IP(or host name), port and community string.
3. Press ‘OK and Connect’ button.
Attention: The default community string is ‘public’. It only has Read-Only
permission to UPS. If you want to send control commands like schedule
shutdown or battery test then you have to input the community string with
Read/Write permission to the SNMP card. Please login SNMP card via web
browser, open the ‘SNMP Access Control’ web page and input the IP
address of the workstation which runs the InsightPower Manager. The next
step is to decide the community string of the SNMP object. The community
string of the InsightPower Manager SNMP object and the SNMP card must
be the same so that the SNMP packet can pass the verification of the
SNMP card which is sent from InsightPower Manager. Finally, select
‘Read/Write’ option of the ‘Access Level’ field in ‘SNMP Access Control’
page to give this object ‘Read/Write’ permission.
Add Local Object
‘Local Object’ means the UPS is connected to the PC directly through the
serial port. At the UPS side, the connection interface can be RS-232 or
RS-485. To add Local UPS to a map, please follow the steps:
1. Select ‘Add Local Object’ from the ‘Object’ menu.
2. Input the UPS title and select a PC COM port.
3. In general, UPS runs at baud-rate 2400.
4. If the UPSs are cascaded by RS485 to the PC then you have to key in
the UPS ID number. For a 3phase UPS, the UPS ID can be observed and
assigned from its LCD panel…
5. If InsightPower Manager connects to the UPS RS232 port then you just
need to leave the UPS ID to 0.
6. Press ‘OK and Connect’ button.
Rename As
Finally you should save the configuration data in a file. Please select
‘Rename As’ from the ‘File’ menu then input the file name and press OK to
4
save the data in hard disk.
If the InsightPower Manager-Service program needs to load the UPS map
file at system startup, please select ‘Auto-Load’ from the ‘File’ menu and
select the UPS map files.
5
Connect to Database
InsightPower Manager has the ability to connect to a database through ODBC to
save UPS event log, user operation log and UPS historical values in the
database. If this function is not being activated, all of the data will be saved in the
installed directory of InsigntPower Manager-Service.
Database Configuration
1. Here we’ll demonstrate to configure the MS SQL 2005 to let you know how to
configure the database for InsightPower Manager.
First of all, please add a new database named ‘ups’ in SQL 2005 and assign an
account to manage it (admin1). InsightPower Manager will login to the database
by using this account.
ODBC connection
2. Please then create a new account from your Windows operating system with
administrative privilege (odbc1).
3. Login Windows by this account (odbc1).
4. Open the System Administrative Tools from the Control Panel, open the Data
Source(ODBC) and create a new data source, input the related information and
press ‘Next Step’.
5. Input the account and password that you have assigned (admin1) then press
‘Next Step’.
6. Set the ‘ups’ to be the default database then press ‘Next Step’ and complete
the configuration.
InsightPower Manager Installation
7. Now please proceed to install the InsightPower Manager.
8. Open the Service from System Administrative Tools in the Control Panel.
Open the Property of InsightPower Manager and switch to the Login page, select
Login by this account and input the account (odbc1) and password.
InsightPower Manager Database Configuration
9. Please select ‘database’ from the ‘File’ menu. ‘Source Name’ must be the
same as it is in the ODBC. ‘Login Account’ and ‘Password’ must be the database
6
administrative account (admin1).
Restart System
10. Please restart your operating system, InsightPower Manager-Service should
start up and connect to the database automatically.
11. To make sure the InsightPower Manager-Service connects to the database at
startup, please open the InsightPower Manager-Monitor program and select
‘Database’ from ‘File’ menu. Users can observe the database connection status
here.
Initial Database
12. After it connects to the database successfully, please press the ‘Establish
Tables’ button to build all of the necessary tables in the database.
13. The next step is to login InsightPower Manager as an administrator to add the
other users account. Please select ‘Login’ from the ‘File’ menu to open the login
dialog box, the default administrator’s account is admin and the password is
password. There are 3 privileges level of users:
1. System Administrator: Only responsible for user account management,
this level of user is not allowed to manage UPS objects.
2. UPS Device Manager: Has the ability to manage UPS objects.
3. Read-Only User: Only has the ‘read only’ privilege.
7
Database Backup Plan
14. There are 3 kinds of record can be stored in the database: the UPS event log,
the operation event log and the historical values log. Most of device managers
would like to remove old data from the database and keep the old data in another
drives or burn it in a CD periodically. To meet this requirements, InsightPower
Manager provides an interface to configure its backup plan.
Press the ‘Backup Plan…’ button in the Database dialog box to open the dialog
box. You can assign the backup directory for each record table and determine
how many months data can be kept in the database then decide to remove the
old records from the database or not.
Remote Monitor ODBC Configuration
15. It is allowed to install remote InsightPower Manager-Monitor programs to
connect to the same Service program for maintenance or monitoring purposes. If
the historical values are stored in the database then the remote computers need
to configure the ODBC connection as the same way as it is in the Service
computer. Please note that the Data Source(ODBC) name must be the same.
8
File Menu
The file menu allows you to handle files, generate report, configure database
connection and load the UMF file at system startup.
Connect To Service
InsightPower Manager-Monitor
searches
all
of
the
InsightPower
Manager-Service programs in the LAN then list them in the Service IP List,
if you would like to connect to a remote Service that is not in your domain
then please assign the IP address in the IP Address text box.
You can also setup the InsightPower Manage-Monitor to connect to a
specific InsightPower Manager-Service automatically, please select the
Enable option in the Auto-Connect and input the specific IP address.
Auto-Load
This dialog box is used to setup the Service program to load an assigned
UMF file at startup. Next time when you restart your system the Service
program will load the UMF file automatically.
Rename As
The Rename As menu allows you to save current map file to the other file
name. If you do not enable database option to save records in a database
then the event log and UPS historical parameters in your hard drive will be
moved to the new directory automatically.
Generate Report
Used for generating the routine reports. You can assign a period of time for
InsightPower Manager to do the statistics of UPS historical parameters and
analyze the UPS event log. The report files will be placed in the \Report
subdirectory of the InsightPower Manager directory.
Database
Please refer to the ‘Connect to Database’ chapter.
9
Login
If you have enabled the database option then it is necessary to login to the
InsightPower Manager-Monitor. There are 3 privilege levels of user and
different level of users can have different operation rights in the
InsightPower Manager.
The 3 levels are:
1. System Administrator: Only responsible for user account management,
this level of user is not allowed to manage UPS objects.
2. UPS Device Manager: Has the ability to manage UPS objects.
3. Read-Only User: Only has the ‘read only’ privilege.
Change Password
Change the password of the current login user.
Access Management
This function will be enabled if you login as an administrator. Here you can
manage the user accounts of the InsightPower Manager system.
10
Object Menu
Add Group
This menu allows you to add a new group in current map layer. The concept
of group is similar to the directory in the file system. A group can contain
some sub-groups and objects. Base on this rule, users can construct a tree
structure for all objects to manage their UPSs.
Add SNMP Object
This function is used to add a SNMP object in current map layer, this object
communicates with the SNMP card in the UPS through network. Once you
choose this function, InsightPower Manager pops up a dialog box. You have
to fill IP address (or host name) and community string to connect to the
SNMP card.
Attention: If you want to control the UPS through SNMP card then you
have to configure the ‘SNMP Access Control’ page from the SNMP
card. In this web page, add the PC IP address, community string and
the access level must select the read/write option.
Add Local Object
Allows you to add an UPS object in the current map layer. ‘Local Object’
means the PC connects to the UPS directly through RS-232 port of PC. For
UPS, the communication interface can be a RS-232 or RS-485. If the UPSs
are cascaded through RS-485 then those UPS should have different ID
numbers. The Comm. Type of RS485 is ‘3Phase’, the Comm. Type of
RS232 is ‘Regular’.
Lock Object
Lock the position of all objects in the map interface, it is recommended to
enable this function if you have finished building the map file.
Cut
Cut the selected object and stores it in the memory. You can then paste it in
a different map layer to move the object.
11
Paste
Paste the object that has been cut.
12
Management Menu
Connection
SNMP polling interval:
InsightPower Manager averages all SNMP packets during the time you
have assigned. For example, if you have 100 SNMP UPSs and the value of
SNMP polling interval is 1000ms then InsightPower Manager will send 10
SNMP packets in 100ms. Each SNMP UPS will receive at least one SNMP
get-packet in 1000ms. Base on this function, users can change this value to
adjust the network traffic.
Serial polling interval:
Because the communication type of SNMP and serial are different. The
polling interval here means the time that UPS should reply. If the response
time expires then InsightPower Manager records it but will continue to query
next UPS. If InsightPower Manager still doesn’t get response from the UPS
in the following ‘Serial timeout’ period then the object will be marked as
communication fail.
SNMP timeout:
If the SNMP card does not response in the period of SNMP timeout then the
SNMP object will be marked as communication fail.
Serial timeout:
If the UPS does not response in the period of Serial timeout then the Local
object will be marked as communication fail.
List/Tab Selection
This dialog box allows you to change the display columns of list view and
tab number.
Notification
E-Mail
InsightPower Manager has ability to send e-mail through SMTP
protocol. To use this function, you have to provide the IP address of
13
SMTP server, sender account and password.
Broadcast
Enables the ‘Domain Broadcast’ will let InsightPower Manager to send
alarms in the entire Windows domain. If you just want to send
messages to the specific hosts then you have to add the host names in
this dialog box.
SMS
The UPS event can also be sent through SMS. To use the SMS you
have to install a GSM modem or mobile phone (Nokia is recommended)
to the PC. Messages will be transmitted in English.
Alarm Management
Allows you to manage all of alarm level and reactions. There are 3 alarm
levels: Serious, warning and information. Each level is associated to a
group of reactions, such as playing audio files, sending e-mail.
Historical Data Management
This function is used to manage the event log and historical parameters in
the hard drive. To manage database, please select
‘File->Database->.Backup Plan’.
Pause Reaction
Select this menu will pause all alarm reactions until a new alarm is raised.
Alarm Management provides an interface to configure all of the alarm level
and reactions. But if your UPSs are spread in a large area, say in a big city
and have different device managers response for different group of UPSs.
Then you may need to notify different contactors by different UPS object or
group. Using InsightPower Manager can easily configure the contactors
and assign the object and/or group to different contactors. Furthermore, to
reduce the notification loading in the Service program, the Monitor program
can also send notification from the remote side.
Contactor
Add, delete and modify the contactor’s information and saves it in the
Service program side.
14
Send Notification From Service
Select a group or object from the Rest Object list then press Add button to
add it to the Selected Object list. Select a group or object from the Selected
Object list then press Remove button to remove from the Selected Object list.
Press the Save button to save the notification table in Service program side.
This table is used for InsightPower Manager-Service to send notification to
the specified contactors.
Send Notification From Monitor
Select a group or object from the Rest Object list then press Add button to
add it to the Selected Object list. Select a group or object from the Selected
Object list then press Remove button to remove from the Selected Object list.
Press the Save button to save the notification table in Monitor program side.
This table is used for InsightPower Manager-Monitor to send notification to
the specified contactors.
Event Log
This menu allows you to observe event log of the selected UPS or event log
of all UPSs. If the database is enabled then you can also query user
operation log, too. Click on the ‘Export’ button to save the query data in
Excel format.
Historical Parameters
This menu allows you to observe the historical parameters of the selected
UPS. Click on the ‘Export’ button to save the query data in Excel format.
Download UPS Event Log
This function allows users to retrieve the 3Phase UPS event log which
recorded in the UPS side.
Control
In this dialog box, you can issue control command to the selected UPS or
the UPSs in the current group or all of the UPSs. If you are controlling the
SNMP object then the object should have a permission of Read/Write.
Please login SNMP card via web browser, open the ‘SNMP Access Control’
15
web page and input the IP address of the workstation which runs the
InsightPower Manager. The next step is to decide the community string of
the SNMP object. The community string of the InsightPower Manager
SNMP object and the SNMP card must be the same so that the SNMP
packet can pass the verification of the SNMP card which is sent from
InsightPower Manager. Finally, select ‘Read/Write’ option of the ‘Access
Level’ field in ‘SNMP Access Control’ page to give this object ‘Read/Write’
permission.
SNMP Batch Configuration
This function is used to configure all of your SNMP cards quickly and
efficiently. Before we proceed to do the batch configuration, please verify
the firmware version of SNMP card is later or equal to v1.14.
Please select a SNMP object from the ‘Source SNMP Device List’ and
press the ‘Download System Configuration File’ button and ‘Download
SNMP Configuration File’ button to get the description files. Please read the
comments in the description files carefully. If the item is not necessary to
update or you don’t understand what it means, please just delete it (In
general, IP address should be unique so you should delete this item). After
completing the modification, please select the target SNMP device from the
‘Dest. SNMP Device List’, clicking on the ‘Upload System Configuration File’
button to update the system configuration or press the ‘Upload SNMP
Configuration File’ button to update the SNMP configuration to the target
SNMP card.
Control Password Setup
This function is used to verify the privilege of users to open the Control
dialog box. It works only when InsightPower Manager does not connect to
the database.
16