1
Bloomsburg
University
Weather
Viewer
User’s
Manual
User’s Manual
Bloomsburg University Weather Viewer User’s Manual
Bloomsburg Weather Viewer Freeware End User License Agreement
For: All SOFTWARE PRODUCTS of Bloomsburg University IMPORTANT READ CAREFULLY
and PRINT FOR YOUR REFERENCE: This End-User License Agreement ('EULA') is a legal
agreement between you (either an individual person or a single legal entity, who will be referred to in
this EULA as 'You') and Bloomsburg University. It includes any associated media, printed materials and
electronic documentation (the 'Software'). The Software also includes any software updates, add-on
components, web services and/or supplements that Bloomsburg University may provide to You or make
available to You after the date You obtain Your initial copy of the Software to the extent that such items
are not accompanied by a separate license agreement or terms of use. By installing, copying,
downloading, accessing or otherwise using the Software, You agree to be bound by the terms of this
EULA. If You do not agree to the terms of this EULA, do not install, access or use the Software. For
purposes of this EULA, the term 'Licensor' refers to Bloomsburg University, except in the event that
You acquired the Software as a component of a Bloomsburg University SOFTWARE PRODUCT
originally licensed from the manufacturer of your computer system or computer system component, then
'Licensor' refers to such a hardware manufacturer. By installing, copying, downloading, accessing or
otherwise using the Software, You agree to be bound by the terms of this EULA. If You do not agree to
the terms of this EULA, Licensor is unwilling to license the Software. In such event, You may not
install, copy, download or otherwise use the Software.
SOFTWARE LICENSE
The Software is protected by intellectual property laws and treaties. The Software is licensed, not sold.
1. This EULA grants you the following rights:
o
Systems Software - You may install and use any number of copies of the SOFTWARE
PRODUCT on any number of Your computers.
o
Storage/Network Use - You may also store or install any number of copies of the
SOFTWARE PRODUCT on a storage device, such as a network server, used only to
install, run, or serve the SOFTWARE PRODUCT on Your other COMPUTERS over an
internal network.
Restrictions:
o
You may not sell, license or distribute copies of the Software on a stand-alone basis or as
part of any collection, product or service, to the inclusion of situations where the primary
value of the product or service is not the Software.
o
You may not use or distribute any of the Software that include representations of
identifiable individuals, governments, logos, initials, emblems, trademarks, or entities for
any commercial purposes or to express or imply any endorsement or association with any
product, service, entity, or activity.
o
You must indemnify, hold harmless, and defend Bloomsburg University from and against
any claims or lawsuits, including attorneys' fees, that arise from or result from the use or
distribution of Software as modified by You.
o
Bloomsburg University respects the rights of external providers of weather data, and the
proper use of the software does not violate those rights. You cannot copy external
weather data in order to sell or give away copies, or for any commercial purpose.
1
Bloomsburg University Weather Viewer User’s Manual
o
Using the Software will create cached copies of weather data. The copy will be a
temporary copy of an asset external to the Software, created solely for private and
personal use. Federal copyright laws prohibit the unauthorized reproduction, distribution,
or exhibition of copyrighted materials, if any, contained in the temporary copy. The
resale, reproduction, distribution, or commercial exploitation of the temporary copy is
strictly forbidden. We ask you to respect the rights of copyright holders.
2. DESCRIPTION OF OTHER RIGHTS AND LIMITATIONS.
o
Limitations on Reverse Engineering, Decompilation, and Disassembly. You may not
reverse engineer, decompile, or disassemble the Software, except and only to the extent
that such activity is expressly permitted by applicable law notwithstanding this limitation.
o
Trademarks. This EULA does not grant You any rights in connection with any
trademarks or service marks of Licensor or its suppliers.
o
No rental, leasing or commercial hosting. You may not rent, lease, lend or provide
commercial hosting services to third parties with the Software.
o
Support Services. Licensor may provide You with support services related to the
Software ('Support Services'). Use of Support Services is governed by the policies and
programs described in the user manual, in 'online' documentation, or in other materials
from the support services provider. Any supplemental software code provided to You as
part of the Support Services are considered part of the Software and subject to the terms
and conditions of this EULA. You acknowledge and agree that Licensor may use
information You provide to Licensor as part of the Support Services for its business
purposes, including for product support and development. For Software licensed from the
hardware manufacturer, please refer to the manufacturer's support number and address
provided in Your hardware documentation.
o
Termination. Without prejudice to any other rights, Licensor or its suppliers may
terminate this EULA if You fail to comply with the terms and conditions of this EULA.
In such event, You must destroy all copies of the Software and all of its component parts.
o
UPGRADES If the SOFTWARE PRODUCT is labeled as an upgrade, you must be
properly licensed to use a product identified by Bloomsburg University as being eligible
for the upgrade in order to use the SOFTWARE PRODUCT. A SOFTWARE PRODUCT
labeled as an upgrade replaces and/or supplements the product that formed the basis for
your eligibility for the upgrade. You may use the resulting upgraded product only in
accordance with the terms of this EULA. If the SOFTWARE PRODUCT is an upgrade
of a component of a package of software programs that you licensed as a single product,
the SOFTWARE PRODUCT may be used and transferred only as part of that single
product package and may not be separated for use on more than one computer.
o
BACKUP COPY After installation of one copy of the SOFTWARE PRODUCT pursuant
to this EULA, you may keep the original media on which the SOFTWARE PRODUCT
was provided by Bloomsburg University solely for backup or archival purposes. If the
original media is required to use the SOFTWARE PRODUCT on the COMPUTER, you
may make any number of copies of the SOFTWARE PRODUCT solely for backup or
archival purposes. Except as expressly provided in this EULA, you may not otherwise
make copies of the SOFTWARE PRODUCT or the printed materials accompanying the
2
Bloomsburg University Weather Viewer User’s Manual
SOFTWARE PRODUCT. Backup and archival copies of the SOFTWARE PRODUCT
are subject to the same limitations on sale or distribution as the SOFTWARE PRODUCT.
o
AUTOMATIC COMMUNICATIONS FEATURES. The SOFTWARE PRODUCT
consists of interactive Internet applications that perform a variety of communications
over the Internet as part of its normal operation. A number of communications features
are automatic and are enabled by default. By installing and/or using the SOFTWARE
PRODUCT, you consent to the SOFTWARE PRODUCT's communications features.
You may be required to register the SOFTWARE PRODUCT, which sends all required
and all filled optional fields of user information to Bloomsburg University's servers. You
are responsible for any telecommunications or other connectivity charges incurred
through use of the Software.
o
INTELLECTUAL PROPERTY RIGHTS. All title and intellectual property rights in and
to the Software (including but not limited to any images, photographs, animations, video,
audio, music, text, and 'applets' incorporated into the Software), the accompanying
printed materials, and any copies of the Software are owned by Licensor or its suppliers.
All title and intellectual property rights in and to the content that is not contained in the
Software, but may be accessed through use of the Software, is the property of the
respective content owners and may be protected by applicable copyright or other
intellectual property laws and treaties. This EULA grants You no rights to use such
content. If this Software contains documentation that is provided only in electronic form,
you may print any number of copies of such electronic documentation. You may also
make any number of copies the printed materials accompanying the Software for backup
and archival purposes only. Printed, backup, and archival copies of electronic
documentation are subject to the same limitations on sale or distribution as the
SOFTWARE PRODUCT. All rights not specifically granted under this EULA are
reserved by Licensor and its suppliers.
o
LIMITED WARRANTY
NOTE: IF YOU LICENSED THE SOFTWARE FROM A HARDWARE
MANUFACTURER AS A COMPONENT OF A Bloomsburg University
SOFTWARE PRODUCT, PLEASE REFER TO THE LIMITED WARRANTIES,
LIMITATION OF LIABILITY, AND OTHER SPECIAL PROVISION
APPENDICES PROVIDED WITH OR IN SUCH OTHER Bloomsburg University
SOFTWARE PRODUCT. SUCH LIMITED WARRANTIES, LIMITATIONS OF
LIABILITY AND SPECIAL PROVISIONS ARE AN INTEGRAL PART OF THIS
EULA AND SHALL SUPERSEDE ALL OF THE WARRANTIES, LIMITATIONS
OF LIABILITY AND OTHER SPECIAL PROVISIONS SET FORTH BELOW.
3. FOR SOFTWARE LICENSED DIRECTLY FROM Bloomsburg University, THE
FOLLOWING SECTIONS APPLY: LIMITED WARRANTY FOR SOFTWARE. Bloomsburg
University warrants that the Software will perform substantially in accordance with the
accompanying materials for a period of ninety (90) days from the date of receipt. If an implied
warranty or condition is created by your country, state/jurisdiction and federal or state/provincial
law prohibits disclaimer of it, you also have an implied warranty or condition, BUT ONLY AS
TO DEFECTS DISCOVERED DURING THE PERIOD OF THIS LIMITED WARRANTY
(NINETY DAYS). AS TO ANY DEFECTS DISCOVERED AFTER THE NINETY (90) DAY
3
Bloomsburg University Weather Viewer User’s Manual
PERIOD, THERE IS NO WARRANTY OR CONDITION OF ANY KIND. Some
states/jurisdictions do not allow limitations on how long an implied warranty or condition lasts,
so the above limitation may not apply to you. Any supplements or updates to the Software,
including without limitation, any (if any) service packs or hot fixes provided to you after the
expiration of the ninety (90) day Limited Warranty period are not covered by any warranty or
condition, express, implied or statutory.
LIMITATION ON REMEDIES: NO CONSEQUENTIAL OR OTHER DAMAGES - Your
exclusive remedy for any breach of this Limited Warranty is as set forth below. Except for any
refund elected by Bloomsburg University, YOU ARE NOT ENTITLED TO ANY DAMAGES,
INCLUDING BUT NOT LIMITED TO CONSEQUENTIAL DAMAGES, if the Software does
not meet Bloomsburg University's Limited Warranty, and, to the maximum extent allowed by
applicable law, even if any remedy fails of its essential purpose. The terms of the section below
('Exclusion of Incidental, Consequential and Certain Other Damages') are also incorporated into
this Limited Warranty. Some countries, states/jurisdictions do not allow the exclusion or
limitation of incidental or consequential damages, so the above limitation or exclusion may not
apply to you. This Limited Warranty gives you specific legal rights. You may have others which
vary from state/jurisdiction to state/jurisdiction.
YOUR EXCLUSIVE REMEDY. Bloomsburg University and its suppliers' entire liability and
your exclusive remedy shall be, at Bloomsburg University's option from time to time exercised
subject to applicable law, (a) return of the price paid (if any) for the Software, or (b) repair or
replacement of the Software, that does not meet this Limited Warranty and that is returned to
Bloomsburg University with a copy of your receipt. You will receive the remedy elected by
Bloomsburg University without charge, except that you are responsible for any expenses you
may incur (e.g. cost of shipping the Software to Bloomsburg University). This Limited Warranty
is void if failure of the Software has resulted from accident, abuse, misapplication, abnormal use
or a virus. Any replacement Software will be warranted for the remainder of the original
warranty period or thirty (30) days, whichever is longer. Outside the United States or Canada,
neither these remedies nor any product support services offered by Bloomsburg University are
available without proof of purchase from an authorized international source. To exercise your
remedy, contact: Bloomsburg University, 400 E. Second Street, Bloomsburg, PA 17815-1301.
DISCLAIMER OF WARRANTIES. The Limited Warranty that appears above is the only
express warranty made to you and is provided in lieu of any other express warranties (if any)
created by any documentation or packaging. Except for the Limited Warranty and to the
maximum extent permitted by applicable law, Bloomsburg University and its suppliers provide
the Software and support services (if any) AS IS AND WITH ALL FAULTS, and hereby
disclaim all other warranties and conditions, either express, implied or statutory, including, but
not limited to, any (if any) implied warranties, duties or conditions of merchantability, of fitness
for a particular purpose, of accuracy or completeness of responses, of results, of workmanlike
effort, of lack of viruses, and of lack of negligence, all with regard to the Software, and the
provision of or failure to provide support services. ALSO, THERE IS NO WARRANTY OR
CONDITION OF TITLE, QUIET ENJOYMENT, QUIET POSSESSION,
CORRESPONDENCE TO DESCRIPTION OR NON-INFRINGEMENT WITH REGARD TO
THE Software. EXCLUSION OF INCIDENTAL, CONSEQUENTIAL AND CERTAIN
OTHER DAMAGES. TO THE MAXIMUM EXTENT PERMITTED BY APPLICABLE LAW,
IN NO EVENT SHALL Bloomsburg University OR ITS SUPPLIERS BE LIABLE FOR ANY
SPECIAL, INCIDENTAL, INDIRECT, OR CONSEQUENTIAL DAMAGES WHATSOEVER
4
Bloomsburg University Weather Viewer User’s Manual
(INCLUDING, BUT NOT LIMITED TO, DAMAGES FOR LOSS OF PROFITS OR
CONFIDENTIAL OR OTHER INFORMATION, FOR BUSINESS INTERRUPTION, FOR
PERSONAL INJURY, FOR LOSS OF PRIVACY, FOR FAILURE TO MEET ANY DUTY
INCLUDING OF GOOD FAITH OR OF REASONABLE CARE, FOR NEGLIGENCE, AND
FOR ANY OTHER PECUNIARY OR OTHER LOSS WHATSOEVER) ARISING OUT OF
OR IN ANY WAY RELATED TO THE USE OF OR INABILITY TO USE THE SOFTWARE,
THE PROVISION OF OR FAILURE TO PROVIDE SUPPORT SERVICES, OR OTHERWISE
UNDER OR IN CONNECTION WITH ANY PROVISION OF THIS EULA, EVEN IN THE
EVENT OF THE FAULT, TORT (INCLUDING NEGLIGENCE), STRICT LIABILITY,
BREACH OF CONTRACT OR BREACH OF WARRANTY OF ANY SUPPLIER, AND
EVEN IF Bloomsburg University OR ANY SUPPLIER HAS BEEN ADVISED OF THE
POSSIBILITY OF SUCH DAMAGES. ENTIRE AGREEMENT. This EULA (including any
addendum or amendment to this EULA which is included with the Software) is the entire
agreement between you and Bloomsburg University relating to the Software and the support
services (if any) and they supersede all prior or contemporaneous oral or written
communications, proposals and representations with respect to the Software or any other subject
matter covered by this EULA. To the extent the terms of any Bloomsburg University policies or
programs for support services conflict with the terms of this EULA, the terms of this EULA shall
control.
5
Bloomsburg University Weather Viewer User’s Manual
Table of Contents
Overview ......................................................................................................................................................................
Welcome........................................................................................................................................................ 8
Getting Started.............................................................................................................................................................
User Types ..................................................................................................................................................... 9
Hardware System Requirements.................................................................................................................10
Installation ................................................................................................................................................... 11
Logging In (Figures 1 & 2) ............................................................................................................................ 12
Selective Log In (Figures 3, 4 & 5) ................................................................................................. 13
Weather Viewer Basic Functions.................................................................................................................................
Main Window Snapshot (Figure 6).............................................................................................................. 14
Main Window Snapshot Items ................................................................................................. 14-15
Movie Panel (Figure 7) .......................................................................................................................... 16-17
Map Panel (Figure 8) ................................................................................................................................... 18
Data Plot (Figure 9) ..................................................................................................................................... 19
Bookmarks/Events (Figure 10) .................................................................................................................... 20
Notes (Figure 11) ......................................................................................................................................... 21
Daily Diary (Figure 12) ................................................................................................................................. 22
Tutorials .......................................................................................................................................................................
Change Password (Figure 13) ..................................................................................................................... 23
Bookmark Instance/Event ...............................................................................................................................
Create a new Bookmark Instance/Event(Figure 14) ...................................................................... 23
Open a Bookmark Instance/Event (Figure 15 & 16) ...................................................................... 24
Search Bookmarks Instances/Events (Figure 17) .......................................................................... 25
Daily Diary........................................................................................................................................................
Create a new Daily Diary Entry (Figure 18) .................................................................................... 25
Export a Daily Diary Entry(Figure 19) ............................................................................................ 30
Notes ...............................................................................................................................................................
Create a new Note( Figure something) ......................................................................................... 30
Lessons ...........................................................................................................................................................
Open a Lesson (Figures 21 & 22) ................................................................................................... 26
6
Bloomsburg University Weather Viewer User’s Manual
Other ...............................................................................................................................................................
Contact Administrator (Figure 25) ................................................................................................ 23
Instructor......................................................................................................................................................................
For Your Information ................................................................................................................................... 30
Tutorials ....................................................................................................................................................... 30
Change Password (Figure 20) ......................................................................................................... 25
Classes ........................................................................................................................................... 30
Add a Class (Figure 21) ...................................................................................................... 25
Manage Your Class(Figures 22, 23, 24, & 25) ............................................................. 26-27
Remove Old Classes(Figure 26) ................................................................................... 27-28
Manage Student Enrollment(Figure 27, 28, 29 & 30) ................................................ 28-29
Lessons .......................................................................................................................................... 30
Add a Lesson(Figure 31) .................................................................................................... 30
Edit a Lesson (Figure 32) ................................................................................................... 30
List your Lessons (Figure 33) ............................................................................................ 30
Delete a Lesson (Figure 34) ............................................................................................... 30
View Main Window as Student (Figure 34) ................................................................................... 30
How To (Guest/Student) ...................................................................................................................................... 30
Not yet typed – Highlighted in yellow
Needs to be updated – Highlighted in green
Completed – Not highlighted
7
Bloomsburg University Weather Viewer User’s Manual
Overview
Welcome
Thank you for downloading the Bloomsburg Weather Viewer! The Bloomsburg Weather Viewer is a
program to gather information from the internet and a webcam and put it together for classroom use
for an introductory meteorology class. Its purpose is to show the link between webcam images and
data from the internet of the corresponding locations and present it in a single window. It also is to
allow students to search for historical weather information to view.
This program was designed by the Object-Oriented Software Engineering class in Bloomsburg
University’s Computer Science program. It is a senior level class that focuses on getting the students to
work on a large project while working as teams and using code from previous classes. As a long term
goal, we would like to see it as a useful tool for an introductory meteorology class in other universities
and schools.
8
Bloomsburg University Weather Viewer User’s Manual
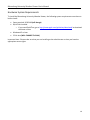
Getting Started
User Types
GUEST: As a guest user, you can view all weather camera, map/loop diagram, and weather station plot
data. You can also print and save/export all data. As a guest, you cannot change the default save
directory, modify weather resources, change the password, add or edit users or classes, or access
lessons.
STUDENT: As a student, you can change the default save directory, change your password, and view
your instructor’s class notes.
INSTRUCTOR: As an instructor, you can add and edit classes and students in your classes. You can also
create class notes, which are viewable to the classes of your choosing. You can also modify web links
and edit lessons.
ADMINISTRATOR: As an administrator, you can modify the weather resources, web links, and student
databases.
9
Bloomsburg University Weather Viewer User’s Manual
Hardware System Requirements
To install the Bloomsburg University Weather Viewer, the following system requirements must be met
before install:
Space required: 30.82 MB (will change)
QuickTime installed
o if you need QuickTime, go to http://www.apple.com/quicktime/download/ to download
the latest version
Windows XP or later
32-bit Java (WILL CHANGE TO 64-bit)
Important Note: Please make sure that you are installing as the administrator so that you have the
appropriate access rights.
10
Bloomsburg University Weather Viewer User’s Manual
Installation
1. (WILL BE EXECUTIBLE)
2. Click install
3. Please read the license for detailed information about the usage of the Bloomsburg University
Weather Viewer. After you finish, click continue.
4. The next window will prompt for the QuickTime install location. Browse for it, and then click
next.
5. Please then enter your desired settings.
a. Movie format: saves the movies to your desired format (default is .mov)
b. Storage host: an IP address is needed to show where the storage host is
c. Storage Port: A port number where the storage is
d. Storage Root Folder: the folder where the storage will be kept
e. Retrieval Host: an IP address is needed to show where the retrieval is
f. Retrieval Port: A port number where the retrieval files are
g. Movie Host: an IP address is needed for where the movies are
h. Movie Port: a port number where the movie is
i. Time Zone: What time zone you currently are in
Then, after your desired settings are selected, then click continue
6. Enter the destination on the system where the program will go. It will also show how much
memory is needed for the program and how much space you have left.
7. Installation now begins!
Congratulations! Thank you for downloading the Bloomsburg University Weather Viewer Client! For
information about the Server install, please contact your system administrator.
11
Bloomsburg University Weather Viewer User’s Manual
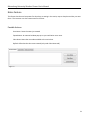
Logging In
Once you start the program, a splash screen of information comes up, describing the basics of who created the
program and the title of the program. After you click on the splash screen, a login screen pops up (Figure 1).
The username and password for first time users will be provided by your teacher or system administrator. Enter
the provided username and password and click “Login”. If you have entered your username or password
incorrectly, an error will pop up above the username and password text boxes, letting you know that it is
incorrect and to try again (Figure 2).
Possible Actions
Login: This button logs the user in to the main program.
Login as Guest: This button logs the user in as a guest.
Email Password: This emails the password to the user to be able to log back in.
Close: This closes the login window
Figure 1
Figure 2
12
Bloomsburg University Weather Viewer User’s Manual
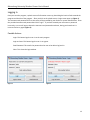
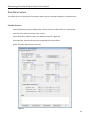
Selective Log In
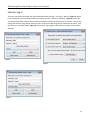
There are also another few ways that you load the data when you login. One way is “Normal” (Figure 3), which
is the setting that you would load all of the information normally. Another is “Selective” (Figure 4), which lets
you choose the weather camera, the map data and weather station plot that you want to see first. You can also
change the resource range, which means that you can chose the date range for the information you want. And
the last way is “No Data Loaded” (Figure 5), which means the program starts without a camera, map or station
data plot.
Figure 3
Figure 4
Figure 5
13
Bloomsburg University Weather Viewer User’s Manual
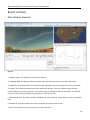
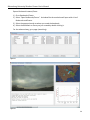
Basic Functions
Main Window Snapshot
Figure 6
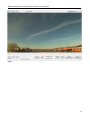
1 Movie Viewer: This displays the movie that is desired.
2 Weather Map: This displays different weather maps desired for the same time period as the movie.
3 Data Plot: This displays different information associated with a time frame similar to the one in the movie.
4 Notes: This is where the notes for the main window will be kept. There are 3 different types of notes:
Personal Notes for you, Class Notes for an entire class using the application and Instructor Notes, for when the
Instructor makes a few notes about the information in the 3 other panels.
5 External Window: This shows an external window of the desired movie, map or data plot. One is attached to
each.
6 Snapshot: This button allows you to take a snapshot of a specific event to save.
7 Print: This allows you to print out the movie, map or data plot.
14
Bloomsburg University Weather Viewer User’s Manual
8 Play/Step Forward/ Step Backward: The movie player options to move through the movie.
9 Last Four Hours: Shows the last 4 hours of the movie in the movie player.
10 Pick Date: This allows you to choose a certain date range and time range for the movie.
11 Daily Diary: This allows the user the save more detailed information about the conditions that day.
12 Dropdown Menu (Movie): This displays a list of possible camera locations where you can view a movie.
13 Dropdown Menu (Map): Displays a list of different weather maps that you can choose from to correspond
to the movie.
14 Dropdown Menu (Data Plot): This displays a list of different weather station to get information from.
15 Plots: This allows you to choose a single variable plot or a multi variable plot where you can choose the
different data you want to display on the data plot.
16 Previous Day: Sets the time and day to the day before the one displayed.
17 Next Day: Sets the time and day to the day after the current one displayed, if possible.
18 Create Bookmark/Event: Creates a bookmark instance or event for that specific time.
19 Search Bookmark/Event: Searches for a bookmark instance or event.
15
Bloomsburg University Weather Viewer User’s Manual
Movie Feature
This feature allows the user to view the weather for that specific day or a different day, so they can analyze the
weather patterns.
Possible Actions
External Window: Shows the movie in a larger window.
Snapshot: Takes a snapshot of the current place in the movie and saves it.
Print: Prints the current shot in the movie player.
Step Forward/ Step Backward: Goes forward or backwards one image in the movie.
Play Speed: Changes the speed the movie is played.
Last Four Hours: This sets the date and time to the last 4 hours from the current time.
Pick Date: Sets the time and day that the movie should show in the movie player.
Previous Day: Sets the time and day to the day before the one displayed.
Next Day: Sets the time and day to the day after the current one displayed, if possible.
Create Bookmark/Event: Creates a bookmark instance or event for that specific time.
Search Bookmark/Event: Searches for a bookmark instance or event.
Weather Station Dropdown: Gives the ability to change the location of the camera.
16
Bloomsburg University Weather Viewer User’s Manual
Figure 7
17
Bloomsburg University Weather Viewer User’s Manual
Map Feature
This feature allows the user to see different weather maps to compare the weather in the movie of the maps.
They can select different kinds of weather maps to compare the movie with.
Possible Actions:
External Window: Shows the movie in a larger window.
Snapshot: Takes a snapshot of the current place in the movie and saves it.
Print: Prints the current shot in the movie player.
Map Dropdown: Changes the map type desired.
Figure 8
18
Bloomsburg University Weather Viewer User’s Manual
Data Plot Feature
This feature allows the user to view weather data for a specific location on a graph, or compare different types
of data on the same graph.
Possible Actions:
External Window: Shows the data plot in a larger window.
Snapshot: Takes a snapshot of the current data plot and saves it.
Print: Prints the current data plot.
Weather Station Dropdown: Gives the ability to change the location of the weather station the data plot
information is coming from.
Data Plot: This displays the data plot for the given weather station and the given plot.
Single-Variable Plots: Different single variable data for the data plot to display for each weather station.
Multi-Variable Plots: Different multi-variable data for the data plot to display for each weather station.
Date Range: To change the date range to display in the data plot.
Day Dropdown: To change the number of days to display in the data plot.
Fit/Default: Changes the way the data plot is displayed: Fit shows the data plot in the range the plot is,
default shows it in a larger range.
Figure 9
19
Bloomsburg University Weather Viewer User’s Manual
Bookmarks/Events Feature
This allows the user to save a snapshot or event that occurred in the weather. They can open it up at a later
time to examine it.
Possible Actions:
Open Bookmarks/Events: Opens an existing bookmark or event
Save Bookmark/Events: Saves the current changes made to a bookmark or event
Search Bookmarks/Events: Searches for a specific bookmark or event specific to the search criteria
Open Local Bookmark: Opens a bookmark you created
20
Bloomsburg University Weather Viewer User’s Manual
Notes Feature
This feature lets the user keep notes for what they are seeing in the movie, map or data plot and they can save
them. The instructor can also create notes for the class.
Possible Actions:
Save Notes: Saves the notes just created
Expand Notes: An external window pops up so you could write more notes
Class Notes: Notes that are made available to the entire class
Refresh: Refreshes the class notes created (only under Class Notes tab)
Figure 11
21
Bloomsburg University Weather Viewer User’s Manual
Daily Diary Feature
This allows the user to save specific information about a movie, map and/or data plot in a detailed entry.
Possible Actions:
Create Daily Diary Entry for a Different Day: Creates a brand new Daily Diary for a selected day
Save This Entry: Saves the current entry created
Export Daily Diary: Export the diary as a different format for a given day
Save and Close: Saves the current entry created and closes the window
Delete This Entry: Delete the current entry
Figure 12
22
Bloomsburg University Weather Viewer User’s Manual
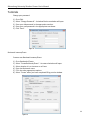
Tutorials
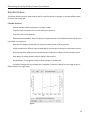
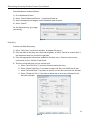
Change your password:
1)
2)
3)
4)
5)
Go to Edit.
Select “Change Password”. A window like the one below will open.
Enter your old password in the appropriate text box.
Enter your new password in the appropriate text boxes.
Click “Save”.
Figure 13
Bookmark Instance/Event
Create a new Bookmark Instance/Event:
1)
2)
3)
4)
5)
6)
Go to Bookmarks/Events.
Select “Create Bookmark/Event”. An external window will open.
Select whether it is an Instance or an Event.
Enter the Bookmark name.
Fill in the other appropriate options.
Select “Create” when you have completed filling out the window.
23
Figure 14
Bloomsburg University Weather Viewer User’s Manual
Open a Bookmark Instance/Event:
1) Go to Bookmarks/Events.
2) Select “Open Bookmarks/Events”. A window like the one below will open with a list of
Bookmarks and Events.
3) Select the appropriate tab to where you saved the bookmark.
4) Select the Bookmark or Event you just created by double-clicking it.
For the advanced way, go to page (something).
Figure 15
Figure 16
24
Bloomsburg University Weather Viewer User’s Manual
Search Bookmarks Instances/Events:
1)
2)
3)
4)
Go to Bookmarks/Events
Select “Search Bookmarks/Events”. A window will pop up.
Select the appropriate category and/or Bookmark type to search.
Select “Search”.
For the Advanced way, go to page
(something).
Figure 17
Daily Diary
Create a new Daily Diary entry:
1) Select “Daily Diary” on the main window. A window will pop up.
2) Enter the date for the diary entry from the dropdown, or select “Search for another Day” if
the drop down does not contain the right date.
3) Enter the appropriate information needed for the diary entry. Please be sure to enter
information for the “Variable 2”tab as well.
4) There are a few selections you can choose from:
a. Select “Save This Entry” if you have finished creating the entry.
b. Select “Export Daily Diary” if you want to export the diary into a different format.
c. Select “Save and Close” if you want to save the current entry and close the window.
d. Select “Delete this Entry” if you want to delete the current entry displayed in the
daily diary window.
25
Figure 18
Bloomsburg University Weather Viewer User’s Manual
Export a Daily Diary entry:
1)
2)
3)
4)
Go to “File”.
Hover over “Export”.
Select “Daily Diary”. A window will pop up (Figure 18).
Select the appropriate information as to how to export the data.
a. Web Page (HTML) – exports the entry into a web page form.
b. Spreadsheet (CSV) – exports the entry into an Excel CSV file.
c. Text – exports the entry into a text file.
5) Select the destination folder of where your entry is.
6) Select the appropriate entry in that folder.
7) Select “Export”.
Lessons:
Figure 18
Open a Lesson:
1)
2)
3)
4)
Go to “Lessons”.
Select “Open Lesson”. A window like the one below opens (Figure 19).
Select a Lesson Category by double-clicking on it. Another window will pop up (Figure 20).
On this new window, a list of lessons in that specific category comes up. Double click the
lesson you want to open.
Figure 19
Figure 20
26
Bloomsburg University Weather Viewer User’s Manual
Other:
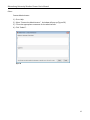
Contact Administrator:
1)
2)
3)
4)
Go to Help.
Select “Contact the Administrator”. A window will pop up (Figure 20).
Fill out the appropriate comments for the administrator.
Click “Submit”.
Figure 20
27
Bloomsburg University Weather Viewer User’s Manual
28
Bloomsburg University Weather Viewer User’s Manual
Instructor’s Section
For Your Information
Thank you for using the Bloomsburg Weather Viewer for your class! As you may know, students may
struggle with new software, so there are a few things you should know about the program in case you
or your students run into any problems.
DATA: Data for the Weather Viewer comes from a variety of locations. It really depends on where the
data is (e.g. If the location you’re viewing is Jackson Hole, Wyoming). It generally comes from
weatherunderground.com, but the Bloomsburg camera and data comes from the Weather Den at
weather.bloomu.edu.
PERFORMANCE: Suppose you have students that live off campus and they need to download
information or use the program. Please let them know that the program will run a little bit slower off
campus than on campus and to plan accordingly.
DOWNLOADS: If you were to ask the class to download different sets of data to the Weather Viewer,
students may find that they cannot download more than one set of data. The Weather Viewer allows a
user to download an unlimited number of data sets, but unfortunately, the client portion of the
program only will do one download at a time. In a future update, the client will be able to handle
multiple downloads at once.
BOOKMARKS: It’s important to know where Bookmark Instances and Events are. There are 2 options that you
and the student can choose. The default location of where the Bookmarks are going is in the database. This
provides the user to be connected to their Bookmarks and other Bookmarks the administrator allows the user to
see. You will be able to change where Bookmarks are stored to your local drive if you choose to.
29
Bloomsburg University Weather Viewer User’s Manual
Tutorials
Change your password:
1)
2)
3)
4)
5)
Go to Edit.
Select “Change Password”. A window like the one below will open.
Enter your old password in the appropriate text box.
Enter your new password in the appropriate text boxes.
Click “Save”.
Figure 20
Classes
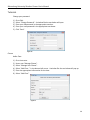
Add a Class:
1)
2)
3)
4)
5)
6)
Go to Instructor.
Hover over “Manage Classes”.
Select “Manage Your Classes”.
Select “Add Class…” in the bottom left corner. A window like the one below will pop up.
Enter the appropriate information for the class.
Select “Add Class”.
Figure 21
30
Bloomsburg University Weather Viewer User’s Manual
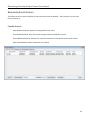
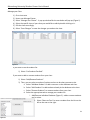
Manage your Class:
1)
2)
3)
4)
5)
6)
Go to Instructor
Hover over Manage Classes
Select “Manage Your Classes”. A pop up window like the one below will pop up (Figure 1).
Select the specific class of yours that you would like to edit by double-clicking on it.
Edit the class accordingly.
Select “Save Changes” to save the changes you made to the class.
Figure 22
If you want to see the student list:
1) Select “List Students Enrolled”.
If you want to add or remove students from your class:
1) Select “Add/Remove Students”.
2) Then, you can select a number of options on here to do what you want to do.
a. Select “Add New Student” to add a new user to the database and class.
b. Select “Add Students” to add students already in the database to the class.
c. Select “Remove Students” to remove students from your class.
d. Select the appropriate tab to manage your student list.
i. Add/Remove Individual Students (Figure 2) – add or remove students
one at a time.
1. Select “Move to Class” to move a student from the list on the
left to the one on the right.
31
Figure 23
Bloomsburg University Weather Viewer User’s Manual
Figure 24
Figure 25
2. Select “Remove from Class” to move a student from the list on
the right to the one on the left.
ii. Manage Multiple Students (Figure 3) – add or remove a few students
at once by following these steps:
1. Create a Comma-Separated Value file – allow you to create a
list of students and their information in a CSV file in Excel.
a. Select “File with Headers” if you plan on creating a CSV
file with headers.
b. Select “File without Headers” if you plan on just
putting the student information in the CSV file without
headers.
2. Resolve conflicts manually – allows you to edit the information
of the student if they are in the database.
a. Verbose – allows you to edit the information of the
student if they already are in the database manually.
b. Silent – automatically allows the database to change
the information for you.
3. Browse to the file – allow you to look for the file in the hard
drive.
a. Select “Browse” to do so.
4. Add students to the database and class – adds the students
from the CSV file to the class and database.
a. Select “Add Students” to do so.
iii. CSV Help (Figure 4) – if you need help with creating a CSV file and an
example of how a CSV file should look.
3) Select “Close” when you are done adding and/or removing students from the class.
If you would like to remove the class from the database:
1) Select “Remove Class”.
7) Select “Close” when you are done editing that class.
Remove Old Classes:
1) Go to Instructor.
2) Hover over “Manage Classes”.
3) Select “Remove Old Classes”.
32
Bloomsburg University Weather Viewer User’s Manual
4)
5)
6)
7)
Select a number of years to see classes that are that number of years old.
Select a class in that time range to remove.
Select “Purge Classes”.
A warning will pop up asking if you are sure if you want to delete that class. If you’re sure,
select “OK”. If you’re not sure, select “Cancel”.
Figure 26
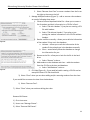
Manage Student Enrollment:
1) Go to Instructor.
2) Hover over “Manage Classes”.
3) Select “Manage Student Enrollment”. A window that looks like the one below will pop up.
Figure 27
33
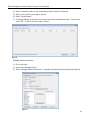
Bloomsburg University Weather Viewer User’s Manual
Figure 28
Figure 29
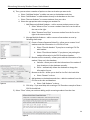
4) Then, you can select a number of options on here to do what you want to do.
a. Select “Add New Student” to add a new user to the database and class.
b. Select “Add Students” to add students already in the database to the class.
c. Select “Remove Students” to remove students from your class.
d. Select the appropriate tab to manage your student list.
i. Add/Remove Individual Students – add or remove students one at a time.
1. Select “Move to Class” to move a student from the list on the left to
the one on the right.
2. Select “Remove from Class” to move a student from the list on the
right to the one on the left.
ii. Manage Multiple Students – add or remove a few students at once by
following these steps:
1. Create a Comma-Separated Value file – allow you to create a list of
students and their information in a CSV file in Excel.
a. Select “File with Headers” if you plan on creating a CSV file
with headers.
b. Select “File without Headers” if you plan on just putting the
student information in the CSV file without headers.
2. Resolve conflicts manually – allows you to edit the information of the
student if they are in the database.
a. Verbose – allows you to edit the information of the student if
they already are in the database manually.
b. Silent – automatically allows the database to change the
information for you.
3. Browse to the file – allows you to look for the file in the hard drive
a. Select “Browse” to do so.
4. Add students to the database and class – adds the students from the
CSV file to the class and database.
a. Select “Add Students” to do so.
iii. CSV Help – if you need help with creating a CSV file and an example of how a
CSV file should look
5) Select “Close” when you are done adding and/or removing students from the class.
34
Figure 30
Bloomsburg University Weather Viewer User’s Manual
Lesson
Add a Lesson:
1)
2)
3)
4)
5)
Go to Instructor
Hover over “Manage Lessons”.
Select “Add Lesson”. A window will pop up (Figure something).
Enter the desired information and files about the lesson.
After you’re done, click “Create”.
Edit a Lesson:
1)
2)
3)
4)
Go to Instructor.
Hover over “Manage Lessons”.
Select “Edit Lesson”.
Stuff happens here when it’s actually implemented.
List your Lessons:
1)
2)
3)
4)
Go to Instructor
Hover over “Manage Lessons”.
Select “List Lessons”.
Stuff happens here when it’s actually implemented.
Delete a Lesson:
1)
2)
3)
4)
Go to Instructor.
Hover over “Manage Lessons”.
Select “Delete Lessons”.
Stuff happens here when it’s actually implemented.
View Main Window as Student:
1) Go to Instructor.
2) Select “View as Student”. A window like the one below will pop up.
3) Select a student to view the main window as by double-clicking the name.
4) The main window will pop up as if you are that student.
35
Bloomsburg University Weather Viewer User’s Manual
36
Bloomsburg University Weather Viewer User’s Manual
37
Bloomsburg University Weather Viewer User’s Manual
38