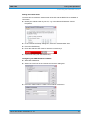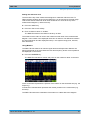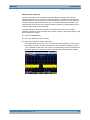
1
R&S®FSH4/8/13/20 Spectrum Analyzer Quick Start Guide Quick Start Guide Test & Measurement 1309.6269.12 – 07 ® The Operating Manual describes the following R&S FSH models and options: ● ● ● ● ● ● ● ● ● ● ● ● ● ● ● ● R&S FSH4 (1309.6000.04) R&S FSH4 (1309.6000.14) R&S FSH4 (1309.6000.24) R&S FSH8 (1309.6000.08) R&S FSH8 (1309.6000.18) R&S FSH8 (1309.6000.28) R&S FSH13 (1314.2000.13) R&S FSH20 (1314.2000.20) R&S FSH4 (1309.6000.54, equivalent to 1309.6000.04) R&S FSH4 (1309.6000.64, equivalent to 1309.6000.14) R&S FSH4 (1309.6000.74, equivalent to 1309.6000.24) R&S FSH8 (1309.6000.58, equivalent to 1309.6000.08) R&S FSH8 (1309.6000.68, equivalent to 1309.6000.18) R&S FSH8 (1309.6000.78, equivalent to 1309.6000.28) R&S FSH13 (1314.2000.63, equivalent to 1314.2000.13) R&S FSH20 (1314.2000.70, equivalent to 1314.2000.20) ● ● ● R&S FSH-K41 (1304.5612.02) R&S FSH-K42 (1309.5629.02) R&S HA-Z2240 (1309.6700.02) The contents of this manual correspond to firmware version 2.50 or higher. © 2014 Rohde & Schwarz GmbH & Co. KG Muehldorfstr. 15, 81671 Munich. Germany Phone: +49 89 4129-0 Fax: +49 89 4129-12 164 E-mail: [email protected] Internet: http://www.rohde-schwarz.com 81671 Munich, Germany Subject to change – Data without tolerance limits is not binding. R&S® is a registered trademark of Rohde & Schwarz GmbH & Co. KG. Trade names are trademarks of the owners. The following abbreviations are used throughout this manual: R&S®FSH4/8/13/20 are abbreviated as R&S FSH, R&S®FSH4View is abbreviated as R&S FSH4View. R&S FSH Table of Contents Table of Contents Documentation Overview ................................................................... 4 1 Hints ..................................................................................................... 6 Certificate of Quality ........................................................................... 6 Support Center .................................................................................... 7 2 Putting into Operation ........................................................................ 8 2.1 Unpacking the R&S FSH .............................................................................................8 2.2 Overview of Controls ...................................................................................................9 2.3 Setting up the R&S FSH ............................................................................................10 2.3.1 Using the AC Adapter ..................................................................................................11 2.3.2 Battery Operation .........................................................................................................12 2.3.3 Battery Maintenance ....................................................................................................14 2.3.3.1 Handling .......................................................................................................................14 2.3.3.2 Storage ........................................................................................................................15 2.3.3.3 Transportation ..............................................................................................................15 2.3.3.4 End of Life ....................................................................................................................15 2.4 Connectors on the R&S FSH ....................................................................................16 2.4.1 RF Input .......................................................................................................................16 2.4.2 Tracking Generator Output ..........................................................................................17 2.4.3 Power Sensor Port .......................................................................................................17 2.4.4 Headphone Jack ..........................................................................................................18 2.4.5 AUX Input .....................................................................................................................18 2.4.6 BNC Connectors ..........................................................................................................19 2.4.6.1 EXT TRIG / EXT REF ..................................................................................................19 2.4.6.2 BIAS Port 1 / BIAS Port 2 ............................................................................................19 2.4.6.3 IF Output / Video Out ...................................................................................................20 2.4.7 Mini USB and LAN Ports .............................................................................................21 2.4.8 Mechanical Locking Device .........................................................................................21 2.4.9 DC Port ........................................................................................................................22 2.4.10 USB Port ......................................................................................................................22 2.4.11 SD Card Slot ................................................................................................................22 Quick Start Guide 1309.6269.12 - 07 1 R&S FSH Table of Contents 2.5 Managing Options......................................................................................................23 2.5.1 Enabling Options..........................................................................................................23 2.5.2 Checking Installed Options ..........................................................................................23 2.5.3 Managing Options with the R&S License Manager .....................................................24 2.6 Configuring the R&S FSH .........................................................................................26 2.6.1 Hardware Settings .......................................................................................................26 2.6.2 Antenna Configuration .................................................................................................28 2.6.3 GPS Receiver Configuration........................................................................................31 2.6.4 Date and Time Configuration .......................................................................................33 2.6.5 Regional Settings .........................................................................................................34 2.6.6 Display Settings ...........................................................................................................36 2.6.7 Audio Settings ..............................................................................................................37 2.6.8 Power Settings .............................................................................................................38 2.6.9 Self Alignment ..............................................................................................................39 2.6.10 PIN Code Protection ....................................................................................................39 2.6.11 Resetting the R&S FSH ...............................................................................................40 2.7 Connecting the R&S FSH to a PC ............................................................................41 2.7.1 Connection via LAN .....................................................................................................42 2.7.2 Connection via an existing LAN ...................................................................................45 2.7.3 Connection via USB .....................................................................................................46 3 Getting Started .................................................................................. 48 3.1 Using the Spectrum Analyzer ...................................................................................48 3.1.1 Attenuating the Signal ..................................................................................................48 3.1.2 Using the Preamplifier .................................................................................................50 3.1.3 Measuring CW Signals ................................................................................................51 3.1.4 Measuring Harmonics ..................................................................................................54 3.2 Using the Network Analyzer .....................................................................................56 3.2.1 Calibrating the R&S FSH .............................................................................................57 3.2.2 Measuring the Vector Reflection..................................................................................59 3.2.3 Measuring Scalar Transmission ..................................................................................60 3.3 Using a Power Sensor ...............................................................................................61 3.3.1 Measuring the Power with a Power Sensor .................................................................61 3.3.2 Measuring Power and Return Loss .............................................................................64 Quick Start Guide 1309.6269.12 - 07 2 R&S FSH Table of Contents 3.4 Identifying Cable Faults ............................................................................................66 3.5 Saving and Recalling Results and Settings ............................................................70 3.5.1 Saving Measurement Results ......................................................................................70 3.5.2 Recalling Measurement Results ..................................................................................71 Index .................................................................................................. 72 Quick Start Guide 1309.6269.12 - 07 3 R&S FSH Documentation Overview Documentation Overview The user documentation for the R&S FSH is divided as follows: Quick Start Guide The Quick Start Guide provides basic information on the instrument's functions. It covers the following topics: ● ● ● ● overview of all elements of the front and rear panels basic information on how to set up the R&S FSH information on how to operate the R&S FSH in a network instructions on how to perform measurements Operating Manual The Operating Manual provides a detailed description on the instrument's functions It covers the following topics: ● ● ● instructions on how to set up and operate the R&S FSH in its various operating modes instructions on how to perform measurements with the R&S FSH instructions on how to work with the available software options and applications Manual for Remote Control Operation The software manual for the R&S FSH-K40 provides a detailed description of the remote control option. It covers the following topics: ● ● ● introduction to the operation of the R&S FSH via remote control detailed description of the remote control commands available with the R&S FSHK40 software application. description of the status reporting system Service Manual The Service Manual provides information on maintenance. It covers the following topics: ● ● ● instructions on how to perform a performance test instructions on how to repair the R&S FSH including a spare parts list mechanical drawings Release Notes The release notes describe the installation of the firmware, new and modified functions, eliminated problems, and last minute changes to the documentation. The corresponding firmware version is indicated on the title page of the release notes. The current release notes are provided on the internet. Quick Start Guide 1309.6269.12 - 07 4 R&S FSH Documentation Overview Internet Site The internet site at: http://www.rohde-schwarz.com/product/fsh.html provides the most up to date information on the R&S FSH. The most recent manuals are available as printable PDF files in the download area. Also provided for download are firmware updates including the corresponding release notes, instrument drivers, current data sheets, application notes and image versions. Quick Start Guide 1309.6269.12 - 07 5 R&S FSH Hints Unpacking the R&S FSH 1 Hints Certificate of Quality Dear customer, you have decided to buy a Rohde & Schwarz product. You are thus assured of receiving a product that is manufactured using the most modern methods available. This product was developed, manufactured and tested in compliance with our quality management system standards. The Rohde & Schwarz quality management system is certified according to: Quick Start Guide 1309.6269.12 - 07 6 R&S FSH Hints Unpacking the R&S FSH Support Center Technical support – where and when you need it For quick, expert help with any Rohde & Schwarz equipment, contact one of our Customer Support Centers. A team of highly qualified engineers provides telephone support and will work with you to find a solution to your query on any aspect of the operation, programming or applications of Rohde & Schwarz equipment. Up-to-date information and upgrades To keep your instrument up-to-date and to be informed about new application notes related to your instrument, please send an e-mail to the Customer Support Center stating your instrument and your wish. We will take care that you will get the right information. Europe, Africa, Middle East Phone +49 89 4129 12345* [email protected] North America Phone 1-888-TEST-RSA (1-888-837-8772) [email protected] Latin America Phone +1-410-910-7988 [email protected] Asia/Pacific Phone +65 65 13 04 88 [email protected] China Phone: +86-800-810-8228 / +86-400-650-5896 [email protected] *0.14 Euro/min within German fixed-line telephone network, varying prices for the mobile telephone network and in different countries. Quick Start Guide 1309.6269.12 - 07 7 R&S FSH Putting into Operation Unpacking the R&S FSH 2 Putting into Operation This chapter assists you in using the R&S FSH for the first time. It contains general information about the R&S FSH as well as information about the available connectors and the general system configuration. 2.1 Unpacking the R&S FSH The R&S FSH is delivered in formfitting packaging. It consists of an upper and a lower shell. The two shells are held together by tape. The packaging contains all accessories that are supplied with the instrument. ► Remove the tape and open the packaging. ► Remove the R&S FSH and its accessories. ► Remove the protective film from the screen. 1 2 3 4 5 6 7 8 9 USB cable LAN cable AC adapter AC plug (country specific) Upper and lower shell R&S FSH Lithium ion battery CD-ROM Quick start guide Quick Start Guide 1309.6269.12 - 07 8 R&S FSH Putting into Operation Overview of Controls 2.2 Overview of Controls 1 2 3 4 5 6 7 8 9 10 11 12 13 14 15 16 17 18 19 20 21 22 RF input (N-connector) Headphone jack BNC connectors (behind protective cap) LAN and Mini USB ports (behind protective cap) Softkey labels (on display) Softkeys Function keys Alphanumeric keypad Kensington lock DC port On/Off key Entry keys Unit keys Cursor keys Preset key Rotary knob Screenshot key Setup key Display SD card slot / USB port (behind protective cap) Tracking generator output (N-connector) Power sensor jack Quick Start Guide 1309.6269.12 - 07 9 R&S FSH Putting into Operation Setting up the R&S FSH 2.3 Setting up the R&S FSH The R&S FSH has been designed for lab operation as well as for service and maintenance applications on-site. Depending on the environment, you can adjust the viewing angle of the display and either lay it out flat or prop it up using the support on the back of the R&S FSH. When laid out flat for operation from above, the R&S FSH is still tilted slightly because of the grip on its top. This position provides the optimum viewing angle for the display. To allow easy operation from the front and still be able to read the display, you can swing out the support on the back of the R&S FSH. For use on-site or service measurements, it is best to hold the instrument in both hands. All controls are easy to reach. It is also recommended to use the R&S HA-Z222 carrying bag in order to leave both hands free for work on the device under test (DUT). You can also use the grip on the top of the R&S FSH to, for example, hang it from cabinet doors. Before you turn on the R&S FSH, you should insert the lithium ion battery included in the delivery into the battery compartment. The battery compartment is located on the bottom right of the R&S FSH. (1) Press a finger against the recessed grip and push the cover down. (2) Open the cover. (3) Insert the battery into the R&S FSH as far as it will go. The round side faces up and the grip is on the right side. (4) Close the cover. (5) Push it upward until it clicks fully into place. You can operate the R&S FSH with the AC adapter or the battery. Both are included in the delivery. Quick Start Guide 1309.6269.12 - 07 10 R&S FSH Putting into Operation Setting up the R&S FSH 2.3.1 Using the AC Adapter Connect the AC adapter (R&S HA-Z201) to the DC port on the left side of the R&S FSH (1). Make sure to fully insert the plug into the port. Depending on the system you need, firmly connect the appropriate plug included in the delivery (2) to the AC adapter. Finally, connect the plug to an AC power outlet. The voltage range of the AC power supply is 100 V to 240 V AC. After the R&S FSH is supplied with power, you can turn it on with the front panel. button on the Risk of instrument damage ● Use the power supply included in the delivery (R&S HA-Z201) only. ● AC supply voltage must be compatible to the voltage specified on the power supply unit. ● Attach the appropriate adapter to the power supply. Quick Start Guide 1309.6269.12 - 07 11 R&S FSH Putting into Operation Setting up the R&S FSH 2.3.2 Battery Operation The lithium ion battery has a capacity of approximately 4 Ah and allows operation of up to three hours when it is fully charged. The actual operation time depends on the current charge status, the ambient temperature and the operating mode of the R&S FSH. The R&S FSH shows the current charge status at the top of the display. When fully charged, the battery icon is completely white. As the battery loses power, the battery icon will lose the white color until it gets red and starts to blink. When the icon starts to blink, the battery low level has been reached. For more information see "Power Settings" on page 38. Note that the battery is not fully charged when it is dispatched. For battery operation you have to charge it first. To charge the battery, connect the AC power adapter included in the delivery. For more information see "Using the AC Adapter" on page 11. Charging time is about 2.5 hours when the R&S FSH is switched off. If it is switched on, the charging time is extended to about 3.5 hours, because the charging current is reduced by the power drain of the R&S FSH. During operation in the field, you can also charge the battery with the R&S HA-Z202 car adapter (order no. 1309.6117.00). You can connect the car adapter to the DC port. With the car adapter, you are able to charge the R&S FSH via the car's cigarette lighter socket. While charging, the R&S FSH displays an arrow within the battery charge status indicator at the top right of the display to show that it is connected to the power supply and is charging. If the battery is fully charged, a plug icon is displayed instead of the battery icon. You can set up the R&S FSH to automatically turn off if no input is made after a particular time period. The possible range is from 0 to 99 minutes. For more information see "Display Settings" on page 36. In the default state, the automatic cut-off is inactive. A replacement battery (R&S FSH-Z206) with a capacity of approximately 6 Ah and an operating time of 4.5 hours is available as an accessory. Charging time for the replacement battery is about 3.5 hours if the R&S FSH is switched off and about 4.5 hours if the R&S FSH is switched on. Quick Start Guide 1309.6269.12 - 07 12 R&S FSH Putting into Operation Setting up the R&S FSH Using an external battery charger You can also use an external battery charger (R&S HA-Z203, order no. 1309.6123.00) to charge an additional replacement battery. To charge the battery externally, put the battery into the external charger and supply it with power via the AC power adapter. An orange LED (CHARGE) on the charger indicates the charging process. The LED turns off when the battery is fully charged. Instead a green LED (READY) turns on. 1 2 3 External charger R&S HA-Z203 Lithium ion battery R&S HA-Z204 or HA-Z206 Power supply unit R&S Z201 or car adapter R&S HA-Z202 Turn off the R&S FSH while driving or while the engine is on. Operation of the R&S FSH via the cigarette lighter socket while driving or while the engine is on is prohibited. Quick Start Guide 1309.6269.12 - 07 13 R&S FSH Putting into Operation Setting up the R&S FSH 2.3.3 Battery Maintenance The R&S FSH comes with a lithium-ion battery. In general, these batteries are easy to handle. However, keep the things mentioned in this chapter in mind when you handle the battery. 2.3.3.1 Handling ● ● ● ● ● ● The battery has been designed for a specific application. Do not use it for any other application Do not connect batteries in series or parallel as it can cause serious damage. Observe correct polarities during installation and charging. To charge the battery, only use the R&S FSH or the R&S HA-Z203 external battery charger. Other chargers can cause serious damage to the battery electronics. Do not heat over 70°C. The battery contains thermal fuses that could activate and render the battery inoperable. The battery contains an electronic device for protection against deep discharge, overcharge and short-circuiting between the terminals. - ● ● ● ● ● ● ● ● ● If you cannot discharge the battery, it may be deep discharged. Charge the battery for 0.5 hours and check again. If you cannot charge the battery, it may be overcharged. Discharge the battery and check again. If the battery has been short-circuited, charge it to reset the electronics. If the battery still does not work, contact the Rohde & Schwarz customer support. Do not apply pressure that will deform the battery. Do not expose the battery to heat or flames. Do not disassemble or modify the battery. Do not expose the battery to direct sunlight for extended periods of time. Do not short-circuit the battery. Do not allow metallic objects to come into contact with the terminals. Do not immerse the battery in water. Do not drop the battery or expose it to repetitive shock. Do not solder directly to the battery. Quick Start Guide 1309.6269.12 - 07 14 R&S FSH Putting into Operation Setting up the R&S FSH 2.3.3.2 Storage The battery self-discharges while not in use. When storing the battery for an extended period of time, make sure to ● ● ● handle the battery carefully to avoid short circuits. Make sure that leads and terminals are insulated. keep the battery in the supplied packaging prior to use. The temperature should not exceed 30°C. store the battery at an initial state of charge between 15% and 50% of its capacity. When calculating the initial state of charge, consider - ● ● the maximum consumption of electronic devices the self-discharge of the battery - the higher the state of charge, the higher the rate of self-discharge avoid a deep discharge of the battery. A deep discharge occurs when the state of charge falls below 5% of the battery's capacity. recharge the battery at least every six months. Should the battery voltage be low or even 0 V, the battery protection circuit may have gone into a sleep mode. In that case, reset the battery with an approved charger. 2.3.3.3 Transportation No special regulations apply for transporting the battery. The battery cells contain no metallic lithium. 2.3.3.4 End of Life The capacity of the battery decreases after it has gone through numerous charge cycles and nears its end of life. When the battery is dead, ● ● do not open the battery. do not dispose of it in fire. Quick Start Guide 1309.6269.12 - 07 15 R&S FSH Putting into Operation Connectors on the R&S FSH 2.4 Connectors on the R&S FSH The R&S FSH has several connectors. The connectors are either on the upper, left or right side. 2.4.1 RF Input The RF input is located on the top of the R&S FSH. Connect a cable or DUT to the RF input with an N connector. Use a cable to connect the DUT to the R&S FSH, if necessary. Make sure not to overload the R&S FSH when a DUT is connected. The maximum power that is permissible at the RF input is 20 dBm (or 100 mW). The R&S FSH may be loaded with up to 30 dBm (or 1 W) for up to three minutes. If you apply 1 W for a longer period, the R&S FSH may be destroyed. The RF input is protected from static discharges and voltage pulses by a limiting circuit. Risk of electrical shock In order to avoid electrical shock the DC input voltage you must never exceed the value specified on the housing. Risk of damage to the R&S FSH To avoid damage to the coupling capacitor, input attenuator or the mixer, the DC input voltage must never exceed the value specified in the data sheet. Quick Start Guide 1309.6269.12 - 07 16 R&S FSH Putting into Operation Connectors on the R&S FSH 2.4.2 Tracking Generator Output The tracking generator output is located on the top of the R&S FSH. The tracking generator output power of the R&S FSH is 0 dBm nominal. With an integrated step attenuator, you can reduce the tracking generator output power by a maximum of 40 dB in 1 dB steps. Risk of damage to the R&S FSH To avoid damage to the tracking generator output, the reverse voltage up to the voltage stated on the R&S FSH housing must not be exceeded. 2.4.3 Power Sensor Port The connector for power sensors is located on the top of the R&S FSH. The connector is configured especially for power sensors. It is used for both the power supply and data transfer via the power sensor interface. Additionally, you can connect accessories like the R&S TS-EMF isotropic antenna (order no. 1158.9295.13) to the power sensor port. Quick Start Guide 1309.6269.12 - 07 17 R&S FSH Putting into Operation Connectors on the R&S FSH 2.4.4 Headphone Jack The 3.5 mm connector for headphones is located on the top of the R&S FSH. The internal impedance of the connector is approximately 10 Ohm. 2.4.5 AUX Input The AUX input is located on the left side of the R&S FSH under a protective cap. You can connect various accessories like the GPS receiver R&S HA-Z240 (order no. 1309.6700.02) to the AUX connector. Quick Start Guide 1309.6269.12 - 07 18 R&S FSH Putting into Operation Connectors on the R&S FSH 2.4.6 BNC Connectors The BNC connectors are located on the left side of the R&S FSH behind a protective cap. You can configure both BNC connectors for various applications. The names of the connections are embossed on the insides of the protective caps. 2.4.6.1 EXT TRIG / EXT REF The first (upper) BNC connector is for application of an external trigger or an external reference signal. The external trigger is only for input configuration. It controls the start of a measurement and has to be selected in the "Sweep" menu. The trigger threshold is similar to that of TTL signals. The 10 MHz reference signal that you can apply is used for frequency synchronization. The level of the reference signal must be larger than 0 dBm. If the input is configured for the external reference and but no reference signal is present, the R&S FSH will show a warning in the display. This is to prevent users from carrying out a measurement without a valid reference. For more information see "Configuring the R&S FSH" on page 26. 2.4.6.2 BIAS Port 1 / BIAS Port 2 When you use them as BIAS ports, the two BNC connectors are direct current inputs. Active equipment under test can be supplied with power via the BIAS Port 1 and BIAS Port 2 direct current inputs. Direct current is supplied with the assistance of a suitable power adapter (600 mA max. / 50 V max.). Quick Start Guide 1309.6269.12 - 07 19 R&S FSH Putting into Operation Connectors on the R&S FSH 2.4.6.3 IF Output / Video Out The second (lower) BNC connector can be used as an intermediary frequency output (21.4 MHz) or a video output. Risk of damage to the R&S FSH To avoid damage to the tracking generator output, never apply currents greater than 600 mA or voltages greater than 20 V to the BNC connectors if the BNC connectors are not configured as BIAS input ports. If they are configured as BIAS ports, never apply currents greater than 600 mA or voltages greater than 50 V. Quick Start Guide 1309.6269.12 - 07 20 R&S FSH Putting into Operation Connectors on the R&S FSH 2.4.7 Mini USB and LAN Ports The mini USB and LAN ports are located on the left side of the R&S FSH behind a protective cap. You can connect the R&S FSH to a PC via USB or LAN and transfer data in both directions. Configure the USB and LAN connection via the "Instrument Setup". For more information see "Configuring the R&S FSH" on page 26. 2.4.8 Mechanical Locking Device A Kensington Lock can be anchored to the R&S FSH housing to secure the R&S FSH to a workstation mechanically. Quick Start Guide 1309.6269.12 - 07 21 R&S FSH Putting into Operation Connectors on the R&S FSH 2.4.9 DC Port The DC port is located on the left side of the R&S FSH. The R&S FSH is supplied with power by the AC/DC transformer power supply via the DC connector. You can also use the DC connector to charge the battery. 2.4.10 USB Port R&S FSH models with a 20 MHz bandwidth feature an USB port (serial number 105000 and higher). The USB port is located on the right side of the R&S FSH behind a protective cap. You can use the USB interface to connect a memory stick and store data sets or screenshots. 2.4.11 SD Card Slot The SD Card slot is located on the right side of the R&S FSH behind a protective cap. Quick Start Guide 1309.6269.12 - 07 22 R&S FSH Putting into Operation Managing Options 2.5 Managing Options For special measurement tasks, you can equip the R&S FSH with various software options. 2.5.1 Enabling Options To enable options, you have to enter a key code. The key code is based on the unique serial number of the R&S FSH. ► Press the SETUP key. ► Press the "Installed Options" softkey. ► Select the "Install Option..." item. ► Press the ENTER key. The R&S FSH opens an entry field to enter the option key. ► Enter the appropriate option key. ► Confirm the entry with the ENTER key. If you have entered the correct code, the R&S FSH shows If you have entered an incorrect code, the R&S FSH shows ► Enter the correct code again. 2.5.2 Checking Installed Options In the "Setup" menu, the R&S FSH shows all options that are currently installed. ► Press the SETUP key. ► Press the "Installed Options" softkey. The R&S FSH shows a list of all available options and the current status of the option: ● ● ● "Installed": the option is installed and working. "Installed Portable": the option is installed and working, the license is a portable one. "Removed: <option key>": indicates that a portable license has been removed from the R&S FSH and is ready to be transferred to another R&S FSH. Quick Start Guide 1309.6269.12 - 07 23 R&S FSH Putting into Operation Managing Options 2.5.3 Managing Options with the R&S License Manager If you are using the R&S FSH in a local area network (LAN), you can manage firmware options with a web browser (e.g. Microsoft Internet Explorer or Mozilla Firefox). For more information on connecting the R&S FSH to a LAN see "Connecting the R&S FSH to a PC" on page 41. After you have connected the R&S FSH, open your web browser. ► Enter the IP address of the R&S FSH in the address bar of the web browser. The browser will access the R&S License Manager. In this part of the R&S License Manager, you can install and activate licenses on the R&S FSH. This page features three areas. ● The first area shows the details of the connected device including the device ID and the IP address. ● The second area provides functionality to install and activate licenses. - Install Registered License Keys and Activate Licenses Follow this link if you have purchased a registered license. Registered licenses only work in combination with a specific device ID. - Register Licenses, Install License Keys and Activate Licenses Follow this link if you have purchased an unregistered license. Unregistered licenses are not connected to a specific device ID. - Reboot Device Follow this link to reboot the R&S FSH. Opens a detailed online help to the corresponding topic. ● The third area provides hints on using the license manager if you move the mouse over one of the options. Quick Start Guide 1309.6269.12 - 07 24 R&S FSH Putting into Operation Managing Options If you already have one or more R&S FSH that are equipped with options, you can also manage the licenses of these options on the license manager web page. ► Press the button. The browser will access another part of the R&S License Manager. In this part of the license manager you can manage licenses already installed on your R&S FSH. This page features two areas. ● The first area provides functionality to manage licenses already installed on a device. - Register Licenses Follow this link if you have purchased an unregistered license. Unregistered licenses only work in combination with a specific device ID. - Unregister License Follow this link if you have installed a portable license. Portable licenses work in combination with several device IDs. However, you have to unregister it on one device before you can use it on another. - Move Portable License Follow this link if you want to move a portable license. Moving a portable license is possible without unregistering the license. Opens a detailed online help to the corresponding topic. ● The second area provides hints on using the R&S License Manager if you move the mouse over one of the options. After you have followed one of the links, follow the instructions displayed in the browser. If you encounter any problems during the licensing procedure, you can icon. The online help contains an access the online help at any time with the extensive description of all functionality that the license manager features. Quick Start Guide 1309.6269.12 - 07 25 R&S FSH Putting into Operation Configuring the R&S FSH 2.6 Configuring the R&S FSH In the "Instrument Setup" dialog box, the R&S FSH provides various general settings that are independent of the operating mode of the R&S FSH. ► Press the SETUP key. ► Press the "Instrument Setup" softkey. The R&S FSH opens the corresponding dialog box. ► Select the item you want to modify with the rotary knob or the cursor keys. 2.6.1 Hardware Settings The hardware settings contain settings that control internal and connected hardware. Using auto accessory detection If you are using any accessories while working with the R&S FSH, the R&S FSH is able to identify the connected hardware. ► In the "Instrument Setup" dialog box, select the "Auto Accessory Detection" item. ► Press the ENTER key. A dropdown menu to turn automatic detection on and off opens. ► Select "On" to turn automatic accessory detection on. ► Confirm the selection with the ENTER key. If active, the R&S FSH automatically detects accessories connected to the R&S FSH. The name of the accessory is displayed in the "Detected Accessory" field. Quick Start Guide 1309.6269.12 - 07 26 R&S FSH Putting into Operation Configuring the R&S FSH Configuring the BNC connectors You can use the BNC connectors for various applications. For more information, see "BNC Connectors" on page 19. ► In the "Instrument Setup" dialog box, select the "BNC 1" item. ► Press the ENTER key. A dropdown menu to select the BNC connector function opens. ► Select the application that you require. ► Confirm the selection with the ENTER key. The way to configure the second BNC connector is similar. ► Instead of selecting the "BNC 1" item, select the "BNC 2" item. Quick Start Guide 1309.6269.12 - 07 27 R&S FSH Putting into Operation Configuring the R&S FSH 2.6.2 Antenna Configuration You can use the log-periodic antenna R&S HL300 (order no. 4097.3005.02) with the R&S FSH to locate potential interfering sources. The R&S FSH also supports the active directional antenna R&S HE300. For a comprehensive description of the antennas and their functionality, refer to the user manuals delivered with the product. Both antennas feature a GPS receiver and an electronic compass. You can control the GPS receiver of the R&S HL300 as described in "GPS Receiver Configuration". ► To work with the R&S HL300, connect it to the AUX input and the RF input. ► To work with the R&S HL300, connect it to the power sensor connector. The "Instrument Setup" dialog box provides all settings necessary to control the antenna. Enabling the antenna ► In the "Instrument Setup" dialog box, select the "HL300 Antenna" item or the "HE300 Antenna" item. ► Press the ENTER key. The R&S FSH opens a dropdown menu to turn the antenna on and off. ► Turn the antenna on or off. ► Confirm the selection with the ENTER key. Enabling the compass The antennas feature an electronic compass to determine directions precisely. ► In the "Instrument Setup" dialog box, select the "Compass" item. ► Press the ENTER key. The R&S FSH opens a dropdown menu to turn the compass on and off. ► Turn the compass on or off. ► Confirm the selection with the ENTER key. Note that the R&S FSH also shows the magnetic declination of your current position in the dialog box. Quick Start Guide 1309.6269.12 - 07 28 R&S FSH Putting into Operation Configuring the R&S FSH Showing compass information ► In the "Instrument Setup" dialog box, select the "Show Compass Information" item. ► Press the ENTER key. The R&S FSH opens a dropdown menu to turn the display of directions on and off. ► Select the "Enabled" menu item to display compass directions. ► Confirm the selection with the ENTER key. Assigning functions to the toggle switch The R&S HL300 has a toggle switch on its handle that you can assign one of several functions to. ► In the "Instrument Setup" dialog box, select the "Assign Antenna Switch" item. ► Press the ENTER key. The R&S FSH opens a dropdown menu to select the function of the toggle switch. - Preamplifier Using the toggle switch turns the preamplifier on and off. - Save current GPS position Using the toggle switch tags your current position in the map material. ► Select the menu item as required. ► Confirm the selection with the ENTER key. The R&S HE300 also has a toggle switch, but it always turns the preamplifier of the antenna on and off. When the preamplifier of the antenna is turned on, the displays an antenna item in the hardware settings. Quick Start Guide 1309.6269.12 - 07 29 R&S FSH Putting into Operation Configuring the R&S FSH Calibrating the antenna If you need to know specifics about the antenna, for example for service or support, you can get the necessary information in the "Antenna Service Menu" on the R&S FSH. The "Antenna Service Menu" also contains functionality to calibrate the antenna. ► In the "Instrument Setup" dialog box, select the "Antenna Service Menu" item. The R&S FSH informs you that it will turn off the antenna to determine the antenna information. ► Press the "Yes" softkey. The R&S FSH tries to determine the antenna characteristics. It shows the results in a dialog box. ► Press the "Calibrate" softkey. The R&S FSH starts the calibration. For antenna calibration, it is necessary to point the antenna in different directions. Follow the instructions on the screen to successfully calibrate the antenna. Quick Start Guide 1309.6269.12 - 07 30 R&S FSH Putting into Operation Configuring the R&S FSH 2.6.3 GPS Receiver Configuration The R&S FSH can locate your exact position if you equip it with the R&S HS-Z240 GPS receiver (order no. 1309.6700.02). To work with the GPS receiver, connect it to the AUX input. GPS reference frequency Note that the reference frequency is automatically adjusted as soon as the GPS receiver function is enabled and there is a fix connection with enough satellites. The "Instrument Setup" dialog box provides all settings necessary to configure the GPS receiver. In addition, the R&S FSH shows some information about the GPS connection like the number of tracked satellites or the signal quality. Enabling the GPS receiver ► In the "Instrument Setup" dialog box, select the "GPS Function" item. ► Press the ENTER key. A dropdown menu to turn the GPS receiver on and off opens. ► Select the "Enabled" menu item to activate the GPS receiver. ► Confirm the selection with the ENTER key. Showing GPS information ► In the "Instrument Setup" dialog box, select the "Show GPS Information" item. ► Press the ENTER key. A dropdown menu to turn the display of the GPS coordinates on and off opens. ► Select the "Enabled" menu item to display compass information. ► Confirm the selection with the ENTER key. Quick Start Guide 1309.6269.12 - 07 31 R&S FSH Putting into Operation Configuring the R&S FSH Setting the coordinate format ► In the "Instrument Setup" dialog box, select the "Coordinate Format" item. ► Press the ENTER key. A dropdown menu to select the coordinate format opens. ► Select the format you are most comfortable with from the dropdown menu. ► Confirm the selection with the ENTER key. Displaying GPS information The R&S FSH shows the GPS information in a blue bar below the hardware settings. When the connection to a satellite is lost, the bar turns red and the GPS coordinates are shown in brackets. However, the R&S FSH still shows the last valid position. The state of the satellite lock is shown in the title bar. in the title bar indicates that the GPS receiver is enabled and that there is a fix connection with enough satellites for the GPS receiver to provide the coordinates. The GPS information bar is blue. in the title bar indicates that the GPS receiver is enabled but that there is no fix connection to a satellite. The GPS information bar is red. The coordinates are not updated. in the title bar indicates that the GPS receiver is enabled, but that the receiver is not connected, not connected properly or defective. The GPS information bar is red. The coordinates are not updated. The title bar shows no symbol, if the GPS receiver is not enabled. If the GPS receiver is connected and enabled when you boot the R&S FSH, it asks whether to restore the GPS coordinates that were active just before it was shut down. Quick Start Guide 1309.6269.12 - 07 32 R&S FSH Putting into Operation Configuring the R&S FSH 2.6.4 Date and Time Configuration The R&S FSH has an internal clock that can apply a date and time stamp. In the "Instrument Setup" dialog box, you can set both date and time. Setting the date ► In the "Instrument Setup" dialog box, select the "Set Date" item. ► Press the ENTER key. The R&S FSH asks you to confirm the change of the date. ► Enter the date you want with the numeric keys. The sequence depends on the date format. ► Confirm the entry with the ENTER key. Setting the time ► In the "Instrument Setup" dialog box, select the "Set Time" item. ► Press the ENTER key. ► Enter the time you want with the numeric keys. ► Confirm the entry with the ENTER key. After you have entered the time, the R&S FSH verifies the validity of the time. If not valid, it sets the next valid time. Selecting the time zone ► In the "Instrument Setup" dialog box, select the "Time Zone" item. ► Press the ENTER key. ► Enter a positive or negative time offset relative to the system time with the numeric keys. ► Confirm the entry with the ENTER key. After you have confirmed the time zone, the R&S FSH adjusts the displayed time accordingly. Quick Start Guide 1309.6269.12 - 07 33 R&S FSH Putting into Operation Configuring the R&S FSH 2.6.5 Regional Settings The regional settings allow you to select a different language, date format and length unit. Selecting the language The R&S FSH provides several languages for the user interface. ► In the "Instrument Setup" dialog box, select the "Language" item. ► Press the ENTER key. A dropdown menu opens to select the language. ► Select one of the languages from the dropdown menu. ► Confirm the selection with the ENTER key. Setting the date format The R&S FSH provides several date formats. ► In the "Instrument Setup" dialog box, select the "Date Format" item. ► Press the ENTER key. A dropdown menu opens to select the date format. ► Select the date format you are most comfortable with from the dropdown menu. ► Confirm the selection with the ENTER key. Quick Start Guide 1309.6269.12 - 07 34 R&S FSH Putting into Operation Configuring the R&S FSH Setting the length unit ► In the "Instrument Setup" dialog box, select the "Length Unit" item. ► Press the ENTER key. A dropdown menu opens to select the length unit. ► Select the length unit you are most comfortable with from the dropdown menu. ► Confirm the selection with the ENTER key. Quick Start Guide 1309.6269.12 - 07 35 R&S FSH Putting into Operation Configuring the R&S FSH 2.6.6 Display Settings The display settings configure the display of the R&S FSH. The display of the R&S FSH is a TFT color LCD display. Indoors, its brightness depends on the intensity of the backlight. To strike a balance between battery operating time and screen display quality, set the backlight intensity to the minimum brightness needed. To optimize the viewing angle, adjust the color settings. To achieve maximum contrast, the screen can be switched from color display to black-and-white display. Under extreme light conditions, it can be of advantage to select the high-contrast monochrome display. Adjusting the display backlight ► In the "Instrument Setup" dialog box, select the "Display Backlight" item. ► Press the ENTER key. ► Enter the backlight intensity you want with the numeric keys. The backlight intensity is a percentage from 0% to 100% with 100% being the brightest. ► Confirm the entry with the ENTER key. Selecting the display color scheme ► In the "Instrument Setup" dialog box, select the "Display Color Scheme" item. ► Press the ENTER key. A dropdown menu opens to select the color scheme. ► Select "Color" to set the display to color display or "Black & White" to set it to monochrome display. The "Printer Friendly" color scheme inverses the colors. ► Confirm the selection with the ENTER key. Quick Start Guide 1309.6269.12 - 07 36 R&S FSH Putting into Operation Configuring the R&S FSH 2.6.7 Audio Settings The audio settings control the audio output of the system. Setting the key click volume The key click volume sets the volume of the sound that the R&S FSH produces when you press a key or softkey. ► In the "Instrument Setup" dialog box, select the "Key Click Volume" item. ► Press the ENTER key. ► Enter the volume you want with the numeric keys. The key click volume is a percentage from 0% to 100% with 100% being the loudest. ► Confirm the entry with the ENTER key. Setting the system beeper volume The system beeper volume sets the volume of the system beeper of the R&S FSH, used for example if a message box turns up. ► In the "Instrument Setup" dialog box, select the "System Beeper Volume" item. ► Press the ENTER key. ► Enter the volume you want with the numeric keys. The system beeper volume is a percentage from 0% to 100% with 100% being the loudest. ► Confirm the entry with the ENTER key. Turning audio output in case of a power overload on and off In case the R&S FSH detects an overload at one of its inputs, you can configure it to make a sound. ► In the "Instrument Setup" dialog box, select the "Beep on Power Overload" item. ► Press the ENTER key. ► Turn the beeper on or off. If on, the R&S FSH will make a sound every time it detects an overload. ► Confirm the entry with the ENTER key. Quick Start Guide 1309.6269.12 - 07 37 R&S FSH Putting into Operation Configuring the R&S FSH 2.6.8 Power Settings The power settings contain settings that configure the power supply of the R&S FSH. The "Current Power Source" shows the source the R&S FSH is currently powered by. Setting the battery low level When the battery low level is reached, the battery symbol in the title bar turns red and starts blinking. ► In the "Instrument Setup" dialog box, select the "Battery Low Level" item. ► Press the ENTER key. ► Enter the threshold you want in percent of a fully charged battery with the numeric keys. ► Confirm the entry with the ENTER key. The current battery level is displayed in the "Battery Level" line. Turning audio output in case of battery low level state on and off The R&S FSH also allows you to turn on an audio signal that sounds if the battery reaches its low level state. ► In the "Instrument Setup" dialog box, select the "Battery Low Level Beep" item. ► Press the ENTER key. ► Select either "Repetitive" or "Once" to turn the audio signal on. If you have selected "Once", the R&S FSH will beep once if the battery runs out of power. For a continuous beep, select "Repetitive". ► Select "Off" to turn off the beeper. Quick Start Guide 1309.6269.12 - 07 38 R&S FSH Putting into Operation Configuring the R&S FSH 2.6.9 Self Alignment The self alignment calibrates the instrument settings for vector network analysis. During the self alignment, the R&S FSH generates new factory calibration data and overwrites the old factory calibration. For the self alignment a short circuit (Short), an open circuit (Open) and 50 Ohm match (Load) is required. In addition, a through connection must be established with an appropriate cable. When you are in Network Analyzer mode, the "Calibration Kit" item becomes available and you can select the calibration kit that you want to use for the self alignment. ► In the "Instrument Setup" dialog box, select the "Calibration Kit" item. The R&S FSH opens a dialog box to select a calibration kit. ► Select the required calibration kit. Performing self alignment ► In the "Instrument Setup" dialog box, select the "Self Alignment" item. ► Press the ENTER key. The R&S FSH initiates the self alignment procedure and shows a warning message box. If you press "Yes", the self alignment begins. Follow the instructions shown on the screen. If you press "No", the R&S FSH aborts the self alignment. 2.6.10 PIN Code Protection The R&S FSH features a PIN protection system with several security levels that protects the R&S FSH from unauthorized access. If PIN protection is on, you have to enter the PIN whenever you turn the R&S FSH on. For more information, please refer to the Operating Manual. Quick Start Guide 1309.6269.12 - 07 39 R&S FSH Putting into Operation Configuring the R&S FSH 2.6.11 Resetting the R&S FSH You can either preset the R&S FSH or reset it to factory settings. Presetting the R&S FSH The PRESET key resets the R&S FSH to the default setup of the currently active operating mode. This allows you to define a new configuration based on defined measurement parameters without parameters from a previous measurement unintentionally still being active. ► Press the PRESET key. Resetting the R&S FSH A "Reset to Factory Settings" resets the R&S FSH to the factory defaults. During a reset, the R&S ZVH restores the original configuration. It also deletes all customized datasets (limit lines, standards, channel tables, cable models etc.). Instead, it will reinstall all the datasets that have been available after delivery. Risk of data loss All datasets you have saved will be deleted during a factory reset. ► In the "Instrument Setup" dialog box, select the "Reset to Factory Settings" item. ► Press the ENTER key. The R&S FSH initiates the reset procedure and shows a warning message box. If you press "Yes", the R&S FSH performs the reset. During the reboot, it shows an information window. If you press "No", the R&S FSH aborts the reset. Quick Start Guide 1309.6269.12 - 07 40 R&S FSH Putting into Operation Connecting the R&S FSH to a PC 2.7 Connecting the R&S FSH to a PC The R&S FSH comes with the R&S FSH4View software package. This software package features several tools that allow you to document measurement results or create and edit limit lines or channel tables among other things. Note that .NET Framework 2.0 or higher is required to run the software properly. You can set up a connection between the R&S FSH and R&S FSH4View either via its LAN port or its mini USB port. You have to install the R&S FSH4View software on the PC before you are able to establish a connection. ► Run the CD-ROM delivered with the R&S FSH. ► Navigate to the "Software" section and start the setup file. ► Follow the instructions on the screen. Alternatively, you can download the latest R&S FSH4View from the R&S FSH product homepage. Firewall settings If no connection can be established between the software and the R&S FSH after successful configuration, check the firewall settings on your PC. Quick Start Guide 1309.6269.12 - 07 41 R&S FSH Putting into Operation Connecting the R&S FSH to a PC 2.7.1 Connection via LAN You can connect the R&S FSH directly to the PC with the LAN cable that is supplied with the R&S FSH. The LAN port is located on the left side of the R&S FSH behind a protective cap. For more information see "Mini USB and LAN Ports" on page 21. You can set up the LAN connection in the "Instrument Settings" dialog box. By default, DHCP (Dynamic Host Configuration Protocol) on the R&S FSH is active. It has to be switched off for direct connection. ► In the "Instrument Setup" dialog box, select the "DHCP" item. ► Press the ENTER key. A dropdown menu opens to set the DHCP state. ► Select "Off" to deactivate DHCP. Setting an IP address To establish the connection, the IP address of the PC and that of the R&S FSH must be identical, except for the digits following the last dot. Example IP address PC 172.76.68.30 IP address R&S FSH 172.76.68.24 ► Identify the IP address of your PC, e.g. in the Microsoft Windows TCP/IP Properties. ► In the "Instrument Setup" dialog box, select the "IP Address" item. ► Press the ENTER key. ► Enter the IP address of the PC with the numeric keys. ► Confirm the entry with the ENTER key. Quick Start Guide 1309.6269.12 - 07 42 R&S FSH Putting into Operation Connecting the R&S FSH to a PC Setting the subnet mask You also have to match the subnet mask of the PC and the R&S FSH to establish a connection. ► Identify the subnet mask of your PC, e.g. in the Microsoft Windows TCP/IP Properties. ► In the "Instrument Setup" dialog box, select the "Subnet Mask" item. ► Press the ENTER key. ► Enter the subnet mask of the PC with the numeric keys. ► Confirm the entry with the ENTER key. Configuring the R&S FSH4View software ► Start R&S FSH4View. ► Select the "LAN" tab in the "Instrument Connect" dialog box. ► Press the "Add" button to create a new network connection. Quick Start Guide 1309.6269.12 - 07 43 R&S FSH Putting into Operation Connecting the R&S FSH to a PC ► Specify a name for the new network connection, e.g. R&S FSH. ► Enter the IP address for the R&S FSH (in this case 172.76.68.24) ► Confirm the entry with the "OK" button. The connection is now created and configured and is added to the IP Configuration list. ► Select the new connection labeled R&S FSH. ► Press the Connect button to establish the connection. Quick Start Guide 1309.6269.12 - 07 44 R&S FSH Putting into Operation Connecting the R&S FSH to a PC 2.7.2 Connection via an existing LAN You can either draw the R&S FSH IP address automatically from the DHCP server or manually assign a fixed address. With manual allocation, a fixed IP address and subnet mask must be assigned to the R&S FSH as described in the chapter on direct LAN connection. Then the R&S FSH4View software has to be configured as described with the assigned IP address. Free IP address Contact your IT system manager to get a free IP address. In networks with a DHCP server, DHCP permits automatic allocation of the network configuration to the R&S FSH connected via LAN cable. For this purpose, DHCP has to be active on the R&S FSH. DHCP is active by default. If not, proceed as follows: ► In the "Instrument Setup" dialog box, select the "DHCP" item. ► Press the ENTER key. A dropdown menu opens to set the DHCP state. ► Select "On" to activate DHCP. The R&S FSH is now allocated an IP address and the subnet mask by the DHCP server. This can take several seconds. The IP address and subnet mask are automatically set in the corresponding input fields and are no longer available for editing. Configure the R&S FSH4View software with the IP address and subnet mask as defined by the DHCP server. For more information see "Connection via LAN" on page 42. Quick Start Guide 1309.6269.12 - 07 45 R&S FSH Putting into Operation Connecting the R&S FSH to a PC 2.7.3 Connection via USB Alternatively, you can connect the R&S FSH to the PC with the USB cable that is supplied with the delivery. The Mini USB interface is located on the left side of the R&S FSH behind a protective cap. For more information see "Mini USB and LAN Ports" on page 21. When you connect the R&S FSH to a computer for the first time, the "Found New Hardware Wizard" pops up on the computer monitor. ► Select the "Install the software automatically (recommended)" item. ► Confirm the selection by pressing the "Next" button. Required USB drivers Note that you have to install the R&S FSH4View software on the PC. Only then can the hardware wizard find the necessary drivers for the USB connection. If successful, the wizard reports that the software for the new hardware has been installed after a few seconds. ► Complete the installation with the "Finish" button. ► Start R&S FSH4View on the PC. ► Select the "USB" tab in the "Instrument Connect" dialog box. Quick Start Guide 1309.6269.12 - 07 46 R&S FSH Putting into Operation Connecting the R&S FSH to a PC ► Select the R&S FSH connection. ► Confirm the selection with the "Connect" button. R&S FSH IP address The R&S FSH internally emulates a LAN connection. The IP address displayed by R&S FSH4View for the USB connection is for information only. It is fixed to 172.16.10.10 and cannot be changed. Quick Start Guide 1309.6269.12 - 07 47 R&S FSH Getting Started Using the Spectrum Analyzer 3 Getting Started This chapter provides a short overview of the first steps of the measurements you can perform with the R&S FSH. 3.1 Using the Spectrum Analyzer This chapter provides a short overview of the first steps of the measurements you can perform with the R&S FSH. 3.1.1 Attenuating the Signal You can attenuate the signal to a suitable level either manually or automatically. In case of automatic attenuation, the level of attenuation at the RF input depends on the current reference level. The R&S FSH provides two ways of automatic attenuation. For the highest possible sensitivity it provides the "Auto Low Noise" attenuation mode. For the lowest possible intermodulation, it provides the "Auto Low Distortion" mode. The main difference between the two modes is that the attenuation level is 5 to 10 dB higher in case of "Auto Low Distortion" than it is for "Auto Low Noise". In the default state, "Auto Low Distortion" is active. ► Press the AMPT key. ► Press the "RF Att/Amp/Imp" softkey. ► Select either the "Auto Low Noise" or "Auto Low Distortion" menu item. The R&S FSH shows the current attenuation level in the hardware settings overview ("Att.:" caption). The currently active menu item has a green background. Quick Start Guide 1309.6269.12 - 07 48 R&S FSH Getting Started Using the Spectrum Analyzer You can also set the attenuation manually. The R&S FSH provides attenuation in the range from 0 to 40 dB in 5 dB steps. ► Press the AMPT key. ► Press the "RF Att/Amp/Imp" softkey. ► Select either the "Man: 0 dB" menu item. The R&S FSH opens an input field to define the attenuation. The R&S FSH provides several methods to fill in input fields: ● ● ● directly with the number keys with the rotary knob with the cursor keys While you can enter any number you want with the number keys, using the rotary knob or the cursor keys is coupled to a certain step size in most cases. If you use the rotary knob to change the attenuation, for example, the step size is 5 dB. ► Enter the attenuation you need. Again, the R&S FSH shows the current attenuation level in the hardware settings overview ("Att.:" caption). Quick Start Guide 1309.6269.12 - 07 49 R&S FSH Getting Started Using the Spectrum Analyzer 3.1.2 Using the Preamplifier The R&S FSH features an internal preamplifier to increase sensitivity. Depending on the frequency, the gain of the amplifier is in the range from 15 to 20 dB and increases the sensitivity by 10 to 15 dB. In the signal path, the preamplifier comes after the RF attenuator and before the input mixer. ► Press the AMPT key. ► Press the "RF Att/Amp/Imp" softkey. ► Select either the "Preamp On" or "Preamp Off" menu item. The R&S FSH turns the preamplifier on or off. The magnitude of amplification depends on the reference level. This coupling to the reference level makes sure that the dynamic range is at an optimum. Quick Start Guide 1309.6269.12 - 07 50 R&S FSH Getting Started Using the Spectrum Analyzer 3.1.3 Measuring CW Signals A basic task for spectrum analyzers is to measure the level and frequency of sinewave signals. The following examples illustrate an effective way of performing these measurements. A signal generator, e.g. R&S SMBV provides the signal source. Test setup Connect the RF output of the signal generator to the RF input of the R&S FSH. Signal generator settings: Frequency: 700 MHz Level: -30 dBm Measuring the level ► Press the PRESET key. The R&S FSH is reset to its default state. The R&S FSH displays the frequency spectrum over its full frequency span. At 700 MHz, the generator signal is displayed as a vertical line. To analyze the generator signal at 700 MHz in more detail, reduce the frequency span. ► Press the FREQ key. The R&S FSH opens an input field to enter the center frequency. ► Enter a center frequency of 700 MHz. The signal is now in the center of the display. ► Press the SPAN key. The R&S FSH opens an input field to specify the span. ► Enter a span of 10 MHz. The R&S FSH now displays the generator signal with a higher resolution. Quick Start Guide 1309.6269.12 - 07 51 R&S FSH Getting Started Using the Spectrum Analyzer Setting the reference level The level at the top of the measurement diagram is called the reference level. To obtain the best dynamic range from the R&S FSH, you should use its full level range. That means that the maximum level value should be at or close to the top of the measurement diagram (= reference level). ► Press the AMPT key. ► Press the "Ref Level" softkey. ► Enter a reference level of -30 dBm. The R&S FSH reduces the reference level by 10 dBm. The maximum trace value is close to the maximum scale value of the measurement diagram. The increase in the displayed noise floor is minimal. The difference between the signal maximum and the displayed noise (i.e. the dynamic range) has, however, been increased. Using Markers The R&S FSH has markers to read out signal levels and frequencies. Markers are always positioned on the trace. Both the level and frequency at their current positions are displayed on the screen. ► Press the MARKER key. The R&S FSH activates a marker and puts it on the maximum value on the trace. A blue vertical line represents the position of the marker on the horizontal axis (e.g. the frequency). A small blue horizontal dash represents the marker position on the vertical axis (e.g. the level). The R&S FSH shows the coordinates of all markers in a table above the diagram. Quick Start Guide 1309.6269.12 - 07 52 R&S FSH Getting Started Using the Spectrum Analyzer Measuring the frequency The trace consists of 631 measurement points (frequency points). The marker is always positioned on one of these measurement points. The R&S FSH calculates the marker frequency from the frequency of the measurement point, the center frequency and the frequency span that have been set. The measurement-point resolution, and consequently the accuracy of the marker frequency readout, therefore depend on the frequency span that has been selected. The R&S FSH has a frequency counter to increase the accuracy of the markerfrequency readout. It stops the sweep at the marker position, counts the frequency and then continues the sweep. ► Press the MARKER key. ► Press the "Marker Function" softkey. ► Select the "Frequency Count" menu item. The marker label "M" turns to a "C" to indicate an active frequency counter. When the frequency counter is active, the resolution of the frequency readout is always 1 Hz, regardless of the span. The accuracy is determined by the internal reference frequency which is far more exact than that of the pixel-oriented marker readout. Quick Start Guide 1309.6269.12 - 07 53 R&S FSH Getting Started Using the Spectrum Analyzer 3.1.4 Measuring Harmonics A spectrum analyzer is ideal to measure harmonic levels or harmonic ratios, because it can resolve different signals in the frequency domain. With marker functions, you can speed up measurement tasks like that. A signal generator, e.g. R&S SMBV provides the signal source. Test setup Connect the RF output of the signal generator to the RF input of the R&S FSH. Signal generator settings: Frequency: 100 MHz Level: -20 dBm Detecting harmonics ► Press the PRESET key. The R&S FSH is reset to its default state. The R&S FSH displays the frequency spectrum over its full frequency span. At 700 MHz, the generator signal is displayed as a vertical line. In addition you can see the harmonics as smaller vertical lines at frequencies that are multiples of 100 MHz. To measure the second harmonic ratio, narrow down the span. ► Press the FREQ key. ► Press the "Start Freq" softkey. ► Enter a start frequency of 50 MHz ► Press the "Stop Freq" softkey. ► Enter a stop frequency of 250 MHz. The R&S FSH displays the frequency spectrum in the range from 50 MHz to 250 MHz. This frequency range visualizes the signal itself at 100 MHz and the second harmonic at 200 MHz. Quick Start Guide 1309.6269.12 - 07 54 R&S FSH Getting Started Using the Spectrum Analyzer To measure the harmonic ratio, set the marker on the signal and a delta marker on the second harmonic. ► Press the MARKER key. The R&S FSH sets a marker on the trace maximum. The trace maximum corresponds to the signal. ► Press the "New Marker" softkey. The R&S FSH activates a delta marker and places it on the next trace maximum. This corresponds to the second harmonic. The harmonic ratio is the vertical distance of the marker and the delta marker. The R&S FSH displays this value in the marker table (see picture above). Quick Start Guide 1309.6269.12 - 07 55 R&S FSH Getting Started Using the Network Analyzer 3.2 Using the Network Analyzer R&S FSH models that feature a tracking generator (models 1309.6000.14/.24/.18/.28) can do two-port measurements like measuring the gain or attenuation. The tracking generator generates a sine signal at the receive frequency of the R&S FSH. The R&S FSH provides scalar measurements with the basic configuration. To be able to perform vector measurements you can equip the R&S FSH with firmware option R&S FSH-K42 (order no. 1304.5629.02). If the R&S FSH has a VSWR bridge (models 1309.6000.24/.28), you are able to perform reflection measurements in addition to transmission measurements. Test setup Connect the device under test (DUT) to the R&S FSH. For measurements on devices that require an external voltage (like power amplifiers), connect the supply of a voltage from a suitable AC power supply to one of the BIAS ports (R&S FSH with VSWR bridge only). ► Press the MODE key. ► Press the "Network Analyzer" softkey. The R&S FSH turns on the tracking generator and starts the network analyzer mode. To get the most accurate results, you should calibrate the R&S FSH for the measurement. In its default state, the R&S FSH is factory calibrated. Factory calibration is a full 2-port . You will get calibration over the complete frequency range. The status line reads sufficiently accurate measurement results with factory calibration, but if you add a cable between the DUT and the test port, results are more accurate after calibration. Before starting the calibration, you should set the frequency and span because calibration is valid only for the calibrated frequency and span. ► Press the FREQ key. ► Enter the center frequency you require. ► Press the SPAN key. ► Set the span you require. Quick Start Guide 1309.6269.12 - 07 56 R&S FSH Getting Started Using the Network Analyzer 3.2.1 Calibrating the R&S FSH Depending on the measurement mode, the R&S FSH provides several calibration methods. Principally, the procedure during calibration is the same for all calibration methods and measurement modes in that you need to connect one or more calibration standards to the port(s) of the R&S FSH. Accessories like the R&S FSH-Z28 or -Z29 calibration kit (order no. 1300.7810.03 and 1300.7510.03) already provide a combined "Open", "Short" and "Load". To calibrate (directional) transmission measurements you will also need a "Through" connection. This chapter shows a calibration procedure for a vector return loss measurement on port 1 as an example. For this calibration method the "Open", "Short" and "Load" standards are necessary. ► Press the MEAS key. ► Press the "Meas Mode" softkey. ► Select the "Vector" menu item. The R&S FSH starts vector measurements. ► Press the "Calibration" softkey. ► Select the "Reflection Port 1" menu item. The R&S FSH asks you to terminate port 1 into an open circuit ("Open"). ► Connect the "Open" to port 1. ► Press the "Continue" softkey. The R&S FSH calibrates the open circuit. Next, the R&S FSH asks you to terminate port 1 into a short circuit ("Short"). ► Connect the "Short" to port 1. ► Press the "Continue" softkey. The R&S FSH calibrates the short circuit. Quick Start Guide 1309.6269.12 - 07 57 R&S FSH Getting Started Using the Network Analyzer Last, the R&S FSH asks you to terminate port 1 into a 50 Ω termination ("Load"). ► Connect the "Load" to port 1. ► Press the "Continue" softkey. . The When the calibration is finished, the R&S FSH shows the message status line now says . If you have calibrated a scalar measurement, the status line says normalization is available for scalar measurements. , because only Quality of calibration deteriorates if you change either frequency parameters (center, start or stop frequency and span), attenuation or tracking generator power. After changing attenuation or tracking generator power, the calibration is still valid, but probably more inaccurate. The R&S FSH shows that by adding a '?' to the status line (e.g. ). Calibration also remains valid if you change one of the frequency settings inside the calibrated frequency range. However, results also may be more inaccurate. In that case, the R&S FSH interpolates the correction data between the reference points of the calibration before applying them to the measurement. The label in the status line reads . If you change one of the frequency settings to a value that is outside the calibrated frequency range, the R&S FSH gets uncalibrated and will use factory calibration . instead. The status line reads 2-Port Calibration With a two-port calibration it is possible to measure the forward and reverse direction without a new calibration. If you change one of the parameters that interfere with the calibration by accident, you can restore the last calibration settings. ► Press the MEAS key. ► Press the "Calibration" softkey. ► Select the "Restore Calibration Settings" menu item. The R&S FSH restores all settings (including span and frequency) that were active during the last calibration. Note that calibration data is included in data sets. Therefore it is possible to start a measurement without performing calibration after loading a data set. For an extensive description of available calibration methods and states see the operating manual. Quick Start Guide 1309.6269.12 - 07 58 R&S FSH Getting Started Using the Network Analyzer 3.2.2 Measuring the Vector Reflection To perform vector measurements you have to equip the R&S FSH with firmware application R&S FSH-K42. Reflection measurements are available for all R&S FSH models with a tracking generator and VSWR bridge. With a model that features a VSWR bridge, you can perform the measurement at both ports. For models without a VSWR bridge reflection measurement are possible only on port 1. ► Press the MEAS key. ► Press the "Meas Mode" softkey. ► Select the "Vector" menu item. The R&S FSH starts vector measurements. ► Press the FREQ key. ► Enter the frequency of the DUT. ► Press the SPAN key. ► Enter an appropriate span. As you have changed the frequency settings, you should calibrate the R&S FSH for more accurate results. ► Calibrate the R&S FSH for vector reflection measurements at the port you want (see above). ► Reconnect the DUT. The R&S FSH shows the magnitude of the reflection. To evaluate the results, you can use, for example, markers. To get different aspects of the results, you can use several measurement formats, like the phase or the reflection coefficient. ► Press the "Meas Format" softkey. ► Select the format you would like to see. The R&S FSH adjusts the display accordingly. The current measurement format is always displayed in the status line. Quick Start Guide 1309.6269.12 - 07 59 R&S FSH Getting Started Using the Network Analyzer 3.2.3 Measuring Scalar Transmission Scalar measurements are available for all R&S FSH models with a tracking generator. ► Connect the DUT between the RF input and the tracking generator output. Note that you need an R&S FSH with VSWR bridge (models .24 or .28) to be able to measure the transmission in forward and reverse direction. Models without VSWR bridge (models .14 or .18) can measure the transmission in reverse direction only. ► Press the MEAS key. ► Press the "Meas Mode" softkey. ► Select the "Scalar" menu item. The R&S FSH starts scalar measurements. ► Press the FREQ key. ► Enter the frequency of the DUT. ► Press the SPAN key. ► Enter an appropriate span. As you have changed the frequency settings, you should calibrate the R&S FSH for more accurate results. ► Calibrate (normalize) the R&S FSH for scalar transmission measurements in the direction you want (see above). ► Reconnect the DUT. The R&S FSH shows the magnitude of the transmission. To evaluate the results, you can use, for example, markers. Quick Start Guide 1309.6269.12 - 07 60 R&S FSH Getting Started Using a Power Sensor 3.3 Using a Power Sensor For highly accurate power measurements, you can connect one of the power sensors that are available for the R&S FSH. To control and power the power sensor, connect it to the corresponding RS-232-C interface at the top of the R&S FSH. You can also use one of the R&S NRP power sensors and connect it to the USB interface on the right side of the R&S FSH. Note that only R&S FSH models with a 20 MHz bandwidth (serial numbers 105000 and higher) have an USB port. 3.3.1 Measuring the Power with a Power Sensor The power sensors R&S FSH-Z1 and R&S FSH-Z18 (especially designed for use with the R&S FSH) measure the power in the range from 10 MHz to 8 GHz and 18 GHz respectively. Risk of damaging the power sensor Because of high input power, ● the continuous power applied to the power sensor’s input must not exceed 400 mW (26 dBm) ● use an attenuator for measurements on highpower transmitters However, brief power peaks ≤10 µs up to 1 W (30 dBm) are permissible. Test setup Connect the cable of the power sensor to the power sensor jack of the R&S FSH. 1 2 3 Power sensor R&S FSH-Z1 or R&S FSH-Z18 Power sensor connector (DUT) Power sensor jack Quick Start Guide 1309.6269.12 - 07 61 R&S FSH Getting Started Using a Power Sensor Measuring the power ► Press the MODE key. ► Press the "Power Meter" softkey. The R&S FSH switches its operating mode. If the R&S FSH recognizes a power sensor, it sets up a connection via the interface and after a few seconds shows the measured power. If no power sensor has been connected or is not connected appropriately, the R&S FSH shows nothing. If there are communication problems between the R&S FSH and the power sensor, the R&S FSH displays an error message that indicates a possible cause. For more information see the operating manual. Zeroing the power sensor To compensate for internal offset of the power meter, it needs to be compensated before starting the measurement. ► Press the "Zero" softkey. The R&S FSH asks you not to apply any signals to the power sensor while zeroing is active. ► Disconnect the power sensor from any signal sources. ► Press the "Continue" softkey to start zeroing. The R&S FSH immediately starts the zeroing process. It asks you to wait until it is finished. After zeroing is done, the R&S FSH outputs the message "Power Sensor Zero OK" and again shows the power sensor softkey menu. ► Connect the signal under test to the power sensor. The R&S FSH shows the measured power level in dBm. Quick Start Guide 1309.6269.12 - 07 62 R&S FSH Getting Started Using a Power Sensor Entering the frequency To get the best results, also enter the frequency of the signal under test. ► Press the "Freq" softkey. ► Enter the frequency of the signal. ► Confirm the entry with one of the unit keys. The R&S FSH transfers the new frequency to the power sensor which then corrects the measured power readings. Quick Start Guide 1309.6269.12 - 07 63 R&S FSH Getting Started Using a Power Sensor 3.3.2 Measuring Power and Return Loss With the directional power sensors R&S FSH-Z14 and R&S ZVH-Z44 you can measure the power in both directions. When you connect the directional power sensor between the source and the load, the R&S FSH measures the power from source to load (forward power) and from load to source (reverse power). The ratio between forward and reverse power is a measure of the load matching. The R&S FSH displays it as the return loss or standing wave ratio. The power sensors for the R&S FSH have an asymmetrical design. Therefore, they have to be inserted into the test setup in such a way that the "Forward" arrow on the sensor points toward the load (= in the direction of the power flux). When measuring high powers, pay strict attention to the following instructions to avoid personal injury and to prevent the power sensor from being destroyed. Danger of skin burns and damage to the instrument ● Never exceed the permissible continuous power. ● See diagram on the rear of the sensor for the permissible continuous power. ● Turn off the RF power to connect the sensor. ● Screw the RF connectors tightly.. Test setup Connect the cable of the power sensor to the power sensor jack of the R&S FSH and insert the directional power sensor between the source and the load. 1 2 3 4 Directional power sensor R&S FSH-Z14 or Z44 Source Load Power sensor jack Quick Start Guide 1309.6269.12 - 07 64 R&S FSH Getting Started Using a Power Sensor Measuring the power ► Press the MODE key. ► Press the "Power Meter" softkey. As soon as it recognizes the power sensor, it shows the type of the directional power sensor that is connected in the diagram header. After a few seconds it also shows the forward power and return loss currently measured at the load. Zeroing the power sensor Before performing the power measurement, you should zero the power sensor. For more information, see "Measuring the Power with a Power Sensor" on page 61. After zeroing is done, the R&S FSH outputs the message "Power Sensor Zero OK" and again shows the power sensor softkey menu. ► Connect the R&S FSH-Z14 or R&S FSH-Z44 between the source and the load. The R&S FSH displays the measured forward power in dBm and the SWR of the load. To get the best results, you should also define the frequency of the signal. For more information see "Measuring the Power with a Power Sensor" on page 61. Quick Start Guide 1309.6269.12 - 07 65 R&S FSH Getting Started Identifying Cable Faults 3.4 Identifying Cable Faults The R&S FSH can perform cable measurements if it features a tracking generator and VSWR bridge (order no. 1309.6000.24/.28). You also have to equip it with firmware option R&S FSH-K41 (DTF measurements, order no. 1304.5612.02). Test setup The test setup requires an R&S FSH, an RF cable (e.g. R&S FSH-Z320) and a calibration standard (e.g. R&S FSH-Z28 or R&S FSH-Z29). 1 2 3 4 RF input (port 1) RF cable Calibration standard Test cable (DUT) ► For measurements on DUTs that require an external voltage supply (e.g. power amplifiers), connect the supply voltage from a suitable AC power supply to the BIAS PORT 1 input. ► Connect the RF test cable to the RF input of the R&S FSH. You should use the RF test cable. Else the measurement results may be incorrect. Starting the measurement ► Press the MODE key. ► Press the "Distance-to-Fault" softkey. The R&S FSH starts the distance-to-fault measurement. Quick Start Guide 1309.6269.12 - 07 66 R&S FSH Getting Started Identifying Cable Faults Selecting the measurement port In the default state, port 1 (RF input) already is the measurement port. To select the measurement port manually, ► Press the MEAS key. ► Press the "Meas Mode" softkey. ► Select the "DTF / Refl Measurement Port" menu item. ► Select the port you want to perform the measurement on. Setting the frequency To get the best results, you should adjust the center frequency to that of the DUT. ► Press the FREQ key. ► Press the "DTF Center Freq" softkey. ► Enter the center frequency you need (e.g. that of the antenna at the other end of the cable) with the numeric keys. The R&S FSH automatically calculates the best bandwidth for the current measurement. Specifying the cable model To perform cable tests, you have to specify the type of the cable and its approximate length. ► Press the MEAS key. ► Press the "Cable Config" softkey. ► Select the "Select Cable Model…" item. The R&S FSH opens a dialog box to select the cable model. ► Select the cable model that you need from the list of cables. ► Confirm the selection with the "Select" softkey. The currently active cable model is always shown in the display header. Quick Start Guide 1309.6269.12 - 07 67 R&S FSH Getting Started Identifying Cable Faults You can also define new cable models on the R&S FSH or with the R&S FSH4View software and then transfer them to the R&S FSH. For more information see the operating manual. In addition to the cable model, you should also specify the length of the cable. ► Press the "Cable Config" softkey. ► Select the "Cable Length" item. The R&S FSH opens an input field to specify the cable length. The range is from 3 m (10 ft) to 1500 m (4921 ft). ► Enter the cable length. The unit depends on the regional settings. It is either meter or feet. For more information see "Regional Settings" on page 34. The R&S FSH uses the cable length to determine the optimal span for the measurement and for scaling the horizontal axis. For best results, the cable should be specified 20% to 50% longer than the actual cable length. Calibrating the test setup Before connecting the cable, you should calibrate the R&S FSH to get the best measurement results. ► Press the MEAS key. ► Press the "Calibration" softkey. ► Select the "Calibrate" menu item. The R&S FSH asks you to connect a "Short", an "Open" and a "Load" to the measurement cable. ► Firmly connect the short, the open and the load to the output end of the cable. ► After each step, proceed with the "Continue" softkey. After the calibration, the R&S FSH shows that it is calibrated by displaying (CAL). ► Screw the cable under test back to the measurement cable. In DTF mode, the R&S FSH performs calibration over its entire span. It is thus not necessary to perform a new calibration after changing the frequency range or cable length. The R&S FSH stores the calibration data in its memory. Thus, the calibration is valid after you change the operating mode or after you turn off the R&S FSH. Quick Start Guide 1309.6269.12 - 07 68 R&S FSH Getting Started Identifying Cable Faults The R&S FSH now shows the cable characteristics over its entire length. With a marker, you can easily detect the distance to the cable fault. In addition to the distance to fault measurement, the R&S FSH also features a cable spectrum measurement and a reflection measurement, e.g. to test impedance matching. Using markers The R&S FSH has markers to read out signal levels and frequencies. Markers are always positioned on the trace. Both the level and frequency at their current positions are displayed on the screen. ► Press the MARKER key. The R&S FSH activates a marker and puts it on the maximum value on the trace. A blue vertical line represents the position of the marker on the horizontal axis (e.g. the frequency). A small blue horizontal dash represents the marker position on the vertical axis (e.g. the level). The R&S FSH shows the coordinates of all markers in a table above the diagram. Quick Start Guide 1309.6269.12 - 07 69 R&S FSH Getting Started Saving and Recalling Results and Settings 3.5 Saving and Recalling Results and Settings The R&S FSH can store measurement results and settings in the internal memory, on a removable SD memory card or on a memory stick via the USB interface. Results and settings are always stored together, allowing them to be interpreted in context when recalled. The R&S FSH can store at least 100 data records in the internal memory which are differentiated by their names. The R&S FSH provides a USB port and a SD card slot. For more information see "USB Port" and "SD Card Slot". To use the SD card (e.g. R&S HA-Z231, order no. 1309.6217.00), insert it into the slot until it audibly clicks into place. Remove the SD card, by pressing it in and then pulling it out. 3.5.1 Saving Measurement Results ► Press the SAVE/RECALL key. ► Press the "Save" softkey. The R&S FSH opens the file manager dialog box. 1 2 3 4 Available data sets and folder structure Data set name input field Remaining memory on selected data storage File manager softkey menu Quick Start Guide 1309.6269.12 - 07 70 R&S FSH Getting Started Saving and Recalling Results and Settings ► Specify a name for the data set in the input field of the dialog box with the number keys. In addition, moves the cursor to the left, moves it to the right and the BACK key deletes a character. You can either - overwrite a data set that already exists by selecting it from the available data sets with the cursor keys or edit the name of an existing data set with the cursor keys and the numeric keys or create a new data set by entering a new name with the numeric keys. ► Select the storage medium you want to use. ► Press the "Save" softkey. The R&S FSH saves the data set. 3.5.2 Recalling Measurement Results Use the R&S FSH recall function to review previously saved measurement results and settings. ► Press the SAVE/RECALL key. ► Press the "Recall" softkey. A list of all saved data sets opens. If you want to recall results from the SD card or a USB stick, select it first to view its contents. Select a data set from the list with the cursor keys. ► Confirm your selection with the "Recall" softkey. Quick Start Guide 1309.6269.12 - 07 71 R&S FSH Index Index AC adapter ........................................................................ 12 Accessories ......................................................................... 9 Accessory detection ........................................................... 27 Attenuation ........................................................................ 49 Audio settings .................................................................... 38 Auto low distortion ............................................................. 49 Auto low noise ................................................................... 49 AUX input .................................................................... 19, 32 Backlight ............................................................................ 37 Battery (car adapter) .......................................................... 13 Battery (charging) .............................................................. 13 Battery (external charger) .................................................. 14 Battery (replacement) ........................................................ 13 Battery insertion ................................................................. 11 Battery low level................................................................. 39 BIAS ports ......................................................................... 20 BNC connectors................................................................. 20 configuration ................................................................... 28 Color scheme..................................................................... 37 Connectors ........................................................................ 17 Controls ............................................................................. 10 Date & time ........................................................................ 34 Date format ........................................................................ 35 DC port .............................................................................. 23 Directional power sensor.................................................... 65 Display settings.................................................................. 37 External reference ............................................................. 20 External trigger .................................................................. 20 GPS information ................................................................ 33 GPS receiver ..................................................................... 32 Hardware settings .............................................................. 27 Headphone jack ................................................................. 19 Quick Start Guide 1309.6269.12 - 07 IF output ............................................................................ 21 Kensington lock ................................................................. 22 LAN port ............................................................................ 22 Languages ......................................................................... 35 Length unit ......................................................................... 36 Options .............................................................................. 24 Positioning ......................................................................... 11 Power overload beep ......................................................... 38 Power sensor..................................................................... 62 directional ....................................................................... 65 Power sensor port.............................................................. 18 Power settings ................................................................... 39 Preamplifier ....................................................................... 51 Preset ................................................................................ 41 Regional settings ............................................................... 35 Reset ................................................................................. 41 RF input ............................................................................. 17 SD card slot ....................................................................... 23 Self alignment .................................................................... 40 Signal attenuation .............................................................. 49 Spectrum analyzer ............................................................. 49 Support .............................................................................. 11 Tracking generator output .................................................. 18 USB port ...................................................................... 22, 23 User Interface .................................................................... 10 Video out ........................................................................... 21 Volume key click volume ............................................................. 38 system beeper ................................................................ 38 Zeroing ........................................................................ 63, 66 ZVHView ........................................................................... 42 72