1
01-094
Applies
To:
2002
CR-V
December 2001
-ALL
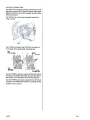
2002 CR-V: PDI and New Model Information
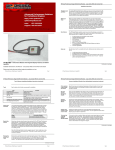
The CR-V is all new for 2002. Many of the features on
this model are shared with other Honda models:
.Side
airbags (KU, as an option)
.Driver
and front passenger airbags
.Front
seat belt and seat belt buckle tensioners
.LATCH
To prevent battery drain during shipping, the No.3
(15A) fuse (Interior Lights) and the No.9 (10A) fuse
(Backup) are removed fr.gm-the under-hood fuse/relay
box and stored in the driver's pocket (swing open
compartment) on the driver's side of the dashboard.
Make sure you reinstall these fuses.
system for child seats
.Immobilizer
.Dust
FUSES
system
and pollen filters
.6-disc
in-dash CD changer
This service bulletin gives you information you need for
POI and describes these features, equipment, and
service requirements:
.Fuses
.Washer
.Idle
Fluid Reservoir
Learn Procedure
.Antenna
WASHER FLUID RESERVOIR
Mast
.Floor
Mats
.Shift
Lock Release Cover (ArT models)
.Front
Tie-Down
.Front
License
.Center
.Rear
Hole Body Plugs
Plate Holder
Seat Belt
Seat "Tumble"
.Filling
Feature
the Fuel Tank
.Sidewinder-
Type Ignition
.Intermittent
Rear Wiper
.Tailgate/Hatch
Key
Glass
.Driver's
Window Auto-Up
.Climate
Control
.Trailer
Towing
.Audio
System
.Service
Feature (KK, KM, KU)
Connectors
WARRANTY
CLAIM
INFORMATION
None. The information
in this service
considered
part of POI.
@ 2001
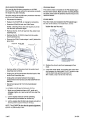
The washer fluid reservoir is under the hood on the left
front fenderwell. You can check the fluid level by
looking at the indicator that sticks out of the opening in
the driver's doorjamb.
American
Honda
Motor
Go.,
Inc.
-All
Rights
Reserved
bulletin
is
XTB23401 (0112)
1of6
~
IDLE LEARN PROCEDURE
ANTENNA MAST
You must do the idle learn procedure on all 2002
CR-Vs at PDI. If you do not do this procedure correctly,
the engine may idle erratically.
The antenna mast is included in the POI plastic bag in
the rear of the vehicle. Make sure the mounting threads
are clean, then screw the antenna into the mount in the
right front fender.
You also need to do the idle learn procedure whenever
you do any of these actions:
.Disconnect
.Replace
.Reset
the battery-
FLOOR MA TS
the ECM/PCM, or unplug its connectors.
the ECM/PCM with the PGM Tester.
Four floor mats are included in the POI plastic bag in
the rear of the vehicle. To install them, do this:
Position the rear floor mat.
NOTE: Clearing DTCs does not require you to do
the idle learn procedure again.
.Remove
the No.6 (15 A) fuse from the under-hood
fuse/relay box.
.Remove
the No.19 (100 A) fuse from the underhood fuse/relay box.
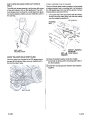
.Remove the PGM-FI main relays 1 and 2 (behind the
glove box).
PGM-FIMAI,NRELAY~
)
-
J\~
~
\
\
\
~
"""""/
/
/
.Remove
either of the wires from the under-hood
fuse/relay box terminal.
.Unplug
any of the connectors from the back of the
under-hood fuse/relay box.
2.
Position the driver's and front passenger's floor
mats.
3.
Lower the center table, and position the center floor
mat between the front seats. For AfT models, snap
it to the front mats and the rear mat. For
Mrr models, snap it to the rear mat only.
.Unplug
the connector between the engine
compartment wire harness and the ECM/PCM wire
harness.
.Disconnect
housing.
ground G1 from the transmission
To complete the idle learn procedure, do this:
1. Make sure all electrical items (NC, audio unit,
defogger, lights, etc.) are turned off, then start the
engine.
2.
Let the engine reach its normal operating
temperature (the radiator fan comes on).
3. Let the engine idle (throttle fully closed and with all
electrical items turned off) for 5 minutes.
NOTE: The ECM/PCM does the idle speed adjustment;
there is no adjustment screw.
2 of6
01-094
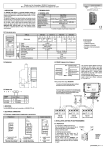
SHIFT LOCK RELEASE COVER (AfT MODELS
FRONT LICENSE PLATE HOLDER
ONLY)
The shift lock release opening is at the lower left corner
of the shift indicator trim on the dashboard. The shift
lock release cover is stored in a small bag in the glove
box during shipping. Make sure you install the cover in
the opening.
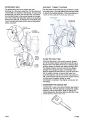
The front license plate holder consists of a top bracket,
a bottom bracket, and a mounting bolt. It is included in
the POI plastic bag in the rear of the vehicle. If a front
license plate is required, do this:
1 .Line up the slot in the top bracket with the middle
vertical rib on the front grille, and slide the bracket
over the middle horizontal rib.
-TOP BRACKET
MOUNTING
BOLT ~
,
"""{)::
~
II~
~ 0/-/
\~
/
SHIFT LOCK
RELEASE COVER
BOTTOM
BRACKET
.
,
MIDDLE HORIZONTAL
RIB ON THE
FRONT GRILLE
FRONT TIE-DOWN HOLE BODY PLUGS
Two body plugs are included in the POI plastic bag in
the rear of the vehicle. Make sure you install them in
the front tie-down holes.
2. Place the bottom bracket under the middle
horizontal rib, lining up the mounting bolt holes in
the two brackets.
3. Install the mounting bolt to hold the two brackets
together.
01-094
3 of6
CENTER SEAT BELT
REAR SEAT "TUMBLE"
The lap/shoulder belt for the center rear seat
passenger is a two-piece assembly. The shoulder belt
is connected to a retractor in the ceiling. To use the lap/
shoulder belt, pull down the shoulder belt, and fasten
the small latch plate to the anchor buckle on the right
side. Then, fasten the large latch plate to the seat belt
buckle on the left side. To re'ease the small latch plate,
insert the large latch plate into the slot on the anchor
buckle, and push.
The rear seats can be folded up and "tumbled" to make
extra cargo room. The strap behind the seat-back holds
the seat in the tumbled position. This strap attaches to
a screw on the inside of the front seat outer rail.
FEATURE
FILLING THE FUEL TANK
Follow the directions in the owner's manual: Always
turn off the engine before loosening the fuel fill cap or
filling the tank. The 2002 CR-V has an onboard vapor
recovery system to capture fuel vapors during a fillup.
The captured vapors are then burned in the engine.
Changes in the purge air vapor concentration may
affect the engine's air-fuel mixture. If you fill up the tank
with the engine running, recovered fuel vapor can
cause the engine to run too rich, which may cause it to
stall. Loosening the fuel fill cap with the engine running
can also cause a sudden change in vapor
concentration, resulting in the engine running too rich
and stalling.
SIDEWINDER- TYPE IGNITION KEY
The 2002 CR-V uses a new type of ignition key called a
sidewinder key. This key requires a special key cutting
machine to cut the key blanks. Refer to SIB 01-077,
Cutting Sidewinder- Type Keys With the MATRIX H Key
Cutting Machine, filed under Tools.
4 of6
01-094
INTERMITTENT
REAR WIPER
The rear wiper stops instantly if the hatch glass is
opened while the wiper is working. To restore normal
wiper operation, close the hatch glass, then turn the
rear wiper switch off and on again.
TAILGATE/HATCH
GLASS
You can lock and unlock the tailgate with either the
keyless entry remote transmitter (EX models) or by
using the master door lock switch on the driver's door.
You can also unlock the tailgate by inserting the key
into the lock and turning it counterclockwise to the
unlock position.
DRIVER'S WINDOW AUTO-UP FEATURE
The driver's window now has a one-touch auto-up
feature. If you pull back firmly on the driver's window
switch (past the detent), then release it, the window
goes up all the way automatically. To stop this
automatic movement, push down on the switch
momentarily.
If an obstruction is sensed while the window is going up
automatically, the window stops, then lowers several
inches. This sensing turns off when the window is just
short of its fully raised position.
You need to reinitialize the system at POI. You also
need to do it if you disconnect the battery or replace
the window regulator. To reinitialize the system, do this:
1. Make sure the driver's window is fully closed.
2.
Push down and hold the window switch. Make sure
the window goes all the way down.
3.
Pull back and hold the window switch. Make sure
the window goes all the way up, then hold the
switch for at least 2 more seconds.
CLIMATE CONTROL
To provide the best cooling, the 2002 CR-V locks the
Recirculation (REC) and the NC functions together
when you select MAX NC on the mode control dial.
The rear window defroster does not have a shutoff
timer. The defroster turns off automatically when you
turn the ignition switch to LOCK (0).
TRAILER TOWING
The 2002 CR-V can tow a utility trailer up to 1,500
pounds.
AUDIO SYSTEM
You can open the hatch glass either with the remote
transmitter or by pressing the hatch glass release
button on the driver's door. You can also open the hatch
glass by inserting the key into the lock and turning it
clockwise to the release position. Note this also locks
the tailgate.
The tailgate has a midpoint stop built into the gas assist
cylinder. When you open the tailgate, you will notice
there is some resistance as the tailgate reaches its
half-open position.
To keep the tailgate door open on an incline, fit the
plastic stop over the stay rod when the tailgate door is
fully open. The plastic stop is stored in the tool kit in the
storage bin under the floor.
The 2002 CR-V LX model has an AM/FM stereo/CD/
cassette player. The EX model has an AM/FM stereo/
cassette/6-disc in-dash CD changer.
To reduce warranty or customer costs whenever an
anti-theft code is lost, you can get the audio unit's serial
number without removing the unit. To get the serial
number, do this:
1. Remove the No.9 (10 A) fuse (Backup) from the
under-hood fuse/relay box for about 5 seconds,
then reinstall it.
2. Turn the ignition switch to ACCESSORY (1 ).
3. Turn on the audio unit. Make sure CODE appears
on the display. .
4.
If CODE does not appear, turn the ignition switch to
LOCK (0), and repeat steps 1 thru 3.
5. Turn off the audio unit.
6.
7.
01-094
Press and hold the number 1 and 6 preset buttons
at the same time, then turn on the audio unit. The
serial number appears in two parts: the first four
digits followed by the last four digits, and then the
sequence repeats.
Enter these eight digits into a DCS terminal to get
the anti-theft code.
5016
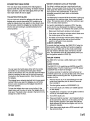
SERVICE CONNECTORS
The 2002 CR-V has three service connectors: the 16P
data link connector (DLC), the 2P memory erase signal
(MES) connector, and the 3P multiplex control system
(MPCS) connector.
The 16P DLC is in the driver's footwell, behind the
center console.
-;> \\
0
-
/
/
DLc
The 2P MES connector and 3P MPCS connector are
on the back of the under-dash fuse/relay box.
MES
CONNECTOR
c
,~
MPCS
\~CONNECTOR
..
-p
r-4
SCSSERVICE
CONNECTOR
~
~
3P
SERVICE
CONNECTOR
Use the 2P MES connector, along with the SCS service
connector (TIN 07PAZ-0010100), to clear SRS DTCs
(see section 23 of the 2002 CR-V Service Manual).
Use the 3P MPCS connector, along with the 3P service
connector (TIN 07WAZ-001010A), to troubleshoot the
multiplex control system.
6 of6
,-()~4