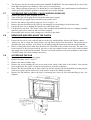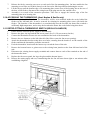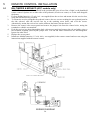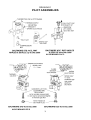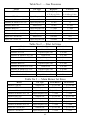
1
SERVICE
MANUAL
for
BALTIMORE
MONACO
NAPLES &
SEVILLE
GAS FIRES
TO BE USED ONLY BY AUTHORISED PERSONNEL
PART No 591060
Issue D — © November 2001
CONTENTS
TROUBLESHOOTING
A.
B.
C.
D.
E.
F.
G.
H.
I.
Page
Pilot will not light after repeated attempts .......................................................... 2
ECS fire won’t light after repeated attempts ....................................................... 3
Spark OK, but pilot refuses to light (not ECS) ................................................... 4
Pilot will light but will not remain alight (not ECS)............................................. 5
Standard heaters. Pilot alight but burner won’t light in 10 seconds...................... 6
Thermostat heaters. Pilot alight but burner won’t light in 30 seconds.................. 7
Thermostat heaters. Erratic operation................................................................. 8
No flame modulation on ECS models ................................................................. 8
Sooting .............................................................................................................. 8
BALTIMORE & MONACO ASSEMBLY AND DIS-ASSEMBLY
Removing and fitting glass, louvre assembly, dress guard, front panel.......................9, 10
Disconnecting the flue..................................................................................................11
Removing and replacing the cabinet .............................................................................11
Access panels, removing and replacing...................................................................11, 12
Removing and replacing the burners.............................................................................12
Removing and replacing the pilot assembly and pilot jet .........................................12, 13
Accessing the main injectors.........................................................................................14
Removing control valves and regulators .......................................................................14
Accessing the fan assembly ....................................................................................14, 15
Removing and replacing the pedestal and pedestal foot.................................................15
Accessing the thermodisc .............................................................................................15
NAPLES & SEVILLE ASSEMBLY AND DIS-ASSEMBLY
Removing and replacing the glass.................................................................................16
Fitting louvre assemblies and dress guards..............................................................16, 17
Removing and replacing burners...................................................................................17
Removing and replacing the pilot assembly...................................................................17
Accessing the main injectors ..................................................................................17, 18
Accessing the control valve..........................................................................................18
Removing and replacing the fascia................................................................................18
Accessing the fan ...................................................................................................18, 19
Accessing and retro-fitting the thermodisc....................................................................19
SERVICE ADJUSTMENTS
Gas pressure adjustment.........................................................................................20, 21
Checking the flue draught ............................................................................................21
Converting Baltimore from LPG to NG........................................................................22
Converting Naples, Seville from LPG to NG ................................................................23
Remote control installation.....................................................................................24, 25
Thermostatic controls ......................................................................................25, 26, 27
Receiver switch positions .............................................................................................27
ECS information ..............................................................................................28, 29, 30
Wiring diagrams.....................................................................................................31, 32
DRAWINGS
Pages 33 to 41
TABLES
No 1.
Gas pressures ..............................................................................................42
No 2.
Pilot jet sizes ...............................................................................................42
No 3.
Main burner jet sizes....................................................................................42
Abbreviated Parts List................................................................................... Back Cover
1
A
— PILOT WILL NOT LIGHT AFTER REPEATED ATTEMPTS
YES
Is it an ECS model?
Go to
B
NO
Has it Battery
ignition?
YES
Is there a spark at
the igniter?
Replace battery, check
battery contacts
NO
Spark?
NO
YES
NO
Go to A6
NO
1 Does the
Piezo 'click'?
2 What type
of Piezo?
6 Is there a spark
at the igniter?
NO
Switch OK
Wiring OK Check switch
wiring
Rotating
Knob
Push
Button
YES
YES
Go to
A6
3 Remove control rod and
operate directly at Piezo
OK
Defective
5 Replace Piezo,
go to A1
7 Is there carbon
YES
on the pilot head?
Check switch
at valve
4 Service
or replace
control rod
assembly.
Go to A1
8
Clean and go to A6
YES
NO. Go to A11
9 A strong spark
every time?
YES
10 Spark OK. Go to C
to check gas supply
NO
11 Is the spark gap correct?
See Drawing No. 1
NO
12 Replace electrode assembly.
Go to A9
YES
13 Are all connecting wires
secure at both ends?
YES
14 Is the high tension wire
shorting to the heater?
NO
16
Fix. Go to A9
YES
15 Replace wire.
Go to A9
NO
17 Is the electrode
insulator cracked?
NO
19 Fit new Piezo or
battery ignition module.
Go to A9
2
YES
18 Replace electrode
assembly.
Go to A9
B
— ECS FIRE WON'T LIGHT AFTER REPEATED ATTEMPTS
Note: The ECS pilot shuts off each time the fire is extinguished and re-lights each time the fire is
started. When operating correctly, the pilot spark ceases as soon as the pilot flame is established,
and the main burners ignite automatically shortly thereafter.
FIRST:- Check that the mains power supply and the gas supply are valid
and that any gas valves are fully open.
1 Aim the handpiece at the receiver and
press the top round button
YES
2 Does the red indicator NO
on the handpiece flash?
3 Check batteries.
Try again
Handpiece OK
4 Indicator
flashes?
NO
YES
Handpiece faulty
YES 8 Do burners
5 Does receiver indicator YES 6 Does spark begin YES 7 Pilot
ignites?
ignite?
in three seconds?
light and remain alight?
NO
NO – Go to F 1
Clean and re-test.
NO – Go to B 23
NO
11 Gas line or
OK 10 Check for gas
injectors clogged
pressure at valve outlet
NONE
9 Does spark
cease?
NO
NO 12 Is flame sensor
in pilot flame?
Adjust or replace
sensor electrode
YES
YES
NORMAL
YES
YES
13 Is there carbon on
the flame sensor?
16 Hold handpiece close to
receiver and try again
YES
17 Receiver
indicator on?
NO
Replace weak
batteries. Go to B1
From F15
Faulty valve or
ignition module
Go to B 7
OK
18 Press start/stop
switch by receiver
Fix and
re-test
Clean and
re-test
NO
OK 14 Check wire
connections
BAD and earth return
from burners
to valve
23 Gas supply faulty. Purge line
15 Verify ignition
loom plugs are firmly
by repeated re-test, pressing
home. Check control
Replace
faulty
RESET switch at rear when
YES
19 Receiver
box fuse. Re-test
handpiece.
Go
spark
ceases after each try.
indicator on?
to B1
Pilot ignites?
BAD
NO
NO
YES
27 Follow steps A 11
20 Check mains
Go to B 8
to A 18 and re-test
24 Hold match flame at
and re-test
pilot while spark is on.
BAD
OK
Does
flame blow sideways?
Go to B 7 Replace ignition
See
Drawings 5 & 6
YES
21 Receiver
module and re-test
Go
to
B
6
indicator on?
NO
YES
NO
25 Check for gas
Continue purging
OK
NO
air by repeated
pressure
at
valve
inlet
22
PRESSURE
starting
attempts
Check all receiver
cable connections
PRESSURE
Remedy gas
and re-test. If still
supply
no indicator light,
26 Check for
Faulty
faulty receiver,
blocked pilot jet STILL
gas
receiver loom or FAULTY
Refer to 'ECS
or tube. Clean NO GAS
valve
control box.
electrical function' 6.2
and re-test
3
C
— SPARK OK BUT PILOT REFUSES TO LIGHT (Not ECS)
FIRST :• Check that all shut-off valves in the gas supply are open.
• For LPG models, check for gas in the bottle and open the bottle valve.
• Check for a gas smell near the pilot, and wait for it to disperse
before starting this procedure.
Press control down
in 'Pilot' position and
hold match flame at pilot
1
Pilot
Ignites
3
2
Is flame
satisfactory?
YES
See Drawing No 5
No
Ignition
4
NO
NO
YES
Does match
flame blow
sideways?
5
See Drg Nos 5 & 6
NO
Does flame
remain when knob
is released 15
secs after ignition?
Wait several
minutes for
pure gas
Go to
D
Turn pilot OFF
6
and attempt re-lighting
five times
(without match)
YES
NO
7
8
Purge air from
system until pilot
ignites. Go to 2
9
Is flame
weak?
Does pilot
light four out of
five times?
NO
YES
Go to A9
OK for service
11 Is gas pressure
Disconnect control
10
rod and adapter (*) and
hold valve down in 'Pilot'
position
OK after
regulator?
12
NO
See Table No 1
Adjust regulator,
test ignition.
Go to 2
YES
NO
NO
13
YES
Does match
flame blow
sideways?
15
14
Is pilot jet
clear?
16 Replace jet and
See Drawing No 2
See Drg Nos 5 & 6
YES
YES
Clean jet and retest. Go to 2
re-test. Go to 2
NO
19
17
Fit new control
rod. Re-test.
Go to 2
18
Is pilot jet
correct size?
See Table No 2
YES
Adjust pilot gas
flow (*) or replace
Pilot gas filter (*)
Re-test. Go to 2
(*) = Some models only
4
D
— PILOT LIGHTS BUT WILL NOT REMAIN ALIGHT (Not ECS)
Disconnect the valve control rod (and adaptor if fitted), and operate
the valve directly.
1
Does the
pilot remain alight?
2
YES
Replace or service
the control rod
and re-test
NO
3
Is the thermocouple
connection tight at
the control valve?
4
NO
Tighten connection
and re-test
YES
5
Is the thermocouple
output at least 15 mV
when the pilot is alight?
6
YES
Replace faulty control
valve and re-test
NO
7
Is the flame impinging
on the thermocouple?
NO
8
Adjust the pilot
flame size. Go to C11
YES
9
Is there soot on
the thermocouple?
NO
10
Replace thermocouple
and re-test
YES
11 Clean thermocouple and adjust
pilot air mixture sleeve (*)
for cleaner pilot flame. Go to 3
(*) = Some models only
5
E
— STD HEATERS, PILOT ALIGHT BUT BURNER
WILL NOT LIGHT WITHIN TEN SECONDS
FIRST :• For an LPG heater, check that there is ample gas in the bottle.
• For a Thermostat heater, verify that the sensor is not warmer than
the temperature set-point.
1
2
Is the gas pressure low
after the regulator?
YES
Adjust the pressure
and re-test
NO
3
4
Are the logs
correctly positioned?
NO
Re-arrange logs
correctly and re-test
See Drawing No 7
YES
5
Are the main burner jets
the correct sizes?
6
NO
Fit correct jets
and re-test
See Table No 3
YES
7
8
Is a jet blocked?
Clean the jet
and re-test
NO
6
F
— THERMOSTAT HEATERS. PILOT ALIGHT BUT BURNER
WILL NOT LIGHT WITHIN 30 SECONDS.
THE PILOT MUST BE ALIGHT BEFORE THE THERMOSTAT CAN TURN ON THE FIRE.(Not ECS).
NOTE: When hand-held remote thermostats are set to MANUAL, they do not operate as thermostats
but give direct control. In the AUTO setting they transmit a thermostat signal to the receiver from time
to time, so there can be some delay, when in this setting, before the fire receives a signal to light or
change flame height (modulate). In the MANUAL setting, there is no time delay for signals to the
receiver. The modulating hand-held thermostat (IRRC 400) steps up or down its various fire height
settings one step at a time, so when the fire is lit in a cold room, the fire level can be more quickly
moved to a higher setting by switching to MANUAL, signalling the desired flame level with the ▲
button and then moving back to the AUTO setting.
1
Is the room temperature
above the set temperature?
YES
2
Normal operation
NO
Is the thermostat
sensing temperatures
above room temperatures?
(e.g. the heater or sunlight)
3
4
YES
Move the thermostat
away from heat sources
NO
Is the thermostat a
remote one? ( Hand held
or wall mounted)
5
Ensure that room air
can circulate freely past
the sensing bulb
6
NO
YES
9
7
Wall mounted?
YES
8
NO
Programmable?
YES
NO
Do the batteries in the
hand unit or the ACC
receiver require replacing?
(Usually once a season)
10
11
Does the heater light when
the wires at the two terminals
on the wall thermostat are
connected together by a
jumper wire?
NO
YES
Do the batteries in
the wall thermostat
require replacing?
(Usually once a season)
NO
12 Replace the
wall thermostat
and re-test
YES
NO
13 Replace batteries
and re-test
14 Is the thermopile
output more than 325 mV
when disconnected
from the control valve?
NO
16
NO
NO
Is it
an ECS?
YES
YES
Replace thermopile
and re-test
17
Does the heater light when
the two thermostat terminals on the
valve (ACC models), the receiver control
box (RMT models) or the terminals
on the cabinet back (ECS models) are
connected by a jumper wire?
See Drawing Nos 8, 9, 10
15
Replace control
valve and re-test
Go to B 15
18
YES
Repair wiring from heater
to wall unit or valve to
receiver and re-test
(*) = Some models only
7
G
— THERMOSTAT HEATERS. ERRATIC OPERATION
ROOM TEMPERATURE FLUCTUATES TOO WIDELY
Ensure that the wall thermostat or hand unit are exposed to free-flowing room air but not in draughts or
too close to windows.
HEATER CYCLES ON AND OFF TOO FREQUENTLY
Move the wall unit or hand unit further away from the heater, ensuring that it is exposed to free-flowing
room air but not in draughts or near windows. A powerful heater in a relatively small room must shut off
shortly after starting unless its maximum heat output is reduced by turning down the high fire setting.
H
— NO FLAME MODULATION ON RMT AND ECS MODELS.
These models are controlled by the IRRC 400 hand-held remote or the ECS handpiece. These remote
controls have the capability of modulating the flame (turning the flame height up and down).
RMT MODELS:
With the fire alight, switch the remote control to MANUAL. Pressing the ▲ and ▼ buttons beside the
display should alter the number of horizontal bars in the display beside the flame symbol. As the number
of bars increases, the flame height should rise and vice versa. When all bars are cleared from the display,
the fire will extinguish. If the flame height does not alter with the display changes, first make sure that
the remote has good batteries and is close to the receiver and aiming at it. Check the voltage at the
'FLAME LEVEL' terminals of the receiver control box while they are still connected to the valve. The
voltage should range from about 10 volts to about 22 volts dc as the number of display bars changes
from 1 to 5. If the voltage is changing correctly but the flame level is not, the wiring between the control
box and the valve may be faulty or the valve itself may be faulty. If the voltage is incorrect, first verify
the connections between the receiver and the control box, and then the connections between the control
control box and the valve. If they are valid, check the modulating coil on the valve for discontinuity in
the winding. If it is OK, the receiver or receiver control box are probably the cause of the problem.
ECS MODELS:
The flame modulation is controlled by the top rocker switch of the handpiece. When the fire is alight,
holding down the + end should increase flame height while holding down the – end will decrease it. The
change in flame height is stepless and it takes 15 or 20 seconds to run through the full range. As for the
RMT models (above), the voltage should be checked only while the modulating coil on the valve is
connected. Ease the connectors at the top of the modulating coil part way off and measure the voltage at
the exposed lower part of the terminals. The normal voltage range is approximately 3 volts to 11.5 volts
dc. If the measured voltages are correct and the flame is not modulating, then the valve is probably
faulty. A faulty modulating coil winding will result in a false voltage reading at the coil.
I
— SOOTING.
If you encounter sooting inside the glass, check the following items:• Verify that the gas pressure is correct.
• Verify that the correct sizes of jets are fitted (see Tables 2, 3).
• Increase the primary air intake, if necessary, by opening the rotary sleeves on the main burners
(adjacent to the main jets).
• If the problem persists, check to see whether the main manifold (the one into which the main jets
are screwed) has been forced from its correct position. Over-enthusiastic tightening of the nut on
the main feed pipe, or levering on the main jets while the burners are being installed or removed
can cause the main jets to discharge up or down hill. The gas streams will then not be central in
their venturies and they will not draw in sufficient primary air. To adjust the manifold, remove the
pedestal front panel, extract four screws holding the inspection plate at the right, and, using a 7/8"
hex socket through the inspection port, flex the manifold to its correct position. This can be done
while the fire is alight so that the results can be observed while adjusting.
NOTE. Avoid making adjustments when burning the final dregs of gas in an LPG bottle as these
can be very 'dirty'.
8
1. BALTIMORE & MONACO ASSEMBLY AND DIS-ASSEMBLY
1.1
REMOVING THE GLASS
1.
2.
3.
4.
5.
6.
7.
8.
9.
1.2
Remove the louvre assembly by lifting it up about 5mm and pulling it carefully toward you.
Remove the dress guard if fitted. For the Baltimore, first remove the front panel (below the glass). Do
this by removing the two retaining plates underneath the front panel, and then lifting its rear corners off
their support posts. Once the panel is clear, swing the bottom of the guard out from the heater and lift
the guard off the two top retaining posts. For the Monaco, un-clip the guard from the glass retainers.
Baltimore. Before lifting the top trim clear, provide support for the three glass pieces to prevent them
from falling and breaking. Adhesive tape will do this.
Remove the two top glass trim fastening screws (positioned horizontally, one at each end of the trim),
slide the trim forward and lift it clear.
Lift the front glass clear first, followed by each side glass. As each side glass is removed, a spring, a
backing strip and a glass rope will be released from behind its rear vertical edge.
Monaco. Remove two fastening screws securing the top glass trim.
Prise forward the top glass trim and lift it clear. Note. This will release the top edges of the left and right
glass retainers.
Lift the glass retainers to remove them, keeping a hand on the glass to ensure that it does not fall
forward.
Lift the glass clear.
FITTING THE GLASS , THE LOUVRE ASSEMBLY, THE DRESS
GUARD AND THE FRONT PANEL.
1.2.1
1.
2.
3.
GLASS ASSEMBLY
Baltimore. Clean all inside glass surfaces carefully and keep fingerprints off them as they are assembled.
Assemble both side glasses. Fit the spring, the backing strip and the glass rope (in that order) into each
retaining slot and then each glass, MAKING SURE THAT THE SMOOTH EDGES WILL BE
AGAINST THE FRONT GLASS. Push them back against their springs until the front edges drop into
the front slot.
The front glass can then be fitted, TAKING CARE THAT THE BEVELLED EDGES FACE THE
FRONT (i.e. away from the side glasses). Offer the front glass into position with its lower edge just
above the top of the bottom retaining channel. Press the front glass back against the side glasses,
compressing the springs until it the glass is directly above the
9
4.
5.
6.
7.
8.
9.
10.
1.2.2
1.
2.
3.
1.2.3
1.
2.
3.
4.
5.
1.2.4
1.
2.
3.
4.
channel. Maintaining the backward pressure, slide the front glass down into the channel.
For safety, strap the glasses together with a piece of adhesive tape at each top corner to prevent them
from falling out while the top trim is being fitted.
Slide the top trim into position under its guides and replace the two horizontal retaining screws. Before
tightening the screws, ensure that the three glass pieces are seated snugly against the top glass tape to
prevent any leakage. Do not over-tighten the screws.
Remove the adhesive tape and clean the glass.
Monaco. Assembly is the reverse of the above removal procedure. Clean the inside surface of the glass
and keep fingerprints off it as it is re-assembled.
Place the glass in position, noting that the bottom edge of the glass has no gasket.
Replace the left and right glass retainers, fitting their lower ends behind the bottom glass trim.
Slide the top glass trim into place, making sure the top ends of the side glass retainers are captured. Fit
the two fastening screws.
LOUVRE ASSEMBLY
Fit the slot at each end of the louvre assembly over its retaining post. For the Monaco, ensure that the
centre support plate engages its loop.
Press downward gently to engage the posts.
Confirm correct engagement by pulling forward on the louvre assembly.
DRESS GUARD (IF REQUIRED)
Baltimore. The front panel must be removed for fitting and removing the dress guard.
Angling the guard forward at the top, fit the two lugs at the top of the guard over the posts at each end
of the top of the glass assembly.
Swing the lower edge of the guard under the front glass support.
The guard is retained in position by fitting the front panel. (See 1.2.4)
Monaco. The guard simply clips behind the top and bottom edges of the glass retainers.
FRONT PANEL (Baltimore only)
Fit the keyhole slot at each end of the front panel over its retaining post.
Press downward gently to engage the posts.
Confirm correct engagement by pulling gently forward on the front panel.
Swing the front panel up into position and fix it there using the two clamp plates and screws vertically
from below.
10
1.3
DISCONNECTING THE FLUE
1.
2.
3.
4.
5.
6.
7.
1.4
Shut off the gas supply at the valve behind the heater.
Remove the access panel on the rear of the cabinet.
Disconnect the gas line at the heater.
Lift the flue sleeve about 75mm and support it with a wooden block.
Slacken any flue clamp and lift the flue while moving the heater from beneath it.
Slide the heater away from the wall, supporting the flue and trim on a suitable spacer.
Keep the heater upright at all times to avoid displacing the logs.
REMOVING THE CABINET
1.
2.
3.
4.
5.
6.
7.
8.
9.
10.
11.
1.5
Remove the front panel (Baltimore only), the dress guard (if fitted), the louvre assembly and the glass (in
that order) as detailed in Section 1.1. For the Monaco, remove the bottom glass trim (one screw at each
end and three into the baseplate.
Remove all access panels ( See Section 1.6.), the pedestal rear panel and the fan (if any).
Disconnect the gas supply.
Disconnect the flue, where applicable. See Section 1.3.
Remove the control knob (STD models) and disconnect the Piezo lead from the bottom of the Piezo
(ACC and RMT models prior to December 2000).
Remove the diverter hood from the rear of the cabinet.
Withdraw the screws holding the rear panel of the cabinet to the heat exchanger.
Extract all the screws under the bottom outer edge of the cabinet.
Remove the screws inside the front of the firebox which fix the firebox sides to the cabinet.
Remove any control rod(s).
The cabinet can now be lifted straight up. Take care not to lose the bush in the control panel (STD
models).
REPLACING THE CABINET
1.
2.
3.
4.
5.
6.
7.
8.
9.
10.
11.
12.
Lower the cabinet carefully over the firebox until it reaches the baseplate.
Re-connect the Piezo lead (if fitted).
Feed the control rod(s) up through the heat shield and the control panel (where applicable).
Attach the lower end of the rod(s) at the valve (as required).
Fit the bush on the control rod (STD models).
Replace all the cabinet retaining screws, taking care not to over-tighten.
Replace the screws holding the rear panel of the cabinet to the heat exchanger.
Replace the diverter hood at the rear of the cabinet.
Re-fit the control knob (STD models).
Replace the glass, the louvre assembly, the dress guard (if fitted) and the Baltimore front panel. See
Section 1.2. Replace the Monaco front glass retainer, ensuring that the spacers are fitted on the end
fastening screws between the glass retainer and the side panel to allow easy fitting of the side access
panel.
Re-assemble all access panels, the fan (if any) and the rear pedestal panel.
Re-install the flue and gas supply and check for gas leaks.
1.6
ACCESS PANELS
1.6.1
REMOVING THE REAR ACCESS PANEL
1.
2.
1.6.2
1.
1.6.3
1.
2.
3.
Remove four screws, three on the face and one underneath.
Lift the panel clear.
REPLACING THE REAR ACCESS PANEL
Offer the panel into position and re-fit the screws. Do not overtighten.
REMOVING THE SIDE ACCESS PANEL
Remove two screws below the panel. In the case of the Monaco, the whole of the right hand side of the
cabinet is the access panel.
Lift the panel gently upward, pulling the lower edge outward.
Lower the panel until it is clear of the pins.
11
1.6.4
1.
2.
3.
1.6.5
1.
2.
1.6.6
1.
1.7
REPLACING THE SIDE ACCESS PANEL
Fit the large holes in the panel over the top locating pins.
Pushing upward, swing the bottom of the panel in until the screw holes align.
Replace the two screws. Do not overtighten.
REMOVING THE PIEZO/FAN SWITCH ACCESS PANEL (Not ECS)
Remove the screws securing the panel to the top rear of the cabinet.
Lift the panel clear.
REPLACING THE PIEZO/FAN SWITCH ACCESS PANEL (Not ECS)
Offer the panel into position and re-fit the screws. Do not overtighten.
REMOVING AND REPLACING THE BURNERS
NOTE: When fitting or replacing the burners, take care to avoid levering the injector jets up or down
as this may cause mis-alignment of the gas jets in their venturi tubes, resulting in insufficient
primary air intake.
1.
Disconnect the gas and power supplies.
2.
Remove the front panel, dress guard (if fitted), louvre assembly and glass . See Section 1.1.
3.
Remove the embers and store them in a plastic bag.
4.
Carefully remove the logs.
5.
Remove the log supports (one at each end of the front burner).
6.
Remove the two screws retaining each burner, and lift the burners clear while moving them to the left to
disengage them from their injector jets.
7.
Follow the above steps in reverse to replace the burners. When re-installing the embers, ensure that they
do not cover the small gas outlet holes in the burner. (See Drawing 2).
1.8
REMOVING AND REPLACING THE PILOT ASSEMBLY
1.
2.
3.
4.
5.
1.9
Remove the burners, following steps 1 – 6 in Section 1.7.
Disconnect the Piezo wire, (the thermopile and thermocouple, if fitted) and the gas pipe to the pilot.
Withdraw the screws fixing the pilot assembly to the burner tray.
The pilot assembly can now be disconnected and lifted clear.
Follow the above order in reverse to replace the pilot assembly.
ACCESSING THE PILOT JET
The various pilot jets are reached for removal as illustrated below.
NOTE: Always smear ROCOL MOLYCOTE J166 on the pilot tube retaining nut threads when re-fitting the
pilot tube.
12
EARLY MODELS
TOP LOADING PILOT
SIDE ENTRY PILOT
CURRENT MODELS
SEE DRAWING 1 FOR CORRECT SPARK GAPS
13
1.10 ACCESSING THE MAIN INJECTORS
1.
2.
3.
Remove the burners (See 1.7)
The injectors can now be unscrewed from the manifold. WARNING. On some models the jet sizes in the
front and back injectors are different. Take care not to mix them up. (See Table 3).
Note. When replacing an injector, it should not be over-tightened, and a small amount of teflon thread
sealant (not tape) should be applied to the thread to prevent gas leakage.
1.11 REMOVING CONTROL VALVES AND REGULATORS (Baltimore & Monaco)
1.11.1
1.
2.
3.
4.
5.
6.
7.
8.
9.
1.11.2
1.
2.
3.
4.
5.
6.
7.
8.
9.
10.
1.11.3
1.
2.
3.
4.
5.
6.
7.
8.
9.
10.
STANDARD MODELS
Turn off the gas supply.
Remove the access panels. See Section 1.6.1 and 1.6.3.
Disconnect the gas pipe at the inlet to the regulator. See Drawing No 8.
Disconnect the pipe between the regulator and the control valve.
At the control valve, disconnect the pipes to the burner and the pilot.
Also disconnect the thermocouple connection to the control valve.
Disconnect the control rod.
After removing their mounting screws the pressure regulator and control valve can be lifted clear.
Re-assemble in the reverse order, taking care to check for gas leaks.
ACC and RMT MODELS
Turn off the gas supply.
Remove the access panels. See Section 1.6.1 and 1.6.3.
Disconnect the gas pipe at the inlet to the control valve. See Drawing Nos 9 & 10.
At the control valve, disconnect the pipes to the burner and the pilot.
Disconnect the thermocouple connection to the control valve.
Also disconnect the thermopile connection to the control valve.
Disconnect the thermostat wires (if any). On RMT models, disconnect the modulating coil wires.
Disconnect the control rods.
After removing the mounting screws the control valve can be lifted clear.
Re-assemble in the reverse order, taking care to check for gas leaks. Correect wire connections are
shown in the wiring diagram in 5.2.
ECS Models
Turn off the gas supply.
Remove the access panels. See Section 1.6.1 and 1.6.3.
Remove the valve top heat shield (3 screws).
Disconnect the wiring loom from the reset switch (on the rear access panel), the thermodisc switch (on
the rear of the firebox), the modulating coil (on the valve) and the earth terminal on the valve. Un-plug
the ignition loom at the top of the control box.
Disconnect the spark wire, the flame sensing wire and the earth wire from the ignition module on the
valve.
Leaving the ignition loom connected to the ignition module, carefully slide the ignition module vertically
from its mounting on the gas control valve.
Disconnect the gas pipe at the inlet to the control valve. See Drawing No 11.
At the control valve, disconnect the pipes to the burner and the pilot.
Remove the screws at each end of the valve mounting cradle and lift the valve clear.
Re-assemble in the reverse order, taking care to check for gas leaks.
1.12 ACCESSING THE FAN ASSEMBLY
1.12.1
1.
2.
3.
4.
5.
NZ STD Models
These have the fan assembly mounted inside the pedestal rear panel.
Un-plug the lead from the mains supply.
Pull off the fan speed control knob.
Remove four screws at the rear of the pedestal.
Operating from the speed knob end, move the fan assembly away from you while swinging the far end
rearward until the assembly can be lifted clear.
Reverse the extraction procedure when re-assembling.
14
1.12.2
1.
2.
3.
4.
5.
1.12.3
1.
2.
3.
4.
5.
6.
7.
1.12.4
ACC and RMT Models
These have the fan assembly mounted inside the pedestal rear panel. A thermodisc switch is fitted
adjacent to the rear of the firebox.
Un-plug the lead from the mains supply.
Remove the four retaining screws at the rear of the pedestal.
Lift the fan assembly carefully away from the pedestal until the loom connector block is exposed.
Disconnect the connector block and lift the fan clear.
Reverse the extraction procedure when re-assembling.
Aust. STD Models
These have the fan assembly mounted on the rear of the heater cabinet. The mains cord enters the fan
assembly and an internal loom extends up to the three speed switch at the top control panel. No
thermodisc switch is fitted.
Un-plug the lead from the mains supply.
If fixing screws are fitted along the top of the fan housing, remove them.
While supporting the housing from falling outward, lift it up to disengage it from the keyhole slots.
Carefully swing the top of the fan housing away from the heater cabinet until it can be lifted clear of the
cabinet at its bottom edge which sits in a ‘V’ formation on the opening in the cabinet.
Swing the right end (viewed from the rear) of the fan housing away from the heater and move the
housing a little to the right to expose the plug and socket in the fan loom.
Disconnect the plug and socket and lift the fan clear.
Reverse the extraction procedure when re-assembling.
ECS Models - Aust. and N.Z.
These have the fan assembly mounted on the rear of the heater cabinet. The mains supply is delivered
through the ECS control box which is mounted inside the rear pedestal panel. Speed control is provided
by a signal from the handpiece to the receiver which is processed by the ECS control box. A thermodisc
switch is fitted adjacent to the rear of the firebox.
To extract and replace the fan assembly, follow steps 1 – 7 in 1.12.3
1.13 REMOVING AND REPLACING THE PEDESTAL
1.
2.
3.
4.
5.
6.
7.
Remove the fan (see Section 1.11) or pedestal rear panel as applicable.
Remove the front panel, dress guard (if fitted), louvre assembly and glass . See Section 1.1.
Remove the logs carefully.
Disconnect the thermostat bulb if attached to the pedestal.
Remove the four screws retaining the pedestal to the baseplate.
Lift the firebox clear. Note: The heat shield below the baseplate will still be partially attached.
Reverse the removal sequence when re-assembling the pedestal.
1.14 REMOVING AND REPLACING THE PEDESTAL FOOT
1.
2.
3.
4.
First carefully disconnect the receiver loom at the plug near the receiver control box (RMT models) or at
the plug on the rear pedestal panel (ECS models).
To remove the foot, carefully slide the foot and trim forward, keeping it in contact with the floor to
avoid damaging the finish on the pedestal.
To replace the foot, make sure the decorative trim is correctly in place before sliding the foot and trim
back around the pedestal, again keeping the foot in contact with the floor to avoid pedestal finish
damage.
Re-connect the receiver loom (if applicable).
1.15 ACCESSING THE THERMODISC (Recent Baltimores & Monacos except Aust. STD)
If the heater has a fan mounted on the rear of the cabinet, remove the fan (see 1.12) to reach the
thermodisc. If easier access is needed, also remove the rear access panel.
For other models, remove the rear access panel to access the thermodisc.
15
2.
NAPLES & SEVILLE ASSEMBLY & DIS-ASSEMBLY
2.1
REMOVING AND REPLACING THE NAPLES GLASS
1.
2.
3.
Remove the top louvre assembly and the bottom right louvre assembly by lifting upward, then outward.
Swing the bottom left louvre assembly open and lift it off its hinge.
If a dress guard is fitted, release it by springing out the clips which hook behind the vertical sides of the
glass frame.
4.
While supporting the glass bay window
assembly, remove the two horizontal fastening
screws (at the ends of the top of the assembly).
Pull the glass assembly outwards at the top
until it is about 15˚ from vertical, then lift it up
out of the bottom retaining channel in the base
of the firebox.
To replace the glass assembly, follow the
above steps in the reverse order, taking care to
clean the inside surfaces of the glass assembly
beforehand, and making sure that the glass
sealing strips are correctly positioned when
swinging the assembly into position.
5.
6.
2.2
REMOVING AND REPLACING THE SEVILLE GLASS
1.
2.
4.
5.
6.
7.
Remove the top louvre assembly by lifting upward then outward.
If a dress guard is fitted, lift off the bottom right louvre assembly, swing open the bottom left louvre
assembly and lift it off its hinge. Spring the bottom retaining clips of the dress guard downwards and
swing the bottom of the guard out from the heater. Lift the guard off the two top retaining lugs.
Spring the bottom retaining clips of the dress
guard downwards and swing the bottom of the
guard out from the heater. Lift the guard off
the two top retaining lugs.
Remove the two top glass trim fastening
screws (positioned horizontally, one at each
end of the trim), slide the trim toward you and
lift it clear.
Remove the two black cover trims, one at
either end of the glass, by lifting them upwards
and then out. Pull the top of the trim forward
before the bottom.
Lift the glass clear and place it where it will not
be damaged.
To replace the glass assembly, follow the
above steps in the reverse order, taking care to
clean the inside surface of the glass assembly
beforehand, and making sure that the glass
sealing strips are correctly positioned when
fitting the glass.
2.3
FITTING THE LOUVRE ASSEMBLIES AND DRESS GUARDS
2.3.1.1
LOUVRE ASSEMBLIES (NAPLES)
1.
2.
With the exception of the bottom left louvre assemblies, the louvre assemblies simply hook over their
retaining posts.
Press downward gently to engage the posts.
16
3.
4.
5.
6.
7.
8.
Confirm correct engagement by pulling forward on the louvre assembly.
The bottom left louvre assemblies are hinged for easy access to the controls. To attach (or detach) the
bottom left louvre, hold it in a position 60° from fully closed.
When attaching, tilt the louvre away from the heater at the top so that the bottom eye of the hinge can be
hooked over the bottom hinge pin.
Keeping the bottom eye engaged on the pin, lift the louvre until its top hinge eye can be swung onto the
top hinge pin.
Lower the louvre into position and swing it shut.
Follow this procedure in reverse to detach the louvre.
FITTING THE LOUVRE - VIEWED FROM INSIDE THE FIREBOX
2.3.1.2
1.
2.
3.
4.
2.3.2
1.
LOUVRE ASSEMBLIES (SEVILLE)
With the exception of the bottom left louvre assemblies on New Zealand Sevilles, the louvre assemblies
simply hook over their retaining posts.
Press downward gently to engage the posts.
Confirm correct engagement by pulling forward on the louvre assembly.
The bottom left louvres on N.Z. Sevilles are hinged similarly to the ones on Naples models. Follow the
instructions in 2.3.1.1 for attaching and removing these louvre assemblies.
DRESS GUARDS (IF REQUIRED)
Naples:
The guard is retained simply by clipping its retaining lugs between the glass and the steel frame at each
side of the side glasses.
Seville:
1.
2.
3.
4.
2.4
The louvre assemblies must be removed for fitting and removing the dress guard.
Angling the guard forward at the top, fit the two lugs at the top of the guard over the lugs at each end of
the top glass trim.
Swing the lower edge of the guard inwards to engage the bottom lugs under the firebox base..
Replace the louvre assemblies.
REMOVING AND REPLACING THE BURNERS
NOTE: When fitting or replacing the burners, take care to avoid levering the injector jets up or down
as this may cause mis-alignment of the gas jets in their venturi tubes, resulting in insufficient
primary air intake.
1.
Remove the glass or glass assembly. See 2.1 or 2.2.
2.
Remove the embers and keep them in a suitable container such as a plastic bag.
3.
Carefully remove the logs.
4.
Remove the log supports (one at each end of the front burner).
5.
Remove the two screws retaining each burner, and lift the burners clear while moving them to the left to
disengage then from their injector jets.
6.
Follow the above steps in reverse to replace the burners. When re-installing the embers, ensure that they
do not cover the small gas outlet holes in the burner.
2.5
REMOVING AND REPLACING THE PILOT ASSEMBLY
1.
2.
3.
2.6
Remove the burners following steps 1 – 5 in 2.4.
To provide easier access, remove the heat shield above the valve by extracting the screws holding it to
the firebox base.
Follow steps 2 – 5 in 1.8.
ACCESSING THE MAIN INJECTORS
1.
Remove the burners. See 2.4.
17
2.
3.
2.7
The injectors can now be unscrewed from the manifold. WARNING. On some models the jet sizes in the
front and back injectors are different. Take care not to mix them up.
Note. When replacing an injector, it is should not be over-tightened, and a small amount of teflon thread
sealant (not tape) should be applied to the thread to prevent gas leakage.
ACCESSING THE CONTROL VALVE (NAPLES & SEVILLE)
1.
2.
3.
4.
5.
6.
7.
8.
2.8
Remove the glass or glass assembly. See 2.1 or 2.2.
Turn off the gas and un-plug the lead from the mains power supply.
Disconnect the gas supply pipe at the inlet to the control valve.
Remove the embers, logs and log supports. See 2.4, steps 2 – 4.
Remove the heat shield above the valve by extracting the screws holding it to the firebox base.
Extract the four screws holding the burner tray to the firebox base.
Lift the burner tray clear. The control valve, pilot assembly and manifold lift clear as a complete assembly
and these parts can be removed and serviced as required.
Reassemble in the reverse order, taking care to check for gas leaks.
REMOVING AND REPLACING THE FASCIA
1.
2.
3.
4.
2.9
Un-plug the lead from the mains supply.
Extract the six screws, two each side and two at the top, which hold the fascia to the firebox cabinet.
Taking care not to strain the wiring looms, ease the fascia away from the firebox. The looms can be
disconnected at the switches, if necessary, by carefully prising the connectors from the spade terminals.
Before re-fitting the fascia, make sure the looms are connected to the switches correctly. The three wire
loom connects to the fan speed switch, red wire to the top terminal, brown wire to the centre terminal
and orange wire to the bottom terminal. The two wire loom connects to the two terminals on the burner
ON-OFF switch. No colour coding is necessary.
ACCESSING THE FAN
1.
2.
3.
4.
5.
6.
Un-plug the lead from the mains supply.
Remove the glass. See 2.1 and 2.2.
Remove the embers and the logs.
Remove the screws holding the rear access panel to the inside of the back of the firebox. Later models
have keyholes for the screws, so they do not need to be removed completely.
Remove the fan heat shield just in front of the fan. On later models, the fan heatshield is an integral part
of the access panel, and it comes clear as the panel is removed by lifting upwardly.
Remove the fan deflector (above the fan) by extracting two screws at each end and lifting it free. See
diagram.
18
7.
8.
9.
Release the fan by removing one screw at each end of the fan mounting plate. On later models the fan
mounting screw holes are keyhole slotted, so the fan can be lifted up without slackening the screws.
Lift the fan up until the bottom edge of its mounting plate comes clear of the locating slot at the rear of
the base of the firebox, disconnect the wiring loom at the plug near the fan, and lift it free.
Assembly is a reversal of the extraction procedure. Take care to engage the bottom edge of the fan
mounting plate in its locating slot.
2.10 ACCESSING THE THERMODISC (Aust. Naples & Seville only)
1.
Follow steps 1 to 5 in 2.9 above. The thermodisc will be seen mounted inside the cavity behind the
firebox on the left hand side. It can be removed by releasing its mounting plate screws just inside the
firebox. The function of the thermodisc is to automatically start the fan after the heater has reached a
sufficiently high temperature, and to stop the fan when the heater has cooled after being shut down.
2.11 RETRO-FITTING A THERMODISC SWITCH (SEVILLE & NAPLES)
1.
2.
3.
4.
5.
6.
7.
8.
9.
10.
Ensure that the electrical power supply is disconnected.
Remove the glass, the logs and the fan access panel. (See 2.9. Do not remove the fan.)
Connect the thermodisc loom to the two terminals at the back of the thermodisc.
Remove the two fasteners on the left sidewall of the firebox (near the fan access opening).
Attach the thermodisc bracket using these two holes, ensuring that the bracket is on the outside of the
firebox and that the thermodisc protrudes rearwards.
Feed the thermodisc loom beside the burner tray toward the front of the unit.
Remove the bottom louvre to gain access to the existing loom junction at the front left hand end of the
unit.
Disconnect the existing brown supply terminals and connect them to each of the terminals at the end of
the thermodisc loom.
Replace the fan access panel, the logs, the glass and the bottom louvre.
Restore the mains supply and test, remembering that the fan will start about eight to ten minutes after
establishing a high fire.
19
3.
SERVICE ADJUSTMENTS
3.1
GAS PRESSURE ADJUSTMENT
All pressure adjustments (except the low pressure on the RMT model) must be made while
the heater is operating on the ‘HIGH’ setting.
1.
BALTIMORE STD NG. This has a pressure regulator separate from its control valve. The regulator
must be set to 1.0 kPa. The pressure test point is on the side of the regulator and the adjusting screw is
on the top. Slacken the lock-nut and rotate the screw by hand, screwing down to increase the pressure.
Tighten the lock nut after adjusting. This should result in a valve outlet pressure of 0.72 kPa.
2.
BALTIMORE STD LP. This model has no internal pressure regulator as it runs directly on the 2.71
kPa pressure delivered by the gas bottle regulator.
BALTIMORE & MONACO ACC NG and ACC LP. These have a pressure regulator inside the
control valve. There are two test points side by side on top of the control valve – the outlet pressure test
point is the one closer to the flame size control knob. If adjustment is necessary, uncouple the control
rod from the top of the flame size control knob, extract the screw from down the centre of this knob and
pull the knob off vertically. The pressure is then set by rotating the knurled plastic wheel exposed by
removing the knob. Once the pressure is correct (0.95 kPa for NG or 2.5 kPa for LP), care must be
taken not to turn the plastic wheel as the knob is re-fitted in its maximum anti-clockwise position. This
position is set when the skirt of the knob is contacting the adjacent metal up-stand. After fitting the knob,
rotate it clockwise and then fully anti-clockwise while observing the pressures to verify that they are
correct before replacing the retaining screw and re-coupling the control rod.
BALTIMORE RMT NG and RMT LP. These also have a pressure regulator inside the control valve.
The outlet pressure test point is on the top of the control valve and is furthest from the gas inlet
connection. There are two pressure settings to adjust, high and low. Access to the adjusters is gained by
removing the protective transparent cap at the very top of the control valve. This will expose the central
screw (low pressure adjuster) and a 10mm hexagonal nut surrounding it (high pressure adjuster).
Set the high pressure first. With the heater running on ‘HIGH’, make the adjustment by rotating the
10mm nut, screwing down to increase the pressure. Correct pressures are 1.0 kPa for NG and 2.71 kPa
for LP. To set the low pressure, move the switch on the receiver control box to ‘ON’ so that the flame is
burning on ‘LOW’. Set the low pressure by rotating the red Phillips head screw downwards to increase
the pressure, taking care not to disturb the setting of the outer 10mm nut. The correct low pressures are
0.3 kPa for NG and 1.0 kPa for LP.
Replace the protective cap on top of the adjusters and set the three-position switch to ‘REMOTE’.
BALTIMORE & MONACO ECS NG and ECS LP. Again, these have a pressure regulator in the
control valve. The outlet pressure test point is on the top of the control valve and is the one remote from
the gas inlet connection. There are two pressure settings to adjust, high and low. Access to the adjusters
is gained by first removing the heat shield above the valve and then removing the protective transparent
cap at the very top of the control valve modulating coil. This will expose the central screw (low pressure
adjuster) and a 10mm hexagonal nut surrounding it (high pressure adjuster). Note that the modulating
coil may be rotated through 90° if necessary to provide easier access for pressure adjustments. Before
adjusting the high pressure, the fire must be alight and burning at the ‘HIGH’ setting. (Hold down the +
end of the top rocker switch on the handpiece for 30 seconds to ensure this).
Set the high pressure first. NG high pressure should be 0.95 kPa and LP high pressure should be 2.3 kPa.
Adjust, if necessary, by rotating the 10mm nut, screwing down to increase the pressure and up to
decrease it.
Before setting the low pressure, remove one of the blue wires connected to the top of the modulating
coil. There is no need to alter the handpiece control setting. Adjust the low pressure by rotating the
central Phillips head screw, taking care not to shift the position of the already adjusted 10mm hex. nut.
Screw down to increase the pressure. The correct low pressures are 1.0 kPa for LP and 0.30 kPa for
NG.
Replace the protective cap on top of the adjusters, re-fit the blue wire to the modulating coil, rotate the
assembly above the coil to its original position and re-fit the heat shield above the valve.
3.
4.
5.
20
6.
NAPLES and SEVILLE models (NG & LP). The manifold pressure is controlled by a replaceable
regulator built into the control valve. The regulator must be changed when converting from one gas to
the other. There are two pressure test points on the face of the regulator. The inlet pressure is measured
at the lower test point and the outlet pressure at the upper one. The pressure is altered by rotating the
knob on front of the regulator. If the pressure on maximum output is incorrect, (it should be 0.80 kPa for
NG and 2.58 kPa for LPG) remove the screw in the centre of the knob, pull the knob off, rotate the shaft
to the correct position and refit the knob making sure it is against its travel limit stop while the shaft is
still in the position giving the required pressure. Re-fit the knob screw and check that the outlet pressure
is still correct at the HI position.
3.2 CHECKING THE FLUE DRAUGHT
BALTIMORE & MONACO.
After the fire has been alight on ‘‘HIGH’ for five minutes, hold a smoking taper or match at the exit of
the draught hood (behind the heater) to verify that the flue is drawing correctly and that flue gases are
not spilling into the room.
NAPLES & SEVILLE (Aust. only).
1.
2.
Remove the top louvre assembly as detailed in 2.2.1
The draught is verified by holding a lighted match just inside the open end of the spill tube when the
heater has been running for at least five minutes. The tube, approximately 12mm diameter, will be found
in the top right hand corner of the firebox outer cabinet. If the match flame is not drawn into the tube but
is blown back out, the flue system is not drawing correctly and it should be corrected immediately. Do
not operate the heater with inadequate draught as dangerous combustion products could be discharged
into the room.
21
4
CONVERSION
4.1
CONVERTING BALTIMORE STD FROM LPG TO NG
1.
2.
3.
7.
Remove the burners. See 1.7, and discard them.
Dis-assemble the pilot assembly and fit the new pilot jet (See 1.9).See Table 2 for size.
Remove both the single-hole main jets (injectors) from the manifold at the right end of the burner tray,
and fit the new seven-hole jets in their place. Note that the new jets are different sizes. The 7@ 0.85 mm
jet is for the front burner (nearest you) while the 7@ 0.90 mm jet is for the back burner.
Note. When replacing an injector, it should not be over-tightened, and a small amount of teflon thread
sealant (not tape) should be applied to the thread to prevent gas leakage.
Fit the new front and rear burners and re-install the embers, logs, glass etc. as previously detailed. See
1.2.
Remove the side and rear access panels to expose the control valve. See 1.6.
Disconnect the gas supply pipe from the inlet to the regulator, and in its place fit the control valve to
regulator connecting pipe as shown.
Fit the regulator to the other end of the pipe as shown.
8.
9.
10.
11.
Connect the NG gas supply to the regulator inlet and check all new joints for gas leaks.
Adjust the regulator until the test point pressure is 1.0 kPa when the fire is operating at ‘HIGH’.
Replace the side and rear access panels.
Carry out a full test firing procedure as described in the installing and operating manual.
4.
5.
6.
22
4.2
CONVERTING NAPLES OR SEVILLE FROM LPG TO NG
1. Remove the burners, see 2.4, but do not discard them.
2. Dis-assemble the pilot assembly and fit the new pilot jet. See Table 2 for jet size.
NOTE: Always smear ROCOL MOLYCOTE J166 on the pilot tube retaining nut threads when re-fitting the
pilot tube.
3.
4.
5.
6.
7.
Remove both the single-hole main jets (injectors) from the manifold at the right end of the burner tray,
and fit the new seven-hole jets in their place. Note that the new jets for these models are not different
sizes for the front and back burners. The 7@ 0.85 mm jets are for both burners.
Note. When replacing an injector, it should not be over-tightened, and a small amount of teflon thread
sealant (not tape) should be applied to the thread to prevent gas leakage.
With the lower left louvre open, carefully remove the two screws that hold the regulator in the control
valve and fit the replacement regulator.
Refit the burners and re-install the embers, logs, glass etc. as previously detailed. See 2.3.
With the fire running at ‘HIGH’, check the outlet pressure from the control valve and adjust, if
necessary, to 0.80 kPa. See 3.1, paragraph 4.
Carry out a full test firing procedure as described in the installing and operating manual.
23
5
REMOTE CONTROL INSTALLATION
5.1
BALTIMORE & MONACO (ACC models only)
1.
2.
3.
4.
5.
6.
NOTE: The receiver should be mounted in the position that gives it best ‘line of sight’ to the hand-held
remote control. Options are at either side of the pedestal (at each rear corner) or on the wall alongside
the heater.
Fit four alkaline batteries (1.5 volt, AA - not supplied) into the receiver and mount it in the receiver box,
using the nuts and screws provided.
To mount the receiver alongside the pedestal, remove the two screws retaining the rear pedestal panel at
the side selected, offer the receiver box up to the retaining screw holes, and re-fit the screws.
Alternatively, mount the receiver box on the wall near the heater (but not above it).
Remove the control valve access panel and remove the jumper wire from the control valve, noting the
terminals to which it was attached.
Feed the receiver box loom through the back valve access panel and connect the red and white wires to
the terminals originally joined by the jumper wire. The red and white connections are interchangeable.
Ignore the other wires.
Replace the access panel.
Install two alkaline batteries (1.5 volt, AAA - not supplied) in the remote control and test run, using the
instructions supplied with the remote control.
WIRING DIAGRAM
24
5.2
NAPLES AND SEVILLE
1.
2.
3.
6.
7.
8.
Open the left lower louvre assembly to gain access to the control valve.
The two terminals on the front face of the valve are normally wired to the on/off switch on the side of
the fascia column. In order to retain the function of the on/off switch, the receiver should be wired in
series with this circuit. Alternatively, the receiver can be wired directly to the terminals, but in this case
stopping and starting the fire will be controlled entirely by the remote control. It will then not be possible
to start and stop the fire by the fascia switch.
As in the case of the Baltimore, only the red and white wires from the receiver box are used. Ignore the
others.
Fit 4 alkaline batteries (1.5 volt, size AA — not supplied) into the receiver unit.
The receiver unit, in its box, is mounted on the wall alongside the fascia. Mount the box where it will
give best ‘coverage’ of the room, with the receiver window (and control switch) facing into the room.
Do NOT mount the receiver behind the louvres (inside the firebox case) as the heat there will destroy it.
Install 2 alkaline batteries (1.5 volt, size AAA — not supplied) in the remote control and test run the
installation, following the instructions supplied with the remote control.
WIRING DIAGRAM
5.3
5.3.1
1.
2.
5.3.2
1.
2.
3.
THERMOSTATIC CONTROLS
WALL-MOUNTED PROGRAMMABLE THERMOSTAT (ACC Models)
First ensure that good batteries (3 x AA alkaline) are fitted in the wall thermostat, that the slide switch
behind the hinged bottom cover is set to ‘HEAT’, that the temperature setting on the thermostat is above
the prevailing room temperature, and that the pilot is alight. Full details of the wall-mounted thermostat
and programming instructions are supplied with it.
Turn the control on the heater fully anticlockwise to the ‘ON’ position and the fire will light at full heat.
There may be a strong smell the first time the logs are fired but this will soon disappear.
THE IRRC 300 PORTABLE REMOTE THERMOSTAT (ACC Models)
First check that good batteries are fitted in the remote control. To fit batteries (two AAA alkaline), slide
the cover below the display in the direction of the arrow and pull it further in the same direction firmly
until it disengages. Ensure that the receiver has a valid 230 volt AC supply, and make sure the pilot is
alight.
Move the switch on the receiver control box (at the rear of the pedestal) to ‘REMOTE’. (See
RECEIVER SWITCH POSITIONS).
Check the display on the remote control. If it reads ‘OFF’, aim the remote control toward the receiver
and press the centre button on the remote to switch it to ‘ON’.
25
4.
5.
6.
7.
5.3.3
5.3.4
5.3.5
5.3.6
When the display shows ‘ON’, the SET TEMP will be displayed below the ROOM TEMP. For the
burner to light, the SET TEMP must be higher than the ROOM TEMP. Raise the SET TEMP, if
necessary, by pressing the right hand button.
Turn the PILOT control fully anticlockwise to the ‘ON’ position and the fire will light at full heat. There
may be a strong smell the first time the logs are fired but this will soon disappear.
After ten minutes, set the HI-LO control to give the desired heat output.
At this stage you may turn on the fan by rotating the fan switch in either direction. The switch gives
three speeds and has an ‘OFF’ position. NOTE. The fan is also controlled by an internal switch which
will not permit it to start until the fire is hot (about ten minutes from cold on high fire) and will keep it
running for some time after the fire goes out.
PROGRAMMING THE IRRC 300 REMOTE CONTROL
The control can be programmed to operate the heater at a desired later time. The controls for this are
under the sliding cover below the display. Programming instructions are in the instruction sheet supplied
with the remote control.
THE IRRC 400 PORTABLE REMOTE THERMOSTAT (RMT Models)
This is supplied with RMT models and it has two modes – MANUAL and AUTOMATIC. First check
that good batteries are fitted in the remote control. To fit batteries (two AAA alkaline), slide the cover
below the display in the direction of the arrow and pull it further in the same direction firmly until it
disengages. Ensure that the receiver has a valid 230 volt AC supply. You can switch between these
modes by pressing the small AUTO/MANU button after first pressing the large centre OFF/ON (OI)
button to turn the control on. The control is ‘ON’ when the ‘flame’ symbol shows on the display. The
display also shows a number of horizontal bars indicating the flame height. The more bars, the higher the
flame. When set on ‘AUTO’, the fire may light on a low flame setting, and since it transmits to the
receiver only about every three minutes, it may take up to twenty minutes to reach a high flame setting
automatically. If this is too slow and immediate heat is required, switch to ‘MANUAL’, select a high
flame by pressing the right button repeatedly until all the horizontal bars are displayed and then return to
the ‘AUTO’ setting.
MANUAL MODE OPERATION
In this mode the central OI button successively lights and extinguishes the burner. While the remote is
‘ON’, the left t button decreases the flame size, while the right s button increases it. The room
temperature is displayed at the left.
AUTO MODE OPERATION
In this mode the central OI button switches the fire on (provided that the SET temperature, the desired
room temperature, is greater than the displayed ROOM temperature) and off (when the ROOM
temperature is greater than the SET temperature). The left t button lowers the SET temperature, while
the right s button increases it. The SET temperature is displayed below the ROOM temperature. Note
that the flame size automatically reduces below the maximum as the room temperature nears the set
temperature, finally shutting down altogether. If the remote is ‘ON’ in the ‘AUTO’ mode, and it is
POINTING TOWARD THE HEATER, it will regulate the flame size to maintain the desired room
temperature.
About ten minutes after lighting the fire, you may turn on the fan by rotating the fan switch in either
direction. The fan has three speeds and ‘OFF’, and it is also controlled by an internal switch which will
not permit it to start until the fire is hot (about ten minutes after lighting). The fan will keep running for
some time after the fire goes out.
PROGRAMMING THE IRRC 400 REMOTE CONTROL
The control can be programmed to operate the heater at a desired later time. The controls for this are
under the sliding cover below the display. Programming instructions are in the instruction sheet supplied
with the remote control.
THE WALL-MOUNTED PROGRAMMABLE THERMOSTAT (ECS MODELS)
ECS models have a remote control handpiece and thermostat connecting terminals on the rear of the
heater. If the wall thermostat is not fitted, a small wire bridging loop must be fitted across these terminals
or the heater will not light. If the battery operated wall thermostat is fitted, it must be switched to
‘HEAT’ (under the bottom hinged cover) and the SET temperature must be above the prevailing ROOM
temperature before the heater will light. The SET temperature can be altered by pressing the + and –
buttons alongside the display. If there is no display, check the thermostat batteries (3 x AA alkaline).
To avoid the risk of backburning, do not attempt to re-light the fire less than three minutes after it has
been extinguished.
26
1.
2.
3.
4.
5.
6.
7.
5.4
Check that the power switch at the wall is ‘ON’ and press the top round handpiece button while aiming
the handpiece toward the receiver on the right front corner of the pedestal foot. The red indicator light
on the handpiece should light and the red indicator light alongside the receiver (on the pedestal foot)
should light in response and remain alight after the handpiece button is released. If the handpiece
indicator does not light up, check the handpiece batteries (4xAAA cells). If the receiver indicator does
not light, press the small button alongside the receiver (on the pedestal foot). If the receiver indicator still
does not light, press the red ‘RESET’ button on the back of the heater and try again.
As soon as the receiver indicator lights, a thirty second ignition sequence begins. After about three
seconds from the start, there will be a continuous spark at the pilot electrode which will light the pilot.
When starting for the first time, there will probably be air in the pilot line supply pipe, so ignition may
not occur immediately. If it has not lit within about thirty seconds, the spark will cease. In this event,
press the red RESET button on the back of the heater and try lighting again. If you need to press the
reset again, wait at least ten seconds before doing this. If there is a lot of air in the pipeline, it may be
necessary to repeat this reset procedure several times.
When the pilot lights, the ECS system shuts down the ignition spark and then turns on the gas supply to
the main burner. This will ignite shortly after.
Once the main burner is alight, the size of the flame can be adjusted using the top rocker switch on the
handpiece. Pressing + increases the flame. Note that the response to flame adjustment may take about
twenty seconds, so the rocker switch should be held down until the flame reaches the desired height.
While the heater is being switched on and off by the wall thermostat (if fitted), the red indicator light
beside the receiver will remain alight, showing that the heater is ready to light again when the room
temperature falls. The flame will light at its last height setting. The pilot light extinguishes each time the
flame extinguishes.
If the mains supply to the heater is switched off, the fire will light next time at the LOW flame setting,
but if the mains supply is uninterrupted, the flame will light again at its last setting.
The lower rocker switch on the handpiece controls the fan, switching it to ‘OFF’, ‘LOW’, ‘MEDIUM’
and ‘HIGH’ sequentially. NOTE. The fan is also controlled by an internal switch which will not permit it
to start until the fire is hot (about ten minutes from cold on high fire) and will keep it running after the
fire goes out. The handpiece will not start the fan during the warm-up period, but it can pre-select the
speed at which the fan will start once the firebox is hot.
RECEIVER SWITCH POSITIONS (ACC and RMT models)
1.
2.
3.
4.
The receiver switch has three positions, ‘OFF’, ‘ON’ and ‘REMOTE’.
‘OFF’ prevents the main burner from being lit. This is a useful safety feature if children might play with
the remote control.
‘ON’ bypasses the remote control entirely, allowing the heater to be lit even though the batteries in the
receiver or remote control are dead, or, in the case of the RMT model, if the mains power supply has
failed. In this setting the thermostat is inactive and the heat output is fixed on LOW for the RMT models.
It may be controlled manually on all other models.
‘REMOTE’ brings the remote control into full operation, allowing its in-built thermostat to match heat
output to the heating needs of the area the remote control is in, provided that the remote control is left
pointing toward the heater. For automatic heat control with RMT models, the remote control must be
ON in the AUTO mode. The remote control can be set to automatically run the heater within any desired
time period. See the separate remote control operating instructions for full details.
27
6.
ECS INFORMATION
6.1
BASIC DESCRIPTION
The main components are:The HANDPIECE. This is a battery powered infra-red hand held remote controller which —
a. Lights and extinguishes the fire by using the top button,
b. Raises and lowers the flame height using the top rocker switch,
c. Switches the fan to any of its three speeds or OFF, using the lower rocker switch,
d. Switches the fire off after a 30 minute delay by pressing the bottom button.
The handpiece has a small red indicator which lights whenever a command is being transmitted to the
receiver.
The RECEIVER. This is mounted on the front corner of the pedestal surround, just above floor level. The
receiver has a red INDICATOR LIGHT alongside the receiver bulb, and also a PRESS BUTTON which will
light and extinguish the fire independently of the handpiece. This is useful in the case of flat handpiece
batteries.
The CIRCUIT BOARD for the control system is mounted in the control box and is connected to the receiver
by an un-pluggable receiver cable.
The CONTROL BOX is inside the rear panel of the pedestal. As well as the circuit board, it houses the
transformer (which supplies 24 v AC for the circuit board), the RELAY and the FUSE (1 A[F] – 20x5 dia.)
for the igniter module (not user serviceable).
The THERMOSTAT TERMINALS are mounted on the back face of the pedestal rear panel. These are
bridged by the THERMOSTAT LOOP unless the optional WALL THERMOSTAT is fitted, in which case it
is connected across the thermostat terminals in place of the thermostat loop.
The FAN LOOM connects between the control box and the fan motor. It has a plug and socket to allow
removal of the fan for cleaning.
The THERMODISC is wired into the ignitor loom and is part of the fan circuit. The thermodisc is mounted
near the rear of the firebox and it prevents the fan from starting until the firebox is up to a reasonable
temperature (about 8 minutes after lighting).
The IGNITION LOOM, which plugs into the top of the control box carries the thermodisc signal and the
mains signal up to the IGNITER MODULE. It also carries a low voltage modulating signal up to the
MODULATING COIL to raise and lower the flame height. The igniter module and modulating coil are both
mounted on the GAS VALVE.
The IGNITER MODULE, once energised, produces a continuous high tension spark for the PILOT until it
lights. The igniter module has an input from the FLAME SENSOR electrode which is active while the pilot is
alight. The module features an automatic spark shut-down after 30 seconds if the pilot does not light within
that time. The igniter module will not repeat its ignition attempt until the RESET BUTTON (on the rear
panel of the heater) has first been pressed.
THE OPERATING SEQUENCE.
Assuming that there is a gas supply to the valve and that the mains plug is switched ON, the operating
sequence is as follows:• The handpiece is aimed generally toward the receiver, and the top button is pushed once. If the indicator
light on the handpiece does not flash, check the handpiece batteries (4xAAA cells). Alternatively, the press
button by the receiver is pushed once.
• The red light beside the receiver will light and stay alight while the heater is in its ‘ready-to-start’ mode.
• If there is no red light, check that the mains power supply is satisfactory.
• If the thermostat loop is in place across the thermostat terminals, a 24 V signal will go to the relay which
closes and sends a mains signal to the igniter module to initiate the ignition sequence.
• If the wall thermostat is fitted in place of the loop and (a) Its slide switch (under the hinged bottom cover of
the thermostat) is set to HEAT rather than OFF, and (b) It has not been programmed, at that particular time,
for a temperature which is below the existing room temperature, the fire will light. If the room temperature is
above the programmed set temperature, the fire will not light, but when the room temperature falls below the
set temperature the fire will then light automatically. If you want to alter the set temperature temporarily,
press the buttons marked with red and blue arrows (alongside the display on the front of the thermostat) to
shift the temperature set point up or down as desired.
28
This will not alter the programmed settings which will be effective from the beginning of the next period. If
the thermostat display shows BATTERY, replace its three AA alkaline cells with fresh ones. See the
thermostat instruction sheet for programming details and a full description of its capabilities.
FIRE LIGHTING
• About 3 seconds after the ignition module is activated, there will be a continuous spark at the pilot light
electrodes.
• If there is no spark, press the top button on the hand piece to extinguish the red light beside the receiver,
press the reset button ON THE REAR OF THE HEATER and then press the top handpiece button again.
• If the spark stops before the pilot ignites, press the reset button on the rear of the heater and try again.
Sometimes, with a new installation, it will take several attempts to give sufficient time to bleed air out of the
pilot pipeline.
• As soon as the pilot lights, the flame sensor will signal the high tension spark to stop.
• The gas valve will receive a signal to supply gas to the burners and they will light.
• The flame height can be controlled by the top rocker switch on the handpiece. Note that flame size change
is deliberately slow and it will be necessary to hold the rocker switch down for about 10 seconds to go
through the full flame adjustment.
FAN CONTROL
• While the fan speed can be pre-selected at this time, using the lower rocker switch, the fan will not start
until the firebox has reached a reasonable working temperature. The fan will start automatically once this has
been attained. (Usually about 8 minutes, depending on the flame height).
SHUT-DOWN
• Pressing the top button on the handpiece (or the press button beside the receiver) once will extinguish the
fire. The fan will stop when the firebox has cooled down.
DELAYED SHUT-DOWN
• If, while the fire is burning, the delayed shut-down button (the bottom one on the hand-piece) is pressed
once, the fire will continue to burn for approximately 30 minutes and then shut down. When delayed shutdown has been activated, the receiver indicator light will flash on and off. Pressing the delayed shut-down
button again will cancel the delayed shut-down and return the system to normal operating condition (the
receiver indicator light will be lit continuously).
PROGRAMMING THE WALL THERMOSTAT
• The thermostat can be programmed to distinguish between weekdays and weekends. Each 24 hour period
can be split up into four periods (in 15 minute steps), each period having its own SET temperature. If the
heater is not required to operate during one or more of these periods, a very low set temperature is
programmed. Hence there are eight periods, four for weekdays and four for weekends, each period, if
desired, can have a different SET temperature. (The SET temperature is the desired room temperature). As
noted above, at any time the programmed set point can be over-ridden without upsetting the programme
which takes control again at the beginning of the next period.
6.2
ELECTRICAL FUNCTION
WARNING: When removing the control box from the heater, extract only the two black hex-headed
screws at each end of the pedestal rear panel. The four plated pan-head screws fix the lid (the pedestal
rear panel) to the control box. These must be extracted only by persons qualified to service mains
voltage electrical appliances. Checking of the electrical components within the control box is to be
carried out only by suitably qualified personnel.
The normal operating sequence of the components in the control box is described so that any
deviations from normal can be used to diagnose possible faults.
A correctly operating control box will have the mains voltage at terminals A and B, and a 24v ac
supply at terminals J1 and J2. There should also be 24 v across J1 and J9. A voltage dependent resistor
(VDR) is fitted across the mains terminals C and D to absorb mains voltage power spikes.
29
If the circuit board is functioning correctly and a valid ‘start fire’ signal has been sent from the receiver,
a relay on the pc board will connect J9 to J8. If the thermostat is currently calling for heat, or if the jumper
wire is across the thermostat connecting terminals, J8 will then be connected to R2 (on the main relay), and
since R1 is permanently connected to J1, there will be a 24v ac supply to the coil of the main relay.
This will close R4 and R5, sending a mains signal from R5 to F1, the input terminal of the 1amp
ignition module fuse. The outlets from the fuse, F2 and F3 (which are common), are fed via the ignition loom
to the ignition module mounted on the gas valve. This mains signal will initiate the ignition sequence,
producing the spark some three seconds later. Once the pilot lights, the flame sensor will quench the spark
and the gas valve will open to supply the main burners.
In the event that the pilot does not ignite, the spark ceases after about thirty seconds as a safety
measure. Before another start can be attempted, the circuit must be ‘reset’ by pressing the switch on the rear
of the heater. In the event that pressing the reset switch seems ineffective, turn off the mains supply for ten
seconds and start the lighting sequence again.
Inside the control box, the circuit board supplies a variable dc voltage to terminals J10 and J11,
ranging from about 3 to 11.5 volts. This variation adjusts (modulates) the gas supply in response to signals
from the handpiece.
Further, the circuit board in the control box has three more relays which switch the mains signal from
J4 (if energised) to one of J7, J8 or J9 or to none of them. J7, J8 and J9 respectively feed the low, medium
and high speed windings of the fan motor through the fan loom. The J4 terminal is energised from C only
when a thermodisc switch, mounted by the rear of the firebox, senses that the firebox has reached a useful
working temperature. The fan will not start until this is the case.
As long as the 24 volt supply is maintained to the circuit board it will hold the settings of flame
modulation voltage and fan speed, even though the thermostat shuts the flame down meanwhile. The fan will
continue running at the selected speed after flame shut-down until the firebox has cooled somewhat.
However, if the mains supply is interrupted, the flame will re-start at the low fire setting and the fan speed
will need to be reselected also. The fire cannot be run without an active mains supply.
The control box is connected to the ignition loom through a 9-way connector plug, and the fan loom
also has a connector plug, so the entire control box can be readily extracted from the heater. For the safety of
persons un-qualified to deal with electrical circuits, it is possible to do this without opening the cover of the
control box. The heat shield surrounding the rear of the control box must always be in place when the heater
is used. It is not necessary to remove the heat shield from the box at any time.
The ignition loom (which includes the feed and return wires to the thermodisc switch) also carries the
modulating coil feed wires. The remaining wires of the ignition loom, the ones actually powering the ignition
module, terminate in a strip connector plug which can be accessed (if absolutely necessary) by removing the
top lid of the ignition module. Great care must be taken in withdrawing this plug.
If required, the ignition module can be lifted clear (vertically) from the valve for valve servicing. It is
not necessary to withdraw the strip connector plug to release the gas valve from the ignition module.
APPROXIMATE RESISTANCES ( )
Modulating Coil
80
Relay Coil
250
Transformer Primary
115
Transformer Secondary
1.5
30
WIRING DIAGRAMS
Fan Wiring Diagram
NAPLES AND SEVILLE
NOTE: If the supply cord is damaged it must be replaced by the manufacturer or its service
agent or a similarly qualified person in order to avoid a hazard.
Fan Wiring Diagram - STD. ACC. RMT.
BALTIMORE AND MONACO
NOTE: If the supply cord is damaged it must be replaced by the manufacturer or its service
agent or a similarly qualified person in order to avoid a hazard.
31
NOTE: If the supply cord is damaged it must be replaced by the manufacturer or its
service agent or a similarly qualified person in order to avoid a hazard.
32
DRAWING 1
PILOT ASSEMBLIES
ALSO MONACO ACC
ALSO MONACO ECS
33
DRAWING 2
PLACEMENT OF EMBERS
34
DRAWING 4
GAS VALVES
SEE 3.1.6 FOR NAPLES / SEVILLE VALVE
35
TESTING FOR PILOT GAS FLOW
LIGHT A MATCH AND ALLOW GAS TO FLOW TO PILOT
DO NOT LIGHT A MATCH IF YOU SMELL GAS
DRAWING 5
MATCH ‘BLOWS’ BUT PILOT DOES NOT LIGHT
DRAWING 6
MATCH ‘STANDS TALL’
36
DRAWING 7
LOG POSITIONING
BALTIMORE & MONACO
NAPLES &SEVILLE
37
DRAWING 8
REAR VIEW — STANDARD MODELS
38
DRAWING 9
REAR VIEW — ACC MODELS
39
DRAWING 10
REAR VIEW — RMT MODELS
40
DRAWING 11
REAR VIEW — ECS MODELS
41
Table No 1 — Gas Pressures
Model
Gas Type
High Fire
Low Fire
Baltimore STD NG
Natural Gas
1.0 kPa @ Regulator
0.72 kPa @ Valve
—
0.30 kPa @ Valve
Baltimore STD LP
Liquid Propane Gas
2.71 kPa
1.3 kPa
Baltimore & Monaco ACC NG
Natural Gas
0.95 kPa
0.5
Baltimore & Monaco ACC LP
Liquid Propane Gas
2.5 kPa
1.5
Baltimore RMT NG
Natural Gas
1.0 kPa
0.5 kPa
Baltimore RMT LP
Liquid Propane Gas
2.71 kPa
1.3 kPa
Baltimore & Monaco ECS NG
Natural Gas
0.95 kPa
0.40 kPa
Baltimore & Monaco ECS LP
Liquid Propane Gas
2.30 kPa
1.0 kPa
Naples NG / Seville NG
Natural Gas
0.80 kPa
N/A
Naples LP / Seville LP
Liquid Propane Gas
2.58 kPa
N/A
Table No 2 — Pilot Jet Sizes
Model
Gas Type
Pilot Jet Size
Baltimore STD NG
Natural Gas
0.45 mm
Baltimore STD LP
Liquid Propane Gas
0.20 mm
Baltimore & Monaco ACC NG
Natural Gas
0.51 mm
Baltimore & Monaco ACC LP
Liquid Propane Gas
0.35 mm
Baltimore RMT NG
Natural Gas
0.51 mm
Baltimore RMT LP
Liquid Propane Gas
0.35 mm
Baltimore & Monaco ECS NG
Natural Gas
0.45 mm
Baltimore & Monaco ECS LP
Liquid Propane Gas
0.20 mm
Naples NG / Seville NG
Natural Gas
0.51 mm
Naples LP / Seville LP
Liquid Propane Gas
0.35 mm
Table No 3 — Main Burner Jet Sizes
Model
Gas Type
Front Burner
Rear Burner
Baltimore STD NG
Natural Gas
7 @ 0.85 mm
7 @ 0.90 mm
Baltimore STD LP
Liquid Propane Gas
1.2 mm
1.2 mm
Baltimore & Monaco ACC NG
Natural Gas
7 @ 0.85 mm
7 @ 0.90 mm
Baltimore & Monaco ACC LP
Liquid Propane Gas
1.3 mm
1.3 mm
Baltimore RMT NG
Natural Gas
7 @ 0.80 mm
7 @ 0.85 mm
Baltimore RMT LP
Liquid Propane Gas
1.2 mm
1.2 mm
Baltimore & Monaco ECS NG
Natural Gas
7 @ 0.85 mm
7 @ 0.90 mm
Baltimore & Monaco ECS LP
Liquid Propane Gas
1.3 mm
1.3 mm
Naples NG / Seville NG
Natural Gas
7 @ 0.85 mm
7 @ 0.85 mm
Naples LP / Seville LP
Liquid Propane Gas
1.2 mm
1.2 mm
42
ABBREVIATED PARTS LIST
DESCRIPTION
Naples
Seville
Baltimore
STD
Conversion Kit, LP to NG
790133
791039
Baltimore
& Monaco
ACC
Baltimore
RMT
Baltimore
& Monaco
ECS
791325
788606
Conversion Kit, NG to LP
Thermopile, 750 mV (580mm long)
588408
588408
588408
588408
Log assembly, front
790110
790110
790110
790110
790110
Log, top
788610
788610
788610
788610
788610
Log, rear
790111
790111
790111
790111
790111
Pilot electrode
588403
588403
588403
588403
588385
Thermocouple
590014
588259
588259
591147
Piezo igniter
597004
588383
588383
Spark lead
590076
588410
588410
591276
Balt.788575
Monaco N/A
Glass, side
788575
Balt.788575
Monaco N/A
788575
Glass, front
788741
Balt.788741
Mon. 791520
788741
Balt. 788741
Mon.
791520
591218
Flame rod
Pilot assy, (new type)
791244
591245
791244
791244
591245
Pilot jet, (new type), NG
591240
591245
591240
591240
591245
Pilot jet, (new type), LP
591242
591241
591242
591242
591241
Main Burner Jet, Front, NG
588592
588592
588592
588624
588592
Main Burner Jet, Rear, NG
588592
591309
591309
588592
591309
Main Burner Jet, Front, LP
588596
588596
591219
588596
591219
Main Burner Jet, Rear, LP
588596
588596
591219
588596
591219
Masport Gas Fires are manufactured in New Zealand by
MASPORT LTD. 1–37 MT WELLINGTON HIGHWAY.
P.O. Box 14-349 Panmure, Auckland 6 New Zealand.