1
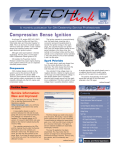
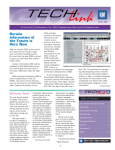
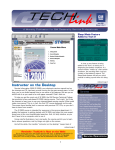
February 2002
Volume 4, No. 2
A monthly publication for GM Dealership Service Professionals
Diagnostic
Strategy
The situation happens every day. You
have a customer’s car to repair, and the
condition requires diagnosis as a first step.
If you could randomly scroll through SI
2000, you’d find that there are hundreds of
thousands of pages of information. Clearly,
you need a better strategy to find what you
want, quickly and efficiently.
Look no further. The Diagnostic Strategy
presented here is a commonized process
designed to help you navigate to the
correct diagnostic procedure quickly. The
accompanying figure illustrates the
approach. Branching out from the
Diagnostic Starting Point, there are two
diagnostic paths (Path 1 and Path 2).
Path 1
Path 2
Diagnostic
starting point
Diagnostic
system check
No
Comm
w/scan
tool?
Yes
No
Intermittent
and poor
connections
DTCs?
Yes
Symptoms
Data Link
Communications
DTC List
TIP: There’s a unique Diagnostic Starting
Point in SI 2000 for each sub-section of
each vehicle. The information you will find
DTC
Diagnostic
Table
Symptom List
Symptom
Diagnostic
Table
System
operations
Checking after
market
accessories
continued on page 3
Techline News
Rebuilt TechLink
Website Launched
Contents
Here’s some New Years
news that you’ll find
interesting and useful. The
GM TechLink website has
been redesigned and rebuilt.
It can be found at
http://service.gm.com.
The on-screen version
now looks just like the
printed version. To view the
new site, you must have the
Adobe Acrobat Reader
installed on your PC.
TIP: Click the Acrobat
symbol provided to install
the latest version of Adobe
Acrobat Reader for your specific
language. This site is best viewed at a
screen resolution of 1024 x 768.
TIP: Use the Acrobat toolbar to
navigate the magazine. The forward and
backward arrows will move you through
the various pages. Click on the
magnifying glass symbol to zoom in on
the page. And when you click on the
hand symbol, you can “grab” onto the
page and drag it in the desired direction.
Diagnostic Strategy . . . . . . . . . . . . . . . . . . . .1
TechLink Website Rebuilt . . . . . . . . . . . . . . . . .1
Class 2 Corner . . . . . . . . . . . . . . . . . . . . . . .2
Tech Tips
Installing New Design Roof Rack Rails . . . . .2
Programming IP Cluster after Replacement .4
Noise in Tilt/Telescoping Steering Column . . .4
Heated Seat Elements . . . . . . . . . . . . . . . .4
U-Van IP Cluster Replacement Parts . . . . . .4
I/P Squeak . . . . . . . . . . . . . . . . . . . . . . . .4
Hazy Paint Appearance . . . . . . . . . . . . . . .5
Driver’s Seatback Gap . . . . . . . . . . . . . . . .6
Power Window Motor Replacement . . . . . . .6
Prizm EVAP System Conditions . . . . . . . . . .6
F/R Door Check Link Noise . . . . . . . . . . . . .7
A/C Control Head Knob Replacement . . . . . .7
Oil Life System Reset Procedures – Trucks . . . .5
TAC Tips
IP Cluster Intermittent Bulb Check . . . . . . . .6
Turn Signal Flashes Fast . . . . . . . . . . . . . .6
Bulletins . . . . . . . . . . . . . . . . . . . . . . . . . . . .7
TIP: When you are viewing page 1 of
continued on page 2
1
Service Operations
Techline News
continued from page 1
the issue, if you click on a title in the
Table of Contents, you will immediately
be taken to the appropriate page.
From the left navigation bar, select:
Monthly Articles to view all the past
issues of GM TechLink for 2000 and
2001. When the menu pops up, click on
the desired month.
Techline takes you to an archive of all
the published Techline articles, which will
include information about SI 2000, Tech
2, service programming and more.
Toolbox will take you to an archive of
all the published J Tool related articles.
Nuts and Bolts takes you to an
archive of all of the published Nuts &
Bolts articles, which cover theory of
operation and basic service procedures.
Past articles include electrical wiring and
measuring voltage.
TAC Tips takes you to an archive of all
the published TAC Tips. This gives you a
quick reference of all the latest technical
information provided by the GM Technical
Assistance Center.
Bulletins takes you to an archive of
the bulletins released to dealerships in
the past several years. The list includes
the bulletin number, subject and models,
all organized by bulletin category.
TIP: Effective with the September
2001 issue, you can view TechLink in
German, Canadian French, and Spanish,
as well as English. Simply click on the
chosen language.
– Thanks to Jerry Turchanik,
Tom Kurtz and Abra Quintero
Installing New Design
Roof Rack Cross Rails
TIP: This information is particularly
important for pre-delivery technicians.
For 2001 and 2002 Chevrolet
Trackers, new, more-aerodynamic roof
rack cross rails went into production in
February, 2001. The cross rails are boxed
separately and shipped inside the
vehicle. Although the cross rails appear
identical, they are actually two different
lengths. The longer cross bar is for the
front position and the shorter cross bar is
for the rear position. If installation of the
rear, shorter cross rail is attempted into
the front wider position, by trying to
stretch it to fit, one of the attachment
arms will likely break off. There is a label
on the end of the front bar which
Every controller connected to the
Class 2 bus is required to send out a
State of Health (SOH) message every 2
seconds. This message alerts the other
computers to the presence of the
controller sending the SOH message.
This allows the computers to know if a
controller has malfunctioned, because it
may no longer be able to send its SOH
message.
For example, if the BCM needs
information from the PCM, and the PCM
Return to page 1
indicates its position, and the included
directions also point this out.
– Thanks to Donald B. Sherman
GM TechLink is a monthly magazine for
all GM retail technicians and service
consultants providing timely information
to help increase knowledge about GM
products and improve the performance
of the service department. This
magazine is a companion to the GM
Edge publication.
Publisher & Editor:
Mark Stesney
GM Service Operations
[email protected]
Technical Editor:
Jim Horner
[email protected]
1-248-816-3641
Production Manager:
Marie Meredith
Desktop Publishing:
Greg Szpaichler, MediaWurks
[email protected]
FAX number:
1-248-649-5465
Write to:
TechLink
PO Box 500
Troy, MI 48007-0500
GM TechLink on the Web:
http://service.gm.com
can no longer send its SOH message,
the BCM would know that there is a
problem with the PCM and set a U1016
– Loss of Communications from the
PCM. The BCM would also have to go
into default or fail safe mode of
operation, i.e. no-start/no-crank. Many
times the defaulted mode of operation
will be the focus of the customer
concern on the RO.
– Thanks to Mark Harris
2
General Motors service tips are intended
for use by professional technicians, not a
"do-it-yourselfer." They are written to
inform those technicians of conditions
that may occur on some vehicles, or to
provide information that could assist in
the proper service of a vehicle. Properly
trained technicians have the equipment,
tools, safety instructions and know-how
to do a job properly and safely. If a
condition is described, do not assume
that the bulletin applies to your vehicle
or that your vehicle will have that
condition. See a General Motors dealer
servicing your brand of General Motors
vehicle for information on whether your
vehicle may benefit from the information.
Inclusion in this publication is not
necessarily an endorsement of the
individual or the company.
Copyright© 2001 General Motors Corporation
All rights reserved.
Diagnostic Strategy
continued from page 1
in the Diagnostic Starting Point for the subsystem you’re working on will lead you to
the proper path, and through the logical
steps to isolate and repair the customer
concern.
Diagnostic Starting Point
Here’s how to use the Diagnostic
Strategy. Begin by ‘building’ the vehicle in
SI 2000. Then select the sub-system you’re
interested in. Next, select Diagnostic
Information and Procedures. The first
heading on the next menu is Diagnostic
Starting Point.
Because each sub-system has unique
diagnostic requirements, the information in
Diagnostic Starting Point is custom written
for each application.
In the Diagnostic Starting Point for subsystems which can communicate with a
scan tool, you will be instructed to conduct
a Diagnostic System Check. This is shown
in the illustration as Path 1.
For systems which do not communicate
with a scan tool, the Diagnostic Starting
Point will instruct you to review the
system Description and Operation. This will
do two things: it will help you determine if
the condition described by the customer is
normal operation, and if not, it will help you
determine which Symptom diagnostic
procedure to use. This is shown in the
illustration as Path 2.
Path 1 – Diagnostic System Check
The Diagnostic System Check does
more than instruct you to check for DTCs.
The Diagnostic System Check is an
essential part of diagnosing any system that
can communicate with a scan tool.
If DTCs are present, you will be directed
to specific DTC diagnostic procedures.
Although not stated, the Diagnostic System
Check is used to prioritize DTCs in the
order they must be diagnosed.
Example:
1. Communication DTCs
2. Internal Control Module DTCs
3. Battery Voltage DTCs
Most importantly, the Diagnostic System
Check identifies all related sub-systems
that can adversely affect the sub-system
associated with the customer concern.
TIP: Don’t omit the Diagnostic System
Check. Skipping it may cause you to bypass
a potential root cause for the customer
concern.
The Diagnostic System Check provides
the following information:
– Identification of the control module(s)
that interact with a system
– Ability of associated control module(s) to
communicate
– Identification of stored diagnostic trouble
codes (DTCs) and their status
The use of the Diagnostic System Check
Return to page 1
will identify the correct procedure for
diagnosing the system, and where the
procedure is located.
If DTCs are not present, you will be
directed to the sub-system Symptom list
(which is shared with Path 2).
Path 1 – Systems that have DTCs
(or depend on serial data
communication)
The following applies to service
categories that:
– Are controlled by one or more electronic
control module(s) that communicate via
the DLC (directly or indirectly).
– Have DTCs set by one or more electronic
control module(s).
– Have system operation inhibited by
another electronic module.
Begin the system diagnosis with the
Diagnostic Starting Point.
Example: If a customer brought in their
Buick LeSabre (with a manual HVAC
system) concerned that it is too hot in the
vehicle, you would begin diagnosis at the
Diagnostic Starting Point in Heating,
Ventilation and Air Conditioning. From the
Diagnostic Starting Point, you could link out
to the Description and Operation to learn
about the system operation or link out to
the Diagnostic System Check within HVAC
Systems Manual.
Once in the Diagnostic System Check,
you would communicate with the
Powertrain Control Module (PCM) to find
out if a HVAC related DTC has been set.
Even though the manual HVAC system in
the LeSabre does not have a Class 2
capable control module, the PCM, which is
Class 2 capable, could be the cause of the
customer concern. If a DTC P0530 has
been set, you would complete the P0530
diagnostic. If a DTC has not been set, you
would link out to Symptoms.
Once in Symptoms, you could link out to
the Description and Operation to learn
about the system operation or link out to
the Too Hot in Vehicle diagnostic table.
Path 2 – Systems that do not have
DTCs, (or do not depend on serial
data communication)
The following applies to all service
categories that:
– Are not controlled by any electronic
control module.
– Do not have DTCs set by any electronic
control module.
– Do not have system operation inhibited
by another control module.
Begin the system diagnosis with the
Diagnostic Starting Point.
The Diagnostic Starting Point will ask
you to review the system Description and
Operation. Reviewing the Description and
Operation information will help determine
the correct symptom diagnostic procedure
3
when a malfunction exists. Reviewing the
Description and Operation information will
also help determine if the condition
described by the customer is normal
operation.
Example: If a customer brought in their
Astro van (with a manual HVAC system)
concerned that it is too hot in the vehicle,
you would begin diagnosis at the Diagnostic
Starting Point in Heating, Ventilation and Air
Conditioning. From the Diagnostic Starting
Point, you could link out to the Description
and Operation to learn about the system
operation or link out to the Symptoms
within HVAC Systems Manual.
Once in the Symptom, you could link out
to the Description and Operation to learn
about the system operation or link out to
the Too Hot in Vehicle diagnostic table. The
Astro van has a non-Class 2 HVAC Control
Assembly and does not have any PCM
related HVAC DTCs, such as those relating
to electric cooling fans or an A/C pressure
sensor.
Summary
It is important that you begin the
diagnostic session with the Diagnostic
Starting Point in the Service Category that
corresponds to the symptom that is
exhibited. The service information is
organized by the symptom that appears
when a fault is present. Give priority to the
symptom types in the following order:
1. Warning Lamp
If a system’s warning lamp is ON, refer
to the system’s subsection for service
information.
Example: A steering system DTC
caused the ABS lamp to be illuminated. The
DTC diagnostic will reside within ABS.
2. Message
If a message appears on the Driver
Information Center, refer to the subsection
of the indicated system for service
information.
Example: The Low Coolant Level
message is displayed. Refer to Engine
Cooling for diagnosis.
3. Symptom
If there is only a symptom, refer to the
appropriate subsection for diagnosis.
Example: The mirror on the driver side
does not operate correctly. There is a DTC,
but there is not a warning lamp or a
message. Refer to the Doors subsection.
Example: The rear window defogger
does not operate correctly. Refer to the
Stationary Windows subsection.
It's important to remember DTCs are
placed into the service information based
on the symptom exhibited when the fault is
present.
– Thanks to Mark Haning and
John Bowman
Programming the IP Cluster
after Replacement
Noise in Tilt/
Telescoping
Steering
Column
Some owners of 2001-2002 Cadillac
Sevilles may comment on a rattle and/or
clunk noise being emitted from the lower
steering column area when the vehicle
travels over bumps in the road. The noise
may be caused by the lower bearing race to
steering shaft fit, or the inner to outer race
clearance within the bearing adaptor
assembly.
After replacing the instrument panel
cluster on 2000-2002 Impala and Monte
Carlo, it will be necessary to program the
instrument panel cluster using the Tech 2.
instrument panel cluster and determine
which cluster is being used. If an incorrect
cluster has been installed, the Tech 2 will
display the following screen.
The Tech 2 will program the necessary
content to permit full functionality of the
instrument panel cluster. Here’s how.
– Connect your Tech 2
– Select Diagnostics
– “Build” the vehicle
– Select Instrument Panel Cluster
– Select Special Functions
– Select IPC Setup
The Tech 2 will display:
The Tech 2 will display:
Condition 3
The Tech 2 will display:
– Select Enter.
The Tech 2 will display:
If yes is selected the procedure will start
over. If no is selected, the procedure will not
continue and will exit to the special functions
menu.
At this point, one of three conditions will
exist.
Condition 1
If the Tech 2 successfully programmed
the instrument panel cluster, the Tech 2 will
display the following screen.
Exit will return user to the special
functions menu.
Condition 2
The Tech 2 will read the replacement
Return to page 1
The part number above will provide 10
blister packs with 1/4-ounce of grease. Refer
to SI 2000 Document 684655 for steering
column service procedures.
– Thanks to Bill Denton
Heated Seat
Elements
If the Tech 2 was unable to program the
instrument panel cluster, the Tech 2 will
display the following screen.
Once the Test in Progress is being
displayed, the Tech 2 will determine the
necessary calibration for the instrument
panel cluster based on model year and
product line.
Currently, this concern may be addressed
by applying damping grease 18010909
(10953487 in Canada) to the shaft area
where the inner race contacts the shaft
and/or pack the bearing adaptor assembly.
TIP: This procedure will be included in SI
2000 back to model year 2000.
– Thanks to Mike Zambo
I/P Squeak
On 2001-02 Buick LeSabre, a customer
may comment on a squeak/rattle/itch noise
coming from the instrument panel directly in
front of the driver. The noise may seem to be
coming from around the cluster.
This condition may be caused by the tip
of the A-pillar interior molding rubbing against
the windshield. To correct this condition, first
remove the A-pillar interior molding. Next,
apply a piece of adhesive-backed felt to the
lower front tip of the molding where it would
come in contact with the windshield. Install
the molding and test drive the vehicle to
verify that the noise is gone.
– Thanks to Frank Justice
4
As cold weather is here, be aware that
almost all heated seat elements for the back
and cushion are wired in series. If one
element goes out, neither one will work. Use
an ohmmeter to quickly test the elements in
back and seat, and replace only the element
that is bad.
TIP: Also, before replacing a seat
element, check to see if a repair kit is
available.
– Thanks to Kobie Glenn
U-Van
Instrument
Panel Cluster
Replacement
Parts
To minimize parts proliferation, the same
microprocessor is used in replacement
clusters for 2000 and 2001/2002 model
years. The software is set for the 2001/2002,
which is different from 2000.
When a replacement cluster is installed in
a 2000 vehicle, a U1000 DTC will set. This is
because the oil life feature is not available in
the 2000 vehicle. Ignore this DTC.
Also, the LOW COOLANT telltale will not
operate when the cluster is used in a 2000
service application.
– Thanks to Doug Kinsman
Hazy Paint Appearance
Owners of some 2002 Chevrolet Monte
Carlos and Impalas may comment that the
paint has a hazy appearance in the areas
where the Transseal transportation protective
coating was applied.
TIP: This may look similar to a condition
experienced on a limited number of 2001
Monte Carlos, but the cause of the condition
is different. For this reason, removing this
haze requires a different procedure than was
recommended for the 2001 vehicles.
Applying heat to the 2002 Monte Carlo paint
is not required to remove the haze
Following is the revised procedure for
removing the hazy residue for the 2002
models:
1. Procure naphtha/solvent, commonly
available from hardware or home
improvement stores (look in the paint
thinner aisle).
2. You will need several clean soft rags.
3. Pay attention to the caution on the
naphtha can.
4. On a cool car, pour the naphtha liberally
on the affected area or body panel.
5. Using a clean soft cloth, wipe the naphtha
over the entire panel, turning the cloth
frequently to keep a clean part of the
cloth on the panel. The naphtha cuts the
haze and then the cloth picks up the
residue. If the cloth is not kept clean, the
residue will be redistributed over the
panel.
6. Once the residue is cleaned off the panel,
repeat the process a second time to
remove any excess residue that was not
picked up.
7. Let the car sit out for a couple of hours to
see if fog reappears.
8. If it reappears repeat steps 4-7.
– Thanks to Gary McAdam
News and Views
Oil Life System Reset Procedures – Trucks
Many GM cars and trucks are equipped with
an oil life system which determines when an oil
change is required. After the oil has been
changed, it’s necessary to reset the system.
In the February and March 2000 issues of
TechLink, you were provided instructions on
resetting all of the systems in existence at that
time. The following list brings you up to date.
Due to space limitations only 2001, 2002 and
limited 2003 resetting procedures for trucks are
published here. Passenger cars were published
last month.
The information for this article is the same
as you will find in the applicable owner or
service manual.
To find this information in SI 2000:
Select the vehicle
Select category General Information
Select category Maintenance and Lubrication
Select category Maintenance and then GM Oil
Life System-Resetting.
You may be able to use the Search function
using the words Oil Life System Resetting.
TIP: You can find copies of the earlier charts
on the TechLink website on the Internet at
http://service.gm.com.
2001 Aztek
2002 Aztek
2002 Rendezvous
If your vehicle does not have the optional
Driver Information Center (DIC) do the
following:
1. With the ignition key in ON but the engine
off, fully push and release the accelerator
pedal slowly three times within five
seconds.
2. Turn the key to OFF.
3. If the CHANGE ENGINE OIL message
comes back on, the engine oil life monitor
has not reset. Repeat the procedure.
If your vehicle has the optional DIC, do the
following:
1. Turn the ignition to ON with the engine off.
2. Press the MODE button until the DIC reads
Return to page 1
OIL LIFE LEFT/HOLD SET TO RESET.
3. Press and hold the SET button until 100% is
displayed.
You will hear three chimes and the CHANGE
ENGINE OIL message will go off. If the
CHANGE ENGINE OIL message comes back
on, the monitor has not reset. Repeat the
procedure.
2001 Montana
2001 Silhouette
2001 Venture
2002 Montana
2002 Silhouette
2002 Venture
1. With the ignition key in RUN but the engine
off, repeatedly push the trip/reset button
until OIL is displayed on the Driver
Information Center.
2. Once OIL is displayed, push and hold the
trip/reset button for five seconds. The
number will disappear and be replaced by
100 (indicating 100% oil life remaining).
3. Turn the key to OFF.
4. If the change engine oil message comes
back on, the engine oil life monitor has not
reset. Repeat the procedure.
2002 Bravada
2002 TrailBlazer
2002 Envoy
1. Turn the ignition key to RUN with the engine
off.
2. Fully press and release the accelerator pedal
three times within five seconds.
3. If the CHANGE ENG OIL light flashes for
five seconds, the system is reset. If the light
does not flash, repeat the procedure.
2001 Sierra
2001 Silverado
2001 Yukon and Yukon XL
2001 Tahoe and Suburban
2002 Sierra Denali
2002 Sierra
2002 Silverado
2002 Yukon and Yukon XL
2002 Tahoe and Suburban
2002 Avalanche
5
2001 Escalade
2002 Escalade
2002 Escalade EXT
2001 Yukon Denali
2002 Yukon Denali
2003 Hummer H2
2001 Lumina
2001 Regal
2001 Century
2002 Regal
2002 Century
1. Turn the ignition to RUN but with the engine
off.
2. Fully push and release the accelerator pedal
slowly three times within five seconds.
3. If the Change Oil Soon light flashes, the
system is resetting.
4. Turn the key to OFF.
5. Start the vehicle.
6. The oil life will change to 100%.
7. If the Change Oil Soon light comes back on,
the system has not reset. Repeat the
procedure.
2001 B7 Chassis Medium Duty
2002 B7 Chassis Medium Duty
1. Turn the ignition to START but with the
engine off.
2. Fully press and release the accelerator pedal
three times within 10 seconds.
3. If the CHANGE OIL light flashes for five
seconds, the system is reset.
4. If the light does not display for five seconds,
you will need to reset the system again.
2003 560 C-Series
1. Turn the ignition to RUN but with the engine
off.
2. Fully press and release the accelerator pedal
three times within 10 seconds.
3. If the CHANGE OIL light flashes for five
seconds, the system is reset.
4. If the light does not display for five seconds,
you will need to reset the system again.
– Thanks to the Owner's Information team
Driver’s Seatback Gap
On a 2001 Monte Carlo equipped with
leather seating, a gap may develop between
the driver's seat back trim and the Side
Impact Airbag (SIAB). This condition is
caused by the lack of tension between the
seat trim and the airbag bezel (white plastic
cup attached to the seat frame).
View of driver’s seatback with Side Impact
Airbag removed
Owners of 2000 -- 2002 Chevrolet Prizms
may comment that their check engine light
comes on, and that there are no associated
driveablity conditions. Any, or all of the
following codes will be present: P0440,
P0441, P0446.
Several improvements were implemented
midway through the 2001 model year to
eliminate this condition. To correct a vehicle
exhibiting this condition, check the bezel slot
width (slots located on the forward edge of
the bezel), and replace the part if it is 5/16inch (7.94 mm) or greater. The new bezel,
part number 88951498, has a slot width of
3/16-inch (4.76 mm).
There are two possible causes.
Pressure Switching Valve
Next, measure the tabs on the seat trim
plastic reinforcement that engage into the
revised bezel slots, located on the forward
edge of the seat trim opening, to determine
if the vehicle has the revised seat trim. The
revised seat trim has a tab length of 20 mm.
The seat trim should be replaced if the tab is
any shorter than this.
Check tabs for
appropriate 20 mm
length
Power Window Motor Replacement
The original service replacement part
number 12487630 was briefly superseded by
The pressure switching valve may be
defective. You should hear a clicking noise
when you command the PSW on and off
using the Tech 2. If you cannot hear the valve
click, make sure there is 12 volts at the
solenoid, and that the PCM is supplying the
ground to the circuit when you command the
valve on. If the power and control sides of
the solenoid are working properly, replace
the pressure switching valve.
Also verify that the air flow through the
PSW is correct. When performing the air
flow test, attach a hose to the inner port and
the air should come out of the outer port.
When the valve is commanded on, there
should be air flow through the valve. When
the valve is turned off, there should be no air
flow through the valve.
Finally, remove the white plastic shim that
may be located between the seat frame and
the bezel. This shim is no longer necessary
when the new seat bezel, described above,
is used.
– Thanks to Gary McAdam
If the owner of a 1987-present Cavalier or
Sunfire is concerned about a power window
motor that does not work, or has had a short
service life, it may be due to an incorrect
replacement part.
Prizm EVAP
System
Conditions
EVAP Pressure Switching Valve
a bronze-colored universal motor part number
12497971. The correct part number is
24015712 and is silver in color. 24015712 will
work on both current and older Cavaliers and
Sunfires. Part release number information
has been corrected.
– Thanks to Bob Benedict
Turn Signal Flashes Fast
Owners may comment that the flasher on
their 2000-02 full size pickup or utility model
flashes faster than on other vehicles of the
same model.
It is possible that an Export relay was
installed into this vehicle. Inspect the part
and part number.
Part number 11516051 for RPO option
T79 (lamps, rear fog, export) is a relay which
operates 3 turn signal lights and 6 hazard
lights.
Part number 12450072 relay operates 2
turn signal lights and 4 hazard lights
(domestic).
Use part number 12450072 to fix this
concern.
– Thanks to GM Technical Assistance
TAC Tips
The EVAP system Pressure Switching
Valve is attached to the vapor canister by a
single screw. Do not replace the complete
canister assembly. The PSW can be replaced
separately. The part number for the valve is
94859365.
Gas Cap
Instrument Cluster Intermittent Bulb Check
On some 2002 Chevrolet Impala LS
models, the IPC may exhibit an
intermittent bulb check condition every 2040 seconds, in which all the warning lights
turn on, then off.
The OnStar VCIM is causing this
condition. When the VCIM is discon-
Return to page 1
nected, the concern goes away. If this is
confirmed, contact TAC to obtain a VCIM
and follow the required steps to replace
the module. Also, notify TAC of the new
ESN and STID numbers and reset the PC
tables before installing the VCIM.
– Thanks to GM Technical Assistance
6
Some defective gas caps are being
replaced with after-market caps which will
not hold pressure.
Look for the word "Toyota" on the face of
the cap. If you can not see the word "Toyota,"
the cap is not OEM and the customer should
be informed that they will need a new OEM
gas cap.
– Thanks to Jeff Strausser
Front and Rear Door Check
Link Noise
AC Control Head
Knob Replacement
Link removed to show lubrication location
Owners of some 2001-2002 Alero, Grand
Am and Malibu models may comment on a
creak or squeak noise when opening or
closing one or more doors on their vehicle.
This noise may be coming from the check
link spring saddle. To correct the noise, slide
the check link grommet back and spray GM
Spray Lube 12346293 (992723 in Canada), or
equivalent, on the check link saddle, using a
straw type nozzle extension. The nozzle
extension should be inserted slightly into the
opening above the check link arm and
sprayed toward the outside of the door. If the
nozzle is inserted too far into the door, it will
go past the target area. Move the nozzle
back and forth while spraying to distribute
the lubricant. Open and shut the door to
work the lubricant into the check link until
the noise is gone.
On 1999-2002 Pontiac Grand Am and
Grand Prix, the mode control or blower
speed control knob is replaceable individually,
if the knob becomes stripped or broken. It is
not necessary to replace the entire control
head in these cases.
Lubricating check link saddle
Replacement part numbers:
– Thanks to Dave Dickey
1999-2002 Grand Prix
9363337
1999-2000 Grand Am
9363337
2001-2002 Grand Am
9380265
– Thanks to Fred Tebbets
Bulletins – January 2002
This review of service bulletins
released through mid-January lists the
bulletin number, superseded bulletin
number (if applicable), subject and
models.
GENERAL INFORMATION:
01-00-90-002; Achieving Correct Oil
Level and Crankcase Capacity Revision;
2002 Chevrolet Cavalier, Oldsmobile
Alero, Pontiac Grand Am, Sunfire with
2.2L Ecotech Engine (VIN F, RPO L61)
HVAC:
01-01-39-005; Noise or Vibration in
Passenger Compartment with A/C on
Between 2000-2400 RPM (Replace
Heater Outlet Hose); 2002-02 Chevrolet
and GMC Pickup Models with 4.3L V6
Engine (VIN W -- RPO L35) and Air
Conditioning (RPO C60)
STEERING:
01-02-32-001A; replaces 01-02-32-001;
Clunk Noise From Front of Vehicle
During Turning Maneuver/Steering
Wheel Rotation (Lubricate Intermediate
Shaft); specified 1997-2002 Buick,
Cadillac, Chevrolet, Oldsmobile, and
Pontiac models
01-02-35-008; Electronic Steering
Column Lock May Refuse to Operate –
DIC Service Message Displayed (Update
Column Lock Wiring, Install Revised
Relay and/or Replace Electronic Column
Lock); 1997-98 and 2000 Chevrolet
Return to page 1
Corvette
01-02-35-010; Revised Lock Cylinder
Replacement; 1995-01 Chevrolet
Cavalier, Pontiac Sunfire
SUSPENSION:
01-03-08-005; Lower Control Arm
Bracket to Frame Fastener Torque
Specification and Tightening Sequence;
2002 Chevrolet and GMC S/T Utility,
Oldsmobile Bravada
01-03-10-009; Replace Wheel Nut
Covers Missing and/or Loose (Replace
Missing Covers and Add Sealant to All
Covers); 2002 and All Prior Year
Passenger Cars (except Cadillac) with
Plastic Wheel Nut Covers
01-03-10-010; Inspection of Tire and
Wheel Size Prior to Diagnosis of
Transmission Shifts, Poor Performance,
Speedometer, Cruise Control Concerns;
2001-02 Chevrolet and GMC C/K with
Duramax Diesel Engine and Allison
Transmission
DRIVELINE AXLE:
01-04-21-001; Transfer Case-Steyr -Revised Fastener Tightening
Specification; 2001-02 Chevrolet,
Pontiac, Oldsmobile Vehicles with AllWheel Drive (RPO M76)
BRAKES:
00-05-22-002A (replaces 00-05-22002); Brake Rotor Warranty Service
7
Procedure; 1995-2002 Passenger Cars
and Light Duty Trucks
01-05-23-002A (replaces 01-05-23002); Front Disc Brake Pulsation (New
Rotor Run-Out Specification and
Correction Method; 1997-2002 Chevrolet
Malibu, Oldsmobile Cutlass, Oldsmobile
Alero, Pontiac Grand Am
01-05-25-004A (replaces 01-05-25004); Yellow: Traction Control/Handling
Lamp On and DIC Displays Service
Active Hndlg (Repair/Reprogram ABS
Module); 2002-02 Chevrolet Corvette
ENGINE/PROPULSION
SYSTEM:
01-06-01-026; Oil Filter Usage; 2002
Chevrolet and GMC S/T Utility Models
and Oldsmobile Bravada with 4.2L Inline
6-cylinder Engine (VIN S – RPO LL8)
01-06-01-027; Revised Cylinder Head
Installation and Replacement
Procedures; Specified 1997-2002 Cars
and Trucks with 4.8L, 5.3L, 5.7L or 6.0L
Engine (VINs V, T, Z, G, S, U, N – RPOs
LR4, LM7, L59, LS1, LS6, LQ4, LQ9)
01-06-01-028; Engine Knock on Cold
Start; 1999-2002 Chevrolet and GMC
C/K, 2002 Cadillac Escalade
01-06-01-029; Higher Than Expected
Engine Oil Consumption (Replace PCV
Valve); 1999-2002 Chevrolet and GMC
C/K, 2002 Cadillac Escalade with 5.3L or
6.0L Engine (VINs T, N, U – RPOs LM7,
LQ9, LQ4)
01-06-01-030; Higher Than Expected
continued on page 8
Bulletins – January 2002
Engine Oil Consumption (Replace
Rocker Arm Cover); 1998-2002
Chevrolet Cavalier, Pontiac Sunfire,
Chevrolet and GMC S Truck with 2.2L
Engine (VINs 4, 5 – RPOs LN2, L43)
01-06-02-012; Water Pump Weep
(Install Coolant Collector); specified
1996-2002 passenger cars with 2.4L
Engine (VIN T – RPO LD9)
01-06-02-013; Radiator Surge Tank
Cap Contacts Underside of Hood
(Reposition Radiator Surge Tank); 19982002 Chevrolet and GMC C7500 MD
Conventional Cab with Caterpillar®
Diesel and Access Hood RPO BQC)
01-06-04-037A (replaces 01-06-04037); SES Light On with DTCs P0716
and/or P0717 Set (Repair Input Speed
Sensor Wiring at Transaxle Wiring Passthrough Connnector; Specified Buick,
Chevrolet, Oldsmobile, Pontiac vehicles
01-06-04-044; Test Guidelines for Use
of Essential Tool J 41413-200 Evap
System Tester; 2002 and Prior
Passenger Cars and Trucks with NonEnhanced and Enhanced EVAP Systems
01-06-04-052; OBD System
Improvements (Reprogram PCM) – SES
Light On, DTC P0014, P0116 or P1683
Set, Delayed Transmission Downshift
and/or Excessive Fan Noise; 2002
Chevrolet and GMC S/T Utility,
Oldsmobile Bravada
01-06-04-053 (replaces 86-63-19);
Auxiliary Fuel Tank Removal Procedure;
1998-02 Chevrolet and GMC C/K
3500HD with Auxiliary Fuel Tank
01-06-05-006; Exhaust System
Rumble/Rattle Noise (Replace Exhaust
Pipe Seals and Modify Exhaust Pipe
Ring Flanges); specified 1996-2002
Chevrolet, GMC, Cadillac models
TRANSMISSION/
TRANSAXLE:
01-07-30-023A; replaces 01-07-30-023;
Harsh 1-2 Upshift, SES, MIL, or CEL
Illuminated, DTC P1870 Set (Replace
Valve Body); specified 1996-2000
Passenger Cars and LD Trucks with
4L60-E Automatic Transmission (RPO
M30)
01-07-30-029; New Product Feedback
Form and Process for Automatic
Transmission Core Returns; 1980-2002
Passenger Cars and Trucks with OE and
Goodwrench Automatic Transmission
01-07-30-036; SES Lamp Illuminated,
Incorrect Transmission Shifts, Poor
Performance of Engine, Transmission
Slipping (Clean Transmission Valve Body
and Case Oil Passages of Debris);
Specified 2000-02 Cars and Trucks
01-07-30-038; DTC P0757 Set, SES
Lamp Illuminated, Poor Performance of
Return to page 1
continued from page 7
Transmission, Transmission Slipping
(Clean Transmission Valve Body and
Case Oil Passages of Debris); specified
1999-2002 cars and trucks
01-08-57-006; General Waterleak
Diagnosis Guide; 1997-2002 Chevrolet
Venture, Oldsmobile Silhouette, Pontiac
TransSport/Montana
01-07-30-039; 4T40E or 4T45E
Transmission Transaxle Changes for
2002 Model Year; 2002 Chevrolet
Cavalier, Malibu, Oldsmobile Alero,
Pontiac Grand Am, Sunfire
01-08-56-007; General Waterleak
Diagnosis Guide; 1999-2002 Chevrolet
Malibu, Oldsmobile Alero, Pontiac Grand
Am
01-07-31-002; Improved Bleeding
Procedure for Hydraulic Clutch Release
System; 2002 and Prior Passenger Cars
and LD Trucks, Chevrolet and GMC TSeries MD Tilt Cab Models
01-07-31-003; Clutch Slipping or Early
Clutch Failure (Replace Clutch Assembly
and Update Clutch Release System);
1997-2000 Chevrolet and GMC F Model
MD Tilt Cab with Eaton Solo 14 Inch
Clutch (RPO MPK) or Valeo 14 Inch
Clutch (RPO MTD)
BODY AND ACCESSORIES:
01-08-44-008A (replaces 01-08-44008); New Tool Availability for Antenna
Mast Installation During Pre-Delivery;
2001-02 Chevrolet and GMC C/K Pickup,
Utility, M/L Van, 2002 Cadillac Escalade,
Chevrolet Avalanche
01-08-44-014; Erratic or Intermittent
Operation of Radio; 2002 Chevrolet
Camaro, Corvette, Chevrolet and GMC
C/K and S/T Pickup and Utility, 2002 M/L
Vans, Cadillac Escalade with RPO UL0,
UN0 or UL9
01-08-44-016; Travel Note Recorder
Message Deletion During Pre-Delivery;
2002 Chevrolet and GMC S/T Utility,
Oldsmobile Bravada
01-08-46-006A (replaces 01-08-46006); Revised OnStar® Antenna Coupling
Replacement Procedures; 2000-02
Passenger Cars and Trucks with Glass
Mounted Antenna
01-08-46-008A (replaces 01-08-46008); Information on Upgrading Factory
Installed OnStar® Generation 2.0 to
Generation 2.6; 2000 passenger cars
and trucks equipped with OnStar
01-08-47-002; Backlighting on Driver
and Passenger Door Switches Remains
On, High Parasitic Current Draw Occurs
(Replace HTR & A/C Programmer
assembly – IP Module); 2000-02 Buick
LeSabre Limited, Oldsmobile Aurora,
Pontiac Bonneville with RPO CJ2
01-08-49-018; Center Floor Console
Rear Power Outlet Replacement Covers;
2001-02 GMC Utility, 2002 Cadillac
Escalade
01-08-56-006; Security Lamp
Illuminated on IP, Engine Stalls, No Start,
DTC B2960 (Security System Sensor
Data Incorrect but Valid) Set (Inspect and
Repair Cause of DTC B2960); 1998-2001
Chevrolet and GMC G-Van Models
8
01-08-64-017; Outside Rearview
Mirror Shake/Inoperative (Replace Mirror
Motor Assembly); 2002 Buick
Rendezvous
01-08-64-018; Front Door Window
Glass Won’t Roll Up, or Out of Channel
(Replace Guide); 1999-2002 Oldsmobile
Alero, Pontiac Grand Am
01-08-64-019; Click or Ratchet Type
Noise from Outside Rearview Mirrors;
2002 Chevrolet and GMC Utility Models
and Oldsmobile Bravada
01-08-64-020; Creak Noise When
Opening or Closing Doors (Apply
Lubricant to Check Link); 2001-02
Chevrolet Malibu, Oldsmobile Alero,
Pontiac Grand Am
01-08-65-001; Fuel Filler Door
Recessed Into Quarter Panel (Replace
Fuel Filler Pocket); 1999-2002 Chevrolet
Cavalier, Pontiac Sunfire
01-08-66-013; End Gate Lock Cylinder
Loose (Replace Lock Cylinder); 2002
Chevrolet Avalanche
01-08-66-014; Pickup Box Sheet Metal
Fracture/Damage with Aftermarket
Accessories Installed (Repair Pickup Box
and Install Reinforcements); 1999-2002
Chevrolet and GMC C/K Pickup Steel
Fleetside (RPO E63)
01-08-66-015; End Gate Handle Binds
(Replace Handle); 2002 Chevrolet
Avalanche
01-08-97-002; Programming
HomeLink® Transmitter; 2000-02
Passenger Cars and Trucks with RPO
UG1
01-08-111-003; Roof Panel Joint
(Ditch) Molding; 2000-02 Chevrolet
Impala
RESTRAINTS:
99-09-40-007A; replaces 99-09-40-007;
Front Seat Shoulder Belt is
Uncomfortable (Replace Both Front Seat
Shoulder Belt Retractors, Shoulder Belt
Guides and Push-on Nuts); 2000
Chevrolet Monte Carlo
01-09-41-010; Air Bag Indicator
Illuminated After Replacement of
Sensing and Diagnostic Module (SDM),
DTC B1001 (Reprogram Body Control
Module – BCM -- to Accept New SDM);
2002 Buick Rendezvous, 2001-02
Pontiac Aztek