1
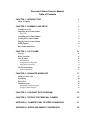
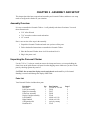
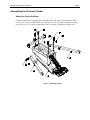
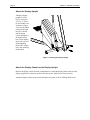
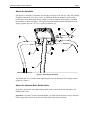
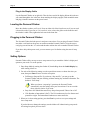
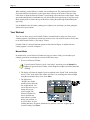
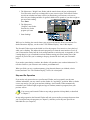
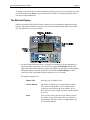
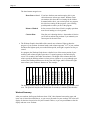
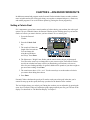
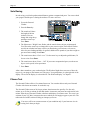
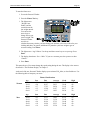
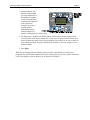
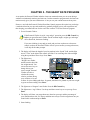
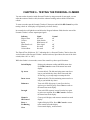
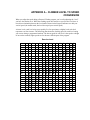
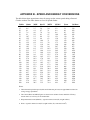
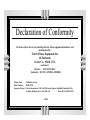
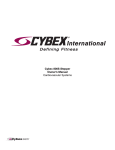
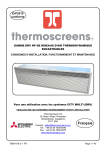
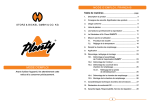
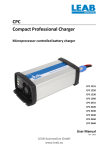
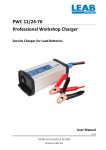
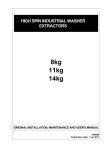
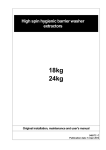
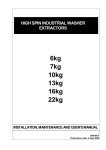
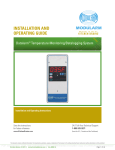
Personal Climber
Owner’s Manual
Tectrix Fitness Equipment
68 Fairbanks
Irvine, California 92618
(800) 767-8082
(714) 380-8082
© 1997 Tectrix Fitness Equipment
Important Safety Instructions: Read and Save
1. Read all instructions before using this equipment.
2. DANGER: DISCONNECT FROM SUPPLY CIRCUIT BEFORE OPENING.
AVERTISSEMENT: DECONNECTEUR DU CIRCUIT D’ALIMENTATION AVANT D’OURVRIR.
3. Unplug all electrical appliances before cleaning and after use.
4. Close supervision is necessary when this equipment is used by or near children or disabled persons.
5. Use this equipment for the intended use as described in this manual.
6. Never operate equipment that has a damaged power cord or plug.
7. Never drop or insert any object into any opening on this equipment.
8. Do not use outdoors.
9. To disconnect, switch off power switch (just above power cord plug), then remove plug from outlet.
In the presence of power line “noise” such as fast transients, the equipment may require that power be
switched off and then back on again, to resume normal operation.
IMPORTANT GROUNDING INSTRUCTIONS
Warning:
Connect This Equipment to a Properly Grounded Outlet
ATTENTION BRANCHER CET EQUIPMENT UNE PRISE CORRECTEMENT RELIEÉ À LA TERRE
This equipment is for use only on a nominal 120-volt circuit and has a grounding outlet that looks like the
outlet illustrated in Figure A, below. This equipment must be grounded. No adapter should be used. It has
been supplied with a cord having an equipment grounding conductor and plug. This plug must be plugged
only into a properly installed grounded outlet. Failure to do so can result in the risk of electrical shock. Do
not modify the plug provided with this product—if it does not fit, have a qualified electrician install the
proper style outlet.
FIGURE A - Grounded Outlet
Parts of Personal Climber are covered by U.S. patent numbers: 4,938,474 and 4,949,993.
Tectrix is a registered trademark of Tectrix Fitness Equipment, Irvine California.
Personal Climber Owner’s Manual
Table of Contents
CHAPTER 1 - INTRODUCTION
About This Book
CHAPTER 2 - ASSEMBLY AND SETUP
Assembly Overview
Unpacking the Personal Climber
Parts List
Assembling the Personal Climber
Leveling the Personal Climber
Plugging in the Personal Climber
Setting Options
Drive Cable Maintenance
1
1
3
3
3
3
5
8
8
8
9
CHAPTER 3 - LET’S CLIMB
11
Overview
Before You Start
Your Workout
Manual Mode
Using the Preset Programs
Step and Go Operation
The Workout Display
Workout Summary
11
11
12
12
13
14
15
16
CHAPTER 4 - ADVANCED WORKOUTS
Setting a Calorie Goal
Solo Racing
Fitness Test
Custom Program
Designing a Custom Program
Using a Custom Program
17
17
18
18
20
20
20
CHAPTER 5 - THE HEART RATE PROGRAM
23
CHAPTER 6 - TESTING THE PERSONAL CLIMBER
25
APPENDIX A - CLIMBER LEVEL TO SPEED CONVERSION
27
APPENDIX B - SPEED AND ENERGY CONVERSIONS
29
CHAPTER 1 - INTRODUCTION
Welcome to the Tectrix Personal Climber, the perfect climber for your home. Personal Climber’s
durability, ease of use, and flexible programming make it ideal for almost everyone’s home
exercise needs.
The Personal Climber’s features include:
• Simple to Use: Personal Climber’s console leads you through the simple steps to start a
workout. Or, just step on and start climbing.
• Continuous Performance Monitoring: The convenient, easy-to-read console shows the
progress of your workout—vertical speed, calories burned, and more.
• Built-in Workout Profiles: Three standard workouts offer combinations of calorie burning,
strength training, and endurance training to satisfy almost everyone.
• Calorie Goals: Tell Personal Climber how long you want to work out and how many
calories you want to burn, and it will set the optimum speed for you.
• Programmable: If you want a specific workout profile that’s not included in the standard
set, you can create your own.
• Optional Heart Rate Program: With its optional heart rate monitor, Personal Climber can
program a workout to reach and keep you at your optimal heart rate.
• Setup Mode: You can change Personal Climber’s display to match the way you want to
operate.
So, the Personal Climber is ideal for you, whatever fitness category you fit into:
• If you’ve never used a climber before, start with manual mode, setting the speed to match
what you’re capable of.
• You can push yourself by using the standard programs to increase strength and endurance.
• If you’re an advanced athlete and know your abilities and needs, you can custom-tailor the
exact workout you want.
About This Book
This book is for you, the Personal Climber owner. It contains assembly and setup information plus
complete details on using Personal Climber for your regular workout.
Besides this introduction, this book contains:
Chapter 2 - Assembly and Setup
Everything about getting the Personal Climber ready to use, from taking it out of its shipping crate
to setting its operation options.
Page 2
Chapter 1 - Introduction
Chapter 3 - Let’s Climb
How to use the Personal Climber. Starting a workout, choosing a program, the console display,
and more.
Chapter 4 - Advanced Workouts
Using the calorie goal, racing, fitness test, and custom workout features.
Chapter 5 - The Heart Rate Program
How to use the optional heart rate control program.
Chapter 6 - Testing
How to make sure your Personal Climber is operating properly.
Appendix A
How Personal Climber’s level settings translate into climbing speeds.
Appendix B
Speed and energy conversion chart.
CHAPTER 2 - ASSEMBLY AND SETUP
This chapter describes how to unpack and assemble your Personal Climber, and how to use setup
mode to configure the climber for your situation.
Assembly Overview
It’s easy to assemble the Personal Climber—it will probably take about 30 minutes. You need
these common tools:
• 3/16” Allen Wrench
• 7/16” wrench or socket wrench and ratchet
• 1/2” wrench
Here’s an overview of the steps in the assembly:
1. Unpack the Personal Climber and make sure you have all the parts.
2. Follow the detailed instructions to assemble the Personal Climber.
3. Place the Personal Climber where it will be used and level it.
4. Plug in the power cord.
Unpacking the Personal Climber
Use the 7/16”or ½” socket or wrench to remove the clamps and screws or tie straps holding the
chassis base to the pallet. Remove all parts from the shipping carton. Make sure you have all the
parts by checking against the parts list.
CAUTION: Do not stand the display console upright tube on its end! Lay it flat instead.
Standing it on end could damage the display ribbon cable.
Parts List
Your Personal Climber includes these parts:
Description
Base Unit
Left Foot Assembly
Right Foot Assembly
Front Foot Assembly
Display Upright Assembly
Left Handrail
Right Handrail
Configuration Kit
Hardware Kit
Qty
1
1
1
1
1
1
1
1
1
Part Number
70310W or 70310B
70056
70057
70058
70360
61089 or 61119
61090 or 61120
varies by country
70362
Item #
1
2
3
4
5
6
7
---
Page 4
Chapter 2 - Assembly and Setup
The Hardware Kit for the Personal Climber contains:
Description
5/16” x 2” Screw
5/16” x 2.25” Screw
5/16” Split Washer
5/16” Nyloc Nut
5/16” x 2.5” Button Cap Screw
Bracket, Handrail Clamp
#10 x 3/4” Phillips-head Screw
Qty
4
3
7
3
2
1
9
Part Number
41011
41050
43042
42033
41138
52078
41009
Item #
8
9
10
11
-12
--
The console and related materials for the Personal Climber are packed in the Configuration Kit
included with the unit. This box contains:
Description
Warranty Card
Owner’s Manual
Service Manual
Power Cord
Personal Climber Display
Console
Qty
1
1
1
1
1
Part Number
03006
03005
03071
Varies with country (14007 for USA)
Varies with language
Personal Climber Owner’s Manual
Page 5
Assembling the Personal Climber
Attach the Feet to the Base
Carefully turn the base (1) upside down. Attach the left (2) and right (3) feet using three of the
5/16” by 2.25” screws (9) and washers (10), and one 5/16” nut (11). Attach the front foot using
two of the 5/16” by 2” screws (8) and washers (10). See Figure 1. Roll the base onto its feet.
Figure 1 - Attaching the Feet
Page 6
Chapter 2 - Assembly and Setup
Attach the Display Upright
Attach the display
upright (5) to the
base (1) using two
5/16” by 2” screws
(8) and washers (10)
as shown in Figure
2. Be sure the ribbon
cable goes through
the slot, as shown,
and the display
console backplate is
facing toward the
base. Finger tighten
the screws; you will
finish tightening
them with a wrench
later, after installing
the handrails.
Figure 2 - Attaching the Display Upright
Attach the Display Console to the Display Upright
Remove the display console from the configuration kit. Attach the display ribbon cable from the
display upright to the connector on the back of the console. Make sure it fastens securely.
Attach the display console to the console backplate using four of the #10 Phillips-head screws.
Personal Climber Owner’s Manual
Page 7
Attach the Handrails
Slip the left (6) and right (7) handrails over the plugs on the top of the rear feet. They will probably
fit tightly; if necessary, use a spray cleaner as a lubricant. Rotate the handrails into the clamp
bracket at the top of the display console upright (5). Slip the handrail clamp bracket (12) behind
the handrails, as shown in Figure 3. Line up the holes and attach the bracket and handrails to the
display upright using two 5/16” by 2” screws (8) and nuts (11).
Figure 3 - Attaching the Handrails
You should now use a wrench to finish tightening the screws at the bottom of the display console
upright. See Figure 2.
Attach the Optional Water Bottle Holder
If you have the optional water bottle holder, attach it to the console back plate using three #10
Phillips-head screws.
Important: If you don’t use the water bottle holder, you must still put the three screws in the open
holes to protect the electronics on the back of the console from the environment.
Page 8
Chapter 2 - Assembly and Setup
Plug in the Display Cable
Lay the Personal Climber on its right side. Take the lower end of the display ribbon cable (the one
you routed through the slot in the base when attaching the display upright). Fold around the motor
and plug it into the connector on the power board.
Leveling the Personal Climber
Move the climber to where you’ll use it. Press on either side of the front foot to see if you can rock
it from side to side. If you can, or if it is not level, raise or lower the glides on the front foot until
the climber is stable. Then, tighten the lock nuts on the front foot.
Plugging in the Personal Climber
The Personal Climber has both power in and power out sockets. You can plug a Personal Climber
into either a wall outlet or the power out socket on another Personal Climber. Using the correct
cord, plug one end into the “in” socket and the other end into the wall or another Personal Climber.
If you have daisy-chain power cords, you can connect up to 10 climbers using the same 10 amp
outlet.
Setting Options
Personal Climber offers an easy-to-access setup menu to let you match the climber’s display and
options to your needs. To set the options:
1. Enter Setup Mode by turning the climber off, then holding down the Switch Display key
while turning it back on.
2. For each of the following settings, use the up and down arrows to choose the value you
want, then press Enter to move on to the next option.
• Full Setup or Step and Go: If you choose “Step and Go,” you can get on the
Personal Climber and start climbing, without entering any workout information. The
default is “Full Setup.”
When you choose “step and go” operation, the Personal Climber
automatically uses the settings from your last workout. You can override
these with new choices if you want.
• Beep On or Off: Should the console keys beep when pressed? Choose On or Off.
• USA Readout or International (“Intl”): The USA readout uses feet for distance and
pounds for weight. The International readout uses meters and kilos.
3. When you’re done setting options, press the Clear key twice to save your settings and
leave setup mode.
If you decide not to change the settings, turn the climber off without leaving setup mode.
All settings keep their previous values.
Personal Climber Owner’s Manual
Page 9
Drive Cable Maintenance
With proper maintenance, your Tectrix Personal Climber will provide you with years of troublefree exercise. Routine maintenance is essential to not only preserve the life of the equipment, but
also to avoid any possibility of personal injury. Particular attention should be given to the condition
of the Personal Climber drive cables. These cables will eventually wear out. We recommend drive
cables be inspected regularly for signs of wear and replaced every 6 to 8 months with Tectrixsupplied replacement cables. Failure to perform drive cable maintenance procedures could lead
to cable damage and serious injury.
CHAPTER 3 - LET’S CLIMB
So far, we’ve discussed what you need to do to get the Personal Climber ready to use. This chapter
describes how to use it: what each member of your family can do to get the most out of his or her
Personal Climber workouts.
Overview
This is how you work out on Personal Climber:
1. Get on.
2. Set how long you want to work out.
3. Set your weight.
4. Select manual mode, a preset program, or one of the advanced workouts.
5. If you want, adjust the climbing speed.
6. Start climbing!
During your workout, watch your progress on the console; you can change your climbing speed at
any time. When you’re done, Personal Climber shows the total statistics for your workout.
This chapter tells you more about manual mode, the preset programs, “step and go” operation, and
the Personal Climber workout display. Advanced workout options are described in Chapter 4; the
heart rate control program is covered in Chapter 5. The heart rate control program is available only
if you have the optional heart rate monitor.
Before You Start
To get the most out of a Personal Climber workout, be sure to follow these general exercise rules:
• Check with your doctor before starting any new exercise program.
• Wear comfortable workout clothing.
• Drink plenty of water or other fluids before, during, and after exercising.
• Stay loose and relaxed while working out.
• Maintain a balanced, upright posture while climbing.
• If you start to hurt, stop climbing.
Page 12
Chapter 3 - Let’s Climb
When climbing, you should have a smooth, stair-climbing action. The pedals should not hit the
floor at the bottom of each stroke, or their upper limit at the top of the stroke. If they do, either
climb faster or adjust the Personal Climber’s speed setting as described later in this chapter. Find a
speed and technique that’s comfortable for you; this could be short, quick steps or long slow steps.
Many people prefer to climb at the top of the stroke, keeping the pedals high without hitting the
upper stop.
Use the handrails only for balance; putting your weight on your arms keeps you from getting the
full benefit of your workout.
Your Workout
There are two basic ways to use Personal Climber: in manual mode or using one of the preset
workout programs. The following sections tell you how to use each of these modes, as well as how
to use the Personal Climber’s “step and go” feature.
Personal Climber’s advanced workout options are described in Chapter 4, and the heart rate
control program is covered in Chapter 5.
Manual Mode
In manual mode, you tell Personal Climber how long you want to climb; you can adjust your
climbing speed at any time during the workout. Follow these steps:
1. Get on your Personal Climber.
If your Personal Climber is set for “step and go” operation, press the Manual key
before you get on Personal Climber, set the length and weight as described, then start
climbing.
2. The display will show the length of your last workout in the “Speed” field, and the light
next to “Time” at the right of the console will flash. You can change the workout length
using the up and down arrow keys. Press Enter.
1. The light next to
“Weight” now flashes,
and the console shows the
last weight entered. You
can use the arrow keys to
change this to your
correct weight. The
Personal Climber uses
this to calculate how
many calories you burn
during your workout, so
be sure to allow for your
clothing and shoes. In general, add about five pounds to your base weight to get an
accurate reading. Press Enter.
Personal Climber Owner’s Manual
Page 13
2. The light next to “Program” now flashes. Press the Manual program key.
3. Start climbing! If the speed is too fast or slow, press the up or down arrow key to adjust it
until you’re comfortable.
While you’re climbing, the console shows your progress and statistics about your workout. For
details about these displays, see the section “The Workout Display,” later in this chapter.
You can raise or lower your climbing speed at any time by pressing the up and down arrows. Pick
a speed that gives you a comfortable workout without causing pain. If you feel like you’re straining
to keep up, decrease the level until you can match it easily.
You can also change from manual mode to one of the programmed workouts during your
workout. Just press the key for the program you want, then follow the instructions later in
this chapter.
If you need to pause during a workout, the climber will remember your workout information. To
reset the climber so you can start a new workout, press Clear twice.
When you finish, you see a workout summary giving the total distance you climbed, calories
burned, and more. See “The Workout Display,” later in this chapter, for a description.
Using the Preset Programs
Personal Climber includes three basic workout profiles you can choose from. These profiles vary
the climber speed at set intervals to maximize either fat burning, strength training, or endurance
building.
The graphs on the program keys show a “profile” of each workout. The higher bars indicate faster
climbing. Each program begins with a warm-up and ends with a cool-down period; as you can see,
the middle sections vary according to the type of workout.
1. Get on the Personal Climber.
If your Personal Climber is set for “step and go” operation, press one of the program
keys before you get on Personal Climber, set the length and weight as described, then
start climbing.
2. The display will show the length of your last workout in the “Speed” field, and the light
next to “Time” at the right of the console will flash. You can change the workout length
using the up and down arrow keys. Press Enter.
When you change the length of a program, Personal Climber intelligently adjust the
program’s profile to match your setting. For the fat burning and strength programs, it adds
or removes repetitions of the center section; for the endurance program, it increases or
decreases the length of the center section. The warm-up and cool-down periods stay the
same. If you set the workout length to five minutes, you’ll do just the warm-up and cooldown.
Page 14
Chapter 3 - Let’s Climb
1. The light next to “Weight” now flashes, and the console shows the last weight entered.
You can use the arrow keys to change this to your correct weight. The Personal Climber
uses this to calculate how many calories you burn during your workout, so be sure to
allow for your clothing and shoes. In general, add about five pounds to your base weight to
get an accurate reading.
Press Enter.
2. The light next to
“Program” now flashes.
Press the key for the
program you want.
3. Start climbing!
While you’re climbing, the console shows your progress and statistics about your workout. For
details about these displays, see the section “The Workout Display,” later in this chapter.
The Personal Climber starts at the default level for the program. You can raise or lower the level
while you’re climbing. This adjusts the entire program up or down the same number of levels. If
you’re interested in exactly how the level settings translate to vertical speed, see Appendix A. Pick
a setting that gives you a comfortable workout without causing pain at the hardest parts of the
program. If you feel like you’re straining to keep up, decrease the level until you can match it
easily.
If you need to pause during a workout, the climber will remember your workout information. To
reset the climber so you can start a new workout, press Clear twice.
When you finish, you see a workout summary giving the total distance you climbed, calories
burned, and more. See “The Workout Display,” below, for a description.
Step and Go Operation
If you are the only person who uses your Personal Climber, and you generally use the same
workout information, you may want to set the climber for “step and go” operation. When a climber
is set to step and go, you just get on and start climbing—the Personal Climber automatically
remembers your workout length, weight, and type of workout (manual or program) from your
previous session.
You can set your Personal Climber to step and go operation in Setup Mode, as described
in Chapter 2.
In step and go operation, the Personal Climber still asks you to confirm your target heart rate when
you’re using the heart rate program (see Chapter 5), and asks you for the pacer speed for an
individual race (see Chapter 4).
Personal Climber Owner’s Manual
Page 15
To change your workout type or other information while the climber is set to step and go, press the
key for the workout type before you get on the Personal Climber. It will then prompt you for the
rest of the workout information.
The Workout Display
During your workout, the Personal Climber console keeps you continuously updated about your
progress. The Progress Indicators at the top of the console and the Workout Graph in the middle
give you different views of your workout.
• The three Progress Indicators show six categories of information. At the beginning of a
workout the three top categories are shown. Pressing the Switch Display button at the
right of the fields switches between categories; the lights over and under each field indicate
which information is currently displayed. If you hold down Switch Display for half a
second, the fields will alternate between categories every five seconds.
The top three categories are:
Elapsed Time
How long you’ve climbed so far.
Calories Burned
The number of calories you’ve burned in this workout.
This is based on the distance you’ve climbed and the
weight you entered at the start of the workout. If you
don’t enter an accurate weight, the calorie number will not
be correct.
Speed
Your current vertical speed in feet per minute or meters
per minute. If your speed doesn’t look very impressive,
remember that each foot of climb is roughly equal to ten
feet of running distance.
Page 16
Chapter 3 - Let’s Climb
The three bottom categories are:
Heart Rate or Level
If you have the heart rate monitor option, this is your
current heart rate in beats per minute. Without a heart
rate monitor, this shows the level setting for the climber.
In manual mode, this is your vertical speed; in a program,
this is the base setting for the program—your climbing
speed depends on where you are in the program.
Distance Climbed
In feet or meters. Each foot of climb is roughly equivalent
to ten feet of running over level ground.
Calories/Hour
How fast you’re burning calories—the number of calories
you’ll burn in an hour-long workout if you maintain your
current pace for the entire time.
• The Workout Graph in the middle of the console uses columns of lights to show the
progress of your workout. In manual mode, each column represents 1/15th of your workout
and shows the highest speed you reached in that period; each light is equal to ten feet per
second.
In a program, the Workout Graph shows a detailed view of the current portion of your
workout: each column of lights represents a 15 second segment, so the entire display
covers 225 seconds (a little under four minutes). The height of the columns shows the
relative speed; the blinking column is where you are right now. As you go through your
workout, the blinking column moves slowly from left to right; when it reaches the rightmost column, your workout is almost over. For example:
n
n
n n n
n n n
n
n
n
n
n
n
n
n
n
n
n
n
n
n
n
n
n
n
O
O
O
O
O
O
n
n
n
n
n
n
n
n
n
n
n
n
n
n
n
n
n
n
n
n
n
n
n
n
n
n
n
n
n
n
n
n
n
n
n
n
n
n
n
n
The blinking column (shown as empty circles) indicates the workout is approximately half
over. The speed will stay the same for the next 90 seconds (six columns), then decrease.
Workout Summary
After your workout, the Progress Indicators show “End,” then alternate between the upper and
lower sets of values (described above), so you can see the totals for your workout. The values will
display for the time-out period set for your Personal Climber, or you can press Clear to clear the
display and start a new workout.
CHAPTER 4 - ADVANCED WORKOUTS
In addition to manual and program modes, Personal Climber includes features to make workouts
more enjoyable and useful: calorie goal setting, races against a computerized pacer, a fitness test,
and custom programs. You use all of these options by pressing the correct program key.
Setting a Calorie Goal
If it’s important to you to burn a certain number of calories during your workout, the calorie goal
option is for you. With this feature, the Personal Climber sets the climbing speed so you burn the
number of calories you want in the time you have allotted. To set a calorie goal:
1. Get on the Personal
Climber.
2. Press the Calorie Goal
key.
3. The console will show the
length of the last workout.
You can change this
using the up and down
arrow keys. Press Enter.
4. The light next to “Weight” now flashes, and the console shows the last weight entered.
You can use the arrow keys to change this to your correct weight. The Personal Climber
uses this to calculate how many calories you burn during your workout, so be sure to
allow for your clothing and shoes. In general, add about five pounds to your base weight to
get an accurate reading. Press Enter.
5. The console now shows “Cals = xxx.” Use the arrow keys to set the number of calories
you want to burn during the workout.
6. Press Enter.
Personal Climber calculates the speed you’ll need to reach your calorie goal in the time you’ve
entered. It ramps up to this speed, then keeps you there for the duration of the workout.
The level display shows your calorie goal. During the workout, you can adjust this by pressing the
arrow keys. Personal Climber will adjust the speed setting to match your new goal. The rest of the
display is as described in “The Workout Display” in Chapter 3.
Page 18
Chapter 4 - Advanced Workouts
Solo Racing
In solo racing, you climb a predetermined distance against a computerized pacer. You can see both
your progress and the pacer’s during the workout. To start a solo race:
1. Get on the Personal
Climber.
2. Press the Race key.
3. The console will show
the length of the last
workout. You can
change this using the up
and down arrow keys.
Press Enter.
4. The light next to “Weight” now flashes, and the console shows the last weight entered.
You can use the arrow keys to change this to your correct weight. The Personal Climber
uses this to calculate how many calories you burn during your workout, so be sure to
allow for your clothing and shoes. In general, add about five pounds to your base weight to
get an accurate reading. Press Enter.
5. The console now shows “Goal = xxx.” Use the arrow keys to adjust the goal distance, 50
feet at a time. Press Enter.
6. The console now shows “Pacer = Off.” If you want a computerized pacer, use the arrow
keys to set its speed, in feet per minute.
7. Press Enter.
After a short countdown, your workout begins. The Workout Graph shows two rows of dots: the
top row is your progress, the bottom row is the pacer. Your goal distance is at the right side of the
display. The rest of the display is as described in “The Workout Display” in Chapter 3.
Fitness Test
The Personal Climber offers a five-minute fitness test. You can take this test only on a Personal
Climber with a heart rate monitor. It works this way:
The Personal Climber starts at 30 feet per minute, then increases the speed by five feet each
minute, up to 50 feet per minute for the fifth minute. It measures your heart rate at the end of each
minute. After the test, Personal Climber calculates and displays your fitness score. The score is an
estimate of your VO2 Max; it measures the rate at which you can supply oxygen to your cells. The
table at the end of this section will help you interpret your score.
Your score will be an accurate measure of your condition only if your heart rate is at its
resting level when you begin.
Personal Climber Owner’s Manual
Page 19
To start the fitness test:
1. Get on the Personal Climber.
2. Press the Fitness Test key.
1. The light next to
“Weight” now
flashes, and the
console shows the
last weight entered.
You can use the
arrow keys to
change this to your
correct weight. The
Personal Climber
uses this to
calculate how many calories you burn during your workout, so be sure to allow for your
clothing and shoes. In general, add about five pounds to your base weight to get an
accurate reading. Press Enter.
2. The light next to “Age” flashes. Use the up and down arrow keys to set your age. Press
Enter.
3. The display then shows “Sex = Male.” If you are a woman, press the up arrow to show
“Female.”
4. Press Enter.
This starts the test. You cannot change the speed setting during the test. The display is the same as
described in “The Workout Display” in Chapter 3.
At the end of the test, Personal Climber displays your estimated VO2 Max, as described above. Use
the following table to interpret your score:
Fitness Classifications
Women
Men
Age
20-29
30-39
40-49
50-59
60-69
Low
< 24
< 20
< 17
< 15
< 13
Fair
24-30
20-27
17-23
15-20
13-17
Average
31-37
28-33
24-30
21-27
18-23
Good
38-48
34-44
31-41
28-37
24-34
High
49+
45+
42+
38+
35+
Age
20-29
30-39
40-49
50-59
60-69
Low
< 25
< 23
< 20
< 18
< 16
Fair
25-33
23-30
20-26
18-24
16-22
Average
34-42
31-38
27-35
25-33
23-30
Good
43-52
39-48
36-44
34-42
31-40
High
53+
49+
45+
43+
41+
Page 20
Chapter 4 - Advanced Workouts
Custom Program
There are two steps to using a custom program: designing it and selecting it. You design it once,
using Setup Mode; you can then select it whenever you workout. A Personal Climber can have
only one custom program saved at a time.
A custom program consists of up to 60 segments. You set the height for each segment when you
design the program, as described below. When you select your custom program during a workout,
Personal Climber divides the workout length you enter by the number of segments to determine the
length of each segment.
Designing a Custom Program
1. Put the Personal Climber into Setup Mode by turning the climber off, then holding down
the Switch Display key while turning it back on.
2. Press Custom.
3. If there’s an existing custom program on this Personal Climber, it is displayed; if there
isn’t, the workout graph is blank.
Now you choose the setting for the first segment of the program. Press the up arrow to
raise the setting or the down arrow to lower it. When the height is correct, press Enter to
move to the next segment. The display scrolls to the left as you move through the program.
4. Repeat this process for each segment of the program: use the arrow keys to set the height,
then press Enter to move to the next segment.
5. If the program has less than 60 segments, enter a segment with a level of 0 to end the
program.
If you make a mistake while defining the program, you can press Custom to move
back to a previous segment and correct it.
6. When you’re done, press Clear to save the program and leave Setup Mode.
Using a Custom Program
1. Get on the Personal Climber.
2. Press the Custom key.
3. The display will show the length of your last workout in the “Speed” field, and the light
next to “Time” at the right of the console will flash. You can change the workout length
using the up and down arrow keys. Press Enter.
Personal Climber Owner’s Manual
Page 21
1. Personal Climber will
take the workout length
you enter and divide it by
the number of segments
in your custom program
to determine the length of
each segment. For
example, if you have a
program with 15
segments and enter a
workout length of 30
minutes, each segment is 2 minutes long.
2. The light next to “Weight” now flashes, and the console shows the last weight entered.
You can use the arrow keys to change this to your correct weight. Personal Climber uses
this to calculate how many calories you burn during your workout, so be sure to allow for
your clothing and shoes. In general, add about five pounds to your base weight to get an
accurate reading.
3. Press Enter.
While you’re climbing, Personal Climber operates just like it does during one of the preset
programs. The console shows statistics about your workout, and you can raise or lower the overall
level of the program, or pause during it, all as described in Chapter 3.
CHAPTER 5 - THE HEART RATE PROGRAM
As an option, the Personal Climber includes a heart rate monitor harness you can wear during a
workout to continuously monitor your heart rate. In either manual or program mode, the heart rate
monitor merely gives you more information—it lets you see your current heart rate at any time.
However, used with the Personal Climber Heart Rate Control program, this option lets you design
a workout tailored to your age and condition by gradually bringing you to your target heart rate,
then keeping you at that heart rate for the rest of the workout. To use the heart rate program:
1. Get on Personal Climber.
If the Personal Climber is set for “step and go” operation, press the HR Control key
before you get on Personal Climber. Set the workout length, weight, age, and target
rate as described, then start climbing.
If you start climbing in step and go mode, and your last workout was a heart rate
control workout, the Personal Climber will ask you to confirm your target heart rate;
it will skip all the other prompts.
2. The display will show the length of your last workout in the “Speed” field, and the light
next to “Time” at the right of the console will flash. You can change the workout length
using the up and down arrow keys. Press Enter.
1. The light next to
“Weight” now flashes,
and the console shows the
last weight entered. You
can use the arrow keys to
change this to your
correct weight. Personal
Climber uses this to
calculate how many
calories you burn during
your workout, so be sure
to allow for your clothing and shoes. In general, add about five pounds to your base weight
to get an accurate reading. Press Enter.
2. The light next to “Program” now flashes. Press the HR Control key.
3. The light next to “Age” flashes. Use the up and down arrow keys to set your age. Press
Enter.
4. The display will show your target heart rate (based on your age) and the percentage of
your maximum heart rate. Use the up and down arrow keys to set the target heart rate you
want for this workout and press Enter.
5. Start climbing.
Page 24
Chapter 5 - The Heart Rate Program
Over the first few minutes of your workout, Personal Climber will gradually build you up to your
target heart rate. It will then keep you at this rate until the cool-down at the end of the workout.
While you’re climbing, the fields at the top of the console show statistics about your workout. For
details about this display, see the section “The Workout Display,” in Chapter 3. The workout
graph shows a horizontal line representing your target heart rate. Each column of lights is your
heart rate for a segment of the workout, moving from right to left. Each light represents ten beats
per minute. The blinking column is your current heart rate.
If you need to pause during a workout, the climber will remember your workout information. To
reset the climber so you can start a new workout, press Clear twice.
When you finish, you see a workout summary giving the total distance you climbed, calories
burned, and more, including your heart rate as you recover. See “The Workout Display” in
Chapter 3 for a description.
CHAPTER 6 - TESTING THE PERSONAL CLIMBER
You can test the electronics inside Personal Climber by using test mode. In test mode, you can
adjust the tension of the drive belt, check the odometer reading, and test all the LEDs on the
console.
To enter test mode, turn the Personal Climber off, then press and hold the HR Control key while
turning it back on. All displays will light until you release the key.
In test mode, the red lights above and below the Progress Indicator fields show the state of the
Personal Climber’s various input/output signals:
Indicator
Elapsed Time
Calories
Speed
Heart Rate/Level
Distance
Calories/Hour
Signal
Not used
Slack Switch
RPM sensor off
Polar signal
Not used
Not used
Normal
off
on
off
off
off
The Elapsed Time field shows “PC,” indicating this is a Personal Climber; Calories shows the
version number of the Personal Climber’s internal software; Speed shows the state of the slack
switch (either “On” or “Off”).
While the climber is in test mode, some of the console keys have special functions:
Switch Display
Displays the odometer reading and RPM sensor data.
Press HR Control to return to the normal test mode
display.
Up Arrow
Loosens the belt. The belt tensioning motor runs for as
long as you hold the key down. Don’t loosen the belt
for too long, or you may tangle or unsnap the belt.
Down Arrow
Tightens the belt. The belt tensioning motor runs for as
long as you hold the key down.
Endurance
Tests each LED digit group, in turn. Press the key
again to go to the next group. Press Clear to return to
the normal test mode display.
Strength
Tests each LED segment, in turn. Press the key again
to go the next segment. Press HR Control to return to
the normal test mode display.
Manual or
HR Control
Clears special displays and returns to normal test mode
display.
Enter or
Fat Burning
Lights all display LEDs. Press HR Control to return
to the normal test mode display.
Clear
From normal display, ends test mode.
Page 26
Chapter 6 Testing the Personal Climber
To leave test mode, press Clear.
APPENDIX A - CLIMBER LEVEL TO SPEED
CONVERSION
When you adjust the speed during a Personal Climber program, you’re really adjusting the “level”
you have the climber set to. While the climbing speed does increase as you raise the level, there is
not a direct relationship between the level number shown in the Progress Indicator area and your
vertical speed. (In manual mode, the level does equal your vertical speed.)
At lower levels, each level raises your speed by five feet per minute; at higher levels each level
represents a ten foot increase. The following chart shows the climbing speed for each level setting
you can use during a programmed workout. The lowest speed for each level is the speed at a height
of one on the workout; higher speeds are for the more difficult parts of the program.
Exercise Level
1
150
140
130
120
110
100
90
80
75
70
65
60
55
50
45
40
35
30
25
20
15
10
n
n
n
n
n
n
n
n
2
n
n
n
n
n
n
n
n
3
n
n
n
n
n
n
n
n
4
n
n
n
n
n
n
n
n
5
n
n
n
n
n
n
n
n
6
n
n
n
n
n
n
n
n
7
n
n
n
n
n
n
n
n
8
n
n
n
n
n
n
n
n
9
n
n
n
n
n
n
n
n
10
n
n
n
n
n
n
n
n
11
n
n
n
n
n
n
n
n
12
n
n
n
n
n
n
n
n
13
n
n
n
n
n
n
n
n
14
n
n
n
n
n
n
n
n
15
n
n
n
n
n
n
n
n
APPENDIX B - SPEED AND ENERGY CONVERSIONS
The table below shows approximate values for energy used at various speeds during a Personal
Climber workout. The values shown are for a 150 pound climber.
Ft/Min
10
15
20
25
30
35
40
45
50
55
60
65
70
75
80
85
90
95
100
110
120
130
140
150
160
170
180
190
200
M/min
3.0
4.6
6.1
7.6
9.1
10.7
12.2
13.7
15.2
16.8
18.3
19.8
21.3
22.9
24.4
25.9
27.4
29.0
30.5
33.5
36.6
39.6
42.7
45.7
48.8
51.8
54.9
57.9
61.0
MPH
3.2
3.7
4.1
4.6
5.0
5.5
5.9
6.4
6.8
7.3
7.8
8.2
8.7
9.1
9.6
10.0
10.2
10.9
11.4
12.3
13.2
14.1
15.0
15.9
16.8
17.8
18.7
19.6
20.5
Km/H
5.2
5.9
6.7
7.4
8.1
8.9
9.6
10.4
11.1
11.8
12.6
13.3
14.0
14.8
15.5
16.2
17.0
17.7
18.5
19.9
21.4
22.9
24.3
25.8
27.3
28.8
30.2
31.7
33.2
METS
1.6
2.4
3.1
3.9
4.7
5.5
6.3
7.1
7.8
8.6
9.4
10.2
11.0
11.8
12.5
13.3
14.1
14.9
15.7
17.2
18.8
20.4
21.9
23.5
25.1
26.6
28.2
29.8
31.4
KPM/S
3.5
5.2
6.9
8.6
10.4
12.1
13.8
15.5
17.3
19.0
20.7
22.5
24.2
25.9
27.6
29.4
31.1
32.8
34.5
38.0
41.5
44.9
48.4
51.8
55.3
58.7
62.2
65.6
69.1
Watts
34
51
68
85
102
119
135
152
169
186
203
220
237
254
271
288
305
322
339
373
406
440
474
508
542
576
610
644
677
Cal/Hour
146
219
292
365
438
511
584
656
729
802
875
948
1021
1094
1167
1240
1313
1386
1459
1605
1751
1896
2042
2188
2334
2480
2626
2772
2918
Notes:
1. The horizontal equivalent speeds (miles and kilometers per hour) are approximations based on
average energy expenditure.
2. The Calories/Hour and METS figures are based on an estimate of 20% metabolic efficiency.
Actual caloric use will vary for each individual.
3. Kilopond-meters/second (KPM/S) = (speed in meters/second) X (weight in kilos).
4. Watts = (speed in meters/second) X (weight in kilos) X (9.8 meters/second2).
Declaration of Conformity
We declare that to best of our knowledge that the fitness equipment listed below, and
manufactured by:
Tectrix Fitness Equipment Inc.
68 Fairbanks
Irvine CA, 92618, USA
conforms to:
Directive : EMC 89/336/EEC
Standards : IEC335-1, EN55014, EN50082-1
Product Name
: ClimbMax (Series)
Model Numbers : 91000-91999
European Contact : Tectrix International, U.K. Ltd, 20 Hornsby Square, Southfields Industrial Park,
Laindon, Basildon, Essex, SS15 6SD, UK
Phone 011-44-1268-412292
03090
Tectrix Fitness Equipment
P/N 03103