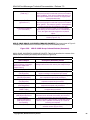
1
Mitel NuPoint Messenger Technical Documentation - Release 7.0
NP Config Administrator’s Guide
Optional Feature
DOCUMENT HISTORY
Revision/Issue
Date Issued
Part Number
Revision A/Issue 2 March 1998
2700-1382-01
Issue 1
November 1999
2700-1382-B1
Contents ©Copyright 2002, Mitel Networks Corporation
Distributed Courtesy of
http://www.promemoinc.com
P.O. Box 1899
Brentwood, CA 94513
Main: (925) 513-7510
Fax: (925) 775-7039
Support: [email protected]
Sales: [email protected]
General: [email protected]
©Copyright 2002, Mitel Networks Corporation
1
Mitel NuPoint Messenger Technical Documentation - Release 7.0
1
Introduction and Overview
This section provides a general introduction and overview of the NP Config Windows NT network
management, fault-detection, and fault-isolation application. NP Config is an optional feature for
NuPoint Messenger™.
Topics covered in this chapter include:
•
A basic description of what NP Config is and how it operates
•
An overview of the NP Config client-server operating environment
Scope of This Manual
Sections 1 through 5 of this manual discuss the following:
•
Section 1. Introduction and overview of the NP Config optional feature.
•
Section 2. Prerequisites. This section lists and briefly describes the various publications and
subject areas that a user should read or understand before using or installing this product.
•
Section 3. Installing NP Config. This section describes the basic steps required for installing
NP Config client software in a selected Windows NT network-management workstation. It
also provides references for instructions on installing NP Config SNMP software in NuPoint
Messenger servers that function as agents on the net.
•
Section 4. Configuration Instructions. This section contains step-by-step instructions on how
to configure installed NP Config software.
•
Section 5. Using NP Config. This section includes step-by-step instructions on how to operate
NP Config client software and how to interpret the output received from selected NuPoint
Messenger servers operating as SNMP agents.
NP Config Features
NP Config is a client application operating in a Windows NT client-server environment that, in
conjunction with an SNMP management application such as the Hewlett-Packard OpenView
Network Node Manager, graphically displays the hardware configuration and operational status of
network-connected NuPoint Messenger servers (see Figure 1-1). Because of the speed with
which the operational status of any component can be displayed, the task of performing network
trouble analysis and fault/alarm management is significantly eased.
NP Config can perform the following tasks:
•
It generates an overall graphic display of interconnected icons showing the hardware
configuration for any selected NuPoint Messenger system on the network.
This configuration diagram (Figure 1-1) displays the interconnection of host units,
communication lines, and mass storage units. Then, by simply clicking on any of the icons in
a display, or by following a brief sequence of displays, screens appear that report the
operational status of these units. When a trap is received from the SNMP management
software about a particular host on the network, the corresponding main card-cage icon
©Copyright 2002, Mitel Networks Corporation
2
Mitel NuPoint Messenger Technical Documentation - Release 7.0
changes to a color that indicates the type of fault. Traps are event messages that the
OpenView Network Node Manager issues when it detects an exception condition.
The NP Config color-coding convention that maps colors to alarm severity is the same as that
used in the Hewlett-Packard OpenView SNMP Network Node Management software.
•
It produces a graphic display showing the physical layout of the various cards in a module’s
card cage.
By clicking on each of the icons showing a card’s location in the card cage, information
screens appear reporting card operational status and showing parameters that can be used
in evaluating the nature of any malfunction.
The use of color coding thus functions to show problem status at the system level. When a
trap is received, the corresponding card-cage icon in the system configuration diagram
changes color in accordance with the alarm severity. By checking the trap-information
screen, the nature of the malfunction can be determined.
Overview
The following paragraphs describe the client-server environment within which NP Config
operates, and includes a functional block diagram (Figure 1-1) showing a typical networkmanagement application. It also includes a description of NP Config functions.
Client-Server Model
NP Config graphical-interface software operates within the client-server model. That is, NP Config
operates as an installed application in an NT network-management workstation allowing the user
to query any of a number of remote nodes on the network to determine how the network is
operating, to request configuration information, or to find out other kinds of management-status
information.
A block diagram of NP Config operating in a typical client-server environment is given in Figure 11. This figure shows NP Config installed in a management workstation running Windows NT. As
shown in the figure, the HP OpenView Network Node Manager is required in order to receive and
process traps generated by any of the servers registered with NP Config.
The selected workstation from which operational queries are sent is known as the client or
manager, and the remote node being queried is known as the agent or server. Because of the NP
Config graphical interface, the network administrator (that is, the client) can send queries or
requests to a specified host by simply clicking on the corresponding icon. The host then responds
without further user intervention and displays the requested data in the form of specific
information screens on the console of the management workstation.
Figure 1-1
NP Config System Block Diagram
NP Config Functions
The NP Config client software performs the network-management functions described in the
following paragraphs.
Configuration Management.
The configuration management function of NP Config allows you to display on your management
©Copyright 2002, Mitel Networks Corporation
3
Mitel NuPoint Messenger Technical Documentation - Release 7.0
console the configuration of any of the servers on the network. Each request for a configuration
display produces a map showing the latest configuration of the server being queried, and permits
the generation of a series of status screens displaying the values of important system parameters
related to that configuration.
Fault/Alarm Management.
The fault/alarm management function of NP Config makes it possible for the user to monitor,
detect, and respond to unusual conditions or alarms (called traps throughout this manual)
generated by the server being monitored.
Fault/alarm-related event information updates the color of the card-cage icon (the inner rectangle)
in the corresponding module-configuration maps. That is, alarm severity is indicated by the color
of the card-cage icon for the module being examined. When more than one alarm is received, the
alarms are prioritized by severity, the most severe being serviced first. Thus, the color
corresponding to the most severe alarm is the one you will see in that module on the
configuration map.
Performance Management.
In addition to reporting configuration changes and alarm events, NP Config also generates
numerous report screens that display the current operational statistics of any selected device on
the network. Using these screens, the user can monitor network performance based on the most
current information.
Screens can be updated on command by the user. These report screens can be grouped into the
following basic categories:
•
System-wide Information screens. This includes NuPoint Voice™ data; optional-feature
information; and screens showing the values of various MIB-II and other defined objects used
throughout the system.
•
Hard-disk-drive statistics screens
•
A basic information screen for each host
•
One or more information screens for each card in the card cage
•
Information screens showing the status of the Ethernet, Fax, and Q-Net cards
2
Prerequisites
This chapter describes the subject areas, manuals, and specifications with which you should be
familiar before using NP Config for network analysis, administration, and management. It also
includes a list of documents that can be used as reference and background sources.
Documents, Specifications, and Topics
Listed below are NP-Config-related subject areas and documents about which network
administrators, installers, and technicians should generally be knowledgeable before they start to
install, configure, or use this system. Where applicable, related manuals, specifications, or
references are listed.
©Copyright 2002, Mitel Networks Corporation
4
Mitel NuPoint Messenger Technical Documentation - Release 7.0
Telecommunication And Network Topics
Basic telecommunication and network-technology prerequisites applicable to NP Config include
general familiarity in the following areas:
•
Hewlett-Packard OpenView Network Node Manager
•
SNMP network-management fundamentals
•
TCP/IP data-transmission protocol
•
The International Standardization Organization (ISO) Open System Interconnect (OSI)
multilayered model for data communication.
•
Packet-switching communication fundamentals
•
SS7 signaling fundamentals
NuPoint Messenger Manuals
The following documents can provide the network administrator with descriptive and background
material for understanding the operation of a NuPoint Messenger server.
•
Model 70 Installation and Service Manual
•
Model 120 Installation and Service Manual
•
Model 640 Installation and Service Manual
•
Error Log Messages Manual
•
NP Admin Mailbox Administrator’s Guide
•
Reference and Configuration Manual (Vol.1: Reference)
•
Reference and Configuration Manual (Vol.2: Configuration)
•
Technical Reference Manual
•
NP Admin API Reference Manual
•
NP Config MIB Reference Manual
•
NP Config SNMP Administrator’s Guide. This manual describes how to install SNMP in a
NuPoint Messenger server and includes the following procedures:
–
Loading NP Config SNMP Files
–
Registering the management station
–
Mapping cards to card-cage slots
–
Loading MIB files
Specifications And References
The following are source and reference documents that cover the application technology on
which NP Config is based.
•
MIB-II: Management Information Base for Network Management of TCP/IP-Based Internets,
(Network Working Group, RFC 1213, (1991))
•
Definitions of Managed Objects for DS1/E1 Interface Types, (Network Working Group, RFC
1406, (1993))
•
Sidnie Feit, SNMP, A Guide to Network Management, (McGraw-Hill, 1995)
©Copyright 2002, Mitel Networks Corporation
5
Mitel NuPoint Messenger Technical Documentation - Release 7.0
•
Douglas Comer, Internetworking with TCP/IP, (Prentice-Hall, 1988)
•
Marshall T. Rose, The Simple Book, An Introduction to Internet Management, (Prentice-Hall,
1994)
•
Travis Russell, Signaling System 7 (SS7), (McGraw-Hill, 1995)
User’s Guide for Hewlett-Packard OpenView Network Node Manager , (HP part number:
•
J1120-90004)
3
Installing NP Config
This section contains the step-by-step procedures for installing NP Config in the workstation you
have selected to use for network management. These installation procedures apply to loading
software both from the diskettes and from shared files on your network.
Required Minimum Configurations
In order to install and operate NP Config (ONC) successfully, your network-management station
should have the minimum configuration of hardware and software as listed in the following
sections.
Network Management Workstation
Your network management workstation should have the following minimum configuration:
•
PC with Pentium CPU, or equivalent
•
32 MB of RAM
•
50 MB of free hard-disk storage available
•
3 1/2-inch diskette drive
•
High-resolution VGA monitor, or equivalent
•
Windows NT 4.0
•
Hewlett-Packard OpenView Network Node Manager, Version 5.01 or above
•
32-bit WinSNMP software (to implement client-server communication)
•
Microsoft Access DBMS and 32-bit ODBC driver. The DBMS and ODBC software are
included with the ONC install program.
NuPoint Messenger Server
Each NuPoint Messenger Server on the network being managed should have the following
minimum configuration:
•
Model 640, Model 120, or Model 70 system with an Ethernet card installed
•
Each server must have Unified TCP/IP optional-feature software installed and configured.
•
NP Config SNMP software must be installed in each server. The step-by-step procedure for
installing SNMP in a NuPoint Messenger server is given in the manual: NP Config SNMP
Administrator’s Guide. This manual describes a complete SNMP installation, which includes
©Copyright 2002, Mitel Networks Corporation
6
Mitel NuPoint Messenger Technical Documentation - Release 7.0
the following procedures:
–
Loading NP Config SNMP Files (optional feature)
–
Registering the management station
–
Mapping cards to card-cage slots
Installation From Diskette
NP Config software and the PDF version of this manual is delivered to the user on five 3.5-inch
diskettes labeled NP Config 1.0. Installation involves two main steps:
•
Installing NP config software in a Windows NT network-management workstation.
•
Installing the enterprise MIBs (management information bases) to operate with HP OpenView
network management software.
Installing NP Config Software
After booting your network-management workstation, proceed as follows:
1. Insert floppy disk 1 in drive A:.
2. In the desktop list of devices and folders, click on the icon marked “31/2 Floppy (A:)”. This
allows you to install NP Config from the floppy drive.
A list of the files contained on Disk 1 is now displayed.
3. In the displayed file list, double click on the file: Setup.exe.
This launches the Setup program. Its progress is shown on the setup screen that now
appears. When setup is complete, the following screens appear in sequence:
–
Welcome screen
–
Software License screen
–
Readme Information screen
–
Choose Destination Location screen
–
Start Copying Files screen
In the sequence shown, follow the directions on each of the above screens.
4. When the Start Copying Files screen appears, select Next.
Your system now starts to copy NP Config files to the location you specified in the Choose
Destination Location screen. You will be prompted to insert each diskette in turn.
5. At the completion of file loading, the Setup Complete screen appears. You can then select
the option of launching the NP Config program file or simply allowing the loading of NP
Config to run to its conclusion. In either case, click on the Finish button to end the installation
procedure.
6. At the completion of installation, restart the system to be able to see the location of NP Config
on the NNM menu bar.
©Copyright 2002, Mitel Networks Corporation
7
Mitel NuPoint Messenger Technical Documentation - Release 7.0
Loading the Enterprise MIBs
After installing NP Config in your management workstation, the next step is to install the
enterprise MIBs. Open the HP Network Node Manager and proceed as follows:
1. Go to the initial map (labeled Root) that appears when NNM boots up.
2. From the Options menu on the NNM toolbar, select: Load/Unload MIBs:SNMP.
A screen labeled Load/Unload MIBs:SNMP now appears.
3. From the Load/Unload MIBs:SNMP screen, select Load.
This begins the process of locating the group of MIBs from which you can select those you
want to install.
4. From the screen labeled SNMP MIB Files Not Found, which now appears, click on Browse.
A screen labeled “Load/Unload MIBs: SNMP / Load MIB From File” now appears. This is the
screen within which you can specify the location of the MIBs to be loaded.
5. Search for the MIB files that have been loaded from the installation diskettes, or enter the
path name for the folder containing these MIBs.
NOTE: If you do not enter a path name at installation, the default path location supplied by
the installation disk is:
C:\Program Files\Centigram\NPConfig\MIBs
Here is a typical list of the MIBs supplied on the installation diskettes:
host1
host2
host3
host4
ss7
system
t1
trapsmi
6. Select a MIB from the list and click on Open.
This returns you to the screen labeled Load/Unload MIBs:SNMP. After a brief delay, the
selected MIB appears in the scroll list labeled “Loaded SNMP MIBs:” The presence of a MIB
in this list indicates that it is now loaded in the NP Config system. Also, note that a MIB in the
scroll list is given the suffix “.mib”. Thus, for example, the host1 and host2 MIBs appear in the
list as host1.mib and host2.mib.
7. To install the next MIB, in the screen labeled Load/Unload MIBs:SNMP, again click on Load.
This returns you to the screen labeled “Load/Unload MIBs: SNMP / Load MIB From File”.
8. Click on the next MIB you want to load and then click on the Open button.
You are again returned to the screen labeled Load/Unload MIBs:SNMP. After a brief delay,
the newly selected MIB appears in the scroll list labeled “Loaded SNMP MIBs:” .
9. Repeat these steps until all desired MIBs are loaded. Then complete the process by clicking
on the Close button.
©Copyright 2002, Mitel Networks Corporation
8
Mitel NuPoint Messenger Technical Documentation - Release 7.0
Installation From a Network
You can also install NP Config from your network. The NP Config files should be part of a
centrally located group of shared applications. For full information on the location of these files
and how to load NP Config onto your network-management workstation, consult your network
administrator. Be sure to restart the system after installation and then load the MIBs.
After Installation
Following installation, there is one possible configuration option. This option is discussed in the
next chapter (“Chapter 4, Configuration”.)
Removing an NP Config Installation
If, for any reason, you need to remove (that is, “uninstall”) a currently installed version of NP
Config from your management workstation, you can do so by means of the “Add/Remove
Programs” application that is part of your Windows software. Proceed as follows:
1. Click on the Start button at the bottom left of your screen.
2. From the Settings menu options, select Control Panel.
A screen labeled Control Panel now appears.
3. On the Control Panel screen, double click on the icon marked Add/Remove Programs.
A screen labeled Add/Remove Programs Properties now appears. This screen has three
selection tabs.
4. Select the tab marked Install/Uninstall and then, in the selection list, scroll to NP Config.
5. Select NP Config and then click on Add/Remove.
Note that Remove is implied here by the very fact that NP Config is present in the selection
list.
6. The uninstall process now begins and is tracked by a progress-indication screen. From this
point, several status screens appear in sequence, each requesting your permission to
proceed. In all cases, indicate your agreement to continue with the process until uninstallation
completes.
4
Configuration
In general, in the process of installing NP Config in its management workstation, all configuration
is handled by the install program and normally no further configuration activity is required. There
is, however, one additional configuration option that is open to you. This involves setting up the
HP OpenView Network Node Manager (NNM) to allow you to launch NP Config from a map icon,
as described in the following paragraphs.
©Copyright 2002, Mitel Networks Corporation
9
Mitel NuPoint Messenger Technical Documentation - Release 7.0
Configure NNM to Launch NP Config From a Map Icon
Proceed as follows:
1. Go to the initial map (labeled Root) that is displayed when NNM starts up.
An icon marked “Internet” appears in this display.
2. Double-click on the “Internet” icon.
A window labeled “Internet” appears, containing an icon, labeled IP, with a node-address
beneath it.
3. Double-click on the IP icon.
This explodes the IP icon into a top-level network map.
4. Working with this map, double-click on the network icon that corresponds to your network
segment
5. Continue moving down through network icons until you reach the NuPoint Messenger map
icon from which you wish to be able to launch NP Config.
6. Using the right mouse button, click on this NuPoint Messenger icon.
A selection box now appears.
7. Click on the option: “Symbol Properties” in the selection box.
A screen labeled “Symbol Properties” now appears.
8. Select the option “Execute” in the box labeled “Behavior.”
9. In the scroll box, scroll to: “NPConfig: Launch NP Config” and select it.
10. Complete the configuration process by clicking on OK at the bottom of the dialog box.
You can now launch NP Config by double clicking on the selected NuPoint Messenger map
icon.
5
Using NP Config
This section contains step-by-step instructions that guide the user in the operation and use of NP
Config in conjunction with the HP OpenView Network Node Manager. These procedures will
guide the user in performing fault detection and fault isolation; in monitoring the status of selected
network components; and in the retrieval and display of network performance information.
Introduction
Starting operation of NP Config involves the following steps:
1. Installing HP OpenView Network Node Manager (NNM) in your network-management
workstation. Be sure to restart the system after you install HP OpenView.
2. Connecting to a selected NuPoint Messenger server from which management information is
desired.
©Copyright 2002, Mitel Networks Corporation
10
Mitel NuPoint Messenger Technical Documentation - Release 7.0
At the completion of the above steps, begin the network-management process for a selected
node. Your starting point is the component interconnections displayed in the form of icons and
buses on the Basic System-Configuration map (Figure 5-3).
Operating Your NP Config System
The procedure that follows gives instructions for operating your NP Config system as a tool for
monitoring, analyzing, and troubleshooting any of the NuPoint Messenger communication servers
on your network.
Registering NP Config Server Addresses
The first step in operating NP Config is to determine which NuPoint Messenger servers (that is,
nodes) on the net you wish to monitor and then to register the names and IP addresses of these
servers into the NP Config new-server files. Proceed as follows:
1. Launch NP Config by either double-clicking on the NuPoint Messenger icon of the basic HP
OpenView network map, or by clicking on NP Config in the HP OpenView main menu bar and
then selecting NP Config from the resulting drop-down menu.
Note that if no servers have yet been registered, a blank NP Config screen appears,
containing only a menu bar and a tool bar at its top.
2. Determine the name, primary IP address, and alternate IP address (if used) for each server
whose network connections you wish to examine.
IMPORTANT: We recommend that you use both a primary and an alternate address if the
NuPoint Messenger system includes more than one Ethernet card.
3. From the File drop-down menu on the NP Config menu bar, select the option New server... A
screen designated New Server now appears, as shown in Figure 5-1.
Figure 5-1
New-Server Data-Entry Screen
4. On the New Server screen (Figure 5-1), enter the name, primary IP address, and alternate IP
address (if used) for the first server you have selected; then select OK.
The ONC Basic System-Configuration map (Figure 5-3) for the server is now displayed.
5. Repeat steps 3 and 4 for the remaining servers that you listed in Step 2.
The servers that you wish to monitor are now connected to NP Config. Their names are also
displayed in the Connect-to-Server screen (see Figure 5-2) to allow you to choose which to
monitor.
Connecting NP Config to a Server
After you have registered the names and IP addresses of your selected servers, use the
procedure that follows to connect NP Config to one or more of these servers.
1. From the File drop-down menu on the NP Config menu bar, select the option Connect
server... A screen designated Connect to Server now appears, as shown in Figure 5-2.
Note that if this is the first server to be connected in this session the drop-down menu serverconnection option is labeled as Open. When any subsequent servers are to be connected,
©Copyright 2002, Mitel Networks Corporation
11
Mitel NuPoint Messenger Technical Documentation - Release 7.0
this menu option is labeled as “Connect server.”
Figure 5-2 Connect to Server Screen
2. The Connect-to-Server screen (Figure 5-2) lists all the servers currently registered in NP
Config.
As shown in Figure 5-2, three servers are currently registered.
3. From this list, highlight the name of the server to be connected and then click on OK.
The basic system-configuration map (see Figure 5-3 and Table 5-1), showing the
components of the selected server, now appears.
4. To connect another server, from the File drop-down menu on the NP Config menu bar, again
select the option: Connect server...
The Connect-to-Server screen now appears.
5. On the Connect-to-Server screen, highlight the name of the next server you wish to connect
to NP Config, then click on OK.
6. Repeat steps 4 through 6 for each server that you wish to connect to NP Config.
This completes the connection process.
Figure 5-3
Basic System-Configuration Map
Confirming a Server’s Name and IP Address
To find or check on the name and IP address of a given server, proceed as follows:
1. Locate the small rectangular server-identification icon (see Figure 5-3) appearing at the lower
left of the window that contains the NP Config basic system-configuration map for the server
whose identification you wish to determine.
2. Double click on the server identification icon.
The corresponding server-identification screen appears (see Figure 5-4). The assigned
server name appears in the bar at the top of the screen. This screen shows the primary and
alternate addresses that are assigned to that server. You can repeat this procedure for all
servers that have been registered with ONC.
Figure 5-4
Server-Identification Screen
Disconnecting a Server
To disconnect a server from NP Config, proceed as follows:
1. Open the server to be disconnected so that its basic configuration map appears in the NP
Config window.
2. From the File drop-down menu on the NP Config menu bar, select the option “Disconnect
server.”
This removes the server from the list of devices that NP Config will monitor. Its name, primary
IP address, and secondary IP addresses continue to be registered in NP Config.
©Copyright 2002, Mitel Networks Corporation
12
Mitel NuPoint Messenger Technical Documentation - Release 7.0
Deleting a Server
Deleting a server removes its name, primary address, and secondary address from registration
with NP Config. A server that you remove can no longer be monitored by NP Config until it is
once again registered.
Note: When you delete a server, you delete all data about it from the underlying data base, including all
trap data for that server.
To delete a server, proceed as follows:
1. From the File drop-down menu on the NP Config menu bar, select the option Delete server...
A screen designated Delete Server now appears, as shown in Figure 5-5. This screen
contains a list of all servers currently registered with ONC.
2. Highlight the name of the server you wish to delete, then click OK.
The server is now removed from registration with NP Config. Repeat this procedure for all
servers to be deleted.
Figure 5-5
Delete-Server Screen
Using the Update Server Information Screen
INTRODUCTION. At any time during the operation of One Net Config, you can update the
contents of any (or all) of the data bases that provide information to the various status,
configuration, and information screens used in managing any selected NuPoint Messenger
server. Note that any time you make changes or reconfigurations to the system, it would be
advisable to update the corresponding databases.
Updating is done by use of the Update Server Information screen shown in Figure 5-6. By using
this screen, you can perform four primary functions:
•
Update all data bases on a selected server.
Notice, however, as described below, that other options on the Update Server Information
screen also allow you to update specific data bases or groups of data bases.
•
Update system information only. This includes the following:
–
The data base controlling the basic system configuration map (Figure 5-3)
–
The data bases controlling the system-wide voice-memo-data screen (Figure 5-31) and
the system-wide optional-features-data screen (Figure 5-32)
–
The data bases controlling the system-wide MIB-II-related screens (Figure 5-30 and
Figure 5-33 through Figure 5-51).
•
Update data bases related to the display of information on any or all (up to four) of the
NuPoint Messenger modules at a selected node. Figure 5-7 shows a typical NuPoint
Messenger module information screen.
•
Update the data bases related to either or both of these optional features:
–
SS7 data bases (Figure 5-18)
–
T1/E1 data bases (Figure 5-13)
©Copyright 2002, Mitel Networks Corporation
13
Mitel NuPoint Messenger Technical Documentation - Release 7.0
The following paragraphs provide instructions on how to use the functions shown in the Update
Server data bases screen (Figure 5-6).
The Update-All-Information Function
The Update All Information function shown in Figure 5-6 allows you to update all data bases used
for NP Config. Proceed as follows:
1. On the Basic System-Configuration map (Figure 5-3), click on the Update button.
The Update Server Information screen (Figure 5-6) now appears.
2. Click on the box marked Update All Information, and then click on the OK button at the
bottom of the screen. Note that when this box is selected, the other boxes on the screen go
gray, an indication that all have been selected.
A progress screen labeled Update Server now appears. When all updates are complete, the
system returns you to the Basic System Configuration map (Figure 5-3).
Note: Depending upon system-configuration factors such as, for example, number of modules in a node,
an update may take up to several minutes to complete.
The Update-System Function
The Update System function shown in Figure 5-6 allows you to update specific system-wide data
bases. Note the following:
SYSTEM INFORMATION. If you select the System Information box, the following data bases
are updated:
•
The data bases controlling the system-configuration information displayed on the basic
system-configuration map (Figure 5-3)
•
The data base controlling the system-wide optional-features-data display (Figure 5-32
MIB-II INFORMATION. If you select the MIB-II Information box, the following data bases are
updated:
•
The data base controlling the system-wide MIB-II-related screens (Figure 5-30 and Figure 533 through Figure 5-51). See the discussion of MIB-II later in this chapter.
To update any or all of these data bases, proceed as follows:
1. On the Basic System-Configuration map (Figure 5-3), click on the Update button.
The Update Server Information screen (Figure 5-6) now appears.
2. Click on the box marked System Information or MIB-II Information, or both boxes, and then
click on the OK button at the bottom of the screen.
A progress screen labeled Update Server now appears. When all updates are complete, the
system returns you to the Basic System Configuration Map (Figure 5-3).
Note: Depending upon system-configuration factors such as, for example, number of modules in a node,
an update may take up to several minutes to complete.
The Update-Module Function
©Copyright 2002, Mitel Networks Corporation
14
Mitel NuPoint Messenger Technical Documentation - Release 7.0
The Update Module function shown in Figure 5-6 allows you to update the data bases containing
information on one or all of the NuPoint Messenger modules that make up a selected node. To do
this, proceed as follows:
1. On the Basic System-Configuration map (Figure 5-3), click on the Update button.
The Update Server Information screen (Figure 5-6) now appears.
2. Click on either the box marked All Modules, or on any of the boxes marked 1, 2, 3, or 4 to
update the data bases corresponding to specific modules, and then click on the OK button at
the bottom of the screen.
A progress screen labeled Update Server now appears. When all updates are complete, the
system returns you to the Basic System Configuration map (Figure 5-3).
Note: Depending upon system-configuration factors such as, for example, number of modules in a node,
an update may take up to several minutes to complete.
The Update-Optional-Features Function
The Update Optional Features function shown in Figure 5-6 allows you to update the data bases
containing information on the SS7 optional feature or on the T1/E1 optional feature, or both.
SS7 and T1/E1. To update either or both of these data bases, proceed as follows:
1. On the Basic System-Configuration map (Figure 5-3), click on the Update button.
The Update Server Information screen (Figure 5-6) now appears.
2. Click on the box marked SS7 Information or T1/E1 Information, or click on both boxes, and
then click on the OK button at the bottom of the screen.
A progress screen labeled Update Server now appears. When all updates are complete, the
system returns you to the Basic System Configuration Map (Figure 5-3).
Note: Depending upon system-configuration factors such as, for example, number of modules in a node,
an update may take up to several minutes to complete.
Figure 5-6
Update Server Information Screen
Displaying the Basic System Configuration Map
To display the Basic System Configuration map screen (Figure 5-3):
1. After registering the server with NP Config, select Connect Server from the File menu on the
menu bar.
The Connect to Server screen (Figure 5-2) now appears.
2. On the Connect to Server screen, select the server you wish to open and then click OK.
The basic system configuration map for the selected server now appears. See Figure 5-3.
Printing The Contents of a Screen
You can print the contents of most NP Config screens shown at your management workstation.
©Copyright 2002, Mitel Networks Corporation
15
Mitel NuPoint Messenger Technical Documentation - Release 7.0
To print out a display, click on the Print button at the bottom of its screen. The normal setup
screen for your printer then appears. After telling the printer to go ahead, the selected screen
prints out on your assigned or default printer.
Using the System Configuration Map
The basic system configuration screen (Figure 5-3) displays in map form the modules that make
up a specific node (up to four modules per node), its card cage, and its configuration of peripheral
devices. The map also diagrams the linkages between the modules that make up the node, its
SCSI disk drives, and the network. To obtain nformation about the module(s), cards, peripheral
devices, and network linkages, click on their respective icons.
The following table (Table 5-1) describes the features that are normally found on a typical basic
system configuration map (Figure 5-3).
Table 5-1
Feature
Module icon
Card-cage icon
Q-Net bus
Basic System Configuration Map
Description
Rectangles designated Module1, Module2, Module3, and
Module4 (depending upon the node’s
configuration) identify the modules in the
selected node. Clicking on one of these icons
displays a screen that contains general
information about the corresponding module.
An example of such an information screen is
shown in Figure 5-7. Contained within each
module icon is a smaller rectangular icon
representing the card cage.
Within each module icon is a smaller rectangular icon that
represents that module’s card cage. These
icons are labeled Card1, Card2, Card3, and
Card4, depending upon the node’s
configuration. The color of each card-cage icon
tells you its current operational status. See
Table 5-4 for an explanation of this color
coding. Clicking on any of these inner
rectangles displays a screen showing the
identification and location of each of the cards
in the corresponding card cage, an example of
which is shown in Figure 5-9.
Clicking on either of the Q-Net lines calls up a screen that
shows the status and characteristics of the
corresponding Q-Net card. This screen contains
four tabs. The tab that is activated (brought to
front) indicates the module in which the Q-Net
card is located. The numeral at the right end of
the bus indicates the card-cage slot in which the
Q-Net card is located.
©Copyright 2002, Mitel Networks Corporation
16
Mitel NuPoint Messenger Technical Documentation - Release 7.0
Ethernet bus
SCSI drive(s)
System Info button
Update button
Clicking on this line calls up a screen that shows the status and
characteristics of the Ethernet card. This screen
contains four tabs. The tab that is activated
(brought to front) indicates the module in which
the Ethernet card is located. The numeral at the
right end of the bus indicates the card-cage slot
in which the Ethernet card is located.
Clicking on any of these icons (designated 0:0, 0:1, 1:0, 1:1, and
so forth) calls up a screen that shows the status
and characteristics of the corresponding SCSI
hard-disk drive. For an example, see Figure 58. Also, note that the interconnection between
the modules and the drives displays the actual
system configuration.
Clicking on this button is the entry point to a series of screens
(starting with Figure 5-31) that provide you with
NuPoint Voice data, overall system information,
information on installed optional features, and
status information on the MIB-II data objects
used in this system.
Clicking on this button causes the display of the Update Server
Information screen (Figure 5-6). Using the fields
in this screen, you can update any or all of the
NP Config data bases.
Clicking on this button opens the Trap Report Information
screen (see Figure 5-52). Using the fields of this
screen you can display basic event-description
information as well as other data that identifies
the origin and nature of a trap or error event.
TRAP button (located
on
menu
bar,
see
Figure
5-3)
Close button
Clicking on this button disconnects the displayed server from NP
Config.
Basic Module Information
You can display a screen containing descriptive information about a selected module when you
click on the Module icon (see Figure 5-3) that contains the module’s number, that is, Module 1,
Module 2, Module 3, or Module 4. Figure 5-7, labeled “Module 1 Info”) is an example of such an
information screen for Module 1.
Note that a subset of this module information is displayed when you click on the CPU icon in the
card-cage display (see Figure 5-9 and Figure 5-10).
Figure 5-7
Basic Module Information Screen
BASIC MODULE INFORMATION TABLE. Basic module information (in this example, for Module
1) is shown in Figure 5-7 and explained in Table 5-2.
Table 5-2
Basic Module Information
Parameter
Description/Values
©Copyright 2002, Mitel Networks Corporation
17
Mitel NuPoint Messenger Technical Documentation - Release 7.0
hostModuleType
(CPU Type)
hostCpuSpeed
(CPU Speed)
hostQNXReleaseVersion
(QNX Release)
hostMachineType
(Machine Type)
hostFloppyType
(Floppy Type)
hostUpTime
(Up Time)
hostCurrentTime
(Current Time)
hostMemoryUsage
(Memory Usage)
hostLogPartitionUsage
(Log Partition Usage)
Close (button)
This field identifies the type of CPU in the selected module.
Possible values:
• i80386
• i80486
• pentium
This field tells you the clock speed (in megahertz) of the
CPU in the selected module.
This field tells you the release/version number of the QNX
system in the selected module.
Range of values: 0 to 20 characters
This field identifies the machine type (platform) employed in
the selected module.
Range of values: 0 to 20 characters
This field tells you the capacity in Kbytes of the floppy drive
used with the selected module. Acceptable values are:
(1) floppy-unknown type/capacity
(2) floppy-360K
(3) floppy-1440K [high density]
This field tells you the elapsed time (measured to
hundredths of a second) since the selected module was
last booted.
This field tells you the current date and time of day.
Range of values: 0 to 40 characters
This field tells you the amount of memory used in the
selected module, expressed as total memory size, current
amount of memory used, and percent of total memory
used.
Range of values: 0 to 40 characters
This field tells you the disk size of the selected module’s log
partition, expressed as total partition size, current partition
amount used, and percent of total partition used.
Range of values: 0 to 40 characters
Click this button to return to the Basic System-Configuration
map (Figure 5-7.)
Disk-Drive Status And Configuration Data
To obtain status and configuration information on any of the hard disk drives operating with a
selected module, click on that drive’s icon in the Basic System Configuration map (see Figure 5-3
and Table 5-1). An information screen describing the selected drive then appears, as shown in
Figure 5-8.
Figure 5-8
Typical Hard-Disk Drive Information Screen
HARD-DISK DRIVE INFORMATION. The hard disk drive information (in this example, for the
drive designated 2:1) shown in Figure 5-8 is described (including the range of possible values) in
Table 5-3.
Table 5-3
Typical Hard Disk Drive Information
Parameter
Description/Value
©Copyright 2002, Mitel Networks Corporation
18
Mitel NuPoint Messenger Technical Documentation - Release 7.0
vmsysDiskType
(Type)
vmsysDiskServiceStatus
(Status)
vmsysDiskVendor
(Vendor)
vmsysDiskModel
(Model)
vmsysDiskSerialNum
(Serial No.)
vmsysDiskRevision
(Revision No.)
vmsysDiskVMSyncStat
(VM Sync)
vmsysDiskQNXSyncStat
(QNX Sync)
vmsysDiskCapacity
(Capacity)
vmsysDiskSpeechHour
(Speech Hours)
vmsysDiskAccounts
(Total Accounts)
This field tells you the configuration of the hard disk drive
you have selected.
Possible values are:
(1) Primary - System Disk. Contains both VM and QNX
data. This is a primary disk operating as part of a primaryredundant pair.
(2) Primary - Nonsystem Disk. Contains only VM data. A
primary disk operates as part of a primary-redundant pair.
(3) Redundant - Nonsystem Disk. Contains only VM
data. Second (redundant) disk operating as part of a
primary-redundant pair.
(4) Redundant - System Disk. Contains both VM and
QNX data. Second (redundant) disk operating as part of a
primary-redundant pair.
(5) Single - System Disk. Contains both VM and QNX
data. This is a stand-alone disk.
(6) Single - Nonsystem Disk. Contains only VM data.
This is a stand-alone disk.
This field tells you the current service status of the selected
drive. Possible values are:
(1) in service
(2) out of service
This field names the manufacturer of the selected disk
drive.
This field provides the model designation of the selected
disk drive.
This field tells you the serial number of the selected disk
drive.
This field tells you the manufacturer’s revision number for
the selected disk drive.
This field tells you the synchronization status of a selected
disk-drive in a system.
Acceptable values are:
(1) vm in sync. The primary drive and its redundant pair are
synchronized.
(2) vm out of sync. The primary drive and its redundant pair
are out of synchronization.
(3) not applicable. This is a stand-alone drive.
This field tells you the synchronization status of a QNX
system disk drive.
Acceptable values are:
(1) QNX in sync. The primary/redundant QNX pair are
synchronized.
(2) QNX out of sync. The primary/redundant QNX pair are
out of synchronization.
(3) not applicable. This is a stand-alone drive.
This field tells you the storage capacity (in megabytes) of
the selected disk drive.
This field tells you the configured speech capacity (in
hours) of the selected disk drive.
This field counts the number of accounts stored on the
selected disk drive.
©Copyright 2002, Mitel Networks Corporation
19
Mitel NuPoint Messenger Technical Documentation - Release 7.0
vmsysDiskRedundantID
(Redundant ID)
Close (button)
This field contains the designation (in the format n:m,
where n is the module number and m is the drive number)
of the drive that is the redundant half of a selected diskdrive pair.
Range of values: up to 10 characters.
Clicking on this button returns you to the Basic SystemConfiguration map (Figure 5-3).
Using the Card-Information Displays
Clicking on the “Card” rectangle located within each Module icon on the basic system
configuration map (see Figure 5-3) produces a screen display showing the contents of the card
cage for that module (see Figure 5-9).
The following sections describe how to obtain operational and status information on the various
cards that may be present in the card cage of a selected server.
Cards Supported
The card displays described in this section are:
•
CPU card
•
Line card (LC8, DSP8)
•
Voice processing cards (DSP24, DSP30)
•
DS1 Trunk Interface card (T1/E1)
•
SS7 card
•
Ethernet card
•
FAX card (FAX2, FAX4, FAX8)
•
Q-Net card
•
Voice recognition card
•
Power card
Clicking on the Card rectangle within a module icon (for an example, see Figure 5-3) causes a
screen to appear that displays the module’s card cage and its current configuration of cards (see
Figure 5-9 for a typical card-cage example). Clicking on any of the card symbols shown in the
card-cage screen causes the display of one or more corresponding information screens for that
card. Such a screen displays data concerning the card’s current operational and configuration
status.
Color Coding of Card-Cage Icons in the System Display
The color of a card-cage icon denotes its trap/alarm status. To obtain information about the trap
status of any the cards in a selected NuPoint Messenger card cage, click on the rectangle
marked Card1, Card2, Card3, or Card4 within the corresponding Module icon shown on the basic
configuration map (Figure 5-3). Note the following points:
•
The color of the Card rectangle within a module icon tells you the trap/alarm status of its
corresponding module. See Table 5-4 for the trap severity levels indicated by the various
colors displayed.
©Copyright 2002, Mitel Networks Corporation
20
Mitel NuPoint Messenger Technical Documentation - Release 7.0
•
If more than one trap is received at your management workstation, NP Config compares
them, and the color corresponding to the highest level of severity then appears on the Card
rectangle as its trap severity indication.
Module Color-Code Meanings
Table 5-4 describes the operational states indicated by the colors of the card-cage rectangles
shown in the Basic System-Configuration map (Figure 5-3). The colors of these icons indicate the
severity levels of the fault/alarm messages received when a server sends a trap to the client
workstation. For your convenience, retain a copy of this table at your management workstation.
Table 5-4
Icon Color
Red
Orange
Yellow
Cyan
(greenish
blue)
Magenta
(purplish red)
Blue
Green
Icon-Color Meanings for Fault/Alarm States
Severity
Description of State
Level
Critical
A unit is down or unavailable. Check the trap
(most severe) information screen (Figure 5-52) for information about
the state of device operation.
Major
Problem resulting in serious but partial degradation of
function. Check the trap information screen (Figure 552) for information about the state of device operation.
Minor
Noncritical condition that results in minor degradation
of function. Check the trap information screen (Figure
5-52) for information about the state of device
operation.
Warning
A problem condition is present, but one that involves
no degradation of core function. Check the trap
information screen (Figure 5-52) for information about
the state of device operation.
Informational This color alerts you to check the trap information
alert
screen (Figure 5-52) for information about the state of
device operation.
Unknown
No information available on state of device (status not
(least severe) reported). Check the trap information screen (Figure 552).
Normal
No problem is present. System is in full operation.
operation
Card-Cage Display
Figure 5-9 displays and identifies the contents of a typical NuPoint Messenger card cage. This
type of display is obtained by clicking on the color-coded rectangle found within each module icon
shown in the basic system configuration map (Figure 5-3).
Figure 5-9
Typical Card-Cage Configuration Display
CPU Card
When you click on the CPU icon in the card cage display (Figure 5-9), the CPU card information
display screen then appears, as shown in Figure 5-10.
Figure 5-10
CPU Card Information Screen
©Copyright 2002, Mitel Networks Corporation
21
Mitel NuPoint Messenger Technical Documentation - Release 7.0
CPU CARD INFORMATION TABLE. Table 5-5 provides an explanation of the contents of the
CPU card information screen (Figure 5-10).
Table 5-5
CPU Card Information
Parameter
Description/Values
hostCpuType
This field identifies the type of CPU in the module. Possible
(CPU Type)
values:
• i80386
• i80486
• pentium
hostCpuSpeed
This field tells you the speed (in megahertz) of the CPU.
(CPU Speed)
hostMachineType
This field identifies the special characteristics of the machine in
(Machine Type)
this module.
Range of values: 0 to 20 characters
hostUpTime
This field tells you the elapsed time (measured to hundredths of
(Up Time)
a second) since this module was last booted.
hostCurrentTime
This field tells you the current date, and time of day. Range of
(Current Time)
values: 0 to 40 characters
hostMemoryUsage
This field displays the amount of memory used in this module.
(Memory Usage)
The display has three parts:
(1) Percentage of total memory used
(2) Total memory size (in Kbytes)
(3) Actual amount of memory used (in Kbytes).
Field size: 0 to 40 characters
Close (button)
Clicking on this button returns you to the Card-Cage
Configuration display (one example of which is shown in Figure
5-9).
Line Cards and Voice-Processing Cards
LINE CARDS. NP Config supports the following line cards, which include up to eight telephone
line interfaces (ports) on one card:
•
LC8
•
DSP8
VOICE PROCESSING CARDS. NP Config supports the following signaling (voice) cards, which
perform standard voice processing functions for store and forward speech and telephony
signaling taken from either a 24- or 30-channel MVIP-bus input stream:
•
DSP24
•
DSP30
BASIC INFORMATION DISPLAY. When you click on any of these line-card or voice-card icons
in the card cage display (Figure 5-9), a basic descriptive-information display screen for that line
card then appears, a typical example of which is shown in Figure 5-11. Note that this screen has
two parts, each selectable by a tab. These tabs are labeled: Card Information (left tab), and
Configured Ports (right tab.) Note that the right tab does not appear for voice cards. The cardinformation screen (left tab) has the same format for both the voice and the line cards listed
above. The Configured Ports display (right tab) appears for line cards only.
©Copyright 2002, Mitel Networks Corporation
22
Mitel NuPoint Messenger Technical Documentation - Release 7.0
CONFIGURED PORTS DISPLAY. When you click on the second (right) tab, the screen presents
descriptive information concerning line group, operational status, and trunk type for each of the
line card’s configured ports. A typical example of a configured-ports display is shown in Figure 512.
Note: Because voice cards do not have configurable ports, the display shown in Figure 5-12 applies to line
cards only.
Figure 5-11
Line-Card and Voice-Card Display
Note: If you have selected a voice processing card, the above display (Figure 5-11) will not include a
Configured Ports tab.
LINE CARD AND VOICE-CARD INFORMATION TABLE. An explanation of the contents of the
basic Line-Card and Voice-Card display (Figure 5-11) is given in Table 5-6.
Table 5-6
Line Card and Voice Card Information
Parameter
Description/Value
hostLineCardType
This field tells you the type of line card you have selected.
(Card Type)
Acceptable values are:
(1) other (none of the following)
(2) lc8
(3) dsp8
(4) dsp24
(5) dsp30
hostLineCardStatus
This field tells you the status of the card in the selected card(Card Status)
cage slot. Acceptable values:
(1) empty (need to update data base)
(2) not configured (card present but not configured)
(3) in service
hostLineCardAddress
This field tells you the I/O address (in Hex) of the selected
(Card Address)
line card. Acceptable address range: 0 through FFFFFFFFH
hostLineCardTotalPorts This field tells you the total number of ports supported by the
(Total Ports)
selected line card.
Range of values:
(1) LC8: 8 ports
(2) DSP8: 8 ports
(3) DSP24:24 ports
(4) DSP30: 30 ports
Close (button)
Clicking on this button returns you to the card-cage
configuration display (one example of which is shown in
Figure 5-9.)
LINE-CARD CONFIGURED-PORTS DISPLAY. The line-card data screen called by clicking on
the second tab (“Configured Ports”) in Figure 5-11 is shown in Figure 5-12.
Note: If you need to widen a cell in order to see its complete contents, click and drag on the vertical border
in the cell’s column heading.
Figure 5-12
Line-Card Configured-Ports Display
©Copyright 2002, Mitel Networks Corporation
23
Mitel NuPoint Messenger Technical Documentation - Release 7.0
Note: The display shown in Figure 5-12 (above) applies only to line cards, since voice cards do not have
configurable ports.
LINE-CARD CONFIGURED-PORTS TABLE. An explanation of the contents of the Line Card
Configured Ports display (Figure 5-12) is given in Table 5-7.
Table 5-7
Line-Card Configured-Ports Information
Parameter
Description
hostLinePortIndex
This column displays the user-assigned index numbers that
(Index)
identify specific ports on this card.
hostLinePortModule
This column contains the module number of this module. In a
(Module)
single-module system, this index number is always 1.
Range of acceptable values: 1, 2, 3, or 4.
hostLinePortSlot
This column contains the backplane slot number for this card.
(Slot)
Range of values: 0-17
hostLinePortPort
This column contains the identifying number (or index
(Port)
number) that system administration has assigned to this port.
Range of acceptable values:
0 through 59.
hostLinePortGroup
This column contains the user-assigned group number of the
(Group)
line group associated with this port.
hostLinePortStatus
The values in this column describe the status of the various
(Status)
lines on this card.
Possible status values are:
(1) not assigned
(2) out of service
(3) in service
hostLinePortTrunkType This column describes the type of trunk used for this port.
(Trunk Type)
Possible values are:
(1) other (not any of the following)
(2) analog E&M
(3) analog loop start
(4) analog did
(5) analog ground-start
(6) digital E&M
(7) digital loop start
(8) digital did
(9) digital ground-start
(10) digital common channel
(11) not configured
Close (button)
Clicking on this button returns you to the card-cage
configuration display (one example of which is shown in
Figure 5-9).
T1/E1 (DS1) Trunk Interface Card
Information on T1/E1 trunk-interface cards is displayed in the following form:
1. A group-selection screen (Figure 5-13) points you to either of two possible T1/E1 information
screens.
2. The first screen allows selection of either basic line-card information (Figure 5-14) or
configured-ports information (Figure 5-15).
©Copyright 2002, Mitel Networks Corporation
24
Mitel NuPoint Messenger Technical Documentation - Release 7.0
3. The second screen allows selection of either basic trunk-configuration information (Figure 516) or per-trunk cumulative-statistics (total) information (Figure 5-17).
T1/E1 Card-Selection Screen
When you click on a T1/E1 icon in the card cage display (Figure 5-9), the T1/E1 trunk-interface
card-selection screen then appears, as shown in Figure 5-13. The function of this screen, which
is labeled T1/E1 Group Information, is to allow the selection of either of two T1/E1 information
screens.
Figure 5-13
T1/E1 Card-Selection Screen
The two buttons of the card-selection screen have the following functions:
•
•
Clicking on the top button, marked T1/E1 Info, brings up the screen shown in Figure 5-14. In
this example, the screen is labeled: Module 1 - Slot 12 - T1/E1 Information. This screen
includes two tabs:
–
CARD INFORMATION. Select this tab (left side) to display the screen shown in Figure 514. Clicking on this tab displays basic information about the selected T1/E1 card.
–
CONFIGURED PORTS. Select this tab (right side) to display the screen shown in Figure
5-15. Clicking on this tab displays statistics relating to the T1/E1 currently configured
ports, line groups, and trunk types.
Clicking on the bottom button, marked T1/E1 Conf - T1/E1 Total, brings up the screen shown
in Figure 5-16. In this example, the screen is labeled: “Module 1 - Slot 12 - T1/E1 Config &
Total Information”. This screen includes two tabs:
–
CONFIGURATION TABLE. Select this tab (left side), to display the screen shown in
Figure 5-16. Clicking on this tab displays configuration parameters and status values for
the selected T1/E1 (DS1) card
–
TOTAL TABLE. Select this tab (right side) to display the screen shown in Figure 517.Clicking on this tab displays cumulative values of various T1/E1 (DS1) statistics for the
24-hour period preceding the current interval.
T1/E1 Basic Card Information Screen
Clicking on the top button, marked T1/E1 Info, in the card-selection screen (Figure 5-13) brings
up the Basic Line Card Information screen shown in Figure 5-14. In this example, the screen is
labeled: “Module 1 - Slot 12- T1/E1 Information.”
Figure 5-14
T1/E1: Basic Line-Card Information
T1/E1 BASIC LINE-CARD INFORMATION TABLE. An explanation of the contents of the
Basic Line-Card information display (Figure 5-14) is given in Table 5-8.
Table 5-8
T1/E1: Basic Line-Card Information
Parameter
Description/Value
hostLineCardType
This field tells you the type of line card you have selected.
(Card Type)
Acceptable values:
(1) t1
(2) e1
©Copyright 2002, Mitel Networks Corporation
25
Mitel NuPoint Messenger Technical Documentation - Release 7.0
hostLineCardStatus
(Card Status)
hostLineCardAddress
(Card Address)
hostLineCardTotalPorts
(Total Ports)
Close (button)
This field tells you the status of the T1/E1 card in a selected
slot.
Acceptable values:
(1) empty
(2) not configured
(3) in service
This field tells you the network address (in Hex) of a selected
T1/E1 line card. Acceptable address range: 0 through
FFFFFFFFH
This field tells you the total number of ports available on a
selected T1/E1 line card.
Range of acceptable values:
E1: 60 ports (maximum)
T1: 48 ports (maximum)
Clicking on this button returns you to the T1/E1 Group cardselection screen (Figure 5-13.)
T1/E1: Configured-Ports Information Screen
Figure 5-15 shows the status and characteristics of each port (line group) configured for the
selected E1/T1 trunk-interface card. This screen appears when you click on the second (righthand) tab of the T1/E1 information screen (Figure 5-14).
Note: If you need to widen a cell in a display in order to see its complete contents, click and drag on the
vertical border in the cell’s column heading.
Figure 5-15
T1/E1: Configured-Ports Information Screen
T1/E1 CONFIGURED PORTS TABLE. An explanation of the contents of the T1/E1 Configured
Ports Information Display (see Figure 5-15) is given in Table 5-9.
Table 5-9
T1/E1: Configured Ports Information
Parameter
Description/Value
(Column Heading)
hostLinePortIndex
The fields in this column contain the user-assigned index
(Index)
numbers that identify each port on theT1/E1 trunk-interface
card.
Range of acceptable values (decimal):
0 through 511
hostLinePortModule
The fields in this column contain the sequence number of the
(Module)
selected module when it is part of a multi-module system. For
single-module systems, this value is always 1.
Range of acceptable values: 1 through 4
hostLinePortSlot
Each field in this column contains the number of the physical
(Slot)
card-cage slot containing a selected T1/E1 card.
Range of acceptable values: 0 through 15
hostLinePortPort
Each field in this column contains the number of ports
(Port)
assigned to a selected T1/E1 card.
Range of acceptable values: 0 through 59
(this is based on two trunks per card and 30 ports per trunk
(max)).
©Copyright 2002, Mitel Networks Corporation
26
Mitel NuPoint Messenger Technical Documentation - Release 7.0
hostLinePortGroup
(Group)
hostLinePortStatus
(Status)
hostLinePortTrunkType
(Trunk Type)
Close (button)
The fields in this column tell you the numbers that have been
assigned to each line group. If no number has been assigned
to a line group, the value “not assigned” is displayed in the
corresponding field.
Each field in this column tells you the operational status of a
selected line port.
Acceptable values:
(1) not assigned
(2) out of service
(3) in service
The fields in this column tell you the type of trunk configured
on a selected T1/E1 card.
Possible values:
(1) other (not any of the following)
(2) analog E&M
(3) analog loop start
(4) analog did
(5) analog ground start
(6) digital E&M
(7) digital loop start
(8) digital did
(9) digital ground start
(10) digital common channel
(11) not configured
Clicking on this button returns you to the T1/E1 Group cardselection screen (Figure 5-13.)
T1/E1: Configuration-Table Display
Clicking on the left tab of the T1/E1 Configuration Table screen (Figure 5-16) displays
configuration parameters and status values for the selected T1/E1 (DS1) card.
Note: If you need to widen a cell in a display in order to see its complete contents, click and drag on the
vertical border in the cell’s column heading.
Figure 5-16
T1/E1: Configuration Table Screen
EXPLANATION OF FIGURE AND TABLE STRUCTURE. Figure 5-16 and Figure 5-17 report
T1/E1 data formatted in the form of tables of 16 rows, each of which represents one T1/E1 trunk
in a maximum-configuration (Model 640) four-module system. Since each module can support
two T1/E1 cards, each having two trunks per card, the Model 640 can support up to 16 trunks.
To represent these 16 trunks, the first column of each display contains the numbers 1 through 16.
The first column in Figure 5-16 is named dsx1LineIndex, and the first column of Figure 5-17 is
named dsx1TotalIndex.
The remaining columns of each table display various functions or characteristics of the
corresponding trunks. The two tables, Table 5-10 and Table 5-11, provide explanations of the
various parameters shown in the two figures.
IMPORTANT: If any T1/E1 trunk is not used (not configured into the system), its corresponding
row does not appear in Figure 5-16 and Figure 5-17.
©Copyright 2002, Mitel Networks Corporation
27
Mitel NuPoint Messenger Technical Documentation - Release 7.0
T1/E1 CONFIGURATION TABLE. An explanation of the contents of the T1/E1 trunk interface
configuration display (Figure 5-16) is given in Table 5-10.
Table 5-10
T1/E1 Card Information: Configuration Table
Parameter
Description/Values
(Column Heading)
dsx1LineIndex
The fields in this column contain numeric values from 1 to
16 that identify specific trunks on a T1/E1 card in each of
four possible modules. Trunk numbers and their
identifications are:
1 = trunk 1, card 1, module 1
2 = trunk 2, card 1, module 1
3 = trunk 1, card 2, module 1
4 = trunk 2, card 2, module 1
5 = trunk 1, card 1, module 2
6 = trunk 2, card 1, module 2
7 = trunk 1, card 2, module 2
8 = trunk 2, card 2, module 2
9 = trunk 1, card 1, module 3
10 = trunk 2, card 1, module 3
11 = trunk 1, card 2, module 3
12 = trunk 2, card 2, module 3
13 = trunk 1, card 1, module 4
14 = trunk 2, card 1, module 4
15 = trunk 1, card 2, module 4
16 = trunk 2, card 2, module 4
dsx1IfIndex
The fields in this column contain values from -1 to -4, which
identify the module containing the selected T1/E1 card.
Values and their meanings are:
-1 = module 1
-2 = module 2
-3 = module 3
-4 = module 4
dsx1TimeElapsed
This fields in this column the number of seconds that have
elapsed since the last reboot. Range of values: 0 to
20,000,000.
dsx1ValidIntervals
This fields in this column count the number of prior 15minute intervals during which valid data was collected. After
24 hours, the value remains at 96.
©Copyright 2002, Mitel Networks Corporation
28
Mitel NuPoint Messenger Technical Documentation - Release 7.0
dsx1LineType
dsx1LineCoding
dsx1SendCode
dsx1CircuitIdentifier
dsx1LoopbackConfig
dsx1LineStatus
The fields in this column contain values that describe the
type of communication line operating on this node.
Possible values and their meanings are:
LINE TYPE
LINE SPECIFICATION
dsx1ESF
Extended SuperFrame (DS1)
dsx1D4
AT&T D4 format (DS1)
dsx1E1
CCITT Recommendation G.704
(4a)
dsx1E1-CRC
CCITT Recommendation G.704
(4b)
dsx1E1-MF
CCITT Recommendation G.704
(4a)
with TS16 multiframing (MF)
enabled.
dsx1E1-CRC-MF
CCITT Recommendation G.704
(4b),
with TS16 multiframing (MF)
enabled.
The fields in this column contain values that tell you the
type of zero suppression (ZS) used at this node.
Possible ZS types and their meanings are:
ZS TYPE
EXPLANATION
dsx1JBZS
DT_AMI-ZCS_CODE (64) (jammed-bit
zero suppression)
dsx1B8ZS
DT_B8ZS_CODE (128) (eight zero-bit
replacement code)
dsx1HDB3
DT_HDB3_CODE (16)
dsx1ZBTSI
Not supported
dsx1AMI
DT_AMI_CODE (32) (no zero-code
suppression is present.)
other
Not any of the above
This field displays the default value “dsx1SendNoCode.”
This is the value for sending normal data. No other values
are supported.
As an aid in troubleshooting, this field displays the
international identification number for the manufacturer of
the selected T1/E1 card.
This field displays the default value “dsx1NoLoop.” This
value means that the T1/E1 card does not operate in
loopback mode. No other values are supported.
The value in this field identifies the line status of the
interface. Supported status values and their meanings are:
LINE-STATUS MEANING
VALUE
dsx1NoAlarm
No alarm present
dsxRcvFarEndLOF Far-end loss of frame (LOF)
(yellow alarm)
dsxXmtFarEndLOF Near end sending LOF indication
dsx1RcvAIS
Far-end sending alarm indication
dsx1XmtAIS
Near-end sending AIS
dsx1Loss OfFrame Near-end loss of frame
(red alarm)
dsx1LossOfSignal Near-end loss of signal
©Copyright 2002, Mitel Networks Corporation
29
Mitel NuPoint Messenger Technical Documentation - Release 7.0
dsx1SignalMode
This fields in this column describe the type of
communications control (or “signaling”) in use at this node.
Possible values and their meanings are:
none
No bits are reserved for signaling.
robbedBit
T1 robbed-bit signaling is in use.
messageOriented This node uses common-channel
signaling on the following
channels:
For T1, channel 24 is used.
For E1, channel 16 is used.
dsx1TransmitClockSource This field describes the source of transmit clock frequency.
Possible values and their meanings are:
loopTiming
The transmit clock frequency is
recovered from received data.
localTiming
The transmit clock frequency is supplied
by a local source.
dsx1Fdl
This field always displays the default value: “dsxFdl-none.”
This value indicates that a facility data link (FDL) protocol is
not in operation. No other values are supported.
Close (button)
Clicking on this button returns you to the T1/E1 Group cardselection screen (Figure 5-13.)
T1/E1 Total-Table Screen
Clicking on the right tab of the Configuration Table screen (Figure 5-16) displays configuration
parameters and status values for the selected T1/E1 (DS1) card, as shown in Figure 5-17. This
screen displays cumulative values of various T1/E1 (DS1) statistics for the 24-hour period
preceding the current interval.
Note: If you need to widen a cell in a display in order to see its complete contents, click and drag on the
vertical border in the cell’s column heading.
Figure 5-17
T1/E1: Total-Table Screen
T1/E1 TOTAL-TABLE INFORMATION. An explanation of the contents of the T1/E1 trunk
interface Total-Table information display (Figure 5-17) is given in Table 5-11. The T1/E1 Total
Table parameters report the cumulative sums of various operational statistics measured over the
24-hour periods preceding the current interval.
Table 5-11
T1/E1 Trunk Card Total-Table Display
Parameter
Description/Values
(Column Heading)
©Copyright 2002, Mitel Networks Corporation
30
Mitel NuPoint Messenger Technical Documentation - Release 7.0
dsx1TotalIndex
dsx1TotalESs
dsx1TotalSESs
dsx1TotalSEFs
dsx1TotalUASs
dsx1TotalCSSs
dsx1TotalPCVs
dsx1TotalLESs
dsx1TotalBESs
dsx1TotalDMs
dsx1TotalLCVs
Close (button)
The fields in this column contain numeric values from 1 to 16
that identify specific trunks on a T1/E1 card in each of four
possible modules.
Trunk numbers and their identifications are:
1 = trunk 1, card 1, module 1
2 = trunk 2, card 1, module 1
3 = trunk 1, card 2, module 1
4 = trunk 2, card 2, module 1
5 = trunk 1, card 1, module 2
6 = trunk 2, card 1, module 2
7 = trunk 1, card 2, module 2
8 = trunk 2, card 2, module 2
9 = trunk 1, card 1, module 3
10 = trunk 2, card 1, module 3
11 = trunk 1, card 2, module 3
12 = trunk 2, card 2, module 3
13 = trunk 1, card 1, module 4
14 = trunk 2, card 1, module 4
15 = trunk 1, card 2, module 4
16 = trunk 2, card 2, module 4
The fields in this column report the total number of errored
seconds encountered by a DS1 interface during the preceding
86,400-second (24-hour) interval. An errored second is one
during which one or more of certain types of defects or
violations take place.
Not supported. Value always 0.
Not supported. Value always 0.
The fields in this column report the total number of unavailable
seconds encountered by a DS1 interface during the preceding
86,400-second (24-hour) interval. An unavailable second is one
during which the interface is not available for any reason.
The fields in this column report the total number of controlledslip seconds encountered by a DS1 interface during the
preceding 86,400-second (24-hour) interval. A controlled slip is
an error in which payload bits are repeated or deleted. A
controlled-slip second is one during which a controlled slip is
detected.
The fields in this column report the total number of path-coding
violations encountered by a DS1 interface during the preceding
86,400-second (24-hour) interval. Path-coding violations can be
the result of bad framing bits or the result of cyclic redundancy
check (CRC) codes that indicate bit errors.
The fields in this column report the total number of line-errored
seconds encountered by a DS1 trunk interface during the
preceding 86,400-second (24-hour) interval. A line-errored
second is one in which one or more coding violations or one or
more loss-of-signal defects occurred.
Not supported. Value always 0.
Not supported. Value always 0.
Not supported. Value always 0.
Clicking on this button returns you to the T1/E1 Group cardselection screen (Figure 5-13.)
©Copyright 2002, Mitel Networks Corporation
31
Mitel NuPoint Messenger Technical Documentation - Release 7.0
SS7 Signal Processing Card
The following paragraphs describe the characteristics and parameters for an SS7 signal
processing card (if configured into your system.)
SS7 Group-Information Screen
When you click on the SS7 icon in the card-cage display (Figure 5-9), the SS7 Group information
display screen then appears, as shown in Figure 5-18. This screen includes three buttons,
labeled “SS7 Info”, “ISUP”, and “MTP Status,” that display information on the status and
configuration of SS7 signaling in the selected module. See Figure 5-19 through Figure 5-23.
Figure 5-18
SS7 Group Information, Initial Screen
SS7 GROUP INFORMATION TABLE. An explanation of the contents of the initial screen of the
SS7 Group Information display (Figure 5-18) is given in Table 5-12.
Table 5-12
SS7 Group Information, Basic Data
Parameter
Description
SS7 Info
Clicking on this button displays basic information about the SS7
integration at this node.
See Figure 5-19 and Figure 5-20;
and Table 5-13 and Table 5-14.
ISUP
Clicking on this button displays ISUP configuration/status
information for the SS7 integration at the selected node.
See Figure 5-21 and Figure 5-22;
and Table 5-15 and Table 5-16.
MTP Status
Clicking on this button displays MTP (Message Transfer Part)
status information for the SS7 integration at the selected node.
See Figure 5-23 and Table 5-17.
Close (button)
Clicking on this button returns you to the Basic SystemConfiguration screen (Figure 5-3.)
SS7 Group Information Screens
If you click on the SS7 Info button in the SS7 Group screen (Figure 5-18), the SS7 Integration
Group screen (Figure 5-19) then appears. This screen includes two sections selectable by tabs.
The screen corresponding to the first (left) tab (“Integration Group”) is shown in Figure 5-19. The
screen called by clicking on the second tab (“Board Group”) is shown in Figure 5-20. Both
screens display basic operational characteristics and configuration status of the SS7 integration
at the selected server.
Figure 5-19
SS7 Integration-Group Screen
SS7 INTEGRATION-TABLE DATA. An explanation of the contents of the SS7 IntegrationGroup screen (Figure 5-19) is given in Table 5-13.
Table 5-13
SS7 Integration-Table Data
Parameter
Description/Values
ss7InfoIntgNum
This field contains a user-assigned identification number for the
(Integration Number)
SS7 integration at this node.
©Copyright 2002, Mitel Networks Corporation
32
Mitel NuPoint Messenger Technical Documentation - Release 7.0
ss7InfoIntgModule
(Module Number)
ss7InfoIntgCount
(Number of Lines)
ss7InfoIntgIName
(Integration Name)
ss7InfoIntgDPC
(DPC)
ss7InfoIntgSPC
(SPC)
ss7InfoIntgSSF
(SSF)
ss7InfoIntgSLC
(SLC)
Close (button)
This field contains the identification number for the module in
which this SS7 integration is installed.
Acceptable values: 1, 2, 3, or 4
This field contains the number of T1 or E1 lines (channels)
assigned to this integration.
Range of acceptable values: 0 through 240
This field contains the user-assigned name for this integration.
Maximum field size: 0 to 255 characters
This field contains the SS7 destination point code (DPC) for this
integration. The DPC identifies the recipient (adjacent
exchange) of an SS7 message.For ISUP A applications (per
ANSI Standard T1.113), the range of acceptable SPC values
(expressed in a three-part decimal format, delimited by dashes)
is from 0-0-0 to 255-255-255.
For ISUP B and ISUP I applications (per CCITT Q.763 and
Q.767), the DPC is a single decimal value in the range: 0
through 16383.
This field contains the SS7 source point code (SPC) for this
integration. The SPC identifies the sender of an SS7
message.For ISUP A applications (per ANSI Standard T1.113),
the range of acceptable values (expressed in a three-part dashdelimited decimal format) is from 0-0-0 to 255-255-255.
For ISUP B and ISUP I applications (per CCITT Q.763 and
Q.767), the range of acceptable values is (decimal) 0 through
16383.
This is the SS7 subservice field. The range of values for this
field is (decimal) 0 through 15.
For national networks, this value is 8.
For international networks, this value is 0.
This field contains the SS7 signaling link code (SLC), part of the
message transport part (MTP) management messages. The
range of values for this field is (decimal) 0 through 15. The SLC
uniquely identifies the first link in the linkset that connects
between the server and the switch. There is a maximum of two
links for an SS7 integration.
Clicking on this button returns you to the SS7 Group Information
initial screen (Figure 5-18)
SS7 Board Group Screen
The screen called by clicking on the second tab (“Board Group”) in Figure 5-19 is shown in Figure
5-20.
Note: To widen a cell in a display in order to see its complete contents, click and drag on the vertical
border in the cell’s column heading.
Figure 5-20
SS7 Board-Group Information Screen
SS7 BOARD GROUP INFORMATION. The second (right) tab in the SS7 Information screen
(Figure 5-19) is labeled “Board Group”. An explanation of the contents of the Board Group display
(Figure 5-20) is given in Table 5-14.
©Copyright 2002, Mitel Networks Corporation
33
Mitel NuPoint Messenger Technical Documentation - Release 7.0
Note: This display is formatted in two rows, one for each of the two trunks in an SS7 board.
Table 5-14
SS7 Board-Group Screen Information
SS7 Parameter
Description/Values
(Column Headings)
ss7InfoBoardNum
This field contains the user-assigned index number for the
E1/T1 line card with which this SS7 card operates.
Acceptable values: 1 or 2
ss7InfoBoardIntgNum
This field identifies the user-assigned number of the
integration in which this SS7 card is installed.
Acceptable values: 1, 2, 3, or 4.
ss7InfoBoardCirCount
This field tells you the number of circuits (channels)
configured on this SS7 board.
Range of values: 1 through 60.
ss7InfoBoardCICBase
This field tells you the circuit identification code (CIC) that is
assigned to each trunk. The CIC is a base address, or
starting point, from which are numbered the constituent lines
of a trunk.
Range of acceptable values:
For ANSI networks: 0-16383
For CCITT networks: 0-4095
NOTES:
(1) For E1 trunk interface cards the CIC values can start at 0
and must be assigned in multiples of 32.
(2) For T1 trunk interface cards the CIC values can start at 0
and must be assigned in multiples of 24.
ss7InfoBoardModule
This field identifies the NuPoint Messenger module number
to which this SS7 card is assigned.
Acceptable values: 1, 2, 3, or 4.
ss7InfoBoardSlot
This field identifies the NuPoint Messenger physical card-slot
number to which the selected SS7 card is assigned. For the
NuPoint Messenger card-slot structure, see Figure 5-9.
Acceptable values: 0 through 17.
ss7InfoBoardLinkNum
This field contains the number of signaling links configured
for this SS7 board.
Acceptable values: 0, 1, or 2.
Close (button)
Clicking on this button returns you to the SS7 Group
Information initial screen (Figure 5-18)
SS7 ISUP Screens
If you click on the ISUP button in the SS7 Group screen (Figure 5-18), the ISUP information
screen then appears. This screen includes two sections selectable by tabs. The screen
corresponding to the first tab (“Circuits Maintenance Group”) is shown in Figure 5-21. The screen
called by clicking on the second tab (“Signaling Messages Group”) is shown in Figure 5-22. Both
screens provide you with the basic ISUP operational characteristics and configuration status for
the SS7 integration in the node server you selected.
Note: To widen a cell in a display in order to see its complete contents, click and drag on the vertical
border in the cell’s column heading.
Figure 5-21
SS7: ISUP: Circuits Maintenance Group
©Copyright 2002, Mitel Networks Corporation
34
Mitel NuPoint Messenger Technical Documentation - Release 7.0
SS7 ISUP CIRCUITS MAINTENANCE GROUP TABLE. An explanation of the contents of the
various components of the SS7 ISUP Circuits Maintenance Group display (Figure 5-21) is given
in Table 5-15.
Table 5-15
SS7 ISUP Circuits Maintenance Group
SS7 ISUP
Description/Values
Parameters
(Column Headings)
ABOUT THIS TABLE
(1) The first three parameters (rows) of this table (isupCirModule, isupCirSlot, and
isupCirPort) are the components of the triplet that uniquely defines each SS7port (that
is, line).
(2) The tabular screen display shown in Figure 5-21 lists ISUP maintenance parameters
in order of port number. The parameter values for each port, in both transmit and
receive mode, are found in the corresponding rows of that display.
isupCirModule
This field contains the module number, which is the first part of
the three-part definition (module number-slot number-port
number) that uniquely identifies a selected line.
Acceptable values: 1, 2, 3, or 4
isupCirSlot
This field contains the card slot number (within the card cage),
which is the second part of the three-part definition (module
number-slot number-port number) that uniquely identifies a
selected line.
Acceptable values: 0 through 17
isupCirPort
This field contains the port number, which is the third part of the
three-part definition (module number-slot number-port number)
that uniquely identifies a selected line.
Acceptable values: 0 through 59
isupCirMode
This field reports the communication status (“transmitted” or
“received”) of the various types of ISUP message on a selected
line.
Values: “transmitted” or “received”
isupCirBlock
This field counts the total number of blocking messages
transmitted or received on a selected line. A blocking message
allows a given exchange to block a voice circuit at a more
remote exchange.
isupCirBlockAck
This field counts the total number of blocking-acknowledge
messages transmitted or received on a selected line. A
blocking-acknowledge message indicates transmission or
receipt of a blocking message as well as the blocking of the
circuit.
isupCirUnblock
This field counts the total number of unblocking messages
transmitted or received on a selected line. An unblocking
message is sent/received by an exchange to remove a blocking
condition at a more remote exchange.
isupCirUnblkAck
This field counts the total number of unblocking-acknowledge
messages transmitted or received on a selected line. An
unblocking-acknowledge message indicates transmission or
receipt of the unblocking message and the unblocking of the
circuit.
©Copyright 2002, Mitel Networks Corporation
35
Mitel NuPoint Messenger Technical Documentation - Release 7.0
isupCirReset
isupCirGrpBlk
isupCirGrpBlkAck
isupCirGrpUnblk
isupCirGrpUnblkAck
isupCirGrpReset
isupCirGrpResetAck
isupCirQueryMsg
isupCirQueryRsp
Close (button)
This field counts the total number of reset-circuit messages
transmitted or received on a selected line. A reset-circuit
message allows an exchange to reset a circuit to a specific
state.
This field counts the total number of circuit-group blocking
messages transmitted or received on a selected line. A circuitgroup blocking message is issued to block selected voice
circuits during maintenance.
This field counts the total number of circuit-group blockingacknowledge messages transmitted or received on a selected
line. A circuit-group blocking-acknowledge message is issued to
acknowledge receipt of a circuit-group blocking message and to
indicate that the circuit has been blocked.
This field counts the total number of circuit-group unblocking
messages transmitted or received on a selected line. A circuit
group unblocking message is sent/received by maintenance
personnel to/from a management workstation to unblock voice
circuits that were previously blocked for maintenance purposes.
This field counts the total number of circuit-group unblocking
acknowledge messages transmitted or received on a selected
line. A circuit group unblocking acknowledge message
acknowledges receipt of a circuit group unblocking message
and indicates that the circuits are unblocked.
This field counts the total number of circuit-group reset
messages transmitted or received on a selected line. The
circuit-group reset message resets a group of circuits when an
exchange no longer knows the status of the voice circuits.
This field counts the total number of circuit-group reset
acknowledge messages transmitted or received on a selected
line. A circuit-group reset acknowledge message acknowledges
receipt of a circuit-group reset message, and indicates that the
reset has been performed on the circuits identified in its range
of parameters.
This field counts the total number of circuit-group query
messages transmitted or received on a selected line. A circuitgroup query message is sent or received to or from a distant
exchange to learn the blocked/unblocked status of a range of
voice circuits.
This field counts the total number of circuit query response
(CQR) messages transmitted or received on a selected line. A
CQR message, which is sent or received as a response to a
circuit query message, supplies the status of the specified voice
circuits.
Clicking on this button returns you to the SS7 Group
Information initial screen (Figure 5-18)
SS7 ISUP Signaling-Messages-Group Screen
The screen called by clicking on the second tab (“Signaling Messages Group”) in Figure 5-19 is
shown in Figure 5-22. This screen defines the messages and message types that define signaling
actions to be taken by the exchange associated with a selected node.
©Copyright 2002, Mitel Networks Corporation
36
Mitel NuPoint Messenger Technical Documentation - Release 7.0
Note: To widen a cell in a display in order to see its complete contents, click and drag on the vertical
border in the cell’s column heading.
Figure 5-22
SS7: ISUP: Signaling Messages Group Screen
SS7 ISUP SIGNALING MESSAGES GROUP TABLE. An explanation of the fields (column
headings) in the SS7 ISUP signaling messages group display (Figure 5-22) is given in Table 516.
Table 5-16
SS7 ISUP Signaling Messages Data
SS7 ISUP
Description/Values
Parameters
(Column Headings)
isupSigSPC
This field displays the SS7 source point code (SPC) for the
selected integration. The SPC identifies the sender (adjacent
exchange) of an SS7 message.For ISUP A applications (per
ANSI Standard T1.113) the range of acceptable SPC values
(expressed in a three-part decimal format, delimited by dashes)
is from 0-0-0 to 255-255-255.
For ISUP B and ISUP I applications (per CCITT Q.763 and
Q.767), the SPC is a single decimal value in the range: 0
through 16383.
isupSigMode
This field reports the communication status (“transmitted” or
“received”) for the various ISUP signaling messages on a
selected line.
Acceptable values: “transmitted” or “received.”
isupSigInitAdr
This field counts the total number of initial address messages
(IAMs) transmitted or received on a selected line. The IAM
establishes the circuit connection and includes information
required for call handling.
isupSigAdrComplt
This field counts the total number of address-complete
messages (ACMs) transmitted or received on a selected line.
ACM is an ISUP acknowledgment message that is returned to
the signaling source to indicate that all address messages
required for routing the call to the called party have been
received.
isupSigAnswer
This field counts the total number of answer messages (ANM)
transmitted or received on a selected line. ANM is a message
sent or received in the backward direction indicating that the
called party has answered the call.
isupSigRel
This field counts the total number of release (REL) messages
transmitted or received on a selected line. A release message
is sent in either direction to indicate that the called or calling
party has gone on-hook and the circuit is ready to be put into
the idle state on receipt of a release-complete (RLC) message.
isupSigRelCmplt
This field counts the total number of release-complete (RLC)
messages transmitted or received on a selected line. RLC is
sent in either direction to indicate receipt of a release (REL)
message indicating that the related circuit is in the idle
condition.
isupSigCon
This field counts the total number of connect (CON) messages
transmitted or received on a selected line. CON is defined for
use in international networks, but not in ANSI networks.
©Copyright 2002, Mitel Networks Corporation
37
Mitel NuPoint Messenger Technical Documentation - Release 7.0
isupSigSusp
isupSigResm
isupSigCallModReq
isupSigCallModRej
isupSigCallModCom
isupSigProgress
isupSigUneqCirId
isupSigUsrToUsr
isupSigSubsAdr
isupSigFac
isupSigFacAck
isupSigFacRej
isupSigOverld
This field counts the total number of suspend (SUS) messages
transmitted or received on a selected line. When an ISDN party
returns to the on-hook condition, only the REL message is
used. When a non-ISDN party returns to the on-hook condition,
SUS (suspend) is sent first, followed by REL and RLC (release
complete.)
This field counts the total number of reset-circuit (RSC)
messages transmitted or received on a selected line. RSC
allows an exchange to reset a circuit after an error.
This field counts the total number of call-modification request
(CMR) messages transmitted or received on a selected line.
The CMR message is used in certain International
Telecommunications Union (ITU) networks. CMR is not
supported by ANSI.
This field counts the total number of call modification reject
(CMRJ) messages transmitted or received on a selected line.
Used with International Telecommunications Union (ITU) only.
CMRJ is not supported by ANSI.
This field counts the total number of call modification complete
(CMC) messages transmitted or received on a selected line.
Not supported by ANSI. ITU only.
This field counts the total number of call progress (CPG/PRG)
messages transmitted or received on a selected line. A CPG
message notifies a distant exchange that a specific event has
occurred during a call.
This field counts the total number of unequipped circuit
identification code (USIS/UCI) messages transmitted or
received on a selected line. A UCI message notifies the
exchange that originates an ISUP initial address message
(IAM) that the corresponding ISUP circuit identification code
location is not equipped to be compatible.
This field counts the total number of user-to-user information
(USR/USU) messages transmitted or received on a selected
line. Not supported by ANSI. ITU only.
This field counts the total number of subsequent address
messages (SAM) transmitted or received on a selected line. Not
supported by ANSI. ITU only.
This field counts the total number of facility request (FAR)
messages transmitted or received on a selected line. Not
supported by ANSI. ITU only.
This field counts the total number of facility accepted (FAA)
messages transmitted or received on a selected line. Not
supported by ANSI. ITU only.
This field counts the total number of facility reject (FRJ)
messages transmitted or received on a selected line. Not
supported by ANSI. ITU only.
This field counts the total number of overload (OLM) messages
transmitted or received on a selected line. Not supported by
ANSI. ITU only.
©Copyright 2002, Mitel Networks Corporation
38
Mitel NuPoint Messenger Technical Documentation - Release 7.0
isupSigInfoReq
isupSigInfo
isupSigForw
isupSigConChkReq
isupSigConti
isupSigPassAlong
isupSigCirReserve
isupSigCirResAck
Close (button)
This field counts the total number of information-request (INR)
messages transmitted or received on a selected line. To
request additional information from another exchange (carried
in the form of an information (INF) message), a given exchange
can send an INR message while a call is in progress.
This field counts the total number of information (INF)
messages transmitted or received on a selected line. After a
request from an exchange, a reply carried in an INF message
returns additional information about a call.
This field counts the total number of forward transfer (FOT)
messages transmitted or received on a selected line. A FOT
message is one sent in the forward direction to bring an
operator into the circuit when such assistance is required.
This field counts the total number of continuity check request
(CCR) messages transmitted or received on a selected line. A
CCR message requests that continuity-check equipment be
attached to the circuit that is designated in the message’s ISUP
circuit-identification-code field.
This field counts the total number of continuity (COT) messages
transmitted or received on a selected line. A COT message
communicates the success or failure of a continuity test.
This field counts the total number of pass-along (PAM)
messages transmitted or received on a selected line. A PAM
allows a specific message to be routed to the exchange
associated with the specified voice circuit connection so that
this message uses the same path as that used for the call-setup
message.
This field counts the total number of circuit reservation (CRM)
messages transmitted or received on a selected line. A CRM is
used when internetworking with a non-SS7 network in order to
allow a voice circuit to be reserved for a call.
This field counts the total number of circuit-reservation
acknowledgment (CRA) messages transmitted or received on a
selected line. After receipt of a circuit reservation message
(CRM), a CRA message acknowledges that a circuit has been
reserved for a call.
Clicking on this button returns you to the SS7 Group
Information initial screen (Figure 5-18)
SS7 MTP Status Screen
If you click on the MTP (message transfer part) Status button in the SS7 Group screen (Figure 518), the MTP Status information screen then appears, as shown in Figure 5-23. This screen
provides you with basic status information on MTP links, call routing, and other MTP
communication functions. A description of the parameters shown in Figure 5-23 is given in Table
5-17.
Figure 5-23
SS7 MTP Status Screen
SS7 MTP STATUS TABLE. An explanation of the contents of the SS7 MTP status display
(Figure 5-23) is given in Table 5-17.
©Copyright 2002, Mitel Networks Corporation
39
Mitel NuPoint Messenger Technical Documentation - Release 7.0
Table 5-17
SS7 MTP Status Screen Data
Parameter
Description/Values
mtpStatSlot
This field tells you the number of the card-cage slot in which the
E1/T1 line card for this integration resides.
Range of values: 0 through 17
mtpStatLink
This field contains the number of signaling links configured for
the selected SS7 board.
Range of values: 0, 1, or 2.
mtpStatIntg
This field tells you the integration number to which the selected
SS7 link is assigned.
Range of values: 1, 2, 3, or 4.
mtpStatSPC
This field contains the SS7 source point code (SPC) for the
selected integration. The SPC identifies the sender of an SS7
message.
For ISUP A applications (per ANSI Standard T1.113) the SPC
is expressed in a three-part dash-delimited decimal format in
the range: 0-0-0 to 255-255-255.
For ISUP B and ISUP I applications (per CCITT Q.763 and
Q.767) the SPC is a decimal value in the range:
0 through 16383.
mtpStatus
The contents of this field tells you the status of the selected
SS7 MTP link. Possible values are:
(1) in service
(2) out of service
(3) aligning
(4) align not ready
(5) aligned ready
(6) processor outage
(7) unavailable
(8) not configured
Close (button)
Clicking on this button returns you to the SS7 Group
Information initial screen (Figure 5-18).
Ethernet Card
If you click on the Ethernet card icon in the card-cage configuration display (shown in Figure 5-9),
or click on the line representing the Ethernet bus shown in Figure 5-3, an Ethernet-information
screen display appears (see Figure 5-24 (without tabs) and Figure 5-25 (with module-identifying
tabs)). Both of these screens provide you with information about the card’s type, its identification,
its I/O port address, and the card’s interrupt request level (IRQ). A description of this information
is provided in Table 5-18.
CARD DISPLAY BY CLICKING ON ICON IN CARD CAGE. Clicking on the Ethernet card icon
in the card-cage display produces the card-display screen shown in Figure 5-24. Note that this
screen does not require module-identification tabs (Figure 5-25) because the module must
already be known to select a card-cage.
Figure 5-24
Ethernet Card Information Screen (No Tabs)
CARD DISPLAY BY CLICKING ON ETHERNET BUS IN SYSTEM CONFIGURATION MAP
(Figure 5-3). If you click on the Ethernet bus in the basic system configuration map (Figure 5-3),
©Copyright 2002, Mitel Networks Corporation
40
Mitel NuPoint Messenger Technical Documentation - Release 7.0
the resultant Ethernet card-display screen (Figure 5-25) includes four identification tabs, one for
each of the modules in a four-module system such as the Model 640. The highlighted tab
identifies the module in which its card cage is located. Also, the numeral following the word
Ethernet (for example, “Ethernet 3”) at the right end of the bus identifies the card-cage slot in
which the card is located.
Figure 5-25
Ethernet Card Information Screen (With Tabs)
ETHERNET CARD INFORMATION TABLE. An explanation of the contents of the Ethernet card
screen (for both Figure 5-24 and Figure 5-25) is given in the Ethernet-card Information table
(Table 5-18).
Table 5-18
Ethernet-Card Information Table
Parameter
Description/Values
hostEtherCardType
This field describes the type of Ethernet card in the selected
(Ethernet Type)
slot.
Range of values: 0 to 40 characters
hostEtherPhysicalID
This field contains the network address of the selected
(Ethernet Physical ID)
Ethernet card.
Field size: 0 to 40 characters
hostEtherIOPort
This field contains the (hex) I/O address of the selected
(Ethernet I/O Port)
Ethernet card. Range of values:
Type 1 Ethernet card: 280H through 29FH
Type 3 Ethernet card: 360H through 37FH
hostEtherIRQ
This field contains the hardware interrupt request (IRQ) level
(Ethernet IRQ)
at which the selected Ethernet card is configured.
Acceptable values:
Type 1 Ethernet card: 10
Type 3 Ethernet card: 15
Close (button)
Clicking on this button returns you to the card-cage
configuration display (Figure 5-9).
FAX Card (FAX2, FAX4, FAX8)
If you click on the Fax card icon in the card-cage configuration display (shown in Figure 5-9), the
Fax-card information screen display appears (see Figure 5-26). The display shown has the same
format whether the Fax card has 2, 4, or 8 channels. The Fax-card screen provides you with
information about the card’s type, its operational status, its I/O port address, and the card’s total
number of ports (channels). Table 5-19 provides a description of this information.
Figure 5-26
FAX Card Information Screen
FAX CARD INFORMATION TABLE. An explanation of the contents of the Fax card information
screen (Figure 5-26) is given in the Fax card data table (Table 5-19).
Table 5-19
Fax-Card Data
Parameter
©Copyright 2002, Mitel Networks Corporation
Description/Values
41
Mitel NuPoint Messenger Technical Documentation - Release 7.0
hostLineCardType
(Card Type)
hostLineCardStatus
(Card Status)
hostLineCardAddress
(Card Address)
hostLineCardTotalPorts
(Total Ports)
Close (button)
This field tells you the type of fax card you have selected.
Acceptable values:
(1) fax2 [two-channel]
(2) fax4 [four-channel]
(3) fax8 [eight-channel]
This field tells you the operational status of the selected fax
card. Acceptable values:
(1) in service
(2) not configured
(3) empty
This field tells you the I/O address (in Hex) of the selected
fax card.
Range of values: 100H through 2A0H
This field tells you the total number of channels (ports)
available on the selected fax card.
Acceptable maximum values:
fax2: 2 channels available
fax 4: 4 channels available
fax8: 8 channels available
Clicking on this button returns you to the card-cage
configuration screen (Figure 5-9).
Q-Net Card
If you click on the Q-Net card icon in the card-cage configuration display (shown in Figure 5-9), or
click on the line representing the Q-Net bus shown in Figure 5-3, a Q-Net card information screen
display appears (see Figure 5-27 (without tabs) and Figure 5-28 (with four module-identification
tabs)). Both of these screens provide you with information about the card’s card-cage slot
location, its physical node ID, its I/O port address, and the card’s interrupt-request level (IRQ).
Table 5-20 provides a description of this information.
CARD DISPLAY BY CLICKING ON ICON IN CARD CAGE. Clicking on a Q-Net card icon in
the card-cage display produces the card-display screen shown in Figure 5-27. The Q-Net card
appears as "MESA-Link" in this display. Note that this screen does not require moduleidentification tabs because the module must be known to select a card-cage.
Figure 5-27
Q-Net Card Information Screen (No Tabs)
CARD DISPLAY BY CLICKING ON Q-Net BUS IN SYSTEM CONFIGURATION MAP (Figure
5-3). If you click on the Q-Net bus in the system configuration map display (Figure 5-3), the
resultant Q-Net card-information screen (Figure 5-28) includes four identification tabs, one for
each of the modules in a four-module system such as the Model 640. The Q-Net card appears
as "MESA-Link" in this display. The highlighted tab identifies the module in which its card cage is
located. Also, the numeral following the words Q-Net (for example, “Q-Net 3”) at the right end of
the bus identifies the card-cage slot in which the card is located.
Figure 5-28
Q-Net Card Information Screen (With Tabs)
Q-Net CARD-INFORMATION TABLE. An explanation of the contents of the Q-Net card
information screens (for both Figure 5-27 and Figure 5-28) is given in the Q-Net card data table
(Table 5-20).
©Copyright 2002, Mitel Networks Corporation
42
Mitel NuPoint Messenger Technical Documentation - Release 7.0
Table 5-20
Q-Net Card Data
Parameter
Description/Values
hostArcSlot
This field contains the Q-Net card-cage slot number in any of
(Q-Net Slot)
the four modules, as follows:
(1) The primary Q-Net card must be in card-cage slot number
1.
(2) The redundant Q-Net card must be in card-cage slot
number 2.
hostArcPhyNodeID
This field contains the physical node ID for any of the four
(Q-Net
possible primary or redundant Q-Net cards that you select.
Node ID)
Acceptable node ID values for these cards are:
Primary card (module 1): 1
Primary card (module 2): 2
Primary card (module 3): 3
Primary card (module 4): 4
Redundant card (module 1): 33
Redundant card (module 2): 34
Redundant card (module 3): 35
Redundant card (module 4): 36
hostArcIOPort
This field contains the I/O port addresses (in Hex) for the
(Q-Net I/O Port)
selected primary or redundant Q-Net cards. Acceptable values
are:
Primary cards: CE000H
Redundant cards: DE000H
hostArcIRQ
This field contains the hardware interrupt level at which the
(Q-Net IRQ)
selected Q-Net card is configured.
Acceptable interrupt-request values are:
Primary cards: IRQ 7
Redundant cards: IRQ 5
Close (button)
Clicking on this button returns you to the card-cage
configuration display (Figure 5-9).
Voice Recognition Card
If you click on the voice-recognition card icon in the card-cage configuration display (shown in
Figure 5-9), the voice recognition card information screen display appears (see Figure 5-29). The
voice recognition card screen provides you with information about the card’s assigned index
number, its operational status, its I/O port address, and the card’s total number of ports
(channels). A description of this information is provided in Table 5-21.
Figure 5-29
Voice Recognition Card Information Screen
VOICE RECOGNITION CARD-DATA TABLE. An explanation of the contents of the Voice
Recognition card information screen (Figure 5-29) is given in the Voice Recognition card data
table (Table 5-21).
Table 5-21
Voice Recognition Card Data
Parameter
Description/Values
hostLineCardType
This field tells you the type of card you have selected.
(Card Type)
Acceptable value:
(1) voicerec [voice recognition]
©Copyright 2002, Mitel Networks Corporation
43
Mitel NuPoint Messenger Technical Documentation - Release 7.0
hostLineCardStatus
(Card Status)
hostLineCardAddress
(Card Address)
hostLineCardTotalPorts
(Total Ports)
Close (button)
This field tells you the operational status of the voicerecognition card. Acceptable values are:
(1) in service
(2) not configured
(3) empty
This field tells you the I/O address (in Hex) of the selected
voice-recognition card.
Range of acceptable values:
0210H through F210H
This field tells you the total number of ports (channels)
available on the selected voice recognition card.
Available ports: 8
Clicking on this button returns you to the card-cage
configuration screen (Figure 5-9)
Power Card
To be supplied
Using the System-Wide Information Displays
At the bottom right of the screen showing the basic-configuration map (Figure 5-3) is a button
marked System Info. Clicking on this button brings up a screen labeled System-Wide Information
(Figure 5-30). Using the four tabs at the top of this screen gives you access to four major
groupings of system information, each selectable by clicking on one of these tabs. The four major
information groups selectable by these tabs are:
•
SYSTEM INFORMATION (first tab (leftmost)). This screen shows descriptive data about the
selected server itself.
See heading: System Information Screen.
•
NuPoint VOICE DATA (second tab). This screen describes the Voice Memo software
installed in the selected server.
See heading: NuPoint Voice Data Screen.
•
OPTIONAL FEATURES (third tab). This screen contains information about optional features
included as part of the selected server.
See heading: Optional Features Information.
•
MIB-II (fourth tab (rightmost)). The group of screens called by this tab presents descriptions
of the various standard MIB-II management-information objects relating to this server’s
network operation (described in the document: Management Information Base, RFC1213,
second version.)
See heading: MIB-II Information.
System-Wide Information Screen
The System Information screen, part of the system-wide Information display, is shown in Figure
5-30. This screen provides you with various kinds of descriptive data on your current system.
Note: The information in the System-Wide Information Screen, shown in Figure 5-30, is actually part of the
MIB-II System group. However, it is included in this location, rather than with the rest of the MIB-II
group itself, as described later in this section, because the data located here is necessary in order to
provide an introductory description of the system.
©Copyright 2002, Mitel Networks Corporation
44
Mitel NuPoint Messenger Technical Documentation - Release 7.0
Figure 5-30
System-Wide Information: System Info. Screen
SYSTEM-INFORMATION-SCREEN DATA. An explanation of the contents of the system
information display (Figure 5-30) is given in Table 5-22.
Table 5-22
System-Information-Screen Data
Parameter
Description/Definition/Values
sysDescr
This field contains user-supplied descriptive text that could
(System Description)
cover such subjects as the hardware for this node, its operating
system, its network applications, and related topics. Field size:
0-255 characters.
sysObjectID
This field contains a proprietary management information base
(Object ID)
(MIB) code, in the standard form of a series of dot-delimited
integers (using the Internet Assigned Numbers Authority (IANA)
tree/subtree format), that uniquely identifies a selected node.
sysUpTime
This field tells you the elapsed time (measured to hundredths of
(Up time)
a second) since the NP Config network management software
was last booted.
sysContact
This field, whose contents are supplied by the user, contains
(Contact)
the name, and other identifying information, of the contact
person(s) having responsibility for this node.
Field size: 0-255 characters.
sysName
This field, whose contents are supplied by the user, contains a
(System Name)
unique name that identifies this system.
Field size: 0-255 characters.
sysLocation
This field, whose contents are supplied by the user, contains a
(System Location)
street/city address that identifies the physical location of this
system.
Field size: 0-255 characters.
sysServices
The contents of this field tells you the set of services (based on
(System Services)
the OSI model) that the selected node provides. Specifically,
the NuPoint Messenger nodes on the network provide: (1)
transport-layer (TCP/UDP), and (2) application-layer functions.
In the present case, based on a network algorithm that
generates a code showing which functions are provided, the
resultant code value of “72” appears in this field, indicating that
these two functions are currently available.
Close (button)
Clicking on this button returns you to the NP Config Basic
System-Configuration map (Figure 5-3).
NuPoint Voice Data Screen
The NuPoint Voice Data screen, part of the System Wide Information display, is shown in Figure
5-31.
Figure 5-31
System-Wide Information: NuPoint Voice Data
NuPoint Voice DATA TABLE. Table 5-23 provides an explanation of the contents of the
NuPoint Voice Data screen (Figure 5-31).
Table 5-23
NuPoint Voice Data
©Copyright 2002, Mitel Networks Corporation
45
Mitel NuPoint Messenger Technical Documentation - Release 7.0
Parameter
vmsysSiteName
(System Name)
vmsysSiteCode
(System Code)
vmsysModel
(System Model)
vmsysRelease
(Release Version)
vmsysRevision
(Revision Version)
vmsysRevDate
(Revision Date)
vmsysQNXPartitionUsage
(QNX Partition Usage)
Close (button)
Description/Definition/Values
This field contains the name assigned to the NuPoint
Messenger system at this node.
Field size: 0 to 60 characters
This field contains the site code, assigned by the user, that
uniquely identifies this NuPoint Messenger system in logand report-files.
Field size: up to 10 characters
The data in this field tells you the model of the selected
NuPoint Messenger server.
Possible values and their meanings:
other = Other models than listed here
120 = Model 120
640 = Model 640
70 = Model 70
This field identifies the current release of the system
software running in the selected NuPoint Messenger
module.
Field size: 0-255 characters
This field tells you the revision level of the current NuPoint
Messenger system software.
Field size: 0-255 characters
This field tells you the revision date of the current NuPoint
Messenger system-software release.
Field size: 0-31 characters
This field tells you the following two items:
(1) What percentage of the assigned QNX partition is
currently in use. The total size of the assigned QNX
partition (in Kbytes) is shown in parentheses.
(2) The actual amount (in Kbytes) of this partition that QNX
currently uses.
Clicking on this button returns you to the NP Config Basic
System-Configuration map (Figure 5-3).
Optional-Features Information
The Optional Features screen, part of the System Wide Information display, is shown in Figure 532. This screen provides you with descriptive data on the optional features currently installed on
your system.
Figure 5-32
System-Wide Information: Optional Features
OPTIONAL FEATURES DATA. An explanation of the contents of the Optional Features display
(Figure 5-32) is given in Table 5-24.
Table 5-24
Optional Features Data
Parameter
Description/Definition/Values
©Copyright 2002, Mitel Networks Corporation
46
Mitel NuPoint Messenger Technical Documentation - Release 7.0
vmsysExtraCostFeature
(Optional Feature)
Close (button)
This field lists the currently supported optional features that
may be present in a selected node. Possible features are:
(1) NP WakeUp
(2) Receptionist
(3) NuPoint Fax™
(4) Call Detail Recorder
(5) NP CSO
(6) Unified TCP/IP
(7) NuPoint Agent™
(8) Disk Redundancy
(9) Zip drive
(10) OneTalk
(11) Power Prompts
(12) NP Config SNMP Server
(13) NP Admin Administration Server
(14) Cut-Through Paging
(15) SS7 ISUP
(16) NP View
(17) SMS-MWI Serial
(18) SS7 TUP
(19) AMIS Analog
(20) NP Net Async
(21) ESMDI
(22) NP Forms
(23) Enhanced in-Band
(24) NP Net Parallel Links
(25) NP Net TCP/IP
(26) Mailbox On Demand
(27) Power Prompt
Clicking on this button returns you to the NP Config Basic
System-Configuration map (Figure 5-3).
MIB-II Group Information
The MIB-II group-selection screen (see Figure 5-33), which is displayed by clicking the MIB-II tab
on the System Wide Information screen (Figure 5-31), allows you to gain access to the values of
various data objects in the eight MIB-II groups supported by NP Config. These groups provide
information to assist in network management, to report network information, and to indicate
operational status of nodes.
The eight MIB-II groups are:
•
SYS (System Group)
•
IF (Interfaces Group)
•
AT (Address Translation Group)
•
IP (Internet Protocol)
•
ICMP (Internet Control Message Protocol)
•
TCP (Transmission Control Protocol)
•
UDP (User Datagram Protocol)
•
SNMP (Simple Network Management Protocol)
©Copyright 2002, Mitel Networks Corporation
47
Mitel NuPoint Messenger Technical Documentation - Release 7.0
Figure 5-33
System-Wide Info: MIB-II Group Selection Screen
MIB-II GROUPS. Seven of the eight MIB-II groups that NP Config uses can be selected from
the MIB-II Group-Selection screen (Figure 5-33). They are listed and described in Table 5-25.
The eighth group (SYS (System)), is fully described under the heading System-Wide Information.
Table 5-25
MIB-II Group: Summary Descriptions
MIB-II Group Name
Description
The
System
group
(SYS)
contains data describing the
SYS (System)
environment that supports and identifies the selected system.
NOTE: SYS is not selectable from the MIB-II group-selection
screen (Figure 5-33). To access SYS information, see Figure 530 and Table 5-22 under System Wide Information.
The MIB-II IF group contains generic information about the
IF (Interfaces)
physical interfaces of the selected server, including
configuration information and statistics about the events
occurring at each interface. See Figure 5-34, Figure 5-35,
Figure 5-36, Table 5-26, Table 5-27 and Table 5-28.
The MIB-II AT group consists of a table that maps from physical
AT (Address
addresses to network addresses. Each row in the table contains
Translation)
the address of one of the physical interfaces of the system. The
corresponding network address is typically the IP address for
the system at this interface. The table is indexed by use of the
MIB object atIfIndex, the value of which uniquely identifies each
interface. The AT table entries are listed in order of network
address. See Figure 5-37, and Table 5-29.
IP (Internet Protocol) This MIB-II group contains information about the
implementation and operation of IP at a node. It contains basic
counters (expressed in number of datagrams) for traffic flow
into and out of the IP layer. Three basic tables are included in
the IP group. These are: the IP Address Table, the Route Table
(listed by IP destination address), and the Net-to-Media table
(showing address translation between physical addresses and
IP addresses.) See Figure 5-38 through Figure 5-42, and Table
5-30 through Table 5-34.
ICMP (Internet Control ICMP objects provide a means of transferring messages
between routers (or other modules) and a module. Primarily,
Message Protocol)
the ICMP group provides feedback about problems, errors, or
malfunctions in the communication environment. See Figure 543, Figure 5-44, Table 5-35, and Table 5-36.
The objects in the TCP group contain information relevant to
TCP (Transmission
the implementation and operation of TCP at a node, such as
Control Protocol)
transmission and retransmission, round-trip time estimates, and
connection data. See Figure 5-45, Figure 5-46, Table 5-37, and
Table 5-38.
UDP (User Datagram An application calls on the User Datagram Protocol when it
wants to send a stand-alone message to another application.
Protocol)
UDP messages are called “UDP datagrams”. See Figure 5-47
and Table 5-39.
©Copyright 2002, Mitel Networks Corporation
48
Mitel NuPoint Messenger Technical Documentation - Release 7.0
SNMP (Simple
Network Management
Protocol)
Close (button)
The objects in the SNMP group describe the implementation
and operation of SNMP station-management and SNMP agent
functions.
See Figure 5-49, Figure 5-50, Figure 5-51, Table 5-41, Table 542, and Table 5-43.
Clicking on this button returns you to the NP Config Basic
System-Configuration map (Figure 5-3).
MIB-II: The System (SYS) Group
The information describing the MIB-II System group is located earlier in this manual under the tab
marked System Information, which is a part of the screen labeled System-Wide Information. See
Figure 5-30 and Table 5-22.
MIB-II: The Interfaces (IF) Group
Selecting the IF button in the MIB-II Group Selection screen produces the IF Interface information
screen shown in Figure 5-34. The three tabs at the top of this screen give you access to the
following three IF information groups:
•
Basic IF-group interface information (Figure 5-34 and Table 5-26)
•
Inbound packets (Figure 5-35 and Table 5-27)
•
Outbound packets (Figure 5-36 and Table 5-28)
Note: If you need to widen a cell to see its complete contents, click and drag on the vertical border in the
cell’s column heading.
Figure 5-34
MIB-II: IF Group: Interface Information
MIB-II: IF GROUP OBJECTS. Table 5-26 provides basic information describing the contents of
the IF-Group Interface Information screen shown in Figure 5-34.
Table 5-26
MIB-II: Basic IF-Group Objects
MIB-II Object
Description/Definition/Values
ifIndex
This field contains a user-assigned decimal number that
uniquely identifies this interface.
ifDescr
The fields in this column describe the selected interface,
including name of manufacturer, product name, and version of
the hardware at this node.
Maximum field length: 255 characters.
ifType
The fields in this column tell you the type of selected interface,
and name the type of routing used. Possible values:
(1) ethernet-csmacd
(2) softwareLoopback
ifMtu
The fields in this column contain the size (in octets) of the
largest datagram that can be sent to a destination without
requiring fragmentation. The value in this field is interface
dependent. This field is known as a maximum transmission unit
(MTU).
©Copyright 2002, Mitel Networks Corporation
49
Mitel NuPoint Messenger Technical Documentation - Release 7.0
ifSpeed
ifPhysAddress
ifAdminStatus
ifOperStatus
ifLastChange
Close (button)
This field contains an estimate of the interface’s current datathroughput capacity (in bits per second).
NOTE: This object is not currently supported.
This is the media-specific physical address (in hex) for this
interface. If it is not required for the system, this field has a 0
value.
This field specifies the desired interface state that would result
from a change-of-state command.
Possible values are:
(1) Up
(2) Down
(3) Testing. The Testing state indicates that no operational
packets can be passed.
Specifies the current (actual) interface state.
Possible values are:
(1) Up
(2) Down
(3) Testing. The Testing state indicates that no operational
packets can be passed.
This field measures how much time (to hundredths of a second)
has elapsed since this interface last changed state. It the local
network management subsystem reinitialized after this interface
entered its current state, this value is zero.
Clicking on this button returns you to the MIB-II group selection
screen (Figure 5-33).
MIB-II: IF GROUP: INBOUND PACKETS SCREEN. The screen shown in Figure 5-35 displays
the group of MIB-II Interface objects that are involved with monitoring inbound packets.
Note: If you need to widen a cell to see its complete contents, click and drag on the vertical border in the
cell’s column heading.
Figure 5-35
MIB-II: IF Group: Inbound Packets
MIB-II: IF INBOUND PACKETS TABLE. Table 5-27 provides basic information describing the
contents of the IF-Group inbound-packets screen shown in Figure 5-35.
Table 5-27
MIB-II: IF Group: Inbound Packets
MIB-II Object
Description/Definition/Values
ifIndex
This field contains a user-assigned decimal number that
uniquely identifies this interface.
ifInOctets
This field counts the total number of octets received on the
interface, including framing characters.
ifInUcastPkts
This field counts the number of subnetwork unicast packets
delivered to a higher-layer protocol.
ifInNUcastPkts
This field counts the number of nonunicast packets delivered to
a higher-layer protocol.
ifInDiscards
This field counts the number of inbound packets that were
discarded, even though no error had been detected, to prevent
their being deliverable to a higher-layer protocol (for example,
buffer overflow.)
©Copyright 2002, Mitel Networks Corporation
50
Mitel NuPoint Messenger Technical Documentation - Release 7.0
ifInErrors
ifInUnknownProtos
Close (button)
This field counts the number of inbound packets that contained
errors preventing them from being delivered to a higher-layer
protocol.
This field counts the number of inbound packets that were
discarded because of an unknown or unsupported protocol.
Clicking on this button returns you to the MIB-II group selection
screen (Figure 5-33).
MIB-II: IF OUTBOUND PACKETS SCREEN. The screen shown in Figure 5-36 displays the
group of MIB-II Interface objects that are involved with monitoring outbound packets.
Note: If you need to widen a cell to see its complete contents, click and drag on the vertical border in the
cell’s column heading.
Figure 5-36
MIB-II: IF Group: Outbound Packets
MIB-II: IF OUTBOUND PACKETS DATA. Table 5-28 provides basic information describing the
contents of the IF-Group outbound-packets screen shown in Figure 5-36.
Table 5-28
MIB-II: IF Group: Outbound Packets
MIB-II Object
Description/Definition/Values
ifIndex
This field contains a user-assigned decimal number that
uniquely identifies this interface.
ifOutOctets
This field counts the total number of octets transmitted on the
selected interface, including framing characters.
ifOutUcastPkts
This field counts the total number of packets, including those
that were discarded or otherwise not sent, that higher-level
protocols requested be transmitted to a subnetwork unicast
address.
ifOutNUcastPkts
This field counts the total number of packets that higher-level
protocols requested be transmitted to a nonunicast address,
including those that were discarded or otherwise not sent.
ifOutDiscards
This field counts the number of outbound packets discarded
even though no errors had been detected to prevent their being
transmitted (for example, buffer overflow).
ifOutErrors
This field counts the number of outbound packets that, because
of errors, could not be transmitted.
ifOutQLen
This field counts the length (in packets) of the output packet
queue.
ifSpecific
NOTE: This object is not currently supported.
(This is a media-specific pointer, branching to that part of the
MIB applicable to the media.)
Close (button)
Clicking on this button returns you to the MIB-II group selection
screen (Figure 5-33).
MIB-II: AT (Address Translation) Group
The screen shown in Figure 5-37 displays the group of MIB-II objects that are involved with
translation between physical address and network address. Each row of the AT (Address
©Copyright 2002, Mitel Networks Corporation
51
Mitel NuPoint Messenger Technical Documentation - Release 7.0
Translation) display shown in Figure 5-37 shows the mapping between physical and network
addresses that takes place for each server at this interface. The network address is the IP
address for the system. The physical address depends on the nature of the subnetwork. For
example, if the interface is to a LAN (Local Area Network), then the physical address is the MAC
(Media Access Control) address for that interface.
Figure 5-37
MIB-II: AT Group: Information Screen
MIB-II: AT group data. Table 5-29 provides basic information describing the contents of the
MIB-II AT Group information screen shown in Figure 5-37.
Table 5-29
MIB-II: AT Group
MIB-II Object
Description/Definition/Values
atIfIndex
This field contains a user-assigned decimal number that
uniquely identifies this interface.
atPhysAddress
This field contains the six-octet media-dependent physical
address (hexadecimal) to be translated. If this address is null,
then this interface is not in use.
atNetAddress
This field contains the network address (for example, the IP
address) that is translated from each corresponding mediadependent physical address received at this interface.
Close (button)
Clicking on this button returns you to the MIB-II group selection
screen (Figure 5-33).
MIB-II: IP (Internet Protocol) Group
Selecting the IP button in the basic MIB-II group information screen (Figure 5-33) pulls up the
initial IP Information screen shown in Figure 5-38. The five tabs in this display provide access to
the group of MIB-II objects that are involved with the operation of IP at a node.
The five tabs in Figure 5-38 give you access to the following topics that describe IP operation at a
selected node:
•
Input Datagrams (leftmost tab.) See Figure 5-38 and Table 5-30.
•
Output Datagrams. See Figure 5-39 and Table 5-31.
•
Address Table (center tab.) See Figure 5-40 and Table 5-32.
•
Route Table. See Figure 5-41 and Table 5-33.
•
Net-to-Media Table (right tab.) See Figure 5-42 and Table 5-34
Figure 5-38
MIB-II: IP Group: Input Datagrams Screen
MIB-II: IP GROUP: INPUT DATAGRAMS. Table 5-30 provides basic information describing
the contents of the input datagrams information screen shown in Figure 5-38.
Table 5-30
MIB-II: IP Group: Input Datagrams
MIB-II Object
Description/Definition/Values
ipForwarding
Specifies whether this interface is forwarding or not
(Is entity forwarding
forwarding datagrams. Values are:(1) forwarding
Datagrams?)
(2) non-forwarding.
©Copyright 2002, Mitel Networks Corporation
52
Mitel NuPoint Messenger Technical Documentation - Release 7.0
ipDefaultTTL
(Default TTL (Time-To-Live
field))
This field contains a default hop-count value to be
inserted into the Time-To-Live (TTL) field of IP
datagram headers originating at this interface. The
default is used when an application does not specify a
hop-count value.
Range of allowable hop-count values: 0-60 (decimal).
ipInReceives
This field counts the total number of input datagrams
(Input Datagrams Received)
received from all interface layers below, including those
received in error.
ipInHdrErrors
This field counts the number of datagrams discarded
(Input Datagrams Discarded
due to errors in their IP headers, including bad
Due to Header Errors)
checksums, version number mismatch, format errors,
time-to-live (TTL) exceeded, and related problems.
ipInAddrErrors
This field counts the number of input datagrams
(Input Datagrams Discarded
discarded due to misdelivery. That is, the IP address in
Due to Address Errors)
the destination field was not valid for reception at this
interface. For interfaces that are not IP gateways, and
therefore do not forward datagrams, this counter
includes datagrams discarded because the destination
was not a local address.
ipForwDatagrams
This field counts the number of input datagrams not
(Input Datagrams That Need to addressed to this interface, for which forwarding is
Be Forwarded)
attempted.
ipInUnknownProtos
This field counts the number of locally addressed
(Input Datagrams Discarded
datagrams received successfully but discarded
Because of Unknown
because of an unknown or unsupported protocol.
Protocols)
ipInDiscards
This field counts the number of input IP datagrams for
(No Problem Input Datagrams which no problems were encountered to prevent their
But Discarded)
continued processing but which were nevertheless
discarded (for example, for lack of buffer space).
ipInDelivers
This field counts the total number of input datagrams
(Input Datagrams Delivered to successfully delivered to IP user protocols (including
IP User-protocols)
ICMP).
Close (button)
Clicking on this button returns you to the MIB-II group
selection screen (Figure 5-33).
MIB-II: IP OUTPUT DATAGRAMS. The screen shown in Figure 5-39 displays the group of
MIB-II objects involved with monitoring IP output datagrams.
Figure 5-39
MIB-II: IP Group: Output Datagrams Screen
MIB-II: IP GROUP: OUTPUT DATAGRAMS. Table 5-31 provides basic information describing
the contents of the output datagrams information screen shown in Figure 5-39.
Table 5-31
MIB-II: IP Group: Output Datagrams
MIB-II Object
Description/Definition/Values
©Copyright 2002, Mitel Networks Corporation
53
Mitel NuPoint Messenger Technical Documentation - Release 7.0
ipOutRequests
This field counts the total number of IP datagrams that
(Output Datagrams Requested the local IP user protocols (including ICMP) have
For Transmission)
supplied to IP in response to requests for transmission.
Note: This counter does not include any datagrams
counted by the MIB-II object ipForwDatagrams.
ipOutDiscards
This field counts the number of IP datagrams for which
(No Problem Output
no problems were encountered to prevent their
Datagrams But Discarded)
continued processing but which were nevertheless
discarded (for example, for lack of buffer space).
ipOutNoRoutes
This field counts the number of IP datagrams discarded
(Datagrams Discarded But No because no route could be found to transmit them to
Route Found)
their destination. This counter also includes any
packets counted in ipForwDatagrams that meet the noroute criterion, or any packets that a module cannot
route because all its default gateways are down.
ipReasmTimeout
This value is the maximum number of seconds during
(Maximum Reassembly
which received fragments are held at this interface
Timeout in Seconds)
while awaiting reassembly.
ipReasmReqds
This field counts the number of received IP fragments
(IP Fragments Received That that need to be reassembled at this node.
Need to Be Reassembled)
ipReasmOKs
This field counts the number of IP datagrams that have
(IP Fragments Successfully
been successfully reassembled at this interface.
Reassembled)
ipReasmFails
This field counts the number of reassembly failures
(Failures Detected by the IP
detected at this interface by the IP reassembly
Reassembly Algorithm)
algorithm. Note that this value is not necessarily a
count of IP fragments since some algorithms may lose
track of the number of fragments by combining them as
they are received.
ipFragOKs
This field counts the number of IP datagrams that have
(IP Datagrams Successfully
been successfully fragmented at this interface.
Fragmented)
ipFragFails
This field counts the number of discarded IP datagrams
(IP Datagrams Discarded
that should have been fragmented at this interface but
Because They Could Not Be
could not be because, for example, their Don’t
Fragmented)
Fragment flag was set.
ipFragCreates
This field counts the number of IP datagram fragments
(IP Datagram Fragments
generated or created at this interface.
Generated as a Result of
Fragmentation)
Close (button)
Clicking on this button returns you to the MIB-II group
selection screen (Figure 5-33).
MIB-II: IP ADDRESS-TABLE SCREEN. The screen shown in Figure 5-40 displays the group of
MIB-II objects that are part of the MIB-II IP address table.
Note: If you need to widen a cell in a display in order to see its complete contents, click and drag on the
vertical border in the cell’s column heading.
Figure 5-40
MIB-II: IP Group: Address-Table Screen
©Copyright 2002, Mitel Networks Corporation
54
Mitel NuPoint Messenger Technical Documentation - Release 7.0
MIB-II: IP GROUP: ADDRESS TABLE. Table 5-32 provides basic information describing the
contents of the IP Address Table information screen shown in Figure 5-40. The IP Address Table
keeps track of the IP addresses and related parameters associated with the managed node.
Table 5-32
MIB-II: IP Group: Address-Table Data
MIB-II Object
Description/Definition/Values
ipAdEntAddr
This is the 32-bit (four-byte) dot-delimited IP address for this
node.
Range: 0.0.0.0 through 255.255.255.255
ipAdEntIfIndex
This field contains a user-assigned number that uniquely
identifies this network interface.
ipAdEntNetMask
This field contains a subnet mask for the four-byte standard
Class-B IP address that identifies this node. The structure of
a subnet mask is: an IP (network) address with all its bits set
to 1’s (two bytes), and all the subnet (local address) bits set
to 0’s (two bytes). The subnet mask thus identifies, that is,
masks, both the portion of the address that is devoted to the
network address, and the portion that is devoted to the local
address. An example would be: 255.255.0.0.
ipAdEntBcastAddr
This entry contains an integer value that corresponds to the
least significant bit (LSB) of the IP subnet broadcast-address
format. If the internet-standard all-ones LSB broadcast
address format is used, the value in this table entry will be 1.
If the all-zeros broadcast format is used, the value in this
table entry is 0.
ipAdEntReasmMaxSize This integer entry contains the size of the largest IP
datagram that this node can reassemble from incoming IP
fragmented datagrams.
Value range: 0 through 65535 bytes
Close (button)
Clicking on this button returns you to the MIB-II group
selection screen (Figure 5-33).
MIB-II: IP ROUTE-TABLE SCREEN. The screen shown in Figure 5-41 displays the group of
MIB-II objects that are involved with monitoring the contents of the MIB-II IP route table.
Note: If you need to widen a cell in a display in order to see its complete contents, click and drag on the
vertical border in the cell’s column heading.
Figure 5-41
MIB-II: IP Group: Routing-Table Screen
MIB-II: IP ROUTING-TABLE DATA. Table 5-33 provides basic information describing the
contents of the IP Routing-Table information screen shown in Figure 5-41.
Table 5-33
MIB-II: IP Group: Routing-Table Data
MIB-II Object
Description/Definition/Values
ipRouteDest
This field contains the destination IP address of this route. An
entry with a value of 0.0.0.0. is considered a default route. Multiple
routes to a single destination can appear in the table if the
network so defines the table-access mechanism.
©Copyright 2002, Mitel Networks Corporation
55
Mitel NuPoint Messenger Technical Documentation - Release 7.0
ipRouteIfIndex
ipRouteMetric1
ipRouteMetric2
ipRouteMetric3
ipRouteMetric4
ipRouteNextHop
ipRouteType
This field contains a number (the index) that uniquely identifies the
local interface through which the next hop of this route should be
transmitted.
This entry contains the primary routing metric or combination of
metrics selected for this route. (A metric is a factor that must be
taken into consideration in order to reach a destination.) The
characteristics of this selection are specified by the value of
ipRouteProto (see below). If this entry is not used, its value is -1.
This entry names an alternate IP routing metric or combination of
metrics selected for this route. (A metric is a factor that must be
taken into consideration in order to reach a destination.) The
characteristics of this selection are specified by the value of
ipRouteProto (see below). If this entry is not used, its value is -1.
This entry contains the IP address of the next hop on this route.
This field reports the following four valid route-status or route-type
settings for this interface. Note that if an automatic routing
protocol is used, route-table entries are updated dynamically.
However, an administrator has the option of entering some
permanent entries manually.
(1) Other. Not any of the three items below.
(2) Invalid. This route type is no longer valid. It is thus logically out
of the table.
(3) Direct. Direct IP routing. The destination is on a directly
connected subnet.
(4) Indirect. The destination is not on a directly connected subnet.
©Copyright 2002, Mitel Networks Corporation
56
Mitel NuPoint Messenger Technical Documentation - Release 7.0
ipRouteProto
ipRouteAge
ipRouteMask
ipRouteMetric5
ipRouteInfo
Close (button)
This table entry names the routing mechanism used to determine
this route. Possible values are:
(1) other. Not any of items (2) through (14) below.
(2) local. This is a non-protocol manual configuration.
(3) netmgmt. Route developed by a network-management
protocol.
(4) icmp. Routing obtained via ICMP Redirect.
The following are gateway routing protocols:
(5) egp: Exterior Gateway Protocol
(6) ggp: Gateway-to-Gateway Protocol
(7) hello: Routing between routers in same system
(8) rip: Routing information protocol
(9) is-is: ISO Intermediate-System (router) to Intermediate-System
protocol
(10) es-is: End-System to Intermediate-System protocol
(11) ciscoIgrp: Cisco Interior Gateway Routing Protocol
(12) bbnSpfIgp: BBN Shortest-Path-First Interior Gateway
Protocol
(13) ospf: Open Shortest Path First protocol
(14) bgp: Border Gateway Protocol.
This integer table-entry counts the number of seconds since this
route was last updated or verified.
This entry is a subnet-address mask value to be logical-ANDed
with the destination address before being compared to the value
in the ipRouteDest field.For those systems that do not support
arbitrary subnet masks, an agent constructs the value of the
ipRouteMask object by:
(1) determining whether the value of its ipRouteDest field belongs
to a Class A, Class B, or Class C network, and then (2) selecting
a corresponding subnet mask, as follows:
Network Type Corresponding Subnet Mask
Class A 255.0.0.0
Class B 255.255.0.0
Class C 255.255.255.0
If the value of the ipRouteDest object is 0.0.0.0 (a default route),
then the mask value is also 0.0.0.0.
This entry names alternate routing selected for this route. The
characteristics of this selection are specified by the value of
ipRouteProto (see above). If this entry is not used, its value is -1.
This field may refer you to other MIB variables relating to this
routing protocol. If not so specified, the value for this field is 0.0.
Clicking on this button returns you to the MIB-II group selection
screen (Figure 5-33).
MIB-II: IP NET-TO-MEDIA TABLE SCREEN. The screen shown in Figure 5-42 displays the
group of MIB-II objects that are involved with IP address translation. The address-translation table
maps physical addresses to IP addresses. Note that the information contained here is basically
the same as that in the MIB-II address translation (AT) group with the addition of the new object
ipNetToMediaType, which indicates the type of mapping used. The value of the variable
ipNetToMediaType indicates whether an entry is a static, manually entered type, or was
discovered by a dynamic protocol such as, for example, ARP (Address Resolution Protocol.)
Figure 5-42
MIB-II: IP Group: Net-To-Media Table Screen
©Copyright 2002, Mitel Networks Corporation
57
Mitel NuPoint Messenger Technical Documentation - Release 7.0
MIB-II: IP ROUTE-TABLE DATA. Table 5-34 provides basic information describing the
contents of the IP Route-Table information screen shown in Figure 5-42.
Note: If you need to widen a cell in a display in order to see its complete contents, click and drag on the
vertical border in the cell’s column heading.
Table 5-34
MIB-II: IP Group: Net-To-Media Data
MIB-II Object
Description/Definition/Values
ipNetToMediaIfIndex
This field contains a user-assigned number that
uniquely identifies this interface.
ipNetToMediaPhysAddress
This field contains the media-dependent physical
address (in hexadecimal) for this interface.
ipNetToMediaNetAddress
This table-entry contains the IP network address that
corresponds to the node’s media-dependent physical
address.
ipNetToMediaType
This field contains the type of net-to-media mapping
used. The following four values are implemented:
(1) Other. None of the following three values
(2) Invalid. This value in the table tells you that this
routing type is not supported.
(3) Dynamic. Dynamic net-to-media routing
(4) Static. Static net-to-media routing
Close (button)
Clicking on this button returns you to the MIB-II group
selection screen (Figure 5-33).
MIB-II: ICMP (Internet Control Message Protocol) Group
GENERAL. The two screens shown in Figure 5-43 and Figure 5-44 display the group of MIB-II
objects involved with the implementation and operation of ICMP at the selected node. ICMP
operates with IP primarily to provide problem-related feedback from agents to management
systems.
The screen shown in Figure 5-43 includes two tabs that give you access to the following ICMP
information groups:
•
ICMP Messages Received. The information displayed by clicking the first (left) tab in Figure
5-43 describes the characteristics of received ICMP messages.
•
ICMP Messages. Sent Click on second (right) tab to display ICMP messages-sent
information, as shown in Figure 5-44.
Figure 5-43
MIB-II: ICMP Group: ICMP Msgs. Received Screen
MIB-II: ICMP MESSAGES-RECEIVED DATA. Table 5-35 provides basic information
describing the contents of the ICMP Messages-Received information screen shown in Figure 543.
Table 5-35
MIB-II: ICMP Group: Messages Received
MIB-II Object
Description/Definition/Values
icmpInMsgs
This field counts the total number of incoming ICMP
(Total number of ICMP
messages received.
Messages Received)
ICMP Messages Received With Errors
©Copyright 2002, Mitel Networks Corporation
58
Mitel NuPoint Messenger Technical Documentation - Release 7.0
icmpInErrors
(ICMP Specific Errors)
icmpInDestUnreachs
(ICMP Destination
Unreachable)
icmpInTimeExcds
(Time Exceeded)
icmpInParmProbs
(Parameter Problems)
icmpInTimestamps
(Timestamp Request
Messages)
icmpInTimestampReps
(Timestamp Reply
Messages)
icmpInAddrMasks
(Address Mask Request
Messages)
icmpInAddrMaskReps
(Address Mask Reply
Messages)
icmpInSrcQuenchs
(Source Quench
Messages)
This field counts the total number of incoming ICMP
messages received that have ICMP-specific errors, for
example, bad checksum, wrong length, wrong type, and so
forth.
This field counts the total number of incoming ICMP
Destination-Unreachable messages.
This field counts the total number of incoming ICMP TimeExceeded messages. These messages are issued in
response to expired Time-to-Live (TTL) hop-count values,
and timeout on the reassembly of fragments.
This field counts the total number of incoming ICMP
Parameter-Problem messages. These usually relate to
problems in optional IP header fields.
ICMP Messages Received
This field counts the total number of incoming ICMP
Timestamp requests received. A timestamp request
message (and its corresponding reply message) can
produce a rough idea of the difference between the times at
two systems.
This field counts the total number of incoming ICMP
Timestamp Reply messages received.
This field counts the total number of incoming ICMP
Address Mask Requests received. Using the addressmask-request message (and its corresponding addressmask-reply message) enables systems on a LAN that have
not been configured with a mask to find out what subnet
mask is currently in use.
This field counts the total number of incoming ICMP
Address Mask Reply messages received.
This field counts the total number of incoming ICMP Source
Quench messages. A source quench message is a type of
error message issued when a router or host reports that it is
congested, and requests a traffic slowdown.
icmpInRedirects
This field counts the total number of incoming ICMP
(Redirected Messages)
Redirect messages. When a system sends a datagram to
the wrong local router, the router sends an ICMP Redirect
message back. The Redirect message contains the correct
next hop for this destination. A module can update its
routing table based on the Redirect information.
icmpInEchos
This field counts the total number of incoming ICMP Echo
(Echo Request Messages) request messages. (NOTE: The Echo Request and Echo
Reply messages form the basis of the Ping function.)
icmpInEchoReps
This field counts the total number of incoming ICMP Echo
(Echo Reply Messages)
Reply messages.
Close (button)
Clicking on this button returns you to the MIB-II group
selection screen (Figure 5-33).
MIB-II: ICMP GROUP: ICMP MESSAGES-SENT SCREEN. The screen shown in Figure 5-44
©Copyright 2002, Mitel Networks Corporation
59
Mitel NuPoint Messenger Technical Documentation - Release 7.0
displays the group of MIB-II ICMP objects that are used for monitoring the contents of the ICMP
messages-sent counters.
Note that the most significant of the messages-sent figures, from the point of view of network
management, are the counts of Source Quenches, Time-To-Live expired, and Destination
Unreachables. A large count during a given interval can indicate routing problems, or message
congestion at the node being examined.
Figure 5-44
MIB-II: ICMP Group: ICMP Messages-Sent Screen
MIB-II: ICMP MESSAGES-SENT DATA. Table 5-36 provides basic information describing the
contents of the ICMP Messages-Sent information screen shown in Figure 5-44.
Table 5-36
MIB-II: ICMP Messages-Sent Data
MIB-II Object
Description/Definition/Values
icmpOutMsgs
This field counts the total number of outgoing ICMP
(Total Number of ICMP
messages that this interface attempted to send.
Messages Sent)
ICMP Messages Sent With Errors
icmpOutErrors
This field counts the total number of attempts to send ICMP
(ICMP Specific Errors)
messages that failed because of problems such as, for
example, lack of buffer space.
icmpOutDestUnreachs
This field counts the total number of ICMP messages sent
(ICMP Destination
to report unreachable destinations.
Unreachable)
icmpOutTimeExcds
This field counts the total number of ICMP Time Exceeded
(Time Exceeded)
messages sent.
icmpOutParmProbs
This field counts the total number of ICMP Parameter
(Parameter Problems)
Problem messages sent.
ICMP Messages Sent
icmpOutTimestamps
This field counts the total number of ICMP Timestamp
(Timestamp Request
Request messages sent.
Messages)
icmpOutTimestampReps
This field counts the total number of ICMP Timestamp
(Timestamp Reply
Reply messages sent.
Messages)
icmpOutAddrMasks
This field counts the total number of ICMP Address Mask
(Address Mask Request
Request messages sent.
Messages)
icmpOutAddrMaskReps
This field counts the total number of ICMP Address Mask
(Address Mask Reply
Reply messages sent.
Messages)
icmpOutSrcQuench
This field counts the total number of ICMP Source Quench
(Source Quench
messages sent. A source quench error message is issued
Messages)
when a router or host reports that it is congested, and
requests a traffic slowdown.
©Copyright 2002, Mitel Networks Corporation
60
Mitel NuPoint Messenger Technical Documentation - Release 7.0
icmpOutRedirects
(Redirected Messages)
icmpOutEchos (Echo
Request Messages)
icmpOutEchoReps
(Echo Reply Messages)
Close (button)
This field counts the total number of ICMP Redirect
messages sent. When a system sends a datagram to a
wrong local router, the router sends an ICMP Redirect
message back to the source. The Redirect message
contains the correct next-hop data for that destination. Note
that routers issue redirects but hosts do not. Hence, the
value in this field is always zero unless the node in question
is a router.
This field counts the total number of ICMP Echo Request
messages sent.
This field counts the total number of ICMP Echo Reply
messages sent.
Clicking on this button returns you to the MIB-II group
selection screen (Figure 5-33).
MIB-II: TCP (Transmission Control Protocol) Group
GENERAL. The two screens shown in Figure 5-45 and Figure 5-46 display the group of MIB-II
objects involved with the implementation and operation of TCP at a selected node. The objects in
the TCP group contain information about TCP operation, such as transmission and
retransmission data, selected timeout-algorithm, datagram statistics, and connection-table data.
The screen shown in Figure 5-45 includes two tabs that give you access to the following two TCP
information groups:
•
TCP Information. The information displayed by clicking the first (left) tab in Figure 5-45
describes the basic characteristics of sent and received TCP information.
•
TCP Connection Table. Click on the second (right) tab to display the MIB objects containing
TCP connection-table information, as shown in Figure 5-46.
Figure 5-45
MIB-II: TCP Group: TCP Information Screen
MIB-II: TCP BASIC INFORMATION. Table 5-37 provides basic information describing the
contents of the MIB-II TCP basic-information screen shown in Figure 5-45.
Table 5-37
MIB-II: TCP Group: Basic TCP Data
MIB-II Object
Description/Definition/Values
tcpRtoAlgorithm
This field tells you the type of algorithm selected for
(Algorithm to determine
computing the retransmission timeout (RTO) value used
timeout value when
when retransmitting unacknowledged octets.
retransmitting
Possible values are:
unacknowledged octets)
(1) other. None of the following three values.
(2) constant. Constant retransmission timeout value.
(3) rsre. Per MIL-STD-1778, Appendix B (RFC-793).
(4) vanj. Uses van Jacobson’s algorithm.
tcpRtoMin
This is the minimum time (in milliseconds) that the present
(Minimum Retransmission TCP implementation permits for the retransmission timeout
Timeout (milliseconds))
(RTO) period. Note that the functional meaning of this value
is dependent upon the retransmission-timeout algorithm
used. See tcpRtoAlgorithm (above).
©Copyright 2002, Mitel Networks Corporation
61
Mitel NuPoint Messenger Technical Documentation - Release 7.0
tcpRtoMax
This is the maximum time (in milliseconds) that the present
(Maximum Retransmission TCP implementation permits for a retransmission timeout
Timeout (milliseconds))
(RTO). Note that the functional meaning of this value is
dependent upon the retransmission-timeout algorithm used.
See tcpRtoAlgorithm.
tcpMaxConn
The decimal number in this field tells you the maximum
(Total TCP Connections
number of concurrent TCP connections that this interface
Supported)
can support. For interfaces where the maximum number is
determined dynamically, this value is -1.
tcpActiveOpens
This field counts the number of outgoing connection
(Active Opens)
requests (that is, the number of times the client enters the
synchronization-sent state) from this node’s interface.
tcpPassiveOpens
This field counts the number of incoming connection
(Passive Opens)
requests to this node’s interface. That is, it counts the
number of times the server enters the synchronizationreceived state.
tcpEstabResets
This field counts the total number of resets that have
(Established Resets)
occurred at this interface. Resets are defined as direct (that
is, abrupt) transitions of established (or in- the-process-ofclosing) connections to their closed state.
tcpCurrEstab
This field counts the number of TCP connections for which
(Current Established)
the current state is either ESTABLISHED or CLOSE-WAIT.
tcpInErrs
This field counts the total number of TCP segments
(Segment Received in
received with errors (for example, bad TCP checksums.)
Error)
tcpAttemptFails
This field counts the total number of failed TCP connection
(Attempt Failures)
attempts, both incoming and outgoing, that have occurred
at this interface.
tcpInSegs
This field counts the total number of TCP segments
(Segments Received)
received, including those received in error.
tcpOutSegs
This field counts the total number of TCP segments sent,
(Segments Sent)
including those on current connections, but excluding those
containing only retransmitted octets.
tcpRetransSegs
This field counts the total number of retransmitted TCP
(Segments Retransmitted) segments. Note that, in certain cases, when TCP
retransmits data, it may repackage a segment so that some
new bytes are included along with the retransmitted bytes.
tcpOutRsts (TCP
This field counts the total number of TCP segments sent
Segments Sent)
out with the RST (reset) flag set to 1.
Close (button)
Clicking on this button returns you to the MIB-II group
selection screen (Figure 5-33).
MIB-II: TCP GROUP: TCP CONNECTION-TABLE SCREEN. The screen shown in Figure 5-46
displays the MIB-II TCP objects that are involved with reporting network connections.
Figure 5-46
MIB-II: TCP Group: TCP Connection-Table Screen
MIB-II: TCP CONNECTION-TABLE DATA. Table 5-38 describes the contents of the MIB-II
TCP Connection-Table screen shown in Figure 5-46.
Table 5-38
MIB-II: TCP Group: TCP Connection Data
©Copyright 2002, Mitel Networks Corporation
62
Mitel NuPoint Messenger Technical Documentation - Release 7.0
MIB-II Object
tcpConnState
tcpConnLocalAddress
tcpConnLocalPort
tcpConnRemAddress
tcpConnRemPort
Close (button)
Description/Definition/Values
This field tells you the state of the present TCP network
connection.
Possible values for this field are:
(1) closed
(2) listen
(3) synSent
(4) synReceived
(5) established
(6) finWait1
(7) finWait2
(8) closeWait
(9) lastAck
(10) closing
(11) timeWait
(12) deleteTCB. NOTE: A management station can kill a
connection by selecting this value, which means: delete the
transmission control block (TCB). A connection’s transmission
control block contains the current information about that
connection.
This field contains the local IP address for this TCP connection.
If this connection is in the listen state, that is, willing to accept
connections with any IP interface associated with the node, the
value in this field is 0.0.0.0.
This field contains the local port number for this TCP
connection. Range of values: 0 to 65535.
This field contains the remote IP address for this TCP
connection
This field contains the remote port number for this TCP
connection.
Range of values: 0 to 65535.
Clicking on this button returns you to the MIB-II group selection
screen (Figure 5-33).
MIB-II: UDP (User Datagram Protocol) Group
GENERAL. The two screens shown in Figure 5-47 and Figure 5-48 display the group of MIB-II
objects involved with the operation of UDP at a selected node. An application calls on the User
Datagram Protocol when it wants to send a stand-alone message to another application.
The screen shown in Figure 5-47 includes two tabs that give you access to the following two
types of UDP information:
•
UDP Information. The information displayed by clicking the first (left) tab in Figure 5-47
describes the basic characteristics and operation of UDP datagrams.
•
UDP Table. Click on the second (right) tab to display the contents of the UDP “listener” table,
as shown in Figure 5-48. This table shows the addresses and port numbers in use by local
applications that are waiting for the arrival of UDP datagrams. Such applications are called
“listeners.”
Figure 5-47
MIB-II: UDP Group: Information Screen
©Copyright 2002, Mitel Networks Corporation
63
Mitel NuPoint Messenger Technical Documentation - Release 7.0
MIB-II: UDP GROUP INFORMATION TABLE. Table 5-39 describes the contents of the UDP
group information screen shown in Figure 5-47.
Table 5-39
MIB-II: UDP Group: Basic UDP Information
MIB-II Object
Description/Definition/Values
Error Datagrams Received
udpNoPorts (Datagrams
This field counts the total number of received UDP
Without Destination
datagrams for which there was no corresponding
Application)
application at the destination port.
udpInErrors
This field counts the total number of received UDP
(Other Errors)
datagrams that could not be delivered for any reason
except the absence of a corresponding application at the
destination port. Such reasons might be, for example, a bad
checksum or insufficient memory.
Total number of Datagrams Sent or Received
udpInDatagrams
This field counts the total number of UDP datagrams
(Total Number of
delivered to UDP applications.
Datagrams Delivered)
udpOutDatagrams
This field counts the total number of outbound UDP
(Total Number of
datagrams.
Datagrams Sent)
Close (button)
Clicking on this button returns you to the MIB-II group
selection screen (Figure 5-33).
MIB-II: UDP GROUP: UDP LISTENERS SCREEN. The screen shown in Figure 5-48 displays
the IP addresses and their corresponding UDP port numbers in use by local applications that are
waiting for UDP datagrams.
Figure 5-48
MIB-II: UDP Group: UDP Listener Screen
MIB-II: UDP LISTENERS TABLE. Table 5-40 describes the contents of the UDP address screen
shown in Figure 5-48.
Note: This table shows the addresses and port numbers in use by local applications that are waiting for the
arrival of UDP datagrams. Such applications are called “listeners.”
Table 5-40
MIB-II: UDP Group: UDP Listeners Table
MIB-II Object
Description/Definition/Values
udpLocalAddress
This table entry contains the local IP address for the UDP listener
at this UDP local port.
udpLocalPort
This field contains the local port number of the listener at the
corresponding IP local address in the UDP table (Figure 5-48).
Range of acceptable values: 0 through 65535.
Close (button)
Clicking on this button returns you to the MIB-II group selection
screen (Figure 5-33).
MIB-II: SNMP (Simple Network Management Protocol) Group
GENERAL. The three screens shown in Figure 5-49, Figure 5-50, and Figure 5-51 display the
group of MIB-II objects involved with counting incoming and outgoing SNMP (Simple Network
©Copyright 2002, Mitel Networks Corporation
64
Mitel NuPoint Messenger Technical Documentation - Release 7.0
Management Protocol) traffic at a selected node. These SNMP MIB-II objects include a group of
statistics event counters and a single configurable variable (snmpEnableAuthenTraps).
The screen shown in Figure 5-49 includes three tabs that give you access to the following SNMP
MIB-II information:
•
ERRORS IN INBOUND SNMP PACKETS. The information displayed by clicking the first (left)
tab in Figure 5-49 describes types of errors related to inbound SNMP messages.
•
SUCCESSFUL INBOUND SNMP PACKETS. Click on the second (middle) tab (see Figure 550) to display statistics relating to successful reception of inbound SNMP packets.
•
OUTBOUND SNMP PACKETS. Click on the third (right) tab (see Figure 5-51) to display
statistics relating to outbound SNMP packets and to the configurable variable
snmpEnableAuthenTraps.
Figure 5-49
MIB-II: SNMP Group: Errors In Inbound Packets
MIB-II: SNMP INBOUND PACKET ERRORS. Table 5-41 describes the contents of the SNMP
Inbound Packet Errors screen shown in Figure 5-49.
Table 5-41
MIB-II: SNMP: Inbound Packet Errors
MIB-II Object
Description/Definition/Values
snmpInPkts
This field counts the total number of incoming SNMP
(Total In Packets (messages
messages delivered to this node by the transport
delivered to SNMP from
layer.
transport layer))
Errors In Inbound Packets
snmpInBadVersions
This field counts the total number of incoming
(Unsupported SNMP Version)
messages to this node that were for an unsupported
SNMP version.
snmpInBadCommunityNames
This field counts the total number of incoming
(Unknown Community Name)
messages that use an SNMP community name
unknown to this node.
snmpInBadCommunityUses
This field counts the total number of incoming
(Operation Not Allowed by
messages that request an operation not supported for
Community)
this community name.
snmpInASNParseErrs
This field counts the total number of failures in ASN.1
(ASN.1 or BER Errors)
(Abstract Syntax Notation 1) or BER (Basic Encoding
Rules) decoding of SNMP messages.
Protocol Data Unit (PDU) Error States
snmpInTooBig
This field counts the total number of incoming
(“field too big”)
messages having an error-status field of ‘too big.’ This
means that the response would not fit into the largest
permissible message allowed between this agent and
the manager.
snmpInBadValues
This field counts the total number of incoming SNMP
(“bad value”)
frames received at this node that have an error-status
field of ‘badValue.’ This means that a value in an
outgoing set-request had a bad data type, incorrect
length, or inappropriate value.
©Copyright 2002, Mitel Networks Corporation
65
Mitel NuPoint Messenger Technical Documentation - Release 7.0
snmpInReadOnlys
(“read only”)
snmpInGenErrs
(“general error”)
snmpInNoSuchNames
(“no such name”)
Close (button)
This field counts the total number of incoming SNMP
frames received at this node that have an error-status
field of ‘readOnly.’ Such errors indicate that there is a
local implementation error because an inappropriate
set-request was sent.
This field counts the total number of incoming SNMP
frames received at this node that have an error-status
field of “genErr”. The category “genErr” encompasses
errors not otherwise enumerated in this table.
This field counts the number of incoming SNMP
frames having an error-status field of “noSuchName.”
Thus, the agent does not support the requested
object.
Click this button to return to the MIB-II group selection
screen (Figure 5-33).
MIB-II: SNMP GROUP: SUCCESSFUL INBOUND PACKETS. The screen shown in Figure 550 displays the characteristics of successful (non-error) inbound SNMP packets.
Figure 5-50
MIB-II: SNMP Group: Inbound Packets (Successes)
MIB-II: SNMP: SUCCESSFUL INBOUND PACKETS. Table 5-42 describes the contents of the
SNMP Inbound Packets (Successes) screen shown in Figure 5-50.
Table 5-42
MIB-II: SNMP: Successful Inbound Packets
MIB-II Object
Description/Definition/Values
snmpInPkts
This field counts the total number of incoming SNMP
(Total In Packets (messages
messages delivered to this node by the transport layer.
delivered to SNMP from
transport layer))
Packets Accepted/Processed Successfully
snmpInGetRequests
This field counts the number of incoming SNMP get(Get-Requests)
request messages accepted and processed.
snmpInGetNexts
This field counts the number of incoming SNMP get(Get-Next Requests)
next requests accepted and processed.
snmpInSetRequests
This field counts the number of incoming SNMP set(Set-Requests)
requests accepted and processed.
snmpInGetResponses
This field counts the number of incoming SNMP get(Get-Responses)
responses accepted and processed.
snmpInTraps
This field counts the number of incoming traps
(SNMP Traps)
accepted and processed.
MIB Objects Received/Altered Successfully
snmpInTotalReqVars
This field counts the total number of local MIB objects
(MIB Objects Received
that have been retrieved successfully as a result of
Successfully)
incoming get-requests and get-next-requests.
snmpInTotalSetVars
This field counts the total number of local MIB objects
(MIB Objects Altered
that have been updated successfully as a result of
Successfully)
incoming set-requests.
Close (button)
Clicking on this button returns you to the MIB-II group
selection screen (Figure 5-33).
©Copyright 2002, Mitel Networks Corporation
66
Mitel NuPoint Messenger Technical Documentation - Release 7.0
MIB-II: SNMP GROUP: SUCCESSFUL OUTBOUND PACKETS SCREEN. The screen shown
in Figure 5-51 displays the characteristics of outbound SNMP packets from this interface.
Figure 5-51
MIB-II: SNMP Group: Outbound Packets
MIB-II: SNMP OUTBOUND PACKETS. Table 5-43 describes the contents of the SNMP
Outbound Packets screen shown in Figure 5-51.
Table 5-43
MIB-II: SNMP Group: Outbound-Packets
MIB-II Object
Description/Definition/Values
snmpOutPkts (Total Out
This field counts the total number of outgoing SNMP
Packets (messages passed
messages sent from this node to the transport layer.
from SNMP to transport layer))
Packets (PDU’s) Generated Successfully
snmpOutGetRequests
This field counts the total number of SNMP outgoing
(Get Requests)
get-request packets generated at this node.
snmpOutGetNexts
This field counts the total number of SNMP outgoing
(Get-Next Requests)
get-next packets generated at this node.
snmpOutSetRequests
This field counts the total number of SNMP outgoing
(Set-Request)
set-request packets generated at this node.
snmpOutGetResponses
This field counts the total number of SNMP outgoing
(Get-Response)
get-response packets generated at this node.
snmpOutTraps
This field counts the total number of outgoing SNMP
(SNMP traps)
trap packets generated at this node.
snmpEnableAuthenTraps
The value in this field tells you whether this SNMP
(Authentication-Failure Traps) agent will be allowed to generate a trap in the event of
an authentication-failure. Note that it is possible that the
generation of such traps could be unnecessary, as in
situations where polling is done automatically and the
community name is incorrect. In such cases, there
needs to be a way to disable authentication-failure trap
generation.
NOTE: The value assigned to this variable overrides
any local configuration.
Allowable values:
1 = Enabled (OK to generate authentication-failure
traps.)
2 = Disabled (Don’t generate authentication-failure
traps.)
Packet (PDU) Error States
snmpOutTooBigs
This field counts the number of outgoing messages
(“field too big”)
sent with their error-status fields set to “tooBig.”
snmpOutBadValues
This field counts the number of outgoing messages
(“bad value”)
sent with their error-status fields set to “badValue.”
snmpOutGenErrs
This field counts the number of outgoing messages
(“general error”)
sent with their error status fields set to “genErr.”
snmpOutNoSuchNames
This field counts the number of outgoing messages
(“no such name”)
sent with their error-status fields set to “noSuchName.”
Close (button)
Clicking on this button returns you to the MIB-II group
selection screen (Figure 5-33).
©Copyright 2002, Mitel Networks Corporation
67
Mitel NuPoint Messenger Technical Documentation - Release 7.0
Traps: Error Handling, Error Events, and Alarms
Traps are proactive messages, originating in a selected NuPoint Messenger server, that report
errors, configuration changes, and other events. The following topics describe how you can
display and interpret trap/alarm information pertaining to the selected server:
•
Trap Reports: Display and interpretation
•
Trap Filtering: Being able to select traps of a specified level of severity
Trap-Report Display
The screen shown in Figure 5-52 presents a typical trap-report display, basic event-description
information, and other data that identifies the origin and nature of a trap or error event.
Note: If you need to widen a cell in a display in order to see its complete contents, click and drag on the
vertical border in the cell’s column heading.
Figure 5-52
Trap-Report Information Screen
TRAP-REPORT-SCREEN DATA. Table 5-44 describes the contents of the trap-report information
screen shown in Figure 5-52.
Table 5-44
Trap-Report Information
Column Heading
Description/Value
[Parameter]
Module 1 (checkbox)
Click on this box if you want to obtain the trap information that
originates in Module 1.
Module 2 (checkbox)
Click on this box if you want to obtain the trap information that
originates in Module 2.
Module 3 (checkbox)
Click on this box if you want to obtain the trap information that
originates in Module 3.
Module 4 (checkbox)
Click on this box if you want to obtain the trap information that
originates in Module 4.
All (checkbox)
Click on this box if you want to obtain trap information (identified
by module of origin) that originates from any of the modules of
this node.
Query (button)
Click on this box to query the system for a listing of the traps
originating in the selected modules (using the selection boxes
at the top of the screen).
©Copyright 2002, Mitel Networks Corporation
68
Mitel NuPoint Messenger Technical Documentation - Release 7.0
Status [errSeverity]
Date/Time
[errTimeStamp]
Description
(errBriefDes)
Detail Info
[errDetailDes]
Process
(Process Name)
PID
(Process ID)
Module
File Name
Line
(Line Number)
IP Address
Trap Code [errCode]
Close (button)
This field indicates the severity of the trap appearing in the
selected row of the display. See Table 5-4 for a complete
description of fault-status and card-cage icon color coding
(Figure 5-3). Possible entries in the trap status field and their
meanings are:
Entry
Meaning
Critical
System is down or unavailable.
(Icon color: red)
Major
Partial degradation of function.
(Icon color: orange)
Minor
Noncritical degradation of function.
(Icon color: yellow)
Warning
Problem exists; function not degraded.
(Icon color: cyan (greenish blue))
Informational Alert for informational message.
(Icon color: magenta (purplish red))
Unknown
No information on state of device.
(Icon color: blue)
Normal System is in full operation.
(Icon color: green)
This field tells you the date and time (to hundredths of a
second) when the error was recorded.
This field contains a description of the primary process or
condition, including associated hardware, that may be involved
with, or may be a causative factor for, a given trap condition.
This field contains any detail or additional information (not
supplied in the adjacent Description column) that relates to a
given trap condition.
The contents of this field specify the name of the NuPoint
Messenger process that generates the trap message when an
error is found.
The contents of this field specify the process ID for the NuPoint
Messenger process that is running when a trap report is
generated.
The contents of this field reports the number of the module (that
is, 1, 2, 3, or 4) from which the trap (error message) originated.
This field contains the QNX file name for the program that is
running when a trap is generated.
This field contains the QNX-program line number where the
trap is reported.
This field contains the IP address of the module from which the
indicated trap message is transmitted to the client workstation.
This field contains an error code that can be used by the
Technical Resource Center. In the event that you report a
problem to your support representative, you may be asked to
supply this group of numbers as an aid in trouble analysis.
Click this button to return you to the tool bar at the top of the
initial NP Config window.
Trap Filtering
In certain situations, large numbers of traps of a low level of severity can appear at your
©Copyright 2002, Mitel Networks Corporation
69
Mitel NuPoint Messenger Technical Documentation - Release 7.0
workstation, making it difficult to locate the more urgent traps amid the traffic. To minimize this
problem, the HP OpenView Network Node Manager provides a way to filter out unwanted traps.
This process, known as trap filtering, allows network administrators to:
•
Display traps of specific severity levels, or a range of levels
•
Specify particular modules as the source(s) of traps to be displayed
System requirements, the general process of trap filtering, and the procedures for configuring trap
filters are all described in the documentation for the HP OpenView Network Node Manager.
Glossary
ACM (Address Complete Message (SS7))
An ISUP acknowledgment message returned to the signaling source to indicate that all address
messages required for routing the call to the called party have been received.
Agent
A set of server software that generates the responses made by a specific network-management
protocol (such as SNMP) to requests for data or services that originate from a network
management (or client) station.
ANM (Answer Message (SS7))
A message sent in the backward direction indicating that the call has been answered. In semiautomatic operation, this message is used in conjunction with charging information to:
•
Start metering the charge to the calling subscriber.
•
Start measurement of call duration for international accounting purposes.
API (Application Programming Interface)
The function-library interface that an application can call in order to perform a particular service.
ASN.1 (Abstract Syntax Notation One)
The language used to define the syntax of objects in the management information base (MIB). It
thus defines the data-representation format used for exchanging, at the protocol level, data
values and their accompanying management information.
AT (Address Translation)
The prefix “at” used with a MIB-II variable name indicates that this MIB item is a part of the
address-translation group of MIBs.
BER (Basic Encoding Rules)
The syntax notation that formats, for purposes of transfer, data types defined, using ASN.1
notation, into serialized strings of octets. Note: “Transfer” here refers to MIB data objects in transit
between server and client.
Blocking
When a telephone call cannot be completed, it is said to be blocked.
CIC (Circuit Identification Code (SS7))
©Copyright 2002, Mitel Networks Corporation
70
Mitel NuPoint Messenger Technical Documentation - Release 7.0
A base address, or known starting point, from which the individual circuits on each SS7 trunk are
sequentially numbered.
Client-server model
This model defines a type of bilateral distributed network processing in which transaction
responsibilities are divided into two areas that communicate with each other. These areas can be
designated front end (client or manager) and back end (server or agent). The client, usually a
desktop computing device, requests data or services from a server and then performs local
processing on that input. The server, a shared node on the network, provides the information and
services requested by the client.
Common Channel Signaling (CCS)
A type of telephony network architecture (for example, SS7) that separates signaling commands
from voice traffic by carrying each type of traffic on independent channels. Each channel operates
at its own speed.
Community Name (SNMP)
In SNMP applications, a password used to control access to an agent’s node information. Agents
are configured to recognize one or more community names.
Connectionless
A service or environment in which a datagram moves from source to destination by means of the
network addresses contained in its header, rather than by use of a specified, physical-connection
routing path.
Datagram
A packet, independent of other packets that, in addition to user data and other descriptive fields,
carries information sufficient for routing from source to destination. A datagram operates in a
connectionless environment: one in which a dedicated physical connection between source and
destination is not established.
DPC (Destination Point Code (SS7))
Identifies the recipient of an SS7 signaling message.
DS1
A digital communication standard operating at 1.544 Mbps. DS1 carries 24 channels, each
digitized at 64 Kbps. In the U.S., the DS1 protocol is designated T1.
E1
A digital telephony protocol with a data throughput capacity of 2.048 Mbps. E1 frames carry data
in 32 channels, out of which channel 0 is dedicated to framing and synchronization, channel 16 is
dedicated to signaling data, and the remaining 30 channels carry PCM data, such as voice.
ESMDI (Enhanced Simplified Message Desk Interface)
ESMDI is a standard call-data packet format used in NuPoint Voice Centrex applications for
unified integrations.
File Transfer Protocol (FTP)
A communication protocol that offers various user-controlled file-transfer services for the group of
Internet protocols.
©Copyright 2002, Mitel Networks Corporation
71
Mitel NuPoint Messenger Technical Documentation - Release 7.0
Fragment
A portion of a datagram that is larger than the maximum transmission unit (MTU) length allowable
for the media in use. In order to transmit such datagrams, they are broken into fragments. After
transmission, if conditions are met, the fragments are reassembled in their original order.
FTP
See File Transfer Protocol.
IAM (Initial Address Message)
An IAM is sent from a source point to a transit exchange or to a destination point (whichever is
first in the path) to set up the trunk between them.
ICMP [1]
See Internet Control Message Protocol.
ICMP [2] (Internet Control Message Protocol)
The prefix “icmp” used with a MIB-II variable name indicates that this MIB item is a part of the
Internet Control Message Protocol group of MIBs.
Internet Control Message Protocol (ICMP)
An Internet error-reporting mechanism that provides feedback messages about how the Internet
(IP) layer of TCP/IP is operating.
IF (interfaces group)
The prefix “if” used with a MIB variable name indicates that this MIB item is a part of the interface
group of MIBs.
IP (Internet protocol)
The prefix “ip” used with a MIB-II variable name indicates that this MIB item is a part of the
Internet-protocol group of MIBs.
In general, the IP, which is designed for use in interconnected systems of packet networks,
provides for transmitting blocks of data, called datagrams, from source to destination(s), where
source and destinations are hosts identified by fixed-length addresses.
IP Address
A 32-bit quantity that designates a point of attachment, or node, in an internet.
IRQ (Interrupt Request)
Hardware interrupt request level for a data bus or CPU.
ISDN (Integrated Services Digital Network)
Digital standards that combine voice, data, and signaling. Circuits are digital end-to-end and use
out-of-band signaling.
ISUP (ISDN User Part (SS7))
An SS7 protocol that provides the signaling functions necessary for basic and supplementary
ISDN services.
ISUPA (SS7)
©Copyright 2002, Mitel Networks Corporation
72
Mitel NuPoint Messenger Technical Documentation - Release 7.0
A variant of ISUP that complies with ANSI standard T1.113.
ISUPB (SS7)
A variant of ISUP that complies with CCITT SS7 recommendations Q.763 (Blue Book).
ISUPI (SS7)
A variant of ISUP that complies with CCITT Q.767 (White Book) recommendations (International).
Line Group (NuPoint Messenger)
A specific number of communication (that is, trunk) channels dedicated to a specific function.
Each line in a line group is identified in three parts (a triplet) that indicate the (1) host number, (2)
backplane-slot number of its line card, and (3) channel number (0-29 for E1, and 0-22 or 0-23 for
T1.)
Listener
UDP socket addresses (that is, IP addresses and UDP port numbers) used by local applications
that are waiting for UDP datagrams.
Management Information Base (MIB)
A collection of network-related defined information objects that can be accessed by a networkmanagement protocol such as SNMP. Basically, a MIB defines grouped network-management
parameters required for communication between a client and an agent.
MIBs relate to each other in a hierarchical (inverted tree) structure in the form of a root (at the
top), main trunk, and various branches. Within this structure, any MIB variable can be identified
by its logical name or by a string of period-delimited numbers that designate its location on the
tree, in descending order from the root.
Manager
A software module in a network management system that monitors the status and configuration
of all or part of a network.
MIB (see Management Information Base)
MTP (Message Transfer Part (SS7))
MTP routes messages between signaling points and controls the flow of data packets to their
correct locations. MTP level 1, level 2, and level 3 make up the first three levels of the basic SS7
OSI signaling protocol. MTP level 1 (the physical layer) interfaces with the actual cabling of the
digital signaling link. MTP level 2 (the link layer) controls the ene-to-end transmission of a
message across a signaling link. MTP level 3 (the network layer) performs message routing and
network management functions.
MTU (Maximum Transmission Unit)
The largest amount of user data (for example, the largest size of an IP datagram) that can be
sent in a single frame on a particular medium.
Multicast
The transmission of messages to a specific, defined set or group of nodes in a network.
Network Management Station (NMS)
A selected host system that runs network management protocol and network management
©Copyright 2002, Mitel Networks Corporation
73
Mitel NuPoint Messenger Technical Documentation - Release 7.0
applications such as NP Config. The network management station is the central point from which
the NP Config operator checks the network for status, configuration, or any operational problem.
NMS
See Network Management Station
Node
An addressable device, such as a server, on a network that is a termination or retransmission
point for two or more communication links; a point of connection into a network.
NP Config
A client application operating in a client-server environment that, in with an SNMP management
application such as HP OpenView, graphically displays the hardware configuration and
operational status of network-connected NuPoint Messenger systems
NuPoint Messenger server
The combination of hardware and software used to run NuPoint Voice, NP View, NuPoint Fax,
and so forth.
Object
A software-defined entity with its own properties, methods, and internal workings. The internal
structure of an object is not known outside the object. Applications that use an object need to
know only its properties and methods (its interface characteristics and requirements). Using
objects facilitates building a complex application by breaking its many facets into smaller,
indivisible components. The structure of the application is built on, or based on, a hierarchy of
objects.
Octet
A group of eight bits of data.
ODBC (Open Data Base Connectivity)
A proprietary software architecture that enables applications to access data by querying any of a
variety of separate and independent database management systems.
PDU (Protocol Data Unit)
A data object, such as a formatted message, that is exchanged as a single unit between peer
processes on different computers. Such formatted messages usually contain both protocolcontrol information (header) and user data. In other contexts, a PDU can also be defined as a
frame, a segment, or a user datagram.
Ping
A program to test IP-level connectivity from one IP address to another.
Q-Net
A local network for connecting multiple NuPoint Messenger server modules into a multi-module
system with a single database and centralized control.
QNX
The Unix-based operating system used by the NuPoint Messenger products.
Redirect
©Copyright 2002, Mitel Networks Corporation
74
Mitel NuPoint Messenger Technical Documentation - Release 7.0
A redirect takes place when a local router informs a host that there is another router on the local
network with a better route to the destination than that in the datagram.
REL (Release Message)
A message sent in either direction to indicate that a circuit is being released for the reason
supplied, and is ready to be put into the idle state upon receipt of a release complete (RLC)
message. If the call was forwarded or is to be rerouted, the corresponding indicator is carried in
the message with the redirection or redirecting address.
Retransmission Timeout (RTO)
If a TCP segment is not acknowledged (ACK) within the period defined by the retransmission
timeout value, then TCP retransmits the segment.
RLC (Release Complete Message)
A message sent in either direction in response to the receipt of a release message. After the RLC
message is received, the corresponding circuit can be released and returned to the idle state.
Segment
(1) A TCP term for a packet made up of a header and any enclosed data. (2) A portion of a
network.
Server
A node that can provide a specific set of services to other nodes on a network.
SLC (Signaling Link Code (SS7))
Links that connect any two SS7 network nodes are a linkset. Each link in a linkset is identified by
a signaling link code, which can have a value between 0 and 15.
SLIP (Serial Line interface Protocol)
A protocol used for transmission of IP datagrams across a serial line.
SNMP
Simple Network Management Protocol. An application protocol used with NP Config offering
network-management services to computer networks running under the Internet TCP/IP
protocols.
The prefix “snmp” used with a MIB-II variable name indicates that this MIB item is a part of the
SNMP-protocol group of MIBs.
Source Quench
A source quench takes place when a router or host reports that it is congested and requests a
traffic slowdown.
SPC (Source Point code (SS7))
This code identifies the sender of an SS7 signaling message.
SSF (Subservice Field (SS7))
An SS7 message-transfer field containing a network routing indicator and two spare bits.
SS7 (Signaling System 7)
©Copyright 2002, Mitel Networks Corporation
75
Mitel NuPoint Messenger Technical Documentation - Release 7.0
A common-channel telephony signaling protocol that carries, between source and destination,
and on a dedicated circuit or channel, call-control information such as call setup, tear-down,
routing, and similar call-related information. In SS7, signaling information and voice information
are carried on separate channels.
Subnet Mask
In general, a 32-bit quantity with 1s in selected network and subnetwork-address bit positions and
0s in selected host-address bit positions. A subnet mask enables a user to configure how many
bits of an address apply to its subnet part and how many apply to the rest of the address.
T1
A type of twisted-pair digital communication link with a capacity of 1.544 Mbps. T1 handles 24
voice channels, each digitized at 64 Kbps. For the NuPoint Messenger implementation, channel
24 may be allocated for SS7 signaling, with the remaining 23 channels available for PCM data,
such as voice. If T1 does not carry SS7 signaling, channel 24 can be allocated to voice.
TCB
See Transmission Control Block
TCP/IP
See Transmission Control Protocol/Internet Protocol.
Transmission Control Block (TCB)
A TCP/IP data structure that contains all the information about a TCP connection or a UDP
communication endpoint.
Transmission Control Protocol/Internet Protocol (TCP/IP)
A set of protocols for layers 3 and 4 of the seven-layered Open Systems Interconnection (OSI)
model. Note the following three points:
(1). TCP (OSI layer 3) A connection-oriented data-transport protocol that is part of the Internet
group of protocols. As a connection-oriented transport protocol, TCP operates in three phases:
setting up a connection, supporting reliable data transmission (or retransmission) between
connection partners, and connection release.
(2). IP (OSI layer 4) An Internet protocol that tracks the network addresses for different nodes,
routes outgoing messages, and recognizes incoming messages.
(3). The prefix “tcp” used with a MIB-II variable name indicates that this MIB item is a part of the
Transmission Control Protocol (TCP) group of MIBs.
Trap
An unsolicited, or proactive, message sent by an SNMP agent to a management station to report
a specific network alarm, event, or other exception condition.
TTL (Time to Live)
The TTL field, part of the IP datagram header, contains the upper time limit after the expiration of
which a datagram cannot be processed within the Internet Protocol. When this time limit or its
default value is exceeded, the datagram is discarded.
UDP [1]
©Copyright 2002, Mitel Networks Corporation
76
Mitel NuPoint Messenger Technical Documentation - Release 7.0
See User Datagram Protocol (UDP).
udp [2] (User Datagram Protocol)
The prefix “udp” used with a MIB-II variable name indicates that this MIB item is a part of the User
Datagram Protocol group of MIBs.
Unicast
Implies the transmission of a protocol data unit (PDU) to a single, defined destination. Compare:
Multicast.
User Datagram Protocol (UDP)
A connectionless-mode transport-layer protocol that can be used on IP networks. Provides a
simple way for an application to send individual messages to other applications. Note that
delivery is not necessarily guaranteed, and messages may not always be delivered in the order
sent.
The prefix “udp” used with a MIB-II variable name indicates that this MIB item is a part of the
UDP-protocol group of MIBs.
©Copyright 2002, Mitel Networks Corporation
77