1
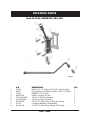
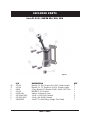
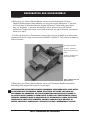
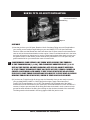
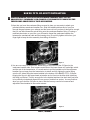
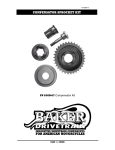
Install at ion Instr uct ions Function Formed FL Oil Spout over view Function Formed FL Oil Spout V.040407 FEATURES: The new line of BAKER FL Oil Spouts follows on the heels of other BAKER Function Formed components brought to market within the last year. Through our own experience as riders, and by listening carefully to comments of our customers, we have set out to solve the many problems found on the current stock configurations of the FL Engine Oil Spouts. With our thread-in, one piece billet dipstick, there will no longer be dipsticks blowing out upon acceleration. This is a big problem for any FL with a big inch or hopped up motor. The tidy packaging of the Oil Spout allows the use of any starter on the market (that will clear your FL frame) as well as any style bearing door and side cover on the market. This Oil Spout is necessary when running the new line of BAKER LSD Hydraulic Side Covers as well as the BAKER LSD FF OD6 Door & Actuators. Not being content with running a black rubber crankcase breather hose similar to the one found on your lawn mower, we have stepped it up with an industry first; a polished stainless hard line & braided stainless crankcase breather assembly that will clear your exhaust as well your oil lines from the motor to the oil tank. The precise packaging of this line was not an accident and was designed to complement both the aesthetics of your 2-wheeled hot rod, but also to ease the installation and service. No removing the exhaust or losing a drop of oil to put this baby in place. We are so happy with the line of FL FF Oil Spouts that we are now including them standard on all complete BAKER FL Transmission builds in polished form. With the discounted upgrade option available on all BAKER Builder’s Kits. The Oil Spouts are available in polished, chrome or black anodized with the dipsticks coming in polished or chrome. FITMENT: • 93-98 EVO FL’s • 99-06 TC FL’s COMMON HAND TOOLS & SHOP SUPPLIES NEEDED: • Factory Service Manual For Your Bike • 3/16 Allen Wrench • 5/16 Allen Wrench • 9/16 End Wrench • 5/8 End Wrench • 11/16 End Wrench • Loctite™ 567 Thread Sealant (Available at your local Auto Parts Store) • ‘BLUE’ Thread Lock • Anti Seize Compound PAGE 1 | OVERVIEW b aker ff fl oil spout installation: table of contents: 1. Overview 2. Table of Contents 3. Included Parts Illustration 4. Included Parts Detail 5. Preparation and Disassembly 6-8. Step by step installation 9. Terms 10. Disclaimer PAGE 2 | TABLE OF CONTENTS i nclu ded part s Stock FL 02-06, BAKER DD5, DD6, OD6 Figure 1. 1 2 3 4 5 6 7 8 9 P/N 473-56 66825 470-56 62432-93A 25C100KCSS/P 25C75KCSS/P 962306ERL 471-56 06_A00410 DESCRIPTION Dipstick, FL, TC, Engine Oil (5-3/16” Overall Length) O-ring, Buna N-70, Dipstick 9/16ID, 3/4OD, 3/32 Thick BAKER FF FL Oil Spout Gasket, Oil Spout to Case 1/4-20 x 1 SHCS SS Polished 1/4-20 x 3/4 SHCS Polished 1/4 NPT To -6AN Fitting, 45 Deg, Zinc Plated Crankcase Breather Line Assembly 1/4 NPT To -6AN Fitting, Straight, Zinc Plated PAGE 3 | PARTS QTY 1 1 1 1 2 2 1 1 1 i nclu ded part s Stock FL 93-01, BAKER DD5, DD6, OD6 Figure 2. 1E 1T 2 3 4 5 6 7 P/N 472-56 473-56 66825 470-56 62432-93A 25C100KCSS/P 25C75KCSS/P 25KKPD0Z DESCRIPTION Dipstick, FL, EVO, Engine Oil (5-5/8” Overall Length) Dipstick, FL, TC, Engine Oil (5-3/16” Overall Length) O-ring, Buna N-70, Dipstick 9/16ID, 3/4OD, 3/32 Thick BAKER FF FL Oil Spout Gasket, Oil Spout to Case 1/4-20 x 1 SHCS SS Polished 1/4-20 x 3/4 SHCS Polished 1/4 NPT To -6AN Fitting, Straight. Zinc Plated PAGE 4 | PARTS QTY 1 1 1 1 1 2 2 1 Preparation an d di ss asse mbly : DISASSEMBLY 1) Referring to you Factory Service Manual, remove your Factory Engine Oil Spout, Gasket & Dipstick and set them aside as you will not be reusing these parts. If you have an FL built from 93-98 and still has the original HD Factory Transmission case, skip to step 1 of ‘Assembly’. If your bike was built from 99-01 and you have a HD Parts & Accessories Transmission Case, or an 02-06 model with any type of HD case, you need to follow on to step 2. **H-D Parts & Accessories Transmission cases are the only type available as an aftermarket purchase and are the cases used to build any BAKER Compete FL Tranny that is available for sale to the public. No fitting for breather: -02-06 FL cases that came from the factory in a bike -99-06 FL HD Parts and Accessories casses Figure 3 - A Harley Parts and Accessories Case. 2) Referring to you Factory Service Manual, remove the Crankcase Breather line and the hose fitting at the engine (See Figure 4 on next page). WHEN REMOVING THE FITTING FROM THE CRANKCASE, GREAT CARE NEEDS TO BE TAKEN TO NOT STRIP OUT THE THREADS, BREAK THE FITTING OFF IN THE CASE OR IN ANY WAY DAMAGE THE CRANKCASE. WE CANNOT STRESS THIS POINT ENOUGH! FAILURE TO DO SO WILL INFLICT DAMAGE TO YOUR ENGINE TO THE POINT THAT EXTENSIVE, LABOR INTENSIVE, EXPENSIVE WORK IS REQUIRED TO FIX THE PROBLEM. USING A SPRAY TYPE LUBRICANT ON THE FITTING’S THREADS, PRIOR TO BACKING IT OUT MAY HELP TO REDUCE THE RISK OF PORT DAMAGE, ALTHOUGH IT IS NOT A GUARANTEE OF SUCCESS. PAGE 5 | preparation and dissassembly b aker ff fl oil spout installation: Crankcase breather fitting Figure 4. ASSEMBLY 1) Now that you have your Oil Spout, Breather Line & Crankcase Fitting removed (if applicable to your model) you are ready to begin bolting on your new BAKER FF FL Oil Spout assembly. Check to make sure that threads are clean both where the Oil Spout mounts to the transmission case as well as the crankcase breather on the engine. If there is residual thread lock in the holes, the holes will need to be cleaned out by running a lubed tap into them. Also check to make sure the gasket surface is clean where you are about to bolt your BAKER FF FL Oil Spout. Any old gasket material left on your transmission case will cause leaks. CONSIDERABLE CARE NEEDS TO BE TAKEN WHEN CHASING THE THREADS IN THE TRANSMISSION (1/4-20), THE CRANKCASE BREATHER PORT (1/4-18 NPT) ON THE ENGINE, OR WHEN CLEANING OFF ANY OLD GASKET MATERIAL. IT IS OF UTMOST IMPORTANCE THAT NO PIECES OF DIRT, DEBRIS, GASKET OR CRUSTY OLD THREAD LOCK MAKES IT WAY INTO YOUR ENGINE OR OIL TANK. FAILURE TO TAKE THESE PRECAUTIONS WILL RESULT IN THAT DIRT OR DEBRIS RUNNING THROUGH YOUR ENGINE, WHICH IS VERY BAD FOR YOUR BIKE. 2) If you have an FL built from 93-98, skip to step 4 of Assembly. Now you are ready to screw in your provided BAKER 1/4NPT to -6AN Fitting at the engine. Apply a liberal amount of Loctite™567 Thread Sealant to the ¼ NPT side (tapered, fully threaded end of the fitting) and thread it into the crankcase on your motorcycle. The thread sealant is a must use item for 2 reasons, it helps to prevents leaks at the fitting and lubes the threads in such a manner to help prevent the steel threads of the fitting from sticking too the aluminum threads of the crankcase. The fitting needs to be threaded in until snug (approx 200in-lbs) and no more. PAGE 6 | preparation and dissassembly b aker ff fl oil spout installation: OVER-TIGHTENING THE PROVIDED CRANKCASE BREATHER PORT FITTING DRAMATICALLY INCREASES YOUR CHANCES OF PERMANTENTLY DAMAGING THE THREADS AND CRANKCASE OF YOUR MOTORCYCLE. 3) Now that you have the crankcase fitting screwed in place you are ready to attach your polished stainless crankcase breather line. Slide the braided stainless end of your line through the gap between your exhaust and the frame rail until you have it through far enough that you can hand thread the swivel fitting onto the crankcase breather fitting. If running a mechanical actuator on your bike, you will need to thread the crankcase breather line between the mechanical cable and the bearing door. Do not fully tighten at this time, just finger tight to keep the tube assembly from falling off the bike. Figure 5. 4) You are now ready to hook the 45˚ elbow fitting on the bottom of the Oil Spout to the crankcase breather tube. Due to space restrictions of the lower frame rail, brake light switch and the rest of the transmission, it is much easier to pull the braided end of the crankcase breather line out away from the transmission to attach and fully tighten the swivel fitting onto the 45˚ elbow fitting that came installed in the bottom of the BAKER FF FL Oil Spout. Aligning the Spout in the approximate orientation as it will rest on the bike while tightening the fitting is sufficient. There is enough flex in the braided stainless line that it does not have to be perfectly clocked and aligned to have years of trouble free service. You may find that when you go to bolt the Oil Spout in place, that the line may need to be loosened and adjusted to be orientated in the correct manner. Figure 6. PAGE 7 | ASSEMBLY b aker ff fl oil spout installation: 5) With the Oil Spout attached to the line and the fitting tight, you are ready to bolt the Oil Spout to your transmission. The dipstick should still not be threaded into the spout as that is the last part that goes on your bike. Using the provided bolts, place the 1” long ¼-20 bolts in the top two holes of the spout, with the two, ¾” long ¼-20 bolts in the bottom two holes. ‘Hanging’ the gasket off of these bolts while getting the bolts and spout all lined up works best. Using “BLUE” thread lock, torque the four bolts to 110 in-lbs. Thread the dipstick into place to prevent dirt and debris from getting in your oil tank. Use a liberal amount of anti-seize on the threads to prevent the aluminum dipstick from galling the threads on the aluminum oil spout. 6) Tighten the fitting from the crankcase breather line at the engine and you are done. You will check your oil level in the similar manner to your stock, slip in dipstick. With the bike on its kickstand, thread the dipstick in all the way, back it out and pull it out. The top line is full, the bottom line shows that you are about a quart low. You are complete… PAGE 8 | ASSEMBLY ter ms SPECIAL ORDERS A minimum $500 deposit is required with all special orders. Special orders include unique case finishes, unique side door requests (i.e.; wrinkle black door or no logo). ALL OTHER ORDERS Orders can be pre-paid using VISA, Mastercard or American Express. Prices shown are F.O.B. Haslett, MI. BAKERTM provides free UPS ground shipping on all retail orders for complete transmissions or transmission kit. UPS air shipment is available upon request. Customer is responsible for air shipment premiums. LIMITED WARRANTY BAKERTM Inc. transmission assemblies, transmission kits, primaries, belt drives and wide tire kits are guaranteed to the original purchaser to be free of manufacturing defects in materials and workmanship for a period of 5 years from the date of purchase or up to 50,000 miles - whichever is sooner. If the product is found by BAKERTM to be defective, such products will, at the option of BAKERTM, be replaced or repaired at cost to BAKERTM. In the event warranty service is required, the original purchaser must call or write BAKERTM immediately with the problem. If it is deemed necessary for BAKERTM to make an evaluation to determine whether the transmission assembly or transmission kit is defective, the entire transmission assembly, whether originally purchased as an assembly or kit, must be properly packaged and returned prepaid to BAKERTM with a copy of the original invoice of purchase. If after an evaluation has been made by BAKERTM and a defect in materials and/or workmanship is found, BAKERTM will, at BAKER’s option, repair or replace the defective part of the assembly. Warranty card must be returned within 45 days of purchase to be valid. ADDITIONAL WARRANTY PROVISIONS This limited warranty does not cover labor or other costs or expenses incidental to the repair and or replacement of BAKERTM products. This warranty does not apply if one or more of the following situations is judged by BAKERTM to be relevant: improper installation, accident, modification (including but not limited to use of unauthorized parts), racing, high performance application, mishandling, misapplication, neglect (including but not limited to improper maintenance), or improper repair. BAKERTM shall not be liable for any consequential or incidental damages arising out of or in connection with a BAKERTM transmission assembly, transmission kit, swingarm, fender, component or part. Consequential damages shall include without limitation, loss of use, income or profit, or losses sustained as the result of injury (including death) to any person or loss of or damage to property. BAKERTM transmissions, transmission kits, primaries, belt drives, and Wide Tire Kits are designed exclusively for use in Harley-Davidson® motorcycles. BAKERTM shall have no warranty or liability obligation if a BAKERTM part is used in any other application. If it is determined that a BAKERTM transmission assembly has been disassembled during the warranty period for any reason, this limited warranty will no longer apply. PAGE 9 | TERMS discl aimer The words Harley, and H-D are registered trademarks and are for reference only. Use of H-D model designations and part numbers are for reference only. BAKER Drivetrain has no association with, and makes no claim against, these words, trademarks, or companies. It is the sole responsibility of the user to determine the suitability of this product for his or her use, and the user shall assume all legal, personal injury risk and liability and all other as well as all other obligations, duties and risks associated therewith. customer support For any installation or service questions, please contact our BAKER technical department toll free: 1-877-640-2004. Baker Drivetrain 9804 E. Saginaw Haslett, MI. 48840 On the web: www.bakerdrivetrain.com PAGE 10 | DISCLAIMER