Transcript
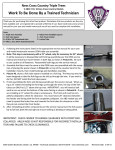
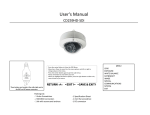
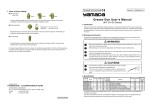
Bolt-On Fairing kit for Dyna
Part# 06-033 and 06-035
Fits: 2006 and up Dyna models w/49mm legs
Thank you for purchasing this Arlen Ness product. We believe that our products are the very best
available and are engineered to provide a lifetime of use. Basic hand tools and a service manual for
your year and model motorcycle are all you need to complete this installation.
IMPORTANT NOTE:The 06-035 fairing is designed to be painted. Please check fitment before painting. Under no circumstance will Arlen Ness warranty damaged paint due to improper installation.
Parts:
1-Windshield
2-Fairing bracket
2-Zip ties
3-1/4-20x5/8 buttonhead allen, chrome
2-1/41ockwasher
1-3/8x16x2 1/2 allen, chrome
1-lnstructions
1-Fairing body
1-Headlight mount
2-Fork clamp
8-Windshield mounting bolt
2-1/4-20 nylock nut, chrome
1-1/4 Flat washer
1-3/8 nylock nut, chrome
1. Remove OEM headlight from OEM mount. Remove OEM mount from lower
tree. Install new headlight mount using 3/8x16x2 1/2 allen and 3/8 nylock nut
(provided). Install headlight onto new mount using OEM hardware. Pic 1.
NOTE: It will be necessary to pull extra wire from inside of the frame to allow
the headlight to move forward on new mount. Aim headlight using procedure
outlined in OEM service manual.
2. Make a felt pen mark on the outside edge of each fork tube 1/2 inch bellow
bottom of top tree.
3. Install clamps onto fork tube lining the top of the clamp up with the pen mark.
NOTE: The threaded portion of the clamp should be on the front side of the
tube pointing out at 90°. Pic 2. Using a zip tie temporarily "zip" the clamp
closed around the fork tube to hold it in place for now. Pic 3.
4. Install one lock washer and the notched side of one upper fairing bracket onto
the threaded portion of clamp with the offset facing out. Install the nylock
that came with the clamp and snug down (do not tighten) with bracket facing
up. Pic 4.
5. Install windshield to the inside of fairing body using plastic hardware
(provided) starting at the front middle screw working your way back evenly.
DO NOT OVER TIGHTEN THE BOLTS WILL BREAK!
6. Using one 1/4x20x5/8 button head allen w/one 1/4 flat washer attach front of
fairing to the bottom of the new headlight mount. Pic 5. Center the opening in
the fairing around the headlight then snug down the allen. Do not tighten yet.
7. Align the holes in the upper fairing brackets with the holes in the fairing body
and install two 1/4x20x5/8 buttonhead aliens (one in each side) snug down.
8. Tighten up all hardware evenly while making sure fairing is aligned and symmetrical with the headlight, fork legs, triple trees, etc. NOTE: The clamps and
upper brackets can be moved around to achieve proper alignment. Cut Zip
Ties and remove after all is tight.
6050 Dublin Boulevard, Dublin, Ca . 94568- Technical assistance: 925.479.6379- www.arlenness.com 1-06033 rev 3-19-10