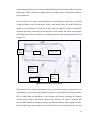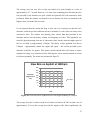
1
Design and Implementation of a Motor
Drive for Steering a BMW X5 Vehicle
Nicholas Randell
10421526
School of Mechanical Engineering, University of Western Australia
Supervisor: Dr Nathan Scott
School of Mechanical Engineering, University of Western Australia
Final Year Project Thesis
School of Mechanical Engineering
University of Western Australia
Submitted: May 31st, 2010
Project Summary
This project has been commissioned by the UWA Renewable Energy Vehicle (REV) team
to aid in their ongoing research into intelligent automotive control. These systems have the
aim of improving vehicle safety, a vital field of research. The project aims to deliver
electronic actuation of the steering system of a research vehicle. A review of available
literature concluded that limited documentation detailing methods of after-market steering
actuation was available.
Alternative methods of actuation were assessed against a design brief. Actuation by a DC
motor mounted in the engine bay with a belt drive to the steering column was deemed to be
the most suitable approach. The design requirements of necessary components were
evaluated in detail allowing components to be analysed and refined until final designs were
produced.
A motor constraint and thermal barrier were required, and were integrated into a single
aluminium component folded from 1.5mm sheet metal. Both the steering column and a
timing pulley were modified to allow the pulley to be attached directly to the steering
column.
The system was successfully installed in the vehicle and tested under experimental
conditions. The system satisfied most of the design requirements. Vehicle steering was
actuated at an effective rate without the introduction of any significant safety hazards.
Convenience of the car was unaffected by modifications made.
There exists significant scope for future work on the project. The system requires both a
method of detecting driver override and the installation of feedback sensors to be developed
further.
2
Letter of Transmittal
Nicholas Randell
29 Morton Road
Carmel, WA, 6076
31st May 2010
Professor John Dell
Dean
Faculty of Engineering, Computing and Mathematics
University of Western Australia
35 Stirling Highway
Crawley, WA, 6009
Dear Professor Dell
I am pleased to submit this thesis entitled “Design and Implementation of a Motor Drive
for Steering a BMW X5 Vehicle”, as part of the requirement for the degree of Bachelor of
Engineering (Mechanical).
Yours Sincerely,
Nicholas Randell
10421526
3
Acknowledgements
This project would not have been possible without the support of several parties. The
vehicle upon which the investigation has been conducted was generously donated by BMW
of Germany. Further parts and assistance have been kindly provided by Auto Classic BMW
dealership of Perth. Credit must also go to Dr Nathan Scott – the supervisor of the project.
His generous provision of time, support and guidance were vital to the progression of the
project at critical junctures.
4
Table of Contents
Project Summary .................................................................................................................... 2
Letter of Transmittal .............................................................................................................. 3
Acknowledgements ................................................................................................................ 4
Table of Contents ................................................................................................................... 5
1. Introduction and Literature Review ................................................................................... 7
1.1 Introduction: Background for the Project .................................................................... 7
1.2 Literature Review: An Evaluation of Documented Attempts at Steering Actuation ... 9
1.3 Steering System in the X5 .......................................................................................... 12
2. Process – Accessing Vehicle Systems, Evaluating Design Alternatives and Developing
Final Design ......................................................................................................................... 14
2.1 Approach 1 – Servo Mounted on Underside of Upper Steering Column .................. 15
2.2 Approach 2 – Servo Mounted in Vehicle Foot-Well ................................................. 17
2.3 Approach 3 – Direct Access to Power Steering System ............................................ 20
2.4 Approach 4 – DC Gear-motor Mounted in Engine Bay ............................................ 23
2.5 Comparison of Alternatives ....................................................................................... 26
2.6 Design Development .................................................................................................. 27
2.7 Fabrication.................................................................................................................. 38
2.8 Installation .................................................................................................................. 46
2.9 Safety Analysis .......................................................................................................... 46
3. Results and Discussion..................................................................................................... 50
3.1 Actuation Technique Investigation ............................................................................ 50
3.2 Final Design of Steering Actuation System ............................................................... 50
3.3 Preliminary Testing Results ....................................................................................... 54
3.4 Analysis of Results ..................................................................................................... 58
4. Conclusions and Future Work.......................................................................................... 60
4.1 Conclusions ................................................................................................................ 60
5
4.2 Suggested Future Work .............................................................................................. 61
References ............................................................................................................................ 63
Appendices ........................................................................................................................... 65
Appendix 1 – Maintaining/Modifying Installed Actuation System ................................. 65
Appendix 2 – Shear-off Bolt Removal............................................................................. 68
6
1. Introduction and Literature Review
1.1 Introduction: Background for the Project
In 2008 alone, 1464 people in Australia were killed in road traffic accidents with many
more seriously injured (Department of Infrastructure, Transport, Regional Development
and Local Government 2008). A recent global study concluded that traffic accidents were
the single largest cause of death in people aged 10-24 (Patton 2009). The development of
technology which could reduce the incidence of road traffic accidents is of great
importance to the global community. An active field of research aimed at improving
vehicle safety is the development of automated control systems in cars.
Bishop (2005) finds that „Regarding safety, both government researchers and engineers
within automotive industry laboratories have been developing technology to help drivers
avoid crashes‟ (Bishop 2005, p 2). At manufacturer level, leading auto companies are
developing control systems to improve the safety and convenience of their cars. Volvo, for
example, have recently released a collision avoidance system, due for production in 2010,
which is able to fully actuate vehicle brakes according to information received from sensors
(Ulrich 2009).
Academic institutions are also contributing to the body of knowledge in the field of active
vehicle control systems. Sharifuddin et al. (2009) recently published a conference paper
detailing the development of real-time lane detection software for an automated steering
system with the aim to improve vehicle safety and comfort.
The Renewable Energy Vehicle (REV) team at UWA wish to conduct research in this field
of automated vehicle control. The team plans to develop driver assistance programs aimed
at improving vehicle safety. A collision avoidance/mitigation program is in the early stages
of development at UWA. Collision avoidance systems avoid an imminent collision by
actuation of vehicle steering (and possibly braking) systems to steer around an obstacle.
Collision mitigation systems mitigate an imminent collision by actuating vehicle braking
7
systems to brake before reaching an obstacle. These systems would hypothetically work in
the following manner:
Cameras, mounted on the car would survey the vehicle surroundings
Imaging software would interpret images from the cameras and deduce the
proximity of external objects, such as other vehicles, pedestrians and trees
This information would be used to determine an imminent collision
Software would then take control of vehicle systems through installed actuators to
avoid or mitigate a collision
In order to test the driver assistance programs being developed, a vehicle with electronic
actuation of vehicle controls is required. A standard production passenger vehicle, namely a
2001 BMW X5, has been made available for the purpose of automated vehicle control
research. The aim of this project is to provide a means of electronically actuating the
vehicle‟s steering controls. An image of the test vehicle is presented in figure 1.
Figure 1: BMW X5 Research Vehicle
8
The general requirements of the design solution as communicated by the REV team were as
follows:
The system must be able to be completely deactivated, and the car should then
operate as normal
The everyday convenience of the car should not be compromised by any additions
made
Control must be returned to the driver in the event of system malfunction
The modifications must not impinge upon the safety of any vehicle occupant
1.2 Literature Review: An Evaluation of Documented Attempts at Steering Actuation
The Defense Advanced Research Project Agency (DARPA) commissions an annual long
distance race for driverless vehicles through the American desert (Gibbs 2006). Stanford
University‟s submission for the challenge in 2005, a modified Volkswagen Touareg, uses
„A DC motor attached to the steering column‟ for electronic steering control (Thrun et al
2006, p 664). The actual design of this motor attachment is unclear from available
literature; the focus being mostly on navigation and sensing techniques.
Isermann (2008) documented testing on an anti-collision system with automatic braking
and steering in a Volkswagen Golf. However, the paper is again sparse with information
about the actuation of vehicle controls, stating only that „the driver-assistance system uses
an active front steering (AFS) and an electro hydraulic braking (EHB) system as actuators‟
(Isermann 2008, p 684).
Steering actuation has been successfully achieved by direct access to the vehicle hydraulic
power-assist mechanism. Prohaska (1998) illustrated that it was possible to gain electronic
control of vehicle steering by modifying the existing hydraulic fluid control system.
Ordinarily, the flow of pressurised fluid in the power-assist system is controlled by valves
which open and close in response to torque applied to the steering column (see section 1.1).
Prohaska (1998) explains that these valves can be bypassed and fluid redirected to a
different set of electronically controlled valves.
9
Prohaska (1998) concludes that the steering actuation achieved is „adequate to study
lanekeeping up to 50 mph, but only barely so‟ (Prohaska 1998, p 15). The paper provides a
good description of how one might go about modifying a vehicle for steering actuation by
access to the power steering system. The vehicle on which work was carried out was a 1989
Ford Crown Victoria. The process required to complete the same work on the 2001 X5 may
vary significantly, given the differing vintages of the cars. However, both cars utilise the
same fundamental system, a power assisted rack-and-pinion.
Retro-fitted commercially available examples of steering actuation can also be found.
These are used predominantly in automotive safety testing for vehicle control without an
occupant. Anthony Best Dynamics (2007) provide a system which attaches a DC motor to
the steering spline directly behind the steering wheel, as shown in figure 2.
Figure 2: Steering Robot (Anthony Best Dynamics)
Shah (2009) completed previous work on the X5 and examined the feasibility of different
methods to actuate vehicle steering. This work concluded that the best method to actuate
the steering would be to use a servo-belt drive mechanism (Shah 2009). The shaft pulley
would be located at the back of the steering wheel and the servo underneath the upper
10
steering column. Although the paper provides some assistance to the design problem, it is
more generally focussed on reviewing literature available for „by-wire‟ technologies. The
paper does not fully evaluate design alternatives, nor does it provide a comprehensive
solution to the design problem.
It can be seen from a review of available literature that neither the driver assistance
programs planned by REV nor the development of electronic control of vehicle steering are
novel concepts. However, most post-production steering actuators found have been bulky
and awkward and have compromised the everyday use and convenience of the car. The
Prohaska (1998) paper is an obvious exception to this observation as all modifications to
the vehicle occur under the bonnet and out of the way of the driver. Other literature
(Isermann 2008, Thrun 2009) mentions the actuation of vehicle steering in passing without
actually being specific about how one would go about achieving it.
The successful completion of work undertaken by this project would allow the REV team
to further their studies into the development of intelligent driver assistance systems.
Without the completion of this technology, the imaging software currently being developed
by post-graduate students would be unable to be tested. The REV team has procured a full
size inflatable model of one of their other vehicles, the Hyundai Getz, for the purposes of
testing the autonomous control systems. Significant time and economic resources have been
expended in the development of the driver assistance project. The success or failure of this
work is dependent upon the ability to actuate vehicle controls and thus the outcome of the
current investigation. Failure to deliver a working solution could potentially delay the
driver assistance program by six months or more.
11
1.3 Steering System in the X5
The X5 utilises a power-assisted rack-and-pinion steering system (Bentley 2007). A
diagram of the steering assembly, taken from the Bentley (2007) service manual, can be
seen in figure 3.
Figure 3: Steering System Diagram (Bentley 2007)
The X5 steering system is composed of three primary elements: the steering column, the
rack and pinion gear box and the power assist mechanism. A schematic diagram of the
steering assembly displaying all of these elements can be seen in figure 4.
12
Figure 4: Rack and Pinion with Power Assist (Nice 2001)
Under normal operation, the driver imparts torque on the steering column in order to turn
the front wheels. This torque is transmitted through the steering column, to the rack and
pinion gearbox. The rack and pinion converts the rotational motion of the steering column
into linear motion of the steering rack, which is then connected to each front wheel. The
rack and pinion gearbox also provides a gear reduction, making it easier to turn the front
wheels (Nice 2001).
Power assist is supplied by delivery of pressurised fluid to either side of a piston connected
to the steering rack. The supply of fluid to the piston is in turn determined by the opening
and closing of a rotary control valve. This valve uses a torsion bar to sense torque applied
by the driver on the steering column and distributes fluid to one side of the piston or the
other (Nice 2001).
13
2. Process – Accessing Vehicle Systems, Evaluating Design Alternatives and
Developing Final Design
In order to develop a design capable of satisfying the project objectives, it is first necessary
to conduct a thorough investigation of different approaches to the design problem. While
established literature could provide some guidance about actuation techniques, an original
investigation into the specific characteristics of the test vehicle needs to be conducted. Four
different methods of steering actuation are evaluated under the investigation:
A servo mounted in the vehicle cabin at the back of the steering wheel with a belt
drive to the steering wheel
A servo mounted in the foot-well of the cabin with a belt drive to the steering
column
Direct actuation of the vehicle‟s power steering system
A servo mounted in the engine bay with a belt drive to the steering column near its
attachment to the steering rack
Each proposal has been developed to the point where meaningful evaluation can take place.
This process has involved gaining access to different parts of the car and in some cases
developing preliminary designs.
Safety has been an ongoing priority throughout all work undertaken for this project. A full
safety evaluation of all hands-on activities completed for the project can be found at the end
of the process section of the report. This discussion includes assessment of risks involved in
all work completed on the test vehicle and all elements of the eventual fabrication process.
Safety considerations also had a large bearing on the design process. Safety of proposed
designs to installers and users of the actuation system was an important aspect of the
decision making process. An analysis of the safety credentials of each design is presented
in the following evaluation of design alternatives.
14
2.1 Approach 1 – Servo Mounted on Underside of Upper Steering Column
Previous work conducted on the vehicle by Shah (2009) found that the best way to actuate
the vehicle steering was to mount a sprocket to the steering wheel, to be actuated by a servo
mounted on the underside of the upper steering column. A servo had been procured for the
task, the SSPS-105 Tone Servo (Craig Kackert Design Technology Inc n.d.). Initial
rendering conducted by Shah (2009) is shown in figure 5.
Figure 5: Initial System Rendering (Shah 2009)
Gaining Access to Vehicle Systems
In order to evaluate the credentials of the proposed design solution, access to the relevant
assembly in the car had to be achieved. Work had already been completed on the car by
Shah (2009) to remove the surrounding interior trim, airbag, steering wheel and
indicator/wiper stalk switches. This had exposed the necessary elements of the car to allow
the proposed design to be evaluated.
Design Evaluation
Under the design proposed by Shah (2009), a timing pulley would be attached to the
steering wheel with the servo mounted on the underside of the steering column. This
approach had both strengths and deficiencies. It would have required little if any
modification to the vehicle steering system, an important safety and cost consideration. It
15
will be shown later that other proposals do involve modification of the steering system. The
system would also have been readily accessible for maintenance and monitoring.
The deficiencies of the proposal, however, were significant. If the pulley were attached to
the steering wheel as suggested, it would have been impossible to reinstall the indicator and
wiper switches to their place at the rear of the steering wheel. An entirely new system for
activating the systems controlled by the stalk switches would have needed to be designed
for the car to be suitable for normal driving, a key design constraint. By installing the servo
in the vehicle cabin, the driver‟s space would also have been significantly compromised.
The addition of the servo on the underside of the upper steering column would have
resulted in less leg room for the driver as well as an awkward embarkation for the driver.
Under testing, it became clear that the servo procure by Shah (2009) for the task of
actuating the vehicle steering did not „free-wheel‟. That is, the position of the servo could
not be changed by the application of external torque to it. With a direct belt link between
the servo and steering column, this would have precluded the driver from changing the
position of the steering column when the servo was not in operation. One solution to this
problem which was examined was the installation of an electromagnetic (EM) clutch
between the servo and drive pulley. This device would engage or disengage the link
between the servo and steering column according to electrical inputs. Once the EM clutch
was factored into the design, the space issues highlighted earlier became even more
problematic.
Safety
In the design proposed, the mechanism is quite exposed. There is potential for material to
get caught up in the pulleys and servo, for example the driver‟s clothes or hair. It may be
possible to install a guard around the belt and pulleys to protect both the driver and the
equipment. However, in certain situations, the additions to the vehicle may still be
dangerous. In the event of a serious accident, any addition to the vehicle cabin could
potentially become a significant safety hazard. The vehicle cabin can often be deformed
16
under the massive forces evident in a collision and the introduction of sharp or bulky
objects inside the cabin could expose the driver to significant risk.
2.2 Approach 2 – Servo Mounted in Vehicle Foot-Well
Whereas the previous approach attempted to attach a pulley to the steering wheel and
mount the servo to the upper steering column, the idea behind this approach was to attach
the shaft directly to the lower section of the steering column. The servo could then be
mounted adjacent to the steering column. The section of the steering column under
consideration is depicted in figure 6.
Upper
Steering
Column
Rubber Connection
Stud Fixings
Spline
Attachment to
Steering Column
Potential Region
of Pulley
Attachment
Firewall
Figure 6: Lower Steering Column Diagram
Gaining Access to Vehicle Systems
In order to gain access to the lower section of the steering column inside the cabin, parts of
the vehicle had to be disassembled. Initially, it was necessary to remove an air vent in the
foot-well of the car. This component is indicated in its original position in figure 7. This
component was held in place only by the shape and elasticity of its material and was easily
removed.
17
The upper section of the steering column was then removed to allow greater access to the
area of interest. This first involved separation of the spline attachment labelled in figure 6.
The lower section of the column contains a telescopic joint near the firewall which both
provides for adjustment of steering wheel depth and ensures that the steering column
collapses forward in the event of an accident. This function also made separation of the
spline relatively straightforward, as the lower section of the steering column could simply
slide forward after the spline was loosened. The separated spline is shown in figure 8.
Figure 7: Lower Section of Steering Column with Air Vent
Figure 8: Separated Steering Spline
18
With the removal of several fasteners, including a „shear-off‟ bolt, the entire upper steering
column was able to be removed, providing access to the area of interest. Removal of the
„shear-off‟ bolt proved to be quite an involved process. A detailed description of this
process can be found in Appendix 1.
Design Evaluations
There were several advantages to be gained by mounting the servo in the foot-well as
proposed in approach 2. The servo would be out of the immediate view and vicinity of the
driver. Access for maintenance or adjustment of the system would still be reasonably good.
Again, significant modifications to the steering system would not be required with the
addition of the proposed system.
Despite the advantages, there were also major drawbacks to the foot-well mounted servo
approach. Even with the aforementioned vent removed, concerns were held over whether
the system would impede the driver‟s leg space during operation of the car. This was
compounded by the need for an EM clutch as described in section 2.1. An EM clutch was
procured at the cost of $20 from a disused automotive air-conditioning system (the clutch in
this case is designed to engage the air-con compressor to a motor driven belt pulley when
the driver activates the air-con system). The difficulty with this clutch was its size. It soon
became apparent that the clutch could not be mounted in the foot-well of the car without
compromising the space available to the driver and causing further safety concerns. The
purchase of a proprietary clutch which was more suitable to the dimensions of the task was
considered, however it was ruled out due to its prohibitive price of around $600.
The design scenario was complicated further by the fact that the position of the steering
column is subject to adjustment. The prismatic joint at the bottom of the lower steering
column allows the depth of the steering wheel to be adjusted. If any pulley were attached to
the lower steering column, its position relative to a servo mounted to the cabin would
change with the steering column. The possibility of mounting the servo such that it could
move with the column while maintaining its relationship to the pulley was explored. So too
19
was the possibility of removing the ability to change the position of the column, though this
would potentially impact upon the normal use of the car.
Safety
By installing the servo in the foot-well, some of the safety issues highlighted in the
previous approach are alleviated. There is far less likelihood of the driver‟s clothes or hair
getting caught in the mechanism, although this risk is not entirely eliminated. A trouser leg,
for example, could still be caught in the moving belt. The risk of harm to the driver in the
event of an accident, however, is at least as bad if not worse in the foot-well approach. If
the driver‟s legs are forced upward impact could occur with the mechanism or guard
causing serious injury to the driver.
2.3 Approach 3 – Direct Access to Power Steering System
The third option studied took a different direction entirely. Instead of accessing the steering
column directly, this approach attempted to actuate the steering by controlling the flow of
hydraulic fluid in the steering power-assist system. As explained in section 1.3 of the
introduction, the power steering system of the car assists the movement of steering rack by
supplying pressurised fluid to a piston connected to the rack. The flow of this fluid is
normally determined by the opening and closing of torsion valves. By redirecting the flow
of fluid to a different set of electronically controlled valves, it could be possible to control
the power steering system externally. Figure 4 depicts the normal operation of vehicle
power-assisted rack-and-pinion assembly. With the introduction of directional and control
valves, control of the power steering system can be transferred to an external source. This
principle is illustrated in the modified schematic shown in figure 9.
20
Figure 9: Adapted Power Steering Mechanism. Modified from Nice (2001)
Gaining Access to Vehicle Systems
Minimal work was carried out on the car to gain access to the power steering system.
However, Bentley (2007) details the steps required to remove both the power steering pump
and the power steering rack.
Design Evaluations
As seen in the literature review above, this power steering access method has been
successfully implemented in previous research. However, that work was completed on a
vehicle of significantly earlier vintage. It was unclear whether the same process could be
applied to the vehicle which was the subject of this investigation. The advantages of
actuating the steering by access to the power steering system are significant. All
modifications would be occurring under the bonnet of the vehicle, meaning there would be
no impediment to the comfort and safety of the vehicle cabin. With the use of directional
valves, the system could readily be switched between normal and automated modes. With
21
electronic control not activated, the car would ostensibly be completely unaltered from the
perspective of the driver.
Several design concerns remain, however. During normal use, the power steering system
increases ease of steering by assisting the driver to move the steering rack. The driver,
however, still imparts a significant amount of torque upon the steering column via the
steering wheel. Whether the power steering would have provided sufficient torque on its
own was unknown. In the case of Prohaska (1998), the flow control orifice was drilled out
to increase the hydraulic fluid flow rate by 20%. Even with this increase, results were
compromised by insufficient flow rates at higher speeds (Prohaska 1998). It is difficult to
predict whether those same difficulties would be present in the X5 or whether similar
modification to the flow control orifice could be completed.
Safety
Modification of the vehicle‟s power steering system introduces several safety concerns. In
one sense this method holds a safety advantage over other methods previously discussed
because it does not interfere with the vehicle cabin. However, the consequences of system
malfunction are potentially severe. Prohaska (1998) finds that when the automatic system is
in operation, the torque provided by the actuator would be greater than that able to be
applied by the driver. In effect, the driver no longer has control over the vehicle and cannot
operate the steering manually. This presents a serious safety concern in the event that the
system malfunctions while there are occupants in the car.
In the case of Prohaska (1998), the system is designed so that if power is cut to the new
actuator control valves, the power steering system is ineffective but the driver retains
control of the steering as if no power assist were in place. If power is cut to the directional
valves, control returns to the original steering column torsion valves (Prohaska 1998).
While losing power steering is not ideal, under both these scenarios the driver can control
the vehicle. The more concerning aspect is the case where there is a malfunction in the
steering actuation system. For the driver to control the course of the vehicle, power to the
automatic control system would have to be cut. Prohaska (1998) does not appear to include
22
any detection of automatic driver override of the system which would automatically return
control to the driver. Driver override detection is particularly vital where the actuator is
more powerful than the driver, as in this case.
One proposed method of driver override detection would be to monitor the torque in the
steering column. Under normal conditions, torque in the steering column should be
minimal. If the driver attempts to override the system, torque would rise sharply. This rise
in torque would be accompanied by an equivalent torsional strain in the shaft. A strain
bridge could be installed on the shaft to monitor the level of strain. An experimentally
determined limit on strain would be set. If the strain bridge detected a value higher than the
set limit, power to the actuator control valves would be cut.
2.4 Approach 4 – DC Gear-motor Mounted in Engine Bay
The fourth option again utilises the servo and steering column pulley concept, discussed in
sections 2.1 and 2.1, however it differs from those approaches in several key ways. Under
this approach, the steering column is accessed in the engine bay and a DC gear-motor is
used in place of the original servo. A timing pulley is attached to the steering column just
above its attachment to the steering rack. The sensor on the gear-motor determines the
angular position of the motor. By accessing a pre-existing BMW steering angle sensor, the
position of the steering column can also be determined.
Gaining Access to Vehicle Systems
In order to gain access to the steering column in the engine bay, it is necessary to
disassemble certain parts of the car. In summary, access to the steering column is achieved
by the following steps:
Placing of front end of car on wheel stands and removal of front right wheel
Removal of exposed wheel shroud
Removal of front right suspension strut
Removal of plastic and aluminium covers to expose steering column from wheel
arch
23
Removal of bash plate to expose steering column from underside of car
For a detailed procedure of disassembly, refer to Bentley (2007).
The section of the steering column to which a pulley could be attached is then able to be
removed, with the use of a specialised spline fixing (see figure 10).
Figure 10: Specialised Bolt Head
Design Evaluations
This solution holds significant advantages over other techniques. Similarly to the case
where the power steering is directly accessed, all modifications to the vehicle occur under
the bonnet of the car and this has several key benefits for safety and convenience.
There are significant advantages to utilising a gear motor rather than the original servo. The
servo has a fixed range of motion over which it can operate (in this case ± 180°) (Craig
Kackert Design Technology Inc n.d.). Further, it cannot „free-wheel‟, as described earlier.
The gear-motor, on the other hand, has an unlimited range of travel and can easily have its
position adjusted by application of torque. The apparent advantage of the servo over the
24
gear-motor is that it has an in-built feedback loop and motor driver. A servo receives a
signal (in this case PWM) which contains only position information. A power source is
supplied and the servo operates until it reaches the desired position. The gear-motor, on the
other hand, is controlled only by the application of input voltage. However, because this
gear-motor is equipped with a position sensor, an external feedback loop can readily be
formed with the use of an appropriate controller to manage the position of the gear-motor in
similar fashion to the servo.
Because the gear-motor can readily „free-wheel‟, the need for an EM clutch as described
above is alleviated. Further, the gear-motor is physically smaller and more manoeuvrable
than the servo. The combination of these two factors allows much greater flexibility in the
mounting of the drive motor. Because the servo has an unlimited range, there is greater
flexibility in the gearing ratio required. The range of steering column angle in the X5 is
±610° (Shah 2009). Thus with the servo range of ±180°, a gearing of at least 3-4:1 would
be required to achieve reasonable travel from the steering column.
Safety
Installing the servo in the engine bay has numerous advantages for passenger safety. The
vehicle cabin is unaffected, effectively eliminating the risk of the driver being injured
directly by the assembly, whether in an accident or through entanglement with the system.
Furthermore, by monitoring the motor speed and current, driver override could be detected.
If the driver halts the motion of the steering actuator, the motor will be forced to stall. At
zero speed, the current drawn by the DC motor is at its maximum (Pittman 2005). Under
normal conditions, motor speed should rapidly increase from this position (i.e. when the
motor is moving from stationary). Driver override would be detected where current remains
high and motor speed low. Accordingly, current to the actuator should then be cut,
returning vehicle control to the driver.
25
2.5 Comparison of Alternatives
A summary of the four preliminary design alternatives, assessed against the system
requirements, is shown in table 1.
System able to
be deactivated
returning car to
normal use
Driver override
detected
Convenience of
car unaffected
Safety of
passengers
System can detect
driver override by
sensing motor
current and speed
System
compromises
usability and
comfort of
vehicle cabin
Safety potentially
compromised by
addition of
hardware above
driver‟s upper
legs and torso
System
compromises
usability and
comfort of
vehicle cabin
Safety potentially
compromised by
addition of
hardware above
driver‟s lower
legs and feet
No compromise
to vehicle
convenience
Appears safe
other than lack of
override – if
power steering
fails driver
retains control
Drive motor
mounted on
upper steering
column
System can be
deactivated with
EM clutch for
servo or use of
free-wheeling
gear-motor
Drive motor
mounted in footwell
System can be
deactivated with
EM clutch for
servo or use of
free-wheeling
gear-motor
System can detect
driver override by
sensing motor
current and speed
Direct access to
power steering
System can be
deactivated by
returning control
to steering
control valves
No override
system designed
– may be possible
by sensing
torsion in steering
column
26
Drive Motor
mounted in
engine bay
System can be
deactivated with
EM clutch for
servo or use of
free-wheeling
gear-motor
System can detect
driver override by
sensing motor
current and speed
No compromise
to vehicle
convenience
Appears safe –
driver retains
control in all
scenarios
Table 1: Summary of performance of design alternatives
Based on the above analysis and comparison, a gear-motor mounted in the engine bay with
a belt drive to the steering column of the car was the most robust design alternative. While
actuation of the vehicle power steering could have been successful, doubt remained over
the ability to design and implement a driver override system. Because the torque provided
by the power steering would be greater than that able to be applied by an ordinary person,
this created an untenable risk to occupant safety. Further, undertaking this alternative would
have required significant modification to the power steering system, introducing greater
possibility of damage to or compromise of vehicle components.
2.6 Design Development
Having deduced that a gear-motor mounted in the engine bay with a belt attachment to the
steering column was the best way to actuate vehicle steering, it was then necessary to
analyse the design problem in further detail and develop the design of required components.
The following section 2.6 of the report traces the design process from the evaluation of the
design criteria and constraints to the completion of the final designs. Design evolution in
the fabrication stage can be found in section 2.7.
Design Criteria and Constraints
The general design requirements of the system as outlined in the project brief provided a
broad means of evaluating actuation alternatives. After choosing an actuation method, the
design criteria and constraints were able to be more fully defined.
27
Significant constraints were placed on the actuator design by the environment in which it
was expected to operate. The limited space available for actuator installation is depicted in
figures 11 and 12. Figure 11 indicates the relevant section of the steering column, as seen
looking down into the engine bay from the front of the car. Figure 12 shows the same
section of the steering column as seen from underneath the car with the engine bash plate
removed. These images attempt to portray the very crowded and awkward area in which the
actuator was expected to be installed. Further, figure 12 shows the proximity of the
catalytic converter to the steering column. The catalytic converter is a component of the
exhaust system with an internal operating temperature as high as 700°C (Annand 1974).
The actuator design had to account for the existence of significant heat transmission from
the catalytic converter.
Figure 11: Steering Column Location in Engine Bay
28
Figure 12: Steering Column Located in Engine Bay from Underneath Vehicle; Clearance
Testing in Progress
The relevant section of the steering column was able to be removed from the engine bay, as
discussed in section 2.4 above. The removed section of the steering column is shown in
figure 13.
Split Pin
Figure 13: Section of Steering Column Removed, Split Pin Indicated
29
The actuation system required three fundamental components: a drive motor, a custom
pulley to be installed on the steering shaft and a mount to constrain the movement of the
motor and maintain tension on the belt. A gear-motor was proposed for the task, the
Pittman GM14900 series (Pittman 2005). An image of the gear-motor is shown in figure
14.
Figure 14: Pittman GM14900 Series Gear-motor
Shah (2009) conducted testing on the X5 and found that the highest steering column torque
required to actuate vehicle steering was 10Nm, and that this value was attained with the
vehicle stationary. Evaluation of the gear-motor data sheet provided the torque-speed curve
for the procured motor, shown in figure 15. The motor was equipped with internal gearing
of 5.9:1. An external gear ratio of 4:1 was proposed for the actuator. With these gear ratios,
a 10Nm torque at the steering column corresponds to a 424mNm torque at the gear-motor.
This approximated value was plotted on the graph and found to be well within operating
bounds of the motor, giving a speed of almost 90rpm at the steering column (after gearing
has been considered).
30
Required Torque at Motor
with 4:1 External Gear Ratio
Figure 15: Torque-Speed Curve of Gear-motor (Pittman 2005)
Based on this analysis, the Pittman gear-motor was deemed suitable for the actuation task.
Having selected a suitable drive motor, design of the custom belt pulley and motor mount
could then begin.
Shaft Pulley
It was necessary to consider several factors in designing the shaft pulley. The steering
column (shown in figure 13) lacked an available end over which any pulley could be
attached. That is, a pulley with a round or square profile matching the shaft could not fit
over either end of the steering column. A positive and reliable torque connection to the
31
steering column was required. Further, it was necessary to minimise pressure placed on
steering column bearings by the application of force through tension on the belt drive.
The first design proposed the attachment of a pulley onto the lower square-profile section
of the steering column. The proposed design is shown in figure 16. As can be seen, the
pulley is split through the middle to allow it to be bolted up either side of the steering
column. In order to bolt the pulley together as shown, countersunk holes would need to be
drilled on the pulley tooth surface. Attaching the pulley at the square end of the steering
column holds two advantages. Firstly, a very positive torque connection is achieved by the
square profile compared to attaching the pulley on a round section of the shaft. Secondly,
the column has a square profile at its attachment to the steering rack (see figure 12). The
column is well supported by bearings at the steering rack. The close proximity of the pulley
to the steering rack minimises the moment generated at the bearing by the belt tension
force.
M4 Allen Key Bolts
Front
Initial Pulley Design
Side
Figure 16: Initial Pulley Design
The major drawback to the solution presented above is that the pulley surface, which must
transmit the pulley forces to the belt, is compromised by the access holes to the clamping
bolts. Refinement of the design included the attachment of a boss extending out one side of
the pulley onto which a hose clamp could be mounted in order to fix the pulley. This
modification alleviated any issues of compromise to the pulley face. The final drawing
32
completed in the design phase of the project is depicted in figure 17. Further design work
was completed during fabrication. Detailed discussion of this can be found in section 2.7.
Final Pulley Design
Hose Clamp
Steering Column
Grub Screw
Steering
Rack
Figure 17: Final Pulley Design
The maximum size of the pulley was determined by clearance analysis, performed by
simulating the pulley with a cardboard model and placing the steering column back in its
original position. This exercise is illustrated in figure 12.
Motor Mount
The design of the motor mount was somewhat more challenging as the mount needed to
serve several purposes. Its primary purpose is to constrain the movement of the motor in all
directions. This requirement must be considered with reference to the directions in which
the motor feels the greatest forces. Figure 18 demonstrates the primary forces felt by the
motor.
33
Forces Felt by Gear-Motor
Reaction Torque
Belt Tension
Figure 18: Forces Felt by Gear-motor
The maintenance of belt tension is particularly important to the successful operation of the
device. It is necessary to constrain the motor so that belt tension is not only applied, but
also maintained under loading. Thus, the connection between the two belt pulleys must be
rigid in compression. If too much elastic deformation occurs in this link, the belt will
simply slip on the pulley under load.
Further, the motor mount was required to provide a heat shield for the belt. The proximity
of the belt to the car‟s catalytic converter, through which all the engine exhaust gases flow,
is demonstrated in figure 12. As discussed in the design constraints, the normal operating
temperature of a catalytic converter can be as high as 700°C (Annand 1974). Heat radiation
from this component could severely damage components of the assembly, particularly the
timing belt.
The exact thermal environment in which the system would be operating was difficult to
accurately model. However, thermal considerations played a significant role in both the
selection of material for the mount and the design of its geometry. Due to its thermal
characteristics, 1000 series aluminium was chosen as the appropriate material. This
material exhibits thermal conductivity of approximately 220 Wm-1K-1, over 4 times greater
than mild steel, at 51.9 Wm-1K-1 (Callister 2007). This high thermal conductivity allows
heat absorbed by the aluminium to spread more efficiently throughout the object,
34
maximising the surface area in contact with the thermal boundary and thus the rate of heat
dissipation. Further, aluminium is highly reflective and thus protects the actuation assembly
from radiant heat.
It was decided to use sheet metal aluminium in fabricating the mount, due to its light
weight and relative ease of fabrication. Further, sheet metal allows for great flexibility in
design as it can effectively be bent into a large variety of shapes. In order to sufficiently
constrain the motor, particularly in the direction of belt tension, the mount was designed
with flanges bent to increase rigidity. A preliminary design of the motor mount can be seen
in figure 19.
Motor
Mount
Primary Link
TIG weld
Tension
Adjustment
Fastener
Bash Plate
Secondary
Link
Steering
Rack
Mounting
Figure 19: Preliminary Motor Mount
The method of belt tension maintenance on the preliminary mount was deemed to be
unsatisfactory. The secondary link (labelled in figure 19) was designed to allow the primary
link to rotate about its attachment to the steering rack, thereby adjusting the distance
between pulley centres and therefore belt tension. However, in order to maintain belt
tension under load the mount had to rigidly constrain the distance between pulley centres.
In the design shown, the secondary link would effectively carry the belt tension, and any
35
lack of rigidity in this member would in turn cause the distance between pulley centres to
vary.
The design was revised, this time to include two mounting points at the steering column. A
bearing onto the steering column was added to strengthen the mount in the plane of the belt.
Belt tensioning capability was achieved by allowing adjustment of the position of the motor
in an arc about one of the mounting bolts. Several design revisions were made before a
final design was decided upon. Scale drawings of the final design revision from the front,
top, left and right are shown in figure 20. The drawings include representations of the
motor, steering column and both drive and shaft pulleys.
36
Front
Top
Left
Right
Figure 20: Final Scale Drawings of Mount Design
37
2.7 Fabrication
Having developed designs for both shaft pulley and motor mount, fabrication of each item
could then be completed. The fabrication process led to significant refinement of each
design, as the reality of both fabrication and installation became apparent.
Shaft Pulley
A timing pulley upon which modifications could be made was procured from an American
company specialising in Computer Numeric Control (CNC) products. Pulleys such as those
procured are used on CNC lathes or milling machines because of their precise positional
accuracy. The original pulley is shown in figure 21.
Figure 21: Shaft Pulley before Modification
In the design shown in figure 17, the flanged section of the pulley extends over the square
section of the steering column. The pulley which was procured was measured to have a
flanged section with a diameter of approximately 37mm. The square section of the column
was measured to have a side length of approximately 28mm. By applying simple geometry
it can be seen that the square would have required a flange diameter of:
(2.1)
38
Thus the pulley with its existing flange could not be used in the proposed design. Further, it
became apparent that it would be very difficult to maintain the integrity of the pitch profile
of the pulley after it had been cut in half. Any change in the geometry of the pulley face
would cause the belt to run incorrectly over the pulley.
Due to these difficulties, the design of the pulley attachment had to be modified. By
removing a split pin, indicated in figure 13, it was possible to separate the square and round
sections of the steering column. The separated square section is depicted in figure 22.
Figure 22: Separated Square Section of Steering Column
The separation of the steering column immediately solved the problem of the split pulley; it
was now possible for a pulley to be placed over the free end of either the round or square
section of the shaft, eliminating the need for a split pulley at all. It was proposed that the
pulley could be mounted on the much narrower round section of the column as the existing
pulley flange would have been able to accommodate this diameter. However, sufficient
clearance around the column to house the pulley was not available at this location when the
steering column was installed in the car. As can be seen in figure 12, the clearance around
the column rapidly decreases as the pulley location moves from the square to round section
of the shaft.
In order to mount the pulley at the square section of the shaft, it was necessary to modify
either the pulley or the steering column. Modifying the pulley would have required the
existing flange to be removed and a new flange attached. While this could have been
39
possible, a far more straightforward solution could be found by modifying the steering
column. The square section of the steering column was able to be turned down on a lathe
and the pulley milled out to a corresponding profile. The final modified components can be
seen in figure 23.
Figure 23: Modified Pulley and Steering Column
The steering column was then reassembled and split pin reinserted with the shaft pulley
loose on the shaft. Dimples were drilled into the column at precise locations into which the
two grub screws on the pulley were inserted, locating the pulley. The reassembled steering
column complete with shaft pulley is shown in figure 24.
Figure 24: Reassembled Steering Column with Shaft Pulley Attached
40
Motor Mount
For the fabrication of the motor mount, a piece of 1.5mm 1000 series aluminium sheeting
was procured. The mount design was resolved into a single piece of sheet metal with
multiple flanges. The preliminary two-dimensional design which was then marked and cut
out of sheet metal is shown in figure 25. The mounting point of the motor was designed to
allow restricted movement of the motor in an arc. This would allow belt tension to be
modified.
Motor Mounting
Flange
Figure 25: Original Sheet Metal Template, Mounting Flange Indicated
Deformation
from vice
Figure 26: Mount Prototype One
41
This design resulted in the finished mount shown in figure 26. Fabrication was completed
with the use of a guillotine, tinsnips, a de-burring tool and a bending machine. The shape
was first cut out of the sheet-metal using the guillotine and tinsnips. It was then de-burred
and finally bent into the desired shape.
The flange onto which the motor should mount, indicated in figure 25 (above), proved
difficult to fabricate as per the original design. The bend line shown could not be completed
without separation of the flange. A vice was used to deform the object in the first attempt at
fabrication. This deformation can be seen in figure 26. For the second attempt at mounting,
it was determined that the sheet metal should be separated such that a separate flange could
support either side of the motor. This revised design is depicted in figure 27.
Figure 27: Modified Sheet Metal Template
The resulting second mount attempt can be seen in figure 28. The second mount also
features a different method of attachment for the shaft bearing, as indicated. Flanges bent
from the original piece of aluminium are attached directly to the top and bottom of the
bearing. This feature was completed after the template had been used so does not appear on
the drawing in figure 27.
42
Bearing Attachment
Point
Figure 28: Mount Prototype 2, Bearing Attachment Indicated
The second prototype was abandoned due to the introduction of unacceptable bending at
the bearing attachment. By cutting and bending the material up, as shown in figure 28,
reaction force from the bearing mount would have created a moment about the first bend,
causing it to flex under load. This could have resulted in poor maintenance of the belt
tension.
The final fabricated motor mount was made larger to remove the need for a separate flange
to be bent up for the purpose of bearing attachment. This final design can be seen in figure
29. Further development included screws to attach each of the three aluminium flanges to
the plastic bearing.
Figure 29: Final Motor Mount/Heat Shield Prototype
43
A belt tensioning capability was achieved with the development of an adjustable contact
between the motor and the mount. The prototype shown in figure 29 was modified to
include this contact. Figure 30 shows the assembled belt tensioning system.
Motor Adjustment
Assembly
Figure 30: Motor Attached to Aluminium Mount with Adjustable Position
The adjustable contact between motor and mount is constrained by four bolts. These screw
directly into threads which are tapped into the plate at the top of the motor. Material was
removed from two flanges on the aluminium mount to allow both the bolts and the drive
pulley to slide back and forth. The final shape of the two flanges on the aluminium mount
is indicated in figure 31.
44
Material Removed to Allow
Horizontal Translation of
Motor
Figure 31: Motor Mount Flanges with Material Removed to Allow Sliding Contact
A plate was fabricated to match the profile of the top of the motor. This plate, shown in
figure 32, was designed to spread the load created by the tightening of the four bolts over
the entire area of the plate.
Figure 32: Load Distribution Plate for Adjustable Motor Contact
45
2.8 Installation
Completed designs were successfully installed in the car. For a step-by-step procedure for
installing the actuation system, see Appendix 1.
2.9 Safety Analysis
This section presents a review of safety analysis undertaken in the physical elements of the
project. The discussion focuses on the work undertaken on the test vehicle and fabrication
tasks completed. Safety was also an integral part of the design evaluation process and as
such a discussion of the safety credentials of each design alternative can be found in
sections 2.1-2.4.
Safety analysis of the physical elements of the project was conducted with reference to
UWA Safety and Health‟s Safety Risk Management Procedures (University of Western
Australia 2009). Under this protocol, risks are identified and characterised according to
both their consequence and likelihood. After all risks are identified, a risk management
summary can be compiled.
The first risk assessment completed was that which applied to work being carried out on the
test vehicle to gain access to steering systems. To access the steering column at various
locations on the car, disassembly of the following components was required:
Steering wheel
Indicator and Wiper Switch Assembly
Upper steering column
Driver‟s seat
Front right wheel
Front right wheel shroud
Front right suspension strut
Engine bash plate
46
Risks were identified and allocated levels of likelihood and consequence according to the
UWA risk assessment matrix (University of Western Australia 2009), before risk control
strategies were devised. A risk management summary of this analysis can be seen in table
2.
Table 2: Risk Management Summary of Work Completed on Test Car
IDENTIFIED
HAZARDS
RISK
ASSESSMENT
(C)
X
RISK
RECOMMENDED
FOLLOW
MEASURE
CONROLS
UP (BY
(L)
WHEN, BY
WHOM)
Risk of vehicle
Major
coming off jack
Injury
Unlikely
High
Support vehicle with
Immediately
jack stands and blocks
by student,
while working
of wood as well as
supervisor
underneath
jack while working
underneath
Risk of coming
Negligible
Unlikely
Low
Take care not to
Immediately
into contact with
disrupt vehicle
by student
somewhat toxic
systems other than
materials: P/S
those which are being
fluid, Brake
worked upon
fluid
Risk of
First Aid
Possible
Moderate
Cover surrounding
Immediately
scratching/
sharp elements with a
by student
bruising hand if
rag when removing
wrench slips
fasteners. Be prepared
for sudden reduction in
resistance as fastener
loosens
47
A second risk assessment was completed with respect to risks involved in the fabrication
process of designed components. As described in section 2.7, fabrication involved several
steps. These were:
Turning down the removed section of the steering column
Milling out the procured timing pulley
Cutting sheet aluminium with guillotine
Cutting sheet aluminium with tinsnips
Bending sheet aluminium in magna-bend and vice
Drilling holes in the aluminium sheeting or attachment of bearing, motor and
steering rack
A risk management summary of the fabrication process can be seen in table 3.
Table 3: Risk Management Summary of Fabrication Processes
IDENTIFIED
HAZARDS
RISK ASSESSMENT
(C)
X
(L)
RISK
RECOMMENDED FOLLOW
MEASURE
CONROLS
UP (BY
WHEN, BY
WHOM)
Risk of getting Major Injury
Highly
extremities
Unlikely
High
Ensure no loose
Immediately
clothing is worn
by student,
getting caught
when operating
supervisor
in guillotine
guillotine and safety
features of machine
are not
compromised
Risk of cuts
First Aid
Possible
Moderate
Ensure all sharp
Immediately
from sharp
edges are deburred
by student
edges on
after all cutting
aluminium
procedures
sheet
48
Risk of injury
First Aid
Possible
Moderate
Ensure part of the
Immediately,
to hands from
object being drilled
by student
work getting
is fixed by either a
caught in drill
vice of held against
a fixed object which
will not allow the
work to rotate. Use
incremental drill
sizes to ensure
quantity of material
removed is not great
in any one operation
49
3. Results and Discussion
The results of the project can effectively be separated into three sections:
The results of a comparison of actuation techniques
The final design of the system to actuate vehicle steering with accompanying
fabricated components
Preliminary results from in-car testing
3.1 Actuation Technique Investigation
As described in section 2.1-2.5, an investigation into different methods for steering
actuation found that mounting an electric motor in the engine bay of the car with a belt
drive to the vehicle steering column was the best method with reference to these design
criteria.
The investigation found that direct access to the vehicle power steering system caused
unacceptable safety concerns in the event of system malfunction and a driver override
mechanism could not readily be integrated into the design. Mounting of a motor at any
point inside the cabin caused unacceptable compromise to vehicle convenience and safety.
By mounting the motor in the engine bay, the vehicle is ostensibly unmodified. While the
power steering approach shares this benefit, the safety concerns highlighted under that
approach are not present with the motor drive solution.
Actuation methods analysed were those which could be readily added on to the steering
system already in place in the car. The investigation does not attempt to exhaustively
examine all potential methods of steering actuation, some of which may require significant
modification or removal of the existing steering system in the car.
3.2 Final Design of Steering Actuation System
50
Having determined that an engine bay-mounted motor-belt drive to the steering column was
the best method of actuation, designs were attempted, refined and finally fabricated. The
final design of the steering system, assembled out of the car, can be seen in figure 33. Due
to the close proximity of original vehicle components to those installed, it is impossible to
view the entire assembly from one vantage point once installed in the car. Images of the
installed system from different directions can be seen in figures 34 and 35.
Figure 33: Final Steering Actuation Assembly, Removed From Car
Rack Mounting Bolt
Aluminium Mount
DC Gear-Motor
Figure 34: Installed Actuation Assembly from Underneath Car, Components Labelled
51
Steering Column
Shaft Bearing
Figure 35: Installed Actuation Assembly from Open Bonnet, Looking Towards Rear of
Car, Components Labelled
As described in section 2.6, the design includes two main fabricated components: the shaft
pulley and the motor mount. The shaft pulley features a two-step profile, matching an
equivalent feature which was turned into the steering column. The pulley is fixed by two
grub screws which locate the pulley according to dimples drilled into the steering column.
The pulley has 40 teeth with a 5mm pitch. A corresponding 5mm pitch drive pulley was
attached to the motor, but with 10 teeth rather than 40. This generates a 4:1 external gear
ratio.
The motor mount integrates several features. It acts as a constraint for the motor, thermal
barrier from nearby exhaust components, belt tensioner and shaft bearing. It is fabricated
from a piece of 1.5mm folded 1000-series aluminium sheet metal. The primary reason for
the use of aluminium is its superior thermal qualities over other materials. Due to its high
thermal conductivity, aluminium dissipates heat very efficiently (see discussion in section
2.6 for more detail). This property is vital to the mount‟s function as a heat shield.
52
The mount has been designed to be rigid in compression along the axis of the belt. Flanges
bent in orthogonal planes ensure the structure resists any tendency to buckle. The structure
achieves triangulation of loads with the use of mounting points on both the steering rack
casting and the steering column. This triangulation is depicted in figure 36, an annotated
drawing of the steering actuation assembly. The rack mounting is obscured in the diagram,
but exists behind the rack as seen in figure 34. The steering column mount is achieved
through the use of a rudimentary bearing which runs on the shaft (see figure 35).
Figure 36: Steering Actuation Assembly, Triangulation of Forces on Mount Indicated
Further, the mount facilitates the adjustment of belt tension with the use of an adjustable
contact between the motor and the mount. This feature is not shown in figure 33 or 36 but
can be seen indicated in figure 30. For a full description of motor position adjustment, see
section 2.6.
For the purposes of preliminary testing, a rudimentary switch capable of reversing the
direction of current to the motor was installed to control the actuation system.
53
3.3 Preliminary Testing Results
After installation of the actuation system, preliminary testing was able to be conducted. The
test vehicle was started and allowed to warm up for around 5 minutes. With the use of the
basic switch mechanism illustrated above, the actuator was tested in both directions. The
gear-motor successfully actuated the vehicle steering controls, without any evidence of
slipping in the timing belt. Following the basic confirmation that the actuator was effective,
endurance testing on both asphalt and concrete was conducted. This essentially involved
continually operating the actuator and reversing its direction when it reached either end of
the steering rack travel. Detailed analysis of this testing is provided below.
Slew Rate on Asphalt
The rate of steering column angle change (slew rate) was determined by recording the time
taken for the steering rack to travel from full lock in one direction to full lock in the other.
The angular displacement of the steering column over this range is 3.4 turns or 1224° (Shah
2009).
Each trial was commenced within a few seconds of the previous one. This
experiment was initially conducted on an asphalt surface with the vehicle stationary and
idling. These conditions were used as they were deemed to create a high torque scenario for
the actuator. The results are presented in figure 38.
Slew Rate on Asphalt at Idle
300
250
200
Slew Rate
(degrees/secon 150
d)
100
50
0
Slew Rate
Linear (Slew Rate)
1
2
3
4
5
6
Trial
Figure 37: Slew Rate on an Asphalt Surface with Engine at Idle
54
The average slew rate over all six trials was found to be quite healthy at a value of
approximately 217 °/second. However, it is clear from examining this data that the slew
rate provided by the actuator was quite volatile and generally fell with consecutive trials
performed. When the actuator was unused for a few minutes, the slew rate returned to the
higher values seen in the first two trials.
It was proposed that the reason this drop in slew rate was occurring was that the car‟s
alternator could not provide sufficient current to maintain 12 volts at the car battery after
consecutive trials. The actuator was drawing more current than that provided by the
alternator and as such the battery voltage was dropping over time. This hypothesis was
tested by again measuring slew rate of consecutive trials, but this time the engine speed of
the car was held at approximately 1500rpm. The theory of this approach was that at
1500rpm – approximately double the engine idle speed – the current provided by the
alternator would be far greater. This greater current should allow the battery to better
maintain its voltage over consecutive trials, allowing slew rate to remain constant or at least
to fall more gradually. The results are presented in figure 39.
Slew Rate on Asphalt at 1500rpm
350
300
250
Slew Rate
200
(degrees/seco
150
nd)
100
Slew Rate
50
0
1
2
3
4
5
6
Trial
Figure 38: Slew Rate on an Asphalt Surface with Engine Running at 1500rpm
The average slew rate over this second set of results was found to be 286°/second, a rise of
approximately 31% over the average rate with the engine at idle. More significantly, the
55
slew rate remained relatively constant from one trial to the next, with no indication of a
downwards trend.
These results support the hypothesis that the current drawn by the actuator causes the car
battery to experience a voltage drop over consecutive trials with the engine running at idle.
They showed that by increasing engine speed to 1500rpm, the power provided by the car‟s
alternator is sufficient to prevent voltage drop.
These findings have potentially significant implications. The vehicle‟s electrical system is
reliant upon the battery for many of its operations. The vehicle headlights, for instance,
would be dimmed by a reduction in battery voltage, with potentially dangerous
consequences. However, during any collision avoidance manoeuvre, the actuation system
would not be expected to continually operate for more than a few seconds. Further, if the
car were being driven, the engine speed would be likely to be at least 1500rpm. Under these
conditions no reduction in slew rate was detected.
Slew Rate on Smooth Concrete
Further testing of slew rate was conducted on smooth concrete. The results of testing on
concrete vs. asphalt are presented in figure 39.
Slew Rate Comparison at 1500rpm
350
300
250
200
Slew Rate
(degrees/second) 150
Slew Rate on Asphalt
100
Slew Rate on Concrete
50
0
1
2
3
4
5
6
Trial
Figure 39: Slew Rate Surface Comparison
56
A trend between results on asphalt and concrete does not immediately present itself. The
average slew rates on the two surfaces are not markedly different: 286°/second in the case
of asphalt compared to 270°/second for concrete. Sufficient statistical analysis was not
conducted to determine any difference in the two surfaces. However, it can be seen that the
system performs with sufficient slew rate on two common surfaces.
Thermal Performance
In order to determine thermal performance, an infra-red thermometer was used to determine
the operating temperature of different components. Unfortunately, due to the congested
nature of the space in which the system is mounted, the only temperatures which were able
to be measured were those of the aluminium mount and the adjacent catalytic converter.
The area which was measured for thermal performance is shown in figure 40.
Catalytic Converter
Aluminium Mount/
Heat Shield
Figure 40: Back of Actuation Assembly Mounted in Car, Objects Used for Thermal
Analysis Labelled
57
The results of thermal testing are shown in table 4. The data was gathered after the car had
been running for over 30 minutes.
Table 4: Temperature Comparison of Aluminium Mount and Catalytic Converter
Temperature of Aluminium
Temperature of Catalytic
Heat Shield (°C)
Converter (°C)
1
45.5
152.5
2
47
162.5
3
43.7
168.1
Average
45.4
161
Trial
It can be seen from the results collected that the motor mount is reasonably effective in
providing a thermal barrier to the actuation assembly. The catalytic converter, which is
adjacent to the aluminium mount, averaged an external temperature of 161 °C, while the
aluminium mount averaged only 45.4 °C. A temperature of 45.4°C is comfortably within
the operating temperature range of the belt being used to drive the steering column. A more
detailed study of thermal performance would be required to be sure the system is thermally
protected under all operating conditions.
3.4 Analysis of Results
The original project objectives called for the design and implementation of a system to
actuate vehicle steering. Required qualities of the actuator were:
The system must be able to be completely deactivated, and the car should then
operate as normal
The everyday convenience of the car should not be compromised by any additions
made
Control must be returned to the driver in the event of system malfunction
The modifications must not impinge upon the safety of any vehicle occupant
The final design and its performance can be evaluated against these criteria.
58
Under testing, the system was found to be able to be deactivated. Where no current was
supplied to the actuator, the steering system of the car could be operated as normal.
However, the slight resistance provided by the idle motor could occasionally be felt when
the steering wheel was manually rotated.
Because all modifications to the car occur in its engine bay, the convenience of the vehicle
cabin is completely unaffected by the addition of the steering actuator. However, in the case
detailed above where the actuator causes voltage drop across the car battery, vehicle
convenience could be affected. The effect of a voltage drop on the vehicle‟s electrical
systems is unknown but could involve:
Dimming of headlights/internal lights
Slower actuation of motor controlled devices such as electric windows, mirrors
It is unlikely that vital engine systems such as ignition and fuel injection would be affected
by any potential voltage drop, as these are designed to remain operational in the event of
total battery failure.
A method of returning control to the driver in the event of system malfunction was
considered in choosing the actuation method but has not been developed. For a discussion
of proposed methods of driver override detection, see section x – future work.
Because all modifications have been completed in the engine bay of the car, there is very
little potential for the assembly to directly affect occupant safety. Unlike other design
scenarios, the intricately engineered safety features of the vehicle cabin are unaffected by
the actuation system. However, in the event of voltage drop across the battery, vital safety
features such as vehicle headlights may be compromised. Further, in the event of
catastrophic failure of the actuation assembly, components could become entangled in the
steering column assembly, potentially jamming its position.
59
4. Conclusions and Future Work
4.1 Conclusions
The objective of this project has been to develop a means of actuating the steering controls
of a test vehicle with reference to key design constraints. An investigation into different
actuation techniques was conducted with each alternative evaluated according to these
constraints. The investigation found that the best way to actuate vehicle steering was to
install a motor in the engine bay of the car with a belt drive to the vehicle steering column.
Subsequent design, fabrication, installation and in-car testing results supported the findings
of the investigation. The design process led to the eventual fabrication of two key
components:
An aluminium link to constrain the position of the motor and provide a thermal
barrier to assembly components
A shaft pulley to impart torque on the steering column
The installed actuation system was ultimately able achieve most of original design
objectives. Under testing the system was effective in actuating the vehicle steering with the
vehicle stationary on both an asphalt and concrete surface. The two designed components
performed their respective duties effectively. The aluminium link ensured that the motor
was well constrained and that the belt did not slip. Preliminary testing indicated assembly
components were sufficiently thermally protected. The shaft pulley was effective in
transmitting torque to the steering column.
Additions made to the vehicle did not significantly affect the safety of the car. In the event
of an accident, passengers would be exposed to no greater risk, as all modifications were
made out of the vehicle cabin. Under testing, the installed system was able to be overridden
by driver inputs, ensuring that in the event of system malfunction, the driver retains control
of the vehicle.
60
Ultimately the project has been successful in delivering an effective steering actuator to the
REV team. The actuator will allow the team to further their research into intelligent vehicle
control systems.
4.2 Suggested Future Work
There is significant scope for future work on the project. Further testing is required to
confirm the reliability and performance of the installed system under different operating
conditions. Endurance testing needs to be completed, where the system is operated for long
periods of time in difficult conditions. A more thorough analysis of the thermal
performance of the system should be completed. An effective test of this performance could
be to drive the car for a long period of time in hot conditions and then analyse the
temperature of various components, including the drive belt.
Further, the performance of the actuator needs to be evaluated under various driving
conditions. Testing variables could include different vehicle speeds, different surfaces
(wet/dry pavement, gravel, ice), different road geometry (incline, cornering) among many
others.
A system of detecting driver override of the actuator also requires development. Two
potential methods of developing such a system have been proposed in this report:
Detecting motor speed and current – in an override situation the driver is likely to
stall the motor, resulting in high current and low speed.
Measuring torsion in the steering column – in an override situation, torque through
the steering column would increase as the driver would be opposing the direction of
the motor. This increase in torque would result in torsional strain which could be
measured with the use of a strain bridge.
The installation of sensors will be required if the system is to be used for active control.
The eventual output variable of the actuator is the angle of turn at the front wheels of the
car. The addition of sensors to detect this variable would allow the development of a
control system for the actuator. If sensing of the wheel angle could not be achieved, the
61
angular position of the steering column could serve as a proxy to this variable. However,
this would likely result in a less accurate output from the actuator.
62
References
Anthony Best Dynamics 2007, Steering Robot, Available from:
<http://www.abd.uk.com>. [28 August 2009].
Bentley, D 2007, BMW X5 Service Manual, Bentley Publishers, Cambridge.
Bishop, R, 2005, Intelligent Vehicle Technology and Trends, Artech House Books,
Norwood.
Callister, WD 2007, Materials Science and Engineering: An Introduction, Wiley, New
York.
Craig Kackert Design Inc 2007, SSPS-105 Tone Servo Heavy Duty Professional Series.
Available from: <www.ckdesigntech.com/tonessps105.htm>. [30 May 2010].
Department of Infrastructure, Transport, Regional Development and Local Government
2008, Road Deaths Australia 2008 Statistical Summary, Government of Australia,
Available from:
<http://www.infrastructure.gov.au/roads/safety/publications/2009/pdf/rsr_04.pdf >. [27
August 2009].
Federal Aviation Administration 2009, Human Factors Design Standard, Government of
the United States of America, Available from: < http://hf.tc.faa.gov/hfds/>. [30 May 2010].
Gibbs, WW 2006, „Innovations From a Robot Rally‟, Scientific American January 2006.
Available from: <http://www.scientificamerican.com>. [15 April 2010].
Isermann, R, Schorn, M, Stahlin, U 2008, „Anticollision System PRORETA with
Automatic Braking and Steering, Vehicle System Dynamics, vol. 46, supplement, pp. 683694.
Nice, K, 2001, How Car Steering Works, HowStuffWorks.com, Available from:
<http://auto.howstuffworks.com/steering.htm>. [10 May 2010].
Patton, G 2009, Global patterns of mortality in young people: a systematic analysis of
population health data, The Lancet, Volume 374, Issue 9693, pp. 881 – 892, Available
from: < http://www.thelancet.com/journals/lancet/article/PIIS0140-6736(09)607418/fulltext > . [14 September 2009].
Pittman 2005, Lo-Cog DC Geomotors. Available from: <www.pittmannet.com>. [30 May
2010].
Prohaska, R 1998, Combined Brake and Steering Actuator for Automatic Vehicle Research,
University of California, Available from:
<http://www.path.berkeley.edu/PATH/Publications/PDF/PWP/98/PWP-98-15.pdf>. [27
August 2009].
63
Shah, A 2009, Drive-by-wire, Honours Thesis, University of Western Australia.
Sharifuddin, AF, Abdullah, AS & Arof, H 2009, „Development of real-time lane detection
software for automated steering system‟, International Conference for Technical
Postgraduates. Available from: IEEE. [25 May 2010].
Thrun, S, Montemerlo, M, Dahlkamp, H 2006, „Stanley: The Robot That Won the Grand
DARPA Challenge‟, Journal of Field Robotics, Vol 23, No. 9, pp. 661-692.
Ulrich, L 2009, „Testing Volvo‟s Collision Avoidance System‟, The New York Times, 9
April. Available from: < http://wheels.blogs.nytimes.com/2009/04/09/testing-volvoscollision-avoidance-system/ >. [20 May 2010].
University of Western Australia 2009, Safety Risk Management Procedures. Available
from: < http://www.safety.uwa.edu.au/policies/safety_risk_management_procedures>. [23
May 2010].
64
Appendices
Appendix 1 – Maintaining/Modifying Installed Actuation System
This section acts as a step-by-step guide to those who may be continuing the work of this
project or seeking to maintain or modify the system of steering actuation which has been
developed. It is designed to be used as a reference in conjunction with a suitable workshop
manual for the car such as Bentley (2007), which was used for this project.
Do not undertake this task if the vehicle is hot. The mount and servo are located in
close proximity to exhaust and engine components. The likelihood of injury is high if
disassembly is carried out with the vehicle at working temperature.
Removal of Actuation Assembly
- Remove the vehicle‟s front bash plate (referred to as front reinforcement plate in Bentley
(2007)). In order to remove the plate, six 16mm head bolts and two screws must be
removed. The nut corresponding to each bolt must be constrained during loosening. Access
to the nuts can be difficult, place the car on wheel stands and remove the front wheels if
necessary to access the nuts. The power cable to the gear-motor currently runs through a
hole drilled in a plastic observation cover on the bash plate. Be careful not to damage the
cable while removing the bash plate
- You should now have reasonable access to the servo and aluminium mount from
underneath the car. The best way to examine the servo or mount is to remove the two
components together.
- First, cut the wire which holds the gear-motor to the chassis upright
- Then, remove the bolt which attaches the aluminium mount to the steering rack (indicated
in Figure 1). Applying a slight upward pressure to the mount to take the belt tension force
off this bolt will make your task easier.
- You should now be able to swing the mount down slightly, to relieve tension from the
belt. Slide the belt off the drive pulley and draw the mount and servo out of the cavity,
taking care not to damage the shaft pulley or aluminium mount in the process.
65
Figure 41: Installed Actuation System From Beneath Car, Steering Rack Mounting Bolt Indicated
Adjusting Belt Tension
- With both mount and gear-motor removed from the car, the four bolts fixing the motor to
the mount can now be accessed.
- Loosen all four bolts by a couple of turns. Use the access holes provided to loosen the
back two. The motor can now be slid back and forth on the mount to the desired position.
You will need to estimate the desired position based on belt tension prior to disassembly.
Use a process of trial and error to find the right position if necessary. Tighten the bolts
firmly when the desired position has been reached.
Installation
- Carefully place the aluminium mount back in position extending around the shaft pulley
- Reach into the space and place the belt (which should still be around the steering column)
over the shaft pulley
- Lower the aluminium mount such that the distance between pulley centres is minimised
- Slide the belt over the drive pulley
66
- Rotate the aluminium mount upwards, tensioning the belt, until it is possible to reinstall
the rack mounting bolt. If the motor position adjustment is correct, this will correlate with
the desired belt tension. Be sure to hold the mount up while installing the bolt, thereby
taking the belt tension load off the bolt.
- Strap the motor to the chassis upright with another piece of wire/cable tie
- Follow directions in the workshop manual (Bentley 2007) regarding reattachment of the
bash plate. Bolts should be tightened according to torque specifications in the manual as
they fasten not only the bash plate but also the front stabiliser bar.
67
Appendix 2 – Shear-off Bolt Removal
The shear-off bolt was installed by BMW to ensure the steering column, a vital safety
feature of the car, was not tampered with by an unqualified technician. At installation, the
bolt head was sheared-off, leaving a conical shaped fastener onto which no fitting could be
attached. An image of the bolt installed in the car is shown in figure 1. The shear-off bolt
proved very difficult to remove.
Figure 1: Shear-off Bolt
First, a hole was drilled into the top of the conical head. A left-hand threaded tapered tap,
known as an „easy-out‟ was then pushed into the hole and rotated anti-clockwise. The
intention was for the easy-out to begin to thread the hole and use the thread and widening
taper to impart torque on the bolt in an anticlockwise direction. The two stage operation is
depicted in figure 2. Unfortunately this approach was unsuccessful as the threaded hole
could not provide enough torque to loosen the bolt. The thread in the hole was instead
stripped when loosening was attempted.
68
Figure 2: Attempted Method to Remove Shear-off Bolt
The shear off bolt had to be ground off with an angle grinder. Plastic sheeting was placed
on the surrounding trim and carpet to protect the cabin of the vehicle from the spray of
grinding sparks. The angle grinding work, completed by a workshop technician, was
effective in removing the bolt head but inevitably inflicted some slight damage to the
steering column frame. Several other regular hex-head fasteners were then removed to
allow complete removal of the upper steering column.
69