1
INSTRUCTIONS
®
-J01983
REV. 5-05-2005
Kit Number 68971-98B, 69728-01, and 69723-XX
HEADLAMP VISOR KIT
General
i01272
Kit Number 68971-98B is designed to fit 1984-1999 FXST,
FXSTC models.
Kit Number 69728-01 is designed to fit 1991-2005 FXDWG
models (Will not fit FXSTB models.).
Kit Number 69723-XX is designed to fit 1991-2005 FXD, FXDC,
FXDWG, and 2006 and later FXDL, FXDB and FXD models.
NOTE
A Service Manual for your motorcycle is available from your
Harley-Davidson Dealer.
1
2
See Service Parts illustration for kit contents.
Installation
1.
2.
See Service Parts illustration. Install the edge gasket (4) to
the headlamp visor (1). The gasket should be installed at
the headlamp opening as indicated in illustration. When
installing gasket, start at the top of the headlamp opening
and work the gasket into place, finishing with the seam top.
1.
2.
Mounting block
Screw
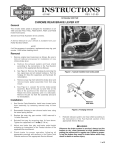
Figure 1. Headlamp assembly (FXSTC shown)
i00711
1
See Figure 1. Remove headlamp assembly from
motorcycle according to Service Manual instructions. Save
all hardware for reinstallation, except mounting block (1)
and screw (2) as shown. These may be stored for use
without the Headlamp Visor in place.
NOTE
Take care while removing headlamp not to scratch any
chrome surfaces.
3.
See Figure1. (For 2005 and earlier models) Replace
existing mounting block with mounting block from kit (2)
and secure with screw (7) as shown. The mounting block
should be positioned with the through hole positioned
forward and to the front as shown. Leave loose until Step
4 is completed.
4.
Position visor bracket (3) on back of headlamp. Secure
headlamp to mounting block (2) using existing bolt,
washers and nut removed in Step 2. Align headlamp using
procedure in appropriate Service Manual.
5.
See Service Parts Illustration. Attach the headlamp visor
(1) to the bracket with the 5 screws (5) and 5 washers (6)
as shown and tighten to 40 in-lbs (4.5 N-m).
2
1.
2.
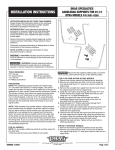
Figure 2. New Clutch Cable Routing
i00716
1
NOTE
If the clutch cable is rubbing on the headlamp visor, proceed to
Step 6.
6.
Clutch cable
Handlebar
See Figure 2. Relocate clutch cable to the inside of the
handlebars as shown in illustration as follows:
a.
Slide rubber boot off cable adjuster. Adjuster is
located approximately halfway along clutch cable by
the front frame downtube.
b.
Holding cable adjuster with 1/2 inch wrench, loosen
jam nut using a 9/16 inch wrench. Back jam nut away
from cable adjuster. Move adjuster toward jam nut to
introduce a large amount of freeplay at the hand
lever.
1.
Clutch cable free play, 1/16-1/8 inch (1.6-3.2 mm)
Figure 3. Clutch Cable Adjustment
1 of 2
c.
Remove small snap ring from pivot pin groove at
bottom of clutch lever bracket. Remove pivot pin and
clutch hand lever from bracket.
d.
Reroute clutch cable to the inside of the handlebars
as shown in Figure 2 and reconnect clutch cable to
clutch lever by reversing step c.
®
Service Parts
Part No. 68971-98A, 69728-01, 69723-XX
Date 5/05
Headlamp Visor Kits
5
3
6
1
2
7
ITEM
1
2
3
DESCRIPTION
Headlamp visor
Headlamp mounting block
Visor bracket
PART NUMBER
Not sold separately
67627-97
90338-01
Note
Item 2, headlamp mounting block and item 7, hex head
mounting block screw are only used on 2005 and earlier
models.
-J01983
ITEM
4
5
6
7
DESCRIPTION
Gasket (not shown)
Screws, buttonhead (5)
Washer (5)
Screw, hex head, mounting block
PART NUMBER
68134-97
4363
6424
4722
Note
Place gasket around interior edge of headlamp visor
opening.
2 of 2