1
Plexus C/1000D
12.8.4 Snap the new switch in place and reattach the three leads.
12.8.5 Attach the neutral lead to the brass color terminal.
12.8.6 Attach the lead from the pump and motor to the center terminal.
12.8.7 Attach the line lead to the remaining terminal.
12.8.8 Plug unit in. Verify if switch is good by turning on the unit. Power and the green indicator light
should go on.
12.9
Float Mode (C/1000DFE Only):
If float mode does not function.
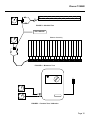
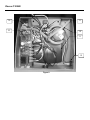
12.9.1 Connect unit as shown in Fig. 5. Place unit in float mode, and wait for 3 minutes.
12.9.2 Check that the timing motor stops when metal tab comes in line with sensor. If motor does not
stop, check continuity of Float Switch. Verify that the switch is working properly with an
ohmmeter. With switch closed unit should stop in the float position.
If motor does not stop, replace PCB assembly.
12.9.3 After three minutes, both ports must be pressurized (This is float position #1) Place unit in
alternating mode, wait for 1 minute. Place unit back in float mode. After three minutes, both ports
must be pressurized (This is float position #2).
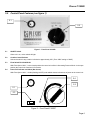
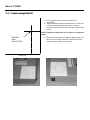
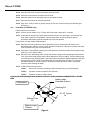
12.9.4 If pressure is not available at both ports in both positions, check the location of the reflective tape.
(See Fig. 6) or for kinked tubing.
12.9.5 Place the unit in alternating mode, monitor the pressure gauges until both gauges read pressure.
Turn unit off with On/Off power switch. Move photosensor until it is slightly over the leading edge
of the reflective tape. Restore power, and check both float positions. Repeat adjustment until both
float positions function. NOTE: The photosensor operates best when a distance of 1/8 inch is
maintained between it and the surface to be sensed. Caution should be used in moving the
sensor to avoid breaking the leads.
12.9.6 If LED or Buzzer does not work:
12.9.6.1
Check LED or Buzzer connectors, make sure that they are secured properly.
12.9.6.2
If problem continues replace LED or Buzzer.
12.9.6.3
If problem continues replace board.
If unit is still not functioning Contact technical services for further assistance at 800-828-7341 or 716-6628739.
Leading edge
(clockwise rotation)
Photosensor
Retaining Pin
.19-.23” Typical
2X
Exhaust Ports
X2
Reflective tape
2 Places
Figure 6