1
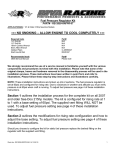
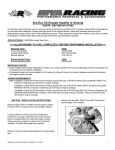
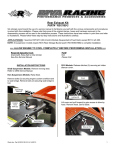
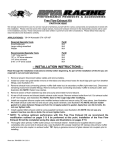
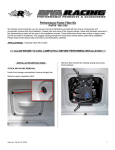
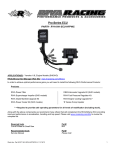
High Volume Fuel Pump PART# - RS12050-340FP-07 APPLICATION(S): 2007-04 Sea•Doo 4-TEC Models We strongly recommend the use of a service manual to familiarize yourself with the various components and procedures involved with this installation. Please note that some of the original clamps, hoses and hardware removed in the disassembly process will be used in the installation process. These instructions have been written in step-by-step format and refer to illustrations. Read through instructions entirely before performing installation. Please follow these step-by-step instructions and illustrations carefully. NO SMOKING REMOVE SEAT(S) WORK IN WELL VENTILATED AREA Required Specialty Tools Dremmel® or Die Grinder Oetiker Pliers Heat Gun Multi-Purpose Crimp and Strip Tool Part# N/A C-48550347 N/A N/A Recommended tools OEM Service Manual Part# Please Call Word doc. Part # RS12050-340FP-07 © H1 2/27/13 1 - INSTALLATION INSTRUCTIONS Disconnect battery cables. Black first. Red second. Remove fuel pump from tank by lifting and tilting forward. As end of fuel pump clears tank continue tilting to allow fuel level sensor to clear opening. REMOVE FUEL PUMP MODULE Remove glove box by unsnapping clips (2) at edge closest to seat. Access fuel pump module. Place a shop rag over top of fuel pump to prevent fuel spill. 1 Disconnect vent hose from top of fuel pump module. Remove clip2 securing fuel supply/return fitting. Remove fitting from top of fuel pump module. Drain fuel pump module thoroughly. Work in clean and well-ventilated area. REMOVE STOCK FUEL PUMP 1 Remove fuel level indicator by lifting straight out of retaining clip. 2 Cover top of fuel pump module with a shop rag to prevent fuel spill. Remove nuts (9) securing fuel pump module in tank. Raise fuel pump out of fuel in tank. DO NOT REMOVE COMPLETELY. Tilt forward to drain excess fuel. Word doc. Part # RS12050-340FP-07 © H1 2/27/13 2 Disconnect electrical connector from underside of fuel pump module top. (One clip each side.) Remove top of fuel pump module by carefully squeezing each arm (3) inward to release from locking tabs inside top of metal housing. Note orientation of top prior to removing. At base of metal housing drill out rivets (2 – 1 per side). Pull metal base plate out of metal housing enough to access fuel pump filter. Carefully separate filter from base plate. NOTE: There will be one gasket and washer in base plate for fuel filter. Do not lose or discard. Pull fuel pump out of top of metal housing. Remove supply tube and disconnect electrical wires. Note orientation of fuel supply tube before removing. You may or may not be able to remove the stock fuel pump from the metal housing. Try pulling up on the supply tube. If tube comes off of pump or pump cannot be removed proceed to next step. If fuel pump can be removed skip next step. Word doc. Part # RS12050-340FP-07 © H1 2/27/13 3 Carefully separate fuel pump filter from rubber spacer at bottom of stock fuel pump. Carefully separate rubber spacer from bottom of stock fuel pump. INSTALL SUPPLIED FUEL PUMP Remove used self-locking retaining ring from inside of rubber spacer. Install supplied new self-locking retaining ring into rubber spacer. NOTE: DO NOT REUSE ORIGINAL SELF-LOCKING RETAINING RING. Install rubber spacer onto bottom of supplied High Volume Fuel Pump. TIP: Use a small socket to press self-locking retaining ring onto fuel pump. Word doc. Part # RS12050-340FP-07 © H1 2/27/13 4 Install fuel pump filter onto rubber spacer. TIP: Apply engine oil to flange on rubber spacer to ease installation of filter. Replace metal base plate and secure to metal housing using supplied rivets. NOTE: Be sure filter gasket, metal washer and outer base plate gasket are in place in metal base plate. GASKET FIRST WASHER SECOND Carefully lower fuel pump assembly into metal housing. NOTE: Fuel pump filter fits one direction only. Be sure filter is seated squarely in metal base plate and plastic support is facing proper direction. Connect electrical wires and install fuel supply tube. Place spring over top of fuel supply tube. Replace fuel pump module top. Reconnect electrical wire. NOTE: Be sure that top moves up and down freely. NOTE: Be sure fuel supply tube is facing proper direction and plastic support is in place. Word doc. Part # RS12050-340FP-07 © H1 2/27/13 Carefully replace fuel level indicator. NOTE: Be sure arm locks in place. 5 INSTALL SUPPLIED RELAY MODULE MODIFY FUEL PUMP WIRING A wiring diagram reference is provided on the last page of these instructions. Measure sheathing on fuel pump electrical connector 3” from end. Carefully trim and discard 3” from end of sheathing. Isolate ‘D’ wire (brown with pink stripe). NOTE: Wires are identified on connector. The supplied relay should be installed in a location away from direct water spray or water intrusion. Example of ideal location for relay. 3” Cut ‘D’ wire 2~3” from connector. Pull ‘D’ wire back out of sheathing. Feed black wire from relay into sheathing towards electrical connector. Allow for some slack back at split in sheathing and trim excess black wire at connector. Using supplied hardware secure relay to inside of hull so that wires hang downward. Black Wire from Relay Example of ideal location for relay. 2~3” long FRONT Connect black wire to ‘D’ wire at electrical connector using supplied heat shrink butt connector. NOTE: DO NOT USE OPEN FLAME to shrink connector. Use a heat gun. Direct heat away from fuel tank and battery. Word doc. Part # RS12050-340FP-07 © H1 2/27/13 6 Pull sheathing down over butt connector. Reconnect to fuel pump module. grounding points on front of crankcase. NOTE: Apply blue Loctite to bolt. Do not over tighten bolt. Direct blue wire from relay to open end of ‘D’ wire (main wiring harness side). Allow for some slack and trim excess blue and ‘D’ wires. Connect using supplied heat shrink butt connector. NOTE: DO NOT USE OPEN FLAME to shrink connector. Use a heat gun. Direct heat away from fuel tank. Cover relay wires with supplied sheathing. Secure wires using supplied zip ties and zip tie mounting tabs. Replace 10amp Fuel Pump fuse with supplied 15amp fuse. Main Harness Side 2007-04 Prior Models: At division in main wire harness for fuel pump module connection isolate and splice ‘A’ wire (purple wire with red stripe). Reconnect using supplied heat shrink butt connector including red wire from relay. NOTE: DO NOT USE OPEN FLAME to shrink connector. Use a heat gun. Direct heat away from fuel tank. Fuel Pump Module Side Reconnect battery cables. Red first. Black second. Replace glove box. Check bilge for tools, rags, etc. Run craft on a flush kit to check for proper operation. Main Harness Side Red Relay Wire Route relay ground wire (black with eyelet connector) towards engine and secure to any one of the three Word doc. Part # RS12050-340FP-07 © H1 2/27/13 7 RELAY WIRING DIAGRAM REFERENCE Remember, the water belongs to everyone. Please ride responsibly and respect the environment! Technical Support For answers to questions regarding installation or trouble shooting RIVA Performance Products contact: RIVA Technical Support directly at (954) 247-0705 or by e-mail at [email protected]. Limited Warranty RIVA High Volume Fuel Pump Kits carry a 90-day limited warranty to the original purchaser. They are warranted to be free of defects in materials and workmanship under normal use and service. Customer modified components will be void of warranty. This warranty is limited to defects in the primary components only. Finish and/or wear marks in or on primary components are not covered under this warranty. RIVA Racing’s liability is expressly limited to the repair or replacement of the components contained within or associated with this kit. RIVA Racing agrees to repair or at RIVA’s option, replace any defective unit without charge, if product is returned to RIVA Racing freight prepaid within the warranty period. Any equipment returned which, in RIVA’s opinion, has been subjected to misuse, abuse, overheating or accident shall not be covered by this warranty. RIVA Racing shall have no liability for special, incidental or consequential damages or injury to persons or property from any cause arising from the sale, installation or use of this product. No other warranty, express or implied, including, but not limited to the implied warranties of merchantability and fitness for a particular purpose, applies. Various states do not allow for the limitation of incidental or consequential damages and therefore the above exclusion or limitation may not apply to you. Warranty does not include the expenses related to freight or transportation of parts or compensation for any inconvenience or loss of use while being repaired. A copy of the original invoice and a Return Authorization Number (RA#) must accompany all warranty claims. Warranted replacement parts will be returned freight collect. Word doc. Part # RS12050-340FP-07 © H1 2/27/13 8