1
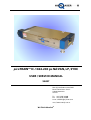
TM
picoTRAIN IC-1064-200 ps Nd:VAN, LP, SYNC
USER / SERVICE MANUAL
SN437
HIGH Q LASER PRODUCTION GMBH
KAISER-FRANZ-JOSEF-STR. 61
A-6845 HOHENEMS
AUSTRIA
TEL +43 (5576) 43040
FAX +43 (5576) 43050
E-MAIL [email protected]
HTTP://WWW.HIGHQLASER.AT
We Think Ultrafast
TM
1.
Welcome !............................................................................................................................................. 3
2.
Safety ................................................................................................................................................... 4
2.1.
Schedule of safety maintenance...................................................................................................... 4
2.2.
Laser safety and eye protection ...................................................................................................... 5
3.
Inspection and unpacking ................................................................................................................... 6
3.1.
Inspection of shipping boxes .......................................................................................................... 6
3.2.
Unpacking ....................................................................................................................................... 6
4.
4.1.
Initial installation................................................................................................................................. 7
Laser head installation .................................................................................................................... 7
4.2.
Laser Controller installation ............................................................................................................ 7
4.2.1
Size and position........................................................................................................................... 7
4.2.2
Heat flow ...................................................................................................................................... 7
4.2.3
Cable connections......................................................................................................................... 8
5.
Laser Controller ................................................................................................................................. 14
5.1.
Laser Controller front panels......................................................................................................... 14
5.1.1
Switching on the laser controller.................................................................................................. 14
5.1.2
Front panel display and functionality ........................................................................................... 15
5.2.
Laser controller back panel ........................................................................................................... 17
5.3.
Other functional features .............................................................................................................. 17
5.3.1
Remote Interlock feature ............................................................................................................. 17
5.3.2
Pump diode laser overtemperature protection ............................................................................. 17
6.
Laser head.......................................................................................................................................... 18
6.1.
Laser head description .................................................................................................................. 18
6.1.1
Installing the Laser head.............................................................................................................. 18
6.1.2
Laser operation ........................................................................................................................... 19
6.1.3
Laser cavity adjustment............................................................................................................... 19
7.
Test Report
picoTRAIN IC-1064-200 ps Nd:VAN, LP, SYNC SN437................................................ 20
7.1.
Test report table ............................................................................................................................ 20
7.2.
Power Tuning ................................................................................................................................ 22
7.3.
Pulse width measurement / autocorrelation @ 1064nm ............................................................... 23
7.4.
Photo detector signal measured with microwave spectrum analyser HP E4401B: ....................... 25
7.5.
Oscilloscope trace, as measured at Photo Detector BNC output at laser head:............................. 27
7.6.
Beam Profile .................................................................................................................................. 28
7.7.
Longtime Stability ......................................................................................................................... 30
8.
High Q Laser RS422 GUI ..................................................................................................................... 31
8.1.
LC1 (laser controller) software interface: ...................................................................................... 32
8.2.
SYNC Software interface................................................................................................................ 34
8.3.
SYNC Service Utility....................................................................................................................... 35
9.
Safety Requirements for High Q Laser ............................................................................................... 37
SN437 IC-1064-200 ps Nd-VAN, LP, SYNC User Manual 2008-02-20
Page - 2 -
1. Welcome !
We of High Q Laser Production GmbH are happy to welcome you among our customers !
The Laser products of High Q Laser are manufactured with greatest care and best materials.
Should you encounter any problems with or have questions about our products, please
contact us directly or our sales representative. We are committed to providing premier
support and service to our customers.
HIGH Q LASER PRODUCTION GMBH
KAISER-FRANZ-JOSEF-STR. 61
A-6845 HOHENEMS
AUSTRIA
TEL
FAX
E-MAIL
+43-5576-43040
+43-5576-43050
[email protected]
HTTP://WWW.HIGHQLASER.AT
SN437 IC-1064-200 ps Nd-VAN, LP, SYNC User Manual 2008-02-20
Page - 3 -
2. Safety
The picoTRAIN Laser system is a Class IV Laser product. The necessary safety requirements
have to be met: Appropriate Laser protection glasses for the wavelengths and power levels
as provided on the Laser head danger label and in the listing below have to be used:
VISIBLE AND/OR INVISIBLE LASER RADIATION
- AVOID EYE OR SKIN EXPOSURE TO
DIRECT OR SCATTERED RADIATION
< 500 mW @ 1064 nm
<5
W
@
808 nm
TM
Model: picoTRAIN IC-1064-200 ps Nd:VAN, LP, SYNC
CLASS IV LASER PRODUCT
2.1. Schedule of safety maintenance
The laser system should be checked - every 12 months and the result should be noted in the following table:
Date
Laser head safety, by
Remote Interlock function, by
2008-02-19
ACD @ HQL
ACD @ HQL
SN437 IC-1064-200 ps Nd-VAN, LP, SYNC User Manual 2008-02-20
Page - 4 -
2.2. Laser safety and eye protection
Caution:
This picoTRAIN laser comes as a class IV laser product. It is therefore very important to obey
the laser safety recommendations.
Eye protection laser glasses need to be worn at any time when laser emission is possible or
the laser is on: The laser glasses specification should be
-
OD>9 at a wavelength of 1064 nm.
-
OD>6 at a wavelength of 808 nm.
The eye should never look into the laser beam emerging from the shutter even when laser
glasses are used.
We recommend to follow the user requirements in the ANSI Z136.1-1993 Standard for the Safe
Use of Lasers. These include appointment of a Laser Safety Officer, operation of the product in
a limited access area by trained personnel, service only by trained and authorised personnel,
and posting of signs warning of the potential hazards.
SN437 IC-1064-200 ps Nd-VAN, LP, SYNC User Manual 2008-02-20
Page - 5 -
3. Inspection and unpacking
3.1. Inspection of shipping boxes
Before unpacking, make sure that the shipping boxes are undamaged. Any damage has to be
reported to the shipping carrier and High Q Laser Production GmbH or our representatives,
respectively.
3.2. Unpacking
When unpacking the shipment, confirm that everything is included:
•
The picoTRAIN TM IC laser head, with a size of approx. 440x200x80 mm.
•
The laser controller electronics, with a size of approx. 470 x 200 x 88 cm.
•
The TEC controller electronics (TSP), with a size of approx. 470 x 200 x 88 cm.
•
The SYNC controller electronics, with a size of approx. 470 x 200 x 88 cm.
•
interconnecting cables and accessories:
-
1 pc.
1 pc.
1 pc.
3 pc.
1 pc.
1 pc.
2 pcs.
1 pc.
2 pc.
1 pc.
2 pcs.
3 pcs.
3 pcs.
Yb-QX cable: LD-current and URDM-TEC cable, ~ 2m long
Laser control cable, WWF 7-pin to WWF 7- Pin, ~ 2m long
BNC 50 Ohm termination, used instead of the external door switch
Line cord, ~ 2m long
Communication cable with converters
Communication cable
SMC to BNC adapter for reference and SYNC diode
Sync control cable
BNC to BNC coax cable
User manual and Test Report
Key for the key switch
1’’ feet
M6 screws and clamps
Inspect every item for signs of damage and notify High Q Laser Production GmbH or the sales
representative if a problem occurs.
It is recommended that you keep the original shipping boxes in case you would like to move
the laser, or service requires the laser to be shipped back to the factory.
SN437 IC-1064-200 ps Nd-VAN, LP, SYNC User Manual 2008-02-20
Page - 6 -
4. Initial installation
4.1. Laser head installation
The picoTRAIN TM laser comes with three 1’’ high feet and three clamps which are provided
with the system to be used for fixing the laser head to a platform, preferably an optical table
or a breadboard.
After installing the Laser head, make sure the shutter is closed or a beam block or power
meter is positioned in front of the laser exit before the laser controller is switched on. The
beam height is 3” (76.2mm±1mm).
4.2. Laser Controller installation
This section describes the installation procedure of the Laser Controller. For a description of
the functionality and pictures of the front panel, please be referred to chapter 5, “Laser
Controller”.
4.2.1
Size and position
The Laser controller box size is approx. 470 x 200 x 88 mm (length x width x height). The size
is designed such that two controllers would fit into a 2-height-units high 19”-rack housing
next to each other. If you prefer to mount the Laser controller in a 19”-rack housing, contact
High Q Laser Production GmbH for adapters.
4.2.2
Heat flow
Heat flow from the front panel through the instrument and out the back panel should not be
inhibited to ensure that the instrument does not become too warm when operated at
maximum current.
SN437 IC-1064-200 ps Nd-VAN, LP, SYNC User Manual 2008-02-20
Page - 7 -
4.2.3
Cable connections
The following procedure needs to be followed when installing the cable connections
between laser head and laser controller. The pictures below show the connectors on the laser
head and on the laser controller.
5
1
6
3
7
8
2
4
Laser back side:
remove the blue cable end (loosening the M3x40mm screw); now 2x WWF connectors are
apparent: 11-pin connector and 7-pin connector
1. LD: 11-Pin WWF – connector for LD pump current and URDM-TEC
2. I-Lock: 7-Pin WWF – connector for Interlock and power supply for internal Photodiode
3. Water input from chiller (please remove plug before connecting water tube)
4. Water output to chiller (please remove plug before connecting water tube)
5. SYNC PD: BNC-connector: Laser AC signal for SYNC
6. PD: BNC-connector for photo diode monitor signal on laser case back
7. SYNC Ctrl: 7-Pin WWF- and 3-Pin WWF-connectors for SYNC
8. TEC: temperature control plug in for etalon (not connected)
SN437 IC-1064-200 ps Nd-VAN, LP, SYNC User Manual 2008-02-20
Page - 8 -
2
4
3
1
5
n.c.
n.c.
Laser controller connectors on the back side:
1. Power supply connector
2. LD1:
4-Pin WWF connector for LD pump current
3. LCtrl:
7-Pin WWF connector for Interlock and power supply for internal Photodiode
4. I-Lock: BNC-connector; the BNC termination has to be removed if a door switch should be
used.
5. COM:
RJ12 communication connectors. For remote control operation.
SN437 IC-1064-200 ps Nd-VAN, LP, SYNC User Manual 2008-02-20
Page - 9 -
5
2
3
4
1
n.c.
n.c.
TEC controller connectors on the back side:
1. Power supply connector
2. SP Monitor:
setpoint monitor, set NTC-Voltage readout
3. Temp Monitor:
temperature monitor, actual NTC-Voltage readout
4. TEC:
D-Sub 15-pin connector for URDM TEC
5. Temp. SP Adjust: potentiometer for setpoint adjustments. Please use the recommended
value; minimum setpoint voltage 0.48V; max. setpoint voltage 1.5V;
2
5
3
1
4
6
SYNC controller connectors on the back side: details see Sync manual
1. Power supply connector
2. SYNC Ctrl: D-Sub 9-pin connector for Sync control cable
3. Ref.:
SMC- connector, reference signal input
4. PD:
SMC-connector, Sync-PD input (laser signal)
5. Phase:
BNC-connector, phase difference monitor
6. COM:
RJ12 communication connectors. For remote control operation.
SN437 IC-1064-200 ps Nd-VAN, LP, SYNC User Manual 2008-02-20
Page - 10 -
Please connect the cables by paying attention to the correct order as described below:
DEVICE / CONNECTOR
CABLE / CONNECTORS
DEVICE / CONNECTOR
Chiller Outlet
Water tube, 2-3m
laser head: water connector 3 on
URDM
laser head: water connector on
URDM
Water tube bypass (already
plugged in)
Laser case water connector
Laser case water connector 4
Water tube, 2-3m
Chiller inlet
wall outlet
3 pin line cord
Laser controller back,
with grounding
Power supply connector 1
3 pin line cord
TEC controller back,
with grounding
Power supply connector 1
3 pin line cord
SYNC controller back,
with grounding
Power supply connector 1
Laser controller back
Interlock cable
Doorswitch
I-Lock (BNC)
(not included in the shipment)
Laser controller back
Yb-Qx cable (Y cable)
Laser head back side
LD (4-pin WWF) 2
4-pin WWF and D-Sub 15pin to
11-pin WWF
LD1 (11-pinWWF) 1
Laser control cable and power
supply for PD
Laser head back side
wall outlet
wall outlet
TEC controller back
D-Sub 15pin 4
Laser controller back
L-Ctrl (7-pin WWF) 3
L-Ctrl (7-pin WWF) 2
7-pin WWF to 7-pin WWF
Laser head back side
coax cable for PD Signal
Oscilloscope
PD (BNC) 6
BNC to BNC
BNC (50 Ohm, DC coupled)
Laser controller back side
Communication cable
Sync controller back side
COM (RJ12) 5
RJ12 – RJ12
COM (RJ12) 6
Laser controller back side
RJ12 to RS232 (converter
RS485-RS232 + adapter DSub25-D-Sub 9)
PC with RS232
Sync controller back side
Sync control cable
Laser head, left side
Sync Ctrl (D-Sub 9-pin) 2
D-Sub 9-pin to WWF 7-pin and
WWF 3-pin
Sync Ctrl (WWF 7-pin and WWF
3-pin ) 7
Sync controller back side
Coax cable
Ref. Signal generator (low noise)
Ref. (SMC) 3
SMC to SMC (with SMC to BNC
adapter)
SMC or BNC connector
Sync controller back side
Coax cable
Laser head, left side
PD (SMC) 4
SMC to BNC
Sync PD (BNC connector) 5
Sync controller back side
Coax cable
Oscilloscope
Phase (BNC) 5
BNC to BNC
BNC (1MOhm, AC coupled)
COM 5
SN437 IC-1064-200 ps Nd-VAN, LP, SYNC User Manual 2008-02-20
Serial COM port
Page - 11 -
1. Chiller connection:
•
Remove the plugs in 3 and 4.
•
Connect the water tube coming from the chiller outlet to the connector labeled 3 on the URDM.
•
Make sure the bypass between (URDM) and (laser case) is well plugged.
•
Connect the water tube coming from the water connector 4 (laser case) to the chiller inlet.
Chiller connection and start should be always the first installation step.
for transportation: before any shippings, please blow out the water from the laser cooling
circuit and use always 2 tubes as bypass between the 4 water connectors.
2. TEC and Laser controller connections:
•
Confirm that the main switch at the Laser controller back panel is in the OFF position labeled “0”.
•
Confirm that the key switch at the front panel is in the vertical position labeled “OFF”.
•
Connect the “100-240 VAC” line-in connector at the Laser controller back panel to the wall plug outlet with a
voltage in the range of 100-240 VAC. Use the power cord which was contained in the shipment, or in any
case a 3-pin power cord which also has a ground pin. The unit is now grounded.
•
The fuse contained in the back panel connector labeled “100-240 VAC” should read 2 A slow-blow.
•
Connect the L-Ctrl cable first on the laser controller side and than on the laser head side
•
Yb-QX cable connection: 1 : connect the 4-pin WWF connector on the laser controller side. 2 : connect the
rd
D-sub 15-pin connector on the TEC controller back side. 3 : remove the 11-pin WWF shorted connector on
the URDM (for transport / storage); plug in the 11-pin WWF connector of the Yb-QX cable.
st
nd
If desired:
•
Use a coax cable (BNC to BNC) to monitor the PD signal on an Scope or an electrical spectrum analyzer.
•
Connect the communication cable bypass between laser controller and Sync controller.
•
Connect the communication cable with converters between COM connector on the laser controller back
side and a PC serial port.
Never disconnect the Yb-Qx cable while the main switch of the Laser
controller or TEC controller is on!
3. Sync controller connections
•
Confirm that the main switch at the Laser controller back panel is in the OFF position labeled “0”.
•
Connect the Sync control cable on the Sync controller back side first, than on the left side of the laser case.
•
Connect the SMC to BNC coax cable for the laser PD signal between SYNC controller and left side of the laser
head
•
Connect the coax cable (SMC to SMC / BNC) for the laser reference signal between SYNC controller and
reference
SN437 IC-1064-200 ps Nd-VAN, LP, SYNC User Manual 2008-02-20
Page - 12 -
Switch on procedure:
1.
Make sure the laser head is fixed on the optical table and the shutter is closed or a power meter or beam
blocker is positioned in front of the laser exit.
2.
Switch on the chiller.
Make sure the set temp. and the actual temp. corresponds to the recommended temperature given in the
quality test report
3.
Switch on the TEC controller (main switch)
Make sure the setpoint and the temp. monitor voltage corresponds to the recommended value in the
quality test report
4.
Switch on the LC1 laser controller (main switch)
Make sure the set current corresponds to the recommended value in the quality test report.
Switch on the laser by the key switch.
Measure the output power with a suitable power meter and monitor the PD signal on a oscilloscope to
check the proper functionality of the laser.
If necessary optimize the output power by adjusting the laser. Laser adjustment is described in chapter
6.2.2.
SN437 IC-1064-200 ps Nd-VAN, LP, SYNC User Manual 2008-02-20
Page - 13 -
5. Laser Controller
5.1. Laser Controller front panels
5.1.1
Switching on the laser controller
The laser controllers are powered by turning the main switches at the laser controller back
panels into the ON position labeled “1”. Before doing this, make sure that the key switches at
the controller front panels are in the vertical “OFF” or “REMOTE“ position. This ensures that
the laser is not enabled until you turn the key switch. The key can be pulled out only in the
OFF position. After switching on the controller main switches at back panel, within a few
seconds, you will see “High Q Laser” displayed on the front panel (shown in FIGURE 1).
FIGURE 1: Front panel of the controller
Further some additional information such as the type of laser and the serial number will be
shown.
After another short wait, one will see the final screen in the display, similar to that shown in
FIGURE 2. This menu allows for monitoring and changing the laser diode current.
FIGURE 2: Laser Controller front panel display when pump laser diode is disabled - key in OFF position (LD1
value shown as example)
SN437 IC-1064-200 ps Nd-VAN, LP, SYNC User Manual 2008-02-20
Page - 14 -
5.1.2
Front panel display and functionality
LC1: (STATUS LINE)
st
The 1 line shows actual status information on the laser diode system and is labeling the
values underneath with “Iact” (actual laser diode current) and “Iset” (laser diode set current).
“ON” / “OFF” indicates the operation state of the laser diode.
“REM”
indicates RS422 interface is activated and push buttons are disabled.
LD1:
The 2nd line of the front panel display shows the laser diode actual current and the laser diode
set current in A. The laser diode set current can be changed by using the push buttons
provided underneath the front panel display, labeled “UP”, “DOWN”, “CANCEL”, and “ENTER”.
An arrow “←” at the end of the 2nd line indicates the active display line. Pressing “ENTER”
enables to opportunity to change the set current. When the arrow is blinking you can change
the laser diode current by pushing the “UP” and “DOWN” buttons. It will be changed within
50mA or 100mA steps (depending on the LC1 model type). The laser diode current is not
changed until you push the “ENTER” button again. If you do NOT want to change the set
current value, press “CANCEL”, and the previous set current is displayed again.
CAUTION
WRONG CURRENT SETTINGS COULD LEAD TO DESTRUCTION OF THE LASER DIODE.
PLEASE REFER TO THE TEST REPORT FOR CORRECT CURRENT SETTING!
KEY SWITCH (ENABLING THE LASER DIODE; REMOTE CONTROL)
The key switch at the laser controller front panel is “OFF” when it is in the vertical position and
st
when it is possible to pull out the key. In this case, the display reads “OFF” in the 1 line, as
shown in FIGURE 2. If you turn the key 90° to the “ON” position, the laser is enabled (unless
other fault conditions apply such as an open Interlock). At the same time you will read “ON”
in the 1st line, indicating laser diode operation.
If the key switch is in “REMOTE” position the system could controlled by RS422 interface. The
st
push buttons at the front panel are disabled, and the status line (1 line of display) displays
“REM”.
Please refer to the LC1 RS422 Communication Protocol for detailed information.
SN437 IC-1064-200 ps Nd-VAN, LP, SYNC User Manual 2008-02-20
Page - 15 -
ERROR MESSAGES:
th
The left corner of the 4 display line is able to show one of the following error messages.
“Ilock”
indicates the interruption of the laser system Interlock loop. Find the reason for
that interruption and restore a functional state of the system. When the system
is restored “ok -> enter” will be displayed. The controller is not in operation
until one presses the “ENTER” button.
“Temp high” /
“Temp low” indicates a laser diode temperature outside the acceptable range.
“Curr high” /
“Curr low” indicates a laser diode current outside the acceptable range.
“Curr off”
indicates a switch off because of temperature or current error.
“ok->enter” indicates that a (all) previous error(s) are not valid any more (e.g. after
an interrupted and restored Interlock loop)
USER MODE (MENU)
The user mode is necessary to execute settings for additional features like Laser diode
temperature control, Display control or Shutter control etc., some of these features may be
not provided with the actual laser system. The user mode will be reached by pressing
“CANCEL” and “ENTER” at the same time, press the “CANCEL” button first. You are also able to
access the user mode by setting the arrow “←” beside the label “Menu” located in the 4th
display line and then press the “ENTER” button.
When you enter the user mode the display appears similar to FIGURE 3 below. The first line
shows the actual laser diode temperature and an arrow “←” occurs at the end of the line. The
arrow can be moved with the “UP” and “DOWN” buttons. Thus one reaches the different
feature setting lines.
Settings will be performed by pressing the “ENTER” button at the corresponding line. The
arrow will start blinking and the set value can be changed by pushing “UP” and “DOWN”.
When “ENTER” is pressed again the new setting will be activated. If you press “CANCEL” the
setting of this line remains unchanged.
The lowest line in the user mode is the Exit line, see FIGURE 4 below. When you press “ENTER”
the user mode will be quit. You reach the standard display (FIGURE 10) again.
The user mode also shows the laser system runtime (in hh:mm:ss). The number of hours
displayed is the actual total operating time of the laser system following the characterization
procedure at the factory. The runtime value cannot be changed.
FIGURE 3: Laser Controller front panel display when in “User Mode”
SN437 IC-1064-200 ps Nd-VAN, LP, SYNC User Manual 2008-02-20
Page - 16 -
FIGURE 4: Laser Controller “User Mode” Exit line
5.2. Laser controller back panel
The laser controller back panel contains all connectors to the wall plug outlet and the laser
system. For a more detailed description and pictures, please see section 4.2.3.
5.3. Other functional features
5.3.1
Remote Interlock feature
The interlock feature includes an optically isolated current loop which has to be closed for
laser operation. The BNC connector at the laser controller back panel provides access to this
loop, which can be extended to more switches, such as for example door switches, which is
highly recommended. It is recommended that all cables and switches are isolated and
potential free, even though the optical isolation from the rest of the laser controller
electronics would not require this.
5.3.2
Pump diode laser overtemperature protection
A temperature sensor monitors the temperature inside the User-replaceable diode module
(URDM). In case the temperature exceeds the maximum temperature value the laser
controller switches the pump laser diode current off until a safe temperature is reached.
This overtemperature protection becomes active, for example, if the laser is operated for
several minutes without the chiller being switched on.
SN437 IC-1064-200 ps Nd-VAN, LP, SYNC User Manual 2008-02-20
Page - 17 -
6. Laser head
6.1. Laser head description
6.1.1
Installing the Laser head
For installing the laser head on an optical table or a breadboard please use the provided
clamps and 1’’ feet. The laser system comes with chiller temperature stabilization of the pump
laser diode and laser case.
SN437 IC-1064-200 ps Nd-VAN, LP, SYNC User Manual 2008-02-20
Page - 18 -
Laser operation and adjustments
6.1.2
Laser operation
Before switching on the Laser, place a power meter into the output beam in front of the exit
to monitor the power. The power meter should be capable of handling powers up to 500mW
in a beam with a diameter of 1mm to 3mm.
Follow the switch-on procedure described in section 5.1.1 and set the recommended Laser
diode current given in the Test Report sent with the Laser.
6.1.3
Laser cavity adjustment
Usually, no Laser adjustments are necessary. Only if the Laser performance is not satisfactory,
or if shipping or moving the Laser system has made changes to the Laser cavity, this
adjustment procedure for the saser cavity may be necessary. If the Laser does not lase at all,
contact High Q Laser Production GmbH.
Important
For Laser adjustments the Laser has to run at recommended operating current and
Temp. settings.
The Laser cavity adjustment procedure described in this section INVOLVES ONLY ONE
LASER CAVITY ELEMENT, which can be accessed on the left side of the Laser had. The
adjustments are labeled as follows:
•
CAH:
This adjustment changes the cavity alignment horizontally.
•
CAV:
This adjustment changes the cavity alignment vertically.
The adjustments SAV and SAH should be used very carefully and just in case of bad performance.
This adjustments allows to move the spot on the SESAM.
Note: Use a 3-mm six-edge allen key to make any adjustments.
Never should the sealed Laser case be opened, which would result in a warranty void
and contamination of the Laser case sealing.
SN437 IC-1064-200 ps Nd-VAN, LP, SYNC User Manual 2008-02-20
Page - 19 -
7. Test Report
picoTRAIN IC-1064-200 ps Nd:VAN, LP, SYNC SN437
This chapter summarizes the test data taken from the laser system prior to shipment.
7.1. Test report table
HP LC1 Controller SN:
Runtime
Act temp
URDM
(user replaceable diode module)
Recommended pump laser diode current
OSC:
SN 0813
TEC:
SN 0715
SYNC:
SN 0802
OSC:
0.0h
TEC:
0.0h
SYNC:
0.0h
TEC :
48°C (0.39V)
OSC:
# 57023
OSC:
2.5A
Cooling water set temp
Pulse repetition rate
min. current:
2.0A (OSC)
max. current:
3.0A (OSC)
24.0°C
81.25 MHz (synchronized)
Measured:
81.24998 MHz
1064 nm: > 200 mW
Avg. output power
Measured:
310mW @ 2.5A
Measured with Coherent
Powermeter
395mW @ 3.0A
(50 ± 5)ps FWHM
Pulse width, FWHM
Measured:
46.9ps (@ 2.5A)
(sech² assumed)
52.4ps (@3.0A)
1064 nm: M² < 1.2
Measured :
Beam quality
M² = 1.08 (@ 2.5A)
(Mx² =1.06, My² = 1.10)
Measured with Coherent
Beam Master
M² = 1.05 (@ 3.0A)
(Mx² =1.03, My² = 1.06)
Astigmatism
Divergence asymmetry
Waist asymmetry
2.5A:
-4.1%
3.0A:
-3.9%
2.5A:
4.3%
3.0A:
5.2%
2.5A:
-0.7%
3.0A:
-2.2%
SN437 IC-1064-200 ps Nd-VAN, LP, SYNC User Manual 2008-02-20
Measured with Coherent
Beam Master
Measured with Coherent
Beam Master
Measured with Coherent
Beam Master
Page - 20 -
Waist location
Waist size
2.5A:
0.01m after exit
3.0A:
0.03m after exit
2.5A:
W0 x = 0.98mm
W0 y = 0.98mm
3.0A:
W0 x = 0.94mm
Measured with Coherent
Beam Master
Measured with Coherent
Beam Master
W0 y = 0.92mm
Long term stability
1064 nm: < 1% RMS
0.27% RMS
Test of external interlock switch off
OK = Passed
Test of internal interlock (laser head
interlock) switch off
OK = Passed
Test of switch off at laser diode over
temperature at ca. 35°C
OK = Passed
SN437 IC-1064-200 ps Nd-VAN, LP, SYNC User Manual 2008-02-20
(@ 2.5A)
Measured with Coherent
Powermeter
Page - 21 -
7.2. Power Tuning
OSC diode current changed from 0.0A to 3.0A with TEC diode temperature set at 48°C. To be
sure that the laser is always modelocked please run the system with a current between 2.0A
and 3.0A. Please do not run the system with a current > 3.0A to save the diode’s lifetime.
Dependency of output power on oscillator current
400
1064 nm
powerout [mW]
300
200
100
0
0.0
0.5
1.0
1.5
2.0
2.5
3.0
oscillator current [A]
SN437 IC-1064-200 ps Nd-VAN, LP, SYNC User Manual 2008-02-20
Page - 22 -
7.3. Pulse width measurement / autocorrelation @ 1064nm
The autocorrelation measurement from the IC-Laser with a pump current of 2.5A yields a
pulse of 9.6ps FWHM @ 1064 nm. Measurement made with APE PulseCheck:
The 0.38mm thick etalon inside the cavity stretches the pulse at 2.5A from 9.6ps to 46.9ps:
SN437 IC-1064-200 ps Nd-VAN, LP, SYNC User Manual 2008-02-20
Page - 23 -
The autocorrelation measurement from the IC-Laser with a pump current of 3.0A yields a
pulse of 11.1ps FWHM @ 1064 nm. Measurement made with APE PulseCheck:
The 0.38mm thick etalon inside the cavity stretches the pulse at 3.0A from 11.1ps to 52.4ps:
SN437 IC-1064-200 ps Nd-VAN, LP, SYNC User Manual 2008-02-20
Page - 24 -
7.4. Photo detector signal measured with microwave spectrum analyser
HP E4401B:
A span of 200MHz and 1MHz on the spectrum analyser show that the laser operates noisefree in its fundamental mode. A span of 10kHz shows a more detailed value of the oscillator
frequency at 81.24998MHz. The results are shown in the three pictures below, taken at a
synchronized laser operation (closed loop):
SN437 IC-1064-200 ps Nd-VAN, LP, SYNC User Manual 2008-02-20
Page - 25 -
To show the maximum range of the SYNC servo the laser was running in the unsynchronized
mode and the servo positions have been set manually to 2000 (left picture) and 4000 (right
picture) and the operating frequencies of the laser were measured. The servo is able to
change the cavity length for fundamental laser frequencies from 81.241MHz to 81.259MHz, a
range of 18kHz:
SN437 IC-1064-200 ps Nd-VAN, LP, SYNC User Manual 2008-02-20
Page - 26 -
7.5. Oscilloscope trace, as measured at Photo Detector BNC output at
laser head:
Signal from the internal photo diode detecting single laser pulses measured with a 500 MHz
band width Tektronixs scope TDS 3052, DC-coupled:
The following to pictures are showing the signals on the “Phase” output of the SYNC
controller. The left picture shows the signal the unsynchronized (open loop), the right picture
of the synchronized mode (closed loop):
SN437 IC-1064-200 ps Nd-VAN, LP, SYNC User Manual 2008-02-20
Page - 27 -
7.6. Beam Profile
M²- and beam profile measurement with Coherent ModeMaster and Coherent BeamView
Camera. The M²-measurement was taken in a distance of 0.50m from laser exit @ 1064nm.
For a diode current of 2.5A the beam waist is located 0.01m after the laser exit:
SN437 IC-1064-200 ps Nd-VAN, LP, SYNC User Manual 2008-02-20
Page - 28 -
For a diode current of 3.0A the beam waist is located 0.03m after the laser exit:
SN437 IC-1064-200 ps Nd-VAN, LP, SYNC User Manual 2008-02-20
Page - 29 -
7.7. Longtime Stability
We confirm that over a time scale of 12 hours the output power stayed constant within < 1%
RMS (measured: 0.27%). The pump diode current was set to 2.5A and the average output
power is 312mW @ 1064nm.
Longtime stability @ 1064 nm with IPump = 2.5A for 14 hours
Power POut [mW]
300
0.27% RMS
200
100
0
0
2
4
6
8
10
12
14
Time [h]
Longtime stability @ 1064 nm with IPump = 2.5A for 14 hours
315
Power POut [mW]
314
313
312
311
310
0
2
4
6
8
10
12
14
Time [h]
SN437 IC-1064-200 ps Nd-VAN, LP, SYNC User Manual 2008-02-20
Page - 30 -
8. High Q Laser RS422 GUI
picoTRAIN IC-1064-200 ps Nd:VAN, LP, SYNC SN437
The laser and the SYNC controller are provided with a serial data interface to a Windows PC
and a software utility program which allows controlling the settings of both controllers. It is
recommended to run this utility at installation and from time to time to ensure that all
parameters are within specification. The controller is connected to a Windows computer via a
serial RS-232 interface.
Start the utility provided on the floppy disk.
With the utility it is possible to control the laser and the SYNC controller, to monitor measured
data and to check if an error occurred.
After switching on the LC1 controller unit with the main switch, start the Windows graphical
user interface (GUI) with a double click on the label “_highqlaser.exe”.
Please note that the front panel key switch has to be in “remote” position otherwise no
communication link to the laser controller can be established.
SN437 IC-1064-200 ps Nd-VAN, LP, SYNC User Manual 2008-02-20
Page - 31 -
8.1. LC1 (laser controller) software interface:
•
Select the serial communication port and click on the “Open Port” button. Click on the
appropriate LC1-LP/HP SWV4.00 controller in the system tree.
SN437 IC-1064-200 ps Nd-VAN, LP, SYNC User Manual 2008-02-20
Page - 32 -
•
•
Type in the desired current in the edit box below “Iset” (check the test report for diode
current maximum ratings!) and click on the button labelled “Enter Iset -> On”
Use the slider in the Attenuator Control Group Box to change the optical attenuation
(provided as an option).
SN437 IC-1064-200 ps Nd-VAN, LP, SYNC User Manual 2008-02-20
Page - 33 -
8.2. SYNC Software interface
•
•
With the SYNC interface the synchronisation mode can be changed from manually to
automatically with the “Start / Stop” botton.
The values of RMS, Ref. and laser level are shown and also the synchronisation.
SN437 IC-1064-200 ps Nd-VAN, LP, SYNC User Manual 2008-02-20
Page - 34 -
8.3. SYNC Service Utility
•
The SYNC Service Utility shows synchronization details like Phase Jitter or signal levels
•
Please do not change any settings, this program is just for information about the
synchronization.
•
For more information, please read the included manual about the SYNC software.
SN437 IC-1064-200 ps Nd-VAN, LP, SYNC User Manual 2008-02-20
Page - 35 -
SN437 IC-1064-200 ps Nd-VAN, LP, SYNC User Manual 2008-02-20
Page - 36 -
9. Safety Requirements for High Q Laser
1.
Record the product model number and serial number, and record the model numbers
and serial numbers of the laser diodes and power supplies used in the product.
Model: IC-1064-200 ps Nd:VAN, LP, SYNC Laser
Done: YES / No
2.
S/N laser head: IC437
Verify that the beam attenuator (manual shutter) can be used to prevent access to
laser energy from the exterior.
Done: YES / No
3.
Verify that the emission indicators (head LED and controller display) are lit for at least 5
seconds prior to and during the time that the laser energy is emitted.
Done: YES / No
4.
Verify that the housing is sealed such that laser energy is accessible only through the
output aperture. Access to Class IV laser energy is considered possible if a very thin,
straight probe can contact a beam.
Done: YES / No
5.
Verify that the remote interlock connector can be used to prevent access to laser
energy whenever the terminals are opened.
Done: YES / No
6.
Verify that the key switch can be used to prevent access to laser energy. Verify that
they key can be removed only with the product not emitting laser energy.
Done: YES / No
SN437 IC-1064-200 ps Nd-VAN, LP, SYNC User Manual 2008-02-20
Page - 37 -
7.
8.
Verify that the following labels are securely affixed at the proper locations (it is
recommended that the procedure include a drawing for each version that describes
the labels and specifies their locations):
ID / Certification label (s)
Done: YES / No
Warning logotype
Done: YES / No
Aperture label
Done: YES / No
Protective housing labels – all types
Done: YES / No
Verify that each interlock switch on the SC head cover independently functions to
prevent access to laser energy. Verify that no laser energy is accessible as the cover is
being removed.
Done: n.a.
9.
Verify that each (optional) interlock switch on the IC cable end protection functions to
prevent access to laser energy. Verify that no laser energy is accessible as it is being
opened.
Done: YES / No
10.
Verify that there is a clear indication whenever the SC head cover interlock is defeated.
Verify that it is not possible to replace the cover when the interlock is defeated.
Done: n.a.
11.
Measure the product output and verify that it is within the test limits established for
that product. The uncertainties in Section 10.3 of the report should be considered in
determining the acceptance test limits.
500mW @ 1064 nm
Done: YES / No
12.
5W @ 808 nm
Verify that a manual reset is required to resume the emission of laser energy after
interruption due to mains voltage loss or due to the use of the remote interlock
connector.
Done: YES / No
SN437 IC-1064-200 ps Nd-VAN, LP, SYNC User Manual 2008-02-20
Page - 38 -